
Kristina Seleshanko's Blog, page 88
July 22, 2013
Canning, Dehydrating, and Freezing Plums
 Some weeks back, my husband spotted what he thought might be a "wild" (i.e., feral) plum tree. Last weekend, I finally had him drive me to the spot so I could check it out. It turned out the plums - little 1 inch balls that looked a lot like a large cherry but have a fantastic plum flavor - were ripe! I picked a bag full, then headed home to research them (they are called, not surprisingly, cherry plums and date back to the 19th century) and decide how I would preserve them.
Canning Plums
The first thing that came to mind was to can them, even though I've never eaten, seen, or heard of canned plums. But, it turns out, plums do can well. You don't have to remove their skins (always a bonus) and you may can them whole or cut them in half and pit them. For full directions, consult The Ball Complete Book of Home Preserving or visit The National Center for Home Food Preservation. The raw pack method is easiest, but some people dislike it because you end up with jars that don't look full because the plums float. To prevent this, you can hot pack the plums instead.

You may also make plum jam. The Ball Complete Book of Home Preserving has several recipes for both canning and freezing. You'll also find recipes all over the web, including:
* Basic Pectin Plum Jam
* No Pectin Plum Jam
* Spiced Plum Jam
* Raspberry Plum Jam
* Peach and Plum Jam
* Lower Sugar Plum Jam
I also found this great-looking recipe for canned plum pie filling.
Freezing Plums
Plums can be frozen whole or cut up. The traditional method is to pack the plums into freezer containers and cover with syrup: 1 3/4 cups granulated sugar and 4 cups of water brought to a boil until the sugar completely dissolves. Cool completely before pouring the syrup over the plums.

A more modern method is simply to pit and slice the plums, placing them in a single layer on a baking sheet. Place the baking sheet in the freezer until the plum slices are solid, then transfer to a freezer bag and freeze for up to 6 months.
There is no need to thaw frozen plums before turning them into pie or jam.
Dehydrating Plums
Before there was home canning, before there were freezers, people dehydrated plums in order to preserve them. Cut the plums in half, then press them into the dehydrator tray, to help flatten them a bit. Dehydrate at 130 - 135 degrees F. until no trace of moisture remains. (To check for moisture, pinch a piece of fruit with your nail; you should feel no moisture.) To hasten dehydration, you can steam blanch the plums first.
To steam blanch: Fill a lidded pot with 1 or 2 inches of water and bring to a rolling boil. Place a steaming at least 3 inches off the bottom of the pot. Place a single layer of plums in the basket, cover, and begin counting 1 or 2 minutes. Immediately plunge the plums in ice water.
 basket in the pot so it is
 Plum Recipes
Of course, a great many of my plums were eaten raw, as snacks. Other ways to eat plums include:
* Plum pie, plum tart, or plum crumble/cobbler
* Plum cake
* Plum shortcake
* Roasted plums
* Plum chutney
* Plum sauce (to eat with pork)
* Kebobs
* Turkey with poached plums
Happy eating!


July 19, 2013
16 Ways to Cook Zucchini - My Favorite Recipes
 Zucchini is, in many ways, the perfect vegetable. It's super easy to grow. It's compact, not needing a whole lot of garden (or container) space. It's versatile in the kitchen - and thank you God for that, because zucchini is also one of the most prolific veggies you can grow. So if you're wondering what to do with all those zukes invading your garden (or coming your way via neighbors), here are my favorite zucchini recipes:
1. Cook it simple. Slice a zucchini into thin rounds, season with salt and pepper, and cook until tender in a skillet with olive oil.
2. Dehydrate zucchini slices and turn them into healthy chips!
3. Cook it a la Julia Child. Shred the zucchini; salt it and let it sit in a colander for about 20 minutes. Press between paper towels to remove excess moisture. Toss into a skillet with a little olive oil and chopped shallots or onions. Cook, but don't stir, until golden on one side. Flip and cook the other side. Season with salt and pepper.
 Simple pan fried zucchini circles.4. Make Zucchini Fries. In bowl #1, mix together some flour, salt, pepper, garlic powder, and paprika. In bowl #2, mix together some breadcrumbs and shredded Parmesan cheese. In bowl #3, place some beaten eggs, or some milk. Cut zucchini in French fry-like slices. Dredge in the flour mixture; coat in the egg or milk; coat in the breadcrumb mixture. Place on a baking sheet and bake at 425 degrees F. for 10 minutes. Turn over and cook another 10. (From A Vegetable for Every Season Cookbook.)
5. Bake zucchini chocolate chip cookies. Find an excellent recipe for this cookie in A Vegetable for Every Season Cookbook.
6. Make zucchini "pasta" by grating the vegetable along it's length. This creates long strands of zucchini. (You may also use a mandolin. Or maybe even a vegetable peeler. Or you can cut them very carefully by hand.) Cook the strands in a skillet and serve with sauces or toppings you'd normally put on pasta.
7. Add it to soups and stews, shredded, chopped, or sliced.
 Zucchini Chocolate Chip Cookies.
8. Add to pasta dishes. Shred first. For example, zucchini excellent added to spaghetti.
9. Whip up some zucchini pesto.
10. Grill stuffed zucchini.
11. Grill it plain. Just slice in half, lengthwise, brush with olive oil, sprinkle with seasonings, and grill until tender, turning once.
12. Bake zucchini pizza. Slice the zuke in half; slice off a bit of the rounded bottom of each slice, so they flat. Now use just like you would a pizza crust, adding pizza sauce, cheese, and other toppings. Bake at 375 degrres F. for 20-30 minutes.
13. Bake zucchini brownies.
14. Make zucchini tots (like tater tots, but better). Find the recipe in A Vegetable for Every Season Cookbook.
 Zucchini blossoms are yummy, too!15. Make zucchi burgers. Shred and well drain about 2 cups of zucchini, squeezing out excess moisture. Add 1 minced onion, 1/2 cup bread crumbs, 2 eggs, salt and pepper, and a dash of cayenne. Place 1 tablespoon olive oil in a skillet. Once warmed, add 2/3 cup of the zuke mixture, pressed into a round patty. Cook until golden on each side. Now add a bun and all the fixings!
16. Make zucchini bread. In fact, bake a bunch of it, double wrap in heavy duty foil, place in a freezer bag and freeze to give away during the holidays.
Still have zucchini? Shred it, squeeze it between paper towels to remove excess moisture, and pop into freezer bags. If you're careful about squeezing out the excess air, it will last years. I measure mine out according to what I'm likely to make with it. For example, I might measure out 3 cups for zucchini bread, then mark the bag "3 cups."
Oh, and while you're at it, eat some zucchini blossoms, too! Just be sure to only eat blossoms that have the start of fruit growing behind them; otherwise, you may reduce the productivity of your zucchini plant.
And one last tip: If you're growing your own zucchini, don't let the zukes get huge. Watch the plant every day, because zucchini grow madly fast - and huge zukes are less flavorful (and more full of big seeds) than their smaller siblings.
July 17, 2013
How to Use Manure in the Garden
 Once upon a time, manure was abundant and every garden was fertilized with it. But these days, we drive cars, not horse-drawn wagons and carriages, so many of us have lost touch with just how awesome a resource manure really is. It's still among the best things you can put in your garden to increase soil health and plant production - so whether you live in the city of the country, here are some tips for finding and using manure to it's best advantage.
First, Know This
All commercially sold fertilizer is analyzed for the stuff it brings to the soil, which is expressed with an NPK rating. For example, Miracle Grow's all purpose (non-organic) fertilizer has an NPK rating of 24-8-16. The first number represents the amount of nitrogen in the fertilizer; the second number, the phosphorus; and the third, the potassium.
Nitrogen helps leaves and stems develop and is ideal for leafy vegetables like cabbage, lettuce, kale, and collards. Too much nitrogen inhibits flower and fruit growth, however. Phosphorus helps develop root systems, flowers, and fruit. Potassium increases plant health, making the roots more hardy and helping the plant fight disease. It also helps develop fruit.
Manure also has NPK ratings, which you'll learn below, but know that because you're dealing with an organic product, actual numbers may vary.
 Add caption
Horse Manure
Add caption
Horse Manure
Many people consider the gold standard in manure is horse manure. In the old days, horse manure was carefully collected and rarely was wasted. Even city families without horses swept the street in front of their home in order to collect this valuable stuff. Today, if you don't have horses of your own, you might be able to get some horse manure for free just by asking friends who own horses. Otherwise, you can purchase manure from nearby stables and truck it back to your house.
Horse manure, however, must be aged before it can be placed in the garden. As with most manures, applying it in the garden before it's sat around and decomposed will "burn" your plants, probably killing them. Fresh manure may also contain E.coli, making it a threat to your health.
If you're buying horse manure, only buy "aged manure." If you're getting the manure for free, you might have to take it while it's still "hot;" if that's the case, you'll need an out of the way corner to mound the manure until it ages. Just how long does it need to age? That depends upon how it's composted. (Is the pile turned or not? How hot is the weather? How large is the pile?) You'll know it's done when it's "crumbly, evenly textured, earthy-smelling, dark material that looks like a commercial potting soil mixture. It will probably take about one to three months for each pile to compost during the summer and about three to six months in the winter...[horse manure] compost should 'cure' for at least a couple of weeks before use," according to WSU Cooperative Extension.
Horse manure has a 1.5–1.0–1.5 N-P-K rating.
Caution: Recently, some gardeners have reported some horse manure as toxic. Apparently, horses who eat hay or grass sprayed with herbicides are producing manure that still has enough herbicide in it that - once it's applied to the garden - kills plants. So before you bring manure home, it pays to bring up this topic with the horse owner. (Learn more here.)
 Chicken & Other Bird Manure
Now that many people are raising backyard hens, chicken manure is gaining in popularity. Chickens poop a lot. Why not use that poop to improve your garden? If you don't have chickens, some industrious homesteaders now sell the manure at farmer's markets and feed stores - or you can buy commercially bagged chicken manure at many gardening centers.
Again, chicken manure must be aged before you put it into your garden. Putting fresh manure in the soil may harm plants - and it might make you sick, too. Expert advice varies on how long to age chicken manure; some say 6 months, others say a year. I would err on the side of caution and age it for a year...although I have used 6 month old chicken manure in the garden, but only in autumn garden beds that will remain inactive until spring.
How to compost your own chicken's manure is a matter of preference. If you have enough land, you can just make a pile somewhere out of the way. But if you live in the suburbs, this can get pretty stinky. Dedicating a compost bin to chicken manure is a non-smelly, safe way to go.
Chicken manure rates at about 1.7-2.4-1.7. If it's mixed with bedding materials, it's more like 2.8-2.3-1.7
Turkey manure is about 1.4-1.0-0.9. Pigeon: 4.2-3-1.4. Duck: 5-23-17. All must be composted before being used in the garden.

Rabbit Manure
As you may remember, last month we brought home a pet rabbit. He's a miniature, and not full grown, but oh my, is he a manure-making machine! I don't mind, though, because rabbit manure is a valuable fertilizer. And, unlike other manures, rabbit manure can go directly into the garden without aging. (That's because rabbits are herbivores.)
To give you an idea of how much manure one rabbit produces, our little bunny produces enough pellets to fertilize about 4 plants each week. (By the by, I figure that our rabbit more than pays for himself. I would be hard pressed to purchase as good an organic fertilizer for the cost of his feed.)
If you don't have rabbits (learn more here about raising them for meat on your homestead) but know someone else who does, they may be willing to give you pellets for free. Otherwise, you may begin to see rabbit manure sold by enterprising homesteaders at farmer's markets and feed stores.
Rabbit manure comes in at about 3.5-1.0–1.8.
 Cow, Sheep, and Goat Manure
Cow manure isn't as great as many other manures, but it's still good enough you may find it at gardening centers. If you know a local farmer, you may be able to buy cow manure from him, too. It does have to be aged for about a year, however, and is only 0.5-0.5-0.5.
Sheep and goats produce better manure for the garden, coming in at about 1.5–1.0–1.8. Because these animals are herbivores, their manure doesn't have to age before going into the garden.
Manures You Should Never Use
Cat and dog manure should never be used in the garden because they can contain parasites and pathogens that attack humans. Most modern sources recommend avoiding pig manure for the same reason.
Humanure
Yes, that's right. Manure from humans can go into the garden, too. In fact, it's done all around the world; even here in the U.S., farmers often get "sludge" (dried up human poop) from local cities. I won't go into the details of safely using human manure, since I'm pretty sure most of us would only resort to it if we had no other fertilizers to use, but you can learn all about it in the The Humanure Handbook, a free .PDF book.
What About Weeds?
Manure may contain weed seeds, especially if it's not composted using a "hot system" (where the pile reaches at least 155 degrees F.). But according to Cornell University, even hot composted manure may contain persistent weed seeds, so it's smart to plan ahead and know how you're going to deal with weeds in the garden. (Two easy methods are laying cardboard down on top of the soil and using thick organic mulches.)
How to Use Manure in the Garden
For added safety, the University of Main's Cooperative Extension says manure should be added to the garden at least 120 days before harvesting crops that may touch the soil. This includes root crops and leafy greens. Otherwise, apply 90 days before harvest. Very often, gardeners and farmers apply manure in the fall, after harvest - but if you'll have a winter garden, you may have to rotate areas of your garden for active growing and for "active feeding" (or manure-ing) the soil.
To get the most from manure, it's best to dig it into the soil. The general recommendation is to use about 40 lbs. of manure per 100 square feet, dug down 6 to 9 inches. With herbivore manure, I'm not quite so exacting. For example, when I empty out the rabbit's manure tray (which is located directly under his wire-bottomed hutch), I simply dig a trench around a plant I want to fertilize, sprinkle his manure pellets in pretty liberally, cover, and then water well.
Always water deeply after applying any manure.
Also remember it's true you can have too much of a good thing. Over-applying manure of any type can actually throw the balance of nutrients in the soil way off, making it impossible to grow anything. To avoid this, most manures should be applied just once a year - usually in the fall or early spring. It's also wise to do a soil test once a year. You can buy inexpensive soil test kits at a gardening center - or online. For best results, conduct the test in the fall, before digging in any manure. The test will reveal if your soil is imbalanced - and what to apply to the garden to correct that imbalance.
July 15, 2013
Little House on the Prairie Activities
 This summer, my children and I are reading Laura Ingalls Wilder's Little House books. They are not only entertaining, but quite educational, too. Here are some of the activities I planned to go along with
Little House on the Prairie
. (For activities for
Little House in the Big Woods
, click here.)
This summer, my children and I are reading Laura Ingalls Wilder's Little House books. They are not only entertaining, but quite educational, too. Here are some of the activities I planned to go along with
Little House on the Prairie
. (For activities for
Little House in the Big Woods
, click here.)* Make a lapbook (or a book from stapled pieces of paper). You'll find some free printables for making a Little House on the Prairie lapbook here.
* Make a covered wagon. (Free wagon printable here or craft idea here. If you're feeling more adventuresome, try this playhouse style wagon.)
Little House on the Prairie offers an excellent opportunity to learn about cowboys and Indians (indiginous people of North America):
* Print out and use free cowboy lapbook printables.
* Make a horse from a cardboard box.
* Make a stick horse. (Here's one made from a sock.)
* Create a foot print horse painting.
* Make a paper cowboy hat.
* Throw an Indian party for your kids. Eat traditional Native American food, play Indian games, learn a little indiginous sign language...
* Make an Indian headdress. Simply cut a piece of cardstock or construction paper into a rectangle long enough to fit around your child's head; staple or glue in place. Use craft feathers, or "feathers" made from colorful cardstock, to decorate the headdress.
* Cook up some easy Native American food, like fry bread and hominy.
* Play Native American dice or other Indian games, found here and here.
* Make a paper totem pole.
* Make a paper tepee.
* Learn about writing symbols the indigenous people used. And while you're at it, learn some Indian sign language .
* Make a tiny bow and "arrow."
* Learn about various tribes and do lots of fun activities in History Pockets Native Americans . (I highly recommend it!)
July 12, 2013
Bacon, Tomato, & Oregano Grilled Double Cheese Sandwich Recipe
 When summer starts producing those amazing right-off-the-vine tomatoes, we eat more sandwiches. BLTs are always great, but my family's favorite is Bacon, Tomato, & Oregano Double Cheese Sandwiches. Words don't begin to describe how yummy these are!
For 1 sandwich:
2 slices sourdough bread
1 slice mozzarella
2 slices tomato
1 slice bacon, cut in half and cooked
1 tablespoon sour cream
1 tablespoon minced onion
1/4 teaspoon dried oregano
1 slice cheddar cheese
Butter, room temperature
1. Lay out one piece of sourdough and place the mozzarella on top of it.
2. Place the tomato slices on top of the mozzarella.
3. Place the bacon on top of the tomato.
4. Place the sour cream on top of the bacon.
5. Place the onion, followed by the oregano, on top of the bacon.
6. Place the cheddar cheese on top of the oregano and onion.
7. Place the other slice of sourdough on top of this. Butter one side of the bread.
8. Place just a dab of butter in a skillet placed over medium high heat. When the butter is melted, place the sandwich in the skillet, buttered side down. While that side of the sandwich cooks until golden, butter the opposite side. Flip over cook the second side until golden. Serve warm.
July 10, 2013
Teaching Kids Not to Covet
 Coveting, or wanting what others have, is a huge problem in our society. It's what fuels occupy protestors. It's behind the cry for higher taxes. It's the basis of most television commercials.
 I think we all fall into the trap of coveting at least once in a while. Have you ever thoughtL "I wish my husband helped with the kids like her's does" or "It must be great to have a husband who helps with the housework. Wish mine did." Oops. That's coveting. And how many times have I heard other mothers say things like, "I wish we were able to take a yearly vacation like the Smith family." Or, given the right tone of voice, "It must be nice to have a grandma who watches the kids for you once a week." Oops again; that's coveting.
But as mothers, we are concerned not just with our personal sin, but about modeling correct thinking and behavior for our children. I feel pretty certain none of us wants our kids to grow up thinking everything should be given to them, or that if they want something somebody else has to get it for them. But with coveting being such a major feeling these days, how can we prevent them from growing up this way?
* Model good work ethic.
* Avoid speaking covetous thoughts aloud. But if you slip, by all means, let your kids hear you ask God for forgiveness. You might also use such an occasion as a way to start a conversation about what coveting is and how the Ten Commandments show us it's wrong.
* Give your kids chores to do - no matter their age. Even toddlers can learn to work to make the home run more smoothly. (For ideas for age-appropriate chores, click here.)
* Let your kids work for stuff. For example, if your daughter really wants a new toy, suggest that she earn money to buy it herself. Not only does this help improve a child's work ethic, but it helps her learn not to be wasteful by not taking proper care of things. (And no, she doesn't have to go get a job at a local business, or even with a neighbor. It's just fine to give her extra chores around the house and then pay her for them.)
* Encourage your children to give to those in need. Help them to see that it's their personal responsibility to help the needy.
* Volunteer at a shelter or travel to a third world country (even if only via the Internet). Help your kids see how much they truly have.
* Encourage thankfulness. Every day, have your child thank God for at least one thing. Once in a while, have each child write (in words or pictures) things they are thankful for. When times are tough for your child and he is struggling with covetness, ask him to name a few things he is especially grateful for.
* Read 1 Kings 21. In this story, a king's covetness leads to murder. It's an extreme example, but see if you and your child can think of other stories where jealousy and covetness lead to bad things.
* Help your child think things through. If she is upset because she doesn't have the latest video game, ask, "If you had it, would you really be any happier? What if your friend got 10 new games - would you still feel as happy?" Encourage your child to come to the conclusion that things you can't buy are what truly make us happy.
"A generous person will prosper; whoever refreshes others will be refreshed." Proverbs 11:25
"No matter how much you want, laziness won’t help a bit, but hard work will reward you with more than enough." Proverbs 13:4
"You shall not covet your neighbor’s house. You shall not covet your neighbor’s wife, or his male or female servant, his ox or donkey, or anything that belongs to your neighbor.” Exodus 20:17
"...make it your ambition to lead a quiet life: You should mind your own business and work with your hands, just as we told you, so that your daily life may win the respect of outsiders and so that you will not be dependent on anybody." I Thessalonians 4:11-12
"Whatever you do, work at it with all your heart, as working for the Lord, not for human masters..." Colossians 3:23" For even when we were with you, we gave you this rule: “The one who is unwilling to work shall not eat.” II Thessalonians 3:10 "Anyone who does not provide for their relatives, and especially for their own household, has denied the faith and is worse than an unbeliever." 1 Timothy 5:8 "[Let them do] something useful with their own hands, that they may have something to share with those in need." Ephesians 4:28
July 8, 2013
Composted Tomatoes - & Accepting Garden Gifts
 A volunteer tomato growing in my squash patchLast week, I noticed some very familiar plants growing amongst the weeds: tomato seedlings! I scratched my head, trying to figure out how not one, but six, tomatoes planted themselves in a location where I've never planted tomatoes before. Then it hit me: My compost.
You see, tomato seeds are ultra-resilient. I learned this when my husband worked at our city's sewer processing plant. "There are tomato plants growing everywhere in the sludge," he told me. ("Sludge" is the nice name for human waste that is drying out.) "People eat the tomatoes and the seeds pass right through their system. Then end up in the sludge and grow like mad." And yes, the guys who work at the plant do eat the fruit those plants produce.
The tomato seed's resilience is also why tomato seeds generally come through the compost pile in tact. So the moral is: If you put tomatoes in your compost pile, expect lots of tomato seedlings in unexpected places.
I'm allowing all but two of the volunteer tomato seedlings to stay in my garden. Given our short growing season - and the fact that the seeds are from hybrid tomatoes and therefore may revert to a variety that won't grow well in our area - I'm not sure they will do much. But I recognize a garden gift when I see one, and I accept it graciously.
Over the years, I've discovered many favorite plants simply by paying attention to the weeds in my garden. It's not uncommon for me to let an unfamiliar weed grow until I can identify it. Sometimes I end up with gems, including chamomile, sorrel, poppies, and even bulbs. (Just be sure to I.D. the weed before it goes to seed, or you may end up with a lot of unwanted plants.)
Tomatoes, though, have to top the list.
What gardening gifts has God sent your way?
July 5, 2013
DIY Popsicles
 I don't know about your kids, but in the summer, mine fairly live on popsicles. And I don't mind; they keep them hydrated - and I make most of our popsicles, so I know they are healthier than store bought. (Seriously - have you read those labels?!) I use an inexpensive plastic popsicle mold I bought years ago; you can even buy BPA free ones now. And here are a few things I put in them:
* Yogurt. Just yogurt and nothing else. The full fat kind works best.
* Real juice. So simple.
* Lemonade. The homemade kind is healthier. Here's my favorite recipe.
* Healthier Fudgesicles: In a blender, pour 2 tablespoons unsweetened cocoa powder, 1/2 cup canned full-fat coconut milk (or other type of milk – though the pops won’t be as creamy), 2 small ripe bananas, a pinch of salt, and 1/2 teaspoon pure vanilla extract. Puree. Add sugar to taste.
* Healthier Orange Creamsicles: In a bowl, combine 1 cup real orange juice, 1 cup heavy cream or full fat coconut milk, 3 tablespoons honey, ¼ teaspoon orange extract, and ½ teaspoon pure vanilla extract.
* Juice-Yogurt: Pour any type of juice you like 2/3 of the way up the popsicle mold. Add enough yogurt (usually plain flavored) to fill the mold, then swirl the juice and yogurt together using a knife.
* Watermelon: Put 2 1/2 cups of cubed watermelon (seeds removed), into the blender and puree. If desired (though it's not necessary), add a teaspoon of pure vanilla extract of 2 tablespoons freshly squeezed lime juice.
Sometimes I want my very own popsicles. That's when I make Mocha Pops: In a bowl, combine 2 1/2 cups hot brewed coffee, 2 tablespoons unsweetened cocoa powder, 1 cup half and half, 1/4 teaspoon pure vanilla extract, and a pinch of salt. Add sugar to taste (I use about 3-4 tablespoons). Stir until sugar dissolves.
In all cases, once the liquid is in the mold, add the sticks and pop into the fridge. Most of these pops are fully frozen within 1 to 6 hours.
July 3, 2013
DIY Natural Powdery Mildew Treatment
 If you live in a region that's wet or humid, you've probably seen plants with a film of what looks like white powder. This is actually a disease called powdery mildew. A small amount of powdery mildew won't really harm plants, but if the powdery mildew spreads, it will reduce the growth of the plant (and its production of fruits or vegetables). In severe cases, powdery mildew can kill a plant.
 Happily, there is an easy, homemade remedy for powdery mildew: Cow's milk.
Preventing Powdery Mildew
There are several ways to help prevent powdery mildew from appearing in the first place. These include avoiding:
* overcrowding
* over-fertilizing
* overhead watering
* watering in the evenings or late afternoons
However, even if you follow these guidelines, powdery mildew may still appear on your plants.
Milk as a Treatment for Powdery Mildew
Nobody knows exactly why cow's milk controls powdery mildew. The scientist who discovered this natural remedy, Wagner Bettiol of Brazil, was trying to avoid buying expensive commercial treatments for powdery mildew and - having an ample supply on milk on hand - decided to give it a try. Scientists believe milk may control powdery mildew because it contains salt - something they know powdery mildew responds negatively to. Some scientists also think cow's milk may boost a plant's immune system, making it fight off powdery mildew more effectively.
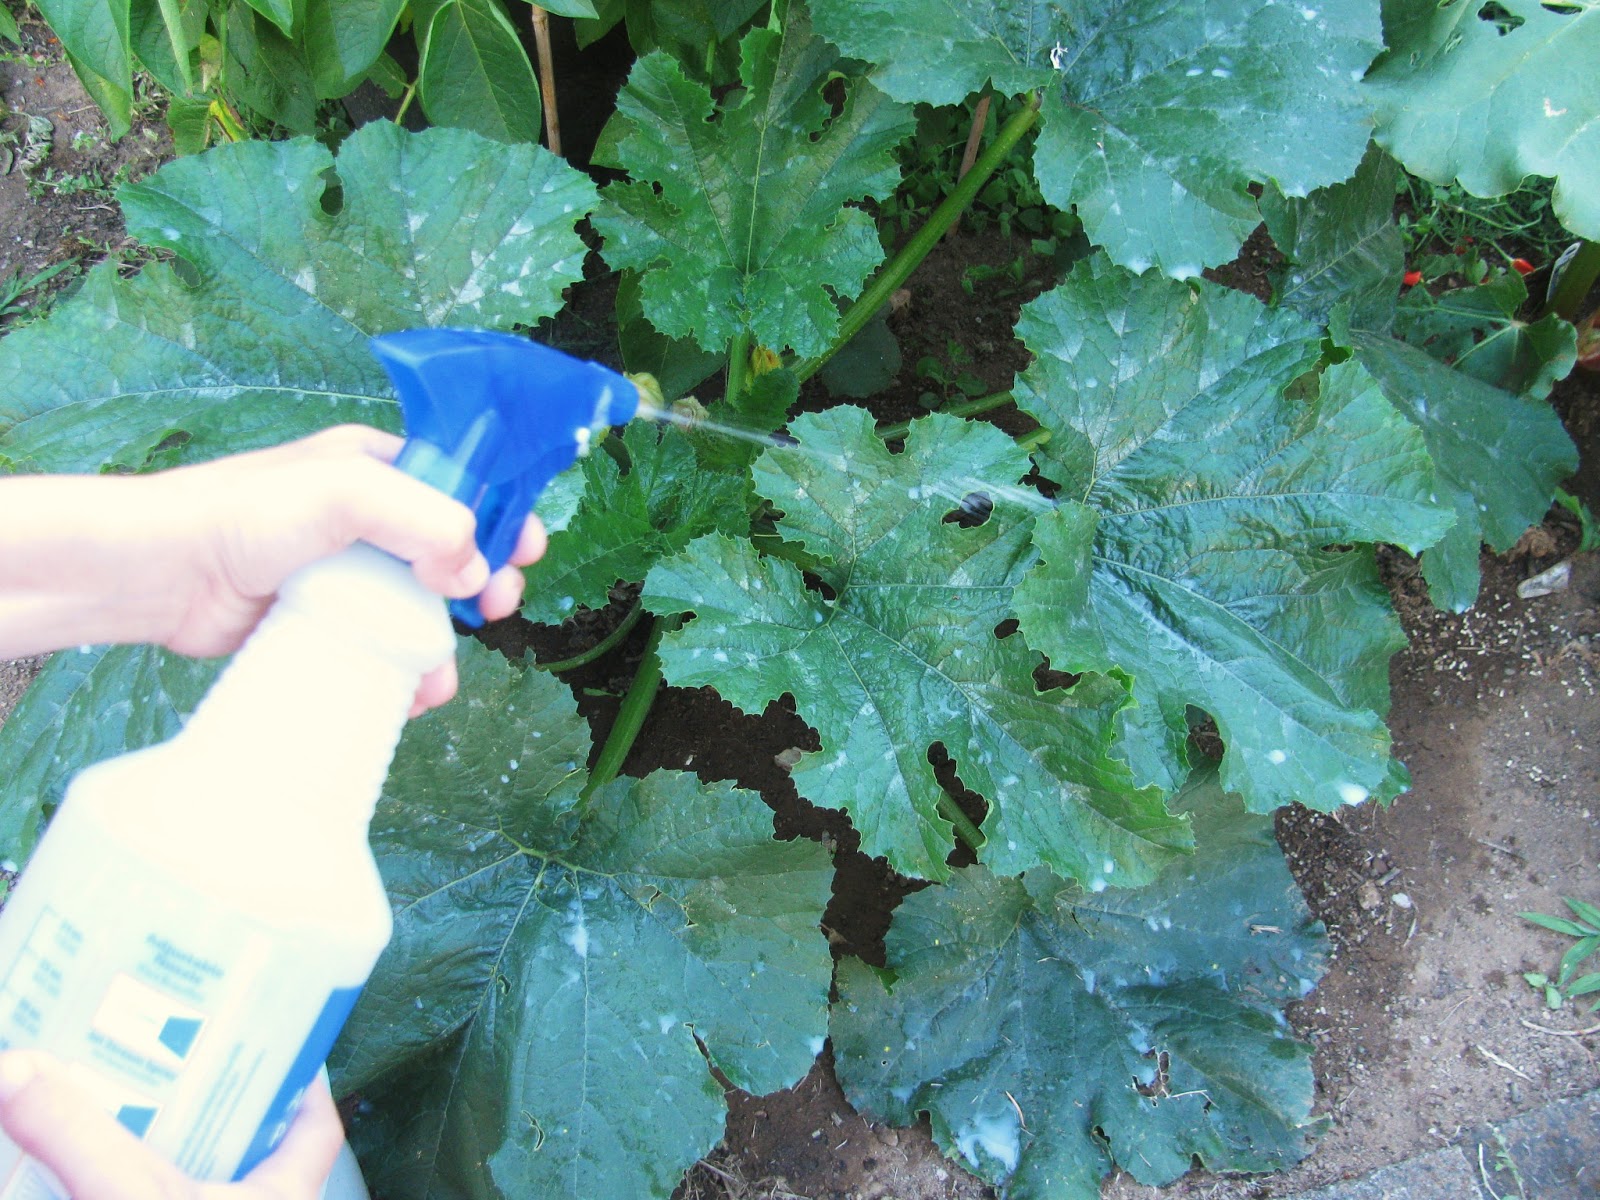
How to Make a Powdery Mildew Spray
Pour 1 oz. of cow’s milk and 9 oz. of water into a clean spray bottle. Shake to mix well.
It doesn't really matter how much fat is in the milk, but fat will go rancid while sitting on the plant, which in turn could attract pests. That's why skim milk is generally recommended; however, I use whole milk and have never had a problem. Oh, and don't use shelf stable milk - or any milk that's ultra-pasteurized (UHT), including most organic milk. UHT destroys milk's natural properties, making it ineffective against powdery mildew.
To Use the Spay
Spray all affected areas of the plant - including the underside of leaves - every three days at the first sign of powdery mildew. Thereafter, spray once a week.
|
July 1, 2013
BLT Salad Recipe
 Recently on Facebook, I mentioned making BLT Salad for my family, and many people asked for a recipe. I thought I'd just send them to a link to the recipe on this blog - but no; I'd never posted it! Then I thought I'd send them to the original source for my slightly altered recipe - but I couldn't find that, either. So here it is: My BLT Salad recipe...a real hit in my family, and ideal for warm weather eating.
BLT Salad Recipe:
2 pints of home canned chicken OR 15 - 20 oz. commercially canned chicken OR about 1 lb. of skinless, boneless chicken breasts
13.25 oz. whole grain or vegetable rotini pasta
7 slices of bacon, cooked
about 4 cups torn lettuce
1 -2 tomatoes, chopped
For the Dressing:
1 cup mayonnaise
2/3 cups water
2 tablespoons barbecue sauce
3 teaspoons white vinegar
3 teaspoons chopped fresh chives OR dried chives, soaked in water for 10 minutes, then drained
1/2 teaspoon garlic powder
pepper to taste
1. In a large bowl, mix together all the dressing ingredients; set aside.
2. If using fresh or frozen chicken breasts, fill a pot with water and bring to a boil over medium high heat. Add the breasts and gently boil until the chicken is cooked through. Drain and shred chicken with two forks. (If using home- or commercially-canned chicken, skip this step.)
3. Fill a pot with water and bring to a boil over medium high heat. (It's fine to re-use the water from step 2.) Add the pasta and boil until just tender. Drain.
4. In a large serving bowl, mix together the pasta, chicken, bacon (crumbled), lettuce, and tomato. Pour in the dressing and toss until completely coated. Serve hot or chilled.
Serves 6 - 8. (The chilled leftovers are yummy!)


