
Kristina Seleshanko's Blog, page 77
March 31, 2014
Spring Cleaning & Repair Organization - Plus FREE Printable Notebook Pages
 Do you ever feel there's so much spring cleaning, repairs, or just general housework to do that you can't possibly remember it all? Me, too.
Here's an idea I love, which I originally saw at Clover Lane: Get yourself a nice, fresh notebook. Or download this free .PDF, print out the pages, punch holes in them, and stick them in a binder. Then:
1. Pick a room and either choose the appropriate printable page for it, or write the name down on the first page of your notebook. Then walk into that room and inspect it. Write down down everything that needs attention. You can include simple cleaning chores (like wash the ceiling and scrubbing the floorboards) to repairs (like fixing the grout or painting). If you like, you can also include things you'd like to change about the room (like change the color scheme or buy a couch slipcover).
2. Walk into the next room, change pages, and make notes.
3. Repeat until you've covered the whole house.
Now you have a handy checklist. You don't have to try to remember everything that needs doing, and you can systematically clean things up or make repairs.
So simple, but so effective, too!


March 29, 2014
Letter of the Week: R - plus FREE R is for Robot Printable
 R is for Robot.Begin this week by eating some raisin oatmeal or rolls. Then show your child an upper- and lowercase R. "R says rrrrrr. Rrrrrr like rrrraisin and rrrroll!" Later in the day, consider eating radishes, raspberries, ravioli, rice, or rainbow sherbet. And there are lots of R related crafts and activities to choose from, below.
For more about Letter of the Week activities, click here.
* R is for Robot (see above; click here for free printable)
* Robot toilet paper roll craft
* Robot shape craft
* Robot lunch
* Robot counting
* Robot unit
* R is for Rocket (uppercase)
* * Rocket shape craft
* Rocket letter craft (scroll down)
* Rocket printable craft
* Rocket craft
* R is for Risen dot page
* He is Risen buns snack* R is for Reindeer (uppercase)
* R is for Reindeer (uppercase 2)
* R is for Reindeer (lowercase)
* R is for Reindeer (upper- and lowercase)
* R is for Reindeer tracing sheet
* R is for Rocks
* R is for Ribbon
* R is for Rainbow
* R is for Rainbow (2)
* R is for Rainbow (3; see also)
* R is for Rainbow (4)
* God makes Rainbows craft
* Rainbow colors and counting activity
* Rainbow rain science experiment
* R is for Rain
* * R is for Rabbit (uppercase 2)
* R is for Rabbit (uppercase 3)
* R is for Rabbit (lowercase)
* Rabbit color by letter printable
* Rabbit paper plate craft
* Rabbit ears headband craft
* Rabbit paper plate mask craft
* Rabbit carrot counting
* Rainbow fish craft
* R is for Raccoon
* R is for Raccoon (2)
* Raccoon hand print craft
* Raccoon toilet paper craft
* Raccoon paper bag puppet craft
* Raccoon paper plate craft
* R is for Rhino (lowercase)
* Rhino paper plate craft
* Rhino printable craft
* R is for Rooster (lowercase)
* R is for Rooster (uppercase)
* Rooster mask craft
* Rooster hat craft
* R is for Road (uppercase)
* R is for Road (lowercase)
* R is for Rice
* R is for Raspberries
* Phonics: Letter R
* Sesame Street: Letter R
* Sesame Street: Grover and the Letter R
* Sesame Street: Special on the Menu: Letter R
* Sesame Street: Chalk R
* Sesame Street: Big Bird's R Sightings
* Sesame Street: Ernie's R Collection
* Sesame Street: Gladys at the Double R Ranch
March 28, 2014
Ridiculously Tasty Rhubarab Recipes
 Last year, I planted my first-ever rhubarb plant. Since it's best not to harvest from a first year rhubarb, this spring will be the first time I pluck those beautiful red and green stems from the plant. I'm excited! And already planning all the yummy things I'll make with my rhubarb.
If you have a rhubarb plant, or if you're tempted by rhubarb at the farmer's market or grocery store, here are some great ways to cook it up!
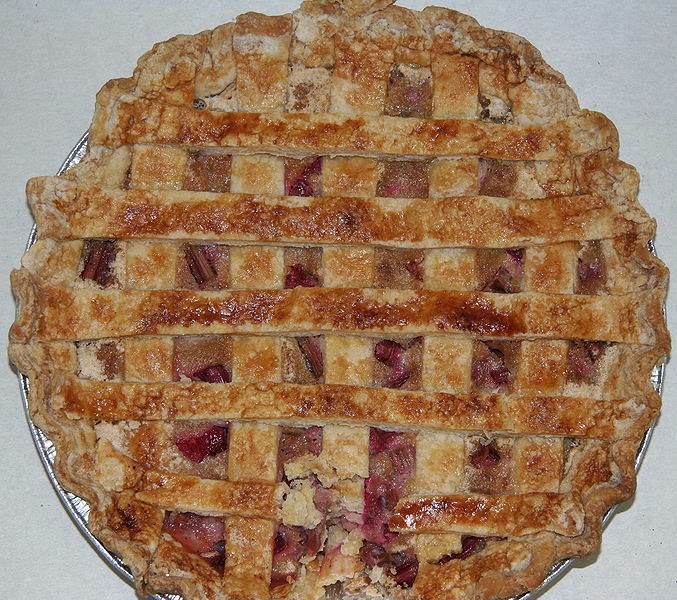 Strawberry-Rhubarb Pie.
Strawberry-Rhubarb Pie (you can can it!)
 Rhubarb Banana Muffins
2 egg whites2/3 cup milk1/4 cups olive oil2 cups all purpose flour (or 1 cup whole wheat flour and 1 cup all purpose flour)1/2 cup granulated sugar1/2 cup mashed banana (about 1 banana)1 tablespoon baking powder1/2 teaspoon salt1/2 teaspoon ground nutmeg2/3 cup chopped rhubarb 1. Preheat the oven to 400 degrees F. Spray a muffin tin with nonstick oil spray; set aside.2. In a bowl, beat the egg whites until frothy. 3. Stir in the milk and oil. Stir in the flours, sugar, banana, baking powder, salt, and nutmeg, mixing until just moist. Fold in the rhubarb.4. Pour the batter into the prepared muffin tin, filling each cup nearly to the top.5. Bake for 20 to 25 minutes, or until a toothpick inserted in the center of a muffin comes out clean. Cool the muffins in the pan for 5 minutes, then transfer to a wire rack to cool completely.Makes about a dozen muffins.
 Spiced Rhubarb Bake4 cups sliced rhubarb1 ½ cups granulated sugar½ teaspoon cinnamon½ teaspoon mace6 whole cloves1 orange1. Preheat the oven to 350 degrees F. Butter a large baking dish; set aside.2. Juice the orange. Grate the orange peel. Set aside.3. In a bowl, mix together the rhubarb, sugar, cinnamon, mace, cloves, orange juice, and grated orange peel (zest). 4. Pour the batter into the prepared baking dish and bake for 30 minutes. Serve hot or cold.Serves 4 – 8.
Upside-Down Rhubarb Cake
2/3 cup packed brown sugar3 tablespoons butter, melted2 1/4 cups diced rhubarb4- 1/2 teaspoons granulated sugar
For the Batter:6 tablespoons butter, at room temperature3/4 cup granulated sugar2 eggs, separated1 teaspoon pure vanilla extract1 cup + 2 tablespoons all purpose flour1 1/2 teaspoons baking powder1/2 teaspoon salt1/4 cup milk1/4 teaspoon cream of tartar Whipped cream (optional)
1. Preheat the oven to 325 degrees F. Grease a 9 inch baking dish.2. In a small mixing bowl, stir together the brown sugar and butter. Spread into the prepared baking pan. 3. Spread the rhubarb over the brown sugar mixture. Sprinkle the sugar over the top of the rhubarb. Set dish aside.4. In the bowl of an electric mixer, cream the butter and sugar together until light and fluffy. Add the egg yolks and vanilla. 5. In another bowl, stir together the flour, baking powder, and salt. Gradually add this mixture to the butter mixture, mixing well. 6. In a another mixer bowl, beat the egg whites and cream of tartar at medium speed until stiff peaks form. 7. Gradually fold the egg white mixture into the butter mixture. Spoon over the sugar-sprinkled rhubarb.8. Bake in the preheated oven for 50 to 60 minutes, or until the cake springs back when touched lightly.
Cool for 10 minutes in the pan, then invert onto a serving platter. Serve warm. Top with whipped cream, if desired. Serves 8 – 12.
Other Great Rhubarb Recipes:
Rhubarb Cheesecake
Rhubarb Freezer Jam
Rhubarb Lemonade
Rhubarb-Peach Cobbler
Strawberry-Rhubarb Ice Cream
Pork Chops with Rhubarb Chutney
Roasted Asparagus with Rhubarb Vinegar
Rhubarb-Raspberry Sauce
Apple-Rhubarb Crumble
Spiced Rhubarb
March 26, 2014
Our Favorite Kids Educational Programs on Netflix Streaming
 We save
hundreds
each year by not buying cable TV. Instead, we pay for Netflix streaming ($7.99/month) and one-at-a-time DVD service ($7.99/month). Not only is it incredibly cheaper, but we don't have to deal with commercials. And for years, I've been using Netflix's instant streaming programing to help educate my kids. I mean, if I'm going to let them watch anything, why not let it be something they can learn from? With that in mind, here are our favorites.* (All age listings are approximate.)
We save
hundreds
each year by not buying cable TV. Instead, we pay for Netflix streaming ($7.99/month) and one-at-a-time DVD service ($7.99/month). Not only is it incredibly cheaper, but we don't have to deal with commercials. And for years, I've been using Netflix's instant streaming programing to help educate my kids. I mean, if I'm going to let them watch anything, why not let it be something they can learn from? With that in mind, here are our favorites.* (All age listings are approximate.)Science:
The Magic School Bus (ages 5 - 9)
Beakman's World (ages 5 - 10)
How Stuff Works (ages 5 - adult)
How Do They Do It (ages 5 - adult)
Reading Rainbow Ocean Life (ages 3 - 5)
God of Wonders (creation science; ages 5 - adult)
Dragons or Dinosaurs (creation science; ages 6 - adult)
Wonders of God's Creation (creation science; ages 6 - adult)
History:
Dear America (ages 5 - 13)
Storybook Treasures: Amazing America (ages 5 - 9)
A Charlie Brown Thanksgiving (ages 4 - 12)
Language/Reading:
WordGirl (ages 5 - 9)
Logic:
Busytown Mysteries (ages 2 - 5)
Preschool Basics:
Shapeville Park
Numberland
Phonics Farm
The Amazing Alphabet Amusement Park
Sesame Street and Sesame Street Classics
Misc.:
The All About series (All about Astronauts, All About Cars, etc.; misc.; ages 3 - 6)
Reading Rainbow Music, Music Everywhere (ages 3 - 5)
Mighty Machines (ages 2 - 5)
Various documentaries (These change rapidly, so I suggest browsing the documentaries section regularly. Note that you can expect all nature related documentaries to mention evolution.)
BONUS: If you use a Roku device for streaming Netflix, there are many other educational channels you can watch for FREE. These channels include:
PBS Kids
PBS
The Smithsonian Channel
The History Channel
National Geographic Kids
NASA
Kids' Food
The list grows monthly. (Note that some stations, like The History Channel and National Geographic Kids, allows Roku users to see only some episodes.)
* Please note that Nextflix streaming offerings change periodically.
March 24, 2014
Identifying Beneficial Insects in the Garden
Recently, a novice gardener who'd read my post "Good Bugs vs. Bad Bugs" asked how to recognize beneficial insects before they are full grown. I think that's an excellent question! While I do recommend gardeners leave all bugs alone unless they are certain they are attacking plants, it can be helpful to know what "good bugs" look like when they are young so you can be extra careful not to disturb them
Now, there are quite a few beneficial insects - those that don't harm plants, and feed on insects that do harm gardens. They vary, depending upon where you live. But here are a few of the most common ones, plus a great source for looking up more. Please note that slight differences in color or shape are possible.
Ladybugs: We all know what cute little ladybugs (or lady beetles, as they are sometimes called) look like. But their young look very, very different! All ladybugs, but especially the young, feast on aphids and other small, soft bodied insects. You can help attract ladybugs to your garden by planting things that have yellow pollen and nectar, like squash and mustard. Also, don't immediately kill aphids when they appear in your garden. (But watch aphids carefully or they will literally drain the life out of your plants.) You may also consider making a ladybug feeder for your garden.
 Adult ladybug, courtesy Jacopo Werther/Wikipedia Commons.
 Ladybug larvae, courtesy Dûrzan cîrano/Wikipedia Commons.
 Ladybug pupa, courtesy Pudding4brains/Wikipedia Commons.
Lacewings: Lacewing larvae eat aphids, thrips, scales, moth eggs, small caterpillars, and mites. To attract lacewings to your garden, don't immediately kill aphids when they appear. Also, consider planting dill, angelica, and fennel, and allow some dandelions and Queen Anne's lace to grow nearby.
 Adult lacewing, courtesy Charlesjsharp/Wikipedia Commons
 Lacewig larvae, courtesy Ellmist /Wikipedia Commons
 Just hatched lacewing larvae, courtesy Staticd/Wikipedia Commons
Aphid Midge: Aphid Midge larvae eat - not surprisingly - lots of aphids. The best way to attract them is to not immediately kill aphids when you see them in the garden. You can also trying planting sweet alyssum, yarrow, mustard, dill, parsley, and cilantro.
 Aphid midge larvae, courtesy Whitney Cranshaw, Colorado State University/Wikipedia Commons.
 Courtesy UC IPM.
Damsel Bugs: Damsel bugs eat aphids, small caterpillars, leafhoppers, thrips, and more. Attract them to your garden with caraway, cosmos, fennel, spearmint, goldenrod, and marigold.
 Courtesy UC IPM.
Praying Mantis: This interesting insect feasts on caterpillars, butterflies, flies, bees, wasps, and moths. Praying mantis are considered difficult to attract to the garden, but cosmos, raspberry, and flowering shrubs are considered plants they like.You can also purchase praying mantis at gardening centers.
 Adult praying mantis, courtesy Shiva shankar/Wikipedia Commons
 Praying mantis egg case, courtesy Lykaestria/Wikipedia Commons
Assassin Bugs: These insects love to eat hornworms, Mexican bean beetles, Colorado potato beetles, leafhoppers, cucumber beetles, aphids, lygus bugs, and caterpillars. To help attract assassin bugs, allow some Queen Ann’s lace to grow in your yard, and consider planting some daisies, goldenrod, and oleander.
 Adult assassin bug, courtesy Muhammad Mahdi Karim/Wikipedia Commons.
 Assassin bug nymph, courtesy Riechvaugen/Wikipedia Commons.
 Assassin bug larvae, courtesy M. Purves/Wikipedia Commons.
Mealybug Destroyers: These bugs - a member of the ladybug family - are imported from Australia. The larvae feast on insect eggs. Adults eat lots of mealybugs, aphids, and other soft bodied insects. Having aphids and mealybugs in your garden will attract mealybug destroyers, but in most cases, you'll need to purchase these "good bugs" at a gardening center.
 Adult mealybug destroyer, courtesy gbohne/Wikipedia Commons.
 Mealybug destroyer larvae, courtesy Jagrob/Wikipedia Commons.
Minute Pirate Bug: This bug eats lots of thrips, aphids, mites, scales, whiteflies and other soft bodied insects. They are attracted to marigolds, cosmos, spearmint, goldenrod, and fennel.
 Minute pirate bugs, courtesy UC IPM.
Other Beneficial Insects: Many flying things, including wasps and certain flies, kill "bad bugs" in the garden (as do spiders). In addition, most beetles eat pesky bugs. For more information on these creatures, plus other beneficial insects, please see the University of California's Agricultural and Natural Resources website, which includes photographs of insects at various stages of life.
Now, there are quite a few beneficial insects - those that don't harm plants, and feed on insects that do harm gardens. They vary, depending upon where you live. But here are a few of the most common ones, plus a great source for looking up more. Please note that slight differences in color or shape are possible.
Ladybugs: We all know what cute little ladybugs (or lady beetles, as they are sometimes called) look like. But their young look very, very different! All ladybugs, but especially the young, feast on aphids and other small, soft bodied insects. You can help attract ladybugs to your garden by planting things that have yellow pollen and nectar, like squash and mustard. Also, don't immediately kill aphids when they appear in your garden. (But watch aphids carefully or they will literally drain the life out of your plants.) You may also consider making a ladybug feeder for your garden.
 Adult ladybug, courtesy Jacopo Werther/Wikipedia Commons.
 Ladybug larvae, courtesy Dûrzan cîrano/Wikipedia Commons.
 Ladybug pupa, courtesy Pudding4brains/Wikipedia Commons.
Lacewings: Lacewing larvae eat aphids, thrips, scales, moth eggs, small caterpillars, and mites. To attract lacewings to your garden, don't immediately kill aphids when they appear. Also, consider planting dill, angelica, and fennel, and allow some dandelions and Queen Anne's lace to grow nearby.
 Adult lacewing, courtesy Charlesjsharp/Wikipedia Commons
 Lacewig larvae, courtesy Ellmist /Wikipedia Commons
 Just hatched lacewing larvae, courtesy Staticd/Wikipedia Commons
Aphid Midge: Aphid Midge larvae eat - not surprisingly - lots of aphids. The best way to attract them is to not immediately kill aphids when you see them in the garden. You can also trying planting sweet alyssum, yarrow, mustard, dill, parsley, and cilantro.
 Aphid midge larvae, courtesy Whitney Cranshaw, Colorado State University/Wikipedia Commons.
 Courtesy UC IPM.
Damsel Bugs: Damsel bugs eat aphids, small caterpillars, leafhoppers, thrips, and more. Attract them to your garden with caraway, cosmos, fennel, spearmint, goldenrod, and marigold.
 Courtesy UC IPM.
Praying Mantis: This interesting insect feasts on caterpillars, butterflies, flies, bees, wasps, and moths. Praying mantis are considered difficult to attract to the garden, but cosmos, raspberry, and flowering shrubs are considered plants they like.You can also purchase praying mantis at gardening centers.
 Adult praying mantis, courtesy Shiva shankar/Wikipedia Commons
 Praying mantis egg case, courtesy Lykaestria/Wikipedia Commons
Assassin Bugs: These insects love to eat hornworms, Mexican bean beetles, Colorado potato beetles, leafhoppers, cucumber beetles, aphids, lygus bugs, and caterpillars. To help attract assassin bugs, allow some Queen Ann’s lace to grow in your yard, and consider planting some daisies, goldenrod, and oleander.
 Adult assassin bug, courtesy Muhammad Mahdi Karim/Wikipedia Commons.
 Assassin bug nymph, courtesy Riechvaugen/Wikipedia Commons.
 Assassin bug larvae, courtesy M. Purves/Wikipedia Commons.
 Mealybug Destroyers: These bugs - a member of the ladybug family - are imported from Australia. The larvae feast on insect eggs. Adults eat lots of mealybugs, aphids, and other soft bodied insects. Having aphids and mealybugs in your garden will attract mealybug destroyers, but in most cases, you'll need to purchase these "good bugs" at a gardening center.
.jpg) Adult mealybug destroyer, courtesy gbohne/Wikipedia Commons.
Adult mealybug destroyer, courtesy gbohne/Wikipedia Commons.
 Mealybug destroyer larvae, courtesy Jagrob/Wikipedia Commons.
Minute Pirate Bug: This bug eats lots of thrips, aphids, mites, scales, whiteflies and other soft bodied insects. They are attracted to marigolds, cosmos, spearmint, goldenrod, and fennel.
 Minute pirate bugs, courtesy UC IPM.
Other Beneficial Insects: Many flying things, including wasps and certain flies, kill "bad bugs" in the garden (as do spiders). In addition, most beetles eat pesky bugs. For more information on these creatures, plus other beneficial insects, please see the University of California's Agricultural and Natural Resources website, which includes photographs of insects at various stages of life.
March 21, 2014
Letter of the Week: Z
 Z is for Zebra, via Raising and Teaching a Smarty PantsGive yourself and your child a big back on the back; you've gone through every letter but the last! This week, show your child an upper- and lowercase Z and tell him what sound it makes: "Z says zzzz." Then brainstorm words with the Z sound. Today you might also eat some Z foods, like zucchini (or zucchini bread) or zoo animal crackers. Then move on to one or more of the Z crafts and activities, below.
For more about Letter of the Week activities, click here.
* Z is for Zebra (see also)
* Z is for Zipper-stamped Zebra
* Zebra size sort, simple puzzle, and more
* Zebra count, lacing, graphing, and more
* Zebra mask craft (see also here, here, and here)
* Zebra hand print craft
* Zebra paper bag craft
* Zebra in the Zoo craft
* Zebra lunch
* Z is for Zipper
* Z is for Zipper (2)
* Z is for Zoo
* Z is for Zoo (2)
* Zoo preschool unit study
* Zoo animal tracks activity
* Zoo craft (consider using a zebra instead of a lion)
* Z is for Zig Zag
* Zig Zag vehicle track activity
* Z is for Zzzzzz
* Phonics: Letter Z
* Sesame Street: Letter Z
* Sesame Street: Kermit Talks About the Letter Z
* Sesame Street: Z Zebra Song
* Sesame Street: Looking for the Letter Z
* Sesame Street: Z Z Blues
* Sesame Street: Z is for Zebra
March 19, 2014
How to Clean a Popcorn or Textured Ceiling
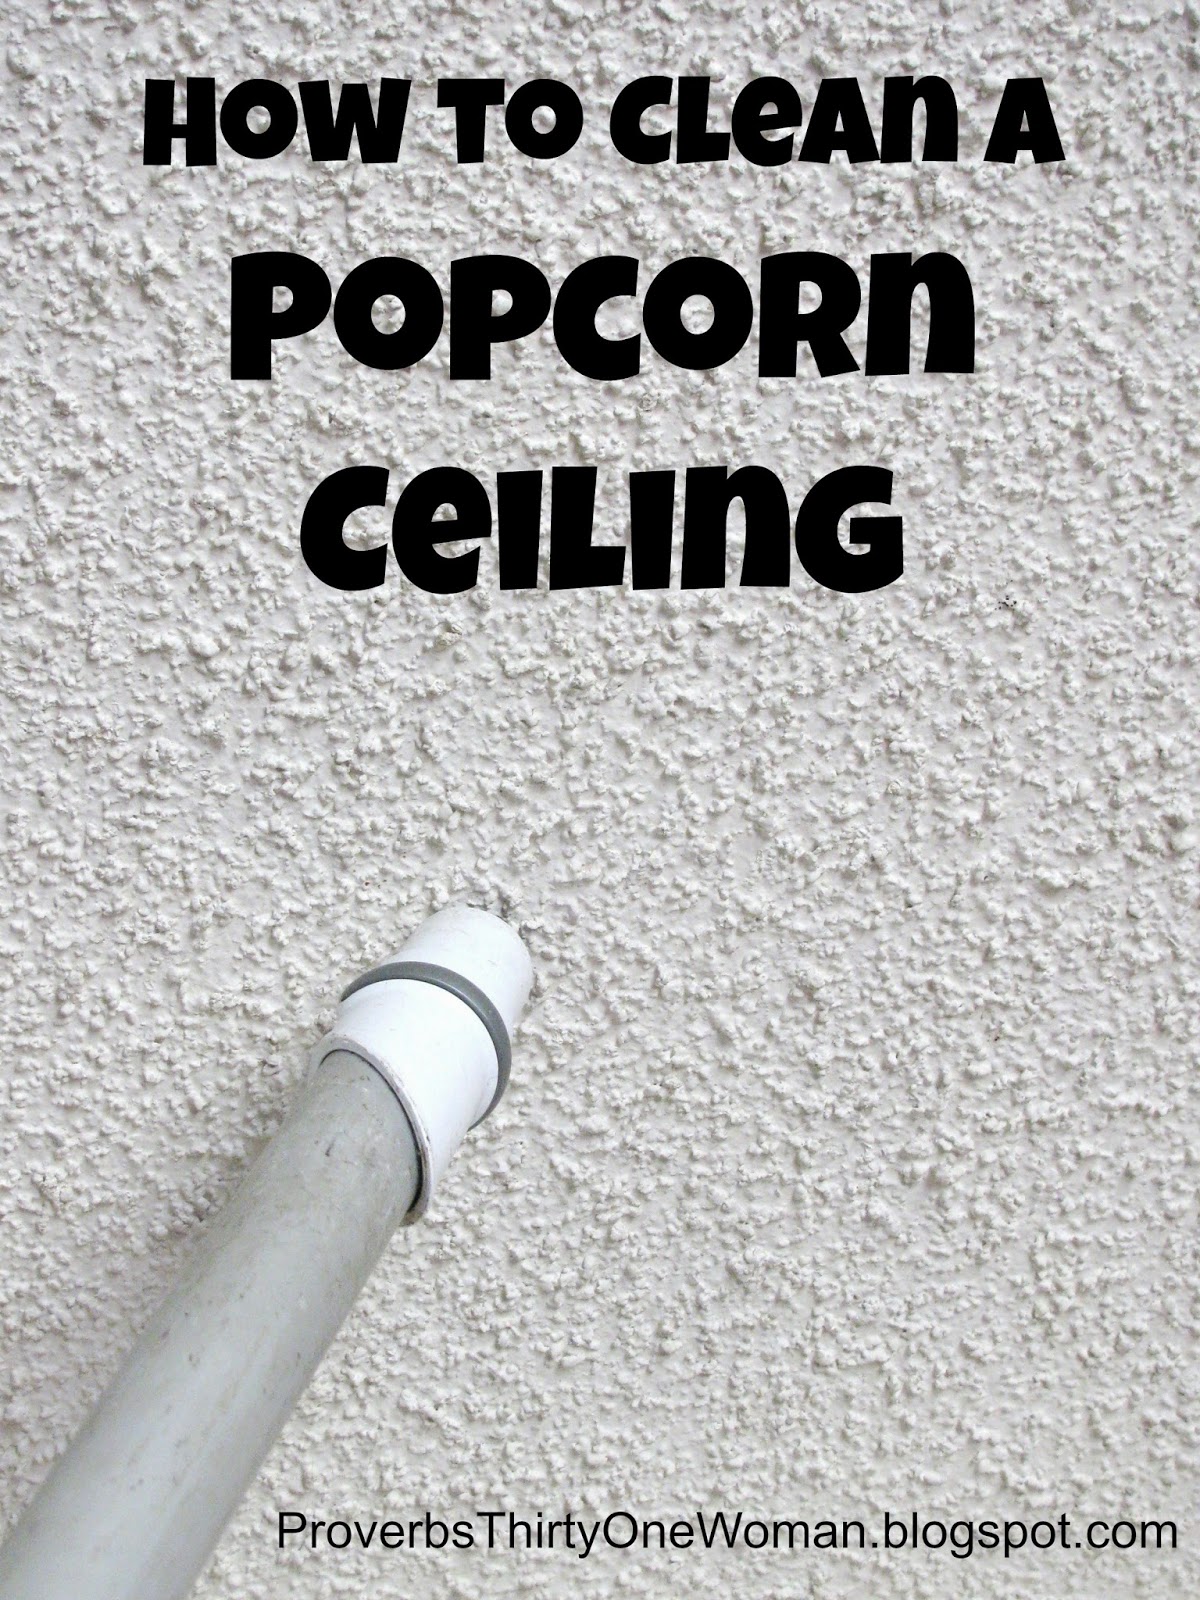 Whoever thought popcorn-style ceilings were a good idea obviously never did any housecleaning! But if you have a popcorn ceiling in your home - or a ceiling that's highly textured - there has to be some way to clean it...right? Right.
First, a few things to avoid:
* Never saturate a textured ceiling. This can literally make the ceiling fall down or peel off.
* Avoid using any moisture (including steam).
* Don't try to scrape off or remove a textured ceiling. They usually contain asbestos - so if you want to get rid of it, hire a pro.
* Some people use a broom to clean textured ceilings. I don't recommend this because brooms can make a lot of the texturing fall off.
How to Clean a Popcorn or Highly Textured Ceiling:
Use the hose on your vacuum to vacuum the ceiling. Work systematically, so you're certain to vacuum the entire the ceiling. It's not a bad idea to wear safety goggles, and you may want to cover your hair with a kerchief.
If there are stains or spots on the ceiling , some experts recommend the following:
"Mix 1 tablespoon of bleach with 1 gallon of water in a sink or pail. Fill a spray bottle with the mixture. Stand on a ladder and spray dark spots on the ceiling with the bleach/water mixture. Do not oversaturate the ceiling. Spray the spot with two or three blasts then allow the ceiling to dry overnight. Repeat the spray treatment daily until the spots lighten." Emphasis mine; remember that dampness can cause the ceiling to peel or fall off.
If the ceiling still looks dirty , you may need to paint it using a slit foam roller. A very fluffy roller works, too. If there are spots or stains left on the ceiling, paint those first, then allow them to dry before you move on to the entire ceiling. Be sure to only paint in one direction. (If you roll back and forth, the popcorn will get saturated and fall off.) For a second coat, I recommend rolling in a different direction than you did the first time.
According to the San Fransisco Gate you can also try just painting over stained areas: Use texture spray in a color that matches the ceiling paint.
March 17, 2014
Little Town on the Prarie Activities
 Little Town on the Prairie
is a lively book filled with tales of how pioneers entertained themselves - and how a 15 year old girl like Laura suddenly found herself becoming a grown woman, complete with a teacher's certificate and a beau. Of all the Little House books, it's the most like the television series. As you read this book with your kids, try a few of these great tie-in activities.
Little Town on the Prairie
is a lively book filled with tales of how pioneers entertained themselves - and how a 15 year old girl like Laura suddenly found herself becoming a grown woman, complete with a teacher's certificate and a beau. Of all the Little House books, it's the most like the television series. As you read this book with your kids, try a few of these great tie-in activities.For more Little House activities, click here.
* Learn to identify common edible weeds, like sheep sorrel (For tips on foraging with kids, click here.)
* "Angleworms" are earthworms used for fishing (i.e. angling). Try calling worms up from any piece of earth in your yard. Then create your own wormery to study worms. Or make your own worm compost bin that will turn trash into great garden soil. Learn more about worms here, here, and here.
 Learn to call worms, or make worm compost.
* Learn a bit about gophers here. Make some gopher paper bag puppets. (Okay, they are supposed to be ground hogs, but they look like gophers to me.) Or how about some groundhog - er gopher - cupcakes, like this or this (scroll down)?
* Learn about the life cycle of chickens. (This video is good for small children. This video has wonderful "inside the egg" photos. This website is also helpful.) Consider doing a chicken life cycle craft like this, too. While you're at it, be sure to notice that William's illustrations show chicks; does this match Laura Wilder's written description? Or should Williams have shown older chickens, known as "pullets?"
* Learn all the verses to the song "America."
* Learn about the Declaration of Independence.
* Learn about the Constitution. Memorize the preamble to the Constitution (via Schoolhouse Rock).
* Look up needle grass.
 1882 fashion plate.
* Look at some fashion plates from 1882.
* Try your hand at writing some funny poems or limmericks.
* Make your own name cards on the computer, or by hand. Do we still use name cards today? How have they changed?
* Create your own literary society. You could do this just with your family, or with like-minded friends.
* Play Charades, Blind Man's Bluff, and Drop the Handkerchief.
* Bake a huge pumpkin pie.
* Hold a family spelling bee.
* Do your own school exhibition. Have every child in the house memorize something and give a presentation to family and friends.
* Learn a little of the history of minstrel shows. Why are they now considered insulting? In Laura's day, why were they not? What appeal did they hold?
* Make your own autograph album. (You can also buy them cheaply here.)
 Eat white cake and orange slices.
* Make a presidential time line.
* Bake a white cake. Now eat it, alternating bites between an orange and the cake. How does the taste of the foods change when you eat them this way?
* Make a simple telegraph with an electromagnet.
* Watch "Electricity for Beginners" or "How Electricity Works."
* Learn what Braille is (and send away for a free Braille card.) Learn more here and here.
* If possible, visit a place with chickens. It could be a friend who has backyard chickens, or a farm.
* Make chicken pot pie.
* Make a Little Town on the Prairie lapbook.
More:
Little House in the Big Woods Activities
Pancake Men (from Little House in the Big Woods)
Little House on the Prairie Activities
Little House on the Prairie Birthday Party
On the Banks of Plum Creek Activities
The Long Winter Activities
March 14, 2014
Letter of the Week: Y
 Y is for Yellow YarnWhen your child is ready to move on to the letter Y, begin by showing him the upper- and lowercase version of the letter. "Y says 'yuh.' What words start with the yuh sound?" One Y word can be the theme for your day or week: Yellow. Eat yellow foods (like bananas, yellow cheese, yellow yogurt, and so on) and see if you can tune your child into pointing out as many things as possible that are yellow or begin with the Y sound. Then do one or more of the activities below.
For more about Letter of the Week activities, click here.
* Y is for Yarn lacing activity
* Y is for Yarn
* Y is for Yarn craft
* Yarn monster craft
* Yarn balls or eggs craft
* Yarn bowl craft
* Y is for Yak (see also)
* Y is for Yak (and Yarn)
* Yak toilet paper tube craft
* Yak hat craft
* Yak hand print craft
* Yak paper bag puppet
* Yak paper plate craft
* Y is for Yoyo
* Y is for Yoyo (2)
* Yoyo craft
* Y is for Yolk
* Y is for Yummy
* Y is for Yellow
* Y is for Yellow (2; see also)
* Yellow jacket craft
* Yoda lunch
* Phonics: Letter Y
* Sesame Street: Letter Y
* Sesame Street: Why Do You Love the Letter Y?
* Sesame Street: Letter of the Day Game Show: Y
* Sesame Street: I Wanna Know Y
March 12, 2014
17 Upcycled Seed Starter Pots - and how to use them
 How much do you spend on seed starting supplies? If you are buying anything more than seeds and soil, you're wasting money! That's because it's so easy to start seeds using materials you already have on hand:
 Salad container turned seed starting container.1. Salad containers. If you buy greens or salads in plastic containers with lids, these are perfect seed
 starting containers. (In fact, they are my favorite!)
2. Cookie, donuts, and other sweet containers. The kind that are plastic with a lid. Again, these are ideal for seed sowing.
3. Toilet paper and paper towel tubes. If you fold the ends under, they make perfect little pots that are biodegradable. (Learn how to make these pots in my free ebook Starting Seeds .)
4. Newspaper. It's easy to fold these into individual seed starting pots. (Learn how my free ebook Starting Seeds .)
5. Plastic soda pop and water jars. Just cut off the tops of plastic jars to make them a suitable height. If you like, duct tape the tops back on, to make a mini greenhouse.
6. Milk and juice jugs and cartons. Treat the plastic jugs just like soda jars. Cut cartons down to height -
 Seed pot from a toilet paper tube.even the single serving cartons work!
7. Yogurt tubs. Also tubs from cottage cheese, Cool Whip, ricotta cheese, and so on.
8. Aluminum soda pop and beer cans. These can be tricky to cut in half (Use caution! The cut edges will be sharp!), but they do work as nice little seed pots.
9. Styrofoam, plastic, and wax-coated paper disposable cups. The kind with domed plastic lids are perfect for making little greenhouses, but even lid-less types work.
10. Aluminum cans from canned food.
11. Aluminum roasting pans. Cheap ones from the Dollar Tree are just fine - or, if you buy rotisserie chicken, the pans they come in work great, too. Ideally, use the type with clear plastic lids.
12. Coffee cans.
 Seed pot from newspaper. No special tools needed!13. CD/DVD cases. The type you buy blanks in.
14. Chinese takeout boxes.
15. Plastic or Styrofoam takeout boxes.
16. Old Tupperware-style containers.
17. Cereal boxes. Just cut down their height.
And a few containers I don't recommend:
* Egg cartons. They aren't deep enough for seedlings to develop healthy roots.
* Ice cube trays. Again, unless they are unusually deep, the seedlings won't develop good root systems.
* Egg shells. Again, the problem is no room for roots.
* Citrus halves. No room for roots!
* Plastic berry boxes. These may seem ideal, but they have holes all over them, and this defeats the wonderful mini greenhouses effect of boxes with lids. If you have plastic berry boxes, go ahead and use them, but plan on using something else to create a greenhouse effect
* Glass jars. All seed starting containers need to have drainage holes...and you can't put drainage holes in glass.
How to Use Upcycled Materials for Seed Starting Pots:
1. Make sure the container has good drainage. Unless the container is paper (like a toilet paper tube), that means poking some holes in the bottom. At least 3 will work for a very small container, like a yogurt cup. For larger containers, like a salad greens box, use 5 - 8. If the material of the container is thin, you may be able to carefully poke drainage holes using one blade of a pair of scissors. Be careful! And make sure you're creating a hole, not just a slit. Otherwise, I recommend using either a hammer and fat nail or an electric drill.
2. Make sure the container is clean.
3. Add new soil - not soil from the garden and not soil that's been used before (unless you know how to sterilze old potting soil). You can use soil designed just for seed starting, but I have great success using plain old potting soil.
4. Thoroughly dampen the soil. Make sure it's wet all the way to the bottom of the container.
5. Plant the seeds, according to seed packet directions.
You can now leave the containers as is, but you'll have better success if you create mini greenhouses that hold in moisture and heat:
6. If the container came with a clear plastic lid, make a few slits in the lid carefully using a pair of scissors or Exacto knife. Place the lid securely on top of the container. Within a few minutes, the container should fog up. If it doesn't, either the lid isn't a tight enough fit or the soil is too dry. As the seedlings grow, gradually cut away more and more of the lid until the plant is ready to go into the garden.
 7. If the container has no lid, you can still create a greenhouse effect by putting a plastic Ziplock-style bag
 over the top of the container, open end down. (Stiff freezer bags are easiest to use; if the bag wants to sag and not stand upright, place a few sticks in the seed pot to hold the plastic up.)
8. If you have many small seed pots (for example, toilet paper tube pots), you can put them in a plastic tub, old Tupperware-style container, roasting pan, or a plastic greens box from the gocery store. Make sure the larger container has some drainage holes and use the container lid (with air circulation slits) to cover the seedlings. Or, cover the large container with plastic wrap, loosely placed on top.
For more information on how to gradually acclimate seedlings to the outdoors, and how to use winter sowing or grow lights to create healthier seedlings, download the FREE ebook "Seed Starting."


