
Kristina Seleshanko's Blog, page 34
March 11, 2017
Weekend Links
In which I share my favorite posts from this blog's Facebook page.

This post contains affiliate links. All opinions are my own. Please see FCC disclosure for full information. Thank you for supporting this site!
_______
1 Corinthians 16:33-34
_______
* The workmen started replacing our burned down pole barn! At LAST! Once the building is up, we can maybe finish unpacking. That would be really, really nice :)
* I created a Facebook group that's all about sharing very low carb, keto recipes (like I'm using to loose weight and normalize my blood sugar). If you're interested, join us!
 * I got this brand new novel (from possibly my favorite modern author) in the mail. I can't wait to dig in!
* SoyNut butter being investigated for E. coli contamination.
* Veal recall.
* Transform your bedroom into a couple's oasis.
* How to pray for a strong willed child.
* Get off to the right start by choosing the healthiest chicks this spring !
 * 3 Common Seed Starting Mistakes & How to Avoid Them.
* A primer on planting fruit trees.
* How to use weeds as garden mulch.
* Glass bakeware can shatter. Here's how to avoid that.
* 15 natural spring cleaning recipes & tips
Oldies But Goodies:
* Mom's Super Easy, Flexible, and DELISH Banana Bread Muffins or Bread.
* If you were being evaluated for your job as a home keeper, would you get a raise? Or would you be fired?
* Lazy Girl's Guide to Spring Cleaning

This post contains affiliate links. All opinions are my own. Please see FCC disclosure for full information. Thank you for supporting this site!
_______
"Then the trees of the forest will sing for joy before the Lord; for He is coming to judge the earth.. O give thanks to the Lord, for He is good; for His lovingkindness is everlasting."
1 Corinthians 16:33-34
_______
* The workmen started replacing our burned down pole barn! At LAST! Once the building is up, we can maybe finish unpacking. That would be really, really nice :)
* I created a Facebook group that's all about sharing very low carb, keto recipes (like I'm using to loose weight and normalize my blood sugar). If you're interested, join us!
 * I got this brand new novel (from possibly my favorite modern author) in the mail. I can't wait to dig in!
 * SoyNut butter being investigated for E. coli contamination.
* Veal recall.
* Transform your bedroom into a couple's oasis.
* How to pray for a strong willed child.
* Get off to the right start by choosing the healthiest chicks this spring !
* 3 Common Seed Starting Mistakes & How to Avoid Them.* A primer on planting fruit trees.
* How to use weeds as garden mulch.
* Glass bakeware can shatter. Here's how to avoid that.
* 15 natural spring cleaning recipes & tips
Oldies But Goodies:
* Mom's Super Easy, Flexible, and DELISH Banana Bread Muffins or Bread.
* If you were being evaluated for your job as a home keeper, would you get a raise? Or would you be fired?
* Lazy Girl's Guide to Spring Cleaning


March 9, 2017
Why I Don't Wash Our Chickens' Eggs
 One thing you'll quickly learn when you add chickens to your homestead is that backyard eggs don't look like store bought ones. Oh sure, they're that classic egg shape and come in all the same colors (and then some). But, unlike store bought eggs, backyard eggs aren't always clean.
This is especially evident during wet seasons, when the homestead tend to be muddy. But the mess on chicken eggs isn't always just mud. Often, there's poop involved, too.
This happens for several reasons. One is that chickens, like all birds, poop on the go - so sometimes they step in their poop, or the poop of one of their sisters. In addition, some hens will poop in the nesting box, or may have manure on her rear end that didn't fall off. (Hey, we're homesteaders, here; there's no use being squeamish on the topic!) Some of these things can be controlled at least somewhat by homesteaders; click here for my tips on getting cleaner eggs from your hens.
But then there's the inescapable fact that the physical passage used for egg laying is the very same one used for pooping. (My husband once had a friend who'd recently bought backyard hens. He loved them...that is, until my husband happened to mention the above fact. The friend was so grossed out by this, he gave away his hens...But he still eats store bought eggs!)
Now, obviously we don't want to get any of that poop in our food. And the natural inclination is to clean those dirty eggs as soon as we collect them...but that inclination is, in my opinion, WRONG.
Why Egg Washing is Bad
You see, eggs naturally have a protective coating, called "bloom," that prevents bacteria from entering the egg shell. This is God's creative way of keeping chicks healthy enough to hatch - and humans healthy enough they can continue to eat eggs. As soon as you wash eggs, that bloom is typically removed - and the part of the egg you eat is now totally exposed to lurking bacteria.
What About Store Bought Eggs?
Why do store bought eggs look so clean? It's certainly not because of the crowded, dirty environment commercial hens are raised in. Instead, it's because those eggs are washed before going to market.
Yep, you read that right.
The FDA requires all commercially sold eggs to be washed in detergent. A fact, by the way, that would make them illegal for sale throughout the European Union. Because Europeans understand that washing away the egg's bloom makes it easier for bacteria to enter the egg and make humans sick.
 THIS is what real backyard eggs look like.
Once upon a time, American farmers applied mineral oil to egg shells after washing, in order to create a sort of artificial bloom. This is rarely done today.
To add insult to injury, commercial American eggs are always refrigerated. But refrigeration can lead to condensation, which can lead to bacterial growth.
What About Farmer's Market Eggs?
Rules about the sale of eggs at farmer's markets and similar venues varies from state to state. But generally speaking, small market farmers are not expected to wash eggs the way large commercial farms are. Instead, they are usually allowed to simply sort through their eggs and not sell dirty ones, or use a brush or sandpaper to gently remove dirt from eggs, or lightly and quickly dampen the eggs to make dirt removal easier. Sometimes, however, small farm eggs are washed by hand, using FDA approved detergents.
How I Handle Our Eggs
 I don't really take our egg cartons out to the hen house :)
Though we've had backyard hens for many years, and though I grew up with chickens, I am not an expert and the law says you should not take my advice as you would that of a scientist.
But I can tell you that on our homestead, dirty eggs go into egg cartons, and then straight into the fridge. When I'm ready to cook the eggs, I wash them immediately beforehand. (How to wash eggs: Under cool, running water. Pat dry immediately. Do not soak eggs.)
Some people are totally grossed out by the thought of putting poopy eggs in the fridge - or anywhere else that's near food. But in my experience, egg cartons protect any other food nearby, and the bloom protects the eggs so we don't get sick.
Now...shall we talk about why I refrigerate our eggs, even though it's not required? I think I'll leave that for another post. Until then...happy homesteading!
March 6, 2017
Why You NEED a Meat Thermometer
 This post contains affiliate links. All opinions are my own. Please see FCC disclosure for full information. Thank you for supporting this site!
Growing up, my mother never used a meat thermometer - so I guess it's no surprise that when I grew up, I didn't either. Instead, I cooked meat the length of time the recipe stated, and then cut the meat a little bit to see if it looked cooked thoroughly. Nowadays (thanks to my superb barbecuing husband), I know there are several problems with this method:
* Different ovens and stoves cook at different rates (faster or slower), so even if you follow the recipe exactly, your cooking time may be different.
* Small changes in temperature - for example, medium temperature as opposed to medium high temperature - make a big difference in cooking times, too.
* Cutting open meat to test for doneness makes the meat more prone to drying out - even if you only do it once.
* Not using a thermometer often leads to either dry, over-done meat that no one enjoys eating, or under-done meat, which can pose a health risk.
By simply using a meat thermometer, you can avoid all that and get perfectly safe and wonderfully edible meat every single time.
What Kind of Thermometer to Use
If you're really serious about cooking, a Thermapen is considered the thermometer to have. All the pros use it because it's accurate, reliable, and gives a quick reading. However, Thermapens are pricey. So I use a less expensive model. Currently, I have a Taylor digital thermometer that cost under $9 - and I'm happy with it.
Whatever brand you choose, just be sure it's actually a meat thermometer, not a candy or oven thermometer. I also recommend choosing a digital instant-read thermometer, since it will save you time in the kitchen and do a much better job of giving an accurate temperature on thin cuts.
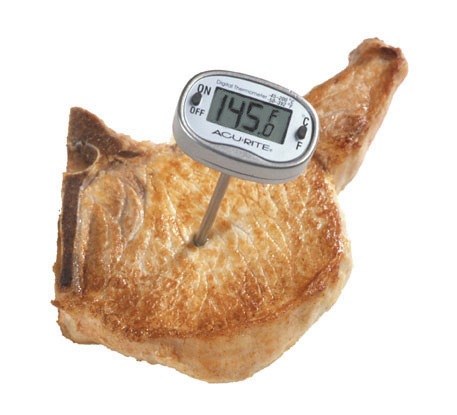 How to Use a Meat Thermometer
1. First, read the instructions that come with your thermometer. Every model has slightly different instructions on accurate use. (Keep the instructions, too, and refer to them now and then.)
2. Test the meat shortly before you think it will be done. (Some digital thermometers can stay in the meat the entire time you're cooking. If you have this type, insert it as soon as the meat goes in the oven or pan.)
3. Insert the thermometer into the thickest part of the meat. Don't let it touch fat, gristle, or bone, or you won't get an accurate reading. (For whole poultry: Insert the thermometer in the inner thigh area, near the breast.)
4. Once you have a reading, remove the thermometer and wash the tip in hot, soapy water.
What Temperatures To Aim For
The USDA has a handy chart of the safe minimum temperatures for all meats. I printed this out and keep it in my recipe binder. Other ideas for keeping the chart handy include laminating it and taping it the inside of a kitchen cupboard; taping it to the inside cover of your favorite cookbook; or keeping the chart in a container that also holds your meat thermometer.
March 2, 2017
Cauliflower Chowder Recipe - Low Carb, Keto, LCHF, Instant Pot
 A few years ago, I posted a version of this recipe, which was a staple in our family, totally replacing potato chowder. (And yep, even my picker eaters who claimed to hate cauliflower loved it!)
Today, I've tweaked the recipe a bit to make it diabetic, low carb, and keto friendly. And I'll show you how to make it in the Instant Pot pressure cooker, if you prefer that to the stove top.
 Low Carb Cauliflower Chowder Recipe
 4 bacon slices, cooked
2 tablespoons butter
1/2 large onion, diced
2 garlic cloves, minced
2 celery stalks, diced
2 carrots, diced (omit for diabetics)
1/3 cup almond flour
4 cups beef or ham stock
1 cup heavy cream
1 cauliflower head, roughly chopped
1 bay leaf
Salt
Pepper
For the Stove Top:
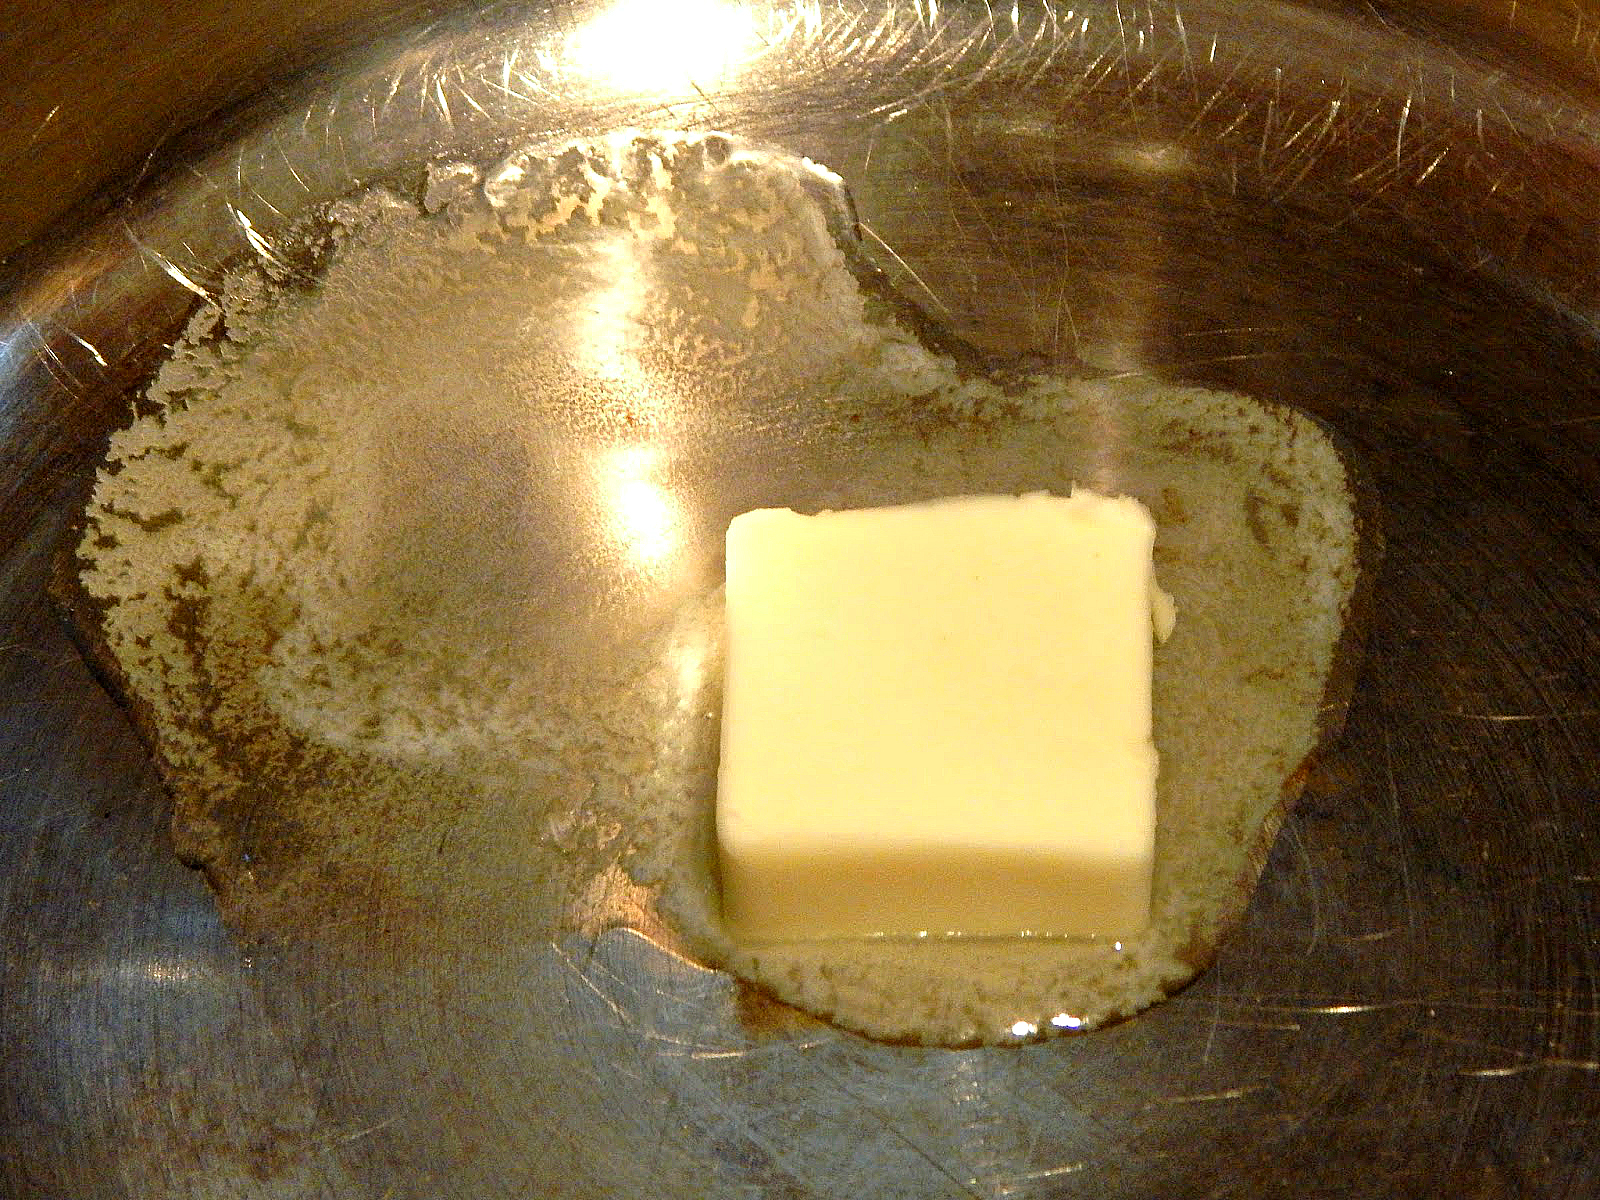
1. Place a large Dutch oven or stockpot over medium high heat. Add the drippings from cooking the bacon. Add the butter and allow it to melt. Add the onion, garlic, celery, and, if using, the carrots. Saute, stirring often, until the vegetables are tender.

2. Add the cauliflower and bay leaf. Saute, stirring often, for about 4 minutes.

3. Add the almond flour, stirring until you cannot see it any more. A little at a time, stir in stock and cream. Stir constantly until thickened a little.
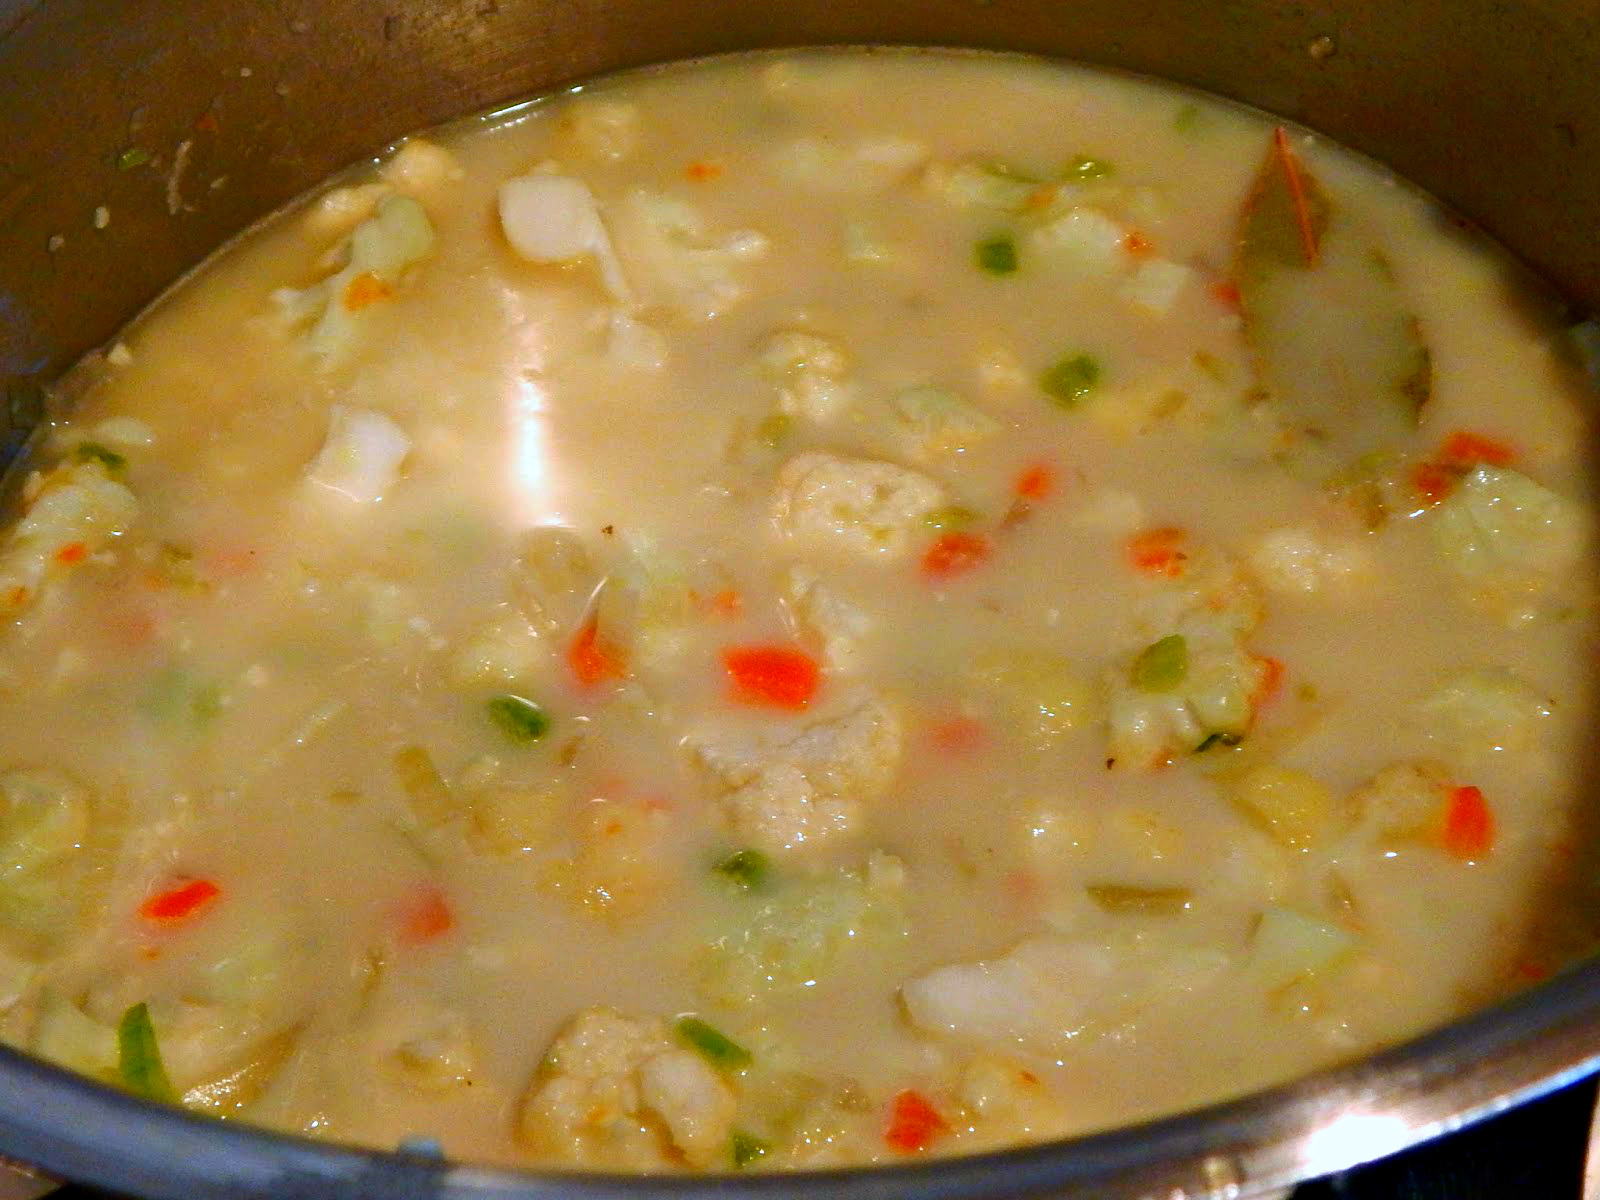
4. Bring mixture to a boil. Reduce heat and simmer until cauliflower is fork tender. Season to taste with salt and pepper. If you feel the mixture is too thick, add a little more cream. Chop up the bacon and sprinkle over the top of the chowder.
Other good toppings for this chowder include grated cheddar cheese and chopped green onions - but be sure to add them to your carb count.

For the Instant Pot pressure cooker:
1. Place the drippings from cooking the bacon in the bowl of the Instant Pot. Add the butter and press the "Saute" button. Add the onion, garlic, celery, and, if using, carrots. Saute, stirring often, until the vegetables are tender.
2. Add the cauliflower and bay leaf. Saute, stirring often, for about 2 - 4 minutes.
3. Add the almond flour, stirring until you cannot see it any more. A little at a time, stir in stock and cream. Stir constantly until thickened a little. Season with salt and pepper.
4. Put the lid on the Instant Pot and lock it. On the "Manual" setting cook on "high pressure" for 5 minutes. Quick release the pressure.
5. Chop up the bacon and sprinkle it over the chowder.
Other good toppings for this chowder include grated cheddar cheese and chopped green onions, but be sure to add them to your carb count.
Makes about 6 servings. Estimated Nutrition, per serving, according to SuperTracker; recipe with carrots: calories 396; Carbs 11 g total (7 g. net); Protein: 12 g.; Fat: 36 g.; Fiber: 4 g. R ecipe without carrots: calories 388; Carbs 9 g total (6 g. net); Protein: 12 g.; Fat: 36 g.; Fiber: 3 g.
February 28, 2017
Why You Need A Digital Homesteading Journal
 If you're serious about feeding your family off your land - whether that be a suburban backyard or a many acre farm - keeping a journal is important. Farmers have been doing it since paper became readily available, and you should, too. But to really get the most from your journal, keeping a digital journal is, in my opinion, an absolute must.
Why a Homesteading Journal?
The simple answer is that a journal will save you endless amounts of time and frustration. For example:
Have you ever grown a wonderful variety of veggie but forgotten it's name or where you purchased it? That won't happen again if you keep a journal.
Have you ever wondered exactly how much money you spent on the garden, or the goats, or the chickens, or the homestead in general?
Ever wondered if you're saving money by growing and raising you own?
Ever wondered if there are places where you can cut back on expenses?
Ever tried to remember exactly when your goat stopped giving milk last time she was bred, or which rabbit you bred with which last breeding season?
Keeping a journal will make discovering all that quite easy.
In it, you can keep track of such things as:
* Weather patterns and temperatures
* Names of plant varieties you've grown or want to try to grow
* Notes on how to grow specific varieties of plants
* Dates for when seeds were started
* Dates for when varieties came to harvest
* Notes on how pounds of each plant you harvested
* Dates for when varieties died back due to frost, disease, pests, or other variables
* Sketches or photos to remember garden layouts
* Notes to assist in the rotation of crops
* Notes to help you remember the outcome of garden experiments
* Figures tracking gardening expenses
* Notes about how specific varieties taste, or work best in which recipes
* Records of how much you've preserved, and how quickly you went through your preserved food
* Notes on which herbal remedies seem to work best for your family
* Reminders about what time of year to forage certain foods, and where to best find them
* Notes on how much milk, meat, eggs you're getting from your animals
* The dates when your hens started and stopped laying
* Information on how long milk animals keep producing
* Notes on how long it takes to grow out meat animals
* Breeding and lineage notes
In short, anything at all you might need to remember about your homestead should go into your homesteading journal.
Why Digital?
Traditional garden and farm journals are hand written and kept in binders or notebooks.They are certainly useful, but it can take some time to look up the notes you're specifically after. However, if your journal is, say, in a Word document, finding what you need is a breeze! Just use the search feature to bring up the information you want.
For example, this spring, I needed a list of the vegetable varieties I grew last year. All I had to do was open up last year's journal and search "seeds sowed," and I instantly had the list in hand.
Suggestions for Making a Homesteading Journal
Everyone has different preferences, but here are some things that work well for me.
1. Each year, create a separate file for your journal. Its name should simply be the year, or "Homesteading Journal [year]."
2. Keep every year's journal in one folder (named, for example, "Homesteading Journals").
3. In the Word document, separate entries by the date. Use bold lettering to make separate entries easier to find, in case you are just browsing the file, instead of using the search feature. Consider putting keywords, like plant and animal names, in bold, too.
4. Type in everything, even if you're sure you'll remember next year.
5. Include photos of your garden layouts.
6. Scan plant tags and include them in the file, too.
7. Scan in all paperwork related to your animals. This will serve as a backup to any paper files you might need to keep, but also make access to them easier. Be sure to tag all photos with a keyword, to make searching easier.
7. Keep a back up copy of your journals on a separate drive.
In just a few minutes every day, you can easily collect a huge variety of highly useful information in your journal. And by looking back on your notes frequently, you'll become a better homesteader, and your homesteading efforts will be easier and more successful, too.
February 25, 2017
Weekend Links
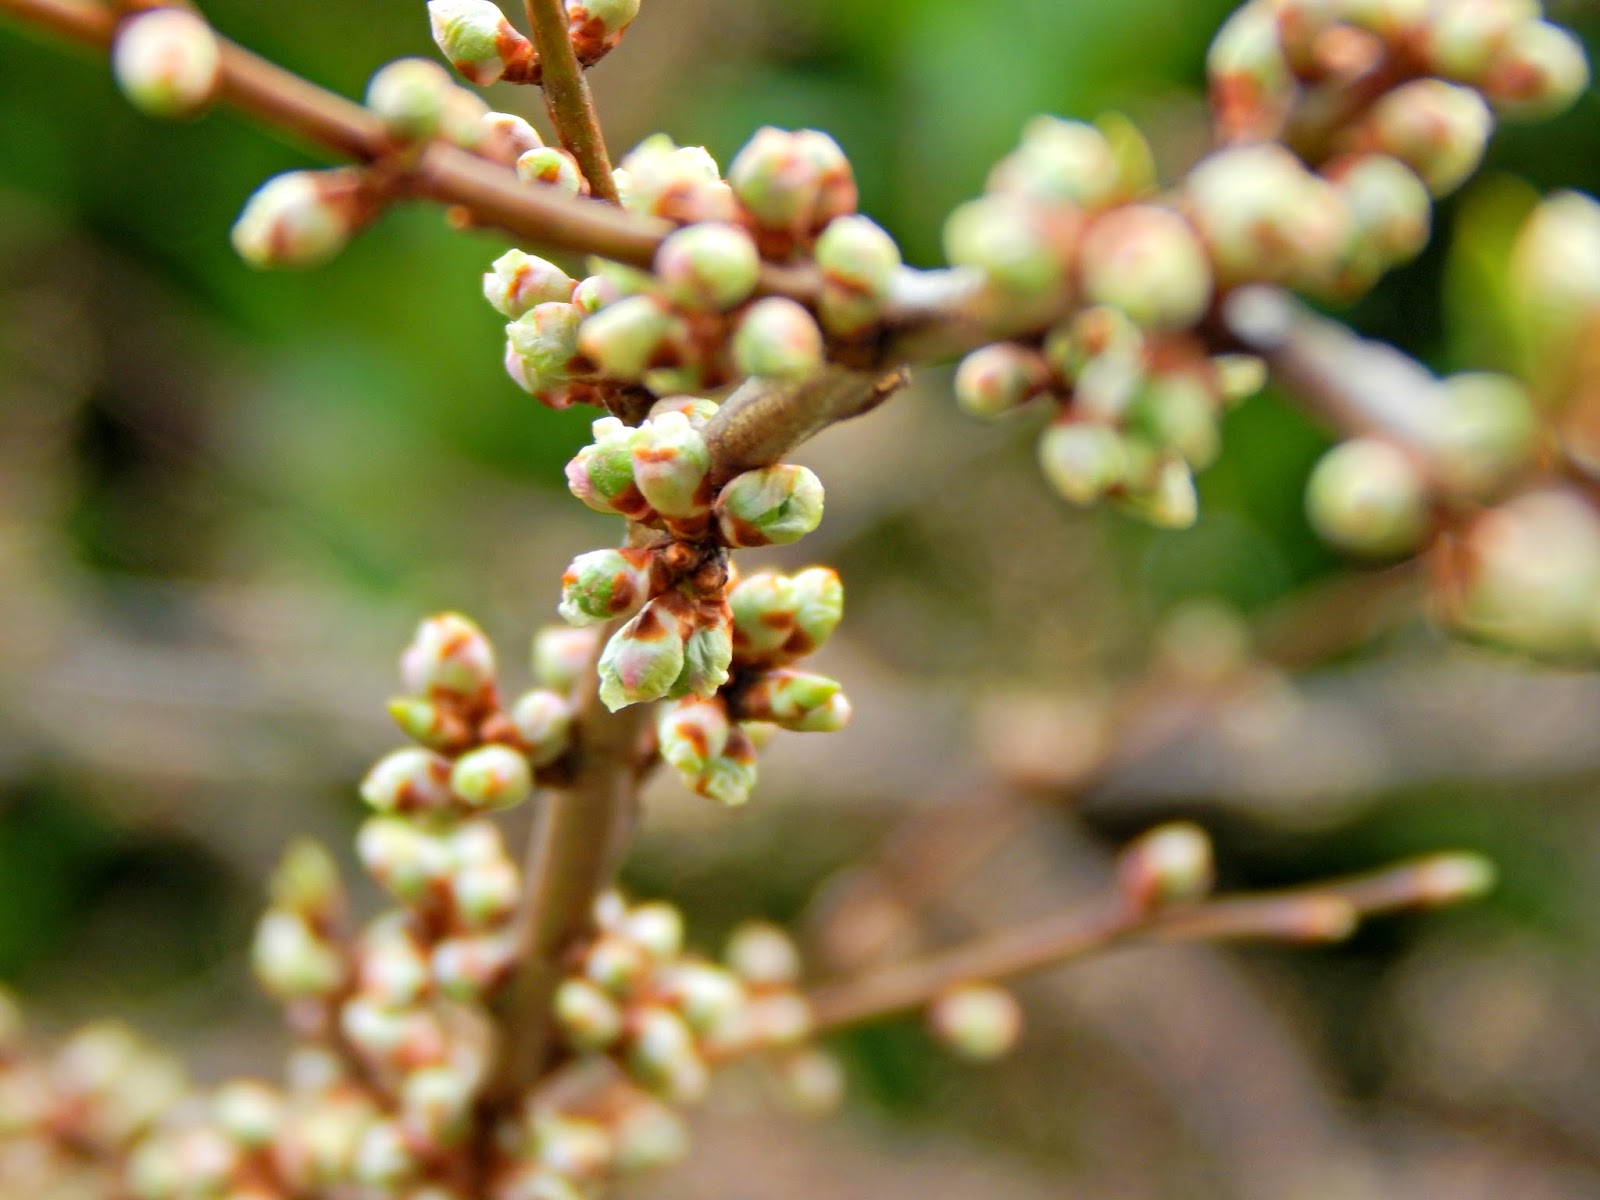 The fruit trees are budding!
In which I share my favorite posts from this blog's Facebook page.
The fruit trees are budding!
In which I share my favorite posts from this blog's Facebook page.
This post contains affiliate links. All opinions are my own. Please see FCC disclosure for full information. Thank you for supporting this site!
_______
"Wait for the Lord;
Be strong and let your heart take courage;
Yes, wait for the Lord."
Psalm 27:14
_______
* Spring is the time homesteaders work hardest to fulfill their dreams. It's the time to start seeds, whip together new garden beds you neglected to create in the fall, and buy baby animals. But a lot of things seem to stand in our way this spring. Every weekend, my dear husband has either been ill in bed or working on an emergency project - like fixing the gas-mileage car he drives four hours every day to commute to work. And then there's all the unexpected medical bills we've incurred lately. And the undiagnosed illness I have that makes me vomit randomly. And a host of other things. (And did I mention we lost one of our laying hens for an unknown reason?) But we push onward, just like the millions of homesteaders before us. At least the homestead is beginning to show some signs of spring!
 Clematis is blooming!* Britax stroller recall.
* Recall of Little Tykes toddler swings.
* Study shows a medication commonly given to women during childbirth or after a C-section may be linked to postpartum depression.
* Make your own cream cheese. It's not hard, and it's less expensive.
 * Research backs up natural remedies for children's ear infections.
* There are sound reasons you should never leave your family's dog alone with a baby or small child.
* Are you eating food from Japan? Quite possibly. And that food might be contaminated with radioactive materials, says the FDA.
Oldies But Goodies:
* Can't Eat Just One Blueberry Muffins. (Time to get the freezer ready for coming harvests!)
* DIY Ranch Dressing. (Tastes better, cheaper, and healthier!)
* Dehydrating Citrus Peels to use in baking.
Books for Spring:
A Vegetable For Every Season Cookbook - just $2.99!
Starting Seeds - only 99 cents!
The Ultimate Dandelion Cookbook
Grow the Dirty Dozen - 5 stars on Amazon!

February 23, 2017
Foraging for Chickweed
 It may not officially be spring, but the plants in my neck of the woods are acting like it is. And that means (among other things) that a lot of wild spring edibles are popping up. In fact, I seem to find a new forage-worthy weed every day. That makes me happy.
One edible weed I recently discovered on our property is one you're just as likely to find in the city as in the country, on the West Coast as the East Coast, and in the U.S. as elsewhere in the world: Chickweed (otherwise known as Starweed, Chickenwort, Winter weed, or Stellaria media).
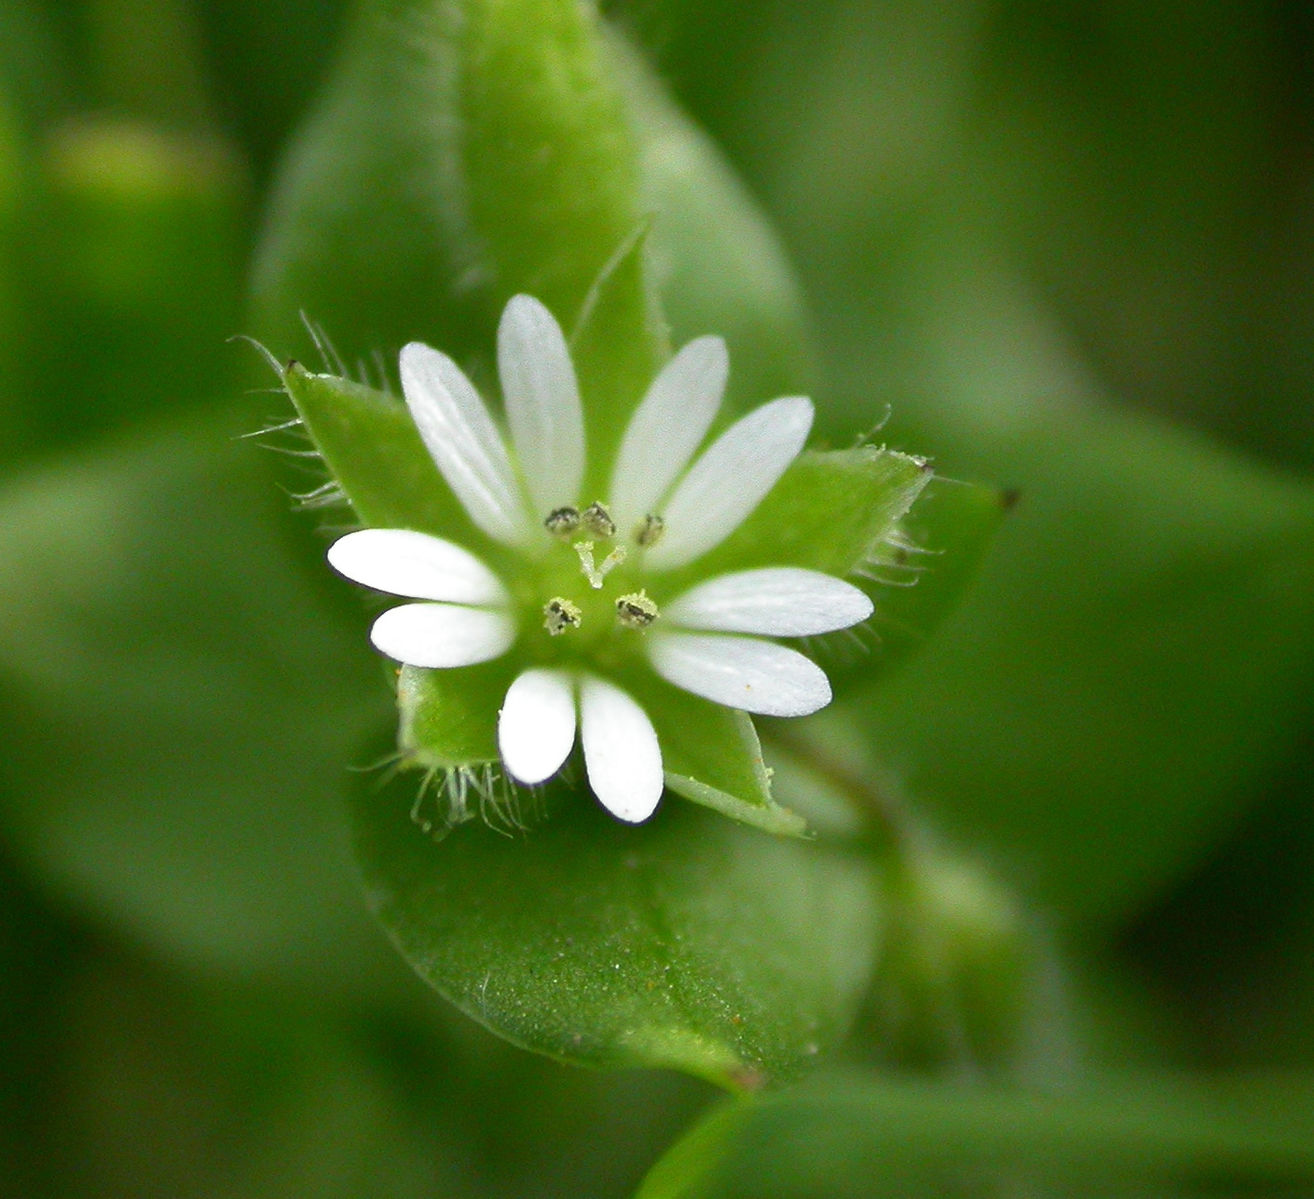 Chickweed's 5 petals look like 10.
Identifying Chickweed
Chickweed grows in a wide variety of areas, including lawns and mow strips - and it grows prolifically. It has tiny white flowers with 5 petals each - but the petals are so deeply split, at first glance, it appears the flowers have 10 petals each.
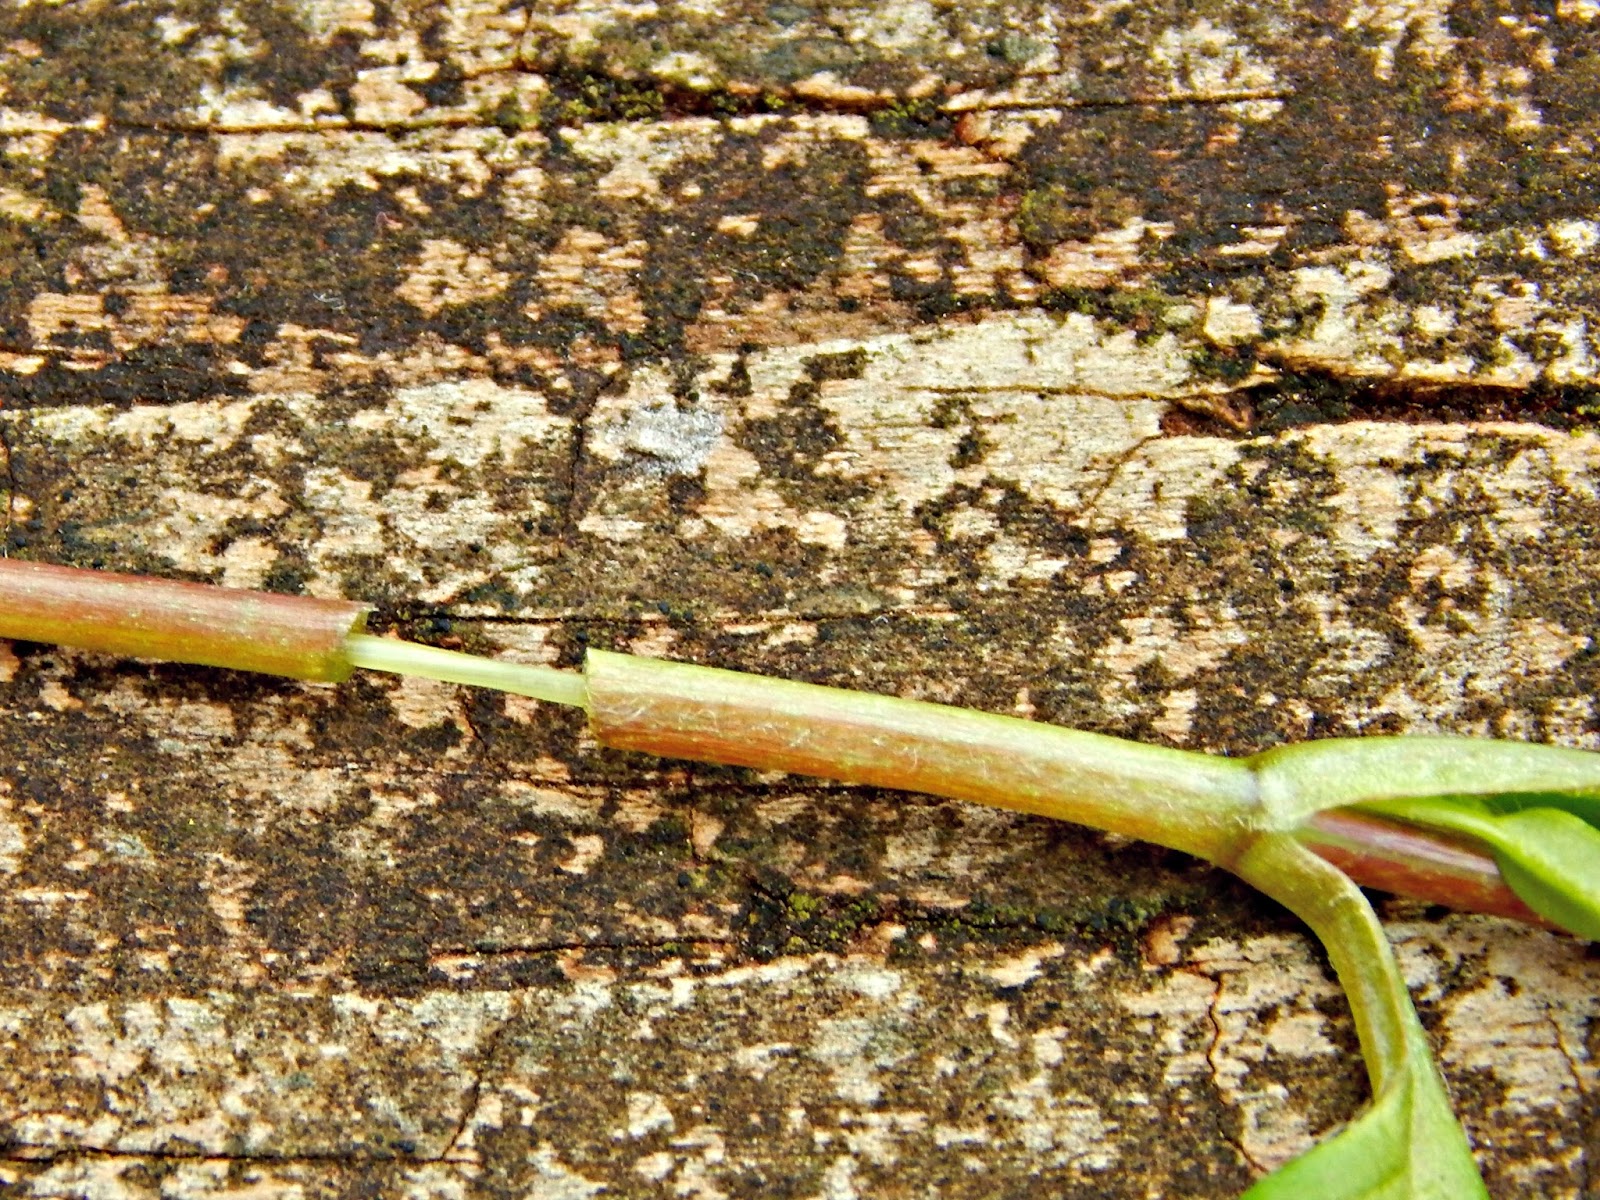
The stems of chickweed are distinctive in that they have a line of white "hairs" on one side. They also do not contain a milky sap - something that differentiates chickweed from similar weeds. Chickweed's smooth leaves are oval with pointed tips.
 Chickweed's stems have a line of fine "hairs."
The plant is easy to spot because it grows in clumps or masses that creep along the ground. It tends to
grow most abundantly in the spring and fall, when the weather is cooler and moist, and generally prefers damp and shady areas.
One final test to know whether or not you've got chickweed: Bend a stem and turn each part of the stem in the opposite direction. Gently pull; the outer part of the stem will break and separate, but an inner part will not break. In fact, it will stretch a little.
Chickweed has two poisonous lookalikes (Scarlet Pimpernel and spurge), but if you look for the 5 petals that look like 10, the line of hair on the stem, the lack of milk in the stem, and the stem with the inner stretchy part, you can be sure you have real chickweed.
 An important test to make sure you identify chickweed correctly.
There is also mouse-ear chickweed (cerastium vulgatum), which is edible, but only when cooked. It's distinguished from regular chickweed by it's very dark green, mouse ear shaped leaves that, unlike regular chickweed, are covered with fine hairs.
NOTE: Do not consume any plant you cannot positively identify.
Eating Chickweed
Chickweed leaves, stems, and flowers are all edible, either raw or cooked. And it's a superfood! Chickweed is packed with nutrients, having 6 times more vitamin C than spinach, 12 times more calcium, and 83 times more iron. It also contains Omega-3 fatty acids, bioflavoinoids, beta-carotene, B vitamins, folic acid, niacin, thiamine, magnesium, potassium, manganese, and zinc.
Try chickweed in a salad, or add it to a sandwich, like you would sprouts. It also makes a nice pesto or can be added to soups, omelettes, quiches, or pretty much any dish where you'd normally use spinach. In fact, cooked chickweed tastes similar to spinach. Raw, it tastes like a mild lettuce.
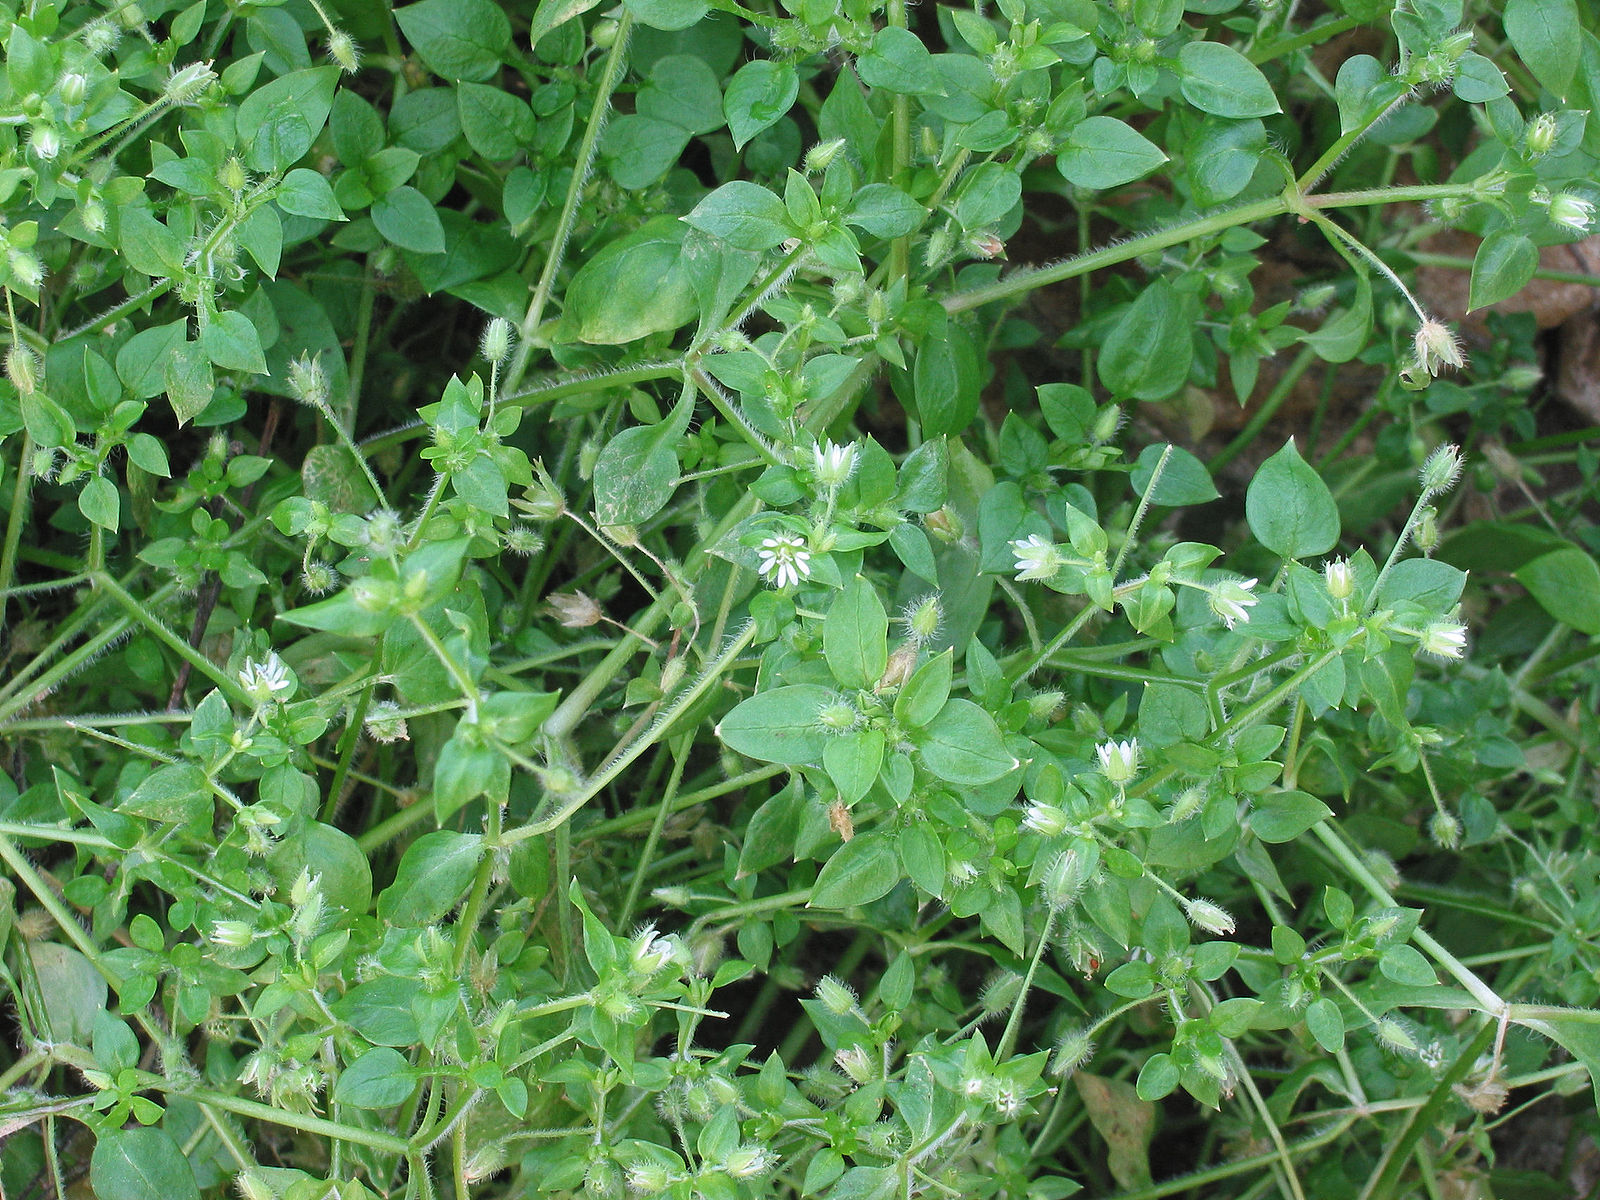 Chickweed grows in a clump.
 Mouse Ear Chickweed is distinguished by it's hairy leaves. Courtesy
 Stefan.lefnaer and Wikimedia.

Chickweed Medicine
Chickweed has long been used in herbal medicine, too. Taken internally in the form of tea or tincture, it's used for complaints such as stomach and intestinal problems, arthritis, asthma and other lung ailments, kidney disorders, and vitamin C deficiency. In addition, chickweed can be used externally to treat eczema, psoriasis, minor wounds, boils, abscesses, burns, itching, and joint pain.
WARNINGS: Those who are allergic to daisies should not eat chickweed. Never eat any wild food you cannot identify 100%.
Disclaimer I am not a doctor, nor should anything on this website (www.ProverbsThirtyOneWoman.blogspot.com) be considered medical advice. The FDA requires me to say that products mentioned, linked to, or displayed on this website are not intended to diagnose, treat, cure, or prevent any disease. The information on this web site is designed for general informational purposes only. It is not intended to be a substitute for qualified medical advice or care. There are no assurances of the information being fit or suited to your medical needs, and to the maximum extent allow by law disclaim any and all warranties and liabilities related to your use of any of the information obtained from the website. Your use of this website does not constitute a doctor-patient relationship. No information on this website should be considered complete, nor should it be used as a substitute for a visit to, consultation with, or the advice of a physician or other qualified health care provider.
February 20, 2017
Creamy Chicken Garlic Recipe - Low Carb, Keto
 I've been debating whether or not to post keto recipes on this blog. Ultimately, I decided that while not everyone will want them, they are a vital part of my family's life now, and may help others - therefore, in my mind, I ought to blog them.
 One of these days, I'll blog about why the keto diet is so healthy for everyone - and why it's the best thing for diabetics. But today, let me just say that you should not be afraid of fat. Healthy fats are so good for your heath, and they make weight loss so much easier! In fact, before the obesity epidemic, people ate lots of fat. (Things that make you go hmm...) And did you know your body does not require you to eat carbs - that it can create them itself through a process called gluconeogenesis? On the other hand, did you know you absolutely must eat fats to stay healthy?
That said, here's one of my family's favorite keto (low carb, high fat) recipes. It's really delish and I make it frequently. In fact, it tastes a lot like the topping on Papa Murphy's Creamy Chicken Garlic pizza!

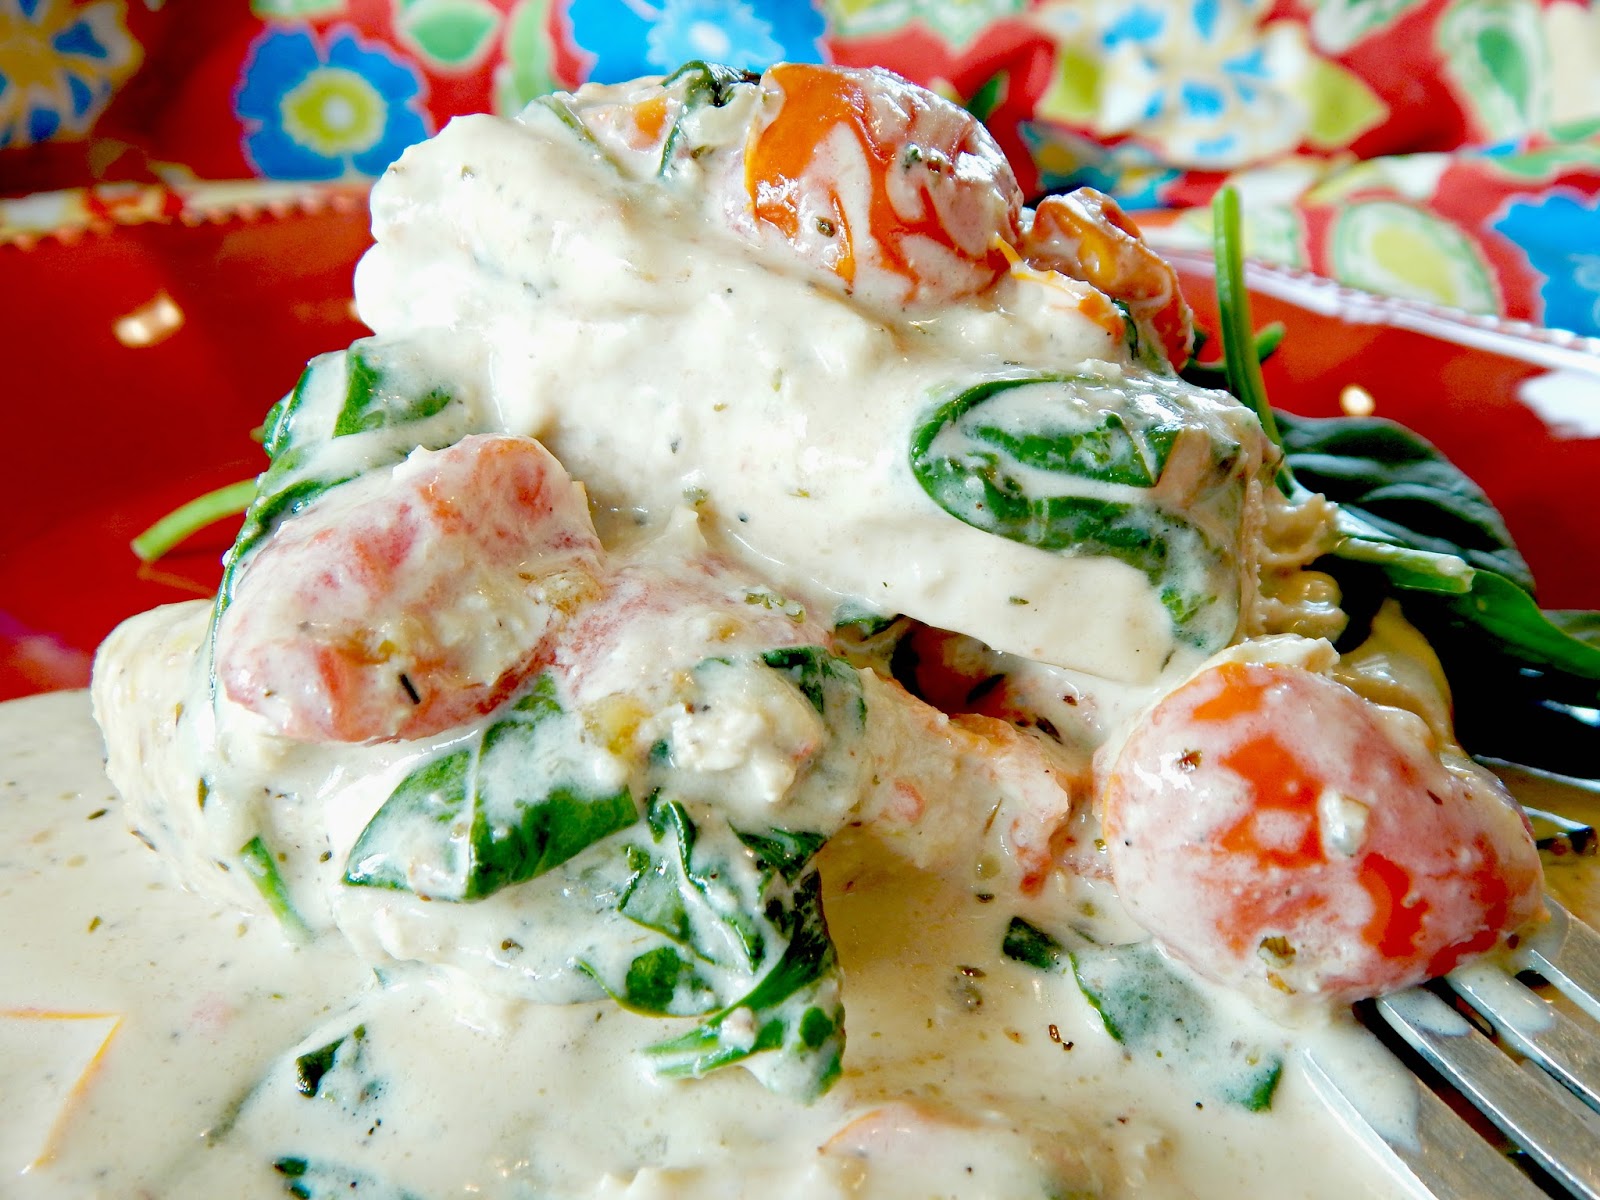
Creamy Chicken Garlic Recipe
Serves 3. (I usually double the recipe for my family of 4, and end up with some leftovers.)
1 1/2 lbs. boneless skinless chicken breasts2 tablespoons+ bacon drippings or coconut oil1/2 cup beef stock3 garlic cloves, minced1 teaspoon garlic powder1 teaspoon Italian seasoning1 cup heavy cream1 large tomato, chopped (or use grape or cherry tomatoes cut in half)2 cups baby spinach1/2 cup shredded Parmesan cheese
1. Cut the chicken breasts into 1/2 inch wide strips and sprinkle with salt and pepper.
2. Place a large skillet over medium high heat and add the bacon drippings. When the drippings are melted and the pan is hot, add the prepared chicken. You may need to work in batches. Cook about 5 minutes on each side, or until the chicken is cooked through and lightly browned. Remove cooked chicken to a plate and set aside.
 Cooking the chicken.3. Remove the skillet from the burner and add the stock. Scrape the bottom of the pan to bring up and bits of chicken that remain on the bottom. Add the garlic, garlic powder, and Italian seasoning to the skillet, stirring until blended. Place the skillet back on the burner; when the mixture bubbles, add the heavy cream. Bring to a boil. Whisk frequently until the mixture thickens slightly.
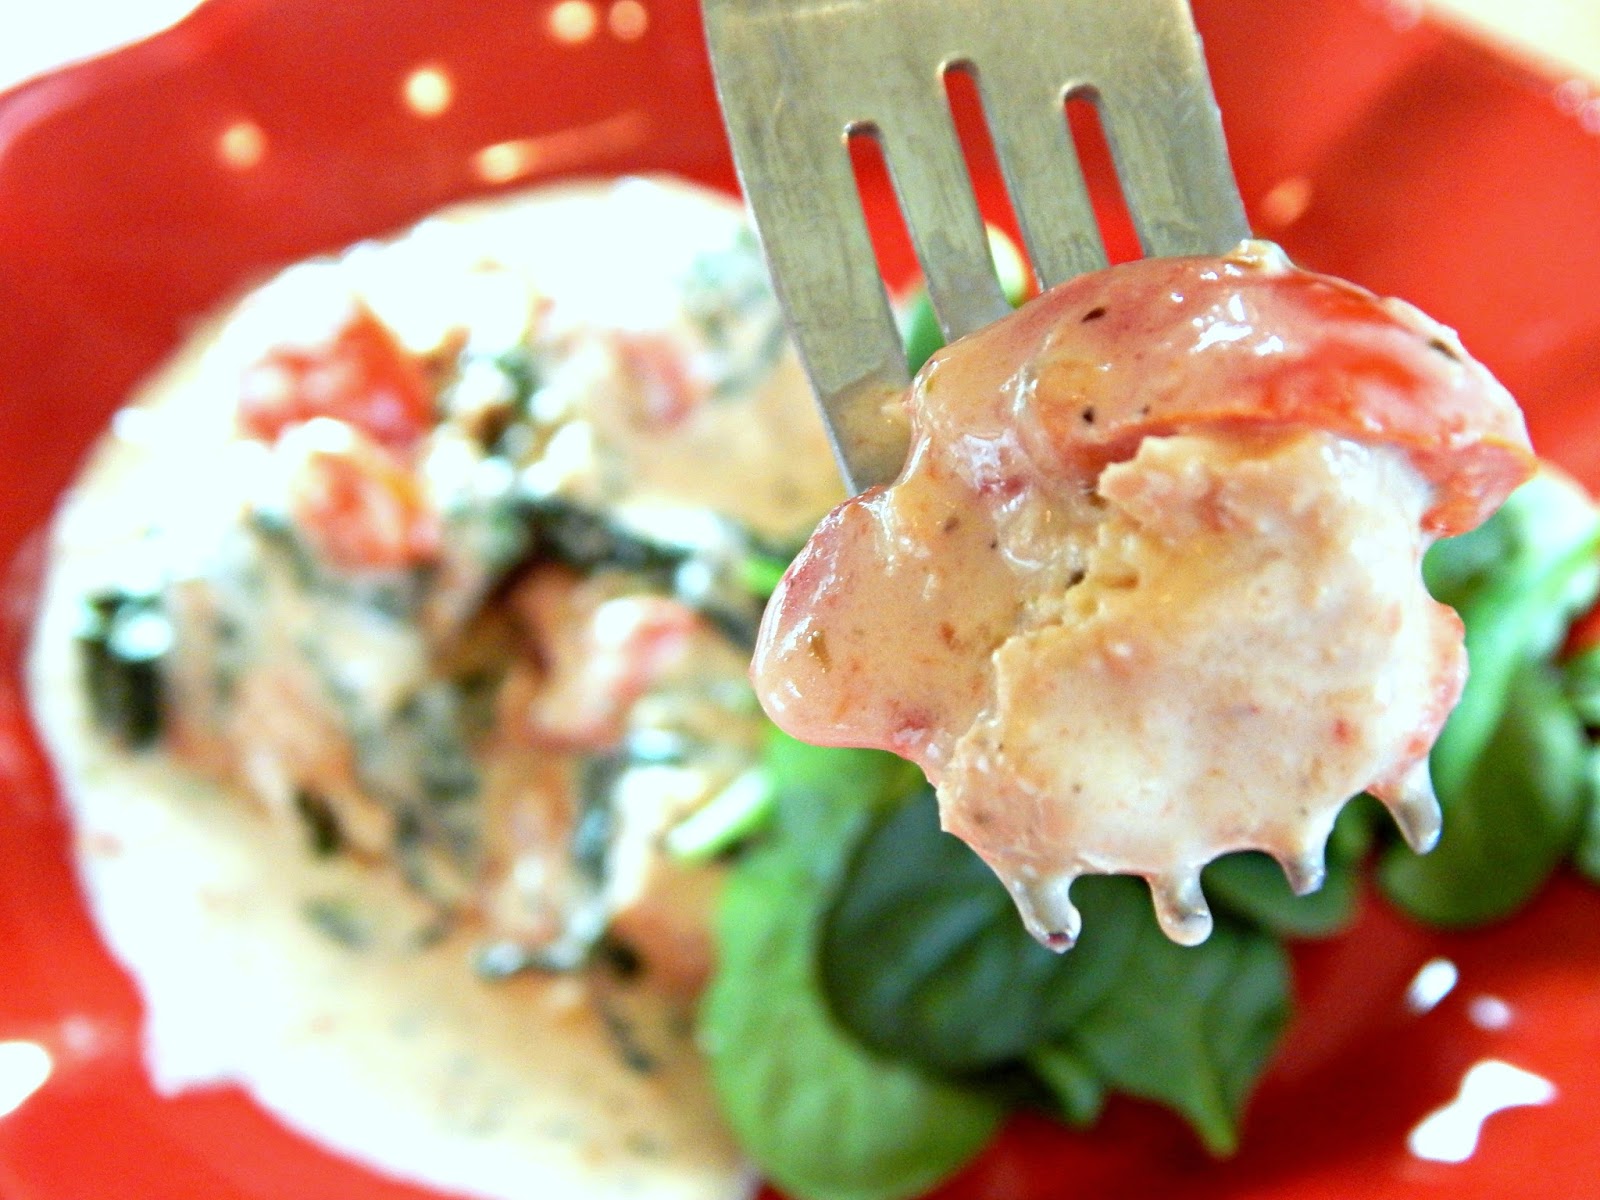
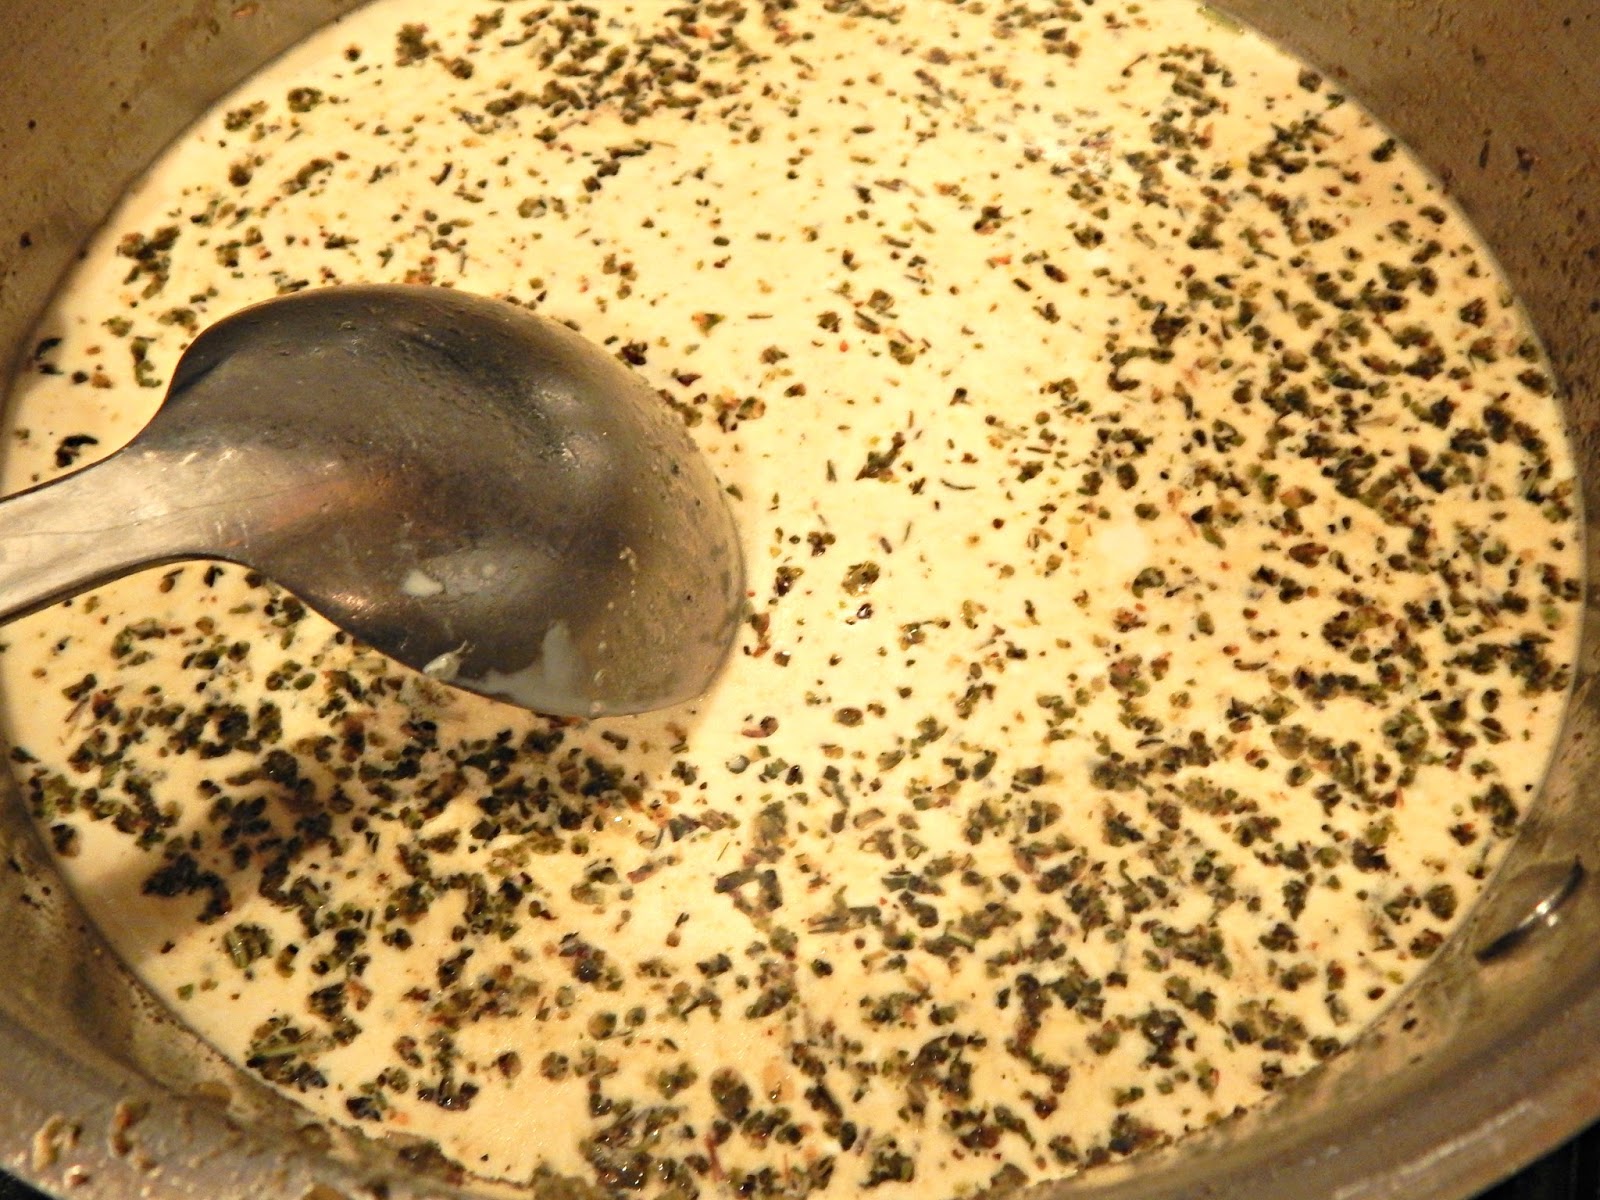 Making the garlic sauce.4. Add the tomato, spinach, and the cooked chicken to the skillet. Stir to combine. Sprinkle Parmesan over the mixture. Cook until spinach is wilted and Parmesan is melted.
  Mixing everything together.Nutrition, per serving, according to SuperTracker: Calories 794; Carbs 8 g total (7 g. net); Protein: 76 g.; Fat: 51 g.; Fiber: 1 g.
 DIY Italian Seasoning
Why make your own? It's cheaper, for sure. But it also means you don't have to worry about any added, unwanted ingredients, like preservatives.
2 tablespoons dried basil
2 tablespoons dried oregano
2 tablespoons dried thyme
2 tablespoons dried marjoram
2 tablespoons dried rosemary
2 tablespoons dried sage
Mix ingredients together. For a finer texture (more like what you'd buy bottled), run through a food processor or clean coffee grinder for about a minute, or until desired texture is reached.
February 16, 2017
How to Winter Sow Seeds - a Video
I've typed before - both on the blog and in my book
Seed Starting
- about winter sowing and how I think it's the easiest seed starting method around. Now I'm showing you how to do it on video. You even get to see my face (most of the time), thanks to my 11 year old! Check it out:
February 14, 2017
16 Tips from the Great Depression that are Still Useful Today
 Whether you're struggling to make ends meet or you just want to save more of your hard earned money for the future, history provides some of the best ideas for doing so. Since the days of Genesis, people have struggled through financially difficult times - but perhaps no time is easier to apply to our modern days than those of the Great Depression. Fortunately, many of the ways our grandparents or great-grandparents used to survive those difficult years still apply today. In fact, you may find that following these guidelines makes your life happier and more fulfilling, even if you aren't strapped for cash. I know I do.
1. "Use it, Wear it out, Make do" was the motto of the Depression and WWII. Patch clothes, make do with household items that aren't perfect but still get the job done, and never replace an item you can fix.
2. Reuse, reuse, reuse. This is especially true of containers. If you buy a jar of food, save the jar for storing something else later. You know the old joke about Grandma's house not having
 Tupperware, but being full of old margarine tubs? Yep, do that. And if my grandmother had Ziplock bags back in the 30s, you'd better bet she would have washed them and reused them until they fell apart.
3. Don't use convenience foods like frozen French fries or jarred spaghetti sauce. Make your own! It really doesn't take much time, but it saves a lot of money - and the homemade versions are usually healthier, too! (Learn how to make some convenience foods here.)
4. When looking for entertainment, do what's free (or cheap). Instead of paying $18 or more to go to the movie theater, get a Redbox rental. Better yet, check out a movie from the library. Go on hikes. Have a family board game night. Have a neighborhood potluck. Often what costs lest is the most fulfilling.
5. Grow or raise your own food, as much as possible. This is cheaper and healthier!
6. Eat your weeds. Weeds are a free source of food that are high in nutrition. One of the most commonly eaten weeds during the 1930s and 40s were dandelion leaves.

7. Stretch meat with beans. Lentils, in particular, are cheap, take on the flavor of what's around them, and easily blend in with ground meat. Grab more ideas for stretching your meat budget here.
8. Learn the difference between real needs and wants. One trick to help: Imagine someone offering you cash instead of the item you're considering buying. If you'd pick cash over the item, you don't need the item.
9. Before you buy, consider how many hours you have to work to pay for that item. It may make you reconsider. (More here.)
10. Buy used. Lots of things - maybe most things - we need can be purchased used for a fraction of the cost, and work just as well as new. Cars are an excellent example. So is furniture. Clothes, too, if you live in a fairly affluent area. Even kitchen items.
11. Use up everything. Use your soap scraps. (Tip: Just lay them on top of a fresh, wet bar of soap and they will stick there.) Dip down into your lipstick tube and get every last bit. Scrape the sides of food cans and bottles. It may feel inconvenient, but over time, you'll save money. Plus, it feels better not to be wasteful.
12. Don't use credit cards. It's good discipline, and will save you a huge amount of money in interest.
13. Use leftover meat and veggies in stews and soups. Plan on having soup or stew at least once a week.
 14. Never throw away vegetable and fruit scraps. Most veggie scraps can be added to the pot when making stock or broth (learn how here), and all veggies and fruits can go into the compost bin. Vegetable and fruit scraps are also excellent feed for animals like chickens.
15. Eat simple food. That doesn't necessarily mean eating high carb foods like beans, rice, and pasta. Even just paring down to a palm-sized piece of meat, plus a side of veggies, will reduce your grocery bill (and make you healthier).
16. Stash away cash. Even if the amount seems insignificant - those little amounts do add up over time. I remember reading about a lady who took small amounts of cash - sometimes just a dollar or two - to her bank to pay off a loan there. The clerks often raised their eyebrows at her, but she paid off her loan many months in advance, saving a lot of money in interest. The principle is the same if you're saving money. A dollar a week may not seem like much, but in a year, you'll have $52 more dollars saved than if you hadn't stashed that cash.
You May Also Like:
* How I Lowered Our Natural Gas Bill by Hundreds
* The Easy Way We Save Thousands Each Year
* Saving Money on Garbage Fees
* How We Homeschool on a Shoestring Budget
* Make Your Produce Last
* Top 12 Tips for Saving Money on Groceries


