Leila Marie Lawler's Blog, page 44
November 19, 2016
{bits & pieces}
The weekly “little of this, little of that” feature here at Like Mother, Like Daughter!

Long-time readers know that I suffer from NGEMTFAP (Not Getting Enough Materials To Finish A Project, due to existing FOES — Fear Of Exploding Stash) and also PMIADCCW (Painting Myself Into A Design Corner, Crafting-Wise). You might not believe it, but these are actually separate, if related, syndromes.
This time is no exception (and I sense a similar fate coming with the knitting and do I have enough yarn to see it through, but that’s a post for another time).
Would you like a little glimpse into the thought (if you can elevate it by that name) process for Finabee’s quilt? I neglected to buy ALL of the cute blue fabric. Can’t explain. And now it’s out of production and not in the usual haunts (believe me, I know where to find discontinued fabrics and yarn, sigh).
After pondering everything in my stash and all the fabrics at JoAnn’s and my local quilt specialty store, I naturally concluded that only this orange I bought long ago complemented it in just the way I was seeking. (In making this choice, I rejected several lovely patterns, also in my stash, bought just for this particular quilt. The design process takes on a life of its own — a monstrous life in my case!)
And of course, I only had a certain amount of the orange. And it’s not available anywhere that I can see.
So I dithered along until I came up with patchwork that I felt made the most of these two fabrics, using white to stretch them to a respectable size. And then, of course, was left with the issue of the backing.

You see, the particular blue of the blue and the exact orange of the orange are not readily coordinated with any blues or oranges out there. It’s surprising how different they are. I find that this is often the case with fabrics from specialty lines — the dyes are just so and don’t go with anything else. In the case of the blue, even within the line (Juliana Horner Edelweiss), the other fabrics aren’t quite what I was looking for — I really needed to move away from the blue — wouldn’t have minded some pink (I happen to like the pink-and-orange vibe). But no.
Back to JoAnn’s and pondering. I do believe I found the one bolt of fabric there that works. And in a mad stroke of uncharacteristic commitment, I bought four whole yards, which I really think should do it for this lap-sized quilt. Here’s hoping!

I kind of like that the pattern picks up the pink in the Edelweiss fabric, ever so slightly.


On to our links:
First — a plea for help for those fleeing or remaining in the Middle East, especially Syria, where Aleppo has undergone intense targeting of hospitals. It’s hard to know what to do, but the Knights of Columbus promise that (after the modest expenses for the concert), 100% of the funds raised here go directly to those in need; they are there on the ground to see to it. Come listen to the beautiful music — but if you can’t, donate directly to the fund.

Bridget and I are part of the large choir, so if you want, come up and say hi afterwards.
The Methuen MA details (tomorrow!) can be found here. And the Nashua NH details (Tuesday!) are here.
Besides the cause and the need, the music is beautiful — and quite unlike anything you’ve probably heard! I hope you can come!
Bridget wrote about her college’s involvement in the project, which is a natural extension of the unique Guild program at Thomas More College.
Watch a video of Paul Jernberg, our director, friend of LMLD, and composer, speaking about the event and the need (that’s Bridget in the middle, wearing the beige sweater!):
The world turns and there is another way that the enemy tries to get us to turn away from God. Lately I’ve noticed that this new-ish way is what might loosely be called the “self-care” ideology. When we do things God’s way, everything is orderly: we will be given the right idea about taking care of ourselves (for instance, ponder the words of Jesus: “love your neighbor as yourself” Mark 12:31). But you know, every single person has suffered or will suffer — this condition of suffering is a result of Original Sin. Doing things the way that is not God’s plunges us into darkness. Fr. Robert McTeigue, SJ, a reliable witness, writes about this danger in The “Jezebel” Tactic.
Rosie Hill has a nice post about setting up a prayer table for her children (and she sweetly includes a link to The Little Oratory, in which we help you to be peaceful about living the liturgical year. The important thing is to connect with Christ’s life in His Church at your own pace). Alert! Lots and LOTS of good links to sellers of religious art including icons. I plan to take a deep dive into all of that soon. Very soon if you know what I mean (ahem Christmas shopping ahem).
The fascinating history of astronomical inquiry in the Church –and in churches.
But what was the persecution of Galileo all about? Science? Or something else? As usual, that story, above, peddles the “Enlightenment” narrative that Galileo was the victim of vicious persecution from anti-scientific religious authorities. But here is what actually happened.
Speaking of religion and science, meet Sister Doctor Colonel Deirdre Byrne!
The Chief on what’s happening in the Catholic Church with the presentation of five questions (Dubia, as they are officially called) by four Cardinals, to the Pope on the topic of marriage. Be sure to follow him on Catholic Culture for responsible commentary on all things religious!
Go “like” Deirdre’s husband’s Facebook page if you are so minded! John Folley, artist.
From the archives:
How to parent in the post-Obergefell (Same-Sex Marriage Supreme Court Ruling) World.
That time that Deirdre insisted we record my pizza-making process, here and here. Would I have liked to have been less sweaty? Yes. But there it is — and the method is the same for making excellent artisanal bread, so take a look if you are wondering about that.
In which I answer that sad but perennial question, Will Homeschooling Make Me Lose My Mind?
~We’d like to be clear that, when we direct you to a site via one of our links, we’re not necessarily endorsing the whole site, but rather just referring you to the individual post in question (unless we state otherwise).~
Follow us on Twitter.
Like us on Facebook.
Auntie Leila’s Pinterest.
Rosie’s Pinterest.
Sukie’s Pinterest.
Deirdre’s Pinterest.
Habou’s Pinterest.
Bridget’s Pinterest.
Habou’s Blog: Corner Art Studio.
Auntie Leila’s Ravelry.
Auntie Leila’s Instagram.
Rosie’s Instagram.
Sukie’s Instagram.
Deirdre’s Instagram.
Bridget’s Instagram.
The post {bits & pieces} appeared first on Like Mother Like Daughter.


November 18, 2016
Oklahoma house tour, Part 2
We’re getting ready to welcome Capt. P home after a 6-week long field exercise (which homecoming is also my self-imposed deadline for a bunch of projects around the house, because some of us function much more efficiently with a deadline, and there’s nothing that says “welcome home” like organized closet shelves and curtains on the windows, amiright?), not to mention thinking about getting going on our Thanksgiving prep, so naturally I thought it was a great time to pop in with another installment of my little tour of our Okla-home.
(In case you happened to miss it, here’s Part 1. I would hate for you to be out of the loop.)
Our next stop is the kitchen, where we did the most work. Again, the before pictures are from the listing when we bought the house:

The kitchen was very brown, with a hint of an orangey glow. Perhaps you can tell?

The granite counters and tile backsplash were not at all what I would have chosen myself, but they were relatively new and in great condition. The appliances were old and a little quirky (my oven, for instance, was only 3/4 size, and because our built-in microwave was 20 years old, my children think the ones that have the plates inside that turn are really fancy), but actually worked great. And the cabinets were custom and solid, but very blahly brown.

So, the day before he started a very demanding new job (it was either commit right then or admit it might never get done!), my husband sanded them all down, and we began the seemingly endless process of painting the kitchen cabinets in the evenings and weekends.
It’s not a big kitchen, but those bottom cabinets all had sliding drawers inside (which were great), and we decided to paint all the insides of everything (aka, at least two coats on every one of the one million surfaces) to make sure everything got a nice fresh start.
It was a lot of work, but it was worth it.


We added hardware, too, (as you can see), which also made a huge difference in how the cabinets looked and functioned. (It’s from the Martha Stewart line at Home Depot.) The brass tied into the warm tones in the counters, and also matched the exposed hinges on the cabinet doors, which I gave a good washing but was not about to replace.

(You can tell which of these are listing photos because my counters are preternaturally clear and the lighting is more even. The others are pics I had on my computer in a file called “after kitchen photos,” for the post-painting kitchen post that I never got around to. UNTIL NOW.)

The kitchen is in the middle of the house, so it doesn’t get that much natural light. Brightening it up was a huge priority, and I was tempted to go with white for all the cabinets (it’s the same Benjamin Moore Chantilly Lace as all the trim in our house), but was concerned that the painted white wouldn’t hold up as well, cleanliness-wise on the lowers, and was also worried that any white I chose would make my floors look eternally dirty.
I mean, that particular textured, not-quite-white tile did look dirty no matter what (for the love of all that is good, why install such devil finishes in your home??), but no need to draw attention to it.
So we went with the two-tone look, which I was super happy with in the end. It actually took us two tries to get it right — we first chose a blue-gray that was just too cool next to those warm brown counters. After getting a coat on and realizing it wasn’t right, we switched to this warmer green-gray that was perfect. (I’m not easily finding the color names right now, but could maybe track them down if anyone was interested… I did carefully save everything, but then left all my house notes with the house for the new owners!)

It wasn’t shiny, fancy, or new, but by golly, it was a good little kitchen!
Since I know from experience that people who are considering painting their own kitchen cabinets often want to know all the information from everyone who ever paints their cabinets, I will say a few things for the record. We prepped very thoroughly (sanding and deglossing and washing), and painted very carefully, with thin, even coats. We used these narrow, very fine little rollers (not foam — we found that the foam ones left bubbles) that worked excellently well and left a very smooth finish. No link, but we got them at the Benjamin Moore store. They were a little more expensive than ordinary rollers, but worked twice as well. Totally worth it.
We used the Benjamin Moore Advance paint, which is lovely. Coverage was great, and it held up very well, even with my munchkins zooming around and shoving their stools around the kitchen, and me bombing around myself. There were a few nicks where I literally smashed pans into the cabinets, but considering how much use they got, they still looked great after three years.
We did paint the insides, as I said, and it did add quite a bit of work. Even so, I think it was worth it, if only for our own peace of mind to know that all the nooks and crannies were sealed and clean and there weren’t any unknown grimy bits (or openings for awful crawling things) lurking in the depths.
It’s really scary to drill into your newly-painted cabinet doors to install hardware. Terrifying. Go ahead and buy the little $5 plastic thingie they sell at the hardware store that tells you where to drill your hole. Mark the one you’re using so you do them all in the same place. Measure twice, drill once. (Haha, jk, you will measure three times at least, because like I said, the last thing you want to do at this point is mess up all your hard work.)
Ok, that’s all I remember for now.
Right next to the kitchen, and opening into the living room, was the eat-in kitchen area.
Before:


Now, we already had the table in the dining room, and when we tried putting a little kitchen table in there, it just seemed to block traffic patterns too much. So we ended up putting bar stools at the counter for quick meals or visiting with the chef, and using the rest of the room as sort of our designated kids’ area.
Pippo at some point started referring to it as “the little dining room,” which stuck.
After:


Those are basically my dream bar stools (if one can have such a thing as dream bar stools, which it turns out one certainly can after starting to google them and realizing how much nice ones cost), which I found at TJ Maxx and hemmed and hawed over until they went on clearance and I snatched them up. Naturally, there’s no place for them in my new house.


I really loved this space by the end, and the kids spent a lot of good time working and playing in here. (And remember, the blue chair in the living room lived in here most of the time, so there was a comfortable spot for a grownup to sit, too.) The light coming in through that big back window in the late afternoon was so sweet, and I could watch them from the kitchen while I worked.


The little Hape play stove was a clearance score at Target — it’s so cute! It’s got everything you need but is tiny and packs up in itself so efficiently. I can’t find it online or I’d link it for you. I put it on another one of those wooden craft store crates that seem to form the backbone of my kids’ storage solutions, and the “drawer” inside it is a wooden wine crate that holds all the rest of the play kitchen things.
The sweet fridge was another case of me stalking my TJ Maxx — I’d seen it there around Christmas time last year, but it was more than I’d wanted to spend. But it was also in what was essentially an unmarked cardboard box, so no one else bought it either. I watched it go deeper and deeper on sale until I finally texted my husband with a link to it on Amazon (don’t spend $200 on a play fridge please, but if you do, please use this affiliate link), saying “this is $25 I can’t not buy it.”
When you turn that knob, little ice cubes come out of the dispenser. I can’t even.

When we were getting ready to list the house, I wondered whether we needed to stage this as an eat-in area again, since how I had it set up was sort of the opposite of the standard clear-out-your-personality advice given to sellers by the experts.
In the end, I decided that it looked cute how it was, and we didn’t have a table and chairs to put in there anyway, so it stayed. And you know what? The sweet family who bought our house actually specifically mentioned loving this play area, and wanting to remember how to set it up in a similar way for their little girl.
So there you go. The experts don’t know everything.

Ok, our last stop for today is the laundry room/pantry, where we really didn’t make any changes to speak of, but I learned a key lesson:
Before:

This was the other room that was supposed to be included in our big painting project that we hired out, but we ended up cutting it out of the job. I kept threatening to go in there with a can of white paint and a paintbrush, but there was just so much stuff on the shelves…
If we’d had longer, I would’ve loved to make this room prettier and more functional, but it still was lots of storage and a super-handy laundry room, so I really shouldn’t complain.
After:

Ooh, big change: we got a glass dome for that bare light bulb! I didn’t even wait until we were selling the house to do that.

Ok, here is the key learning from Rosie’s Oklahoma Pantry:
Just Buy the Bins.
These shelves were so deep and things were always getting thrown around on them or disappearing into their dark corners. Dear, long-suffering Sukie organized them for me when she was visiting while I was having Molly. She used random boxes that she pulled out of our recycling to try to corral things. It made a huge difference, and I used those same cardboard boxes for years, but I always meant to find some real bins to get it all in order. I just could never commit to finding the right ones, or making sure they matched, or just spending the $30 or whatever the store wants for a pantry’s worth of bins.
Instead, the order deteriorated until I had another baby, and my long-suffering mother reorganized my pantry again for me while I was in the hospital with Nora.
Again, good intentions, failure to commit, chaos descending.
Finally, before I took the pictures to sell the house, I went to TJ Maxx and just bought a bunch of bins. They didn’t have enough of one color, so I got white and gray, in two different sizes. I bought more than I thought I’d need (I was wrong: I needed them all), because you can always return them if they don’t work.
And you know what? It made a huge difference in how my pantry looked, and in how it functioned. It was so much easier to find things (just grab the baking bin!), or for my husband to put groceries away for me in the right places. (I labeled the bins! You can just call me Miss Pinterest.)
And the bins are still useful in my new house. Because you know what? It’s super useful to have things to put things in. Lesson learned.
I will stop saying bin now.
Next time, the bedrooms! The bathrooms! Stay tuned…
The post Oklahoma house tour, Part 2 appeared first on Like Mother Like Daughter.
November 16, 2016
Thanksgiving Holiday Prep the LMLD way!
Have you been knitting (more on that below), or getting ready for Thanksgiving? Or wondering how the heck you’ll do it, with babies and toddlers and, well, babies?
I’m re-upping my comprehensive guide, No, Really, THIS is How You Get Ready for Thanksgiving. I’m giving you ample time to buy dress shoes, strategize about your monkeys helpers, and otherwise get yourself in gear.
Right now, the only decorations my house has are left over from the end of October, when Bridget and her fiddling friend from college, Maire, strung leaves for me.

{Fun fact: our 5600 sq. ft. house was moved a few miles at some point at the turn of the last century, and the only real damage sustained, including among the 6 marble fireplaces, was this crack, visible here. According to a previous owner, at least… }
I can’t even post about the gathering we had, because we were so busy we didn’t take any pictures. It was a “house concert” with fiddling and singing — and a pie party!
Everyone brought a pie, savory or sweet. When Deirdre’s neighborhood in Manchester does this, they have a competition, which she has won twice! They’ve only had the party for two years! Deirdre is killing it, pie-wise.
We had a lot going on already with the concert, so we didn’t do that, but everything was amazingly tasty and a winner in my book.
I can’t recommend this kind of gathering enough. The hostess doesn’t do too much (I made two savory pies and one sweet, and set out the drinks and paper goods for about 50 people). And who doesn’t love pie!?

Bridget has fiddled herself into a fine place, I am bursting with pride to say, and having Maire land in her vicinity is a real Godsend — they play together like two fiddling angels. With another friend on guitar, they gave us a good number of tunes; and then everyone had dessert and joined in the music-making in the session.
I’ve been knitting another owl baby vest instead of getting ahead on cooking (although I do have a huge butternut squash cooked up and in the freezer — one dish down, fifteen or so to go!).

I highly recommend this little book, Meditations Before Mass, from Romano Guardini, author of our first Spirit of the Liturgy book club reading. Many of the ideas about the liturgy are developed in this book more as meditations for the person who hopes to delve deeper into the mystery of worship on a personal level. Many gems to contemplate here, and real help when it seems like much of what passes for spiritual reading today is more on the sentimental side.
Well, I better get myself up and cooking, myself. Thanksgiving is so close! How does this happen every year! Someone rescue Auntie Leila from terminal procrastination.
Next week I will round up my Advent posts for you. Shorter Auntie Leila: Advent wreath with candles you remembered to buy now (take that, procrastination!), maybe an Advent calendar, stay close to the Liturgy — and you will be good.
Happy to join Ginny at Small Things for the Yarn Along!
This post contains affiliate links — when you shop at Amazon using a link here, we get a little change. Thank you!
The post Thanksgiving Holiday Prep the LMLD way! appeared first on Like Mother Like Daughter.
November 12, 2016
{bits & pieces} and a little thinking ahead for 2017
The weekly “little of this, little of that” feature here at Like Mother, Like Daughter!


Just thought I’d share that I recently took the big, committal step to buying my daily planner for 2017. There I was, there it was, the price was right… and I even had my current planner in my purse, so I was able to take it out and compare the two and make sure this new one would serve my purposes. I decided it would.
The only downside is that it’s a Sept. 16 – Dec. 17 calendar. Since I already have my planner in use through Dec. 16, it just means that those first few months will be wasted space in the new one. I would have preferred it to bump into 2018 a little on the other end.
But perhaps that’d be useful for you, if you haven’t gotten started on a planner this year but intend to do so next year? Maybe you’ll run into one of these as well and start warming up with these last few months of the year?
I got mine at T.J. Maxx. Pretty, right? We’ll see how the white background holds up. You can see that my homemade grocery bag-covered one is a bit dog-eared after all these months of daily use!
Just a refresher — here’s the post in which I walk through how I use my daily planner and how it has enabled me to make time for the things I love. I wrote that post while it was still in trial mode; I can tell you now that I haven’t been consistent with it 100% of the time this year. But using it even most (if not all) of the time has made a big difference to me, enabling me to take on art commissions and find so many hours I didn’t know I had for them! Well worth a few dollars on a planner and a little dedication.
On to this week’s links!
Interested in book design and production? You might enjoy . We are particularly intrigued by the big winner of the night, a commemorative release of Alice in Wonderland from the Folio Society.
Speaking of British stuff: I haven’t seen The Crown nor do I even know much about it, but my mom was interested in this article about how Real Doctors Acted out the Surgery Scene. From Auntie Leila: “are you watching The Crown? So many interesting little facts. How on earth can it be better to have an operation in a palace than in a hospital?? WHAT IF THEY FORGOT SOMETHING??”
Occasionally, there’s nothing I enjoy quite like an interesting read on management and leadership. It’s fun for me to think about applying these sorts of ideas in a workplace or volunteer environment… and it’s also interesting to think about how some of these ideas cross over into mothering. Radical Candor: the Surprising Secret to Being a Good Boss. (NB: Language somewhat vulgar.) The author uses the example of being helped out of a speech tic by her boss (Sheryl Sandberg) being ruthlessly candid with her. Whenever I encounter someone with a truly obnoxious laugh, I can’t help but think that that person’s mother failed him/her by not laying down the law at some point and giving candid feedback from a place of love.
This weird folding map of the world isn’t perfect, but it’s close.
On a more serious note, a call to revive the family Rosary from Fr. Pokorsky, who reflects on the mysteries of Fatima as we approach the 100th anniversary.
Liturgical Year:
Today is a memorial for St. Josaphat and St. Martin I
From the Archives:
Ask Auntie Leila: Weaning and solid foods for the health nursing baby
Yarning along, natural child spacing, and why not to give cereal to your four-month old baby
Ask Auntie Leila: No Really, how do you prepare for Thanksgiving? The MASTERPLAN, people!
~We’d like to be clear that, when we direct you to a site via one of our links, we’re not necessarily endorsing the whole site, but rather just referring you to the individual post in question (unless we state otherwise).~
Follow us on Twitter.
Like us on Facebook.
Auntie Leila’s Pinterest.
Rosie’s Pinterest.
Sukie’s Pinterest.
Deirdre’s Pinterest.
Habou’s Pinterest.
Bridget’s Pinterest.
Habou’s Blog: Corner Art Studio.
Auntie Leila’s Ravelry.
Auntie Leila’s Instagram.
Rosie’s Instagram.
Sukie’s Instagram.
Deirdre’s Instagram.
Bridget’s Instagram.
The post {bits & pieces} and a little thinking ahead for 2017 appeared first on Like Mother Like Daughter.
November 8, 2016
Family Update
A few acquaintances have just gone ahead and asked me, after looking me up and down, so that probably indicates that it’s high time to make it known on here.
Would you ask a woman such a question? I guess I have a very “obvious” look about me from the beginning. I honestly don’t mind it at all, and I’m happy to share that “yes, it’s true” — but still, it’s a big risk on their part. They’re bold.

You heard about Rosie, right? The pattern between us continues. When we were on our family vacation this summer and she announced her news, that signaled to me that what I had been suspecting about myself was probably true. I just had to wait to get home and take the test to confirm it.
So yes, baby number 3 is on the way, due in April! The chuckle is that, technically, my due date is April 1 — a “Folley on April Fools!” But I’ve been saying that the joke will truly be on me if that comes to pass, since I am fully prepared, given my previous experiences (both babies born at 42ish weeks), for a Tax Day baby.

Some questions I’ve been getting:
Am I planning another home birth? Short answer: Yes. I have the same midwife as with Peabodee and so will be having another home birth, although I haven’t planned out the logistics yet.
Do we have a nickname? Yes. Once again, The Artist has delivered (pun intended), and we’ve been calling this little on “Chickapea.” That name will likely stick around here on the blog as well (you do remember that “Finnabee” and “Peabodee” are not their real names, right? Just checking to make sure you know I’m not that weird.)
Are you going to be surprised again? Yep. Just too much fun! So unless this baby does anything exhibitionist during the upcoming ultrasound, we will be happily surprised again come d-day.
How’s the Diastasis thing going this time around? I think certainly better than last time. That space is there again, but didn’t come up as quickly nor as drastically as with Peabodee, and now I have the confidence and know-how that I’ll be able to address it after the birth by getting back into Mutu (by the way, there will be a Black Friday sale on the Mutu program, which I’ll remind you about when the time approaches). In full disclosure, I’ve been trying to keep up a Mutu routine while pregnant now that my energy is back, just to try to keep my abs strong around this baby and to avoid lower back and hip pain (it really helps!). And who knows? Maybe I’ll won’t have a giant baby this time! Just a thought…
Do the kids know/are they excited? We just told them last night. I had held out for a while. First, to protect them from any potential sad news. Then, to protect them from the burden of a very long wait. After a while, I was curious to know when Finnabee might just figure out for herself what was going on, so I resisted breaking it to them openly. But The Artist persuaded me we should let them in on it, and I’m glad that we did!
Us: “We’re going to have another baby!”
Finnabee: “A baby GIRL?”
Us: “Well, we don’t know if it’s a boy or a girl – we’ll have to find out!”
Finnabee: “When will she be born??”
Peabodee ran in circles around the room yelling, “baby! baby! baby!” and took long, inquisitive looks at my stomach when we told him, “inside Mama’s tummy.” Just a few beats later, he was the one giving his Daddy knowing, nodding glances and explaining, “tummy” and “seep” (baby is asleep, Dad). I told Finnabee that she could listen to the baby’s heart beat the next time the midwife comes to visit, to which she replied, “How will you make the baby’s heart beep?”
They were both happy to give my belly a kiss goodnight.

A very apparent 19 weeks.
And of course, the Artist and I are SO excited and grateful and always marveling that we get to experience this amazing thing all over again and dream all over again about meeting (and falling in love with) a whole new family member! It continues to boggle the mind, even despite having less time to think about it, with two toddlers keeping me busy.
Please keep us in your prayers! We’re going into the third year of our crazy artist thing here in NH (you know, that whole “leave the job and go back to being a student so that you can have the skills to become a professional and support a family while restoring beauty and high-quality, classical art to the Church and culture at large” thing?), so if you wouldn’t mind keeping that in your intentions now and again, we’d appreciate it!
The post Family Update appeared first on Like Mother Like Daughter.
November 5, 2016
{bits & pieces}
The weekly “little of this, little of that” feature here at Like Mother, Like Daughter!
That little enameled soap dish in my bathroom is wicked cute, huh? (Don’t forget to check out my new copper backsplash that I installed myself!)
I sort of assumed that it actually isn’t vintage (it appeared in my life, as so many things do, courtesy of Habou, whose studio is an a vast antiques/junk store), but apparently it is! So I better be careful of it. I was going to link to it so that you could get one too, but alas.
And why don’t they make it? If you had a company that made enamel things, wouldn’t you make that sweet little item?? Honestly. People.
What about this one?

You could put it up and install a hook above it — on that hook you could hang a little enamel cup. And then you’d just about be there, I think. This one is darling, though a bit pricey, I admit:

The soap dish also comes in green and other colors:

Anyway, just a thought of how to “get the look” if your vintage shops aren’t forthcoming. (The Amazon links in this post are affiliate links — thanks for shopping with us!)
On to our links!
If I had a student in high school anymore, I would schedule a time to watch this hour-long interview by Bill Kristol with Supreme Court Justice Clarence Thomas. It starts out rather slow, but little by little you get to know this impressive man, and by the second half, you’re hooked. Have a notebook handy to look up the books, Supreme Court decisions, and movies referenced in the conversation (I have a post about Killer Angels, a historical novel set at Gettysburg, mentioned towards the end of the video).
Love your neighbor enough to speak the truth — an astonishingly honest essay, directed at an Evangelical leader who has decided (just as it becomes extra comfortable to do so) that homosexuality is just fine — but it could apply to any situation in which the impetus to agree or to be silent is far stronger than that to speak the truth. Rosaria Butterfield is a woman who left a prestigious post, and a lifestyle as a lesbian that she was quite content with. Someone was brave enough to speak the truth to her, and now she returns the favor. (That last link may need to be clicked on more than once, but you can get to it eventually without subscribing, I’m pretty sure.)
Where’s the love for donkeys, asks the New York Times. Well, I love donkeys! Sometime I’ll take a picture of the ones who are my neighbors. They are so adorable.
The man who saved the papers of St. John of the Cross — well, this story is more fascinating than you might think. Roy Campbell was certainly larger than life. At first, C. S. Lewis didn’t like him, and then they became fast friends. I still remember that thrill of danger with something mysterious behind it, as of hidden goodness and power, when I first read the account of the meeting of the hobbits with Strider at the Inn at Bree. I think that there is practically no scene in all of literature that so combines all the marvelous elements that make a good story as that one. Well, who was Strider modeled after but Roy Campbell!
A very good piece about how to approach reading aloud to children, with application to many other things we do for their good. Maybe just enjoy…
Three doctors’ antidotes to social media — just some reflections on how these insightful men approached the search for meaning and connectedness; how these things relate to how we raise our children, and perhaps ourselves as well.
Why minds are not like computers, even if sometimes we talk as if they are.
From the archives:
Some thoughts on navigating organic/healthy/costly food.
I’m re-upping this (re-re-upping) because, timely: Mapping out the electoral college votes — do you or someone you love not quite get how the President is elected? What is this “electoral college” we sometimes hear tell about? Now is the moment to learn! (The comments are all good too.)
Is it scary to start a St. Greg’s Pocket? Now is the time — and how about starting with reading about marriage?
November is the month that Christians have traditionally remembered the dead. How do we do that? Lots of info here. And here is the doctrine of Purgatory, explained.
~We’d like to be clear that, when we direct you to a site via one of our links, we’re not necessarily endorsing the whole site, but rather just referring you to the individual post in question (unless we state otherwise).~
Follow us on Twitter.
Like us on Facebook.
Auntie Leila’s Pinterest.
Rosie’s Pinterest.
Sukie’s Pinterest.
Deirdre’s Pinterest.
Habou’s Pinterest.
Bridget’s Pinterest.
Habou’s Blog: Corner Art Studio.
Auntie Leila’s Ravelry.
Auntie Leila’s Instagram.
Rosie’s Instagram.
Sukie’s Instagram.
Deirdre’s Instagram.
The post {bits & pieces} appeared first on Like Mother Like Daughter.
November 3, 2016
Copper flashing backsplash; I think I’m the only one.

At least…
I don’t pretend to be pretty good at googling, but my friends say I am (as Mrs. Elton might tell us), and I searched and searched for how to do this project, and didn’t get much in the way of examples.
{All the specs are at the end of this post!}

I’ll explain, just in case anyone else needs to know how to use what’s on hand to fix a problem that is only occurring because you previously used what was on hand — in this case, the minuscule sink that came with the house/bathroom, and must be 100 years old; pretty sure that most people would have gotten a new sink and thus, not been in this pickle!
I mean, you almost certainly won’t have this exact problem. But maybe the thought-process will help you in a similarly outside-the-box situation.
Or maybe you’ll just be amused! And that is fine.

The fact that there was no backsplash behind the sink, but the faucets are so close to the back wall, meant that every time I (and I’m pretty sure I was at least a major culprit) went to turn on the water, I gouged the wall!
And then, the sink is so small that soap won’t really fit on it anywhere; the little shelf above that holds the soap dispenser is really too high for a child. I don’t want to bear ultimate responsibility for infecting the universe with nameless germs, either.
I wanted to install this little enameled soap dispenser that I’ve had for just this purpose…
But, that meant we needed to find a stud. Which is hard, in an old house. Swearing often occurs. Much fruitless drilling. Many fillings of untoward holes.
And the thought of messing up my newly painted surface (I mean, any surface that’s been painted within the span of a decade falls in this category) in the thankless process of stud-finding was paralyzing me.
Here is the “before” picture, which is right after the renovation, so the wall looks untouched (because it is) and the soap inventory checks out (but actually, is not practical):

Obviously we needed a backsplash, and could do this other thing in the process: Cue overthinking!

What could be used for a backsplash? Where there is just no room?
At Lowe’s, they actually had a nice white ceramic tile that was 16″ (which actually is a tiny bit longer than the width of this sink, which is 15 3/4″, but I probably could have made it work). But it is a good 1/4″ thick, which brought it right up to the back of the faucet setting. Space is precious in here — even down to the quarter inch!
There are peel-and-stick tile-ish things, but the ones I saw weren’t very nice at all. At. All. Contact paper or what have you — maybe okay for a rental, but not in here.
They actually sell granite and formica backsplashes in the plumbing department, but again, too thick, not the right material, not the right length.
I thought of metal.
I looked at stainless steel flashing and sheet metal at the store — stainless would certainly go with the other fixtures in here. But it just seemed a.) daunting to figure it out and b.) expensive, and c.) silly, when I was pretty sure I had what I needed!
Yes, I remembered that somewhere in the Garage of Death there was a stash of copper flashing left by previous owners or roofers or who knows. In fact, it had been on my mind, because every once in a while I wonder what I could do with it. Yes, I could sell it off, as copper is rather pricey, but it’s also awesome, you know?
I hadn’t seen it in a long time, however, even though every once in a while I’d look for it.
But this time, I was motivated. I thought — it could work!
Well, Reader, we found it. Habou said she thought it was in a certain place, and the Chief did a good search for it (I like giving him the quests that require a certain dogged determination/stubbornness — I tend to get impatient and defeatist).
And I do have another copper accent in there — this beautiful invitation, made for a gala event by my son-in-law John Folley, when he was teaching at The Heights in Washington, D.C.:

The vintage frame was painted by Habou, who did a great job matching the tone of the card.
But — how to install my backsplash?
The only directions I could find, which were for putting sheet metal behind a stove (and I might still go for that), said to use bonding caulk and then duct tape it until it dries. But the problem is that I didn’t want to duct tape my walls… that seemed… imprudent.

Then a carpenter friend suggested using double-sided tape. That makes sense! There are several different kinds there in the store: the kind that is made for backsplashes, actually, but seems a bit thick. This needed to go right flush to the wall. So in the end I got the kind that is meant for putting up posters. It’s a bit cushiony but rather thin. And I used sealing and bonding caulk.
Okay, the overthinking was behind me now!
I got started.
So I now had that rarest of experiences for the old-home owner: simply re-painting a room, because it has already been renovated and I still love the color I chose! No rehabbing, no agonizing over decorating, just — repainting! So easy! (As I said in the dining room post, painting is the least of it!)
Especially as, quite unexpectedly, the stud was found with no trouble at all, one hole was made (the right hole!), and the soap dish was installed!


So that’s a lot of backstory for a backsplash; now I will tell you the specs in case you want to do such a thing — and of course, you could use stainless steel or anything else that you think would work.
Prepare the sink by renewing the caulking around where the sink meets the wall and the faucet meets the sink. Clean everything up. The key to caulking, and you must believe me on this, is to go ahead and use your finger. The gun will get the caulk where you need it to go; only your (moistened) finger will give you a smooth, perfect, tiny bead with no edges and no overage. Keep a damp paper towel handy; you can wash your hands after; use your finger!
To cut the flashing, I used an old-school paper cutter, the kind with the iron guillotine blade, that is in the store-room at church. You can score it and then cut it with a sharp utility knife on the workbench — use a metal straight-edge to guide your knife. It’s really easy to use the paper cutter, though.
Phil rescued me after a while, hammering with a ball peen hammer to give it that look. It’s actually hard on your arm! I think it’s attractive and covers imperfections that you start with and that you will inevitably collect along the way. Just put a cloth under and over the piece and hammer away.
The metal is soft. It will begin to bend almost immediately when you hammer it. You can turn it over and hammer the other side. In the end, you want to hammer it basically flat, but use a rounded edge of something — a piece of wood out in the garage, the edge of your workbench, something — to place under the very edge of each side as you hammer, to curve it inwards, so that when you put it on the wall, the edges will snug up to the wall.
Using double-sided tape, tape around the periphery of the piece on the back — not right on the edge, but within about 1/8″ of it. Now do a dry run by putting the flashing in place. Look good? Edges and corners slightly bent inwards?
Using your caulk gun, caulk the inside of the taped area with a good amount of bonding/sealant.
Remove the backing from the tape and press the flashing to the wall, taking care to center it. Press hard, all over.
Let it all dry and rest overnight if possible.
Using the same sealant, caulk around the edges: wall and sink. Let it dry.
Using painter’s tape, tape the backsplash’s edges; with a small craft brush, paint the caulk to match the wall. Let it dry, remove the tape, and you are good to go!
The tape you can find with the command strips; this one is Hillman:

And the caulk is Loctite all-purpose bonding and sealing; you want something you can paint.

The bathroom color is Valspar Sea Foam in satin finish; the trim is Benjamin Moore White Dove in semi-gloss.

Mainly, the way I end up doing something like this (as I explained in this post about fixing a hole in a good blanket) is by asking myself, What if I came across a blog post where someone had done this crazy thing? I would be mad at myself for not having thought of it!
And that is my only excuse.
The post Copper flashing backsplash; I think I’m the only one. appeared first on Like Mother Like Daughter.
October 29, 2016
{bits & pieces}
The weekly “little of this, little of that” feature here at Like Mother, Like Daughter!
I told my college girlfriends that I’m feeling very mom-ish, since I’ve been sewing a halloween costume for one of my children for the first time.

I haven’t sewn anything in such a long time! I do find the halloween costume thing daunting. On the one hand I want the result to be awesome. On the other hand, I don’t want to spend any money, because I a) am trying to keep a tight budget around here and b) have strong feelings that halloween costumes should come from readily-available materials and pure cleverness and creativity (like that time I was Mary Poppins). But on the other hand (yep, there are three hands) I can be intimidated by all the social media sharing of other people’s kids’ costumes…
Well, I lucked out, because I found the perfect piece of material not only at a thrift store, but at the thrift store on half-off day. The ribbon was something I already had around. So, not counting the thread, this little cloak cost me $3.
And several hours of work, most of which has been very enjoyable, but some of which has been made slightly stressful by the addition of little people who like nothing more than to lean over my “Machine!! Machine!!” and ask me 100 questions while I wrangle a slippery polyester blanket into a Dream come True. Yes, I chose to do the sewing in the presence of the two munchkins, because I’m busy with commissioned work during the evenings and other chores during the (recently too short) naptimes! Keeping them amused (and not fighting nor strewing things around the apartment on rainy days) has its value, too.
Admittedly, the Dream come True has been mostly mine, since I was the one who persuaded my little Finnabee to want this costume. It was the only one I could think of that seemed manageable enough while also being warm (I just can’t bear to see a beautiful fairy costume covered by a dumb jacket!); it also has the double-whammy benefit of coming with a little brother-appropriate costume: Big Bad Wolf.
If you’re interested, I used the guidelines from this blog post as a pattern. My luck truly could not have been better in finding this thrift store blanket, because it was already double-sided, thereby saving me the work on several seams and finding a lining fabric. Recently I keep on being graciously handed the raw materials for my kids’ sake; it’s almost like the Lord knows exactly the level of crafting that I can handle. I’m very grateful.
On to this week’s links!
How a certain John Basinger managed to commit all of Paradise Lost to memory. I dislike the title of the article because of the use of the word “encoding,” which depicts man in the image of computer and seems to indicate that he used some fancy scientific process on his braincells in order to memorize. In fact, it’s really about the techniques that people – and actors in particular – have used often, for ages — just applied on a massive scale. Still cool!
An interactive feature on the Syon Cope, an extremely ornate and beautiful embroidered cope (yes, that heavy outer garment that a priest wears while celebrating Mass), currently being exhibited at the Victoria and Albert Museum in London.
A National Geographic piece about Christ’s burial place being exposed for the First Time in Centuries. I enjoyed the beautiful photos included.
A surprising look at our country’s geography: a neon map of all the river basins in the US.
Some information about the rumored “minecraft sex mod,” in case this was a topic of concern for you. I admit that I could only skim this article, since the content was totally outside my comprehension and also made me feel a little sick (kids have better uses for their time, anyway!!); but it might be helpful to you or someone you know… From my mom: “this article has many good points — mainly, the online things don’t jump at your child, YOU CONNECT and then that’s when bad things happen. To me, a young child has too many important developmental areas to explore for any kind of screen time. If a child wants to play games on a device, they have to be older — it’s like the latency period in sexual development — just don’t give a young child access.”
From Public Discourse: Calling All Electors: Throw the election to the House, and you just might save our country. This fascinating (and complicated!) piece has a lot of helpful information about the process that could, just could take place in the next few weeks.
Have I already asked you to follow me on Instagram? I still don’t totally get the medium, but I’m enjoying it and like to give occasional updates about my work (which I’ll be doing less of on the blog here since I now have my website… so do follow along if you are still curious about my pysanky and random other art works!). Don’t forget that all of our social media follow buttons are below.
Liturgical year: Today we honor St. Narcissus! (I honestly didn’t realize we had a saint by that name!)
From the archives: In my costume discussion, did I mention that I feel pressure to live up to the standards set by my sister? A Knight and a Piggy.
If you’re like me, it’s that time of year. The days are shorter, sunshine-wise, and yet longer, struggle-wise. Trying to take deep breaths: 10 Survival Tactics for Rescuing a Bad Day.
~We’d like to be clear that, when we direct you to a site via one of our links, we’re not necessarily endorsing the whole site, but rather just referring you to the individual post in question (unless we state otherwise).~
Follow us on Twitter.
Like us on Facebook.
Auntie Leila’s Pinterest.
Rosie’s Pinterest.
Sukie’s Pinterest.
Deirdre’s Pinterest.
Habou’s Pinterest.
Bridget’s Pinterest.
Habou’s Blog: Corner Art Studio.
Auntie Leila’s Ravelry.
Auntie Leila’s Instagram.
Rosie’s Instagram.
Sukie’s Instagram.
Deirdre’s Instagram.
Bridget’s Instagram.
The post {bits & pieces} appeared first on Like Mother Like Daughter.
October 27, 2016
A house tour of our Okla-home (part 1)
Since at least two or three of you were so kind as to humor me when I offered to give a little house tour of a house we no longer live in, I am here to oblige with lots of photos. (One such reader, dear Clarice, is the one who called it our Okla home, which made me feel a little bit like I wasted the last three years of my life not referring to our house that way…)

One of the advantages to moving often is that it forces you to commit to things, homemaking-wise, faster than you otherwise would. (At least if, like me, you’re a sort of overthinking, commitment-phobic, perfectionist type with a limited budget.) You have to move in quickly so you have time to live before you start moving out again.
An advantage to the actual moving is that it forces you to declare things done, homemaking-wise (ready or not!).
And if you’re selling your house, you even have pictures to prove it. (Which is good if you keep promising After photos without delivering.)
So here, at last, is a tour of the house we just left in Oklahoma — or at least the start of it, because who can do a house tour in only one post? Not me.

You’ve seen most of it before in pictures here and there, but never in any sort of systematic way. But I figure that I always appreciate poking my nose around someone else’s home (even just virtually), so I’ll assume that you won’t mind looking at mine, even if we don’t live there anymore.
Since these photos are mostly from our real estate listing, I’ll try to point out when they don’t correspond to how we actually lived our life there (spoiler: any clear horizontal surface is a LIE!) and supplement with a few others and link up to past posts so you can see it in all its ordinary glory as well.
We took the listing photos ourselves, since we were not in one of those hopping housing markets where house staging consultants and professional photographers are the norm. I was pretty sure my husband and I could do a better job than your average realtor with a point-and-shoot (not that our realtor wasn’t great, because she was!), if only because I was willing to take pictures over the course of several days so I didn’t have to have all the rooms ready at once.


We took the photos before our garden was looking its best, but it was much more colorful by the time we were showing the house. But, you may recall, there was a water feature here when we moved in (look at the last pic on that post for the best shot of it), which was not our thing for many reasons. So we ripped it out and used the millions of landscaping stones to line the path to the front door and, eventually, to make a sort of rock garden there by the door.
I don’t consider myself any sort of expert in the gardening department, and goodness knows the clay and the heat and the droughts and the flooding weren’t on my side, but I was pretty pleased with it by the end.
When you go in through the front door, you’re in the main living area, which is very open:
(All the “before” photos are from the old listing when we bought the house. So obviously, the furnishings don’t belong to us.)
BEFORE:


Painting all this space and the kitchen were the two big projects we tackled as soon as we moved in, and you may recall that we ended up hiring some guys to paint all the walls and woodwork — and some of the ceilings, too. It was a huge job! (More on this project here.)
Totally worth it, though. I remember seeing all that brown trim and the yellow and blue walls in the photos on Zillow, and thinking, “if we just paint it all white…”
This is basically what I imagined it would look like.
AFTER:


You can see our little oratory tray there on the homemade bookshelves. That trunk has been used as a coffee table by three generations of our family at this point. The green sofa is a hand-me-down we inherited from Nick and Natasha when they moved to Hong Kong, and the brown leather one is from the as-is section at Ikea (I don’t think they have this particular one anymore). It used to be held up by a stack of magazines, but now we’re really classy folks who have sofas that stand up on their own four legs.
I never got the curtains hung up in here. Fail.


That blue chair bounced back and forth between the living room when we had guests and a few feet over in the eat-in-kitchen area, so Capt P could sit and keep me company while I made dinner. And in reality, we do also keep toys in our living room, and it more often actually looked like this:

We always sort of wished we had a bigger rug for this room, but having that stretch of hard floor between my desk and the rug made it so there was plenty of room for the kids to spread out and play. The big Legos lived in that basket with the lid under the window, the baby toys got tossed into the basket by the fireplace, and the trains all fit into that very glamorous plastic bin (complete with lid held together by packing tape!), which tucked under my desk.
So it did all tidy up nicely, when it was tidy.

This little corner between the bookshelves and the bar counter is where we kept our current picture books (in the bin on the left), board books (right), and wooden blocks (Nora’s chosen seat). I find that my children are well nigh incapable of putting books back neatly on a shelf, but they can tidy them into these wooden bins pretty well.
This setup had the added bonus of cutting off easy access to the corner under the bar counter, which was just high enough so that kids wouldn’t really see it, but low enough so that they’d smack themselves in the forehead if they tried to casually walk under it. Ouch.
Ok, on to the dining room, which you can see over the green sofa’s shoulder up there. The one with the huge windows.
BEFORE:

AFTER:


Goodness, did I love all that light. Our dining room table was a craigslist find in California that at this point has seen better days. If I weren’t committed to finding a bigger table, one that wasn’t an odd-sized square, I might be motivated to fix the wobbles and scratches, but the time has come to move on.
(Exciting development: we brought a new old dining room table down this summer from my in-law’s barn, and Capt. P is refinishing it for us.)
We actually have six of those chairs, plus my trusty green high chair for the baby and two adjustable high chairs (affiliate link!) for the bigger kids. (We can talk about those more sometime if you want to, and it sort of kills me because I couldn’t find them used anywhere nearby, so I had to stalk sales and stack coupons and they still each cost more than the rest of my dining room chairs combined. But twice now it’s gotten to the point where I’m being driven crazy by a squirming child at every mealtime, and my husband tells me it’s worth any price to keep our sanity, and I finally agree, and then they can reach the table and rest their feet and be strapped in, and our lives are so much better.)
But anyway, we moved all the extra chairs out of the room for the pictures. Normally the high chairs are all up at the table, and the extra “grown-up” chairs are against the wall. That’s why the room looks so empty.
Ok, one more room before I wrap it up for today. This was the “bonus” room — the previous owners had it set up as a fourth bedroom:
BEFORE:

It was at the very front of the house — the very first door there just on your left as you came in through the front door. We called it the study, because of the big built-in bookshelves (cue angel choir) and Capt P’s desk area in there. It’s also where we kept our TV, but I declared that I didn’t want to call it “the TV room,” so study it was.
(We do have a TV — a rather nice, big one, actually, because my husband is the kind of person who cares about electronics and we like to watch movies and baseball and things like that. But we don’t like having a big TV right in the middle of everything, and we especially don’t like it to be the first thing you see when you walk in the door. With our very open floor plan, this solution worked very well for us.)
This is the last room we tackled before we moved — it was really awful. I shared a few “before” photos in this post (and if you’re at all tempted while seeing all these photos to think I have my act together, you should really click on that link…) but never got to the afters:
AFTER:

The curtains are the ones I had always intended to hang up in the living room, but I think I had miscounted when I was buying curtain rods at Ikea, and ended up short. So they never went up there, but by the time I was dealing with this room, I no longer had these curtains mentally earmarked for another room, so up they went, thank goodness.


The sofa and desk were both Capt. P’s from before we got married (the sofa is from Ikea, and I did get a new slipcover for it at one point) — oh, and there’s one of the other dining room chairs at his desk! The rug is a nice indoor-outdoor one from Target that we got to replace the one Nora spilled the can of paint on while we were painting the bookshelves.
(I was actually super happy about this, because I hated that old rug, and there were lots of things in that room — including Nora herself — that I did not want paint spilled all over!)
I know everyone always says that they wish they didn’t wait until moving to make their house look nice, and this is the room that I do really wish we had tackled earlier, not that I’m sure I know when we would have done it. (Actually, when we hired the painters on first moving in, this room and the laundry room were supposed to be part of the job, but when it took them much longer than expected, we sacrificed these last few areas in order to have our home restored to us. So it’s not my fault after all!)
But it’s a room that we used all the time, and the paint (and the new rug — thanks, Nora!) made such a big difference. Next time! Next time.
Ok, I’m signing off for now, but next time I’ll show you my kitchen (ooh!) and laundry room (aah!). If it’s possible that you still have questions about anything after this long post, go ahead and ask away in the comments — obviously, I am happy to chit-chat about homemaking things for days!
The post A house tour of our Okla-home (part 1) appeared first on Like Mother Like Daughter.
October 25, 2016
In which I upgrade my sticky-note to-do list method.
Always on the quest to perfect the ultimate, most fabulous to-do list, I have an update for you. Do you mind?
Just so you know, I am not pushing this method — only offering it if your note-taking temperament happens to line up with mine — that you gravitate towards little notes scattered all over, tend to find notebooks too commitment-y, and find that an archive of admonitions to go to the bank rather burdensome.
If you love your bullet journal, you can keep your bullet journal!

In January, when peak efficiency in to-do list making seems like the most pressing task on earth (to be put on the list, perhaps?), I posted about my brilliant (for me!) system of Simplifying your To-Do List With Sticky Notes.
In that excellent post — with its stellar advice about having only three things on your to-do list for any given day — I lamented thusly:
I was picturing a small spiral-bound photo album, the pages of which are practically laminated. You don’t want too many pages, though, because that’s too much pressure to multiply the tasks! We have enough tasks as it is. But I couldn’t find what I was looking for.
If only I could find such a thing!
As happens to me very often — does this happen to you? — when I have something particular in mind, and simply can’t find it out in the world, it’s because I already have it.
It’s just a matter of finding where I stashed it.
In this case, this elusive thing I was describing was in fact in my closet on my “gift stash” shelf. I have maybe looked at it a thousand times, and it has never quite passed muster as a gift.
But as a task notebook, it’s just exactly right! The proof that I’m sadly deficient as a blogger is that this perfect item is apparently not made anymore; at least, I can’t find it online anywhere. A million apologies.
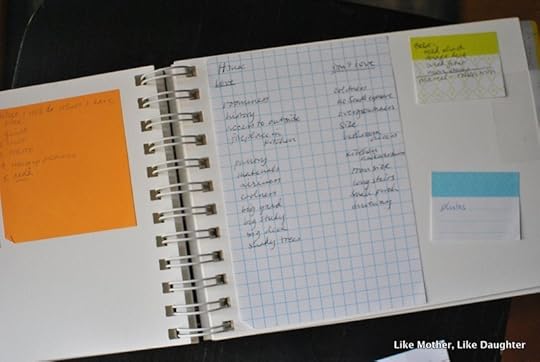
It’s about 8 1/2″ by 6″. It will fit in my purse or a tote; it can sit on the table and not take up too much room. It opens completely. The covers are very stiff and sturdy. The pages are card stock and there aren’t too many of them.
Here it is by a teacup for scale:


As soon as I saw it and made the connection, I put it into use. First, I transferred the tabs and my extant notes (you can see all the details about tabs and such in this post).
I knew I had to cover it. Obviously.
A) it’s white. I think we all know how that will go.
B) I have this stash of pretty papers (yes, those are ziploc bags full of Christmas cards of yesteryear, because, stash):

And this one of cards and other notebook-facilitating items:

Some people put inspirational quotes in their notebooks. Usually I don’t want words, I want a picture. Old cards are great for this sort of thing — somehow, the little visual that someone sends you is so comforting and often so beautiful that you want to keep it, but it’s a card, you know — you’re supposed to let go of those little ephemera, lest they clutter up your life.
Mod Podge to the rescue! Even the name — mod (if it has to say it’s mod, it probably isn’t, right?) and podge (sounds… stodgy or something) — seems dumb, but it’s a really useful way of getting things glued up and laminated with very little fuss. This way, that little image or design can be popped on a notebook or a little tin or box and brighten things up.
{By the way, this is not a sponsored post. But the links to Amazon are affiliate links — I get a little cash when you buy using the link — thanks!}
Anyway, I wanted something inspiring, and I do love this little toddler Jesus, as un-PC as he is. I mean, little blue-eyed Jesus, you aren’t sacred art but you are really, really cute and loving. I think he’s worth putting on my notebook… so I did it.

A paper-cutter is very handy. The Florentine paper is just wrapping paper I picked up one day at Marshall’s. It doesn’t quite go but this is my very own little notebook. I can have what I want!
Method: A coat of Mod Podge, stick paper on, dry; give another coat, stick on the image, dry; spread all well with one more coat, dry well. Very sturdy, very wipe-able, very non-peelable. (Don’t you hate it when corners start popping up? Ugh.)

Since implementing my system in the winter, I have a nice stash of post-its going.
I keep the main supply near my desk and also some in the kitchen. But there is a little supply here at the back of my notebook (including some random advertising ones that always seem to appear — and that work just fine), which I keep contained by means of a strip of card stock which I glued to form a pocket:

My main to-do’s are on the first page:

They include actual “go to the bank” style notes and then, on the bottom, my “work order” ones — for ongoing projects, to keep the tasks in view.
For instance, let’s say you are re-painting the bathroom, a project that will take two or three days overall, and also prepping the auction booklet for the school. You’d want a post-it for each project, labeled as such, with the main tasks listed. That way you don’t have to keep going over and over what has to be done, in your poor little sieve of a mind (well, speaking for myself).
If it’s a really big project with many steps, just use a page elsewhere in the notebook.
On the facing page, inside the front cover, I have my prayer lists (including novena intentions). (I’ve sort of blotted the names to protect the victims. You are on there.) One note has intentions for Samaritan Ministries, because this medical-cost sharing group that I belong to asks you to pray for each other — such a wonderful idea!

So when I open my notebook to tend to my to-do’s, my prayer list is right there. I do recommend, if you find figuring out what to do each day difficult, taking your notebook to prayer with you. Just put it all before God and ask Him what He thinks you should do. Then, write down what seems fitting to you.
If little thoughts occur to me, I might scribble them down (like I did on that Pilgrim note).

I’ve found that if I have a thought I’d like to write more about, I need to jot it down. It’s not so much that I will forget, but I will sort of keep having it and being super impressed with it each and every time, which gets silly.
If it turns out to be a truly worthwhile idea, I transfer it to an index card and file it away. That is why I do have some index cards in that stash at the back of my notebook. Most of my cards have quotes from good resources on them, though. If you’ve ever attended a talk I’ve given, you’ve seen these index cards in all their glory, because I am not super in control of my thought process!

Just to peruse another area of the notebook, here is my “book” page. I have a real outline and draft on my computer, but ideas will pop up when I’m trying to figure out whether to mow or vacuum first, so I need this page. As I transfer ideas to the manuscript, I throw away the post-it.
Some of you asked something like, “Well, what about all the other tasks — other than those three or five that you do each day?” That all goes in my “tomorrow” section — anything and everything that occurs to me that needs to be done, ever. Just don’t put it on today’s list!
So there you have it. And now life should be perfect, right?

The post In which I upgrade my sticky-note to-do list method. appeared first on Like Mother Like Daughter.