
Ruth Soukup's Blog, page 113
April 24, 2014
Thrifty Thursday {Week 57}

Happy Thursday! I hope you are all having a great week! This is the only week this month I don’t have a trip schedule which means that I have been working like crazy to get ahead! After attending the Launch conference a few weeks ago I have so many new ideas that I want to get started on. The hardest part is just finding enough time to get it all done and still make enough time for my family as well. I have found that waking up early is what works best for me, so this week I have been up at 4am every day! Are you an early riser too? What other ways do you successfully juggle blogging with taking care of your family?
One of the projects I have been working on is a fairly major update to my blogging book, How to Blog for Profit (Without Selling Your Soul). If you have already bought the book you will be able to get the update from Amazon for free when it is ready. If you have not bought it yet, you may want to grab it now while it is still only $4.99, as the price will be going up at that time! The updated version will have even more helpful info about building traffic, social media marketing, and more ideas for monetization. There will also be a whole new chapter full of essential info on turning your blog into a business!

Here are the most clicked links from last week:
1. The Latina Homemaker {5 Habits That are Sabotaging Your Budget}
2. Snail Pace Transformations {101 Blogs Thrifty People Read}
3. Letters from Sunnybrook { I Don’t Deserve a Nice Kitchen}
4. Saving the Family Money{7 Ways to Save the Family Money When Eating Out}
5. Pulling Curls {Floors So Clean You Could Eat Off Them}
6. Six Figures Under {No-Spend Month Menu}
7. Singing Honey Bee {Saving at a Discount Grocery Store}
8.An Inviting Home{Why I’m Not a Full-Time Blogger}
9. The Coupon Challenge { Simple Household Money Saving Tips}
10. Creative Savings {3 Simple Ways to Maintain Your Monthly Budget}
Never linked up before? Here’s how:
Scroll down, find the little blue “Add your Link” Button and click on that.
Follow the instructions on the next page – add a great image of your project and an interesting title. Make sure you link to the direct page of your budget friendly post – not the main page of your blog!
Try to visit at least a few other blogs at the party. Be sure to leave a comment to let them know you stopped by!
Please link back to this post somehow. There are badges available here; a simple text link is just fine too.
 Feel free to tweet about Thrifty Thursday so others can join the fun, and don’t forget to check back here Sunday morning to see which posts have been featured this week at Weekend Wandering!
If this is your first time here I also invite you to check out my eBook, How to Blog for Profit (Without Selling Your Soul). It is a fantastic resource if you are interested in building your blog, getting more traffic, or learning how to monetize. Or, if you have read the book and are still looking to take your blog to the next level, I encourage you to check out my options for one-on-one blog consulting.
An InLinkz Link-up
Pin It
The post Thrifty Thursday {Week 57} appeared first on Living Well Spending Less™.


April 23, 2014
Orange Glazed Pork Chops

Are you ready for another freezer friendly meat recipe that is both foolproof and delicious?
So far we’ve tackled both chicken (with this to-die-for Honey Lemon Garlic Chicken) and beef (with this oh-so-easy London Broil), so I thought it was only fitting that we move on to something just slightly more challenging: Pork Chops.
The main reason pork chops can be challenging is that it is really easy to overcook them, which can make them dry and tough. Luckily this delicious orange glaze helps add a lot of moisture and flavor, but it is also important to cook them just enough. For pork it is super helpful to have a meat thermometer on hand so that you can take them out of the oven the second they hit 145 degrees. If you don’t have one, don’t fret too much, just set the timer on the low end and check them frequently to prevent overcooking.
I promise that the extra effort will be worth it–my family absolutely raved about this dish & literally could not get enough!
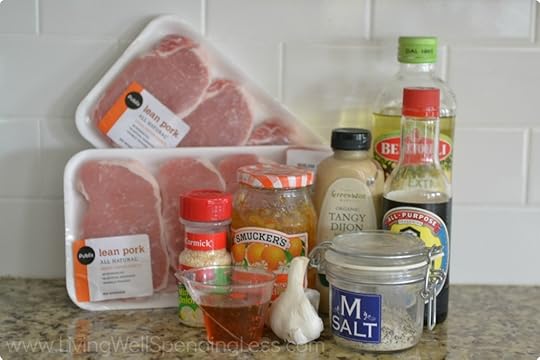
Here is what you need:
1 cup orange marmalade
1/4 cup dijon mustard
1/4 cup honey
2 tablespoons olive oil
2 tablespoons soy sauce
1 tablespoon dried minced onion
1 teaspoon seasoned salt
1/4 teaspoon black pepper
4 cloves garlic
8 pork chops (approximately 6-8 ounces each)
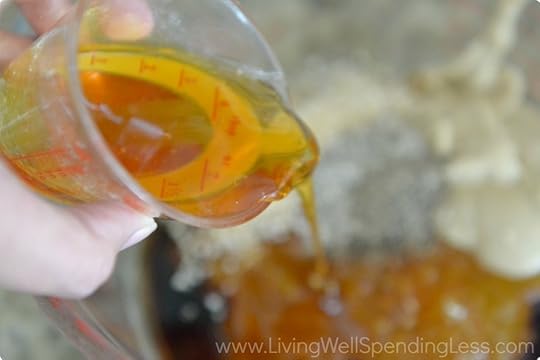
Step 1: In medium bowl, whisk together marmalade, dijon mustard, honey, olive oil, soy sauce, minced onion, salt, & pepper.
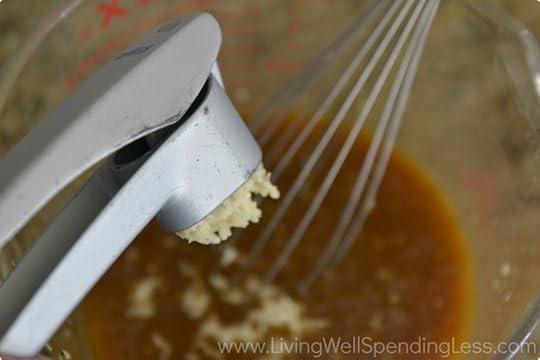
Step 2: Mince or press garlic, then whisk into marmalade mixture.

Step 3: Poke each pork chop several times with a fork

Step 4: Pour marinade mixture into two 1 gallon freezer bags. (Be sure to label bags first!) Place four pork chops into each bag. Press out air and seal. Marinate for 30 minutes or freeze until needed.
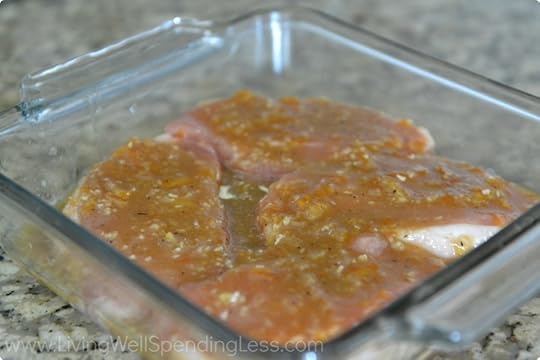
Step 5: Thaw pork chops; place in shallow baking dish, cover with remaining marinade, and bake at 375 degrees for 20-25 minutes, turning once during cooking and removing from oven as soon as center temperature reaches 145 degrees.

Print This!
Recipe: Orange Glazed Pork Chops
Summary: Moist and full of flavor this pork chop recipe is sure to be a hit!
Ingredients
1 cup orange marmalade
1/4 cup Dijon mustard
1/4 cup honey
2 tablespoons olive oil
2 tablespoons soy sauce
1 tablespoon dried, minced onion
1 teaspoon seasoned salt
1/4 teaspoon black pepper
4 cloves garlic
8 pork chops (approximately 6-8 ounces each)
Instructions
Step 1: In medium bowl, whisk together marmalade, Dijon mustard, honey, olive oil, soy sauce, onion, salt, & pepper.
Step 2: Mince garlic, then whisk into marmalade mixture.
Step 3: Poke each pork chop several times with a fork
Step 4: Pour marinade mixture into two 1 gallon freezer bags. (Be sure to label bags first!)
Step 5: Place four pork chops into each bag. Press out air and seal. Marinate for 30 minutes or freeze until needed.
Step 6: Thaw pork chops; place in shallow baking dish, cover with remaining marinade. Bake at 375 degrees for 20-25 minutes, turning once during cooking and removing from oven as soon as center temperature reaches 145 degrees.
Preparation time: 5-10 minutes
Cooking time: 20-25 minutes
Number of servings (yield): 8
* * *
What’s your favorite way to prepare pork?
Pin It
The post Orange Glazed Pork Chops appeared first on Living Well Spending Less™.
April 22, 2014
Part 8: Home Maintenance & Seasonal Cleaning
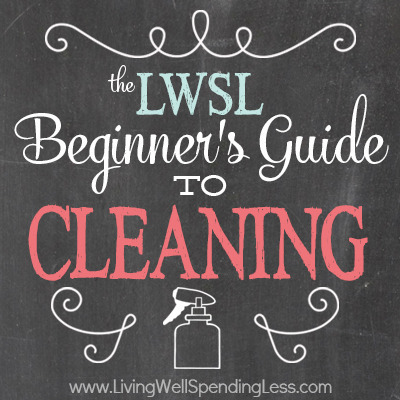
This is Part Eight of an 8-Part Beginner’s Guide to Cleaning Series. See the overview here.
* * *
Welcome to the final week of the Beginner’s Guide to Cleaning, and congratulations—you made it! At this point, if you’ve kept up on your assignments, your house is probably now cleaner than it has ever been before. Almost every room has been thoroughly deep cleaned, your laundry pile has been tamed, and the cleaning schedule you created for your family in Week 1 is helping to keep it all that way. You’ve worked really hard to get to this point and it is time to pat yourself on the back!
Today, at the close of this series, as much as we want to sit back, celebrate, and enjoy the fruits of our labor, it is also time to think seriously about how we will maintain all this progress we’ve made. Because let’s face it, a clean house never stays that way without ongoing effort!
Furthermore, there are lots of cleaning & home maintenance tasks that don’t need to be done every week, but should be done regularly, whether it be once a month, once every quarter, or once a year. Having a long-term plan & schedule for those items helps us stay out of crisis mode, because preventative maintenance is almost always cheaper and easier than having to do a major repair because we didn’t take care of something the way we should have.
Part of being an adult means learning to take responsibility for the management of your household, so be sure to include your children in this process too! Remember that empowering them to learn good habits now will only help them prepare for living on their own, and it will make your life a whole lot easier!
In this final week we will be following a few steps for getting caught up on some key home maintenance & seasonal cleaning tasks that we didn’t tackle in the previous weeks. We will then finish by revisiting our cleaning schedule and making sure we have a solid plan for going forward. As always, please feel free to add your own tips & tricks in the comments below!
Let’s finish this thing!
 Step 1: Inspect & change your HVAC air filter
Supplies needed: a ladder, new air filter in the proper size
How-To: Climb ladder; open air filter vent and move pins to remove old air filter. If dirty and clogged, replace filter with new filter and move pins back to secure in place. Add this task to your Monthly-Quarterly-Annual Checklist to be done every 1-3 months, depending on the amount of dust in your home.
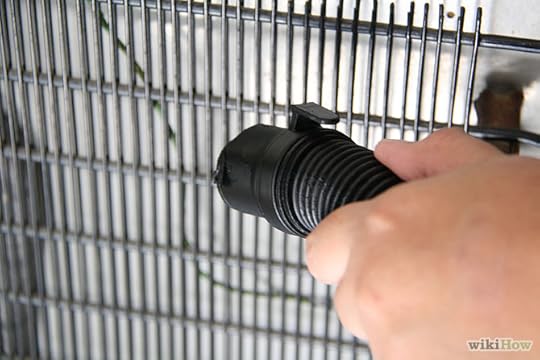 Step 2: Clean Refrigerator Coils
Supplies needed: Vacuum with hose attachment; small brush or rag
How-To: Unplug refrigerator. Move appliance away from the wall and thoroughly vacuum coils and fan to remove dust and dirt. Scrub away any stubborn dust with a small brush or rag. Don’t forget to re-plug in power cord! (For more detailed instructions, check out this Wiki-How article.) Add this task to Monthly-Quarterly-Annual Checklist to be done once a year.
 Step 3: Clean Your Range Hood & Filter
Supplies needed: water-based oil de-greaser, old sponge or rag.
How-To: Fill sink with hot water and degreaser. Remove filter and soak for 20-30 minutes, scrubbing if necessary. While filter is soaking, wipe down hood using sponge or rag dipped in degreaser mixture. (For more detailed instructions, check out this post.) Rinse filter and let dry completely, then replace. Add this task to your Monthly-Quarterly-Annual Checklist to be done once every quarter.
 Step 4: Replace batteries in your smoke & carbon monoxide detectors.
Supplies needed: ladder, batteries.
How-To: Climb ladder; remove old batteries & replace with new ones. Toss old batteries per your local waste removal service’s instructions. Add this task to your Monthly-Quarterly-Annual Checklist to be done once every quarter.
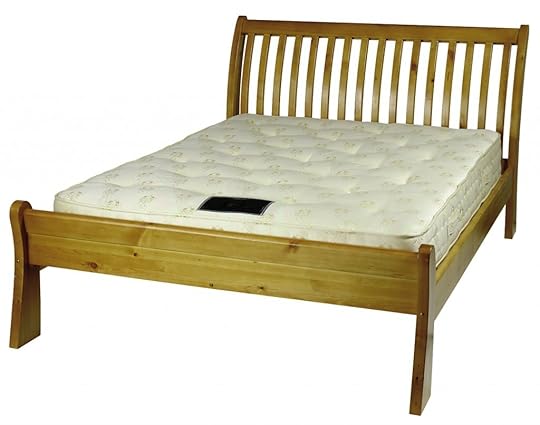 Step 5: Flip or Rotate Mattresses
Supplies needed: permanent marker & an extra person to assist.
How-To: Remove sheets & blankets from bed. Mark mattress with permanent marker to keep track of rotation schedule (some mattresses come with stickers for this purpose already attached). If using a pillow-top mattress, rotate mattress 180 degrees; otherwise flip mattress completely over to opposite side. Add this task to your Monthly-Quarterly-Annual Checklist to be done once every quarter.
 Step 6: Wash Outside Windows
Supplies needed: ladder, glass cleaner, squeegee, rag
How-To: Spray glass; run squeegee against glass from side to side, wiping blade with rag as necessary. Add this task to your Monthly-Quarterly-Annual Checklist to be done once a year.
 Step 7: Clean Behind Washer & Dryer
Supplies needed: vacuum with hose attachment
How-To: Unplug appliances. Move away from the wall and thoroughly vacuum out dust, lint, and dirt. Plug back in. Add this task to your Monthly-Quarterly-Annual Checklist to be done once a year.
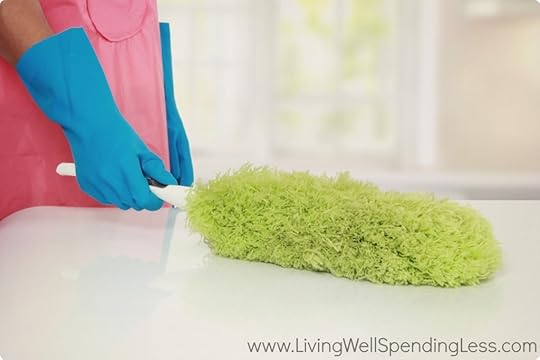 Step 8: Dust forgotten upper ledges & tops of furniture
Supplies needed: hand-held vacuum or portable wet-dry, duster, ladder
How-To: Climb ladder; use hand-held vacuum & duster to tackle neglected upper ledges, such as those in a high-ceilinged entryway or living room. Add this task to your Monthly-Quarterly-Annual Checklist to be done once every three months.
 Step 9: Update Monthly-Quarterly-Annual Checklist with Additional Cleaning Tasks
Supplies needed: printable checklists from previous weeks, Monthly-Quarterly-Annual Cleaning Checklist
How-To: Go through your checklists from each room and add the deep cleaning tasks to your seasonal schedule so that you will know when it is time to do them again.
Part Eight Assignment
Just to review, here is your Eighth assignment:
Set aside a few hours sometime this week to take care of these seasonal maintenance items. If your kids are old enough, have them help!
Update your Monthly-Quarterly-Annual Checklist with the items from both today’s checklist and the previous weeks’ checklists.
Re-assess the Cleaning Schedule you created at the beginning of this series to make sure it is still a good fit for your family; make changes as necessary.

The LWSL Beginner’s Guide to Cleaning:
Part 1: Getting Started
Part 2: Cleaning Supply 101
Part 3: How to Clean Your Living Space
Part 4: How to Clean Your Kitchen
Part 5: How to Clean Your Bathroom
Part 6: How to Clean Your Bedroom
Part 7: Laundry 101
Part 8: Home Maintenance & Seasonal Cleaning
* * *
Did I miss anything? What are your biggest home maintenance & seasonal cleaning challenges?
Pin It
The post Part 8: Home Maintenance & Seasonal Cleaning appeared first on Living Well Spending Less™.
April 21, 2014
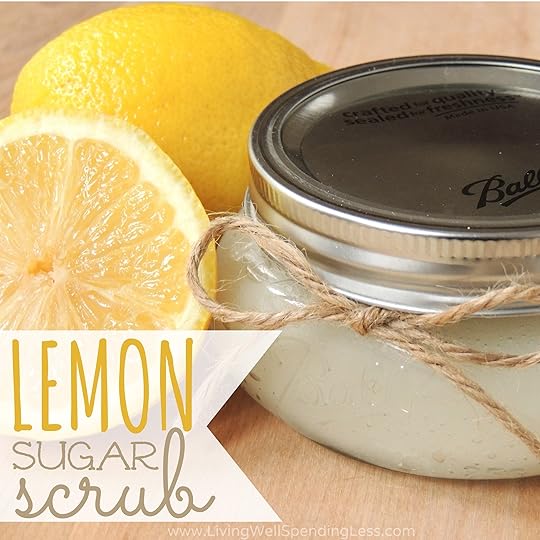
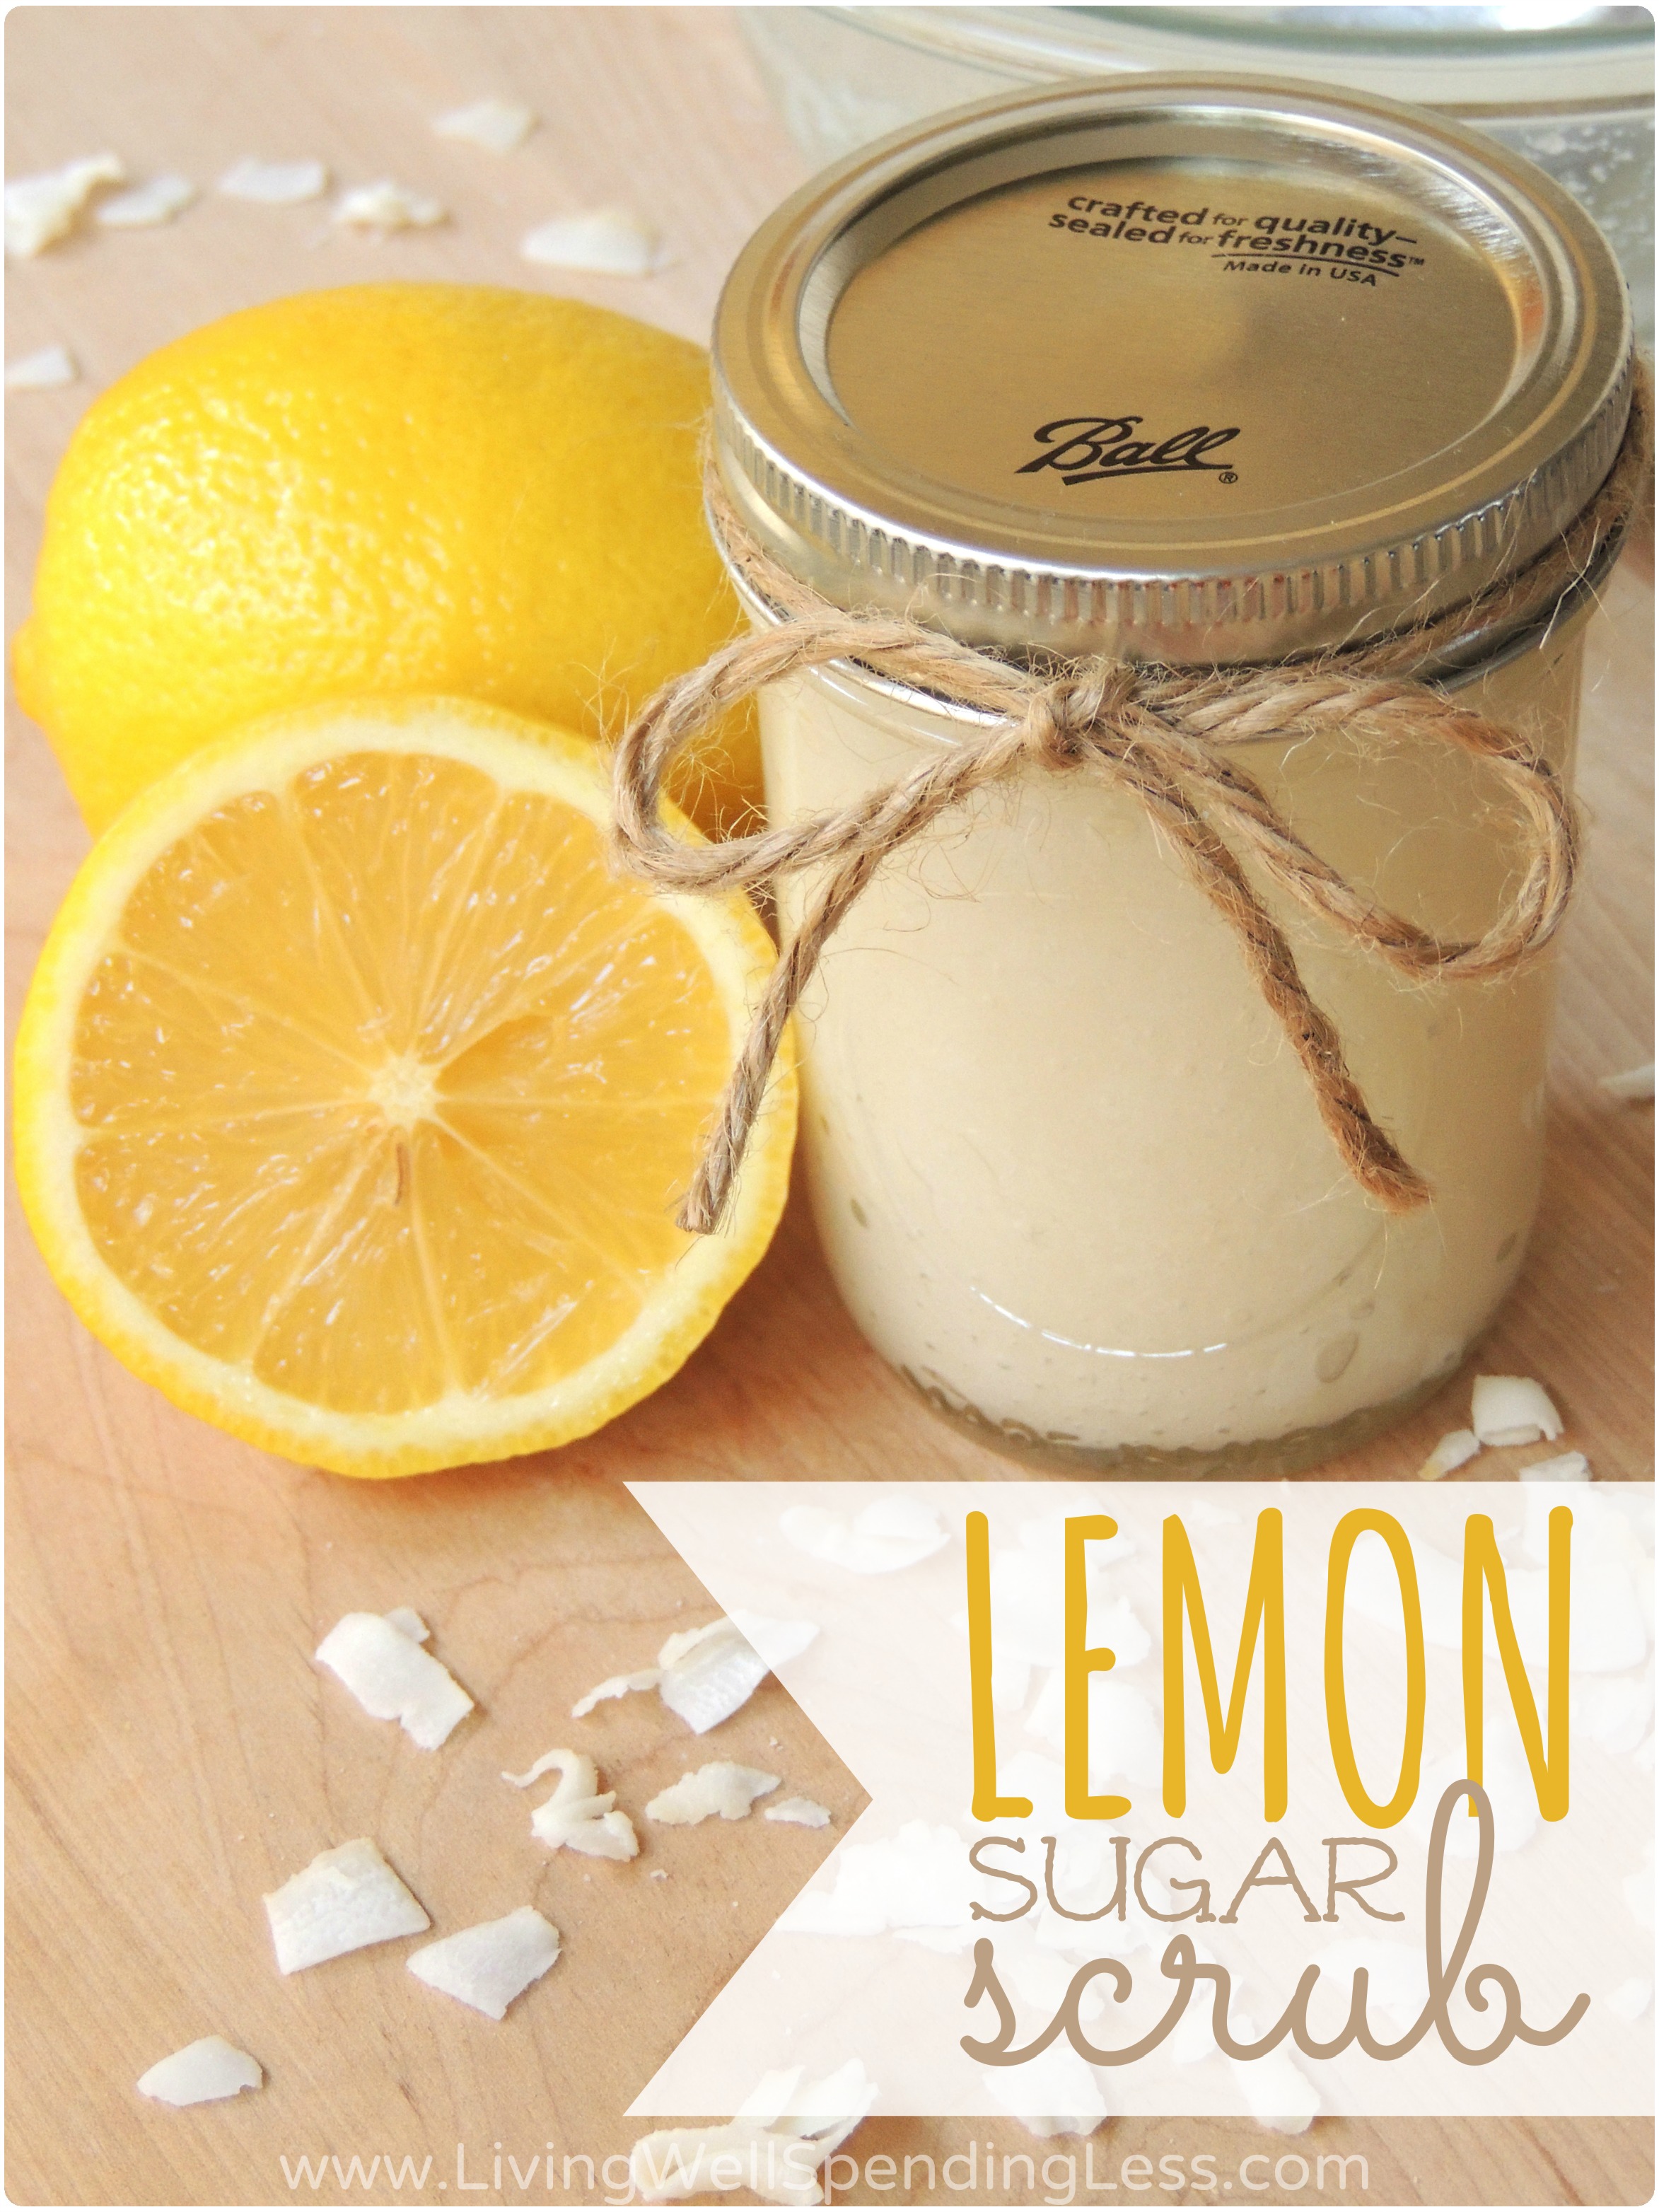
DIY Lemon Sugar Scrub

This is a guest post from Gabby at Essentially Eclectic
Happy Monday! This is Gabby back again from Essentially Eclectic, and today I wanted to share with you a quick tutorial on how to whip up your own simple sugar scrub for way less than the cost of expensive store-bought skin moisturizing and exfoliating products. If you’ve never made a sugar scrub before, you’re really in for a treat! It makes a great gift, and quite frankly with Mother’s Day just around the corner you simply can’t go wrong giving this scrub a try!
For this tutorial I will be making a lemon sugar scrub, but it is incredibly easy to adapt this recipe and come up with some amazing scrub creations. Feel free to play around with the type of sugar you use, the essential oils you scent it with, and the different carrier oils and other additives you can mix in. All of these ingredients can be purchased at your local grocery store or online, and your finished product will easily cost less than a quarter of what you might pay in stores. Even better, it won’t be full of the chemicals & preservatives often found in manufactured skin care items!
So let’s get started, shall we?
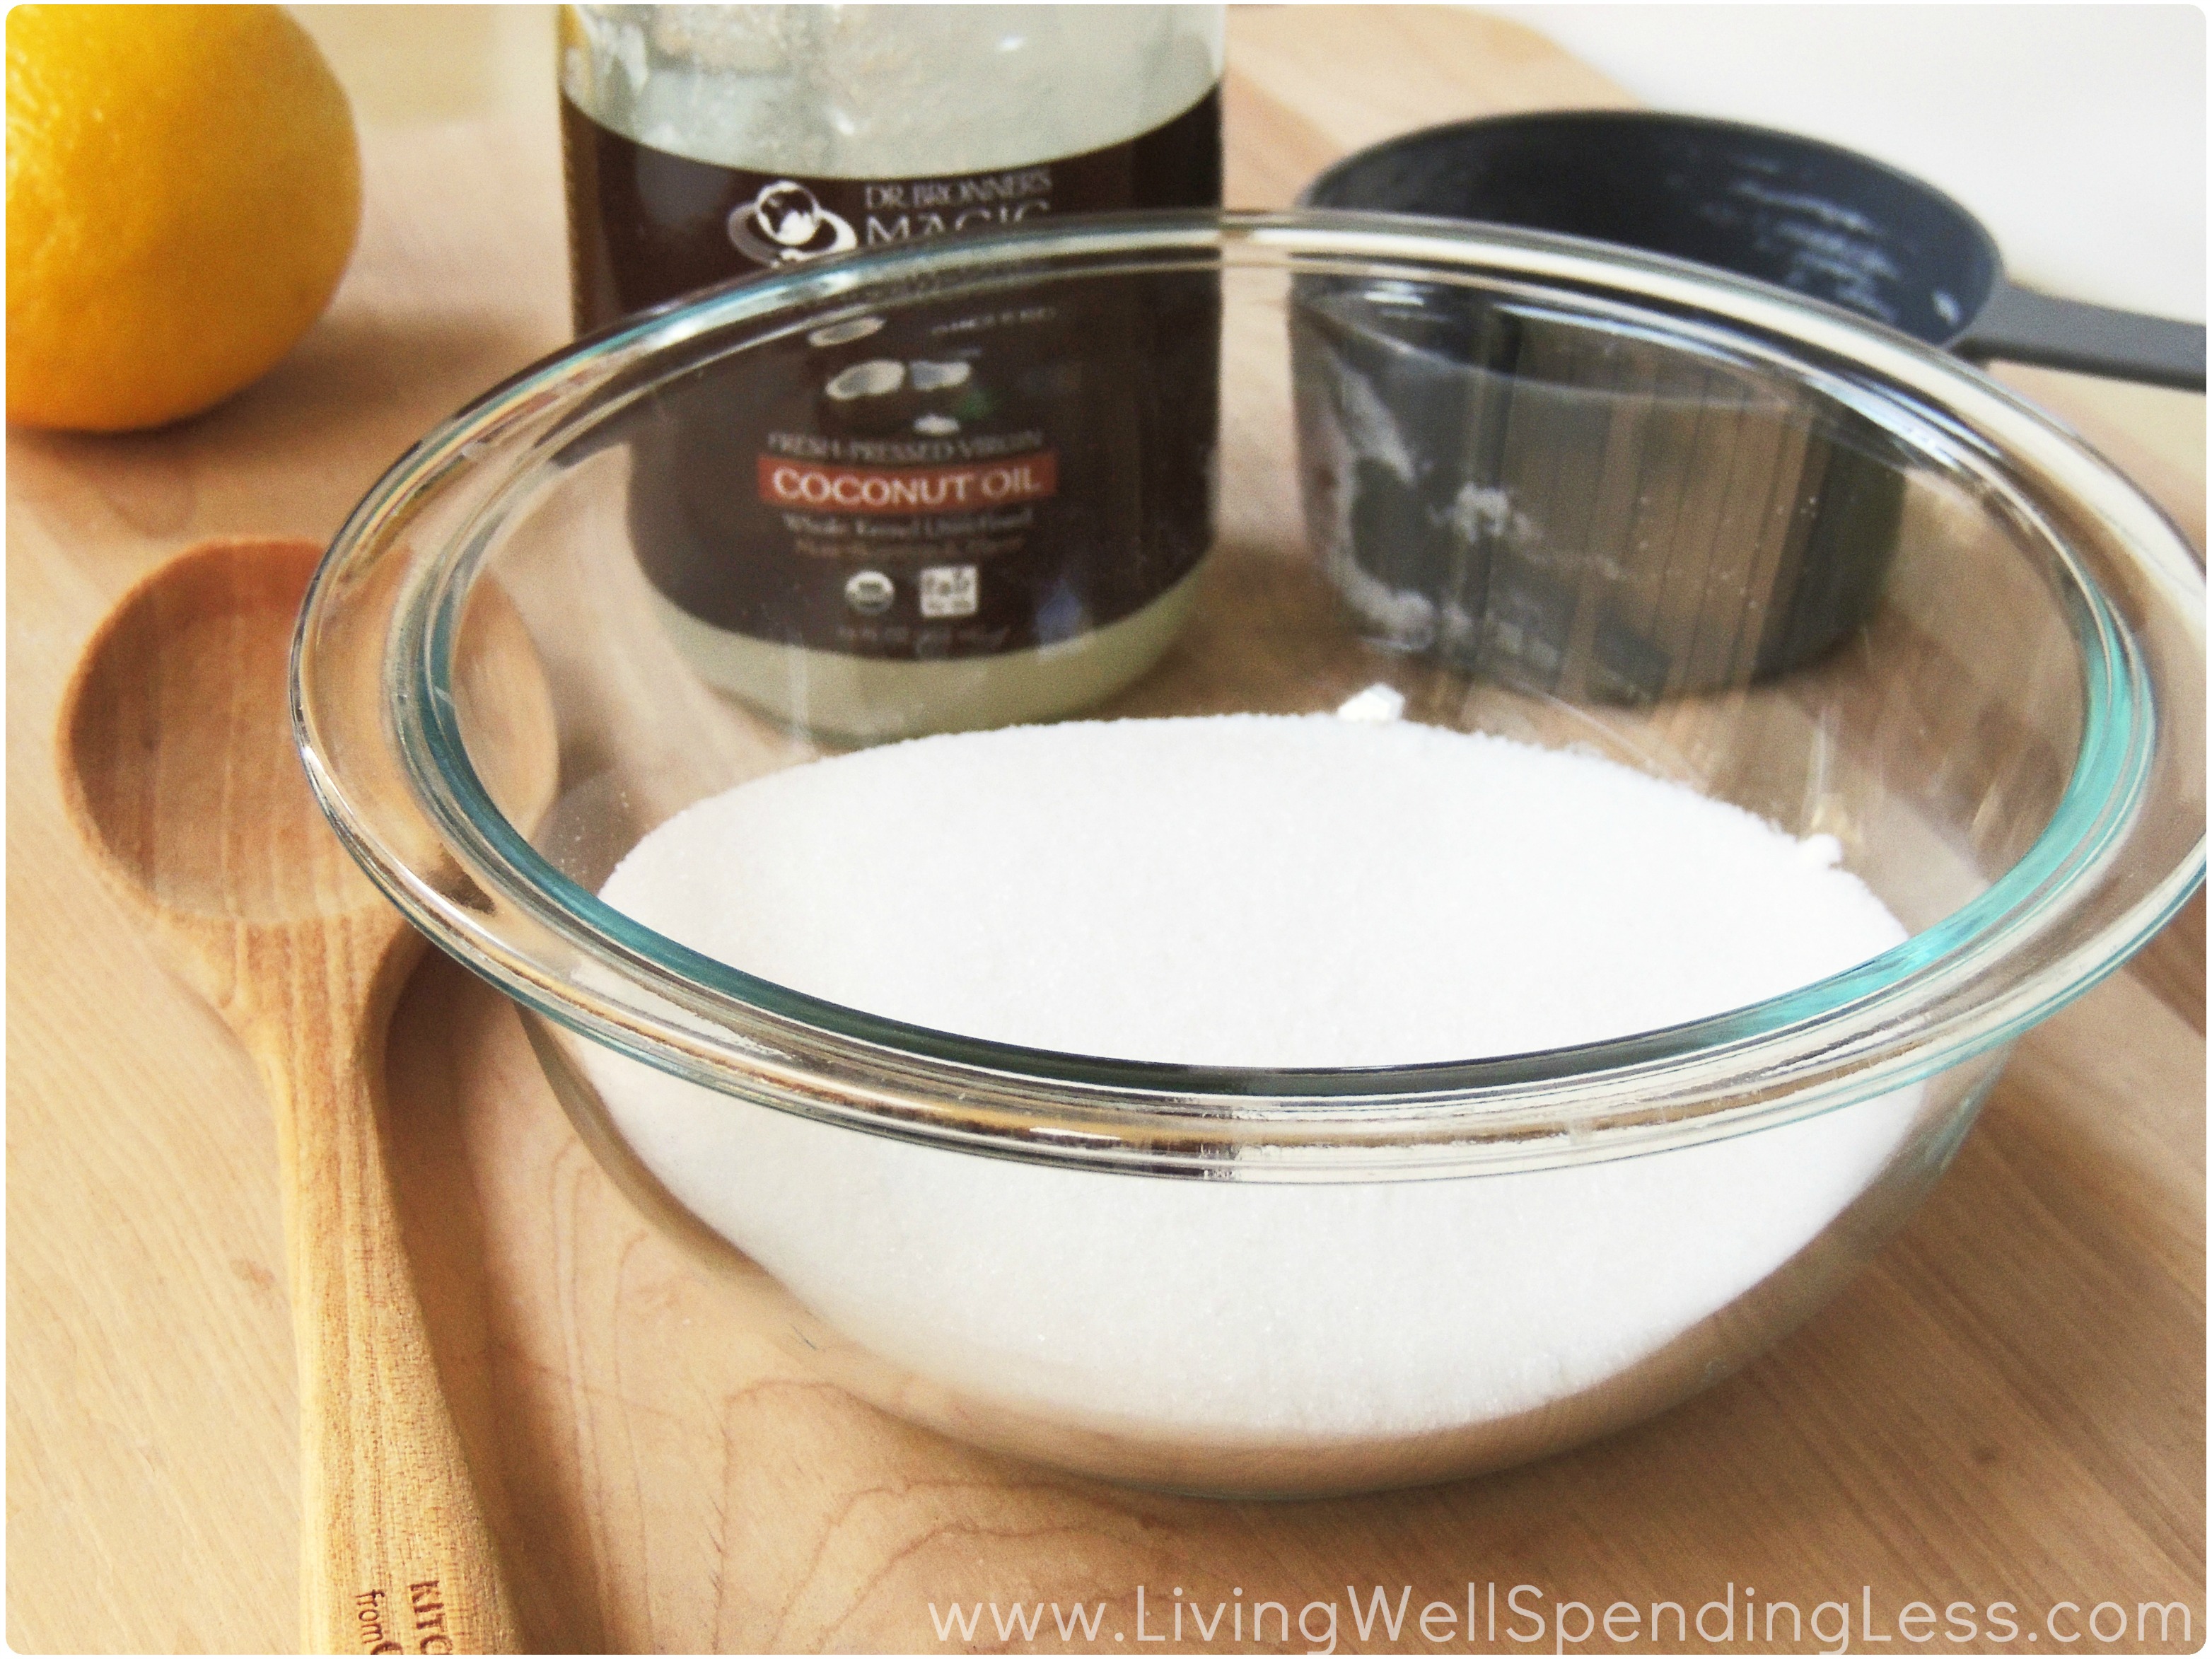
Here is what you need:
1 cup white sugar
1/4+ cups Coconut oil (substitutions listed below)
Lemon essential oil
8 oz. mason jar
Step 1: Measure out 1 cup of white sugar and place it in a mixing bowl.
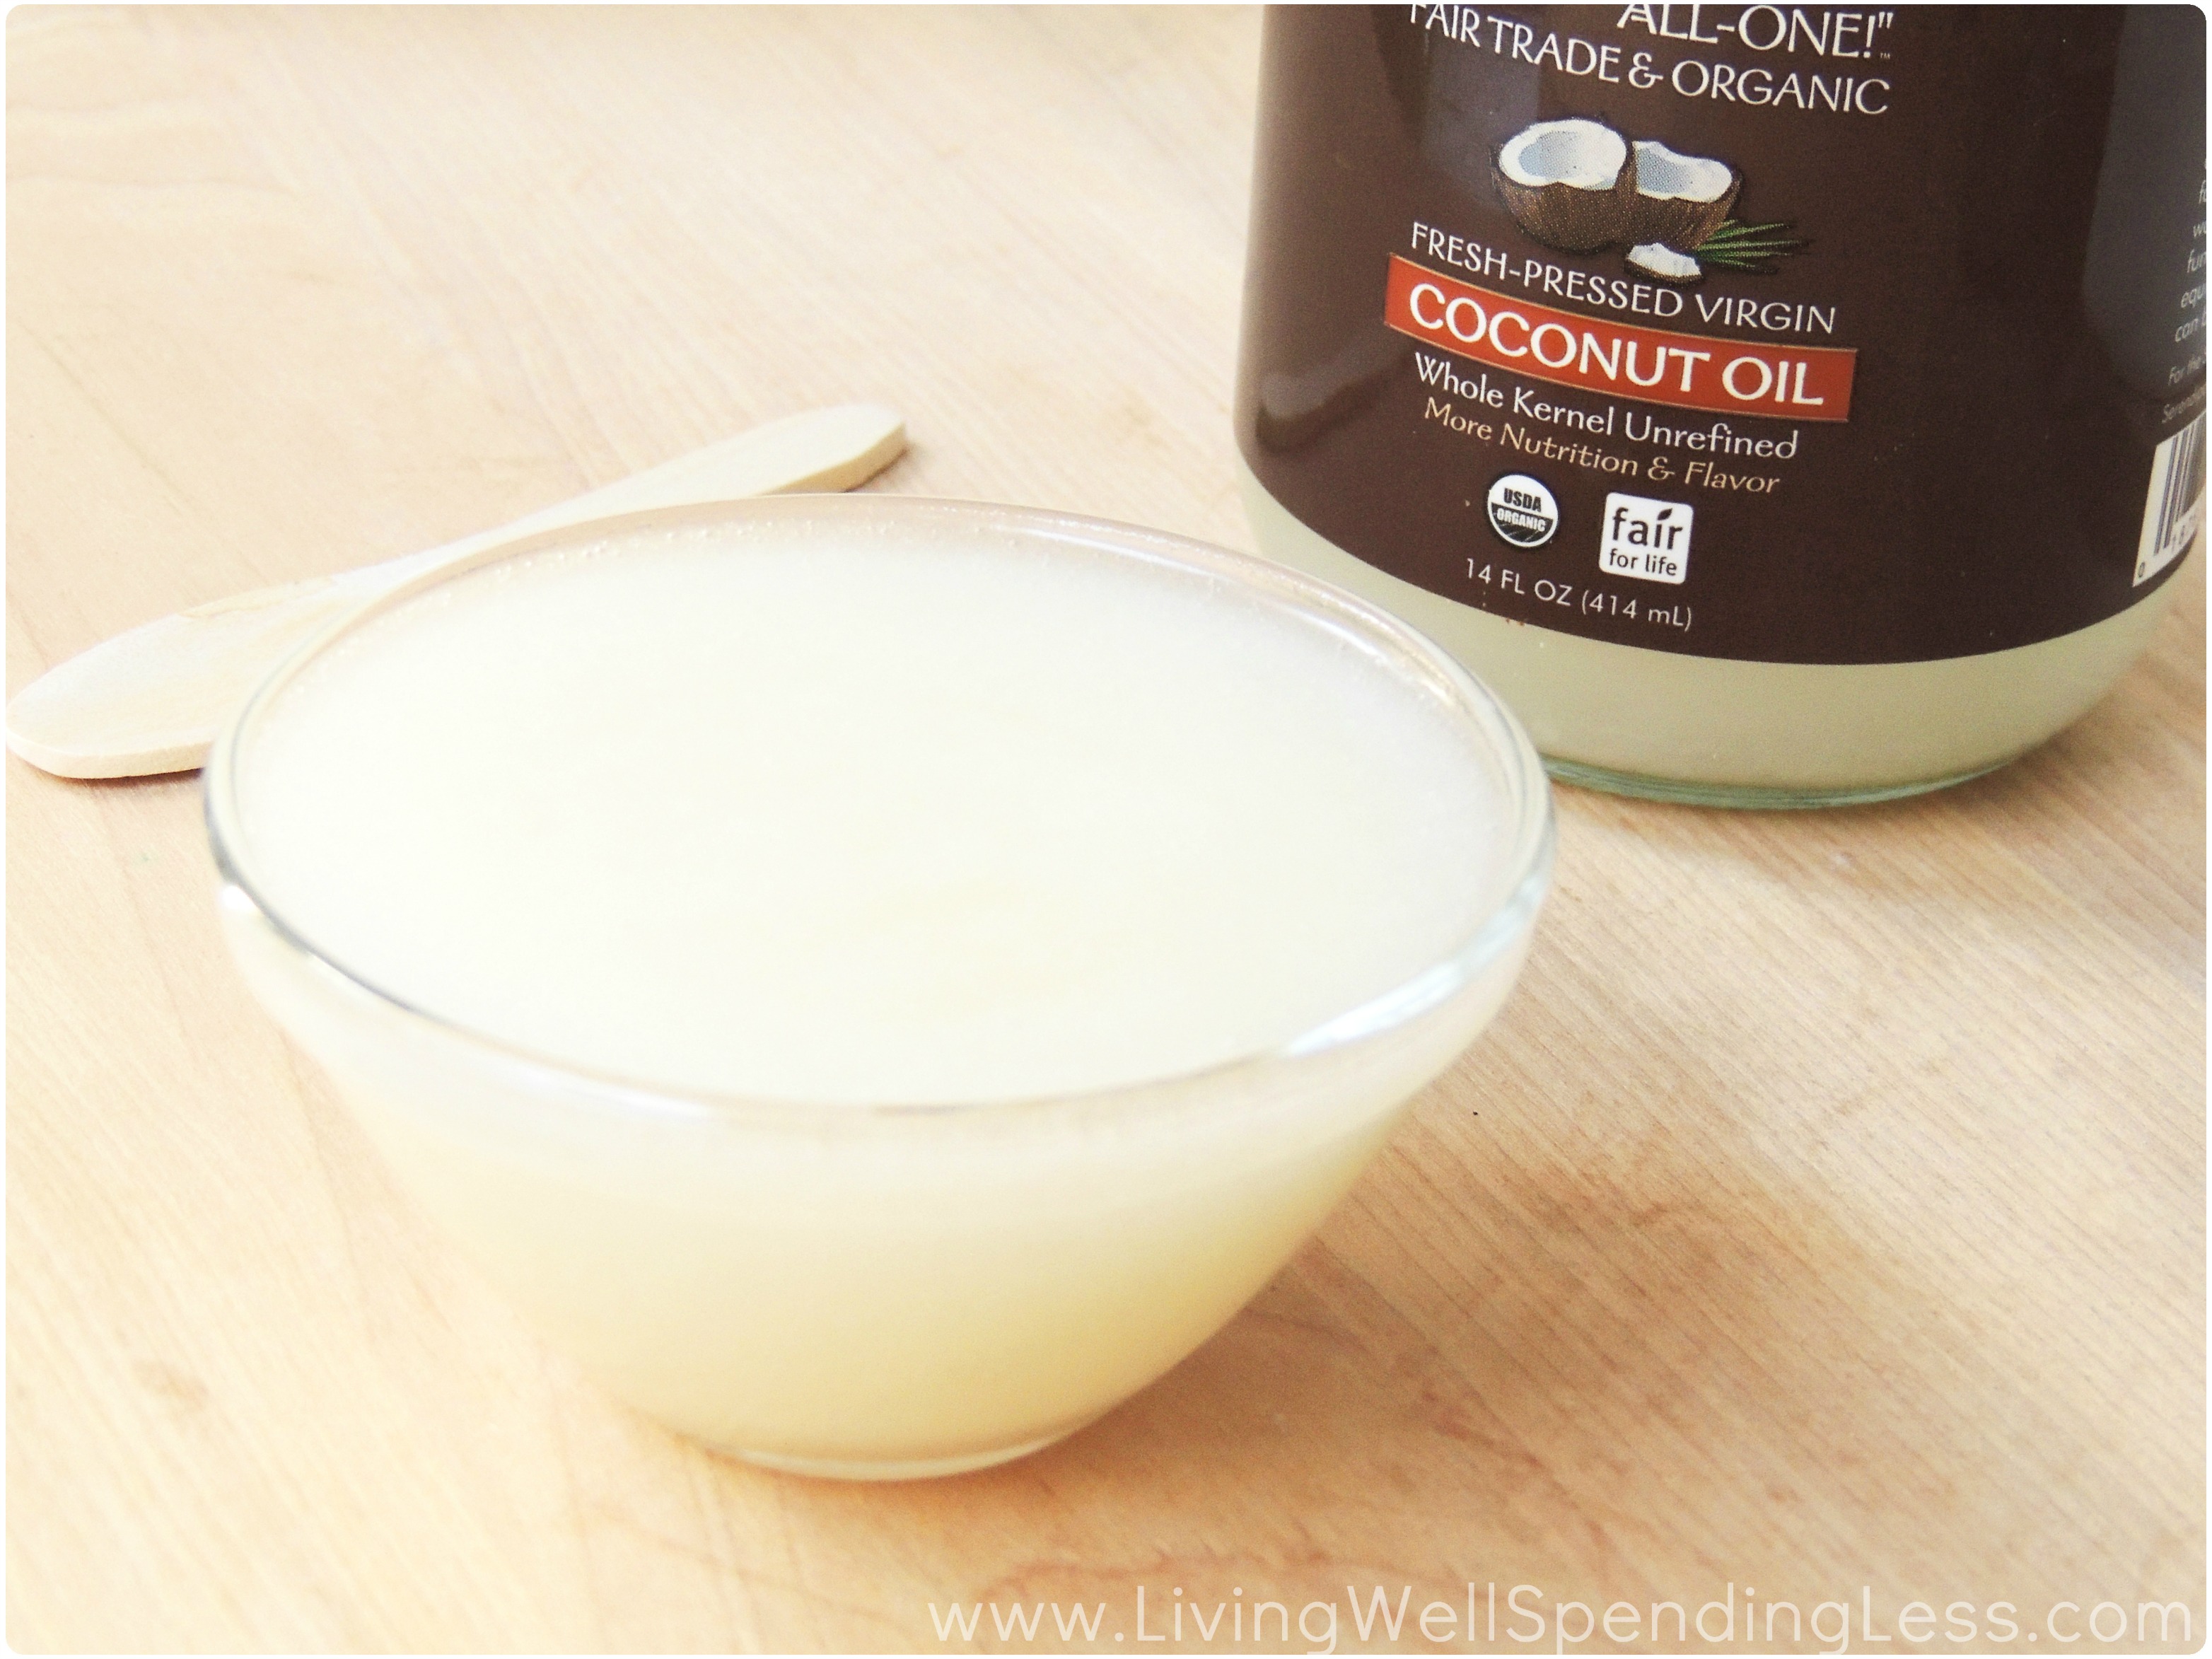
Step 2: Measure out your coconut oil. The amount of oil you use is up to you, but you might consider starting with 1/4 cup and going from there. If you’re allergic to coconuts, you could substitute coconut oil for almond oil, jojoba oil, grapeseed oil, etc. I chose coconut oil, however, since I love the slightly sweet scent it carries and because it is a solid at room temperature. As a result, I’ve found that it is marginally better at staying mixed in with the sugar. In addition to smelling fantastic, coconut oil is great for your skin (and even good for cooking!).
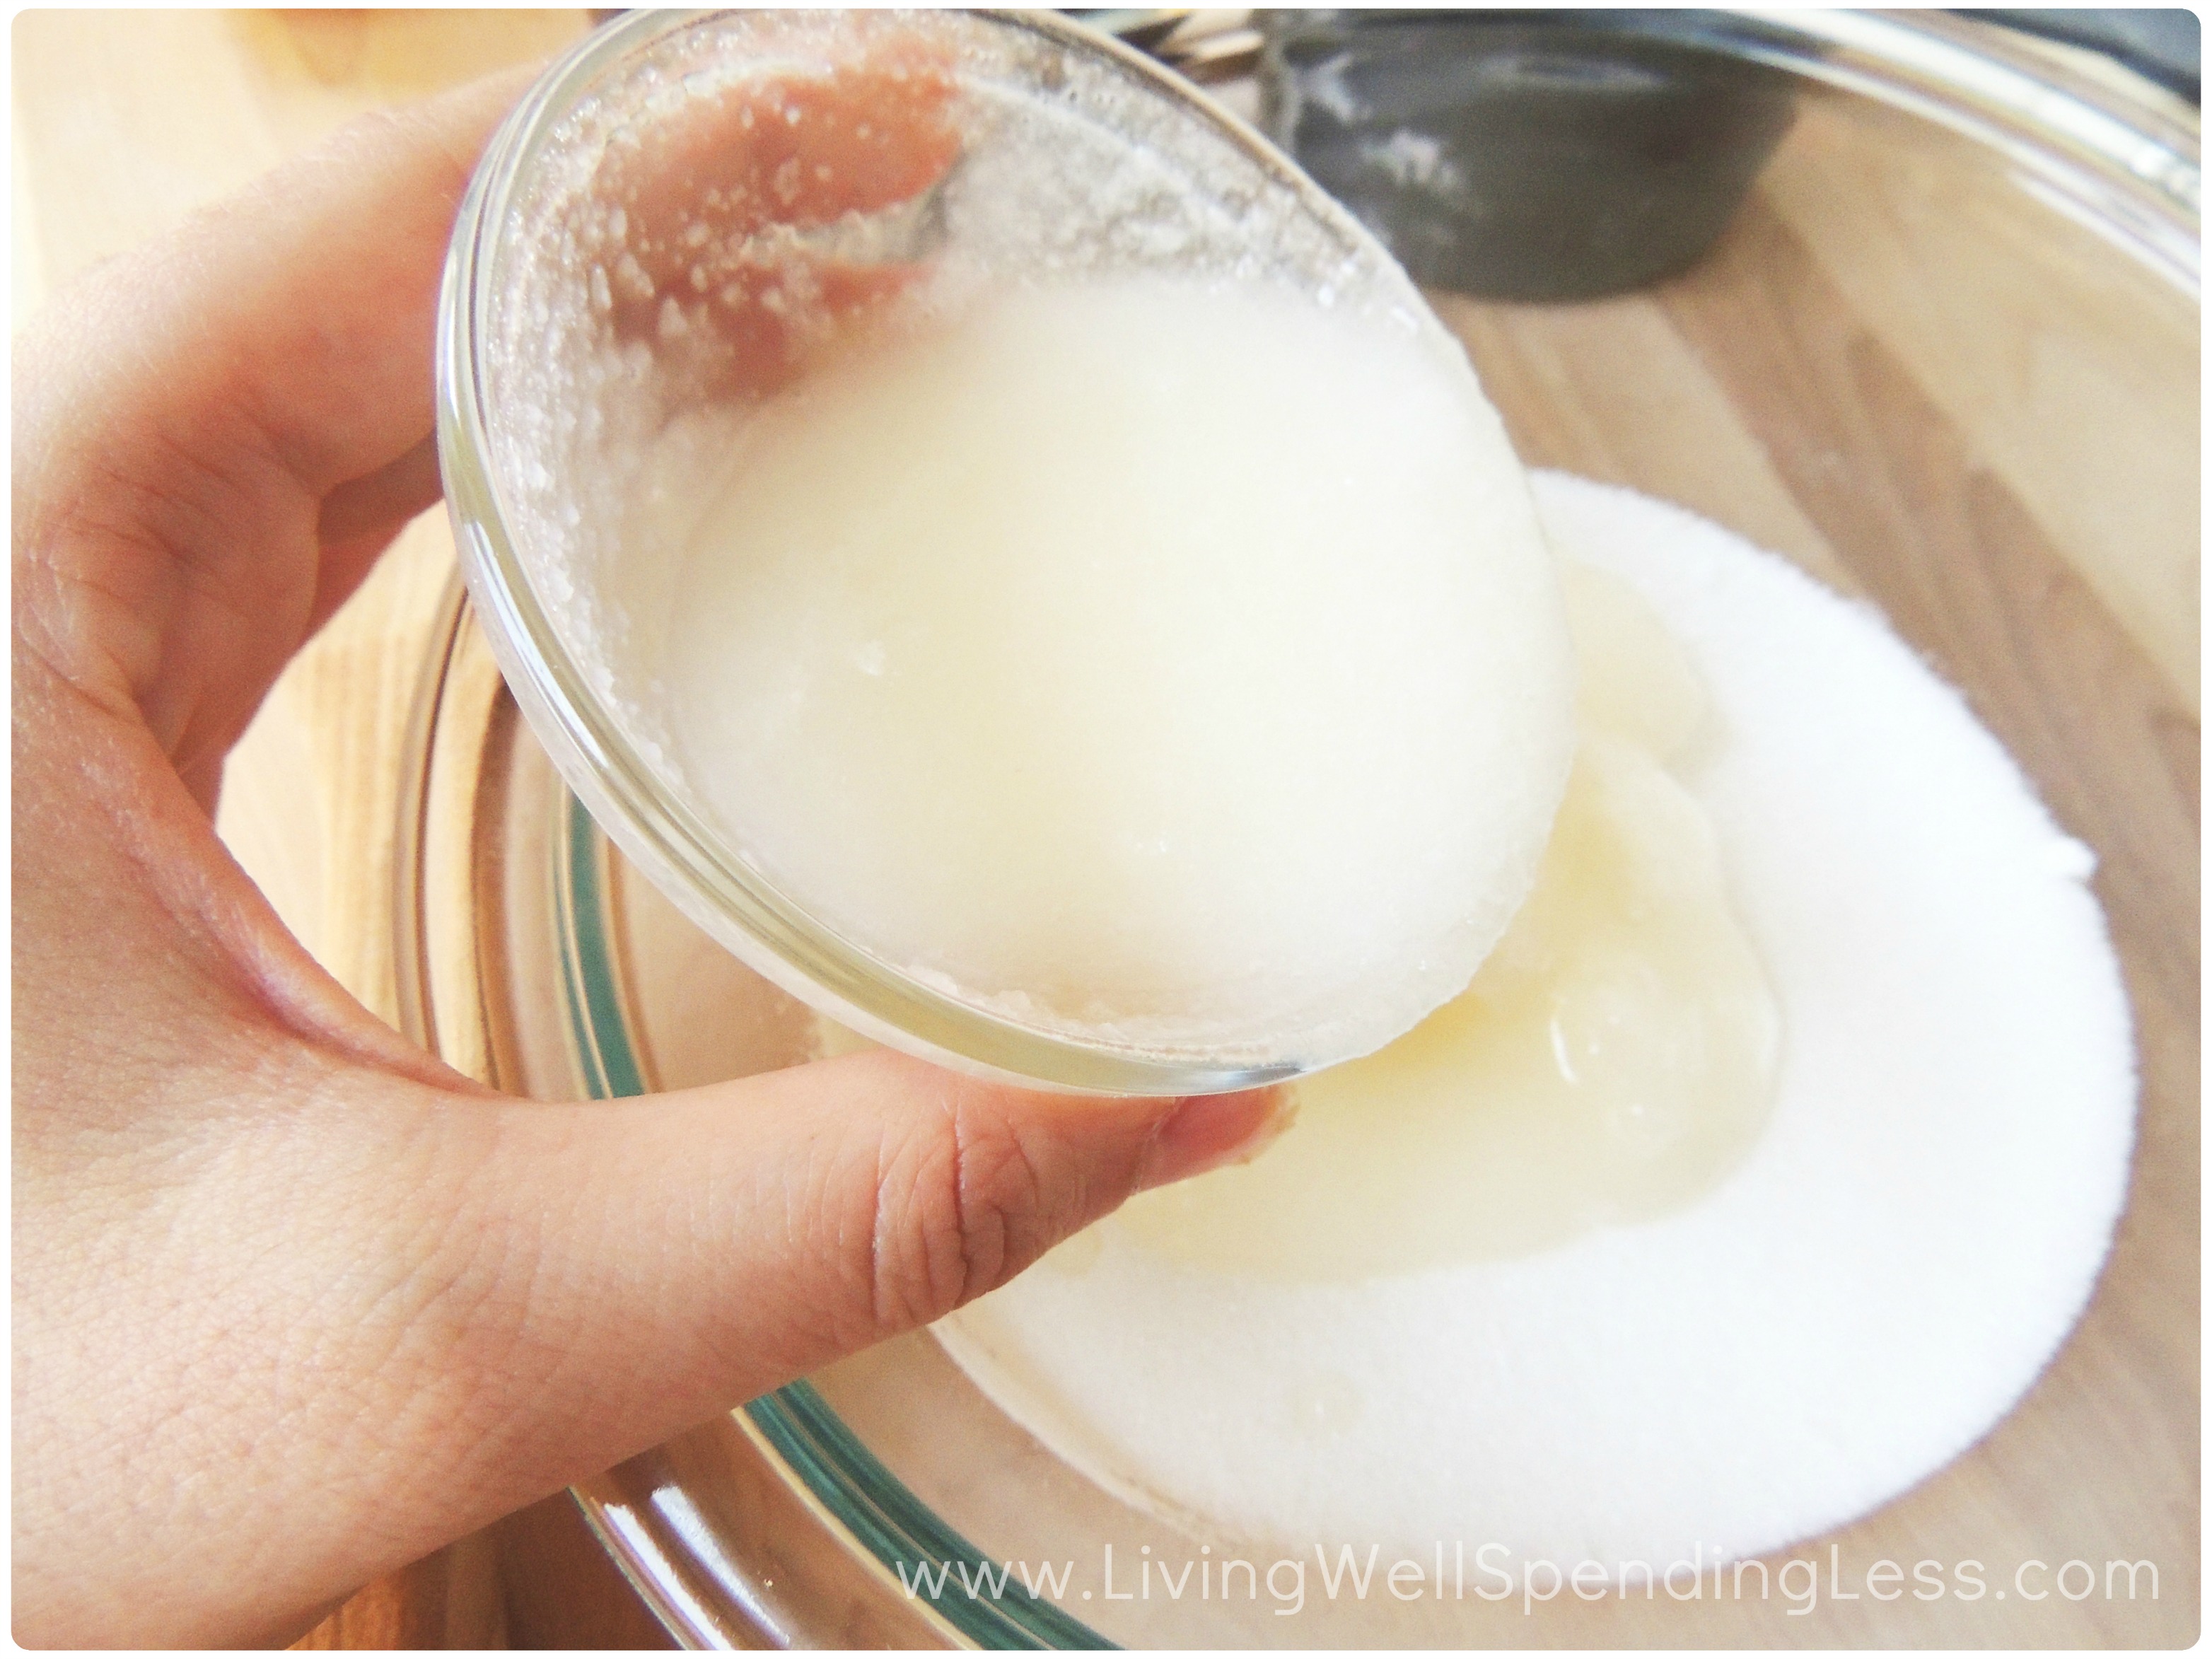
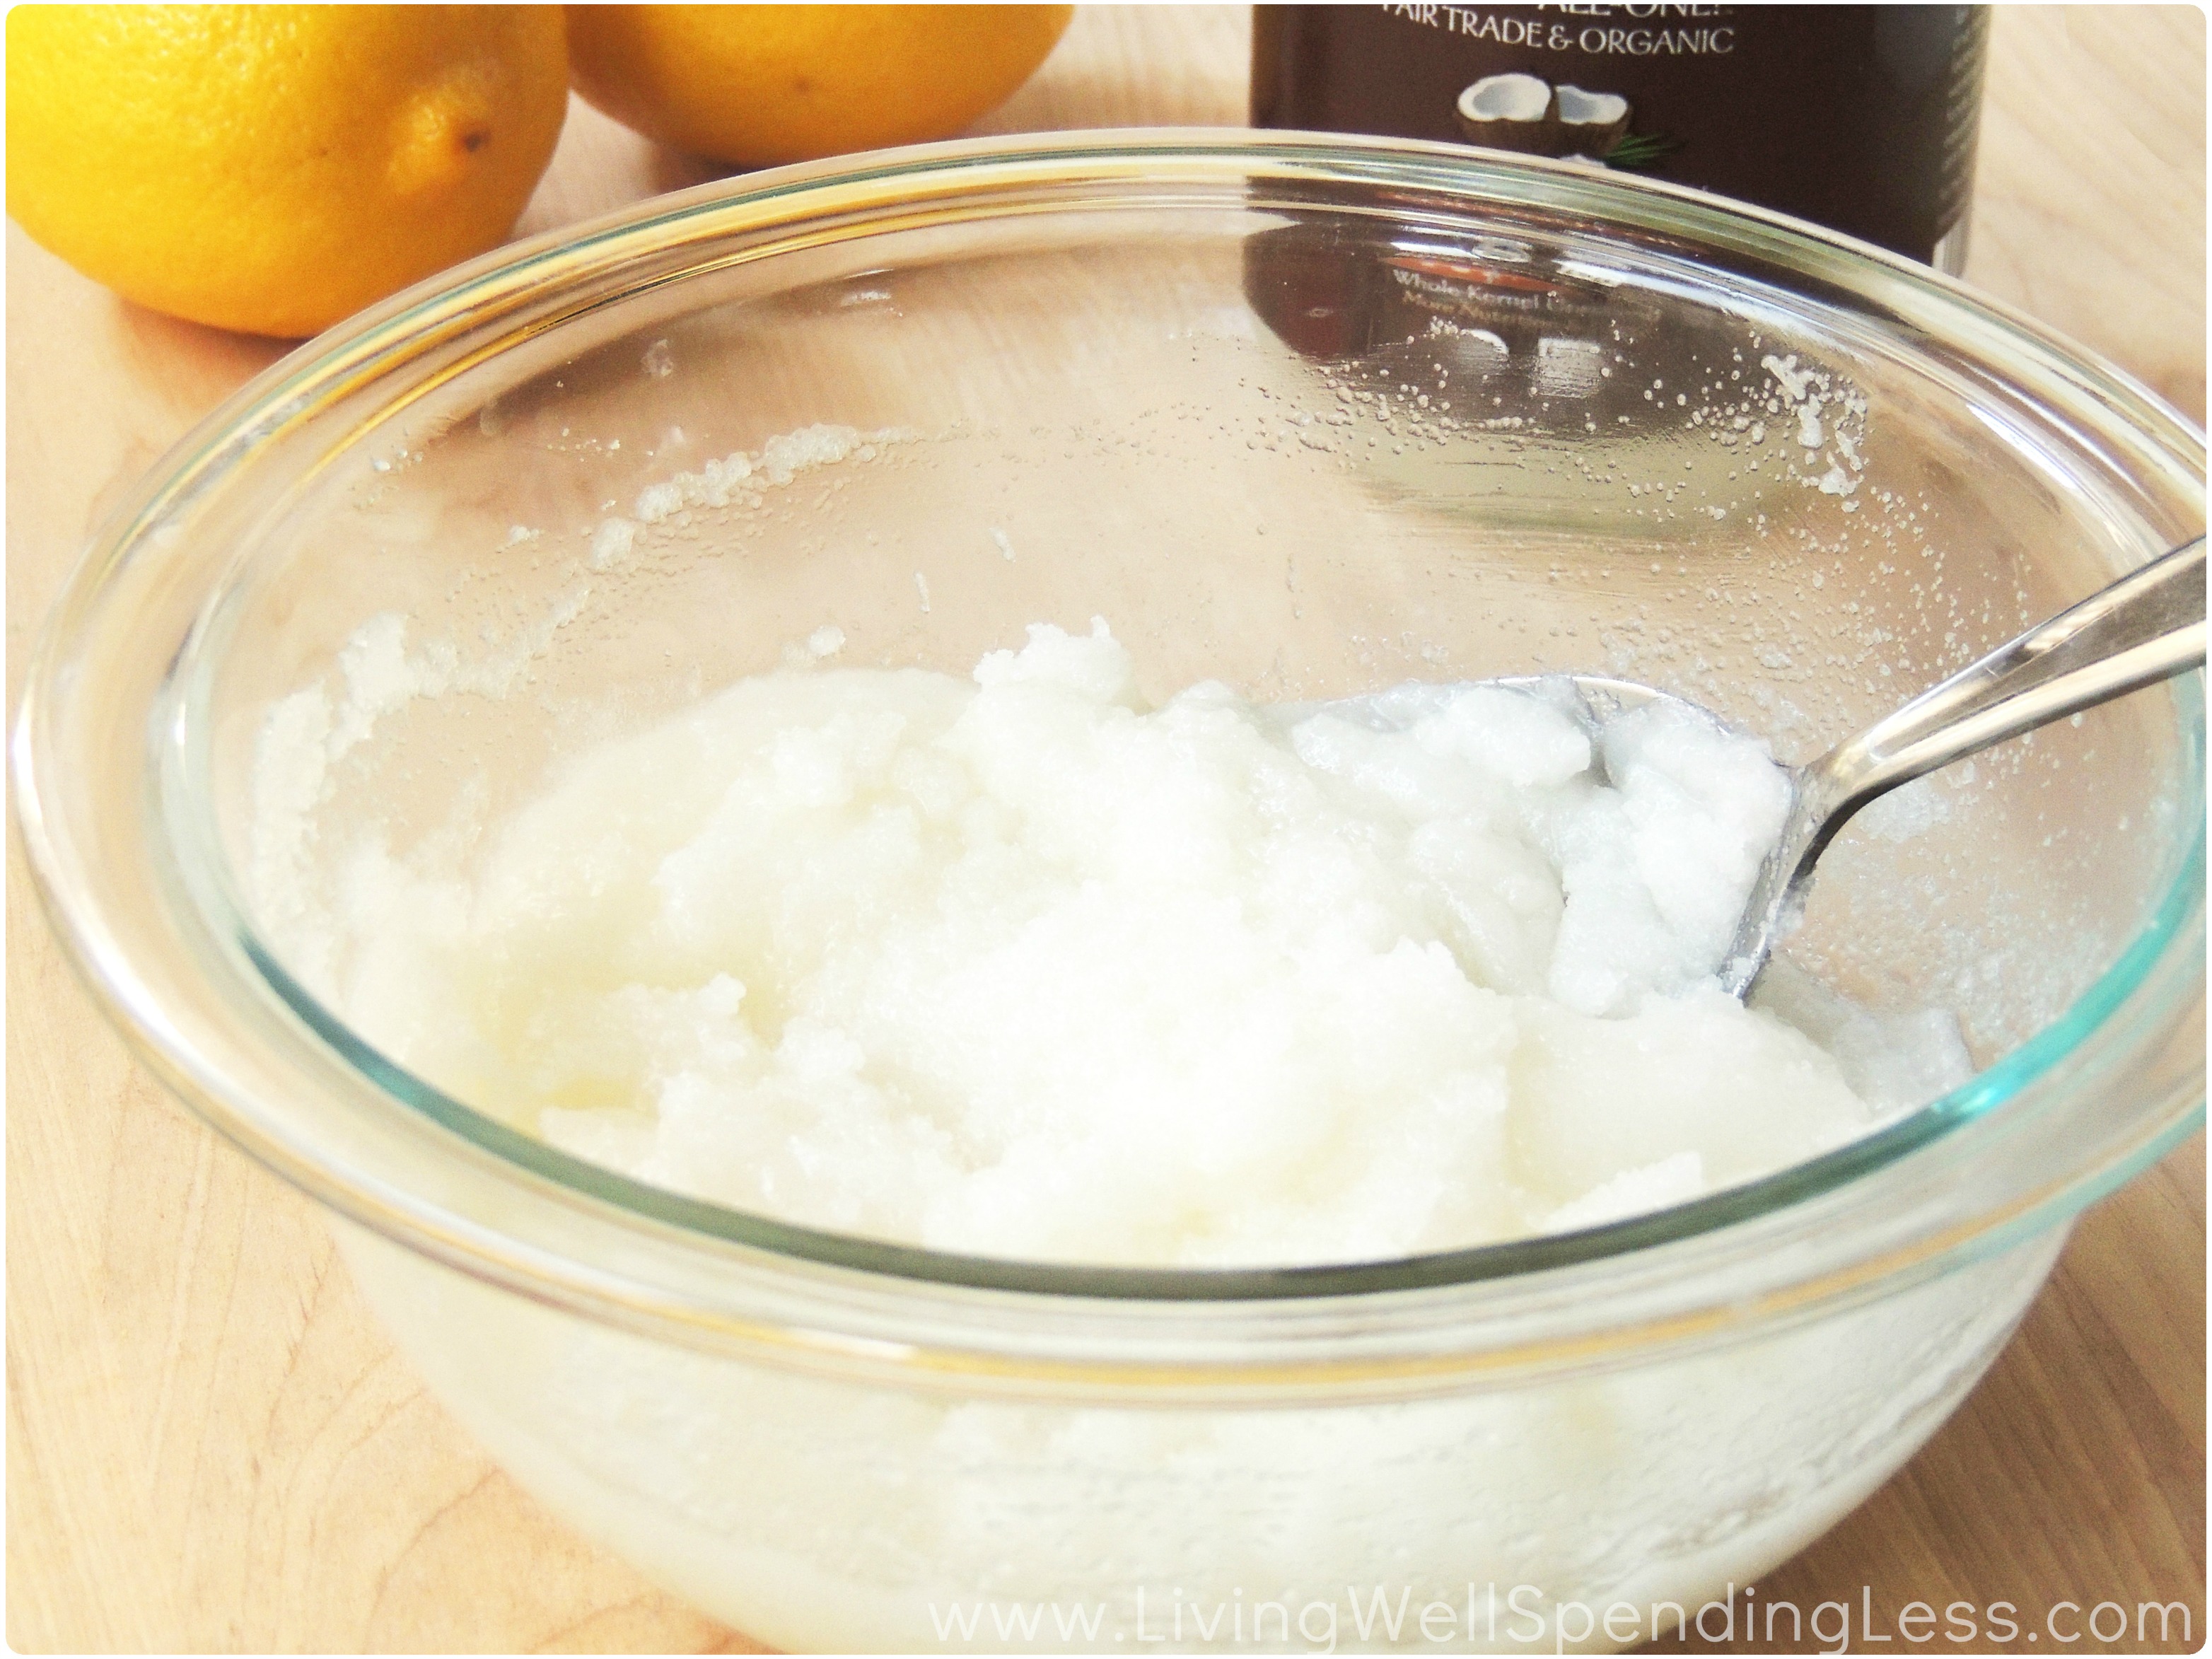
Step 3: Mix your coconut oil with your sugar until your mixture becomes almost light and fluffy looking, adding more or less coconut oil until you have your desired consistency. How moist you would like your scrub to be is completely up to you!
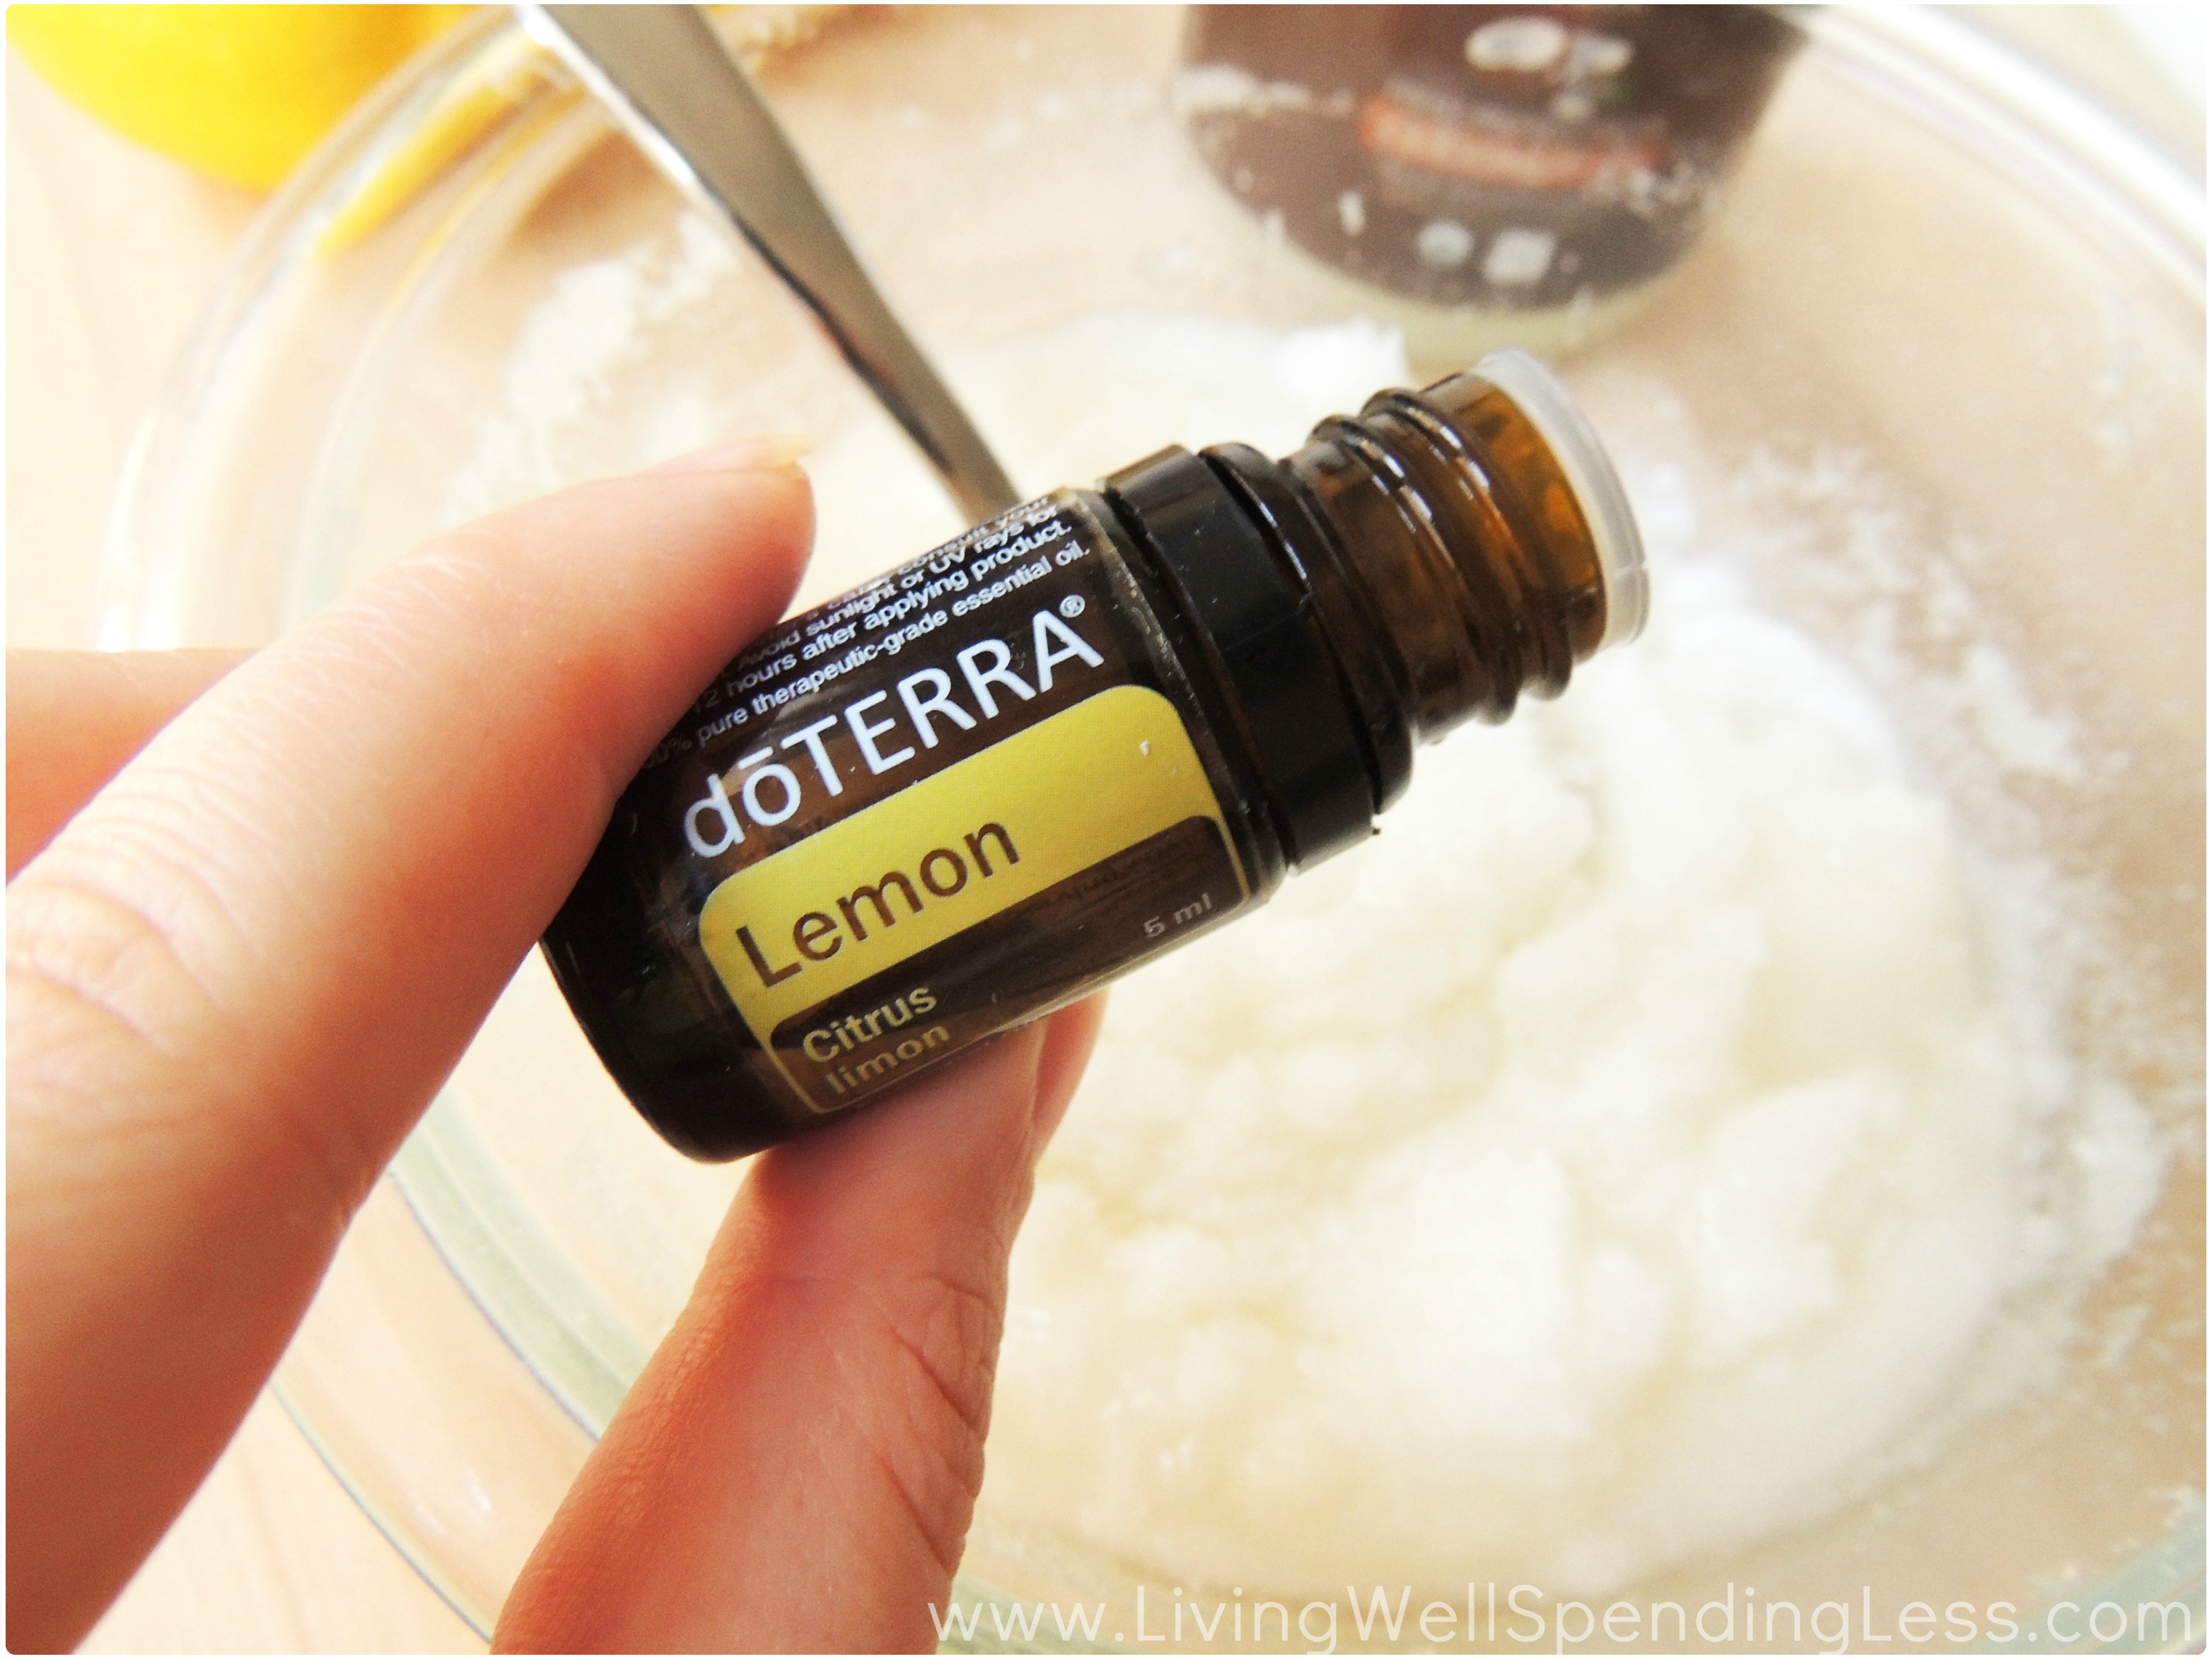
Step 4: Add your essential oils to give your mixture a nice lemony scent! Personally, I love doTERRA’s lemon essential oil since it smells particularly lemony in my opinion, but you could put in any essential oil you prefer. I put in about 15 drops of this essential oil, but you may opt for more or less.
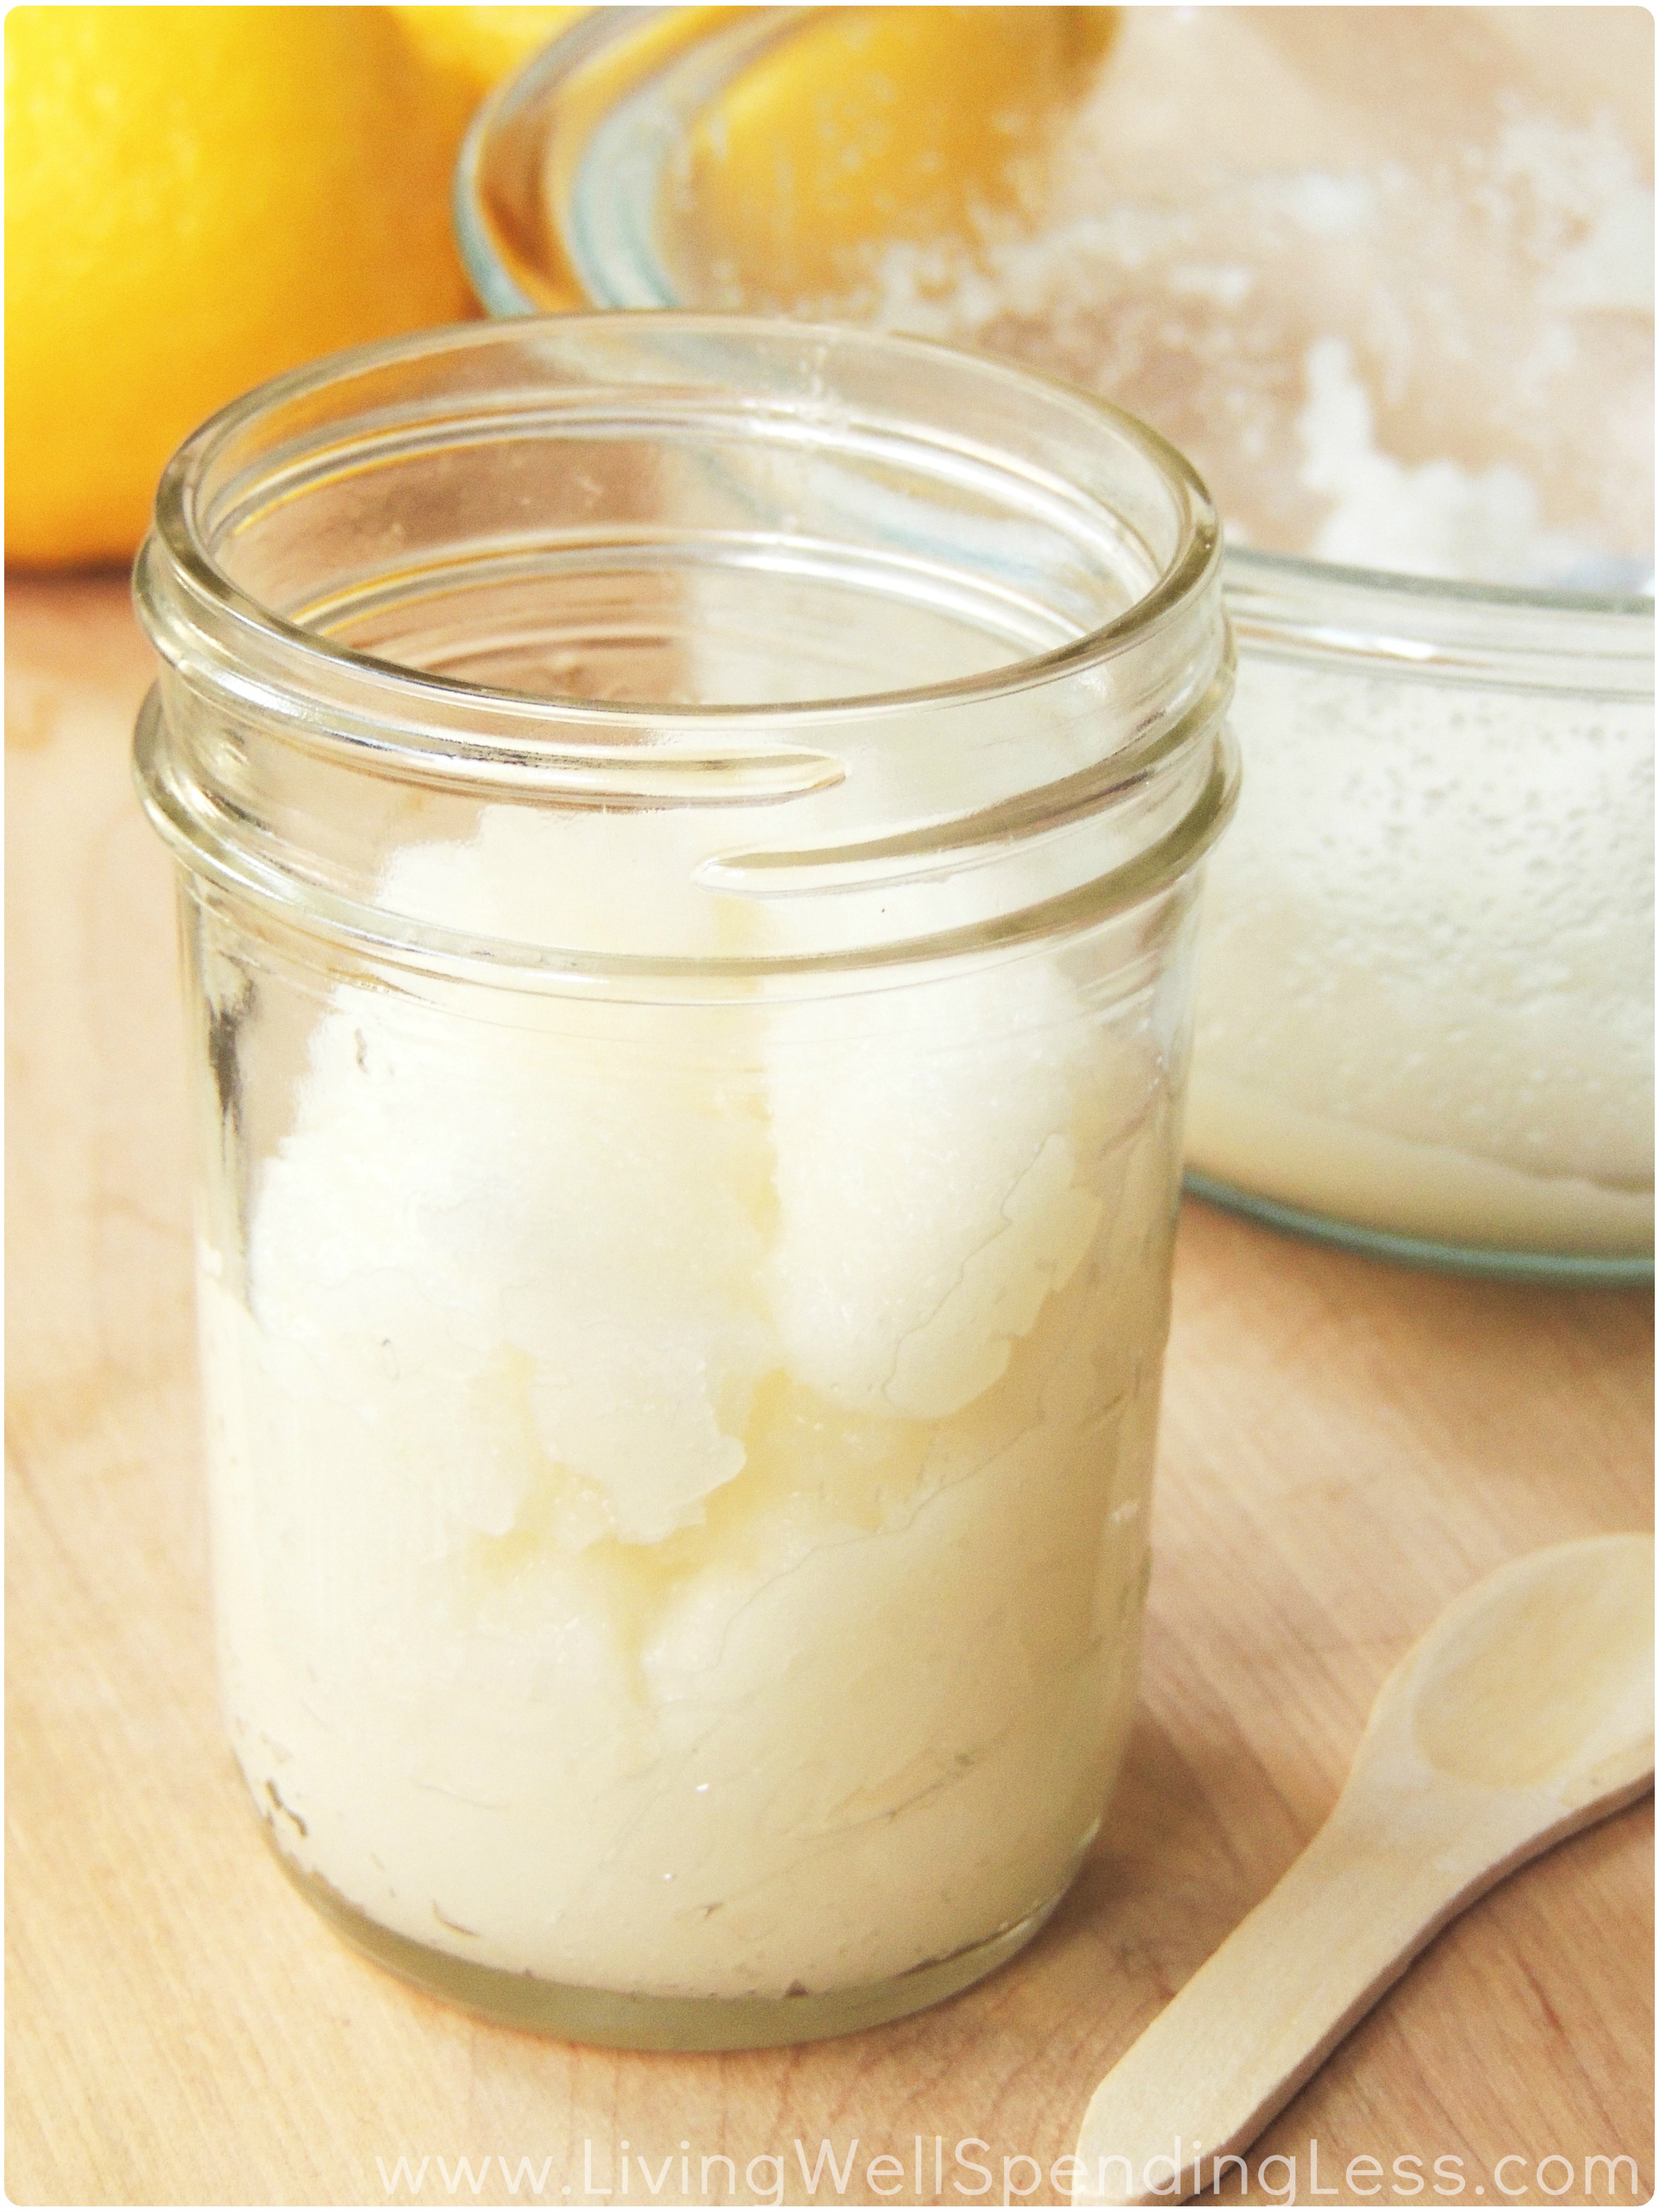

Step 5: Place your sugar scrub in a clean 8 oz. mason jar (wide mouth or regular mouth size, as shown above), making sure that no water is left over in your jar from washing it. Then enjoy! To use your scrub, scoop out about a spoonful and rub it in your hands as though you were washing your hands with soap, allowing the oil to moisturize your skin while the sugar exfoliates. Rinse your hands with cool water once you have worked in the scrub and enjoy your silky smooth skin!
Gabby Whitaker of Essentially Eclectic is a DIY/Craft/Lifestyle Blogger from Phoenix, Arizona. After moving to Boston, Massachusetts in the Summer of 2012, she started blogging as a way to share her crafting creations, cooking escapades, and adventures in Boston with friends and family across the country. Some of Gabby’s favorite things include Chai lattes, Downton Abbey, cozy bookstores, Netflix marathons, and of course, blogging!
* * *
What’s your favorite sugar scrub scent?
Pin It
The post DIY Lemon Sugar Scrub appeared first on Living Well Spending Less™.
April 20, 2014
Weekend Wandering


Happy, happy Easter to you all! I hope you are all having a wonderful and blessed weekend!
 My family and I got back yesterday from our quick little 2-day cruise on the Carnival Sunshine, and it was so nice to get away together, even if just for a couple of days. Living in Florida, cruising has always been our go-to vacation of choice because it is just so convenient and cost effective. You can score some amazing last minute deals if you don’t have to fly, and once you are on board the ship, the food, entertainment, and even the kids club is all included! We were super impressed with the Sunshine! The 4-slide water park was SO much fun, and the food was seriously the best we’ve ever had on a cruise. If you are considering a cruise in the near future, I highly recommend it!
If you haven’t already, be sure to enter to win this amazing Financial Legacy prize pack! In addition to Dave Ramsey & Rachel Cruze’s amazing new book, Smart Money Smart Kids, it also includes The Legacy Journey financial course and Financial Peace Jr. kits for each child in your family. The giveaway closes TONIGHT at midnight and we will pick a winner tomorrow morning, so be sure to head over to this post to enter!

And now, without further ado, here is what I loved this week:
* * *
There were several fresh & healthy vegetarian recipes shared this week that sounded absolutely delicious! This Skinny Gorgonzola Pasta from Love Food, Will Share is definitely right up my alley. I love that it calls for fresh roasted tomatoes.

Next, this Spicy Black Beans and Sweet Potatoes from Whole Food Mom on a Budget sounds like a veggie lovers dream. Yum!

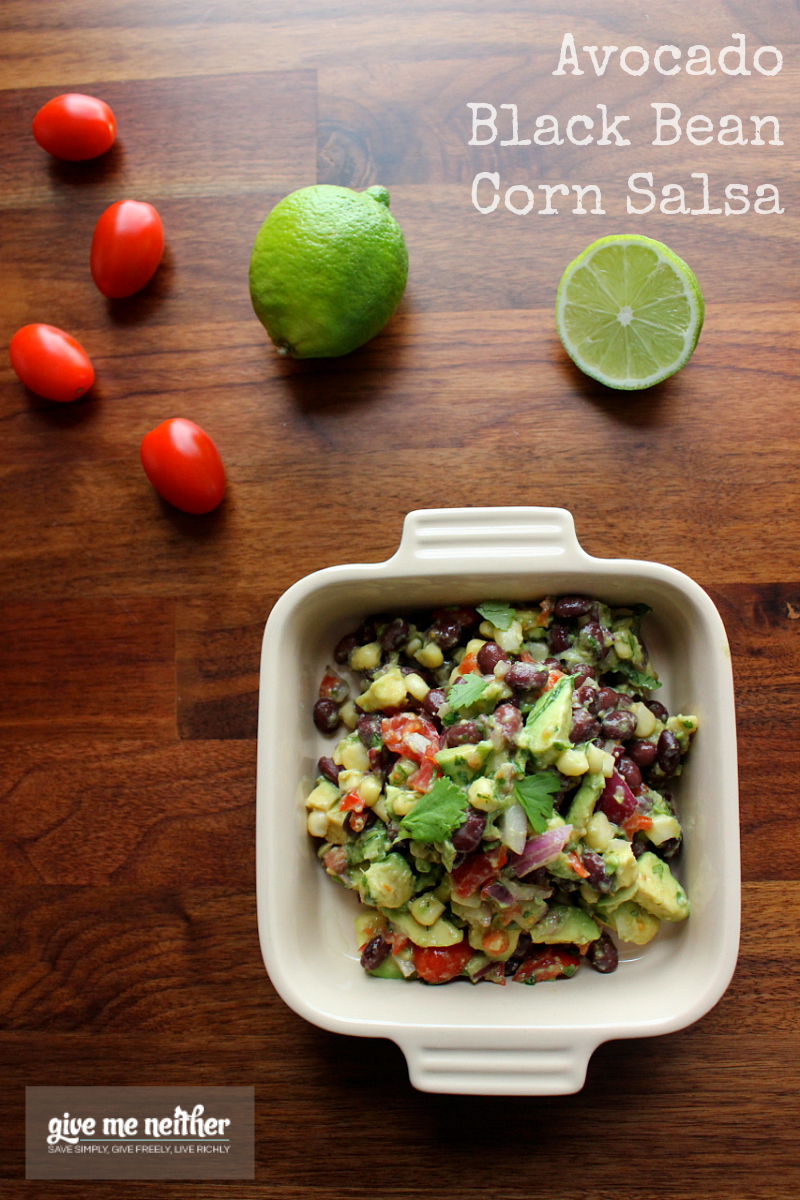
I’m also drooling over this Avocado Salsa Dip with Black Beans and Corn from Give Me Neither! I’ll bet the grilled corn gives it an awesome smoky flavor.
I’m quite certain this Mexican Fruit Salad from Posed Perfection could easily become a new family favorite!

Love dill as much as I do? Earning & Saving with Sarah Fuller has 6 Foods That Love Dill!

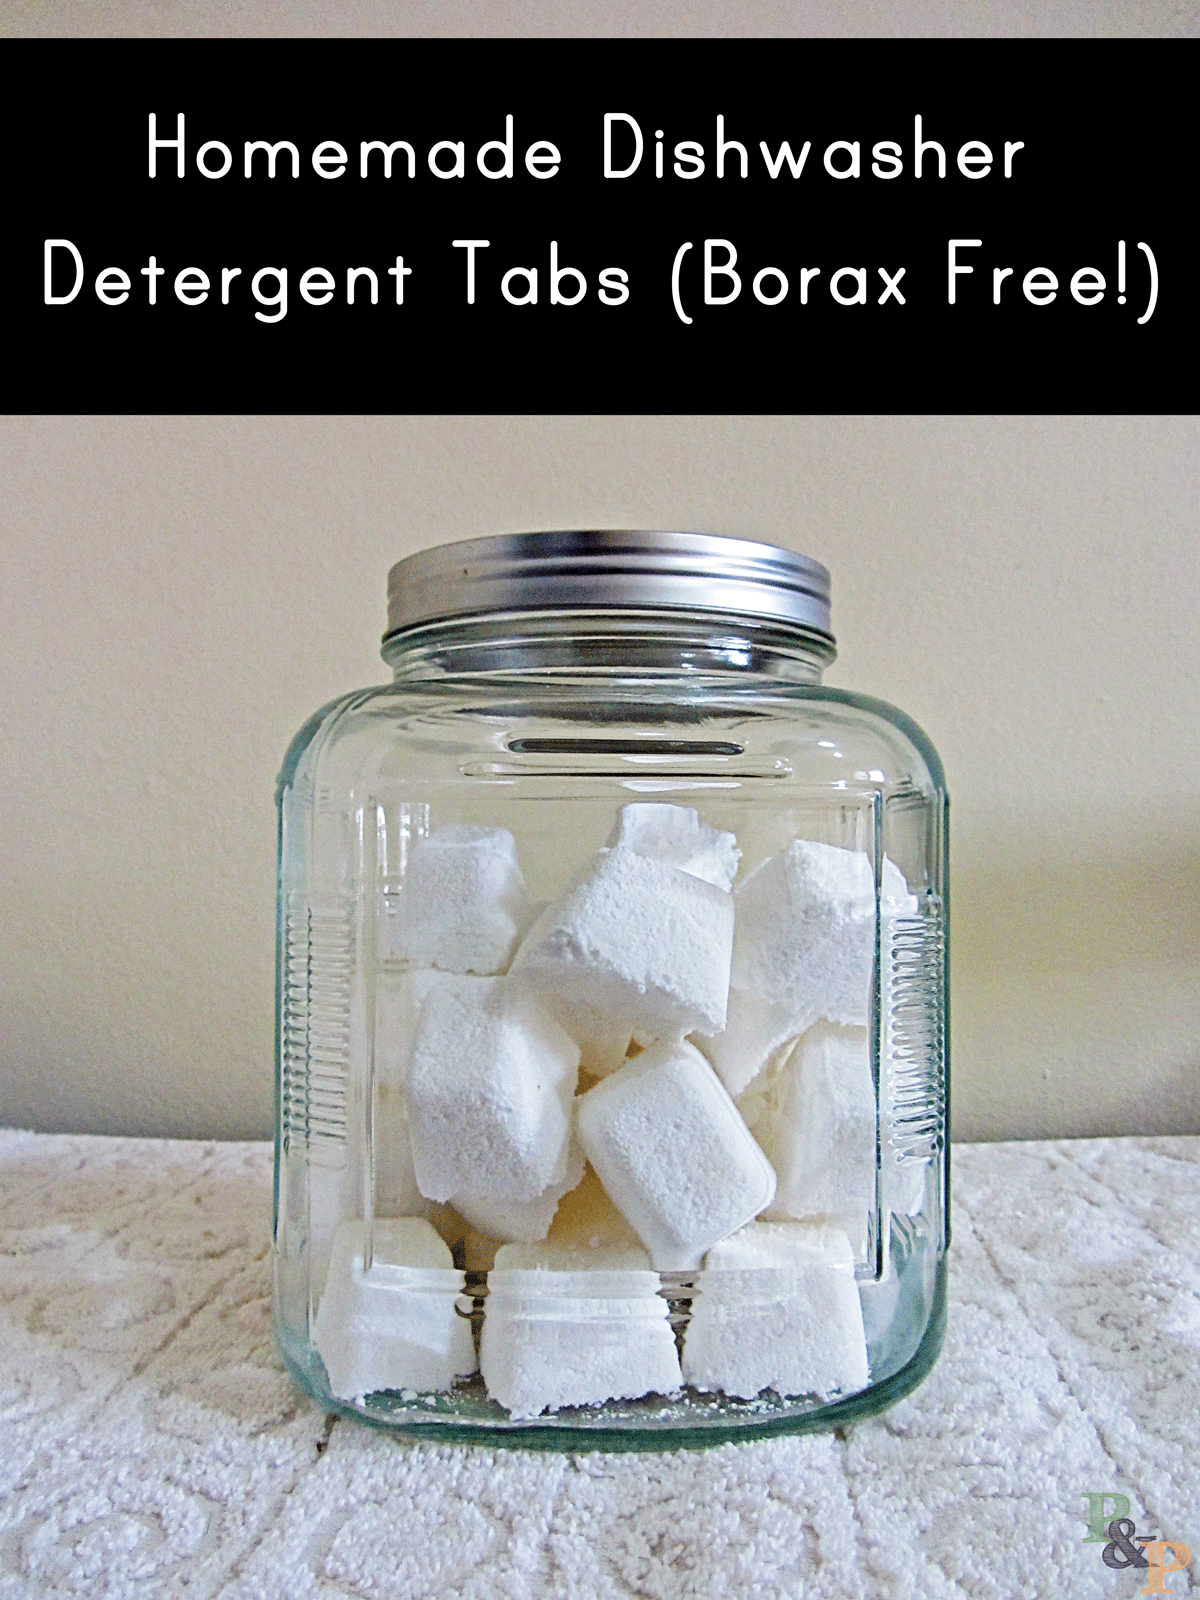
Moving on to some great DIY projects and useful tips. Pins & Procrastination has a recipe for Borax-free Homemade Dishwasher Detergent. Each tab will only cost you about 9 cents!
I want to raise my own chickens so badly! Teaching Free-Range Chickens to Come Home from Taylor Made Ranch is a post I’m definitely sharing with my husband! Too bad our deed restrictions prohibit it!

I wish I had this post several years ago when my girls were younger. 5 Ways to Make Camping with Toddlers Easier from The Budget Mama would have been a life saver!

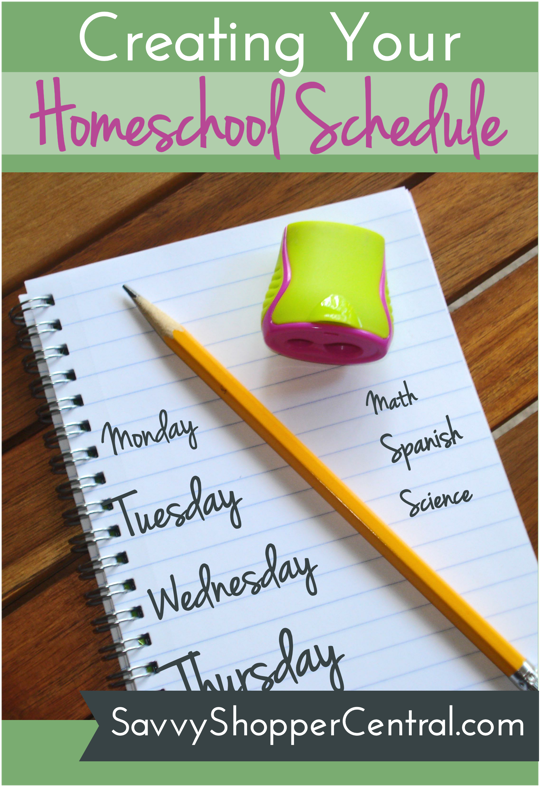
We are not homeschooling this year but when we were, managing our schedule was definitely one of my biggest challenges. Savvy Shopper Central provides great tips for Creating Your Homeschool Schedule.
While blogging is now very much my full time, it wasn’t always that way. I loved this insightful post from An Inviting Home about why she’s not a full-time blogger. Such a great reminder on the importance of balance!

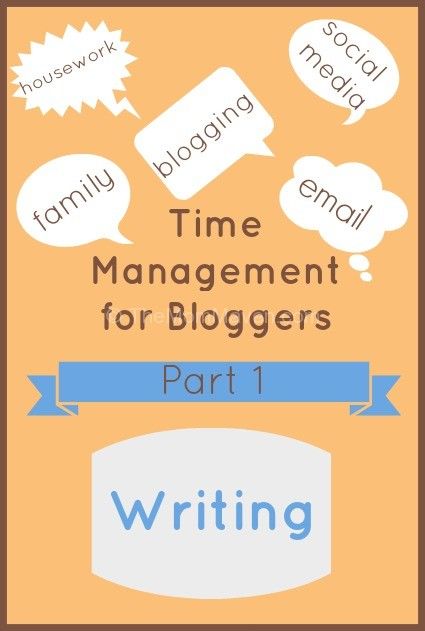
And speaking of finding balance, Mom Maven also provides a realistic look into the blogging world in her post Time Management for Bloggers Part 1-Writing.
Any one else love going out for dinner? Saving the Family Money has 7 Ways to Save the Family Money When Eating Out. Number 3 provides a great website to see where kids can eat free during the week!

Finally, financial success is super dependent on being on the same page as your spouse. This post about What to do when you and your spouse don’t agree about money from Practical Stewardship has some sage advice we could all use.

* * *
What did you love this week?
Pin It
The post Weekend Wandering appeared first on Living Well Spending Less™.
April 18, 2014
7 Smart Things to Teach Kids About Money


Growing up in my family, the first rule of money was this: We don’t talk about money. All I ever knew is that we had more than enough. While my parents did encourage me to work both around the house and at part-time jobs, there wasn’t a whole lot of guidance when it came to learning how to save or control my spending.
 As a result, my own journey to financial peace has been full of giant mistakes and more than a little heartache along the way. I certainly don’t blame my parents—I take full responsibility for my own stupidity—but I can’t help but wonder if I would’ve made better choices had I learned earlier all the things that I know now.
In any case, I am bound and determined to help my kids avoid the mistakes I made. I want them to grow up confident and secure, and to understand exactly how money works and they can make it work for them. It is a tall order—after all, they are only 4 and 7—but I believe in my heart of hearts that it not only can be done, but that it is one of the most important things I will ever teach them.
A couple of weeks ago I received an advance copy of Dave Ramsey and his daughter Rachel Cruze’s new book, Smart Money, Smart Kids: Teaching the Next Generation to Win With Money. I’m already a huge fan of Dave Ramsey’s principles, but this book blew me away. It was SO inspiring! I loved reading about the process of teaching kids about money from both the perspective of a parent and a child who was taught well from the very beginning. While it solidified the conviction I already felt, I also came away with some very practical ideas for exactly how to raise money smart kids. (The book comes out this coming Tuesday, but if you preorder it you will get $50 in freebies, including both a digital and audio copy of the book.)
And while the following list is certainly not all-inclusive, these are the seven things I most want to teach my kids about money:

1. Money Comes From Work
It is pretty scary to realize that most kids these days—and even many parents—don’t understand this very basic concept. Dave and Rachel recommend setting up a commission system—where kids get paid for the work that they do—rather than offering them a weekly allowance. That commission then gets split into 3 separate envelopes—one to spend, one to save, and one to give.
We have set this up in my house, and let me just tell you, it works! The closer it gets to payday, the more enthusiastic my girls become about helping out around the house. They absolutely love filling the check marks in their chore chart, (we use the ones in this Financial Peace Jr. set) then counting up their money at the end of the week. Our payday happens on Sunday night so they have all weekend to boost their payout. Their chores and pay scale are based on their age—7-year-old Maggie has a few harder tasks that can earn more money, while 4-year-old Annie simply earns a quarter per checkmark.
2. When it is Gone, It’s Gone
Teaching kids that actions have consequences is a lesson that goes far beyond money. It is so hard to let your kids fail sometimes! Both my husband and I have a really hard time with this, especially when it comes to money. Rather than letting them make bad choices and then experience the consequence of that choice, we simply say, “no, you can’t buy that,” and all their money stays in the bank. After reading Smart Money, Smart Kids, I realized that we do need to let them experience the process of spending the money that they earn so that they can also learn that when it is gone, it is gone.

3. It’s Okay to Wait
We live in a world of instant gratification, one that is becoming more so all the time, and there are sadly far too many kids who grow up thinking that if they want it, they should have it right now.
A few years ago, as the director of a large day spa, I saw this all too frequently with my entry-level front desk employees, who were mostly girls in their late teens and early 20s who thought working at a spa would be glamorous and easy. I can’t even tell you the number of times one would ask for a raise after just a week—or sometimes even a few days–of work. They had been so accustomed to being rewarded for nothing, they had no concept of delayed gratification. It was sad, and as an employer, extremely frustrating!
Through their commission system, my own girls are slowly learning that it is okay to wait and save for the things they want. Right now they are each saving for a (ridiculously overpriced) Lego play set. $65.00 is a huge number when you are only earning $0.25 at a time, but they are both doing great. Each week they get a little closer to their goals, and each week they become a little more motivated to work harder. I’m pretty sure I will cry the day we finally get to go to Target with their jar full of money to pick out the toy they worked so hard for!
4. It’s Not All About You
Not long ago I was stopped in my tracks by one simple but life-changing question: What are you doing with God’s money? As a Christian, I believe that what I have is not my own. It is a responsibility I take seriously. I am called to be a good steward of the resources I’ve been given, and just importantly, I am called to teach my children to do the same.
But in all honesty, this calling is not a burden. There is no greater joy than teaching my kids how to give! We do this in lots of different ways, especially at Christmas, and our favorite ways to give are with our time, not our money. Even so, it is important that my kids understand that they money they earn needs to be shared.
Each week, at payday, they first put a portion aside to put in their give envelope. They get to decide how much they will give, and they also get to pick the recipient, since at this point we are far less concerned with who they give to than that they experience the joy of giving. I’m sure our giving plan will evolve and adapt as they get older, but it will always be an important part of their financial education.

5. Tell Your Money Where to Go
Right now our primary focus is teaching our kids the basic concept that money comes from work. Even so, by teaching them to divide their money each week into their spend, save, and give envelopes, we are also trying to set the foundation for learning how to budget their money. We want them to learn while they are very young that if you don’t tell your money where to go, it will go away. It is a concept I wish I would have learned much earlier in life!
While the envelope system works great for younger kids, older kids need to be given even more responsibility for their own budgets. By the time they are teenagers, kids should know what their main expenses are–everything from entertainment & activities to clothing, food, and savings–and how to create a simple budget each month to make sure they are living within their means. (There are some fantastic tips for exactly how to set this up in Smart Money, Smart Kids.)
6. Don’t Buy Things You Can’t Afford
In today’s society, our instant gratification mentality has also transferred to our wallets, where we buy things we can’t afford with credit cards so that we can have them right now. Teaching my kids that credit is not the answer means that I have to be willing to live by this philosophy too. After all, if they see me buying whatever I want, regardless of my ability to pay, my warnings not to use a credit card won’t mean a whole lot, especially as they get older. Instead, our goal is to model for them a cash budget system, one where we save for the things we really want just like they do.
As they get older, they will have to learn how to save for bigger things like college or their first car. While car payments and student loans have become the norm, they shouldn’t be. Kids today are graduating from college saddled with huge debts that in many cases could have been avoided with more planning and better choices. We are determined to not let our kids become a statistic by teaching them now that credit is not the answer.

7. Choose Contentment
While all this other stuff is important, helping my kids learn to live with a spirit of contentment is by far the most important lesson I will ever teach them. A wise person once said that there are two ways to be rich—one is to have everything you want, and the other is to be satisfied with what you have.
At our house we call this our “Attitude of Gratitude,” and it is a subject that comes up a lot, especially when my kids start to get whiney or entitled. Last month, for instance, we decided to surprise the girls and two friends with a visit to Disney on Ice, which was touring nearby. As we walked into the arena, they were positively giddy with excitement. Until, of course, they spotted all the light-up wands, cotton candy, stuffed toys, and other assorted trinkets for sale. Their attitudes instantly shifted from excitement to longing. After listening to several rounds of “please, please, pleeeeaaase can we have that Mommy,” we gently encouraged them to list all the things they were experiencing (getting to see princesses, having a fun sleepover with friends, etc.), rather than focusing on things we weren’t buying. It completely changed their perspective, and we all had a great time. (And just in case you are wondering, yes, my husband and I sometimes have to remind each other of this too!)
Choosing contentment is a daily battle and a choice I have to make right alongside my kids. It means choosing to count our blessings rather than focus on what we don’t have. It means remembering to say thank-you, and to stop comparing. And it never, ever ends.
* * *
But now it is time for something fun! I loved Dave Ramsey & Rachel Cruze’s new book Smart Money, Smart Kids so much that I decided to ask if they would be willing to share a few copies with you all. They not only said YES, but wanted to give away something a little bit bigger! Are you ready for it? One lucky reader will receive a super amazing Financial Legacy Family Gift pack worth $400.00, plus three more lucky readers will receive a copy of Smart Money, Smart Kids along with a Financial Peace Jr. Kit to go with it! (a $45 value.)
To be entered to win, just leave a comment below answering the following question:
What is one way you teach your kids about money?
Be sure to include your email address so that we have a way to contact you! This contest will be open through Sunday, April 20th at 11:59pm, and we will choose the winners via Random.org on Monday, April 21st. Winners will be contacted via email and will have 24 hours to respond before we choose a new winner.
Pin It
The post 7 Smart Things to Teach Kids About Money appeared first on Living Well Spending Less™.
April 17, 2014
Thrifty Thursday {Week 56}
Happy Thursday! I hope you are all having a fabulous week! My family and I are headed out-to-sea this afternoon for a very quick 2-day press cruise on the Carnival Sunshine! We love cruising & can’t wait to see all the cool new features of this recently renovated ship. I’ll keep you posted!
In the meantime, I can’t wait to see all the great posts you have to share this week. I am always so inspired by all your amazing ideas!

Here are the most clicked links from last week:
1. My Mothermode {5 Ways We Saved This Week}
2. Provident Home Design {My House Hunters Episode}
3. A Geek in Glasses { A Real Family, Saving Real Money}
4. Six Figures Under{Debt Repayment Progress Report}
5. Snail Pace Transformations {Step by Step Grocery Shopping With a Thrifty Person}
6. Mission to Save {Never Pay for Toothpaste Again}
7. An Inviting Home {An Adoption Story}
8.Aspired Living {Frugal Pantry Organization}
9. Raking in the Savings {The Ultimate Cheat Sheet on Saving Money}
10. So They Can Fly {Yard Sale: Friend or Foe}
Never linked up before? Here’s how:
Scroll down, find the little blue “Add your Link” Button and click on that.
Follow the instructions on the next page – add a great image of your project and an interesting title. Make sure you link to the direct page of your budget friendly post – not the main page of your blog!
Try to visit at least a few other blogs at the party. Be sure to leave a comment to let them know you stopped by!
Please link back to this post somehow. There are badges available here; a simple text link is just fine too.
Feel free to tweet about Thrifty Thursday so others can join the fun, and don’t forget to check back here Sunday morning to see which posts have been featured this week at Weekend Wandering!
If this is your first time here I also invite you to check out my eBook, How to Blog for Profit (Without Selling Your Soul). It is a fantastic resource if you are interested in building your blog, getting more traffic, or learning how to monetize. Or, if you have read the book and are still looking to take your blog to the next level, I encourage you to check out my options for one-on-one blog consulting.
An InLinkz Link-up
Pin It
The post Thrifty Thursday {Week 56} appeared first on Living Well Spending Less™.
April 16, 2014
One Bowl Brownies


Everyone needs a go-to chocolate brownie recipe that whips up super fast using ingredients you probably already have on hand. And if it only messes up one bowl in the process? Well, that’s even better! Of course when my friend Natalie shared this recipe with me a few weeks ago, insisting that these were the best brownies on the planet, I have to admit, I was skeptical. After all, I’ve already publicly declared my allegiance to brownies from a box. How much better could these ones be?
So. Much. Better.
Fudgy, chocolatey, melt-in-your-mouth-and-make-you-want-to-cry better.
I know when I’ve been beaten. These One Bowl Brownies win the gold medal, hands down.
But do you want to know the best part of all? You can make these brownies using 12 ounces of any chocolate you happen to have sitting around. I used milk chocolate chips for this particular batch, but come Monday I will definitely be confiscating, er repurposing all those chocolate eggs from the Easter Bunny. You know, to make brownies for my kids. 
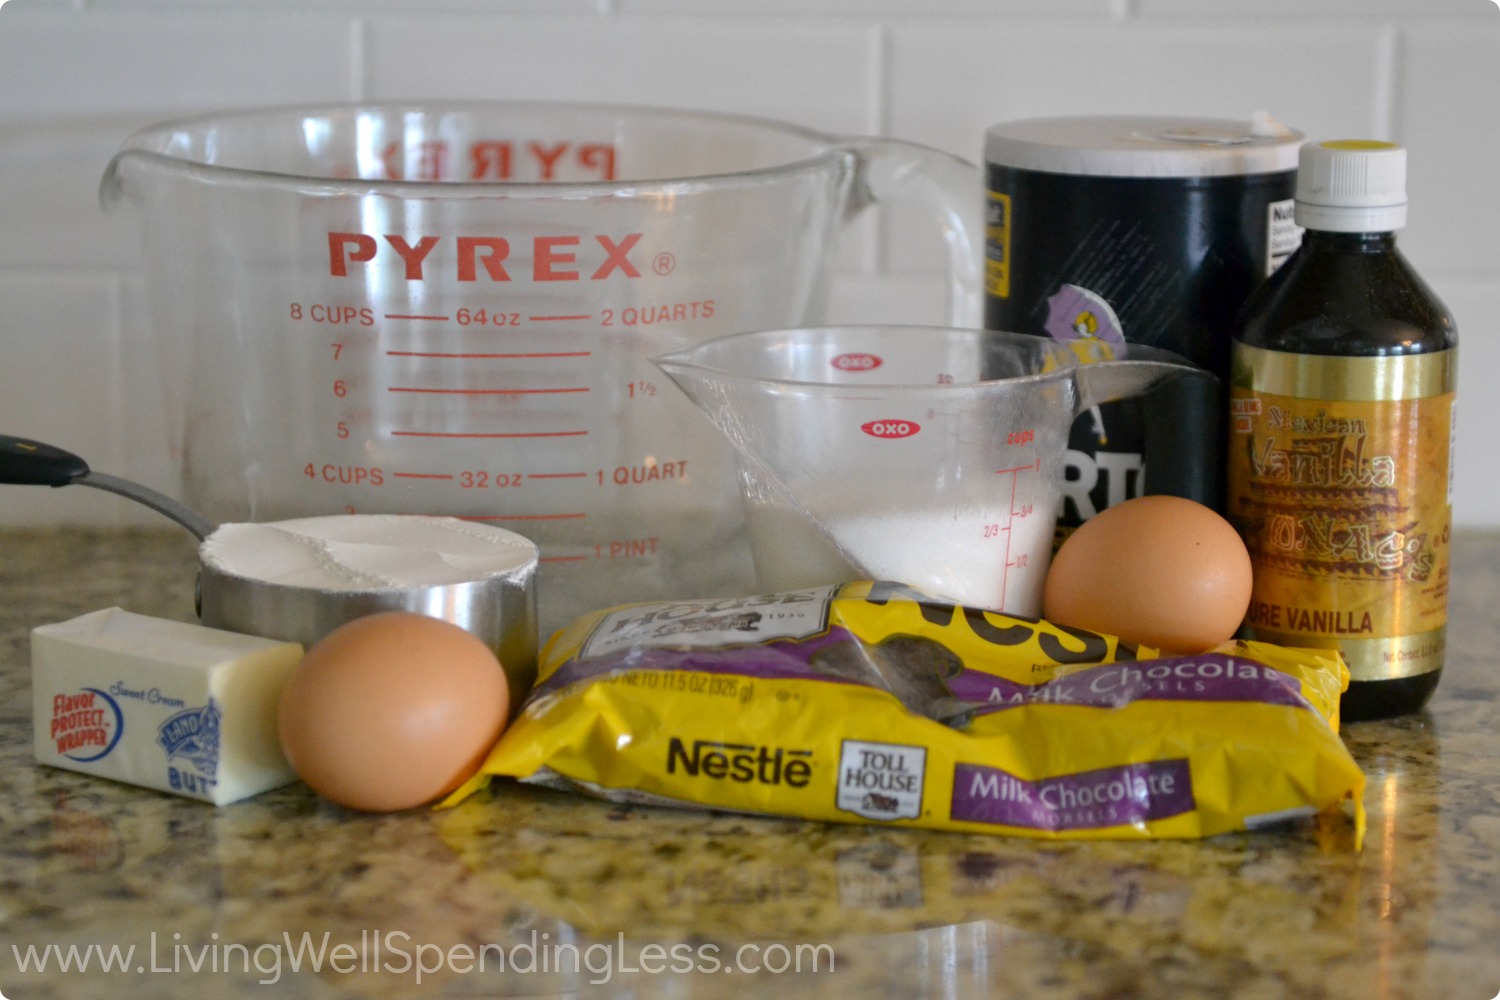
Here is what you need:
12 ounces chocolate chips or chocolate candy
1/4 cup (1/2 stick) butter
3/4 cup sugar
2 eggs
1 cup flour
1/2 teaspoon salt
1 teaspoon vanilla
1/2 cup chopped walnuts (optional)
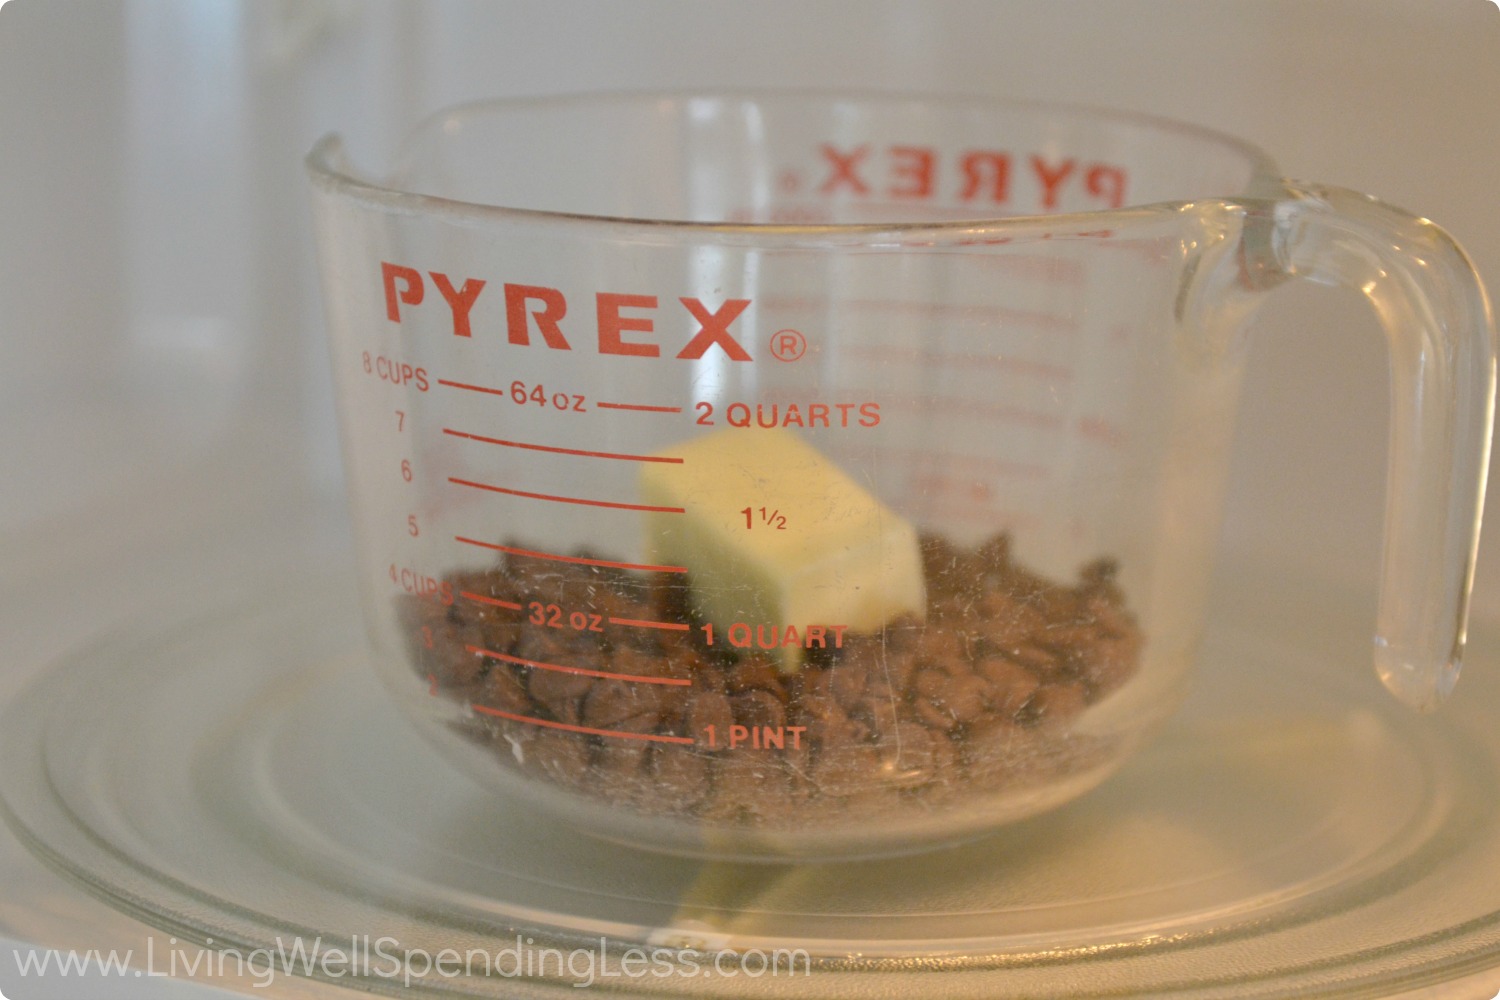
Step 1: Preheat oven to 350 degrees. Melt butter and chocolate in microwave for 30 seconds.

Step 2: Stir; return to microwave and heat for 30 seconds more until chocolate is melted.

Step 3: Add sugar, eggs, flour, and salt and mix until smooth.
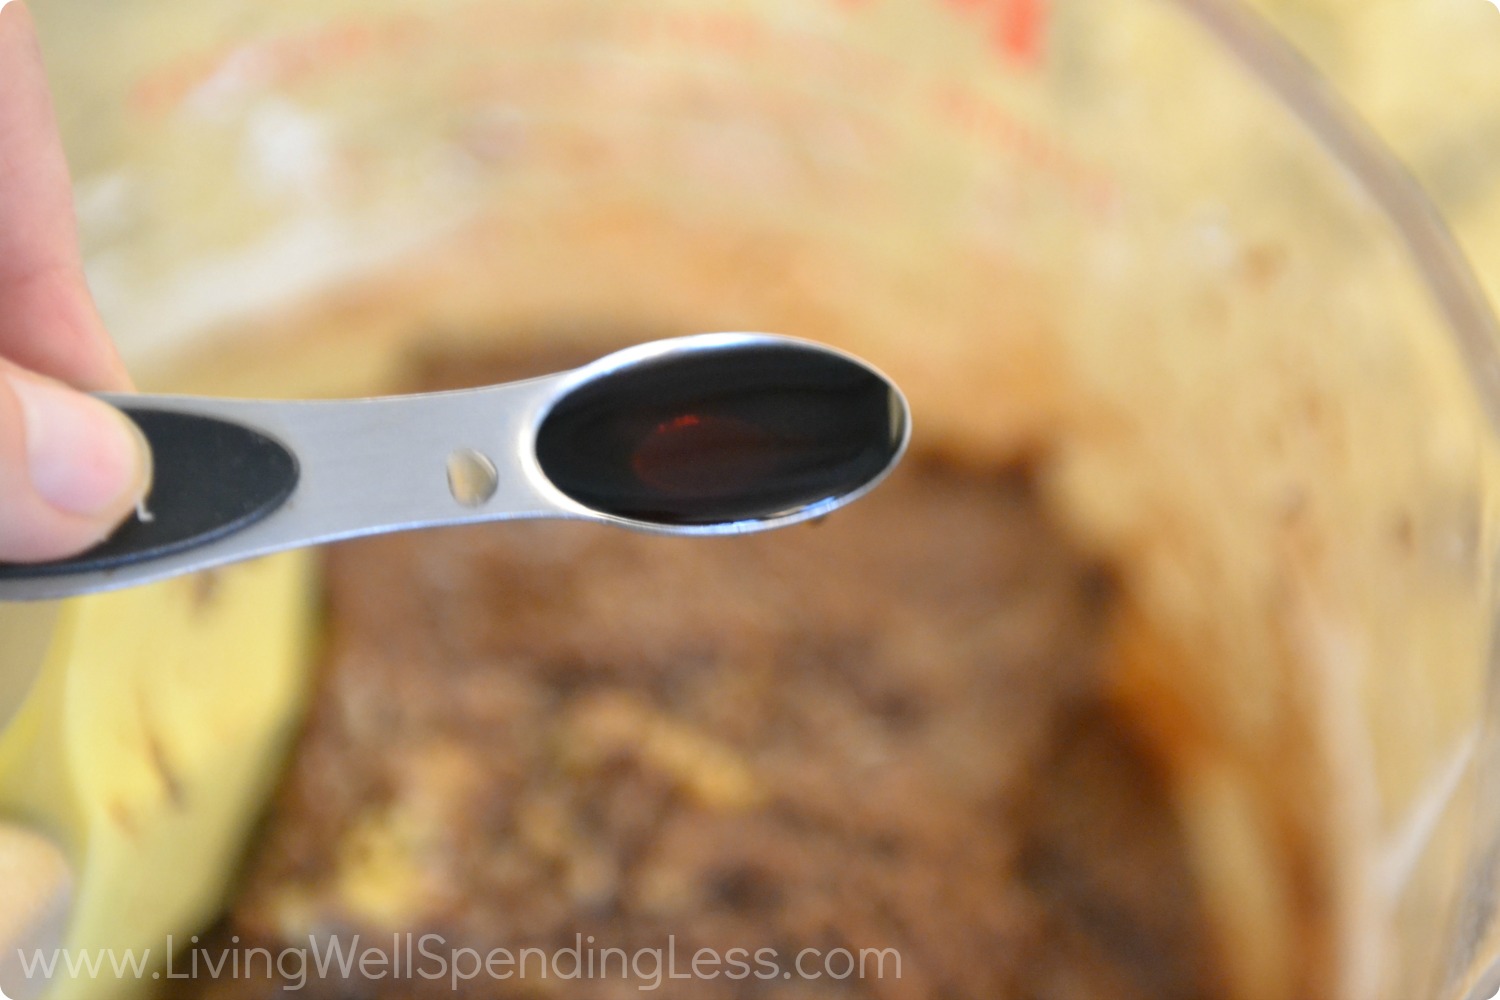
Step 4: Add vanilla extract, and fold in walnuts if using.
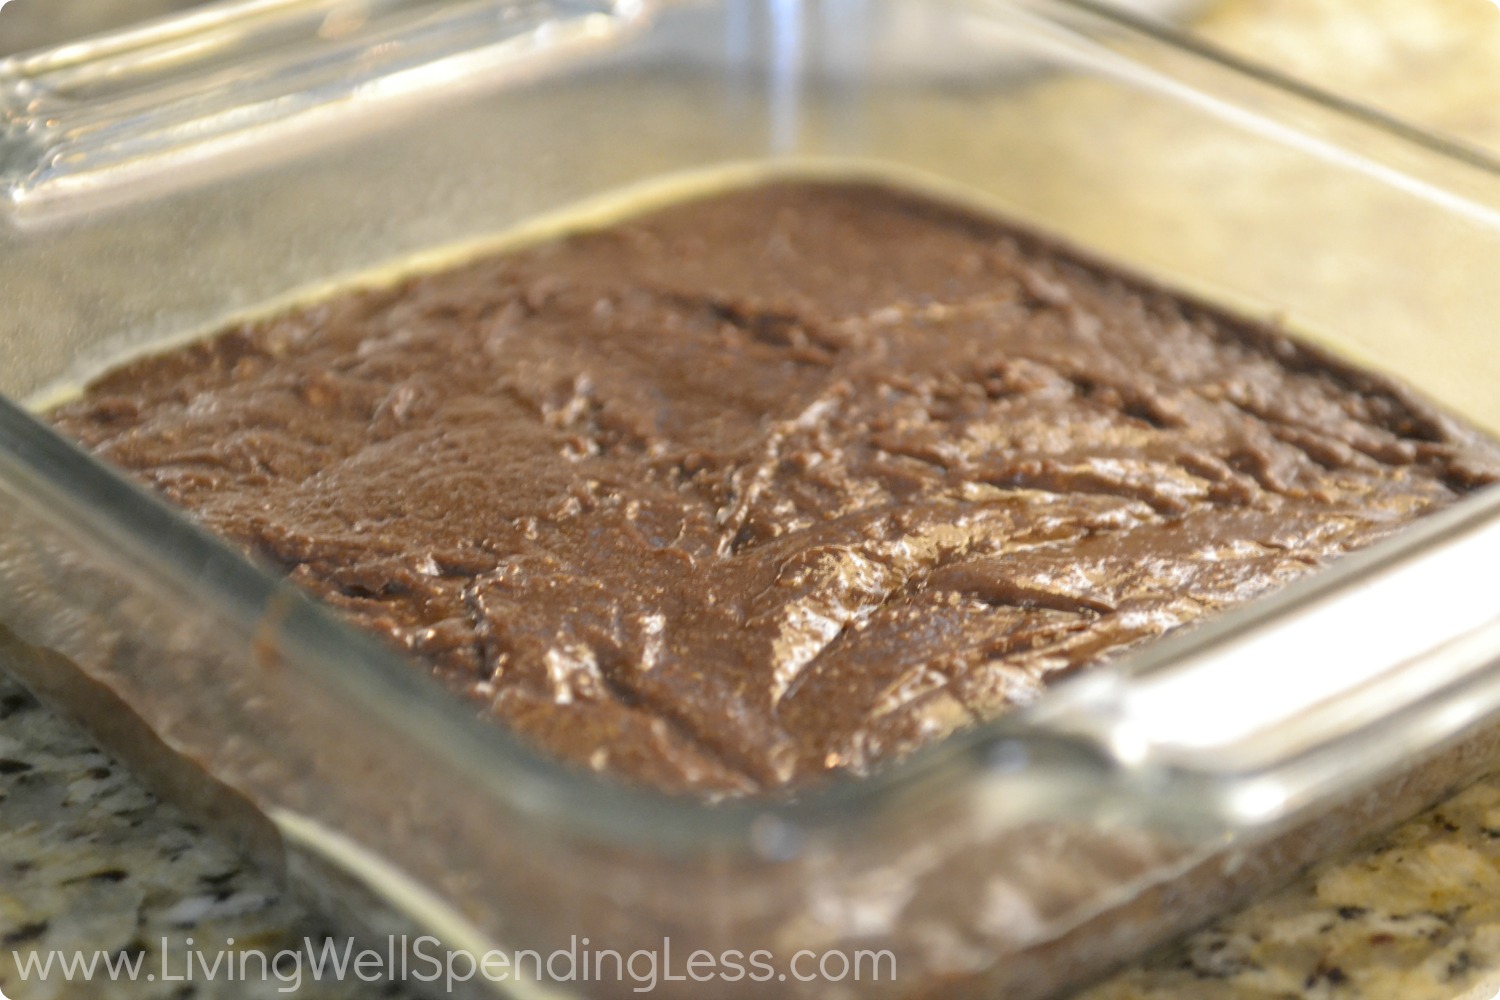
Step 5: Pour into greased 8×8 glass baking dish and bake at 350 degrees for 25-30 minutes.
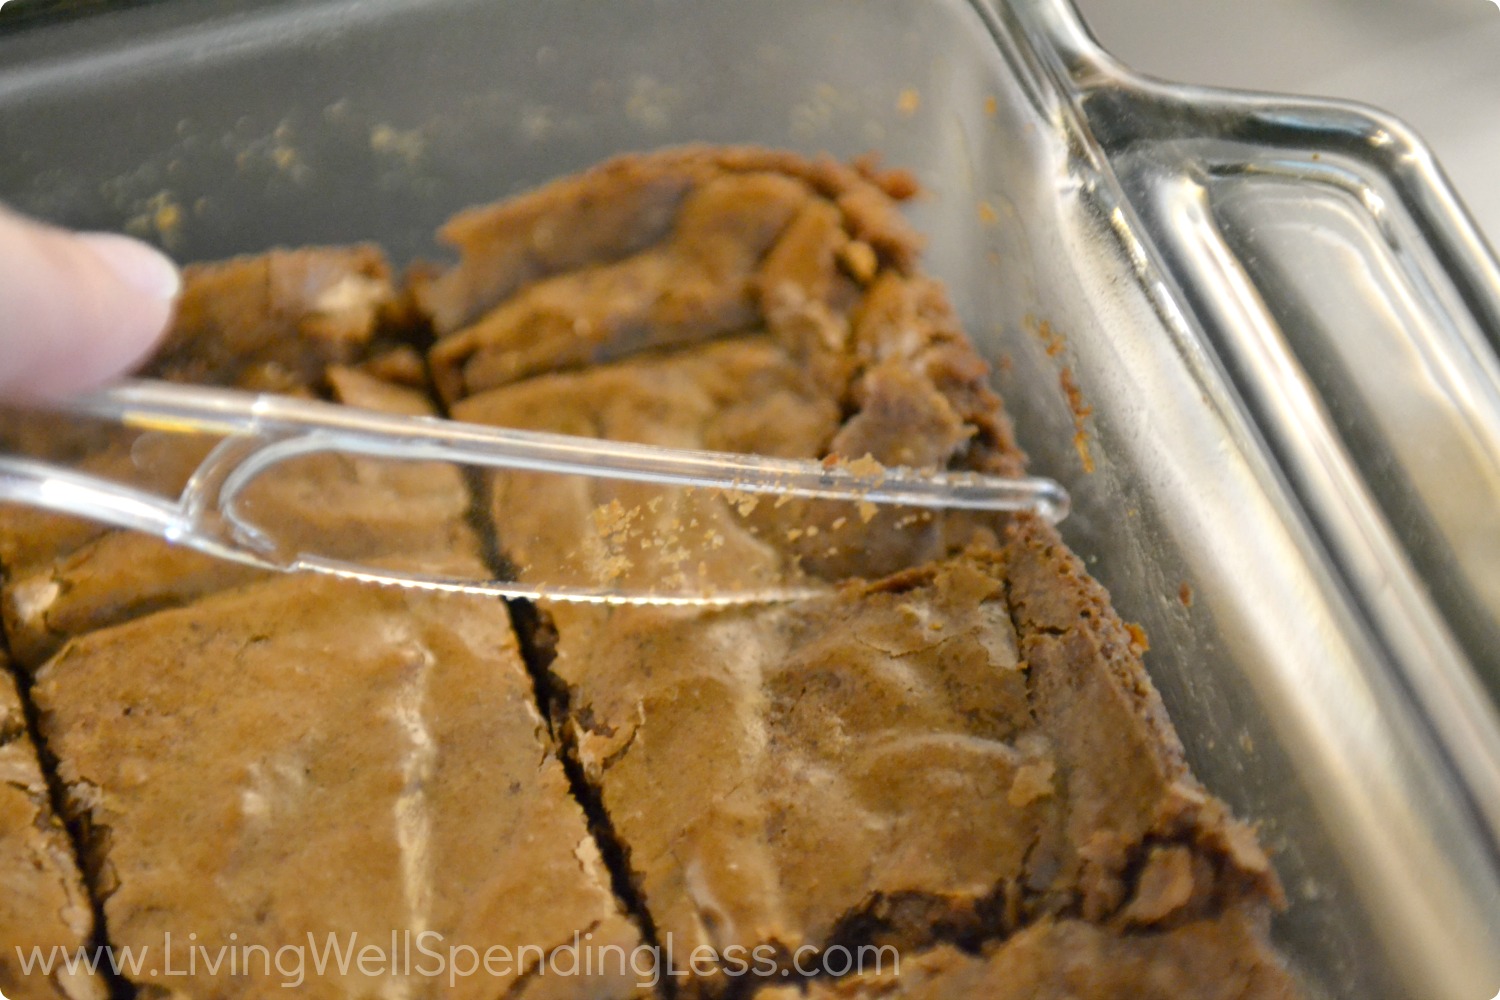
Step 6: Remove from oven; let cool for 10 minutes then cut into 2×2 inch squares with plastic knife.

Print This!
Recipe: One Bowl Brownies
Summary: Need a chocolate dessert in a hurry? These brownies are easy to make and only require one bowl!
Ingredients
12 ounces chocolate chips or chocolate candy
1/4 cup (1/2 stick) butter
3/4 cup sugar
2 eggs
1 cup flour
1/2 teaspoon salt
1 teaspoon vanilla
1/2 cup chopped walnuts (optional)
Instructions
Preheat oven to 350 degrees. Melt butter and chocolate in microwave for 30 seconds.
Stir; return to microwave and heat for 30 seconds more until chocolate is melted.
Add sugar, eggs, flour, and salt and mix until smooth.
Add vanilla extract, and fold in walnuts if using.
Pour into greased 8×8 glass baking dish and bake at 350 degrees for 25-30 minutes.
Remove from oven; let cool for 10 minutes then cut into 2×2 inch squares with plastic knife.
Preparation time: 2-3 minutes
Cooking time: 25-30 minutes
Number of servings (yield): 16
* * *
What’s your go-to chocolate fix?
Pin It
The post One Bowl Brownies appeared first on Living Well Spending Less™.
April 15, 2014
Part 7: Laundry 101
This is Part Seven of an 8-Part Beginner’s Guide to Cleaning Series. See the overview here.
* * *
Welcome back to the Beginner’s Guide to Cleaning! At this point in our series you should be feeling pretty good about your progress. Almost every room in your house is now spic and span, and hopefully the cleaning schedule you created for your family in Week 1 is helping to keep everyone stay on task.
Even so, you may have to dig deep for motivation this week because we are going to tackle the job that most of us dread more than any other cleaning task. Seriously, is there anything less appealing than a pile of dirty clothes? The washing, the drying, the ironing, the folding, and the putting away….there is almost anything I’d choose to do before laundry.
But while had laundry is may be one of those parts of life we’d just assume avoid, the truth is that knowing a few essential basics & tricks will not only make the job easier, it will also get things cleaner and make your clothes last longer. And besides, isn’t anything worth doing is worth doing well?
The truth is that most essential part of conquering that laundry pile is not the know-how, but actually making the time for it. The time involved will vary according to your own family’s needs. Laundry for two or three people might be easier to do once a week, while laundry for a large family might need to be done a little each day. Make sure to include enough time in your weekly cleaning schedule for your family’s laundry needs!
Furthermore, if your kids are older (9 or more), take the time to teach them how to do their own laundry (or let them read this post!) Empowering them to learn good habits now will only help them prepare for living on their own, and it will make your life a whole lot easier!
This week will be a little different in that we are not tackling a specific room. This time I will walk you through the steps for pre-treating stains, washing whites, colors, towels, & delicates, as well as some basic tips for drying, ironing, and folding. If you are a seasoned launderer, much of it may be review—feel free to skip to the end of the post, or add your own tips & tricks in the comments below!
Let’s do this!
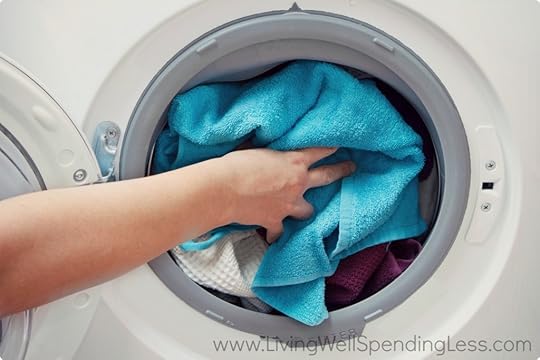
 Step 1: Sort Laundry
Supplies needed: multiple laundry baskets or a heavy-duty laundry sorter
How-To: Gather all laundry and bring to one central location, preferably near the washer and dryer. In my home we have one permanent heavy-duty laundry sorter that everyone uses, and we sort our laundry as we go. (If you have a larger family, you may want to set up multiple sorters.) Sort laundry into whites, lights, and darks. I is also a good idea to sort towels and delicates into separate piles. Be sure to check for stains as you sort, and set any stained items aside.
 Step 2: Pre-Treat Stains
Supplies needed: paper towels, detergent or stain remover, Oxy-Clean or all-fabric bleach
How-To: Place stain face-down on a paper towel. Apply detergent or stain remover to stain and rub gently. Let set for a few minutes. Fill sink with lukewarm water and Oxy-Clean or all-fabric bleach. Soak stained items for 15-30 minutes, rubbing stains occasionally, then launder normally. Refer to this post or more tips on how to remove specific stains.
 Step 3: Wash Colors
Supplies needed: Laundry detergent, laundry booster, liquid fabric softener
How-To: If you have more than one load of colors to do, separate your lights from darks. Darks should be washed in COLD water, but lights can be washed in warm water. If you are using a powdered laundry detergent, dissolve it in a cup of hot water before adding it to your wash. This will help prevent any powder residue. If you are using a front load washer, place laundry in washer, add detergent and fabric softener to detergent compartment, then close door and select wash temperature and cycle. For top load washers, set wash temperature and cycle, then fill with water, detergent, and laundry booster. Agitate for a minute or so before adding laundry. Wait for rinse cycle to add liquid softener, or use a dryer sheet instead.
 Step 4: Wash Whites
Supplies needed: Laundry detergent, bleach, liquid fabric softener
How-To: Whites should be washed in HOT water with bleach. Using bleach every single time will prevent your whites from getting dingy. If you are using a front load washer, place laundry in washer. Add detergent, bleach, and fabric softener to detergent compartment, then close door and select wash temperature and cycle. For top load washers, set wash temperature and cycle, then fill washer with hot water, detergent, and bleach. Agitate for a minute or so before adding laundry. Wait for rinse cycle to add liquid softener, or use a dryer sheet instead.
 Step 5: Wash Delicates
Supplies needed: mesh laundry bags, Woolite or other mild detergent
How-To: If you are using a mesh bag, most delicates do not have to be washed by hand (even those that say hand-wash only.) Place items in bags, then wash on gentle cycle in cold water. If washing in sink, use cold water and agitate water by hand. Let soak, then rinse well and gently squeeze out excess water. Do not wring! Hang to dry.
 Step 6: Drying
Supplies needed: dryer sheets, flat surface
How-To: After washing, sort items to be dried. Sweaters and other knits should be laid flat to dry, while blouses and delicates can be hung. Air-dry anything else you do not want to shrink, as well as athletic wear such as yoga pants or swimsuits. Tumble dry clothing on low heat to avoid shrinkage; towels and sheets can be dried on medium-to-high heat. Use a dryer sheet or other fabric softener if not used during wash. Remove items from dryer as soon as they are dry and lay flat to avoid wrinkles.
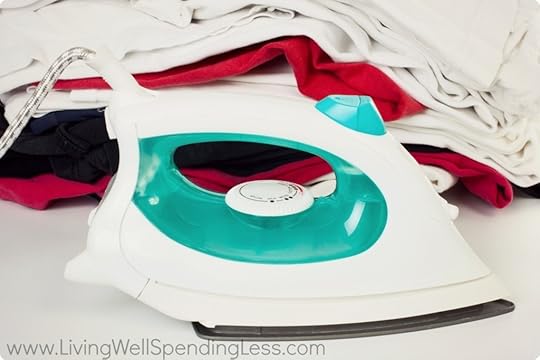 Step 7: Ironing
Supplies needed: Iron, spray starch, water, hangers
How-To: Check label of item you will be ironing. Fill iron with water, then plug in and set to appropriate heat setting, letting it sit upright while heating. If ironing multiple items, start with the item that requires the lowest heat setting and turn up the heat as you go. Lay section of item to be ironed flat on board. Smooth out wrinkles by hand. Spray with starch, then press with iron. Do not let the iron sit in any one place, but keep it moving continuously. Once section is complete, move to the next section until item is fully pressed. Hang immediately. For shirts, start with the collar, then press the sleeves, and finish with the main body of the shirt.
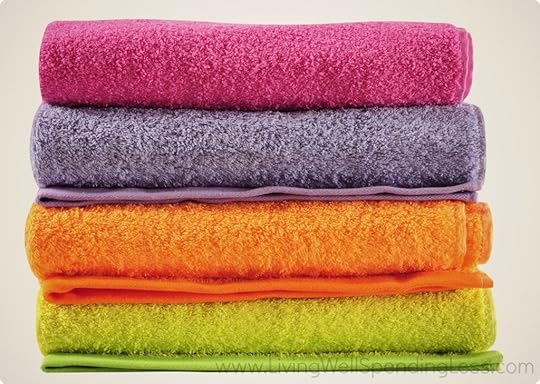 Step 8: Folding & Hanging
Supplies needed: book or cardboard for t-shirts, hangers
How-To: Create a standard folding method for your t-shirts, jeans, tank tops, shorts, socks, towels, sheets, and any other item that you keep folded. Things are much easier to put away when they are all folded the same way! Lay all items to be hung facing the same way in a single pile on flat surface. Place hangers inside necks as they lie flat. Be sure to check out this tutorial for how to fold a fitted sheet! Create separate piles for each family member.
 Step 9: Putting Away
Supplies needed: laundry basket(s)
How-To: Once items have been folded and separated into piles, place items for each family member into laundry baskets to be put away. Be sure to allow your kids to help put away their own clothing! Finish by putting away sheets and towels.
And of course, just in case you need it, here is a printable Laundry 101 Cheat Sheet to hang in your laundry room:
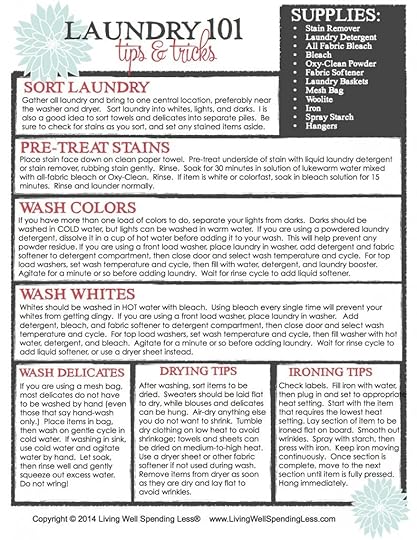
{Get your printable Laundry 101 Cheat Sheet here}
Part Seven Assignment
Just to review, here is your Seventh assignment:
Set aside a full day sometime this week to get completely caught up on laundry. If your kids are older, make plans to use this as a teaching day.
Gather all the laundry in your house, then sort into whites, lights, darks, towels, and delicates. Pre-treat stains. Wash darks first, then lights, then whites, followed by towels and delicates.
Dry, iron, fold, & put away clean laundry.
Once you have caught up on all laundry, create a realistic plan for going forward. Will you a little laundry each day? Do a few loads twice a week? Tackle everything on one day? Figure out what will work best for your family, then schedule the time to do it.
The LWSL Beginner’s Guide to Cleaning:
Part 1: Getting Started
Part 2: Cleaning Supply 101
Part 3: How to Clean Your Living Space
Part 4: How to Clean Your Kitchen
Part 5: How to Clean Your Bathroom
Part 6: How to Clean Your Bedroom
Part 7: Laundry 101
Part 8: Home Maintenance & Seasonal Cleaning
* * *
Did I miss anything? What are your biggest laundry challenges?
Pin It
The post Part 7: Laundry 101 appeared first on Living Well Spending Less™.
April 14, 2014
How to Remove (Almost) Any Stain

It’s happened to all of us at one point or another. We dribble coffee on our favorite shirt. Our 2-year-old decides to color herself–and her Sunday dress–with rainbow assortment of felt-tip markers. Our husband gets a little overly enthusiastic with his barbecue sauce. Our romantic candlelit dinner leaves us with candle wax all over the tablecloth. In any of these cases, and certainly a whole lot more, it is easy to just want to throw up our hands and declare a total loss. Yes, it’s unfortunate, we think, but what can we do? After all, these things happen.
But while stains may just be an inevitable part of life, giving up on them doesn’t have to be. With a few simple tricks and some good-old-fashioned elbow grease, you may just be able to salvage that favorite item and save yourself both money and heartache along the way.
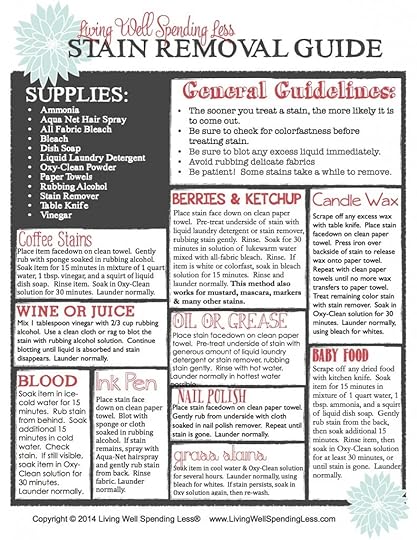
General guidelines:
Act quickly! The sooner you treat a stain, the more likely it is to come out. Even so, not all stains can be removed.
Be sure to blot any excess liquid immediately.
Be sure to check for colorfastness before treating stain.
Stain remover should always be applied to the underside of the stain. Place stain down on clean paper towel, then treat from the opposite side to push stain off fabric and onto the paper towel.
For carpet & upholstery, an ounce of prevention is worth a pound of cure. Treat both with a stain resister before stains occur.
For solid stains, such as wax, remove as much of the solid as possible with a table knife before treating.
Avoid rubbing delicate fabrics
Bring dry-clean only fabrics to the dry-cleaner as soon as possible, and be sure to give the cleaner as many details as possible.
Be patient! Some stains take a while to remove. If you follow the steps below but the stain is still visible after washing, just repeat the process again before drying. (Heat drying will set stains, so avoid drying until stain is gone!)
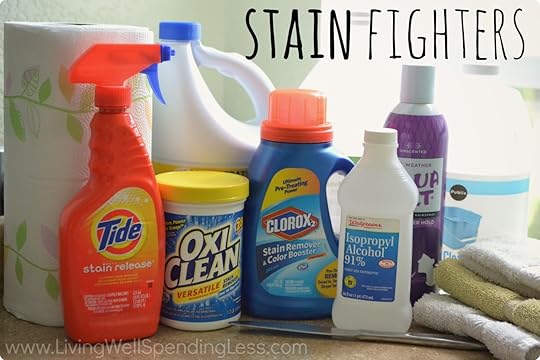
Stain fighters to keep on hand:
Ammonia
Aqua Net Hair Spray
All Fabric Bleach (such as Clorox 2)
Bleach
Dish Soap
Liquid Laundry Detergent
Oxy-Clean Powder (or similar alternative)
Paper Towels
Rubbing Alcohol
Stain Remover
Table Knife
Vinegar
Specific stain removal:
(Get a free printable Stain Removal Guide to hang in your laundry room here.)
Baby Food: Scrape off any dried food with kitchen knife. Soak item for 15 minutes in mixture of 1 quart lukewarm water, 1 tablespoon ammonia, and a squirt of liquid dish soap. Gently rub stain from the back, then soak additional 15 minutes. Rinse item, then soak in Oxy-Clean solution for at least 30 minutes, or until stain is gone. Launder normally.
Blood: Soak item in ice-cold water for 15 minutes. Rub stain from behind. Soak additional 15 minutes in cold water. Check stain. If still visible, soak item in Oxy-clean solution for 30 minutes. Launder normally, using bleach for whites.
 Berries: Place stain face down on clean paper towel. Pre-treat underside of stain with liquid laundry detergent or stain remover, rubbing stain gently. Rinse. Soak for 30 minutes in solution of lukewarm water mixed with all-fabric bleach. Rinse. If item is white or colorfast, soak in bleach solution for 15 minutes. Rinse and launder normally.
Candle Wax: Scrape off any excess wax with table knife. Place stain facedown on clean paper towel. Press iron over backside of stain to release wax onto paper towel. Repeat with clean paper towels until no more wax transfers to paper towel. Treat remaining color stain with stain remover. Soak in Oxy-Clean solution for 30 minutes. Launder normally, using bleach for whites.
Dinginess: For whites or colorfast fabrics, fill sink or bucket with lukewarm water and 1-2 cups bleach. Soak items for 30 minutes; launder normally with bleach. For non-colorfast fabrics, fill sink or bucket with warm water, 2 squirts dish soap, and 2 tablespoons ammonia. Soak for 30 minutes. Drain water & rinse items. Refill sink and add ¼ cup vinegar. Soak items for 30 minutes. Rinse and launder normally with hottest water possible, adding Oxy-Clean to detergent.
Coffee: Place item facedown on clean towel. Gently rub from back with sponge soaked in rubbing alcohol. Soak item for 15 minutes in mixture of 1 quart lukewarm water, 1 tablespoon vinegar, and a squirt of liquid dish soap. Rinse item. Soak in Oxy-Clean solution for 30 minutes. Launder normally, using bleach for whites.
Grass Stains: Soak item in cool water & Oxy-Clean solution for several hours or overnight. Launder normally, using bleach for whites. If stain remains, soak in Oxy-Clean solution again, then re-wash.
Grape Juice or Wine: Mix 1 tablespoon vinegar with 2/3 cup rubbing alcohol. Use a clean cloth or rag to blot the stain with rubbing alcohol solution. Continue blotting until liquid is absorbed and stain disappears. Launder normally.
Ink Pens: Place stain face down on clean paper towel. Blot with sponge or cloth soaked in rubbing alcohol. If stain remains, spray with Aqua-Net hairspray and gently rub stain from back. Rinse fabric. Launder normally.
Ketchup: Place stain face down on clean paper towel. Pre-treat underside of stain with liquid laundry detergent or stain remover, rubbing stain gently. Rinse. Soak for 30 minutes in solution of lukewarm water mixed with all-fabric bleach. Rinse. If item is white or colorfast, soak in bleach solution for 15 minutes. Rinse and launder normally.
Mascara: Place stain face down on clean paper towel. Pre-treat underside of stain with liquid laundry detergent or stain remover, rubbing stain gently. Rinse. Soak for 30 minutes in solution of lukewarm water mixed with all-fabric bleach. Rinse. If item is white or colorfast, soak in bleach solution for 15 minutes. Rinse and launder normally.
Makeup: Place item facedown on clean towel. Gently rub from back with sponge soaked in rubbing alcohol. Soak item for 15 minutes in mixture of 1 quart lukewarm water, 1 tablespoon vinegar, and a squirt of liquid dish soap. Rinse item. Soak in Oxy-Clean solution for 30 minutes. Launder normally, using bleach for whites.
Mustard: Place stain face down on clean paper towel. Pre-treat underside of stain with liquid laundry detergent or stain remover, rubbing stain gently. Rinse. Soak for 30 minutes in solution of lukewarm water mixed with all-fabric bleach. Rinse. If item is white or colorfast, soak in bleach solution for 15 minutes. Rinse and launder normally.
Nail Polish: Place stain facedown on clean paper towel. Gently rub from underside with cloth or sponge soaked in nail polish remover. Repeat with clean paper towels until stain is gone. Launder normally.
Oil or Grease: Place stain facedown on clean paper towel. Pre-treat underside of stain with generous amount of liquid laundry detergent or stain remover, rubbing stain gently. Rinse with hot water. Launder normally in hottest water possible.
Permanent Marker: Place stain face down on clean paper towel. Pre-treat underside of stain with liquid laundry detergent or stain remover, rubbing stain gently. Rinse. Soak for 30 minutes in solution of lukewarm water mixed with all-fabric powdered bleach. Rinse. If item is white or colorfast, soak in bleach solution for 15 minutes. Rinse and launder normally.
Need a cheat sheet of all these stain fighting tricks to keep handy in your laundry room? Don’t worry–I’ve got you covered! Just pop over to the Living Well Spending Less Facebook page to access this free printable stain removal guide!
* * *
Have you ever removed a tough stain? How did you get it out?
Pin It
The post How to Remove (Almost) Any Stain appeared first on Living Well Spending Less™.


