Clara Lieu's Blog, page 51
July 9, 2013
Ask the Art Professor: How can I learn to draw noses?

Albrecht Durer
Welcome to “Ask the Art Professor“! Essentially an advice column for visual artists, this is your chance to ask me your questions about being an artist, the creative process, career advice, a technical question about a material, etc. Anything from the smallest technical question to the large and philosophical is welcome. I’ll do my best to provide a thorough, comprehensive answer to your question. Submit your question by emailing me at clara(at)claralieu.com, or by posting here on this blog. All questions will be posted anonymously. Read an archive of past articles here.
Here’s today’s question:
“I have a really difficult time trying to draw noses. How can I learn to draw them?”
People tell me all the time that that they can’t draw _______________. If you’re having an issue drawing a specific subject, it’s because you are thinking too much about the end product and on achieving a convincing likeness. Instead, you need to be focusing on the basics of drawing that will get you there.
Approach drawing every subject the same way. (read this article on gesture drawing for drawing tips) Many people think that each subject demands a strategy specific to that subject only, when really your strategy for every subject should be fundamentally the same. I would draw a rabbit using the same strategy as I would if I were drawing a lemon or a bicycle.
The next time you sit down to draw a nose, forget that you’re drawing a nose. Instead, look at the nose as an abstract series of forms that you’re observing, and don’t let yourself get distracted by how it looks as you draw.
I was a portrait painter for a few years after I finished my undergraduate degree. I used to put unnecessary pressure on myself to achieve a perfect likeness, which of course was hugely problematic because that’s the whole point of being a portrait painter. I would worry and stress the whole time as I was painting about the outcome of the finished piece. Naturally, this was counter productive, as the more I worried the less and less of a likeness I was able to create. Once I started to block out my mental concerns of achieving a likeness, and started to focus exclusively on seeing abstract forms and relationships in the face, the painting immediately got better.
Remember that the nose is just one small component of a head, and that for a nose to work, it has to fit in with and relate to everything else on the head. The classic mistake I see everywhere with portraits is people starting out by drawing the eyes, nose, and mouth. The problem with this approach is that there is absolutely nothing structural about the eyes, nose, and mouth. The eyes are soft squishy spheres, the nose is cartilage, and the mouth is just soft tissue. Instead, structural forms like the forehead, the brow, the cheek bones, the jaw bone, and the chin are what need to be addressed first in a portrait. Once these structural forms are established, drawing in the eyes, nose, and mouth should be like dropping the cherry on the sundae.
The reason why portraits are so challenging for many people is because they carry significant psychological baggage. We see faces all the time, and they are one of the primary forms of visual communication between humans. Let’s face it, you wouldn’t be judgmental of the way someone draws a pear the way you would with a portrait. With a portrait, anyone can always tell when something is a little “off”, even if they can’t point out exactly where the problem is.
Finally, I think that noses are funny looking forms to begin. (Check out these wonderful grotesque portraits by Leonardo da Vinci below) If you accept that, noses will be easier to deal with in your drawings.

Leonardo da Vinci
Related articles:
“What is a gesture drawing?”
“Is drawing considered an innate talent or a craft, which can be learned by anyone?”
“How can I learn to shade objects in my drawings?”
“How can I draw what I see in my head?”
“What is the best way to practice my drawing skills?”
“How can you learn to draw hair?”
“How do you get yourself to practice drawing?”
“What is the best way to simplify the human figure?”


July 8, 2013
Cover solution

Today I got some really terrific feedback from people online about the two covers that I was debating between. The vast majority of people who responded overwhelmingly reacted to the cover with the photograph. (see above right) Although deep down I like the sprout better, I’ve decided to go with the cover with the photograph. The reason I’ve made this decision is because I know that if I went with the sprout that I would be doing it only to please myself. I need to do what’s best for the project, not what will please me personally.
I’m not completely letting go of the sprout; it will appear on the title page, which I think is the next best thing.
The photograph above right was from a free stock photo we found online. Although I technically have the rights to use it, I decided that I wanted to shoot my own photograph. I know it sounds silly, but I feel weird that the first photograph isn’t of my own tools. I like that I know every single tool in the new photographs and that I have a special relationship with each and every tool. My butter knife that I’ve bent too many times is in there, as are my favorite wired loop tools that I discovered in graduate school. No one will see these details or understand the stories behind each tool, but to me it’s a personal connection I have to the photograph that is important to me.


Torn

I’ve been mulling over cover options for my book for the past few days. I’ve gotten lots of feedback from people on cover #1 (see below), which has been useful in determining how that cover might be received. People who didn’t like it commented that the font (Garamond) looked too ordinary, that the image of the sprout wasn’t strong enough, and that overall the design looked too academic, like a textbook or a dissertation. One person even commented that they thought it looked like a self-published book.
My husband came up with cover #2 (see above) last night. With the use of the photograph, this design definitely has much more for the eyes to feast on, and is compositionally much more interesting. When I posted cover #2 online, people overwhelmingly responded to cover #2 more than cover #1.
The problem is, I personally still like the minimal quiet design of cover #1 better. I know that I should probably go with cover #2 if I want to sell more books. I should probably just get over it and do what’s better for the project, rather than indulging myself. I’m torn, what do I do?


July 7, 2013
Book excerpt

A 6 page excerpt from my book is now available for viewing! Click on this link to view the excerpt. What do you think?


July 6, 2013
Possible Cover
Above is what might possibly be the final cover for my book that my husband designed. In general I don’t tend to like design that is overdone and loud, so I like that this is a quiet and minimal design. What do you think?


July 5, 2013
Sneak Peek

Above is a sneak peek of a page from my book. The font isn’t the one I ultimately went with, and the text isn’t matched with the appropriate illustration, but this gives a sense of how each chapter is visually structured.
I feel like I’m pacing back and forth a bit right now because the final tasks of the book are now out of my hands. The PDF document has been sent to my editor for review. My husband is actively working on designing the cover, which is the last task before the book goes to print. The finish line is near!


July 3, 2013
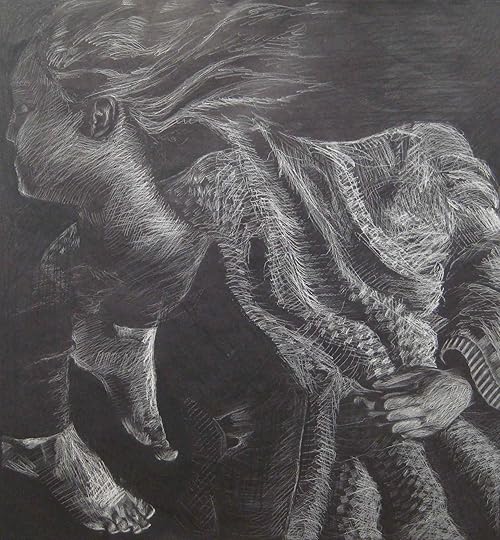
Crit Wall #11
Welcome to “Crit Wall“, where I offer online critiques of individual art pieces. To submit, send me a link to one image by commenting here, or by emailing the link to me at clara(at)claralieu.com. Please, NO ATTACHMENTS. Include the media, size, and title if you have one. Only submit original, finished works, no works in progress or sketches. Artwork created for a RISD degree program course is not eligible. You’ll receive notification if your piece is selected to be critiqued. Only one submission per person please, and know that I will not be able to critique every single work due to the volume of submissions. All images will be posted anonymously.

“Desert Rocks”
watercolor
7.5″ x 14″
The variations of color in the rocks is the most compelling part of this piece. The colors are vibrant and strong, yet the rocks still appear to be cohesive. There is a looseness to the way that the colors have been applied that comes across as confident and gestural.
The dark grey strokes that are used to articulate the details in the desert rock are executed successfully. There is a good mix of brushstrokes that are more graphic, while other areas are more finely modeled with softer transitions of gradation. However, the dark grey strokes in many areas seem to operate separately from the colors in the rocks, as if one was simply painted on top of another. There are a few areas like the rock on the far left hand side where the dark grey strokes and the colors of the rocks seem to merge together more effectively. If there could be more areas like this one throughout the composition, the rocks would achieve a greater depth and dimensionality.
The sky is the weakest part of the composition. The blue appears to be “out of the tube”, with no mixing involved to make the color more sophisticated. The sky is an opportunity to create a mood and atmosphere to the landscape, and in this case that opportunity was not taken advantage of. The background is also the same in every area, without any shifts of light and dark contrast. Relative to the variation of color in the rocks, the sky seems overly simplified. There seems to be a white halo that is hugging the edge of the rocks, which makes the rocks seem to glow.
Finally, the tiny mountains in the lower right hand corner look too mushy to read as a believable landscape. These mountains would have to be entirely removed, or painted with more sensitivity and care. If the mountains were painted with a lighter tone of purple, with softer edges, this would push the mountains further back in the distance, increasing the sense of space in the entire piece.
Past “Crit Wall” pieces are below. Click on the images to read the critique.


July 2, 2013
Cover ideas
I spend the evening plugging in the illustrations for my book into the layout. It felt great to finally see the illustrations matched up with the correct text, and I had fun sizing the images appropriately.
With the layout of the book nearly complete, I am now directing my focus towards the cover of the book. It seems to me that I have three options: 1) text only, 2) text with a photograph, and 3) text with an illustration.
I hadn’t really considered an illustration until my husband suggested it, but now I’m thinking it might be a simple way to represent the book. I already have an illustration of a small sprout growing out of a patch of dirt that my husband liked because it could represent the beginning of the creative process. What other images do you think would work as an illustration for the cover? Any suggestions?


Ask the Art Professor: How do you work in a series?
Welcome to “Ask the Art Professor“! Essentially an advice column for visual artists, this is your chance to ask me your questions about being an artist, the creative process, career advice, a technical question about a material, etc. Anything from the smallest technical question to the large and philosophical is welcome. I’ll do my best to provide a thorough, comprehensive answer to your question. Submit your question by emailing me at clara(at)claralieu.com, or by posting here on this blog. All questions will be posted anonymously. Read an archive of past articles here.
Here’s today’s question:
“I recently went to an art retreat and was told I need to make a series. I have never done this before and I keep struggling with a topic. My question is how can I take a topic , like “transformation” and make it into a series? I have always been a “paint what I see” painter and I use images for reference. I have such a hard time with concept painting. How can you take an idea and translate it into a two-dimensional surface?”
For a series to work, you need to find a subject you are passionate about that is both open to variation and yet specific at the same time. A strong series is like a really good television show. You want to have details that make the show distinctive, but the fundamental premise has to be open enough that many contrasting episodes can be generated. A successful series should allow each individual work to be able to stand on its own, yet simultaneously relate to the rest of the other works in some manner.
I find that it’s helpful to establish a list of “rules” for your series that you can consistently follow. This could be done in terms of the format, the size, the materials, the subject matter, etc. Write down what the list of rules are and make sure that you stick to them from the beginning to the end of the series. Even if you have moments where you want to stray from the rules, force yourself to adhere to the rules. Not only do the rules help keep you on track, but they can create both conceptual and visual cohesion for the series overall.
If you are starting with the word like “transformation” which is quite abstract, do some extensive brainstorming first. The primary objective of brainstorming is the creation of as many ideas and images as possible, with an emphasis on quantity over quality. One of the key elements of this process is that brainstorming is inclusive of everything that emerges, regardless of how odd or unappetizing an idea or image may seem at first. Write everything down, and play “word association”. Give every idea and image a voice and a place on the page. Once you are done brainstorming, you should have have enormous amounts of pure, unedited content to select from. This content is the raw material from which you can create thumbnail sketches. This post “How do you develop an idea from a sketch to a finished work?” talks more in depth about how to bridge the gap from idea to sketch to final work.

An example of a brainstorming session.
Since you are used to observational painting, it is probably a good idea to select one image from your brainstorming session that you can then create variations from. Look at other artists who worked serially and see what kind of subjects they chose. Monet painted water lilies, haystacks, and Rouen cathedral. Degas drew ballet dancers and jockeys. Rembrandt painted self-portraits consistently throughout his entire career. Andrew Wyeth had his Helga pictures. Analyze their works and ask yourself what their rules were for their series. This can provide inspiration as well as a departure point for your own work.

Claude Monet, Rouen Cathedral
Related articles:
“How can I tell if I’m skilled enough?”
“How do you find your own individual style?”
“How do artists manage to get their soul out into images?”
“How do you develop an idea from a sketch to a finished work?”
“How do you make an art piece more rich with details that will catch the eye?”
“How do you learn the basics?”
“Is if bad to start another piece of art before finishing another one?”


July 1, 2013
60 Illustrations complete!
Tonight I finished up all 60 illustrations for my book! These illustrations definitely challenged me conceptually and technically, and I’m really glad that I assigned this task to myself. Initially I had briefly entertained the idea of hiring a professional illustrator to do the illustrations for me. I made so many changes in the concepts behind the illustrations that I think I would have been a nightmare to work with! On top of that, it would have been crazy expensive to hire someone, and probably would have taken four times longer.
I drew everything from a butter knife, a shrimp, a gavel, a cafeteria tray, the leaning tower of Pisa, a cup of coffee, the Venus of Willendorf, and a group of sharks. I’m very pleased with the wide range of images, I think it will make each forthcoming illustration a surprise as readers go through the book.

The Venus of Willendorf