
Justine Allen's Blog, page 4
July 24, 2025
WordPress vs. Substack: Choose the Best Platform for Your Newsletter
If you’re looking to start a newsletter, you’ve likely encountered two major options: Substack and WordPress. While both can help you reach your audience, they represent fundamentally different approaches to building your online presence. One locks you into a single platform with limited growth potential, while the other provides a foundation you can build on for decades.
In this concise guide, we’ll compare WordPress vs. Substack to help you choose the platform that aligns with your long-term goals as a creator.
Substack: Simple but limitedSubstack invented itself as a newsletter-first platform, offering creators a straightforward way to write, publish, and monetize newsletter content.
Substack’s strengths:
Simple setup: Launch a newsletter quickly with minimal technical knowledge.Built-in discovery: Potential exposure through Substack’s recommendation system.Integrated monetization: Easy paid subscription setup.Substack’s limitations:
Platform dependency: Your entire business exists within Substack’s ecosystem. If they make changes you don’t like—whether to pricing, features, or policies—you’re forced to accept them or start over completely on another platform. Unsustainable revenue sharing: Substack takes 10% of your subscription revenue forever. This becomes extremely expensive as you scale. A creator earning $5,000 pays Substack $500 per month.Limited customization: Substack offers minimal branding and design options. Your newsletter looks like everyone else’s, making it difficult to establish a unique brand identity.Growth ceiling: While Substack has expanded beyond newsletters to include podcasts and video, it remains limited to basic communication mediums. You can’t easily sell products, courses, or memberships without using separate platforms.Platform evolution: Substack has increasingly focused on social features like tweets and shorts. This shift toward chasing cheap engagement rather than fostering meaningful creator-audience relationships contradicts why many chose newsletters in the first place.WordPress: Built for ownership and growthWordPress powers over 40% of all websites because it offers something Substack can’t: complete ownership and unlimited potential for growth. As the world’s most popular website software that’s endured for decades, WordPress provides the foundation for creators who want to build something lasting.
 With WordPress, you can build a beautiful web and newsletter presence to truly stand out.
WordPress’ strengths:
Complete ownership: With WordPress, you own your content, data, and audience without being locked into any single company’s platform. Your website, subscriber list, and content remain under your control regardless of what happens to hosting companies or service providers.Unlimited customization: WordPress offers thousands of themes and plugins, allowing you to create exactly the newsletter and website experience you envision. Want specific colors, fonts, layouts, or functionality? WordPress makes it possible through extensive customization options.Platform Independence: WordPress is portable. You can move your site between hosting providers, change themes, or modify functionality without losing your content or starting over. This flexibility ensures you’re never trapped by a single company’s decisions or policy changes.Superior SEO capabilities: WordPress sites consistently rank higher in search engines thanks to clean code structure, SEO plugins like Yoast and RankMath, and complete control over technical optimization. This means new audiences can discover your content organically.Unlimited growth potential: Start with a newsletter and seamlessly expand:Full websiteSell productsOnline courses and membership areasPodcasts and multimedia contentCommunity forumsWordPress’ limitations:
Technical knowledge: Self-hosted WordPress requires a basic understanding of web hosting, domain management, and website maintenance. While many hosting providers offer one-click WordPress installation, you’ll still need to handle updates, backups, and security measures. But there are hosts like WordPress.com that can handle all of that for you.Plugin and theme management: With thousands of plugins and themes available, choosing the right combination can be overwhelming. Some plugins may conflict with each other or slow down your site, requiring careful selection and testing.WordPress.com Newsletter: Best of both worldsWordPress.com Newsletter offers the same benefits of WordPress while removing the complexities of WordPress behind the scenes. It’s easy to start a newsletter or a full website, grow your audience, and build meaningful connections.

WordPress.com’s strengths
All the benefits of WordPress listed aboveCreator-first pricing: Start completely free with unlimited subscribers and sends. Upgrade your plan to reduce fees, all the way down to 0%. This can add up to thousands of dollars in savings as you grow your subscriber list.The calm platform: For those that are trying to leave “always-on” social media platforms, WordPress.com offers a thoughtful platform focused on meaningful creator-audience relationships without the anxiety of chasing trends or social media metrics.Built for growth: Transform your newsletter into a full website, add e-commerce functionality, create membership areas, or expand into any direction your creativity takes you—all without changing platforms.WordPress.com’s limitations
Discovery ecosystem: While WordPress.com offers the Reader and other discovery features, it isn’t as strong as Substack’s recommendation system. Building your initial audience may require more active promotion and SEO efforts.Head-to-Head comparisonFeatureWordPress.com NewsletterWordPressSubstackSetup DifficultyEasyModerateVery easyOwnershipCompleteCompleteLimitedCustomizationExtensiveExtensiveLimitedSEO CapabilitiesStrong built-in SEOStrong built-in SEOLimitedMonetization Fees0-10% (decreases with paid plan)Depends on plugin10% of everythingGrowth PotentialUnlimitedUnlimitedCommunication mediums onlyTechnical RequirementsNoneHosting, pluginsNoneContent PortabilityCompleteCompleteCan export, will need new platformDiscovery OptionsWordPress Reader, SEO, socialSEO, socialSubstack network onlyWhen to choose each platformChoose Substack if:
You want the fastest possible setupYou’re comfortable with permanent platform dependencyYou don’t mind paying 10% of your revenue indefinitelyYou have no plans to expand into e-commerce, courses, or forumsYou’re willing to accept limited customization and branding optionsChoose WordPress if:
You want to own your platform and audience completelyYou value long-term cost savings over short-term convenienceYou plan to grow beyond newsletters into a full online businessYou want superior SEO and organic discovery capabilitiesYou prefer maximum customization and branding controlYou want the security of platform independenceYou’re comfortable with some technical maintenanceSpecifically Choose WordPress.com Newsletter if:
You want WordPress without technical complexityYou need professional newsletter features with creator-friendly pricingYou want to start free and scale affordablyYou value a calm platform, free from social media style tweets and shortsYou value having your online presence integrated under one platformSetting up your newsletter with WordPressOption 1: WordPress.com Newsletter (recommended for most creators)
Visit WordPress.com/newsletter and select “Start my newsletter”Go through the onboarding checklist to finish setting up your newsletterOption 2: WordPress + Jetpack Newsletter
Choose a WordPress hosting provider like Pressable or BluehostInstall WordPress (most hosts offer one-click installation)Install and activate a Jetpack, which is made by the people behind WordPress.com, and offers all of the same benefits as WordPress.com NewsletterConfigure Jetpack Newsletter settingsOption 3: Add Newsletter to an existing WordPress.com site
Add a Subscribe Block or Newsletter Subscription Pattern to your existing siteUpdate Newsletter settings to your liking.Importing from Substack to WordPress.comIf you’re ready to make the move from Substack, migrating to WordPress.com is straightforward:
Export your Substack content and subscribersVisit the content importer by visiting Tools -> ImportImport your content to WordPress.comImport your subscribers to WordPress.comUpdate your Newsletter settingsYour questions answeredHow much does WordPress.com Newsletter cost compared to Substack? WordPress.com Newsletter starts free with unlimited subscribers and sends. Paid plans offer lower transaction fees (down to 0%) compared to Substack’s permanent 10% revenue share. See our detailed cost comparison to understand potential savings.
What does “owning your content and subscriber list” actually mean? It means your content and audience data belong to you, not the platform. You can export everything at any time, switch to different hosting, or change platforms entirely. With Substack, your audience relationship is mediated through their platform—if they change policies or shut down, rebuilding becomes much more difficult.
Can I customize my WordPress newsletter’s appearance? Yes, extensively. WordPress.com offers numerous themes, color schemes, custom fonts, logos, and layout options. You can create a unique brand identity rather than looking like every other newsletter on the platform.
How do I know WordPress is reliable for email delivery? WordPress.com sends over 20 million emails daily with excellent deliverability rates. This infrastructure has been refined over 17+ years and includes proper authentication, spam protection, and delivery optimization.
Is it really easy to import from Substack? Yes. WordPress.com’s import process handles both content and subscribers. The technical migration typically completes in hours, though you may want to spend additional time customizing your new site’s appearance and features.
Can I start free and add paid subscriptions later? Absolutely. This is one of WordPress.com’s key advantages—start building your audience for free, then add monetization when you’re ready, with much lower fees than Substack.
Your newsletter deserves a forever homeChoosing a newsletter platform isn’t just about today—it’s about where you want to be in five years. Substack might offer quick setup, but WordPress gives you a foundation that grows with your ambitions.
WordPress represents a fundamentally different philosophy: instead of renting space on someone else’s platform, you’re building a forever home on the open web. A place where you make the rules, keep more of your revenue, and never worry about platform changes affecting your business.
Whether you choose WordPress.com Newsletter for the perfect balance of power and simplicity, or self-hosted WordPress with Jetpack for maximum control, you’re choosing ownership over dependency, flexibility over limitations, and unlimited potential over artificial constraints.
Your brand deserves a home you own.
Start your WordPress.com Newsletter today or learn more about migrating from Substack to begin building your audience on a platform you truly control.
Have you made the switch from Substack to WordPress? Share your experience in the comments below!


July 22, 2025
How to Change Your Domain Name With Zero Downtime
Changing your domain name can feel intimidating and isn’t without risks. If done carelessly, it can lead to broken links, lost traffic, and a drop in search rankings. At the same time, it can also be a chance to rebrand, upgrade to a more memorable website address, and improve your SEO.
The difference simply lies in careful planning and execution. In this tutorial, you’ll learn everything you need to know to change your website’s domain name with as little hassle as possible.
Why change your domain name?Your site’s is a very important part of branding, which is why you usually want to keep it as is. Then again, there are also many valid reasons to switch.
For example, you might have changed your company or blog name and want your domain to match it. Or maybe your business has changed, and your current domain no longer accurately represents what you do.
Another possibility is that you found a better, shorter, more memorable, or more professional domain.
You might also only want to change the domain extension, such as when relocating your business and going for a country-specific TLD like .de, .fr, or .co.uk. Domain changes also happen for legal reasons, such as trademark conflicts.
Finally, you might aim to improve your SEO with a more relevant domain or distance yourself from an old name that carries a damaged reputation.
No matter the reason, a domain change can be a smart move if you plan it carefully and with a clear purpose in mind.
Challenges to be aware ofSwitching to a new domain name is not without risks. Discussing them isn’t meant to scare you off, but to stress the importance of preparing well. Most of the risks can be minimized or avoided entirely, and if your reasons for changing your site’s domain name are good, the effort is usually worth it.
Loss of brandingMaking the switch without communicating it can negatively impact your audience’s brand association that you worked so hard to build. Returning visitors might not recognize your site right away and think it has shut down or moved.
In addition, any other marketing material your domain name was part of, such as logos, slogans, social media presences, or printed materials, may need updates.
SEO implicationsYour site will likely experience a drop in rankings and website traffic after the domain change. This is a normal part of the process and is usually temporary. Search engines need time to recrawl and re-index your site under the new domain.
You do, however, need to do the necessary work to maintain your rankings. For the most part, that means putting redirects in place to make sure traffic from search engines, backlinks, and other sources is sent to the correct (new) address.
Costs involvedChanging your domain name isn’t just a technical task, but can come with financial costs:
More expensive fees for the new domain.Paying for two domains during the transition period.Design costs, such as for logo changes and reprinting branded materials.Technical costs like development time or a new SSL certificate.Additional marketing costs to promote the new domain.While not all of these costs apply in every case, it’s important to budget for them in advance.
Website downtime and technical issuesThere can be technical hiccups as well, such as:
Lengthy DNS changes may cause your site to become temporarily inaccessible.Redirect mistakes can lead to broken pages or errors.SSL certificates may not transfer automatically and may stop working.Email services connected to your domain can be disrupted.Third-party integrations and APIs may need reconfiguration.These issues are usually temporary, but even a short period of downtime can affect visitor trust and search engine rankings.
Time investmentEven with a clear plan, transitioning to a new domain involves many small steps, most of which need to be done by hand. It can be time-consuming, but it’s critical for success.
Expect the process to take several hours at minimum, and potentially days depending on the complexity and size of your site. It’s better not to rush than deal with time-consuming problems later.
Changing your domain: A step-by-step guideHere’s how to switch domains with minimal disruption.
1. Choose and purchase your new domainThe process of is worth its own article, so we won’t go over it in detail here. You can register domains from any registrar. When using WordPress.com, you get domain privacy and super fast DNS included. Just saying.
Use our domain search tool to find your desired name:

Make your choice, then continue to the checkout and complete your purchase. That’s it.

Tip: Do you want your domain and hosting under one roof? Switch to WordPress.com’s world-class secure hosting using our hassle-free site migrations and get a free domain for the first year (on annual plans). You can also move your existing domain and manage everything in one place.
2. Plan your redirectsA redirect is like a virtual signpost showing that a web page has moved. It automatically sends visitors and search engines from an old address to the new one.
If you change your domain name without redirects, old links to your site in search results, other websites, and social media will lead to broken pages and 404 error messages. That’s why they are essential to preserve traffic, SEO value, and usability, and need to be planned in advance.
There are different kinds of redirects. The one most relevant here is the 301 redirect, which signals that a page has permanently moved.
Make a list of your most important pages — blog posts, product pages, landing pages, and any content that gets consistent traffic — and plan their counterparts on the new domain.
For detailed information, check out our online course lesson on redirects.
3. Notify your audienceOnce you are ready to execute the domain change, let your audience know about it ahead of time. Send out an announcement via email, blog post, or banner on your site.
Example of announcement blog post from a well-known brand changing their name (and their domain name to match).Clearly explain that only the address will change, not the content or company behind your website. Use this opportunity to reinforce your branding and highlight improvements that come with the change.
4. Change DNS recordsDNS stands for “Domain Name System.” It’s a network of servers containing the information regarding which domain points to which server. It’s essentially the internet’s phone book (if you are old enough to remember those).
To change domains, you need to update your new domain name’s DNS settings so it is connected to your server and site. This process isn’t instantaneous — the changes have to register or “propagate” globally, which takes up to 48 hours, but usually happens much sooner.
Here’s where to direct your new domain depending on your use case:
If all you are doing is switching the domain name, aim it at your existing website. Your site will simply have two domains for a while, allowing you to switch once ready with no downtime.Should you be changing hosts too, point the new domain to your new server instead, and keep the old site live as is for now. This allows you to migrate your content and prepare the new site without affecting your current web presence. You can update the DNS to point the old domain to your new hosting provider once ready.You can manage your domain’s DNS settings through your domain registrar or a management panel like cPanel, and it roughly looks like this:
Get your hosting provider’s nameserver address(es). It will be something like “ns1.example.com” and “ns2.example.com.”Log in to your domain registrar account and find your new domain’s DNS or nameserver settings.Update the A records with your hosting provider’s nameservers.Save the changes.Make sure to back up the DNS records from your old domain in case you need them later!
In WordPress.com, you manage your site domains under Upgrades → Domains (or Hosting → Domains if you are using WP Admin).

If you purchased your domain together with hosting, it’s automatically connected to your site. You also have the option to switch transferred domains to the WordPress.com nameservers with the click of a button.
You can learn all about it in our detailed instructions for , including alternative methods, and more information about DNS on WordPress.com.
5. Back up your existing websiteAlways back up your website in full before making major changes like switching your domain name. On a managed hosting provider like WordPress.com, backup is done for you, and you can restore your site with one click.

When self-hosting your website, use a backup plugin like Duplicator or back up your site manually. Make sure to save both your database and website files. For even more security, download your backup and store it in multiple places.
6. Switch the domain in your CMSThe upcoming steps will all directly impact your site’s usability and — possibly — availability. Therefore, if you are not switching your host along with your domain and only have one version of your site, it’s highly recommended that you use a staging site first before making changes to your live website.
When the DNS changes have propagated, it’s time to update your site to use the new domain. In WordPress, you usually do this under Settings → General. Fill in the new domain under WordPress Address (URL) and Site Address (URL), then save at the bottom.
Both settings should include the https:// or http:// part and not have a slash (“/”) at the end.
Depending on your hosting provider, these settings may also be located elsewhere. For example, on WordPress.com, you change your website’s primary domain in the aforementioned Upgrades → Domains.

An important consideration for this step is your SSL certificate. You need to ensure it is active and valid for the new domain. On WordPress.com, SSL/HTTPS is included with every plan.
7. Update links in your databaseAfter changing your domain, all WordPress page and menu links will switch automatically as well. However, you likely still have manually created links pointing to the old domain in posts, pages, and elsewhere.
The easiest way to update those is to replace them in your website’s database. WordPress has several plugin solutions for this, like Update URLs.

Alternatively, you can also use a tool such as the database search and replace script by Interconnect, SQL commands inside phpMyAdmin, or WP-CLI. Double-check your input and run a preview or dry run to see if your tool supports it and avoid making mistakes!
8. Implement redirectsNow the only thing left is to set up redirects from your old to your new domain. You have two main options for that, depending on your scenario:
Set up redirects on the old server: When you move hosting providers along with switching your domain name, you can keep your old website around, but redirect it completely. In this case, you do NOT change the DNS record of your old domain to the new host.Redirect on the new server: If you plan on directing your old domain to your new host, redirects have to be in place on the new server. That’s because, once you change the DNS records of your old domain, anyone who uses it will arrive at the new server and need to be redirected to the right location from there.A plugin like Redirection is great for self-hosted sites where you will keep the old website around, at least for a while. It has a dedicated option to move your entire site.

There are also SEO plugins that help you set up redirects, like All in One SEO.
A comfortable solution for implementing redirects on the new server is your .htaccess file. Place the following code at the top of the file and make sure to replace the example domains with your old and new domains:
RewriteEngine OnRewriteCond %{HTTP_HOST} ^olddomain\.com$ [OR]RewriteCond %{HTTP_HOST} ^www\.olddomain\.com$RewriteRule ^(.*)$ https://newdomain.com/$1 [R=301,L]Tip: On WordPress.com, redirecting your website is super easy. It happens automatically when you change the primary site address.
9. Check site links thoroughlyOnce redirects are in place, be sure to test them! Access your most important pages via your old domain and see if you land in the right place. You can also use a bulk redirect checker to test multiple links at once.

While you are at it, look for any broken links on your site and correct or redirect them as well. You can find them with a plugin like Broken Link Checker. The aforementioned Redirection plugin also tracks 404 errors, so you can easily point them to the right location.

Another option is advanced tools like Sitebulb or Screaming Frog.
Once you’re done with that, if you’ve been working with a staging site so far, now is the time to move your changes over to your live or production website.
10. Signal the domain change in Google Search ConsoleTo preserve your SEO rankings and speed up the reindexing process, Google needs to be notified that your website has moved to a new domain. To do that, both your old and new domain names need to be set up and verified in Google Search Console.
Open the old domain property and use the Change of Address tool under Settings.

Select your new domain from the drop-down menu and click Validate & Update.

In addition, prepare and submit a new sitemap for your new domain under Indexing → Sitemaps.
Do the same for other webmaster tools you might have connected to your site.
11. Update Google AnalyticsThe last step is confirming your change in domain in Google Analytics so you can continue tracking your traffic correctly. Log in to your Google Analytics account and go to the Admin panel, and then to Data streams under Data collection and modification.

Edit the stream details to use your new domain’s URL.

Ensure the existing tracking code is installed on the new domain and working properly. If you plan to track traffic for both domains, make sure to enable cross-domain measurement.
Next stepsThe domain switch is done, but a few follow-up steps help ensure everything continues to run smoothly:
Stay on top of analytics and Search Console: Watch for crawl errors, indexing issues, warnings, and unexpected changes in traffic patterns to catch problems early.Update robots.txt: Check your robots.txt file for any hard-coded links to the old domain, such as the sitemap URL.Revise social profiles: Update the website URL on all your social media accounts to reflect the new domain.Adjust email addresses: Change any email addresses that used your old domain. On WordPress.com, you can use email forwarding for that.Migrate backlinks: While redirects should do a good job of preserving the SEO value of your backlinks, it’s a good idea to reach out to websites that have linked to your site and politely ask them to update the links to your new domain.Disconnect and cancel the old domain: Monitor traffic and indexing to ensure the new domain has fully replaced the old one in search results before canceling the old domain. Google recommends maintaining 301 redirects for at least 12 months to preserve SEO value. Change your domain name with confidenceA domain name isn’t just an address — it’s part of the brand and identity of your site and business. Changing it can feel like a risk, but it can also be an opportunity to grow, move forward, or start fresh.
What matters most is that you take your time. Switching to a new domain is a process with many steps that requires careful planning and attention to detail.
Of course, having a good partner on your side makes it easier. Choose WordPress.com and comfortably manage domains and redirects right from your site backend.
Move to WordPress.comJuly 18, 2025
3 Fresh Features We’ve Added to the ActivityPub Experience for WordPress
Imagine publishing once and instantly reaching engaged readers across dozens of platforms—without ads, algorithms, or corporate interference. That’s the power of the Fediverse. You can expand your reach to millions of potential readers while maintaining full control over your content and audience relationships. WordPress.com’s newest ActivityPub features make joining this thriving network of independent creators simpler than ever.
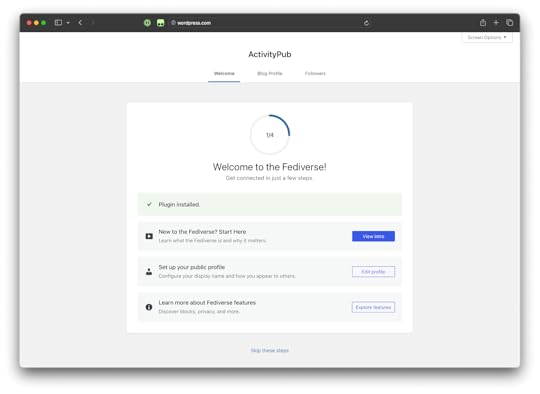
A smoother start with the new onboarding experienceTrying something new can feel overwhelming, so we’ve added a step-by-step guide that walks you through everything ActivityPub can do. When you turn it on, you’ll get a quick tour of the basics: what ActivityPub is, how it helps you connect your blog with the wider Fediverse, and where to find all your new settings. We’ll even show you the special editor blocks you can use to highlight your Fediverse profile right on your site.
 Customize your Fediverse presence
When your blog appears on other Fediverse platforms like Mastodon, these new settings help shape how your content and identity are presented. Each platform might display things a little differently, but customizing these options helps your blog stand out and feel more welcoming to potential followers.
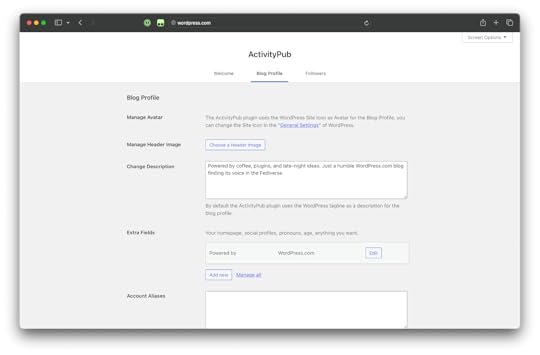
Here’s what you can personalize:
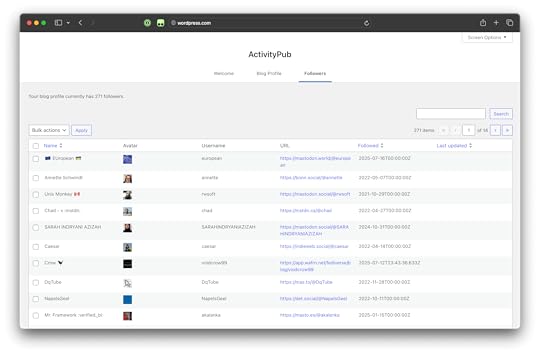
Avatar: This is the small image that shows up next to your posts and comments across the Fediverse. By default, it’s your WordPress.com Site Icon. Want to change it? Just update your Site Icon in your General Settings—a clear, recognizable image works best.Header Image: The header is a big banner that sits at the top of your blog’s profile on Fediverse platforms. You can upload something that reflects your style or what your blog is about, or leave it blank if you prefer.Description: This is your blog’s short bio. By default, it uses your WordPress tagline, but you can write something custom to introduce your blog to new followers.Extra Fields: Add links to your homepage, social profiles, pronouns, or anything else you want people to see. You can edit, add, or organize these fields however you like.See and manage your followersCurious about who’s following your blog from across the Fediverse? Now you can see a list of your followers, complete with profile details and the last time they interacted with your site. It’s a simple way to keep track of your growing audience.
 Ready to try it out?
If you haven’t enabled ActivityPub yet, it’s easy to get started!
Just head to Tools → Marketing → Connections (or Hosting → Marketing → Connections in WP Admin) and activate the Fediverse feature. Once it’s on, you’ll find all the new settings under Settings > ActivityPub.
We can’t wait to see how you use these new features to connect with even more people across the Fediverse!
July 17, 2025
How to Fix a Hacked Website: A Step-by-Step Recovery Guide
How do you fix a hacked website? How can you tell if your website has been compromised? What can you do to prevent it from happening again in the future?
This guide will cover each of these questions in detail. So, if you are currently dealing with a website that’s been infiltrated by a hacker, you’ll know exactly what to do about it by the end of this article.
How websites get hackedHow do website hacks happen in the first place? Here are some of the most common ways ill-minded individuals gain access:
Poorly secured web hosting: For example, weak server configuration or a lack of separation between sites.Compromised login credentials: Typically through brute-force attacks, credentials leaked in another breach, or those obtained via phishing.Outdated WordPress core, plugins, or themes: They often contain known security flaws that hackers can easily exploit.Extensions from untrustworthy sources: Nulled or unofficial plugins or themes frequently contain hidden malware and backdoors.Injection attacks: A poorly secured site may allow hackers to execute scripts on your site to access your database, inject malicious code, or breach it.Why hackers target websitesYou might think your site is safe because it’s small and unknown, but this is a common misconception.
Most website hacks aren’t personal or planned, but simply a matter of opportunity. Automated bots scan the internet for potential targets, and if your site is vulnerable, it may become subject to an attack.
Why do hackers do this? For various reasons:
Data theft: Hackers harvest emails, passwords, and customer info to resell or use in future attacks.Install malware: They use your site to infect your visitors’ devices with harmful software.Traffic redirection: Visitors are sent to shady, scammy, or fraudulent websites.Hijack server resources: Sometimes hackers secretly use your server’s processing power to mine cryptocurrency, send email spam, or carry out DDoS attacks.Phishing: Fake login or payment pages steal credentials from users.Ransom demands: Here, attackers lock you out of your site and ask for payment to get back in.Hacktivism: Some people disrupt services or deface websites to push a political or ideological message.Fun, practice, or testing: Hackers may just target you because they can, to improve their skills, or to test new attack methods in the wild.What happens when your site gets hacked?Some attacks are obvious, like finding your homepage vandalized, your site filled with spam content, redirects to other websites, or pages you didn’t create. Others are more subtle:
Website unavailable: Your site shows a blank page or the “white screen of death.”Security warnings: Alerts from browsers, Google Search Console, or sites like Google Transparency Report, Norton Safe Web, or your hosting provider that indicate that your site is unsafe, contains malware, or has been blocked/suspended.Traffic changes: Unusual visitor patterns, like an influx from unexpected countries or a sudden drop in website traffic.Unknown admin users: Suspicious new user accounts in your dashboard or existing users whose privileges have been escalated.Strange files in your webspace: Files or scripts you don’t recognize, or server files containing unusual code.Suspicious activity: Login attempts, file edits, or plugin changes you didn’t make show up in your activity log.In addition to these visible problems, a hacked website can have serious, long-term consequences for your business, site, and bottom line. It can result in a loss of revenue, traffic, and search rankings, as well as harm your brand reputation. Cleanup can be time and cost-intensive; you might run into legal issues, lose important data, and have to pay higher hosting and security fees in the future.
Overall, it’s a scenario best avoided, but what do you do if it’s too late for that?
Fixing a hacked website — Phase 1: Check site accessWhen dealing with a hacked website, the first step is to find out what level of access you still have to it.
1. See if you can log inTry logging in to your WordPress admin dashboard. It’s usually located under yoursite.com/wp-admin.
If the login screen doesn’t appear or redirects elsewhere, skip ahead to downloading and cleaning up your website files first. Otherwise, try your normal username and password. Should that not work, try the password recovery.

In case neither of these steps is successful, you can access your database (e.g., via phpMyAdmin) and check the wp_users table to confirm your admin account still exists.

If it does, you can reset your password directly in the database or even create a new admin user to regain access. It’s also possible to reset your password using FTP and WP-CLI.
2. Switch your site to maintenance modeOnce you can access your backend, it’s best to make your site temporarily unavailable. This helps you protect your site visitors and reputation from further harm while you fix the hacked website. The best option for that is to put it into maintenance mode.

You can use a maintenance mode plugin or set up an HTML file for that. Some CDN providers also let you put up a maintenance mode screen, such as Cloudflare.
Phase 2: Secure the siteNext, it’s time to start regaining control of your site.
3. Talk to your hosting providerYour host should be one of your first ports of call and also your strongest ally in case of a website hack. For example, at WordPress.com, you can trust our security features to the point that, should a site we host become compromised, we remove the hack for you. Just contact WordPress.com support, and we’ll help you right away.

Even if you host your site elsewhere, you should get in touch with your provider. On some types of hosting, such as shared hosting, the hack could have originated from another website on the same server. In that case, your site would likely just become compromised again, no matter what you do.
Speaking to your host will also let you know about any assistance they offer to fix your hacked website and if temporary account restrictions or suspensions are in place. They might also be able to give you an indication of when and how the hack happened via access and error logs.
4. Back up your site in its current stateSave a copy of your site — even if it’s compromised. It lets you preserve recent content, conserve evidence to analyze the source of the hack, and allows you to restore your site should something go wrong during recovery.
Make sure to back up both your site files and database. Use your hosting control panel, SFTP, or a backup plugin. Managed hosting providers like WordPress.com usually offer automatic backups. On our Business and Commerce plans, you can restore from backup with one click and also download site backups.
You can spin up your copied site in a local development environment, for example, using WordPress.com’s Studio, to analyze it later or perform your cleanup there.
5. Restore from a recent clean backup (if possible)If you had the foresight to set up an automatic backup solution, restoring from a recent clean site copy is often the easiest way to fix your hacked website.
Make sure the backup predates the hack or suspicious activity. If possible, first load it on a staging site to run diagnostics before restoring.
Be aware that restoring doesn’t remove the original vulnerability. You’ll still need to investigate how the hack happened to prevent reinfection.
Phase 3: Lock it downThis phase is all about closing off common entry points into your site.
6. Go through your user accountsHackers who gain access to a website frequently create an admin user account for themselves. This gives them a quick way back into the site and is often easy to disguise.
Therefore, review all accounts in your WordPress User menu and/or database.

Look for unfamiliar usernames, especially with admin privileges and delete or downgrade them. Document any changes you make and do the same with other accounts associated with your site, like hosting, FTP, email, CDN, and third-party tool credentials.
7. Change all passwordsNext up, lock down the accounts you’ll keep by changing their passwords. On your site, you can reset passwords for all users and enforce strong passwords with plugins like Emergency Password Reset and Password Policy Manager.

Another step is to implement multi-factor authentication, so users have to confirm their login with a code sent to their email address or mobile phone. Again, do the same for other accounts associated with your site.
If you want to go a step further, reset your database username and password as well. Don’t forget to update wp-config.php to reflect the new values; otherwise, your site won’t work.
Lastly, replace the SALTs in wp-config.php. These are security keys used to encrypt login sessions and cookies, and look like this:
define( 'AUTH_KEY', 'put your unique phrase here' );define( 'SECURE_AUTH_KEY', 'put your unique phrase here' );define( 'LOGGED_IN_KEY', 'put your unique phrase here' );define( 'NONCE_KEY', 'put your unique phrase here' );define( 'AUTH_SALT', 'put your unique phrase here' );define( 'SECURE_AUTH_SALT', 'put your unique phrase here' );define( 'LOGGED_IN_SALT', 'put your unique phrase here' );define( 'NONCE_SALT', 'put your unique phrase here' );Visit the official SALTs generator and copy a new set over the existing ones in your file, then save and re-upload it. This will force all users (including hackers) to be logged out immediately. The aforementioned Emergency Password Reset plugin can also do this for you.
8. Update all softwareYour website hack might have happened via outdated and vulnerable files. Besides that, hackers like to modify core files to make reinfection easier.
That’s why an important step to fix your website after it’s been hacked is to update all its software to the latest version. This means WordPress core and all plugins and themes.
If you can’t access the admin dashboard or the automatic update isn’t working, download the files from WordPress.org and install them manually via FTP.

Be sure to preserve the wp-content folder and don’t overwrite wp-config.php. In addition, remove any unused, outdated, or unsupported plugins and themes, and consider updating server software like Apache or your PHP version.
By the way, WordPress.com keeps your WordPress version updated automatically, and you can activate the same for plugins and themes.
Phase 4: Remove hidden threatsThis phase is about digging deeper to find hidden code snippets and backdoors. These are entry points hackers like to leave behind so they can regain access to your site even after you cleaned it up.
9. Check your website filesHackers can include malicious code in many parts of your website. One common hiding place is the wp-content folder. It doesn’t get replaced during updates, so files added to it stay safe unless removed manually. Check it for hidden PHP files, especially in the uploads folder, child themes, inactive themes, and plugins. If you can’t access your site at all, try renaming folders, like the plugins directory.
In addition, examine your current theme’s files for unfamiliar code. Download a clean copy of your theme from the WordPress directory or your vendor (make sure to get the same version as your site) and use a tool like Diffchecker to see if there are any differences between files.

You can also do file comparisons via SSH.
Malicious code frequently appears at the top or bottom of files, often encoded or obfuscated using functions like:
base64_decode()eval()gzinflate()preg_replace()str_rot13()You can use tools like Base64 Decode, UnPHP, or UnPacker to decode it.
Especially pay attention to files such as:
functions.phpheader.phpfooter.phpindex.phpwp-config.phpwp-load.phpIn addition, look for oddly named or slightly misspelled files like wp-logon.php or wp-config1.php.
Additionally, open the .htaccess file and look for suspicious code and redirect rules that don’t belong there. Besides that, check for additional .htaccess files in wp-content and its subdirectories. You may also want to check your file permissions.
If this seems to be outside of your skill set, get professional help or use a security plugin or malware scanner like Jetpack, WordFence, MalCare, or Sucuri Security.
10. Clean up the databaseThe WordPress database is another place you need to examine after a website hack. Cleaning it up manually is a painstaking process, especially if your database is very large. Therefore, the easiest way is usually to scan it with a plugin like those mentioned above.
You can also access your database with the aforementioned phpMyAdmin or a similar tool and look for problems by hand, such as:
Hidden spam content in the wp_posts table.Keywords like eval, base64, gzinflate, preg_replace, or assert.Common spam terms like “gambling.”Be sure to always back up your database before making any manual edits. If unsure, export it and compare the database to a clean version from a backup.
Phase 5: Recover and relaunchAfter fixing your hacked website, it’s time to bring it back online.
11. Reupload clean site filesUpload your files and database from your local install or staging site (skip this part if you did the repairs on your live site).
Test your site’s main features: navigation, forms, checkout, login, etc. See if any content, including images, is missing. Visit your website in an incognito window to confirm it displays correctly for visitors.
Disable maintenance mode if it’s still active. Clear your site cache to ensure no cached malware or outdated pages are loading.
To be completely on the safe side, rescan your live site files and database tables for remaining threats. Use a malware scanner both from inside WordPress and outside.
12. Deal with the aftermathOnce the immediate problem is resolved, you need to deal with its fallout:
Communicate with your customers: If the hack affected your users through downtime, strange behavior, or a potential data breach, be transparent. Let them know what happened, what you’ve done to fix it, and what steps you’re taking to prevent the problem from occurring again.Submit requests to remove your website from Google’s blocklist: If Google Search Console flagged your site as dangerous, request a review via Security & Manual Actions → Security issues after the cleanup is complete. This helps restore search visibility and remove browser warnings. Do the same for other blocklists you may have appeared on.Restore any lost content from backups: If pages, images, or posts were damaged or deleted, recover them using your most recent clean backup. Double-check everything before re-publishing to ensure you don’t reintroduce malicious code.Analyze the hack: Document what happened, how your site was compromised, what actions you took, and what you plan to do going forward to strengthen future security.Keep monitoring: Set up ongoing monitoring tools, such as an activity log to track user logins, site changes, and system events. Monitor changes to files, regularly scan your site for malware, and keep an eye out for any of the signs of a website hack we discussed earlier.Prevent website hacks before you have to fix themThe final step is to make sure you never have to be in this situation again. First, follow security best practices:
Use strong passwords, change them regularly.Implement multi-factor authentication for all relevant accounts.Set up user roles with the minimum necessary privileges.In addition, take steps to harden your website security:
Use SSL encryption.Keep WordPress Core, plugins, and themes updated.Put a backup solution in place.Set up automatic malware scans, brute force, and DDoS protection.Add a firewall to your site.On WordPress.com, all of the above is included with every plan, together with additional security features. So, if you want a simplified and effective way to prevent being hacked, move your site to WordPress.com.
Move your site to WordPress.comJuly 15, 2025
How to Add Schema Markup to WordPress Sites (And Why You Should)
Schema markup gives you a way to enhance how your website and its content are displayed in the search engine results pages (SERPS).
Examples of these enhancements include star ratings, event info, product pricing, and FAQs. When implemented correctly, they’re an effective way to make your content stand out in the SERPs and increase click-through rates.
Adding schema markup to your WordPress site also helps search engines to understand your content better, increasing the chances of it being displayed where your target audience will find it.
By the end of this guide, you’ll better understand schema markup for WordPress and how to add it to your site.
What is schema markup?
Schema markup, sometimes called structured data, is code you add to your website. Its purpose is to help search engines understand your content better, such as its meaning and context.
Similar to categories and tags in WordPress, schema markup can be used to add labels to your content that explain what each piece of content is about and its format. Some examples of these labels include products, recipes, reviews, and events.
Adding schema markup is also a way to enable rich results or rich snippets for your site and its content.
You’ve probably seen rich results in the SERPs before. They include extra details about a page in the results, such as business information, star and average ratings, product details, FAQ, recipe information, and more.
This additional information makes rich results-enabled content stand out and helps search engine users decide which result to click on.
Common Types of Schema Markup
Here are some widely used schema markup types and how they can generate rich results:
Review and Rating: Can display star rating and number of reviews in the SERPs.Articles: Includes headline, author, publication date, and a thumbnail image. Product: Price, availability, and rating can be displayed. FAQ: Collapsible questions and answers are displayed.Recipe: Cooking time, ingredients, and ratings can be displayed.Local Business: Name, address, phone, and business hours can be included.Event: The event’s date, location, and ticket availability can be displayed.Not everything that can be displayed in a rich result is displayed. Many factors control how and when they’re displayed, such as site settings, the user’s search term, and the search engine algorithm.
However, adding schema markup is essential for enabling rich results for your site.
While there are hundreds of types of schema, you must use the types supported by Google if you want your content to feature rich snippets when displayed in their search results.
Benefits of adding schema markup to your WordPress site
One of the main benefits of adding schema markup to your WordPress site is that it can increase your content’s click-through rate when it’s displayed in the SERPS.
For example, one study found that 58% of search engine users clicked on results enhanced with rich results while only 41% of users clicked on regular (non-rich) results.
This makes sense as rich results not only stand out but they also provide search engine users with more information when deciding which result to click on.
For example, if a user is searching for a recipe, seeing the cooking time and user rating displayed in the SERPs demonstrates that the content is informative and whether or not it meets their requirements.
The other main benefit is that search engines can use schema markup to better understand your content. This helps the search engines to know when to display your content in their results, sending more relevant traffic to your site.

A further benefit of using schema markup is that it increases the chances of your content being displayed in more places in the SERPs. This includes the People Also Ask boxes and recipe carousels.
 Key benefits of adding schema markup:
To summarise, the main benefits you could potentially unlock by adding schema markup to your WordPress site include:
Increased visibility in the SERPs by enabling rich results.Improved click-through rates in the SERPs by making your content stand out.Increased traffic to your site without needing to improve your ranking. Help search engines understand your content and know where to display it.Make your content eligible for display in People Also Ask boxes and elsewhere on the results pages.As we’re about to cover, adding schema markup to WordPress is relatively straightforward, making it something all site owners should consider.
How to add schema markup to WordPressYou can add schema markup to your site manually, but this is another area where WordPress plugins can be used to simplify the task.
Here are some recommended plugins as well as a guide to adding structured data to WordPress using one of the options.
Schema markup WordPress pluginsThere are lots of plugins that can add schema markup and structured data to WordPress. Some of these plugins include other useful functionality, such as search engine optimization features, while others are focused solely on implementing schema markup.
Not all schema markup plugins for WordPress cover all the available schema types, so you must choose a plugin that supports the ones you need. For example, if you’re creating a food blog with WordPress, you could select a recipe-specific plugin that adds the relevant schema markup, such as WP Recipe Maker.
Just ensure that any plugin you’re considering supports the schema markup you want to use.
Rank Math SEORank Math SEO is a popular and user-friendly option for adding schema markup to WordPress.
The free version of the plugin lets you add 13 schema types, making it suitable for most projects. The paid version supports six more types.
Thanks to its broad range of SEO features, Rank Math SEO can also be used as your WordPress SEO plugin.
The paid version has more schema-related features, including adding multiple schema types to a single page. This would let you add the Product Schema and Review Schema to an eCommerce product page to display pricing and rating information in the rich results.
The paid version also includes a schema generator to help you choose the correct schema for each piece of content and a tool for importing schema markup from other websites so you can see how others are using structured data. However, the free version of Rank Math SEO can add a good range of schema markup to WordPress.
Rank Math SEO is an excellent option if you’re looking for a powerful SEO and schema plugin that’s easy to use.
Yoast SEO
Like Rank Manth SEO, Yoast SEO is an SEO plugin for WordPress that can add schema markup to your site. It’s also one of the most popular plugins on WordPress.com.
Like the other options covered here, you can set a default schema markup type for your site so you don’t have to select one each time you publish a new piece of content. This can be overridden at the post and page level if needed.

Yoast SEO integrates with other schema markup plugins, including WP Recipe Maker, giving you more options for adding structured data to your site while maintaining access to the rest of the plugin’s features.
Choose Yoast SEO if you want to install the most widely used SEO plugin for WordPress and add schema markup with the same plugin.
Schema & Structured Data for WP & AMP
Schema & Structured Data for WP & AMP was built specifically for adding schema markup to WordPress rather than also being an SEO plugin. The free version supports an impressive 46 schema types.
The developers claim that users can request additional schema types, and they will add them to the plugin. This makes Schema & Structured Data for WP & AMP ideal for anyone creating content types not covered by other plugins.
Schema & Structured Data for WP & AMP isn’t quite as user-friendly as the other plugins covered here. However, I’ve included it as it supports many schema types, making it a good option if it covers the schema types you want to use that other plugins don’t. It’s also a suitable option if you’re already using an SEO plugin you’re happy with and are looking for a schema markup plugin to use alongside it.
Using Rank Math SEO to add schema markup to WordPressHere’s a walkthrough of using the Rank Math SEO plugin to demonstrate how you can add schema markup to WordPress.
You’ll need the Business plan or above if WordPress.com hosts your site and you want to install this plugin.
Rank Math SEO is a good option as it has a user-friendly setup wizard to help you optimize your site for search engines and add structured data to WordPress.
To get started, go to Plugins → Add New in WP Admin.

Next, search for “Rank Math SEO” and click the “Install Now” and then Activate buttons.
The optional setup wizard will launch after activating the plugin. The wizard walks you through setting up the SEO features of the plugin and gives you the option of importing the settings from an SEO plugin you might already be using on your site.
To configure the schema markup capabilities of the plugin, go to Rank Math SEO → Titles & Meta from the WP Admin sidebar menu.
Then, click on Posts under Post Types on the Rank Math SEO panel.
Now you can set the default schema markup type for all posts. Choose Article from the Schema Type dropdown menu if you’re primarily creating blog posts.
You can override the default settings from the WordPress editor when you’re creating a piece of content that will use a different schema markup type.
To do so, click on Schema Generator from the Rank Math panel in the WordPress editor.
One instance where this would be necessary is if you’re publishing a recipe where the default schema type for the site was set to Article.
You can then add the additional information for the schema type you’ve selected.
For example, if you selected the recipe type, you can add the preparation time, cooking time, and other details that will be displayed in the rich results in the SERPs.
Click the “Save for this Post” button when you’ve finished.
You can then repeat the above to add structured data to any new and existing content on your site.
The Titles & Meta section of the Rank Math SEO documentation has the full details on adding structured data to WordPress with this plugin.
Testing your schema markupOnce you’ve added the schema markup via your choice for plugin, rich results should be displayed for your content in search engines.
However, it’s recommended that you test your site to ensure that everything is working as expected. While the best schema markup plugins for WordPress do an effective job of adding structured data to your site, checking and testing can highlight any issues, such as missing required fields.

There are a few tools you can use to test your site’s schema markup, including:
Schema.org Validator : Enter the URL of a page to find out if the structured data has been added correctly. Any errors will be highlighted to help you resolve them. Google Rich Results Test: Validate your schema markup to check which rich results can be generated by its structured data.Correctly adding schema markup to your site is no guarantee that search engines like Google will display rich results for your content.
However, by using a reliable plugin or correctly adding the structured data manually, you will have done all you can to activate rich results for your site.
Ready to add schema markup to WordPress?Adding schema markup to WordPress makes it possible for your site to start benefiting from rich results, such as improved click-through rates from the SERPs and more traffic.
The easiest and most convenient way to add structured data to WordPress is to use a schema markup plugin.
Before you choose a plugin, ensure it supports the type of schema markup you’d like to use on your site.
Plugins like Rank Math SEO and Yoast SEO are easy to use and include many useful features. However, they don’t cover all the schema markup types, so be sure to choose the right plugin for your goals.
If WordPress.com hosts your site or you’d like it to, you can install plugins on the Business and Commerce plans and benefit from fast load times, enhanced security, and many other valuable features.
Move your site to WordPress.comJuly 14, 2025
Introducing Selective Push and Pull in WordPress Studio
Picture this: You’re working on a client’s website, fine-tuning a new theme you’ve been developing for weeks in WordPress Studio. The design is perfect in your local environment, and you’re ready to push it live using Studio’s sync feature.
But there’s a catch. You only want to deploy the theme. You don’t want to overwrite the plugins already running smoothly in production, and you definitely don’t want your local test content affecting the live database.
If that sounds familiar, you’re not alone. Until now, Studio’s sync feature was all or nothing; you could easily push or pull entire sites between your local environment and WordPress.com or Pressable, but there was no way to sync just part of a site, like a single theme.
That changes today with the release of Selective Sync in WordPress Studio 1.5.5.
Adding granular controlSelective Sync gives you precise control over what gets transferred between WordPress Studio and any connected production or staging sites. You can now choose exactly what to sync, whether it’s a single theme, a specific plugin, only the database, or the entire wp-content folder.

The reality of WordPress development is that production sites are constantly changing. While you’re working on new features locally, your live site continues to serve visitors, process orders, and collect user data. A full sync in either direction could result in lost changes or disruptions for active users.
Here are a few scenarios where Selective Sync really shines:
Plugin development: When building a new plugin feature, you often work with test data that shouldn’t make its way into production. Selective Sync lets you push only the plugin files, keeping your local database separate. Your live site’s data stays intact, and your new feature goes live without disruption.Theme updates: Theme developers face similar challenges. You might spend days fine-tuning layouts and testing block patterns with sample content. When it’s time to deploy, you want to push only the theme files, not placeholder posts or demo images. Selective Sync makes that easy.Privacy and scale: If you’re working with a WooCommerce store that has hundreds of products and thousands of customers, cloning the full site locally can be risky or unnecessary. Selective Sync allows you to pull down only the code you need to work on, such as the theme or a specific plugin, without syncing sensitive customer data to your local environment.Focused environments: Some developers prefer to separate concerns by using different local Studio sites for different types of work. You might maintain one environment for plugin development and another for theme design. With Selective Sync, each can connect to the same production site and push changes independently, without affecting unrelated parts of the project.Since full-site sync launched in January 2025, developers, designers, and site builders have asked for more flexibility. Selective Sync was built in direct response, making it easier to adapt Studio to the needs of real-world projects.
How Selective Sync worksIf you’re new to WordPress Studio, this is a great time to explore what the tool offers beyond its new syncing features. Studio is free, open source, and built to make building WordPress plugins, themes, and full sites more efficient and enjoyable.
Download WordPress Studio for freeAlready using Studio? Selective Sync is available now. Just update to the latest version when prompted in the app, then follow the steps below to get started.
TIP: Keep in mind that while WordPress Studio is free to use, the sync feature requires a WordPress.com site on a Business or Commerce plan, or a Pressable site with the Jetpack Security plugin active. For more information, check the official documentation.
Connect a live siteThe first step is to connect a local Studio site to an existing production or staging site on WordPress.com or Pressable. You can also create a new site on WordPress.com from the Studio interface:
Select the site you wish to connect from the Studio sidebar.Open the Sync tab.Log in to WordPress.com if you haven’t already.Click the “Connect site” button to see available sites. Select the site you want to connect to and confirm by clicking the Connect button.(Optional) Create a new site by clicking “Create a new WordPress.com site.” Pull content into Studio
Once your live site is connected in Studio, you can either pull content from the connected site into Studio or push content from your local environment back to the connected site.
Let’s start with pulling content:
Open the Sync tab for the site you want to synchronize (if you’re not already there).Locate the connected WordPress.com or Pressable site you want to pull content from.Click Pull to open the sync modal. Choose to sync “All files and folders” or “Specific files and folders,” then use the checkboxes to select what you want to include.Decide whether to include the Database in the sync.Click Pull to confirm and begin syncing.
The process may take some time, as a full backup of your live site will be created. Once complete, you’ll be ready to start working locally in Studio.
Push content to a live sitePushing content from Studio to a connected site follows a similar process to pulling, but with more control. You can choose individual plugins, themes, and other files to sync.
Open the Sync tab for the site you want to synchronize (if you’re not already there).Locate the connected WordPress.com or Pressable site you want to pull content from.Click Push to open the sync modal. Choose to sync “All files and folders” or “Specific files and folders,” then use the checkboxes to select what you want to include. You can expand the plugins, themes, and uploads folders to select individual items.Decide whether to include the Database in the sync.Click Push to confirm and begin syncing.
As with pulling content, the process may take some time. A full backup of the connected site will be created before your local changes are applied. Once the sync is complete, you’ll receive an email confirmation with a summary of what was transferred.
Pro tips for using Selective SyncSelective Sync is built to streamline development, but there are a few key details to understand before getting started.
When pushing from Studio to a production or staging site, development-only files such as .git directories and node_modules folders are automatically excluded. These files remain local, keeping your live site clean and efficient.
As noted earlier, when pulling content into Studio, you can sync entire folders, such as all themes or all plugins, rather than selecting individual items. In contrast, when pushing to a live site, you can choose specific themes and plugins. We found this setup reflects the needs of most workflows, but we’re always listening to feedback for future enhancements.
While Selective Sync covers many common scenarios, some projects may still require a more advanced deployment workflow. For those cases, GitHub Deployments on WordPress.com offers more control and works well alongside Studio for complex setups.
What’s next for Studio?Selective Sync is part of a broader effort to support the variety of workflows developers use every day. That work continues, especially within WordPress Playground, the foundation that powers Studio.
Upcoming enhancements include:
XDebug support: One of the most requested additions, this will bring professional debugging capabilities to WordPress Studio. Follow along on GitHub.Performance improvements: Upcoming enhancements in WordPress Playground will make Studio even faster and more responsive.Community feedback drives these priorities. The WordPress Studio GitHub repository is the central place to suggest features, report bugs, and contribute directly to the project. Every issue, comment, and pull request helps shape the future of Studio.
If this is your first time exploring WordPress Studio, or if it has been a while since you last tried it, now is a great time to take another look. Alongside Selective Sync, dozens of improvements have rolled out this year, with more still to come.
Try WordPress Studio nowJune 30, 2025
7 Popular WordPress Backup Plugins to Keep Your Site Safe
It’s important to back up your website before a crisis occurs. Backups come in many forms, from full site downloads to smaller incremental backups. Your backup needs will depend on what kind of site you own and how frequently your data changes.
Below, we’ll dive into some popular plugin options and discuss their ideal use cases.
Editor’s note: WordPress.com websites on the Business plan and above include built-in backups via Jetpack VaultPress Backup at no extra charge.
If you are a WordPress.com user and you’re interested in other third-party plugins, you can install them from the plugin library. All plugins listed in this article are compatible with WordPress.com, but you may find backup plugins that are not compatible; see all incompatible plugins here.
Backup plugins are additional software you can install through the WordPress Plugin library to create backup copies of your site template and data. If something goes wrong with your website, you can restore it using these backup files.
Backup plugins are critical if you “break” your site, which can happen when installing a new plugin, updating WordPress core software, or changing your site template or styling. If things go awry, a backup makes it easy to revert your site to an earlier (working) version.
Backups are also useful when migrating your WordPress site from one hosting provider to another — a full site backup transfers all of your site code and content in one go.
10 WordPress backup plugin options for all use casesOnce you’ve answered the questions above, you can start to evaluate different plugin options. Below are our top plugin picks with recommended use cases.
1. For easy, real-time backups: Jetpack VaultPress
Jetpack VaultPress offers real-time backups at an unbeatable price. VaultPress is a great choice for sites that need regular, reliable updates, like e-commerce stores, online businesses, news organizations, and online communities. It’s included with all WordPress.com websites on the Business plan and above; if you’re a WordPress.com user, you can learn more about it here.
Price: Included with WordPress.com on the Business plan and above at no extra charge; $59.40 for the first year for other hosts
User friendliness: There is no configuration required for VaultPress, and you can restore previous versions of your website in the WordPress admin with just one click.
Backup configuration: VaultPress will automatically create a full site backup (including WooCommerce databases) upon installation, and continues to create real-time, incremental backups every time you edit your site. Backups are stored on a secure network of servers around the globe.
Performance: The incremental backup system means that Jetpack doesn’t require many server resources, and a distributed network of servers ensures backups are always available. For multi-site installations, each website needs its own Jetpack installation.
Install Jetpack VaultPress (Included With WordPress.com)2. For free, local backups: Backup MigrationUser review: The ability to restore to automatically-created restore points is invaluable. Every time you hit the save or publish button, a restore point is created. This makes it easy to restore to a point, say, just before the last page you updated. This is much more flexible than just restoring a previous full backup. Highly recommended! –@bobfalk

Small sites looking for affordable, easy-to-use backups created daily, weekly, or monthly will love Backup Migration’s free tool and competitive annual pricing for their paid personal and commercial plugin, Backup Bliss.
Price: Free, up to 4GB of storage; Backup Bliss less than $40 a year (non-commercial sites) or $60/year (commercial sites)
User friendliness: Backup Migration does a good job of walking users through setup with accessible language that avoids technical lingo. It also offers one-click restore.
Backup configuration: You can set your backup frequency to hourly, daily, or weekly, and choose which parts of your site to back up, with advanced rules and triggers on premium plans. Backup Migration’s free tool focuses on local backups and does not offer cloud backups, though they recently started offering cloud backups on paid plans.
Performance: Depending on whether you choose to back up your full site or only a partial backup, server performance may be reduced during the backup period.
Install Backup Migration3. For fast-scaling websites: UpdraftPlusUser review: I gave this a go and it worked flawlessly and restored my site to the exact condition it was prior. While I can do server backups it’s good to have one of your entire WP site just in case. In my case, I changed servers, so this helped. –@uniqf0x

UpdraftPlus offers a solid, free backup plan that allows users to create backups as frequently as every two hours. We like that Updraft offers incremental backups to paid users, which is a great upgrade as your site grows.
Price: Free; $70/year for Personal (up to two sites) or $95/year for Business (up to 10 sites)
User friendliness: Updraft Plus tries to compensate for a busy and complicated user interface with tooltips that point non-technical users to the right buttons and settings. Logging into cloud-based storage systems with Updraft and finalizing backup locations can be unintuitive, but the restore process is fairly simple and only requires a few clicks.
Backup configuration: Users on every level, including the free tier, can automatically back up their site as frequently as every two hours. Paid plans also enable you to utilize incremental backups on a separate schedule and back up database content. While free users can only backup to one location, they can save to popular services like Google Drive, Dropbox, and Amazon S3. Paid users have additional location options, like Microsoft OneDrive and Google Cloud.
Performance: Full backups, the only option on the free plan, can strain server resources and slow down your site. Paid plans benefit from less intensive incremental backups, which only back up the changed sections, leaving more resources available for site traffic. Encryption and premium support are only available on paid plans. Multi-sites are also supported on the paid plans.
Install Updraft Plus4. For a one-time site migration: All-in-One WP MigrationUser review: I maintain other people’s websites for a living, and when I get a new client, I always install Updraft if it’s not already there. It is, far and away, the most no-nonsense, reliable, powerful backup solution for a WordPress site that is out there. A lot of hosting services provide backups, but almost none of them will bring a site back as quickly as you can with a click or two in Updraft… – @cmkl

All-in-One is our favorite tool for full-site migrations from one web host to another. It’s also an option for ongoing backups.
Price: Free up to 128MB; $69+ for larger sites and cloud extensions
User friendliness: We love All-In-One for its one-click export and import options, which make it easy for any user to download and move their site from one host to another. Just be sure to download the plugin on both sites.
Backup configuration: All-In-One creates full site backups for site migration. By default, backups are stored locally to your computer or hard drive, but you can purchase extensions to send the backups to popular cloud storage services like Dropbox, GDrive, and Amazon S3 (for $99).
Performance: Because All-In-One creates a full site backup for local download, it may temporarily slow down your website. Premium extensions come with dedicated support.
Install All-in-One WP Migration5. For multi-site backups: ManageWP BackupsUser review: I haven’t found anything better for backing up your entire WordPress yet. – @milan574

If you manage multiple websites, you may benefit from ManageWP’s separate multi-site dashboard, where you can review and restore all of your sites from one place. However, ManageWP only runs backups at most every hour, which can lead to data loss on extremely active sites.
Price: ManageWP pricing is based on the number of websites you manage. Backup add-ons are $2/month for each website and $75/month for 100 bundled websites.
User friendliness: ManageWP offers a separate dashboard on its website for multi-site management.
Backup configuration: ManageWP allows individual site backups and backups for a whole multi-site network. It offers hourly, incremental backups stored in US/EU-approved cloud storage or locally (for paid plans only).
Performance: ManageWP’s incremental backups reduce server load because less data needs to be saved on each update. Additionally, ManageWP claims that 95% of the backups are done on their servers to reduce server load. ManageWP backups are automatically encrypted.
Install ManageWP6. For staging backups: WPVivid Backup and MigrationUser review: We use ManageWP as a simple dashboard to oversee all our companies websites. Currently it is only being used by our web development department as an easy interface to login to our websites (as it bypasses 2FA requirements), update our websites plugins & themes, and watch or any issues on our sites. –Darian Chaffart

If you want to use your existing website while working on a new version of the site behind the scenes, you’ll need to use a staging website. Like a live website, it’s important to create backups for staging sites to avoid any data loss. WPVivid is a great tool for managing staging site backups.
Price: Free; $49+/year
User friendliness: WPVivid has an easy-to-use staging environment built into your WordPress dashboard, making it easy to back up and migrate staging sites. However, if you want to push your staging site live, you’ll need to upgrade to the paid version.
Backup configuration: The free plan includes monthly scheduled backups saved to popular cloud services, while the paid version offers incremental backups and additional cloud options. If you are actively working on your staging site and making frequent updates, you may want to opt for the more robust incremental updates. WPVivid also allows you to make multiple cloud-based backups on the paid plan.
Performance: Because WPVivid backups are stored on your server, this can impact server speed during your backup period. Encryption is available on paid plans, but must be configured in your settings.
Install WPVivid Backup and Migration7. For tried-and-true results: Solid Backups (formerly Backup Buddy)User review: I really appreciate that, when my website homepage turned up inexplicably broken today, the restore process — including the instructions (since I’d never had to do a WPVivid restore before) … simply worked perfectly. – @jrgeek

Solid Backups is one of the oldest backup plugins still in use today and maintains a solid reputation. It is one of the most expensive options on this list, but you are paying for a reliable and established tool with a robust feature set.
Price: $99+/year
User friendliness: Solid Backups is feature-rich, which may be overwhelming for first-time users. If offers good walkthroughs and documentation on both setup and restore processes, but there is no one-click option for restores — you have to run a separate script called ImportBuddy to retrieve a backup.
Backup configuration: Solid Backups is highly customizable in terms of backup storage frequency and backup location. In addition to other popular storage options, it offers a proprietary storage option called Stash Live. Incremental backups are also available.
Performance: Thanks to its incremental backup feature, Solid Backups is less resource-intensive than some other options after the initial full-site backup. All backups are encrypted with SSL and password encryption.
Install Solid BackupsHow often should I back up my site?User review: When trying to restore a client’s website, I learned that SolidWP’s legacy backup product, Backup Buddy, has been replaced by a more reliable one. As a non-technical, 14-year subscriber to the original product, that caused tremendous complications. (OK, so I was panicked.) The committed customer service techs held my hand with step-by-step instructions in personalized videos and helped me accomplish the mission within about three days. – William Alexander
You should run backups whenever you change your website’s design or content. If you have a backend customer database or e-commerce store, that information should also be backed up.
Some websites, like informational websites for small businesses, rarely change and don’t need frequent backups. Sites with regular content additions, like blogs, need backups when new content is added.
Busy e-commerce sites and community websites can benefit from automated, real-time backups to ensure every order and comment is accounted for.
Do I need a backup plugin if my hosting provider includes 30-day backups?A common rule of thumb is the 3-2-1 rule: three copies of your data stored in two different storage locations (like a local computer and a hard drive) and one “offsite” copy at another physical location or on the cloud. Your hosting provider counts as one of your three copies, but we highly recommend a dedicated backup tool for your website.
Considerations when choosing a backup pluginThere are a variety of backup plugins available, ranging from free, basic plugins to robust subscription plans. There is no one-size-fits-all approach to backup plugins, but you should consider:
User friendlinessBackup configurationPerformanceThe number of its active users and its last update date are good indicators of whether the plugin is reliable and being maintained.
User friendlinessInvestigate how easy it will be to use your backups when you need them. Some backup plugins work within the WordPress interface, while others require a separate platform. While flexibility benefits advanced users, it can create unnecessary confusion for everyday users.
Key considerations include:
Setup process: Do you need to configure your backup schedule or storage locations before you can start backing up your website?Restore processes: Some plugins have one-click options while others use wizards that walk you through more complex restore processes.Support: Check when the plugin was last updated and whether their team has an active and helpful support option available for users.Backup configurationThere are different types of backups and storage locations available. Not every site needs complex backup configurations, so consider what factors are necessary for your site.
Things to look for:
Frequency: More frequent backups are useful when your site changes frequently, but they can also slow your site down and require a lot of file storage.Automation: Some backups happen automatically, while others must be manually started. Manual tools are generally cheaper and may be sufficient for sites that don’t have frequent updates.Storage locations: Consider storing multiple copies of your data in different locations, such as locally on your computer, on an external hard drive, or in the cloud.Backup types: Consider what data gets updated regularly. Full-site backups take longer and require more storage. Some plugins solve this problem by allowing you to manually select the content to back up, or use “incremental” backups that only save the changed component.Backup content: What site content is included in your backup? If you have backend databases, ensure your plugin supports backups of that data.PerformanceBackups can impact server capacity and site speed. If your backups are stored directly on your server and you create frequent backups, this could take up a significant amount of bandwidth and slow down your website.
Other things to be aware of include:
Compatibility: Some plugins are optimized for specific hosting providers, or are incompatible with a host because they offer identical functionality to built-in tools. If you have multiple sites to back up, look for a plugin that supports multisite backups.Security: Does your site store sensitive data, like customer information? If so, you want to ensure your backups are encrypted. You can also check WordFence to evaluate your plugin for any vulnerabilities.Get JetPack VaultPress with WordPressIf you’re interested in getting real-time site updates with Jetpack VaultPress, consider hosting your website with WordPress.com. Since WordPress’ parent brand Automattic also owns Jetpack, many Jetpack security features — like spam protection, site activity logs, and automatic updates — are included on all WordPress plans (including the free ones). VaultPress and one-click restores are included on the Business plan and above.
At just $25/month, WordPress Business plans offer exceptional bundled value with built-in backup features and more. Plus, you don’t have to download or install anything additional — Jetpack plugins are pre-integrated in our software.
The best backup strategy starts with the right hostIf you’re ready for top-of-the-line backup features, you can get started building (and backing up) your website today with WordPress.com.
Move your site to WordPress.comBuild your site with WordPress.comJune 29, 2025
How to Back Up Your WordPress Site So You Can Rest Easy
Keeping your WordPress site backed up is essential. Imagine how you’d feel if your website was gone one day and there was no way to get it back.
While there are many ways to back up your WordPress site, choosing the right one can be difficult. Each option has its own features and user experience.
This guide covers the important features to look for in a backup tool. It also looks at some of the best backup tools available and includes a quick walkthrough of how to back up a WordPress site.
What are WordPress backups?
A WordPress backup is a copy of your website’s files and database. The backup lets you restore the whole site if something goes wrong. There are two types of backups:
A full backup restores the entire site to the state it was in when the backup file was created.An incremental backup only restores new or recently modified items, such as updated pages, new plugin settings, or altered media files.While the WordPress editor autosaves your posts and pages, giving you a way to restore earlier versions of your content, this isn’t the same as backing up an entire WordPress site, including its files and database.
A database backup includes your site’s content, such as all posts and pages, the site settings, user information, and comments.A file backup typically includes the themes, plugins, media uploads, and core WordPress files of your site.A partial backup only includes some files or parts of the database and its tables.Partial backups
If you want to restore the site’s content, without overwriting any changes you’ve made to the site’s files since the backup was created, you can make a partial backup.
For example, maybe you want to restore a deleted blog post, but you’ve changed your site’s theme since the post was deleted. Restoring just the database will restore the post (and other database contents) without affecting the site’s files.
Manual vs. automatic backupsBackups can be created manually or automatically, depending on the features of your backup tool.
Basic WordPress backup solutions often don’t back up your site in real time, necessitating a manual backup prior to changing your site. While a manual backup offers more control, the downsides include:
Not always knowing when to make a backupHaving to remember when you should make a backupRole-based restrictions on who can make the backupAutomatic backups happen on a regular schedule, such as once per day, or as changes are made to your site. Due to the importance of having a recent backup, it’s a good idea to choose a solution that automatically creates backups.
Why WordPress backups are importantReasons you might need to use a backup to restore your site include:
Hacking or malware: Although WordPress is a secure platform, a clean backup allows you to quickly recover your site if it gets hacked or infected.Server crashes or hosting failures: If your host loses data or has a server error, a backup can help you get your site online again quickly.Accidental data loss or deletion: We all make mistakes, and whether you’ve accidentally edited a blog post, deleted an image file, or changed a key setting, a recent backup lets you undo those changes.Plugin or theme conflicts: Installing or updating a plugin or theme may introduce errors to your site or cause a conflict. A backup enables you to return your site to how it was before the issue arose.WordPress software updates: New WordPress releases are thoroughly tested, but you might need to roll back to a previous version due to a conflict or introduction of a new feature you’re not ready for.To mitigate against the above situations, backups must have been recently created, safely stored, and be easy to restore.
Some websites need more robust backup solutions than others. For example, if you have a site that rarely changes, making a manual backup on a daily or weekly cadence should suffice.
However, you’ll need a more feature-rich, automatic backup solution if you’re regularly making changes to your site, such as frequently publishing new blog posts, or you often receive comments or messages via your site’s forms.
Those selling items or subscriptions through their WordPress site will also need robust backup solutions to prevent the loss of orders and other key data.
Additionally, if you have multiple users working on your site, there’s a higher chance of mistakes being made. This means you’ll need to create backups more frequently than once daily.
What to look for in a WordPress backup toolYour main options as a WordPress site owner are using the backup service provided by your web host or a plugin.
The quality of the available plugins and options provided by hosts vary considerably. Some solutions are very robust, feature-rich, and comprehensive, while others are basic and challenging to use.
Some key points to consider when choosing a way to back up your WordPress site include:
Automation: Can backups be automatically created on a set schedule, such as daily, or in real-time whenever a change is made?Frequency: How often are automatic backups created, and can backups be created manually on demand?Breadth: Is your entire site backed up, including the files, database, and email provision? Restoration options: Can you restore part of the backup, such as the database or a specific post, or do you have to restore and overwrite your entire site each time?E-commerce-friendly: Is the solution compatible with online stores and does it give you the option of keeping order details while restoring other parts of your store?Storage: Are the backups stored separately from your website, such as on another server or in your cloud storage? Can you download the backups to your computer? Are multiple copies of the backup files created for redundancy, and how long are they available?Security features: Are the backups encrypted and stored securely?Ease of use: How easy is it to access and restore the backups? Is the interface user-friendly?. Use your host’s backup solution
Most web hosts provide a backup solution. However, the functionality of the system varies significantly between hosts. Some might have a powerful in-house tool, while others rely on the cPanel backup functionality.
If your host provides a backup solution, try it out and see how easy it is to restore your site. Check its features and how useful they’d be if there’s a problem. If your host’s backup solution isn’t good enough, you should be able to switch to a plugin.
Use a WordPress backup pluginThere are many backup plugins for WordPress. The best options automatically back up your site on a custom schedule or in real time.
Make sure you closely check out the features and test any plugin you install to see if it works as expected, especially the free options.
Top WordPress backup pluginsHere’s a quick overview of some popular free and paid plugins you can use to back up your WordPress site:
Jetpack VaultPress Backup
Jetpack VaultPress Backup is a paid service available as a stand-alone WordPress plugin or as part of the WordPress.com Business and Commerce hosting plans, at no extra cost.
The service includes key backup-related features such as real-time backups, full and partial restoration, and an activity log that makes it easy to undo site changes.
Jetpack VaultPress Backup has good support for WooCommerce, so you can safely restore your site to any past state while keeping all order and product data.
UpdraftPlus
UpdraftPlus is a very popular plugin available in free and paid options.
The free version covers all the essentials, including automatically creating backups, saving them to cloud storage, and the ability to easily restore them. However, incremental backups, automatic backup creation before installing WordPress updates, and database encryption are paid features.
Using UpdraftPlus is straightforward, but like most other WordPress backup plugins, it lacks the useful Activity Log feature of Jetpack VaultPress Backup.
BackWPup
BackWPup is another popular plugin with free and paid versions.
The free version lets you choose exactly what parts of your site to back up. Backups can be automatically created as frequently as every hour. Saving backups to a selection of cloud storage services is another free feature.
However, restoring backups with the free version isn’t as user-friendly as UpdraftPlus and JetPack VaultPress Backup.
BlogVault WordPress Backup Plugin
The BlogVault WordPress Backup Plugin connects your site to the BlogVault backup service rather than integrating a backup tool into your WordPress dashboard.
Once set up, all backup and restore actions take place in your account area on the BlogVault website.
The free version allows you to create backups, but you can only restore them with the relatively expensive paid plans.
Which WordPress backup plugin should you choose?Out of the above options, the free version of UpdraftPlus is an excellent choice. Frequent automatic backups are included, and you can restore them without upgrading to a paid plan.
If you’d like a more robust backup solution and don’t mind paying for it, the ease of use and Activity Log feature of Jetpack VaultPress Backup make it an appealing option.
Whichever one you choose, be sure to thoroughly test the backup and restore functionality now, rather than waiting until it’s needed.
How WordPress.com handles backupsIf you host your site with WordPress.com and choose the Business or Commerce plan, you have access to real-time backups powered by Jetpack VaultPress Backup.
Once you’ve signed up for either the Business or Commerce plan, Jetpack VaultPress Backup automatically starts backing up your site in real time. Manually creating a backup at any time is possible, too.
Backups are available for up to six months while you’re subscribed to an eligible plan. They’re also kept for 30 days after your subscription expires.
Let’s walk through how to use Jetpack VaultPress Backup with WordPress.com hosting.
Accessing your backupsYou can view your backups from your WordPress dashboard.
Once logged in, go to Jetpack → VaultPress via the sidebar menu.

The last time a backup was created is shown on the Jetpack VaultPress Backup page.
 Restoring a WordPress backup
You can restore a backup from your WordPress dashboard or download the file for safekeeping.

You can also view and restore the individual components of the backup, for example if you need to restore an image file that was accidentally deleted.

You can also use the staging site feature available on the Business and Commerce plans to handle more complicated restoration of a backup.
This is handy if, for instance, you created many blog posts after your last backup, and don’t want to lose those blog posts. You can restore the backup to the staging site, then restore the specific content to the live site.
Although the above is an advanced aspect of Jetpack VaultPress Backup, you never know when you might need it.
Using the Jetpack Activity LogThe Jetpack Activity Log is another way to access your backups. The log displays a detailed list of activities on your site from the past 30 days.
You can undo a change or restore your site to a specific point in the log, if needed.

Jetpack also has a mobile app so you can easily access the Activity Log and restore backups on the go.

As you can see, backing up and restoring your WordPress site can be very straightforward, depending on the tool you choose.
WordPress site backup best practicesTo get the most out of your WordPress site backups, consider the following:
Frequency: Set a frequency that covers the important changes to your site, such as form submissions, content publication, and customer orders. Even better, opt for real-time backups.Storage: Make sure the backups are securely stored and not on the same server as your website. Retention: Ensure enough backups are retained for long enough that you can recover a specific version of your site, rather than only being able to restore to when it was last backed up.Test restoring backups: Test your backups occasionally to ensure they are easy to restore when needed.If you follow the above advice, you’ll never have to lose sleep over whether or not your WordPress site is backed up sufficiently.
Is your WordPress site backed up?You don’t want to wait until you need a backup to find out whether or not your site is backed up.
If your site is being backed up, make sure everything is functioning as expected and that you can successfully restore a backup. If you’re not backing up your site, now is the time to choose a solution.
If you don’t yet have a website, WordPress.com’s managed hosting makes it easy to start one. Depending on your chosen plan, you get access to feature-rich backups, premium themes, and a fast, secure hosting environment. Ready to bring your site home? Start your site migration to WordPress.com here.
June 28, 2025
Web Hosting vs. Website Builder: A Beginner Guide
If you’re thinking about building a website for the first time, you’re likely to run into a question: do you need web hosting or a website builder?
The quick answer: you don’t necessarily have to choose one or the other. Web hosting companies host your site’s files so they are accessible online, while website builders are software services for creating websites. For most new users, the best solution is to choose a hosting company and a website builder.
In this post, we’ll dive into what the terms website hosting and website builder mean in more detail, explain how they work together, and help you choose the best services and options for you based on your skills, budget, and long-term goals.
What is web hosting?Web hosting is a service that stores your website’s files, such as code, images, and content, on a server. When someone types in your , this server sends the files to their browser, allowing them to view your site.
How web hosting worksThink of web hosting like renting an empty apartment. This server is your space, and you can use it to store your site’s files, images, text, design elements, and more.
You also get full control over how you build your site. You can install a free tool like WordPress or write code using HTML, CSS, and JavaScript to create your website. You’re not locked into a single system.
Tip: Different hosting providers offer different types of hosting plans — shared, VPS, cloud, and dedicated. Learn more about each option and explore which one suits your site’s size, budget, and technical needs.
What is a website builder?A website builder is an all-in-one platform for building, customizing, and hosting a website. You get a drag-and-drop editor, pre-designed themes, technical support, and built-in hosting in a single subscription.
How does a website builder work?A website builder offers a more user-friendly interface for creating a website.
Log in to your platform of choice and pick a theme for your site. Then, use the visual editor to design each page with text, images, buttons, custom code, and other features.
Note: A website builder isn’t the same as a content management system (CMS). A CMS gives you a flexible backend to manage your website’s content, themes, and plugins, but you’re responsible for setup, hosting, updates, and security. In contrast, a website builder manages everything automatically. In short, a CMS offers more control and customization, while a website builder offers more convenience and ease of use.
Common website builders to exploreHere are three platforms to see how a website builder works:
WordPress.com: Offers managed WordPress hosting and a website builder functionality, all under one roof.Squarespace: Design your website with clean templates using built-in tools for blogging, ecommerce, and scheduling. Wix: This website builder offers many templates and AI tools to build your site quickly. It’s suitable for small businesses, freelancers, and personal brands for designing websites without coding.Now that we’ve discussed the basics of website hosting and builders, let’s discuss how they’re similar and where they differ.
Similarities between website hosting and buildersAt first glance, web hosting and website builders seem totally different, but they share a lot of common ground. Before we discuss what sets them apart, let’s look at what both options help you do behind the scenes.
Store and manage all your website filesYour website is made up of many files like text, images, code, a database, and more. All this content has to be stored somewhere.
Website hosting stores these files on a server and gives you direct control over managing them. You can access folders, upload assets, and organize everything the way you want.
Website builders, on the other hand, store these files on their own server. You can’t access or organize them directly, but they’re stored safely and displayed to visitors when they land on your site.
Handle secure domain connectionsYour domain name (like example.com) should be linked to the server where your website’s files are stored. You can do this through DNS settings.
With traditional hosting, you can connect your domain manually by updating DNS records through the registrar. Website builders simplify the process. They often guide you step-by-step or handle it automatically if you purchase the domain through them.
Either way, hosting services and builders ensure your website shows up when someone visits your domain.
Keep your site secureUptime, backups, and updates are critical to your website’s maintenance and security.
Whether you’re using a hosting provider or a website builder, the platform you choose is responsible for keeping your website running smoothly and securely.
Most hosting services offer tools like SSL certificates, regular backups, malware scanning, DDoS protection, and server firewalls. Website builders also offer similar protections, but you don’t need to configure anything manually.
Web hosting vs. website builder: how are they differentBoth of these approaches have a similar end goal — getting your website online, but the way they work is quite different.
Let’s break down where web hosting and website builders go their separate ways, and what those differences mean for you.
Level of controlQuick answer: Web hosting lets you modify anything, like plugins, code, and more. Website builders limit changes and customizations to what the platform offers.
Web hosting gives you complete control over how your website works behind the scenes.
You can choose a hosting software like WordPress, set up your website, add plugins or themes, and customize your code. This setup works well for developers and teams looking to build custom features on their sites.
With web hosting, you can decide on different aspects like speed, security, and how much server power your site gets.
On the other hand, website builders give you a closed environment.
You can change the design and use the add-ons available on the platform, however, it limits the extent to which you can tweak your site. Basically, you can’t customize the underlying code of your site.
With this approach, it’s much easier to design a website. However, if you need a feature that the platform doesn’t offer, you can’t add it yourself.
Ease of useQuick answer: Web hosting can require multiple steps to complete the setup. Website builders provide a quick workflow to get started.
With a hosting service, you need to manage multiple systems manually. You have to:
Set up your hosting account.Install a CMS like WordPress. Back up your site manually. Manage files through FTP.This approach requires more technical involvement at every step. It’s more suited for developers who can manage these tasks independently, but it can be frustrating for those who don’t have the necessary technical expertise.
That’s where website builders offer convenience to anyone who doesn’t know the technical side of web development.
A website builder gives you everything in one place:
Themes and templates. Design tools. Security. Hosting.It requires a shorter learning curve, and you don’t need to write code.
Speed to launchQuick answer: It can take more time to launch a website if your web hosting doesn’t include a website builder or CMS. Choosing a hosting option with an included website builder make it easier to design and publish websites.
Launching your site takes many steps when you use a hosting service.
You have to pick a hosting platform, buy a domain, install software, and customize your site. It can take a few days to finish your design, especially if you’re figuring everything out as you go forward.
In contrast, website builders are made for fast results.
Most builders offer a user-friendly interface and guide you through the process of designing a site. Pick a template, add your copy and images, and publish when you’re ready. For one-pager sites, you can even go live the same day.
Cost structureQuick answer: Web hosting alone can look cheap up front, but you pay extra as your website grows. Website builders roll everything into one bill: higher entry price, simpler bookkeeping.
Using a hosting service means you pay separately for different elements — themes, plugins, extra storage, and more. While basic hosting plans seem cheap at first, the total cost can add up once you factor in upgrades or outside help.
Website builders charge a bundled price inclusive of hosting, design tools, support, and security. Choose from tiered plans based on your requirements.
While builders look pricier upfront, they simplify your billing process. Plus, the cost of hosting plans can add up when you factor in upgrades in the long term.
can be tough because you might have to rebuild your site from scratch.
Make the right choiceChoosing web hosting is ideal when you:
Need complete control over your site’s code, plugins, and server settings to work with a custom tech stack.Want to create a one-of-a-kind design or special features that off-the-shelf templates can’t deliver.Expect to see significant traffic spikes or reach international audiences, and need the flexibility to adjust your site’s bandwidth.Have in-house technical expertise to manage updates and troubleshoot issues.Website builders are ideal when you:
Want to go live with your site quickly with a minimal setup (for side hustles, portfolios, or small businesses).Prefer a simplified billing process with fewer moving parts and everything like hosting, analytics, and CMS in one package.Have limited technical knowledge and no time to learn web development and maintenance tasks, WordPress.com offers the best of both worldsWith WordPress.com, you don’t have to worry about choosing one or the other option.
WordPress.com uses the same powerful WordPress engine that powers 40% of all websites globally. This means you get the familiarity, flexibility, and plugin support of open-source WordPress, without too much manual effort.
Here’s what you can do with WordPress.com:
Easy design with block editor and themesUse the block editor to design pages by simply dragging and dropping elements. Create custom block styles to build visual consistency across your site.
Plus, you can access hundreds of professionally designed themes for multiple industries and use cases. These themes automatically adapt to different screen sizes and don’t require any coding.
 Thousands of plugins for added features
Pick tools from the WordPress plugin marketplace to improve your site and expand its functionality. You can add plugins to:
Improve SEO.Create forms.Connect to CRM.Build a multilingual site. Fully managed hosting and security
Unlike the self-hosting approach, you don’t need to worry about setting up servers, installing SSL certificates, or handling updates.
WordPress.com takes care of all the maintenance tasks, like site security, uptime monitoring, automatic backups, and performance optimization. You can focus entirely on your website design and business growth.
All WordPress.com websites also come with built-in security features like SSL certificates, domain privacy, spam protection, malware detection, DDoS protection and mitigation, and more.
24/7 support and safe testing toolsWordPress.com offers real human support around the clock on every paid plan. Or get free advice from experts in the active user community.

Plus, you can experiment within your site in staging environments to test changes privately before going live.
Built to grow with your websiteWhether you’re building a small website or have big dreams for the future, WordPress.com grows with your goals.
You don’t need to switch platforms even if you want to switch your approach from no-code to code. The platform has everything you need to customize and enhance your site.
Pick the best path forwardRather than pitting website hosting against website builders, now you know you can have both together (and WordPress.com delivers both with one platform). You get a builder’s ease and a hosting provider’s flexibility without the hassle of migrating your site to a different platform.
Ready to get started? Build and host your site WordPress.com today.
June 26, 2025
How to Make a Favicon for Your Website (And Why You Should)
When you’re sifting through a sea of open tabs, how do you quickly find the one you need? I bet it’s by using favicons — the small icon that appears next to a site’s title in your browser tab.

Short for “favorite icons,” favicons don’t just appear in browser tabs; you’ll also find them next to bookmarks, history results, search bars, mobile browser screens, home screen shortcuts, and SERPs.
Favicons are often overlooked when creating a website, but they can make a big impact on how polished your website feels. In this article, we’ll cover why you need a custom favicon, how to create one, and how to add it to your website.
Why should you add a favicon to your website?Favicons are one of those small things that make a big difference. Here’s why:
Favicons improve the user experience: Favicons help people quickly navigate to your website when they have multiple tabs open. It also allows visitors to recognize your site in search results. This instantly elevates the website experience and enables people to find your website easily whenever they need.Favicons boost brand recognition: Favicons make your website instantly recognizable in a jungle of tabs or SERPs. Visitors will soon start associating and remembering your website with your custom favicon, regardless of the device they’re on. If you’ve used an iteration of your logo, favicons will also reinforce your brand identity and allow you to maintain consistent branding across marketing channels.Favicons lend your website some credibility: Generic favicons (like the globe sign) can make a website look unfinished or poorly maintained. Custom favicons, on the other hand, can instantly make a site look more reliable and professional.Now you know why favicons are an essential addition to elevate any website. WordPress makes connecting them to your site easy, too — more on that in the upcoming sections.
Do favicons impact your website’s SEO efforts?Not directly, no, but favicons still influence SEO. How? Google crawls your website and looks for the favicon file to identify your website. Your website visitors do the same thing — they spot familiar favicons in search results, leading to a better click-through rate.
Don’t take my word for it: a blogger shared on Reddit that they witnessed a drop in organic traffic because Google wasn’t showing their favicon in SERPs.
 How to create a favicon for your website in three steps
There’s a lot of conflicting and confusing advice about creating a favicon — should you use SVG or PNG? Is 16×16 the right size or 48×48? Here’s a step-by-step guide that cuts through the noise and clears up what you really need to know:
Step 1: Design your faviconIdeally, your favicon is a variant of your logo. This ensures your brand identity remains consistent and memorable. If your website doesn’t have a logo, you can either hire a graphic designer to create one for you or DIY it using graphic design tools like Canva or Photoshop.
Once you have a logo, you can export it in the right size (512×512) directly from Canva or Photoshop. Or you can also upload your logo to a favicon generator tool to convert it into a favicon. Here’s a list of five useful favicon generators:
RealFaviconGeneratorIonos Favicon GeneratorFavicons generatorFavicon.ccFavicon.ioThese tools provide your favicon icons in both PNG and ICO formats. For example, in RealFaviconGenerator, you can upload your image, see how your favicon appears across different devices, and download your favicon package. You can also customize how your favicon appears on browsers with dark themes enabled.

Tip: Use a transparent background for your favicons so they blend seamlessly with browser backgrounds. If your logo isn’t already transparent, a tool like Remove.bg can help you make the background disappear in seconds.
Step 2: Optimize your favicon size and formatIf you have built your website using WordPress, you need to ensure that you meet the site icon image guidelines.
Aspect ratio: Your favicon should be a square image.Dimensions: For WordPress websites, your favicon size needs to be at least 512×512 pixels.File type: WordPress supports any valid favicon format — the most common file types are PNG and SVG.Should you use PNG or SVG? It depends.
SVG stands for “Scalable Vector Graphics,” meaning your favicon in SVG format will be made of paths and shapes, not pixels. This feature makes it infinitely scalable, without losing your favicon’s crisp quality. The issue is that SVG isn’t fully supported for favicons by all browsers.On the other hand, PNG is not only widely supported by all browsers and devices, it’s also easier to use since most of us have already used this format.If you want to understand which browsers support which favicon formats, head over to Can I Use to resolve all your doubts instantly. You can see which browser versions are compatible with PNG and SVG formats.

Note: Depending on a user’s browser and device, your favicon will appear in different sizes. For example, favicons usually appear in 96×96 dimensions in a desktop shortcut. The shortest dimension is 16×16. Choose a favicon that remains in good shape once it’s shrunk to those dimensions. It’s also a good idea to stay up-to-date with Google’s guidelines to ensure your favicon displays optimally in SERPs and browser tabs.
Step 3: Add your favicon file to your websiteIf you are using WordPress, there are two easy ways to add your favicon to your website:
Using the WordPress general settings.Using the WordPress customizer.Let’s cover each method.
Using the WordPress general settingsThis is the fastest and most straightforward method to add a favicon to your WordPress website. All you have to do is ensure you have a square 512×512 pixels favicon — WordPress will take care of the rest.
In your site’s dashboard, navigate to Settings → General.Click on the “Choose a Site Icon” button.Upload a new file or choose one from your existing media library.Click the “Set as Site Icon” button after choosing your image. If your favicon needs cropping, WordPress will ask you to adjust the dimensions of the image.
You can see a preview of your favicon after saving changes:
 Using the WordPress customizer
Similar to the previous method, using the WordPress customizer is a pretty simple way to upload your favicon.
In your site’s dashboard, navigate to Appearance → Customize.Click on “Site Identity.”At the bottom, you’ll find the “Select Site Icon” button to upload your favicon.You can also crop your image if you need to after uploading.
Another way to add a favicon to any site (regardless of whether it’s on WordPress or not) is to edit your theme code files. Follow these steps:
Upload your favicon file to your website builder’s media manager or library.Copy the URL of the uploaded file.Insert the following piece of code inside the of your HTML:……However, I wouldn’t recommend using this method because most website builders have easier ways to upload the favicon, and messing with the code can disturb your website’s functionality and appearance if you’re not careful.
Three best practices for designing a great favicon for your websiteHere are a few best practices you should follow to ensure your favicon looks professional and loads reliably:
1. Keep it simpleDon’t use overly detailed logos that contain too much text or elements. If you have a big company name, for example, don’t spell out the whole name. Keep it concise and limit it to a letter or an acronym. Why? A favicon is a small icon — you want to make sure it’s clearly visible across all browsers and devices. Use a bold symbol that’s crisp and easily recognizable.
2. Color-check your faviconWith the new variety of browsers and increasing popularity of dark mode, ensure your favicon looks great against all types of backgrounds. Test it on white, gray, and black backgrounds. Keeping your favicon transparent by removing the background also helps here.
3. Test your favicon after uploadingCheck how your favicon appears on various browsers, mobile devices, iPads, bookmarks, and pinned tabs. If it is warped in any device or browser, troubleshoot and reset the dimension to the right measure.
Small but mightyA favicon is a small detail that can make a big impact on the brand identity and user experience of your website. Hopefully, this article helped you understand how to create them quickly and give your website the polish it deserves.
Favicons aren’t the only thing that elevate your website experience, though. A fast speed and a clean user interface also go a long way. Get started with WordPress.com (or migrate your existing website) for excellent website performance, maintenance, managed hosting, security, and much more.


