
Justine Allen's Blog, page 9
March 6, 2025
10 Reasons Why Small Businesses Should Choose WordPress
In today’s digital landscape, every small business needs a website to stay competitive (even if you aren’t selling anything online!). Whether you run a brick-and-mortar store, restaurant, or local service, getting your brand online is an important way to attract new business.
But even if you understand why you need a business website, choosing which platform you’ll use to build it can be overwhelming.
In this post, we’ll explain why WordPress, the world’s largest open-source website software, is the best option for small businesses that want to establish a sustainable digital presence that can grow with their brand.
10 Reasons to Use WordPress for Your Small Business SiteWordPress is an open-source publishing platform that powers over 43% of the internet. There’s a reason that WordPress has endured as the most popular website-building software:
1. No Coding RequiredCreating a professional WordPress website requires zero coding skills. With block-based themes, anyone can build a website using intuitive drag-and-drop tools and a visual interface showing how your website will appear to visitors.
WordPress’s large library of drag-and-drop elements offers a ton of flexibility without compromising on web best practices: blocks are responsive, automatically adjusting to look good on any screen, and follow the WordPress Accessibility Coding Standards.
Need help getting started? You can find tons of tutorials and guides online—including guides and tutorials created by WordPress.com.
Prefer to work with an expert? You can hire a WordPress.com professional to build you a site for as little as $499 + hosting or work with a qualified WordPress partner agency to build you a one-of-a-kind website.
2. Thousands of Customizable Themes Make Design EasyWordPress themes are ready-made website designs that instantly give your site a professional look. Each theme contains a comprehensive design package—including color schemes, typography, and pre-designed page layouts—to give your website a cohesive look and feel. There are thousands of WordPress themes, ranging from free to premium, so it’s easy to find a design that suits your brand’s visual identity.
With 97% of people researching local businesses online before visiting, a well-designed and professional website significantly increases the chances that potential customers will walk through your door
WordPress.com offers users even more options, with additional themes created by our in-house developers, including many themes designed specifically for online businesses.
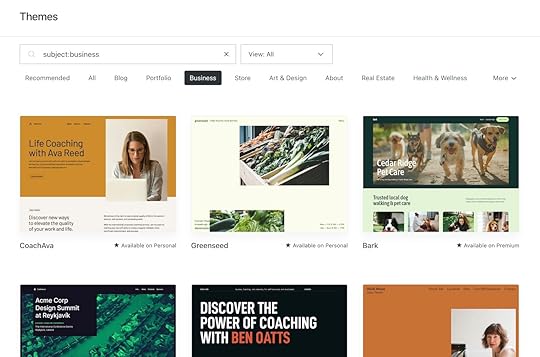
If you still can’t find what you’re looking for, anyone on a Business plan or above can buy and install third-party themes, offering endless options for customization and design.
3. Plugins Make It Simple to Extend Your Site’s FunctionalityIf you need a feature or tool that isn’t available out of the box with other visual website builders, your only choice is to hire a developer to build you a custom solution.
WordPress offers a better option: plugins. Since WordPress is an open-source platform, any developer can build plugins you can download to extend your site’s functionality—think of them as apps for your website. With thousands of free and paid plugins available, endless opportunities exist to customize your website’s functionality to meet your personalized needs.
Popular plugins give small business websites additional functionality like:
Contact forms: Enable customers to complete and submit digital forms on your site.SEO: Increase your search rankings by optimizing your content.Ecommerce: Sell products directly on your website.Booking and scheduling: Allow clients to book appointments or consultations online.CRMs: Manage customer data directly through WordPress.Email, social, and marketing: Streamline your communications across every platform.Payment processing: Accept online payments or donations.The Jetpack plugin automatically includes a suite of added functionality—such as spam filtering, analytics, and marketing—for all WordPress.com users. Additional plugins are available on the Business plan and above.
 4. It’s SEO-Friendly
Search engine optimization (SEO) is a set of strategies and best practices designed to help your website and content rank higher in search results, making it easier for potential customers to find you. While SEO can be complex, WordPress is built to support strong SEO, supporting optimization necessities like sitemaps and meta tags.
Businesses can also utilize powerful free and paid SEO plugins to help their site rise above the competition. WordPress.com customers on the Business plan and above can rely on Jetpack’s built-in SEO features for optimizing meta descriptions and title structure (or can download an SEO plugin of your choice).
 5. You Fully Own Your Site and Content
One of the biggest advantages of WordPress is that it is completely open-source, meaning you have complete ownership of your website and everything on it. Unlike proprietary platforms that may claim rights to content and designs you create on their platforms, WordPress sites can be easily backed up, exported, and ported from one host to another without limitations. With WordPress, your content is yours—period.
For small businesses building their digital footprint, this ownership provides long-term security. You’re investing in building a digital brand that is entirely under your control rather than renting an online space on someone else’s platform.
6. It’s Secure and Keeps Your Information SafeDepending on where you host your business’ WordPress site, robust security features should protect your site. For example, every WordPress.com site has built-in security features like SSL, DDoS protection and mitigation, and barriers against brute force attacks.
WordPress.com users get even more security features out-of-the-box with Jetpack for WordPress.com. Even businesses with Free plans get great benefits with Jetpack, including built-in spam protection and site activity logs, with additional security features included at higher tiers.
7. It’s Simple to Set Up Access for Multiple UsersRunning a business means delegating responsibilities, and WordPress makes creating multiple logins easy for managing different aspects of your site. The platform’s robust user management system allows you to create multiple users with varying permission levels, from Administrators who can make site-wide changes and handle site billing, to Contributors who can only draft content.
This means your marketing team can update your blog, your sales team can manage product pages, and your customer support team can respond to inquiries—all without compromising the security of your site. As your business grows, this flexibility becomes increasingly valuable, ensuring that everyone on your team has everything they need and nothing they shouldn’t.
8. You Can Move Your WordPress Site Between HostsUnlike websites built on proprietary software like Wix and Squarespace, WordPress websites can be easily moved between hosts without having to be rebuilt. This flexibility means you can always move your website to a new hosting provider.
Already have a WordPress site? Consider switching to WordPress.com for top-of-the-line performance and support. Our site migration service makes the transition smooth and hassle-free, ensuring your business website stays online throughout the entire process.
9. There’s a Massive Community to Support YouWhen you choose WordPress, you’re joining the largest website community in the world. That means there are endless opportunities to learn, troubleshoot, grow your skills, and build community with like-minded users.
WordPress offers public forums where developers and users alike come together to answer questions, and WordPress.com also provides its own dedicated forums where our active community is always on-hand to help. These communities can be invaluable resources for small businesses without dedicated IT staff to answer urgent questions about their websites.
Want to take things offline? WordPress also hosts in-person events and gatherings all around the world.
 A snapshot from WordCamp Asia 2025—a gathering of nearly 2,000 WordPress community members!10. Why WordPress is a Smart Investment
Building and maintaining a professional business website doesn’t have to break the bank. WordPress is maintained by a huge community of dedicated designers, developers, and community builders, so the software itself is free, meaning you get a ton of value for just the price of hosting and your domain name.
Many small businesses choose a managed hosting provider like WordPress.com that will maintain your website for you. WordPress.com offers high-value plans for every budget, starting with Free plans and scaling up to support businesses of every size.
Why Choose WordPress.com for Your Small Business Website?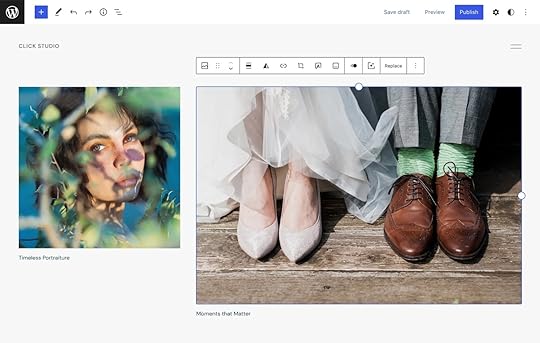
While WordPress itself is a powerful platform, WordPress.com offers specific advantages that make it an exceptional hosting choice for small businesses:
WordPress.com is Lightning FastWhen choosing a hosting provider, you need to consider how fast your website loads for users. Slow-loading sites create a poor experience for visitors and can hurt your search engine rankings. WordPress.com consistently ranks among the fastest providers in third-party speed benchmarks, outperforming many competitors in load time.
This means your customers will always enjoy a fast experience on your site, reducing bounce rates and improving conversions. Our infrastructure is optimized specifically for WordPress, ensuring your website will experience peak performance without requiring any technical knowledge on your part.
Maintenance Done For YouOne of the biggest challenges for small business owners is finding time to maintain their website. Because WordPress.com is managed hosting, you don’t need to perform routine maintenance yourself.
We automatically run all the necessary updates, including security patches, WordPress core updates, and plugin updates. WordPress.com also has 99.999% uptime, so you don’t have to worry about your site going down.
This hands-off approach means you can focus on what you do best—running your business—while we ensure your website stays current, secure, and professional.
Unlimited BandwidthGrowing businesses shouldn’t be penalized for success. While some hosts charge you more money when your web traffic grows, WordPress.com will keep you online for one price, no matter how much traffic you receive.
This predictable pricing is crucial for businesses that may suddenly experience a surge in visitors, whether because you’re running a promotion, experiencing seasonal traffic spikes, or receiving an unexpected shout-out from a publication or influencer. You can rest easy knowing that you’ll never face surprise charges or experience declining site performance at the moments when your website matters most.
Customer SupportEven with the most user-friendly platforms, questions will inevitably arise. Our comprehensive support platform is there for you, offering tons of step-by-step guides, AI-powered answers, and for paid plans, live customer support. We’re here to ensure you can successfully build, launch, and grow your new website.
From technical issues to guidance on best practices, our experienced support staff can help you overcome obstacles and make the most of your WordPress.com website.
Get Your Business Online with WordPress.comIn today’s digital world, having a strong online presence isn’t just an option for small businesses—it’s necessary. WordPress offers the perfect balance of power, flexibility, and ease of use, making it the ideal platform for businesses of all sizes.
With WordPress.com, you get the benefits of managed hosting, top-tier performance, and expert support. And because WordPress is so flexible, you can start small and add features as your business grows, ensuring you’re never paying for more than you need.
Ready to take your business online? Build your site with WordPress.com today and join the millions of successful businesses that trust WordPress for their online presence.
Get WordPress.com for your business

March 4, 2025
How to Write a Blog Post: A 14-Step Blueprint for Excellent Content
Imagine you just checked your favorite blogger’s website and they did it again. Their latest post is flawless—engaging, well-written, and full of value. If only you knew how to write a blog post like that.
How do others do it? How do they write post after post, and it always comes out right? Why can’t you seem to do the same?
Here’s the secret: all successful bloggers have a process. They follow repeatable steps that result in a polished, high-quality post, almost like it’s on autopilot.
Here’s our step-by-step guide to writing blog posts that will wow readers, please search engines, and help you grow your blog.
1. Choose a Topic That Stands OutThe first question is what you’re going to write. You want to cover topics that meet the interests of your audience. Otherwise, why would they frequent your blog or find your posts in their search results?
There are several ways to uncover topics:
Do keyword research: Find phrases your audience types into search engines to learn what they are interested in. You can use tools like Keywordtool.io, Ubersuggest, Semrush, or Ahrefs for that.Look at trending topics: What’s something everyone in your industry is talking about right now? Providing a resource about that topic may be timely and helpful for your readers. Check your competitors: Look at existing blogs and blog content. What are others writing about? Are there any gaps? Is there anything you can add to the conversation?Lean on your interests and experiences: Choose a topic that excites you and that you know a lot about. When you talk about something personal, your enthusiasm will shine through and help you be authentic. Read forums: Check Reddit, Quora, and other online communities to see what people in your area of expertise want to know more about.Look on social media: Keep your ear on conversations happening on social platforms to find topic ideas.Cover reader comments and questions: Gather ideas from comments or emails from your existing audience.When deciding on a topic, try to find a fresh angle and include your unique insights to add value beyond basic information.
By the way, if you come up with more than one topic, feel free to add the others to your editorial calendar so you can come back to the others later.
2. Adopt a Reader-First MindsetBlogging is all about your audience. Who you write for should always be at the forefront of your mind when writing a blog post because it’s their questions you need to answer.
To be able to do that, you need to get to know your readers. Writing a blog post is like buying a birthday present; it’s much easier when you know the person you want to give it to well.
Ask yourself questions like:
Who is this content intended for? Who will benefit from this post?How do they feel about the topic and why?What are they most interested in?What questions do they have?Which problems are they trying to solve?What have they tried before, and why hasn’t it worked?By clarifying these questions, you can put yourself in your readers’ shoes and deliver what they need.
3. Determine the Type of Blog Post You Will WriteYou can cover a given topic in many different ways, but the right approach depends on the topic, audience, and outcome you are trying to achieve. Are you trying to educate, entertain, persuade, engage, inform, or something else entirely?
There are a ton of different blog post styles, but here are a few common ways to structure a blog post:
List posts: A blogging classic, and for good reason. These types of posts are easily digestible by your readers because the topics are naturally divided into numbered sections. This article is a good example of that!How-to guides: These provide your readers with step-by-step instructions for how to achieve a desired outcome.Personal stories: You can share personal experiences and lessons learned through these types of posts.Case studies: Report on a product or service and how it helped produce a certain outcome, usually for a customer.Feature articles: Provide an in-depth analysis of a singular topic, like our post about PHP.Interviews: Talk to someone who knows more about a topic than you, or interview several people for an expert roundup.Product reviews and comparisons: Evaluate a product or service, or compare several with one another.News articles: Provide time-sensitive updates on your industry or your company.This list isn’t exhaustive, and you can also combine post types. For example, how-to articles are also often list posts.
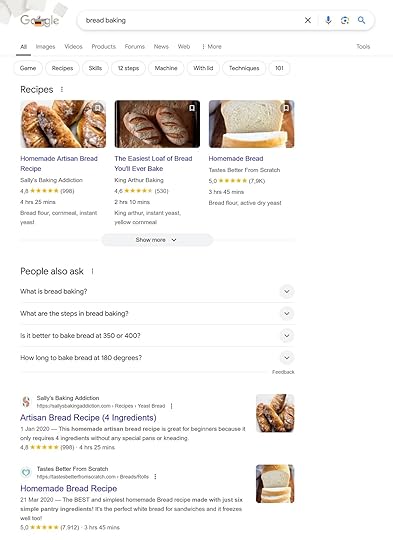
If you’re not quite sure which post type best suits your topic, check out which formats are already ranking for that keyword.
For example, when you google “bread baking,” most of the results are recipes. If you want to appear in search results for this keyword, you will likely also want to post a recipe with your own spin.
 4. Craft a Compelling Headline
In Ogilvy on Advertising, legendary advertiser David Ogilvy wrote that five times more people read a headline than the body copy.
That means, your headline is the main element that decides whether someone clicks on your post in search results or on social media.

For that reason, you should spend plenty of time crafting it, writing several iterations and trying different angles, formats, and wording.
Here are some tips for writing an effective headline:
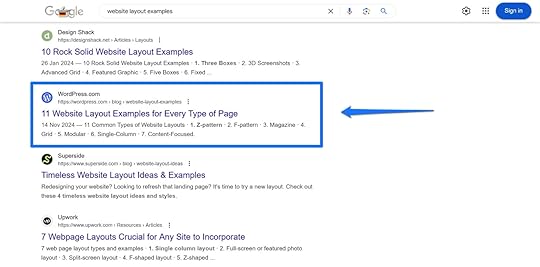
Be descriptive, as readers should be able to clearly understand what your post is about from that headline alone (or intrigue them enough to click through to read the whole post)Use emotional, curiosity-driven, or benefit-focused wording to hook readersKeep it concise, ideally under 60 characters, so your headline doesn’t get shortened in search resultsInclude numbers in your headline. They set clear expectations and make information appear more easily digestible.Use brackets and parentheses to provide additional information and context as well as make your headline stand out visuallyMention your main keyword/topic, preferably toward the beginning, so anyone skimming search results can easily tell what your post is aboutHere are examples from our blog that use these principles:
11 Website Layout Examples for Every Type of PageHow to Get Web Design Clients: 12 Practical Tactics That WorkHow to Create a Website Mockup in 5 Easy Steps (+ Examples!)A good way to get started is to familiarize yourself with common headline formulas. You can also consider using a headline analysis tool like those by CoSchedule or Sharethrough.
Finally, if you’re struggling with writing an intriguing headline, you can revisit it after you finish writing the blog post. Sometimes that’s easier because you’ll have a better sense of the main message, key takeaways, and tone. With that clarity, you can craft a headline that grabs attention and accurately reflects the value in your post.
5. Outline Before You WriteCreating an outline means laying out a roadmap for your work; you can draft its overall structure and evaluate your main points.
An outline makes your blog post writing much easier because it’s a lot more comfortable to work alongside a roadmap than it is to try creating a ready-to-publish blog post out of thin air.
To set up your outline, first plan your main sections, like the introduction, main points, and conclusion. If you’re blogging on WordPress, you can easily do that with headings directly inside the editor.
Use H2 for main sections, then break them down further with H3 and H4s. Switch on the Outline feature in Document Overview in the top-left corner for an overview.
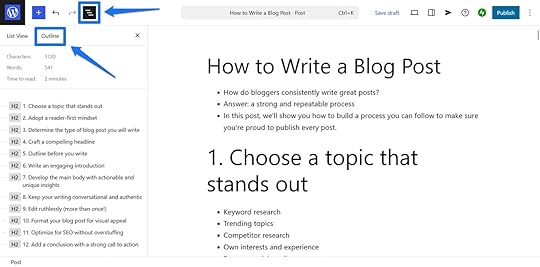
Then you can brainstorm the content in each section. Jot down important items as bullet points or lines of text. Make sure you cover every important aspect of your topic, adding your unique experiences or perspectives to each point. Optionally, include links to sources or examples you are going to use to support your ideas.
Finally, examine your outline for logical flow—each section should naturally lead into the next.
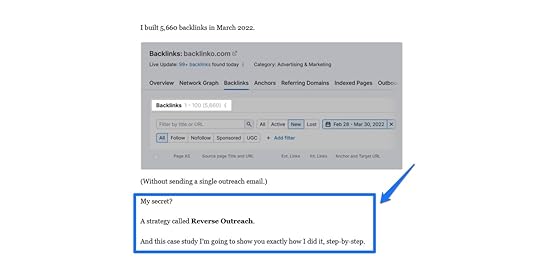
6. Write an Engaging Blog Post IntroductionThe best way to draw readers into reading your blog post is to start with a hook. Hooks can come in the form of an interesting idea, a bold statement, a question, a story, or a relatable scenario.
Jon Morrow, who is one of the most prolific bloggers out there, definitely manages to do that with his introductions.

Once you have hooked readers, convince them to keep reading by clearly stating what they’ll gain from your post. This makes it much easier to move them on to the main event.
Be aware that readers are busy, so keep your introductions concise and free of fluff.
Sometimes it’s helpful to write your introduction last; having the main body of your post ready can help you have a better understanding of what to say in the beginning.
7. Develop the Main Body with Actionable and Unique InsightsThe body of your post is why readers came to your site in the first place. It’s where you address what’s most important to your audience—their problems, questions, objections, and fears.
Your first job is to simply fill in your outline. Build out the points you noted with examples, resources, and additional information.
It’s not just about what you say but also how you say it. To make the main body most effective:
Strive for clarity and a logical order.Explain concepts and jargon not everyone may be familiar with.Link to trusted sources to support your arguments.Include links for additional resources where readers can go to learn more about the topic.Provide examples and personal anecdotes to clarify and amplify.Plan space to use visuals to further enhance your message.8. Keep Your Writing Conversational and AuthenticA blog post should feel like a conversation with a friend—write the way you talk. Write your blog posts the way you talk, and let your tone, humor, and quirks shine through. This introduction for a post on Pinch of Yum is a great example.

Bringing warmth and humanity into your writing helps readers connect with the real you instead of a fake blogger persona. In contrast, stiff and formal language makes your writing dull, lifeless, and hard to read.
A great way to make writing relatable is to tell personal stories. Make points by sharing anecdotes about yourself and your friends or family. Communicate your own struggles or what event made you want to look into this particular blog topic. Discuss how you were feeling and take readers on an emotional journey.
Finally, keep it simple. Simple writing is clear writing. Avoid the urge to use long paragraphs and complicated words.
You will find that writing simply is its own challenge that takes plenty of practice, but it makes your blog post more accessible and personable.
9. Edit Ruthlessly (More Than Once!)The essence of writing a high-quality blog post is editing and rewriting. That also means you shouldn’t despair if the words don’t come out right the first time around. The first draft doesn’t matter; it’s only supposed to give you a starting point, not a finished product.
When editing, be sure to:
Correct spelling and grammar mistakes.Cut unnecessary words and fluff.Strengthen clarity, logic, and flow.Ensure everything is factually correct.Add links and other important elements.Reading your blog post out loud mirrors how readers process it in their minds. It helps you get a better sense of how the text sounds, if it flows well, and if it’s clear.
In addition, because editing is so important, it’s best if you do it more than once. Each additional pass strengthens your blog post.
For best results, put some space between writing and editing. Come back to your article the next day with a fresh mind and some distance. In addition, you can use tools like Grammarly or Hemingway for some automated help or ask someone you trust for their input.
10. Format Your Blog Post for Visual AppealThe presentation of your content matters as much as what you say in it. If you write your blog post in a way that it’s overwhelming to look at, it turns readers away before they have time to give it a chance.
One part of the presentation piece is formatting your post for readability by:
Using short sentences and paragraphs.Including bullet points, lists, and tables.Using enough headings and subheadings.Bolding or italicizing text for emphasis.Healthline does this very well—shorter paragraphs encourage readability and bold text draws your eye to important text.
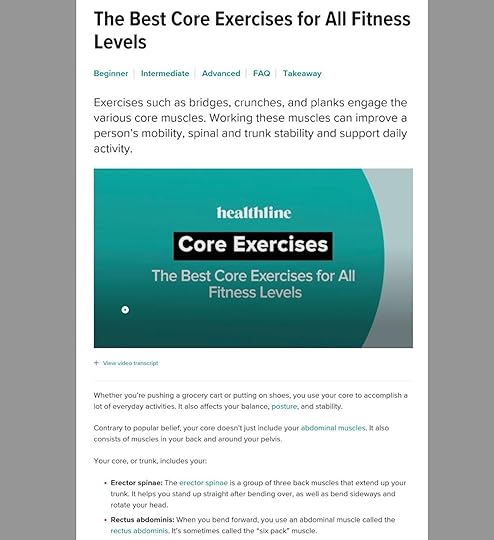
In addition, your blog post shouldn’t be a text-only experience. Enhance it with relevant visuals to help break up the text, make your post more engaging, and clarify key points.
Consider adding some of the following visual elements to your blog posts:
ScreenshotsPhotosStats and graphsQuotesInfographicsEmbedded social updatesGIFs and video embedsWhen you’ve finished formatting your post, scroll through and see how it makes you feel. And don’t just do this for the desktop version—also check how it looks on mobile, as many readers will visit your site on their mobile devices. In fact, the majority of internet traffic now comes from smartphones so your blog post also needs to be readable and appealing on small screens.
11. Optimize for SEO Without OverstuffingPolishing your blog post for search engines helps readers find your content when they search for specific topics or keywords.
Good SEO means mentioning your main keyword naturally and including variations, synonyms, and secondary keywords. Additionally, include links to relevant posts and pages on your blog, as well as to credible external sources. It helps you establish your expertise and gives readers natural next steps if they want to learn more.
After that, it’s important to optimize the parts of your post that appear in search engines:
Post URL: Make the URL short and descriptive, divide words with hyphens, and include your main keyword (e.g., yourgroovydomain.com/chocolate-chip-c...). Title : Your title tag could be your headline, or you could further optimize it for search results. If you’re on WordPress.com, you can easily optimize your post’s title tag with the Jetpack plugin.Meta description: This is text that may appear beneath the post title in search results. Use it to accurately summarize the post content and include the main keyword to encourage readers to click through to read your full blog post. Image alt text : You can use this to describe image content for search engines and accessibility. But don’t overdo it. Over-optimizing will do more harm than good. Write your blog post for people first, meeting their needs and search intent.
12. Add a Conclusion With a Strong Call to Action (CTA)You have multiple ways to finish your article:
Give a summary: Sum up the key points you covered in your post.Provide a takeaway: Leave readers with one main idea, often an angle you established at the beginning of the article.Redirect readers: Link to another article on your blog so readers can dig even deeper into the topic or a related topic.Leave a bonus tip: Offer one final tip to readers as they apply the knowledge in your post.In addition, you should leave your audience with a call to action. After all, the goal of a blog post isn’t to just attract traffic—you’re usually trying to achieve an additional outcome, like building leads, growing your newsletter, or selling a product.

But to do that, you need to clearly and explicitly tell readers what you want them to do. This is known as a “call to action” and might prompt readers to:
Leave a comment.Share the article.Sign up for your email newsletter.Download a free resource.Read more blog posts.Check out your shop.You can also have more than one CTA that may take one of these forms:
A headingSimple textA button (for example, using social sharing plugins and the Sharing Buttons block)A formAn image13. Publish and Promote Your Blog Post StrategicallyAt this point, your blog post should be ready to go live and be published.

Publishing content is just one half of running a successful blog—the other half is promoting your content. Without a plan to spread the word, your blog post is less likely to get the traffic it deserves.
We have 21 different ways to increase blog traffic listed here, but here are a few ideas to get you started:
Share on social media: Post key insights on social networks with a link to the original post. Use appropriate hashtags, attractive visuals, and other ways to increase reach and attention. Automating social sharing makes this a lot easier.Send your new post in a newsletter: If you already have an email list, be sure to let subscribers know about your latest post.Share it in relevant communities: There are many places where members of your audience congregate, including Discord, Reddit, Slack, Quora, and Facebook groups.Repurpose your article: Turn your blog post into other pieces of content to increase reach. This could be a LinkedIn post, Bluesky thread, script for a video, slide deck, infographic, or Medium article.Part of content promotion is also keeping existing blog posts up to date. You spent all this time getting each article ready for search engines—it would be a shame to just let it slide into obscurity over time.
Therefore, regularly revisit older posts and update them with the latest information, improve the writing, and use newer visuals. This keeps them fresh and relevant as well as helps you retain search engine positions.
14. Track Performance and Improve The final step in writing a blog post is tracking its performance and iterating on it. For this purpose, you can use analytics tools like:
Jetpack StatsGoogle Search ConsoleGoogle AnalyticsThey allow you to track search engine performance, views, reader engagement, conversions, comments, shares, backlinks, and more. This helps you understand what kind of content resonates most with your audience and what doesn’t.
This is invaluable information because you can use it to grow your blog. Figure out what makes existing posts work and apply that knowledge to refine your content strategy and blog writing process.
What Kind of Blog Post Will You Write?Writing a gripping and informative blog post is neither an accident nor raw talent. Most of it simply comes down to knowing what your readers need and applying that knowledge. The rest is just practice.
Use the blueprint above as a basis to step up your blog post game. Add to your own blueprint as you continue to write blog content by integrating your own insights and findings to make it your own.
We want to hear from you! Leave a comment below—what’s the top tip you’ll apply to your next blog post, and what will you write about?
How to Write a Blog Post: A 14-Step Blueprint for Killer Content
Imagine you just checked your favorite blogger’s website and they did it again. Their latest post is flawless—engaging, well-written, and full of value. If only you knew how to write a blog post like that.
How do others do it? How do they write post after post, and it always comes out right? Why can’t you seem to do the same?
Here’s the secret: all successful bloggers have a process. They follow repeatable steps that result in a polished, high-quality post, almost like it’s on autopilot.
Here’s our step-by-step guide to writing blog posts that will wow readers, please search engines, and help you grow your blog.
1. Choose a Topic That Stands OutThe first question is what you’re going to write. You want to cover topics that meet the interests of your audience. Otherwise, why would they frequent your blog or find your posts in their search results?
There are several ways to uncover topics:
Do keyword research: Find phrases your audience types into search engines to learn what they are interested in. You can use tools like Keywordtool.io, Ubersuggest, Semrush, or Ahrefs for that.Look at trending topics: What’s something everyone in your industry is talking about right now? Providing a resource about that topic may be timely and helpful for your readers. Check your competitors: Look at existing blogs and blog content. What are others writing about? Are there any gaps? Is there anything you can add to the conversation?Lean on your interests and experiences: Choose a topic that excites you and that you know a lot about. When you talk about something personal, your enthusiasm will shine through and help you be authentic. Read forums: Check Reddit, Quora, and other online communities to see what people in your area of expertise want to know more about.Look on social media: Keep your ear on conversations happening on social platforms to find topic ideas.Cover reader comments and questions: Gather ideas from comments or emails from your existing audience.When deciding on a topic, try to find a fresh angle and include your unique insights to add value beyond basic information.
By the way, if you come up with more than one topic, feel free to add the others to your editorial calendar so you can come back to the others later.
2. Adopt a Reader-First MindsetBlogging is all about your audience. Who you write for should always be at the forefront of your mind when writing a blog post because it’s their questions you need to answer.
To be able to do that, you need to get to know your readers. Writing a blog post is like buying a birthday present; it’s much easier when you know the person you want to give it to well.
Ask yourself questions like:
Who is this content intended for? Who will benefit from this post?How do they feel about the topic and why?What are they most interested in?What questions do they have?Which problems are they trying to solve?What have they tried before, and why hasn’t it worked?By clarifying these questions, you can put yourself in your readers’ shoes and deliver what they need.
3. Determine the Type of Blog Post You Will WriteYou can cover a given topic in many different ways, but the right approach depends on the topic, audience, and outcome you are trying to achieve. Are you trying to educate, entertain, persuade, engage, inform, or something else entirely?
There are a ton of different blog post styles, but here are a few common ways to structure a blog post:
List posts: A blogging classic, and for good reason. These types of posts are easily digestible by your readers because the topics are naturally divided into numbered sections. This article is a good example of that!How-to guides: These provide your readers with step-by-step instructions for how to achieve a desired outcome.Personal stories: You can share personal experiences and lessons learned through these types of posts.Case studies: Report on a product or service and how it helped produce a certain outcome, usually for a customer.Feature articles: Provide an in-depth analysis of a singular topic, like our post about PHP.Interviews: Talk to someone who knows more about a topic than you, or interview several people for an expert roundup.Product reviews and comparisons: Evaluate a product or service, or compare several with one another.News articles: Provide time-sensitive updates on your industry or your company.This list isn’t exhaustive, and you can also combine post types. For example, how-to articles are also often list posts.
If you’re not quite sure which post type best suits your topic, check out which formats are already ranking for that keyword.
For example, when you google “bread baking,” most of the results are recipes. If you want to appear in search results for this keyword, you will likely also want to post a recipe with your own spin.
4. Craft a Compelling HeadlineIn Ogilvy on Advertising, legendary advertiser David Ogilvy wrote that five times more people read a headline than the body copy.
That means, your headline is the main element that decides whether someone clicks on your post in search results or on social media.
For that reason, you should spend plenty of time crafting it, writing several iterations and trying different angles, formats, and wording.
Here are some tips for writing an effective headline:
Be descriptive, as readers should be able to clearly understand what your post is about from that headline alone (or intrigue them enough to click through to read the whole post)Use emotional, curiosity-driven, or benefit-focused wording to hook readersKeep it concise, ideally under 60 characters, so your headline doesn’t get shortened in search resultsInclude numbers in your headline. They set clear expectations and make information appear more easily digestible.Use brackets and parentheses to provide additional information and context as well as make your headline stand out visuallyMention your main keyword/topic, preferably toward the beginning, so anyone skimming search results can easily tell what your post is aboutHere are examples from our blog that use these principles:
11 Website Layout Examples for Every Type of PageHow to Get Web Design Clients: 12 Practical Tactics That WorkHow to Create a Website Mockup in 5 Easy Steps (+ Examples!)A good way to get started is to familiarize yourself with common headline formulas. You can also consider using a headline analysis tool like those by CoSchedule or Sharethrough.
Finally, if you’re struggling with writing an intriguing headline, you can revisit it after you finish writing the blog post. Sometimes that’s easier because you’ll have a better sense of the main message, key takeaways, and tone. With that clarity, you can craft a headline that grabs attention and accurately reflects the value in your post.
5. Outline Before You WriteCreating an outline means laying out a roadmap for your work; you can draft its overall structure and evaluate your main points.
An outline makes your blog post writing much easier because it’s a lot more comfortable to work alongside a roadmap than it is to try creating a ready-to-publish blog post out of thin air.
To set up your outline, first plan your main sections, like the introduction, main points, and conclusion. If you’re blogging on WordPress, you can easily do that with headings directly inside the editor.
Use H2 for main sections, then break them down further with H3 and H4s. Switch on the Outline feature in Document Overview in the top-left corner for an overview.
Then you can brainstorm the content in each section. Jot down important items as bullet points or lines of text. Make sure you cover every important aspect of your topic, adding your unique experiences or perspectives to each point. Optionally, include links to sources or examples you are going to use to support your ideas.
Finally, examine your outline for logical flow—each section should naturally lead into the next.
6. Write an Engaging Blog Post IntroductionThe best way to draw readers into reading your blog post is to start with a hook. Hooks can come in the form of an interesting idea, a bold statement, a question, a story, or a relatable scenario.
Jon Morrow, who is one of the most prolific bloggers out there, definitely manages to do that with his introductions.
Once you have hooked readers, convince them to keep reading by clearly stating what they’ll gain from your post. This makes it much easier to move them on to the main event.
Be aware that readers are busy, so keep your introductions concise and free of fluff.
Sometimes it’s helpful to write your introduction last; having the main body of your post ready can help you have a better understanding of what to say in the beginning.
7. Develop the Main Body with Actionable and Unique InsightsThe body of your post is why readers came to your site in the first place. It’s where you address what’s most important to your audience—their problems, questions, objections, and fears.
Your first job is to simply fill in your outline. Build out the points you noted with examples, resources, and additional information.
It’s not just about what you say but also how you say it. To make the main body most effective:
Strive for clarity and a logical order.Explain concepts and jargon not everyone may be familiar with.Link to trusted sources to support your arguments.Include links for additional resources where readers can go to learn more about the topic.Provide examples and personal anecdotes to clarify and amplify.Plan space to use visuals to further enhance your message.8. Keep Your Writing Conversational and AuthenticA blog post should feel like a conversation with a friend—write the way you talk. Write your blog posts the way you talk, and let your tone, humor, and quirks shine through. This introduction for a post on Pinch of Yum is a great example.
Bringing warmth and humanity into your writing helps readers connect with the real you instead of a fake blogger persona. In contrast, stiff and formal language makes your writing dull, lifeless, and hard to read.
A great way to make writing relatable is to tell personal stories. Make points by sharing anecdotes about yourself and your friends or family. Communicate your own struggles or what event made you want to look into this particular blog topic. Discuss how you were feeling and take readers on an emotional journey.
Finally, keep it simple. Simple writing is clear writing. Avoid the urge to use long paragraphs and complicated words.
You will find that writing simply is its own challenge that takes plenty of practice, but it makes your blog post more accessible and personable.
9. Edit Ruthlessly (More Than Once!)The essence of writing a high-quality blog post is editing and rewriting. That also means you shouldn’t despair if the words don’t come out right the first time around. The first draft doesn’t matter; it’s only supposed to give you a starting point, not a finished product.
When editing, be sure to:
Correct spelling and grammar mistakes.Cut unnecessary words and fluff.Strengthen clarity, logic, and flow.Ensure everything is factually correct.Add links and other important elements.Reading your blog post out loud mirrors how readers process it in their minds.. It helps you get a better sense of how the text sounds, if it flows well, and if it’s clear.
In addition, because editing is so important, it’s best if you do it more than once. Each additional pass strengthens your blog post.
For best results, put some space between writing and editing. Come back to your article the next day with a fresh mind and some distance. In addition, you can use tools like Grammarly or Hemingway for some automated help or ask someone you trust for their input.
10. Format Your Blog Post for Visual AppealThe presentation of your content matters as much as what you say in it. If you write your blog post in a way that it’s overwhelming to look at, it turns readers away before they have time to give it a chance.
One part of the presentation piece is formatting your post for readability by:
Using short sentences and paragraphs.Including bullet points, lists, and tables.Using enough headings and subheadings.Bolding or italicizing text for emphasis.Healthline does this very well—shorter paragraphs encourage readability and bold text draws your eye to important text.
In addition, your blog post shouldn’t be a text-only experience. Enhance it with relevant visuals to help break up the text, make your post more engaging, and clarify key points.
Consider adding some of the following visual elements to your blog posts:
ScreenshotsPhotosStats and graphsQuotesInfographicsEmbedded social updatesGIFs and video embedsWhen you’ve finished formatting your post, scroll through and see how it makes you feel. And don’t just do this for the desktop version—also check how it looks on mobile, as many readers will visit your site on their mobile devices. In fact, the majority of internet traffic now comes from smartphones so your blog post also needs to be readable and appealing on small screens.
11. Optimize for SEO Without OverstuffingPolishing your blog post for search engines helps readers find your content when they search for specific topics or keywords.
Good SEO means mentioning your main topic or keyword throughout your blog post. Use your keyword naturally and include variations, synonyms, and secondary keywords. Additionally, include links to relevant posts and pages on your blog, as well as to credible external sources. It helps you establish your expertise and gives readers natural next steps if they want to learn more.
After that, it’s important to optimize the parts of your post that appear in search engines:
Post URL: Make the URL short and descriptive, divide words with hyphens, and include your main keyword (e.g., yourgroovydomain.com/chocolate-chip-c...). Title : Your title tag could be your headline, or you could further optimize it for search results. If you’re on WordPress.com, you can easily optimize your post’s title tag with the Jetpack plugin.Meta description: This is text that may appear beneath the post title in search results. Use it to accurately summarize the post content and include the main keyword to encourage readers to click through to read your full blog post. Image alt text : You can use this to describe image content for search engines and accessibility.But don’t overdo it. Over-optimizing will do more harm than good. Write your blog post for people first, meeting their needs and search intent.
12. Add a Conclusion With a Strong Call to Action (CTA)You have multiple ways to finish your article:
Give a summary: Sum up the key points you covered in your post.Provide a takeaway: Leave readers with one main idea, often an angle you established at the beginning of the article.Redirect readers: Link to another article on your blog so readers can dig even deeper into the topic or a related topic.Leave a bonus tip: Offer one final tip to readers as they apply the knowledge in your post.In addition, you should leave your audience with a call to action. After all, the goal of a blog post isn’t to just attract traffic—you’re usually trying to achieve an additional outcome, like building leads, growing your newsletter, or selling a product.
But to do that, you need to clearly and explicitly tell readers what you want them to do. This is known as a “call to action” and might prompt readers to:
Leave a comment.Share the article.Sign up for your email newsletter.Download a free resource.Read more blog posts.Check out your shop.You can also have more than one CTA that may take one of these forms:
A headingSimple textA button (for example, using social sharing plugins and the Sharing Buttons block)A formAn image13. Publish and Promote Your Blog Post StrategicallyAt this point, your blog post should be ready to go live and be published.
Publishing content is just one half of running a successful blog—the other half is promoting your content. Without a plan to spread the word, your blog post is less likely to get the traffic it deserves.
We have 21 different ways to increase blog traffic listed here, but here are a few ideas to get you started:
Share on social media: Post key insights on social networks with a link to the original post. Use appropriate hashtags, attractive visuals, and other ways to increase reach and attention. Automating social sharing makes this a lot easier.Send your new post in a newsletter: If you already have an email list, be sure to let subscribers know about your latest post.Share it in relevant communities: There are many places where members of your audience congregate, including Discord, Reddit, Slack, Quora, and Facebook groups.Repurpose your article: Turn your blog post into other pieces of content to increase reach. This could be a LinkedIn post, Bluesky thread, script for a video, slide deck, infographic, or Medium article.Part of content promotion is also keeping existing blog posts up to date. You spent all this time getting each article ready for search engines—it would be a shame to just let it slide into obscurity over time.
Therefore, regularly revisit older posts and update them with the latest information, improve the writing, and use newer visuals. This keeps them fresh and relevant as well as helps you retain search engine positions.
14. Track Performance and ImproveThe final step in writing a blog post is tracking its performance and iterating on it. For this purpose, you can use analytics tools like:
Jetpack StatsGoogle Search ConsoleGoogle AnalyticsThey allow you to track search engine performance, views, reader engagement, conversions, comments, shares, backlinks, and more. This helps you understand what kind of content resonates most with your audience and what doesn’t.
This is invaluable information because you can use it to grow your blog. Figure out what makes existing posts work and apply that knowledge to refine your content strategy and blog writing process.
What Kind of Blog Post Will You Write?Writing a gripping and informative blog post is neither an accident nor raw talent. Most of it simply comes down to knowing what your readers need and applying that knowledge. The rest is just practice.
Use the blueprint above as a basis to step up your blog post game. Add to your own blueprint as you continue to write blog content by integrating your own insights and findings to make it your own.
We want to hear from you! Leave a comment below—what’s the top tip you’ll apply to your next blog post, and what will you write about?
February 27, 2025
Edit and Optimize WordPress Title Tags to Boost Traffic
Title tags play a crucial role in the SEO success of your WordPress posts and pages. While they’re not the only factor that influences rankings, they help search engines understand your content and encourage users to click. Let’s explore what title tags are and how to optimize them for better visibility and traffic.
What Are Title Tags?A title tag is a line of HTML that labels what a website page is about. Search engines use them to understand the topic of a page or post. They are an important ranking signal that Google, Bing, and other search engines use to understand and rank website pages.
Search engines also use them to populate the blue links you see in search results:
 The blue link is a title tag.
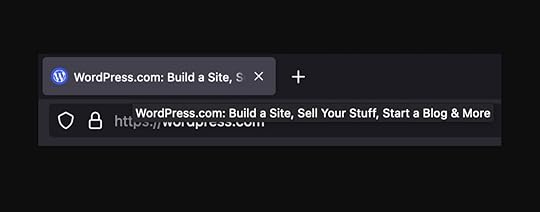
That’s not the only place you might see a title tag. Some browsers also display title tags in tabs. Here’s an example from Firefox, where the cursor hovers over the tab to reveal the full title tag:
If you’d like to find the title tag on a page you’re viewing, you can also right-click on the page, click View Page Source, and then use CTRL-F to search for “title”:
 The highlighted text shows what a title tag looks like in HTML. It’s like looking at an X-ray of your website.Why Do Title Tags Have So Much Power?
Search engines are all about gathering and organizing information from across the web. In order to do this, they need an easy way to quickly determine what a web page is about.
Search engines use title tags in a similar way to how libraries use card catalogs, which help organize large collections of books and documents with key information.
What are the Benefits of Optimizing Title Tags?By default, WordPress will use the H1 heading (which is typically the headline) for the title tag on pages and posts. However, there are several reasons why you might choose to optimize your title tag so they aren’t exactly the same as your headline (for example, if your headline is too long). Here are a few key benefits:
Improve search engine rankings: Sometimes, your headline might not be optimally written for search engines. Making some strategic tweaks can help improve rankings. Improve click-throughs: If your headline is too long to show in search engine results, then it’s possible fewer users will click on your result.Increase your traffic: Higher rankings and improved click-through rates equal more traffic for the content you worked hard to create.You can optimize title tags on WordPress using a plugin—more on that in a bit.
What’s the Best Way to Write a Title Tag?Even though title tags should be relatively short, there is an art to writing them well. Fortunately, it isn’t difficult to master best practices.
Aim for Around 60 CharactersGoogle cuts off title tags that are more than 600 pixels wide. This is usually equal to around 60 characters. Since you probably can’t visualize what 600 pixels looks like on your own (unless you are an actual superhuman robot), you might need a tool to help while you’re writing.
Fortunately, several free title tag testing tools let you preview how yours will appear in search results. Here are a few options:
Spotibo Google Search Results Preview ToolMangools Google SERP SimulatorTo The Web Title Tag TesterInclude KeywordsIf you’re aiming to drive traffic from search engines, then your title tags should include relevant keywords. These are terms a searcher might use to find your content. A well-written headline should cover this requirement.
Some sources say you should include the keyword you want to rank for at the beginning of your title tag. Realistically, somewhere between the beginning and the middle is best. If you have to make a trade off, prioritize readability rather than trying to force your keyword into the beginning.
Keep Them Consistent with Your HeadlineA good title tag should reflect the headline (or H1 heading) on the page. If it’s not possible to fit the entire headline under the character limit, then shorten it as best you can. Avoid writing a title tag that sounds drastically different from your headline.
Make Sure They’re UniqueIf two pages have the same title tag, search engines will not be able to tell them apart. That could cause the search engine to not rank either page for the intended keyword. If they’re too similar, they may also struggle to understand what the actual difference is between the two pages.
Note: If all the content on two or more pages or posts is identical, then you have an even bigger problem called “duplicate content.” You can fix this issue by ensuring your pages and posts offer unique value to readers.
If you need to have duplicate pages for any reason, use rel=canonical tags to tell search engines which of the pages is the “original” or the one you want to rank. Yoast and other SEO plugins can help you set rel=canonical links.
Remember that title tags don’t just have to communicate to search engine bots. They also need to be easily readable for users. Try reading your title tags out loud (or at least back to yourself in your head) to make sure they read well and aren’t over-optimized for search engines.
How Can You Edit Title Tags on a WordPress Website?By default, WordPress uses the H1 title of a post for the title tag. While this is a quick and convenient solution, it isn’t always the most effective.
There are several ways you can customize title tags on your WordPress website. Let’s look at several different SEO plugins that enable this feature.
Note: WordPress.com users can enable the following features and plugins on the Business plan and above. All WordPress.com sites come with Jetpack pre-installed.
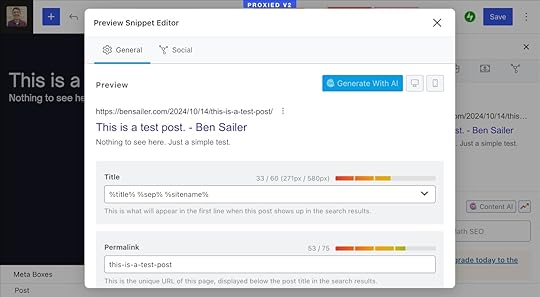
Editing Title Tags With JetpackWordPress.com users (as well as WordPress users with other hosts using the Jetpack plugin) can edit title tags using the SEO Title field. From the editor, click the Jetpack logo in the upper right corner, then scroll down to SEO Title:
 Install JetpackEditing Title Tags With Yoast SEO
Yoast SEO is one of the most popular WordPress plugins of all time, and there’s a good reason for that. It’s easy to use and enables tons of SEO functionality, including writing title tags.
If you have the plugin installed, when viewing a post or page in the editor, you’ll see Yoast SEO at the bottom of the screen:

Here, you’ll see several different fields. Let’s break down what’s happening with each one:
SEO Title: This is where you can enter a custom title tag. By default, it auto-populates with templated placeholders that will automatically include your page headline, the name of the page, a separator ( – ), and the title of your site.Slug: This controls how the slug will appear in the post or page URL.Meta Description: Short (160 characters or less) summaries that appear under title tags in search results.There’s nothing wrong with using Yoast’s default templates for title tags. But it doesn’t typically yield optimal results for a few reasons:
They end up being too long. When you add your page name and site title, you might not have many characters left over for your page headline or relevant keywords.They include extraneous information. People already know they’re on your website or blog. It’s usually in every title tag.They might not read well to users. Due to both factors listed above, they may get cut off in search results or read awkwardly.Fortunately, you can simply delete the default placeholders, and enter your own title tag. You can also edit title tag templates to control how title tags auto-populate on your site. Yoast has excellent documentation on how to do this.
Install Yoast SEOEditing Title Tags With Rank Math SEORank Math is another plugin similar to Yoast SEO. It’s another reputable option that offers some different features. Much like Yoast, there is a lot that Rank Math can do. For our purposes, we’ll focus on title tag editing.
First, you’ll want to download and activate the Rank Math SEO plugin. Then, when viewing a post or page in the editor, you’ll see the Rank Math icon at the top of your screen. Click it to open Rank Math:

Next, click Edit Snippet:

You can now edit your title tag, permalink, meta description, and other relevant SEO metadata:
 Install Rank Math SEOEditing Title Tags All In One SEO (AIOSEO)
Last but not least, let’s look at All In One SEO. This is a time-tested WordPress SEO plugin that’s full-featured and easy to use. Similar to Yoast, it allows you to edit title tags directly in the editor while editing a post or page:
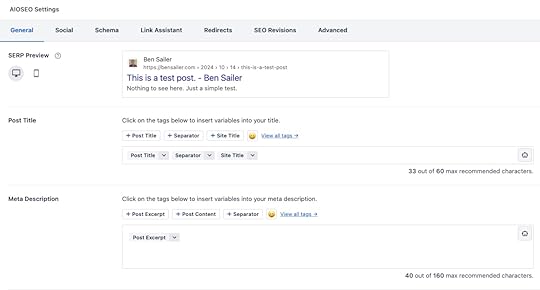 Install All In One SEOImprove Your Rankings and Get More Traffic
Title tags are small but mighty page elements that help ensure your content is seen and clicked in search results, so be sure to give them the time and attention they deserve by using a proper SEO plugin and optimizing the character length.
Looking for lightning-fast WordPress hosting that’s optimized for search engines out of the box? WordPress.com is an excellent choice thanks to its built-in Jetpack-powered SEO capabilities and full plugin support on the Business plan and above. Whether you’re a hobbyist, blogger, or business owner, see what makes WordPress.com the best place to host your WordPress site.
February 26, 2025
WordCamp Asia 2025: A Celebration of Community & Open Source in Manila
I work at WordPress.com and have since 2014. It’s the longest I’ve ever stayed at a company, and in so many ways, it often feels like home. But when I landed in Manila last Sunday evening to join some of my colleagues at the first WordCamp Asia held in the Philippines, it literally was a homecoming.
Born and raised in Manila, I can’t even begin to describe the thrill of seeing the global WordPress community descend onto the busy, raucous streets of my hometown. Out of nearly 1,800 attendees, about a third were local, coming from all parts of the Philippines, across the 7,107 islands that make up the archipelago.
Filipinos love WordPress; on WordPress.com alone, they represent hundreds of thousands of new signups every month, consistently ranking the Philippines as one of the top five countries in the world for new WordPress users.
The Philippine International Convention Center, a 1970s-era Brutalist behemoth of a structure, served as the official venue for WordCamp Asia 2025. We shared its massive halls, vaulted ceilings, and bright red carpets with local university graduation attendees, but the sprawling complex allowed for plenty of room to spread out.

Matias Ventura, lead architect of Gutenberg, kicked off the official conference schedule with a thoughtful and inspiring keynote sketching out an exciting future for WordPress that centers the user and delivers a friction-free, intuitive experience.
A jam-packed schedule of workshops and talks followed, where attendees could hear Elementor’s Miriam Schwab discuss the basics of GPL, learn from digital marketer Chiaki Kouno about what having a truly successful “multilingual” WordPress site really entails, and pick up tips from Keiko Muto on how to get started with building an accessible site—plus so much more.
On Friday night, the WordPress.com team hosted a meet-and-greet happy hour where we had the privilege of meeting with local and regional WordPress.com users. Special thanks to Nicole King, Carlo Carrasco, George Buid, Ajit Bohra and his colleagues from LUBUS, Vivek Jain and his crew from rtCamp, Tom and Vicky Morton, and Dika and Diane Fei for spending the evening with us.


WordPress co-founder and Automattic CEO Matt Mullenweg closed out the three-day festivities with a Q&A in Meeting Room 1, an oddly generic name for such an immense, elegant hall. It’s also known as the Rizal Hall, which seems more fitting.
Jose Rizal, after whom the room and a million buildings, schools, streets, even entire cities in the country are named, is our de facto national hero. He was a 19th-century writer, doctor, and polymath whose writings helped inspire and ignite the Philippine Revolution in 1896 against the Spanish colonial authorities. What better place to close a conference dedicated to the freedom and democracy of open source than in a soaring hall named after the man who dedicated his life to pursuing freedom of speech and assembly for all?

By the way, if you missed the conference, we’ve got your back! Most workshops and talks, including both keynotes mentioned above, are now available to view on the official WordPress YouTube channel.
Think you might want to join us for WordCamp Asia 2026? We’d love to see you! WordCamp is open to all, so whether you’re a developer, a marketer, a designer, a support engineer, a blogger, or just curious about what this WordPress thing is that you’ve been hearing so much about, WordCamp was created for you. Check out the WordCamp Central site for more information about local and regional WordCamps.
And if you’re in Asia and want to experience the excitement of WordCamp Asia next year, start planning now: we’ll see you in 2026 in Mumbai, India!

February 25, 2025
Safeguard Your Personal Information Online with Domain Privacy
Owning a domain is a big step in establishing your online presence. Whether you’re creating a personal blog, running a small business, or launching an e-commerce store, your domain is your “digital real estate,” on top of which you can build your digital home (your website!). However, just like physical property, owning a domain involves certain considerations—including protecting your personal information.
What Happens When You Register a Domain?Similar to when you buy property like real estate or a car, you must register your purchase. Domains are registered with the nonprofit organization that coordinates the domain system, ICANN (Internet Corporation for Assigned Names and Numbers). As part of your registration, you must provide ICANN with personal information including:
Your full namePhysical address (home or business)Phone numberEmail addressBusiness or organization name (if applicable)By default, this information is added by ICANN to WHOIS, a publicly accessible database with contact information for domain owners across the web. Anyone can use a WHOIS lookup tool to find information about a website’s owner.
In the early days of the internet, WHOIS was a useful tool for developers to collaborate with other domain owners, drive internet accountability and transparency, buy and sell domain names, and direct legal communications, such as digital copyright infringement cases. However, as the internet has grown from a niche community space into a global economy with billions of users, the WHOIS database has become a growing security risk for domain owners.
Luckily, many internet domain registrars, including WordPress.com, offer some level of domain privacy—also known as “WHOIS privacy”—to keep your personal information safe.
What is Domain Privacy?Most people purchase their domains through domain registrars, companies that register and manage your domain on your behalf. In addition to helping you find and purchase your web address, your registrar manages the DNS connections between your domain and services like your host and email provider.
When you add domain privacy through your registrar, your registrar replaces your personal registration information in the WHOIS database with proxy contact information that directs communication to the registrar’s privacy service. When someone searches for registration information about your domain, they’ll see:
A proxy organization name.A generic address and phone number that redirects to the registrar.An email forwarding service that filters out spam while ensuring legitimate messages about your domain (like legal outreach) make it to your inbox.When you register a domain through WordPress.com, domain privacy is free and your WHOIS record will contain information for one of our three privacy services, depending on your domain’s registrar of record. If someone searches for your domain using a WHOIS lookup tool, they will see that privacy service’s contact information listed on your domain record.
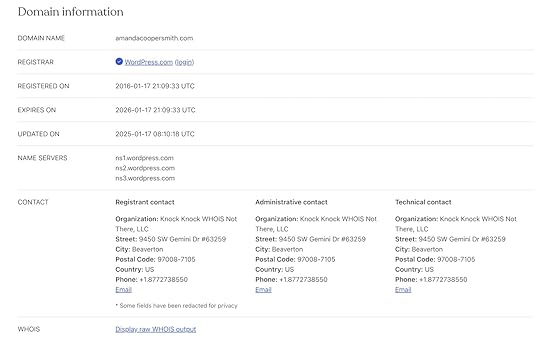
For example, when I looked up one of my domains registered with WordPress.com using a public WHOIS database lookup tool, the registrant contact listed was Knock Knock WHOIS Not There, LLC (see what we did there?).
Without domain privacy, my name, address, phone number, and email address would be shown instead.
 Why is Domain Privacy Worth Having?
As the internet has grown, so have privacy risks and spam. WHOIS was designed to be transparent, publicly accessible, and easily queryable by engineers, making it particularly easy to scrape domain holders’ names, emails, mailing addresses, and phone numbers.
Free domain lookup tools, which allow anyone to type in a website’s address and receive their full ICANN contact record, also make it easy for any individual to quickly find details on a particular domain holder.
These factors make WHOIS a potential target for data miners and bots, which could put domain owners at risk of:
Spammers: Automated bots or people using digital tools can scrape WHOIS data, leading to issues like email spam, texts, and robocalls.Scammers: Scammers will often use information like your home address and phone number in phishing schemes. Using the information they already have, they will pretend to be one of your legitimate service providers—like your post office or bank—and attempt to get you to share your login credentials.Identity theft: Cybercriminals can try to use data from WHOIS to impersonate website owners in fraud schemes, like applying for credit cards or loans.Targeted doxxing and harassment: If you run a blog or organization that deals with controversial topics or sensitive issues, critics could use WHOIS lookup tools to find your email and physical addresses, which can lead to forms of harassment.Unwanted marketing: While it is technically illegal, companies may scrape WHOIS data or buy scraped domain data to send unsolicited business offers, often in the form of cold calls and ongoing marketing emails.ICANN faces mounting pressure over the WHOIS database, which many feel opens domain owners to unnecessary privacy risks. New data protection laws, such as the EU’s General Data Protection Regulation (GDPR), have already made strides in protecting EU domain holder’s information. If you live in the EU or are registered as an EU company, you probably have some default protections automatically enabled by your domain provider.
What is Data Scraping, and How Does Domain Privacy Counter it?Data scraping is a process where someone uses an automated tool or writes code to quickly extract and download a large amount of data from a website. The more standardized a website’s data structure is and the fewer protections the site uses to limit bots (like CAPTCHA or rate limiting), the easier it is to scrape.
Since WHOIS is publicly available and designed to be easily searched, it is particularly vulnerable to this practice. Some WHOIS lookup tools even allow bulk searches, meaning that a scammer can extract thousands of domain owners’ contact details in minutes.
How Does Domain Privacy Differ Across Registrars?Not all domain privacy offerings are created equal: some registrars only offer domain privacy for an annual fee, while others have pieced-together offerings, allowing you to mix and match services like identity protection or email forwarding for an added cost.
At WordPress.com, we believe internet privacy should be a right, regardless of location, not an add-on, which is why domain privacy is automatically included when you purchase a domain through WordPress.com.
This service includes both a proxy address in the WHOIS database and digital and physical mail forwarding for relevant requests via WHOIS (please note that this is for domain-related requests only, please do not list this contact information on your website!).
How to Ensure Your Domain has Privacy ProtectionDepending on where your domain is registered, your domain privacy settings may look a little different. There are a few places you may be able to verify that your domain has domain privacy enabled, including any domain registration emails you receive and your domain record on your registrar’s website.
If you still have questions, you can email your domain registrar for confirmation on whether or not your domain has domain privacy enabled.
Verifying Privacy Protection on WordPress.comDepending on your location, domain privacy for domains registered on WordPress.com may be activated by default.
If you aren’t sure whether you have domain privacy enabled, you can check by following these directions or visiting our support article:
Visit your WordPress.com dashboard.Click Upgrades → Domains (or Hosting → Domains in WP-Admin).Select your domain. Navigate to Contact Information.Check that the option “Privacy protection on” is shown. If the toggle is switched off, click it to turn on privacy protection for your domain.If, for some reason, you’re uninterested in domain privacy protection or you’d like to transfer your domain to another registrar, you can also disable your domain privacy on the same page under Contact Information.
Keep Your Personal Information Private with Domain PrivacyWith growing cyber threats and data privacy concerns, domain privacy is no longer just an optional feature—it’s a necessity. With WordPress.com, you can rest easy knowing you have free domain privacy without hidden fees.
In addition to protecting your personal information, WordPress.com domains offer a suite of great benefits, including blazing-fast DNS, free SSL certificates (aka even more domain security!), and super competitive pricing.
While many registrars have been raising their domain prices year-over-year, WordPress is committed to offering affordable plans for the long haul. Our prices are some of the most affordable on the market, averaging just $13/year for popular .com, .net, and .org addresses.
Anyone can host a domain through WordPress.com—even if you host your website on another platform. To sweeten the deal, WordPress.com users with a paid hosting plan get a domain name free for a year when they purchase or transfer an existing domain. Transferring is super easy—check out our domain transfer guide.
Ready to secure your domain (and your information)?
Buy a domain with free domain privacyFebruary 24, 2025
Introducing Preview Sites: Pushing the Limits of Collaboration with Studio
One of Studio’s most-loved features just got a big upgrade: Demo Sites, now named Preview Sites, are enhanced to better support your local development needs and simplify sharing progress with clients and teammates.
More Space, More Sites, More PossibilitiesWe made substantial improvements to Preview Sites, giving developers more room to create and experiment:
Eight Times More Storage Per SiteWe’re dramatically increasing the storage capacity from 250 MB to 2 GB per Preview Site. This added space means you can now work with larger themes, more media assets, and richer content during your development process.
Double Your Preview SitesWe’ve removed the limit of one Preview Site per Studio site, and we’re doubling the number of preview sites you can run simultaneously from five to 10 sites. This expansion allows you to:
Maintain different versions for A/B testing.Manage multiple client projects concurrently.Run separate test environments for different features.Review and compare your most recent changes.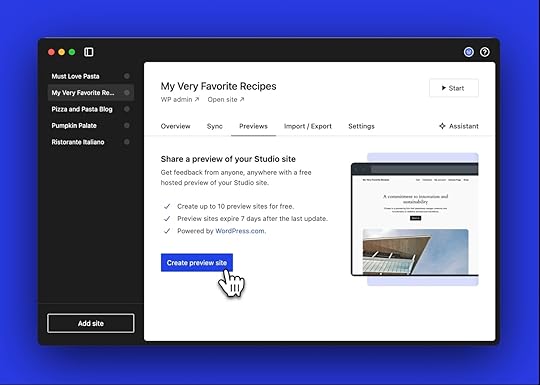 Shorter, Personalized URLs
We’ve created a new, more concise URL structure that’s unique to each user, making links easier to share. Now, every URL begins with your username and excludes random words, reinforcing your identity and reducing confusion.
Same Reliable TimelinePreview Sites will continue to be available for seven days after your last update, providing you with the perfect window for development, testing, and client reviews.
Why Preview Sites?The name change from Demo Sites to Preview Sites better reflects how developers use this feature in their workflows. Whether you’re showcasing works-in-progress to clients, collaborating with team members, or testing new features that need to be accessed online, Preview Sites are a quick and reliable way to share your work.
Each Preview Site is hosted on WordPress.com, giving you a publicly accessible URL that you can share with clients and colleagues. In a few minutes, you can generate a link to your local site that stays active for seven days—perfect for gathering feedback and iterating on your designs.
Start Using Preview Sites TodayThese enhancements are now available to all Studio by WordPress.com users. The transition from Demo Sites to Preview Sites will be seamless, with all of your existing Demo Sites automatically converting to the new system with the increased storage capacity.
We’re excited to see what you’ll create with these expanded capabilities. Download Studio today and start exploring this enhanced Preview Sites feature!
Develop with StudioFebruary 20, 2025
Why We Redesigned Our Blog (And How You Can Too)
You may have noticed things look a little different around here. Here’s how we redesigned our blog (and how you can redesign yours too).
Why Did We Redesign Our Blog?A blog is your home on the Internet. Like all homes, they eventually need to be tidied up. That was certainly the case for this very blog you’re reading right now. While we were busy working on our product and other priorities, we realized it was time to give our blog a refresh.
 They say the classics never go out of style, but they do.
We’re blogging and design nerds, so a blog redesign is something we would do for fun. Rest assured there were much more important reasons to redesign our blog though. Blogging is what we do, so our blog should be exceptional, right? With this thought in mind, our marketing, design, and engineering teams collaborated to create the best blog experience possible.
 The new and improved WordPress.com Blog design.
 Now, you might think you can learn everything there is to know about this redesign just by looking at it. However, there are some subtle details and improvements that may be easy to miss. Let’s look at some redesign details we’re particularly proud of and share some simple tips you can use to improve your own blog (with advice straight from our own design team).
What’s Improved on the WordPress.com BlogWe know what you’re thinking: “Okay, but what does all this mean for me?” If we were you, we’d be asking the same question. Here are some enhancements made to our blog that make your experience better.
A More Engaging AppearanceThe WordPress.com Blog was visually outdated and no longer matched the branding of the rest of our site. We modernized our design and post layouts to bring them up to our 2025 design standards.
Here’s a snapshot of our old single-column homepage design:
It was clean and simple but bland. The article description font for text below headlines was difficult to read, and the small image thumbnails didn’t do justice to our sharp header designs that had already been using some of our refreshed design standards. There was room for improvement here.
In case you haven’t seen it, here’s what our new and improved blog homepage looks like:

The clear header section places our most recent posts front and center, while the multi-column layout makes it easier to find more content you might be interested in. You’ll also notice a consistent approach to visual styling, ensuring design elements and images look their best.
Tips for planning your own blog redesign:– Establish consistent colors you use across your blog. This helps create a more cohesive appearance that is more immediately recognizable as “you.”
– Choose header images that will catch your reader’s attention using or complimenting your established colors.A More Useful Navigation Structure
Our previous blog homepage design featured a single column with a simple search bar. The new design implements a streamlined menu for better organization and easier navigation:

This may look like a simple design, but that simplicity is intentional. Each category has been strategically considered to effectively group content together into the fewest buckets possible.
At the bottom of the blog home page, we also include a section for popular content. This ensures that posts receiving high engagement get extra visibility:
 Tip for establishing your blog categories:
– Select blog categories thoughtfully. A smaller number of carefully considered categories focused on core topical areas may be better than having lots of categories because it presents fewer, more intentional options for your readers. For more detailed guidance on choosing categories, read this guide.An Easier Reading Experience
Redesigning the WordPress.com Blog wasn’t just about appearances though. We made several improvements that make content (like this post) more comfortable to read:
Making our font selection consistent with the rest of our websiteEnsuring those fonts are web-friendlyChoosing colors that are not only consistent but support easy readabilityTips for choosing colors and fonts on your blog:– Use consistent font styles across your site. See how to edit fonts on WordPress.com here.
– Use AccessibilityChecker.org, a free accessibility assessment tool, to ensure everyone can easily enjoy your site.
– Additionally, read our article on color accessibility to ensure your style choices are suited for all.
– For WordPress.com users, remember that our themes are built with careful consideration for optimal color and font usage.More Clear Calls to Action
We work hard to create content that makes you say, “This blog post was so good, I need more of it in my inbox.” Now, every post has a clear subscription banner across the bottom. We’ve also made it easier for readers to find where they can start a new website or blog of their own (for readers who are just getting started).
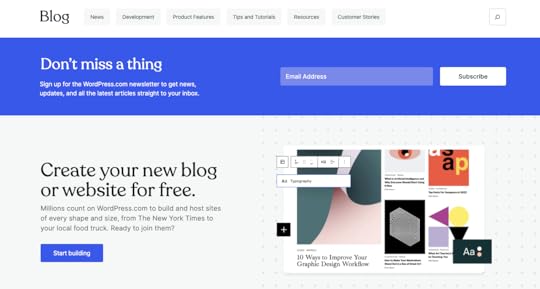 How could you not enter your email address in this form? Who could resist building a new website or starting a new blog? Couldn’t be us.Tips for adding CTAs to your blog:
– Make it easy for readers to find more of your content.
– Add clear calls to action that encourage users to take your desired action (such as subscribing to your blog, signing up for your service, or buying a product).Six Tips to Improve Your Next Redesign Project
If you’re thinking about redesigning your own blog or website (or for a client), we have some additional advice to share.
1. Set Clear Expectations with ClientsOur blog redesign project required a high level of collaboration between teams and stakeholders. If you are redesigning a blog for a client, ensure that both sides understand the goals of the project. Here are some items you should be sure to document:
Your clients’ goals and prioritiesAll high-level tasks to implement the redesignExpected initial launch dateTimeline for improvements and iterations after launchThen, throughout the project, regularly review and update this document to ensure alignment and track progress effectively. This will help keep the project on track and avoid disappointment.
2. Create a Checklist of Design TasksBefore you start working, create a more detailed checklist of all the steps you need to follow. Break out this list into two sections:
Steps that need to be completed before launchSteps that can be completed after launchThis will help you prioritize the work that needs to be done at a granular level.
3. Optimize for the Right ThingsEven the best-looking design is wasted if a site doesn’t function well. Prioritize performance: optimize assets, use lazy loading, minimize JavaScript and CSS, and implement caching where possible. This will help make sure your client’s site works as well as it looks.
To get some WordPress and site-specific performance recommendations, be sure to use our free Speed Test tool.
4. Test, Test, TestDuring development, start and maintain a record of pre-launch and post-launch testing items. This will ensure smooth deployment (and help you catch bugs before your client or their users do).
5. Determine How Much Existing Code and Content Can be ReusedRedesign projects can be a lot of work. Fortunately, you might not have to redesign everything on your site or blog. Clearly define what parts need to be fully redesigned and what can be kept or inherited from other products for common patterns. For example, with our own blog redesign, we were able to keep the existing pattern for comments.
6. Implement a Clear Feedback ProcessWe believe feedback is a gift. When someone calls attention to something you can improve on, they are trying to help you be better. Establish an easy process for your client to review designs and provide constructive feedback throughout the process (and not just at the end). This way, your client will feel valued, and the end product will be more likely to meet their expectations.
Ready to Redesign Your Own Blog?If you’re inspired to redesign your own blog, follow our detailed guide (it’s geared toward full website redesigns, but much of the advice is still applicable). Or, if you’d like to start a blog (or help a friend start one of their own), we have another guide that can help you do that too. Here’s to making the Internet a more beautiful and useful place, one blog at a time.
February 13, 2025
Color Accessibility 101: How Color Affects Readability on Your Website
When designing a website, it’s easy (and fun!) to focus on layout and content. But one crucial element that often gets overlooked is color. Color plays a vital role in web accessibility, ensuring that all users—regardless of visual impairments or color vision deficiencies—can easily navigate and engage with your content.
Proper color contrast is key to making text readable for those with low vision or color blindness. In this post, we’ll explore why color is so important for accessibility and how to create a color palette that ensures your website is inclusive and user-friendly for everyone.
Why color is important for accessibilityColor, specifically color contrast, is central in ensuring web content is accessible, particularly for users with visual impairments, color blindness, or low vision.
Someone with low vision may struggle to read text with poor contrast, such as light gray text on a white background. Users with color blindness may find it difficult to differentiate between certain colors, such as red and green, if the contrast is insufficient. High-contrast design helps bridge these gaps.
Not only that, accessibility isn’t just a best practice—it’s becoming a legal requirement in many parts of the world. The European Accessibility Act (EAA), taking effect in 2025, will require digital products and services, including some websites, to meet certain accessibility standards like sufficient color contrast, avoiding color-dependent information, and following Web Content Accessibility Guidelines (WCAG). Non-compliance could lead to fines, making accessibility an essential priority for businesses serving the EU market.
Beyond its impact on accessibility, proper color contrast also benefits all users, including those viewing content in challenging environments. Bright sunlight, low-quality monitors, or small screen sizes can make low-contrast elements harder to see for anyone.
What makes a color palette accessible?While color contrast is central to the accessibility of color, there are other things you can do to make the color on your site even more accessible. All of these elements come together to ensure optimal color accessibility:
Sufficient contrast: Colors must have enough contrast between the text and background to meet WCAG—more on contrast ratios below. Avoid relying on color alone: Information shouldn’t be conveyed through color alone. For example, add an underline to links or use icons to support color-coded elements.Color blindness considerations: Choose combinations that are distinguishable for users with common types of color blindness, such as red-green or blue-yellow deficiencies.Consistent use of color: Maintain consistency in how colors are used throughout your design. This helps users quickly understand an element’s meaning and function.Testing across devices: Colors may appear differently on various screens and under different lighting conditions. Testing ensures accessibility in real-world scenarios.By considering all these elements, you can create a site that is both functional and inclusive.
 Example from WebAIM demonstrating the use of other elements, like underlines and icons, to support color-coded elements. What is a contrast ratio?
To better understand if your site’s color palette is accessible, it’s important to understand how color contrast is measured.
Color contrast ratio is a numerical value that represents the difference in luminance (light intensity) between two colors, such as the text and its background. It is calculated as a ratio, with values ranging from 1:1 (no contrast, e.g., white text on a white background) to 21:1 (maximum contrast, e.g., black text on a white background). A higher ratio indicates greater contrast, making it easier for users to distinguish between the foreground and background elements.
The Web Content Accessibility Guidelines (WCAG) recommends a minimum contrast ratio of 4.5:1 for most text and images of text, and 3:1 for large text (at least 18 point or 14 point bold and above).
Example of a low contrast ratioTake this example of a light green button with white text. It may look legible to you, but upon further inspection, using the Chrome Accessibility tools in the Chrome browser, the contrast ratio is quite low at 1.71:1. As such, the text on this button would be difficult for many users to read.
 Here’s how a low contrast button appears flagged in the Chrome Accessibility tool, along with other accessibility details for the element. How to test for accessible color combinations
Testing color combinations for accessibility is straightforward with the right tools. Here are some of our most trusted tools for testing colors:
Chrome Accessibility Report: This tool is an easy-to-use resource built right into the Chrome browser when you want to quickly test a single page or element on your site. Equalize Digital Accessibility Checker: This freemium WordPress plugin from Equalize Digital goes beyond just colors to ensure your site is accessible to a wide range of visitors. WAVE Web Accessibility Evaluation Tool: A free tool you can use to scan any page on your site for accessibility issues. When you’re looking to improve colors, check for the “contrast errors” part of the report. Deque University contrast checker: Use this free tool to check a color combination you’re unsure about.Many design programs, such as Adobe and Figma, include built-in accessibility tools or add-ons that allow you to analyze color contrast directly within your design files, allowing you to address accessibility considerations early in the design process—even before development begins.
 Some beautiful, accessible color combinations and themes
Finding accessible color combinations doesn’t mean sacrificing aesthetics. Here are some of our favorite high-contrast designs in the WordPress.com theme directory:
 High contrast Koinonia theme from WordPress.com. Koinonia
The Koinonia theme is ideal for building community-focused websites, such as nonprofits and churches. It features a clean, modern layout with a focus on readability and easy navigation. It adheres to accessibility standards, with features like proper color contrast, keyboard navigation support, and screen reader compatibility, which helps differently abled users access content effortlessly.
 Darkest Black
#030203Berry Sorbet
#FB6669Dark Sangria
#560122
 High contrast Conference theme from WordPress.com.Conference
The Conference theme is thoughtfully designed for event and conference planners, combining functionality with accessibility to create an inclusive experience for all users. Its design emphasizes clear, intuitive navigation and offers support for high-contrast color settings, ensuring content remains readable and usable for individuals with visual impairments.
 Signal Blue
#345EFCEmerald Glow
#49EF7CDeep Black
#1E1D2C
 High contrast Fixmate theme from WordPress.com.Fixmate
This theme from the WordPress.com team features clean, high-contrast text on light backgrounds, ensuring maximum readability for users with visual impairments. The theme adheres to accessibility best practices by using logical heading structures, keyboard-navigable menus, and link styling that avoids reliance on color alone for identification.
 Golden Marigold
#FDC62AMidnight Cola
#0F0C0CTidepool Jade
#2D92A1
Want a more customized look? When you’re ready to build, WordPress.com makes it easy to define and implement an accessible color palette for your site on Premium plans and above. You can customize these themes with the colors of your choosing, but be sure to always verify your color contrast ratios and test them in different contexts, such as buttons, headers, and body text.
A final word on accessible colorAccessible design is not just about meeting standards; it’s about creating experiences that welcome everyone. By prioritizing color accessibility, you’re taking a meaningful step toward a more inclusive web.
Want to learn more about building an inclusive WordPress site? Here are a few resources to get you started:
WordPress Accessibility DayWordPress Accessibility StandardsWordPress Accessibility TeamWordPress Accessibility ForumFebruary 12, 2025
Your Home for a Century: Our 100-Year Domains and Plans
The internet moves fast. Platforms rise and fall in popularity, websites disappear, links go bad, and domains lapse. Some things shouldn’t disappear and deserve to last.
At WordPress.com, we believe in building for the long term. That’s why we’re introducing 100-Year Domains and relaunching our 100-Year Plan—two powerful ways to secure your digital legacy for generations to come.
With 100-Year Domains, you can lock in your .com, .org, .net, or .blog domain for a full century—ensuring that what you create today remains accessible for the future and safeguarded from expiration, platform changes, and digital decay.
But securing a domain for 100 years is just the beginning. Our newly reimagined 100-Year Plan is a comprehensive long-term hosting solution, equipped with enhanced features to preserve your website, protect your data, and ensure your legacy endures for years to come.
The internet never sleeps, and neither should your website.
The 100-Year Plan: Own your online legacy for 100 yearsOur 100-Year Plan, which was originally introduced in 2023, has always been about long-term digital preservation. But we’ve taken it even further, introducing new features that ensure your website and data are secure, resilient, and adaptable across the next century.
Special numbered trust accounts: We help you administer a secure, numbered trust account system, ensuring seamless management and continuity over the next century.Contingency planning for digital security: Robust protocols and financial investment systems guarantee the continuity of your online presence, even if WordPress.com or Automattic face unexpected challenges.Standalone 100-Year Domains: For the first time, domains can be purchased independently of hosting, giving you more flexibility in long-term planning.Lots of Copies Keeps Stuff Safe (LOCKSS) principle storage: WordPress.com stores all of your data in at least three separately mirrored data centers to ensure access and redundancy in the event of failures or disasters. In addition, 100-Year Plan websites will have active snapshot backups in the Internet Archive’s Wayback Machine and the Wayback Linkfixer plugin to redirect any links that go bad on your site to the most recent one at the Internet Archive.Commemorative website placard: We are creating a custom metal and glass placard to commemorate your 100-Year website that will be sent to you as a display and reminder of your commitment to your future.
For creators, organizations, and institutions, our 100-Year Plan is a commitment to ensuring your name, story, brand, or mission stands the test of time.
Introducing 100-Year Domains: Secure your digital name for a centuryNot ready for a full century hosting plan? You can confirm your family or company namespace is safe with our 100-Year Domains. They offer a unique way to protect your domain name for 100 years, ensuring your identity and legacy remain yours—without the risk of expiration.
Normally, domain names can only be registered for 10 years at a time. But with our 100-Year Domains, we start with a 10-year registration and handle renewals automatically by adding a year to registration annually so there is always at least a nine-year buffer.
Keep your name online for 100 years and get:
No expiration surprises.No lost domains due to admin mistakes.No stress about renewals—ever (or 100 years, whichever comes first).A full century of security for your domain.One setup. 100 years of ownership.Who should get a 100-Year Plan or Domain?Whether you’re a creator, entrepreneur, institution, or someone thinking about the long game, the 100-Year Plan and 100-Year Domains ensure your online presence is protected for the future.
Long-term plans and domains are great for:
Cultural institutions & nonprofits: Museums, libraries, and research organizations can preserve history and knowledge for generations.Super creators & thought leaders: Writers, artists, and digital pioneers can ensure their work outlasts social media trends.Families & legacy holders: Parents can secure a digital heirloom, while individuals can protect their names and online presences.Businesses & entrepreneurs: Keep your brand identity intact for the next century, with no risk of expiration or loss.Future historians: The internet forgets, but your story can stay forever.Why creating a lasting legacy matters more than everThe web is fragile. Domains and hosting plans expire.
This is how history gets lost. The 100-Year Plan and 100-Year Domains fight back against this digital impermanence—ensuring that your work, your name, your mission, and your voice remain accessible far beyond the limits of today’s platforms and policies.
Imagine including the next 100 years of website hosting fees in the same budget as your next website build or update. You’re locking in a one-time hosting or domain payment now, even if and when prices rise in the future.
Secure your digital future todayDomains expire and websites disappear every day. But yours doesn’t have to.
Get a century of stability with our 100-Year Plan and Domains today:
100-Year Plan: $38,000 (includes hosting, a domain, trust-based continuity, and website preservation tools)100-Year Domain: $2,000 (one-time purchase, no annual renewals)

