Marc Spagnuolo's Blog, page 80
March 1, 2015
Marc’s Mini Drum Set
Thank you for taking a look at my homemade drum set. I spent many hours creating this project. Don’t ask how many! Being a woodworker/woodturner and a drummer, I decided to challenge myself by making a mini drum set. I sketched the design on paper first, to get a better feel for scale. Once I was happy with how it looked on paper, I made all the parts. There was trial and error along the way. Some parts took 2 attempts to get it right. The hardest parts were the cymbals, by far. That took some figuring out.
The drum set consists of 609 individually made pieces, standing 14” tall on the stage. As for the wood species, I used Walnut for the drum shells and Maple for all the hardware (rims, stands, etc.). Ebony is sprinkled throughout the kit. The cymbals are made of Yellowheart and can be removed from their stands for transport. Some pieces of the drum set are Maple dyed black. The stage is all Bubinga, except the little Maple spindle in the bottom center.
The drum shells and rims are segmented. The cymbals move freely. I made the dowels for the drum hardware on the lathe. The dowels range in size from 3/8 inch down to 1/8 inch. I applied 3 coats of a water-based polyurethane finish to the entire project.
The stage diameter is 20” and is put together with 2 pretty boards of Bubinga. After starting to shape the bottom, I got the idea to make it look like an album… label and all. I let the computer help me lay out the label placement and font, which I transferred to the Bubinga with my woodburning tool. I carefully scratched tiny lines with my skew chisel to make it look like an album.
I called it “All The World’s A Stage” after the name of an album by Rush, one of my all time favorite bands.
Hope you enjoyed looking at my musically inspired wood creation, which was definitely a joy to create. If you have any questions about this piece, or would like to see my other creations, please visit my website.
The post Marc’s Mini Drum Set appeared first on The Wood Whisperer.
All The World’s A Stage
Thank you for taking a look at my homemade drum set. I spent many hours creating this project. Don’t ask how many! Being a woodworker/woodturner and a drummer, I decided to challenge myself by making a mini drum set. I sketched the design on paper first, to get a better feel for scale. Once I was happy with how it looked on paper, I made all the parts. There was trial and error along the way. Some parts took 2 attempts to get it right. The hardest parts were the cymbals, by far. That took some figuring out.
The drum set consists of 609 individually made pieces, standing 14” tall on the stage. As for the wood species, I used Walnut for the drum shells and Maple for all the hardware (rims, stands, etc.). Ebony is sprinkled throughout the kit. The cymbals are made of Yellowheart and can be removed from their stands for transport. Some pieces of the drum set are Maple dyed black. The stage is all Bubinga, except the little Maple spindle in the bottom center.
The drum shells and rims are segmented. The cymbals move freely. I made the dowels for the drum hardware on the lathe. The dowels range in size from 3/8 inch down to 1/8 inch. I applied 3 coats of a water-based polyurethane finish to the entire project.
The stage diameter is 20” and is put together with 2 pretty boards of Bubinga. After starting to shape the bottom, I got the idea to make it look like an album… label and all. I let the computer help me lay out the label placement and font, which I transferred to the Bubinga with my woodburning tool. I carefully scratched tiny lines with my skew chisel to make it look like an album.
I called it “All The World’s A Stage” after the name of an album by Rush, one of my all time favorite bands.
Hope you enjoyed looking at my musically inspired wood creation, which was definitely a joy to create. If you have any questions about this piece, or would like to see my other creations, please visit my website.
The post All The World’s A Stage appeared first on The Wood Whisperer.
February 25, 2015
Marcel’s Aurora Nightstand
I’ve done a few simple projects in the past with cedar for outdoor furniture and decided that woodworking was something I really enjoyed. After a year of setting up my basement shop and building shop furniture, I was finally ready for my first real project.
While watching all the great learning videos from the Wood Whisperer and looking at the online projects, I saw the Aurora Nightstand for the first time in Brian’s project on this site, and the style immediately appealed to me. After reading Darrell Peart’s book, I was sure that I wanted the Aurora Nightstand to be my first project–why not dive off the deep end.
After visiting a family-owned hardwood store and putting my newly found knowledge of board feet into action (again thanks to the videos on this site) I was ready to start. Being a weekend warrior, it was slow going, but after countless hours and a few learning mistakes along the way, I finally finished by very own Aurora table.
I’d really like to thank The Wood Whisperer. I’m not sure I would have even tried such a daunting first project without having access to all the great learning videos available on this site.
Original design by Darrell Peart.
The post Marcel’s Aurora Nightstand appeared first on The Wood Whisperer.
February 21, 2015
Curt’s Standalone Shop
Building was completed in November 2010. It is a dual purpose shop: 1) woodworking; and 2) build and fly radio controlled airplanes. Second work bench is a torsion box design for its ridged and flat surface. Plane construction requires a flat surface.
The post Curt’s Standalone Shop appeared first on The Wood Whisperer.
February 19, 2015
Doug’s Tall Dining Chairs
When telling people I was building new dining chairs, the common response was something to the effect of “Isn’t that a lot of work? Why don’t you just buy them?” These people are obviously not woodworkers. Those of you who are know exactly why we put forth this time and effort, because that sense of satisfaction upon completing such a project cannot be bought.
While I have been around woodworking my whole life (my dad was a high school wood shop teacher), the past 10 years of bouncing around apartments for school and early career is just not conducive to building up a shop. So most of my builds have consisted of smaller projects I could do with hand tools. Now that I own a house, I needed something to justify a few new tools and further convince the wife “No, that’s not a garage, it’s a shop. Cars don’t go in there.” Agreeing to build a new set of dining chairs helped me to do just that.
This was my first venture into fine furniture and also my first attempt at chairs. The design is by Greg Wood and comes from an article he wrote for Rockler about building a tall counter-height chair (http://www.rockler.com/how-to/build-t...). The design was fairly straightforward and not too difficult to build, and to top it off the chairs are very comfortable.
The chairs are made from solid 8/4 cherry, finished with a coat of natural danish oil and four coats of Arm-R-Seal.
The post Doug’s Tall Dining Chairs appeared first on The Wood Whisperer.
February 17, 2015
Steven’s Adjustable Sledzilla
This sledzilla was born after I tried making Marc’s crosscut sled. I made Marc’s sled and it was amazing, but after about three days of use it was out of alignment by almost 1/16th of an inch, I was so disappointed. I was so careful when transporting the sled. I’m not sure if it got bumped or from pulling and pushing on it back and forth, but somehow it got ruined. I couldn’t afford to make a new one, not from a monetary standpoint, but a time standpoint. My customers and wife are waiting for projects and if it failed me again, I wouldn’t know how to fix it or make it any different.
So that got me thinking, what if I made a bigger, better sled with a fence that was separate from the other parts of the sled so I didn’t have to pull or push on it. I also wanted it to be adjustable and not screwed down, so if it ever got out of alignment, I could just realign it within minutes and be back to work.
I started with a 48″ x 40″x 3/4″ poplar ply (cause I had a bunch of it). I then added 2 strips to the front and 2 strips to the back that are 2-1/2 by 48. I glued and screwed those in place first. Then I attached my miter bars. After all those basic parts were attached, I attached my first of two aluminum extrusions that I use as my fence. The base is bolted down on the left side as a pivot point. The other side of the base is held down by a t-track and t-bolt and jig handle. All hardware is 1/4-20 on this project. So then I attached the face of the fence it was another piece of extrusion. I used some 3-D squares cut apart as my brackets and I drilled some oversized holes. Having the t-track on the right hand side gave me unlimited adjustability. I did the usual three rounds of squaring it up and my final numbers were .00025. I think that’s just amazing and the best part of all is that if I ever have it get out of alignment, then I can undo the track bolt and set it again without making a whole new sled. I’m in love with it and plan on converting my failed first attempt into a sled like this but designated for dadoes only. Thanks for the inspiration Marc.
The post Steven’s Adjustable Sledzilla appeared first on The Wood Whisperer.
February 16, 2015
Hall Tree & Bench
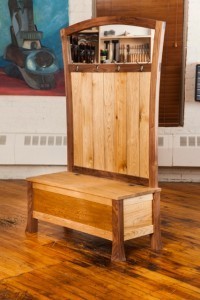 This Summer, I was invited to appear as a guest on the PBS woodworking show Rough Cut with Tommy Mac. I jumped on the opportunity and flew out to Boston to spend a day in Tommy’s shop. The experience wasn’t all that unlike what I do every day in my own shop: video cameras and woodworking. It’s kind of what I do. But there was one key difference: I wasn’t calling the shots. That means I had to break my habit of looking at the camera and I had absolutely no control over what made it into the final version of the show. That was all very new to me.
The show has already aired on PBS in many markets but some cities don’t even carry the show. Furthermore, folks outside the US might have trouble getting access. So I contacted the powers that be and asked if it would be possible to run the episode here on The Wood Whisperer. I was surprised and delighted that they said yes.
So I’d thank to thank the folks at WGBH for letting me do this, as well as David M. and Tommy for helping make it all happen. Of course I have to thank Eli as well for designing the Hall Tree & Bench.
If you want to learn more about Rough Cut or you’d like to catch up on more episodes, click here.
The post Hall Tree & Bench appeared first on The Wood Whisperer.
February 12, 2015
Mark’s Rustic Oak Dining Table
My wife and I always wanted a solid wood dining table and I have always been partial to oak. Unfortunately, these tables are pretty expensive here in Germany. I tend to operate on the assumption of “what’s the worst that could happen.” So I embarked on an adventure almost three years in the making, which started with watching EVERY video Marc had posted!
I wanted massive oak legs and I wanted to see as much end grain as possible; so I decided to let the legs follow all the way through to the tabletop. To complement the massive legs, the tabletop needed to be at least 4 cm thick. So I started looking for suitable lumber, not an easy job here in Germany.
I finally found 4 leg blanks but they were pretty warped, so it took me almost 4 hours each with a Nr.4 and Nr.6 Stanley to get them down to size. Because I didn’t have any clamps that were longer then 30 cm, I had to improvise with tension belts used to secure loads for transportation to glue up my tabletop. This worked well enough. All cracks and knots were filled in with epoxy resin. (I poured about 200 ml into one of the leg blanks). Cutting the mortises for the rails were another challenge, as well as a good test of my patience, but the dry fit of the base was worth every blister.
Six hours with a belt and random orbit sander, working my way up from 40 to 240 grit left my back raw. But assembling the table for the first time made me forget the pain. I admit this project may not be up to par in comparison to some of the very fine furniture here I see posted here, but this is my first piece built with a minimum of machinery and lots of anxiety. And that makes sitting at it all the more gratifying! Thanks for allowing me to share my project with you!
The post Mark’s Rustic Oak Dining Table appeared first on The Wood Whisperer.
February 7, 2015
Double Mortise & Tenon Joints
The mortise and tenon joint is fundamental to good woodworking. There are lots of variations of the mortise and tenon including what I’m going to show you today: the double mortise and tenon joint. The concept is simple. Instead of having one giant mortise and tenon joint, we split it into two.
Is It Stronger?
Maybe. For thicker workpieces such as 8/4 stock, I personally believe a double tenon can be stronger than a single massive tenon. My logic comes from the fact that the double tenon sports twice as much surface area as the single tenon. And more surface area typically equates to increased strength. Admittedly, I haven’t done the testing myself so I have no numbers to back up my opinion. If anyone can recommend a joint strength test that we can reference, please feel free to mention it in the comments below.
Start With the Mortise
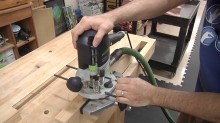
Routing Double Mortises
Just like a regular mortise and tenon joint, I like to start with the mortise. I use a router with an edge guide and a 3/8″ router bit to do the work. By making a pass on each side of the board, I can produce perfectly symmetrical twin mortises, each the exact same distance from the edge of the workpiece.
Using a piece of scrap, I make a sample mortise that starts off just like the others. But to help us with our tenon setup, I’ll remove the middle piece of stock between the mortises to produce one full width mortise. This is what we’ll use to setup for the outer cheek tenon cuts.
The Tenons
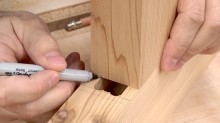
Laying out outer cheeks
Using the large mortise, I make marks on the end of the tenon board that represent where we need to cut the outer cheeks. It’s also a good ides to use a cutting gauge to establish the shoulder. At the table saw, I use a miter gauge and the rip fence to cut the 3/8″ shoulder on all four sides of the workpiece.
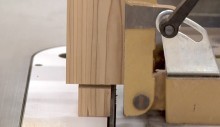
Cutting outer cheeks
Next, using a tenon jig, I raise the blade and cut the cheeks. It’s a good idea to intentionally make the tenon just a little fat. Check the tenon against the large mortise and adjust the jig as necessary, sneaking up on the perfect slip fit. Once the wide cheeks are established, cut the short cheeks as well using the same setting at the table saw.
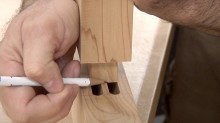
Laying out center cheeks
With the tenon resting on one of the true double mortises, mark the location of the center mortise wall. Rest the tenon jig as needed to remove stock from the middle producing two equal-sized tenons. This is another case where you’ll want to be cautious and sneak up on the fit. In all likelihood, you’ll need to do a little chisel cleanup after the operation if you want the shoulders of your tenon to meet up perfectly with the mortise board. While the initial setup takes a few minutes, you can batch out a bunch of these joints in no time flat!
Stuff to Think About
Consider using a square-tooth blade. Some rip blades feature a square tooth that results in a nice square cut. Box joint blades and blades with a deliberate square tooth grind are also good choices. Here’s the one I use. If you have to use a blade with alternating bevels, it isn’t the end of the world though. You’ll just have a little more cleanup to do with the chisels.
Although I didn’t show it in the video, you’ll need to be concerned about the square tenon/round mortise issue. To get the perfect fit, you’ll either need to square up your mortises or round over your tenons. I prefer to round over the tenons since it’s generally faster and it allows me to easily finesse how much slack I have in my joint.
If a tenon jig is a little rich for your blood consider making your own:
Shop-Made Tenon Jig – Woodsmith
Table Saw Tenon Jig - Popular Woodworking
How to Make a Tenon Jig (VIDEO) – Austin DenHerder
The post Double Mortise & Tenon Joints appeared first on The Wood Whisperer.
February 5, 2015
Darryl’s Cherry Bath Vanity
I was commissioned to build this bathroom vanity for a family friend. It is made primarily of locally sourced Florida cherry. The project design developed as I went along, making changes as needed.
The legs are laminations that were joined to the cherry plywood side panels with dominos. Originally I was going to create a frame and panel look on the sides with solid cherry stiles framing the plywood panels, but after laying out the parts on the bench, I decided to simply put a curve on the bottom of the panel. The curve on the aprons were cut on the bandsaw and faired using the flexible sanding block technique that Marc has demonstrated in the past. The slatted bottom shelf was originally going to be a flat plywood panel, but I felt that the lines in the slatted shelf would really add to the overall look. I also decided to run the grain in the drawer fronts vertically instead of horizontally for additional interest. The panel under the sink is removable so that the plumbing can be repaired when necessary. I also built a matching medicine cabinet and I have included a picture of the door which is cherry with a solid 1/4″ cherry panel.
I was really going for a very clean, simple design, using the beauty of the material as my big feature. Early on, I took a piece of finished cherry to the customer to sign off on the natural cherry finish that we had initially agreed upon. The customer took one look at it and asked if I could stain it darker (ugh). I had read somewhere that lye can be used to kick start the aging process in cherry and decided to give that a try. The color change was immediate and dramatic, it was love at first sight! I enjoyed this build immensely, I hope that everyone enjoys the pictures and the story.
The post Darryl’s Cherry Bath Vanity appeared first on The Wood Whisperer.


