Marc Spagnuolo's Blog, page 79
March 25, 2015
Richard’s Rolling Supply Cart
This is a themed supply cart commissioned by a local non-profit. The cart will be used like a hotel supply cart. The cart has 28 drawers which will contain items used by the residents handed out by volunteers.
The case is constructed with pocket screws, drawers were butt jointed with glue and brad nails. Made from 3/4″ birch and 1/2″ plywood drawer sides with 1/2″ bottom. All drawers are inset with push to open drawer guides. Ships wheel was purchased from Ebay.
The project started with a sketch of a steamboat on a box and this is the final product. This project was completed in collaboration with a local professional artist.
The post Richard’s Rolling Supply Cart appeared first on The Wood Whisperer.
March 23, 2015
Howard’s Garage Woodshop
When we purchased this home, a basement was a $20,000+ option that I decided would make a shop prohibitive. Our home did come with an unfinished loft above the two car garage. The loft floor was one inch OSB supported by a steel I beam, however it is 15 steps up from the laundry room. The challenge was moving all of the cast iron up those steps. Most tools were moved up on a hand truck by brute force, but when I purchased my SawStop, a requirement was delivery to the shop. As the loft was entirely open it provided a great opportunity to add three 220 and six 110 electrical circuits along with heavily insulating the south facing roof. I was also able to install four recessed light fixtures before hiring a drywaller to install over forty sheets (that stairwell again). The shop is sealed off from our home by an insulated and magnetically weatherstripped door, and heat is provided by a single electric heater and cooled by a portable air conditioner unit. I had planned to add a linoleum floor for easy clean up, but my wife pointed out that it would be very slippery, so I just painted the OSB floor and that is very slip resistant, but cleans up well.
Wood storage is at the top of the steps and can accommodate full sheets, although I usually break them down in the garage below.
The end wall has my bandsaw, sander and drill press–all are hooked to the dust collection header mounted on the wall. Below the clamp rack, the half double doors allow me to access storage for lengths as long as 12′ under the eaves.
The lathe is bolted to the floor in the alcove to provide the best light and supplies are stored in the modular drawer system. I settled on a consistent drawer module of 30″ wide, 20″ deep with drawer slides supporting either a 6″ or 12″ drawer. Any drawer can move to any position. The counter tops are cabinet grade particleboard and I don’t hesitate to use screws into the top to hold down parts or jigs.
My workbench is supported by a single screw jack and raises over 12″. When fully lowered the wheels below the tool storage hit the floor and the workbench is fully mobile.
The router table and planer are on carts, but they are designed to lock to the end and side of the workbench and feed into a dust collection port above the workbench. While the sharpening station is a bit far from the lathe, the outfeed table is removable for easier access. The SawStop is on wheels and can be rotated to rip longer stock, although it is placed to feed right over the jointer. For long boards, I open the attic access door for jointer feed out.
The dust collection is 6” S&D pipe embedded in the ceiling and under the table saw. Unfortunately, I couldn’t afford the new dust collection until a few years after the drywall was installed, so I had to install the piping in the attic above the shop and deal with the sloping headroom. I built a penthouse into the attic to allow for the full height of the cyclone above the stairs. Almost all of the slide valves are shop built.
The sliding double bevel saw sits between two more worktops, which have modular drawers below. The vacuum is below the saw, but can roll out when needed and is held in place by the floor sweep. Jigs hang on the walls near the appropriate tools.
I primarily build furniture from ash, maple and cherry along with some bowl turnings from local downed trees. Although recently I’ve added rocking horses as a first birthday present for our two granddaughters, while each of my great nieces and nephews got a hand built wooden truck.
The post Howard’s Garage Woodshop appeared first on The Wood Whisperer.
March 19, 2015
The Uncomfortable Men’s Valet
In an effort to expand my design abilities, I decided I needed to move completely out of my comfort zone. I generally stick to styles I like. This time I challenged myself to create something from a style I am not particularly fond of-mid century modern.
I borrowed the clean aesthetics and the splayed outboard legs, but added my own touches like the exposed drawer slide, splines, and mitered drawer front construction. This was an absolute nightmare of a glue up, but I like the end result. I also enjoy the walnut and ash combination and the black leather on the top complements it well
The drawer pull is inspired by a cufflink.
Finish is a custom mixed oil/varnish blend which I find to work well on light colored species and departs a lot less tone than Danish oil or the like. After it cured, I waxed it using an old “spit polish” technique to add a subtle sheen and amazing tactile feel.
In addition, most of the work was done with hand tools, another first for me. I am pleased with the end result and taking inspiration from something not necessarily appealing to me did really open my eyes to a lot of possibilities.
The post The Uncomfortable Men’s Valet appeared first on The Wood Whisperer.
March 14, 2015
Cameron’s White Oak Cabinet
This was my Final Project for my Cabinetry and Woodworking Technology Course At Red River College. It’s made from all solid white oak, the only sheet goods used were for the bottoms of the drawer boxes, the substrates for the veneered drawer fronts, and the bottom of the case itself.
The veneered drawer fronts are Wenge for the field and Santos Rosewood for the diamond. The Greene & Greene plugs are made of Walnut.
The design is a blend of Mission and Greene & Greene styles with the design for the shape and arrangement of the door and drawer front top rails being inspired by The Wood Whisperer’s Gadget Station that he built for Leo Laporte.
The overall build time for this project was 7 weeks, with one week allotted for finishing.
All of the rail and stile connections are haunched mortise and tenons.
The finish for the case, doors, drawer fronts, drawer boxes, and shelf is 5 coats of Zinssers clear shellac thinned to a 1½lb cut. The finish for the top is 3 coats of zinssers clear shellac thinned to a 1½lb cut on the bottom side and 1 coat of nitrocellulose lacquer on the top side for a bit more protection.
The hinges are blum cliptop 107* inset hinges, and the slides are accuride 100lbs full extension drawer slides (yes i know, extremely overkill)
I spent around 2-3 months designing this piece in SketchUp before drawing it in Autocad 2013 and then building the piece in real life. There are a few things I missed out on adding due to time constraints. I was going to have some more splines and plugs along the flat edge of the top below the ogee.
In the end I’m very happy with the final product.
The post Cameron’s White Oak Cabinet appeared first on The Wood Whisperer.
Is Wood Turning A Dying Art Form? Not According to Jake!
Every few weeks, the idea that woodworking is a dying art form is discussed in a blog post, podcast, or forum. I think most people would disagree with that statement today, and I would tend to as well. But what about woodturning? Although it may not be as popular as general woodworking, turning appears to be growing in popularity and seems to be more appealing to a younger generation.
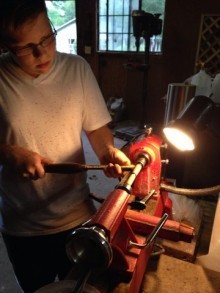 I recently met a young wood turner, Jake Guy, who is producing and selling absolutely stunning work made by hand on a lathe. When I found out he is 14, I was absolutely blown away! I wanted to learn more about how he got his start in wood turning, so I decided to interview him.
Motivation and support are two key ingredients to success, and when you add talent and dedication it’s obvious why Jake has become a very proficient wood turner in only 2 years. Jake covers the motivation, talent, and dedication parts himself, and his parents provide the necessary support to allow him to excel. Jake’s parents, Theresa and David, have helped pave the way by supporting his interests and passing on a little business knowledge as well, and Jake’s determination and craftsmanship fuel the fire.
This interview is proof positive that age has nothing to do with being passionate about your craft, or the ability to give great tips and advice!I hope you enjoy learning more about Jake and his his work, I think you’ll find this interview to be very interesting and insightful. His interview skills are excellent!
Enjoy the interview…
How and when did you get started in woodworking/turning?
I have been doing this exciting hobby since I was 12. I found that I was interested when I was at a book sale. I picked up a book titled Turning Pens by Barry Gross. I pondered a moment, wondering if I could actually make something like this. I came home to research all was involved, expenses, etc. I was so fascinated that I asked my dad about getting a lathe. He eventually said yes, and I saved my money and bought one.
What do you enjoy most about woodturning?
 I enjoy being able to take an unpretentious block of wood, turn it on my lathe, finish it with patience, and admire the color and grain of the finished product. It’s nice when other people can see the artistry and uniqueness represented in the piece and appreciate it as well!
What types of projects do you like to to make the most?
 I primarily like turning pens, single-barreled pens, to be precise. But I also enjoy making the occasional bowl.
What tips would you give beginners who are just starting out?
Making mistakes is one of the biggest parts to turning when you’re just starting. As one of my woodturning friends, Richard Pulaski, said, “If you’re not making mistakes, you’re not doing much”. Finding a local woodturning group can be extremely helpful. I wouldn’t have been able to do what I am doing today if it wasn’t for them.
What part of turning do you find the most challenging?
 On larger projects such as bowls, I find sanding to be the most difficult. On smaller projects like pens, it is preparing the blank, cutting, drilling, and glueing, because I find it the most time-consuming part of the process. And because I am really anxious to get it on the lathe and turn it.
Where do you get inspiration or design ideas for your work?
I get most of my inspiration from an amazing friend Dennis Ford. He has taught me a lot about woodturning. He has inspired me to try all sorts of shapes on a bowl such as a hollow form bowl, which I just turned a week ago. I also enjoy seeing what woodturners all over the world are creating through their photos on social media.
How long have you been selling your work, and how did you get started selling your work?
A year ago I started selling pens to friends and family that wanted to support my new venture. After I became more proficient, I started selling online. This past fall and during the holidays, I began selling my work at a local festival and a couple of different craft shows.
Do you have any tips for people who are thinking about selling their work?
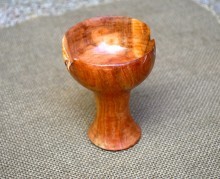 Focus on making the best product possible, and keep investing until you have the money to upgrade your equipment to make better products.
If you want to sell online, good photography is a very crucial part. Most people will judge the product by how it looks in a well-lit and composed photo.
Also, having a well-designed website is another huge part of online sales. Having a clean, easy-to-navigate site goes a long way to getting the sales you desire. Advertising online can sometimes be difficult, and that’s where social media really plays a starring role. Having a Facebook page for your business is a great idea.
I really enjoyed getting to know Jake through this interview, and I hope you did too. This is the next generation of woodturning, and it would appear that the craft is alive and well! I personally believe that as long as we all share the passion we have for our craft, it will never die out. In fact, it will only improve!
If you would like to learn more about Jake and see more of his excellent work, head on over to his website or find him on Facebook. I want to thank Jake, Theresa and David for taking the time to do this interview with me.
The post Is Wood Turning A Dying Art Form? Not According to Jake! appeared first on The Wood Whisperer.
March 10, 2015
Nik’s Mashing Fork/Rakes
Canton Brewing Company cares enough about their brewing process and supporting local craftsman that they hired me to hand make some traditional mashing forks for use in their beer production. If they care this much about the details of their tools, I can’t wait to try their brews!
They needed commercial size and robust tools but wanted them made in a traditional form. After meeting with the brewmaster, we decided on Ash as a strong and robust handle material. I selected the straightest grain Ash I had available.
I chose walnut as a secondary wood as I felt the colors complemented the Ash well. I shaped the top of the handles by hand with a rasp. All the joinery was reinforced with pins.
This was a great opportunity and quite a fun little project that’s totally different than anything I’ve ever tackled.
The post Nik’s Mashing Fork/Rakes appeared first on The Wood Whisperer.
March 7, 2015
Arts & Crafts Style Hall Tree
A few years ago, a close friend of mine was looking for a hall tree. A place where she could store shoes, jackets, hats, mittens, etc. Apparently, it was very difficult to find a hall tree that not only looked good, but was of quality construction. These friends of mine are not very fond of the “disposable” approach to furniture (that’s refreshing!).
So they asked me to design one for them. After about a year, I cleared the project queue (terrible, isn’t it! Woodworking is my #1 hobby, but then again, so is my daughter and my wife…and the house and yard upkeep, and the…you feel me), we finally dug in.
I sketched an idea that I had, in the Stickley-esque arts & crafts style, with two tone color; the dark to match their existing furniture, the light a contrast to make the piece more interesting and show off the tiger Oak.
Wood: Solid Red Oak, except for the panels which are QS White Oak
Joinery: Mortise and tenon on the bench, dados for the cubbies. Glue and dowels attaching the top to the bottom chest, and MUCH attention to the issue of expansion contraction in the directions of the woods, what is glued, etc. I used those little figure 8 hold-downs to attach the lid, so it allows for movement relative to the rigid cube chest. Most of the top is glued together because the grain direction is all the same, with the exception of the back panels which are partially glue and partially held tight with screws.
Finish: (Dark) 2 coats of Brown Mahogany/Dark Walnut mix Transtint Dye (make the wood dark), Followed by a dark Gel Stain (fill the pores, and make slightly darker), 1 rubdown with mineral spirits because OH CRAP, it was too dark!! And then 2 coats of Arm-R-Seal Semi-gloss Polyurethane.
(Tiger Oak) – 1 coat Brown Mahogany Transtint Dye, 1 coat minwax tung oil (to partially seal it), 1 coat minwax mahogany gel stain (fill pores, darken things a little), again 2 coats Arm-R-Seal semi-gloss. The Transtint dye does a great job increasing the contrast between the rays and the wood, popping the tiger striping.
What I enjoy so much about building furniture is that it has a legacy and has a daily impact in the lives of the people that own it. First the legacy of the maker, but then a legacy within the family who grow to use and love these pieces. Would love to hear everyone’s thoughts, comments, or suggestions.
The post Arts & Crafts Style Hall Tree appeared first on The Wood Whisperer.
Rabbet Joints
Rabbets are a fundamental woodworking joint and we use them extensively in frame and panel construction, case construction, and drawer construction. Knowing how to execute rabbets quickly and effectively is an essential woodworking skill. To learn more about cutting various joints using “hybrid” methodology, check out my book Hybrid Woodworking.
What Are Rabbets
You might already be familiar with the terms dado and groove which are simple recessed channels cut into a board. If the dado or groove is cut at the edge, effectively making it open-sided, you have what is known as a rabbet or a rebate for those of you on the other side of the pond.
Table Saw First
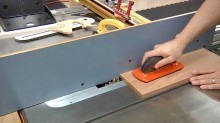 There are lots of ways to cut a rabbet, but I find the table saw to be the fastest. I use a dado stack that’s about 1/8″ wider than the desired width of the rabbet. That extra 1/8″ gets buried into a sacrificial fence that’s attached to the regular fence. Once setup, you can batch out rabbet after rabbet in a matter of seconds.
Unfortunately, this method can sometimes result in rabbets of an inconsistent dimension. This is primarily due to variances in downward pressure as well as boards that aren’t completely flat. Using a push block or some form of hold-down rollers can certainly help with this but you still might have some finessing to do for a perfect fit. That’s why I generally aim for my rabbets to be just a little bit heavy. I can then dial in the perfect fit at the workbench.
Finesse with Hand Tools
First things first: the goal here is NOT to waste time and effort. You should make your table saw cuts much like you would if you were bidding on the showcase showdown: closest without going over. This way, natural variances will cause your rabbet to range from perfect to just a bit too thick instead of perfect to just a bit too thin. So in the ideal world, this hand tool process would take no more than one or two passes and about 10 seconds per joint. A small price to pay for perfection!
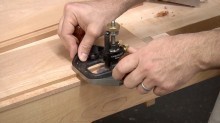 There are two tools that I recommend using and you don’t necessarily need both. The first is the Router Plane. This bad boy is incredibly handy and very easy to understand for the new hand tool woodworker. The blade sits at a fixed depth below the body much like a powered router and it’s perfect for making sure your rabbet is at a consistent depth. Simply set it at the lowest point on the rabbet and remove everything that’s higher than that.
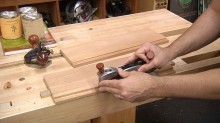 The second tool is the Shoulder Plane. The shoulder plane operates like any other plane, only it’s tall narrow body and full-width blade make it perfect for trimming rabbets. It tends to leave a smoother cut than the router plane but doesn’t have the same no-brainer depth adjustment. So I like to use the shoulder plane in conjunction with a test groove to find the high spots and quickly remove them. You could also use both of these planes in conjunction with one another, leveling the rabbet with the router plane and doing a cleanup pass with the shoulder plane.
The end result should be a slip-fit rabbet that drops into the groove like buttah!
 For more woodworking tips that incorporate both power tools and hand tools, pick up a copy of my book, Hybrid Woodworking!
The post Rabbet Joints appeared first on The Wood Whisperer.
March 6, 2015
A Great Time To Join the Guild!
Truthfully, any time is a good time for the Guild! But right now we’ve got a tremendous value for you. This is the first year we have projects that will total over $300 if purchased individually. And you can get all that for the regular 1 Year Bundle Subscription price of $129!
So here’s a quick review of what you’ll get if you sign up now:
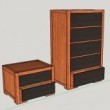 Modern Chest of Drawers & Nightstand – This project is running as we speak with a video release every Friday. It’s a two-for-one deal since you’ll get plans for creating both the Chest of Drawers and the Nightstand.
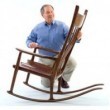 Sculpted Rocker – This is the classic Maloof-inspired sculpted rocker woodworkers know and love. We’ll be basing our design off of Charles Brock’s version of the chair. This project will begin May 2015.
Gaming/Dining Table – The design for this table is not complete at this point, but it’s going to be pretty slick. The table will look like a beautiful dining table but will feature options that turn it into a multi-functional gaming surface. Think family game night on steroids. For those who don’t play games, you can use the design as the basis for a standard dining room table. This project begins September 2015.
That’s a whole year of high quality woodworking courses valued at over $300! Even if you aren’t interested in these specific projects, I guarantee you’ll learn something! So sign up today for a Subscription Bundle to take advantage of this early bird pricing!
The post A Great Time To Join the Guild! appeared first on The Wood Whisperer.
March 4, 2015
Michael’s Nightstand/Mini Dresser
First of all, thanks to Marc for all the free content he provides. I used many of the techniques he shows in this project. Popping the curly maple figure, installing drawer pulls, and especially the table saw sled.
This is my fourth project and first with a table saw and router. Previously, I just built stuff with a Harbor Freight biscuit joiner. After getting pretty confident with cutting a straight line and gluing some wood together, I asked the girlfriend what she wanted me to make her for Christmas. She asked for a nightstand, so I drew one in sketch-up. After all with a good plan, it should only take me a couple weeks. Took about 9 months of weekends!
I started by making the drawers first. I figured since there are 9 of them, there will be a lot of very repetitive work so I might as well set up stop blocks and fences how I need them and cut them all at once. That worked out okay. I did sliding dovetails all the way around on a router table. With some chiseling and sanding, they fit together. Some were looser than others though. Before moving on to the cabinet, I finished the inside oak by wiping 2 lb shellac. This took probably a week by itself. The drawer fronts are curly maple from a board I was lucky to find at a big box store. I popped the figure with dye like Marc recommended and was really satisfied with the results. The fronts were then covered with a few wipe-on coats of poly and a full strength brushed coat on top.
The cabinet is mitered all the way around with 1/2 inch maple plywood sides and back. The poplar frame is really what holds it together though, and is done with lap joints. I made the ogee looking feet by making coves on a table saw and planing the top curve. These feet are probably what I’m most proud of in this thing.
The top is solid maple with a oak inlay finished the same way as the drawers, wipe-on poly and brush top coat. I found that I get really good results if I wet sand up to 2000 grit right before the last coat of poly.
I’m really happy overall with the way it came out. I would do a lot of things differently though. Some of which are: Build the case first and the drawers second; don’t rush to finish individual pieces before gluing the big stuff together; and don’t touch the finish before it’s dry (even if it is “probably dry”).
The post Michael’s Nightstand/Mini Dresser appeared first on The Wood Whisperer.


