
Marc Spagnuolo's Blog, page 22
February 26, 2021
Three Sketchup File Management Tips – Free Version
All of our plans for TWW and the Wood Whisperer Guild are made using Sketchup Pro. When we distribute the files to users, some folks are unable to open them because Pro files aren’t compatible with older free versions of the software like Make 2017. What many people don’t realize is that the free web version of Sketchup is a pretty powerful tool in its own right, and even if you don’t want to use it on a regular basis, you can still use it to manage/convert files. This video will show you how to do the following:
Open and navigate files in SketchUp FreeAccess your files via the cloudConvert files to an older version, such as Sketchup Make 2017If you like the cut of Brian’s jib, check out his Intro to Sketchup course in the Wood Whisperer Guild.
Looking for the old desktop version of Sketchup (SketchUp Make 2017)? Click here.
The post Three Sketchup File Management Tips – Free Version appeared first on The Wood Whisperer.


February 19, 2021
If You Can’t Be Good-Looking At Least Be Funny
00:01:10 – Welcome to the Woodworking Morning Show
00:01:32 – Thank you’s
00:06:35 – How many is too many dog holes?
00:08:00 – Outfeed Assembly Table video and plans released!
00:10:15 – How can you hide the “paper” in paper-backed veneer when looking from the side?
00:14:55 – Are you interested in the new Woodpeckers multi-function router base?
https://www.woodpeck.com/multi-functi...
00:17:25 – Is a mitered joint on a plywood cabinet a good idea?
00:19:10 – Does the adjustability on your track saw keep it hard to keep it square?
00:20:25 – What’s a good overhead tablesaw dust collection solution?
00:21:35 – Do you have a recommendation for a router table? MLCS Guild Discount
00:25:10 – Do the outfeed table plans come with guild membership?
00:26:43 – Do the wheels of your outfeed table get in the way?
00:28:13 – Are there rules for what grit to start sanding with?
00:30:00 – How can you make alder look like cherry?
00:31:55 – What are the most useful hand planes and best mid-range brand?
00:33:45 – What’s the difference between the Incra HD 1000 and Incra 5000?
00:35:10 – How do I become a full guild member?
00:38:13 – What are your thoughts on commercially made flip tables?
00:41:55 – Any tips for jointing long boards on a smaller jointer?
00:43:30 – How often do you do the live show?
00:44:00 – How can you grow your business even more?
00:45:20 – Is the guild the same as the Wood Worker’s Guild of America?
00:47:40 – Are jointer bed extensions a good idea?
00:48:45 – How was your mail order pizza?
00:50:40 – How can I run a successful woodworking business?
00:55:00 – Would you ever “upgrade” to a Sawstop?
The post If You Can’t Be Good-Looking At Least Be Funny appeared first on The Wood Whisperer.
February 17, 2021
Outfeed Assembly Table | Functional & Gorgeous
A project like this Outfeed Assembly Table makes me realize just how long I’ve been doing this whole woodworking thing. I’ve had multiple assembly and outfeed tables throughout the years. Here are the links to the old versions:
Torsion Box Assembly Table (2007)My New Assembly Table (2011)Table Saw Outfeed Table (2007)My New Outfeed Table (2011)Because I’m now in a smaller shop, I thought it would be best to design a table that served double duty, providing ample room for table saw support and plenty of real estate for assembling my projects. The icing in the cake is the thoughtfully-design base with plenty of storage and an integrated shelf for your favorite table saw sled.
The PlansIf you like what you see here and you want to purchase the plan, you can do that here. The plan is offered in both Imperial and Metric.
[image error]Outfeed Assembly Table Plan $15.00Add to cartResourcesPlease note that some of the links below include products from sponsors as well as Amazon.com affiliate links. Using our links to make your purchases helps support our efforts and we really appreciate it.
Recommended Tools
Track Saw or Circular Saw, Table Saw, Router, Flush Trim Bit, Dado Stack, Miter Gauge, Bandsaw, Drill
Bits
1/2″ Flush Trim Bit – MLCS #73991/4″ Flush Trim Bit – Eagle America #120-04021/8″ Roundover Bit – MLCS #6084Amana Countersink BitRecommended Hardware
12 – 28” Drawer Slides with Over-Travel4 Leveling Feet4 Workbench Casters4 European Style Cup Hinges6 Drawer Pulls (I got mine from Lowe’s)2 Door Knobs (Also from Lowe’s)Other Stuff I Used
Formica LaminateRockler Bandy ClampsTitebond OriginalTitebond Speed SetTitebond Polyurethane GlueMagswitch Magnets – Use the code MARC at checkout to get 10% OFF!Bench Dog Push PadsMaterials List
5BF (20% has been added) – 4/4 Hardwood Species 110 BF (20% has been added) – 4/4 Hardwood Species 2Please note that I used a couple different species of hardwood in my build but you can use only one if you like.4 Sheets – 3/4″ Plywood2 Sheets – 1/2″ PlywoodThe post Outfeed Assembly Table | Functional & Gorgeous appeared first on The Wood Whisperer.
February 12, 2021
Boogers & Strippers
Show notes coming soon.
The post Boogers & Strippers appeared first on The Wood Whisperer.
February 5, 2021
Multitasking is a Myth
00:00:43 – Welcome to the Woodworking Morning Show
00:01:00 – Social media musings – Rocky Mountain Sawblades
00:05:45 – Nicole’s mug
00:06:17 – Thanks to our new Patreon subscribers and YouTube Members!
00:07:55 – When’s the beginner project coming out?
00:09:25 – Do you flatten the whole back of a plane iron or just the tip?
00:10:23 – Do you have any opinions on butternut? How is it to work with?
00:11:25 – How can I apply Rubio to a handrail that’s attached to the wall?
00:12:50 – How does a hybrid woodworker incorporate hand planes?
00:14:55 – Have you tried the 3M Cubitron sandpaper?
00:16:05 – What spray primer can I use for under a tinted pre-catalyzed lacquer?
00:18:30 – What is the fingernail cutter bit that Philip used in the Lounge Chair?
00:19:30 – How can I keep my woodworking paperwork organized?
00:21:10 – What wood can I use to make my own wooden clamps?
00:21:42 – What’s the best way to dry and store lumber?
00:22:50 – Can I replace the L fence in Philip Morley’s videos with a flush-trim bit?
00:25:25 – Any suggestions on how to keep my cut line clear when using a jigsaw?
00:27:18 – How do you rank the projects on your to-do list and choose which to work on?
00:32:10 – Can you recommend any sources on designing pieces to be more proportional?
00:35:25 – Got my Essential Joinery book in the mail. Thanks!
00:36:10 – How can I fix a film finish that is flaking?
00:37:28 – Do you ever make scale models of your furniture first?
00:38:30 – When is the “Non-Essential Joinery” book coming out?
00:39:05 – What’s your opinion on scraping planes vs cabinet scrapers?
00:39:55 – Where do you buy your lumber?
00:40:50 – Will oil-based finishes change the tone of woods like purpleheart?
00:41:25 – When are you recording the audiobook versions of your books?
00:42:20 – How can you sand the little details in a scroll saw project?
The post Multitasking is a Myth appeared first on The Wood Whisperer.
February 1, 2021
Installing Drawer Fronts the Easy Way!
Installing drawer fronts or “false fronts” can be quite intimidating. Not only do you have to get your drawer fronts cut to the correct size, you also have to make sure the gaps between the fronts and around the perimeter are perfectly consistent. This is one of those details that often separates decent work from stellar work so it’s well worth your time to master. Luckily, there’s a simple method for installing drawer fronts that’s truly dummy-proof and the only special things you’ll need to execute it are your drawer pull hardware and some shims.
I’ve shown this technique in a couple of videos in the past, such as the Quick High-Quality Shop Cabinets video, but I wanted to make a stand-alone tip video so that it would be easier for folks to find in the future. And I can’t take credit for inventing this technique as I’m sure I heard about it in a forum years ago or read about it in a magazine. But the technique is such a game-changer, it’s worth sharing far and wide.
1. Cut your drawer fronts to size, using shims between them and around the perimeter. The fronts should be snug, but not tight.
2. Drill the holes for the hardware into each drawer front.
3. Replace the drawer fronts with the shims and attach with short panhead screws (temporarily).
4. Remove the drawers from the case and attach the drawer fronts permanently with screws from the inside. Use a countersink bit for best results.
5. Remove the temporary screws and drill the rest of the way through the drawer box for the hardware.
6. Attach the drawer pull hardware and slide the drawer back into the case.
7. Celebrate with a Cream Soda.
The post Installing Drawer Fronts the Easy Way! appeared first on The Wood Whisperer.
January 29, 2021
Morning Show Cardio
Show notes coming soon.
The post Morning Show Cardio appeared first on The Wood Whisperer.
January 22, 2021
How Do You Say, Who Cares?
00:00:43 – Welcome to the Woodworking Morning Show
00:02:54 – Thanks to our new Patreon subscribers and YouTube Members!
00:03:25 – Sale Announcement
00:04:50 – How did you decide what piece to glue in the domino connectors?
00:06:00 – What brand HVLP do you recommend?
00:07:25 – Would an outdoor tabletop last if I finish it with deep penetrating epoxy?
00:09:40 – What do you topcoat a tung oil with, if anything?
00:10:50 – Are there any plans to write another book?
00:13:20 – For the gaming table, is it ok if the legs are closer to 3″ milled?
00:15:00 – How can I repair a jewelry box that bowed so badly, the drawers no longer close?
00:19:50 – What’s your favorite method to fill oak pores?
00:21:10 – How do you like your mini-split?
00:22:43 – What’s the best way to give you support?
00:23:40 – What brand mini-split do you use?
00:24:35 – What are your thoughts on CNC vs handcrafted?
00:26:45 – What’s a good sander with a point that you can recommend?
00:27:40 – Do I need to wet the grain before finishing if using a card scraper?
00:29:15 – Do you announce the winners of this week’s guild project?
00:31:20 – Can you go over your zero clearance insert for your miter saw?
00:32:35 – Have you experimented with the Rubio colored versions?
00:33:45 – Do you use a respirator at all when using hand tools?
00:34:35 – Do you like your T1-11 wall?
00:35:30 – New guild project pre-order. Until 1/31
00:36:47 – Can I use reclaimed lumber for my workbench?
00:37:45 – What tools are must-haves to complete a guild project?
00:39:25 – How long do you let your glue dry before jointing and planing?
00:41:15 – How can I make economical 2×2’s?
00:43:15 – What’s the best wood for an outdoor barbecue frame?
00:44:22 – Do you have any experience with building quilt racks?
00:46:05 – Why are my glue up clamps lose in the morning?
The post How Do You Say, Who Cares? appeared first on The Wood Whisperer.
January 19, 2021
Epoxy Floor Makeover
If you have concrete as ugly as mine, and epoxy floor makeover might be just what the doctor ordered. My Denver, CO shop has concrete floors that have moved quite a bit over the years and as a result it developed high spots and cracks that became trip hazards. My brother in law Jay rented a diamond grinder and took down the most offensive spots, but what was left was an ugly mess of a floor. So I decided it was time to apply an epoxy floor coating.
By the way, this isn’t my first rodeo with epoxy. When I built the “Dream Shop” in Arizona, I wrote two articles about shop flooring choices and ultimately decided to go with epoxy as a base level of protection with black rubber mats in the work areas for additional comfort.
Below you can see the dramatic before and after:
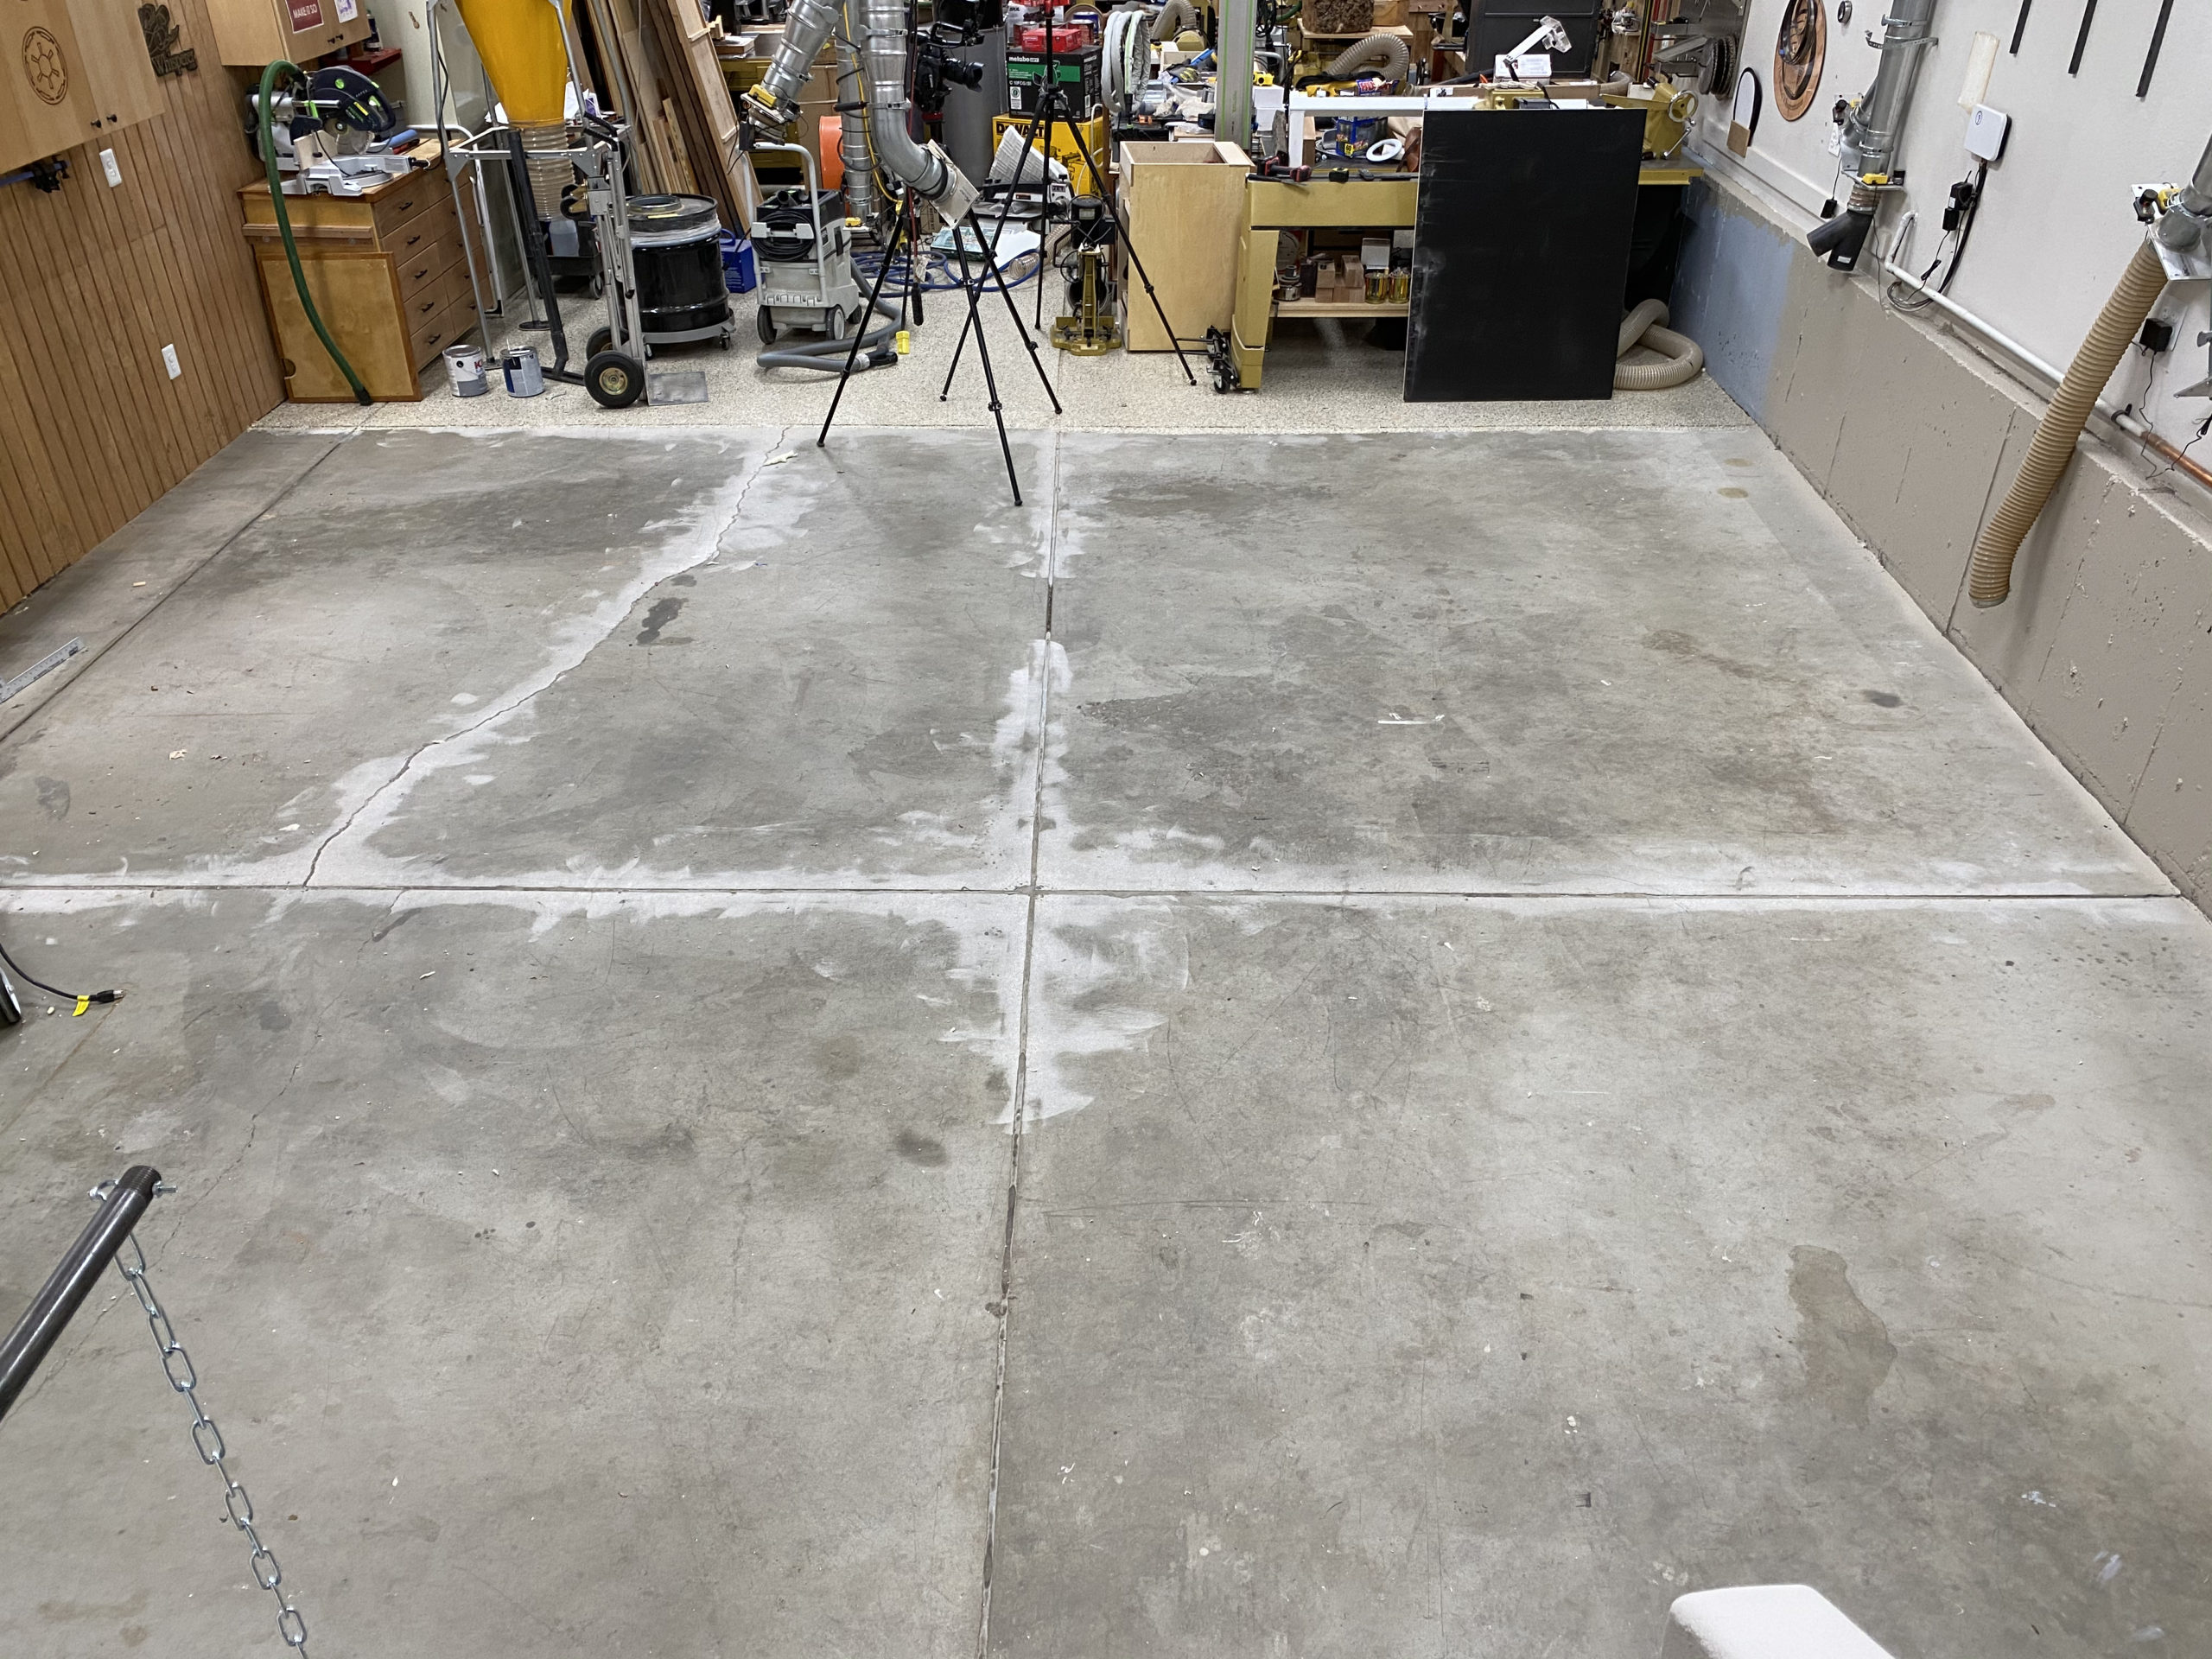
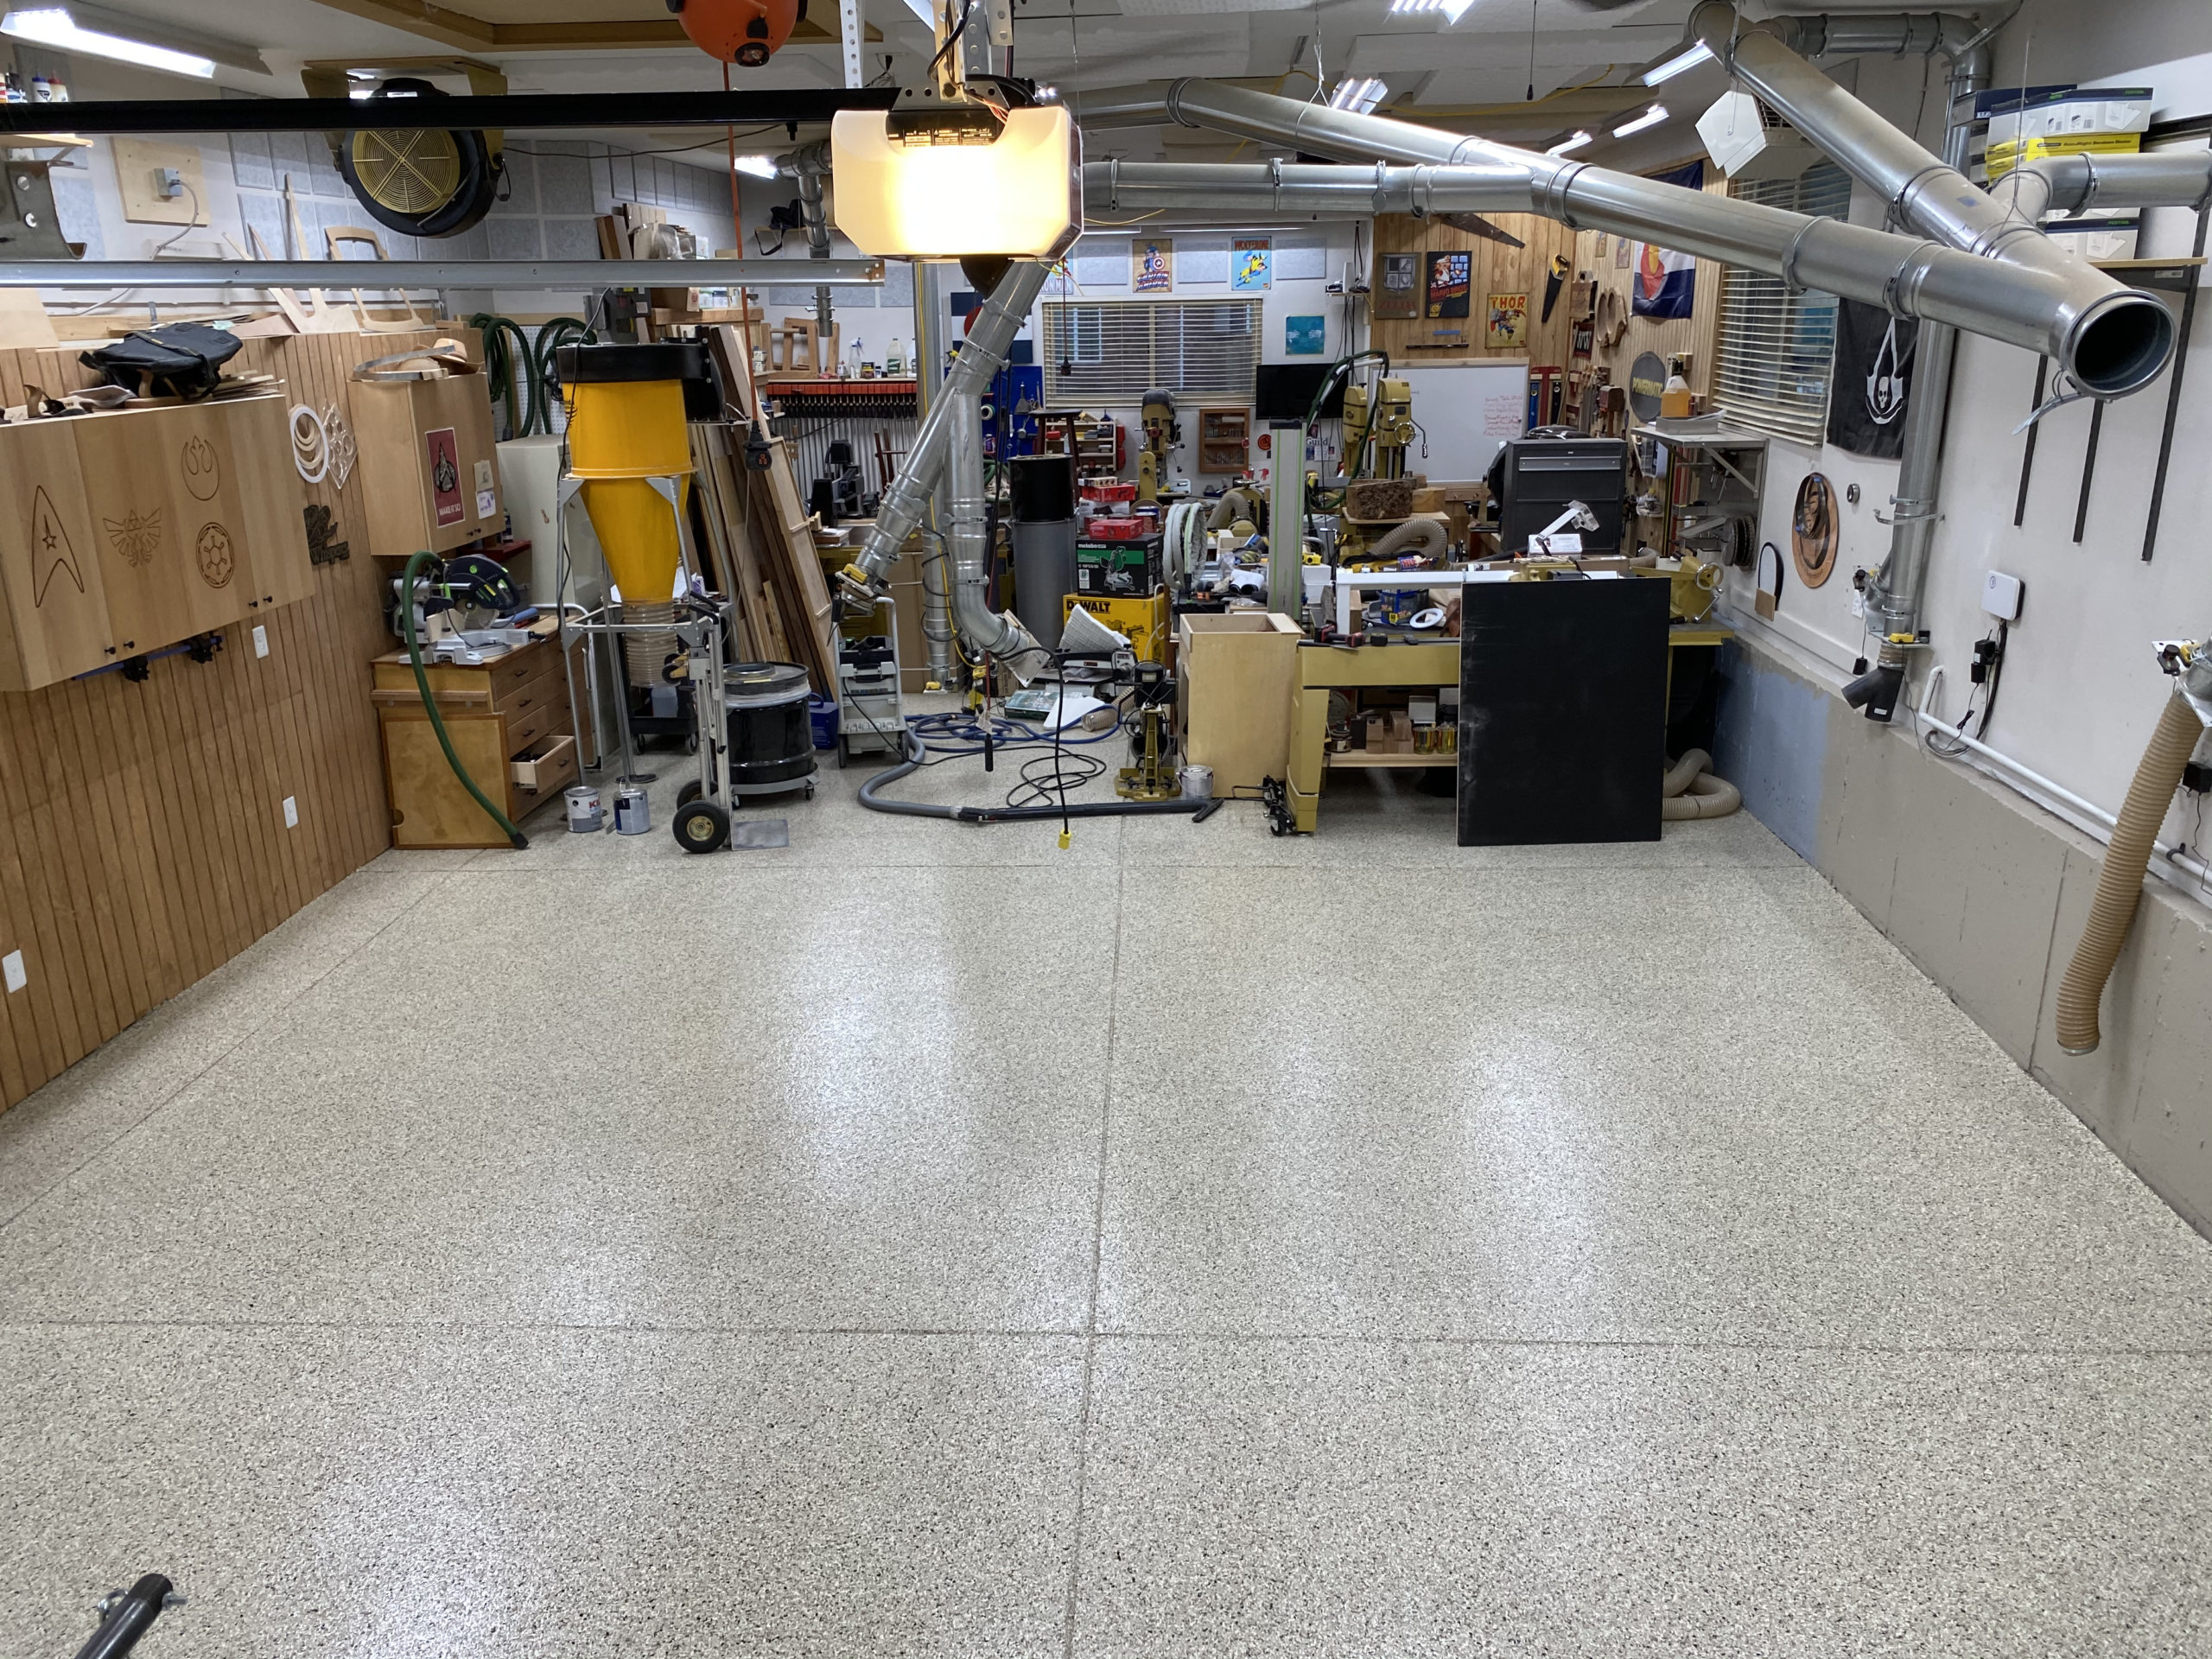
Epoxy floor coatings are fundamentally similar to the epoxy we use in our shops as an adhesive or in epoxy pours. It’s a 2-part mixture that cures via a chemical reaction and bonds to the concrete providing an attractive and durable finish. Sometimes little chips (or other stuff) can be used as a broadcast medium that sit in the wet epoxy and provide texture and more color. After the epoxy dries, a topcoat can be applied for additional durability. That pretty much describes my floor: a light tan epoxy coating with a 1/4″ broadcast medium, with a polyaspartic topcoat.
DIY or Hire a Pro?There are a lot of things to consider if you plan to go the DIY route. First, you will want to research the preparation process and decide if you’re up to the task. Old concrete is usually worn, stained, cracked and damaged so you’ll need to fill the cracks and remove the stains. In order for the epoxy to bond effectively, the pores need to be opened up and you can’t have anything contaminating the surface. Most DIY’ers will do an acid etch. This involves applying an acid solution to the concrete and then rinsing it away. In my shop, this was a no-go because two of my garage doors are sealed shut so there’s nowhere for the water to go. Also keep in mind that acid etching isn’t a perfect process and isn’t nearly as effective as what the pros do: diamond grinding. The grinding abrades the top layer of the concrete, cleaning it and opening up the pores all in one shot. You can rent these machines if you’re adventurous but be prepared for a dust party. Even with proper dust collection these tools can produce oodles of incredibly dangerous concrete dust particles. A respirator is mandatory if you plan on continuing to use your lungs for a while.
After the prep work is complete, the epoxy is mixed and applied. While it’s not incredibly difficult to do this work, there are tools and techniques that help the process go smoothly and I’m sure you can find all of that info and gear online. But there’s definitely a nuance to the process since it’s not quite as forgiving as painting a wall. And remember, the fumes from the epoxy are brutal. Once again, a respirator is mandatory. Speaking of the epoxy specifically, keep in mind that the pros have access to a higher quality epoxy than the stuff we can get at home centers.
For me, the choice was obvious: I hired a pro. Between the challenges in preparation, the safety issues involved, and the fact that I want the coating to last as long as possible, I couldn’t justify going DIY.
How to Apply Epoxy with a Shop Full of Tools?If you have the budget and means, the easiest thing to do is to get the tools out of the shop completely. That means you need either a safe covered storage area or you’ll need to rent something like a POD. In my case, I don’t have the storage area and a POD was out of the question because they’re not flush with the ground. Many of my tools weigh in excess of 500 lbs and getting them up a 6″ step is a daunting task. So I opted to break the project up into two phases. This extended the total length of the project and required me to move my tools a total of THREE times, but in the end it worked out just fine. Thankfully, it’s Winter right now and it wasn’t difficult to find a flooring company willing to break the job up into two parts. It was also fortunate that I have a tool:space ratio that allows all of my tools to fit in one half of the shop when arranged like Tetris pieces.
What Does an Epoxy Floor Do For You?A lot of folks will dismiss an epoxy coating as merely aesthetic. There’s no doubt it really dresses up the space nicely, but there are functional reasons for an Epoxy Floor Makeover. An epoxy floor is very easy to clean, whether by vacuum or broom. Since the surface is sealed, the floor is stain resistant and spills are easy to clean up. And because the floor is lighter in color and slightly reflective, the space becomes brighter and more inviting. Also consider that an epoxy floor coating with no additives can actually be quite slippery and hazardous. But with the addition of broadcast medium and grit, the floor takes on more of an “anti-slip” quality. Finally, while I don’t have plans to move any time soon, an epoxy floor can help boost resale value.
How Much Does it Cost?I’m sure this is something that will vary dramatically depending in the company, the region, the materials they use, and maybe even the time of year. In my case the price was about $4.75/sq ft. Obviously if you go the DIY route it’s going to be much cheaper but make sure you factor in the potential equipment purchases and rentals.
In the end, I do feel an epoxy floor coating fits firmly into that “luxury” category. It is by no means a necessity. If you’re setting up a new shop and the budget is tight, I’d rather see you get the tools you need instead of improving the shop floor. But when the budget is there and your tool needs are satisfied, an epoxy floor coating can be a real nice shop upgrade.
The post Epoxy Floor Makeover appeared first on The Wood Whisperer.
January 15, 2021
Don’t Micromanage Your Microbevels
00:01:40 – Good morning, it’s the Woodworking Morning Show
00:01:45 – Thanks to our Patreon subscribers and YouTube Members!
00:04:37 – Post-Holiday Update
00:06:30 – How can I keep my bevel flat while sharpening?
00:12:00 – What does 2021 look like for the guild? Morely Lounge Chair pre-order ends Jan 31st
00:16:45 – Do you still do consultations?
00:18:00 – Have you changed your stance on personal air filtration?
00:19:18 – How much space do you need on either side of your miter station?
00:21:13 – Any info on the new double square from Woodpeckers?
00:21:35 – What was the cost to do your floor?
00:24:20 – Any chance you’ll reload the old wood whisperer morning shows?
00:25:20 – How should I plan outlets for my shop?
00:30:00 – How can you snug up a jointer knife without moving on the final snug?
00:31:45 – What are your thoughts on the economy of buying 8/4 and resawing instead of buying thinner material?
00:33:35 – What are some tips for installing an air filtration unit?
00:37:20 – Can you thicken up TotalBoat to use as a glue instead of filling?
00:39:20 – Have you ever considered adding metalworking to your repertoire?
00:42:20 – Can you do an epoxy pour thicker than the recommended or will it never cure?
00:45:45 – Have you ever done a full blind dovetail?
00:47:30 – How do you get back in the groove when you’re burnt out?
00:50:37 – Have you ever thought about using Fusion360?
00:52:08 – How can I finish a live edge waterfall project?
00:56:20 – When is WoodTalk coming back?
Products recommended by Marc
https://www.amazon.com/shop/thewoodwhispererCanada! http://amazon.ca/shop/thewoodwhisperer
Woodworking Morning Show as an audio podcast
The post Don’t Micromanage Your Microbevels appeared first on The Wood Whisperer.


![[image error]](https://thewoodwhisperer.com//280221-868553-raikfcquaxqncofqfm.stackpathdns.com/wp-content/uploads/Screen-Shot-2021-02-01-at-2.43.57-PM-scaled.jpg)
![[image error]](https://thewoodwhisperer.com//280221-868553-raikfcquaxqncofqfm.stackpathdns.com/wp-content/uploads/Screen-Shot-2021-02-01-at-2.46.40-PM-scaled.jpg)
![[image error]](https://thewoodwhisperer.com//280221-868553-raikfcquaxqncofqfm.stackpathdns.com/wp-content/uploads/Screen-Shot-2021-02-01-at-2.48.44-PM-scaled.jpg)
![[image error]](https://thewoodwhisperer.com//280221-868553-raikfcquaxqncofqfm.stackpathdns.com/wp-content/uploads/Screen-Shot-2021-02-01-at-2.49.54-PM-scaled.jpg)
![[image error]](https://thewoodwhisperer.com//280221-868553-raikfcquaxqncofqfm.stackpathdns.com/wp-content/uploads/Screen-Shot-2021-02-01-at-2.51.23-PM-scaled.jpg)
![[image error]](https://thewoodwhisperer.com//280221-868553-raikfcquaxqncofqfm.stackpathdns.com/wp-content/uploads/Screen-Shot-2021-02-01-at-2.53.30-PM-scaled.jpg)
![[image error]](https://thewoodwhisperer.com//280221-868553-raikfcquaxqncofqfm.stackpathdns.com/wp-content/uploads/IMG_5908.jpeg)