
Marc Spagnuolo's Blog, page 21
April 8, 2021
Build a Blanket Ladder with Nicole | Great for Beginners!
As you probably know, The Wood Whisperer has always been focused on mid to high level woodworking. I like to think we are welcoming to beginners as well but rarely do we make content aimed directly at a person who has almost no tools and no experience in the shop. That is, until now. With the help of my wife Nicole, who stands in as “the beginner”, we’ll show you how to make a simple but elegant blanket ladder using a very small and basic set of tools. In fact, the entire set costs less than $500 and will serve you well on future projects too. While Nicole has been around woodworking for the last 15 years, she has almost no personal experience. Her questions guide the discussions and should prove useful to anyone who is new to the craft. This video is LONG with a lot of conversation and explanation. If this isn’t your cup of tea, consider sharing the video with someone you’d like to see get into the craft. We feel this is an excellent starting point.
In the video we reference two other videos you might want to check out: Block Plane Tune-Up and Applying Rubio to Furniture.
Download the FREE PlansThese plans feature measured drawings and a cut list.
Imperial PlanMetric PlanTools We UsedThe list below represents the tools I selected specifically for this beginner series. Many of them maybe be things you already have in your house or garage and all of them can be used again on future projects.
Miter Saw – Used to cut the boards to length as well as adding the angles to the bottom of the vertical ladder pieces.Hand Saw – Used to cut the long angles at the top of the vertical ladder pieces. This Japanese pull saw features two sides: one for finer cross-cuts and one for more aggressive rip cuts.Random Orbit Sander – A random orbit sander is capable of smoothing the surface without leaving noticeable scratch marks. Purchase 180 grit sandpaper.Block Plane – Inexpensive block planes often need some tuneup. Learn how to do that here.Cordless Drill –�� A basic cordless drill is an asset to any wood shop.Brad Point Bit Set�� – We only use a 3/8″ bit for this project but it obviously makes a lot more sense to buy a set if you don’t already own one.24″ Clamps – You’ll want four of these. If you’re looking for a bargain in clamps, check out your local Harbor Freight store.Glue – Titebond 3 – Any wood glue will work but this is what I use most often.Preppin’ Weapon Sanding Block – Purchase 180 grit sandpaper.Tape Measure – Pretty much any tape measure will do.6″ Combination SquareClear ProtractorDowels – This is a mix of dowel sizes but all you need for this projects are sixteen 3/8″ dowels.Dead Blow Hammer – Not a necessity but sure nice to have.Watco Danish Oil – While I used a product called Rubio Monocoat, I really recommend something like this for beginners.MaterialsIf purchasing pre-surfaced material from the big box store, you’ll want THREE 1 x 3’s. Although they are called “one by threes”, their actual dimensions will usually be smaller and the thickness will actually be 3/4″, which is exactly what we want for this project.�� You will then cut those three boards into the following pieces. Be sure to consult the PDF plan for more detail.
(2) Vertical Sides – 72″L x 3″W x 3/4″T(4) Ladder Rungs – 20 1/2L x 3″W x 3/4″TThe post Build a Blanket Ladder with Nicole | Great for Beginners! appeared first on The Wood Whisperer.


Easy Blanket Ladder | For Beginners
As you probably know, The Wood Whisperer has always been focused on mid to high level woodworking. I like to think we are welcoming to beginners as well but rarely do we make content aimed directly at a person who has almost no tools and no experience in the shop. That is, until now. With the help of my wife Nicole, who stands in as “the beginner”, we’ll show you how to make a simple but elegant blanket ladder using a very small and basic set of tools. In fact, the entire set costs less than $500 and will serve you well on future projects too. While Nicole has been around woodworking for the last 15 years, she has almost no personal experience. Her questions guide the discussions and should prove useful to anyone who is new to the craft. This video is LONG with a lot of conversation and explanation. If this isn’t your cup of tea, consider sharing the video with someone you’d like to see get into the craft. We feel this is an excellent starting point.
In the video we reference two other videos you might want to check out: Block Plane Tune-Up and Applying Rubio to Furniture.
Download the FREE PlansThese plans feature measured drawings and a cut list.
Imperial PlanMetric PlanTools We UsedThe list below represents the tools I selected specifically for this beginner series. Many of them maybe be things you already have in your house or garage and all of them can be used again on future projects.
Miter Saw – Used to cut the boards to length as well as adding the angles to the bottom of the vertical ladder pieces.Hand Saw – Used to cut the long angles at the top of the vertical ladder pieces. This Japanese pull saw features two sides: one for finer cross-cuts and one for more aggressive rip cuts.Random Orbit Sander – A random orbit sander is capable of smoothing the surface without leaving noticeable scratch marks. Purchase 180 grit sandpaper.Block Plane – Inexpensive block planes often need some tuneup. Learn how to do that here.Cordless Drill –�� A basic cordless drill is an asset to any wood shop.Brad Point Bit Set�� – We only use a 3/8″ bit for this project but it obviously makes a lot more sense to buy a set if you don’t already own one.24″ Clamps – You’ll want four of these. If you’re looking for a bargain in clamps, check out your local Harbor Freight store.Glue – Titebond 3 – Any wood glue will work but this is what I use most often.Preppin’ Weapon Sanding Block – Purchase 180 grit sandpaper.Tape Measure – Pretty much any tape measure will do.6″ Combination SquareClear ProtractorDowels – This is a mix of dowel sizes but all you need for this projects are sixteen 3/8″ dowels.Dead Blow Hammer – Not a necessity but sure nice to have.Watco Danish Oil – While I used a product called Rubio Monocoat, I really recommend something like this for beginners.MaterialsIf purchasing pre-surfaced material from the big box store, you’ll want THREE 1 x 3’s. Although they are called “one by threes”, their actual dimensions will usually be smaller and the thickness will actually be 3/4″, which is exactly what we want for this project.�� You will then cut those three boards into the following pieces. Be sure to consult the PDF plan for more detail.
(2) Vertical Sides – 72″L x 3″W x 3/4″T(4) Ladder Rungs – 20 1/2L x 3″W x 3/4″TThe post Easy Blanket Ladder | For Beginners appeared first on The Wood Whisperer.
April 2, 2021
I Don’t Want Your Tips!
Become a YouTube member and gain access to our bonus aftershow or if you prefer Patreon
00:00:35 – Welcome back to the Woodworking Morning Show
00:01:38 – Schedule Change Announcement!
00:02:45 – New iPhone holder project!
00:04:17 – Block plane tune-up video Find new videos on our Amazon Store
00:07:07 – Do you ever use quick-change collets for your routers? https://www.amazon.com/vdp/71b6bbe044...
00:08:03 – Giveaway today! Use the code MARC25 at https://parcilsafety.com/ until April 16th for 25% your order
00:08:40 – Thanks to our Patreon and YouTube members
h00:10:20 – Is a parallelogram jointer worth the upgrade?
00:12:55 – Are quick-change collets standard?
00:13:20 – Is prefinished plywood ok for cabinets?
00:14:00 – What are your favorite router accessories?
00:15:30 – Which three furniture designers would you take to dinner?
00:18:05 – How can I design a pizza “rocker” cutter with a wooden handle to be safe to use?
00:18:53 – Powermatic’s 100 year anniversary!
00:20:25 – Is pre-primed pine ok for a face frame for cabinets?
00:22:50 – What order do you suggest buying the “big ticket” items for woodworking?
00:26:52 – Is there any sag on your router table due to the weight of the router?
00:29:00 – Did you finish your blacker house chair?
00:30:04 – Is the dado stack a safe tool to use?
00:31:10 – What’s a good 3M filter for paint? or these
00:33:10 – Giveaway time from Parcil Safety!
Use the code MARC25 until April 16th for 25% your order
00:42:40 – Congratulations!
00:43:30 – What is the dumbest mistake you’ve recently made?
New time starting next week! Thursday Evening Friday Morning Show!
We started our live show in 2014 as a community-focused Q&A show featuring me (Marc) and my wife Nicole as a way to connect with other woodworkers each week. It’s a lot of fun and a great way to share thoughts and ideas with your fellow woodworkers.
Join us each week at 11:30 Eastern and be sure to subscribe and click the bell notification to get an email when we publish a new video or go live.
Searchable Spreadsheet for past episodes of The Woodworking Morning Show https://docs.google.com/document/d/1Q...
Looking for the products and tools Marc uses and recommends?
You can find them at our Amazon stores:
US – https://www.amazon.com/shop/thewoodwh...
Canada – https://www.amazon.ca/shop/thewoodwhi...
UK – https://www.amazon.co.uk/shop/thewood...
The post I Don’t Want Your Tips! appeared first on The Wood Whisperer.
March 26, 2021
$40 Block Plane | Tune-up & Sharpening
A block plane is a simple and fundamental woodworking tool. I think it’s probably the first hand plane most of us purchase when we’re just getting started. Unfortunately, unless you spend $100-$200, the plane will not come prepared for peak performance. With some time, a little sandpaper, a sharpening stone and some sweat equity, you should be able to get more performance out of just about any block plane. In this video, I took a brand new Stanley Low Angle Block Plane and gave it a little love. The end results looks better, feels better, and cuts better and that’s about all we can ask out of a $40 block plane.
Stuff I Used:Stanley Low Angle Block Plane��Sharp Pebble 2-Sided Sharpening StoneHoning GuideThe post $40 Block Plane | Tune-up & Sharpening appeared first on The Wood Whisperer.
March 18, 2021
Classy Headphone Controller Rack
When I looked around at headphone and controller racks to go with my RGB Gaming Desk, the products I found were either 3D printed plastic or large stands that took up valuable desk space. So I decided to design a classy-looking wall-mounted rack that would happily hold and display my controller and headphones. I started by making sure the utility was there and then shaped the parts with curves I found appealing. It’s a great addition to my PC gaming setup. If you don’t have the time or tools to build your own using the free plans below, you can buy one from us for a limited time. These actually take a lot more work than anticipated so I don’t know how long we’ll continue making them so get ’em while you can!
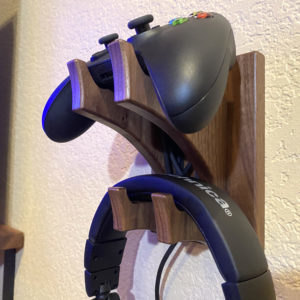 Headphone/Controller Rack $50.00Select optionsDownload the PlansImperialMetricCNC DXF File
The post Classy Headphone Controller Rack appeared first on The Wood Whisperer.
March 12, 2021
Marc Invented It
00:00:40 – Welcome to the Woodworking Morning Show
00:01:25 – Thanks to our Patreon and YouTube members!
00:02:25 – New RGB gaming desk video!
00:05:52 – How can I stabilize punky wood?
00:06:40 – Are bow tie splines necessary for stabilizing cracks?
00:07:10 – Circle templates in stock!
00:09:15 – Coupon code for Total Boat!
00:10:15 – Does your recommendation on waiting until buying still stand with current backorders?
00:13:05 – Is there a concern for not finishing the inside of drawers?
00:14:25 – How much more mileage do you get out of Rubio vs teak oil?
00:16:23 – What Rubio do you use?
00:17:25 – How much snow are you expected to get this weekend?
00:18:18 – How can I drill a hole in a board thicker than my drill press travel?
00:19:44 – What type of glue do you use when you use a vacuum bag?
00:22:07 – Do you ever use CA glue as a temporary hold when gluing things in place?
00:24:15 – What finish would you recommend for a bed made out of maple?
00:25:45 – Did you do any soundproofing in your shop?
00:29:48 – Do I need to worry about oil from finish leeching from frames onto artwork?
00:31:30 – 3D printed object showcase!
00:33:28 – How do you remove the replaceable top from your outfeed assembly table?
00:32:25 – Are you going to AWFS if it happens?
00:35:30 – What 3D printer did you end up getting?
00:36:18 – How’s the bandsaw blade working out?
00:37:00 – Is there a follow-up to some shop projects you’ve done?
00:40:20 – What router do you have in your router table?
00:41:00 – Do you plan to do any more classes with William Ng?
00:43:00 – What happened to Porter Cable routers?
00:44:55 – Is the Wood Whisperer available on Amazon Prime in Canada?
00:45:20 – What do you think about Felder?
The post Marc Invented It appeared first on The Wood Whisperer.
March 11, 2021
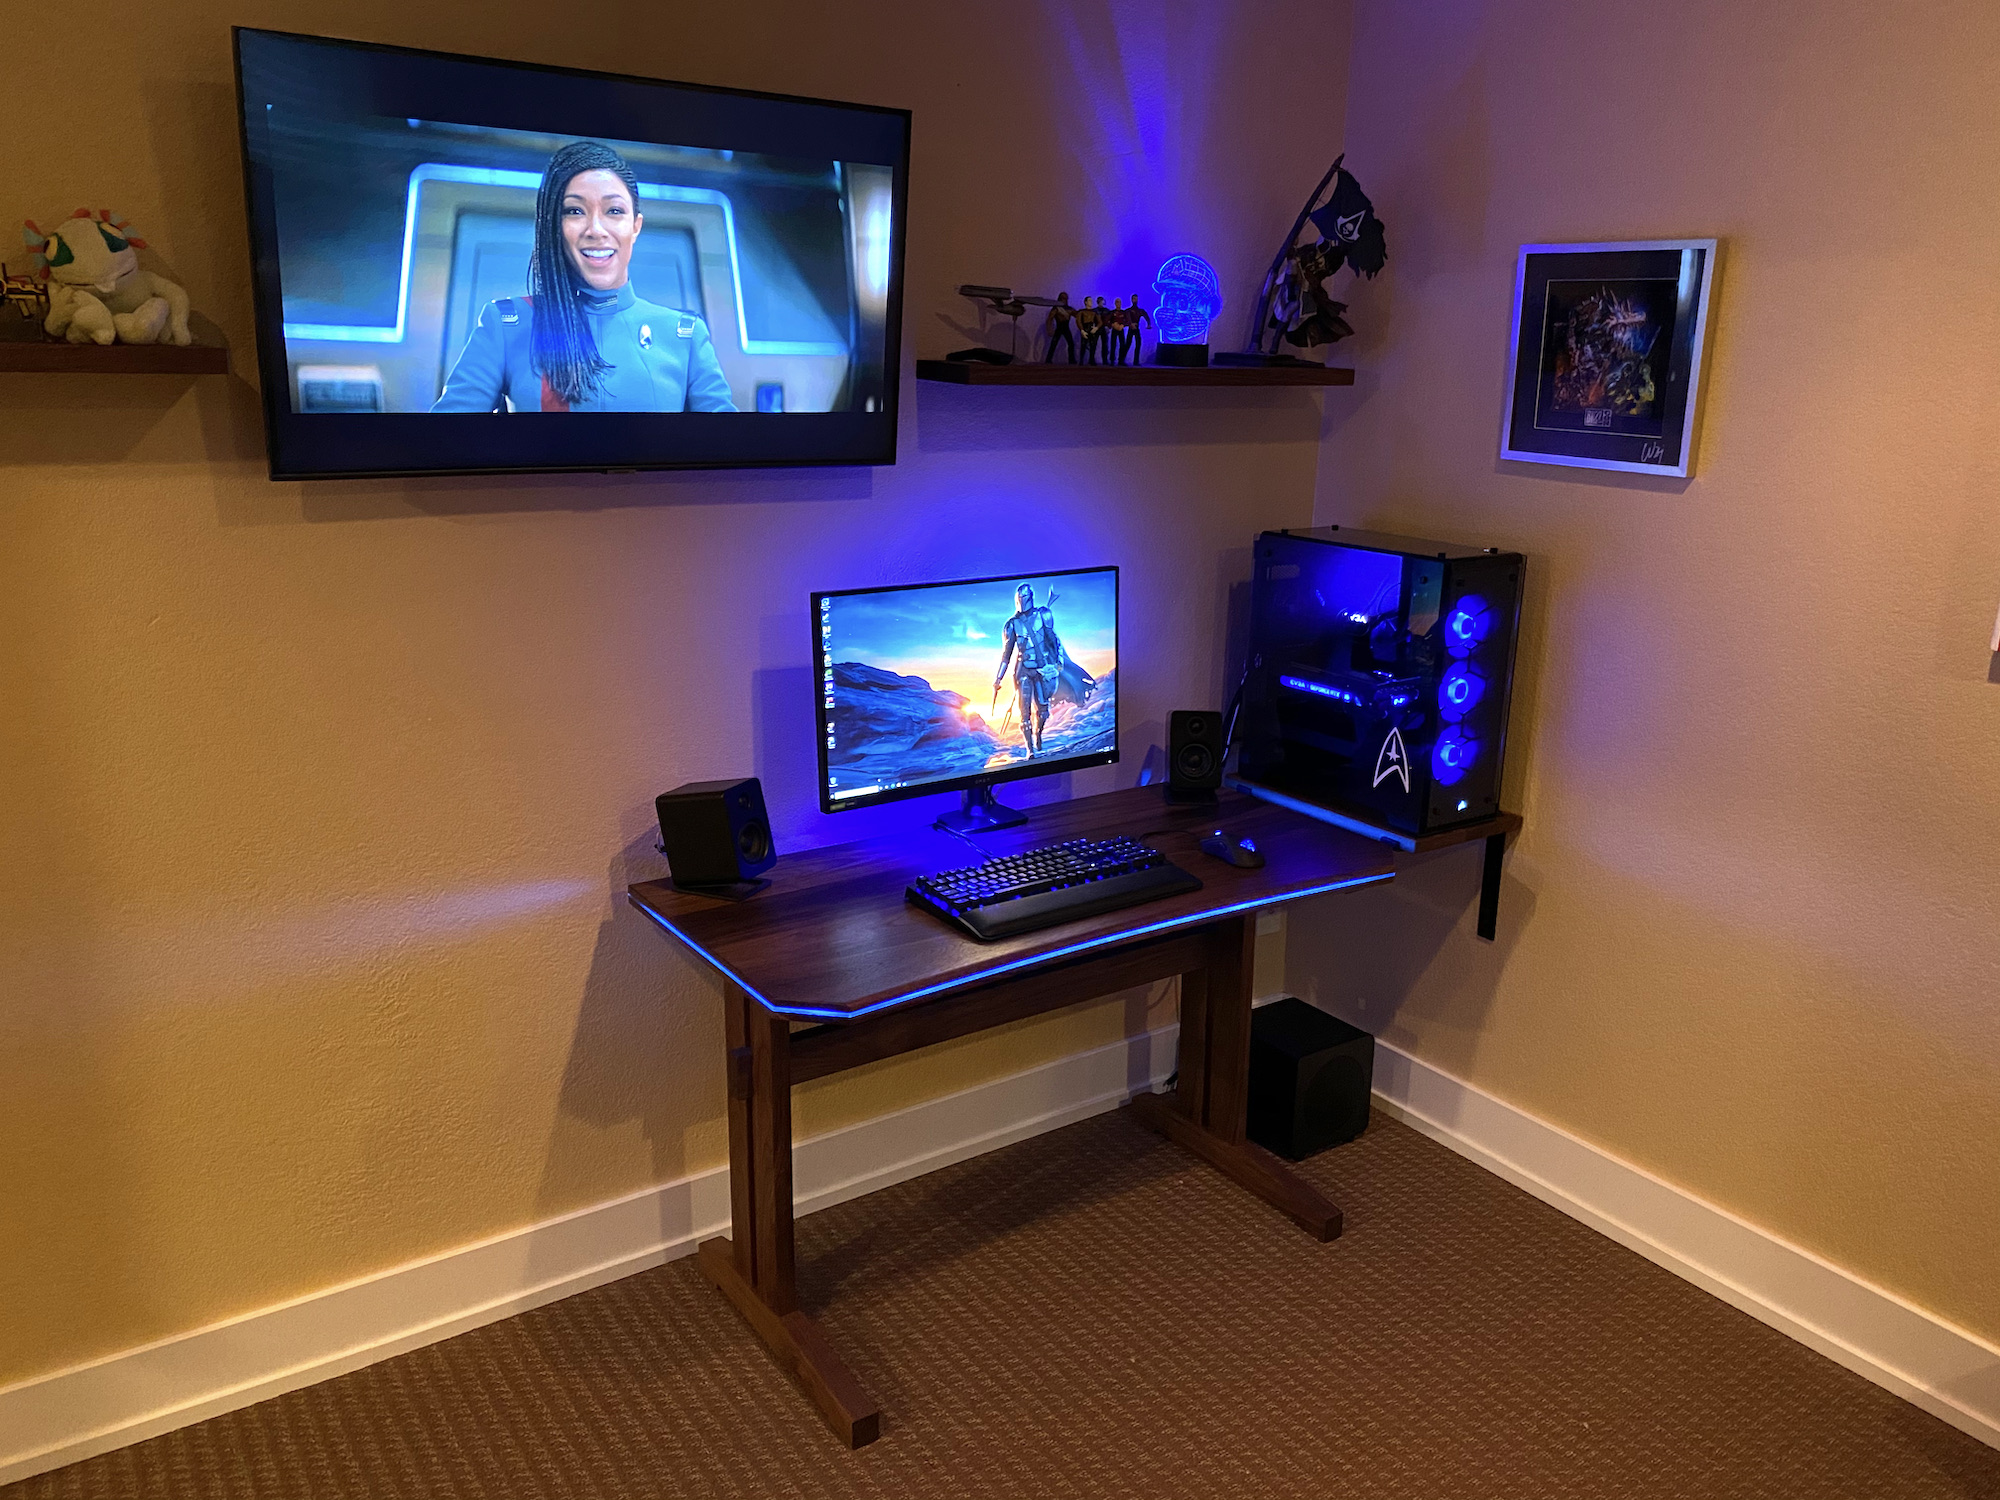
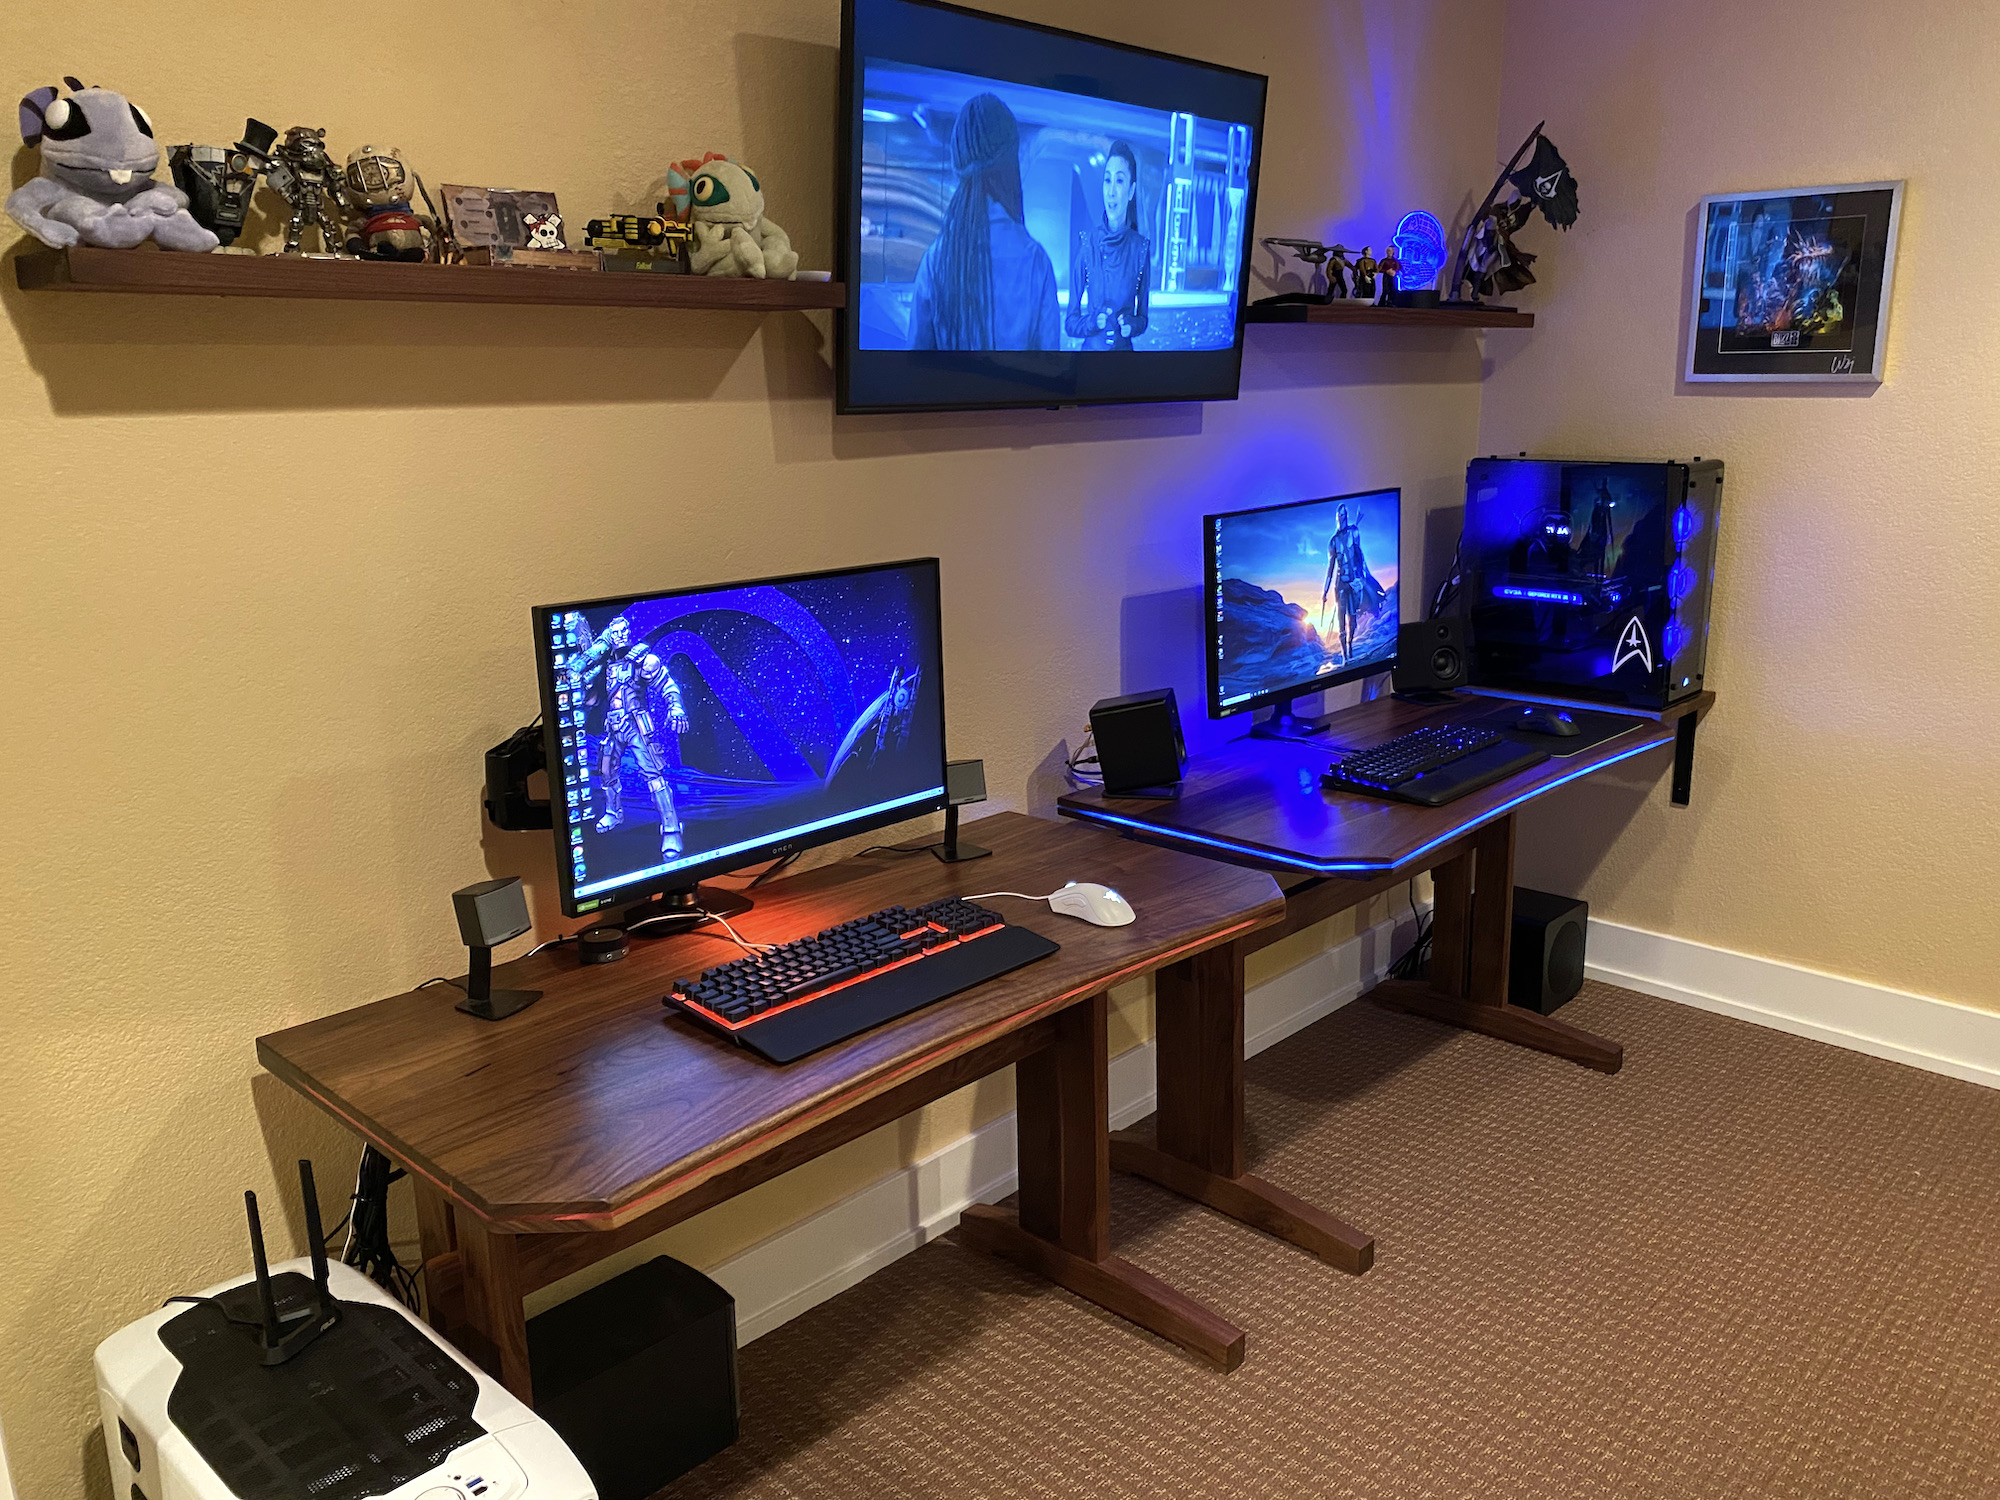
RGB Gaming Desk
Warning! This video is less of a how-to and more of a process documentary. There’s a lot of talking, pontificating, thinking out loud, and general yappin’. I had to work through some challenges as I built the RGB top and I don’t pull any punches on the materials and tools I used to make it. I hope you enjoy this slightly different style of video.����
You don’t have to spend too much time around Nicole and me to find out that we’re avid gamers. Whether it’s on consoles, mobile, or PCs, we’re nearly always playing something after the kids go to bed. And our gaming history goes back to the day we met, which I won Nicole over by showing her my shiny new Sega Dreamcast. A lot of time has passed since then and I just recently picked up a new PC from Doghouse Systems. They’re a sponsor of this episode by the way. Use the code WOODWHISPERER for a free SSD Upgrade. Because I had this new badass PC, I felt it was time to upgrade our gaming desks. Inspired by the trestle base designs seen in many modern metal and plastic gaming desks, I set out to create something more elegant and hopefully include RGB lighting in a way that’s tasteful. It was also important to me that the desk continue to look nice even if the RGB isn’t used, since as trends evolve I imagine one day we’ll all look back and thing, “WTF with all that RGB?!”
The desk features a set-back trestle base that allows for plenty of leg room. The top has lots of surface area for a big monitor, speakers, and any other peripherals you might need. At the back I installed a large tray for cable management. It’s as comfy as it is beautiful.
Looking for the video on keeping panels flat? Watch here!��
Download the Free PlansImperialMetricStuff I UsedTotalBoat EpoxyNeon Rope LightsTitebond II DarkTitebond II ExtendTitebond Polyurethane GlueMLCS Roundover Bits #6084MLCS 3/8″ Straight Bit #7467Plastic SpreadersWhite Charcoal PencilsGet your TWW Card Scraper!��Magnate Thumbnail BitPreppin’ Weapon Sanding Block3/8″ Tapered Plug CutterPretty Pictures

The post RGB Gaming Desk appeared first on The Wood Whisperer.
RGB Gaming Desk | Not DIY!
Warning! This video is less of a how-to and more of a process documentary. There’s a lot of talking, pontificating, thinking out loud, and general yappin’. I had to work through some challenges as I built the RGB top and I don’t pull any punches on the materials and tools I used to make it. I hope you enjoy this slightly different style of video.����
You don’t have to spend too much time around Nicole and me to find out that we’re avid gamers. Whether it’s on consoles, mobile, or PCs, we’re nearly always playing something after the kids go to bed. And our gaming history goes back to the day we met, which I won Nicole over by showing her my shiny new Sega Dreamcast. A lot of time has passed since then and I just recently picked up a new PC from Doghouse Systems. They’re a sponsor of this episode by the way. Use the code WOODWHISPERER for a free SSD Upgrade. Because I had this new badass PC, I felt it was time to upgrade our gaming desks. Inspired by the trestle base designs seen in many modern metal and plastic gaming desks, I set out to create something more elegant and hopefully include RGB lighting in a way that’s tasteful. It was also important to me that the desk continue to look nice even if the RGB isn’t used, since as trends evolve I imagine one day we’ll all look back and thing, “WTF with all that RGB?!”
The desk features a set-back trestle base that allows for plenty of leg room. The top has lots of surface area for a big monitor, speakers, and any other peripherals you might need. At the back I installed a large tray for cable management. t’s as comfy as it is beautiful.
Looking for the video on keeping panels flat? Watch here!��
Stuff I UsedTotalBoat EpoxyNeon Rope LightsTitebond II DarkTitebond II ExtendTitebond Polyurethane GlueMLCS Roundover Bits #6084MLCS 3/8″ Straight Bit #7467Plastic SpreadersWhite Charcoal PencilsGet your TWW Card Scraper!��Magnate Thumbnail BitPreppin’ Weapon Sanding Block3/8″ Tapered Plug CutterPretty Pictures
The post RGB Gaming Desk | Not DIY! appeared first on The Wood Whisperer.
March 5, 2021
Too Talented For YouTube
00:00:40 – Welcome to the Woodworking Morning Show
00:00:50 – Employee Appreciate Day!
00:02:10 – Thank you to our Patreon and YouTube members
00:03:25 – Marc’s read-along!
00:06:15 – Is there a general rule of thumb for overhang for legroom at the ends of tables?
00:08:10 – What degree smoothing plane should I get?
00:10:25 – How can I protect the top surface of my MDF torsion box assembly table?
00:12:25 – What big tool should I get it next? Upgrade existing or new?
00:14:52 – What is your opinion on electric hand planers?
00:17:30 – How can I align the tape to the right and to the left of the blade on my T tracks?
00:19:05 – Do you ever use bench cookies?
00:19:55 – What Laguna bandsaw would you buy for resawing lumber?
00:20:38 – What do you think the minimum thickness of a desktop would be?
00:22:50 – What are your thoughts on epoxy in cutting boards?
00:26:35 – Which guide rail square do you use for your track saw?
00:28:10 – How do you adjust your finishing process for how “thirsty” a wood is?
00:31:52 – What’s the best finish for an outdoor finish project?
00:34:27 – Where would you rate tong oil as an outdoor finish?
00:36:10 – What wood should we use for outdoor furniture?
00:37:20 – Should I get a cheap miter saw and table saw or a moderately expensive tablesaw?
00:40:10 – Is teak oil just a tung oil mixture?
00:41:20 – What is the aftershow like?
00:42:00 – Would you recommend the mobile base for bigger tools?
00:43:20 – What table saw blade do you use?
00:46:30 – How can I use a domino to make a panel for a cabinet for my hand tools?
00:47:34 – What is your preferred method to joint and plane curly hard maple?
00:49:35 – Can you “cut corners” when picking out a miter saw?
The post Too Talented For YouTube appeared first on The Wood Whisperer.
February 26, 2021
Marc Made Her Cry
00:01:00 – Welcome to the Woodworking Morning Show
00:01:13 – Thank you to our Patreon and YouTube members
00:04:05 – Leather aprons back in stock!
00:04:32 – Do you still make the planer brackets?
00:05:15 – New Sketchup Video!
00:05:55 – When will you compare your new Mirka sander to your Festool?
00:07:20 – What’s a good budget table saw?
00:08:10 – Blanket ladder preview
00:10:25 – Did you do any sanding/finishing to the T1-11 wall?
00:12:13 – What’s a good standard for workbench height?
00:14:18 – How long should you have your tracksaw guide rail for ripping 8′ plywood sheets?
00:15:45 – Is a 7/8″s thick desktop ok for a mid-century modern desktop?
00:18:50 – Just wanted to give a shoutout to your books!
00:19:40 – Do you have a recommendation on a laser engraver?
00:20:10 – Any tips on how to keep my cuts on a table saw with a miter gauge square?
00:22:25 – What kind of wood rasps do you recommend?
00:24:15 – What’s the best way to glue up a live edge dining table?
00:26:00 – Any suggestions on plans for dining room chairs? Matt’s chair kits
00:28:40 – Would you include a center divider and back panel if making a nightstand similar to the chest of drawers?
00:30:16 – What’s the difference between using a vertical sled vs coping sled on the router table?
00:31:55 – Do you have a humidifier in your shop?
00:33:22 – There seems to be an issue with the pdf plans for the outfeed tables. Any ideas?
00:34:25 – How do you safely dispose of your blades?
00:35:05 – Would finishing the end grain on the bottom of the legs of a chair slow wood movement?
00:36:12 – What finish do you use on lighter woods that will not yellow the final product?
00:38:13 – How can I clean up the “condor” tails on the roubo off the bandsaw?
00:39:42 – Any advice to get a glossy black paint job on a baltic birch piece?
00:42:42 – How do I prep a new Lee Valley jack plane?
00:44:05 – What are your thoughts on the SawStop?
00:45:30 – What’s the better natural finish on white oak? General Finishes High Performance or Endurovar?
00:46:48 – What’s a “condor tail”?
The post Marc Made Her Cry appeared first on The Wood Whisperer.


