
Marina Delio's Blog, page 19
June 3, 2016
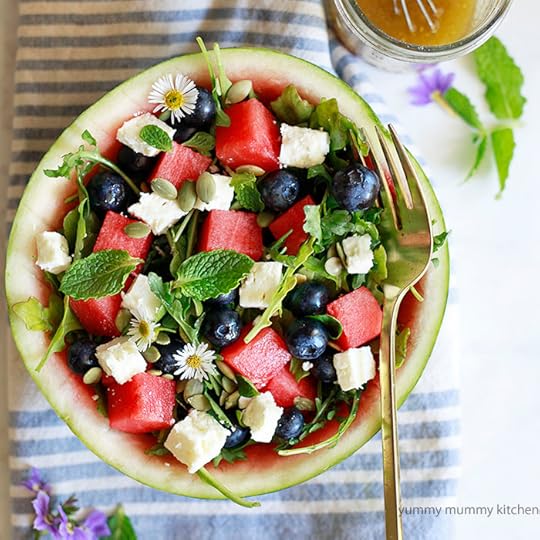
Watermelon Salad with Arugula, Feta, and Blueberries
 A few years ago when I made those cute Watermelon Feta Bites I discovered that watermelon is insanely tasty paired with something salty. Juicy and sweet, watermelon makes salads extra refreshing and tasty. And that pop of watermelon pink is the icing on the cake. The past few summers I have been bringing this watermelon salad to every party I've been to. This watermelon salad is always a crowd pleaser and has that wow factor in both the flavor and aesthetics departments. Arugula creates a nice peppery base, blueberries add another punch of color and summer sweetness, and creamy feta adds a nice salty bite. I know I have a lot of vegan readers, and you can still make this! Just swap out the feta for some salty walnuts. I adore fresh mint with watermelon, but fresh basil is nice too if that's what you happen to have. I like to add little crunch with pumpkin seeds. And everything. Everything. Is more fun served out of a watermelon bowl, dontcha think?
 This watermelon was a little small, but it's what I had at home this week. If you use a small watermelon like this, you may want to use both halves and serve your salad in two watermelon bowls. Fun! If you use a large watermelon, one half should be sufficient. Use a knife to score around the rind and make rectangles. They should scoop out easily and then you can slice the watermelon rectangles to make cubes, or leave as is.
 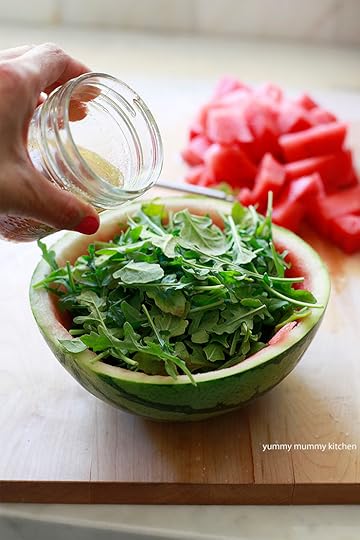 Homemade vinaigrette is so easy to whisk or shake together in a jar. Fill your watermelon bowl up with arugula. If you're going to eat the salad right away, you can dress the arugula now. If you're bringing it to a party, hold off on dressing the salad until just before serving.
 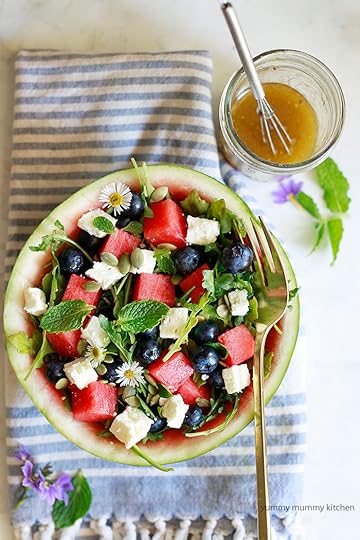 Decorate your arugula salad with the watermelon cubes, mint, feta, and pumpkin seeds. There you have a summer salad that's easy, gorgeous, flavorful, and refreshing. It's sweet, salty, and crunchy, and you don't even have a bowl to wash at the end.
Watermelon Salad with Arugula, Feta, and BlueberriesBy Yummy Mummy Kitchen
PRINTER FRIENDLY RECIPE
Published 06/03/2016
A flavorful and refreshing watermelon salad perfect for summer. Ingredients1 large seedless watermelon5 oz. arugula 6 oz. blueberries 1/2 cup cubed feta cheese 3 tablespoons shelled pumpkin seeds (pepitas)1/4 cup fresh mint leaves 3 tablespoons extra virgin olive oil2 tablespoons red wine vinegar1 teaspoon Dijon mustard1-2 teaspoons honey or maple syrup salt and pepper to taste InstructionsCut watermelon in half lengthwise. To create a watermelon bowl and watermelon cubes, cut around the perimeter to separate the flesh from the rind. Make 1/2-3/4 inch cuts across the watermelon, then 1/2-3/4 inch cuts the other direction. Use a large serving spoon to scoop out the watermelon. The chunks should come out as rectangles. Cut the watermelon pieces into cubes. Scoop out any remaining juice or watermelon flesh from the watermelon bowl. Place arugula into the empty watermelon bowl. Top with blueberries, feta, pumpkin seeds, and mint. To make the vinaigrette, in a small bowl or jar, whisk together the olive oil, vinegar, mustard, honey, salt and pepper. Dress the salad just before serving. Yield: Serves 4-6
Prep Time: 7 mins. Total time: 7 mins.
Tags: salad, summer, watermelon, BBQ, picnic, fourth of July


June 2, 2016
Easy Refrigerator Dill Pickles
 Homemade pickles has always been on my list of things to make "someday when I have extra time." I had imagined canning pots of boiling water and special equipment. I had envisioned stressing about using the exact amounts of acidity so that I didn't get my family and friends all sick with botulism. One day, when I truly do have more time, canning is something I would like to try. But for now, since I really don't enjoy following recipes or stressing about equipment or perfection, I'm enjoying the refrigerator and freezer methods of small batch canning.
 When we planted our summer garden about a month ago, the one thing my pickle-loving children wanted to grow was a "pickle plant" - more commonly known as a cucumber plant. So we picked up a pickling cucumber transplant at the nursery and put it in our garden bed. It has taken off and already given us about 5 perfect cucumbers. The girls were so excited to watch the little cukes grow and boy do they grow quickly once fertilized. Naturally the kids were eager to make pickles. After a little research I discovered that we could make refrigerator dill pickles without any special canning equipment. We have now made several batches as more cucumbers have ripened. I was amazed at how quick and easy it is to make refrigerator pickles. Refrigerator dill pickles require no cooking and take about 5 minutes to assemble in a jar. So easy, in fact, that I have no problem making a jar every week as the "pickle plant" gives us more and more cucumbers.
 Homemade refrigerator dill pickles are tangy, crunchy, and flavorful. They add delicious flavor to sandwiches and salads, and make a great snack on their own. You can play with the flavor by adding herbs, onions, lemon, more garlic, or turning up the heat with extra pepper.
 We made 1 jar with distilled white vinegar and 1 with organic apple cider vinegar. The white vinegar results in a more traditional pickle flavor and a crystal clear jar of pickles. The apple cider vinegar results in a jar that is a little bit murky, but also more nutritious.
 Pickling cucumbers work well (of course!) but you can also use English hothouse cucumbers (the long ones that come in plastic) or Kirby cucumbers. Slice your cucumbers thinly, but any way you would like - crosswise into rounds or lengthwise into sandwich pickles.
 Since refrigerator pickles are not preserved with the traditional canning method, they cannot be left in the pantry like grocery store pickles. Keep them in the refrigerator and us within one week.
Easy Refrigerator Dill PicklesBy Yummy Mummy Kitchen
Published 06/02/2016

Make 1 jar of refrigerator pickles the easy way! Ingredients1 cup water3 tablespoons white vinegar1 tablespoon pickling salt (or kosher salt)2 cloves garlic, peeled and crushed or sliced1 pinch red pepper flakes1/2 teaspoon black peppercorns1/2 teaspoon mustard seed5 sprigs fresh dill2 pickling cucumbers, or 1/2 English hothouse cucumber, slicedInstructionsPlace water, vinegar, salt, garlic, red pepper flakes, peppercorns, and half the dill in a pint-sized canning jar. Stir to combine. Add the cucumber slices to the jar and top with the remaining dill. Cover the jar with the top and shake to combine. Refrigerate. Your pickles will be ready in about 2 days, but I like them even just a few hours after sitting in the brine! These are not preserved pickles and cannot be left in the pantry. They should keep for about 1 week in the refrigerator, though ours are usually all eaten within a few days. Enjoy in sandwiches, on salads, and as a snack. Yield: 1 jar
Prep Time: 5 mins. Total time: 5 mins.
Tags: summer, garden, cucumbers, pickles
Recipe adapted from the Kitchn and Brown Eyed Baker


May 27, 2016
15 Recipes for Summer BBQs
 I hope those of you here in the U.S. are getting excited for the long weekend! Memorial Day marks the unofficial first day of summer, but of course is much more important than that. It's a day we honor those who have died serving our country. So before I get on to the summer recipes, I'd like to thank the military families for all you do.
 Summertime means al fresco get togethers with family and friends. Today I'm sharing over 15 recipe ideas that are all great for bringing to a summertime backyard dinner or picnic. Whether it's for Memorial Day, Forth of July (see the Red, White, and Blue recipes below!) or any day, these recipes are easy crowd pleasers. These summer BBQ recipes are all chosen because they are hearty enough to be made in advance. No mushy green salads here.
I hope these Summer recipes come in handy the next time you're invited to a summer party and left with the question of, "Wait, what should I bring?" I like to bring dishes that can be made well in advance so I have time to actually get myself ready for the party without scrambling at the last moment. So without further adieu, here are my top picks to bring to summer BBQs and get togethers... Happy unofficial summer!
 CAPRESE BRUSCHETTAThis recipe is so simple. You may want to assemble it once you're at your destination so the bread doesn't get soggy.
WATERMELON FETA BITES
 LOADED GREEK HUMMUS DIP
 MANGO GUACAMOLE
 CAPRESE QUINOAServe this flavorful salad in tomatoes, scooped up with crostini, or on it's own.
  ULTIMATE SUMMER SALAD WITH QUINOA, BEANS, AND PEACHESMy favorite summer salad.
  PATRIOTIC SALAD
  GRILLED APRICOT SALAD
 STONE FRUIT SUMMER PANZANELLAPlus a postcard from Italy *sigh*
 3-BEAN CHILI FOR A CROWD
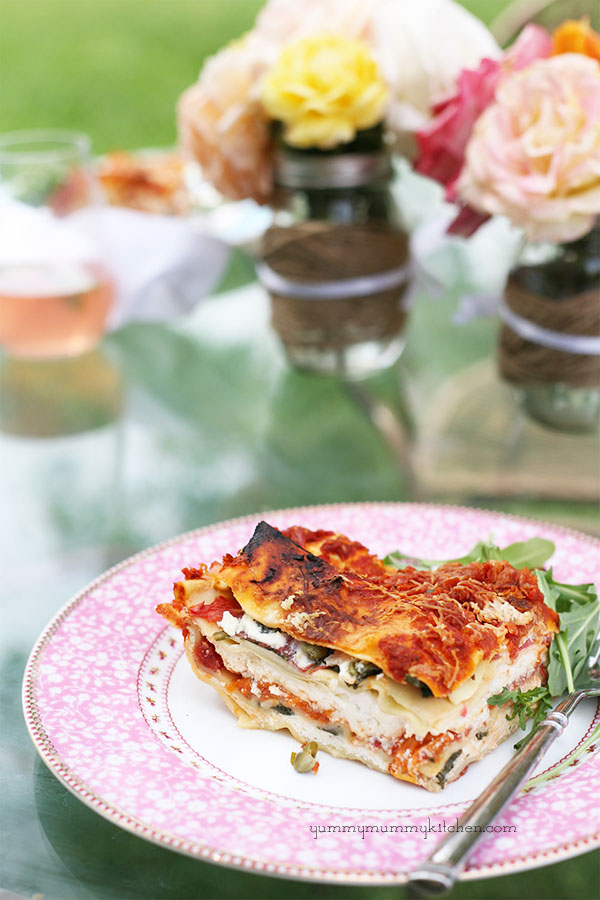 HEIRLOOM TOMATO AND GREENS LASAGNA
 HOMEMADE MINT CHIP ICE CREAM
 NO SUGAR ADDED PLUM BERRY CRISP
 WHOLESOME BLUEBERRY CRISP WITH ALMOND OATMEAL TOPPING
 RED, WHITE, AND BLUE FROZEN YOGURT PIE WITH GRANOLA CRUST
 VEGAN FROZEN KEY LIME AND BLACKBERRY PIE
What's your favorite thing to bring to a summer party? I'd love even more ideas!


May 26, 2016
Summer Vegetable Hash
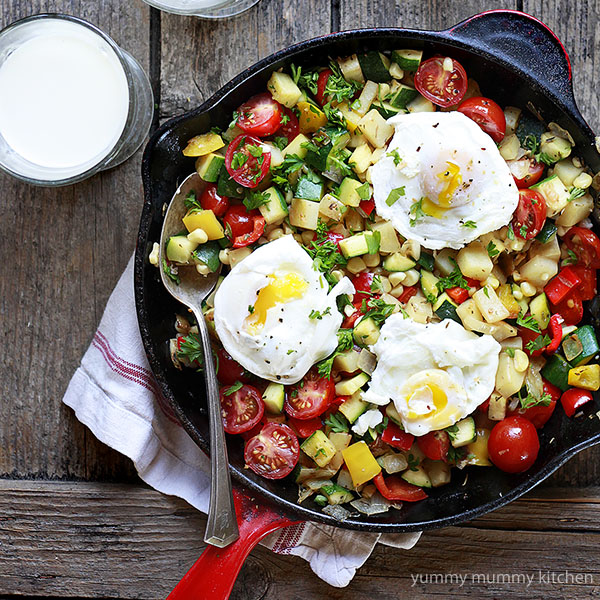
Vegetarian Summer Vegetable Hash with Poached Eggs is perfect for breakfast, lunch, or dinner and a great way to use up those fresh summer garden veggies.
Brought to you by got milk? Food Loves Milk. Recipe and all content is mine.
 A few weeks ago my family went out to brunch for Mother's Day. Yummy Hubby ordered a sweet potato and sausage hash with a poached egg. It looked delectable, other than the sausage bit. His meal reminded me how great hashes are. They are so my type of cooking: one pan, veggie rich, no rules. This summer veggie hash is loaded with veggies we have growing in our garden. I would love to say that I made this lovely brunch in the morning, but in reality, this was a weeknight dinner. Our chickens are laying like rock stars right now, so eggs are often for dinner at our house. My family loved this humble dinner with a glass of ice cold milk. Milk cools your mouth down, so it's great with savory or spicy dishes. My 8 year old is so funny, ever since she was two years old, she's asked for "ice cold milk" never just "milk." Since our diets are so veggie heavy, and they don't always love my lentil and leafy green dishes, I know my girls are getting enough protein and calcium if they have a glass of milk with breakfast or dinner. I always choose and recommend organic grass-fed whole milk from CA farms.
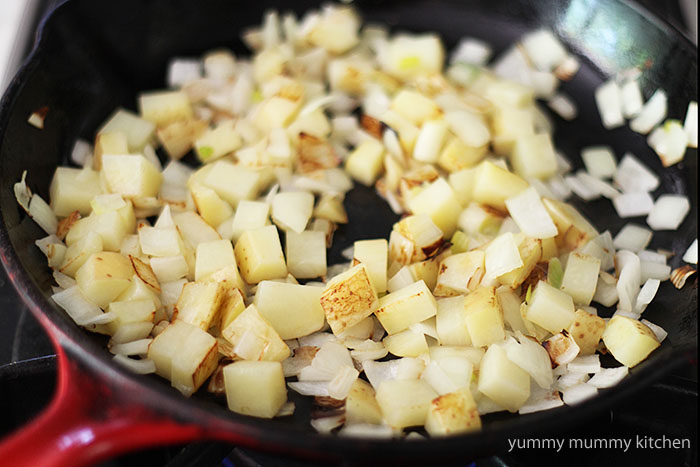
 I started with the traditional hearty diced potato base. Just cook it in some olive oil with chopped onion for few minutes until the potatoes get nice and browned. Then toss in the rest of your veggies, always starting with the firmest veggies that take longest to cook. I like to season each layer as I go with a little pinch of salt and pepper. You can use this hash to clean out your fridge or garden and toss in any veggie you like. Have fun with it!
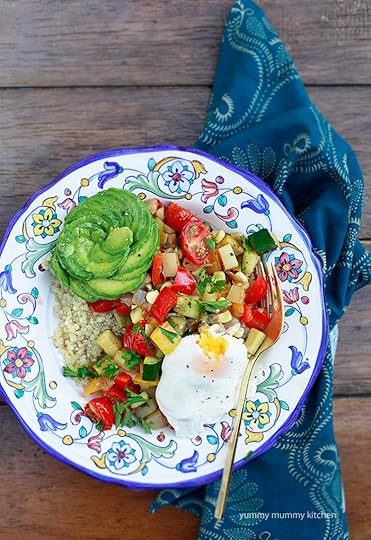 We have corn, zucchini, bell pepper, and tomatoes growing right now, and they are all abundant in the summer, so that's what I used. Our garden isn't quite mature enough to provide all the veggies I needed, so I had to supplement with grocery store produce, but it's all good. This summer veggie hash is hearty enough for breakfast, lunch or dinner. To make it an even heartier meal, serve this hash over a bed of quinoa and top with half an avocado sprinkled with a little salt (truffle salt is my favorite). And I'm having a moment with avocado flowers - once you get the hang of it they are easy peasy.
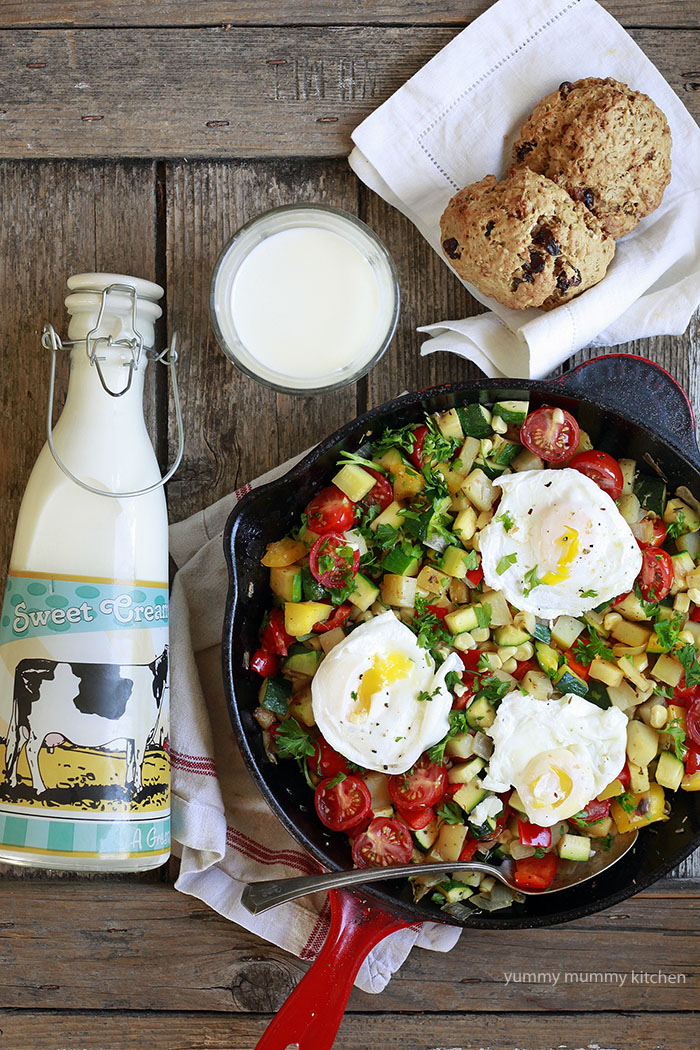
 To round out our meal, I made some morning glory oat scones. I'll have to share the recipe for those soon too! You can turn up the heat with a drizzle of sriracha, if you'd like. And to wash it down, some "ice cold milk" as my daughter would say.
 Summer Vegetable Skillet HashBy Yummy Mummy Kitchen
Published 05/27/2016
Summer vegetable hash made in one skillet and topped with poached eggs. With zucchini, corn, tomatoes, and bell peppers, this vegetarian dish is a delicious way to use up summer garden vegetables.Ingredients1 tablespoon extra virgin olive oil 1 yellow onion, diced 1 cup diced Yukon gold potato1 teaspoon dried all purpose seasoning blend sea salt (I am loving truffle salt here!) 1 cup diced red or yellow bell pepper1 zucchini, diced 1 ear corn, kernels sliced off1 cup halved cherry tomatoes 1/4 cup chopped fresh parsley free range eggs (as many as you'd like or none at all!)1 tablespoon white vinegar 1-2 avocados, for serving sriracha or favorite hot sauce, for serving (optional) InstructionsHeat olive oil in a large skillet over medium low heat. Add onion and potato, and lightly season with a pinch of salt. Cook until golden and lightly browned, stirring occasionally, about 5 minutes. Add the bell pepper, zucchini, corn, and tomatoes, and continue to cook until tender. Feel free to toss in any other veggie you have around and would like to use up! Season to taste with salt and pepper, and more seasoning blend. Sprinkle with parsley. To poach the eggs, bring 1-2 inches of water to a simmer in a large saucepan. Add the vinegar. Crack 1 egg into a small bowl and then slowly pour it into the pot of simmering water. Repeat with any remaining eggs, one at a time. Cook at a low simmer until cooked to desired doneness, about 5 minutes. Serve the hash warm with eggs, avocado, and sriracha. *VEGAN OPTION: Omit the eggs and replace the protein with a cup of cannellini beans stirred in with the veggies.
Yield: Serves 4
Prep Time: 5 mins. Cook time: 20 mins.
Total time: 25 mins.
Tags: eggs, breakfast, brunch, summer, spring, vegetables, vegetarian


Brought to you by got milk? Food Loves Milk. Recipe and all content is mine.
 A few weeks ago my family went out to brunch for Mother's Day. Yummy Hubby ordered a sweet potato and sausage hash with a poached egg. It looked delectable, other than the sausage bit. His meal reminded me how great hashes are. They are so my type of cooking: one pan, veggie rich, no rules. This summer veggie hash is loaded with veggies we have growing in our garden. I would love to say that I made this lovely brunch in the morning, but in reality, this was a weeknight dinner. Our chickens are laying like rock stars right now, so eggs are often for dinner at our house. My family loved this humble dinner with a glass of ice cold milk. Milk cools your mouth down, so it's great with savory or spicy dishes. My 8 year old is so funny, ever since she was two years old, she's asked for "ice cold milk" never just "milk." Since our diets are so veggie heavy, and they don't always love my lentil and leafy green dishes, I know my girls are getting enough protein and calcium if they have a glass of milk with breakfast or dinner. I always choose and recommend organic grass-fed whole milk from CA farms.
 I started with the traditional hearty diced potato base. Just cook it in some olive oil with chopped onion for few minutes until the potatoes get nice and browned. Then toss in the rest of your veggies, always starting with the firmest veggies that take longest to cook. I like to season each layer as I go with a little pinch of salt and pepper. You can use this hash to clean out your fridge or garden and toss in any veggie you like. Have fun with it!
 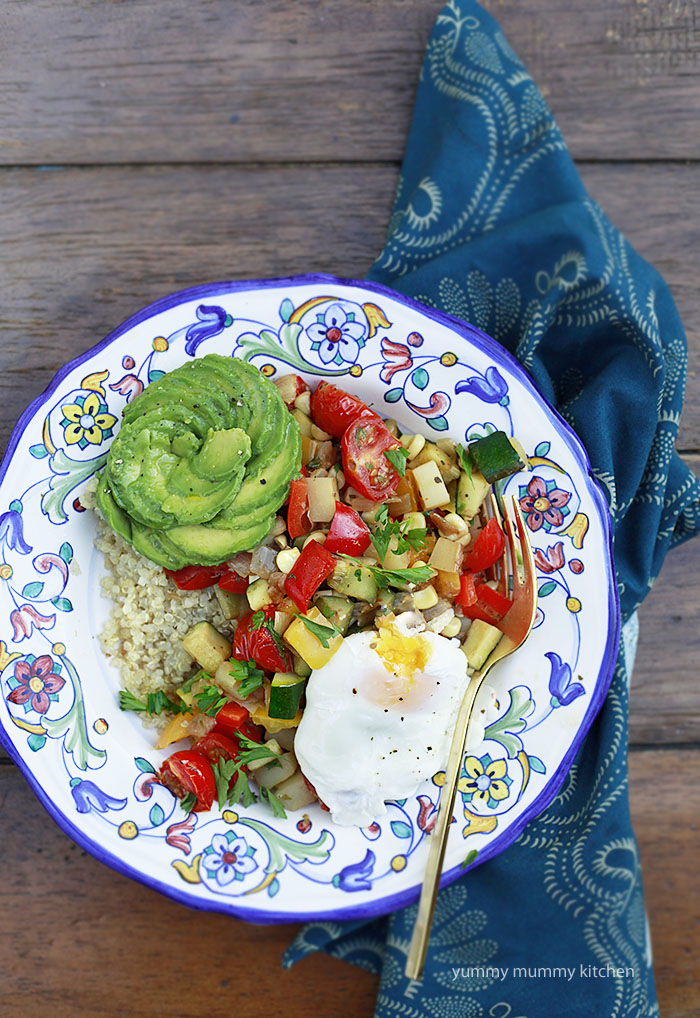 We have corn, zucchini, bell pepper, and tomatoes growing right now, and they are all abundant in the summer, so that's what I used. Our garden isn't quite mature enough to provide all the veggies I needed, so I had to supplement with grocery store produce, but it's all good. This summer veggie hash is hearty enough for breakfast, lunch or dinner. To make it an even heartier meal, serve this hash over a bed of quinoa and top with half an avocado sprinkled with a little salt (truffle salt is my favorite). And I'm having a moment with avocado flowers - once you get the hang of it they are easy peasy.
 To round out our meal, I made some morning glory oat scones. I'll have to share the recipe for those soon too! You can turn up the heat with a drizzle of sriracha, if you'd like. And to wash it down, some "ice cold milk" as my daughter would say.
 Summer Vegetable Skillet HashBy Yummy Mummy Kitchen
 Published 05/27/2016
Summer vegetable hash made in one skillet and topped with poached eggs. With zucchini, corn, tomatoes, and bell peppers, this vegetarian dish is a delicious way to use up summer garden vegetables.Ingredients1 tablespoon extra virgin olive oil 1 yellow onion, diced 1 cup diced Yukon gold potato1 teaspoon dried all purpose seasoning blend sea salt (I am loving truffle salt here!) 1 cup diced red or yellow bell pepper1 zucchini, diced 1 ear corn, kernels sliced off1 cup halved cherry tomatoes 1/4 cup chopped fresh parsley free range eggs (as many as you'd like or none at all!)1 tablespoon white vinegar 1-2 avocados, for serving sriracha or favorite hot sauce, for serving (optional) InstructionsHeat olive oil in a large skillet over medium low heat. Add onion and potato, and lightly season with a pinch of salt. Cook until golden and lightly browned, stirring occasionally, about 5 minutes. Add the bell pepper, zucchini, corn, and tomatoes, and continue to cook until tender. Feel free to toss in any other veggie you have around and would like to use up! Season to taste with salt and pepper, and more seasoning blend. Sprinkle with parsley. To poach the eggs, bring 1-2 inches of water to a simmer in a large saucepan. Add the vinegar. Crack 1 egg into a small bowl and then slowly pour it into the pot of simmering water. Repeat with any remaining eggs, one at a time. Cook at a low simmer until cooked to desired doneness, about 5 minutes. Serve the hash warm with eggs, avocado, and sriracha. *VEGAN OPTION: Omit the eggs and replace the protein with a cup of cannellini beans stirred in with the veggies.
Yield: Serves 4
Prep Time: 5 mins. Cook time: 20 mins.
Total time: 25 mins.
Tags: eggs, breakfast, brunch, summer, spring, vegetables, vegetarian
May 23, 2016
Pineapple Vegan Ice Cream
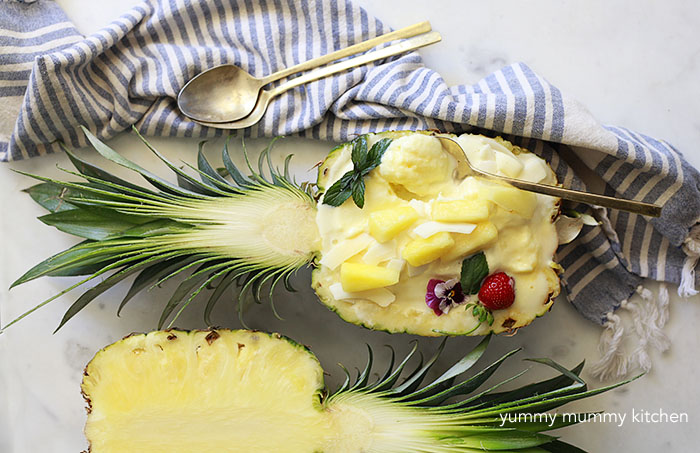
 Summer feels soooooo close I can almost taste it. I'm already dreaming about less rush, warm lazy days at the beach, and afternoons spent painting with the kids outside. And what treat is synonymous with warm summer days? Ice cream of course! Ice cream is one of our favorite desserts, but I try not to make a habit of keeping tubs of it around the house. Lately when the girls get home from school I've been making a batch of vegan, dairy-free, "nice cream" with just two ingredients. It's so easy to make it's ridiculous. And it tastes creamy, frozen, and amazing. My favorite version is this pineapple flavor. Have you tried the Dole pineapple whip at Disneyland? It kind of reminds me of that. Only without any added sugar. I have a feeling I'm going to be making this healthier refreshing dessert all summer long.
 We keep a lot of fruit in the freezer for smoothies, so the ingredients are already on hand most of the time. All you need is some yogurt and frozen pineapple. I used SoDelicious plain coconut based yogurt, but you can use any that you like. I like non-dairy yogurt best for this ice cream, because the enzymes in pineapple can make it taste bitter when combined with milk. I also find dairy upsets my stomach, though the rest of my family is fine with it.
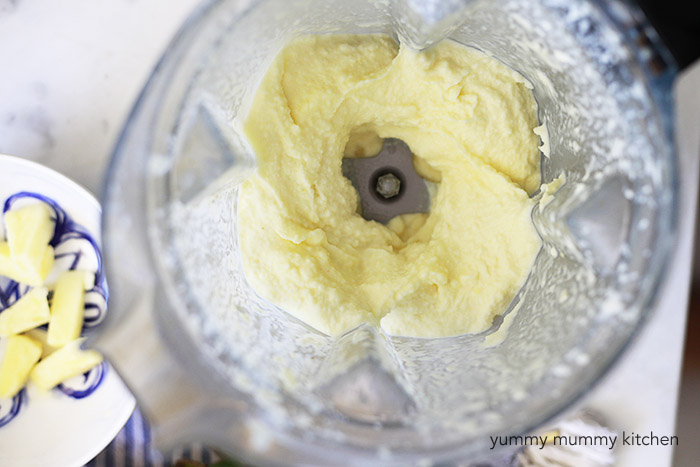 Just dump and blend. Seriously, that's it! My Vitamix has a tamper that I use to push the pineapple down. This vegan ice cream recipe is very thick, so you will need a high powered blender or food processor. If you try this and your blender still won't turn, try adding a peeled orange or a little coconut milk.
 You can transfer your nice cream to a freezer container to enjoy later,
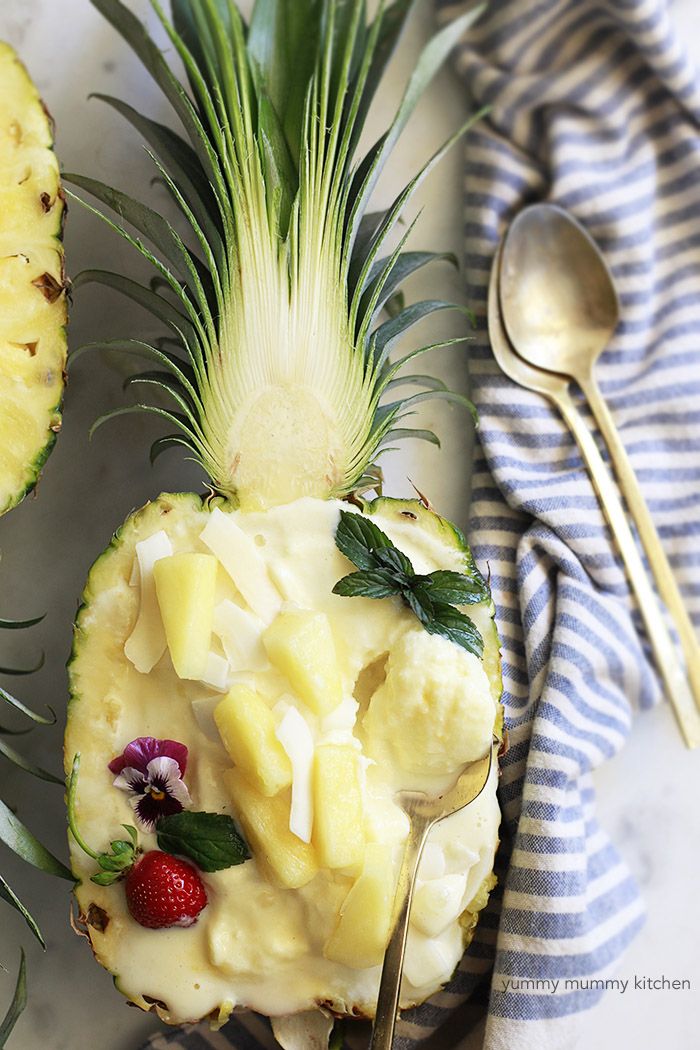
Or eat it straight away. 2-Ingredient Vegan Pineapple Ice CreamBy Yummy Mummy Kitchen
Published 05/23/2016

The easiest 2-ingredient pineapple frozen yogurt/ice cream recipe. Ingredients1 cup plain yogurt (I used SoDelicious coconut yogurt) 3 cups frozen pineapple chunks (or pineapple and mango) InstructionsPlace yogurt and frozen fruit into a high powered blender or food processor. Blend until pureed and smooth. If desired, blend in a few drops of liquid stevia or favorite sweetener. Done! You should now how a delicious and nutritious frozen treat! Yield: Serves 4
Cook time: 3 mins.
Total time: 3 mins.
Tags: vegan, pineapple, ice cream, frozen yogurt, blender recipe


May 20, 2016
Growing Vegetables in Raised Beds
This post is sponsored by EcoScraps. However, all content presented in this post represents my own opinions.
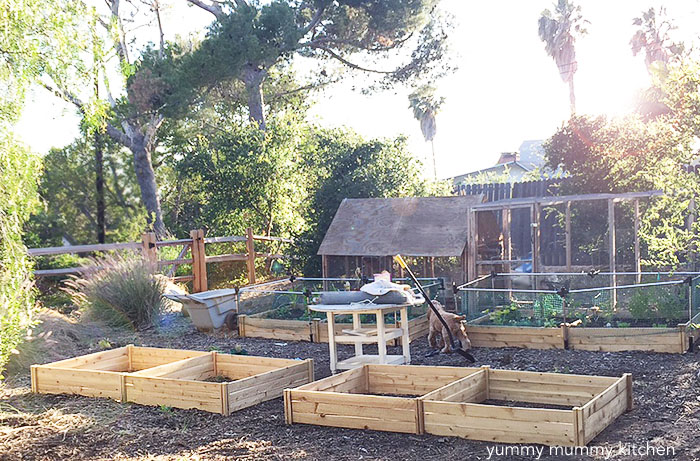
One of the things I love most about summer is growing vegetables in my backyard vegetable garden. I shared our garden in the past here. Last summer, however, I came out to check on my tomatoes one morning and found they had all been severed at the base. My heart sank. Months of tending to these plants from seed to prolific producers destroyed by rabbits or gophers. When spring rolled around this year I was determined to take back the garden. Since the old garden wasn't getting quite the light it should, I decided to start over completely. While it's not finished yet, I thought I would give you a first look at the new garden and show you how to make your own raised garden beds. And you don't have to start out with four beds, even a small planter on a patio can yield juicy tomatoes all summer long. Growing vegetables is a fun, rewarding, and tasty adventure.

Just as I was starting my new garden, a company called EcoScraps sent me an email to let me know about their natural and organic garden soil and plant food. Perfect timing! I loved what they are all about and agreed to try their soil. EcoScraps recycles food scraps into organic and sustainable lawn and garden products, and promotes growing gardens, not landfills! How cool! I know food waste is a huge problem in the United States. Here are some quick facts from EcoScraps.
*In the United States, we waste 40% of the food produced. That is enough to fill the Rose Bowl every day. It sits in landfills producing methane, which is 20X more harmful than CO2.
*Between 2011 and 2015, EcoScraps recycled 75 million lbs of food waste. We are matching that number in 2016 with projected recycling of another 75 million lbs of food waste--this time in just 12 months.
*Individuals can make a significant difference in the food waste crisis by changing shopping habits. Bagged salad, for instance, is one of the #1 foods wasted. Consider buying bagged salads only on the days you plan to use them.
EcoScraps is available at Walmart
 I have been admiring beautiful edible gardens, also known as potager gardens, on Pinterest for years. Just dreaming and dreaming... My top three inspirations for my dream potager are: this gorgeous garden designed by Velvet and LinenMeryl Streep's garden in the movie It's ComplicatedPatina Farm Garden (with goats!)While I don't know our garden is ever going to be that dreamy, here's how to start...
1. Build a planter box. I got this 4x8 foot raised bed kit (Amazon affiliate link) that took about 20 minutes to put together and didn't require any tools. 2. Dig out about 10 inches of soil below the box. You want plenty of room for roots to grow, especially if you are planting taller vegetables like tomatoes. 3. To keep gophers from eating your garden, line the bottom with hardware cloth and staple to the sides of the box. I don't recommend using chicken wire, as it deteriorates in just a few years. Hardware cloth is more expensive, but will last much longer. Sew together any seams with wire.
 4. Fill the boxes back up with the native soil you removed. Top with potting mix.
 5. Add plant food. All those fruits and veggies you will be growing will need nutrients to thrive. Compost helps add nutrients too.
 6. Plant your veggies! We start some from seed and some from transplants.
 Enjoy watching your garden grow! I think the chickens enjoy the view from Hen Haven.

Here's a new video to learn more about what EcoScraps does.
GIVEAWAY!!! EcoScraps is generously giving one of my readers a $50 Walmart gift card to get you started on your own summer garden!
a Rafflecopter giveaway
A big thank you to EcoScraps for sponsoring this post, and all my fabulous sponsors, who make running this blog possible.


One of the things I love most about summer is growing vegetables in my backyard vegetable garden. I shared our garden in the past here. Last summer, however, I came out to check on my tomatoes one morning and found they had all been severed at the base. My heart sank. Months of tending to these plants from seed to prolific producers destroyed by rabbits or gophers. When spring rolled around this year I was determined to take back the garden. Since the old garden wasn't getting quite the light it should, I decided to start over completely. While it's not finished yet, I thought I would give you a first look at the new garden and show you how to make your own raised garden beds. And you don't have to start out with four beds, even a small planter on a patio can yield juicy tomatoes all summer long. Growing vegetables is a fun, rewarding, and tasty adventure.
Just as I was starting my new garden, a company called EcoScraps sent me an email to let me know about their natural and organic garden soil and plant food. Perfect timing! I loved what they are all about and agreed to try their soil. EcoScraps recycles food scraps into organic and sustainable lawn and garden products, and promotes growing gardens, not landfills! How cool! I know food waste is a huge problem in the United States. Here are some quick facts from EcoScraps.
*In the United States, we waste 40% of the food produced. That is enough to fill the Rose Bowl every day. It sits in landfills producing methane, which is 20X more harmful than CO2.
*Between 2011 and 2015, EcoScraps recycled 75 million lbs of food waste. We are matching that number in 2016 with projected recycling of another 75 million lbs of food waste--this time in just 12 months.
*Individuals can make a significant difference in the food waste crisis by changing shopping habits. Bagged salad, for instance, is one of the #1 foods wasted. Consider buying bagged salads only on the days you plan to use them.
EcoScraps is available at Walmart
 I have been admiring beautiful edible gardens, also known as potager gardens, on Pinterest for years. Just dreaming and dreaming... My top three inspirations for my dream potager are: this gorgeous garden designed by Velvet and LinenMeryl Streep's garden in the movie It's ComplicatedPatina Farm Garden (with goats!)While I don't know our garden is ever going to be that dreamy, here's how to start...
 1. Build a planter box. I got this 4x8 foot raised bed kit (Amazon affiliate link) that took about 20 minutes to put together and didn't require any tools. 2. Dig out about 10 inches of soil below the box. You want plenty of room for roots to grow, especially if you are planting taller vegetables like tomatoes. 3. To keep gophers from eating your garden, line the bottom with hardware cloth and staple to the sides of the box. I don't recommend using chicken wire, as it deteriorates in just a few years. Hardware cloth is more expensive, but will last much longer. Sew together any seams with wire.
 4. Fill the boxes back up with the native soil you removed. Top with potting mix.
 5. Add plant food. All those fruits and veggies you will be growing will need nutrients to thrive. Compost helps add nutrients too.
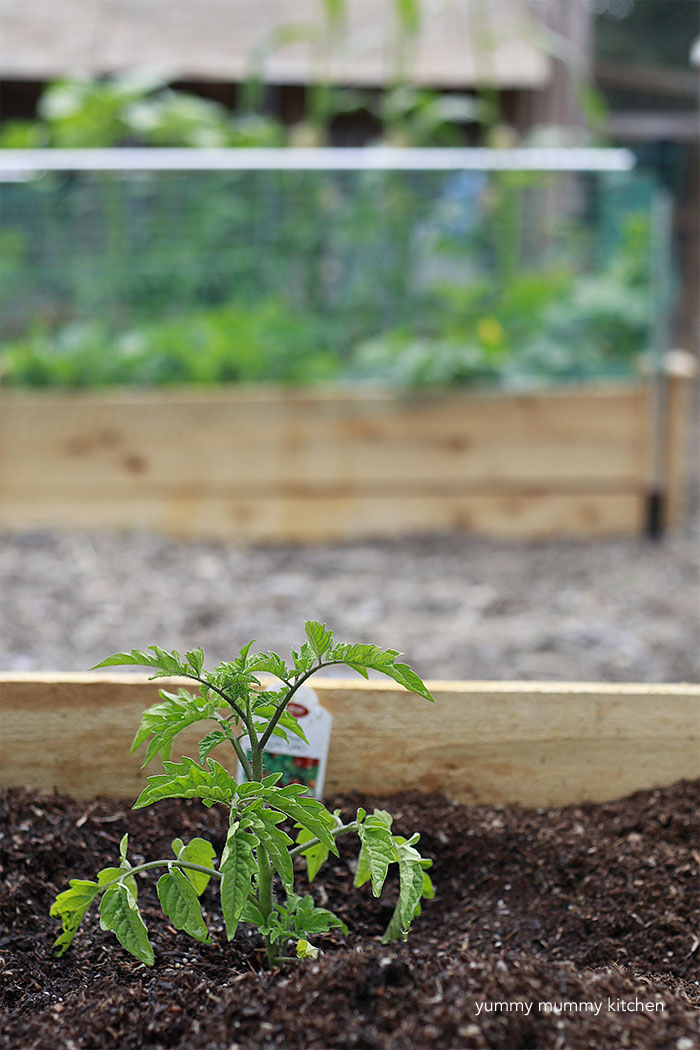 6. Plant your veggies! We start some from seed and some from transplants.
 Enjoy watching your garden grow! I think the chickens enjoy the view from Hen Haven.
Here's a new video to learn more about what EcoScraps does.
GIVEAWAY!!! EcoScraps is generously giving one of my readers a $50 Walmart gift card to get you started on your own summer garden!
a Rafflecopter giveaway
A big thank you to EcoScraps for sponsoring this post, and all my fabulous sponsors, who make running this blog possible.
May 18, 2016
Turmeric Tea Golden Milk with Chai Spices

Last week I posted a recipe for a tropical turmeric smoothie. And I realized, while we're on the hot topic of turmeric, I better share one of my favorite bedtime treats - turmeric tea. A cup of herbal tea after the kids go to bed has been a part of my evening routine for as long as I can remember. This small ritual signals to my body and mind that it is time to unwind and rest, and a warm cup in my hand makes me feel warm and cozy. I first learned about turmeric tea, or "golden milk" a few years ago from a UK blogger (I can't remember who), and have been making it ever since. Golden milk is creamy, warm, and slightly sweet. To me, it's the perfect dessert or afternoon tea time treat. Turmeric contains curcumin, a powerful healing compound, so I try to add it into our diets as often as I can. It's mild flavor works in everything from soups and sauces to rices, smoothies, and tea! Turmeric and curcumin can help with:
Inflammation Rheumatoid Arthritis DepressionDiabetesCancerSigns of Aging Brain Health (source: Dr. Axe)
What does a turmeric tea/golden milk latte taste like? Well, have you ever had a chai latte? I add some of the same spices, so it has the same warm and cosy flavors. Only bright orange. Fresh turmeric has been popping up at grocery stores recently, so you can use that, and grate the peeled turmeric right into the saucepan, or use the dried variety in the spice jar.
 I enjoy my turmeric tea latte-style, with a creamy almond or soy milk base. If you don't want it quite as rich, you can simmer your spices with water and then add milk at the end, as you would with English tea or coffee. Turmeric tea is so easy to make. Just bring your water or milk to a simmer, and toss in a teaspoon of dried turmeric (more if you're using fresh) and spices.
 Whisk it together and simmer for a minute or two to infuse those wonderful warm spices into your milk or water. Sweeten to taste with honey, syrup, or stevia. I use a few drops of organic liquid stevia (Trader Joe's brand is my favorite).
 Take your turmeric tea off the heat and pour into a mug or teacup. This afternoon I'm enjoying a cup along with my favorite nourishing Raw Brownie Bars. They got extra fancy with some natural sprinkles this week. Because kids.
 Have you tried turmeric tea yet?
 If you're thinking you would like turmeric tea, but are getting into the warm weather summer groove, you can keep a jar of your turmeric tea in the refrigerator and have a glass over ice any time you feel like you could use a pick-me-up. It's just as tasty!
 I would also like to confess that some nights, when I fall asleep tucking my girls in, and come walking out with groggy eyes at 9pm, I take the easiest route and heat up a turmeric tea bag. I like having both options, so I'm sharing both with you. I use Numi Organic turmeric tea, which I got at Whole Foods, but you can also get online.
Amazon affiliate link:
Turmeric Tea By Yummy Mummy Kitchen
Published 05/18/2016

How to make a delicious and healing turmeric tea latte, or golden milk. The spices listed below are optional - add the ones you like. Pumpkin pie spice would also be easy and tasty. Ingredients1 cup favorite milk (I like unsweetened almond milk)1 teaspoon ground turmeric 1/4 teaspoon cinnamon1 pinch ginger1 pinch nutmeg1 star anise sweetener of choice to taste InstructionsWhisk milk and spices in a saucepan over medium heat until combined and just simmering. Simmer 1 to 2 minutes to infuse the spices. Carefully pour into a mug or teacup and sweeten to taste. Yield: Serves 1
Prep Time: 1 mins. Cook time: 2 mins.
Total time: 3 mins.
Tags: turmeric, tea, milk, vegan


May 13, 2016
How to Make a Flower Arrangement Centerpiece
How to make a beautiful floral arrangement or centerpiece for home, parties, or weddings. Easy DIY flower arrangement using grocery store flowers.
 I have always loved having fresh flowers in the entrance of our home or in the kitchen. They add such fresh, beautiful life to any space, and just make me happy. I've always just grabbed a bunch of flowers from Trader Joe's, taken them out of the plastic sleeve, chopped them to the same length, and plopped them into a vase. Ta daaaaa!!! The flowers would immediately fall to the outer edges of the vase and look a little sparse and naked.
 Until last Christmas when I made a "real" arrangement. It was so much fun to create and I loved how it turned out. I used Oasis floral foam to anchor the stems. But then I went back to my old "plop and go" method. Until last week when I attended a benefit flower arranging class hosted by one of my favorite stores, Coast 2 Coast Collection and lovely local florist, Rachael. I suddenly remembered how easy and fun it is to play with flowers. Instead of using Oasis, we used an even easier method, that most people probably have the supplies for at home already.
  I gave my floral centerpiece to my mom for Mother's Day, but had so much fun, that I made another yesterday. This time I used sunflowers, white peonies, and a Eden rose from my garden. There's no need to spend a fortune at the florist, you can easily make beautiful arrangements with flowers picked up at the grocery store. All of the flowers you see in this post were from Trader Joe's and greenery from my yard. There are just a few tips to keep in mind, and then you can let your creativity loose.
 As you can see I had my mini me assistant helping me. And I realized that flower arranging is a fantastic craft project for little ones to help with. From the foraging for greenery to flower placement, creating our flower arrangement was a fun project for both of us.
 Flower Arranging Tips
ADD GREENERY-
Look through your backyard and snip any branches and vines you like. Those unruly vines look perfectly romantic with floral centerpieces. My favorites are olive and eucalyptus branches, which are abundant where we live.
LOOK AT YOUR ARRANGEMENT LIKE ART
In drawing, painting, and photography, you want the eye to move through the piece of artwork. I like to create that same movement in a flower centerpiece.
PICK A COLOR SCHEME
Group two or three colors together, rather than going wild with every color you can find.
THERE'S NO RIGHT OR WRONG WAY
If you make enough flower arrangements, you'll find you have a unique style. "Perfect" arrangements are boring - let your's get a little and organic. And most importantly, have fun!

Floral Centerpiece By Yummy Mummy Kitchen
Published 05/13/2016

How to make a flower arrangement centerpiece Ingredients1 vase (I like a large compote dish/pedestal bowl) tape Vines or branches from your yard, walking path, etc. 2 or 3 bunches of grocery store flowers (1 type of flower each, not an arrangement)InstructionsFill vase 2/3 of the way with room temperature water. Create a tic-tac-toe pattern over the top of the vase with tape. This will hold your stems in place. Cutting and placing one stem at a time, create the overall shape of your arrangement with the greenery. Place your larger, bulkier flowers into the vase. Then arrange the thinner flowers to give dimension and hight. Use the flowers to fill in any gaps. You want your arrangement to look nice and full. Enjoy your masterpiece! Yield: Makes 1 CenterpieceTotal time: 15 mins.


May 11, 2016
Turmeric Smoothie Recipe
This is a sponsored conversation written by me on behalf of ElevĀte. The opinions and text are all mine.
Recipe for bright, creamy, citrusy turmeric smoothies. These tasty smoothies are the perfect accompaniment for a superfood salad at lunchtime, or anytime you need a refreshing pick-me-up. Turmeric is a wonderful superfood that has been used in Chinese and Indian medicine for centuries and now one of my favorite ingredients.
If you're a regular reader of this blog, you probably have noticed I am a big fan of getting in as much nutrient dense superfoods in as possible. If we are what we eat, I'll take vibrant, fresh, and real. One of the reasons I'm so in love with eating this way is because I have noticed just how much better I feel when I do.
ElevĀte organic salads asked me to give their superfood salads a try, and I must say, I love what they are all about. Although I adore scratch cooking, that's just not always possible in real life. In real life, I have multiple school pick-ups, school volunteering, animal and garden chores, and dirty dog footprints to clean up... and I try my best to sneak in a yoga class instead of taking a proper lunch break. If I can have a nourishing smoothie, superfood salad, and detoxifying lemon water, I am a happy mama and feel energized, light, and uplifted all day. So today I'm sharing one of my current favorite smoothies (my kids' favorite too!) and elevĀte organic salads. I am so happy to see more healthy convenience food that's accessible to everyone. There really is no need for fast food filled with additives and chemicals when eating organic, Non-GMO, real food is this easy.
 ElevĀte organic salads make it easy to eat clean and feel great all day, even on those days when we don't have time to make lunch or a superfood side salad to go with dinner. My all-around favorite salad combination is the Nutty Cranberry - filled with organic greens, cranberries, walnuts, almonds, and creamy feta, but there are 8 different elevĀte salads, from vegan to vegetarian to omnivorous. All 8 are available at Walmart and with rollback savings until May 17th, so you can stock up and eat well all week long.
 To go along with my superfood salads this week, I've been taking just a minute to whip up my favorite turmeric smoothie. Most of us are used to using dried turmeric in curries and other Indian recipes, but fresh turmeric is creeping into more and more grocery stores as it's benefits are being more widely recognized. Turmeric looks a bit like ginger but is bright orange inside. It's easy to peel with a vegetable peeler and then it can be grated into many recipes, from sauces and soups to rices, or easily added to smoothies. If you can't find fresh turmeric, you can use dried.
 This turmeric smoothie has a bright citrusy, creamy, tropical flavor. That bright orange makes me feel happy just looking at it! The icing on the cake was when I was photographing this turmeric smoothie, my littlest ladybug came over and said, "Mama, can I have that? It looks SO good and orangey!" And with that, she downed the whole smoothie. So I guess superfood salads and smoothies aren't just for busy mamas.

Not only are the elevAte salads packed with some of my favorite delicious and nourishing ingredients, they are organic and non-GMO. Thank you, elevAte! You don't have to compromise your health throughout the day when things get busy - these salads make it easy to eat clean and feel great all day. I've had the best lunches this week and all I had to do was grab one of these salads from the fridge and set it down in front of my computer to munch on while I work, or throw in my pool bag to eat during the kids' swim lessons. There's even a fork inside, so you really don't have to think about doing a thing. Here was a great lunch that took just a minute to put together and toss in my pool bag to enjoy during my daughter's swim lesson. This was so much more satisfying that the protein bar I have been known to grab in a hurry.
Are you a smoothie and salad lover too? What is your favorite combination?

Turmeric Smoothie By Yummy Mummy Kitchen
Published 05/11/2016

Tropical citrus turmeric smoothieIngredients1 orange, peeled 1 peeled and sliced frozen banana 1/2 cup frozen pineapple chunks1/2 cup frozen mango chunks 1 heaping teaspoon fresh peeled and grated turmeric (or 1/2 teaspoon dried)1/2 cup ice cubes1/8 cup almond milk (optional) InstructionsPlace the orange, banana, pineapple, mango, and turmeric in a blender. Blend until smooth. Add almond milk to thin, and ice cubes to thicken or make more icy. Yield: Makes smoothie
Prep Time: 3 mins. Cook time: 1 mins.
Total time: 4 mins.
Tags: smoothies, juice, turmeric, superfoods
This is a sponsored conversation written by me on behalf of ElevĀte. The opinions and text are all mine.


Recipe for bright, creamy, citrusy turmeric smoothies. These tasty smoothies are the perfect accompaniment for a superfood salad at lunchtime, or anytime you need a refreshing pick-me-up. Turmeric is a wonderful superfood that has been used in Chinese and Indian medicine for centuries and now one of my favorite ingredients.

If you're a regular reader of this blog, you probably have noticed I am a big fan of getting in as much nutrient dense superfoods in as possible. If we are what we eat, I'll take vibrant, fresh, and real. One of the reasons I'm so in love with eating this way is because I have noticed just how much better I feel when I do.
ElevĀte organic salads asked me to give their superfood salads a try, and I must say, I love what they are all about. Although I adore scratch cooking, that's just not always possible in real life. In real life, I have multiple school pick-ups, school volunteering, animal and garden chores, and dirty dog footprints to clean up... and I try my best to sneak in a yoga class instead of taking a proper lunch break. If I can have a nourishing smoothie, superfood salad, and detoxifying lemon water, I am a happy mama and feel energized, light, and uplifted all day. So today I'm sharing one of my current favorite smoothies (my kids' favorite too!) and elevĀte organic salads. I am so happy to see more healthy convenience food that's accessible to everyone. There really is no need for fast food filled with additives and chemicals when eating organic, Non-GMO, real food is this easy.
ElevĀte organic salads make it easy to eat clean and feel great all day, even on those days when we don't have time to make lunch or a superfood side salad to go with dinner. My all-around favorite salad combination is the Nutty Cranberry - filled with organic greens, cranberries, walnuts, almonds, and creamy feta, but there are 8 different elevĀte salads, from vegan to vegetarian to omnivorous. All 8 are available at Walmart and with rollback savings until May 17th, so you can stock up and eat well all week long.
To go along with my superfood salads this week, I've been taking just a minute to whip up my favorite turmeric smoothie. Most of us are used to using dried turmeric in curries and other Indian recipes, but fresh turmeric is creeping into more and more grocery stores as it's benefits are being more widely recognized. Turmeric looks a bit like ginger but is bright orange inside. It's easy to peel with a vegetable peeler and then it can be grated into many recipes, from sauces and soups to rices, or easily added to smoothies. If you can't find fresh turmeric, you can use dried.
This turmeric smoothie has a bright citrusy, creamy, tropical flavor. That bright orange makes me feel happy just looking at it! The icing on the cake was when I was photographing this turmeric smoothie, my littlest ladybug came over and said, "Mama, can I have that? It looks SO good and orangey!" And with that, she downed the whole smoothie. So I guess superfood salads and smoothies aren't just for busy mamas.
Not only are the elevAte salads packed with some of my favorite delicious and nourishing ingredients, they are organic and non-GMO. Thank you, elevAte! You don't have to compromise your health throughout the day when things get busy - these salads make it easy to eat clean and feel great all day. I've had the best lunches this week and all I had to do was grab one of these salads from the fridge and set it down in front of my computer to munch on while I work, or throw in my pool bag to eat during the kids' swim lessons. There's even a fork inside, so you really don't have to think about doing a thing.
Here was a great lunch that took just a minute to put together and toss in my pool bag to enjoy during my daughter's swim lesson. This was so much more satisfying that the protein bar I have been known to grab in a hurry. Are you a smoothie and salad lover too? What is your favorite combination?
Turmeric Smoothie By Yummy Mummy Kitchen
Published 05/11/2016
Tropical citrus turmeric smoothieIngredients1 orange, peeled 1 peeled and sliced frozen banana 1/2 cup frozen pineapple chunks1/2 cup frozen mango chunks 1 heaping teaspoon fresh peeled and grated turmeric (or 1/2 teaspoon dried)1/2 cup ice cubes1/8 cup almond milk (optional) InstructionsPlace the orange, banana, pineapple, mango, and turmeric in a blender. Blend until smooth. Add almond milk to thin, and ice cubes to thicken or make more icy. Yield: Makes smoothie
Prep Time: 3 mins. Cook time: 1 mins.
Total time: 4 mins.
Tags: smoothies, juice, turmeric, superfoods
This is a sponsored conversation written by me on behalf of ElevĀte. The opinions and text are all mine.
May 10, 2016
Blueberry Crisp with Almond Oatmeal Topping
Follow my blog with Bloglovin
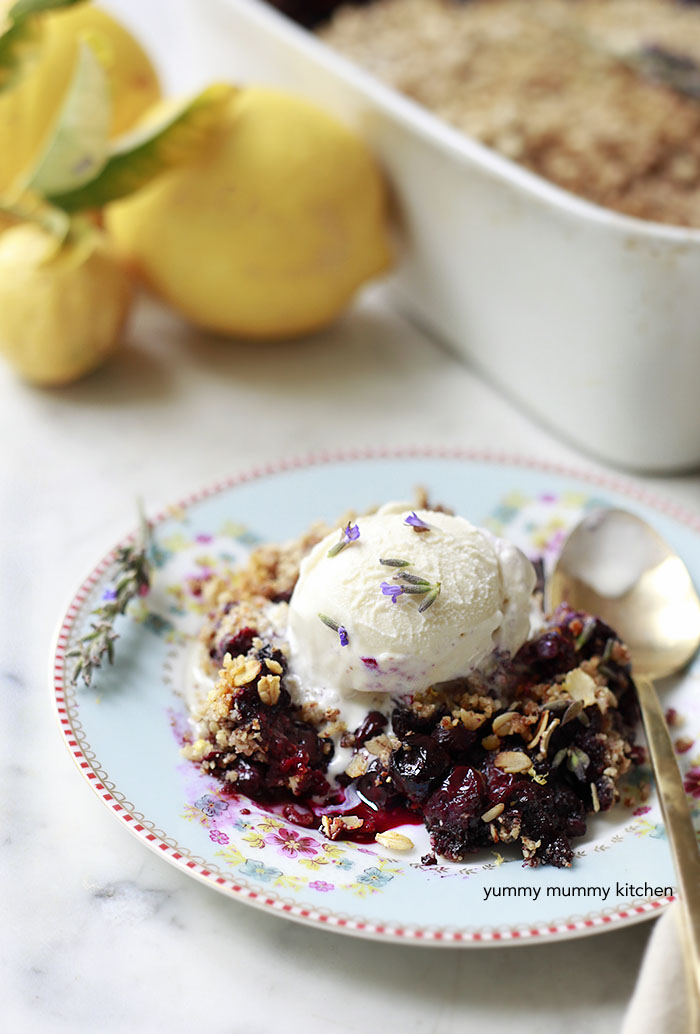
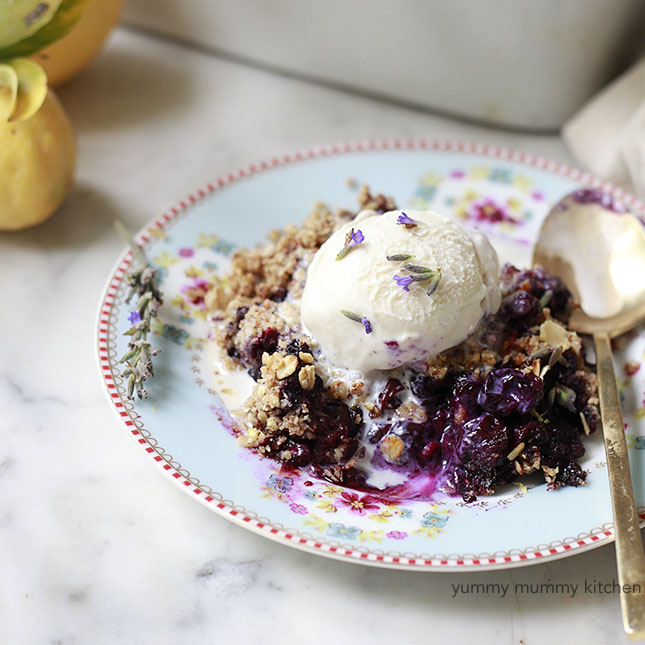
This wholesome blueberry crisp with oatmeal and nut topping is easy to make vegan and gluten-free. Lemon and lavender take this blueberry crisp to another beautiful level. Blueberry crisp, blueberry crumble... whatever you want to call it, this is our family's favorite treat right now. With blueberries just coming into season, now is the time to treat yourself to this sweet, juicy, crumbly treat. As far as desserts go, this one is quite wholesome. I usually prefer fruit crisps over pies, so that the fruit can really shine without being weighed down by overly rich and starchy pie crust. This blueberry crisp is made up of heaps of blueberries brightened up with lemon and naturally sweetened. Crumbly oatmeal and nuts make the perfect satisfyingly crunchy topping.
 We spent Mother's Day over the hill in Santa Ynez. After brunching at SY Kitchen (aaaaaamazing), we headed to our go-to family spots. First the Farmstead to pet the piglets, goats, baby donkey, and pony. Then just up the highway to Santa Barbara Blueberries, to pick bucketfuls of plump berries. Searching for the biggest, bluest berries is such a fun treasure hunt.
 While handfuls of fresh berries are always devoured on our drive home, I am always excited to use these juicy berries in the kitchen.

The firm berries cook down to release vibrant purple juice that thickens up when baked with lemon juice and a little honey.
 I prefer blueberry crisp over blueberry pie because of taste, but another plus is that it is so easy to make. I combine the base ingredients for this easy blueberry crisp right in the baking dish. The topping ingredients get whirled together in the food processor. Effortless. Natural. Beautiful.
 I am going to insist you serve this crisp with a little vanilla ice cream on top. I like Nada Moo for an organic non-dairy coconut based ice cream. Whipped coconut cream is also delicious. The juicy berries and crumbly topping are so much tastier with a little creaminess on top. I love garnishing this dreamy dessert with a few lavender flowers and fresh lemon zest for another layer of earthy, summery flavor. If you don't have lavender in your backyard or farmers market, dried lavender works just fine and you can find it at gourmet food stores. You can actually add 1 teaspoon of lavender to the blueberry mixture, but any more than 1 1/2 teaspoons and it can become a bit "soapy" tasting.

Blueberry Crisp with Almond Topping Printer Friendly Recipe
By Yummy Mummy Kitchen
Published 05/10/2016
Easy blueberry crisp made healthier with an almond topping. This blueberry crisp is easy to make vegan and gluten free. Ingredients5 1/2 cups fresh or frozen blueberriesjuice of 1/2 lemonzest of 1 small lemon, plus more for garnish 1/4 cup maple syrup or honey1 cup almond meal1 1/2 tablespoons all purpose or gluten free flour1/4 teaspoon sea salt1/4 cup coconut sugar (or your favorite sugar) 2 tablespoons hemp seeds 1/3 cup Earth Balance, coconut oil, or butter1 tablespoon honey1 cup old fashioned oats (gf if needed)1/4 cup walnuts favorite vanilla or coconut ice cream for servingdried or fresh culinary lavender for garnish InstructionsPreheat the oven to 350 degrees F. In a 9x13" baking dish, combine the blueberries, lemon juice and zest, and syrup. In a food processor, pulse together the almond meal, flour, salt, sugar, hemp seeds, "butter" or oil, and honey until starting to stick together when pressed. You can add a little more "butter" if the crumble is too dry. Add oats and walnuts and pulse a few more times to combine. I like some whole oats, but you can pulse until the crumble topping is as fine as you would like. Place topping over the berries. Bake until bubbly, 45-55 minutes. Check halfway through and cover with foil if the top is getting too brown. Serve this blueberry crisp warm with ice cream or whipped coconut cream. Sprinkle with a little lavender and lemon zest for an extra special earthy and fresh flavor.Yield: serves 6-8
Prep Time: 10 mins. Cook time: 50 mins.
Total time: 60 mins.
Tags: summer, blueberry crisp, blueberry crumble, lavender, lemon
*Vegan Option: Use maple or coconut syrup instead of honey. Use Earth Balance or coconut oil instead of butter.
*Gluten Free Option: Be sure to use all gf ingredients, such as gluten free oats and gluten free flour.
You may need:


This wholesome blueberry crisp with oatmeal and nut topping is easy to make vegan and gluten-free. Lemon and lavender take this blueberry crisp to another beautiful level.
 Blueberry crisp, blueberry crumble... whatever you want to call it, this is our family's favorite treat right now. With blueberries just coming into season, now is the time to treat yourself to this sweet, juicy, crumbly treat. As far as desserts go, this one is quite wholesome. I usually prefer fruit crisps over pies, so that the fruit can really shine without being weighed down by overly rich and starchy pie crust. This blueberry crisp is made up of heaps of blueberries brightened up with lemon and naturally sweetened. Crumbly oatmeal and nuts make the perfect satisfyingly crunchy topping.
 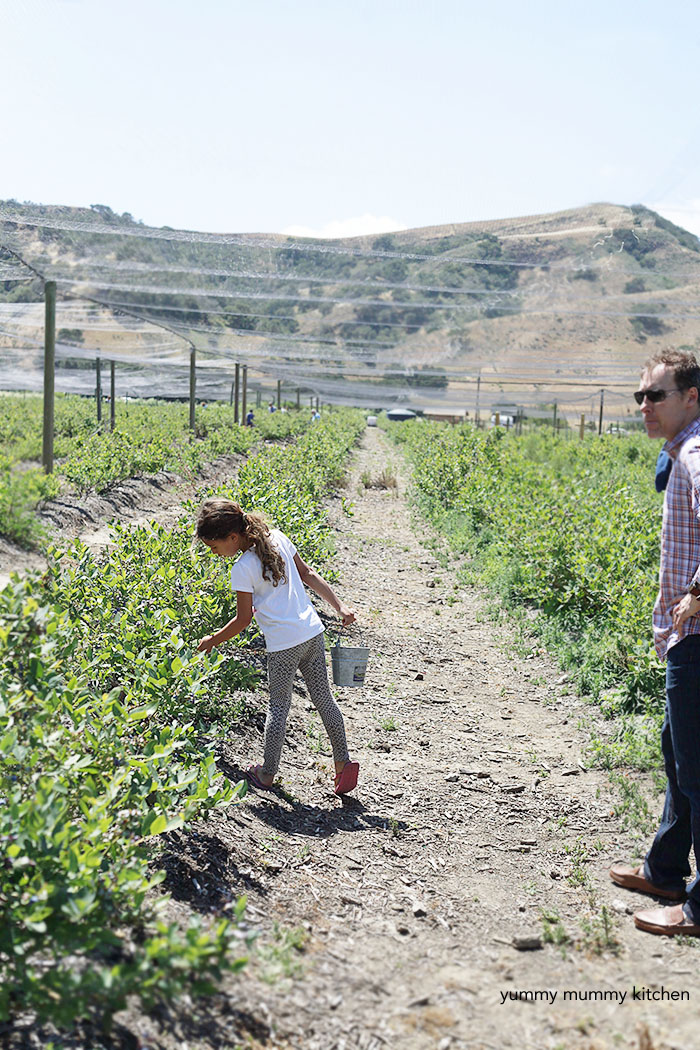 We spent Mother's Day over the hill in Santa Ynez. After brunching at SY Kitchen (aaaaaamazing), we headed to our go-to family spots. First the Farmstead to pet the piglets, goats, baby donkey, and pony. Then just up the highway to Santa Barbara Blueberries, to pick bucketfuls of plump berries. Searching for the biggest, bluest berries is such a fun treasure hunt.
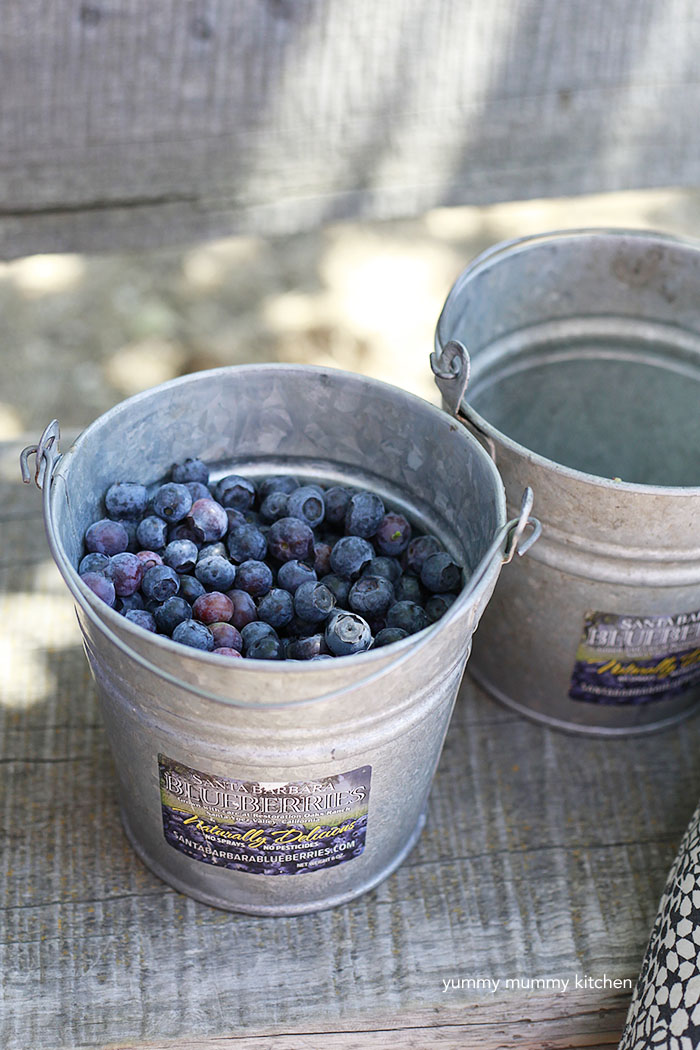 While handfuls of fresh berries are always devoured on our drive home, I am always excited to use these juicy berries in the kitchen.

The firm berries cook down to release vibrant purple juice that thickens up when baked with lemon juice and a little honey.
 I prefer blueberry crisp over blueberry pie because of taste, but another plus is that it is so easy to make. I combine the base ingredients for this easy blueberry crisp right in the baking dish. The topping ingredients get whirled together in the food processor. Effortless. Natural. Beautiful.
 I am going to insist you serve this crisp with a little vanilla ice cream on top. I like Nada Moo for an organic non-dairy coconut based ice cream. Whipped coconut cream is also delicious. The juicy berries and crumbly topping are so much tastier with a little creaminess on top. I love garnishing this dreamy dessert with a few lavender flowers and fresh lemon zest for another layer of earthy, summery flavor. If you don't have lavender in your backyard or farmers market, dried lavender works just fine and you can find it at gourmet food stores. You can actually add 1 teaspoon of lavender to the blueberry mixture, but any more than 1 1/2 teaspoons and it can become a bit "soapy" tasting.
Blueberry Crisp with Almond Topping Printer Friendly Recipe
By Yummy Mummy Kitchen
Published 05/10/2016
Easy blueberry crisp made healthier with an almond topping. This blueberry crisp is easy to make vegan and gluten free. Ingredients5 1/2 cups fresh or frozen blueberriesjuice of 1/2 lemonzest of 1 small lemon, plus more for garnish 1/4 cup maple syrup or honey1 cup almond meal1 1/2 tablespoons all purpose or gluten free flour1/4 teaspoon sea salt1/4 cup coconut sugar (or your favorite sugar) 2 tablespoons hemp seeds 1/3 cup Earth Balance, coconut oil, or butter1 tablespoon honey1 cup old fashioned oats (gf if needed)1/4 cup walnuts favorite vanilla or coconut ice cream for servingdried or fresh culinary lavender for garnish InstructionsPreheat the oven to 350 degrees F. In a 9x13" baking dish, combine the blueberries, lemon juice and zest, and syrup. In a food processor, pulse together the almond meal, flour, salt, sugar, hemp seeds, "butter" or oil, and honey until starting to stick together when pressed. You can add a little more "butter" if the crumble is too dry. Add oats and walnuts and pulse a few more times to combine. I like some whole oats, but you can pulse until the crumble topping is as fine as you would like. Place topping over the berries. Bake until bubbly, 45-55 minutes. Check halfway through and cover with foil if the top is getting too brown. Serve this blueberry crisp warm with ice cream or whipped coconut cream. Sprinkle with a little lavender and lemon zest for an extra special earthy and fresh flavor.Yield: serves 6-8
Prep Time: 10 mins. Cook time: 50 mins.
Total time: 60 mins.
Tags: summer, blueberry crisp, blueberry crumble, lavender, lemon
*Vegan Option: Use maple or coconut syrup instead of honey. Use Earth Balance or coconut oil instead of butter.
*Gluten Free Option: Be sure to use all gf ingredients, such as gluten free oats and gluten free flour.
You may need:


