
Marina Delio's Blog, page 23
January 29, 2016
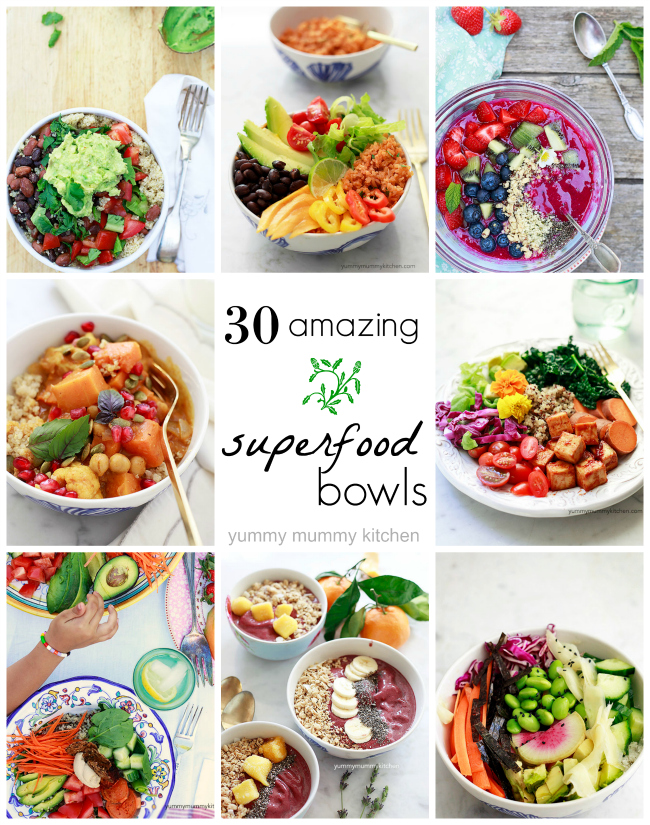
30 Best Buddha Bowls
30 of the best nourishing Buddha bowls around. These colorful vegetarian and vegan bowls are bursting with macronutrients to fuel your body and mind.
 Buddha bowls, nourish bowls, rainbow bowls, hippie bows, macro bowls, yoga bowls... these beauties have many names and have become increasingly popular over the past couple of years. And I, for one, couldn't be happier about it! I would be happy to eat these colorful bowls for breakfast, lunch, and dinner. They are simple to make, beautiful, nourishing, and (maybe surprisingly) kid friendly. My favorite way to serve savory dinner Buddha bowls is to set out bowls of various nutrient dense ingredients/toppings and let everyone make their own bowl. There are no rules - just be sure to include veggies and protein, and several colors and textures. If you take an hour over the weekend to prep some foods that take longer, your Buddha bowls will be quick and easy. I like to cook quinoa, lentils and some veggies like beets and sweet potatoes over the weekend. You can dress your bowls with your favorite dressing or add a dollop of hummus, tahini, salsa, or guacamole. Or leave them undressed!
 A bowl of quinoa with roasted kale, avocado, and a poached egg is one of my go-to lunch or dinner recipes for nights when there's "nothing" in the house to eat. It's so much healthier, cheaper, and quicker than that pizza delivery that will leave you with a bellyache.
 My winter Buddha bowl of the week: Curried chickpeas with roasted Brussels sprouts, purple carrots, purple sweet potatoes, golden beets, and radishes, avocado, and tahini over a bed of quinoa. Recipe at the end :-)
My 30 favorite Buddha Bowl RecipesMexican Rice & Beans Rainbow Bowl Quinoa, Kale, and Egg Bowl (pictured above) Curried Chickpea Buddha Bowl (pictured above and recipe below) Easy Vegan Chia Pudding ParfaitsAcai Bowls Pitaya BowlsRainbow Bowls Veggie Sushi BowlsBBQ Baked Tofu Buddha Bowls Quinoa Taco Bowls Stuffed Baked Sweet PotatoesButternut Squash Curry with Pumpkin, Cauliflower, and Chickpeas Spicy Mango Avocado Rice Bowl from Love and LemonsChili Orange Veggie BowlGreek Goddess Grain Bowl from Half Baked Harvest Roasted Nourish Bowls with Lemon Tahini Dressing from A Couple Cooks The Ultimate Winter Bliss Bowls with Falafel from Pinch of YumHoney Ginger Tofu Veggie Stir Fry from Pinch of YumMediterranean Quinoa Bowls with Roasted Red Pepper SauceVegan Quinoa Power Bowls with Roasted Veggies and Avocado Sauce from Avocado PestoThai Style Buddha Bowl from LeelaliciousChimichurri Nourish Bowl from The Simple Veganista Winter Cobb Salad from Begin With Nutrition Farmers Market Sesame Miso Noodle Bowls from Half Baked HarvestSunshine Bowl with Sunflower Seed Tahini from Feasting at Home Summer Glow Bowl from Feasting at HomeSweet Potato Chickpea Buddha Bowl with Lemon Maple Tahini Sauce Nourish + Glow Bowl with Sun Dried Tomato Hummus from Oh She GlowsFall Veg Lentil Bowl with Gogi Ginger Tahini Cream from The First MessPolenta with French Lentils from In Pursuit of MoreKale Salad Balance Bowl from Begin Within Nutrition
I love these Buddha bowls so much I made a whole Pinterest board devoted to them. Follow along here!
Follow Marina | Yummy Mummy Kitchen's board Superfood Bowls on Pinterest.

Buddha Bowl with Curried ChickpeasBy Yummy Mummy Kitchen
Published 01/29/2016
Crunchy curried chickpeas perfect for snacking or adding to salads and Buddha Bowls! Ingredients2 (15 oz.) cans chickpeas 2 tablespoons extra virgin olive oil1/2 teaspoon sea salt 1 teaspoon curry powder 2 cups cooked quinoa or other base favorite veggies for making your Buddha bowl hummus or tahini dressingInstructionsPreheat oven to 400 degrees F. Drain and rinse chickpeas. Gently dry chickpeas until they are no longer wet and shiny. On a baking sheet, toss chickpeas with olive oil and salt to coat. Roast for 25 minutes, or until crisp. Toss with curry powder and enjoy warm! Yield: serves 4
Prep Time: 2 mins. Cook time: 30 mins.
Total time: 32 mins.
Tags: vegan, vegetarian, chickpeas, Buddha bowls


 Buddha bowls, nourish bowls, rainbow bowls, hippie bows, macro bowls, yoga bowls... these beauties have many names and have become increasingly popular over the past couple of years. And I, for one, couldn't be happier about it! I would be happy to eat these colorful bowls for breakfast, lunch, and dinner. They are simple to make, beautiful, nourishing, and (maybe surprisingly) kid friendly. My favorite way to serve savory dinner Buddha bowls is to set out bowls of various nutrient dense ingredients/toppings and let everyone make their own bowl. There are no rules - just be sure to include veggies and protein, and several colors and textures. If you take an hour over the weekend to prep some foods that take longer, your Buddha bowls will be quick and easy. I like to cook quinoa, lentils and some veggies like beets and sweet potatoes over the weekend. You can dress your bowls with your favorite dressing or add a dollop of hummus, tahini, salsa, or guacamole. Or leave them undressed!
  A bowl of quinoa with roasted kale, avocado, and a poached egg is one of my go-to lunch or dinner recipes for nights when there's "nothing" in the house to eat. It's so much healthier, cheaper, and quicker than that pizza delivery that will leave you with a bellyache.
 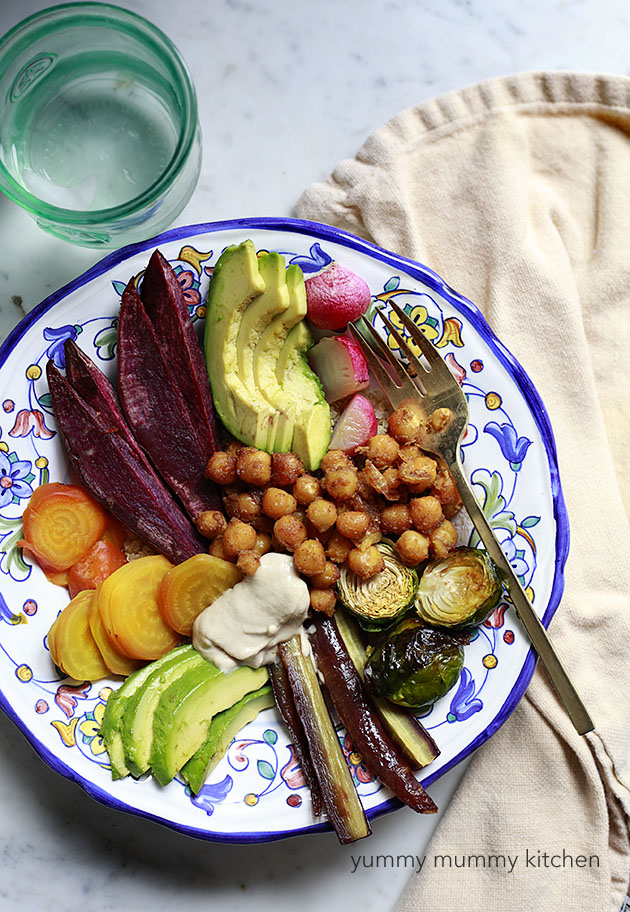 My winter Buddha bowl of the week: Curried chickpeas with roasted Brussels sprouts, purple carrots, purple sweet potatoes, golden beets, and radishes, avocado, and tahini over a bed of quinoa. Recipe at the end :-)
My 30 favorite Buddha Bowl RecipesMexican Rice & Beans Rainbow Bowl Quinoa, Kale, and Egg Bowl (pictured above) Curried Chickpea Buddha Bowl (pictured above and recipe below) Easy Vegan Chia Pudding ParfaitsAcai Bowls Pitaya BowlsRainbow Bowls Veggie Sushi BowlsBBQ Baked Tofu Buddha Bowls Quinoa Taco Bowls Stuffed Baked Sweet PotatoesButternut Squash Curry with Pumpkin, Cauliflower, and Chickpeas Spicy Mango Avocado Rice Bowl from Love and LemonsChili Orange Veggie BowlGreek Goddess Grain Bowl from Half Baked Harvest Roasted Nourish Bowls with Lemon Tahini Dressing from A Couple Cooks The Ultimate Winter Bliss Bowls with Falafel from Pinch of YumHoney Ginger Tofu Veggie Stir Fry from Pinch of YumMediterranean Quinoa Bowls with Roasted Red Pepper SauceVegan Quinoa Power Bowls with Roasted Veggies and Avocado Sauce from Avocado PestoThai Style Buddha Bowl from LeelaliciousChimichurri Nourish Bowl from The Simple Veganista Winter Cobb Salad from Begin With Nutrition Farmers Market Sesame Miso Noodle Bowls from Half Baked HarvestSunshine Bowl with Sunflower Seed Tahini from Feasting at Home Summer Glow Bowl from Feasting at HomeSweet Potato Chickpea Buddha Bowl with Lemon Maple Tahini Sauce Nourish + Glow Bowl with Sun Dried Tomato Hummus from Oh She GlowsFall Veg Lentil Bowl with Gogi Ginger Tahini Cream from The First MessPolenta with French Lentils from In Pursuit of MoreKale Salad Balance Bowl from Begin Within Nutrition
I love these Buddha bowls so much I made a whole Pinterest board devoted to them. Follow along here!
Follow Marina | Yummy Mummy Kitchen's board Superfood Bowls on Pinterest.

Buddha Bowl with Curried ChickpeasBy Yummy Mummy Kitchen
Published 01/29/2016
Crunchy curried chickpeas perfect for snacking or adding to salads and Buddha Bowls! Ingredients2 (15 oz.) cans chickpeas 2 tablespoons extra virgin olive oil1/2 teaspoon sea salt 1 teaspoon curry powder 2 cups cooked quinoa or other base favorite veggies for making your Buddha bowl hummus or tahini dressingInstructionsPreheat oven to 400 degrees F. Drain and rinse chickpeas. Gently dry chickpeas until they are no longer wet and shiny. On a baking sheet, toss chickpeas with olive oil and salt to coat. Roast for 25 minutes, or until crisp. Toss with curry powder and enjoy warm! Yield: serves 4
Prep Time: 2 mins. Cook time: 30 mins.
Total time: 32 mins.
Tags: vegan, vegetarian, chickpeas, Buddha bowls


January 27, 2016
Sushi Buddha Bowls
How to make veggie sushi Buddha bowls. A quick and easy recipe.
 I hear the Super Bowl is coming up. Will you be watching? The big parties look like a lot of fun, but I have to tell you, we never watch the game. The Super Bowl, does, however remind me of one of my favorite meals... super food bowls! I'm going to be sharing a few of my favorite versions in the next few days. You could totally serve these SuperFood Bowls at you Super Bowl parties. Set out the topping and let everyone make their own Super Bowls. Today's super food Buddha bowl is sushi inspired. I love love love making Buddha rainbow bowls because they are so fun and colorful and loaded with nourishing ingredients.
Step 1: Choose your base. I used cauliflower rice for mine (see video for the simple recipe!) and Jasmine rice for the kids. To be honest, in the future I would use Jasmine rice as well - it's just tastier and more satisfying than the cauliflower rice. Quinoa is also a great base for your Buddha Bowls.
Step 2: Choose your favorite sushi toppings. I put out some of my favorite toppings/sushi fillings, and some of the kids' favorites. After I took the photos I added crispy baked tofu to make this a more filling meal. If you're a meat eater, you could add teriyaki chicken or grilled shrimp. Our vegan Buddha sushi bowl toppings! Shoot for a variety of colors and textures.
Here's the video! I would be so honored if you would take a second to subscribe to my YouTube channel as I plan to add more videos every week.

Sushi Buddha Bowls By Yummy Mummy Kitchen
Published 01/27/2016

Nourishing veggie sushi inspired bowl. These easy bowls are great for taking on the go and would be perfect for a delicious work lunch. Ingredients4 cups cooked Jasmine rice, quinoa, or cauliflower rice 2 avocados, seeded and diced or sliced 2 large carrots, peeled and thinly sliced 2 cups shelled edamame cubed baked tofu (optional) 2 Persian cucumbers, dicedpurple cabbage, sliced2 tablespoons black sesame seeds pickled ginger 1 radish, thinly sliced 1/2 cup sliced nori (roasted seaweed) soy sauce or Bragg liquid aminos InstructionsFill bowls with rice. Arrange toppings over the rice. Serve with soy sauce and enjoy! *You can make these bowls early, cover with plastic wrap, and refrigerate until ready to eat. Yield: serves 4
Prep Time: 10 mins. Cook time: 5 mins.
Total time: 15 mins.
Tags: vegan, vegetarian, superfoods, sushi, Japanese, Buddha bowls


 I hear the Super Bowl is coming up. Will you be watching? The big parties look like a lot of fun, but I have to tell you, we never watch the game. The Super Bowl, does, however remind me of one of my favorite meals... super food bowls! I'm going to be sharing a few of my favorite versions in the next few days. You could totally serve these SuperFood Bowls at you Super Bowl parties. Set out the topping and let everyone make their own Super Bowls. Today's super food Buddha bowl is sushi inspired. I love love love making Buddha rainbow bowls because they are so fun and colorful and loaded with nourishing ingredients.
 Step 1: Choose your base. I used cauliflower rice for mine (see video for the simple recipe!) and Jasmine rice for the kids. To be honest, in the future I would use Jasmine rice as well - it's just tastier and more satisfying than the cauliflower rice. Quinoa is also a great base for your Buddha Bowls.
Step 2: Choose your favorite sushi toppings. I put out some of my favorite toppings/sushi fillings, and some of the kids' favorites. After I took the photos I added crispy baked tofu to make this a more filling meal. If you're a meat eater, you could add teriyaki chicken or grilled shrimp.
 Our vegan Buddha sushi bowl toppings! Shoot for a variety of colors and textures.
 Here's the video! I would be so honored if you would take a second to subscribe to my YouTube channel as I plan to add more videos every week.

Sushi Buddha Bowls By Yummy Mummy Kitchen
Published 01/27/2016
Nourishing veggie sushi inspired bowl. These easy bowls are great for taking on the go and would be perfect for a delicious work lunch. Ingredients4 cups cooked Jasmine rice, quinoa, or cauliflower rice 2 avocados, seeded and diced or sliced 2 large carrots, peeled and thinly sliced 2 cups shelled edamame cubed baked tofu (optional) 2 Persian cucumbers, dicedpurple cabbage, sliced2 tablespoons black sesame seeds pickled ginger 1 radish, thinly sliced 1/2 cup sliced nori (roasted seaweed) soy sauce or Bragg liquid aminos InstructionsFill bowls with rice. Arrange toppings over the rice. Serve with soy sauce and enjoy! *You can make these bowls early, cover with plastic wrap, and refrigerate until ready to eat. Yield: serves 4
Prep Time: 10 mins. Cook time: 5 mins.
Total time: 15 mins.
Tags: vegan, vegetarian, superfoods, sushi, Japanese, Buddha bowls
January 22, 2016
Homemade Raw Chocolate Recipe (dairy free, vegan)
Easy recipe for raw, dairy-free, vegan chocolate packed with superfoods. Try this healthier chocolate made with cacao and honey or coconut syrup for Valentine's Day!
 Chocolate has always been one of my favorite things. When I gave up refined sugar and killed my sugar addiction (except for special occasions) a few years ago, I thought chocolate would be off limits. I was so wrong. Chocolate, in it's adulterated from, is a quality superfood. Cacao is high in protein, antioxidants, and feel-good mood boosting compounds. So now I add unsweetened cacao to my smoothies, oatmeal, chia pudding, and more. Most conventional chocolates from the grocery store are so processed and filled with sugar that the benefits of cacao are diminished. So let's make our own superfood chocolate!
 It's really very simple. Just a few nourishing ingredients melted together. The main components are raw cacao butter, which you can find at natural foods stores or on Amazon here plus some unsweetened cacao/cocoa powder and your sweetener of choice. Coconut nectar, honey, or liquid stevia.
Sidenote!!! I've finally gotten with the times and started making YouTube videos. Here's the video for these superfoods chocolates. Since I'm not going to be adding all my videos here on the blog, go subscribe to my channel.

No need to give up chocolate! It's a wonderful part of a healthy lifestyle. Hooray! These chocolates are deep, dark, and intense. We like them best with lots of crunchy toppings like nuts, seeds, and quinoa puffs. I got my quinoa puffs here on Nuts.com. Easy Raw Vegan Chocolate RecipeBy Yummy Mummy Kitchen
Published 01/22/2016
Nourishing chocolate recipe loaded with superfoods. Ingredients1 cup raw cacao butter, chopped, or coconut oil 1 cup unsweetened cacao or cocoa powder (raw if desired) 1/2 cup coconut nectar or honey, or liquid stevia to taste1 teaspoon vanilla extract toppings: quinoa puffs, nuts, seeds, freeze dried fruit, coconut...InstructionsMelt cacao butter in a bowl of a double boiler. Remove from heat and whisk in cacao powder, coconut nectar, and extract until thickened. Drop spoonfulls of chocolate onto a cookie sheet lined with wax paper or a silicone mat. Or fill a silicone ice cube tray. Sprinkle crunchy toppings over the melted chocolate. Place in the refrigerator or freezer until completely hardened. Store in the refrigerator to keep chocolates from melting. Yield: serves 4
Prep Time: 2 mins. Cook time: 25 mins.
Total time: 27 mins.
Tags: vegan, raw, chocolate, Valentine's Day, superfoods


 Chocolate has always been one of my favorite things. When I gave up refined sugar and killed my sugar addiction (except for special occasions) a few years ago, I thought chocolate would be off limits. I was so wrong. Chocolate, in it's adulterated from, is a quality superfood. Cacao is high in protein, antioxidants, and feel-good mood boosting compounds. So now I add unsweetened cacao to my smoothies, oatmeal, chia pudding, and more. Most conventional chocolates from the grocery store are so processed and filled with sugar that the benefits of cacao are diminished. So let's make our own superfood chocolate!
  It's really very simple. Just a few nourishing ingredients melted together. The main components are raw cacao butter, which you can find at natural foods stores or on Amazon here plus some unsweetened cacao/cocoa powder and your sweetener of choice. Coconut nectar, honey, or liquid stevia.
 Sidenote!!! I've finally gotten with the times and started making YouTube videos. Here's the video for these superfoods chocolates. Since I'm not going to be adding all my videos here on the blog, go subscribe to my channel.

No need to give up chocolate! It's a wonderful part of a healthy lifestyle. Hooray! These chocolates are deep, dark, and intense. We like them best with lots of crunchy toppings like nuts, seeds, and quinoa puffs. I got my quinoa puffs here on Nuts.com. Easy Raw Vegan Chocolate RecipeBy Yummy Mummy Kitchen
Published 01/22/2016
Nourishing chocolate recipe loaded with superfoods. Ingredients1 cup raw cacao butter, chopped, or coconut oil 1 cup unsweetened cacao or cocoa powder (raw if desired) 1/2 cup coconut nectar or honey, or liquid stevia to taste1 teaspoon vanilla extract toppings: quinoa puffs, nuts, seeds, freeze dried fruit, coconut...InstructionsMelt cacao butter in a bowl of a double boiler. Remove from heat and whisk in cacao powder, coconut nectar, and extract until thickened. Drop spoonfulls of chocolate onto a cookie sheet lined with wax paper or a silicone mat. Or fill a silicone ice cube tray. Sprinkle crunchy toppings over the melted chocolate. Place in the refrigerator or freezer until completely hardened. Store in the refrigerator to keep chocolates from melting. Yield: serves 4
Prep Time: 2 mins. Cook time: 25 mins.
Total time: 27 mins.
Tags: vegan, raw, chocolate, Valentine's Day, superfoods
January 18, 2016
Easy Vegetarian Lasagna Soup Recipe
Easy and delicious one pot veggie lasagna soup recipe. A dollop of ricotta on top makes this veggie soup rich and creamy. This one is easy to make vegan, vegetarian, or gluten free.
 We love lasagna in our family and I've posted several of our favorites here in the past. But now that the weather has cooled down I am craving soup at least once a week. Turning those irresistible lasagna flavors into a comforting and nourishing bowl of soup may just be the best idea ever. Lasagna soup is my new favorite quick and easy soup and the easiest way to serve lasagna. Lasagna soup is so much fun because the veggie options are endless. I always add a bag of fresh spinach to my usual veggie lasagna recipe, so I did the same with this soup. In the summer zucchini would be perfect in this soup. If you are a meat lover you could add some Italian sausage or even some meatballs. I prefer mushrooms to make it hearty.

Using a jar of sauce makes this lasagna soup quick and easy because all the seasonings are already packed in one place. You don't have to worry about flavoring this soup perfectly - that's already done for you with the sauce. The key is that it needs to be a top quality sauce. Check the ingredients. Sugar should not be near the front of the ingredients list. We just want simple ingredients like tomatoes and fresh basil slow cooked to perfection. Our favorite is from Ilvento's which tastes like it was just homemade by your Italian grandma. You can buy it at a few specialty shops in Santa Barbara like Goodland Kitchen, or on Amazon.
 The veggie soup is great on its own, but a dollop of ricotta is what really transforms it into lasagna soup. The ricotta makes this soup creamy, rich and satisfying. I just discovered artisan ricotta made from almonds. Dairy-free friends rejoice! I was skeptical, but this tastes just like the real thing, only more flavorful. You can of course use regular ricotta on top if you prefer.
 Just like when I make minestrone soup, I add a bag of baby spinach. It looks like way too much at first, but quickly wilts down to the perfect amount. As always, I go for a variety of colors. This easy one pot dinner I would be happy to enjoy weekly. Isn't it just the best when you only have one cooking dish to wash after dinner? When I make traditional baked lasagna I have at least three cooking dishes that need washing at the end.
I made a quick little video so you can see all the steps in action.
Easy Lasagna SoupBy Yummy Mummy Kitchen
Printer Friendly Recipe
Published 01/18/2016

Easy and comforting veggie soup that tastes just like lasagna. Ingredientsextra virgin olive oil1 yellow onion, diced1 red or yellow bell pepper, diced3 cloves garlic, minced8 oz. crimini or button mushrooms, sliced1 (15 oz.) jar good quality marinara (I used Ilvento's brand)32 oz. low sodium vegetable broth2 cups bow tie pasta (gf if needed) 5 oz. baby spinach 1 small container ricotta cheese (I love Kite Hill dairy free almond ricotta)1/2 cup shredded mozzarella cheese (optional) 1/2 cup fresh basil, torn or thinly sliced InstructionsHeat olive oil in a large pot over medium heat. Add the onion and saute until softened. Add garlic and bell pepper and continue to saute until pepper begins to soften, being careful not to burn the garlic. Add the mushrooms and saute until mushrooms are cooked. Stir in marinara and broth and bring to a simmer. Add pasta and simmer until al dente. Turn off heat and stir in spinach until it has wilted. Serve with a dollop of ricotta and a sprinkle of mozzarella and fresh basil. Yield: serves 4
Prep Time: 5 mins. Cook time: 25 mins.
Total time: 30 mins.
Tags: vegan, vegetarian, vegetables, soup, dinner
*Vegan Option: Use Kite Hill almond ricotta and dairy free mozzarella
*Gluten Free Option: Use gf pasta


We love lasagna in our family and I've posted several of our favorites here in the past. But now that the weather has cooled down I am craving soup at least once a week. Turning those irresistible lasagna flavors into a comforting and nourishing bowl of soup may just be the best idea ever. Lasagna soup is my new favorite quick and easy soup and the easiest way to serve lasagna. Lasagna soup is so much fun because the veggie options are endless. I always add a bag of fresh spinach to my usual veggie lasagna recipe, so I did the same with this soup. In the summer zucchini would be perfect in this soup. If you are a meat lover you could add some Italian sausage or even some meatballs. I prefer mushrooms to make it hearty. Using a jar of sauce makes this lasagna soup quick and easy because all the seasonings are already packed in one place. You don't have to worry about flavoring this soup perfectly - that's already done for you with the sauce. The key is that it needs to be a top quality sauce. Check the ingredients. Sugar should not be near the front of the ingredients list. We just want simple ingredients like tomatoes and fresh basil slow cooked to perfection. Our favorite is from Ilvento's which tastes like it was just homemade by your Italian grandma. You can buy it at a few specialty shops in Santa Barbara like Goodland Kitchen, or on Amazon.
 The veggie soup is great on its own, but a dollop of ricotta is what really transforms it into lasagna soup. The ricotta makes this soup creamy, rich and satisfying. I just discovered artisan ricotta made from almonds. Dairy-free friends rejoice! I was skeptical, but this tastes just like the real thing, only more flavorful. You can of course use regular ricotta on top if you prefer.
 Just like when I make minestrone soup, I add a bag of baby spinach. It looks like way too much at first, but quickly wilts down to the perfect amount. As always, I go for a variety of colors. This easy one pot dinner I would be happy to enjoy weekly. Isn't it just the best when you only have one cooking dish to wash after dinner? When I make traditional baked lasagna I have at least three cooking dishes that need washing at the end.
 I made a quick little video so you can see all the steps in action.

Easy Lasagna SoupBy Yummy Mummy Kitchen
Printer Friendly Recipe
Published 01/18/2016
Easy and comforting veggie soup that tastes just like lasagna. Ingredientsextra virgin olive oil1 yellow onion, diced1 red or yellow bell pepper, diced3 cloves garlic, minced8 oz. crimini or button mushrooms, sliced1 (15 oz.) jar good quality marinara (I used Ilvento's brand)32 oz. low sodium vegetable broth2 cups bow tie pasta (gf if needed) 5 oz. baby spinach 1 small container ricotta cheese (I love Kite Hill dairy free almond ricotta)1/2 cup shredded mozzarella cheese (optional) 1/2 cup fresh basil, torn or thinly sliced InstructionsHeat olive oil in a large pot over medium heat. Add the onion and saute until softened. Add garlic and bell pepper and continue to saute until pepper begins to soften, being careful not to burn the garlic. Add the mushrooms and saute until mushrooms are cooked. Stir in marinara and broth and bring to a simmer. Add pasta and simmer until al dente. Turn off heat and stir in spinach until it has wilted. Serve with a dollop of ricotta and a sprinkle of mozzarella and fresh basil. Yield: serves 4
Prep Time: 5 mins. Cook time: 25 mins.
Total time: 30 mins.
Tags: vegan, vegetarian, vegetables, soup, dinner
*Vegan Option: Use Kite Hill almond ricotta and dairy free mozzarella
*Gluten Free Option: Use gf pasta
January 15, 2016
sweet potato hummus recipe
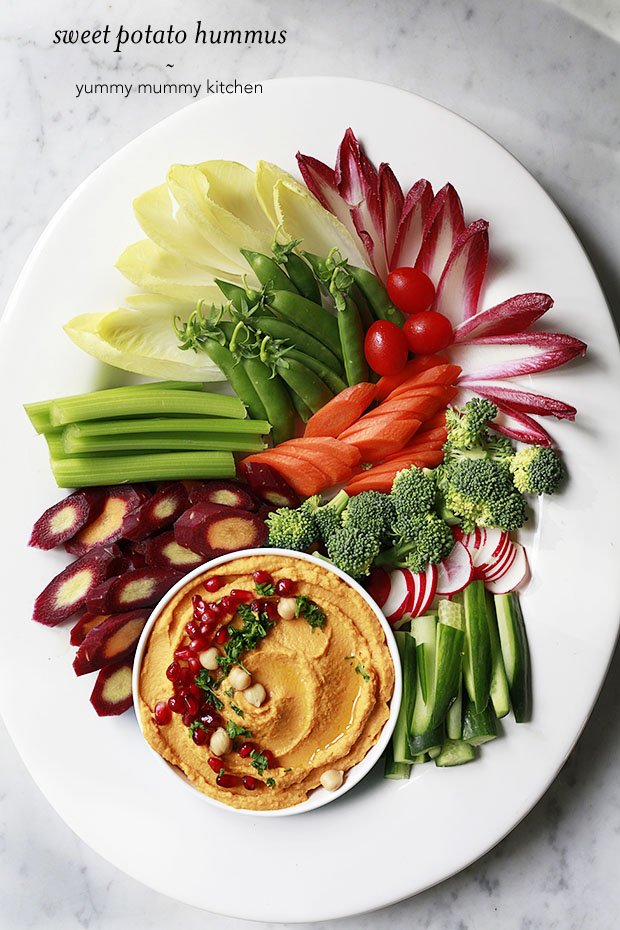 Hummus is a staple in our house. If you follow me on Instagram, you may know my girls often request hummus cucumber wraps in their lunch boxes. For years hummus was one of those things I picked up at the grocery store. When I made if for the first time, I was astounded at just how easy, cheap, and fun it is to make at home. The main components of hummus are: chickpeas, tahini (ground sesame seed sauce), lemon juice, and olive oil. From there you can get creative and play with the flavors. The Edamame hummus in my cookbook is my all time favorite.
  My kids are loving roasted sweet potatoes right now, so I tossed a couple of left over potatoes into our hummus this week. The result was a beautiful orange colored hummus packed with vitamins and minerals. This recipe makes a mild, slightly sweet hummus. If you'd like to add more kick, you can add cayenne pepper.
 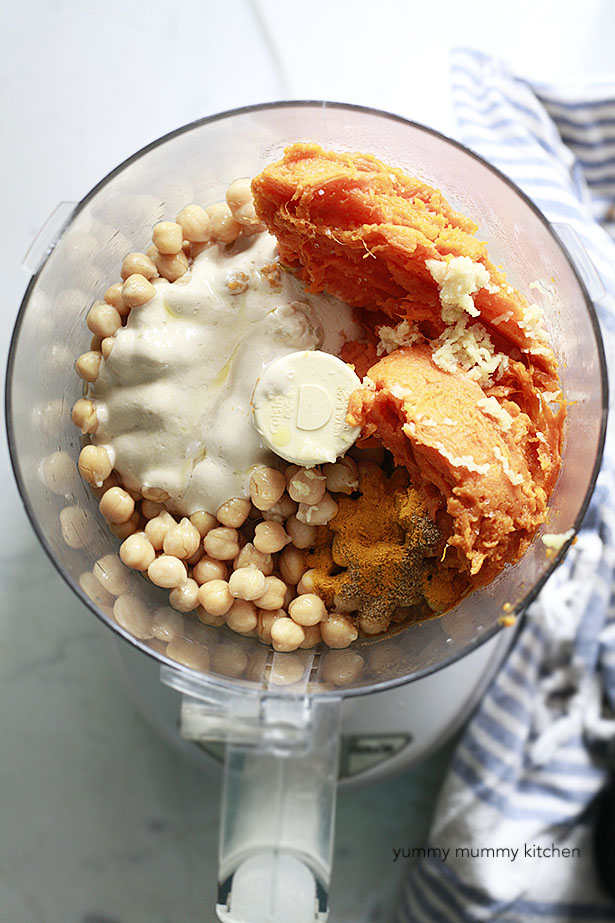 Making hummus in a food processor takes just a few minutes. Roasting the potatoes does slow down the process, so I recommend roasting extra sweet potatoes one night for dinner and using the left overs for this recipe the next day.
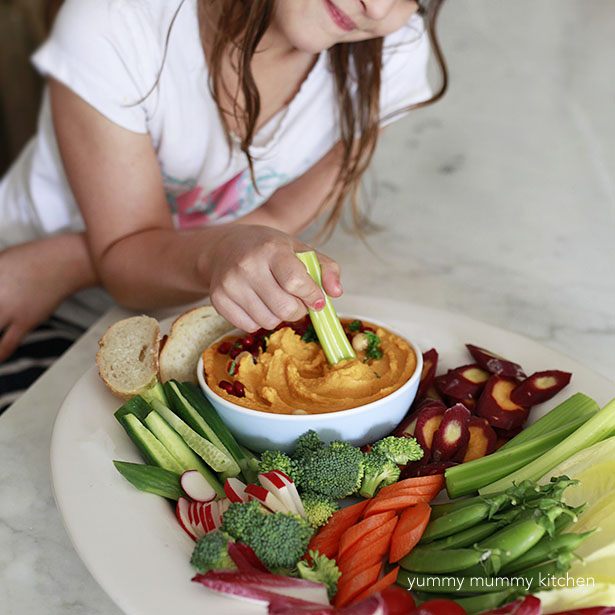 Dips are a great way to get your kids to eat more veggies. I love making a big platter of gorgeous vegetables when we have guests over. Although my kids decided they like plain hummus best, this sweet potato version was a fun change and I would definitely make it again, especially when guests are coming. Yummy Hubby and I finished this big bowl in two days.

Sweet Potato Hummus RecipeBy Yummy Mummy Kitchen
Published 01/15/2016
Printer Friendly Recipe

Sweet potato hummus recipe made in a food processor. Perfect for dipping veggies and pita chips, or as a sandwich spread. Ingredients2 sweet potatoes 1 (15 oz.) can chickpeas, drained 3 cloves garlic, minced or crushed 3 tablespoons tahinijuice of 1 lemon 3 tablespoons extra virgin olive oil 2 teaspoons cumin1/2 teaspoon paprika salt and pepper to taste cayenne pepper (optional to add heat) InstructionsTo roast sweet potatoes: Preheat oven to 400 degrees F. Poke with a fork about 5 or 6 times. Bake on a baking sheet until tender, about 40 minutes. Cool. In a food processor, puree potato flesh with chickpeas, garlic, tahini, lemon juice, olive oil, cumin, and paprika until very smooth. Season to taste with salt and pepper. Turn up the heat with cayenne, just a pinch at a time, if desired. Spoon hummus into a bowl and serve with vegetables or pita chips, or use as a sandwich spread. Yield: about 2 cups
Prep Time: 5 mins. Cook time: 50 mins.
Total time: 55 mins.
Tags: vegan, vegetarian, vegetables


Vegan Sugar Cookies with Coconut Oil and Cookie Mix
[image error]
This is a sponsored conversation written by me on behalf of General Mills®. The opinions and text are all mine. Last month one of my girls was in an annual holiday ballet performance. It is beyond adorable to see all these tiny dancers, ages 2 and up, with sparkly costumes and tiny buns atop their heads. The girls are giddy with the the thrill of being on stage and the anticipation of Christmas. I always sign up to help backstage which is a mixture of chaos and delight. After the show we like to give the girls flowers and some other special gift or treat. I love seeing their faces light up with the excitement of simple surprises. Sugar cookies are definitely a special occasion treat in our house. I made these dainty bite sized hearts on skewered on toothpicks with raspberries and the girls loved them. CONTINUE READING THIS POST »


This is a sponsored conversation written by me on behalf of General Mills®. The opinions and text are all mine.
Last month one of my girls was in an annual holiday ballet performance. It is beyond adorable to see all these tiny dancers, ages 2 and up, with sparkly costumes and tiny buns atop their heads. The girls are giddy with the the thrill of being on stage and the anticipation of Christmas. I always sign up to help backstage which is a mixture of chaos and delight. After the show we like to give the girls flowers and some other special gift or treat. I love seeing their faces light up with the excitement of simple surprises. Sugar cookies are definitely a special occasion treat in our house. I made these dainty bite sized hearts on skewered on toothpicks with raspberries and the girls loved them. CONTINUE READING THIS POST »
January 12, 2016
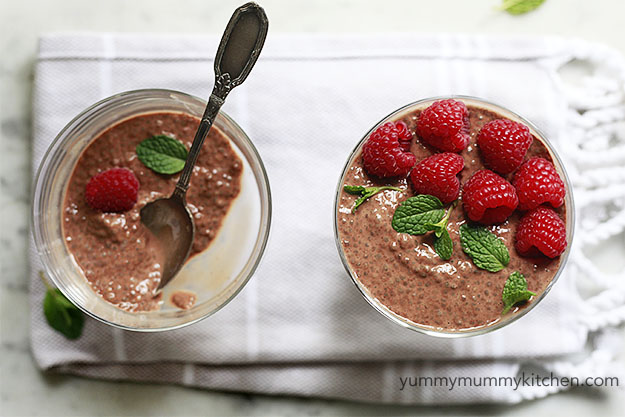
Vegan Chocolate Chia Pudding
Try this easy recipe for incredibly delicious vegan chocolate chia pudding. This healthy treat doesn't taste healthy at all.
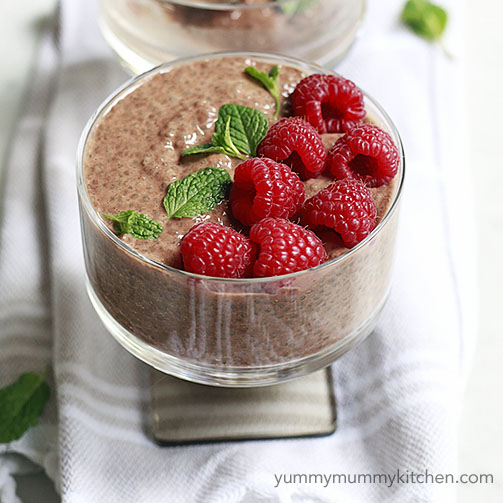
 I know I just posted a chia seed pudding recipe, but... chocolate chia pudding deserves it's own post. It's that good. After months of making plain chia pudding, I've started adding unsweetened cacao powder to the mix. Yummy Hubby and the kids couldn't believe this rich, chocolaty, decadent tasting pudding is actually so nourishing. My daughter was shocked I was letting her have chocolate for breakfast. Cacao is a superfood with many benefits, so the chocolaty addition isn't just for taste.
Raw cacao: Is very high in antioxidantsBoosts tryptophan, serotonin, and endorphins, which boost mood Supports metabolism and can help with weight lossContains vitamins A, B, E and minerals (1) So go ahead and eat that chocolate for breakfast! There is no reason to give up sweet chocolate treats when eating healthy. Just make sure it doesn't have a bunch of added sugar and is unprocessed. Raw cacao has the maximum amount of nutrients compared to processed chocolate. This is the brand I used.

This chia pudding needs to sit overnight to set up, but takes about 1 minute to prepare. Shake a batch together in a canning jar before bed and it will be ready in the morning. This pudding can be served for breakfast, snack, or a healthy dessert to satisfy those chocolate cravings.

Chocolate Chia Pudding RecipeBy Yummy Mummy Kitchen
Published 01/11/2016

Vegan chocolate chia pudding recipe. Ingredients1 cup unsweetened vanilla almond milk (or favorite milk) 3 tablespoons chia seeds 1 1/2 tablespoons unsweetened cacao or cocoa powder liquid stevia or maple syrup to taste InstructionsPlace almond milk, chia seeds, and cacao into a canning jar and cover with the lid. Shake until well combined. Add a teaspoon of maple syrup or sweeten to taste with stevia or desired sweetener. Place in the refrigerator overnight or at least 8 hours. Serve as is or topped with berries, coconut chips, or cacao nibs on top. Yield: 2 servings
Prep Time: 2 mins. Total time: 8 hrs.
Tags: breakfast, dessert, health, vegan, vegetarian, chia, chocolate, cacao
Sources: (1) http://dailysuperfoodlove.com/2852/21-fantastic-benefits-of-cacao/


 I know I just posted a chia seed pudding recipe, but... chocolate chia pudding deserves it's own post. It's that good. After months of making plain chia pudding, I've started adding unsweetened cacao powder to the mix. Yummy Hubby and the kids couldn't believe this rich, chocolaty, decadent tasting pudding is actually so nourishing. My daughter was shocked I was letting her have chocolate for breakfast. Cacao is a superfood with many benefits, so the chocolaty addition isn't just for taste.
 Raw cacao: Is very high in antioxidantsBoosts tryptophan, serotonin, and endorphins, which boost mood Supports metabolism and can help with weight lossContains vitamins A, B, E and minerals (1) So go ahead and eat that chocolate for breakfast! There is no reason to give up sweet chocolate treats when eating healthy. Just make sure it doesn't have a bunch of added sugar and is unprocessed. Raw cacao has the maximum amount of nutrients compared to processed chocolate. This is the brand I used.
This chia pudding needs to sit overnight to set up, but takes about 1 minute to prepare. Shake a batch together in a canning jar before bed and it will be ready in the morning. This pudding can be served for breakfast, snack, or a healthy dessert to satisfy those chocolate cravings.
Chocolate Chia Pudding RecipeBy Yummy Mummy Kitchen
Published 01/11/2016
Vegan chocolate chia pudding recipe. Ingredients1 cup unsweetened vanilla almond milk (or favorite milk) 3 tablespoons chia seeds 1 1/2 tablespoons unsweetened cacao or cocoa powder liquid stevia or maple syrup to taste InstructionsPlace almond milk, chia seeds, and cacao into a canning jar and cover with the lid. Shake until well combined. Add a teaspoon of maple syrup or sweeten to taste with stevia or desired sweetener. Place in the refrigerator overnight or at least 8 hours. Serve as is or topped with berries, coconut chips, or cacao nibs on top. Yield: 2 servings
Prep Time: 2 mins. Total time: 8 hrs.
Tags: breakfast, dessert, health, vegan, vegetarian, chia, chocolate, cacao
Sources: (1) http://dailysuperfoodlove.com/2852/21-fantastic-benefits-of-cacao/
Chia Pudding Recipe Ratio
Easy recipe for vegan chia pudding. All you need is one simple ratio.

Last week I posted my "fast food" breakfast on Instagram and I realized I haven't posted here about one of my favorite breakfasts. I was in the car just after school drop-off with my pretty cup of chia pudding and berries. In the rush of making kids breakfasts and lunches I don't always remember or have time to feed myself a nutritious breakfast. So chia pudding is my go-to. I take 1 minute to shake almond milk and chia seeds together before bed and I have an instant breakfast ready in the morning. I will admit that I was not a fan of chia pudding the first time I tried it. However, I've grown to absolutely love chia pudding and even my cereal loving husband is on board and gets really excited when I've made a big batch. Chia is a fantastic source of plant based protein and energy. This superfood was first used by the Aztecs as early as 3500 BC! These little seeds swell in liquid, forming a gelatinous outer layer a bit like tapioca. CONTINUE READING THIS POST »


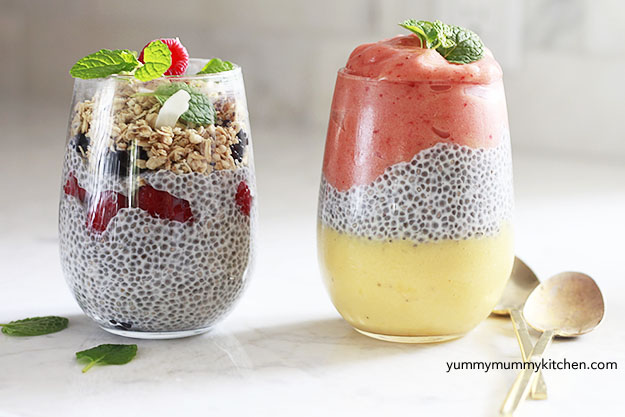
Last week I posted my "fast food" breakfast on Instagram and I realized I haven't posted here about one of my favorite breakfasts. I was in the car just after school drop-off with my pretty cup of chia pudding and berries. In the rush of making kids breakfasts and lunches I don't always remember or have time to feed myself a nutritious breakfast. So chia pudding is my go-to. I take 1 minute to shake almond milk and chia seeds together before bed and I have an instant breakfast ready in the morning. I will admit that I was not a fan of chia pudding the first time I tried it. However, I've grown to absolutely love chia pudding and even my cereal loving husband is on board and gets really excited when I've made a big batch. Chia is a fantastic source of plant based protein and energy. This superfood was first used by the Aztecs as early as 3500 BC! These little seeds swell in liquid, forming a gelatinous outer layer a bit like tapioca. CONTINUE READING THIS POST »
January 7, 2016
How to Make Bath Bombs
How to make bath bombs with no cornstarch. Try this easy DIY recipe for bath fizzies. Post contains affiliate links.
 My kids love using bath bombs for their nightly baths. I had been buying lavender scented bath bombs to help the girls relax before bed, but noticed the cost was really adding up. Bath bombs at stores like Lush and natural grocery stores run around $4.00 to $8.00 each. So I set out to make my own bath bombs that are natural, therapeutic, calming, and more affordable. These fizzies took about 5 minutes to mix up and now we have a big jar of about 30 beautiful homemade bath bombs by the tub. That would have cost around $100 to buy! These make great gifts too.
 After researching many recipes, I found that bath bombs are usually made with corn starch. I did not have any, and it turns out it's not necessary. My bombs turned out very fizzy and held together without it. The essential ingredients for bath bombs are citric acid and baking soda. Body oil binds the mixture together and softens skin in the bath. Essential oils make the bath wonderfully fragrant and have many health benefits. Citric acid can be found at some stores in the canning aisle, but it was easier for me to find on Amazon here. I used this almond oil and also use it as a natural moisturizer. We added some lavender flowers since they grow in our backyard. You could also add some food coloring or dried orange zest to fancy up the bombs.
 DoTerra's Family Physician kit is part of my winter health arsenal. It contains an oil for almost everything. I use lavender and Frankincense to calm, OnGurad and oregano for immune system support, Breathe for colds, Deep Blue for sore muscles, and the list goes on. You can use any oils you like for your bombs. I used a mixture of lavender, OnGuard, and Frankincense for a calming, cleansing, protective bedtime mixture. You can get your own DoTerra oils here and lavender essential oil is also available on Amazon.
 Mix the ingredients together with your hands or a rubber spatula until it just holds together like a damp sand when squeezed.
 Really pack the mixture down as firmly as possible into silicone molds. I used silicone ice cube trays like this one and it worked perfectly and the bombs are just the right size.

Bath Bombs RecipeBy Yummy Mummy Kitchen
Published 01/06/2016
Homemade bath fizziesIngredients1 cup citric acid 1 ½ cups baking soda ½ cup almond oil or coconut oil 8-10 drops essential oils silicone mold or ice cube trayInstructionsIn a medium bowl, whisk together the citric acid and baking soda. With a spoon or spatula, mix in almond oil and essential oils. Mixture should just hold together when pressed between fingers. Press mixture into your molds so that it's firmly packed. Let dry for 24 hours. To speed up the process, you can put the silicone molds into the oven. Bring the oven to 200 degrees F and then turn it off and let the bombs sit in the oven, with it off, for an hour, then cool completely before carefully removing. If bombs don't yet hold together, let dry longer. Yield: varies depending on size
Prep Time: 5 mins. Cook time: 24 hrs.
Total time: 24 hrs.
Tags: DIY, gifts, health, wellness, essential oils


 My kids love using bath bombs for their nightly baths. I had been buying lavender scented bath bombs to help the girls relax before bed, but noticed the cost was really adding up. Bath bombs at stores like Lush and natural grocery stores run around $4.00 to $8.00 each. So I set out to make my own bath bombs that are natural, therapeutic, calming, and more affordable. These fizzies took about 5 minutes to mix up and now we have a big jar of about 30 beautiful homemade bath bombs by the tub. That would have cost around $100 to buy! These make great gifts too.
 After researching many recipes, I found that bath bombs are usually made with corn starch. I did not have any, and it turns out it's not necessary. My bombs turned out very fizzy and held together without it. The essential ingredients for bath bombs are citric acid and baking soda. Body oil binds the mixture together and softens skin in the bath. Essential oils make the bath wonderfully fragrant and have many health benefits. Citric acid can be found at some stores in the canning aisle, but it was easier for me to find on Amazon here. I used this almond oil and also use it as a natural moisturizer. We added some lavender flowers since they grow in our backyard. You could also add some food coloring or dried orange zest to fancy up the bombs.
 DoTerra's Family Physician kit is part of my winter health arsenal. It contains an oil for almost everything. I use lavender and Frankincense to calm, OnGurad and oregano for immune system support, Breathe for colds, Deep Blue for sore muscles, and the list goes on. You can use any oils you like for your bombs. I used a mixture of lavender, OnGuard, and Frankincense for a calming, cleansing, protective bedtime mixture. You can get your own DoTerra oils here and lavender essential oil is also available on Amazon.
 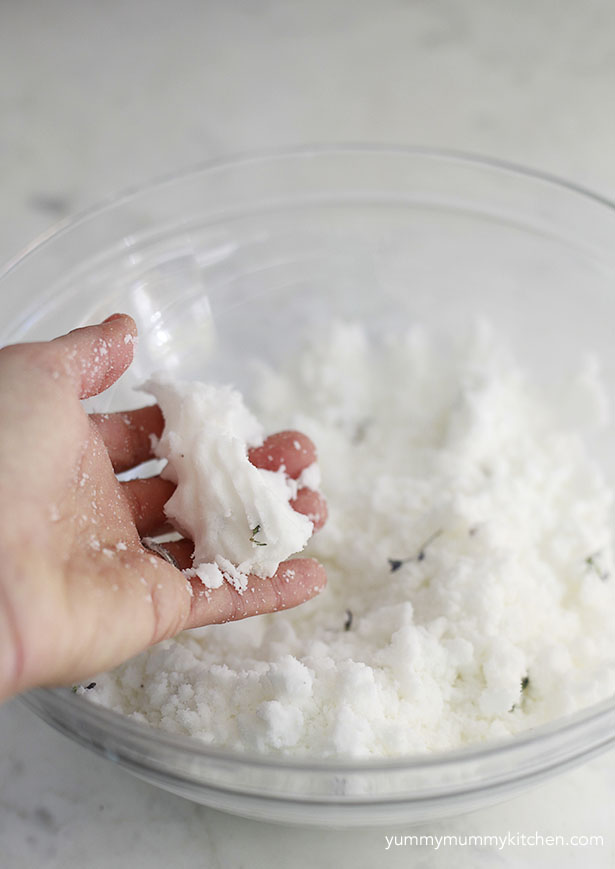 Mix the ingredients together with your hands or a rubber spatula until it just holds together like a damp sand when squeezed.
 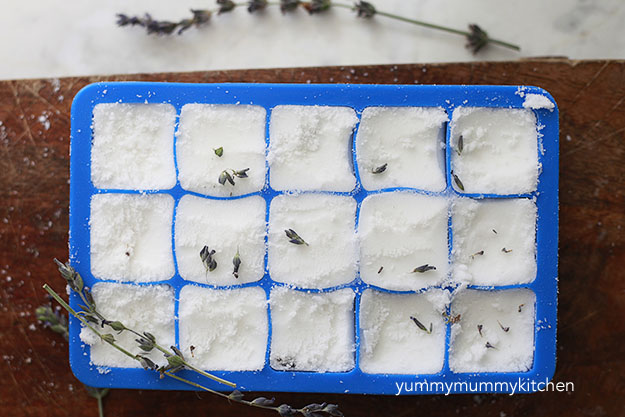 Really pack the mixture down as firmly as possible into silicone molds. I used silicone ice cube trays like this one and it worked perfectly and the bombs are just the right size.
Bath Bombs RecipeBy Yummy Mummy Kitchen
Published 01/06/2016
Homemade bath fizziesIngredients1 cup citric acid 1 ½ cups baking soda ½ cup almond oil or coconut oil 8-10 drops essential oils silicone mold or ice cube trayInstructionsIn a medium bowl, whisk together the citric acid and baking soda. With a spoon or spatula, mix in almond oil and essential oils. Mixture should just hold together when pressed between fingers. Press mixture into your molds so that it's firmly packed. Let dry for 24 hours. To speed up the process, you can put the silicone molds into the oven. Bring the oven to 200 degrees F and then turn it off and let the bombs sit in the oven, with it off, for an hour, then cool completely before carefully removing. If bombs don't yet hold together, let dry longer. Yield: varies depending on size
Prep Time: 5 mins. Cook time: 24 hrs.
Total time: 24 hrs.
Tags: DIY, gifts, health, wellness, essential oils
January 5, 2016
Kids Cooking Ideas
What happened when my kids cooked a week of plant based dinners.

The holiday break meant "kids cook" week at our house. The kids were in charge of planning and cooking (with supervision, of course) every dinner during the week. My friend This Week For Dinner did the same thing with her 10 year old daughter and I loved the idea. Although our girls have been helping in the kitchen since they were teeny tiny, I hadn't completely put them in charge of dinners. I suggested the idea to my girls and they were overjoyed. They alternated nights cooking, as they wanted to cook alone. We stuck to dinners that didn't need a recipe, which is how I cook almost all the time. I guided them on how to make things, but encouraged them to use their creativity to make the dishes their own.
I know I have said it before, but when kids help with cooking there is a shift at dinnertime. They suddenly have a stake in the meal. They have the control they want. They are proud of the meal. And they eat dinner without complaints.
 I encouraged the girls to create a beautiful colorful plate. I never told them they had to use any particular ingredients, but I did say things like, "Let's use at least 2 of these veggies on the pizza." At the grocery store I encouraged them to choose a variety of colors. They saw cooking as not just making food, but creating art as well. It was like a week of edible craft projects.
Here's what they made:
 Homemade Veggie Sushi This truly was my 8 year old's choice for dinner. The girls love those crunchy seaweed snacks and perhaps that's what got them into sushi. Or the salty soy sauce. I don't know. We have made sushi in the past so this was easy for her. I helped her cook the rice since our pot is quite heavy, and sliced the rolls since a very sharp chef's knife is required. She did the rest. Aren't these rolls utterly luscious?! She served the rolls with a side of crispy baked tofu and roasted broccoli (not pictured). Here's how to make sushi at home.
 Pizza NightMy 5 year old decided on pizza. She used dough from Trader Joe's, veggies, store bought sauce, and nut cheese from Parmela's creamery in addition to fresh mozzarella. Easy peasy. This dinner is mostly assembly, which is great for a 5 year old. I obviously was in charge of the oven.
 Minestrone SoupYou just can't go wrong with heaps of chopped veggies in a tomato broth with kidney beans. The chopping took much longer than when I cook, but that's ok!
 Rainbow Burritos I knew my sweet 5 was going to choose burritos. They are her favorite and one of my go-to easy dinners I know the kids will gobble up. I will confess we picked up the Spanish rice from the Whole Foods hot bar. She made the guacamole, chose the ingredients, and assembled the burritos for everyone in the family.
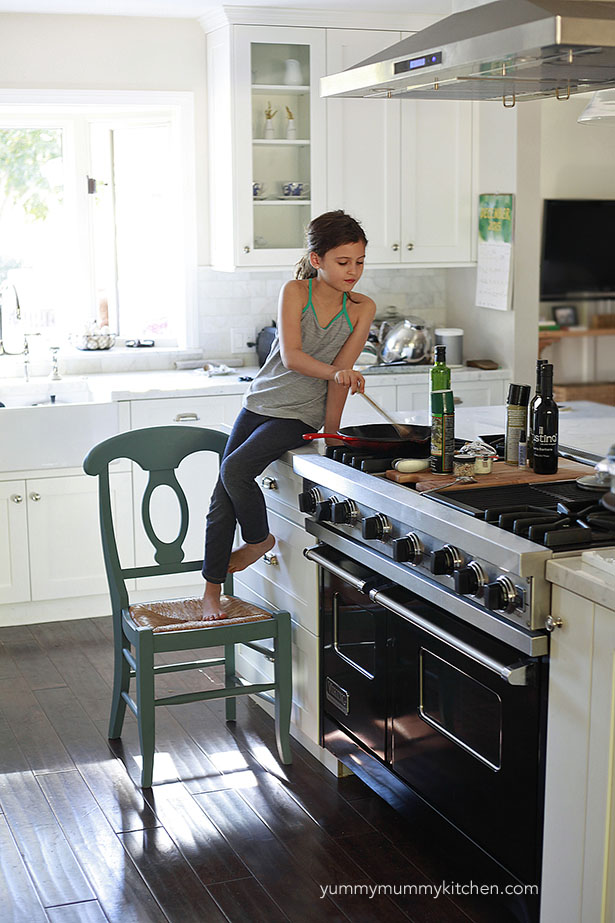
 Pasta with Homemade White Bean Marinara This was my 8 year old's first time making homemade sauce. I showed her how I make super simple marinara and then asked her to add what she wanted. She chose cannellini beans and chopped carrots, which was delicious! I let her take a shortcut and put together a salad from the salad bar at Whole Foods.
 To make the sauce we basically just simmer my favorite jar of tomatoes with some olive oil, garlic, and basil. I started using these tomatoes in Italy and am so happy they are now available in the US.
 Guacamole for burrito night was the perfect 5-year-old recipe. I told her the ingredients, halved the avocado and lime, and let her go for it.
Although I would love love love if everyone did a kids cook week, I have to emphasize that we did this on a school break. Cooking with kids does take longer and this would have been much more difficult to accomplish if we had after school activities in the afternoons. I do think it's realistic and a great idea to put the kids in charge of dinner one night a week.
My friend Laura has a guide on Momables to help you teach your kids to cook by age.
The girls would love to hear your thoughts about their cooking week so please leave a comment below!
What we learned:
The kids liked having more control over the dinners than I expected. They each wanted to have the spotlight and didn't want much help. They were genuinely very excited every day. There are cooking basics that every child should learn. For example, we realized my 8 year old didn't know how to use a can opener until this week. From my 8 year old: "It's really fun at the end to see everyone's reaction to your meal." "I realized that some things are harder than they seem, like peeling garlic and using a can opener." "I'm glad I know how to cook some things like pasta sauce and sushi now so that when I'm a grown-up I'll be able to cook." "Cooking is fun and I want to do it more often." "I love cooking." From my 5 year old: "I thought cooking dinner was going to be hard but really it was easy." I felt adult sized knives were much to big for little hands. I'm ordering a set of these kids' knives. Cooking with your kids is a great way to bond and have a fun evening.
Disclaimer: If you do a "kids cook week" at your house, please be sure to use common sense and always watch what your kids are doing. Make sure everything is age appropriate as ovens, burners, and blades can be very dangerous. Links are affiliate.


The holiday break meant "kids cook" week at our house. The kids were in charge of planning and cooking (with supervision, of course) every dinner during the week. My friend This Week For Dinner did the same thing with her 10 year old daughter and I loved the idea. Although our girls have been helping in the kitchen since they were teeny tiny, I hadn't completely put them in charge of dinners. I suggested the idea to my girls and they were overjoyed. They alternated nights cooking, as they wanted to cook alone. We stuck to dinners that didn't need a recipe, which is how I cook almost all the time. I guided them on how to make things, but encouraged them to use their creativity to make the dishes their own.
I know I have said it before, but when kids help with cooking there is a shift at dinnertime. They suddenly have a stake in the meal. They have the control they want. They are proud of the meal. And they eat dinner without complaints.
 I encouraged the girls to create a beautiful colorful plate. I never told them they had to use any particular ingredients, but I did say things like, "Let's use at least 2 of these veggies on the pizza." At the grocery store I encouraged them to choose a variety of colors. They saw cooking as not just making food, but creating art as well. It was like a week of edible craft projects.
 Here's what they made:
 Homemade Veggie Sushi This truly was my 8 year old's choice for dinner. The girls love those crunchy seaweed snacks and perhaps that's what got them into sushi. Or the salty soy sauce. I don't know. We have made sushi in the past so this was easy for her. I helped her cook the rice since our pot is quite heavy, and sliced the rolls since a very sharp chef's knife is required. She did the rest. Aren't these rolls utterly luscious?! She served the rolls with a side of crispy baked tofu and roasted broccoli (not pictured). Here's how to make sushi at home.
  Pizza NightMy 5 year old decided on pizza. She used dough from Trader Joe's, veggies, store bought sauce, and nut cheese from Parmela's creamery in addition to fresh mozzarella. Easy peasy. This dinner is mostly assembly, which is great for a 5 year old. I obviously was in charge of the oven.
  Minestrone SoupYou just can't go wrong with heaps of chopped veggies in a tomato broth with kidney beans. The chopping took much longer than when I cook, but that's ok!
  Rainbow Burritos I knew my sweet 5 was going to choose burritos. They are her favorite and one of my go-to easy dinners I know the kids will gobble up. I will confess we picked up the Spanish rice from the Whole Foods hot bar. She made the guacamole, chose the ingredients, and assembled the burritos for everyone in the family.
 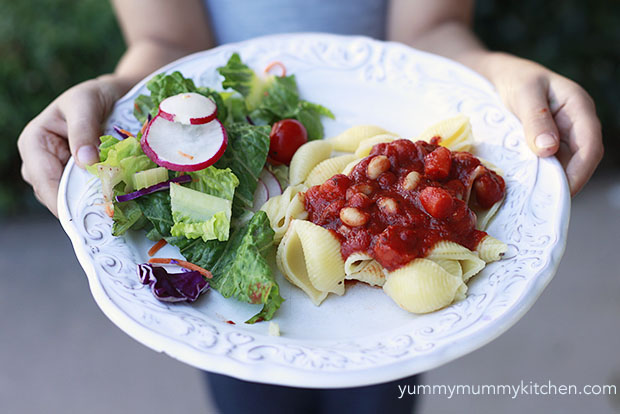 Pasta with Homemade White Bean Marinara This was my 8 year old's first time making homemade sauce. I showed her how I make super simple marinara and then asked her to add what she wanted. She chose cannellini beans and chopped carrots, which was delicious! I let her take a shortcut and put together a salad from the salad bar at Whole Foods.
 To make the sauce we basically just simmer my favorite jar of tomatoes with some olive oil, garlic, and basil. I started using these tomatoes in Italy and am so happy they are now available in the US.
  Guacamole for burrito night was the perfect 5-year-old recipe. I told her the ingredients, halved the avocado and lime, and let her go for it.
 Although I would love love love if everyone did a kids cook week, I have to emphasize that we did this on a school break. Cooking with kids does take longer and this would have been much more difficult to accomplish if we had after school activities in the afternoons. I do think it's realistic and a great idea to put the kids in charge of dinner one night a week.
My friend Laura has a guide on Momables to help you teach your kids to cook by age.
The girls would love to hear your thoughts about their cooking week so please leave a comment below!
What we learned:
The kids liked having more control over the dinners than I expected. They each wanted to have the spotlight and didn't want much help. They were genuinely very excited every day. There are cooking basics that every child should learn. For example, we realized my 8 year old didn't know how to use a can opener until this week. From my 8 year old: "It's really fun at the end to see everyone's reaction to your meal." "I realized that some things are harder than they seem, like peeling garlic and using a can opener." "I'm glad I know how to cook some things like pasta sauce and sushi now so that when I'm a grown-up I'll be able to cook." "Cooking is fun and I want to do it more often." "I love cooking." From my 5 year old: "I thought cooking dinner was going to be hard but really it was easy." I felt adult sized knives were much to big for little hands. I'm ordering a set of these kids' knives. Cooking with your kids is a great way to bond and have a fun evening.
Disclaimer: If you do a "kids cook week" at your house, please be sure to use common sense and always watch what your kids are doing. Make sure everything is age appropriate as ovens, burners, and blades can be very dangerous. Links are affiliate.


![[image error]](https://www.pinterest.com/pin/create/button/?url=http%3A%2F%2Fwww.yummymummykitchen.com%2F2016%2F01%2Fvegan-sugar-cookies-with-coconut-oil.html&media=http%3A%2F%2F4.bp.blogspot.com%2F--wRi4onC1qE%2FVpbP7AXzkTI%2FAAAAAAAA4OU%2FsES_xXU0geI%2Fs1600%2Fvegan%252Bsugar%252Bcookie%252Bhearts.jpg&description=Next%20stop%3A%20Pinterest)