
Marisa McClellan's Blog, page 89
May 14, 2015
CSA Cooking: Kale Rapini Spread

Years ago, I picked up a copy of Marcella Says while wandering a used bookstore. While I don’t typically follow the recipes closely, it often provides very useful inspiration, particularly when I’m looking for something delicious to do with unusual produce.

One recipe that’s long been in the back of my mind is this one for rapini and pecorino spread for crostini. So, when I found a bundle of kale rapini in the CSA box from Philly Foodworks, it seemed a good time to try it.

It’s an easy thing to make. You plunge the rapini in a large pot of boiling salted water for a few minutes and then run it under cold water to cool. Marcella says you should only use the leaves and florets, and I find that the easiest way to do that is to pull them off the stems after blanching. Once you’ve stripped all the good stuff off the stems, chop it fine.

Then, warm a couple tablespoons of olive oil in a pan and add the chopped rapini. Stir in two or three minced, pressed, or grated garlic cloves, a big pinch of salt, and a few vigorous turns of a pepper grinder. Cook until the greens are warm and the garlic has lost its rawness.

My plan was to tuck this spread in the fridge, so I didn’t add any cheese. However, I took some of it to a little tea party for three, and we perched slivers of strong, hard cheese on top of it which complimented it beautifully. I ate the rest this morning, folded into some warmed leftover rice and topped with fried eggs.

It would also be good spooned into a little omelet or stirred into a grain salad. It keeps in the fridge for a bout a week and is a useful way to condense your greens if your fridge overflows.
Next time, I’ll tell you about that bundle of chard.
Related Posts:
Philly Foodworks Partnership + Stinging Nettle Pesto


May 12, 2015
Philly Foodworks Partnership + Stinging Nettle Pesto

Over the years, I’ve participated in a number of different CSA shares. Last year, I had to sit the CSA thing out entirely because I just wasn’t home enough. This year, I’ve partnered up with Philly Foodworks, for a series of blog posts on how I approach a CSA share. The goal is to share recipes for preserves as well as salads, spreads, and other goodies to help you make the most of what’s in your weekly, bi-weekly, or monthly box.

Once a month, they’ll be dropping off one of their small Farmer’s Choice/Share boxes on my doorstep. When it’s in my hands, I’ll document and then share the ways I cooked, preserved, and prolonged the various bits of produce. If you’re in the Philly area and want to play along, sign up for one of the Philly Foodworks CSA programs. Use the code “FOODINJARS” to get $10 off your first order.

The first box contained kale rapini, stinging nettles, a head of butter lettuce, 3/4 pound of fat asparagus spears, Swiss chard, a bundle of arugula, a slender bunch of ramps, and a pound of red potatoes. I’ve made several things so far, but right now, want to talk about the stinging nettles.

Stinging nettles grow wild in the springtime and are typically foraged rather than cultivated. They have a taste similar to spinach and are bursting with good things, including vitamin A, vitamin C, iron, potassium, and calcium. They can cause a topical rash (hence the stinging) when touched raw with bare skin, so if you do forage them, you want to wear gloves.
If you end up with a big bag of them like I did, the best approach is to bring a large pot of water to a boil and then upend the bag of nettles right into the pot. Cooked for 2 to 3 minutes, they’ll lose their sting and become a possible ingredient for all manner of dishes.

My freezer stash of pesto has dwindled over the last few months, so it seemed best to transform these nettles into a bright, green pesto to start replenishing the stores. Once my nettles had spent the requisite time in the boiling water, I strained them into a colander and rinsed them with cold water. That made it possible to pick through and remove the tougher stems and any twigs that came along with the nettles. Finally, I gave them a good, hard squeeze, in order to force as much of the cooking water out as possible.

They went into a food processor with 1/2 cup toasted walnuts, 3 crushed garlic cloves, a generous pinch of salt, and the zest and juice of 1 lemon. I pulsed to help combine the ingredients and then ran the motor while streaming in 1/2 cup of extra virgin olive oil. I stirred, tasted, added a bit more salt and a few turns of a pepper grinder, and processed for another 10 to 15 seconds (I like a silky pesto).
Once it was done, I smeared a little on a piece of toast for a snack and then packed the rest into little mason jars. The total yield was just under 2 cups. I topped the jars with a thin layer of olive oil (to keep the air out), screwed on old lids and rings (this is where you can reuse lids that have been through the canner), and stashed the jars in the freezer.
I’ll be back tomorrow to talk about the sauteed rapini. It’s a riff on a recipe from Marcella Hazan, so you know it’s good.
Related Posts:
CSA Cooking: Kale Rapini Spread
Sponsored Post: Marcella Hazan’s Butter, Tomato, and Onion Pasta Sauce Recipe from Craftsy
Curly Parsley and Arugula Pesto
May 11, 2015
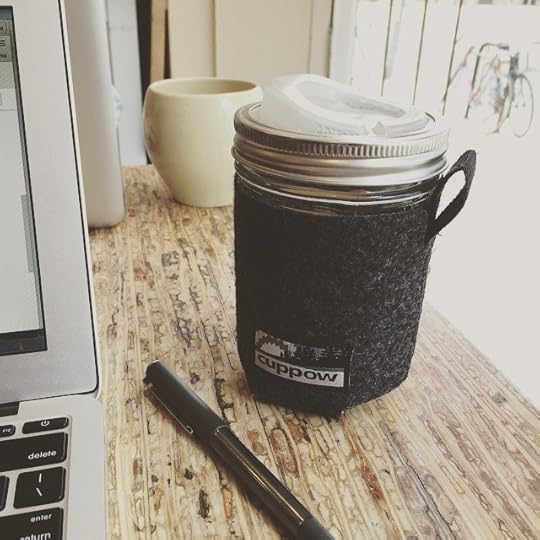
Giveaway: The Complete Cuppow Glass Travel Mug

About a month or so ago, the Cuppow team added a new product to their line-up. Called the Cuppow Coozie, this snug-fitting jar jacket works with most wide mouth pint jars and is made from recycled plastic PET bottles (those are the ones with a #1 on the bottom). The material is called pfelt and is durable and feels good in the hand.

I’ve had a Cuppow Coozie in my life for about a month now, and I’ve been using it a lot. Back in January, I made a private resolution to only get take-out coffee if I had a reusable cup with me. Because of this, I almost always tuck a travel mug of some kind in my bag before heading out (I never know when the urge to grab a cup will strike).
Before the Coozie landed in my mail box, I had been using a Contigo Autoseal mug. It’s a very well made mug, but it insulates so well that in order to bring the coffee down to a drinkable temperature, I’d need to remove the lid for an extended period of time. To my mind, that defeats the purpose of a travel mug.

What I appreciate about the Cuppow Coozie is that it provides some insulation (and hand protection) while allowing the coffee to cool naturally enough that I can manage to drink it without removing the lid or waiting half the day. It also comes fitted with a little finger loop, making it easy and comfortable to hold and drink from the jar.
I’ve started taking a jar fitted with a Coozie with me whenever I’m planning on working from a coffee shop, which is something I do at least twice a week. My two favorite shops both offer reusable mugs if you plan on staying awhile, but far too often, I’ve managed to spill coffee everywhere when using their ceramic mugs. Using a jar fitted with a Cuppow lid and Coozie means that my risk of spillage is much less (additionally, both shops offer a small discount if you bring your own mug, so I save a few pennies each time).

The kind folks at Cuppow have offered up five of their Complete Glass Travel Mug set-ups for me to giveaway. Each one contains a wide mouth pint jar and ring, one Cuppow lid, and a Cuppow Coozie (just like what’s pictured in the first image in this post). Oh, and if you don’t want to wait to see if you win the giveaway, the travel mug kit is on sale right now for just $24.95.
Here’s how to enter.
Leave a comment on this post and tell me what you’d put in a Complete Cuppow Glass Travel Mug.
Comments will close at 11:59 pm eastern time on Saturday, May 16, 2015. Winners will be chosen at random and will be posted to the blog soon thereafter.
Giveaway open to United States residents only. Void where prohibited.
One comment per person, please. Entries must be left via the comment form on the blog at the bottom of this post.
Disclosure: The Cuppow team sent me one of their travel mug kits for photography and review purposes. They are also providing the units for this giveaway. Additionally, they are a Food in Jars sponsor. However, I would write about their products even if they didn’t help support this site because they are good and useful, particularly for those of us who are preoccupied with jars.
Related Posts:
Giveaway: Mason Tap, Coffee Sock, and BNTO from Cuppow
Giveaway: Cuppow Total Collection Gift Pack
Giveaway: BNTO from Cuppow
Upcoming Classes: Morris Arboretum and Online!

I’ve made my teaching schedule intentionally lighter this year than it’s been in previous years, but I have a couple rapidly approaching classes I wanted to highlight.
The first is a jam making class this Saturday, May 16 from 10 am to 12 noon at the Morris Arboretum. I’ll demonstrate how to make a batch of honey-sweetened strawberry jam that is set using Pomona’s Pectin. This class is a terrific opportunity to refresh your skills for the upcoming season and will also help attendees get comfortable with both alternative sweeteners and Pomona’s Pectin. The class costs $40 for Arboretum members and $45 for non-members. Register here.
The second class I want to draw your attention to is my first-ever live online class. It will be on Tuesday, May 19 from 7-8:30 pm eastern time (but folks in other time zones are also welcome to join, I’ll just be appearing a bit earlier in your location!). In the class, I’ll make small batch of strawberry jam and will talk about canning safety, boiling water baths, and how to safely make a recipe your own. I will also be answering questions, so come prepared with your queries.
The class costs $20 and is being hosting by a service called Concert Window. If you want to participate, create an account on the site now and follow the event. I’ll start broadcasting promptly at 7 pm! Please let me know if you have any questions!
Related Posts:
Upcoming Classes: Temple University! The Brooklyn Kitchen! And More!
Upcoming Classes: Pressure Canning! Apple Pie Filling! Autumn Retreat!
Upcoming Classes: Pressure Canning! Pie Filling! Fall Chutney!
May 10, 2015
Links: Ramps, Rhubarb, and Winners

Since turning in the book draft on Wednesday, I’ve slept a little more than normal, gone for a couple extended walks along the river, made nettle pesto (more on that soon), and wandered through two farmers markets. I have a busy start to the coming week, but my birthday (36!) is Thursday and I plan to do nothing but fun things. Now, some links.
The story of shrubs parts 1 and 2.
Foraging ramps. Pickled ramps. Ramp powder.
Golden sauerkraut.
Apricot apple honey butter.
Mexican pickled red onions.
Rye crispbreads. Chocolate rye sandwich cookies.
How to put a sourdough starter on hold.
How to make mustard.
Rhubarb yogurt cake. Rhubarb raspberry crumb cake.
Flourless thumbprint cookies.

In the madness of finishing the book manuscript, I never managed to post the winners in the Will It Waffle giveaway from a few weeks ago. The US winner is #190/Laura and the Canadian winner is #210/Anne. And don’t forget about the Orchard Road giveaway. It’s open until Tuesday.
Related Posts:
Links: Granola Bars, Roasted Cauliflower Leaves & a Winner
Links: Quick Pickles, Nut Butters, and Winners
Links: Turnips, Matzo Toffee, and Winners
May 7, 2015
Giveaway: Orchard Road Decorative Series One-Piece Lids

Before I start talking about these lids, I want to say thanks. I so appreciate your patience with me during the last few weeks, when finishing the book draft made it so hard for me to show up here. I turned the manuscript in last night, so we can now turn our attention to more important things, like mason jar lids with whimsical prints!
Last summer, a new mason jar company entered the canning market. Called Orchard Road, they offered five sizes of jars as well as lids and rings (I first wrote about them here). In the last year, I have the chance to use their jars and lids a number of times and they have performed well and given me absolutely no grief.

This summer, Orchard Road has brought out a line of Decorative One-Piece Lids. They recall the old gingham and flowered lids that Ball used to make back in the day and have been a really fun addition to my canning process. They are one-piece lids, which means that they need to be handled a bit differently than the two-piece lids most of us regularly used. Happily, I have an entire blog post devoted to that topic that you can find right here.

The nice folks at Orchard Road have offered three sets of their new lids for a giveaway. Each of the three winners will get a one box of each of the new designs (fruit, purple gingham, and daisies). Additionally, for those of you who don’t want to take your chances on a giveaway, you can use the code “DECO25″ for 25% off your order over at Orchard Road. As long as you buy at least one box of lids, it will take 25% off your entire order, including the jars!
To enter the giveaway, here’s what you do:
Leave a comment on this post and share something new to you that you’re hoping to can this season.
Comments will close at 11:59 pm eastern time on Tuesday, May 12, 2015. Winners will be chosen at random and will be posted to the blog soon thereafter.
Giveaway open to United States residents only. Void where prohibited.
One comment per person, please. Entries must be left via the comment form on the blog at the bottom of this post.
Disclosure: The folks at Orchard Road sent me the lids you see here so that I could try them and take some pictures. They are also providing the giveaway units. They have been site sponsors in the past, but are not at this time. No additional compensation has been provided for this post. All my opinions remain my own.
Related Posts:
Giveaway: Orchard Road Mason Jars
Giveaway: Sustainable Picnic Gear from Mighty Nest
Cookbooks: Will It Waffle + Giveaway
May 5, 2015
IMUSA Kitchen Tools for Cinco de Mayo

Sometime in mid-April, I got an email from an IMUSA PR rep, asking if I might be interested in participating in a Cinco de Mayo campaign. They would send me some IMUSA tools and I’d make something with them and write about.
Because it sounded like fun and I spend my life grossly underestimating how long tasks will take me to get done, I said yes. I was not worried at all about the fact that my book manuscript was due right around Cinco de Mayo because I was certain I would be done in advance of the deadline.

The box containing a tortilla press, a citrus squeezer, an avocado slicer, a pair of salsa bowls, and a tortilla warmer arrived last Thursday. I was hunched over my computer in my signature stress-writing position and so only managed to open the box and glance quickly at its contents before returning to writing about date purees and coconut sugar measurements.
 .
.
I thought I’d find a moment or two in which to take the tools out for a test drive sometime over the weekend, but it didn’t happen (I did manage to take a break on Saturday to see the new Avengers movie with Scott and our friend Joe. Priorities).
This left me with Monday (and with the manuscript still unfinished) and I was okay with that. I knew I didn’t have a ton of time to devote to dreaming up a new recipe and so instead, I turned to the things I knew would make a good dinner and I could make without a huge investment of time.

I started early in the afternoon by making a batch of this Cumin Cabbage Slaw (it tastes best if it has a couple hours for the flavors to mingle). I cheated a little by using pre-sliced cabbage (in my defense, it was all they had at Trader Joe’s), and added some pre-grated carrots for more color. I used the IMUSA citrus squeezer to juice the lime and it worked beautifully.

Wanting to put the tortilla press to work, I decided to make the tortillas out of Vanessa Barrington’s lovely little book, DIY Delicious (a great book for homemade basics).

However, I made a critical error. I opted for flour tortillas because I didn’t have time to run out for masa harina. But because of the gluten content in the flour tortillas, they don’t work well with a press (you press them and they shrink right back up). So I ended up using the press to start them and then rolled them out by hand the rest of the way. Happily, they were delicious enough to make the effort worthwhile (and truly, it was nicely meditative).

I made a batch of Molly’s Turkey Taco meat and smashed some of my home canned pinto beans in a saucepan with a little oil, minced red onion, chopped green pepper, and a crushed garlic clove.

A jar of salsa, a tub of sour cream, and some grated cheddar cheese rounded things out. There was no guacamole because the two avocados in the fridge were way past their prime. It ended up being a really good dinner (even if it was eaten on Quatro de Mayo) and produced leftovers enough for lunches today (and right now, nothing pleases me more than getting multiple meals out of a single cooking effort).

Oh, and the tools? They are sturdy, useful, and colorful. I’m not sure that my life requires a tortilla warmer, but the squeezer and tortilla press are staying in the permanent rotation. I can’t wait to use the avocodo slicer and will do so, as soon as the pair on my counter ripen up.
Happy Cinco de Mayo to all!
PrintFlour Tortillas from DIY Delicious
Ingredients
2 1/2 cups unbleached all-purpose flour1/2 cup whole wheat flour
1 1/2 teaspoons kosher salt
1 teaspoon baking powder
2 tablespoons vegetable oil
2 tablespoons softened butter
Instructions
In a large bowl, mix together the all-purpose flour, wheat flour, salt, and baking powder. Add the oil and butter and mix with your hands, rubbing the fat into the flour with your fingertips.Pour in 1 1/4 cups warm water a little at a time and knead for 2 to 3 minutes in the bowl. The dough should be soft and pliable, but not sticky.
Let the dough rest for 15 to 20 minutes under a damp towel.
Form the dough into 12* equal balls, about 2 ounces each. Let rest for about 10 minutes (longer is okay if covered with a damp towel).
Heat a dry cast-iron skillet over medium-high heat.
On a lightly floured board or counter, flatten one dough ball slightly with your palm and, using a rolling pin, roll it out into a thin circle 8 inches in diameter.
When the skillet is hot, but not smoking, gently peel the tortilla off the counter and carefully place it in the pan.
Cook for 1 minutes, and then flip it over with a spatula. It should have small brown spots. Cook for 1 minute on the other side.
Nestle the cooked tortillas in a clean towel as you finish cooking the rest.
Once you get a rhythm going, you should be able to roll out one while cooking another.
The dough is easy to work with and shouldn't give you trouble. You may need to adjust the heat under the pan if you notice the tortillas cooking either too quickly or too slowly.
Use the tortillas immediately or let them cool, wrap well, and refrigerate for up to 1 week or freeze for 2 months.
Notes
*Since I was making tacos, I made slightly smaller balls and got 16 tortillas from this batch of dough.
This a verbatim version of Vanessa's recipe from DIY Delicious.
3.1http://foodinjars.com/2015/05/imusa-kitchen-tools-for-cinco-de-mayo/Disclosure: IMUSA sent me the box of kitchen tools you see pictured at the top of this post. No additional compensation was provided and all opinions expressed here are mine and mine alone.
Related Posts:
May 1, 2015
May Sponsors: Cuppow, iLids, Fillmore Container, Mighty Nest, Mrs. Wages, Fermentools, and Preserving Now!
It is the first! of! the! month! which means it is time to thank those companies who help support Food in Jars. It would not be sustainable for me to write here so often without their support! If you like something they do, please do follow a link or two and show them that you care.
Cuppow is the creator of the original mason jar travel mug topper and the BNTO, a small plastic cup that transforms a canning jar into a snack or lunch box. They also recently expanded their product line to include branded jar coozie (which I’ve been using non-stop) and they’ve teamed up with the EIO Kids Cup folks to bring the manufacturing of that kids drinking system onto US soil.
iLids is a Seattle-based small business that makes both storage and drink lids in both regular and wide mouth sizes for mason jars. Their storage lids are water tight and the drink lids can accommodate a straw. Add some to your kitchen today!
Fillmore Container is a family-owned business based in Lancaster, PA and sells all manner of canning jars, lids, and other preservation gear. If you’re wedding planning, making sure to check out this post on their blog that details all the ways you can integrate jars into your big day.
MightyNest is an amazing resource for non-toxic, natural, and organic products for homes and families. I’m currently hosting a giveaway that they sponsored for a collection of green picnic gear. Make sure to enter before it ends on May 4, 2015!
Mrs. Wages makes pectin, vinegar, and more canning mixes than I can count. Their website is an incredible preserving resource and I can’t say enough good things about their salsa mix. Make sure to sign up for their newsletter for monthly installments of canning goodness.
Fermentools offers a brilliant fermentation starter kit that involves a heavy-duty glass pickling weight, an airlock, a lid with a reusable rubber seal, and mineral-rich salt. I used the kit recently for a batch of sauerkraut and it worked like a dream! Get one (or several!) before the summer growing season gets going!
Preserving Now is a small business based in Atlanta, Georgia run by Lyn Deardorff. This summer, in addition to teaching her regular Canning Immersion Classes, Lyn has added a Summer Preserving Series at Serenbe in Atlanta and Nashville. Each class in the series features both a seasonal fruit preserve and a pickle or relish.
If your company or small business is interested in becoming a sponsor, you can find more details here. I offer discounts for multiple month purchases and am always happy to work with your budget.
Related Posts:
April Sponsors: Cuppow, Fillmore Container, Spice Ratchet, Mighty Nest, and Fermentools
February Sponsors: Cuppow, Fillmore Container, Spice Ratchet, and Fermentools
Hopes and Goals for Food in Jars in 2015
April 29, 2015
Resurfacing and Salmon Cakes

It’s been a little over a week since I admitted my overwhelm and put up a picture of rhubarb. The book manuscript has made great strides since then and I’ve pulled myself together enough that I actually have something to say here! Oh glorious day.
I’m writing about salmon cakes (or patties, depending on your preferred nomenclature) today. They’re not the most glamorous of foods, but they are delicious, can often be made with just what’s in your fridge and pantry, and they make some of the best and most flavorful leftovers I know. And when you’re six days away from a deadline, meals that produce leftovers are absolutely key.

I’ve been making these cakes for the last four or five years, ever since my neighbor Lucille knocked on our door one evening and asked if we liked salmon cakes. She had made a full batch thinking her daughter was coming over for dinner, but she had gotten the night wrong. Would we like some?
Up until that point, I didn’t have much of an opinion about salmon cakes but I love eating food other people have prepared (because no matter how much I change up the spices, my food somehow always tastes like my food) and so I happily accepted Lucille’s salmon cakes. We ate them for dinner that night and decided that salmon cakes should be a regular player in our dinner routine.
I asked Lucille for her recipe and made them just once as written. I’ve since tweaked and altered the recipe enough that I feel comfortable calling it mine.

One of the things I really love about these salmon cakes is that they are best made with canned salmon. If you’ve never worked with the canned stuff before, be prepared for the fact that the filets will come out of the cans with some skin and bones remaining.
I handle this by spreading the drained filets (if you have a cat, save them the liquid and they will love you forever) out on a plate and using a fork to remove the skin and the biggest bits of the bones. It’s fine to leave the tiny pin bones behind because they’ve been cooked to the point of crumbling and are a good source of calcium.

Once you’ve picked through the salmon, it’s just a matter of chopping a few things, breaking a couple eggs, and mashing it all together. The cakes are fragile and it won’t seem possible that they’ll hold together, but once you get the first side nice and browned, they will flip and hold their shape nicely.
Normally we eat these cakes as-is, but last night just as we were sitting down to eat, my husband asked, “Do we have any relish?”
Now, if you know me, you’ll know to be amused by that remark. Of COURSE we have relish. I pulled out a jar of last summer’s batch of this cucumber and green pepper relish. He stirred a forkful into a generous dollop of mayonnaise for a slapdash tartar sauce. We ate our cakes over greens with Scott’s sauce and all felt right with the world.
A note: I use parmesan cheese in these cakes instead of the more traditional bread crumbs. The reason for that is that Scott is often on a low carb diet. Plus, the parmesan melts a little during cooking and helps hold the cakes together really nicely. However, if you want to reduce the amount of fat in these cakes or make them a little more affordable, feel free to use bread crumbs. Just make sure to add some salt. I don’t use any because the cheese adds plenty.
PrintSalmon Cakes
Ingredients
2 14.75 ounce cans of salmon2 eggs
1/2 cup grated parmesan cheese
1/2 cup minced celery
1/3 cup minced red onion
1/3 cup chopped dill pickles
1 teaspoon dried dill (a big handful of fresh minced dill would be good instead, if you have it)
1/2 teaspoon granulated garlic powder
1/4 teaspoon freshly ground black pepper
Olive oil, for browning
Instructions
Combine all the ingredients and mix well with a fork.Heat a small amount of olive oil in a large skillet over medium-high heat.
Begin forming small, relatively thin patties (think 3-4 inches in diameter), gently laying them one by one into the hot skillet. If they crumble, use your spatula to shove them back together.
Cook until they're nicely browned on one side (if they seem to be browning too fast, reduce the heat) and carefully flip them. I sometimes use the two spatula technique to help the turn without breaking.
Once they're browned on both sides and heated through, they are done. With this size batch, I typically end up filling my skillet twice before I've cooked them all.
Serve hot, warm or cold. 3.1http://foodinjars.com/2015/04/resurfacing-and-salmon-cakes/
Related Posts:
April 22, 2015
Deadline Blues

Friends, I am feeling more than a little bit unhinged right now. I can count the number of days before this book is due on my fingers and toes and I am feeling every morsel of that stress. I am embarrassed to admit how many times I’ve lost my cool over the littlest things.
So I’m just going to leave this picture of rhubarb here in place of a recipe, canning tips, or anything truly useful. I’ll be back with something more fulfilling soon.
Related Posts:


