Andrew Winkel's Blog, page 3
January 28, 2018
from “The Secret Miracle” by Jorge Luis Borges
“Hladik felt the verse form to be essential because it makes it impossible for the spectators to lose sight of irreality, one of art’s requisites.”
from “The Secret Miracle,” pg. 91.
Borges, Jorge Luis. Labyrinths: selected stories & other writings. New Directions Pub. Corp., 1986.


October 27, 2015
Hacked!
My self-hosted WordPress site was hacked in late July/early August. In a short time period almost one million files were uploaded to the server. The first sign that there was a problem was redirects sending visitors to unexpected sites. I spent a frantic weekend deleting files using FTP programs on two computers, but the hackers must have installed backdoors which resulted in repeated problems. Over the next two months, I dealt with files that were mysteriously deleted and php files that autogenerated SPAM. By October, scripts installed within my sites triggered my web hosting service to suspend any sites hosted within my account until I showed proof that the sites had been professionally cleaned. I talked to the service recommended by my web host, Hostgator, and the cost for my site alone was $120 with no guarantee that the scan would actually solve the problem. Since I was hosting multiple sites, I chose to discontinue my personal blog and move my site to Wordpress.com.
The unfortunate side-effect of being hacked is that all of my work from the last four years has been destroyed. I generally received between 3,000 and 4,000 pageviews each month, and starting over is a very frustrating and disappointing consequence to being hacked. Unfortunately, I can’t see any other way to bounce back from the damage that was done. I will be attempting to recreate those posts that were most popular on my self-hosted site. This will take some time, however, so I apologize for the inconvenience this has caused you.


July 22, 2015
DIY Air-tight Sump Hole Cover Redux

Original Finished Sump Cover
Previously I explained how to build your own do-it-yourself air-tight sump hole cover using PVC, glue, and caulk. Since then, my sump cover met its match when it tried to swallow a ping-pong ball. The more I tried to remove the ping-pong ball from the inside of the 1 1/2″ PVC trap, the more the trap became blocked; the end result was I had to remove the entire sump hole cover to get��the ping-pong ball out of the drain. This proved particularly troublesome since there was no convenient way to pull the cover off. In the end I was forced to drill a hole in the cover and use an L-shaped piece of metal inserted into the hole to give me pulling power to remove the cover; otherwise I couldn’t find any way to get the cover off.
Before re-attaching the cover I decided to make some minor improvements that were not incorporated in the initial design. Obviously the first modification needed to be a handle so the cover can be removed when necessary.
Three additional ping-pong balls had found their way into the sump hole while the cover was off (plus two Nerf balls). The drain needed some kind of cover or screen to prevent��anything from blocking it.
One thing that had always bugged me about the original cover was that I could not see anything going on inside. How much water was sitting in the hole? It was always a mystery, and the only way to know what was going on in the covered hole was to listen to the water trickling in or the pumps running. A window to see into the sump hole would be an ideal addition to the design.
First Modification: Handle
I attached a handle to part of the cover. Rather than use the screws that came with the handle, I bolted it all the way through the cover. I caulked the bottom and top before tightening the screws and bolts.

Attach handle using bolts
��Second Modification: Drain Cover
This choice was really a matter of convenience. I needed something to fill the drain, but I didn’t want a screen that could get blocked with lint or dust or dirt. I tried looking around the house for a ball, something larger than a ping-pong ball that would float and create a barrier to keep out ping-pong balls or other smaller objects, but nothing that I came across worked. As I was standing at my workbench, I noticed an empty seltzer bottle in the garbage can. I thought, why not? And I cut the bottom from it.

Remove bottom from plastic bottle
Next, I used tin snips to cut triangles between the ridges of the base:

Use scissors or snips or a razor blade to remove triangles from the base of the bottle
Finally, I set the bottle cut-side down in the drain. It fits; water will flow down over it and through the cut triangles without any risk of ping-pong balls getting in.

Set plastic bottle base cut-side down into drain
Is it elegant? No. Is it going to win design awards? Does it look like HAL2000? Not really. But does it work? Yes.
Third Modification: Window
Inserting the window from the beginning would have been preferable to adding it after the pieces had all been glued in place. Ideally I would have cut the opening for the window, then routed a lip to recess the plastic. This was after-the-fact, however, so ideal wasn’t going to happen. I was going to have to resort to a plain, old jigsaw hole.
For the window I found a $4 piece of Lexan plastic at Menards.

Lexan plastic for sump window
I used a square to scribe a rectangle on the plastic:

Mark the rectangle to be removed
Then I used a drill to give my jigsaw a place to start and cut out the rectangle:

Drill starter hole

Use jigsaw to cut rectangle from plastic

Finished hole
While there may be recommended tools to cut Lexan, I��simply used an X-acto knife and a straight edge. After scoring the plastic a number of times, I bent it until it snapped. This is the step that could probably result in a painful injury, so for heaven’s sake, be careful! After cutting the plastic, I found that my hole was 1/8″ too short, and it was easier to use the jigsaw to remove an additional 1/8″ than try to re-cut the plastic.

Cut plastic ready to be inserted
I spread��plastic wrap on the work area. After placing the cover face down, I set the cut Lexan into the opening, then applied the silicone caulk to the perimeter. Again, I’ll mention that ideally there would be a lip around the perimeter that would hold the plastic level to the surface of the sump cover; this method only holds the plastic in place with caulk, so it cannot support weight. Hopefully you aren’t standing on your sump cover anyway.

Set plastic into opening

Caulk perimeter and let dry
Once the caulk dried I put a second layer of caulk around the plastic on the other side of the cover.
Set Cover
I cleaned the area around the sump hole and ran a fan on it for a couple hours to dry it out before setting the cover in place.

Prepare sump hold for the cover by cleaning and allowing drying time
I ran a bead of caulk around the perimeter, but with the variations in the lip from age and deterioration, some sections did not allow for a good seal.

Apply a bead of caulk to perimeter of sump hole
Something I failed to mention previously was that I realized after I installed the cover the first time that the sump hole was not level; water that ran onto the cover didn’t run straight to the drain; instead, it pooled on one side. I used this opportunity to make sure the cover sat in such a way that the water would be directed toward the drain. Running a��second bead of caulk around the perimeter and on every seam insured a snug fit and a good seal.

Finish the cover by adding caulk between the pieces, to the perimeter, and along every seam

Detail of the drain in use: no ping-pong balls are going in here!

Finished DIY air-tight sump hole cover
Conclusion
If you are fortunate enough to have a prefabricated sump hole unit, there may be covers available for cheap that will save you the stress and time of building your own. Most everything I found online was for round sump holes; many did not include drains, or were not air-tight. If you have a house like mine that was built in another era (mine is from the 1950s), building your own may be the best option. I suppose it’s possible this sump cover is not 100% air-tight, but it has to be pretty darn close. Plus, this is the only cover I see that incorporates a window to see into the sump hole.
What do you think? I’d love to hear your stories or feedback. Leave me a comment below!
Compulsory Disclaimer: This post does not take the place of professional advice; it simply describes what I did. I am in no way responsible for you, your choices, your experiences, and your problems. In other words: use at your own risk!
February 1, 2015
Easy, Inexpensive DIY Board Game & Library Table

Build this solid wood board game and library table with basic woodworking skills and shop tools for around $200.
For Christmas 2014, my wife and I told our children that the Winkel family was going to have a “non-electronic” Christmas: no video games, no video game systems, no tablets, and no computers. Our boys noticed a game table in a local resale shop; that became their non-electronic Christmas request. Unfortunately it was square which made it impractical for many of the board games that have rectangular boards, or involve more than four players. I bounced around boardgamegeek and did some research on the internet, but none of the game tables that I found were what I had in my head for the boys. I also needed a table that I could build with my palette of woodworking skills: some of the tables I found had excessive joinery, or unnecessary routing. I wanted simple. After doing research, I stepped back and made a list of needs for the table:
Recessed playing surface to protect games that require more than one gaming session
Cover that can be used as a work or playing area
Inset for Go and Chess
Relatively simple to construct
Inexpensive (e.g., not in the same league as the Geek Chic tables which run in the thousands)
Rectangular playing area (32″ by 64″ stuck in my head for some reason)
Standard table height (30″)
Removable legs to transport it upstairs to the boys’ room
I did not succeed in all my original ideas. I imagined a reversible chess/go board that would rest on the top of the table; this did not work in my final design. The finished height is actually 32″ as built, though this last could be adjusted by constructing the legs two inches shorter.
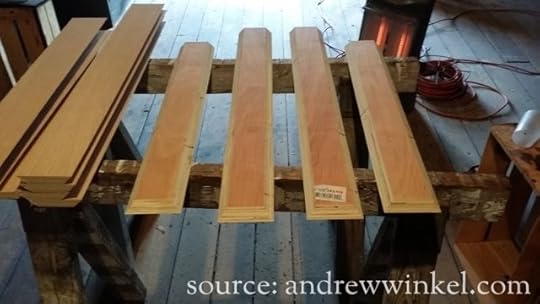
The entire table is constructed from oak plywood with the exception of edge pieces. This helps keep the cost down while retaining the look of solid wood. I purchased all of the materials from the local Menards store.
Construction requires a table saw, circular saw, miter saw (preferably 12″, although I made every cut on a 10″ miter saw except for trimming the top edges of the constructed legs), screw gun, and power nailer with air compressor. If you don’t have access to the power nailer, you could certainly use finish nails and pilot the nail holes with a drill bit, but this would be both tedious and time consuming. A square and clamps will also be necessary, and I did make use of a belt sander at one point.
One caveat if you’re still with me: I’m not a draftsman, and I’m not interested in spending the time to learn Google Sketchup, so you will have to put up with my rough sketches and the photos I took while building mine. I’ve made every effort to accurately depict the steps required to build this table, but I’m recreating the steps after the fact from my notes and pictures, and there were times when I screwed up and had to go back and revise things.
Material List
Wood
Item DescriptionMenards Stock #QtyPrice EachTotal
4 ' x 8' x 3/4" Red Oak Plywood12517992$39.99$79.98
1" x 3" x 6' Red Oak Board10438202$8.88$17.76
1" x 3" x 8' Red Oak Board10438331$11.84$11.84
1" x 2" x 6' Red Oak Board10425912$5.52$11.04
1" x 2" x 8' Red Oak Board10426271$7.36$7.56
Wood Total$128.18
Hardware
Item DescriptionMenards Stock #QtyPrice EachTotal
Floor Levelers 1-1/16" Leveling Glide21727581$2.49$2.49
Joint Connectors Male202537116$0.79$12.64
Joint Connecters Female202532616$0.69$11.04
Hardware Total$26.17
A note on the joint connectors:
Menards carries these joint connectors, which are perfect for attaching the legs. However, they replenish stock one case at a time, and the case count is 16. You will need 16 connectors! My recommendation is to simply order a full case of each rather than purchase whatever the store has on hand then wait for them to reorder. I waited over a month to get the last few of these because the first case Menards ordered never made it onto the shelf; the store had to zero out their inventory counts to get their system to replenish with an additional case.
Other Materials
Wood glue
Paint thinner
Masking tape
Sandpaper of assorted grits
Steel wool
Wood filler
Wood screws
Nails for power nailer (I used 1 1/2″ 16 gauge finish nails)
Wood Stain (I used Minwax English Chestnut because that’s what I had)
Polyurethane or similar
Wood Repair Pencil (I used Minwax Blend-fil Color Matched Wood Repair Pencil)
Tack cloth
Assorted rags
Brushes for staining
Cutting the Plywood Sheets
Follow these steps to rip the plywood sheets into the pieces that will be assembled into the table. The illustrations are not drawn to scale; however, they do provide a rough overview of the cuts necessary for assembly. There will be additional cuts after the initial prep work to fit pieces to the table.
Most of these cuts will make use of the table saw, with only a couple using a circular saw or miter saw.
The plan includes some extra wood for mistakes, but not a lot. If you are like me and make frequent mistakes, and extra sheet of plywood will probably be in your future.
Cut Overview


Cut #1
Remove 14 3/4″ from Board “A,” leaving a 33 1/4″ wide piece.
Cut #2
Using a circular saw, remove 30 1/4″ from Board “A1″ so a 65 1/4″ piece remains. The 33 1/4″ x 65 1/4 piece will be the inside table surface. I’ve identified it here as piece “A4.”
I use masking tape when cutting against the grain to try to prevent shredding the edges of the veneer.

Cut #3
Remove 11″ from Board “B,” leaving a 37″ wide piece.

Cut #4
Using a circular saw, remove 27″ from Board “B1″ so a 69″ piece remains. The 37″ x 69″ piece will be the table top surface. I’ve identified it here as piece “B4.”

Cut #5
Take the two remaining 8′ boards, “A2″ and “B2,” and rip them into 4 5/8″ pieces. It might be possible to cut three from board “A2″ and one from “B2″ with the remaining wood left as scrap. The essential thing here is to have the four 8′ lengths of 4 5/8″ wood, which will become both the inside and outside sides of the table.

Cut #6
Boards “A5″ and “A6″ should be cut exactly the same: remove a 33 1/4″ piece from each and set them aside to be cut in the next step; these will be the inside short sides of the table, labelled here as “A7″ and “A8.”
Likewise, “B5″ and “B6″ should be cut exactly the same: remove a 64″ piece from each and set them aside to be cut in the next step; these will be the inside long sides of the table; these will be the inside long sides of the table, labelled here as “B8″ and “B10.”

Cut #7A
Set the table saw fence to 4″, then rip pieces “A7,” “A9,” “B8,” and “B10″ to 4″ width. These pieces will be used, along with piece “B4″ to form the interior playing surface of the game table.

Cut #7B
With the table saw still set at 4″, rip Boards “A3″ and “B3″ into 4″ strips. There should be 16 total, with the 8 leg pieces from “B3″ making up the short side of the legs, and the 8 leg pieces from “A3″ making up the long side of the table legs.

Cut #8
As referenced in the above notes, set the table saw blade to 45° and run each of the sixteen table leg pieces to bevel each long edge. The important thing here is that every table leg is identical in width; it is not essential that the legs are exactly 4″; rather, they must be exactly the same.
It would be a good idea to use some short pieces of scrap to test the 45° angle of the saw. I lost four leg pieces because the angles were wrong and the pieces didn’t fit snug together. I was lucky that I was able to save the remaining pieces and recut the boards at the correct angle.
Cut #9
Use a miter saw to cut a 45° angle on one end of each table leg.
Cut #10
Cut the legs pieces ripped from piece “A3″ to a length of 30 5/8″ for the long leg pieces (there will be a total of eight).
Cut the leg pieces ripped from piece “B3″ to a length of 26″ for the short leg pieces (there will also be a total of eight).
Cut #11
Use scrap and a miter saw to cut 4″ by 4″ end pieces with 45° edges for the bottoms of the legs. These cuts are not on the cut overview because there are enough leftovers to cut these pieces to fit.
Assembling the Legs
Leg assembly is straight-forward. Two short legs and two long legs are attached to one another. I used glue and the power nailer.
A note on the power nailer: I have had problems with nails that are too long blasting out the sides of plywood and ruining pieces. I used 1 1/2″ 16 guage nails for this project and did not have any blow-outs.

Glue and nail leg pieces together lining up the bottom edges.

Three sides assembled

Top of a table leg with four sides assembled. The corners of the table will sit on the short sides of the table legs while being mounted to the tall sides of the table legs.

Bottom of the table leg; Note how the last piece will fit in place like a lid.
Attach each leg bottom; it should slide in place securely.

Leg bottom after assembly
Use a wood filler of your choice to fill the nail holes and any edges that need it. I use a putty knife to try to scrape the excess, then paint thinner to really clean the area. In the past when I’ve been too sloppy and trusted to sanding to remove the excess, I’ve created more work for myself. The thinner seems to be a better solution.


Scrape excess with putty knife.

Use mineral spirits to clean the excess that was missed by the putty knife.

Example of a filled, wiped nail-hole (top) contrasted with an unfilled hole (bottom).
Next, attach the floor levelers (I stained the legs prior to this step; however, since I had already glued the legs, I had some dried glue that left inconsistencies in the way the wood took the stain).

I chose these floor levelers to make sure the wooden legs stayed off the ground.

Draw an X from corner to corner

Pilot the hole

Tap the plastic insert into the hole, then screw the leveling glide in
Assembling the Inside Table Top
Collect pieces “A7″, “A9″, “B8″, and “B10″; these pieces will be used as the sides. Piece “A4″ will be the bottom.
I stained the pieces for the inside table top in advance so I wouldn’t have problems with the glue drying in the corners in hard to sand areas. I should have followed this step for the legs also.

Spread glue on the edge of piece “A7″ or “A9″ (since they are exactly the same, it doesn’t matter which you use)

Place the glued edge against the end of piece “B8″/”B10″ (again, since they are cut the same it doesn’t matter which you use)
Avoid putting either a screw or nail 1″ from the top and 1″ from the bottom; the leg anchors will be in this area at a later step.

First I tacked the pieces together to hold them in place, then I piloted and countersunk screws to secure the pieces together.

Inside edges assembled, including pieces “A7″, “A9″, “B8″, and “B10″ with a bead of glue all around it, just waiting for the placement of the inside table surface, “A4″
Make certain the corners are square before attaching the table surface, “A4.” Note in the picture below that I had a slight overhand along one edge. I dealt with this in a subsequent step.

Attach “A4″ to edges with combination of glue and wood screws. I piloted and countersunk my screws.

The assembled interior of the game table (after much clean up of glue!)

Notice the edge sticking out? It needs to be flush. I used a belt sander and rough sandpaper to take care of it.

After sanding, the edge is straight
Attaching the Legs
Using clamps, set the table into the legs and insure that none of the legs extend above the 4 5/8″ height of the table’s surface (the reasons for this will make sense at a later step). I had two that were about 1/16″ longer, and I ripped them down with a miter saw. Unfortunately, doing this also splintered some of the veneer at the edge of the cut, though I think I should have used a better blade for this cut (it wasn’t my saw; I had, by this time, moved the entire project into my father-in-law’s shop because my garage isn’t heated and the temperatures were approaching freezing).
Remember these?

They will be used to attach the legs to the table. There will be 4 on each leg for a total of 16 connectors of each type. The male piece has a smaller diameter than the female piece. Find drill bits to accommodate each size when piloting holes. I actually drilled the holes for the male piece right at that width so the bolts are tight, not loose.
Use scrap wood to build a template to attach the legs. It should be 4″ from top to bottom and at least 4″ wide.

The template is simply two pieces of scrap plywood attached together.

Measure the holes three inches from the corner and one inch from the top and the bottom
Use the template to drill holes in the legs. Use a piece of scrap wood on the back to prevent blow-out (I didn’t, and someday when my sons take the legs off, they will see my sloppiness revealed).
Align the legs on the table and check for square. It is absolutely essential that the legs be checked for square at this step because any imperfection will be permanent once the legs are attached. Clamp a piece of scrap wood inside to prevent blow-out; the inside surface will be visible in the final table (though likely covered by the head of the joint connector).

It is absolutely essential that each leg be checked for square before drilling the hole for the joint connectors.
Once the holes have been drilled into the table’s edge, they will need to be widened to accept the thicker diameter of the female joint connector. Replace the drill bit and drill-out the four holes in each corner of the table. Do not do this to the legs; they should have a smaller hole.

The inside of the table will have slightly wider holes because the female joint connectors are thicker than the male joint connectors.
Use the joint connectors to attach all of the table legs, checking for square while tightening them.

Top view of the leg against the table with the joint connectors ready to be tightened.
Finishing the Sides
The side pieces, ripped at 4 5/8″ and identified as “A8″, “A10″, “B7″, and “B9″ will now be cut to fit the actual width of the table. Each end will be cut at a 45° angle to slide behind the attached legs.
I prefer to measure and cut slightly wide, then shave edges down to get the piece to fit. Because of the height of these pieces, 4 5/8″, it will be necessary to use a 12″ miter saw to complete the cut. A 10″ blade will not have the necessary depth for a clean cut through the entire height of the board. However, a 10″ compound miter box may be able to do it; I’ve never used one of those.

Measure and cut long, then shave the edges until the piece can slide into place.
Next, apply generous amounts of glue. I’m sorry my picture is from a different side; it’s jarring to have the angle switch like that.
The two joint connectors in the picture are the ones waiting for Menards to replenish their stock so they have a partner connector to attach the table legs.

Use lots of glue and be ready with clamps — they will need to stay in place until the glue dries
Slide the side in place, clamp it, and use a power nailer to attach the sides by nailing into the base of the table. Careful you don’t nail too high and damage the playing surface!

Space Nails: I don’t measure, but rather put one on each end, one in the middle, and then an additional two in between for a total of five nails per side

Repeat the gluing and nailing of each side, giving the glue enough time to dry while clamped
Assemble the Removable Top
The top of the table is a large piece of plywood (identified during the cuts as “B4″) that will be bordered on each side with solid oak 1″ x 2″ pieces. I had already stained the wood at this point, as you will see in the images.
There are two 1″ x 2″ pieces in 6′ lengths; these two will be used for the long edges of the table. There is one 1″ x 2″ piece in 8′ length; this will be divided in two for the short edges of the table.
Again, I apologize that the images switch back and forth between the sides. I don’t have a set of pictures capturing the entire process for a single side.
Choose a side to begin with and select the appropriate piece for the edge. Cut a 45° at one end, then lay the piece atop “B4″ to measure the next cut.

Cut one end to 45 degrees.

Use the actual length of the table to determine where the second cut should be made.
Once the cuts are made, and the corners are precise, use glue and the nail gun to attach the piece.

Glue and nail, then repeat three more times

I like to use tape on the edge to see exactly where the cut should be made. I also tend to over-cut and then shave the edge a sliver at a time until it’s perfect.
It’s a good idea to make absolutely sure the surface of the plywood sheet is exactly parallel to the top edge of the board. I have one corner of the finished table that has an ever-so-slight edge that extends above the trim, and to me, this glaring error is a constant aggravation:

This slight ridge feels like failure; I don’t recommend it.
Once the removable table top was assembled, I primed and painted the interior. I used materials I already had on hand which is why the surface was painted with chalkboard paint. The back of a sheet of plywood is not meant for display, so covering it with paint makes sense.

This type of plywood has an inferior reverse side, so priming and painting makes sense to cover the ugliness.

Chalkboard paint has a flat finish which covers well, but it also shows every single scuff, scratch, or mark.
Almost There: One More Set of Cuts to Go!
The inside game table needs a rail for gamers to lean on; The rail also provides additional stability to the table, a surface for the removable top to fit on and against, and an overall finished look. The rail is made from 1″ x 3″ solid oak boards. The long rails are cut from 6′ length solid stock, and the short rails are cut from a single 8′ length.
I used the table top as my template and made the cuts from the 1″ x 3″ boards because I wanted to be absolutely sure the table top would fit atop the rails. Fortunately the edges, when cut to fit the edges of the inside table, fit perfectly beneath the removable top; of course, that was the plan, but sometimes plans and reality don’t like to hang out on the same woodworking project.

The rail must fit within the edges of the removable top
Next, I removed the top and arranged the rail pieces on the table itself.

A slight lip inside would not be the end of the world, but I discovered that the pieces fit perfectly.
Glue and nail, but not to the legs! The glue should only be to the sides of the table if the legs are going to be removable!

To make certain your legs will not “stick” to the rails, avoid gluing them!

Repeat gluing and nailing each side
Finished (without the Finish)!

Recessed game surface of completed table: Angle #1

Recessed game surface of completed table: Angle #2

Completed table with top on: Angle #1

Completed table with top on: Angle #2
Now Finishing Details
With the table assembled, the only remaining steps are to wrap-up some unfinished business and apply the polyurethane (or whatever finish you wish).
First, get stain in all of the places that you missed during the assembly process. For me, this included the area beneath the rail and also the very slight bare wood visible between each leg and its side piece. In fact, I removed all the legs to complete this process and reattached them later.
Fill any nail holes with wood repair pencils to match the stain color. These “pencils” differ from wood filler because they are a waxy material that is designed by the manufacturer to match a particular stain. I found that wiping the excess with mineral spirits created a more natural look for the filled nail holes. This could be done either before or after the polyurethane.
I used scrap wood to create holders for the legs so I could apply the polyurethane to all four sides of the table legs at one time.

Tacking scrap wood to saw horses let me slide the legs onto them like sleeves so I could apply the finish coat.
The Chess Board
Part of my original vision was a reversible inset chess and go board. As I worked on the table design, I could not find any way to create such a feature – at least, not without adding a second layer of plywood to either the table top, or the recessed bottom. In the meantime, however, I had purchased two used chess sets from ebay: one set was the E. S. Lowe “Renaissance Chessmen” produced in the fifties and sixties, and the other was an obscure plastic Civil War set that looks to have been modeled after the Ann Carlton sets.
In the end, I needed the chess board to go with the chess pieces, and I concluded that board applied directly to the recessed playing surface would be the best option.
I am not going to go over the steps I followed precisely except to cover the basics. The tedium of the measurements I’ll leave to anyone who wishes to create their own. I did not add the polyurethane until after the chess board was done.
I did learn that wood stain bleeds beneath masking tape which makes for imperfect edges. My conclusion was to add 1/8″ strips of black spray paint to cover any stain bleed.
Here are some images from adding the chess board:

Measuring to get the board exactly in the center was a piece of tedious mathematics, especially since I sized my squares at 2 1/8″ each.

Only one-half of the squares can be stained at one time. I discovered that scrubbing with mineral spirits after the bare surface had dried would clean much of the accumulated stain from beneath the tape.

I used black spray paint to create 1/8″ lines to cover any of the stain that bled between squares

Testing out the squares to see how they looked with the Renaissance pieces.
The one inch lines at the edges of the board were mistakes. I realized I made them after the first set of lines, and I didn’t like the idea of a border fully one inch thick, so I decided to incorporate them into the design of the board by adding chess coordinates. I based the letters and numbers on the font Sorts Mill Goudy (though I did use the lining form of the numbers rather than the regular form), then hand lettered the coordinates with a drawing pen.
The board was finished with a solid black border.

Finished chess board after lettering, numbering, outside border, and polyurethane

Alex and Bryan ready to start a game of chess while Anna watches.
The Table in Action

Alex and Bryan playing Power Grid: The First Spark

Bryan, Alex, and Chris playing Citadels

Bryan, Alex, Chris, and Tim analyzing a game of Suburbia
Reflection
I am very pleased with how the table turned out; In fact, my biggest concern is that someday, when the boys move out, there may be a problem figuring out who gets the table, which makes this document all important in building another one. Hopefully at that time somebody else will want to do the staining and polyurethaning because I can unequivocally state: I hate staining and polyurethaning wood.
The height of the table at 32″ is just tall enough to make folding chairs feel short. On the other hand, a 24″ stool makes for a nice height, but you can’t hold your legs perpendicular and fit them beneath the table. I prefer the stools, and since 24″ stools can slide beneath the table, I think I’ll pick up some cheap ones periodically until we have six. You can see the heights in the image below.
I tested how the underside of the removable top would work as a playing surface:

Avalon Hill’s Mystic Wood, one of my earliest board games, and one that usually needs a decent sized table to play.
The problem with reversing the removable top was that it’s not secured, so it can slide around. I imagine there is a creative solution to keep this from happening, but it’s not in the current design. Still, it is a possible option that could be explored.
When I told some of my friends and family members that I planned to share these plans and images online, they told me I should charge for them, as though there are lines of people waiting to throw money at me. I’m sure another person would have the skillset to do that, but for me, I enjoy knowing that others will be able to make use of the plan to construct their own board game tables, or brainstorm from my ideas and take them in a new direction to come up with something great that will give them pleasure in their lives. That is truly what using the internet to share ideas is all about; it’s why I keep this blog (and all the expenses of keeping it, since I don’t have any ads or monetizing set up on it except for those links to buy my books). I hope that if you find these plans useful or informative, you will share your story and images with me.
Disclaimer: I’ve tried to make certain the plans I’ve presented above will result in the table that I built. As mentioned at the beginning, I’m reconstructing the information from notes and photos, so it is entirely possible I made some mistakes in chronicling my adventures. Please use common sense as you are working on your own project, and remember I offer this information without guarantee, warranty, or liability to you.
The above text is version 1.0, revised 2015-01-30.
September 30, 2014
Children Need Bedtime Stories
With school back in session and earlier bedtimes in place for my children, the Winkel family has returned to the routine of bedtime stories. Katherine and Anna beg to hear the further adventures of Meg, Jo, Beth, and Amy in Little Women by Louisa May Alcott, while Alex and Bryan eagerly listen for an hour to The Count of Monte Cristo by Alexandre Dumas.
After Raceboy and Super Qwok Adventures was published in 2012, I did a presentation on the importance of reading to your child(ren) at the Exploration Station, a children’s museum located in Bradley, Illinois. As I reflect this school year on the value reading to my own children has brought to them (and to me), it felt appropriate to revisit my notes from 2012 and present them to a broader audience.
As with my presentation in May, 2012, everything comes from my own experiences. It is anecdotal. I think science would back me up, or the conclusions of educational researchers, but I did not take the time to scour journals to substantiate what I essentially know to be true: I am right.
Read on to find out why.
Rules for reading to your children:
Start. A little bit is better than not at all.
Fit reading into a routine that your family already performs.
It’s okay to quit a longer book, just not too often.
Don’t use reading for leverage or punishment.
Exercise your executive override.
For as long as I have been a parent, I have been reading bedtime stories to my children. Board books gave way to picture books that gave way to short novels and even book series. When the adventures of their favorite superheroes thrilled Alex and Bryan with ideas of heroism and adventure, it was only a short hop, skip, and jump to create even greater personal connections by turning the boys themselves into the superheroes; thus the source material for Raceboy and Super Qwok Adventures grew from bedtime stories, and has even become a part of other families’ bedtime routines.
If there is a single, simple thing you can do as a parent to positively impact your children, it is to share bedtime stories with them.
The seeds of success in school can be found in bedtime stories. They expose children to a greater vocabulary than what they will hear in the home and provide repetition of words and phrases which is essential for learning new words. Picture books are deceptive: adults assume that because they were written for children, they must be juvenile or simple. Nothing can be further from the truth. Picture books abound with vibrant language, as any reader of David Kirk’s Miss Spider books will acknowledge. With stringent limits on word count, picture books represent written economy and precision. They also push children outside the boundaries of the mundane, resulting in brave, new worlds of experiences that create context for language that could not be encountered in the world of the quotidian.
During the picture book stage of the bedtime stories, children will ask to hear the same book over and over and over. This repetition strengthens familiarity with word sounds, and results in greater connection with words when the child becomes the reader.
My experience has been that children who listen to bedtime stories have improved focus and concentration, demonstrating an ability to sit quietly and spend time engaged on a single task. This translates to greater awareness of social expectations in a school setting. This does not mean that your child should only sit still and stare into space, as I’ll mention later. In this age of immediate, electric feedback from digital devices, the skill of delayed gratification may very well be the most important gifts you can give your child. I suspect the neurological effects of a generation raised within the very limited (yet flashy) dimensions of a smartphone or tablet will only begin to be understood in the next decade, and by that time it will be someone else’s children who will be diagnosed with the syndromes that haven’t been coined yet, but will be recognizable as an inability to focus without constant interaction from technology.
Over time, as the number of bedtime stories grows, and as the type of literature matures, children gain a greater awareness of cultural literacy. The ability to make connections with the vast body of literature, science, and history will augment classroom instruction and provide fodder for essays and constructed responses. It also makes for much more interesting dinner conversations than hearing about the third level of whatever trendy new video game was released last week.
Reading bedtime stories to my children hasn’t been all about giving; there are real advantages that I, too, have reaped from the last thirteen years of reading. I am a substantially better reader than when I started. Between the classroom and home, I literally spend hours each day reading aloud, and the results are clear. I am a much more fluent reader. My inflections, vocal control, and even ability to perform accents have improved.
There are also two very important–maybe even the most important–pieces to consider about reading bedtime stories to your children. First, bedtime stories create an opportunity to spend time with your children. I was shocked years ago when my classroom of seventh grade students admitted that they did not eat dinner as a family. Most of them ate dinner in their room in front of a television or computer. If there were any who ate the way I was raised–with both Mom and Dad at the table–they were in the minority and felt pressured to keep that information hidden. So bedtime stories may be an opportunity to, in some small way, try to defeat the isolation that has become both dominant and acceptable in our culture.
The second important aspect is that bedtime stories open up the opportunity to have discussions with your children, and through these discussions, the opportunity to share your perspective on life, ethics, and really, any subject you wish. I don’t mean a soap box. Children (actually, most of us), are turned off by overt didacticism. We don’t want to be beat on the head with a theme cudgel, and if that becomes your purpose, you will turn what can be an enjoyable way to spend time together into another barrier between you and your children.
Many people quit reading to their children once they are old enough to read to themselves. This is a huge mistake. While it is true that your children should be independent readers, there is nothing in the act of reading to them each night that will take away their independent reading skills. Rather, this experience will give them a chance to share a storyline with you and discuss concepts or topics that you otherwise would never have the chance to discuss. As the adult, you have the chance to explain in greater detail those elements that may have been confusing or simply above your child’s head.
Excuses why parents don’t read to their children:
We have no time.
Fix #1: Start with five minutes. Choose short books (I’m not talking about four page books about the letter A with water color images of an apple, an aardvark, an astrolabe, and the antipodes!) that have limited words. Many picture books let the illustrations do a majority of the telling; use some of these to help you with limited time. Suggestions: Don’t Let the Pigeon Drive the Bus by Mo Willems, No David! by David Shannon, or Dinosaur Roar by Paul Stickland.
Fix #2: Find a time that works for your family; there is no one size fits all time. Maybe after lunch but before nap time. Maybe first thing in the morning? (Winkels aren’t morning people, but I’ve heard stories of mythical children who wake up at the crack of obnoxious and shake their parents’ shoulders asking to be entertained. Personally, I’d pull them into my bed and snore for a couple more hours, but if you can get up that early, it’s obvious your genes are to blame.)
Fix #3: Push bedtime back five minutes. Believe it or not, the world won’t end if you don’t keep your “schedule.” Besides, there’s a certain satisfaction in knowing your child feels like he’s getting away with something, especially when you make it clear that this exception to the rule is caused by a book. This teaches your child that books upset the order of the universe, and you know what? It’s the truth!
We don’t have any good books or books are expensive
Fix: The last one hundred years of publishing has done one major thing for the printed word: it’s made it plentiful, and what is plentiful, is cheap.
Books can be borrowed from friends, especially books that appeal to a very limited age range. Although picture books are certainly enjoyable for adults and children alike, rare is the adult (who isn’t a picture book author) who spends an hour reading picture books. It just doesn’t happen. Adults have to do adult things like fill the gas tank, or scrub the mildew on the edge of the tub. There’s not time to visit the land where the wild things are. Just remember, if you do borrow books, give them back!
Libraries are the best friends a thrifty reader can have. If you haven’t developed a relationship with your local library, you should finish reading this blog post and immediately proceed to your library during its regularly scheduled hours. After you walk the shelves and discover the range of materials that is available locally, you should ask about interlibrary loan. You will suddenly realize that an amazing amount of the written word (as well as other media) has suddenly become available to you, and after your initial list of interlibrary loan requests fills the back seat of your car, things should calm down to a more manageable level.
Garage sales, rummage sales, tag sales, resale shops, all have copies of books for greatly reduced prices. If the sticker price at Barnes and Noble leaves you feeling like your weekly income is inadequate, buy some paperbacks from a local kid who will be thrilled to get fifty cents a piece for them. The other advantage to purchasing used books is that they aren’t in pristine condition, so you don’t have to freak out when Junior rips the middle third of the book out, surprised by his own strength.
My child has no interest in listening to books
Fix: Read anyway.
Bryan, as the second son, has always been two years behind Alex. It was inevitable that a two-year-old Bryan would not have the maturity to handle longer books like a four-year-old Alex.While I read longer stories to Alex, Bryan would sometimes find things to play with. He never left the room, and he didn’t make noise, but he might play with a different toy while I read. I gave him that freedom because I felt that part of his brain that processes the story was still listening. And he would verify this by coming to look at the pictures, or asking questions, even if he would go back to playing afterwards.
Other times Bryan protested that he didn’t like the book. This requires that you be more diplomatic. There can be some give and take, and all voices should be equally represented, but in the end, as parent, you have final say. Make certain your child feels empowered to choose a title, and also make sure your child learns to accept titles chosen for him or her.
As the boys have gotten older and we’ve moved into novels that require a greater investment of time, I’ve actually given them less input into the books I read to them. Each time I get done, Bryan will say, “Can I pick the next book?” and then he’ll suggest something, maybe a book from the Warriors series. I tell him that if it’s a book that he’s going to read anyway, he should just read it himself; the books I’m looking to read with them have to have some quality, some distinction that sets them apart, that makes them stand out to me. I may read something like Warriors some day, but the truth is, I know that the amount of time I have to do this will not go on forever, and I want it to be filled with the best works I can read while it lasts. In this way my children may be exposed to a quality of literature they never choose to read for themselves later in life, though I think that they will choose to do so now that they have been exposed to quality literature during their entire childhoods.
My child is too young
Fix: Read short, short books. Don’t expect plot. Board books are ideal, as are books with textures. Sandra Boynton books were always favorites with my kids, and I must have read Goodnight Moon over a thousand times. Oddly enough, I don’t remember Goodnight Moon from my own childhood.
Start having fun while your child is too young to know how silly you are. Make the voices for the characters. Give witches an extra scratchy, screechy voice. Use a loud, rumbly voice for a giant. Voices add to the experience, and as your child grows older, you will grow more fluent and confident in your own reading.
A word of caution: don’t over-eager about pushing into more challenging titles. If anything, my greatest weakness has been an impatience for longer books, and my youngest daughter Anna has been a casualty of this. She’s had to keep up with the older kids, and it’s been hard for me to backpedal to a title like Charlotte’s Web after years of more complex works.
My child is too old
Fix: No one is too old to be read to. At the same time, no one wants to listen to a stumbling reader read for an extended period of time. This is why there is a beautiful progression that takes place if you start reading to your children when they are young, and continue with it as they grow: you grow as a reader and become more practiced. My kids know that I read to them. It’s not that they read poorly, but it’s the routine that’s evolved during their lives. You may find that taking turns reading works better for your family, especially if you are beginning this late in the game.
Since older readers will need longer texts, spend some time researching length. Long books can take upwards of ten or twenty hours to read orally. You can estimate approximate lengths by looking up the running time for a book’s audio edition. Or you can get a word count for the book (see my post here) and divide that word count by 150. Then multiply the result by 60 to get the total hours the title will take (total words divided by 150 words per minute times 60 minutes in an hour equals total hours to read aloud).
Reading novels is great, but don’t discount short fiction. Short story collections or digest-style magazines offer high-interest content that can be read in fewer settings. Because short fiction comes encapsulated in a smaller package, it provides even greater opportunities for exposure to new genres, concepts, and discussions. And like picture books, short fiction values economy and precision: every word counts.
I also like graphic novels, if they are age appropriate. The storylines move fast, the images are exciting, and kids are hooked.
(Longer) Titles That I Have Read to My Children
These are the most recent twenty-two books that I have read to my kids, as I’ve recorded them on GoodReads. I’ve approximately reordered them from most approachable to most advanced:
Spunky’s Diary by Janette Oke
Little House in the Big Woods by Laura Ingalls Wilder
Dance Divas: Showtime by Sheryl Berk
Pippi Longstocking by Astrid Lindgren
Mary Poppins by P. L. Travers
Mary Poppins Comes Back by P. L. Travers
The BFG by Roald Dahl
Anne of Green Gables by L. M. Montgomery
The Little Prince by Antoine De Saint-Exupery
The Chronicles of Narnia by C. S. Lewis
A Wrinkle in Time by Madeleine L’Engle
The Neverending Story by Michael Ende
The Book of Three by Lloyd Alexander
Johnny Tremain by Esther Forbes
The Last Unicorn by Peter S. Beagle
The Last Unicorn (Graphic Novel) by Peter S. Beagle
Watership Down by Richard Adams
The Killer Angels by Michael Shaara*
The Stars My Destination by Alfred Bester*
Nine Princes in Amber (Amber Chronicles #1) by Roger Zelazny*
Guns of Avalon (Amber Chronicles #2) by Roger Zelazny*
* These have some mature content that may require extra tact and conversations
and we are currently reading:
Little Women by Louisa May Alcott
The Count of Monte Cristo (Unabridged) by Alexandre Dumas (we switched to this edition midway through, and they are different!)
June 16, 2014
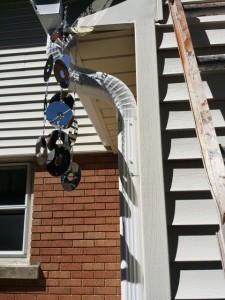
DIY Wind Chimes from Repurposed Hard Disk Platters
After tearing apart a number of old hard disk drives to make certain the data was irrecoverable, I wondered what I could do with the dazzling, mirrored platters that store data. I decided on a simple idea: wind chimes.
Assuming you have already disassembled the hard disk drives to remove the platters, this project is very quick and requires very few materials.
What You Must Have:
Drill with assorted bits
Needle-nose pliers
Scrap wood
Clamp
Assorted hard disk platters (I had 13)
Decorative chain
What To do:
Step One
Drill two holes at opposite ends of one disk platter. Use scrap wood beneath the platter to protect your work area. This platter will serve as the guide for the remaining platters. Choose a bit that makes a large enough hole to fit two chain links. Careful to leave enough space between the hole and the edge of the disk.

Step Two
Clamp all remaining platters together beneath the platter that has holes from step one. Use the holes for guides and drill through all the platters.

Step Three
Select one platter and drill two additional holes for a total of four holes each 90 degrees around the platter. This will serve as the top of the wind chime, and the twelve remaining platters will dangle from this one.

Step Four
Assemble the pieces. I used the following plan (which I didn’t draw until afterwards, so feel free to experiment and make your design work for you). Different chain links have different lengths, so test the relationship between links and platters to find a number that will create the best effect. I wanted the platters to hang at differing heights.

Needle-nose pliers easily open and close the decorative chain to attach to the drilled holes in the disk platters.

Begin with strands of four chain links from the top platter to a single link that will serve as the hanger for the wind chime. You can then either assemble each strand of links/platters or work your way down from the top.
I chose the top-down approach.


Step Five
Hang wind chime somewhere that will get both wind and sun. The platters ring pleasantly as they bounce against one another, and the sun reflecting from the mirrored surfaces of the platters is reminiscent of lights dancing from a disco ball.
Final Thoughts
Following my steps will leave holes in both the top and bottom of each platter, including those platters that are at the bottom of the chimes. These bottom platters don’t have anything to dangle from them which means the bottom holes are pointless unless you either omit the bottom holes on four platters or find an alternative item to dangle from them, like a decorative rock or something.
I have no idea how the platters will hold up to the elements. Right now they are pristine mirrors, but by next year? We’ll have to wait and see how the platters weather the heat and cold of Illinois. The chain I used will probably prove to be the greater liability since it was inexpensive.
After the chimes had been up for two days my wife told me, “You’ve gotta move that thing. I can’t stand it there. It shines in the house.” The light bounces from the platters into the bathroom window. The bathroom has a giant mirror and it reflects the light out into the hallway on the staircase so that the dancing lights appear all the way in the front hall of the house. Make sure to find a location that will not be disturbing.
Although this article focuses on repurposing the platters, hard disks also have very powerful magnets that can be removed and reused. You can see some of these magnets in the photos of the work bench.
If you look very carefully around the 13 second mark of the video of the chimes, you can see me taking the video reflecting from one of the spinning disk platters.
For the record, I have not done a single internet search to see how many thousands of people have already used hard disk platters to make wind chimes, or what sorts of cool designs they came up with. This post is simply a description of what I did in case someone else can adapt the idea.
If you find this post helpful, drop me a comment. I’d love to hear what you came up with, or how your chimes turned out.
May 13, 2014
Game of Illinois: House Madigan
Is anybody else in Illinois having a hard time telling these guys apart?


See Illinois Politics: A Citizen’s Guide for a nice summation of Madigan’s consolidation of power (even if they never call him “The Hand of the Governor.”)
March 24, 2014
Anna’s Song
After church Sunday morning, Anny, my six- (almost seven) year-old daughter, spent an hour composing her first song. She wrote it on large paper and played a small toy guitar as she sang. Normally I wouldn’t think anything of it, but her lyrics surprised me, especially since they were written by a first grader.

As she wrote them:
years pas by in the cedy
and dreams still come trou and all that i see is the face of you and well love pass is by my love is not love can not be inless you’re with me.
She added “another verse” later that day:
forever lasting love love cannot be apart forever lasting love
And now, a translation (because how she spells and how she sings are sometimes different things):
Years pass by in the city
and dreams still come true
and all that I see is the face of you
and well, love passes by; my love is not.
Love cannot be unless you’re with me.
Forever-lasting love.
Love cannot be apart.
Forever-lasting love.
March 3, 2014
The End of the Desktop
For the first time since I was 12 years old, there is no longer a desktop personal computer in my house. I have the last desktop machines in my car to go to the electronics recycling even as I type this on a laptop. There are no stand-alone monitors, and also no keyboards with wires to plug into anything.
We’ve moved on. Now we have three laptops, four tablets, an e-reader, a phablet, and a smart phone. The amount of computing power in any of these new devices dwarfs that found in the old towers.
It’s an eerie feeling knowing that there is no desktop humming softly somewhere, no green power light staring devotedly in the darkness, no buzz of fans. It’s been replaced with the glowing lights of the cable modem standing sentinal over all internet connectivity, fearlessly guarding our route to internet freedom.
Just another sign of the times…
February 23, 2014
Revisiting My Favorite Interactive (Print!) Picture Books
Most picture books tell a story: the reader observes the story, interprets it, and enjoys it, but rarely is the reader an active part of the storytelling process. There are a few exceptions to this, as I was reminded today when my six-year-old daughter Anna asked if she could read a book to me. She chose Jon Stone’s The Monster at the End of this Book, a picture book that has been a favorite of each of our four children. It has withstood innumerable readings and has even survived major reconstructive surgery to reattach its pages to the cover with packing tape.
The premise is simple. As the title warns, there is a monster at the end of the book. And with each page turn, that monster looms closer and closer. Since Stone was working within the Sesame Street universe, the main character is Grover, a fuzzy blue monster himself. Because Grover wants to keep as far away from the monster at the end of the book, he gets increasingly agitated with each page turn. In the beginning he asks the reader: “So please do not turn the page.” Later, when the page turns get the reader closer to the monster at the end, Grover tries different antics to keep the reader from turning the pages, including tying the pages closed, or bricking the pages shut. Of course, it’s hilarious to young readers to see Grover’s reaction when the inevitable page turn happens.
Using a similar strategy, Ian Lendler imagines that his illustrator “Ned” can’t finish the pictures fast enough to keep up with the reader of An Undone Fairy Tale. “Sorry to interrupt again,” Lendler writes, “but you’re still reading very fast. Please don’t turn the page. Ned doesn’t have the horses or armor yet.” With each page turn, “Ned” must salvage his artwork by improvising; he garbs his knights in tutus, replaces a moat monster with Ned’s dog dressed in a shark fin and a snorkel, and creates a finale that must be read to be appreciated (suffice to say, the hero doesn’t quite save the day on his own). He warns his reader not to turn the page, even begging, “The next page won’t be ready for four of five weeks. So put the book down and come back then. Okay?” And what reader could resist turning the page to find out what happens next?
Rather than telling the reader not to turn the page, Mo Willems takes the interactivity in a different direction in his Don’t Let the Pigeon Drive the Bus. The book opens with a bus driver who asks the reader to watch his bus, and then he even asks his reader specifically not to let the pigeon drive the bus. Whereas both Stone and Lendler used reverse psychology to encourage their readers to turn the pages (“Don’t!), Willems employs his reader with a task: keeping the pigeon from driving the bus. Each page turn is another opportunity for the reader to shout, “No!” to the pigeon, who finally has a multipage breakdown that results in giggles.
These three books do something that most picture books can’t do, which is bring the reader into the story as a participant rather than an observer. They are elegant in their simplicity and efficiency. I’ve racked my brain to imagine a plot line that would involve the reader as effectively as these do, and I still haven’t found anything that wouldn’t be simply a copy.
Do you have any favorite interactive picture books? I’d be interested to hear about them.
Where are the pictures from the books? Yes, it would be easy enough to copy and paste cover images of these books into my post, but the truth is that the book covers are copyrighted, and I neither own the copyrights nor have permission to use the images. I’ve used links to the GoodReads site to help steer readers to more information about the books.