Easy, Inexpensive DIY Board Game & Library Table

Build this solid wood board game and library table with basic woodworking skills and shop tools for around $200.
For Christmas 2014, my wife and I told our children that the Winkel family was going to have a “non-electronic” Christmas: no video games, no video game systems, no tablets, and no computers. Our boys noticed a game table in a local resale shop; that became their non-electronic Christmas request. Unfortunately it was square which made it impractical for many of the board games that have rectangular boards, or involve more than four players. I bounced around boardgamegeek and did some research on the internet, but none of the game tables that I found were what I had in my head for the boys. I also needed a table that I could build with my palette of woodworking skills: some of the tables I found had excessive joinery, or unnecessary routing. I wanted simple. After doing research, I stepped back and made a list of needs for the table:
Recessed playing surface to protect games that require more than one gaming session
Cover that can be used as a work or playing area
Inset for Go and Chess
Relatively simple to construct
Inexpensive (e.g., not in the same league as the Geek Chic tables which run in the thousands)
Rectangular playing area (32″ by 64″ stuck in my head for some reason)
Standard table height (30″)
Removable legs to transport it upstairs to the boys’ room
I did not succeed in all my original ideas. I imagined a reversible chess/go board that would rest on the top of the table; this did not work in my final design. The finished height is actually 32″ as built, though this last could be adjusted by constructing the legs two inches shorter.
The entire table is constructed from oak plywood with the exception of edge pieces. This helps keep the cost down while retaining the look of solid wood. I purchased all of the materials from the local Menards store.
Construction requires a table saw, circular saw, miter saw (preferably 12″, although I made every cut on a 10″ miter saw except for trimming the top edges of the constructed legs), screw gun, and power nailer with air compressor. If you don’t have access to the power nailer, you could certainly use finish nails and pilot the nail holes with a drill bit, but this would be both tedious and time consuming. A square and clamps will also be necessary, and I did make use of a belt sander at one point.
One caveat if you’re still with me: I’m not a draftsman, and I’m not interested in spending the time to learn Google Sketchup, so you will have to put up with my rough sketches and the photos I took while building mine. I’ve made every effort to accurately depict the steps required to build this table, but I’m recreating the steps after the fact from my notes and pictures, and there were times when I screwed up and had to go back and revise things.
Material List
Wood
Item DescriptionMenards Stock #QtyPrice EachTotal
4 ' x 8' x 3/4" Red Oak Plywood12517992$39.99$79.98
1" x 3" x 6' Red Oak Board10438202$8.88$17.76
1" x 3" x 8' Red Oak Board10438331$11.84$11.84
1" x 2" x 6' Red Oak Board10425912$5.52$11.04
1" x 2" x 8' Red Oak Board10426271$7.36$7.56
Wood Total$128.18
Hardware
Item DescriptionMenards Stock #QtyPrice EachTotal
Floor Levelers 1-1/16" Leveling Glide21727581$2.49$2.49
Joint Connectors Male202537116$0.79$12.64
Joint Connecters Female202532616$0.69$11.04
Hardware Total$26.17
A note on the joint connectors:
Menards carries these joint connectors, which are perfect for attaching the legs. However, they replenish stock one case at a time, and the case count is 16. You will need 16 connectors! My recommendation is to simply order a full case of each rather than purchase whatever the store has on hand then wait for them to reorder. I waited over a month to get the last few of these because the first case Menards ordered never made it onto the shelf; the store had to zero out their inventory counts to get their system to replenish with an additional case.
Other Materials
Wood glue
Paint thinner
Masking tape
Sandpaper of assorted grits
Steel wool
Wood filler
Wood screws
Nails for power nailer (I used 1 1/2″ 16 gauge finish nails)
Wood Stain (I used Minwax English Chestnut because that’s what I had)
Polyurethane or similar
Wood Repair Pencil (I used Minwax Blend-fil Color Matched Wood Repair Pencil)
Tack cloth
Assorted rags
Brushes for staining
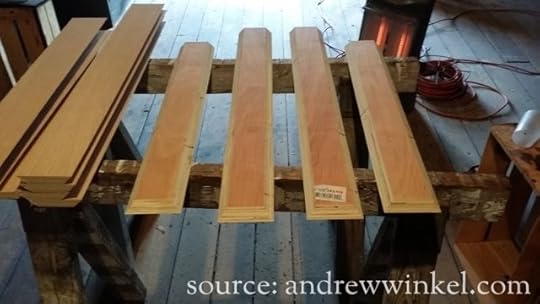
Cutting the Plywood Sheets
Follow these steps to rip the plywood sheets into the pieces that will be assembled into the table. The illustrations are not drawn to scale; however, they do provide a rough overview of the cuts necessary for assembly. There will be additional cuts after the initial prep work to fit pieces to the table.
Most of these cuts will make use of the table saw, with only a couple using a circular saw or miter saw.
The plan includes some extra wood for mistakes, but not a lot. If you are like me and make frequent mistakes, and extra sheet of plywood will probably be in your future.
Cut Overview


Cut #1
Remove 14 3/4″ from Board “A,” leaving a 33 1/4″ wide piece.
Cut #2
Using a circular saw, remove 30 1/4″ from Board “A1″ so a 65 1/4″ piece remains. The 33 1/4″ x 65 1/4 piece will be the inside table surface. I’ve identified it here as piece “A4.”
I use masking tape when cutting against the grain to try to prevent shredding the edges of the veneer.

Cut #3
Remove 11″ from Board “B,” leaving a 37″ wide piece.

Cut #4
Using a circular saw, remove 27″ from Board “B1″ so a 69″ piece remains. The 37″ x 69″ piece will be the table top surface. I’ve identified it here as piece “B4.”

Cut #5
Take the two remaining 8′ boards, “A2″ and “B2,” and rip them into 4 5/8″ pieces. It might be possible to cut three from board “A2″ and one from “B2″ with the remaining wood left as scrap. The essential thing here is to have the four 8′ lengths of 4 5/8″ wood, which will become both the inside and outside sides of the table.

Cut #6
Boards “A5″ and “A6″ should be cut exactly the same: remove a 33 1/4″ piece from each and set them aside to be cut in the next step; these will be the inside short sides of the table, labelled here as “A7″ and “A8.”
Likewise, “B5″ and “B6″ should be cut exactly the same: remove a 64″ piece from each and set them aside to be cut in the next step; these will be the inside long sides of the table; these will be the inside long sides of the table, labelled here as “B8″ and “B10.”

Cut #7A
Set the table saw fence to 4″, then rip pieces “A7,” “A9,” “B8,” and “B10″ to 4″ width. These pieces will be used, along with piece “B4″ to form the interior playing surface of the game table.

Cut #7B
With the table saw still set at 4″, rip Boards “A3″ and “B3″ into 4″ strips. There should be 16 total, with the 8 leg pieces from “B3″ making up the short side of the legs, and the 8 leg pieces from “A3″ making up the long side of the table legs.

Cut #8
As referenced in the above notes, set the table saw blade to 45° and run each of the sixteen table leg pieces to bevel each long edge. The important thing here is that every table leg is identical in width; it is not essential that the legs are exactly 4″; rather, they must be exactly the same.
It would be a good idea to use some short pieces of scrap to test the 45° angle of the saw. I lost four leg pieces because the angles were wrong and the pieces didn’t fit snug together. I was lucky that I was able to save the remaining pieces and recut the boards at the correct angle.
Cut #9
Use a miter saw to cut a 45° angle on one end of each table leg.
Cut #10
Cut the legs pieces ripped from piece “A3″ to a length of 30 5/8″ for the long leg pieces (there will be a total of eight).
Cut the leg pieces ripped from piece “B3″ to a length of 26″ for the short leg pieces (there will also be a total of eight).
Cut #11
Use scrap and a miter saw to cut 4″ by 4″ end pieces with 45° edges for the bottoms of the legs. These cuts are not on the cut overview because there are enough leftovers to cut these pieces to fit.
Assembling the Legs
Leg assembly is straight-forward. Two short legs and two long legs are attached to one another. I used glue and the power nailer.
A note on the power nailer: I have had problems with nails that are too long blasting out the sides of plywood and ruining pieces. I used 1 1/2″ 16 guage nails for this project and did not have any blow-outs.

Glue and nail leg pieces together lining up the bottom edges.

Three sides assembled

Top of a table leg with four sides assembled. The corners of the table will sit on the short sides of the table legs while being mounted to the tall sides of the table legs.

Bottom of the table leg; Note how the last piece will fit in place like a lid.
Attach each leg bottom; it should slide in place securely.

Leg bottom after assembly
Use a wood filler of your choice to fill the nail holes and any edges that need it. I use a putty knife to try to scrape the excess, then paint thinner to really clean the area. In the past when I’ve been too sloppy and trusted to sanding to remove the excess, I’ve created more work for myself. The thinner seems to be a better solution.


Scrape excess with putty knife.

Use mineral spirits to clean the excess that was missed by the putty knife.

Example of a filled, wiped nail-hole (top) contrasted with an unfilled hole (bottom).
Next, attach the floor levelers (I stained the legs prior to this step; however, since I had already glued the legs, I had some dried glue that left inconsistencies in the way the wood took the stain).

I chose these floor levelers to make sure the wooden legs stayed off the ground.

Draw an X from corner to corner

Pilot the hole

Tap the plastic insert into the hole, then screw the leveling glide in
Assembling the Inside Table Top
Collect pieces “A7″, “A9″, “B8″, and “B10″; these pieces will be used as the sides. Piece “A4″ will be the bottom.
I stained the pieces for the inside table top in advance so I wouldn’t have problems with the glue drying in the corners in hard to sand areas. I should have followed this step for the legs also.

Spread glue on the edge of piece “A7″ or “A9″ (since they are exactly the same, it doesn’t matter which you use)

Place the glued edge against the end of piece “B8″/”B10″ (again, since they are cut the same it doesn’t matter which you use)
Avoid putting either a screw or nail 1″ from the top and 1″ from the bottom; the leg anchors will be in this area at a later step.

First I tacked the pieces together to hold them in place, then I piloted and countersunk screws to secure the pieces together.

Inside edges assembled, including pieces “A7″, “A9″, “B8″, and “B10″ with a bead of glue all around it, just waiting for the placement of the inside table surface, “A4″
Make certain the corners are square before attaching the table surface, “A4.” Note in the picture below that I had a slight overhand along one edge. I dealt with this in a subsequent step.

Attach “A4″ to edges with combination of glue and wood screws. I piloted and countersunk my screws.

The assembled interior of the game table (after much clean up of glue!)

Notice the edge sticking out? It needs to be flush. I used a belt sander and rough sandpaper to take care of it.

After sanding, the edge is straight
Attaching the Legs
Using clamps, set the table into the legs and insure that none of the legs extend above the 4 5/8″ height of the table’s surface (the reasons for this will make sense at a later step). I had two that were about 1/16″ longer, and I ripped them down with a miter saw. Unfortunately, doing this also splintered some of the veneer at the edge of the cut, though I think I should have used a better blade for this cut (it wasn’t my saw; I had, by this time, moved the entire project into my father-in-law’s shop because my garage isn’t heated and the temperatures were approaching freezing).
Remember these?

They will be used to attach the legs to the table. There will be 4 on each leg for a total of 16 connectors of each type. The male piece has a smaller diameter than the female piece. Find drill bits to accommodate each size when piloting holes. I actually drilled the holes for the male piece right at that width so the bolts are tight, not loose.
Use scrap wood to build a template to attach the legs. It should be 4″ from top to bottom and at least 4″ wide.

The template is simply two pieces of scrap plywood attached together.

Measure the holes three inches from the corner and one inch from the top and the bottom
Use the template to drill holes in the legs. Use a piece of scrap wood on the back to prevent blow-out (I didn’t, and someday when my sons take the legs off, they will see my sloppiness revealed).
Align the legs on the table and check for square. It is absolutely essential that the legs be checked for square at this step because any imperfection will be permanent once the legs are attached. Clamp a piece of scrap wood inside to prevent blow-out; the inside surface will be visible in the final table (though likely covered by the head of the joint connector).

It is absolutely essential that each leg be checked for square before drilling the hole for the joint connectors.
Once the holes have been drilled into the table’s edge, they will need to be widened to accept the thicker diameter of the female joint connector. Replace the drill bit and drill-out the four holes in each corner of the table. Do not do this to the legs; they should have a smaller hole.

The inside of the table will have slightly wider holes because the female joint connectors are thicker than the male joint connectors.
Use the joint connectors to attach all of the table legs, checking for square while tightening them.

Top view of the leg against the table with the joint connectors ready to be tightened.
Finishing the Sides
The side pieces, ripped at 4 5/8″ and identified as “A8″, “A10″, “B7″, and “B9″ will now be cut to fit the actual width of the table. Each end will be cut at a 45° angle to slide behind the attached legs.
I prefer to measure and cut slightly wide, then shave edges down to get the piece to fit. Because of the height of these pieces, 4 5/8″, it will be necessary to use a 12″ miter saw to complete the cut. A 10″ blade will not have the necessary depth for a clean cut through the entire height of the board. However, a 10″ compound miter box may be able to do it; I’ve never used one of those.

Measure and cut long, then shave the edges until the piece can slide into place.
Next, apply generous amounts of glue. I’m sorry my picture is from a different side; it’s jarring to have the angle switch like that.
The two joint connectors in the picture are the ones waiting for Menards to replenish their stock so they have a partner connector to attach the table legs.

Use lots of glue and be ready with clamps — they will need to stay in place until the glue dries
Slide the side in place, clamp it, and use a power nailer to attach the sides by nailing into the base of the table. Careful you don’t nail too high and damage the playing surface!

Space Nails: I don’t measure, but rather put one on each end, one in the middle, and then an additional two in between for a total of five nails per side

Repeat the gluing and nailing of each side, giving the glue enough time to dry while clamped
Assemble the Removable Top
The top of the table is a large piece of plywood (identified during the cuts as “B4″) that will be bordered on each side with solid oak 1″ x 2″ pieces. I had already stained the wood at this point, as you will see in the images.
There are two 1″ x 2″ pieces in 6′ lengths; these two will be used for the long edges of the table. There is one 1″ x 2″ piece in 8′ length; this will be divided in two for the short edges of the table.
Again, I apologize that the images switch back and forth between the sides. I don’t have a set of pictures capturing the entire process for a single side.
Choose a side to begin with and select the appropriate piece for the edge. Cut a 45° at one end, then lay the piece atop “B4″ to measure the next cut.

Cut one end to 45 degrees.

Use the actual length of the table to determine where the second cut should be made.
Once the cuts are made, and the corners are precise, use glue and the nail gun to attach the piece.

Glue and nail, then repeat three more times

I like to use tape on the edge to see exactly where the cut should be made. I also tend to over-cut and then shave the edge a sliver at a time until it’s perfect.
It’s a good idea to make absolutely sure the surface of the plywood sheet is exactly parallel to the top edge of the board. I have one corner of the finished table that has an ever-so-slight edge that extends above the trim, and to me, this glaring error is a constant aggravation:

This slight ridge feels like failure; I don’t recommend it.
Once the removable table top was assembled, I primed and painted the interior. I used materials I already had on hand which is why the surface was painted with chalkboard paint. The back of a sheet of plywood is not meant for display, so covering it with paint makes sense.

This type of plywood has an inferior reverse side, so priming and painting makes sense to cover the ugliness.

Chalkboard paint has a flat finish which covers well, but it also shows every single scuff, scratch, or mark.
Almost There: One More Set of Cuts to Go!
The inside game table needs a rail for gamers to lean on; The rail also provides additional stability to the table, a surface for the removable top to fit on and against, and an overall finished look. The rail is made from 1″ x 3″ solid oak boards. The long rails are cut from 6′ length solid stock, and the short rails are cut from a single 8′ length.
I used the table top as my template and made the cuts from the 1″ x 3″ boards because I wanted to be absolutely sure the table top would fit atop the rails. Fortunately the edges, when cut to fit the edges of the inside table, fit perfectly beneath the removable top; of course, that was the plan, but sometimes plans and reality don’t like to hang out on the same woodworking project.

The rail must fit within the edges of the removable top
Next, I removed the top and arranged the rail pieces on the table itself.

A slight lip inside would not be the end of the world, but I discovered that the pieces fit perfectly.
Glue and nail, but not to the legs! The glue should only be to the sides of the table if the legs are going to be removable!

To make certain your legs will not “stick” to the rails, avoid gluing them!

Repeat gluing and nailing each side
Finished (without the Finish)!

Recessed game surface of completed table: Angle #1

Recessed game surface of completed table: Angle #2

Completed table with top on: Angle #1

Completed table with top on: Angle #2
Now Finishing Details
With the table assembled, the only remaining steps are to wrap-up some unfinished business and apply the polyurethane (or whatever finish you wish).
First, get stain in all of the places that you missed during the assembly process. For me, this included the area beneath the rail and also the very slight bare wood visible between each leg and its side piece. In fact, I removed all the legs to complete this process and reattached them later.
Fill any nail holes with wood repair pencils to match the stain color. These “pencils” differ from wood filler because they are a waxy material that is designed by the manufacturer to match a particular stain. I found that wiping the excess with mineral spirits created a more natural look for the filled nail holes. This could be done either before or after the polyurethane.
I used scrap wood to create holders for the legs so I could apply the polyurethane to all four sides of the table legs at one time.

Tacking scrap wood to saw horses let me slide the legs onto them like sleeves so I could apply the finish coat.
The Chess Board
Part of my original vision was a reversible inset chess and go board. As I worked on the table design, I could not find any way to create such a feature – at least, not without adding a second layer of plywood to either the table top, or the recessed bottom. In the meantime, however, I had purchased two used chess sets from ebay: one set was the E. S. Lowe “Renaissance Chessmen” produced in the fifties and sixties, and the other was an obscure plastic Civil War set that looks to have been modeled after the Ann Carlton sets.
In the end, I needed the chess board to go with the chess pieces, and I concluded that board applied directly to the recessed playing surface would be the best option.
I am not going to go over the steps I followed precisely except to cover the basics. The tedium of the measurements I’ll leave to anyone who wishes to create their own. I did not add the polyurethane until after the chess board was done.
I did learn that wood stain bleeds beneath masking tape which makes for imperfect edges. My conclusion was to add 1/8″ strips of black spray paint to cover any stain bleed.
Here are some images from adding the chess board:

Measuring to get the board exactly in the center was a piece of tedious mathematics, especially since I sized my squares at 2 1/8″ each.

Only one-half of the squares can be stained at one time. I discovered that scrubbing with mineral spirits after the bare surface had dried would clean much of the accumulated stain from beneath the tape.

I used black spray paint to create 1/8″ lines to cover any of the stain that bled between squares

Testing out the squares to see how they looked with the Renaissance pieces.
The one inch lines at the edges of the board were mistakes. I realized I made them after the first set of lines, and I didn’t like the idea of a border fully one inch thick, so I decided to incorporate them into the design of the board by adding chess coordinates. I based the letters and numbers on the font Sorts Mill Goudy (though I did use the lining form of the numbers rather than the regular form), then hand lettered the coordinates with a drawing pen.
The board was finished with a solid black border.

Finished chess board after lettering, numbering, outside border, and polyurethane

Alex and Bryan ready to start a game of chess while Anna watches.
The Table in Action

Alex and Bryan playing Power Grid: The First Spark

Bryan, Alex, and Chris playing Citadels

Bryan, Alex, Chris, and Tim analyzing a game of Suburbia
Reflection
I am very pleased with how the table turned out; In fact, my biggest concern is that someday, when the boys move out, there may be a problem figuring out who gets the table, which makes this document all important in building another one. Hopefully at that time somebody else will want to do the staining and polyurethaning because I can unequivocally state: I hate staining and polyurethaning wood.
The height of the table at 32″ is just tall enough to make folding chairs feel short. On the other hand, a 24″ stool makes for a nice height, but you can’t hold your legs perpendicular and fit them beneath the table. I prefer the stools, and since 24″ stools can slide beneath the table, I think I’ll pick up some cheap ones periodically until we have six. You can see the heights in the image below.
I tested how the underside of the removable top would work as a playing surface:

Avalon Hill’s Mystic Wood, one of my earliest board games, and one that usually needs a decent sized table to play.
The problem with reversing the removable top was that it’s not secured, so it can slide around. I imagine there is a creative solution to keep this from happening, but it’s not in the current design. Still, it is a possible option that could be explored.
When I told some of my friends and family members that I planned to share these plans and images online, they told me I should charge for them, as though there are lines of people waiting to throw money at me. I’m sure another person would have the skillset to do that, but for me, I enjoy knowing that others will be able to make use of the plan to construct their own board game tables, or brainstorm from my ideas and take them in a new direction to come up with something great that will give them pleasure in their lives. That is truly what using the internet to share ideas is all about; it’s why I keep this blog (and all the expenses of keeping it, since I don’t have any ads or monetizing set up on it except for those links to buy my books). I hope that if you find these plans useful or informative, you will share your story and images with me.
Disclaimer: I’ve tried to make certain the plans I’ve presented above will result in the table that I built. As mentioned at the beginning, I’m reconstructing the information from notes and photos, so it is entirely possible I made some mistakes in chronicling my adventures. Please use common sense as you are working on your own project, and remember I offer this information without guarantee, warranty, or liability to you.
The above text is version 1.0, revised 2015-01-30.