Seth Apter's Blog, page 92
September 18, 2013
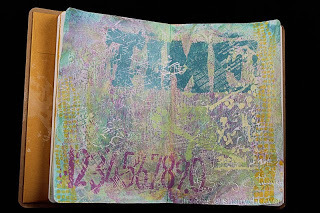
ATC Ring Book

Today's project and tutorial was inspired by a pile. Actually, by two piles. I have saved every sheet of artist paper that comes inside my copies of magazines published by Stampington & Company. If you have ever bought a copy of Somerset Studio or Somerset Memories, you know exactly what I mean. So today was the day to dig into my selection and make use of these beautiful papers.
My second inspirational pile was my stack of ATCs - Artist Trading Cards. These are playing card sized works of art that are traditionally made to trade with other artists. I have quite a few that I have received and many that I have made that I still own. I decided that they deserve a better home.

After choosing a piece of artist paper, I used a die from Spellbinders A2 Curved Matting Basics B set to cut and emboss 2 sections.

Using a die from Spellbinders Deckled Rectangles Small set, I cut a window into one of these pieces.

I flipped over this piece and added double-stick tape to three sides, leaving the top-most section untaped.
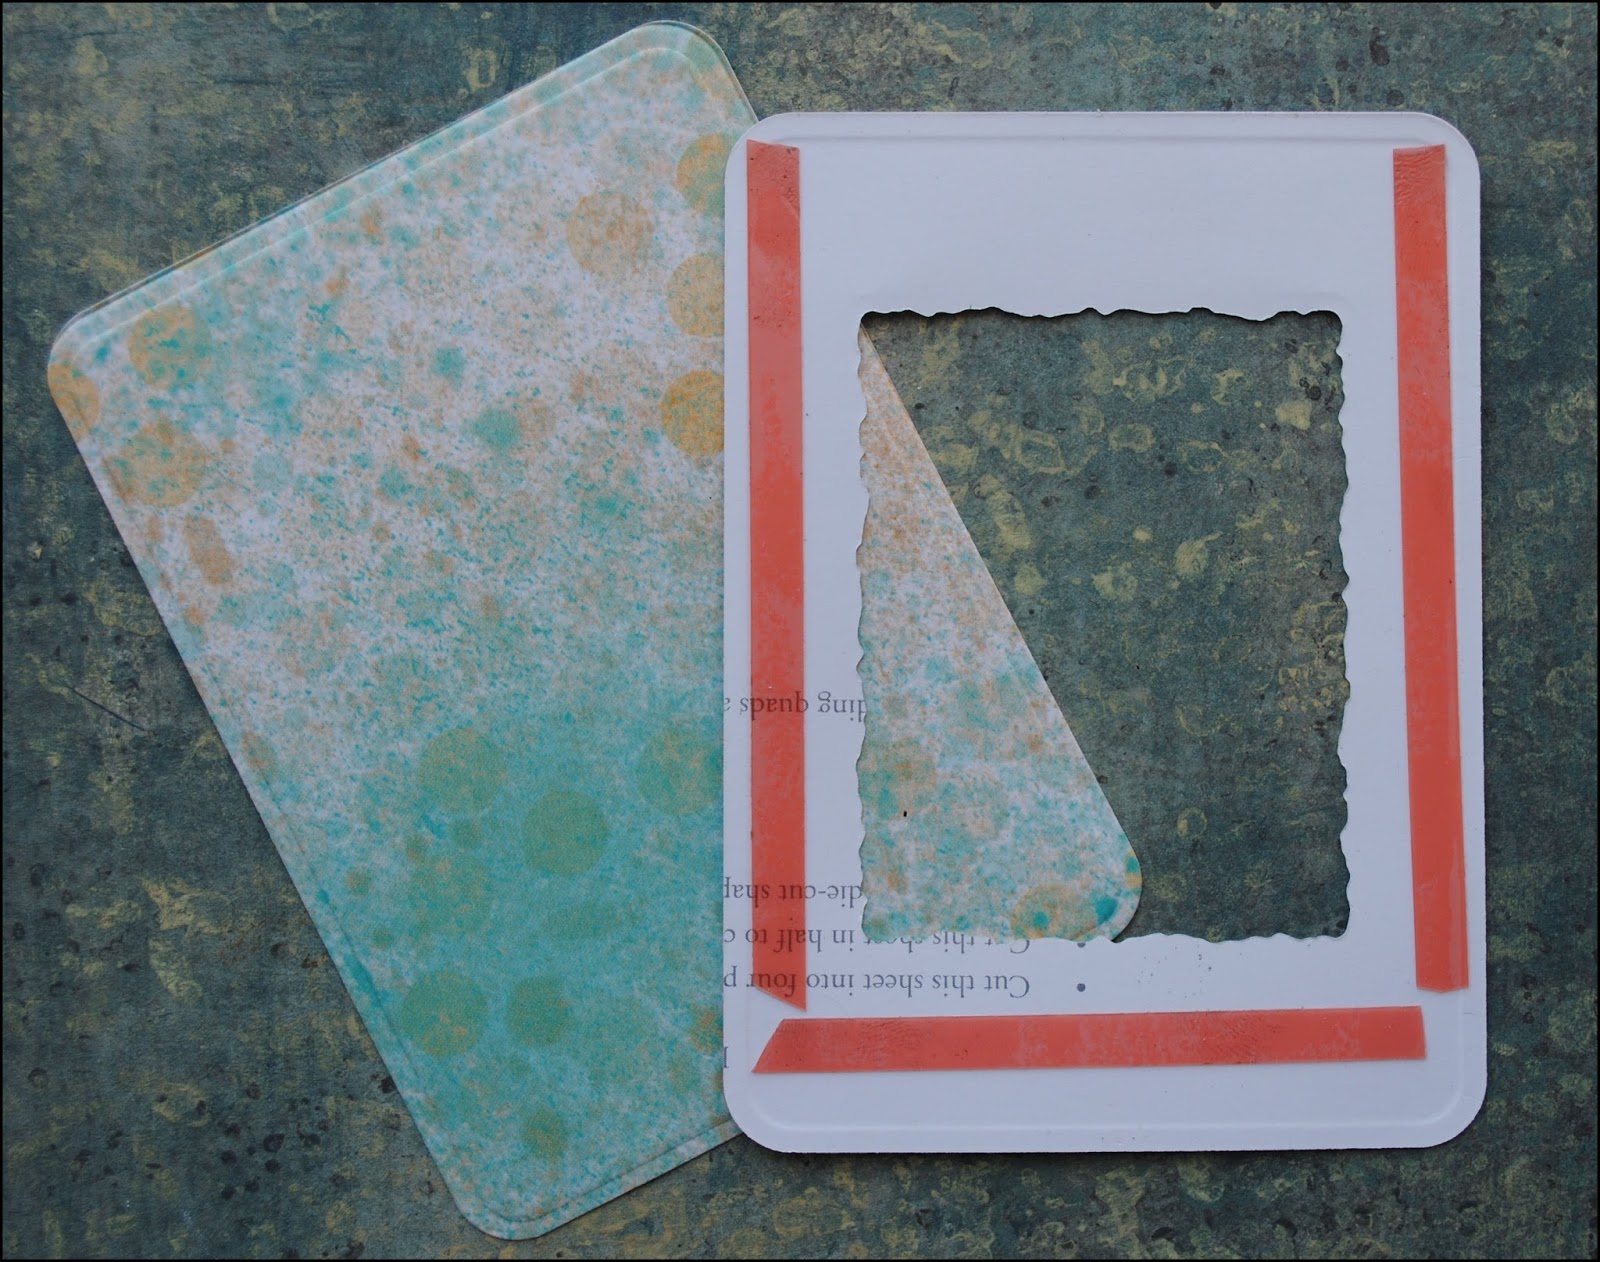
I adhered the two curved rectangles together, creating a pocket with a window. This will hold my ATC.

I added some ink to the edges on both front and back, both bringing in some additional dimension and color as well as highlighting the embossed edge. At the open end at the top, I punched a hole in the center.

This pocket was now complete and ready to hold an ATC.

I went ahead and repeated these steps using different artist papers until I had a total of 10 pockets, each filled with a different ATC.


To make the book, I attached all the pockets together by slipping a loose leaf ring through the hole at the top. Now these ATCs have a proper home and I love the fact that I can add or remove pockets as well as switch out the ATCs.


--------------------------
Supply List
Spellbinders Paper Art Supplies:
GC-001 Spellbinders® Grand Calibur® MachineS5-172 Spellbinders® Nestabilities® A2 Curved Matting Basics BS4-201 Spellbinders® Nestabilities® Deckled Rectangles Small
Preferred Promotional Partners: Tsukineko Momento dye ink pad
Other: Artist Trading Cards, artist paper, double-stick tape, scissors, hole punch, loose leaf ring


September 16, 2013
Stencils in Action
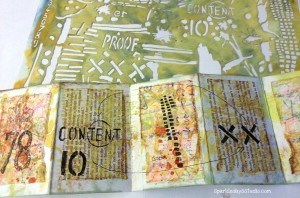
Sending out congratulations to Debbie from A Stitch of my Time, who is the winner of Content to Be, an original art piece that I created from my stencils and gave away as part of the StencilGirl Products blog hop. If you didn't win and would like to order my stencils, you can either get them directly from me or at StencilGirl Products.
One of the most exciting things about designing stencils is seeing how other artists choose to use them to create art. That was evident from all the varied art that was created by the artists participating in the blog hop. Here are a few more examples from...you!
 MB Shaw...the original StencilGirl
 One more from Mary Beth Shaw
 Sherry Cheever
 Corrine Gilman
 Joy Lowell
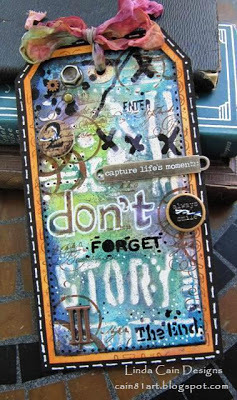 Linda Cain
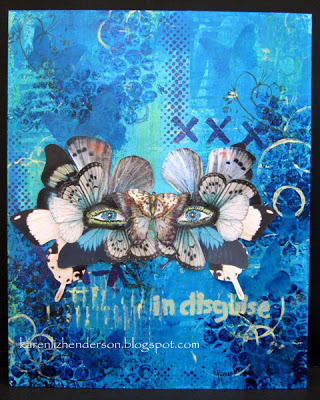 Karenliz Henderson
---------------------
And if you use any of these stencils to create your own artwork, please send me a picture so I can highlight it on my blog in a future post.
September 12, 2013
A Blog Hop Giveaway. Times two!

Happy to announce that StencilGirl Products is hosting a blog hop and highlighting my stencil designs.

A group of seven artists has been invited to participate and given a license to create. Stop by their blogs and see what they came up with. And, while you are there, plan to leave a comment because one lucky person will win all three stencils. You can also leave comments on this post and on the main post at StencilGirl Talk, so that you will have 10 chances to win. Start at Carolyn's blog below and all the participants will direct you to the next artist in the order listed.
StencilGirl TalkSeth ApterCarolyn DubeKirsten ReedMarjie KemperJanet JoehlinCorrine GilmanLinda CainMary C. Nasser
---------------------
And the winning doesn't stop there. Everybody who leaves a comment on my post will also be eligible to win Content to Be, an original art piece I made using my stencils.

For both giveaways, comments will close on Sunday 9/15 at 11:59pm Central Time. On 9/17, the winner of the stencils will be announced on StencilGirl Talk and the winner of the artwork will be announced on my blog.
---------------------
If you are having a stencil emergency and cannot wait to see if you are the winner of my stencils, you can purchase them right away either directly from me or from the StencilGirl Products website.
September 11, 2013
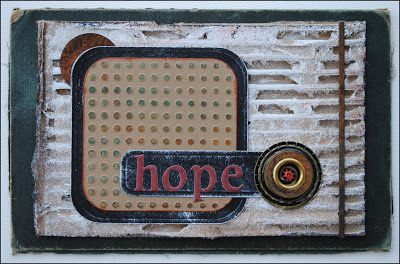
Hope: Step-by-Step
Yesterday I posted an image of Hope, a new mixed media piece that I created in honor of the 12th anniversary of 9/11. Today I wanted to share the step-by-step process that went into making this artwork.
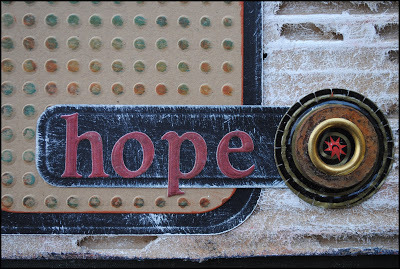
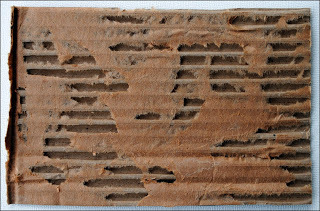
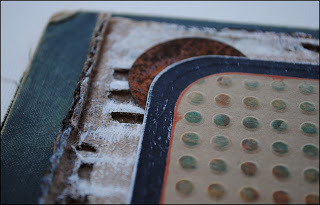
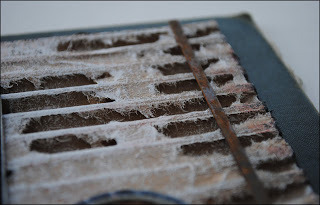
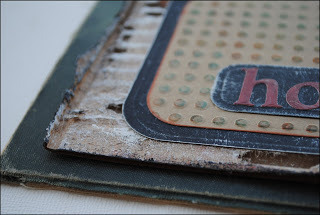
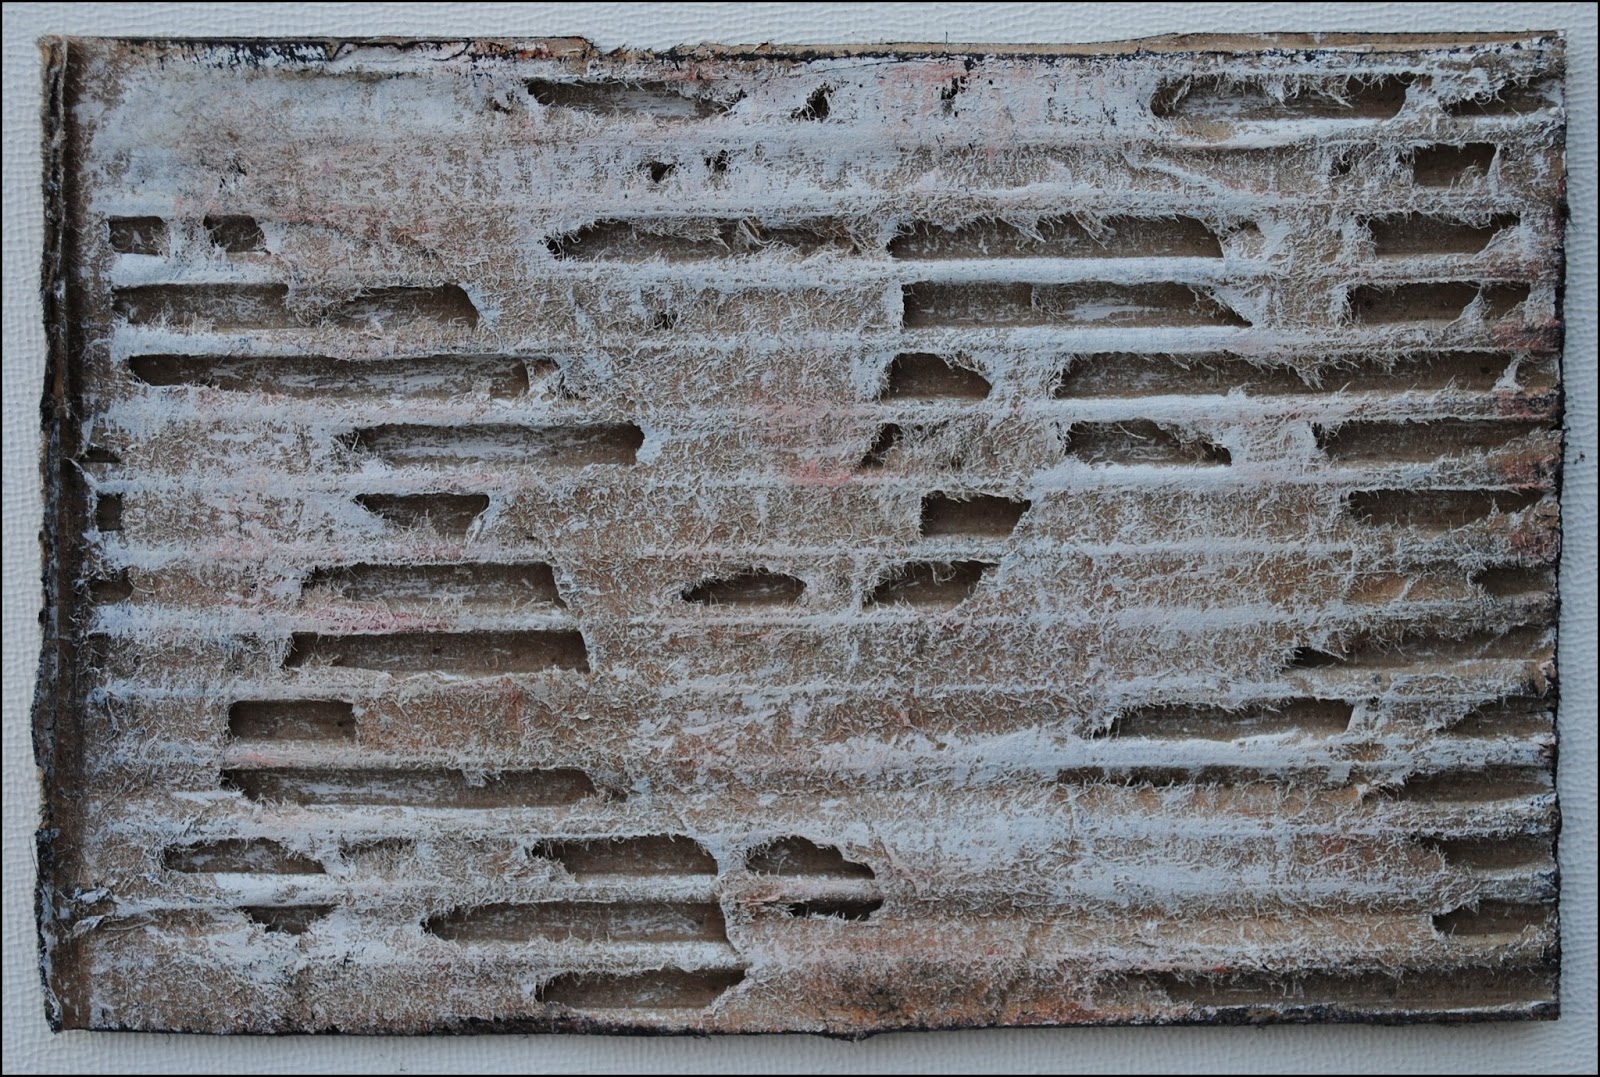
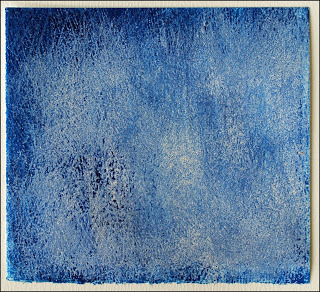
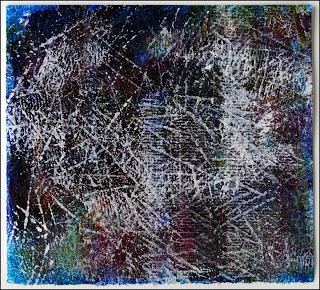
--------------------This piece started with a section of corrugated cardboard from a shipping box. I cut it to a size of approximately 4 1/2 x 7 inches and then tore away part of the smooth cardboard surface.
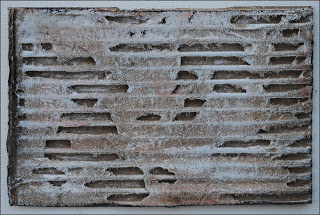
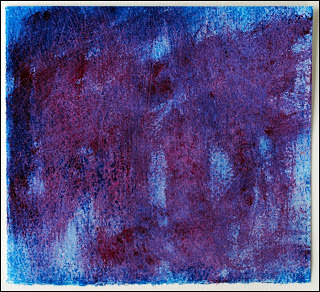
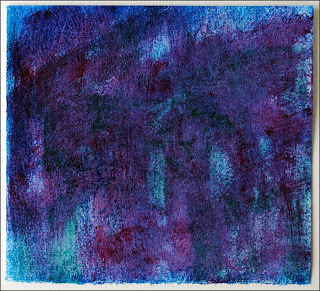
I changed the color by dry brushing both white and black gesso on to the surface and highlighting spots with a red dye ink pad.
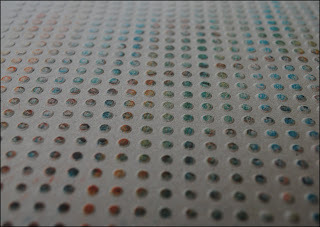
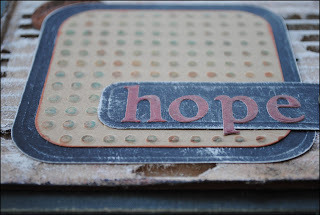
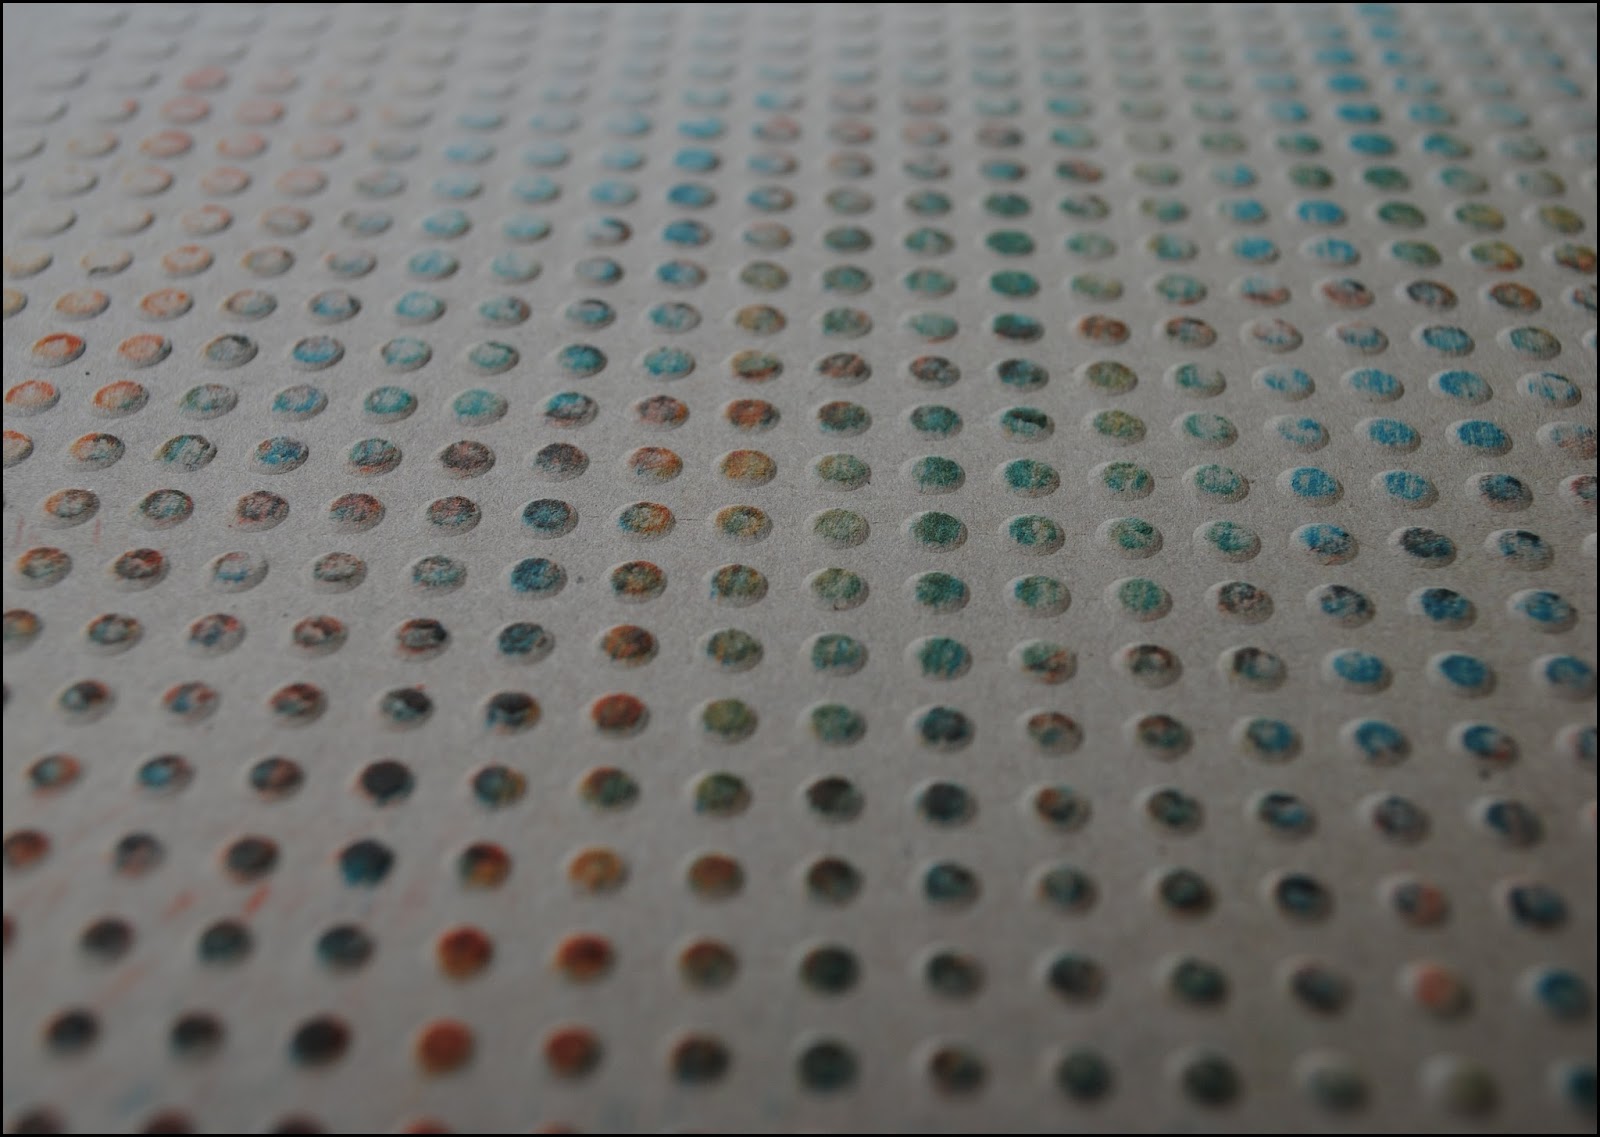
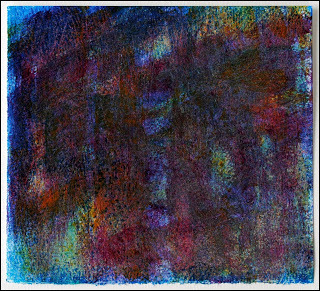
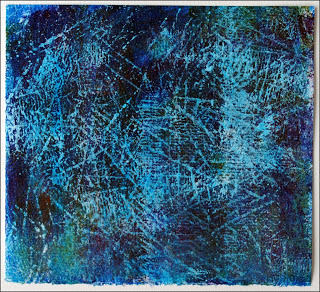
Adding another textural element to the piece, I used a Spellbinders M-Bossabilities folder to create a deeply embossed grid of dots into a sheet of kraft-color card stock.
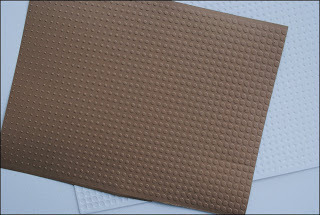
I shaded the raised dots by rubbing dye ink pads in multiple colors across the surface.
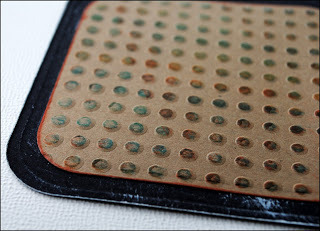
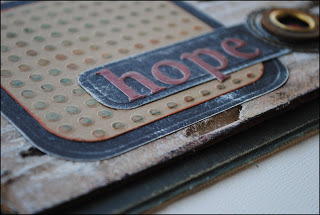
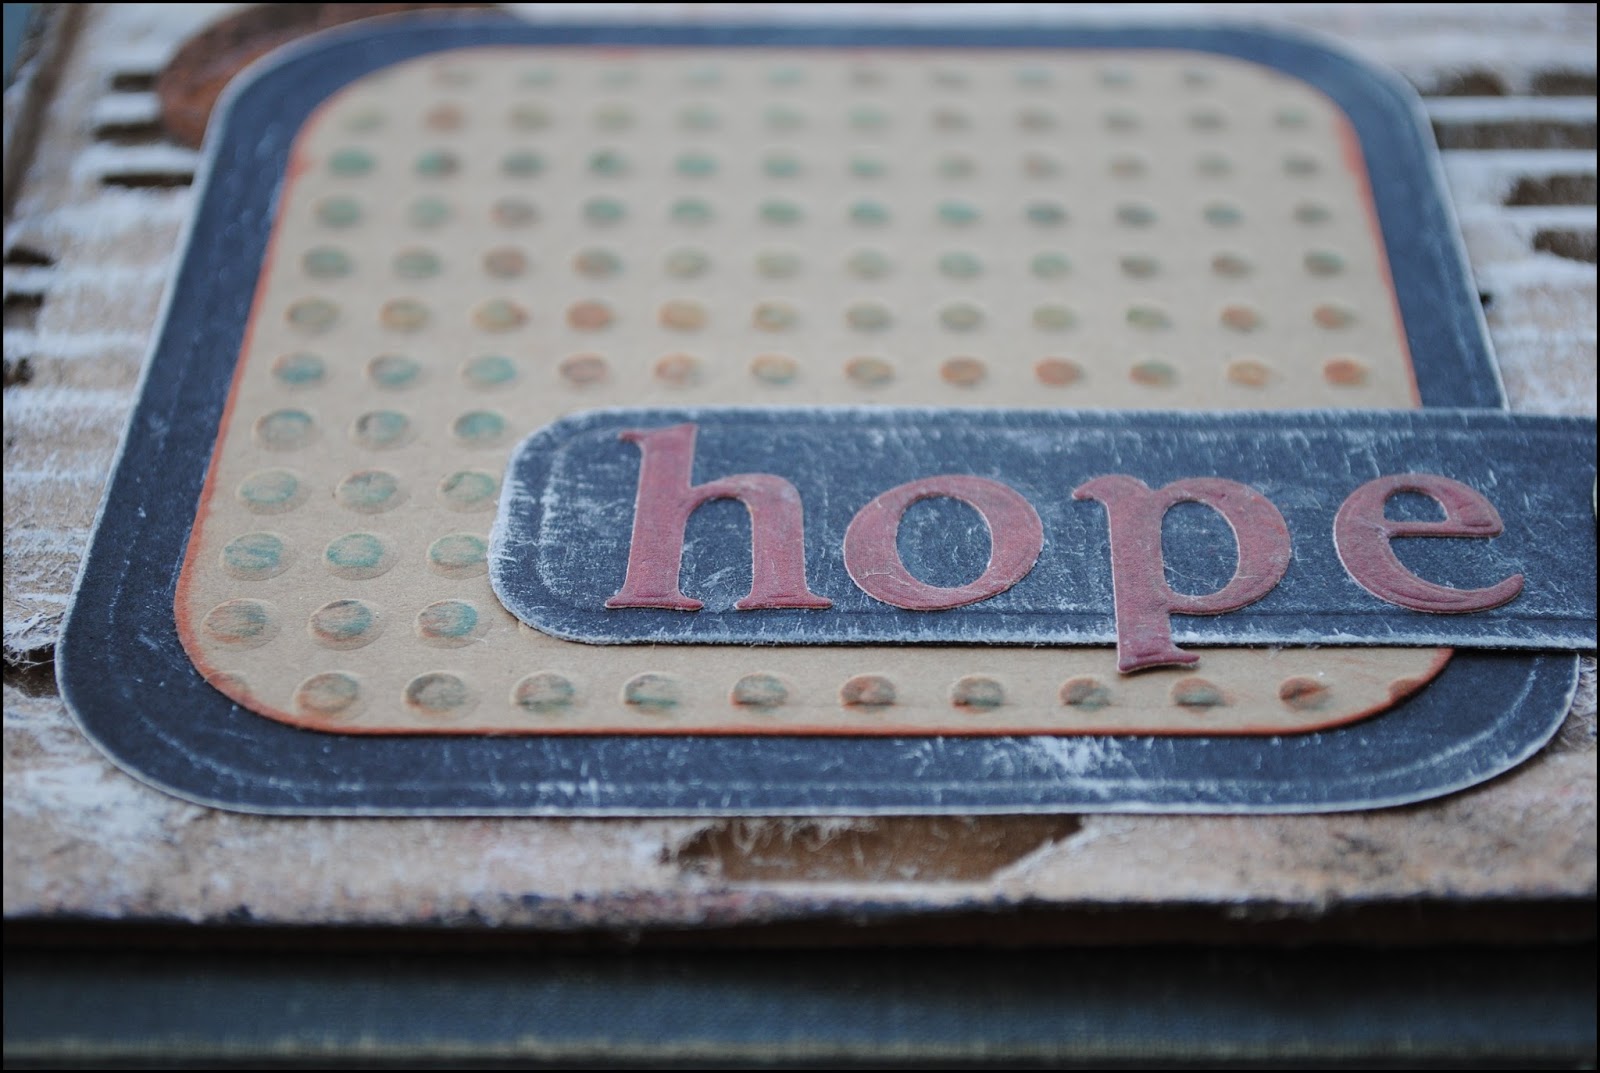
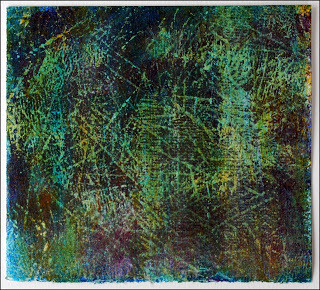
I used a Spellbinders Rounded Squares die to cut a curved square from the sheet of embossed card stock. I also cut the same shape from a sheet of black card stock using the next larger die from the same set. I shaded the edges of the embossed card stock with dye ink for a finishing touch.
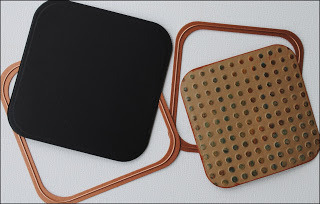
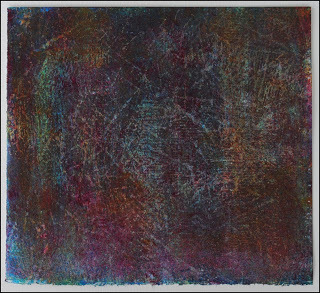
I shaded the black card stock by dry brushing with white gesso and adhered the two pieces together.
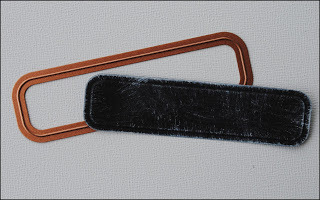
Using the Spellbinders A2 Curved Matting Basics B die set, I cut another piece of black card stock and dry brushed it with gesso as well.
This piece was all about hope and I used Spellbinders Lowercase Font One dies and red card stock to show that.
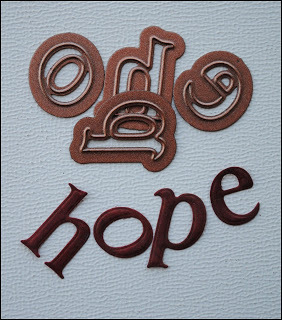
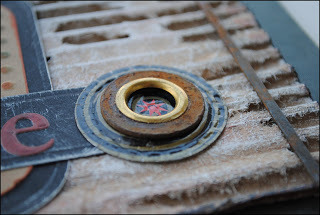
Sorted through my stash of found objects, metal bits, and embellishments and found some pieces to add that mixed media element. Gotta have that!
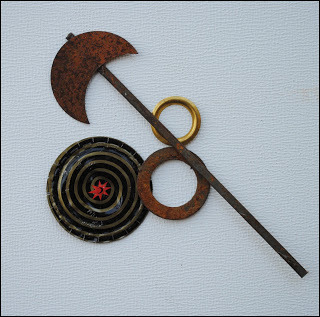
Time to put it all together. And adhere the piece to a vintage book cover, as yet another layer, an additional design element, and a way to make the piece sturdier.
Available for purchase in my Etsy Shop--------------------------
Supply List
Spellbinders Paper Art Supplies:
GC-001 Spellbinders® Grand Calibur® MachineEG-001 Spellbinders® M-BossabilitiesTM Graduated DotsS4-408 Spellbinders® Nestabilities® Rounded SquaresS5-172 Spellbinders® Nestabilities® A2 Curved Matting Basics BS5-199 Spellbinders® Shapeabilities® Font One - Lowercase
Preferred Promotional Partners: Tsukineko Memento Dye Ink
Cross Promotional Partners: 7 Gypsies Paper
Other: card stock, corrugated cardboard, vintage book cover, gesso, paint brush, found metal embellishments, adhesive, scissor, craft knife

--------------------This piece started with a section of corrugated cardboard from a shipping box. I cut it to a size of approximately 4 1/2 x 7 inches and then tore away part of the smooth cardboard surface.

I changed the color by dry brushing both white and black gesso on to the surface and highlighting spots with a red dye ink pad.
Adding another textural element to the piece, I used a Spellbinders M-Bossabilities folder to create a deeply embossed grid of dots into a sheet of kraft-color card stock.

I shaded the raised dots by rubbing dye ink pads in multiple colors across the surface.
I used a Spellbinders Rounded Squares die to cut a curved square from the sheet of embossed card stock. I also cut the same shape from a sheet of black card stock using the next larger die from the same set. I shaded the edges of the embossed card stock with dye ink for a finishing touch.

I shaded the black card stock by dry brushing with white gesso and adhered the two pieces together.

Using the Spellbinders A2 Curved Matting Basics B die set, I cut another piece of black card stock and dry brushed it with gesso as well.

This piece was all about hope and I used Spellbinders Lowercase Font One dies and red card stock to show that.

Sorted through my stash of found objects, metal bits, and embellishments and found some pieces to add that mixed media element. Gotta have that!

Time to put it all together. And adhere the piece to a vintage book cover, as yet another layer, an additional design element, and a way to make the piece sturdier.


Available for purchase in my Etsy Shop--------------------------
Supply List
Spellbinders Paper Art Supplies:
GC-001 Spellbinders® Grand Calibur® MachineEG-001 Spellbinders® M-BossabilitiesTM Graduated DotsS4-408 Spellbinders® Nestabilities® Rounded SquaresS5-172 Spellbinders® Nestabilities® A2 Curved Matting Basics BS5-199 Spellbinders® Shapeabilities® Font One - Lowercase
Preferred Promotional Partners: Tsukineko Memento Dye Ink
Cross Promotional Partners: 7 Gypsies Paper
Other: card stock, corrugated cardboard, vintage book cover, gesso, paint brush, found metal embellishments, adhesive, scissor, craft knife
Hope: For 9/11

This piece was inspired by 9/11. I have lived in NYC for over 30 years and September 11, 2001 is the only day that still unfolds in my mind second by second. It is an experience that I will always remember. Twelve years later, images of that day still bring me back to the confusion, anger, and despair that I felt as my country - and my city - was attacked. The healing began immediately though and this piece represents the hope that has existed in all of us following that day.
September 8, 2013
El Libro Abierto
El Libro Abierto
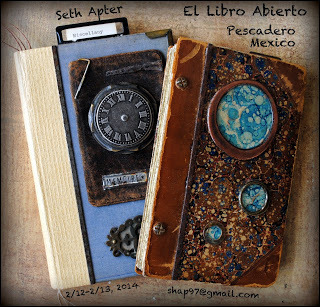 The Open Book
Join me for a two-day, book-making workshop in beautiful Pescadero, Baja California, Sur, Mexico on February 12-13, 2014. Pescadero is located approximately 45 minutes north of Cabo San Lucas. The focus of the class will be learning unique sew and no-sew bindings that will allow you to bind single sheets of paper and to create books that open flat. Part of day 2 will also be spent on the inside pages using multiple art techniques. The workshop is geared toward both absolute beginners and experienced book makers.
All supplies will be provided, but you are welcome to contact me in advance for supply list details so that you have the option to personalize your books in your own individual style.
Workshop limited to 10 students.
Registration via email shap97@gmail.com.
Cost of the workshop is $240, with $100 deposit due at registration. Payment via PayPal.
Please email me with any questions and for additional details.
September 6, 2013
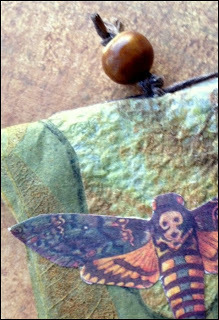
Pages of Autumn
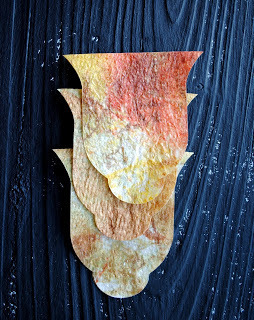
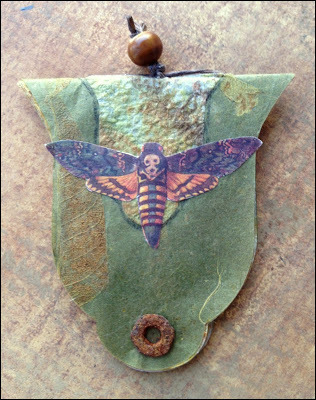
The feeling of fall is in the air in NYC. The days are less humid and the nights are cooler. Autumn is by far my favorite season and I was inspired by the colors of the season to create my newest mini-book
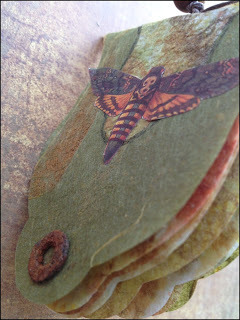
For the book pages, I zeroed in on a stack of paper towels that I had saved from a workshop I taught earlier this year. They were the paper towels I used to wipe off paint and were shaded in a beautiful fall palette.

I learned a tip from Leslie Marsh regarding painted paper towels. If you add two layers of matte medium to the surface, letting the first layer dry before adding the second, the surface texture of the paper towel changes to an almost fabric-like feel and it protects it from tearing.
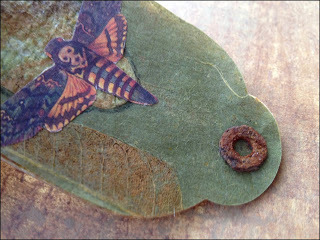
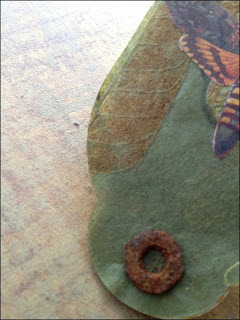
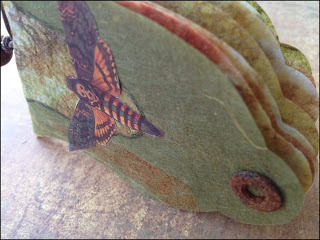
For the book cover, I found the perfect scrap of mossy green handmade paper with leaf inclusions.
Ready to make the book, I realized that I did not want to create a typical, linear-shaped book. Cut to (pun intended) Spellbinders Labels Thirty-Three die set. I chose that largest die and easily cut my first piece of paper towel.

Folding it in half to create a single folio, I realized that the shape resembled an upside-down bell.
I cut two more pages from the same die template, folded them in half, and stacked them together to form a single signature.
Now onto the cover. Using the same die, I cut the moss green paper into the same shape. At the same time, I cut more paper towel using a smaller die from the same set.
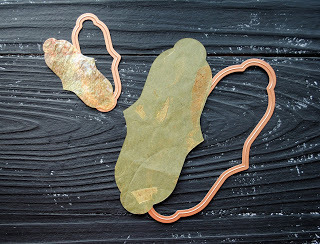
I folded both pieces and glued the smaller piece on to the larger for some compositional layering. I shaded the edges of the smaller paper with a rough line from a pencil.
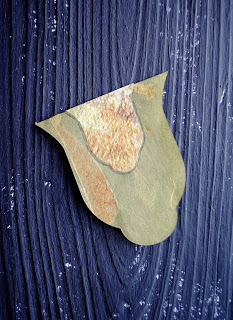
I inserted the paper towel signature into the cover and sewed them all together with a simple three-hole pamphlet stitch using brown waxed linen thread and a needle.
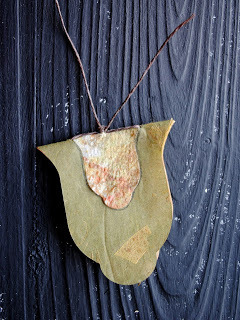
To complete the cover, I added a bead, an image that I cut from Spellbinders Ephemera Papers One from their Media Mixage line, and a small, found washer. It wouldn't be me without some rust!

 ---------------------------------
Supply List
Spellbinders Paper Art Supplies:
MMM-001 SpellbindersTM Artisan X-plorerS5-187 SpellbindersTM Nestabilities® Labels Thirty-ThreeMP1-001 SpellbindersTM Media Mixage Ephemera Paper One
Other: handmade paper, hand painted paper towel (acrylic paint, matte medium, paint brush), pencil, adhesive, waxed linen thread, sewing needle, scissor, bead

For the book pages, I zeroed in on a stack of paper towels that I had saved from a workshop I taught earlier this year. They were the paper towels I used to wipe off paint and were shaded in a beautiful fall palette.

I learned a tip from Leslie Marsh regarding painted paper towels. If you add two layers of matte medium to the surface, letting the first layer dry before adding the second, the surface texture of the paper towel changes to an almost fabric-like feel and it protects it from tearing.
For the book cover, I found the perfect scrap of mossy green handmade paper with leaf inclusions.

Ready to make the book, I realized that I did not want to create a typical, linear-shaped book. Cut to (pun intended) Spellbinders Labels Thirty-Three die set. I chose that largest die and easily cut my first piece of paper towel.
Folding it in half to create a single folio, I realized that the shape resembled an upside-down bell.

I cut two more pages from the same die template, folded them in half, and stacked them together to form a single signature.

Now onto the cover. Using the same die, I cut the moss green paper into the same shape. At the same time, I cut more paper towel using a smaller die from the same set.

I folded both pieces and glued the smaller piece on to the larger for some compositional layering. I shaded the edges of the smaller paper with a rough line from a pencil.

I inserted the paper towel signature into the cover and sewed them all together with a simple three-hole pamphlet stitch using brown waxed linen thread and a needle.

To complete the cover, I added a bead, an image that I cut from Spellbinders Ephemera Papers One from their Media Mixage line, and a small, found washer. It wouldn't be me without some rust!


 ---------------------------------
Supply List
Spellbinders Paper Art Supplies:
MMM-001 SpellbindersTM Artisan X-plorerS5-187 SpellbindersTM Nestabilities® Labels Thirty-ThreeMP1-001 SpellbindersTM Media Mixage Ephemera Paper One
Other: handmade paper, hand painted paper towel (acrylic paint, matte medium, paint brush), pencil, adhesive, waxed linen thread, sewing needle, scissor, bead
September 4, 2013
Blog Hop: Pam Carriker's New Stamp Line
I am thrilled to be supporting my friend Pam Carriker by participating in this blog hop, the first ever hosted by Stampington & Company. Not only is Pam an outstanding artist, she is also the mastermind behind an ever-increasing line of art supplies. Today we are celebrating the release of her new cling mount stamp line, a collection that includes 23 stamps that range from grungy background to perfect portrait.
Pam herself kicked off this blog hop last week with her own step-by-step tutorial in this post on Somerset Place, Stampington & Company's blog. This week is my turn. But you are going to want to follow along in the coming weeks to see how Pam's stamps are used by Jen Cushman, Mary Beth Shaw, Dina Wakley, Traci Bautista, and Christen Olivarez, Stampington's Director of Publishing.
-----------------------------------Now onto the art...
I started with a piece of watercolor paper and created my background by adding layers of acrylic paint, acrylic glazes, and gesso. The layers were added in no particular order and continued until I felt that the painted background was complete. Today it took 9 layers and you can see the step-by-step process below.
Done. I was happy with how the piece looked so far and decided it was time for stamps. I started with Sketched Background and a black ink pad.
This is the perfect stamp for me as I knew I could use it to add both random marks on the surface as well as more deliberate marks around the edge of the piece. I always feel that "framing out" an artwork makes it look more complete. For that reason I also rubbed a black stamp pad around the edges of the paper as well.
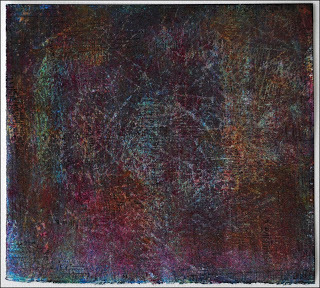
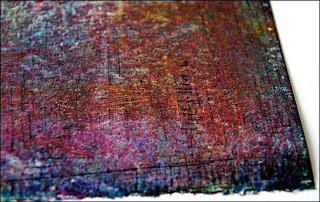
It is hard to see the stamping online with such a dark background but you can see it more clearly in this close-up detail.
I moved on to Pam's
I love the grungy and random way the dots were created. This time I stamped using both a black ink pad and a metallic gold ink pad.

You can see in this close up detail that I also used a white gel pen to randomly add curved marks around some of the stamped circles.
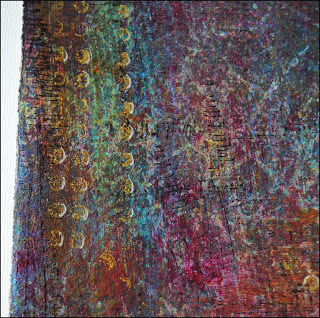
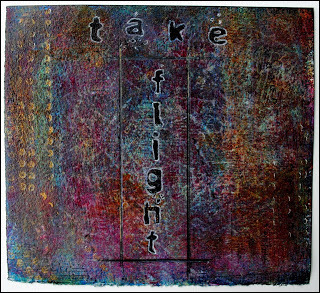
I went into my stash of alphabet stamps and found a set that had the perfect font and size for this piece. I used a black ink pad to stamp the words "take flight" and outlined the letters with a white gel pen to make them stand out from the dark background. I also drew a scratchy rectangle around the word "flight" using black, white and gold pens.
For my next step, I painted another piece of watercolor paper using the same process I described above. I used a bit of a different color palette and added metallic gold acrylic paint as my top layer.
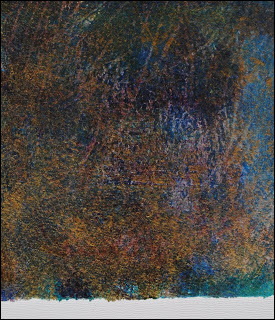
I saved the best for last: Pam's
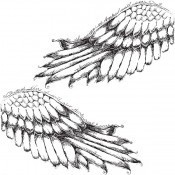
I stamped them onto the painted paper using a black ink pad. Once stamped, I cut out the wings using the edges of the stamped wings as a guide. I actually often think of wings as being one of those images that has been a bit overused in mixed media art. But I couldn't resist using Pam's wings. There is something very special about their design!

I added the wings to the piece, inserting small squares of book board between the substrate and the wings so that the wings were lifted off the piece, adding dimension and echoing the title of the artwork "Taking Flight."
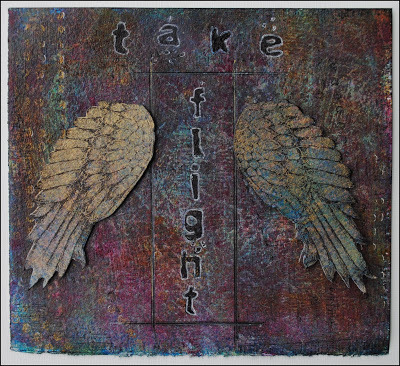
Thanks Pam. These stamps are going to get a lot of use!

Pam herself kicked off this blog hop last week with her own step-by-step tutorial in this post on Somerset Place, Stampington & Company's blog. This week is my turn. But you are going to want to follow along in the coming weeks to see how Pam's stamps are used by Jen Cushman, Mary Beth Shaw, Dina Wakley, Traci Bautista, and Christen Olivarez, Stampington's Director of Publishing.
-----------------------------------Now onto the art...
I started with a piece of watercolor paper and created my background by adding layers of acrylic paint, acrylic glazes, and gesso. The layers were added in no particular order and continued until I felt that the painted background was complete. Today it took 9 layers and you can see the step-by-step process below.


Done. I was happy with how the piece looked so far and decided it was time for stamps. I started with Sketched Background and a black ink pad.
This is the perfect stamp for me as I knew I could use it to add both random marks on the surface as well as more deliberate marks around the edge of the piece. I always feel that "framing out" an artwork makes it look more complete. For that reason I also rubbed a black stamp pad around the edges of the paper as well.

It is hard to see the stamping online with such a dark background but you can see it more clearly in this close-up detail.

I moved on to Pam's

I love the grungy and random way the dots were created. This time I stamped using both a black ink pad and a metallic gold ink pad.

You can see in this close up detail that I also used a white gel pen to randomly add curved marks around some of the stamped circles.

I went into my stash of alphabet stamps and found a set that had the perfect font and size for this piece. I used a black ink pad to stamp the words "take flight" and outlined the letters with a white gel pen to make them stand out from the dark background. I also drew a scratchy rectangle around the word "flight" using black, white and gold pens.

For my next step, I painted another piece of watercolor paper using the same process I described above. I used a bit of a different color palette and added metallic gold acrylic paint as my top layer.

I saved the best for last: Pam's

I stamped them onto the painted paper using a black ink pad. Once stamped, I cut out the wings using the edges of the stamped wings as a guide. I actually often think of wings as being one of those images that has been a bit overused in mixed media art. But I couldn't resist using Pam's wings. There is something very special about their design!

I added the wings to the piece, inserting small squares of book board between the substrate and the wings so that the wings were lifted off the piece, adding dimension and echoing the title of the artwork "Taking Flight."

Thanks Pam. These stamps are going to get a lot of use!
September 2, 2013
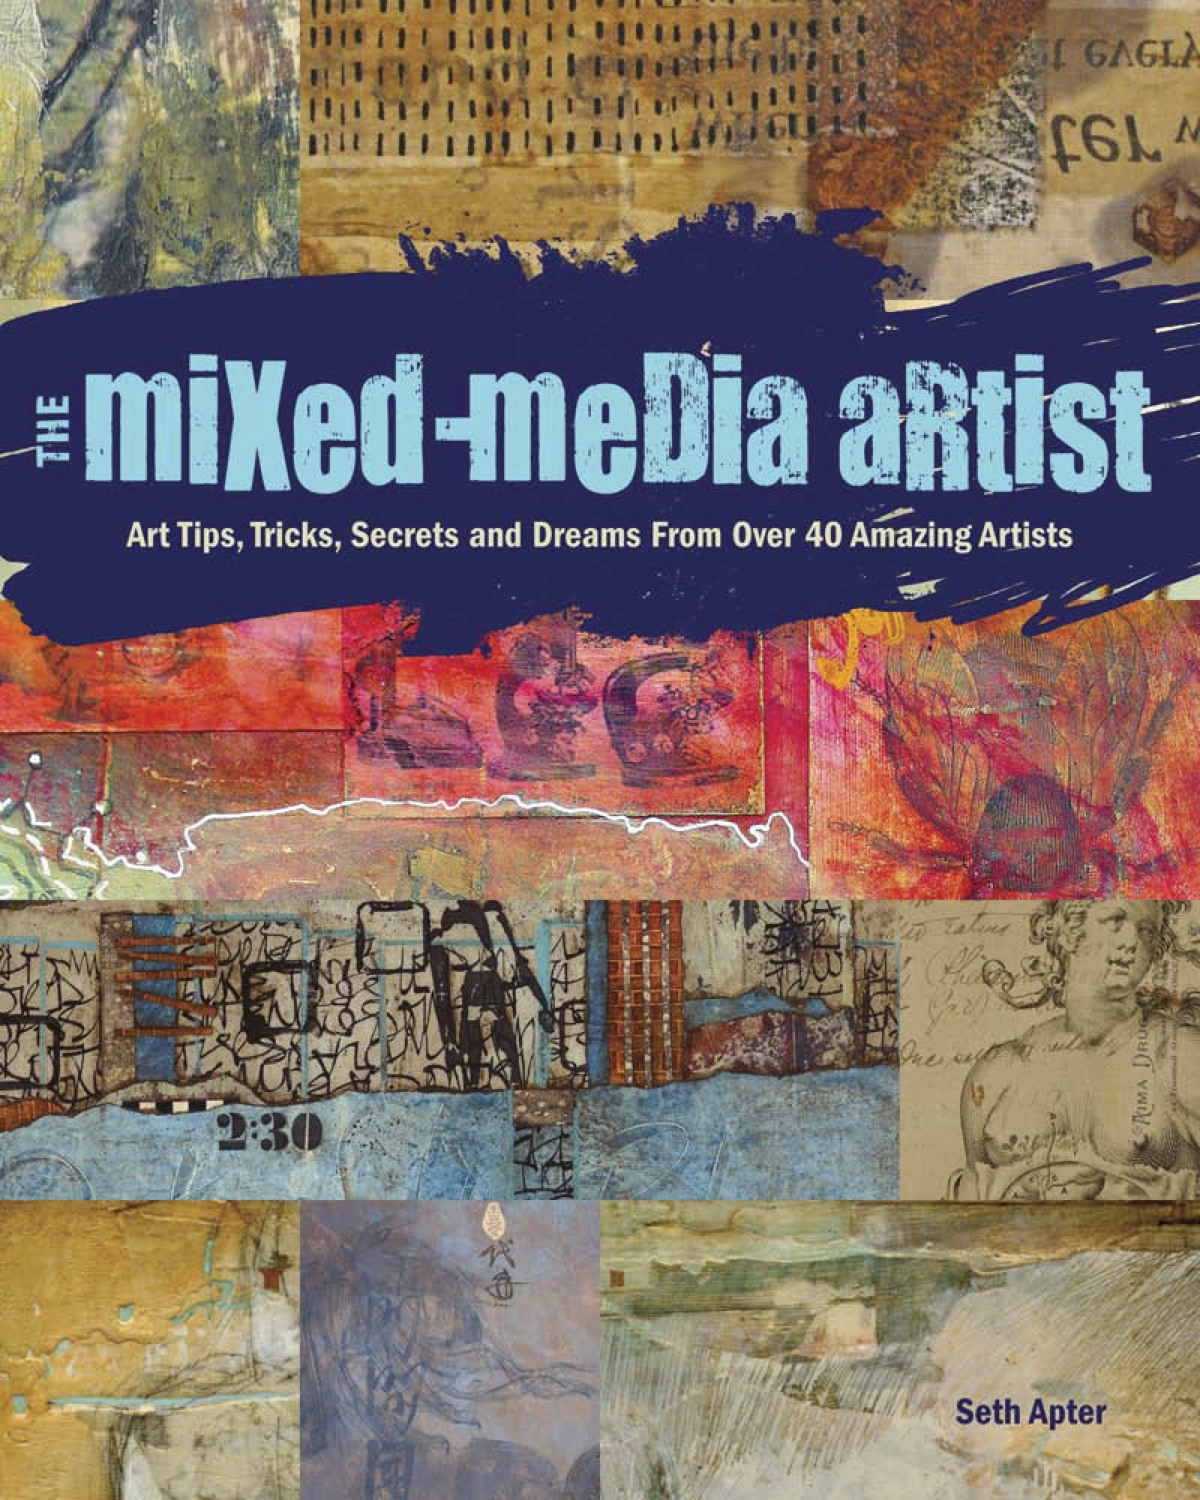
On the Pages of 'The Mixed-Media Artist'
The Mixed-Media Artist

My upcoming book, due to be released in October 2013, provides an intimate look into the hearts, souls, and creative processes of 44 inspiring artists.
Just some of what you will find on the pages of this book includes:
Q & A: Contributing artists share their creative perspective and intimate thoughts in response to a series of provocative questions relevant to being an artist today.
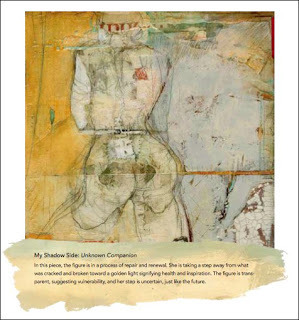
Artwork: New artwork was created by every contributing artist in response to thought provoking prompts. Artists also provided a description of the meaning behind each of their pieces. Many contributors, including CW Slade whose work is presented here, created self portraits based on their choice of 1 of the following 3 prompts: My Shadow Side, The Face I Show the World, or The Woman/Man I'll never be.
Step-Outs: Many of the artists, such as Nathalie Nayer whose work is excerpted below, provided step-by-step instruction to show the process they undertook to complete the specific work that they contributed to the book.

Tips and Tricks: A number of the artists included their own special tips and tricks that are a big part of their creative process...and can be a part of yours as well.

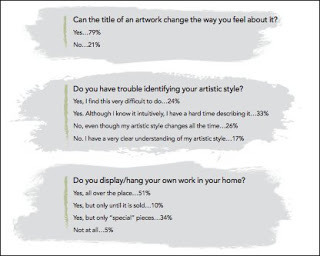
Community Survey: The results of a survey posted on my blog and opened to the entire online, creative community are revealed in sidebars threaded throughout the entire book. No doubt many of you contributed responses.
Online Component: Given the limit of 144 pages and the generosity of the participating artists, I received much more content than could be published. As a result, links are provided within the book to additional online content.
----------------------------
The Mixed-Media Artist will be sold in stores and will ship from online shops in October. It is currently available by preorder at Amazon. Signed copies will also be sold through my blog as well.
My upcoming book, due to be released in October 2013, provides an intimate look into the hearts, souls, and creative processes of 44 inspiring artists.
Just some of what you will find on the pages of this book includes:
Q & A: Contributing artists share their creative perspective and intimate thoughts in response to a series of provocative questions relevant to being an artist today.

Artwork: New artwork was created by every contributing artist in response to thought provoking prompts. Artists also provided a description of the meaning behind each of their pieces. Many contributors, including CW Slade whose work is presented here, created self portraits based on their choice of 1 of the following 3 prompts: My Shadow Side, The Face I Show the World, or The Woman/Man I'll never be.

Step-Outs: Many of the artists, such as Nathalie Nayer whose work is excerpted below, provided step-by-step instruction to show the process they undertook to complete the specific work that they contributed to the book.

Tips and Tricks: A number of the artists included their own special tips and tricks that are a big part of their creative process...and can be a part of yours as well.

Community Survey: The results of a survey posted on my blog and opened to the entire online, creative community are revealed in sidebars threaded throughout the entire book. No doubt many of you contributed responses.

Online Component: Given the limit of 144 pages and the generosity of the participating artists, I received much more content than could be published. As a result, links are provided within the book to additional online content.
----------------------------
The Mixed-Media Artist will be sold in stores and will ship from online shops in October. It is currently available by preorder at Amazon. Signed copies will also be sold through my blog as well.
August 27, 2013
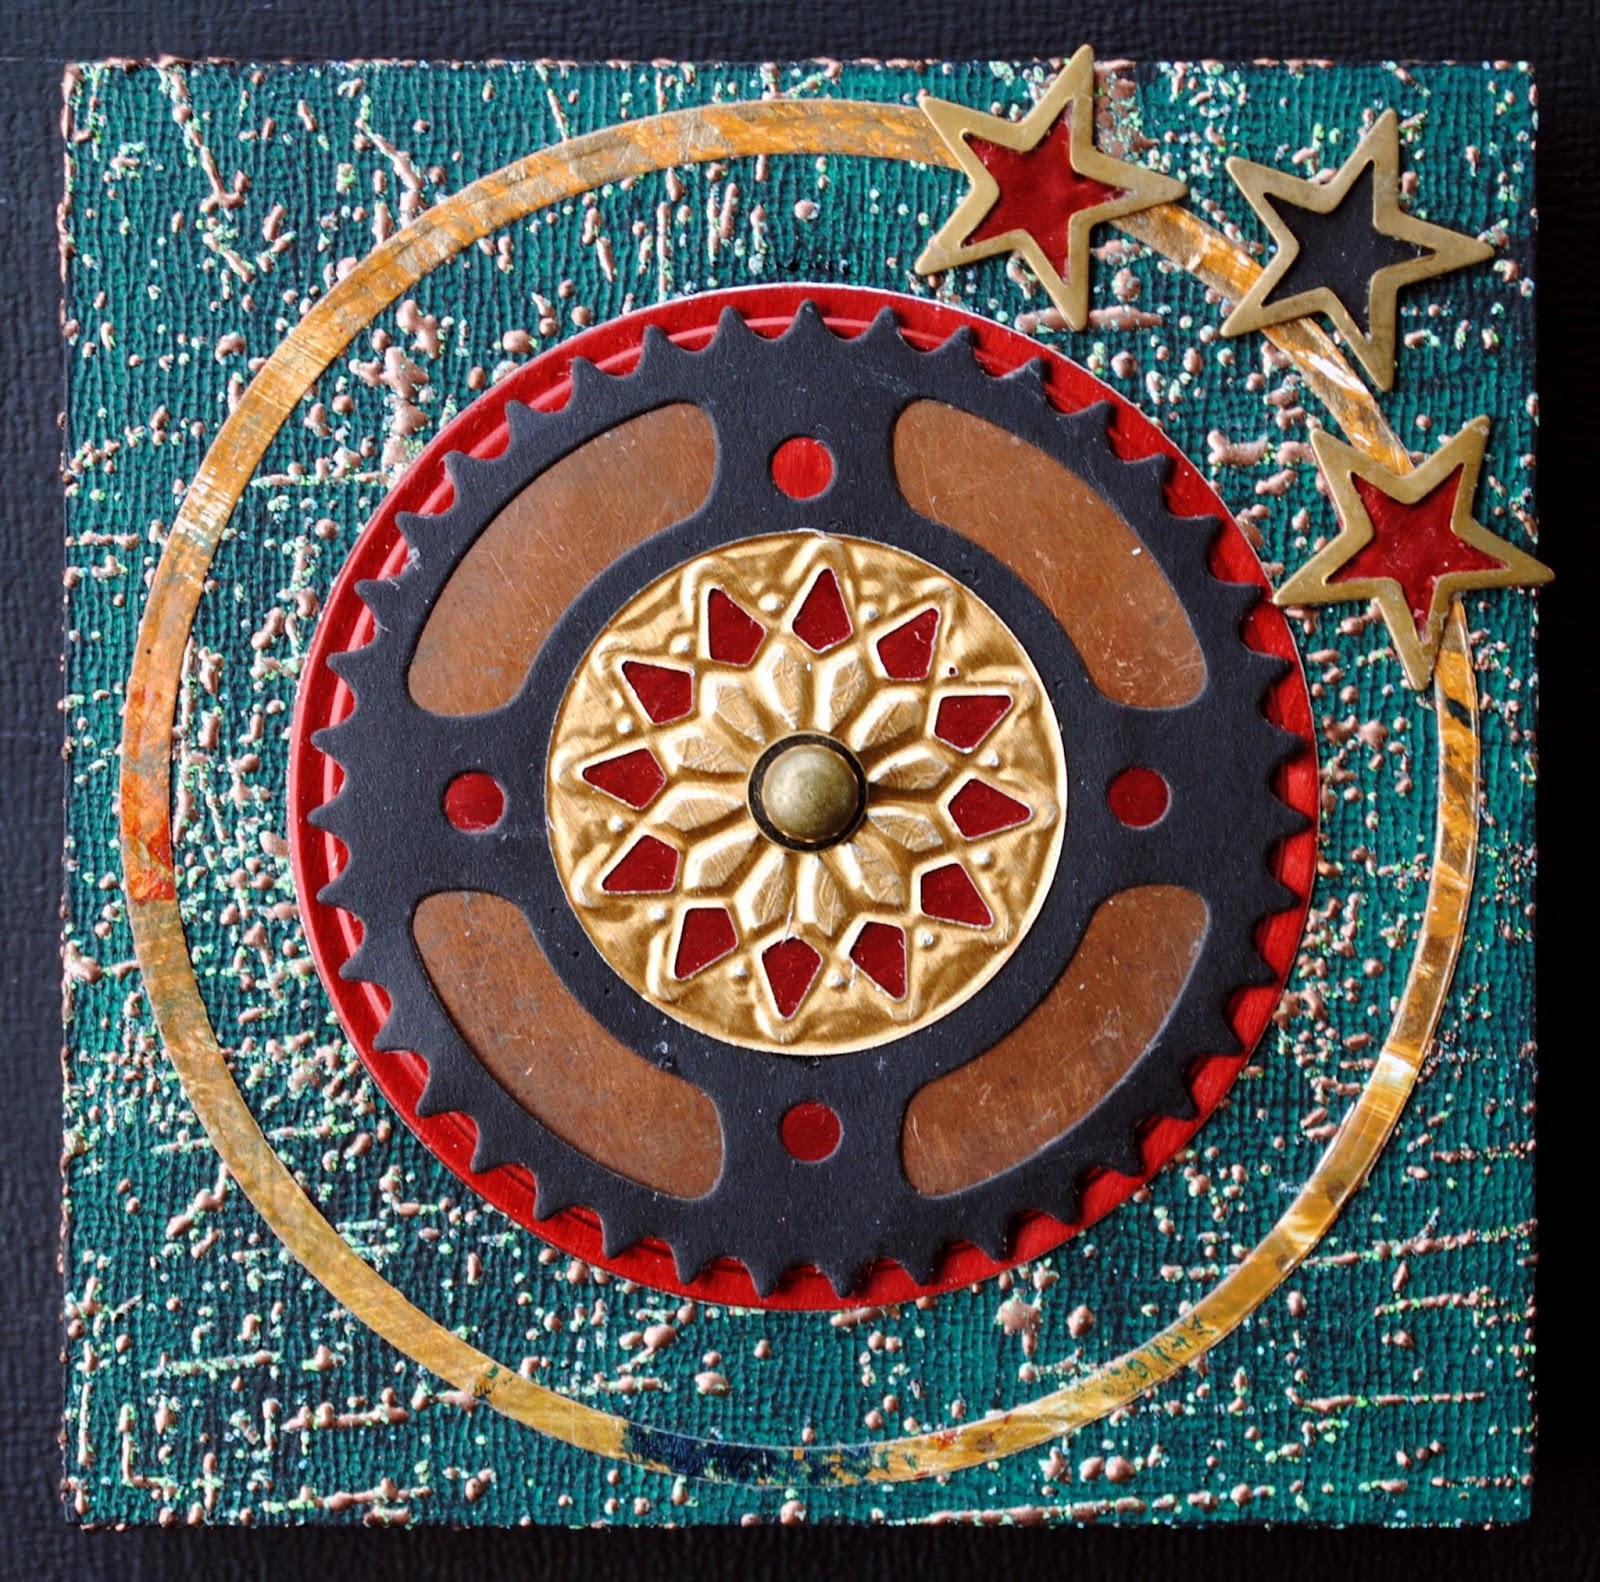
Trinity

I have recently purchased a new stash of vintage embellishments and today was drawn to three metal stars.

I decided to build the entire artwork around these small element, something that I find myself often doing. In thinking about stars, my thoughts drifted in both spiritual and celestial directions and I wanted to reflect both of these concepts in my artwork.
I started with a blank 4x4 inch cradled wood panel and added a layer of green paint.

Using black gesso, I dry brushed a second layer to add more depth and to cut the brightness of the green.

The next step was embossing using a grungy background rubber stamp, a watermark stamp pad, and aged copper embossing powder.

Happy with the background and well aware that this was an abstract rather than a literal interpretation of the night sky, I moved on to create the foreground components. My focus was on circles, with respect to both celestial (orbiting planets) and spiritual (the circle of life)thinking.
Wanting to add a bit of copper to connect with the copper embossing powder I had used on the surface of the panel, I dug into my stash and found the perfect copper disc to use as one layer.

This ring was created using two dies, one from Spellbinders Standard Circles Small and one from Spellbinders Standard Circles Large, and hand painted paper layered with metallic acrylic paint.

This circular disc was cut and embossed with Spellbinders Standard Circles Large and red foil from Spellbinders Media Mixage Foil Pack.

I chose to use black card stock for my next element, to ground the work and to add contrast to the brighter green, red and metallic elements. I cut it using Spellbinders Sprightly Sprockets die cut set.

I backed the four open holes of this piece with red foil.

The central focus of this piece was made next using a die from Spellbinders Gold Facet die set coupled with a die from Spellbinders Standard Circles Large. I cut a piece of gold foil and used a sanding block to tone done the brightness and bring up the silver metal under the gold surface.

This piece was also backed with red foil.

Because the three gold stars were not solid, I decided to back them as well - two with red foil and one with black card stock.

I also grabbed a metal hitch fastener to eventually place in the center of the Gold Facet die cut.

My favorite part...putting it all together.


Available for purchase in my Etsy Shop.-------------------------------------
Supply List
Spellbinders Paper Art Supplies:
GC-001 SpellbindersTM Grand Caibur® MachineGC-015 SpellbindersTM Grand Calibur® Junior Magnetic Placement MatF-012 SpellbindersTM Precious Metals Premium Craft Foils Assortment S5-203 SpellbindersTM Imperial Gold Shapeabilities® Gold FacetsS5-048 SpellbindersTM Shapeabilities® Sprightly Sprockets S4-114 SpellbindersTM Nestabilities® Standard Circles LargeS4-116 SpellbindersTM Nestabilities® Standard Circles Small
Preferred Promotional Partners: Tsukineko VersaMark watermark stamp pad
Other: cradled wood panel, acrylic paint, gesso, embossing powder, paint brush, rubber stamp, card stock, metal embellishments, sanding block, scissors, heat gun, adhesive