Virginia S. Anderson's Blog, page 31
May 17, 2016
InDesign for Book Formatting: Cheat Sheet I

Rank Beginners is Us!
This, my next post in my crazy-journey series as I experiment with various options for POD book-formatting, deals with some of the things I found you must learn—and will want to learn—if you are interested in trying InDesign as your formatting option.
I’ve written already that I found the program a lot easier to learn than I thought it would be when I first opened that cluttered, intimidating screen. I still claim that for a book consisting of basic black-and-white text, InDesign is a reasonable choice.
Last time, I wrote about a number of things you already know how to do—functions that work the same in InDesign as in any other word-processing program I’ve ever used, for example, commands you know already from Word.
This and the upcoming posts lay out some of the new pieces that served me well. Many of these components are intuitive; the trick is often just using an item often enough to begin remembering where it lives.
Today: Navigating with The Pages Panel and the Layout menu.
The Pages Panel is the first and arguably the most important of the components you’ll want to get to know. It opens from the “Window” menu at the top of the InDesign screen. As with all the other panels, you can position it wherever you want, even outside of the program workspace. I’ve been keeping it open all the time.
It shows two sections. The top section displays your “masters,” which you set up in advance with the formatting you want on your pages—in the case of a black-and-white book, specifically a text frame or box, running heads, and page numbers.
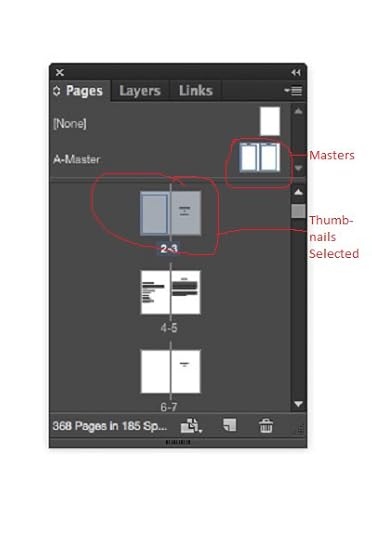
The Pages Panel, showing the Master Pages at the top and the thumbnails of the front matter of my book below. Here, pages 2 and 3 are selected. You can scroll or use the “go to page” option in the Layout menu to move through these thumbnails.
Your masters should be the “trim size” of your eventual book, say, 5X8. Set up the text frame with Margins and Columns, accessible in the Layout menu, much as in Word. Ingram specifies at least 0.5 inches. Running heads and page numbers should be inside these margins, so the top margin of your text frame should be larger than your other margins (as should your bottom margin, if you plan to position your page numbers at the bottom of your pages). I opted for 0.8 on left, right, and bottom, and 1.0 at the top, which gave me room for my heads.
You can set up as many different masters as you want, so that different sections of your book can have different formats. I only needed one, because the only “different” pages I included were those for front matter and chapter title pages; for both of these, I simply applied the “none” option, stripping the heads and page numbers.
More on what I learned about setting up the masters and running heads later!
The second section of the Pages Panel shows thumbnails of the various pages of your developing book.
For me, the panel itself had three major functions
I could double click on a page and go there;
I could select one or more pages and either apply the masters or choose not to apply them (more later);
I could drag and drop pages or spreads to re-order them. When my text didn’t load in the right order (it sometimes didn’t), this feature saved a lot of time.
I found that the Pages Panel operates in partnership with the Layout option in the menu bar at the top of the screen.
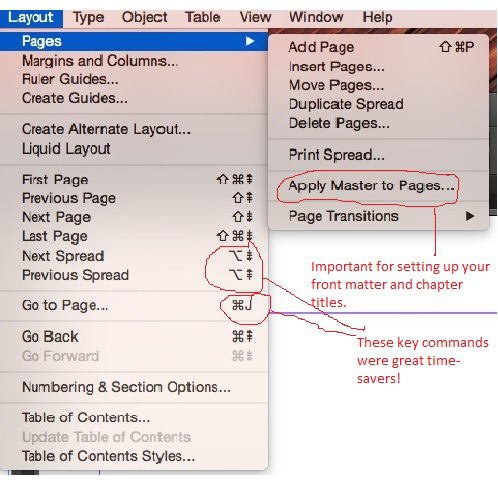
You can move from page to page via Layout→Next Page or Layout→Next Spread (or “Previous” in both cases). I found this easier than clicking on the next set of thumbnails. (Actually, Adobe provides a useful list of key commands so you really don’t have to click on anything. “Next Spread,” for example, is “Option + Page down” on my Mac.)
Layout→Go to Page (CTRL or COMMAND + J) allows you to select a particular page to work on. Much better than scrolling through the Pages thumbnails looking for a page.
You can delete selected pages: Layout→Pages→Delete Pages
You can similarly add pages or insert pages after a selected page. Layout→Pages→Add or Insert Pages
You can apply formatting to a group of pages or to a single page. You do this through Layout→Apply Master to Pages, which gives you a menu of any masters you’ve created, or, helpfully when it comes time to set up your front-matter section and chapter title pages, the option of “None.”
The only other navigation tool I used regularly was View→Fit Spread in Window (CTRL or COMMAND + Shift + 0). I found this command useful because sometimes, when you “go to” a page, the spread may not be centered, and I liked working with entire two-page spreads visible. Fit Spread in Window became my fix for this feature.
I’d argue that this is all you really need to move around comfortably in InDesign: your Pages panel, the commands in the Layout→Pages menu, the key commands for “Next” or “Previous” spread, and Fit Spread in Window. That’s not really very much, and it’s easy to remember.
My version of Word offers a “Navigation Pane” with much the same function. I began experimenting with using Master Pages in Word so that I could see whether I had the same options in Word as in InDesign, such as the ability to apply masters at will, which, as I’ll discuss in a later post, is one of the features I found essential. At first glance, working with masters in Word is different in several ways and possibly not as flexible as in InDesign. More on this as I continue my education!
Have you worked with master pages in Word? What options does it offer, and how have you made them work for you?


Survey Question-Why do you put that book down?
I’ve been writing about this issue quite a bit on this blog, mostly because I’ve been disappointed by a number of the books I’ve picked up recently. My own concern is whether I’m being too curmudgeonly, since the books I can’t make it through often seem to have many fans. Here, I posted about the value of voice for smoothing over glitches that would otherwise stop me. And here, just recently, about a plot device in mysteries and thrillers that made me quit in the final chapters.
Others include what I call “illogic“: people who just don’t act like normal people or events that couldn’t happen because the author needs characters to behave bizarrely or the world to reorganize itself to make the plot work out. Hate that!
And not too long ago I stopped reading a book where everybody was so terminally nice that even when conflict reared its leonine head, everybody smiled and and gave it a gentle hug.
Finally, when I read a scene I could have written myself based on the hundred+ times I’ve already seen that exact scene or read that dialogue (e.g., “I want to be there for you”), I have a hard time pressing on.
Am I being too persnickety? I’m eternally grateful for books that surprise me, even if only just a little, with a view of the world I couldn’t get anywhere else.
Jog on over to the original post and add your thoughts, or share them here.

Here is the first of our LWI Survey Questions. Never a list, just the one. Yes, I know there are two but the second is clarifying the first. The results will be shared, minus names provided.
Make sure to share this post around through social media and reblogging.


May 12, 2016
Tech Tips for Writers #116: How to Screenshot
In addition to the very helpful hints in this post about taking screen shots from Jacqui Murray, Mac users can try the Grab utility. The only real advantage I see to Grab is that it opens your shot in a separate window so that you don’t have to hunt for it on your desktop. However, this process is faster than opening Grab from your Go–>Utilities menu. Enjoy!

 Tech Tips for Writers is an (almost) weekly post on overcoming Tech Dread. I’ll cover issues that friends, both real-time and virtual, have shared. Feel free to post a comment about a question you have. I’ll cover it in a future Tip.
Q: I need to take a screenshot with my Chromebook.
Here’s the shortkey: Hold down the Ctrl key and press the Window Switcher key. The screenshot is placed on the clipboard and in the download folder. If you have trouble finding the Download file, click Alt+Shift+M to open the File Manager. Download will be one of the options on the left sidebar.
In case you use a different digital device, here are the screenshot shortkeys for other platforms:
View original post 166 more words


May 10, 2016
Mystery Plot Slow Reveals: A Cranky Follow-Up

A post I shared earlier thoughtfully spells out ways to use unreliable narrators to build suspense in mysteries and thrillers by letting readers edge slowly into characters’ personalities and the dilemmas their personalities create for them, so that the journey through the story is one of ongoing discovery. Mulling this post, I found myself lamenting a plot device that in some ways is the antithesis of this slow reveal and, sadly, one I’ve recently encountered more than once.

Cranky Part: I HATE this plot structure.
Mea Culpa Part 1: I tried it once. Got shot down royally by my wonderful St. Martin’s editor.
Mea Culpa Part 2: Yeah, sometimes a little of this strategy sneaks by; sometimes a modicum of it is even necessary to tie up ends in a denouement.
But! In my curmudgeonly view, we should all be highly self-conscious about the degree to which we’re tempted to fall back on this device.
So what is this cardinal plotting sin?
Here’s how it worked in the latest iteration I came across:
Step 1: The heroine/protagonist/amateur sleuth roves around, earnestly enough, learning basically nothing—generally ruling out unlikely suspects.
Okay, I’ll go along. My interest flagged somewhat because throughout her inquiries, the protagonist/sleuth seemed to have nothing personally at stake except satisfying her suspicion that the relevant death had not been adequately explained. Still, I’ll go along. When a character dies in mysterious circumstances, the protagonist really ought to express and act on his or her doubts. In the history of mystery fiction, idle curiosity has uncovered and solved many a crime.
Step 2: Suddenly the identity of the villain is revealed.
In this plot structure, this revelation usually occurs when the protagonist/sleuth is in the company of the villain, inevitably far from help. In the worst iterations, it occurs without warning: “Now I’ve got you, my pretty! How nice that you didn’t suspect!” In the book on which I’m basing this analysis, the protagonist/amateur sleuth abruptly identifies the killer (but without letting us readers know what clued her in)—
At which point, all of a sudden, she realizes that her bumbling inquiries might inspire the bad guy to come after her. And voilà, within mere minutes after she realizes she’s in danger, he shows up. Before I could contain my frustration at being deprived of the basic piece of information that would have allowed me to share her revelation, he has her bound and gagged and completely at his mercy.
Now comes the worst part:
Step 3: For pages and pages, the murderer lectures his captive audience—
That is, his victim(s)—on what happened, why, how he did it, what clues they missed—in short, all the things that the best detective/mystery fiction stack up slowly so that when the final piece settles into place, the protagonist and the readers have done some work, the kind of work that makes both the journey and its resolution an achievement, intellectual but emotional as well.

Yes, many mysteries turn on a sudden realization, a moment in which the detective/sleuth chains together a string of loose clues or recognizes the importance of some minor incident or discovery. The best of these revelations, in my view, are the ones where the sleuth deduces the connection, à la Sherlock Holmes, instead of having the information told to him or her.
But the success of this turning point, regardless of how the sleuth arrives at it, depends on the quality of the groundwork we’ve laid. In other words, if our villain has to explain the case to our hero, we haven’t done our job. In the best mysteries, when the villain pops up, as he or she probably will, the reader and the sleuth, in concert, should be able to exclaim, without pages of tedious instruction, “Now it all makes sense!”
In the kind of slow reveal Jane K. Cleland discusses in “Writing Suspenseful Fiction: Reveal Answers Slowly,” we readers get the information as the protagonist encounters it. We’re not deprived of the building blocks that the protagonist will ultimately use to solve the crime. The beauty of using an unreliable narrator for this process, as Cleland illustrates, is that the information is filtered through the character’s misreading. As we slowly come to understand the character and the emotional or cognitive needs that drive him or her, we have the chance to read through to a coherent solution ourselves.

But even without an unreliable narrator, we mystery writers owe it to our characters as well as our readers to take a hard look at that lecture we’re tempted to let the villain deliver and, instead, piece out the information so that we can lay it before our hero and our readers step by step, obviously with alluring wrong turns along the way. Revelations ought to come from within, not from some obnoxious bad guy pointing a gun at our readers’ bound and gagged and silenced bodies. The slow reveal of character and information gives readers voice. They become our partners, our eager allies, in solving the crime.


May 8, 2016
Mystery Fiction Suspense: A Useful Post
Here something instructive about building suspense in mystery fiction by using unreliable narrators, from Jane K. Cleland, posted on Jane Friedman’s blog. Do you use these techniques?


May 5, 2016
Step By Step Instructions for Promotion of your Book with Twitter Ads
You may want to partake of this comprehensive advice on how to run and manage Twitter Ads.

I’ve written a couple posts about Twitter Ads now, and most of the feedback I’ve gotten has been: SLOW DOWN! People want a step-by-step on how to (hopefully) reproduce the success I’ve had with Twitter Ads. And I’m the kind of fella who gives the people what they want! (Occasionally, if I feel like it.) There are roughly a zillion steps, so I’m going to do this in a bunch of blog posts.
Before we begin, I need you to take a minute and count how many books you’ve written. I’ll wait. (doo-be-doo-be-doo…) Back? What’d you come up with? Is it one book? If so, then I’ll wait while you go finish the next book. Because what we’re going to do is run a break even advertising campaign. It isn’t going to cost you any money in the end, but you aren’t going to make any money either. This…
View original post 366 more words


May 4, 2016
» 15 Publishers of Mystery Novels That Accept Submissions Without an Agent
 A list I’ve been looking for a long time! As is so often the case, found it through Chris the Story Reading Ape. Hope you find it useful!
Reblogged on WordPress.com
Source: » 15 Publishers of Mystery Novels That Accept Submissions Without an Agent


May 3, 2016
How Much Should You Spend On Self-Publishing Your Book?
What about it, folks. Is this what it costs to self-publish? If you had to choose and were paying these prices, where would YOU allocate your funds?

 I received an article with this information and wanted to share. Although I didn’t use Reedsy for editing and my book cover, I found I fell within most of the pricing ranges.
One thing I didn’t see on this infographic was the Q&A time with the editor. I certainly had questions as I moved through the process and the last thing I wanted was to be left hanging if my editor said, “this doesn’t work in the plot.” I’ve worked with previous editors who would make a comment and instead of being able to ask a few questions you had to make the changes, submit, and pay again. I’m not clear what Reedsy offers, but if you’re looking for an editor, it’s an important topic to ask about.
By Maryann Yin on May. 2, 2016 
Until Next Time…


May 2, 2016
Formatting in Word for PC users
Here’s a detailed post by Melinda Clayton from Indies Unlimited on stripping unwanted formatting from your Word document before submitting it to Kindle. Her directions apply to PC users. I use a Mac, and was able to format my books fairly easily following Mark Coker’s directions for Smashwords. In both cases, making sure you have a clean document is essential.

My InDesign experience is much more complicated. I’m close to submitting to Ingram and will see how it works. More on my crazy journey into InDesign for IngramSpark coming soon!


April 28, 2016
May Be A Reason Your Editor Is Crabby…
Here’s a comprehensive “editor’s POV” discussion shared by Chris the Story Reading Ape. In my experience, careful reading of directions and the ability to follow them is a learned skill. On the one hand, as a teacher (and as many of my fellow teachers regularly lamented), getting students to follow written directions was one of the greatest of pedagogical challenges. Yet I’ve found myself misreading directions or missing an important caveat or guideline—especially when I’m trying to do something technical online