Marie Bostwick's Blog, page 20
April 16, 2019
A Dozen Deviled Egg Recipe Ideas to Try Right Now
Deviled eggs. You either love ’em or you hate ’em. I am both feet in on the former.
I remember the first time I had one. It was one of those bustling church picnics where everyone brings a blanket and a pot luck dish and there’s children and ants running around everywhere. My sisters dared me to try it, and by the looks of it, I proceeded with extreme caution and suspicion. (Some of the things my sisters dared me try to weren’t exactly in my best interest. Bless their hearts.)
But it was love at first bite. And the rest is history.
My husband prefers the classic rendition – a hint of celery salt, a bit of mayo and mustard, a splash of vinegar, and a dash of paprika.
That’s fine and all.
But I say live a little.
I’ve pulled together a dozen deviled egg recipe ideas that would be perfect for your Easter brunch, afternoon iced tea with friends, popping while the grands hunt eggs, a Spring picnic, or really any time at all. If you’ve spent much time in fancy schmancy restaurants lately, you know that deviled eggs are all the rage. Go figure! We were gourmet chefs all along and didn’t know it! But it’s easy to see why deviled eggs are so popular. They’re not only delicious but versatile.
They’re great for breakfast. Mid-morning snack. Lunch. Mid-afternoon snack. Cocktail hour. Dinner. Midnight snack. You get the idea.
What make’s these puppies so great is that you can deck them out in all kinds of flavors and they are the perfect vehicle to usher those flavors into your mouth (especially when you use my tried and true system for boiling eggs!). They don’t call them the incredible edible egg for nothing, right?
Ok, let’s jump in. I dare you not to get mad cravings while you are reading this post. I personally had to take two snack breaks while writing it.
Lime Guacamole Deviled Eggs
I’m kicking things off strong with a recipe from a local food blogger friend of mine, the Reluctant Entertainer. Everything she posts crosses all of the boxes for me. Her recipes are pretty. And easy. And perfect for last minute guests. And she’s a really lovely human being to boot. What more could I ask for? Nothing.

Photo credit: Reluctant Entertainer
Sun-dried Tomato Deviled Eggs
I’m very intrigued by this one. Sun-dried tomatoes are one of my favorite flavors.

Photo Credit: Faith Hope and Love Survive Despite Whiskered Accomplice
“The Best” Deviled Eggs
I’m sure these are fighting words in most parts of the country, but I’d say these look like they’re worth a shot!

Photo credit: Can’t Stay Out of the Kitchen
Caesar Deviled Eggs
This one might just get my husband to widen his deviled egg horizons. He loves a good Caesar salad.

Photo credit: Jess Fuel
Crab Stuffed Deviled Eggs
Oh my! Deviled eggs and crab? Two of my favorite things in one delectable bite? Yes, please!
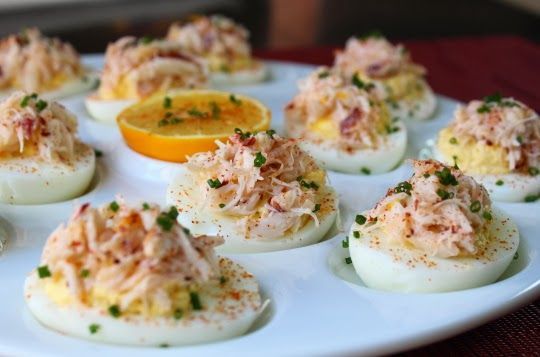
Photo credit: So News
Bacon Balsamic Deviled Eggs
Bacon and eggs – a classic combination. Need I say more?
Photo credit: Recipe Girl
Bacon Guacamole Deviled Eggs
This one really pushes the deviled egg envelope in all kinds of delicious directions. And guess what? For all you carb watchers out there, this one is Keto friendly.

Photo credit: Peace Love and Low Carb
Buffalo Chicken Deviled Eggs
Another Keto friendly recipe. My sons love all things hot and spicy. I’m sure they’d go crazy for these fiery beauties!

Photo credit: Mad About Food
Spinach Artichoke Deviled Eggs
This is the one to serve when you’re trying to impress your gourmet friends. Just beautiful.

Photo credit: Thanksgiving
Jalapeño Popper Deviled Eggs
Another great option for those who love turning up the culinary heat!

Photo credit: Low Carb Life
Pimento Cheese Deviled Eggs
The years I spend in Georgia taught me to love pimento cheese! Adding it to deviled eggs seems like a no-brainer. Why haven’t I done this before?

Photo credit: Southern Lady Cooks
Thai Green Curry Deviled Eggs
You either love curry or you don’t. I definitely do! Have to add this to my repertoire soon!

Photo credit: A Full Living
The post A Dozen Deviled Egg Recipe Ideas to Try Right Now appeared first on Fierce Beyond 50.


April 12, 2019
Easter Crafts Abound!
Easter crafts are just plain cute.
All crafting is fun. The fun is built in whether you’re quilting or painting or decoupaging or glittering or…you get the idea.
But in addition to being fun, Easter crafts are cute. Bunnies! Baby chicks! Flowers! Pastel colors! Little girls wearing bonnets with bows bigger than their heads!
Now see what I mean?
I’m a sucker for Easter decorations and Easter crafts, probably because they are so cute. Also, possibly I have a soft spot because years ago I nicknamed my book readers ‘Bunnies.’ A name I still use lovingly to this day.
When Katie at Personal Creations reached out to me to share some adorable bunny bookmarks that just screamed, “Marie Bostwick” I knew I had to put together a little roundup of the Easter crafts I’m seeing around this year. (And rest assured, the bunny bookmarks are below!)
An Oldie But A Goodie
These have been around for years. I remember making them with my kiddos when they were little, and more recently, I made a pumpkin version with a few of my grand-darlings on the East Coast. They’ve stuck around because they are versatile and I love them because they can stay out all spring! These string eggs are messy (an outdoor craft if there ever was one) but they are somehow both bright and cheery and also classy enough to be able to decorate anywhere in your home. They can be a bit delicate to pack up as you don’t want to crush them, but if you’ve got the space they’ll last for years to come.

Another Egg-celent Option
Sorry for the pun, but I couldn’t resist at least one!
These eggs make such a natural, beautiful craft. I actually made some of these a few years ago with small flowers from the garden and they turned out lovely. The part I’m most intrigued by is the all natural dyes! I’ve never made my own dyes but now I’m dying to try it. (Ok, a second pun. I guess the jet lag is bringing it out of me.)
Jokes aside, I’d love to try this sometime. My mind is bursting with ideas of other crafts I could do with natural dyes. The look of these eggs is so natural and beautiful with the nature imprints and subdued color palate – these could stay out all year long!

Bunnies Bookmarks = Marie Bostwick
As promised above, here are custom made bookmarks that would look great tucked in the corner of Hope On The Inside! Seriously though, these bunny bookmarks are a festive addition to your nightstand and would only take a few minutes to make. An easy craft for kiddos too, and you can make a handful of them and pass along to friends. Once you get the hang of the folds I’m thinking you could also make these out of beautiful scrapbook paper!

Twine Carrots
Grab some old newspaper out of the recycling bin, and let’s make some carrots. These twine carrots fall into one of my favorite categories of crafting: imprecise crafts. What I mean by that is crafting where you’re supposed to be imprecise, no measuring, no exact specifications, easy peasy! You squish some newspaper and say, “Eh, sure, that looks like a carrot.” The. Absolute. Easiest. You can’t mess these up! I’m even wondering about dying the twine with some of the natural dyes we looked at earlier…

The Reason For The Season
Christmas and Easter are wonderful holidays full of family and fun and food and other things. It’s easy to get wrapped up in those things and forget the reason we are celebrating in the first place. Which is precisely why I love this last craft. Take an old picture frame, add a little ribbon of your choice, and you get a beautiful reminder of why we are all here in the first place.
Amen to Easter!

The post Easter Crafts Abound! appeared first on Fierce Beyond 50.
April 10, 2019
SOMETIMES IT’S GOOD TO BE LOST
In case you hadn’t picked up on it by now, I am a planner.
I love a good to-do list and am utterly devoted to my schedule. Seeing my Living Well Planner with my daily tasks time-blocked and color-coded, fills me with the satisfaction and the comfort of feeling in control of my circumstances. People frequently ask how I’m able to get so much done. Organization is my secret weapon, making a plan and sticking to it.
Take my workout routine. Even when I’m traveling, I block out time in my schedule for exercise. It’s a good plan when it works, and sometimes even when it doesn’t.
WHEN THE MYSTICAL PATH IS A MYSTERY
Last week, while I was in Connecticut for my book tour, I had breakfast with one of my dearest friends, a wise poet with an old soul. After a welcome hug and putting in our breakfast order, my friend gazed at me with her deep blue eyes and asked, “So where are you on your mystical path?”
Good question.
For the first time in many years, I have given myself the gift of unstructured, unplanned time. This chance to refresh my soul and recharge my creative battery is very necessary, something that I’ve needed for a long time. Because of my professional commitments, carving out this unplanned time had to be scheduled far in advance so I’ve been looking forward to it for months, even years.
But the arrival of the long anticipated break has brought something I hadn’t expected – anxiety.
For the first time in fifteen years I’m not under a deadline. At first it felt great. I did some quilting, caught up with friends, drew up sketches for how I’d like to reorganize my workspace, and took some nice long walks.
But after a couple of weeks, not having a plan for what I was going to do next felt really, really uncomfortable. I had hoped that this break would refill my creative well, summon up my next big idea, and shine bright light on my mystical path, showing me exactly what I should do next.
So far, none of that has happened. As days stretched into weeks with no blinking neon sign pointing me in the right direction, I started to feel confused, then tense, then anxious.
Why is this taking so long?
SOMETIMES IT’S GOOD TO BE LOST
After breakfast with my friend, I planned to spend an hour working out and the balance of the day answering mail and writing a blog post. Since it was such a nice day, I decided that taking a hike could serve as my workout.
Steep Rock Preserve is a beautiful place with over forty miles of trails. During my years in Connecticut, I hiked those trails often. I planned to do what I’d done so many times before, walk along the north side of the river for about a mile, cross the footbridge, then return along the south side.
It’s an easy hike, just a couple of miles. Or would have been, if I hadn’t gotten lost. Really lost.
How did this happen? Hard to say. It was such a pretty day. I was distracted by the buds on the trees, the sun on the water, the chirping of birds. Somewhere along the way, I went left when I should have gone right. By the time I realized my mistake, the river was nowhere in sight.
Before I found my way back to my car, nearly three hours later, I’d walked up so many hills and rocky trails that my quadriceps were aching. I was hot, tired, and thirsty and way behind schedule.
And I was completely, uncharacteristically okay with it.
Sometimes it’s good to be lost.

GETTING COMFORTABLE WITH BEING UNCOMFORTABLE
Being a little lost, not knowing what may or may not be around the corner isn’t always easy, or comfortable, but sometimes it’s exactly we need.
Why?
Because people who always know exactly what they are doing and where they’re heading next are never surprised. Like I mentioned in my post about diving out of your comfort zone, it is the surprises, the unanticipated blessings and unexpected jolts of inspiration, that make life an adventure.
Wandering off my pre-planned path gave me a chance to explore places I’d never seen before. I found a stream I didn’t know existed and I saw a breathtaking vista from the aptly named Steep Rock. I’d never climbed to the summit before.
Getting lost gave me a chance to let my mind wander as well as my feet. I got to enjoy the silence of the forest well as conversation with the Creator. I had a pleasant encounter with an interesting woman who finally directed me to the right path. Also, I got to meet her dog, Brophy, and laugh at the sight of him trying to carry a big branch that was longer than he was in his mouth.
Or course, it wasn’t all fun and games and serendipitous encounters. I will admit that I experienced some uncomfortable, even anxious moments along the trail. My writer’s imagination kicked in, conjuring all kinds of dramas and scenes, and lions, and tigers, and bears. (Oh my!)
But then I reminded myself that being a little lost was all right. After all, this wasn’t completely new terrain for me. If I walked long and far enough, eventually, though perhaps circuitously, I’d find my way. Once I made peace with that, I was able to quit worrying about what came next and just enjoy what was.
Being lost wasn’t the way I’d planned to spend my day but it was a good day just the same. In fact, it turned out to be a better day than the one I had planned. Much better.


WHEN A SELF-PROFESSED PLANNER GOES OFF-ROADING
I’m always going to be a person who plans. That’s just part of my make up and an important aspect of my personality. Without it, I’d never have written one novel, let alone fifteen, and I certainly wouldn’t have taken on the additional task of creating this blog. There’s a lot to be said for planning. Getting from where you are to where you want to be requires a roadmap.
But, as I stood at the top of Steep Rock last week and gazed out over the hills to the valley below, I was reminded that there’s also a lot to be said for the unplanned path and unexpected adventures.
Where am I on my mystical path?
Still not sure. For now, that’s okay. Eventually, though perhaps circuitously, I’ll get where I’m going.
I may not know exactly where the path leads but one thing is certain; I’ll have some amazing adventures along the way.
The post SOMETIMES IT’S GOOD TO BE LOST appeared first on Fierce Beyond 50.
April 5, 2019
Free Quilt Pattern: A Companion Quilt for HOPE ON THE INSIDE
If you’ve been around the blog for any amount time, you know that I L-O-V-E quilts and books. And quilting and reading.
These two favorite pastimes of mine have shaped my life in many different ways; they’ve built powerful bonds and friendships, they’ve offered a creative outlet, they’ve been my “therapy,” they’ve even paid the bills. (However, a lot of those earnings seem to migrate back into books and quilts. Weird how that happens.)
Quilting has inspired my books, and books have inspired my quilts. But what inspires me most is the sisterhood of life-long friends I have gained through it all: women who share my passion for reading, for happy endings, for stitching quilts with love. It’s for them that I write and it’s through them that my creative energy is renewed.
So when I get the chance to fuse together my two favorite things, I say YES and probably wave my hands in the air!
Quilting and Books Just Go Together
How do quilting and books go together? Well, for one thing, they both require a big investment of time from the artist who makes them. And they both tell a story, whether its in the lines of the book or the textures, patterns and stitching of a quilt. More importantly, both books and quilts can be enjoyed over and over and have an almost magical ability to bring people together.
As many of my readers know, the talented Deb Tucker’s Studio 180 Design creates a companion pattern that highlights a certain character or theme for many of my books.
Yes. You read that right. My books have actual quilt patterns designed just for the book. Pretty cool, right?
The quilts Deb has designed for my books have added an exciting dimension to the reading experience and her A-MAZING rules and tools have made me a better quilter than I am in real life. Best of all, the friendship we developed over the years is something I treasure.
Here’s a picture of Deb and I standing in front of a gorgeous quilt. So much joy going on here!

A Companion Quilt for Hope On The Inside
For my most recent novel that came out last week, Deb really outdid herself.
Here’s a teaser on the right. How pretty is that? The colors! The lines! That fabric!

If you haven’t yet seen all the gorgeous collaborative patterns that Deb and I have created as companions to my books, you can check them out on her website by clicking here. Deb creates two patterns to go with my books, a smaller project that is offered free on my website and a larger, full-sized quilt which is available for purchase at Studio 180 Design.
As part of our creative process, we go over the story line, the characters, possible quilt designs, and difficulty level for actual quilt makers. In the end, Deb is the one who does the heavy lifting (or should I say stitching?) and always creates something incredibly beautiful.
For HOPE ON THE INSIDE, we decided that a block titled “Dove in the Window” would be a perfect starting point. I love the imagery of a dove in the window felt very relevant as I think about the women serving time in my story, especially my character Mandy. I envisioned her gazing out the window, dreaming of freedom and being reunited with her daughter Talia, the ultimate recipient of the quilt that Mandy stitches while behind bars.
The Dove in the Window block also represents the exciting moment when an inmate is set free. They take flight, return home, and begin to rebuild.
Design and Fabric
To spice things up – because it’s always fun to keep our quilts spicy – Deb nestled the traditional Dove in the Window blog inside a larger Dove in the Window block. It’s a lovely, fresh, and unique interpretation of this traditional block (and easier to make that it looks!)
The block size is large at 19½” finished, which by itself could make a nice wall quilt or throw pillow. (The bed runner pattern is available as a free download from my website. The pattern to make a lap, twin, or king-sized version of the quilt is available for purchase at Studio 180 Design.)
In the instructions, you’ll see that the quilt is made with Deb Tucker’s second signature fabric collection with Island Batik titled “Steam Engine”. In the story, this is the fabric that Mandy chose when beginning her quilt for her young daughter. This gorgeous fabric will be in quilt shops late summer or early fall 2019. I’m already dreaming up what I’ll be making with these gorgeous hues! A Doves of Hope quilt is at the top of the list!
Remember: we love to see your work! If you make this bed runner, please share on Instagram and make sure to include #DoveintheWindowBedRunnerPattern180 #sharehope so we will be sure to see it!
Download your Free Quilt Pattern!
To access the free quilt pattern, head on over to my author website here. All you have to do is enter your email and you can download all of the patterns for all of my books!
Happy stitching!
The post Free Quilt Pattern: A Companion Quilt for HOPE ON THE INSIDE appeared first on Fierce Beyond 50.
April 2, 2019
Adventures in Quilting: Using Stencils
One of the really cool things about writing a blog is that, every now that then, you get free stuff. Some bloggers receive appliances, or furniture, or even fancy vacations from companies. They hope the blogger will enjoy that product and write a post about it.
Okay, sure. I guess those are pretty good items to get. You know, if you’re into that kind of thing. But what have I been offered?
Crafting supplies! Which, as we all know, is way cooler.
Stencils? Stencils!
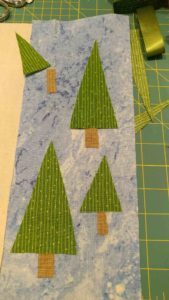
Seriously, when the folks from StencilRevolution.com got in touch with me a couple of months ago and asked if I’d like to try some free stencils, I was really excited! Surfing their website made the creative side of my brain light up like crazy. After a couple of minutes, I had ideas for all kinds of ways to put these stencils to work in my craft projects – starting with a charity quilt.
Not long ago, someone from my local quilt guild asked the membership to donate quilts to an auction for the Wildland Firefighters Foundation, an organization that provides immediate financial and crisis assistance to families of fallen and injured wildland firefighters. My guild sister said that outdoorsy themed items had gone well in the past. The second I saw the “Adventure Awaits” stencil, I knew it would be perfect focal point for a quilted wall hanging.

The Adventure Begins

The first step in making my quilt was placing the 18 x 12 inch “Adventure Awaits” stencil onto a piece of plain muslin. Using a small sponge and different colors of ink (All Purpose Ink is available here), I transferred the stencil image onto the fabric.
Because I simply laid the stencil onto the muslin, there was a little “bleeding” of the ink along the edges. Next time, I’m going to try using a spray adhesive – the same kind I use for quilting basting – on the back of the stencil. However, by being careful not to apply too much ink to the sponge I was still able to get a good result.

After transferring the image, I used a paintbrush to add a bit of snow to the top of the mountains.

Next, I started searching through my stash for fabrics to complete the project. Luckily, I had absolutely everything I needed!
A beautiful dark blue with little bubbles and whorls was perfect for my stream. I found a mottled light blue for my sky, a piece with some wonderful waves of green that were just right for a grassy field, and some bright green on green stripe for the pine trees.
(This is why it is important to have a large and varied fabric stash! I explained this to my husband. Several times. He is still not convinced.)
No-Pattern Quilting
Before you ask, there was no pattern here. I just made it up as I went along. Improvisational quilts are such fun to make! These days, probably three quarters of the quilting projects I make are of my own design and I really enjoy it. Even when it is something as simple as this little wall hanging, there’s something incredibly satisfying about making a piece that is totally original. If you haven’t tried it before, you really should!
Some people find working without pattern daunting at first but really, why should it be? The worst thing that could happen is that you’ll wreck a little fabric or perhaps make an ugly quilt. (Hey, I’ve made a few ugly quilts even with a pattern.) But you might end up making something really cute, or fun, or even beautiful, something that’s all yours, something you can feel proud of. Give it a try!
The Adventure Continues
Anyway, back to my cute little quilt…Once I had the stencil section completed, I simply added light blue “sky” strips on the left and right sides of the quilt, another “sky” strip to the top edge, and a green “grass” section on the bottom.
Next, I cut out several green triangle shapes for my trees, some little brown rectangles for the tree trunks. I used MistyFuse and a hot iron to adhere them to the fabric. I used chalk to draw a meandering stream on a strip of blue fabric, then ironed it to the grassy section, again using MistyFuse.
When all my appliques were in place, I stitched the edges on my sewing machine with a tight zigzag. The curves of the stream were quite gentle, so I didn’t lower the feed dogs on my machine. By going slowly and guiding the fabric carefully, I was able to sew smooth, even curves. After adding my trees and stream, my little quilt was looking pretty good! But the top looked a little bare to me. I added two trapunto clouds to give the piece a little added dimension.

 If you’ve never heard of it, trapunto is a technique whereby a little extra stuffing or batting is added to a quilt to make it puff out a bit. Perfect for clouds, right? And it was very easy to do. I cut a couple of slits into the base fabric in the back, being careful not to cut the appliquéd clouds, and then stuffed in a bit of cotton. The batting and backing covered up the slits, so I didn’t even bother stitching them closed. Such a simple technique but it made a big difference.

Wrapping up the Adventure
Finally, I added the batting and backing to the quilt, did a single line of echo quilting around the trees, stream, and clouds, bound it with brown fabric, and stitched a hanging sleeve onto the back.
That was it!

I only put four or five hours into this quilt but it but such fun to make. Hopefully, this cute little quilt will catch someone’s eye at the Wildwood Firefighters Foundation auction. I’m proud to raise money for this very worthy cause.
Using the stencil couldn’t have been easier and it gave me a chance to create something unique. I’m excited about finding other ways to use stencils in my future projects!


The post Adventures in Quilting: Using Stencils appeared first on Fierce Beyond 50.
March 29, 2019
Book Club Party Kit for ‘Hope On The Inside’
My latest novel, Hope On The Inside, has all the elements of a quintessential book club book. The quickly paced plot. The strong themes of creativity and sisterhood. It has the surprises. The lovable characters. The tear-jerking moments. And did I mention the food?
Don’t even get me started on my passion for book clubs! Although I guess I already got started on my love of book clubs in this post from last year.
Suffice it to say book clubs = books, food and friends. Basically a perfect recipe in life.
But throwing the perfect book club party can be a little daunting! What should I cook? What music should I play? What wine should I serve? What thought-provoking questions should I throw out to the group?
Don’t worry, that’s the fun part.
If you’ve been debating on your next book club book and have made the (obviously very smart) choice to read Hope on the Inside, I’m going to make your life very easy when it comes to prepping for your book club party.
How, you ask? I made a Hope on the Inside party kit just for the occasion!
 So, grab your best gal pals, your latest quilting or crafting project, and cook the books with recipes inspired by Hope On The Inside. You won’t have to dig very deep into the book to find out about the husband with an affinity for baking! If you need some help getting started with the book discussion, there are helpful suggestions and questions in the back.
Choose savory muffins, a rosemary olive bread, or the very best oatmeal cookies and offer along with iced mint tea and fruit. Because they are the fuel you’ll need for a lovely book discussion, if you ask me.
And in this case, the rosemary won’t be a bad omen. (You’ll know what this means after you get through the first chapter or two).
Download Your Free Party Kit!
If you’d like to have the full Book Club Party Kit simply enter your email address below and the whole kit-n-caboodle will show up in your email a few minutes later! Oh, the magic of the internet!
A Little Teaser
Just to make you drool a little bit, here’s a picture of the wonderful Rosemary Olive Loaf that’s included with the party kit! Serve warm, spread a little butter, slice on the diagonal (because, pretty) and you’ll be in food heaven!

Alright readers, that’s all I’ve got time for today! Book launch weeks are busy – in a good way!
Have a great weekend, Fierce Friends, and maybe bake some oatmeal cookies!
The post Book Club Party Kit for ‘Hope On The Inside’ appeared first on Fierce Beyond 50.
March 27, 2019
Spring Pea, Pesto & Ricotta Dip to Usher in the Season
Now that the ice and howling wind is giving way to warm breezes and crocuses peeping out of the ground, it’s time to get serious about spring flavor. So long, comforting winter stews and roasts. Hello, vibrant and fresh everything!
Some time ago, I discovered an exceptionally delicious flavor combination that The Barefoot Contessa seems to use a lot in the spring. She combined spring peas, herby pesto, and pine nuts all together into a beautiful and delicious salad that hit all the high notes of the flavors of the season. That’s what gave me this idea. It’s a good one!
For this Spring Pea, Pesto & Ricotta Dip, use the herbs you have on hand. If you live in certain climates, you already have all of the herbs popping their heads up from your herb garden. Basil, chives, parsley, mint, you name it. I think a combination of any of these would be excellent to pair with the light and fresh ricotta and the crusty toast points.
To keep this low-calorie and lower-point, I chose to not use any nuts that are traditionally in pesto, I kept the parmesan to a minimum, and I used low-fat ricotta.
When I made this last, it was intended to just be an appetizer and it became the main event. It’s delicious enough to stand on its own and there’s certainly not a better recipe for kicking off Spring!
Here’s how to make it.
.tasty-recipes-image {
float: right; }
.tasty-recipes-yield-scale {
border: 1px solid #979599;
border-radius: 2px;
color: #979599;
margin-left: 3px;
padding: 0 4px;
font-size: 0.7rem; }
.tasty-recipes-scale-container {
float: right;
padding: 0 0 1rem; }
.tasty-recipes-scale-container .tasty-recipes-scale-label {
text-transform: uppercase;
font-size: 0.6rem;
color: #979599; }
.tasty-recipes-scale-container button {
background: transparent;
border: 1px solid #979599;
border-radius: 2px;
color: #979599;
margin-left: 5px;
padding: 2px 4px; }
.tasty-recipes-scale-container button.tasty-recipes-scale-button-active {
color: #353547;
border-color: #353547; }
.tasty-recipes-scale-container button:focus {
outline: none; }
.tasty-recipes-print-button {
background-color: #666677;
display: inline-block;
padding-left: 1em;
padding-right: 1em;
padding-top: 0.5em;
padding-bottom: 0.5em;
text-decoration: none; }
a.tasty-recipes-print-button {
color: #fff; }
a.tasty-recipes-print-button:hover {
color: #fff; }
.tasty-recipes-rating.tasty-recipes-clip-10 {
-webkit-clip-path: polygon(0 0, 10% 0%, 10% 100%, 0% 100%);
clip-path: polygon(0 0, 10% 0%, 10% 100%, 0% 100%); }
.tasty-recipes-rating.tasty-recipes-clip-20 {
-webkit-clip-path: polygon(0 0, 20% 0%, 20% 100%, 0% 100%);
clip-path: polygon(0 0, 20% 0%, 20% 100%, 0% 100%); }
.tasty-recipes-rating.tasty-recipes-clip-30 {
-webkit-clip-path: polygon(0 0, 30% 0%, 30% 100%, 0% 100%);
clip-path: polygon(0 0, 30% 0%, 30% 100%, 0% 100%); }
.tasty-recipes-rating.tasty-recipes-clip-40 {
-webkit-clip-path: polygon(0 0, 40% 0%, 40% 100%, 0% 100%);
clip-path: polygon(0 0, 40% 0%, 40% 100%, 0% 100%); }
.tasty-recipes-rating.tasty-recipes-clip-50 {
-webkit-clip-path: polygon(0 0, 50% 0%, 50% 100%, 0% 100%);
clip-path: polygon(0 0, 50% 0%, 50% 100%, 0% 100%); }
.tasty-recipes-rating.tasty-recipes-clip-60 {
-webkit-clip-path: polygon(0 0, 60% 0%, 60% 100%, 0% 100%);
clip-path: polygon(0 0, 60% 0%, 60% 100%, 0% 100%); }
.tasty-recipes-rating.tasty-recipes-clip-70 {
-webkit-clip-path: polygon(0 0, 70% 0%, 70% 100%, 0% 100%);
clip-path: polygon(0 0, 70% 0%, 70% 100%, 0% 100%); }
.tasty-recipes-rating.tasty-recipes-clip-80 {
-webkit-clip-path: polygon(0 0, 80% 0%, 80% 100%, 0% 100%);
clip-path: polygon(0 0, 80% 0%, 80% 100%, 0% 100%); }
.tasty-recipes-rating.tasty-recipes-clip-90 {
-webkit-clip-path: polygon(0 0, 90% 0%, 90% 100%, 0% 100%);
clip-path: polygon(0 0, 90% 0%, 90% 100%, 0% 100%); }
.tasty-recipes-nutrition ul {
list-style-type: none;
margin: 0;
padding: 0; }
.tasty-recipes-nutrition ul:after {
display: block;
content: ' ';
clear: both; }
.tasty-recipes-nutrition li {
float: left;
margin-right: 1em; }
.tasty-recipes-plug {
text-align: center;
margin-bottom: 1em;
display: flex;
align-items: center;
justify-content: center; }
.tasty-recipes-plug a {
text-decoration: none;
box-shadow: none; }
.tasty-recipes-plug a img {
width: 150px;
height: auto;
margin: 5px 0 0 8px;
display: inline-block; }
@media print {
.tasty-recipes-no-print,
.tasty-recipes-no-print * {
display: none !important; } }
.tasty-recipes {
border: 5px solid #666677;
margin-top: 6em;
margin-bottom: 4em;
}
.tasty-recipes.tasty-recipes-has-plug {
margin-bottom: 1em;
}
.tasty-recipes-plug {
margin-bottom: 4em;
}
.tasty-recipes-print-button {
display: none;
}
.tasty-recipes-image-shim {
height: 69.5px;
clear: both;
}
.tasty-recipes-entry-header {
background-color: #666677;
color: #fff;
text-align: center;
padding-top: 35px;
padding-bottom: 1.5em;
padding-left: 2.5em;
padding-right: 2.5em;
}
.tasty-recipes-entry-header.tasty-recipes-has-image {
padding-top: 0px;
}
.tasty-recipes-entry-header .tasty-recipes-image {
float: none;
text-align: center;
transform: translateY(-115px);
margin-bottom: 1em; /* Decide if we need this */
}
.tasty-recipes-entry-header .tasty-recipes-image img {
-webkit-border-radius: 50%;
-moz-border-radius: 50%;
border-radius: 50%;
border: 5px solid #666677;
height: 150px;
width: 150px;
display: inline-block;
}
.tasty-recipes-entry-header h2 {
font-size: 2em;
font-weight: 400;
text-transform: lowercase;
margin-bottom: 0;
text-align: center;
color: #fff;
margin-top: 0;
padding-top: 0;
padding-bottom: 0;
}
.tasty-recipes-has-image .tasty-recipes-entry-header h2 {
margin-top: -115px;
}
.tasty-recipes-entry-header hr {
border: 1px solid #b7bbc6;
background-color: #b7bbc6;
margin-bottom: 1em;
margin-top: 1em;
}
.tasty-recipes-entry-header div.tasty-recipes-rating {
text-decoration: none;
border: none;
}
.tasty-recipes-entry-header .tasty-recipes-rating:hover {
text-decoration: none;
}
.tasty-recipes-entry-header div.tasty-recipes-rating {
font-size: 1.375em;
display: block;
}
.tasty-recipes-entry-header .tasty-recipes-rating p {
margin-bottom: 0;
}
.tasty-recipes-entry-header span.tasty-recipes-rating {
margin-left: 0.25em;
margin-right: 0.25em;
color: #fff;
}
.tasty-recipes-entry-header .rating-label {
font-style: italic;
color: #b7bbc6;
font-size: 0.6875em;
display: block;
}
.tasty-recipes-entry-header .tasty-recipes-details {
margin-top: 1em;
}
.tasty-recipes-entry-header .tasty-recipes-details ul {
list-style-type: none;
margin: 0;
}
.tasty-recipes-entry-header .tasty-recipes-details ul li {
display: inline-block;
margin-left: 0.5em;
margin-right: 0.5em;
font-size: 1em;
line-height: 2.5em;
color: #fff;
}
@media only screen and (max-width: 520px) {
.tasty-recipes-entry-header .tasty-recipes-details .detail-icon {
height: 0.8em;
margin-top: 0.4em;
}
.tasty-recipes-entry-header .tasty-recipes-details ul li {
font-size: 0.875em;
line-height: 1.75em;
}
}
@media only screen and (min-width: 520px) {
.tasty-recipes-entry-header .tasty-recipes-details .detail-icon {
height: 1em;
margin-top: 0.6em;
}
.tasty-recipes-entry-header .tasty-recipes-details ul li {
font-size: 1em;
line-height: 2.5em;
}
}
.tasty-recipes-entry-header .tasty-recipes-details .tasty-recipes-label {
font-style: italic;
color: #b7bbc6;
margin-right: 0.125em;
}
.tasty-recipes-entry-header .tasty-recipes-details .detail-icon {
vertical-align: top;
margin-right: 0.2em;
display: inline-block;
fill: #ffffff;
}
.tasty-recipes-entry-content {
padding-top: 1.25em;
}
.tasty-recipes-entry-content .tasty-recipes-buttons {
margin-bottom: 1.25em;
margin-left: 1.25em;
margin-right: 1.25em;
}
.tasty-recipes-entry-content .tasty-recipes-buttons:after {
content: ' ';
display: block;
clear: both;
}
.tasty-recipes-entry-content .tasty-recipes-button-wrap {
width: 50%;
display: inline-block;
float: left;
box-sizing: border-box;
}
.tasty-recipes-entry-content .tasty-recipes-buttons a {
text-transform: uppercase;
text-align: center;
display: block;
color: #fff;
background-color: #666677;
font-size: 1em;
line-height: 1.375em;
padding-top: 1em;
padding-bottom: 1em;
font-weight: bold;
margin-top: 0;
border: none;
border-radius: 0;
text-decoration: none;
}
.tasty-recipes-entry-content a img {
box-shadow: none;
-webkit-box-shadow: none;
}
.tasty-recipes-entry-content .tasty-recipes-buttons a:hover {
background-color: #979599;
text-decoration: none;
}
.tasty-recipes-entry-content .tasty-recipes-buttons img {
vertical-align: top;
}
.tasty-recipes-entry-content .tasty-recipes-buttons img.svg-print,
.tasty-recipes-entry-content .tasty-recipes-buttons img.svg-pinterest {
height: 1.25em;
margin-right: 0.375em;
margin-bottom: 0;
background: none;
display: inline-block;
}
@media only screen and (min-width: 520px) {
.tasty-recipes-entry-content .tasty-recipes-button-wrap:first-child {
padding-right: 0.625em;
}
.tasty-recipes-entry-content .tasty-recipes-button-wrap:last-child {
padding-left: 0.625em;
}
}
@media only screen and (max-width: 520px) {
.tasty-recipes-entry-content .tasty-recipes-button-wrap {
width: 100%;
}
.tasty-recipes-entry-content .tasty-recipes-button-wrap:nth-child(2) {
padding-top: 1em;
}
}
.tasty-recipes-entry-content h3 {
text-transform: uppercase;
font-size: 0.75em;
color: #979599;
margin-bottom: 1.5em;
}
.tasty-recipes-entry-content h4 {
font-size: 1em;
padding-top: 0;
margin-bottom: 1.5em;
margin-top: 1.5em;
}
.tasty-recipes-entry-content hr {
background-color: #eae9eb;
border: 1px solid #eae9eb;
margin-top: 1em;
margin-bottom: 1em;
}
.tasty-recipes-entry-content .tasty-recipes-description,
.tasty-recipes-entry-content .tasty-recipes-ingredients,
.tasty-recipes-entry-content .tasty-recipes-instructions,
.tasty-recipes-entry-content .tasty-recipes-keywords {
padding-left: 1.25em;
padding-right: 1.25em;
}
.tasty-recipes-entry-content .tasty-recipes-description p {
margin-bottom: 1em;
}
.tasty-recipes-entry-content .tasty-recipes-ingredients h3 {
clear: none;
}
.tasty-recipes-entry-content .tasty-recipes-ingredients ul,
.tasty-recipes-entry-content .tasty-recipes-instructions ul {
list-style-type: none;
margin-left: 0;
margin-bottom: 1.5em;
padding: 0;
}
.tasty-recipes-entry-content .tasty-recipes-ingredients ul li,
.tasty-recipes-entry-content .tasty-recipes-instructions ul li {
margin-bottom: 0.625em;
list-style-type: none;
position: relative;
margin-left: 2.5em;
line-height: 1.46;
}
.tasty-recipes-entry-content .tasty-recipes-ingredients ul li:before,
.tasty-recipes-entry-content .tasty-recipes-instructions ul li:before {
background-color: #666677;
-webkit-border-radius: 50%;
-moz-border-radius: 50%;
border-radius: 50%;
height: 0.5em;
width: 0.5em;
display: block;
content: ' ';
left: -1.25em;
top: 0.375em;
position: absolute;
}
.tasty-recipes-entry-content .tasty-recipes-ingredients ol,
.tasty-recipes-entry-content .tasty-recipes-instructions ol {
counter-reset: li;
margin-left: 0;
padding: 0;
}
.tasty-recipes-entry-content .tasty-recipes-ingredients ol li,
.tasty-recipes-entry-content .tasty-recipes-instructions ol li {
list-style-type: none;
position: relative;
margin-bottom: 1em;
margin-left: 2.5em;
line-height: 1.46;
}
.tasty-recipes-entry-content .tasty-recipes-ingredients ol li:before,
.tasty-recipes-entry-content .tasty-recipes-instructions ol li:before {
content: counter(li);
counter-increment: li;
position: absolute;
background-color: #666677;
-webkit-border-radius: 50%;
-moz-border-radius: 50%;
border-radius: 50%;
height: 1.45em;
width: 1.45em;
color: #fff;
left: -1.25em;
transform: translateX(-50%);
line-height: 1.5em;
font-size: 0.6875em;
text-align: center;
top: 0.1875em;
}
@media only screen and (max-width: 520px) {
.tasty-recipes-entry-content .tasty-recipes-ingredients ol,
.tasty-recipes-entry-content .tasty-recipes-instructions ol {
margin-left: 0;
}
}
.tasty-recipes-entry-content .tasty-recipes-notes {
padding: 1.25em;
background-color: #edf0f2;
}
.tasty-recipes-entry-content .tasty-recipes-notes ol {
counter-reset: li;
margin-left: 0;
padding: 0;
}
.tasty-recipes-entry-content .tasty-recipes-notes ul {
margin-left: 0;
padding: 0;
}
.tasty-recipes-entry-content .tasty-recipes-notes p,
.tasty-recipes-entry-content .tasty-recipes-notes ul li,
.tasty-recipes-entry-content .tasty-recipes-notes ol li {
background-color: #fff;
padding-left: 1.5625em;
padding-right: 1.5625em;
padding-top: 1.25em;
padding-bottom: 1.25em;
position: relative;
-webkit-clip-path: polygon(20px 0, 100% 0, 100% 100%, 0 100%, 0 20px);
clip-path: polygon(20px 0, 100% 0, 100% 100%, 0 100%, 0 20px);
margin-bottom: 1.5em;
}
@media only screen and (min-width: 520px) {
.tasty-recipes-entry-content .tasty-recipes-notes p,
.tasty-recipes-entry-content .tasty-recipes-notes ul li,
.tasty-recipes-entry-content .tasty-recipes-notes ol li {
padding-left: 2.5em;
}
.tasty-recipes-entry-content .tasty-recipes-notes p:before,
.tasty-recipes-entry-content .tasty-recipes-notes ul li:before {
content: 'i';
display: block;
background-color: #666677;
-webkit-border-radius: 50%;
-moz-border-radius: 50%;
border-radius: 50%;
height: 1.3em;
width: 1.3em;
font-size: 0.75em;
line-height: 1.3em;
text-align: center;
color: #fff;
position: absolute;
left: 1.167em;
top: 1.9em;
}
.tasty-recipes-entry-content .tasty-recipes-notes ol li:before {
content: counter(li);
counter-increment: li;
position: absolute;
background-color: #666677;
-webkit-border-radius: 50%;
-moz-border-radius: 50%;
border-radius: 50%;
height: 1.45em;
width: 1.45em;
color: #fff;
left: 2em;
transform: translateX(-50%);
line-height: 1.5em;
font-size: 0.6875em;
text-align: center;
top: 2em;
}
}
.tasty-recipes-entry-content .tasty-recipes-notes p:last-child {
margin-bottom: 0;
}
.tasty-recipes-entry-content .tasty-recipes-other-details {
background-color: #edf0f2;
padding: 0 1.25em 1.25em;
}
.tasty-recipes-entry-content .tasty-recipes-other-details ul {
color: #666677;
display: flex;
flex-wrap: wrap;
font-size: 0.85rem;
justify-content: center;
list-style: none;
margin-bottom: 0;
}
.tasty-recipes-entry-content .tasty-recipes-other-details ul li {
margin: 0 0.5rem;
list-style: none;
}
.tasty-recipes-entry-content
.tasty-recipes-other-details
ul
li
.tasty-recipes-label {
font-style: italic;
}
.tasty-recipes-entry-content .tasty-recipes-other-details .detail-icon {
fill: #666677;
vertical-align: top;
margin-right: 0.2em;
display: inline-block;
}
@media only screen and (max-width: 520px) {
.tasty-recipes-entry-content .tasty-recipes-other-details .detail-icon {
height: 0.8em;
margin-top: 0.4em;
}
.tasty-recipes-entry-content .tasty-recipes-other-details ul li {
font-size: 0.875em;
line-height: 1.75em;
}
}
@media only screen and (min-width: 520px) {
.tasty-recipes-entry-content .tasty-recipes-other-details .detail-icon {
height: 1em;
margin-top: 0.6em;
}
.tasty-recipes-entry-content .tasty-recipes-other-details ul li {
font-size: 1em;
line-height: 2.5em;
}
}
.tasty-recipes-entry-content .tasty-recipes-keywords {
background-color: #edf0f2;
padding-bottom: 1em;
padding-top: 1em;
}
.tasty-recipes-entry-content .tasty-recipes-keywords p {
font-size: 0.7em;
font-style: italic;
color: #979599;
margin-bottom: 0;
}
.tasty-recipes-entry-content .tasty-recipes-keywords p span {
font-weight: bold;
}
.tasty-recipes-nutrifox {
text-align: center;
margin: 0;
}
.nutrifox-label {
background-color: #edf0f2;
}
.tasty-recipes-nutrifox iframe {
width: 100%;
display: block;
margin: 0;
}
.tasty-recipes-entry-content .tasty-recipes-nutrition {
padding: 1.25em;
color: #666677;
}
.tasty-recipes-nutrition .tasty-recipes-label {
font-style: italic;
color: #b7bbc6;
margin-right: 0.125em;
font-weight: 400;
}
.tasty-recipes-nutrition ul {
text-align: center;
}
.tasty-recipes-nutrition li {
float: none;
display: inline-block;
line-height: 2em;
}
.tasty-recipes-entry-footer {
background-color: #666677;
padding-top: 1.5625em;
padding-bottom: 1.25em;
padding-left: 2.5em;
padding-right: 2.5em;
text-align: center;
}
.tasty-recipes-entry-footer .tasty-recipes-footer-content {
display: inline-block;
}
.tasty-recipes-entry-footer img {
width: 65px;
}
.tasty-recipes-entry-footer h3 {
color: #b7bbc6;
font-size: 1.25em;
line-height: 2.25em;
margin-top: 0.5em;
margin-bottom: 0.125em;
padding: 0;
line-height: 1em;
}
.tasty-recipes-entry-footer p {
margin-bottom: 0;
color: #fff;
font-size: 0.75em;
}
.tasty-recipes-entry-footer p a {
color: #fff;
text-decoration: underline;
box-shadow: none;
border-bottom: none;
}
.tasty-recipes-entry-footer:after {
content: ' ';
display: block;
clear: both;
}
@media only screen and (max-width: 520px) {
.tasty-recipes-entry-footer h3 {
margin-top: 0.5em;
margin-bottom: 0.5em;
}
.tasty-recipes-entry-footer {
text-align: center;
}
}
@media only screen and (min-width: 520px) {
.tasty-recipes-entry-footer img {
float: left;
}
.tasty-recipes-entry-footer h3,
.tasty-recipes-entry-footer p {
margin-left: 90px;
clear: none;
text-align: left;
}
}
/* Print view styles */
.tasty-recipes-print-view {
font-size: 11px;
background-color: #fff;
}
.tasty-recipes-print-view .tasty-recipes-print-button {
display: inline-block;
}
.tasty-recipes-print {
padding: 0;
font-size: 11px;
}
.tasty-recipes-print-view .tasty-recipes {
margin-top: 1em;
}
.tasty-recipes-print .tasty-recipes-entry-header {
background-color: inherit;
color: inherit;
padding-bottom: 0;
padding-left: 1em;
padding-right: 1em;
padding-top: 1em;
}
.tasty-recipes-print .tasty-recipes-entry-header .tasty-recipes-image {
float: right;
transform: none;
}
.tasty-recipes-print.tasty-recipes-has-image .tasty-recipes-entry-header h2 {
margin-top: 0;
}
.tasty-recipes-print .tasty-recipes-entry-header h2 {
color: inherit;
margin-bottom: 0.5em;
}
.tasty-recipes-print .tasty-recipes-entry-header hr {
display: none;
}
.tasty-recipes-print .tasty-recipes-entry-header span.tasty-recipes-rating {
color: #000;
}
.tasty-recipes-print .tasty-recipes-entry-header .tasty-recipes-details ul {
padding: 0;
clear: none;
}
.tasty-recipes-print .tasty-recipes-entry-header .tasty-recipes-details ul li {
line-height: 1.5em;
color: #000;
}
.tasty-recipes-print
.tasty-recipes-entry-header
.tasty-recipes-details
.detail-icon {
display: none;
}
.tasty-recipes-print .tasty-recipes-entry-content img {
max-width: 50%;
height: auto;
}
.tasty-recipes-print
.tasty-recipes-entry-content
.tasty-recipes-ingredients
ul
li,
.tasty-recipes-print
.tasty-recipes-entry-content
.tasty-recipes-ingredients
ol
li {
margin-bottom: 0.25em;
line-height: 1.1;
}
.tasty-recipes-print
.tasty-recipes-entry-content
.tasty-recipes-instructions
ul
li,
.tasty-recipes-print
.tasty-recipes-entry-content
.tasty-recipes-instructions
ol
li {
margin-bottom: 0.5em;
line-height: 1.1;
}
.tasty-recipes-print
.tasty-recipes-entry-content
.tasty-recipes-ingredients
ul
li:before,
.tasty-recipes-print
.tasty-recipes-entry-content
.tasty-recipes-instructions
ul
li:before {
top: 0.3em;
}
.tasty-recipes-print
.tasty-recipes-entry-content
.tasty-recipes-ingredients
ol
li:before,
.tasty-recipes-print
.tasty-recipes-entry-content
.tasty-recipes-instructions
ol
li:before {
top: 0;
}
.tasty-recipes-print .tasty-recipes-entry-content .tasty-recipes-notes p,
.tasty-recipes-print .tasty-recipes-entry-content .tasty-recipes-notes ul li,
.tasty-recipes-print .tasty-recipes-entry-content .tasty-recipes-notes ol li {
padding-top: 0;
padding-bottom: 0;
background-color: #edf0f2;
clip-path: none;
}
.tasty-recipes-print .tasty-recipes-entry-content .tasty-recipes-notes p:before,
.tasty-recipes-print
.tasty-recipes-entry-content
.tasty-recipes-notes
ul
li:before {
top: 0;
clip-path: none;
margin-bottom: 0.5em;
}
@media print {
.tasty-recipes-print .tasty-recipes-entry-footer img {
display: none;
}
}
.tasty-recipes-print .tasty-recipes-source-link {
text-align: center;
}

Spring Pea, Pesto & Ricotta Dip to Usher in the Season
Author: Marie Bostwick
 Prep Time: 15 Total Time: 15
  Yield: 4
  Print Recipe
  Pin Recipe
Ingredients
1 cup thawed frozen peas
1 cup garden herbs, plus more for garnish (I used a mix of chives, mint, and parsley, but basil would be excellent too!)
1/4 cup chopped Parmesan
1 garlic clove
¼ cup olive oil, plus more for garnish drizzle
Kosher salt and freshly ground black pepper, to taste
1 pound low fat ricotta
Flaky sea salt like Maldon, for garnish
Toasted bread, for serving (I went above and beyond here and made the super easy and super delicious no-knead dutch oven bread from Girl Versus Dough and then sliced it and toasted it with olive oil). Pita chips or even crudité would be an excellent option as well.

Instructions
In a food processor, blend together the peas, herbs, Parmesan cheese and garlic clove. Purée until almost smooth (a little texture is a good thing here!). With the processor on, slowly add the olive oil to emulsify and process until you have a chunky paste. Season with salt and pepper.

Add a pillow-like cloud of ricotta in the middle of a pretty serving bowl. Add the pesto on top. To finish, gracefully swirl the pesto into the ricotta and garnish with herbs, pepper and flaky sea salt, then serve with toasted bread, pita or crudité.

Keywords: pea, ricotta, healthy spring recipes, appetizer ideas

Did you make this recipe?
Tag @fiercebeyond50 on Instagram and hashtag it #fiercebeyond50
The post Spring Pea, Pesto & Ricotta Dip to Usher in the Season appeared first on Fierce Beyond 50.
March 26, 2019
The Book Launch for Hope On The Inside (and a special surprise)
My latest book, Hope on the Inside, is released today.
Though this is my fifteenth time at this particular rodeo, celebrating a book birthday is always exciting, the culmination of at least a year of work. It’s true. Back when I did that sort of thing, it took me less time to gestate a tiny human than it takes me to birth a book.
As with my real children, none of my literary offspring can claim the status of favorite child. Every novel I’ve penned holds a special place in my heart; they’re all my favorites.
But I feel like there’s something extra special about Hope on the Inside. Perhaps it has something to do with my particular stage of life. Perhaps it has something to do with the times we’re living in.
HOPE ON THE INSIDE
The title of the book is something of a play on words. Hope is not only the name of my principal character, it’s a quality she brings with her as she begins teaching crafting and quilting to women in a state correctional facility. Standing at a crossroads in her own life, Hope doesn’t always get it right. She falters more than once and sometimes gets things spectacularly wrong. But she tries. And she cares. Others see this and so her name suits her.
I won’t get any deeper into the plot than that today. I do think it’s a story you’ll enjoy and naturally I would love it if you’d read the book. But I’ve got more than commerce on my mind right now. Today my thoughts are centered on hope, something we all need but which so often seems to be in short supply.
Happily Ever After
A few years back, I wrote an article titled “The Case for a Happy Ending” for Publishers Weekly magazine. My premise was this: in spite of the complexities of our post-modern age, and perhaps indeed because of it, the world needs books with happy endings. “In a world devoid of hope, what intelligent being would attempt to tackle the seemingly insurmountable problems of our age?”
In short, hope is something that everyone needs. When days seem dark, and odds seem insurmountable, and the world seems bankrupt, we bank on hope. We have to. Hope is the thing that keeps us going when times are tough. It’s the stuff that dreams are made of. It is essential to human existence, right up there with food, and water, and oxygen.
As I was writing this book, a short but powerful directive kept popping into my head: share hope.
When I write my books, stories of women experiencing crossroads, conflict, and crisis, I end them happily. Always. That’s how I share hope with a world that is desperately in need of it.
But as I penned Hope Carpenter’s story, I kept thinking about all the other ways, large and small, that people share hope. Some people share hope through the work they do, or the time they spend volunteering, or by donating money or goods to worthy causes. Those are all wonderful ways to share hope with others.
But sharing hope can also be as simple as speaking words of encouragement, comfort, or affirmation to someone in need of it.
Or better yet, writing them. 
SHARING HOPE WITH WORDS
You might remember a post I wrote a while back about reviving the lost art of letter writing. In it, I explained that letters are a wonderful way, maybe even the best possible way, to let someone know you care.
When we share hope and encouragement with others through the written word, we’re sharing something tangible, something that people can actually hold in their hands as well as their hearts, and refer to again and again in moments of need.
There’s a file in my office, filled with letters of hope that I’ve kept through the years. Some came from family and close friends, some came from readers who I’ve not yet had the pleasure of meeting face to face. Some of those letters are long, rambling, and descriptive. Others are short and pithy, only a couple of sentences long. But, long or short, I treasure them. When I get down and discouraged, when I doubt my talent and purpose, when despair about the hopeless state of the world and my poor place in it lays me flat, I read those letters. Doing so renews my strength. It helps me get up from the floor, roll up my mat, and keep walking.
#sharehope
With that in mind, I decided to celebrate this book birthday by encouraging others to “share hope” with people they know.
Readers who attend my upcoming Hope on the Inside book tour events, or participate in my Virtual Book Launch Party, will receive a small gift from me to help them do exactly that. But I also wanted to give another “share hope” gift to all of my readers, in hopes that the message will spread.
So, here it is. My book birthday gift to you, an easy but potentially meaningful way for you to share hope with someone else.

Fill in your email at the bottom of this page, and I’ll send you this card. (Well, not this card. A card like this that you can decorate yourself.) Hopefully, it’s existence in your inbox might will give the a nudge to write to someone who is a little low on hope.
Print it out on your computer. (Regular paper will work just fine but if you’ve got some slightly heavier paper or cardstock, that would be extra nice. I bought some scrapbook paper from the craft store and it worked really well.) Use pencils, or crayons, or markers, or paint to turn your card into a one-of-a-kind little piece of art. Write a note to someone you care about who is going through a hard time. Share words of encouragement, comfort, and affirmation. Tell them about all the good you see in them, the unique qualities and gifts that make them special.
Note: when I travel (as I am right now) I scroll social media far more than I do regularly. (You know how it is, you have 5 minutes standing in line at the hotel. Or 10 minutes waiting for the Uber to pick you.) So I would love to know how you’ve taken the opportunity to #sharehope with others. Here’s how you can do that!
(1) take a picture of YOUR decorated Hope On The Inside stationary and
(2) post it on your social media and tag Fierce Beyond 50 or Marie Bostwick
AND use the hashtag #sharehope in your post and I’ll share them!}
Wouldn’t it be wonderful if we could #sharehope with scores, with hundreds, with thousands of people who would cherish a few words of hope and encouragement? Yes. I think so too. In fact, I can’t think of a better way to celebrate this book birthday.
So, let’s do it! Let’s #sharehope!

The post The Book Launch for Hope On The Inside (and a special surprise) appeared first on Fierce Beyond 50.
March 20, 2019
Growing in Knowledge Just for the Sake of It
It’s my birthday this week. Letting my new age sink in and embracing this next year wholeheartedly has got me thinking about a few things.
As I reflect back on what I’ve accomplished with my life, what I’m still working on, and what I hope to do before I cross the finish line, there are a few main themes that run through it all.
Some are more prevalent during certain times. Sisterhood. Motherhood. Family. Career. Creativity. Quilting. Glamping. Simon Baker. Chocolate. I could go on.
Learning for a Lifetime
One of the main themes that sticks out with festive flare and fireworks is the idea of learning for a lifetime. I know that sounds broad. You can learn all sorts of things every day just by reading a newspaper or scrolling Google news.
What I’m talking about is intentional learning. Reaching for knowledge just for the sake of it. Spending time feeding your brain and absorbing every ounce.
They say that humans learn the most in their first three years of life. That sounds fairly accurate to me, so I won’t dispute that whatsoever. But I would like to add that learning later in life has its benefits as well. Keeping your mind sharp, for one. Or enjoying the schoolhouse feeling of lightbulbs that go off in your head when you finally “get” something.
You can Always Learn More
Sometimes it’s easy to just decide that we know so much, how could we ever fit more in our brains? We’ve already learned so much and are doing just fine with the knowledge we’ve already amassed, why bother learning more? Especially if it’s not going to bring us a direct benefit?
Take algebra, for example. A few months ago, I decided that I needed to learn algebra. No, it didn’t really even interest me (I’m more of a “word” person.) And no, it’s really not something I am going to use in every day life (hold your judgement, sweet math teachers). I ordered the book on algebra because I just wanted to learn something new. Perhaps something I should have years ago. The act of learning is so fulfilling and exciting and human.
No matter how clever and well-read we think we are, we are never past a place in our lives when we can’t benefit from learning and seeking knowledge.
How I Accidentally Got Suckered In To Learning Irish
A friend recently was musing that as she is recovering from surgery, she’s decided that instead of convalescing on her couch for six to eight weeks, she’s going to take the time to learn a language. Should it be Mandarin? Irish? Latin?
I tried to convince her to do something practical, like Spanish.
She ignored me.
And then something weird happened.
She convinced ME to learn Irish with her! Irish! Of all the languages that probably won’t come in handy for me, it’s Irish. It’s also incredibly hard to master because the sounds and structure are just so different than English and the Romance languages.
What to Learn Next
Here are a few ideas if you’re in the market for some good, old fashioned knowledge.
Learn a language.
Learn to dance. Zumba or river dancing, anyone? What about ballroom dancing to keep your mind sharp?
Learn a craft. Quilting, crocheting, sewing, the list goes on for about a million pages.
Learn calligraphy. (This book is where I would start!)
Learn to make your own spice blends. (I’m talking to you, culinary goddesses.)
Learn more Bible verses. There is more knowledge and wisdom packed in those pages than textbooks. This one takes time and reflection and prayer. But it’s worth the effort, if you ask me.
Learn from history. Pick up a biography and learn about famous people in history. If you need a list, just check out my list of biographies of women who changed the world. It’s a good place to start.
Learn about yourself. Try a 23 and Me test to learn about your ancestry and general health and wellness!
Learn about poetry appreciation.
Learn how to make a sourdough starter.
Learn how to choose a glass of wine from a wine list (and how to pronounce it!).
Learn how to grow heirloom tomatoes (this was a big FAIL for me, but I did learn a lot through the process).
The possibilities are endless here, Fierce friends. The point is to go for it and enrich your life through knowledge. What will you learn next?
The post Growing in Knowledge Just for the Sake of It appeared first on Fierce Beyond 50.
Spring Cleaning: 15 Minutes To Freshen Each Room In Your House
I’m gearing up for my book tour, which is always a season of travel for me. (Side note: OH MY GOODNESS MY NEW BOOK COMES OUT IN LESS THAN A WEEK!).
Travel is many good things: fun, adventurous, new and an excuse to tote around my adorable carry-on. But it’s also some not fun things when you’re living a life that’s more disjointed than normal. There’s not a lot of routine to be had on the road.
It also means leaving my house for stretches of time. And I’m not alone when I say that I like to come home to a clean house. Especially after the celestial snow goddesses have wreaked havoc on my property for the last few months.
I like to come home to gleaming floors. And sparkling windows. And bright white grout. And Marie Kondo-worthy closet organization. The hard part is getting it all done!
All of this is to say that cleaning is on my mind.
(to judge whether this time of the year has the same effect on me, see my clean out post from last year.)
spring time
I’ve got another thing on the mind too: timed tasks. As I mentioned in my blog on productivity, I am a sucker for a chicken timer.
15-minutes is a short time, it feels manageable. An hour, that’s a long time. But 15 minutes? I can find 15 minutes. I bet you feel like you can find fifteen of those minutes too.
So what can you do in 15 minutes? How many emails can you delete? How much of that stack of mail can you trash? Can you get everything cleaned out of your car?
So I went and searched the wisdom of the organizational gurus. This is because I am not a guru. Honestly, I just aspire to know where all my shoes are at one time. I searched for organizational or cleaning tasks that can be done in 15 minutes, and I found so many! Those gurus really come through for you when you need them, huh?
So I’m sharing and the subject is all cleaning (don’t get me started on the organization part. I’m not organized enough right now to share them!) Here’s three sets of 15-minute tasks you can do to spruce up your house before those beautiful spring breezes start.
Spring cleaning your kitchen

Minute 1, 2 & 3: Dust the top of cabinets, the refrigerator, all surfaces starting at the top of the room and working your way down!
Minutes 4, 5, & 6: Get microwave safe bowl or cup, fill about 1/3 with vinegar, 1/3 with water and leave 1/3 room empty. Put in microwave for 3 minutes. While that runs, take out the tray from the bottom of your toaster, dump in the trash and rinse off with hot sponge. Take any washable components of the coffeemaker and put in the dishwasher. Now the microwave dings, wipe the inside with your warm sponge. Take the trashbag out of the trashcan, set on the ground. Wipe down the inside and outside of the trashcan and THROW AWAY that sponge. Tie up the bag and put a fresh one in the freshened up can. Toss a dash of baking soda in the bottom of the fresh bag to pull out any odors.
Minutes 7 & 8: Take the bowl you just had in the microwave, fill it with vinegar and set open side up on the top rack of your dishwasher. Put in soap or a pod and run a cycle – you can leave whatever dishes (and that coffee pot) in there while it runs!
Minutes 9-15: I know this is the longest step, but it’s worth it! Take everything out of the refrigerator, set it on the counter. Make some hot soapy water and use a new sponge and wipe down all the shelves and doors and everything else. Then put everything back in the fridge (do take this opportunity to trash anything that’s obviously old or expired, but don’t think too hard.) Then use that hot, soapy water to wipe down the countertops where you just had everything.
Voila! With the exception of emptying the dishwasher you’re finished for today.
Spring cleaning your master bathroom
Minutes 1 & 2: Climb up and dust those high surfaces, the tops of your cabinets, the tops of your shower stalls, etc.
Minutes 3 & 4: Time to clean the shower head. If it’s a wand that’s removable set it in a bowl of vinegar and leave overnight, if it’s attached then pour vinegar in a ziploc bag and tape or tie or otherwise attach the bag over the showerhead and leave soaking overnight.
Minutes 5 – 9: Turn off the lights, and then take apart whatever lighting you have and wash the glass/plastic parts (away from the electricity!) with soapy water. Maybe those are sconces, maybe it’s one large rectangular over-the-mirror light – whatever it is take it apart, dust and give a little scrubbing love to everything and then screw it all back together and turn the lights on!
Minutes 10, 11, 12: Spend a few quick minutes moving items from the shelves to the countertops. Then wipe off those shelves! As you’re moving items back take quick stock and throw away anything obvious but don’t spend too much time, gotta be fast.
Minutes 12 – 14: For your last few minutes take Windex and clean the mirror and windows. Many miss cleaning bathroom windows because they are frosted or obscured glass. We’re past daylight savings time so help the light shine bright through those windows!
Minute 15: Run a load of laundry with the bathmat, shower curtain (the pretty exterior one, but make sure it’s washable!) and any other linens in the bathroom that aren’t laundered regularly.
Voila! Move that load of laundry to the dryer and put away, but otherwise you’re finished.
Spring cleaning your master bedroom

Get excited – the bedroom has the least steps of any other room
Minutes 1, 2 & 3: Start by dusting all those high places again – curtain rods, tops of dressers, backs of TVs, ceiling fan blades – all the tall things you might otherwise skip with the duster.
Minute 4 & 5: Start a load of laundry with your curtains, any (washable!) shams that aren’t part of your regular washing routine, the decorative blanket you keep on top of the comforter, anything else that might apply to your room.
Minute 6-10: Clean those windows and any other glass or mirrors you have in your room
Minute 11-15: Turn the lights off and take down those globes or sconces whatever light fixtures you have and give them a light scrub with some hot soapy water. Then place them back and turn on the lights!
Voila! (And I bet I don’t even have to clarify about that load of laundry this time.)
Now pour yourself a beverage and take a small walk around your house and see how much you’ve accomplished. And all in less than an hour in total. Just marvelous!

The post Spring Cleaning: 15 Minutes To Freshen Each Room In Your House appeared first on Fierce Beyond 50.