Marie Bostwick's Blog
October 6, 2025
Easy Herb Rub Pork Sirloin Roast

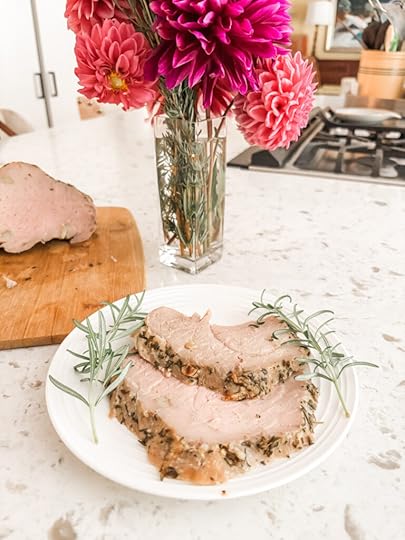
A simple herb rub with plenty of garlic infuses this Easy Pork Sirloin Roast with can’t-miss flavor! A terrific way to prepare an affordable Costco favorite. Great for family meals or company dinners. So easy! And so good!
Easy Pork Sirloin Roast – Great Recipe for A Costco Favorite!Whenever I go to Costco, I head straight for the meat department to buy meat, fish, and poultry. They’ve got terrific prices that make it easy to stock up.
One of my favorite items is the four-pack Pork Sirloin Roast. They’re a real bargain and freezer staple for our family.
Each roast weighs about two pounds. That’s the perfect size to feed four people, or just my husband and me with leftovers. If we’ve got extra guests for dinner, as happened recently, I make two.
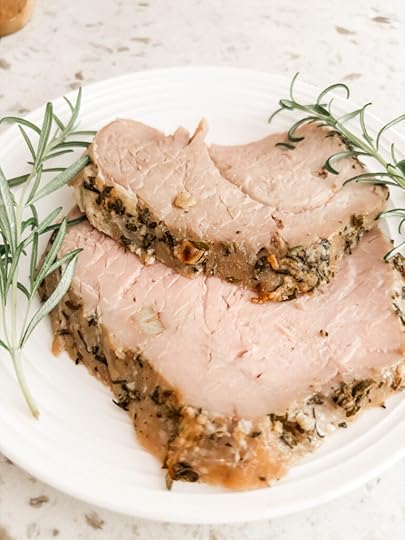
This simple fresh herb rub is one of my favorite ways to prepare pork sirloin roast. It’s crazy easy and the results are always tender, juicy, and mouth-wateringly flavorful. It’s second only to my Perfect Boston Butt Pork Roast.
However, this pork sirloin was my recipe of choice for the final company dinner I hosted in our old house. It earned rave reviews and requests for second and even third helpings. It’s that good! And so easy.
Scroll down and you’ll see what I mean.
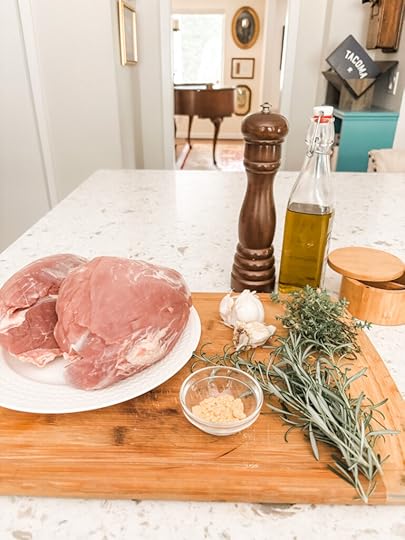
Ingredients for Easy Herb Rub Pork Sirloin Roast
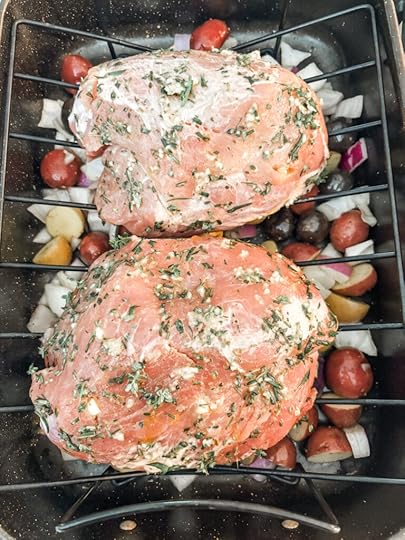
Though I made two roasts when I photographed this recipe, the amounts you’ll find in the recipe below are for one roast. Just double it up if you want to cook an extra pork sirloin roast.
Pork Sirloin Roast – Weight should be about a pound and a half to two pounds. Costco’s prices are hard to beat, but you can buy at any supermarket. Just make sure that your pork sirloin roast is boneless. Cooking times would be very different for a bone-in cut.Garlic – Slivered, peeled garlic cloves will actually be stuffed into the roast to help infuse it with flavor. It adds a lot, so I wouldn’t skip this part.Fresh Herbs – I love rosemary and thyme for this recipe. With its robust flavor and fragrance, rosemary in particular brings a lot to the party. But you could also use other fresh herbs, including oregano, sage, or even tarragon. Parsley can work too, but it’s fairly mild in flavor, so be sure to pair it with a more strongly flavored herb if you use it.Dry mustard – Powdered mustard combined with the herbs adds a nice little zing to the rub. If you dislike mustard, you could substitute smoked or regular paprika.Olive oil – You can also sub just about any neutral-flavored oil, including vegetable, corn, canola, grapeseed, or safflower oil.Kosher salt – Kosher is my go-to choice for salt. I like the way the coarse grains provide little pops of flavor as I’m eating. If you substitute regular table salt, reduce the amount of salt by about half.Ground pepper – if at all possible, grind it fresh. It really does taste better.Prepping and Cooking Easy Pork Sirloin RoastThis is such a simple and delicious recipe. The instructions below are straightforward and practically foolproof. But I do have a couple of tips.
The first step is to pat the pork sirloin roast dry with clean paper towels. That will make it easier for the meat to absorb the flavors of the herb rub.
As I said, garlic adds a lot to this recipe, so don’t skip that part. And if you want to add extra garlic, feel free to add an additional clove or two. You’d have a hard time using too much.
Be sure to use large, peeled garlic cloves, and slice each one into three or four slivers.
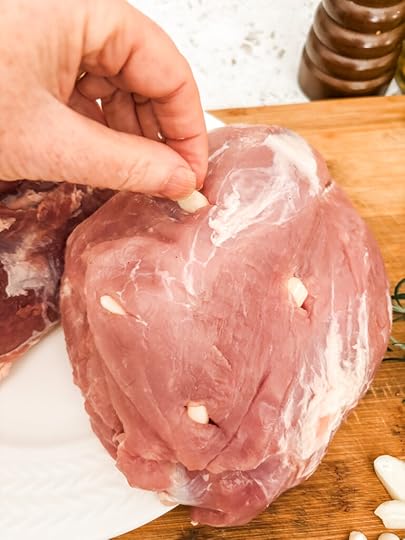
Use the tip of a sharp knife to cut pockets into the roast, and stuff a garlic sliver into each pocket. Don’t be afraid to make some of the pockets deep. You want the garlic flavor to infuse deep into the roast, not just on the surface.
The herb rub goes on next. After applying it, let the pork sirloin roast sit in the fridge for at least an hour before cooking. If you have time, let it sit for several hours or even overnight. More time to rest and absorb the rub will give you an even more flavorful result.
After taking it out of the oven, let the roast rest on the counter for ten to fifteen minutes before slicing. That will give the juices time to absorb back into the meat, which will make it more tender. If you’re worried about it getting too cool, tent the roast with foil while it rests.
What To Serve with Easy Pork Sirloin RoastTurning this recipe into a one-pan dinner is easy.
Cut up potatoes, onions, or other root veggies and put them in the bottom of the roasting pan. Then drizzle on some olive oil, sprinkle with a little Kosher and fresh ground pepper, and give them a stir. If you like, you can stir in a few more chopped herbs as well.
Place the pork roast on a rack over the veggies. As the pork roast cooks, those lovely herb and garlic juices will drip down onto the vegetables to help flavor them. Cooking your main dish and side dish simultaneously is a huge time saver.
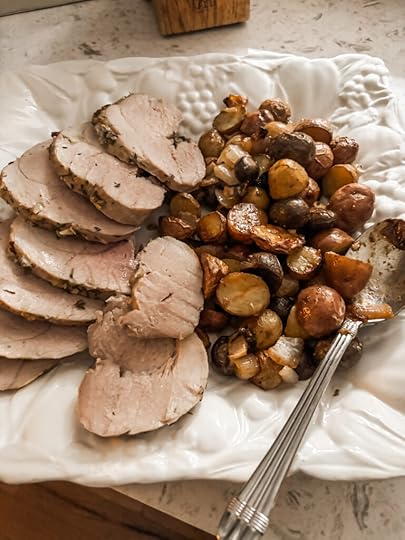
Serve slices of the pork alongside the potatoes or veggies. Add a green salad and some nice, crusty bread, and dinner is served!
This easy pork sirloin roast is a satisfying meal your friends and family will love. Give it a try soon!
Print Easy Herb Rub Pork Sirloin Roast Author: Marie Bostwick
  Yield: 4 to 5 servings
  Print Recipe [image error] Pin Recipe const share_pin_buttons = document.getElementsByClassName( 'share-pin button' ); if ( share_pin_buttons ) { for ( let share_key = 0; share_key < share_pin_buttons.length; share_key++ ) { share_pin_buttons[share_key].addEventListener( 'click', (e) => { e.stopPropagation(); window.open(e.target.dataset.href,'targetWindow','toolbar=no,location=no,status=no,menubar=no,scrollbars=yes,resizable=yes,width=500,height=500'); return false; } ); } } Ingredients 1.5 to 2lb boneless pork sirloin roast3 to 4 large cloves garlic, peeled and slivered (3 or 4 slivers per clove)2 T fine chopped fresh rosemary1 T fresh thyme leaves2 tsp ground dry mustard2 T olive oil1 tsp Kosher salt½ tsp fresh ground pepperOptional – 1 lb potatoes and/or other root vegetables, drizzled with olive oil and seasoned with salt and pepper, to cook under the pork roast. See post for suggestions. Cook Mode Prevent your screen from going dark Instructions Use paper towels to pat the surface of the pork sirloin roast dry.Use the tip of a sharp knife to cut pockets all around the pork and at varying depths. Shove a sliver of garlic into each pocket.In a small bowl, stir together rosemary, thyme, mustard, olive oil, Kosher salt, and fresh ground pepper. Rub the herb mixture over the roast on all sides. Place the roast in the refrigerator to rest for at least one hour, or up to overnight.When ready to cook the roast, preheat the oven to 350 degrees. Place the roast in a deep roasting pan on a rack. (If using, place optional prepared potatoes or vegetables in the pan beneath the rack.)Place roast in the preheated oven and cook for 60 to 90 minutes, until the interior temperature reaches 145 degrees.Remove pan from oven. Allow the roast to rest for 10-15 minutes before slicing and serving.
  Did you make this recipe?
 Share a photo and tag us — we can't wait to see what you've made!


September 29, 2025
Creamy Tomato and Lentil Slow Cooker Soup: Inspired by the NYT Recipe

Fresh tomato, basil, spices, and red lentils, simmered in a savory broth. Nothing could be more delicious, or easier to make, than this Creamy Lentil and Tomato Slow Cooker Soup. It’s my version of a favorite, 5-star NYT recipe.
No Time to Cook? Creamy Tomato and Lentil Slow Cooker Soup to the Rescue!Sometimes, even though you have zero time to cook, you still want to.
That’s the boat I was in a couple of weeks ago.
We’d just moved into a new house and everything was understandably chaotic. The fact that I was leaving town for ten days of book tour events a week after the move wasn’t helping.
However, wanting to start life in our new house off on the right foot, I asked the vicar of our church to come and bless the house. His only availability was in the evening, so naturally I invited him to stay for dinner.
We’d only moved in four days before. Half my kitchen was still in boxes. If I had decided to pick up a pizza or takeout Thai, the vicar would have understood. He’s a good guy.
But I didn’t want to.
He was to be the very first guest in our new home. Though I had zero time and couldn’t find my garlic press, favorite skillet, or the good wine glasses, I still wanted to serve him a proper, home-cooked meal.
Fortunately, I had been able to locate my trusty slow cooker. It was one of the first things I’d unpacked.
And though I couldn’t find the box with my cookbooks, I had one of my favorite NYT-inspired slow cooker recipes all but memorized. That’s understandable, because this Creamy Tomato and Lentil Slow Cooker Soup really is memorable.
And when you’re short on time but still want to cook? Well, it’s a lifesaver!
Scroll on down, you’ll see what I mean.
Simple, Fresh Ingredients for the Best Creamy Tomato and Lentil Slow Cooker Soup

My recipe for creamy tomato and lentil soup is slightly different than the original New York Times version it was inspired by.
However, it still features the fresh, flavorful veggies and herbs that make this five-star soup so mouthwateringly good. Including…
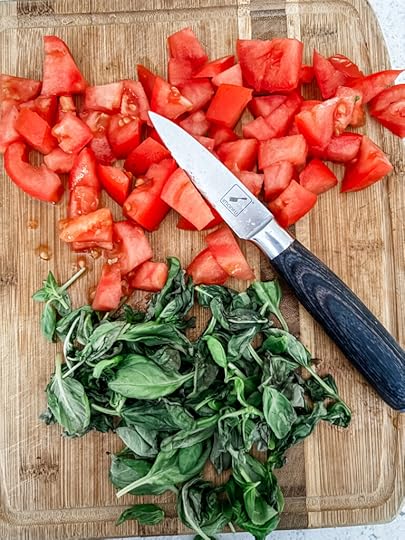
Tomatoes – Fresh tomatoes are the star of the show here! You’ll use more than a pound and a half, which means your soup will be loaded with tons of bright, beautiful tomato flavor. Use any kind of tomato you want – Beefsteak, Romas, cherry, or heirlooms. Just make sure they’re nice and ripe.Basil – When it comes to the basil in this soup, more is definitely more! It adds a wonderful scent and citrusy taste to the soup, as well as some beautiful color and smell.Garlic – This recipe calls for four large cloves of garlic. That might seem like too much but trust me, it’s not. Stick with the recipe and you’ll see what I mean.Red lentils – they have a delicate flavor that’s perfect for this soup and cook very quickly. I don’t recommend substituting other types of lentils for this recipe, as it would drastically alter the cooking time as well as the flavor.Tomato pasteOlive oilDried oregano – You could sub thyme or herbs d’ Provence if desiredBroth – This is one of the places where my recipe varies from the NYT version. I use broth instead of water, which boosts the flavor. My preference is for homemade vegetable or chicken broth. If you use store-bought broth, try to stick with a no-salt or low-sodium version. Or, if you use regular salted broth, leave out the salt during the first stage of cooking, only adding extra at the end after you’ve tasted it.Sugar – Just a little, to help balance the acidity of the tomatoes and lemon juiceLemon juice – Fresh lemon juice is best, but you can sub bottled in a pinchWhole milk – The original NYT version calls for cream, but I prefer to use whole milk. It adds plenty of richness with a little less fat.Salt and pepperSimple Steps for Making a Delicious Creamy Tomato and Lentil Slow Cooker Soup
Thanks to the slow cooker, this soup isn’t just incredibly tasty (people always go back for seconds), it’s incredibly easy to make!
It’s not quite some of those “dump it in and walk away” slow cooker recipes, but it’s pretty close.
In the first stage of cooking, you’ll add broth, lentils, garlic, about half the tomatoes, tomato paste, olive oil, sugar, seasonings, and one or two basil stems.
Just chop the tomatoes roughly before adding them to the cooker, or halve them if you’re using cherry tomatoes. Toss everything in – seeds, juices, and all.
And yes, I did say to add the whole basil stems with the leaves attached, during this stage. They’ll help infuse the soup with a wonderful basil flavor.
Once the soup has cooked, you’ll fish out the basil stems. Then you’ll use a whisk or immersion blender to help break up the tomatoes and lentils. It doesn’t need to be perfectly smooth, just more like a soup than a stew.

The last step will be to add the rest of the tomatoes, plus the basil, lemon juice, and milk. Give it a good stir and then let the soup cook for another five to ten minutes, to give the milk a chance to warm up.
That’s all there is to it!

After that, you simply serve it up and wait for compliments and requests for seconds.
Creamy tomato and lentil slow cooker soup is the delicious dinnertime solution for busy days – or even not-so-busy days. Give it a try soon, and check out some of my other slow cooker recipes!
Print Creamy Tomato and Lentil Slow Cooker Soup: Inspired by the NYT Recipe Author: Marie Bostwick Yield: 6-8 servings Print Recipe [image error] Pin Recipe const share_pin_buttons = document.getElementsByClassName( 'share-pin button' ); if ( share_pin_buttons ) { for ( let share_key = 0; share_key < share_pin_buttons.length; share_key++ ) { share_pin_buttons[share_key].addEventListener( 'click', (e) => { e.stopPropagation(); window.open(e.target.dataset.href,'targetWindow','toolbar=no,location=no,status=no,menubar=no,scrollbars=yes,resizable=yes,width=500,height=500'); return false; } ); } } Ingredients 1.5 pounds of your favorite tomato (or two dry pints of cherry tomatoes), roughly chopped, and divided1.5 cups red lentils, rinsed5 cups no-salt vegetable or chicken broth4 large garlic cloves, peeled, smashed, and minced1-2 large stems of basil with leaves, plus 1 cup rough chopped fresh basil¼ cup canned tomato paste2 T olive oil2 tsp Kosher salt¼ tsp black pepper2 tsp sugar1 tsp dried oregano2 T lemon juice, preferably fresh¾ cup whole milk Cook Mode Prevent your screen from going dark Instructions Add half the tomatoes, the lentils, broth, minced garlic, basil stems, tomato paste, olive oil, salt, pepper, sugar, and oregano to a 6 to 8 quart slow cooker. Stir ingredients, then cook on high setting for 4 hours.Remove the basil stem from the slow cooker. Use a whisk or immersion blender to help break up the tomatoes and lentils. The texture doesn’t have to be perfectly smooth, but should be more like a soup than a stew.Add the remaining tomatoes, the cup of chopped basil, lemon juice, and cream to the cooker. Stir to combine and cook for another five to ten minutes, until the milk has heated through. This is a thick soup, but if it seems too thick for your liking, add a little more broth, milk, or water.Add half the tomatoes, the lentils, broth, minced garlic, basil stems, tomato paste, olive oil, salt, pepper, sugar, and oregano to a 6 to 8 quart slow cooker. Stir ingredients, then cook on high setting for 4 hours.Remove the basil stem from the slow cooker. Use a whisk or immersion blender to help break up the tomatoes and lentils. The texture doesn’t have to be perfectly smooth, but should be more like a soup than a stew.Add the remaining tomatoes, the cup of chopped basil, lemon juice, and cream to the cooker. Stir to combine and cook for another five to ten minutes, until the milk has heated through. This is a thick soup, but if it seems too thick for your liking, add a little more broth, milk, or water. Did you make this recipe?
 Share a photo and tag us — we can't wait to see what you've made!
September 15, 2025
Savory Corn and Zucchini Fritters: Zucchini Recipes


These Savory Corn and Zucchini Fritters make the most of your garden’s bounty. Healthy, simple to make, and simply delish! Great for quick snacks, appetizers, or a yummy dinnertime side dish!
Savory Corn and Zucchini Fritters – The Tastiest Way to Eat Your VeggiesSummer is winding down as I write this. Gardeners are harvesting lots of late summer veggies, especially corn and zucchini. Farmers’ markets and grocery stores are offering good prices on them, too. And lots of folks are looking for zucchini recipes so they nothing goes to waste.
So, here’s no better time to make these savory Corn and Zucchini Fritters. They’re simple to make and oh-so easy to love.
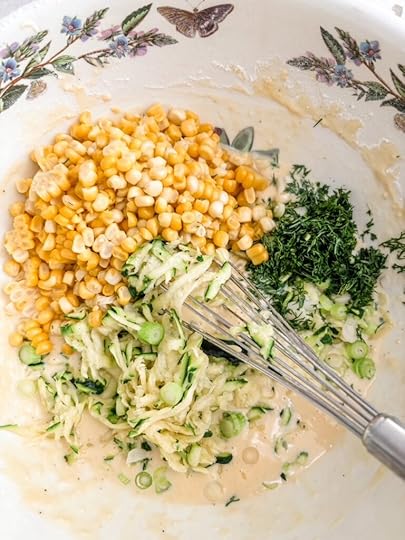
Sweet corn, fresh zucchini, and citrusy dill, lightly fried in simple batter is a scrumptious way to eat (and love) your veggies. It’s a recipe that’ll have everybody from picky-eater kids to gourmand grownups asking for seconds.
What Do You Need to Make Savory Corn and Zucchini Fritters?
One of the things I love about this recipe is the simplicity of the ingredients. Chances are good that you already have most of what you need on hand, including…
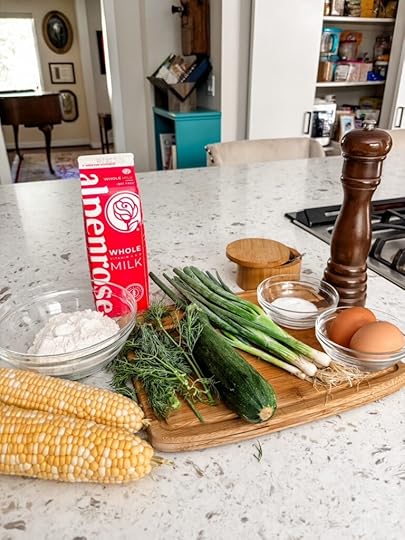
Corn – You can use frozen or even canned corn in this recipe. But I love corn fresh off the cob for my fritters. I just shuck the corn and boil it in well-salted water for about five to seven minutes to remove the starchiness. Then I run the cobs under cold water and use a sharp knife to slice the kernels from the cob. You’ll need two or three large cobs to get two cups of corn kernels.Zucchini – Because the taste is so mild, grated zucchini is the secret weapon for moms of veggie-averse kiddos. If you peel the skin off, they’ll never know they just ate a vegetable. Zucchini has a lot of water, so put it in a clean tea towel and squeeze out the excess moisture after grating.Dill – Fresh dill has a subtle, citrusy taste that pairs beautifully with the sweetness of the corn. You could also substitute an equal amount of fine-chopped basil. Fresh dill has a milder flavor than dry, so reduce the amount by half if you use dried dill.FlourBaking powder – This will help the fritters rise and make them lighter and fluffier.Salt and pepperEggsWhole milk – Some fritter recipes call for cream, but I think whole milk adds plenty of richness to the fritters.Neutral oil – Though I use a lot of olive oil for my recipes, the taste would be too strong for this. Vegetable, corn, safflower, or canola oils are the way to go. The amount of oil you use is up to you. I prefer to use just a light coating of oil on a non-stick griddle. That gives me a fritter that’s light and crispy on the edges, but not greasy.How to Make Savory Corn and Zucchini FrittersIf you’ve ever made pancakes, you’ll have no trouble at all making Savory Corn and Zucchini Fritters. The process is very similar.
It all starts with whisking.
In one bowl, you’ll whisk together your dry ingredients – flour, baking soda, and seasonings. In a second bowl, you’ll whisk together the wet ingredients – eggs and milk. Whisk the eggs and milk vigorously, so the mixture is perfectly smooth.
Next, you’ll sift.
Sifting the flour mixture into the egg mixture is important because if you just dump in the flour and stir, you’ll get lumps. If you don’t have a proper sifter, use a fine mesh soup sieve or colander. Then stir everything well to make a smooth batter.
Then, you’ll add your veggies to the batter.
Be sure to read my ingredient notes about prepping the vegetables, especially the grated zucchini. If you don’t squeeze the water out before adding it to the bowl, your batter will be too thin.
The last step is frying.
As I said in the ingredient notes, how much oil you use is up to you. But you really don’t need a lot to get a nice, crispy edge on your fritters.
Make sure the oil is nice and hot, then pour about a quarter cup of the batter onto the griddle or pan. Cook the fritters for about three minutes per side, until they’re golden brown.

You can serve the fritters warm, but they’re also terrific cold. We like to enjoy a few hot from the pan, and then save the rest covered in the refrigerator to snack on later. Leftover fritters will keep covered in the refrigerator for up to three days.
They’re also really terrific, make-ahead appetizer or party nibble. Serve alongside a small bowl of tzatziki or aioli for dipping.
Sometimes, I serve corn fritters as a side dish. They’re terrific with all kinds of roasted meat and poultry, including chicken, pork, and beef. Add a nice green salad, and you’re all set with a healthy and hearty meal!
However, at our house, occasionally Savory Corn and Zucchini Fritters are the meal.
Top generously with a dollop of tangy Greek yogurt and an extra garnish of dill and scallion, and you’ve got a terrific light and tasty lunch or dinner.
Though I especially love this recipe when fresh corn is in season, frozen or canned corn will also work well. So, anytime is a great time to make some yummy corn and zucchini fritters.
Give them a try soon!
Print Savory Corn and Zucchini Fritters: Zucchini Recipes Author: Marie Bostwick Yield: Makes 12 to 16 fritters Print Recipe [image error] Pin Recipe const share_pin_buttons = document.getElementsByClassName( 'share-pin button' ); if ( share_pin_buttons ) { for ( let share_key = 0; share_key < share_pin_buttons.length; share_key++ ) { share_pin_buttons[share_key].addEventListener( 'click', (e) => { e.stopPropagation(); window.open(e.target.dataset.href,'targetWindow','toolbar=no,location=no,status=no,menubar=no,scrollbars=yes,resizable=yes,width=500,height=500'); return false; } ); } } Ingredients 1 cup white, all-purpose flour2 tsp baking powder½ tsp Kosher salt¼ tsp fresh ground pepper2 large eggs¾ cup whole milk2 cups corn kernels (can use fresh, frozen, or canned – see notes in post)1 medium zucchini, grated and squeezed to extract liquid (see preparation notes in post)3 scallions, white and pale green parts, sliced (reserve a few for garnish)2 T minced dill (reserve a little for garnish)2 to 4 T neutral oil for frying (see post notes regarding amounts) Cook Mode Prevent your screen from going dark Instructions In a small bowl, whisk together flour, baking powder, salt, and pepper. In a medium sized bowl, vigorously whisk eggs and milk until smooth.Sift dry ingredients into wet ingredients and stir, making a smooth batter. Add prepared veggies and herbs to the bowl – corn kernels, grated zucchini, scallions, and dill. Stir to combine.Add oil to a non-stick pan or griddle, set on medium high heat. When oil is hot, add quarter cups of fritter batter to pan, leaving enough room between so fritters can spread a bit.Cook fritters for about 3 minutes on each side, until cooked through and golden brown on both sides. Serve hot or cold. See serving and storage suggestions in post. Did you make this recipe?
 Share a photo and tag us — we can't wait to see what you've made!

September 8, 2025
Gluten-Free Peach Crumble Dessert

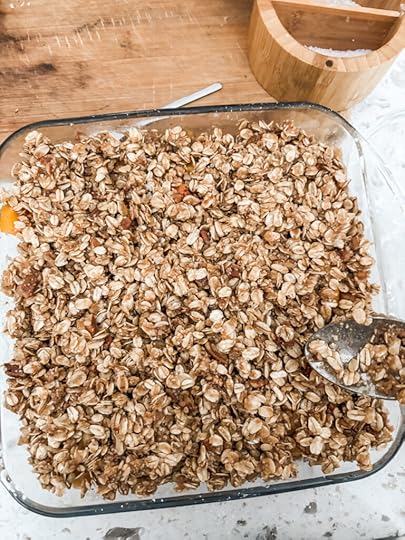
Family and friends will cheer for this Gluten-Free Peach Crumble Dessert! Sweet, cinnamon-kissed peaches with a crunchy, buttery oats and nut topping. Easy to make and SO, so good!
Gluten-Free Peach Crumble – A Peachy Keen Dessert Everyone Will LoveBy necessity or choice, more people (but not all people) are eating gluten-free these days. Though that can create something of a challenge for home chefs, it really doesn’t have to. The solution is simple. Find delicious, gluten-free recipes that taste so great that nobody will miss the gluten.
This Gluten-Free Peach Crumble is one of those recipes!
I recently made it for a mixed- audience dinner party, with equal number of gluten lovers and gluten avoiders. Not only did people go back for seconds, they scraped their bowls in hopes of getting one last, luscious bite.
And who can blame them?
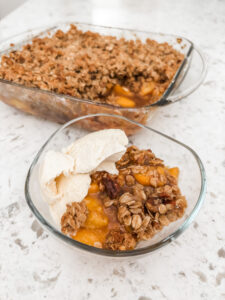
What’s not to love about a warm, peach and cinnamon filling topped with a sweet and crunchy crumble of oven-baked oats, nuts, and butter. Nothing!

This scrumptious peach crumble will bring a cheer from everybody at your dinner table – especially the cook! Because not only is this delectable dessert a genuine crowd-pleaser, it’s incredibly easy to make.
Scroll on down and I’ll show you!
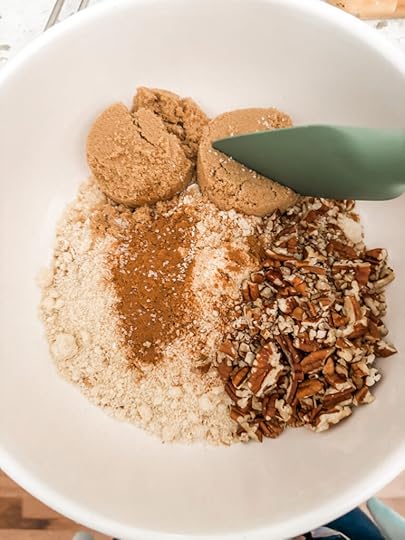
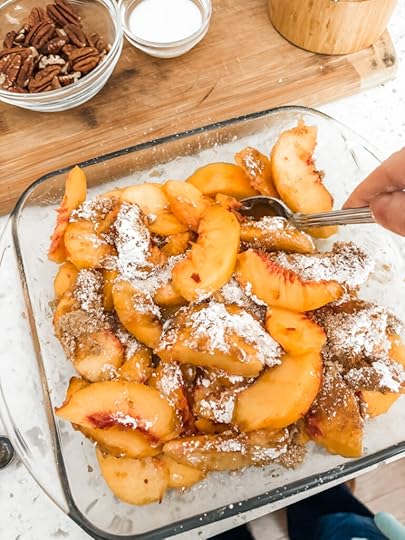
What Do You Need To Make Gluten-Free Peach Crumble?Fruit crumbles have two parts – the filling and the topping. Let’s go over the ingredients for each part separately, starting with the filling.
Peaches – Fresh, ripe, peeled, and sliced peaches would be my first preference here. But if peaches aren’t in season, frozen will work too.Brown sugar – Brown sugar has a rich, slightly caramel flavor that works well with peaches. You could sub white sugar in a pinch, but brown is better.Tapioca flour – This will help make the filling a little thicker (but not gluey). Tapioca flour is my favorite thickener for fruit fillings. It has a neutral taste that lets the fruit flavor shine through. You could also use cornstarch. Either way, sift it onto the fruit. Nobody likes lumps in their peaches!Ground cinnamon – A little cinnamon adds flavor and smells amazing during baking!Next, let’s talk about the topping ingredients. If you’re making this for someone who is gluten-free, you need to pay attention to this part.
One of the many things I love about crumbles is that they are incredibly easy to make.
You don’t even have to cook the filling beforehand. You just plop the peaches into the baking pan, sprinkle on the other ingredients, and stir.
The topping’s dry ingredients are stirred together in a bowl. Then you’ll drizzle and stir the butter and milk in turn, spoon it over the peaches, and bake.
Honestly, that’s all there is to it!
The filling will be very hot when it comes out of the oven. So, you should let it cool for a few minutes before serving, especially if you’re feeding kids.
It’s just as good warm as cold. That’s a bonus if you want to make dessert ahead of time. If you want the best of both worlds – warm and made ahead – just pop it back in the oven for five or ten minutes before serving.
Gluten-Free Peach Crumble is terrific all by itself. However, a scoop of vanilla ice cream will add an extra layer of yum to an already fantastic dessert.
Give it a try soon!
Print Gluten-Free Peach Crumble Dessert Author: Marie Bostwick Yield: 6-8 large muffins Print Recipe [image error] Pin Recipe const share_pin_buttons = document.getElementsByClassName( 'share-pin button' ); if ( share_pin_buttons ) { for ( let share_key = 0; share_key < share_pin_buttons.length; share_key++ ) { share_pin_buttons[share_key].addEventListener( 'click', (e) => { e.stopPropagation(); window.open(e.target.dataset.href,'targetWindow','toolbar=no,location=no,status=no,menubar=no,scrollbars=yes,resizable=yes,width=500,height=500'); return false; } ); } } Ingredients
 For the filling:
2.5 lbs peaches, peeled and sliced1/3 c brown sugar2 T tapioca flour (can sub cornstarch)½ tsp cinnamonFor the topping:
1.5 gluten-free rolled oats2/3 cup brown sugar½ cup almond flour½ cup pecans, chopped1 tsp salt4 T unsalted butter, melted2 T milk Cook Mode Prevent your screen from going dark Instructions Preheat oven to 350 degrees.Place peaches in an ovenproof 8×8 baking pan. Sprinkle brown sugar, tapioca flour, and cinnamon on peaches and stir gently to distribute and coat peaches.In a separate bowl, stir together oats, brown sugar, almond flour, pecans, and salt. Drizzle melted butter over top of mixture and stir. Drizzle milk over mixture and stir.Spoon topping over the peaches. Bake in preheated oven for 30 minutes, until peach filling is bubbly and topping is golden brown. Serve warm or cold, alone or with ice cream. Did you make this recipe? Share a photo and tag us — we can't wait to see what you've made!
September 1, 2025
Cherry Tomato and Basil Salad


My Cherry Tomato and Pearl Couscous Salad is bursting with fresh flavors! Sweet tomatoes, fragrant basil, spicy red onion, and chewy pearl couscous in a simple cider vinaigrette. A delicious, quick-to-cook summertime side or light meal. So good!
The Perfect Time to Make Cherry Tomato and Basil Salad!If you’re a gardener, it’s possible that you might have almost more cherry tomatoes than you know what to do with right now. Not that you’re complaining!
After all, you spent all winter dreaming about sweet, luscious, homegrown cherry tomatoes. And you spent most of the summer tending your tomato plants to make the dream come true. Now it has (hooray!) and you’re looking for terrific tomato recipes.
Or, maybe you’re like me. Maybe you didn’t have the time/space/skill to grow your own tomatoes, but found a great deal on locally grown cherry tomatoes.
Either way, this super-delish, super-easy Cherry Tomato and Basil Salad is the recipe you’ve been looking for! Just four fresh, flavor-packed ingredients plus an easy cider vinaigrette and you’re in business.
There’s no better summertime salad. And no better way to celebrate tomato season!
What Do You Need to Make Cherry Tomato and Basil Salad?

No kidding, the salad part of this Cherry Tomato and Basil Salad requires only four ingredients, plus a wonderful dressing.
Cherry Tomatoes – Using real cherry tomatoes is key to this salad. Bonus points if they are homegrown or locally grown. Regular tomatoes or grape tomatoes aren’t as sweet, so I don’t recommend them for this recipe.Fresh Basil – The bright, slightly grassy flavor of fresh basil is the perfect foil for the sweetness of the cherry tomatoes. You’ll slice the basil leaves in chiffonade. That’s a fancy word for skinny little ribbons.To do it, just stack big basil leaves – 5 or 6 at a time – and roll them up like a cigar. Then slice the “cigar” crossways into beautiful, bright green basil ribbons.

 Cherry Tomato and Basil Salad – Serve as a Side or Make It a Meal
This wonderful salad comes together in a snap, and looks just as gorgeous as it tastes!
Cherry Tomato and Basil Salad will keep covered in the refrigerator for up to three days, so you can make it ahead of time. It’s great to bring to potlucks and a wonderful side with fish, chicken, pork, or beef.
Add some cheese and you’ve got a light and healthy one-dish meal!
I tried it with cubes of tangy Feta cut into cubes. It was terrific! Next time, I think I’ll toss in some creamy, fresh mozzarella pearls, sliced in half. Yum!

With or without the cheese, this Cherry Tomato and Basil Salad tastes incredible! Give it a try soon!
Print Cherry Tomato and Basil Salad Author: Marie Bostwick Yield: 6-8 side servings Print Recipe [image error] Pin Recipe const share_pin_buttons = document.getElementsByClassName( 'share-pin button' ); if ( share_pin_buttons ) { for ( let share_key = 0; share_key < share_pin_buttons.length; share_key++ ) { share_pin_buttons[share_key].addEventListener( 'click', (e) => { e.stopPropagation(); window.open(e.target.dataset.href,'targetWindow','toolbar=no,location=no,status=no,menubar=no,scrollbars=yes,resizable=yes,width=500,height=500'); return false; } ); } } Ingredients For the Salad:
1 dry pint (about 16 oz) cherry tomatoes, sliced into halves1 cup pearl couscous, cooked according to package directions. (See post for stovetop toasting suggestion before cooking)½ cup small diced red onion (can sub yellow or white onions, or shallots)½ cup basil ribbons (See post for quick instructions on slicing basil ribbons)*Optional* – Add 6 to 8 ounces of cubed feta cheese or fresh mozzarella pearls, sliced in halfFor the dressing:
3 T sunflower or other neutral oil3 T apple cider vinegar2 tsp Dijon mustard2 tsp sugarKosher saltPepper Cook Mode Prevent your screen from going dark Instructions Place the sliced cherry tomatoes, cooked pearl couscous, basil ribbons, diced red onion (and cheese, if using) into a medium sized serving bowl.In a separate, smaller bowl, whisk together oil, vinegar, mustard, sugar, and salt and pepper to taste.Pour dressing over the salad. Stir gently with a wooden spoon or spatula to coat. Serve immediately, or store covered in refrigerator for up to 3 days. Salad will taste best if tomatoes are closer to room temperature, so remove from salad fridge and let it sit on counter for 20 to 30 minutes before serving. Did you make this recipe? Share a photo and tag us — we can't wait to see what you've made!
August 25, 2025
Easy Puff Pastry Blackberry Turnovers

It doesn’t get easier than my puff pastry Blackberry Turnovers – with frozen puff pastry, it’s a snap! Fresh blackberry filling in layers of flaky pastry. Yum! Make ahead for a delicious quick breakfast or on the go or a sweet treat!
Celebrate Blackberry Season – Bake Some Easy Blackberry TurnoversThere’s so much I love about living in the Pacific Northwest – especially blackberry season.
Blackberries grow like nobody’s business around here. Banks of blackberry vines spring up along almost every roadside and pathway. They’ll take over your garden too, unless you cut them back.
That part is literally kind of a pain. Getting poked by blackberry stickers can sting and make you say bad words. I know this from experience!
However, when August comes and those prickly bushes are loaded with sweet, luscious blackberries, all is forgiven. I walked outside and picked a big bowl of berries in just a few minutes recently.

Remembering I had a couple of boxes of prepared puff pastry in the freezer, I decided to try my hand at making blackberry turnovers. I’m a better cook than baker, so I really wasn’t sure how they would turn out. And yes, it took me a couple of attempts to get the hang of it.
But after getting a handle on the technique, I decided to call this recipe Easy Puff Pastry Blackberry Turnovers.
Because in addition to being utterly delish…I mean, what’s not to love about sweet, thick, fresh blackberry filling encased in crisp, flaky layers of pastry? These scrumptious turnovers are super simple to make.
Let me show you how!
Easy Puff Pastry Blackberry Turnovers – Start with the FillingThe blackberry filling for the turnovers is essentially a simple stovetop jam. It thickens as it cools, so you’ll want to make it first.
You’ll put the berries into a heavy-bottomed pot over medium heat along with sugar, salt, a little lemon juice, and tapioca flour.
Tapioca flour is my preferred thickening agent for this recipe. The neutral taste allows the blackberry flavor to shine through, creating a translucent, glossy-looking jam. However, you can substitute an equal amount of cornstarch.

After you stir everything together, mash the mixture with a wooden spoon or potato masher to help release the berry juice.
Stir the mixture to keep it from sticking until it just comes to a boil. Then take the pot off the stove and add the butter, stirring until it melts.
Put the filling into the refrigerator until it cools completely and becomes very thick.
My recipe makes three cups of filling, which is more than enough to make eight Puff Pastry Blackberry Turnovers. Leftover filling can be stored covered in the refrigerator for up to five days, or in airtight containers in the freezer for up to six months.
Extra blackberry filling is terrific as a topping for ice cream. It’s also great on muffins, scones, and toast.
Tried and True Techniques for Easy Puff Pastry Blackberry TurnoversFrozen puff pastry is what makes these blackberry turnovers so easy.
After you roll and cut the dough, all you have to do is add the filling, fold and crimp the dough, and bake. It really is simple!
Well…once you get the hang of it.
It took me a few tries before I figured out how to prevent blackberry explosions like this one.

But you have the opportunity to learn from my mistakes. The secret to non-exploding blackberry turnovers is proper crimping and a couple of tricks.
More about that later. Right now, let’s talk pastry
Puff Pastry for Easy Blackberry Turnovers – Thaw, Roll, Cut, FillThawing is the first step in working with puff pastry.
Puff pastry comes in sheets that are folded so they’ll fit in the box. If you try to unfold the sheet while it’s still frozen, it will break. So make sure you figure in time for thawing.
Since you still want the pastry to be cool, the best place to thaw it is in the refrigerator. Leave it in the fridge for about four hours or overnight. This is the best technique.
If you absolutely must, you can thaw puff pastry on the counter for 45 minutes to no more than an hour. But I don’t recommend it. If the pastry gets too warm, it won’t puff up properly during baking.
Once the puff pastry is thawed, unfold the sheet onto a floured work surface or pastry mat. Sprinkle a little more flour on top of the pastry and roll it out into a 12-inch square.
Cut the pastry square into four six-inch squares. Place about three tablespoons of the blackberry filling onto the center of each square.

Everybody loves turnovers with lots of filling, especially when it’s made with sweet, fresh blackberries! Even so, resist the urge to overfill your turnovers.
Doing so is a recipe for disaster – and filling explosions!
Folding and CrimpingAn egg wash – basically egg whisked with water – turns pastry golden brown as it bakes. It can also serve as a sort of glue to help layers of pastry hold together during baking.
So, the next step in making Easy Blackberry turnovers is important.
Dip a finger in the egg wash and use it to “paint” a line (about half an inch wide) around all four edges of the first pastry square.
Fold the pastry over into a triangle, matching the edges as closely as possible. Try not to let any filling get onto the edges with the egg wash. Doing so can cause filling leaks during baking.
Use the tines of a fork to closely crimp the turnover along the two edges, paying special attention to the corners. You really can’t crimp too much!

After you’ve filled and crimped all the turnovers, brush the top with more egg wash and bake.
Though everyone loves a still-warm-from-the-oven treat, Easy Blackberry Turnovers really taste best after they’ve cooled.

If you eat them warm, the filling sort of melts into the pastry. When the turnover has cooled, the filling will thicken up, giving you a lovely taste of sweet blackberry in every bite. Yum!
Print Easy Puff Pastry Blackberry Turnovers Author: Marie Bostwick Print Recipe [image error] Pin Recipe const share_pin_buttons = document.getElementsByClassName( 'share-pin button' ); if ( share_pin_buttons ) { for ( let share_key = 0; share_key < share_pin_buttons.length; share_key++ ) { share_pin_buttons[share_key].addEventListener( 'click', (e) => { e.stopPropagation(); window.open(e.target.dataset.href,'targetWindow','toolbar=no,location=no,status=no,menubar=no,scrollbars=yes,resizable=yes,width=500,height=500'); return false; } ); } } Ingredients 3 cups fresh blackberries3 T tapioca flour (can sub cornstarch)½ cup sugar1 T lemon juice1/4 tsp salt1 T butter1 package (2 sheets) frozen puff pastry doughFlour for rolling out dough1 egg, beaten with 2 tsp water Cook Mode Prevent your screen from going dark Instructions
 Make the Blackberry Filling
Place the blackberries, salt, sugar, lemon juice, and tapioca flour in a heavy-bottomed saucepan on stove over medium-high heat.Stir to mix ingredients, then mash berries with a wooden spoon or potato masher to help release berry juice. Cook, stirring frequently, until mixture just comes to a boil.Remove pan from stove. Stir in butter until it melts.Cool blackberry filling completely in refrigerator before making turnovers. Filling will thicken considerably as it cools.Make the Turnovers
Thaw puff pastry (see post for thawing tips).After pastry is thawed, preheat oven to 400 degrees. Line rimmed baking pan (one or two, depending on size) with baking parchment.Roll a sheet of pastry out on floured surface into a 12-inch square. Cut pastry into four 6-inch squares. Whisk egg and water together, to make an egg wash.Place approximately 3 T of blackberry filling onto the center of each square. Use fingers to spread a half-inch line of egg wash around edges of one pastry square.Fold pastry over filling and into a triangle, matching edges. Press fork tines firmly along the pastry edges, paying special attention to the corners. (See post for tips). Repeat steps 4 and 5 with remaining squares. The roll out remaining pastry sheet to make four more turnovers.Place turnovers on prepared baking pan. Brush top of each turnover with egg wash. Bake in preheated oven for 20 minutes, until turnovers have puffed nicely and turned golden brown.Remove pan(s) from oven. Cool turnovers completely before enjoying. Did you make this recipe? Share a photo and tag us — we can't wait to see what you've made!
August 11, 2025
Broiled Panko Halibut with Tropical Salsa
c
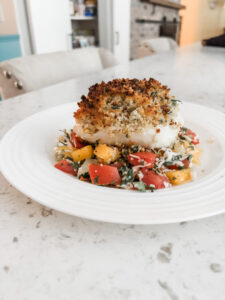
Need a special dish for date night or a company dinner? This elegant, absolutely delicious Broiled Panko Halibut with Tropical Salsa is sure to impress! A restaurant-worthy meal made at home!
During a recent beach trip, my husband and I booked a “splurge” dinner at a fancy restaurant. I ordered one of the specials, Broiled Panko Halibut with Tropical Salsa. The server made it sound so good.
And it was!
The halibut was tender, flaky, and mild with a wonderfully light and crunchy panko topping. It paired beautifully with a gorgeous salsa of tomatoes, mango, cilantro, coconut, and more.
Though it might not seem like halibut and tropical salsa go together, believe me, they do. It’s a divine but also somewhat surprising flavor combination. I loved every bite.
However, the bill was a less welcome surprise.
It was my own fault for not asking the price when the server described the special, so I didn’t complain. But I just never imagined that halibut could top $60 a plate! Maybe it’s better that I didn’t ask. If I had, I would never have ordered it. And that would have been a shame because it really was a wonderful meal, one I kept thinking about.
That’s why I decided to recreate that Broiled Panko Halibut with Tropical Salsa at home.

It was a huge success! The Chairman and I loved it. So will your family or guests.
This deliciously elegant entrée is just as good but far less expensive than the restaurant version. Best of all? You don’t need to be a chef to make it.
Broiled Panko Halibut with Tropical Salsa – Ingredients and SubstitutesThis dish has a more extensive list of ingredients than most of my recipes, but don’t let that intimidate you!
Thanks to the variety of ingredients, the flavor profile of this dish is complex, but the technique and preparation aren’t.
When it comes to the salsa, all you need to do is chop and stir. There is literally zero cooking involved. Making the halibut is a little more work, but not much. Making the topping and cooking the halibut will take less than thirty minutes, probably closer to twenty.
I’m not going to list all the ingredients, but I do want to talk about a few of them and suggest some possible substitutions.


If possible, make the salsa a few hours or even a day ahead of time. You can make and serve immediately if need be; it’ll still taste terrific. But giving the flavors a little time to meld will taste even better.
When it comes to making the halibut, I have a few pointers.
First, I recommend removing the skin from the filet and seasoning the fish with salt on all sides. Halibut is a fairly mild-tasting fish, so it’s important to make sure it’s well-seasoned.
Second, don’t be afraid to mound the topping on top of the fish, even pressing it on the sides and top with your fingers if you need to.
Third, you’ll turn on the broiler for the final two minutes. Broil the halibut on the middle oven rack and keep an eye on it. It only takes seconds for the topping to go from brown to black.
Use an instant-read thermometer to make sure the halibut is cooked through. The internal temperature should be 145 degrees.

My recipe makes a generous amount of salsa. Even if you’re serving four people instead of two, you’ll still have plenty of salsa. Any extra salsa can be covered and stored in the refrigerator for up to three days. We served ours with tortilla chips the next day. Really good! (Looking for more salsa? Check out my Peach and Avocado recipe!)
However, fish doesn’t keep the way salsa does.
Serve my Grilled Panko Halibut with Tropical Salsa immediately and eat it the same day. It doesn’t lend itself to leftovers, not that I think you’ll have any. We practically licked our plates with this one!
Give it a try soon!
Print Broiled Panko Halibut with Tropical Salsa Author: Marie Bostwick Yield: 2 servings Print Recipe [image error] Pin Recipe const share_pin_buttons = document.getElementsByClassName( 'share-pin button' ); if ( share_pin_buttons ) { for ( let share_key = 0; share_key < share_pin_buttons.length; share_key++ ) { share_pin_buttons[share_key].addEventListener( 'click', (e) => { e.stopPropagation(); window.open(e.target.dataset.href,'targetWindow','toolbar=no,location=no,status=no,menubar=no,scrollbars=yes,resizable=yes,width=500,height=500'); return false; } ); } } Ingredients
 For the salsa:
3 Roma tomatoes, seeded and diced1 cup diced fresh mango½ cup diced pineapple2-3 green onions, chopped¼ cup shredded sweetened coconut½ cup chopped cilantro¼ cup pineapple juice2 T fresh lime juice (zest the lime before juicing, putting the zest aside)1/4 tsp Kosher saltOptional – Dash or two of cayenneNote: this makes a generous amount of salsa. Any leftovers can be covered and stored in the refrigerator for up to 3 days.
For the panko broiled halibut:
2 6oz halibut filets½ cup panko breadcrumbs1 T fine chopped cilantro1 tsp Kosher salt, divided¼ tsp pepperZest of one lime2 T butter, melted2 tsp Dijon mustard Cook Mode Prevent your screen from going dark Instructions Preheat the oven to 400 degrees. Line a rimmed baking sheet with foil and spray with cooking spray. Zest the lime and put the zest aside for now.Stir all the salsa ingredients into a medium bowl – tomatoes, mango, pineapple, onions, coconut, cilantro, pineapple juice, lime juice, salt, and optional cayenne, if using. Set aside. If making salsa in advance, cover and store in the refrigerator.Remove the skin from the halibut filets. Rinse with cool water and pat dry with paper towels. Season fish on all sides with ½ teaspoon of Kosher salt. Place filets on prepared baking sheet.In a small bowl, stir together the Panko breadcrumbs, cilantro, remaining salt, pepper, and lime zest. While stirring vigorously with a fork, drizzle the melted butter onto the mixture.Brush a teaspoon of mustard onto the top of each filet. Top each filet with half the Panko mixture, mounding on top and pressing gently with your fingers if necessary.Place the pan with the fish onto the middle rack in the preheated oven. Bake for 10 minutes, until the interior temperature of the fish reaches 145 degrees. Turn on the broiler and broil for 1 to 2 minutes, until the Panko topping turns golden brown.Remove the pan from the oven. Place a generous helping of salsa on a plate and top with the broiled halibut. Serve immediately. Did you make this recipe? Share a photo and tag us — we can't wait to see what you've made!
August 3, 2025
Italian Spritz Mocktail: A Non-Alcoholic Summer Drink


With tart, herbal flavor and festive bubbles, this deliciously refreshing Italian Spritz mocktail is an alcohol-free version of the popular Aperol Spritz. A terrific, non-alcoholic toast to summer!
Italian Spritz Mocktail – A Refreshing, Grown-Up Beverage for the Sober or Sober CuriousOver the last couple of years, I’ve read more and more articles explaining that even moderate alcohol consumption just isn’t good for us.
Multiple studies have branded alcohol as toxic, showing that even modest amounts can increase the risk for cancer, heart and liver disease, and dementia. More and more doctors are recommending that people avoid alcohol completely.
I’ve never been a big drinker. But especially as I age, I find that even one drink can make me feel pretty rotten, pretty quickly. Headaches are only part of it. Drinking can leave me feeling tired, down, and just blah.
So, I really didn’t need a scientific study to convince me that alcohol isn’t good for me.
But there’s a problem…
I truly enjoy the social aspect of drinking. Pouring myself a fancy cocktail at the end of a long day, or ordering one in a restaurant, feels like a little celebration. Sipping an iced tea might be better for me, but it’s not the same.
As more and more people are turning sober or sober curious, it seems like almost every restaurant has at least a couple of mocktails on the menu. And I appreciate that!
But the problem is that most mocktails taste more like soda pop than cocktails. They’re just too sweet.
When I order a mocktail, I’m looking for a grown-up beverage, something to sip and savor the way I would a cocktail. Most mocktails I’ve had fall short.
Earlier this month, I ordered an Italian Spritz mocktail that our server said tasted almost exactly like an Aperol Spritz, one of my favorite summer cocktails. I had my doubts.
But you know what? That server was right!

This wonderfully refreshing mocktail has all the tart, complex herbal flavor of an Aperol Spritz with none of the alcohol. And none of its cocktail cousin’s less pleasant side effects either.
After getting the basic recipe from our server and making a few tweaks of my own, I’ve been making Italian Spritz Mocktails for myself and my husband on a regular basis.
Mixing up your own is oh-so simple, and oh-so tasty!
All you need is a recipe and the right ingredients.
What Do You Need to Make an Italian Mocktail?Lyre’s Italian Spritz, Bitter Orange StyleThis is a premium, non-alcoholic beverage, featuring a balanced bouquet of flavors and aromas, including bitter orange, rhubarb, and herbs. The price is similar to Aperol, but you don’t need much to make an Italian Spritz.
My local stores didn’t carry it, so I bought mine on Amazon.

There are several varieties of no-alcohol sparkling wine available, and just about any of them will be great in your Italian Spritz Mocktail. Look for it at your local market. I chose Gruvi Dry Secco because it comes in individual bottles, which is great when I want to make just one drink. It has a crisp, bright taste and plenty of bubbles, similar to prosecco.

A little bit of lime juice adds an extra note of citrus and a little more depth to the drink. If at all possible, use fresh-squeezed lime juice. Adding an extra slice of lime to the rim of the glass makes a pretty garnish.
Simple SyrupJust a touch of sweetness from simple syrup will keep your Italian Spritz Mocktail tasting tart, but not too tart. Though you can buy simple syrup at the store, there’s really no need to do so. It’s made with a one-to-one ratio of sugar to water.
In other words, if you use a quarter cup of water, then add a quarter cup of sugar. You’ll heat the mixture in a heavy pot on the stove, stirring until the sugar is completely dissolved and the liquid is clear. Leftover simple syrup can be kept covered in the refrigerator for up to a month.
How to Make an Italian Spritz Mocktail

The ingredient amounts you’ll need are listed in the recipe below. But the method for making your mocktail couldn’t be easier.
Just fill a tall, 16-ounce glass halfway with ice cubes. Pour in the Lyle’s Italian Spritz, lime juice, and simple syrup, then give the mixture a stir.
Fill the glass to the brim with the non-alcoholic sparkling wine. Garnish with a lime slice and enjoy immediately.
If you’re looking for a great, grown-up tasting mocktail, give this Italian Spritz a try. It’s my favorite summertime beverage. I bet it will be yours too!
Print Italian Spritz Mocktail: A Non-Alcoholic Summer Drink Author: Marie Bostwick Yield: One Mocktail Print Recipe [image error] Pin Recipe const share_pin_buttons = document.getElementsByClassName( 'share-pin button' ); if ( share_pin_buttons ) { for ( let share_key = 0; share_key < share_pin_buttons.length; share_key++ ) { share_pin_buttons[share_key].addEventListener( 'click', (e) => { e.stopPropagation(); window.open(e.target.dataset.href,'targetWindow','toolbar=no,location=no,status=no,menubar=no,scrollbars=yes,resizable=yes,width=500,height=500'); return false; } ); } } Ingredients 2 oz Lyles Italian Spritz1.5 tsp fresh lime juice2 tsp simple syrup (see post for instructions on making your own)8oz chilled, non-alcoholic sparkling white wine, such as Gruvi Dry SeccoLime slice for garnish – optional Cook Mode Prevent your screen from going dark Instructions Fill a 16oz glass halfway with ice cubes. Pour Lyle’s Italian Spritz, lime juice, and simple syrup into the glass, then stir.Fill the glass to the rim with the no-alcohol sparkling wine. Garnish glass with lime slice, if using. Enjoy immediately. Did you make this recipe?
 Share a photo and tag us — we can't wait to see what you've made!

July 27, 2025
Summer Tomato Recipes: Grilled Caprese Sandwich


Meet your new favorite summertime lunch – Grilled Caprese Sandwich! With thick slices of ripe tomato and fresh mozzarella, plus fragrant basil and pesto, this recipe takes grilled cheese to a whole new level! A great summer tomato recipe!
Tomato Season – The Perfect Time for A Grilled Caprese SandwichTomato season is here at last! And I couldn’t be happier!
Yes, I know that you can buy tomatoes year-round. However, those out-of-season, out-of-state tomatoes cannot compare to fresh, vine-ripened, locally grown tomatoes.
The first generally tastes like Styrofoam injected with artificial tomato flavoring. The second tastes like…heaven.
So, it’s not surprising that I find as many ways as possible to eat real, locally grown tomatoes during this too brief season. Sometimes I just eat them sliced with a little sprinkle of salt and pepper, or maybe a side of cottage cheese. One of my favorite ways to enjoy tomatoes is in a classic caprese salad – thick slices of tomato layered with creamy buffalo mozzarella, fresh basil leaves, and a drizzle of good balsamic vinegar. So simple but so good!
Not long ago, I was tucking into a wonderful caprese salad when a thought popped into my head.
“Wouldn’t this be terrific in a sandwich? A grilled sandwich?”
The answer, of course, is yes.
Like the classic salad that inspired it, this Grilled Caprese Sandwich is so simple, but so very, very good.
What Do You Need to Make A Grilled Caprese Sandwich?

Good ingredients make all the difference! Take a moment to look over my recommendations.
Tomatoes: But not just any tomatoes, friends! A nice, big beefsteak or heirloom tomato is the way to go here, something you can slice thick. It should be ripe but not squishy or too soft. Bonus points for tomatoes that are vine-ripened and locally grown.Buffalo Mozzarella Cheese: This is different than regular mozzarella. The buffalo mozzarella is a soft, creamy, fresh cheese that melts easily and can be sliced thick.Parmesan or Pecorino Romano Cheese: This is optional, but I decided to kick up the mild flavor of the mozzarella with a little sprinkle of shredded Parmesan.Pesto: If you’ve got homemade pesto on hand, lovely. But any good brand of jarred pesto will do the trick.Fresh Basil: Just a few nice big leaves will be perfect.Olive Oil: Use a good quality, fruity flavored olive oil for your Grilled Caprese Sandwich.Bread: My bread of choice for this recipe is sourdough. However, any good peasant-style bread with a nice, firm structure that will hold up to grilling is fine. I would stay away from rye bread as the strong flavor would overwhelm the other ingredients.Tips for Making Grilled Caprese SandwichOne of the best things about sandwiches is that they’re easy. With the right ingredients, literally anybody can make a delicious sandwich. But grilling sandwiches takes a little more skill and effort. So I’ve got a couple of tips…
Don’t be afraid to be generous when brushing on the olive oil. Make sure you brush oil all the way to the edge of the bread, so you get nice, even grill marks.


As you can see, I made my sandwiches on my outdoor grill. You can also make them on the stovetop, using a grill pan such as this cast iron model from Lodge that I’ve been using for years. They run around $25 and will last forever.
Grilled Caprese Sandwiches are delicious served hot or cold, winter or summer. Try making them for yourself or your family soon!
Print Summer Tomato Recipes: Grilled Caprese Sandwich Author: Marie Bostwick Yield: Two sandwiches Print Recipe [image error] Pin Recipe const share_pin_buttons = document.getElementsByClassName( 'share-pin button' ); if ( share_pin_buttons ) { for ( let share_key = 0; share_key < share_pin_buttons.length; share_key++ ) { share_pin_buttons[share_key].addEventListener( 'click', (e) => { e.stopPropagation(); window.open(e.target.dataset.href,'targetWindow','toolbar=no,location=no,status=no,menubar=no,scrollbars=yes,resizable=yes,width=500,height=500'); return false; } ); } } Ingredients 4 large slices of sourdough or other rustic, firm textured bread6 to 8 large fresh basil leaves2 oz shredded parmesan or pecorino Romano cheese1 or 2 large, ripe beefsteak or heirloom tomatoes, sliced about half an inch thick6 to 8 oz buffalo mozzarella cheese, sliced about half an inch thick2 to 3 T pesto2 to 3 T good olive oil Cook Mode Prevent your screen from going dark Instructions Preheat the grill.Layer the basil leaves on two slices of bread. Sprinkle half the shredded cheese on the basil, then top with the tomato slices and mozzarella slices.Spread the pesto onto the remaining two slices of bread. Place slices on top of the sandwich. Brush both sides of the bread generously with the olive oil, all the way to the edges.Place the sandwiches on the hot grill and cook for 3 to 4 minutes on each side (flip only once) until the cheese is beginning to melt and the bread is a golden brown with nice grill marks on both sides.Slice sandwiches in half. Enjoy hot or cold. Did you make this recipe? Share a photo and tag us — we can't wait to see what you've made!
July 21, 2025
Easy Sew Corner Bookmarks: A Fabric Scrap Project


These Easy Sew Corner Bookmarks are super quick to sew and cute as can be. There’s no better way to use up your fabric scraps. A terrific homemade gift that any bookworm will love!
Getting A Gift and Making A Gift – Easy Sew Corner BookmarksPresents are one of the many perks of my job. No kidding!
I don’t know if it’s the same for all authors, but darling readers frequently come to my book events bearing gifts. Often, it’s something they made themselves, which makes them even more precious to me.
One of the presents a reader brought during my Book Club for Troublesome Women tour was a darling, hand-drawn portrait of Showgirl. Drawing is not among my skills, so I was very impressed by this woman’s talent and deeply touched by her thoughtfulness.

Another kind reader brought me a corner bookmark she’d sewn herself. I was delighted and put her gift to work immediately.
Once I was home, I decided I’d like to make a few more for myself. Because can you ever have too many bookmarks? I don’t think so, especially if you read as much as I do.
Making my own Easy Sew Corner Bookmarks has been a lot of fun, and even a little addictive. They’re very satisfying to sew and a perfect stitching break for busy days.
I love making them in colors that complement the cover of a book I’m giving to a friend. It’s a thoughtful, one-of-a-kind gift that won’t break the bank. And it’s a great way to use up fabric scraps!
Sound like your kind of project? Then follow along with my tutorial and learn to make your own Easy Sew Corner Bookmarks!

To start with, you’ll need basic sewing equipment and notions. That includes a sewing machine, iron and ironing surface, pins, thread, marker, ruler, and a rotary cutter and cutting mat, or scissors.
You’ll also need some kind of pointer to help push out the fabric corners. I love my That Purple Thang sewing tool for this task, and for helping to gently push the fabrics along when I’m stitching bulky seams.

And here are the materials you’ll need for each bookmark…
Three 4-inch squares of 100% cotton fabricThree 4-inch squares of lightweight, non-woven fusible interfacingThe fabric squares will be used on the front, back, and corner sections of your bookmark.
You can use just one color of fabric if you want. However, I recommend using two or three fabrics that complement one another.
Using fabrics with contrasting colors and patterns looks so pretty and will give your bookmarks a little more pizazz!

Step 1: Lay an interfacing square, fusible side down, on the wrong side of the front and back squares. Press with a hot iron to fuse the interfacing to the fabric.
Step 2: Cut the remaining interfacing square in half diagonally. Place it on the wrong side of the corner square and press as above. Fold the corner square diagonally, interfacing to the wrong side of the fabric. Give the folded edge a quick press.

Step 3: Position the folded corner in the corner of the top fabric square, right sides together. Layer the bottom fabric square on top of them, right sides together.
Step 4: Pin through all layers on all four sides of the fabric square. Make a mark or place a pin on the bottom edge of the square about an inch in from both corners. This will remind you to leave the space between the marks unsewn.

Step 5. Using a quarter-inch seam, stitch around all four sides, beginning at the first mark (or pin) and ending at the second mark, leaving an opening between them. Be sure to backstitch at the beginning and end. Clip the threads.
Easy Sew Corner Bookmarks: Turning and Top-StitchingStep 6: Clip the corners of the fabric, taking care not to cut any stitches. Turn the square inside out, so the right side of the fabric is showing. Use That Purple Thang or a stylus to push out the corners.

Step 7: Give the bookmark a quick press to set the seams. Topstitch around all four sides of the bookmark, about an eighth of an inch from the edge. Clip threads.

If you’ve done any sewing at all, this really should be an easy project for you. Once the fabrics and interfacing are cut, I can sew a bookmark in ten minutes or less.
However, there are a lot of layers of fabric and interfacing here. That can make sewing a little tricky, especially when you’ve got short seams. Normally, I use a walking foot when dealing with bulky seams. That might do the trick for you. But I found that my regular sewing foot did a better job than my walking foot.Using my That Purple Thang tool was very helpful, letting me give the fabric a little extra encouragement to keep scooting along.Make sure you’re using a lightweight interfacing to help reduce bulk. If you’re still having trouble, leave the interfacing out of the corner piece. However, I don’t recommend leaving out all the interfacing. Interfacing will give your bookmark structure and keep it looking crisp.

A final note.
Printing out whole blog posts can be a pain, using up a lot of paper and ink. So, I’ve included the basic instructions below, like I normally would for recipes.
Though it doesn’t include pictures, all the instructions are listed and will be easy to print out. If you need a visual, just refer back to the blog post.
Happy sewing! And reading!
Print Easy Sew Corner Bookmarks: A Fabric Scrap Project Author: Marie Bostwick Print Recipe [image error] Pin Recipe const share_pin_buttons = document.getElementsByClassName( 'share-pin button' ); if ( share_pin_buttons ) { for ( let share_key = 0; share_key < share_pin_buttons.length; share_key++ ) { share_pin_buttons[share_key].addEventListener( 'click', (e) => { e.stopPropagation(); window.open(e.target.dataset.href,'targetWindow','toolbar=no,location=no,status=no,menubar=no,scrollbars=yes,resizable=yes,width=500,height=500'); return false; } ); } } Ingredients
 Equipment and notions: Sewing machine, iron and ironing surface, pins, thread, ruler, pointer or stylus for turning the fabric, rotary cutter and cutting mat or scissors.
Materials: Three 4-inch squares of 100% cotton fabric. Three 4-inch squares of lightweight, non-woven fusible interfacing.
Cook Mode Prevent your screen from going dark InstructionsStep 1: Lay an interfacing square, fusible side down, on the wrong side of the front and back squares. Press with a hot iron to fuse the interfacing to the fabric.
Step 2: Cut the remaining interfacing square in half diagonally (can save leftover piece to use in another bookmark). Place interfacing triangle on the wrong side of the corner square and press. Fold corner square diagonally, interfacing to wrong side of fabric. Give the folded edge a quick press.
Step 3: Position the folded corner in the corner of the top fabric square, right sides together. Layer the bottom fabric square on that top of them, rights sides together.
Step 4: Pin through all layers on all four sides of the fabric square. Make a mark or place a pin on the bottom edge of the square about an inch in from both corners. This will remind you to leave the space between the marks unsewn.
Step 5. Using a quarter inch seam, stitch around all four sides, beginning at the first mark and ending at the second mark, leaving an opening between the marks. Be sure to backstitch at the beginning and end. Clip the threads.
Step 6: Clip the corners of the fabric, taking care not to cut any stitches. Turn the square inside out, so the right side of the fabrics are showing. Use That Purple Thang or a stylus to push out the corners.
Step 7: Give the bookmark a quick press to set the seams. Topstitch around all four sides of the bookmark, about an eighth of an inch from the edge. Clip threads.
Did you make this recipe? Share a photo and tag us — we can't wait to see what you've made!