Ava Fails's Blog, page 2
May 8, 2023
ePub Upload Error on Google Play Books
Last Updated on May 8, 2023 by
I formatted an eBook for a client, which included conversion to ePub and mobi. When the client attempted to upload the ePub file to Google Play Books, the following error occurred:
Error while parsing file: attribute “value” not allowed here; expected attribute “class”, “dir”, “lang”, “style”, “title” or “xml:lang”
If you’re having a similar ePub upload error on Google Play Books, I’m going to show you how to fix the problem.
What You NeedA messed up ePub file – You’ll only know it’s messed up when you try to upload it.Calibre – This free software is a must-have for self-publishers. It does a lot of things, but in this application, we will use it to edit the messed up ePub file.A Google Play Books Partner Center accountWhat the Error Looks LikeThe error occurs when you attempt to upload your ePub book file to Google Play Books. The platform used to accept a variety of file formats, but now you can only upload an ePub or PDF.
In this case, we’re working with an eBook file and we want the text to be reflowable so readers on all kinds of devices can view the content comfortably. So, we want to upload an ePub, but it’s giving us an error.
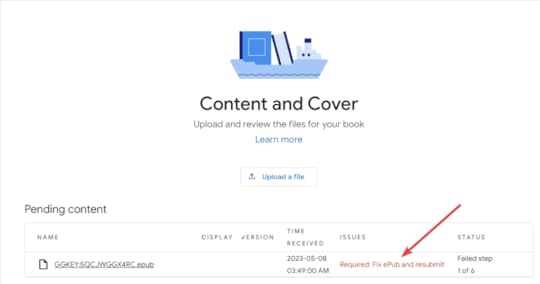
Fortunately, Google Play Books will provide you with the exact error, and where to find it in your ePub file so we can fix it!
Click the red text to open the error report.
The help information provided by Google Play Books here is not very helpful. They recommend an ePub file validator tool that requires Java to run. This is something most modern computers no longer have installed by default. If you go through all the trouble to get Java running on your machine, then you better know how to read the command line because that’s how the program delivers information.
This is not ideal.
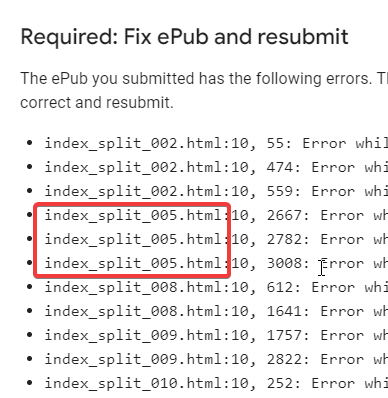
Our error report looks like this:
index_split_005.html:10, 2667: Error while parsing file: attribute “value” not allowed here; expected attribute “class”, “dir”, “id”, “lang”, “style”, “title” or “xml:lang”
index_split_005.html:10, 2782: Error while parsing file: attribute “value” not allowed here; expected attribute “class”, “dir”, “id”, “lang”, “style”, “title” or “xml:lang”
index_split_005.html:10, 3008: Error while parsing file: attribute “value” not allowed here; expected attribute “class”, “dir”, “id”, “lang”, “style”, “title” or “xml:lang”
index_split_008.html:10, 612: Error while parsing file: attribute “value” not allowed here; expected attribute “class”, “dir”, “id”, “lang”, “style”, “title” or “xml:lang”
index_split_008.html:10, 1641: Error while parsing file: attribute “value” not allowed here; expected attribute “class”, “dir”, “id”, “lang”, “style”, “title” or “xml:lang”
index_split_009.html:10, 1757: Error while parsing file: attribute “value” not allowed here; expected attribute “class”, “dir”, “id”, “lang”, “style”, “title” or “xml:lang”
index_split_009.html:10, 2822: Error while parsing file: attribute “value” not allowed here; expected attribute “class”, “dir”, “id”, “lang”, “style”, “title” or “xml:lang”
index_split_010.html:10, 252: Error while parsing file: attribute “value” not allowed here; expected attribute “class”, “dir”, “id”, “lang”, “style”, “title” or “xml:lang”
index_split_010.html:10, 625: Error while parsing file: attribute “value” not allowed here; expected attribute “class”, “dir”, “id”, “lang”, “style”, “title” or “xml:lang”
It’s a bit longer than this, but you get the idea. This looks like gobbledy gook, right? When my client first sent me the screenshot, I was like, “I have no idea what any of that means!”
I Googled “epub upload error on google play”, then I copied and pasted the error string directly and figured out my solution.
Let’s dissect this.
index_split_005.html:10,
This portion tells you where the error occurs in your ePub file. I’m sure you have no idea where this is. Don’t worry, Calibre will tell you. The rest tells you what you need to fix.
2667: Error while parsing file: attribute “value” not allowed here; expected attribute “class”, “dir”, “id”, “lang”, “style”, “title” or “xml:lang”
We don’t really care about any of it of this except for this:
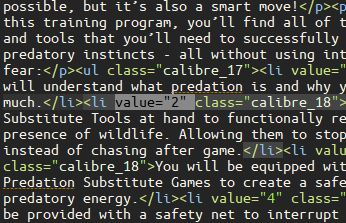
attribute “value” not allowed here;
This is telling you what you have to remove from each location. The ePub file is using a value attribute in its XML coding that is not allowed. We just need to remove it with a simple Ctrl+F to find it and then delete it.
You’ll need to do this for each error in the report, save, and re-upload the ePub.
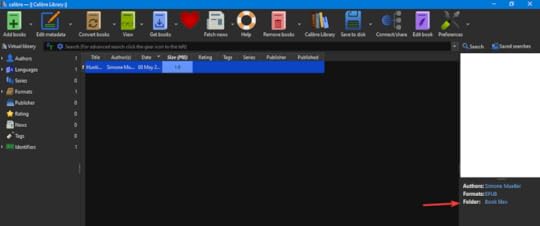
How To Fix an ePub Upload Error on Google Play Books with CalibreOpen Calibre.
Add your ePub file by clicking the green Add books button.
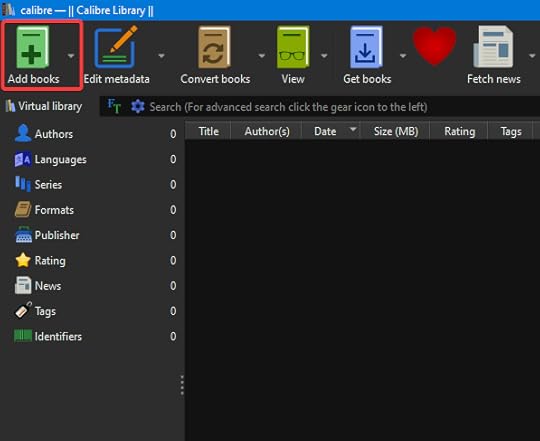
Click your book to highlight it (it’s highlighted by default after you upload it) and then click the purple Edit book button.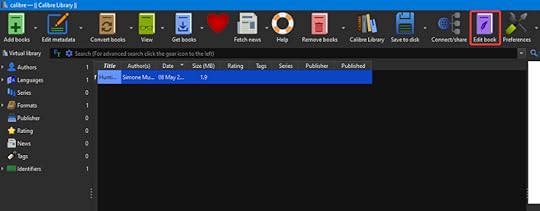
The Calibre Editor will open in a new window.
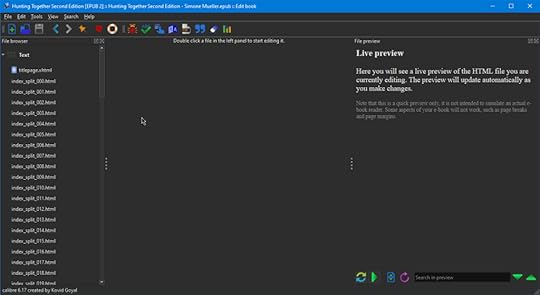
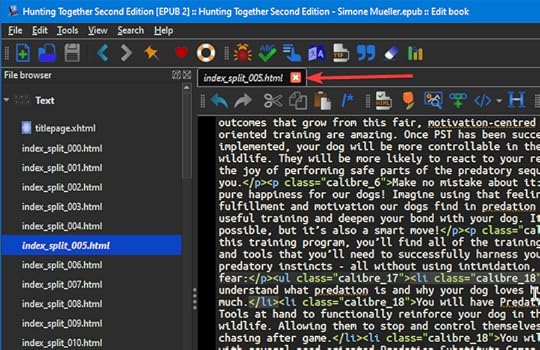
In the left File browser panel, you can see a portion of the error string you should recognize. This is how you find the location of the error you want to remove. Let’s refer back to our code:
index_split_005.html:10
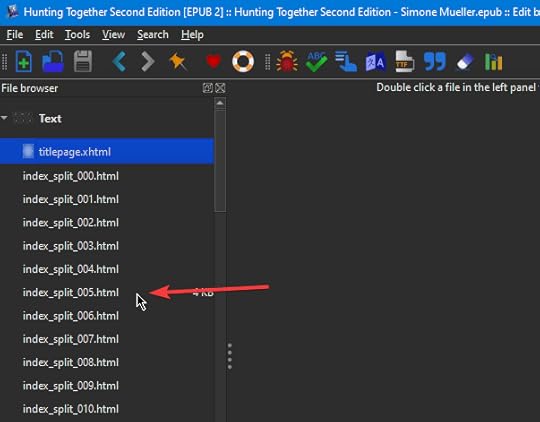
Double-click the corresponding file in the File browser.
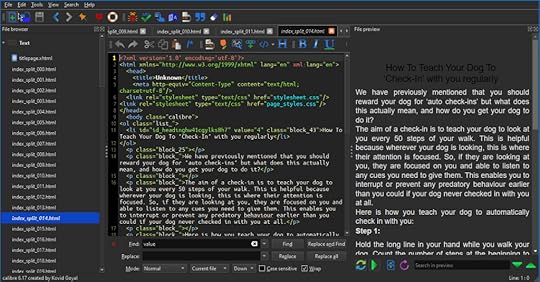
We now have this very intimidating screen:

Don’t worry, we don’t have to know what this means.
Press Ctrl + F to pull up the Find Replace box. Type value in the Find box. Click Find.
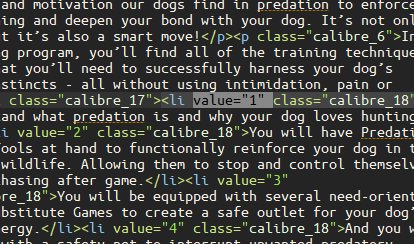
The Editor will find the text in the code and highlight it:
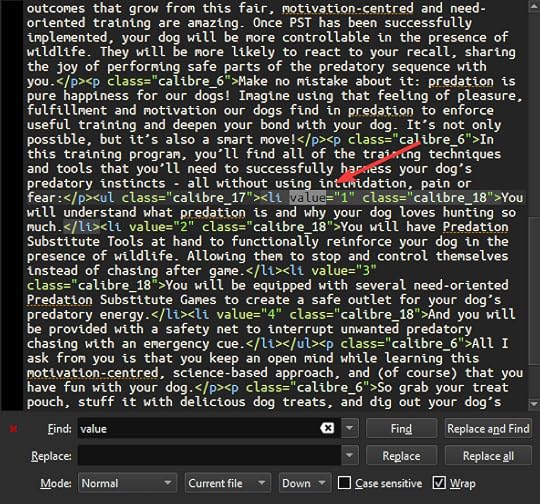
Highlight the entire attribute and press Delete.
You can see in your error report how many instances there are for this file. In this case, we know we have 3 to fix:
Click Find again to move on to the next one. Highlight and delete it in the same manner. Repeat this until you’re finished with all the errors in this file. Press Ctrl + S to Save.
Click the red X to close the file.
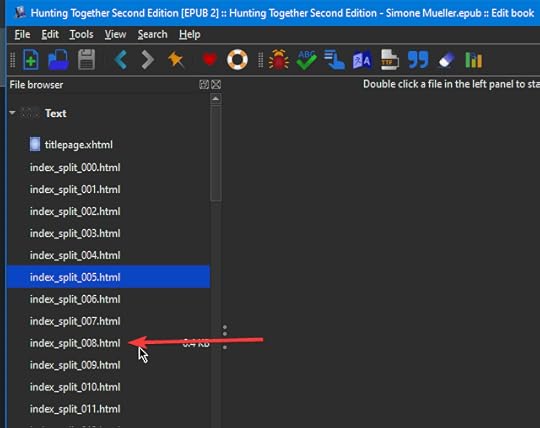
Double-click the next file in the error report and repeat the steps to Find, Replace, and delete the value errors.
Repeat the steps:
Press Ctrl + F to open Find/Replace.Type value in the Find box and click the Find button.Highlight the attribute and delte it.Repeat as many times as needed for the current file as indicated by the error report.Press Ctrl + S to Save.Click the red X to close the file.When you’re done, don’t forget to save the file. Once you’ve saved the file, it’s okay to close the Editor window. Navigate to your newly repaired file by clicking the Book files link. The folder will open.
This ePub is now ready to upload to Google Play.
You may need to repeat this process if you missed something. Google Play also timed out on me a couple of times, so if you have upload issues, try again later.
When I recreated my errors for this post, I had some new ones pop up that looked like this:
index_split_002.html:10, 474: Error while parsing file: element “a” not allowed here; expected element “address”, “blockquote”, “del”, “div”, “dl”, “h1”, “h2”, “h3”, “h4”, “h5”, “h6”, “hr”, “ins”, “noscript”, “ns:svg”, “ol”, “p”, “pre”, “script”, “table” or “ul” (with xmlns:ns=”http://www.w3.org/2000/svg”)
index_split_002.html:10, 559: Error while parsing file: element “blockquote” incomplete; expected element “address”, “blockquote”, “del”, “div”, “dl”, “h1”, “h2”, “h3”, “h4”, “h5”, “h6”, “hr”, “ins”, “noscript”, “ns:svg”, “ol”, “p”, “pre”, “script”, “table” or “ul” (with xmlns:ns=”http://www.w3.org/2000/svg”)
In this case, I would Find, Replace, and delete a and blockquote from the XML code using the Calibre Editor in exactly the same way we did the value attribute.
I Hope This Helps!I hope this helps you with your ePub upload error on Google Play. I’m sure you’re excited to get your book available on all platforms, so one less hurdle is sure welcome!
Are you seeing a different problem with your ePub file? Let me know in the comments below, and I’ll try to help you out!


June 26, 2021
How To Back Up Your Computer Daily Using Free Software
Last Updated on June 26, 2021 by
I work online, so my data is a little more important to my life than if I was just casually scrolling Facebook or watching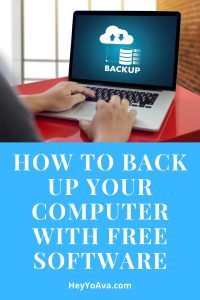 Netflix. A while back, I conducted a web search similar to the one that probably brought you here: how to back up your computer.
I was elated with the result. Before we get to that, let’s talk about what we’re going to cover in this article.
My personal backup system is:
Triple redundant for client files (Google Drive + 2 hard drives)Double redundant for personal files (2 hard drives)Uses the cloud in addition to hardwareAffordableScalableEffectiveMy Current SetupMy setup isn’t fancy. I have an entry-level gaming computer with a 500GB SSD running Windows 10 Home.
I have a 2TB Drive that is the main host for all of my files, both work and personal. I don’t keep anything on the SSD except the OS and program files. All of my pictures, music, videos, and documents are on the 2TB. This ensures my computer boots quickly and runs efficiently.
I back up all client data to Google Drive. I’m not entirely happy with Google’s privacy policy, so if you want to start right out of the gate, here are some viable alternatives. I’ve used Mega and box and recommend both. Any service where you can keep a folder on your PC that syncs to the cloud will work. This way, you have a local copy of everything that you can back up to your hard drives. Triple redundancy!
I back everything up to a 4TB drive.
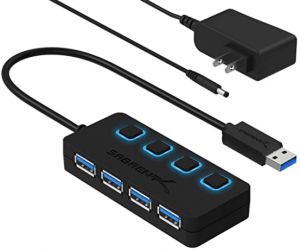
My external drives are plugged in a USB 3.0 hub with a separate power supply and on/off switches from my computer.
 The cost of your setup will depend on your needs. If you are handling more data, you may require larger hard drives. Fortunately, this whole system can easily be scaled.
I’m currently running Toshiba drives. I bought one and it’s been great, so when I purchased my second one, I looked for Toshiba again. You can get a set of 2TB and 4TB Toshiba drives for just under $150 before tax as of this writing. Is your data worth $150? I bet so!
You’ll notice the guy recommends a different brand in the video below, so the choice is yours. Almost any well-known brand is a good choice.
What Ties It All Together?Back to those search results…when I searched for “how to back up your computer”, I landed on this video:
It was the solution to my problem.
I’ve been using Personal Backup for 9 months as of this writing.
It does what it says.
It is updated regularly.
I have ZERO complaints.
How To Back Up Your Computer Using Personal BackupFirst things first, go download Personal Backup and install it if you haven’t already – https://personal-backup.rathlev-home.de/index-e.html
NOTE: If you have any concerns about privacy while using Personal Backup, here’s the info on that – https://personal-backup.rathlev-home.de/index-e.html
Also, Personal Backup recently had a facelift, so it will look slightly different than the software in the video.
It installs easily. Just follow the prompts.
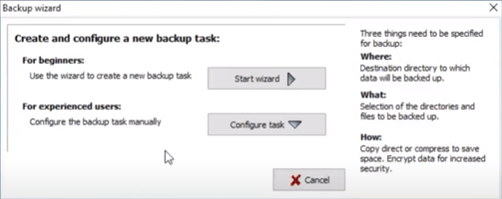
Step 1. When you launch Personal Backup for the first time, it will prompt you to start the Backup Wizard. Click Start Wizard.
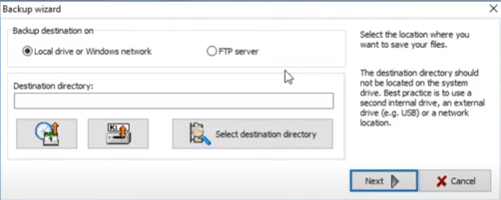
Step 2. Select the backup destination. Click Select destination directory and navigate to the drive or folder where you want to save your backups. Click Next.
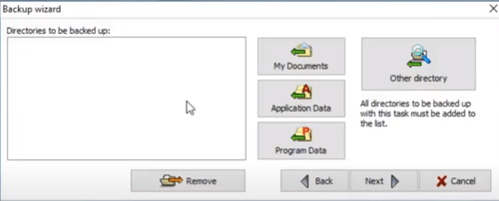
Step 3. Select the directories you want to be included in your backup. Click My Documents to quickly add your Documents folder to your backup. To add additional directories, click Other directory and select one direct at a time and add it to your backup. I back up my Documents, Music, Pictures, Videos, Google Drive folder, and Desktop to my 4TB drive. Click Next.
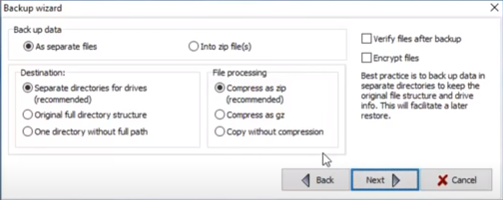
Step 4. Next, you can specify how you want your data to be saved including, but not limited to, encryption, compression, and as separate directories. I have my set to back up as the same file structure I have saved on my drive. I selected As separate files, Separate directories for drives, and Copy without compression. I do verify, but I do not encrypt my files. Click Next.
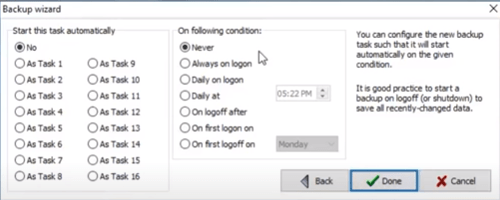
Personal Backup allows you to schedule up to 16 backups in chronological order. You can also manually trigger the backup or have it start automatically at a specified time. I run daily backups at 6PM. This is usually after my workday is complete during supper and TV time for me. The backup is normally complete after I return to my computer to shut it down before bed.
Step 5. Specify the start times and conditions of your backup task. I am currently only running 1 backup task, so I start it automatically by selecting As Task 1. I schedule it daily at the specified time. When you’re done configuring your backup, click Done.
Personal Backup will prompt you to save the backup file. Just follow the prompts.
Also, worthy of note here, I have my backup set to update and sync my drives. That means if I delete a file in one location, it will be deleted from the backup during the backup process.
On the Task settings tab, I have it set to Update as the Backup mode.
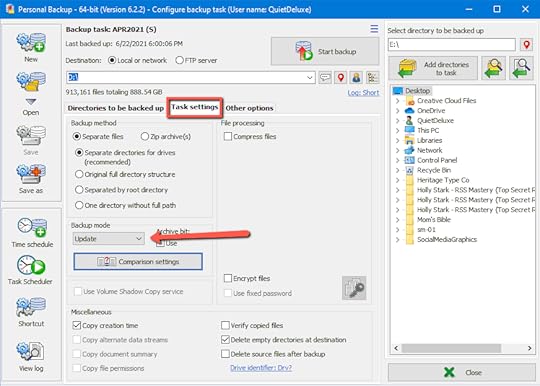
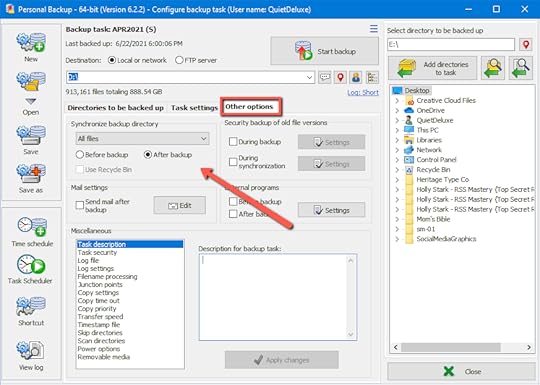
On the Other options tab, I have it set so that All files synchronize After backup.
Click Save and Close.
You may have to supervise the backup a couple of times to make sure it’s working as you expect.
This is far from a comprehensive guide on Personal Backup and all of its capabilities, so be sure to check their website for documentation.
That’s a WrapNow that you know how to back up your computer, what other problems can I solve for you? I’d love to hear from you in the comments.
You can see the other problems I’ve already solved by visiting this link – https://heyyoava.com/category/i-solve-problems/
June 1, 2021
How to Unlock Computer Without Password – Windows 10
There’s a lot of scenarios where you can use the information I’m about to share with you.
I’m going to show you how to unlock your computer without a password in Windows 10 free. That’s right, it’s not going to cost you anything and it’s a procedure you can use over and over again.
Disclaimer: I am providing this information for educational purposes only. I am not seeking to educate those with nefarious intentions. The free sharing of information unfortunately means with everyone. If you’re using this for nefarious purposes, you’re a dirtbag.
What you’ll need to unlock your computer without password Windows 10A Windows 10 computer that is password lockedA DVD or CD rewritable media or USB stick with a fresh install of Windows 10 (No, we are not reinstalling Windows; also, this is free)This article or the video belowNOTE: This method will NOT erase any data on your computer if you follow these steps exactly. By continuing, you agree that neither Ava nor heyyoava.com are responsible for your mistakes. You are proceeding at your own risk.
Step 1 – Create your Windows 10 Installation MediaNOTE: The video below does not include this step.
Go to – https://www.microsoft.com/en-us/software-download/windows10
Scroll down the page, and click the Download tool now button.
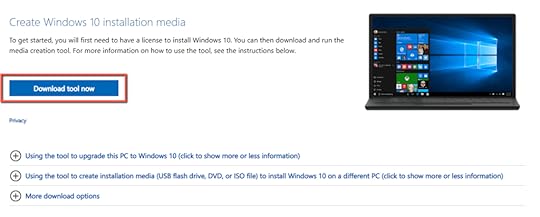
Accept the terms if you feel inclined and want to use the tool. 
Click the radio button next to Create installation media (USB flash drive, DVD, or ISO file) for another PC. This is very important! If you run it on Upgrade this PC now, it will upgrade the PC you’re using to create the media and you probably don’t want that to happen. 
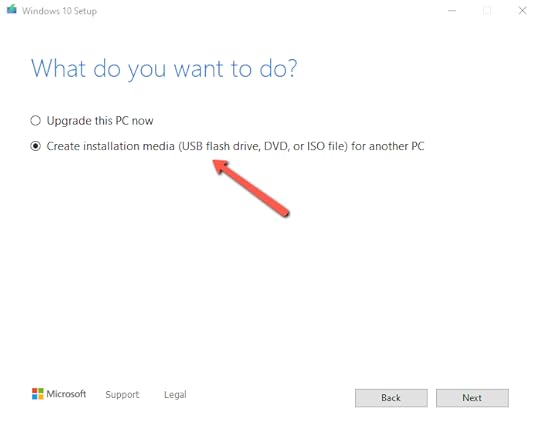
Click Next.
On the next screen, make your desired selections about language, etc. The defaults were fine for me.
Click Next.
Now you have a choice to make. Depending upon the media you’re using, select accordingly:
For USB stick – click the radio button next to USB flash driveFor DVD or CD-ROM – click the radio button next to ISO fileIf you choose the ISO file, you’ll have an extra step in burning the file to your DVD or CD disc.
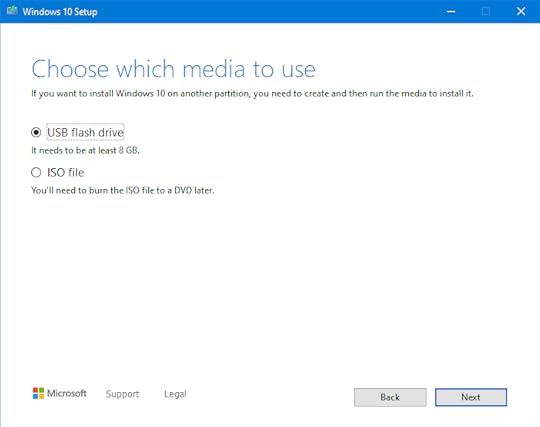
Click Next.
Select your drive from the list.
Once you click Next, the program immediately begins preparing your installation media, so be sure that’s what you want to do. Any files on your USB stick will be erased.
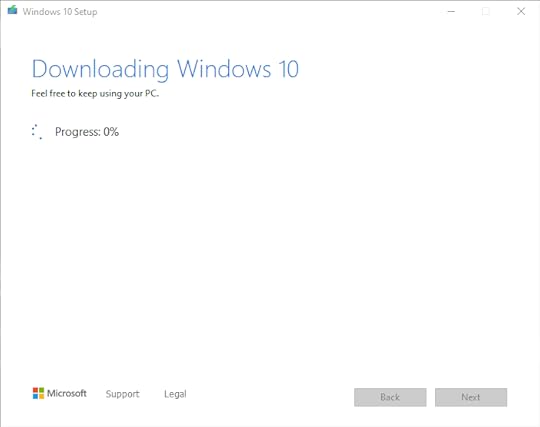
Creating the installation media takes several minutes depending upon the speed of your computer. For me, it was 45 minutes to an hour. I walked away and let it work.
When it’s done, click Finish, remove the media from your computer and insert it into your locked Windows 10 computer.
BIOS – Booting the Locked Computer to Your MediaFor screenshots of this section, watch the video below.
This procedure isn’t for the faint of heart, we’re going to be going into the BIOS, and later on, we’ll be doing some heavy lifting with the Command Prompt, so get ready.
Don’t worry, if you follow the steps exactly, you will be golden. You can do it!
If the computer you’re trying to unlock has a BIOS password, you’ll need to follow these steps – https://youtu.be/0lxwvCu8XJc
You need to find out what keyboard shortcut gets you into the BIOS per the manufacturer of the locked computer. Here’s a list that should have you covered – https://www.tomshardware.com/reviews/bios-keys-to-access-your-firmware,5732.html
Turn on the locked PC, press, and hold whatever key combo you need to get into the BIOS while it’s booting.
Once you’re in the BIOS, you want to access the Boot section and look for where the boot order is listed.
The list should begin with Windows Boot Manager.
Arrow down to the list and highlight your drive: either USB or the DVD/CDROM.
Use F5/F6 to move it to the top of the list. F6 moved it up for me.
Press F10 to Save and Exit.
The computer will now boot to your media.
Gaining Access to the Locked Windows 10 ComputerFor screenshots of this section, watch the video below.
Once the locked computer has booted to your installation media, click Next on the first screen with the language, etc.
On the next screen, pay attention, click Repair your computer in the lower-left corner. DO NOT click Install now. This will erase everything on the locked computer.
Click Troubleshoot.
Click Advanced Options.
Click Command Prompt.
In the command prompt, type C:\
Press Enter.
The prompt will open the C drive for you which is the main drive for most PCs by default.
You don’t see anything on the screen, but the command prompt will now read:
C:\>
There will be a blinking cursor next to that where you can input your next command.
Type CD WINDOWS\SYSTEM32
Press Enter.
The prompt will now read:
C:\System32>
There will be a blinking cursor next to that where you can input your next command.
Type COPY UTILMAN.EXE C:\
Press Enter.
The computer will make a copy of that file and display the following prompt again:
C:\System32>
Type COPY CMD.EXE UTILMAN.EXE
Press Enter.
The computer will make the cmd file into the utilman file, so when you click on the Ease of Access on the startup screen later on, you get an Admin level command prompt. You will then use this window to create a new user and make that user an Administrator of the locked computer.
Type exit.
Click Continue to boot the computer.
Remove your DVD/CD or USB drive. We are finished with it.
Click the screen like you’re going to log in and click the Ease of Access icon in the lower right corner.

This will open a command prompt window. This is an Admin level command prompt.
You’ll see this:
C:\WINDOWS\System32>
Type NET USER
Press Enter.
This will show a list of the accounts on the locked computer.
Type NET USER Owner 123456 /ADD
NOTE: You can replace Owner with a different desired username and 123456 with your desired password.
Press Enter.
You should see:
The command completed successfully.
C:\WINDOWS\System 32>
If you repeat the net user command, you’ll now see the new account you created in the list.
NOTE: You may also see an error message that says “The command completed with one or more errors.” You can ignore it.
Now we need to add the new user you created as an Administrator.
Type NET LOCALGROUP ADMINISTRATORS OWNER \ADD
Press Enter.
You should see:
The command completed successfully.
C:\WINDOWS\System32>
When you type NET LOCALGROUP ADMINISTRATORS and press Enter, you should see your new account in the list.
You can now log in to the locked computer with this account.
Type exit.
Press Enter.
Click Restart.
Click the username of your new account in the lower-left corner and type your password to log into your new Administrator account.
Windows 10 will go through the normal set-up procedure for a new user.
Access Accounts for Other UsersNavigate to the Users folder in Windows by double-clicking the C drive in File Explorer under This PC.
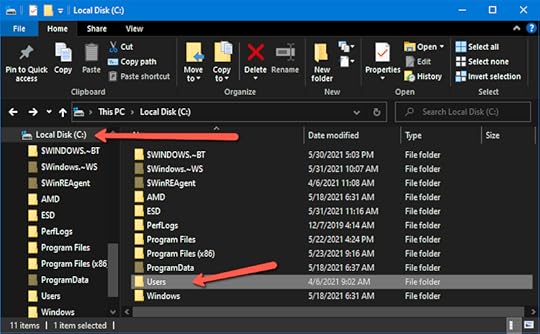
Double-click any user inside the folder and you’ll get an error message telling you that you don’t have permission to access the folder. Click Continue and wait for it to load. Depending upon the number of files, this could take several minutes or even a couple of hours. The users data will load and you’ll be able to view all of the folders and files.
Here’s a video from a guy a lot smarter than me who helped me learn this procedure and solve a problem. If you found this helpful, give him a like and maybe a subscribe.
If you found out how to unlock computer without password Windows 10 with this article, I’d love to hear from you!Drop a comment below if you have time and be sure to check out the other problems I’ve solved for myself and then documented to help you solve them as well – https://heyyoava.com/category/i-solve-problems/
May 22, 2021
Cat Litter Pellets – The Clay Way is the WRONG Way
 Look at that guy! This is Leonardo DiCatrio, Leo for short. He is my sanity.
If you’re like me, as a cat lover, you’ve probably had cats all of your life. If you’re as old as me, you remember cat litter before it clumped. You’ve probably tried cat litter pellets before without real success. If you’re still doing clay, it’s the wrong way to do cat litter.
Hear me out.
You’ll be glad you did.
A Brief History of Cat Litter

The first commercial cat litter became available in 1947 and was invented by Ed Lowe.
Prior to the clay cat litter that Ed created, sand was used (More on this later). Since the clay was much more absorbent than the sand, it was widely adopted. Pretty soon competitors were coming out of the woodwork. Fast forward to today, and cat litter is a $2 billion per year industry.
5 billion pounds of clay are mined annually, and it all goes where? Landfills.
I’m no environmentalist, but I do believe we should be doing our part the best we can to reduce the amount of waste going to landfills.
The Clay WayI used clay litter for 40 years. I’ve had cats since I was 5 years old. I remember when clay litter basically looked like a litter pan of gravel and it came in paper bags like cement. The first marketing gimmicks were scent crystals. They were supposed to make things smell better, and they worked better than just plain cat litter.
This original litter absorbed urine and feces could be scooped from the box. The litter didn’t need to be changed completely until the smell became a problem.
I think the clumping variant showed up at some point in the 90s, maybe the late 80s.
Made of bentonite clay, this version of clay cat litter stuck together in a clump when it got wet, aka the cat peed. This “clump” could then be scooped from the box along with the feces. This resulted in the litter lasting a lot longer than its predecessor.
It also didn’t take as much because you didn’t need to change the entire litter box out as often due to the smell.
Over the years, clay cat litter has varied by container, weight, and scent, ad nauseum.
It was the price we were more than willing to pay to keep our beloved furry companions.
There’s Got to Be a Better WayA few years ago, I began looking for a more cost-effective alternative. I have 2 cats, and it seems like they eat the cat litter we go through it so quickly.
Paying $12 and $13+ for 20lbs of clay cat litter twice a week was getting old. There had to be a better way.
The first thing I tried was sand. I didn’t know this was what was used before clay cat litter was invented. A bag of play sand was super cheap, so I bought some.
There were several problems with using sand as cat litter:
It tracked worse than clay litterIt didn’t absorb the urine for beans. The entire box would be wet within a couple of days, I was going through the stuff 4 times as fastIt was heavyIt wasn’t available at the grocery store like official cat litterThis experiment was short-lived. I returned to clay cat litter, but I was still looking for something better.
That’s when I came across this video:
Becky and that video have changed my life for the better and saved me hundreds, maybe thousands in the last 2 years.
Cat Litter Pellets are Far Superior to Clay Litter
I tried a popular brand name of cat litter pellets back in the mid-90s, and I was unimpressed. The stuff disintegrated into a soggy pile of sawdust that was impossible to get out of the litter pan without washing it out with the hose.
Again, I gladly returned to my scoopable clay cat litter without looking back.
The part I didn’t know then about using cat litter pellets was that a sifting box was needed.
The information that Becky provides in the video above was golden. It was the whole picture on how to use cat litter pellets and she outlined the benefits so nicely. I had to try it.
I back her on everything she said in the video.
Cat litter pellets are:
CheaperDust-freeSmell greatEasier to useA no-brainerAfter finding Becky’s video in 2019, decided to try cat litter pellets by duplicating her system. I bought 2 of the sifter boxes she recommended from Amazon. https://amzn.to/3f9ZEos
I’m not going to lie, the transition took 2 to 4 weeks.
I set out the new sifter box with the cat litter pellets in addition to their old litter boxes. My 2 cats were uninterested. They didn’t use the box at all at first.
Each time I cleaned out their old box with the clay litter in it, I would throw in a few cup fulls of the cat litter pellets. Eventually, the clay box had more pellets than clay and the cats started using the new box with only cat litter pellets all by themselves.
The last step was to get rid of the clay litter box altogether. I haven’t looked back since.
I buy my pellets at the Tractor Supply. They are packaged as equine bedding. I buy them 2 bags at a time. The bags are 40 lbs and cost $5 each, and I do mean a whole 40 lbs! Prepare to lug!
Two bags is enough to last for about 3 months in 2 to 3 litter boxes.
If you don’t have a Tractor Supply store where you live, you may be able to find the same thing marketed as pellet fuel for burning in wood stoves at your local home goods store or Walmart. They will cost quite a bit more than the bedding alternative, so it might behoove you to find where you can get the bedding in your local area.
I went from spending $24 a week give or take on cat litter to $10 every 3 months. The savings are significant, to say the least! Dang, Becky!
I Want to Hear From You If You Try Cat Litter PelletsDrop me a comment below. I’d like to hear from you and/or answer your questions.
Got more problems? Here are the ones I’ve solved so far through various means – https://heyyoava.com/category/i-solve-problems/
May 17, 2021
Roku TV Not Connecting to Wifi

A few years ago, I upgraded my television. It’s nothing fancy. I have a 55-inch Hisense Roku TV. It was a heck of a deal for under $300. It was GREAT for about a year until I ran into the problem of the Roku TV not connecting to wifi.
I consulted Google. I tried everything:
“Press Home 5 times, press Fast Forward, Pause/Play, Rewind, Pause/Play, Fast Forward to…” I don’t even remember what that was supposed to do. Clear the cache or something.
I even did a factory reset on the whole shebang, but still the same problem: Roku TV not connecting to wifi.
I was baffled. Nothing changed as far as my wifi network. I hadn’t upgraded my modem or router. The TV simply would no longer connect to the network.
I resorted to plugging an old Roku stick into the TV and moving on with life.
For the last couple of years, I’ve Googled the issue periodically just to see if there was anything new I could try.
The Problem with the Roku TV not Connecting to WifiThis issue is compounded by the fact that there is no hope of something like a firmware update fixing the issue. If you can’t connect to the Internet, you don’t get updates.
It’s really a pain to have additional remote controls and crap because you can’t get your Roku TV to work properly. You also get robbed of some really great features. For example, once I got my Roku TV working with the method below, Roku built out an amazing guide for all of my channels that is just stunning. I’m so pleased with it that I can hardly stand it. I recently cut the cord to DirectTV, so that guide is HUGE for me.
I specifically selected a television with Roku because I believe the Roku software is far superior to the other Smart TV options on the market.
My parents have a Samsung Smart TV and it’s painful to use. So much so, that I got them a Roku box to use instead.
So, when the Roku TV not connecting to wifi problem persisted with my Smart TV, I was worried I had been wrong about Roku altogether.
Most recently, the remote for my Roku stick stopped working. I’ve been scrambling for weeks trying to find a solution and fumbling with the Roku app on my phone. The Roku app is good, but it’s not as convenient as a dedicated remote. After all, you have to wait for the app to load, and when your phone screen times out, it causes issues with the connectivity. It’s just not the best solution.
The best solution is if the built-in Roku software for my television would work! Before going through the hassle of configuring a new remote for my Roku stick, I decided to give the Roku TV software one more go.
After consulting Google and YouTube for the latest round of remote button gymnastics, I finally found a solution for my Roku TV not connecting to wifi.
The Solution to Roku TV not Connecting to WifiDisclaimer: The Roku TV not connecting to wifi is still an issue. I just circumvented it.
I still can’t get my Roku TV to connect to my wifi network, but I noticed that my television has an Internet port there beside all of the HDMIs and other things.
This triggered my “light bulb over the head” moment.
I have a few of these lying around: That is a wifi range extender and it happens to have a couple of ethernet sockets.
Could it work?
It was certainly worth a try.
It wasn’t too difficult to relocate this extender across the room and dig out an ethernet cable to connect the TV to it.
Bada boom, bada bing, the moment of truth.
My TV was still on the wifi connection screen.
I selected the option to set up a wire connection and BAM, my Roku TV connected to the Internet and started updating immediately.
I’m sure I danced a jig right there in the middle of my living room. My Roku TV not connecting to wifi was no longer an issue!
It’s been 2 days of bliss since I got this fixed. It’s so nice to have my TV working properly. The built-in software is so much nicer than that old Roku stick. I don’t have to use the phone app.
This method solves two problems:
The Roku TV not connecting to wifi issueWorrying about a repeat performance of the issue once I did manage to connect via wifiEven I had managed to get my TV reconnected to my wifi network, I would have been worried it would break again. Now that it’s hardwired in with the range extender, I don’t worry about that anymore.
Where to Buy a Range Extender?Amazon is probably your best bet. That’s where I got mine several years ago. Here’s an updated model from TP-Link for just under 20 bucks.
Don’t like TP-Link? Choose your own adventure – https://amzn.to/3eSZRvT
You may feel like you shouldn’t have to buy additional equipment to get your Roku TV to work, and I understand that. This device also extends the range of your wifi, so your other connected devices in the room with your TV will work with the Internet more efficiently.
Did This Information Solve Your Problem?I’d love to hear about your experience in the comments below.
If this is your first time at HeyYoAva.com, this website serves multiple purposes and this is actually the first post where I’m sharing from my personal experience. There is much more to come.
Keep an eye on this space – https://heyyoava.com/category/i-solve-problems/
January 20, 2020
A New Strategy for Leveling Up
I did some studying this weekend, and it’s high time that I develop a plan, implement it, and take my small empire to the next level.
GOAL
Create content that helps and inspires while generating a full-time income that meets my financial goals.
That goal includes a lot of ideas. There’s a certain path I’d like people to take with me, and there are certain people I want to help. I will be looking for ways to target a specific audience.
For example, I would like to help people coming out of prison and looking for legit ways to make money. I do not want to work with prisoners/ex-cons directly. I’d love to, but I can’t. I want to create content to help them find meaningful ways to support themselves well.
I want to help people who are juggling minimum wage jobs trying to scrape by.
I want to help people in my state and community.
I want to help people who are struggling.
I’m not looking to be a savior, I’m looking to share THE Savior, Jesus Christ without ramming religion down throats. I want to do these things because these are the desires given to me by my Heavenly Father. It’s up to YOU to decide how that relates to you if at all.
WHERE – My Sandbox
This will be taking place mostly here, but some content will also appear on CandidCashflow.com. I will track my progress and share content that pertains to this journey here on HeyYoAva.com while podcast content and money-making stuff will go on CandidCashflow.com.
Here’s my Goals page where you can follow along with my progress on my goals.
WHAT
I will be drawing from my personal knowledge of Internet Marketing as well as these two articles that I studied over the weekend:
How to Learn Digital Marketing for (Nearly) Free in 6 Months
The Wiki Strategy – How to Grow Your Blog to 100K+ Monthly Visitors – Disclaimer: I do NOT agree with using Wikipedia as a source.
Sometimes, all you need is a solid plan that has worked for someone else. The caveat is knowing that the “someone else” isn’t full of it.
I’m going to be choosing a minimum of 1 of each of the following:
Acquisition Skills
SEOSearch Engine MarketingAdvertising
Social MediaAffiliate MarketingInfluencer Marketing
Viral MarketingPublicityCommunities
Other Platforms
Retention Skills
Email MarketingCommunity Building
Social MediaNotifications
Retargeting
Engagement Channels
FacebookTwitterInstagram
SnapchatTik TokPinterest
Conversion Skills
CopywritingSales
Landing Page DesignEmail Marketing
Retargeting
Here’s my stack that I chose:
SEO/Blogging, Other Platforms
Email Marketing
Copywriting
For my “other platforms”, I’ll be syndicating my content from both websites to Medium and LinkedIn Articles just to name a couple. I will be researching ongoing opportunities and creating a product on where and how to syndicate content.
I will continue writing my list every day, and I’ll be testing ways to get more opt-ins.
I’ve chosen Facebook as my engagement channel. It was between Facebook and Twitter, and I feel like more people use Facebook so it’s more likely that my audience will be there. I will be using Pinterest as well. Other social media posting will be automated.
What a great opportunity to practice and improve my writing!
This is where I’ll be focusing in an attempt to level up my online business. I am hoping to phase out client work.
TRACKING
I’m going to be tracking my experiments using a copy of the spreadsheet from the article above. I made a template in Google Sheets, so you can grab it as well. Just click the link and select File>Make a copy to add it to your own Drive.

Initially, I will be focusing on my acquisition channel: SEO/Blogging.
I will be making my opt-in form the most prominent feature and running experiments to drive traffic to it.
I will keep this post updated, but most of my progress will be chronicled on my Goals page. When I create new content in regard to this journey, I’ll notify my email list first, so, be sure to subscribe if you’re interested in following along.
June 18, 2019
Ebook Formatting in 6 Steps – Easy Tutorial Using Free Tools!
Ebook formatting can either be super simple or complicated. It’s completely up to you.
Y’all know me! I like to keep things simple!
It is with that in mind that I’ve developed these steps to format ebooks for Kindle Direct Publishing, other self-publishing platforms, and aggregate publishers.
In a hurry or just want a copy of this tutorial?
I’ve compiled this information in a PDF for you convenience. Take it with you. I hope it helps you in your self-publishing journey!
Grab The PDF!
Usually, if you’re in the ebook formatting phase, then the hard part is over.
Con gra tul ati on s!
Before we go further, I want to let you know about a special one-time offer just for you. Yes, you, reading this right now.
If you’d like to forego the learning curve of formatting your own ebooks, you can hire me to do it for you at a super great price of only $50. That’s it.
Just $50.
To be eligible for this offer, you can be a first-time client or an existing one, but you can only use this special pricing ONCE. Your manuscript shouldn’t be overly complicated containing tables or be more than 20% images. This is up to my discretion. Get in on this offer and advance another step on your self-publishing journey!

Find out more about the self-publishing services I offer, my other skills, and pricing.
Back to the Ebook Formatting Tutorial

If you’re a first-time publisher, there is no other feeling like seeing your own work on a huge platform like Amazon for the first time.
These are the exact steps that I have used to publish my own books.
These are also the exact steps that I use to format books for clients.
The prerequisite for these steps is to have the manuscript you are going to format in Word document format.
The simplicity of this task may leave you wondering why we’re not adding page numbers, fancy fonts, or other formatting elements.
The eReader settings dictate the look and feel of the book rather than the formatting. Spending loads of time on fancy formatting is a waste of time. eReaders don’t use page numbers.
It really is this easy to format for eBooks.
Enough yapping…let’s jump into these steps!
Step 1. Upload the manuscript to your Google Drive.
What? No Google Drive?
Do you have gmail?
If so, you have 15GB of free storage space available to you at https://drive.google.com.
If not, this tutorial requires it. It’s free, but you’ll have to create a Google account to get access.
Why Google Drive?
Because it is super simple to use. It doesn’t have all the bells and whistles that Microsoft Word has, but it has all the ones you need and eliminates the confusion.
The default styles in Google Docs which is contained inside Google Drive are the exact ones you need to format your eBook for KDP and other aggregate publishing platforms.
This is the main reason I use Google Docs to write and format my books.
There are many other benefits as well like:
Google Docs autosaves every time you make a changeYour Gogole Doc is automatically saved to the cloudIt’s FREE
Step 2. Open the manuscript in Google Docs.
From your Google Drive, right-click the file, hover your cursor over Open with, and select Google Docs from the fly-out menu.

The manuscript will open in your browser.
I would recommend editing the document name in the top-left corner to indicate that it’s the formatted version so when you download it as a Word document when you’re done, you don’t get it mixed up with the original file.

Step 3. Format the Title Page.
Your Title page should contain 3 elements:
The book titleThe book subtitle if applicableThe author’s name
Sometimes, a title page may contain other information like copyright, publisher, etc.
Highlight the title and select the Title style.

Highlight the subtitle, and select the Subtitle style.

Highlight the author name and increase the font size a bit.

Highlight all three items and center align them on the page.

Finally, place your cursor after the author name, and press the Ctrl+Enter keys.
This inserts a Page Break and drops the rest of the text in the manuscript down to the next page.
At this point, you should have something that looks like this:

You are free to make this page aesthetically pleasing to your eye.
I like to adjust the font sizes and drop the author name down a few lines. I end up with this:

Normally, I would tell you to click Save right here, but you don’t have to worry about that because Google Docs autosaves each time you make a change to the document.
Isn’t that GREAT!?!
Step 4. Insert page breaks after each section of the manuscript.
Drop down to the first page after your Title page and press Ctrl+Enter again.

This will insert another Page Break and create a blank page. This is your future Table of Contents.
The first section of the manuscript isn’t always the first chapter. Some authors have additional copyright information, dedications, forewords, prefaces, etc.
Whatever the case, you want to insert a Page Break after each section and chapter of the entire manuscript.
If you end up with extra spaces after the Page Break, press the Delete key until the next section is at the top of the page.

To eliminate this problem, place the cursor directly to the left of the next section before creating your Page Break.

Step 5. Format your headings and subheadings.
Highlight the title of each section of your book, and select the Heading 1 style from the drop-down.

If you have subheadings, you are able to differentiate up to 3 levels deep using Styles in Google Docs before you have to manually format them with the font tools.
In my experience, I rarely need anything deeper than a Heading 3, and even if I need a Heading 4 through 6, it’s not something I need to include in the Table of Contents so it doesn’t matter.
You are free to center align your headings or format that as you prefer.
Step 6. Insert your Table of Contents.
Scroll back up to the blank page you created previously for your Table of Contents.
If you don’t have a blank page yet, you can create one by creating a Page Break after your Title page
Click Insert, hover your cursor over Table of contents, and click the with blue links option.

This will insert a linked clickable Table of Contents into the manuscript.

When a reader taps or clicks these links, they will be taken to the corresponding section of the book.
Download the manuscript as a Word document.
This is the final step.
The Word document you download will be ready to upload to Amazon KDP or an aggregate publishing platform.
Click File, hover your cursor over Download as, and select Word document from the fly-out menu.

That’s a Wrap
That’s all there is to it. Easy, right? Share this tutorial with someone who needs help!
Before you go…

Get started absolutely free with the DIY Publishing Course for Beginners – https://heyyoava.com/freeselfpub
See everything offered under the DIY Publishing umbrella including courses from yours truly, and other experts! If you want to learn how to build a self-publishing business and build an unstoppable brand, this is the place to do it!
Multiple payment options available including MONTHLY as low as $10!
>>>>
https://heyyoava.com/DIYselfpub
<<<<
The post Ebook Formatting in 6 Steps – Easy Tutorial Using Free Tools! appeared first on HeyYoAva.com.
January 18, 2019
My Personal Struggle with Art and Coming Full Circle
 Braille by Ava Fails
My journey as an artist has been uncertain, insecure, sordid, and honestly, painful.
My Dad is quite talented in art. He can draw and carve among other things. Despite multiple attempts, he never quite figured out how to turn his passions into income streams.
Once I showed the same potential, my parents began to nurture my artistic creative side when I was 10 years old.
I didn’t really impress myself until I was about 15 when I drew a rose while looking at a picture of it on a bookmark. I started drawing all the time.
The more I drew, the more I felt like this was my purpose. I was supposed to do art, and all of my goals moved in that direction.
 Angel after Albrecht Durer drawn by Ava
At 18, I started transfer courses at the local community college. There were 1 or 2 art courses I was able to take, but the rest would have to wait until I went to a university. I focused on getting all the other stuff out of the way, so when I got to the university, I could concentrate on art…I did that for the next 3 years.
Let me pause to say that my education is a long, insane tale that perhaps I’ll share in another post although I don’t know why I would.
Anyway, 6 years later, I was accepted to Campbell University after a failed attempt at working for a few years to save money. Here I was, a sophomore at 24 living in the dorm when most people my age were 2 years post-graduate out in the workforce making a life.
5.5 years and a transfer later, I still had no degree.
Still don’t.
Back into the world of dead-end jobs, I went. Only now, I had around $50K in student loan debt.
There are so many facets to this story, but I believe the catalyst of all of this abounding failure was because I just couldn’t focus for the long-term. I just didn’t have what it took to push through to the end in spite of the obstacles I faced. For me, these obstacles were insurmountable.
I stopped taking medication for A.D.D. at age 12. Back then, there was ONE med for A.D.D., and it was believed that medication (Ritalin) had the opposite effect after puberty.
My alternative was Prozac, and it was so controversial at the time that my mom didn’t want me to take it. So, I didn’t. Over the next few years, I learned how to deal…or at least how to deal in the sense of not disrupting others. I don’t think my ability to focus ever evolved or improved. I just learned how to not seem like I was unfocused.
 One of my poems.
I started writing.
I focused heavily on writing because I was halfway decent at it. Not to mention, it seemed that I could produce written pieces a lot faster than I could produce a piece of art, and I could certainly sell my writing much easier.
Also, the writing was mine alone. It was effortless to produce something original whereas, with art, I was always copying someone. While I could draw anything on this planet that I could see, I didn’t draw well from my head.
I didn’t know how to develop what I was seeing in my mind onto paper. It never looked the same. It never looked right.
For essentially, the next 20 years, I drew when it served my purpose like when I needed a gift for someone or something like that.
In the last year, I have learned about so many opportunities for artists.
When I started college, I felt like in order to make money with art, I had to go digital. I suck at digital art. The tools that would allow me to connect with my art via a computer in the same way I can with a pencil to paper are more than I can afford. But now…I see so many traditional artists creating their place in art regardless of their medium.
This rekindled the desire in me to revisit my art.
I happened upon a video on YouTube, and I’ve talked about this a bit on my podcast. It was the first studio vlog by Catherine of Katnipp Illustrations. Catherine is a young illustrator who runs her own shop in the northeast of England. It’s all so quaint and charming.
Anyway, in this video, she was creating stickers to sell in her Etsy shop. She drew them with a red pencil in her sketchbook and went over them with a darker pencil once she achieved the look she wanted. As I watched, something clicked, and I thought to myself, “I could maybe make some of this stuff in my head look the way I want using that technique.”
So, I started sketching, and things started happening.
 One of my first sketches from my head.
I’ve drawn the first things out my head EVER.
I’ve started selling designs online.
I’ve figured out how to convert my line art into digital files even with a crummy picture.
I have hope.
I have plans to begin broadcasting the creation process.
Sometimes, I feel like I’ve wasted all this time when I could have been developing my talent to a higher level. Then I think, but I’ve essentially spent a massive amount of time developing my writing. Now, my abilities are multiplied. I’m really interested to see what
 A recent piece that was inspired but not copied!
God does with that.
I have not arrived.
I never create anything that I’m completely happy with. I am a typical artist.
At its core, art is a tenuous sacrifice given unselfishly by necessity. It’s bleeding. It’s vulnerable.
Art heals.
Art is how we deal with the crap of this world. It’s how we self-soothe. It’s how we stop the bleeding.
So, I’m ecstatic to be in this place, but I’m also a bit scared of screwing it up. All I can do is do, and hope that in doing, I can be.
I hope that my struggle with and about art is over. I hope this is a reconciliation, and that from it, amazing things happen.
For years, I’ve been writing how I wanted to do something amazing, and how it’s eluded me. Perhaps this is my chance. I’m not looking for fame, I’m simply looking to be fulfilled, and to fulfill my purpose somehow through this.
About a year or so ago, after much pleading, God revealed my purpose to me: “Help as many people as you can whenever you can for as long as you can.”
There will be mistakes…but I will live out the rest of my life trying my face off to be in a place where I can do just that.
The post My Personal Struggle with Art and Coming Full Circle appeared first on HeyYoAva.com.
January 16, 2019
Keyword Research Free Tools and Methods – The Candid Cashflow Podcast – Episode 55
 Keywords.
Most of us know that keywords are well, the key to selling your product, getting your content noticed, and building your audience online. Yet, these words and phrases elude us. They are the holy grail that we can’t quite seem to find, but that’s not really the problem. The problem is that everyone else is looking for them too!
Some people stash their keywords out of sight for fear of someone using them more effectively, or just finding them in the first place to steal their thunder.
Keywords can mean the difference between money and no money.
They can be the difference between business and no business, so it’s understandable to an extent, right?
Today, I’m going to show you some free keyword tools that I use that can give you a leg up in the game and how to optimize your keywords on multiple platforms, so stay right where you are!
Do you have a book idea or even a book ready to publish? If you’d like to skip the trial and error of learning to publish it yourself, I highly recommend the DIY Self-Publishing Course from Dale L. Roberts. Inside, you’ll learn all you need to know to publish your book. Dale’s course is the absolute best because he continues to update it with new content. Soon, he will release his new course on publishing low and no content books! You may remember we talked about that in Episode 38 of The Candid Cashflow Podcast. Don’t snooze on Dale’s course! He has 2 great price plans for any budget. Check it out at HeyYoAva.com/Dale.
The Free Keywords Everywhere Tool
This first tool is one of those that makes you say, “How in the world is this thing free?”
This tool will show you search volume, cost per click, and competition data in MULTIPLE places online. Keep in mind though, the data is all Google-based even if it’s showing you data on Amazon or someplace else. Even if you use a paid application, they all pull estimated data from Google for all of the other platforms. This is just the lay of the land.
Well, what’s the name already!?! Sorry, this tool is Keywords Everywhere. It is a free browser extension for Chrome or Firefox that adds the aforementioned search data to your searches on multiple platforms.
Once you install the extension and add your free API key, you will notice the search data appearing now when you search on various platforms. Just follow the prompts on how to obtain your key.

You’ll also notice a couple of extra buttons in the lower right corner of your window:
Export CSV – does exactly what it says. It exports your current search data to a CSV file that you can open with Microsoft Excel or Google Sheets.
Add All Keywords – adds your current keyword search terms to your My favorite keywords list inside Keywords Everywhere.
You can view this list by clicking the Keywords Everywhere icon that is now at the top of your browser with your other extensions.

I’ll leave it up to you to peruse the other settings in Keywords Everywhere, but I assure you it’s a very simple tool to use. You can also use it to analyze different pages on your website or maybe even your competitor’s pages. Simply navigate to the page you want to get data about, click the Keywords Everywhere icon, and select Analyze this page. It will return information such as:
The SEO title of the page
The meta description if available
The word count
A list of keywords and their data
Needless to say, this tool is crazy useful, and as always the best part is that it’s free! Keywords Everywhere doesn’t retain any data from you as a user including your keywords.
Keyword Suggestion Tools
There a couple of good free keyword suggestion tools available to you as well. If you’re stumped or you need some good variations on your main keyword, these tools work great for that.
Keyword.io
Keyword.io does have a pro account feature, but you can get plenty done without it. I do suggest that you create a free account so you have more searches available to you at one time. I believe they limit your search to 5 or so without the free account.
To use this tool, you simply type your keyword into the box.

Keywords.io will then return hundreds of keyword suggestions. You can either go through the list and handpick the keywords by checking the boxes next to each one or you can add them all by clicking the Add all button on the results page. Once you do that, you’re able to download the list as a text file, copy the list of keywords to your clipboard, or import the selection into the Amazon keyword list tool.
I usually use one of the first two options for general keyword research. Once you have your list, we’ll discuss how you can analyze it in the next segment.
Ubersuggest
Ubersuggest is a keyword suggestion tool from Neil Patel. Neil puts out a ton of great information and free tools all about SEO and traffic. If this is an area of interest for you, then I suggest you check out his content. He is highly qualified in this arena.
To use Ubersuggest, simply type your main keyword in the box.

Ubersuggest will return a lot of data on your keyword. This data is quite easy to understand, and if you don’t understand just click the question marks next to the various pieces of information for a concise explanation. Ubersuggest is very useful for getting a drilled down analysis of the keywords you’d like to use.

If you scroll down and click the View All Keyword Ideas button, you get the option to copy the list to clipboard or download it as a CSV file.
Autosuggest
Autosuggest can be extremely powerful and informative as well! It’s not a tool per se, but rather something that most search engines build into their system.
You should understand that most of the websites we use online that may not fit in the search engine category are in fact, search engines. For example, Amazon is a search engine. Pinterest, Twitter, eBay, and YouTube are also search engines. That is why keywords drive all of these services.
To use autosuggest to find keyword gems, open an incognito browser window. You can do so by pressing Control, Shift, N. This opens a fresh browser that doesn’t contain any cached information or search data that is tailored to you based on your previous usage. This allows you an unbiased view of the search data you’re looking for.
Navigate to whatever platform you want to optimize your keywords for. I’ll use Amazon for an example.
I’m searching for scarf.

When you begin typing the keyword, you’ll notice a drop-down below the search with a list of suggested search terms that are related to your keyword. These are here because these are the terms that shoppers are already typing into Amazon to search for products they want to buy.
The same thing happens when you type a search almost anywhere. The difference is the site on which you’re searching. As each site has their own suggestions.
Since most platforms don’t share this data outside their website, it’s a great way to get keywords that are tailored to that site. If you have Keywords Everywhere installed, you’ll also get the search volume and other data. You know right off the bat if the Internet as a whole is searching for that term since Keywords Everywhere’s data comes from Google, and Google is the one that sends searchers to sites like Amazon in the first place.
If you do nothing else to find keywords, use autosuggest.
Bulk Keyword Analyzer
So you have this list of keywords from your research. It could be a list that you downloaded or copied from Keyword.io or Ubersuggest or one you’ve brainstormed yourself. How can you analyze them all at once?
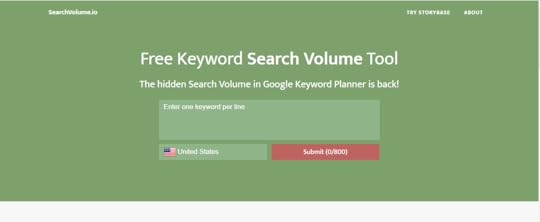
Easy. Copy and paste your list into the tool over at SearchVolume.io. You can analyze up to 800 keywords at a time.
SearchVolume.io will then return search volume data for your keywords.
Click the small arrow icon next to Avg. monthly searches to sort the data so you can view the keywords that are getting the most search volume.
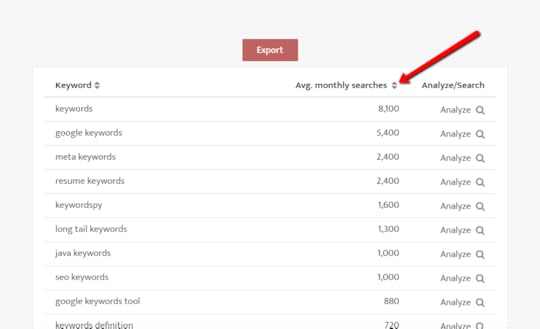
I wouldn’t bother to optimize for keywords with less than 500 average monthly searches.
Creating Your Keyword List
You don’t need hundreds of keywords. Amazon’s publishing platform, Kindle Direct Publishing only allows you to use 7 keywords. Keywords aren’t a “the more the merrier” type thing. A list of around 10 keywords max using the tools above should be sufficient for most anything you need keywords for…which is everything on the Internet.
Analyze your keywords for competition data one by one using Keywords Everywhere.
You should have a nice keyword list that you can use for whatever purpose you need it for. I suggest keeping a record of your keywords so you can tweak them for better results later if you need to. Searches change from month to month. What’s a good keyword now may not be great in the future. New keywords may evolve as time moves forward. Keywords can quickly become an ongoing project.
With these tools, you can make short work of it and it shouldn’t dominate too much of your time. You don’t need to be an SEO expert, you just need to know how to spot great keywords.
I would say that mastering keywords is probably about 50% intuition and 50% research skills.
How To Perform Keyword Research on These Popular Platforms
Now that we have a variety of keyword research tools that we can use, we are ready to apply our knowledge and try to tame the keyword beast.
You might be optimizing for multiple platforms or perhaps just one or two are your goal. Whatever the case, I’m going to cover a few here to at least give you a leg up in the keyword race.
Your first and best tool is always the autosuggest for the platform you are optimizing for. Don’t forget to open the website in an incognito browser window by pressing Control, Shift, N.
1. Amazon
For Amazon simply begin typing in your search term to see what comes up. I have another free tool that I use to expand the autosuggest results on Amazon. It’s called AMZ Suggestion Expander. I don’t know if it’s available for any other browsers besides Chrome, but it greatly multiplies the autosuggest results on Amazon.
Be sure to grab the show notes so you get all the links and goodies at HeyYoAva.com/Episode55.
Using the AMZ Suggestion Expander, you should be able to get more than enough keywords to analyze for whatever you’re selling. If you’re optimizing for books, be sure to select the Kindle Store for eBooks and just Books for paperbacks. You can do this from the drop-down menu directly to the left of the search box.

This may also apply if you are selling products that fit inside of Amazon’s other departments.
2. YouTube
I cover a lot more information on YouTube in Episode 50 of The Candid Cashflow Podcast where I discussed why you should start a YouTube channel and how to rank your videos.
However, we’ll do a brief recap. For YouTube keyword research, I use a tool called TubeBuddy. You can find out more at HeyYoAva.com/TubeBuddy. What TubeBuddy does is give you a lot more information from YouTube than you normally get. They do have a free account which will offer you plenty of keyword insight to get started. Their paid offerings are insanely cheap and if you have fewer than 1,000 subscribers, you can utilize their tools for only $4.50 per month.
Once you have TubeBuddy all set up, when you type search terms into YouTube, it returns search volume and competition information to let you know if your keyword will be easy or difficult to rank for.

This gives you an idea of how your video will perform before you even upload it. When I create a YouTube video, I compile a list of 10 keywords or so that I’ve researched just by simply typing in keywords and looking for ones with a decent rating according to TubeBuddy.
Likewise, on the back end, TubeBuddy provides a list of best practices, tag tools, and other optimization prompts for helping your videos go as far as possible.
3. Etsy
KeywordToolDominator.com has an Etsy keyword tool that provides you with 3 free searches per day. Keywords Everywhere also provides search data for Etsy. Otherwise, there are a couple of paid tools that work great for Etsy. One is EtsyRank and the other is Marmalead. Both of these tools cost a monthly fee though EtsyRank is the cheaper of the two.
Etsyrank is what I’ve used to generate sales in my own Etsy shop.
Simply use autosuggest and determine the search volume data using a different tool as we described earlier.
Advanced Keyword Research
It gets murkier the more you branch out from the search engines. Well, we say search enginessss, but we really mean Google. Google has dominated search for nearly 2 decades now, and nothing points to that changing any time soon.
There are hundreds of tools out there for the different sites you may want to rank on. It really comes down to how much time, money, and effort you want to put into it. Just know, that keywords run the web. If you can master keywords, you can sell anything and build a following for your business or brand.
That’s a Wrap!
That’s it for this episode of The Candid Cashflow Podcast. I hope you found this information useful. This is really just the tip of the iceberg when it comes to keyword research.
Each episode of The Candid Cashflow Podcast is accompanied by a detailed blog post and downloadable PDF with the show notes containing all the links and bonuses. Links are in the description.
If you enjoyed this episode, I hope you will consider subscribing so you don’t miss what comes next! You can do so in your favorite listening app at HeyYoAva.com/candidcashflow. You can also request that Alexa play the latest episode by saying, “Alexa, play The Candid Cashflow Podcast.”
If you’d like to catch up on topics that we’ve covered in past episodes, check out the archives at HeyYoAva.com/candidarchives. You can also join the Cashflow Nation in our free Facebook Group at HeyYoAva.com/CashflowNation! I’d love to see you there.
It’s always a pleasure to have you listen.
Remember, we release a new episode each Wednesday.
Until next time, turning your passion into cashflow!
The post Keyword Research Free Tools and Methods – The Candid Cashflow Podcast – Episode 55 appeared first on HeyYoAva.com.
January 7, 2019
Find Your Best Life in Online Business – Course Launch and More! – The Candid Cashflow Podcast – Episode 54
I’ve taken an unplanned hiatus from The Candid Cashflow Podcast for a couple weeks in order to present this information to you.
As my listening audience knows, I work as a Virtual Assistant for the best clients on the planet. However, it has always been my goal to be able to move away from the service realm and really work for myself completely.
I recently partnered with one of my clients to bring you a new, fresh course on Social Media. This course is geared toward authors and self-publishers, but the information therein can be used for any industry.

The purpose of this post is not just to promote my new course, but I really want to dive into the story behind it.
The Un-Guru
I’m not here to sell you stuff and line my pockets with your hard-earned money.
Week after week, I bring you a podcast PACKED with information about how you can unharness yourself from the rat race, find financial freedom, and end your struggle.
I spent YEARS in jobs that didn’t fulfill me with bosses who had little regard for my life outside of work. It was nothing for them to call me in for an extra shift or ask me to work 2 to 4 hours over my shift sometimes multiple times a week. Every time I had to work extra ate into the time I had to build my business so that I could ultimately quit my “real job”.
That is an extremely frustrating and soul-sucking place to reside.
So, I’m not some guru trying to sell you my latest gimmick. I share free information with you every week. I’m here to offer you a comprehensive solution to Social Media for your business. This course is not too long and the information is actionable. You can take it and run with it…to the moon if you wish.
Long Tales of Struggle and Woe

I think all of us probably have a story similar to mine. In these times, getting the basics in life seems harder than it’s ever been. In recent decades, the American Middle Class has experienced increasing hardships just to live an average life. I’m far from any sort of expert on the economy or state of our society, but the struggle is palpable.
I found Internet Marketing back in 2006 when I was between jobs. I’d always wanted to be in business for myself, but as an artist was finding very little opportunity to make that happen.
I worked mostly jobs that were dead ends full of dismal days where my only goal was to make it to my next day off. Maybe if I savored those off days a bit more, they would seemingly last longer.
It was existing. I was merely surviving.
Have you been there? Most of us have.
So, when I found Internet Marketing, I spent hours and hours perusing Digital Point forums soaking it all in. I could write. There was no doubt in my mind that I could make money online.
I did, shortly thereafter. I made my first money online writing SEO articles for a few bucks. Very little of my early work remains online, but you can find it if you look around hard enough.
Holy crap, though, in order to make any sort of living, I would have to write a zillion articles, and would be just as burnt out as I was working for “the man”.
I kept it as a side gig and I did eventually find better-paying options.
Still, on the forum, I was seeing a lot of claims of these marketers pulling in some serious money. Man, I sure wanted that, and if content truly was king like they were saying, it would be mine because I could write!
I’m not the most business-savvy person on the planet. I’ll be the first to admit that. Just like with anything else, some people have a talent for business, some don’t…and some learn.
My learning has taken over a decade.
Friend, I have tried it all.
I’m still trying things.
I will be trying things until I die.
I have an insatiable WHY that has nothing to do with riches and everything to do with helping others. Sure, having things is nice, but giving things is even better!
 I have elderly parents who have never owned a home that wasn’t on wheels.
I live in a predominantly black and Hispanic neighborhood surrounded by needs.
In my area, kids go to school hungry.
Homeless people line the streets with their cardboard signs.
People are rotting away in jails and prisons for non-violent crimes.
I asked God…I pleaded with Him to tell me my purpose on this planet from the throes of depression. The answer finally came…whispered as is His way…”Help everyone that you can for however long you can with whatever you can.”
Everywhere you look, there’s a sob story and a piece of humanity that we’ve let down. My work will never be done.
Focus is Nearly Everything
Why has it taken me so long?
At 15, I found out that I could draw. I mean I dabbled before that, but that was the first time I impressed myself. I was set…for life. I’d do art.
I could and still can draw ANYTHING I can see. I can draw people and hard stuff like hands. I can reproduce any character, logo, or just whatever you can imagine.
My problem was and has always been that I don’t draw well from my head. I can’t just imagine up cool stuff. I’m also kind of a wreck with digital art. I’ve had applications and digitizer tablets galore, but suffered the disconnect of drawing down here and seeing it up there on the screen. Not to mention, finding the right settings, brushes, and all that other stuff to achieve the effect I’m going for was difficult.
A hundred small problems became an insurmountable hurdle for me.
I had no clue where to focus to find my groove.
All of my tries were gigantic failures.
For the better part of 20 years, I tried and tried and tried to figure out how I could use my talent to earn a living. I had no mentor to speak of and have spent so much time in a state of utter directionlessness.
I was diagnosed with Attention Deficit Disorder at age 10, and I attribute my lack of focus to that fact.
However, I also have something else…and that has been my absolute rock…I have an insatiable desire to NEVER GIVE UP. I just can’t. Sure, I get tired and sometimes I want to throw in the towel, but I always find some little pocket of motivation to step forward out of the depths.
Once I found Internet Marketing and realized what was possible, there was no doubt in my mind that it could be possible for me if I just put all the right pieces together. So, that’s what I’ve been doing for the past 13 years.
In the last year, so many parts have fallen into place.
You looking at one. You are witnessing it.
It’s Not For Everyone
Why am I writing this long, drawn-out post just to present a stupid course?
I want to relate to you.
If none of this plucks your heartstrings…if you can’t resonate with it, then my course probably isn’t for you and that’s okay!
I realize these are all first-world problems and there are many people out there who have it much worse than I.
Let’s Check Out the Course!
You get 1.5 hours of video content and 88 pages of PDFs to supplement what you learn. You know, so you don’t have to try to find something in the video every time you need a little recap.
I haven’t seen this taught anywhere else. Of course, I’ve not taken every course or read every piece of content available on the topic. My point is that I didn’t learn this from someone else. This is the result of my own testing over the last 4 years.

What you’ll learn:
How to create and optimize a Facebook Fan Page
How to create and optimize your Twitter account
What the heck to post to these that won’t eat up all your valuable time
How to automate 80% of your posts so you can focus on creating content for your brand
How to build a following
Some of the content is basic for beginners, and some of it is for anyone looking to improve their experience and learn how to market their products and services.
Here’s the table of contents:
Introduction
A little text and a 3-minute video. You can actually preview this section without paying.
Facebook Fan Page
A little text, a video, and a PDF that recaps the video with detailed instructions and screenshots.
Twitter Domination
A little text, a video, and a PDF.
Social Media Automation
A little text, a video, and a PDF.
Bonus Videos and PDFs
You know me…I love to pack in a bonus!
You get:
A video on creating graphics with Canva.
A PDF on creating book covers with Canva.
A video on how to find great content to post to your Social Media accounts.
My Twitter Domination ebook.
A PDF of more than 100 author and self-publisher hashtags.
The Course That Keeps On Giving
This is unprecedented…I’ve set up TWO payment options:
You can get lifetime access for $99.97 to everything forever.
You can subscribe for $10.00 per month and get access to everything for as long as you are subscribed.
Now, you might be wondering why you’d subscribe for the long term…well, because this course is not done. I’ll be adding content over time.
The initial offering shows you how to get established on Facebook and Twitter which is just a starting point. That’s where everyone  should be even if they never intend to expand their Social Media presence.
Launching in early 2019, I will be adding courses on Pinterest, Quora, and Instagram. These are the big traffic and revenue drivers for many online businesses.
Whether you choose the one-time payment or the subscription, you will automatically have access to this future content.
Sound Good? But Wait…There’s More!
No, no…not upsells and funnels and all that garbage. Don’t you hate that stuff? NO WEBINARS either! Ugh!
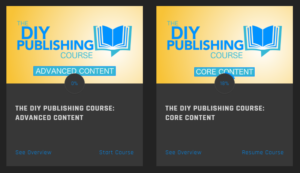
This course lives under the umbrella of the DIY Publishing Course from Dale L. Roberts.
Dale has created the most up-to-date and top-notch course on self-publishing available today. So if you’ve been through his course and you’re ready to move into the marketing phase of your self-publishing business, I have your next stop.
If you haven’t taken Dale’s course, then I highly, highly recommend it.
I don’t recommend it because I’m promoting it or because I’ve created a course to compliment it. Dale creates the best content available on self-publishing. He lives and breathes self-publishing because he is passionate about literature. He’s not some guru in publishing just to make a quick buck with ghostwriters and Virtual Assistants.
 That really resonated with me as someone who writes all of her own books. If it resonates with you as well, then I urge you to get connected with Dale. If you’re not up for investing in his course at this time (or mine for that matter), get a taste of what’s inside through Dale’s YouTube channel and his FREE Facebook group on Self-Publishing books.
You will not be sorry!
Dale has built one of the most amazing communities online that I’ve ever been a part of, and I’ve been in a lot! In 13 years, I’ve gone from forum to forum to Facebook Group to group. I’ve seen the drama and the catty mess that can happen in those places, and you won’t find any of that in Dale’s group.
You also won’t find him constantly trying to sell you things either! What you will find is an amazing community of like-minded people willing to help you whether you’re completely new or a seasoned writer/publisher.
Every week, Dale is involved. Group members are able to share links to what they’re working on in a dedicated thread each week. A group member is also highlighted each Friday.
Dale’s content is highly worth your investment whether that be time, money, or both.
Find Your Best Life
You’ve landed here and everything happens for a reason. If you’re looking to supplement your income and/or find financial freedom, Dale and I will teach you how.
And it’s not just us…with us comes a community more than 1000 strong of people doing the same thing producing their own content.
 There’s Dale’s wife Kelli of KelliPublish who is absolutely dominating the print on demand market. If you’ve listened to The Candid Cashflow Podcast for any length of time, then you’ve heard my interview with Kelli.
There’s Keith Wheeler! He focuses on self-publishing on a part-time basis in addition to his day job and produces some of the best tutorials I’ve seen!
There’s Em Louise Fairley who is super helpful in the Facebook group and works with clients to help them self-publish their books.
There’s Kevin Maguire who shares aspects of his own self-publishing journey on a regular basis from the frozen tundra of Ukraine.
There’s Anne Manera, a bombshell of an action taker who does awesome things in art and all things coloring books!
There Omanah Bultman who is just starting out. She’s a mom, a wife, a student, and gets the most done of anyone I’ve ever seen! She’s also trying to relieve her husband who is the sole bread-winner working 50 to 70 hours a week to provide for his family.
So, I urge you to connect and get involved.
We don’t push numbers, we don’t push products, our main goal is helping you find your way to your best life!
Other Links – Now is the time to Connect With Me!
Free Cashflow Nation Facebook Group – https://www.facebook.com/groups/cashflownation/
Twitter – https://twitter.com/CandidCashflow/
Instagram – https://www.instagram.com/candidcashflow/
Check out the insane growth on my Pinterest account since my episode just a few weeks ago – https://www.pinterest.com/candidcashflow/boards/
The post Find Your Best Life in Online Business – Course Launch and More! – The Candid Cashflow Podcast – Episode 54 appeared first on HeyYoAva.com.