
Ali Edwards's Blog, page 209
December 5, 2014
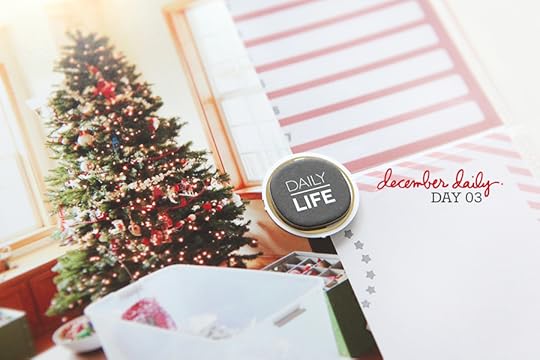
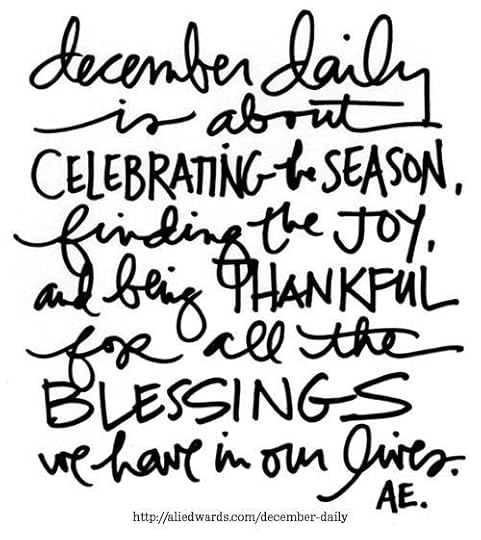
December Daily® 2014 | Day Four
Welcome to
December Daily® 2014 | Day Four.
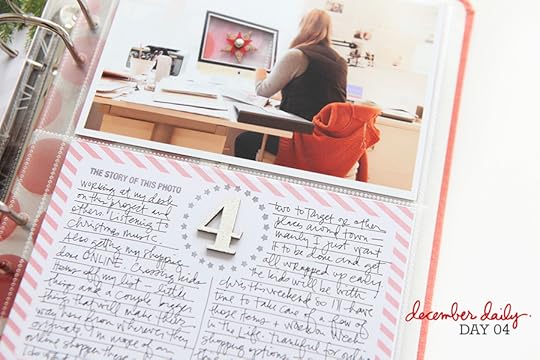
Do you have most of your gifts purchased already? I'm moving through my list so my story today is about sitting at my desk and shopping online. I know some people love it and others hate it (shopping online) - I'm in the love camp as it seems to simplify my shopping experience overall especially when I know what I'm looking for already (and my kids are pretty specific).
PS | Brene just
re-posted this great post from a few years ago that is such a great reminder of focusing on what's most important. Definitely worth reading if you feel yourself on the crazy train of more.
PSS | Remember again, small stories add up to one big December story. Don't feel like you have to re-invent the wheel. Look for one thing to include and move on with your day.
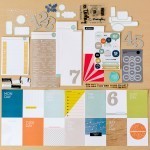
Here's a look at Day Four:
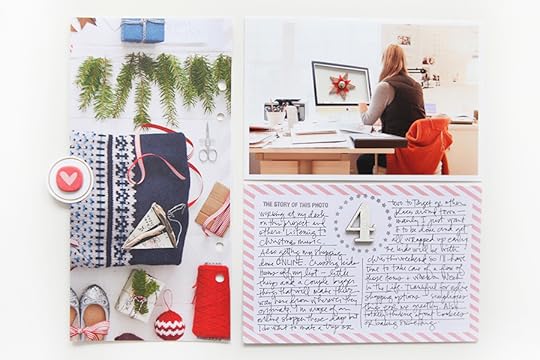
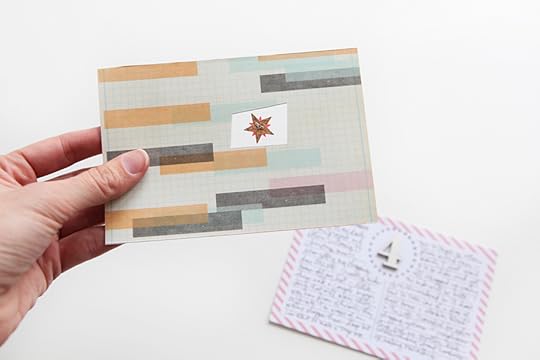
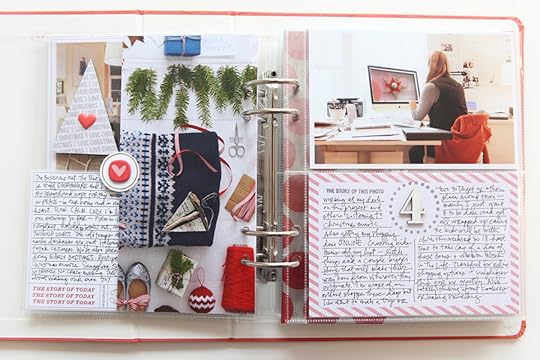
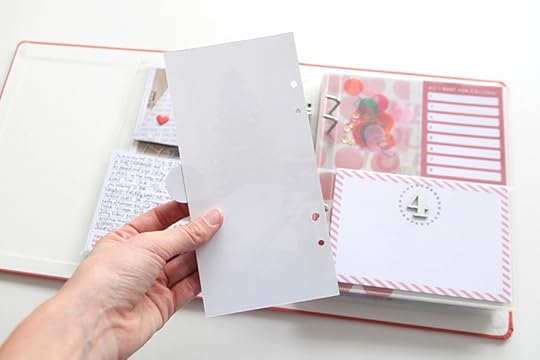
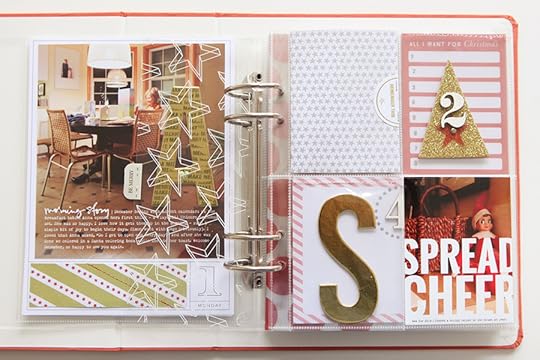
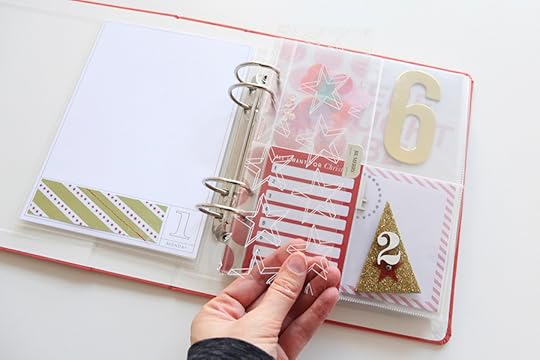
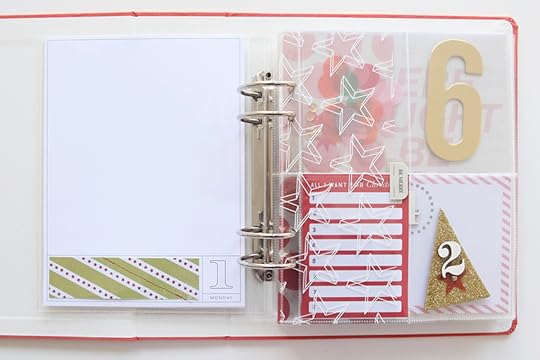
Day Four includes the back of the 4x8 inch tree photo from yesterday + 2, 4x6 pockets.
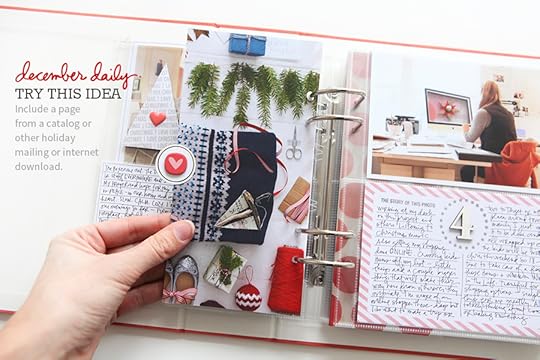
One thing I've enjoyed including in past years are a page or two cut from a holiday catalog. This one here is from
Boden and it could be one of my favorites ever - the styling was just awesome throughout. It made a nice compliment to my online shopping story - you could also simply use one of the pattern papers from the kit there.
You'll also notice that I repeated another gold foil circle + a chipboard shape along the edge as a tab (repeating the same thing from
Day Three).
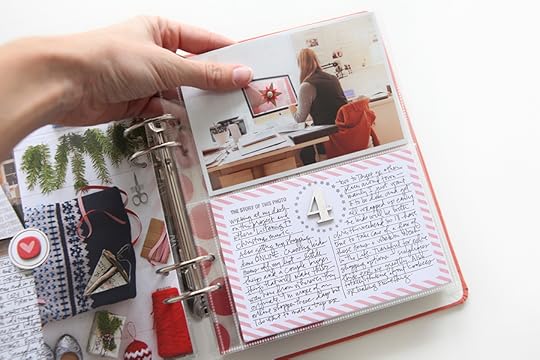
On the right side of the spread I took a photo of myself sitting at my computer and printed it on my Epson printer.
On my computer screen was an image of some online shopping I was doing for the kids that I don't want to include so I decided to cut that part out and create a window that peeks through to the next pages in the album (you can see my finger peeking through in the image above).

Cutting out a shape from a photo is pretty easy (easier to see the hole in the image within the whole album). It took my two tries to get it right because I screwed up with the
craft knife going to far on the first one.
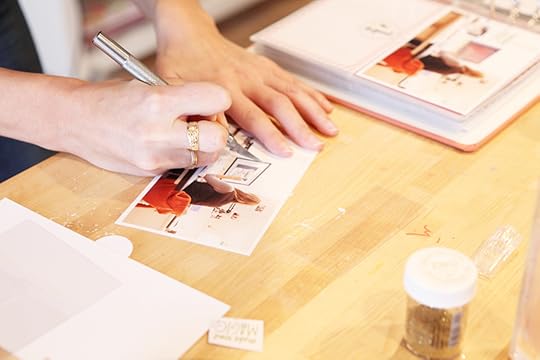
As you can see above I used a
craft knife to carefully cut out the computer screen.
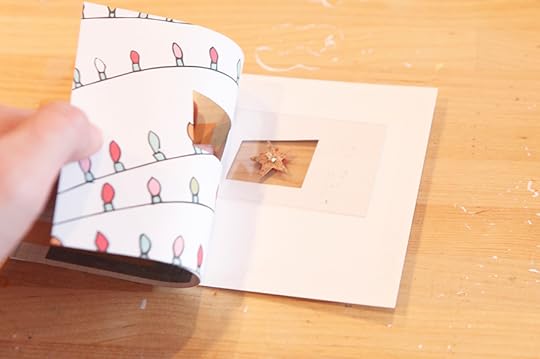
Then I took a piece of
transparency and added one of the small plastic red stars + a cork star + a brad through the transparent piece.
You'll also notice that I'm getting ready for tomorrow by cutting out a second window in the pattern paper I want to use tomorrow because I want the window to show through both sides.
There's the start for tomorrow.
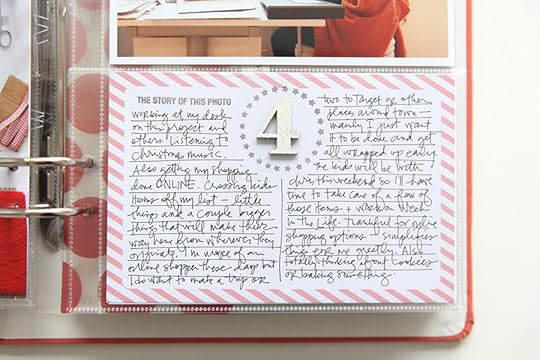
Someone in the comments yesterday asked if I write the lines or the words first. Usually I write the words first and then underline them. You can totally do it either way.
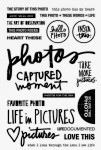
"The story of this photo" stamp is from my
Photos stamp set.
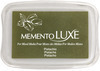
The wood veneer 4 was embossed and I stamped the heart circle using the
Gray Flannel Memento Ink.
SUPPLIES


TODAY'S POST SPONSORED BY | SIMON SAYS STAMP
We want to be your ONE STOP SHOP! At
Simon Says Stamp, we care about our customers and pride ourselves on going the extra mile to make customers happy. Offering quality products that you want to use in your December projects is our priority. Our whole team is passionate about crafting & the power of sharing stories. We want to share that passion with you by getting you inspired! Please visit our blog that is updated daily and 2 weekly challenge blogs on Monday and Wednesday! Have a "click" and stay awhile!
SHARE A LINK TO YOUR DAY FOUR
You're invited to share a link to your Day Four pages below. Please link directly to your post vs. a general blog link.


December 4, 2014
Week In The Life™ 2014 | Tuesday In Album
Making time to get back to my
Week In The Life™ album and am sharing Tuesday with you today.
Tuesday was word and photo heavy and I love it.
All the words were taken directly from my
Tuesday blog post during the week.
A couple things I was thinking about as I was working through the process of putting this album together:
What's most important in a project like this, or December Daily® or anything really, is making it work for you. My focus this time was even more on words and photos. I used the kit as accents to my story. You might not need this many pages per day - take them out! You might need more pages - figure out a way to add them in (add photos back to back, etc). Don't limit you story because you have too many or not enough of something.
On the other hand, the limits might help you. You can definitely use the structure to MAKE CHOICES about what to include in your album. I always leave something out - I choose what to include - and I'm okay with that. As I work with my photos I do pick and choose, being mindful of the overall story of the week. Limits can be a positive thing as long as you don't spend too long agonizing over which photos to use to tell these stories.
I also wanted to say thank you for your patience as I finish up this project. I've cleared my calendar and my plan is to get album completed this weekend.
Here's a look at my Tuesday:

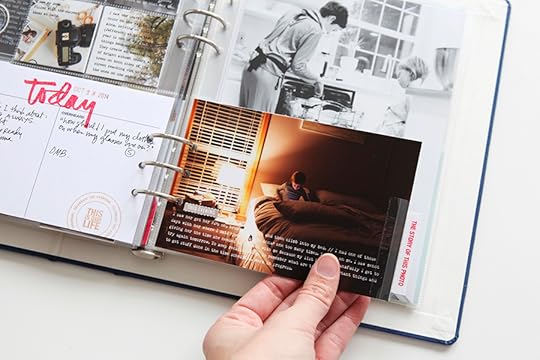
Sometimes when I chose the photo to enlarge for the start of the day I choose my favorite and sometimes I choose the first shot of the day and other times I just choose one I feel would make a good enlargement. For Tuesday I went with something that came from the words I included on my blog post:
Tuesday began and ended with rain.
The font I'm using is my current typewriter go-to
Remington Noiseless. The words were all added to my photos in Photoshop before printing.
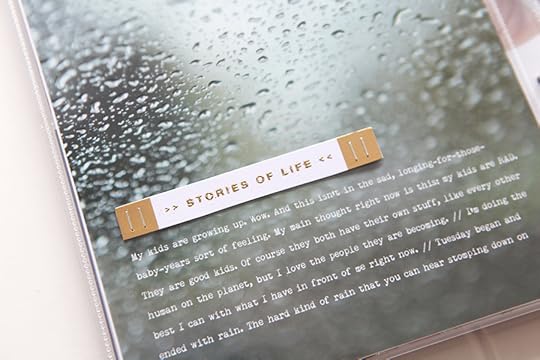
On top of the enlarged photo I added one of the gold foil label stickers - on top of that I had embossed "stories of life" from the stamp kit (in
gold of course).
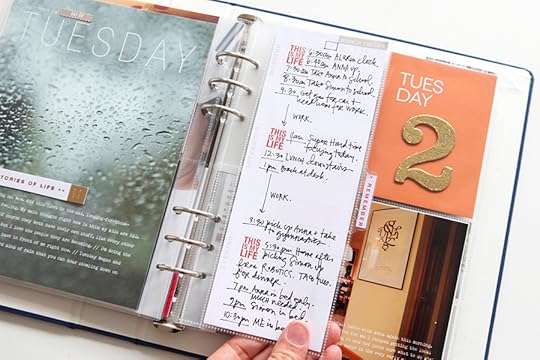
On the 3x8 insert I stamped "this is my life" using
red ink and then took some of the details from my Daily Sheet and hand-wrote them (including the times). It's a very simple overview but I like how it contrasts with all the typed words on the photos.
The small plastic tab is from the kit - remember that I'm folding the printed-side down and using the stamps on those instead? I did that again here.
On the back side I added another 3x8 photo. Love that look.
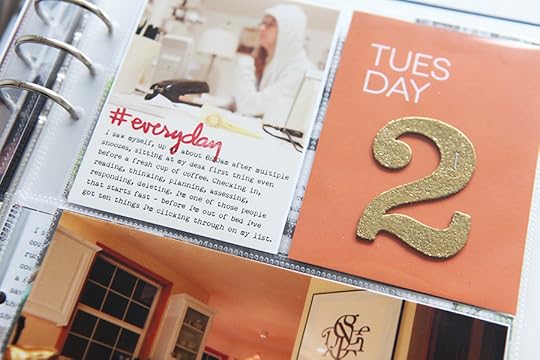
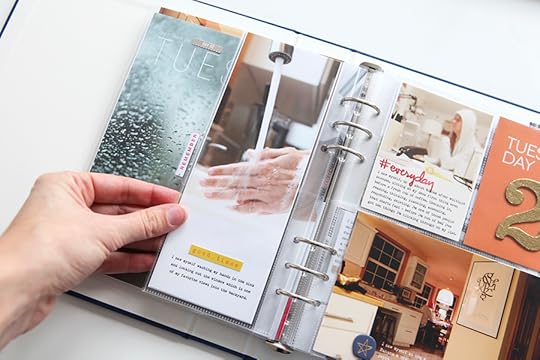
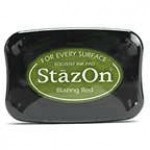
On the next page I stamped "#everyday" using
red Stazon ink directly onto my photo. On the bottom photo I added the blue circle with the gold star from the chipboard pieces + the orange Tuesday card and the number two above.

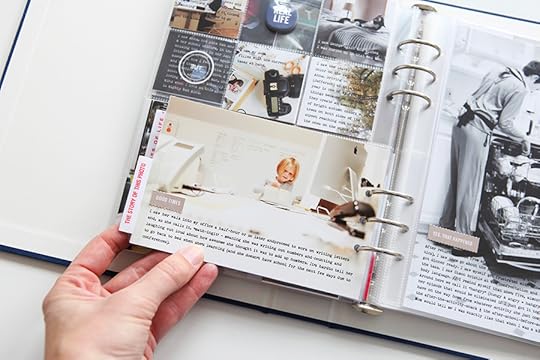
I had a lot of photos I wanted to include today so I really went for it. On the left side I simply added my words in Photoshop, printed and then added phrases from the phrase sheet.
On the right side I used the 2x2 inch pocket page which is also awesome. I can't wait to have more of those in my stash.
I cropped all those photos to 2x2, added my words and printed here at home (I put them all on an 8.5x11 canvas and printed them on that size photo paper).
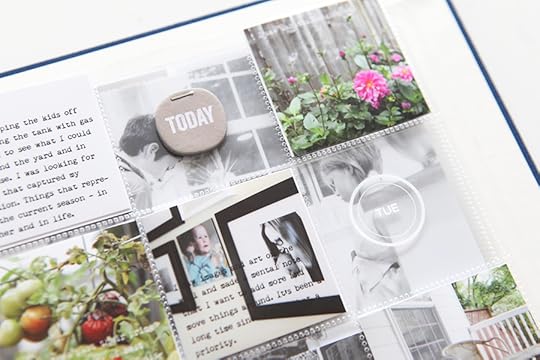
I left a few of the pockets blank so you could see through to the other photos coming later in the day.
To the top center pocket I added two chipboard circles back to back and stapled them in place.
The white TUE circle is from the rub-on set - it's applied directly to the top of the page protector.
On the back side I added the rest of the 2x2 photos (you can also see the chipboard circle back). You can also see where I added three of the blue stars (for three people in my house) and I ran that through my sewing machine to close the pocket and keep those in place.
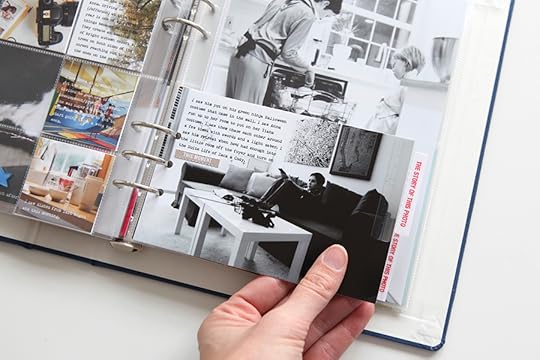
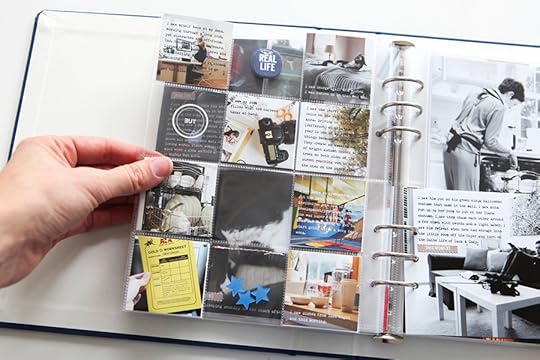
After cropping all those 2x2 photos I still had three photos I wanted to include (that had stories to go along with them) + the last 6x8 enlargement.
I decided to print them 4x6 and do the back-to-back thing again and punch holes in the photo using the Crop-A-Dile.

On the back of the first photo I added a cropped piece of my Daily Sheet. On the top I used the "today" stamp and on the bottom I added the circle stamp + this is our life.
Two more 4x6 photos were printed and adhered back to back. You'll also notice that I added the
2-inch Avery plastic tabs along the edge of the back-to-back photos. When I add photos straight in like that I really like to have some sort of tab along the edge.
I used my
Photos stamp set for the sentiments inside those tabs.
I also added more of those torn phrases.
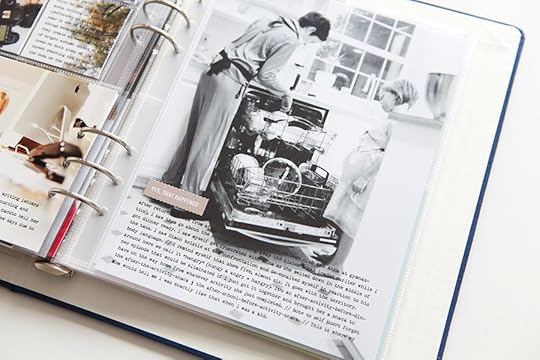
I finished off my Tuesday with an enlarged photo of the kids emptying the dishwasher. The story is about challenges with Anna. Because that's how life goes.
Check out my Monday Week In The Life™ post
here.
Click on the images below to link to the products used in this project.
December Daily® 2014 | Day Three
Welcome to
December Daily® 2014 | Day Three.
Here's my story for today:
"The boxes are out. The tree is up. There is stuff everywhere and I love it. My prayer and hope for this month is peace - in our home and in my heart. Slow. Calm. Cozy. I'm loving our evenings so far - fires in the fireplace, holiday books out, and twinkle lights. The cold temps and early darkness are just helping to foster coziness. We've also been doing early bedtimes. Rest and peace. Christmas movies. Snuggling. Quiet. No frenzy. No crazy making. All about making our own joy."
I'm really embracing the mess of getting everything up and making space for coziness right now. I know that the pace will likely pick up a bit as the month rolls on and especially as we get closer to the 25th, but for now I'm all about the calm evenings with my kids and the twinkle lights.
Also, heads up that I'll have a second post up later today sharing my completed Tuesday in my
Week In The Life™ album.
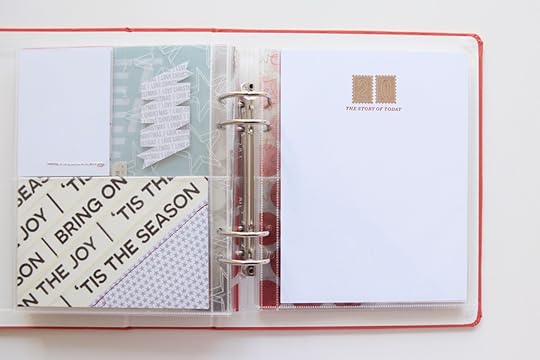
Here's a closer look at Day Three:
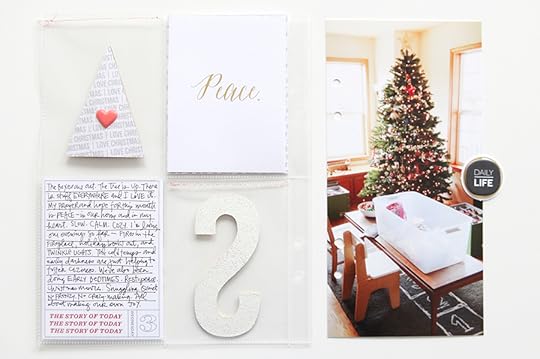
Day Three includes the back of Day Two - here you can see the back of the glitter tree (cut pattern paper to fit) and how I embossed the "S" with my contaminated white embossing powder (gold got in there last year I think).
The
gold foil 3x4 peace card came in the mail from my friend Cristina at Sweat Pea Ink. It is absolutely what I want for myself (and for others) during this season of light and I wrote about that in my journaling.
On the
3x4 journal card I stamped "the story of today" (x3) using red ink and hand-wrote my story and underlined the words.
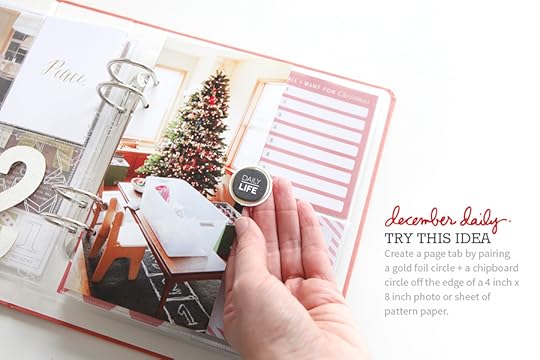
Opposite my journaling and the 4-pocket page I added a 4 inch x 8 inch photo. On top of that photo I added one of the gold foil circles + the "daily life" chipboard piece from the kit. The two together will act as a page tab. I'll repeat another one of the gold foil circles on the back along with whatever I adhere to the photo page. I punched holes in the photo using the
Crop A Dile.
Here's a look at it in the album:

Here's a look at what the back looks like right now - tomorrow I will cover it with something. I'm thinking I might stamp a patten using the star stamps.
Hope you have a great day!
SUPPLIES


SHARE A LINK TO YOUR DAY THREE
You're invited to share a link to your Day Three pages below.
Please link directly to your post vs. a general blog link.
December 3, 2014
December Daily® 2014 | Day Two
Welcome to
December Daily® 2014 | Day Two.
NOTE BEFORE READING | Potential holiday spoilers. Some words might not be suitable for young viewers.
Some of you might remember reading my post from earlier this year called
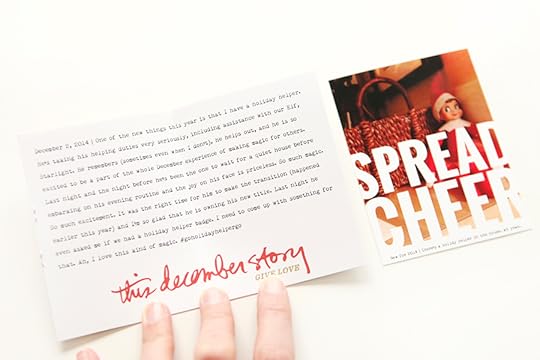
Goodbye Kids, Hello Holiday Helper. Well holiday helping season is in full effect around here and this is the story I most wanted to include in my album for Day Two because the joy is contagious.
I debated exactly how to go about including this story, knowing that Anna might try to read the words at some point before the time is right for her. I decided to write it in a way that was a little vague and to include it inside a folded card that not everyone would know actually included a story.
Unless you read my blog of course (
and who knows when she might start doing that).
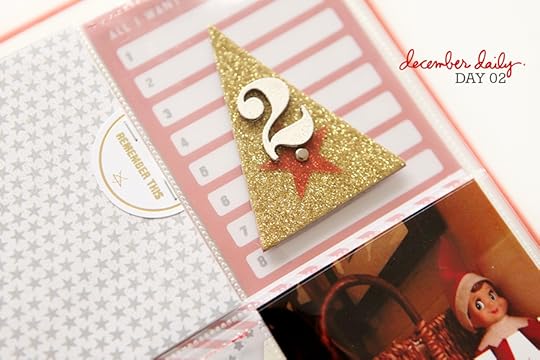
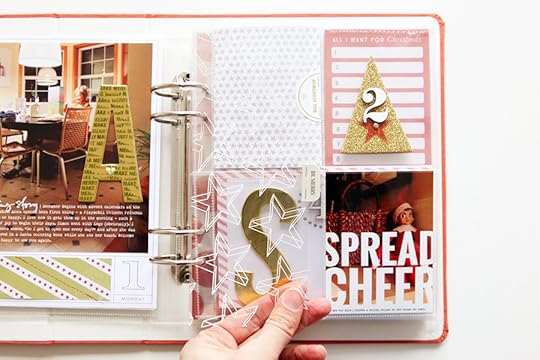
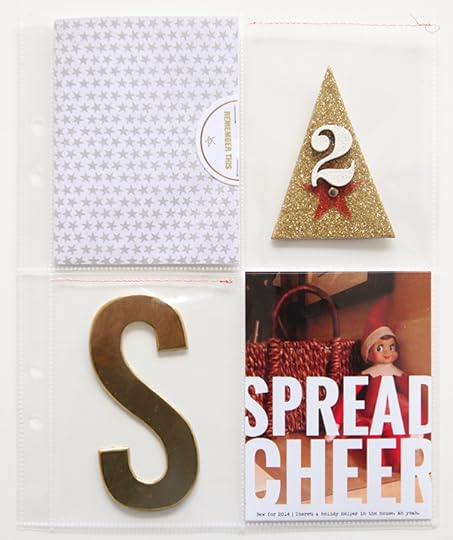
The "S" can be for Simon or it can be for "Starlight" the elf.
It's an important part of our December story this year and it's significant for him. And man he is so awesome.
Here's a look at how it came together:
Between day one and day two I added 1/2 sheet of one of the transparent pages and attached one of the sticker tabs (see more about that from my Foundation Page post).
You might also notice that originally I had the "All I Want For Christmas" 3x4 card in the pocket for Day Two. I moved it to another day simply because it didn't match my story for the day and I like that it can almost be it's own story for the day so I'll save it for when I need it. Don't be afraid to move things around based on the stories you most want to tell.
Be the boss of your own album.
Here's a look at the page outside of the album:
The tree and the "S" are both floating inside the pockets which means I get to see through to the next page. I used my Brother sewing machine to stitch the top of the pocket closed (a great gift if you know a crafter who wants a multi-purpose machine). I don't do anything special with my machine - just run it through. This time there happened to be red thread in the machine so I went with it - if it was purple I might have changed it out.
You might be wondering,
where are the words? Hidden inside that star pattern paper card of course - more about that below.
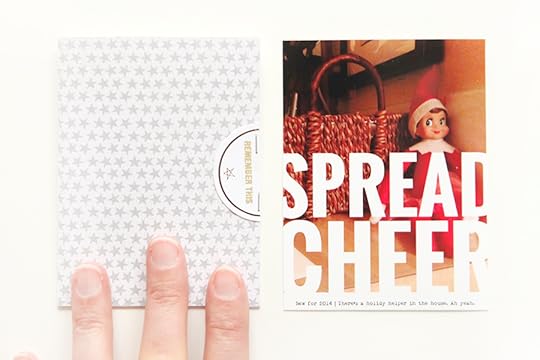
On top of the outside of the folded star card I added 1/2 of the gold foil circle and stamped "remember this" from the
kit stamps. At first I thought I would fold the circle in half and then wrap it around the card - essentially creating a seal to make it even harder for little eyes to look inside without ripping it open but folding the circle didn't work as awesomely as I hoped - too many creases and my stamping was off a bit so I just cut it in a way that makes my stamping look more straight and added two little staples right along the edge.
The "spread cheer" card was made using the
Christmas Rocks 6x8 layered templates - see a video on that process below.
Inside that star card is where I added the story:
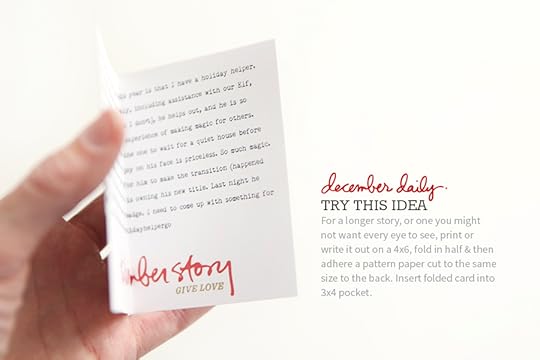
A simple easy way to add more words to a smaller pocket (or hide from small eyes).
The truth is most of the time right now they are just looking at the photos and the pretty sparkly things.
Here's a look at it totally open:
I put together a very short video about working with the
Christmas Rocks 6x8 layered templates (what I used to add Spread Cheer onto the 3x4 photo - simply resize and move the word art down) and the December Stories 4x6 layered templates ("this December story") - that one was printed on Epson Matte Presentation Paper and adhered to the gray star pattern paper.
I also added the "give love" stamp (from the
kit stamp set) using Pistachio Memento Luxe ink.
Here's a look at the full page in the album.
I really do love the see-though pockets.
PS: I did end up embossing the back of the large gold "S" with white. You'll see that tomorrow.
Hope your December is off to a great start!
SUPPLIES


TODAY'S POST SPONSORED BY | CAPTURE YOUR 365
CaptureYour365 is a community for inspiration, ideas, and support for your everyday photography. Grab the monthly photo challenge list, listen to the CY365 Podcast, or take a class. Katrina Kennedy and the CY365 Team have helped thousands of memory keepers take control of their cameras with classes, community, and FREE daily email prompts.
SHARE A LINK TO YOUR DAY TWO
I'd love to have you share a link to your Day Two pages below. Please link directly to your post vs. a general blog link.
[image error]
December 2, 2014
December Daily® 2014 | Day One
Welcome to
December Daily® 2014 | Day One.
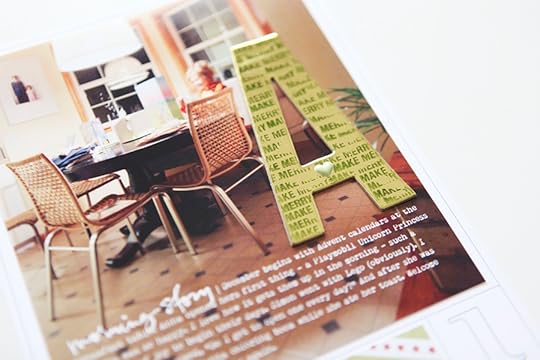
Remember when I suggested not making this more complicated than it needs to be? It's still true. I thought about that a lot today as I printed my photo and added a bit of stamping directly onto the letter A.
I also thought about how this project, like many others I embark on, is not about any one single page. It's about all these pages coming together - some super simple, some more complex, some with long stories and some with short - to tell the story of our December.
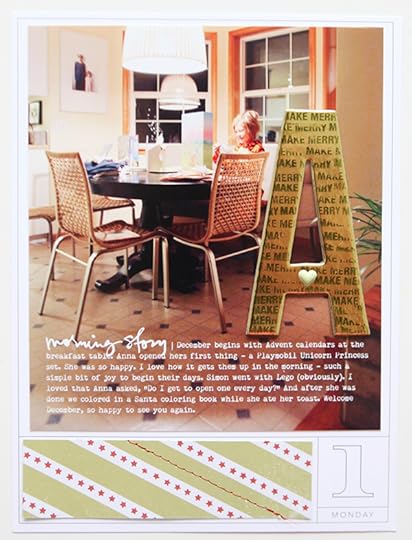
Here's a look at my full page for Day One:
My
foundation page included a printed date card + green stripe pattern paper + star stamps + red stitching.
We do have some
printed date cards (in all three sizes) available in the shop if you'd rather have them printed for you (vs. using the overlay set to print your own).
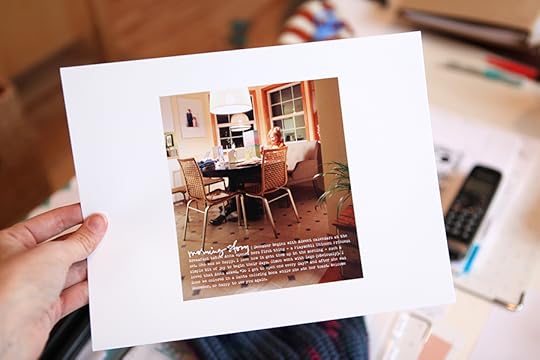
Today's story centers around a photo of Anna at the table in the early morning hours opening her Advent calendar. I'll probably include something about Simon and his on another day - he was still in bed at this point in the morning. On top of the photo (in Photoshop) I added
"morning story" from this word art set + my story about Anna and welcoming December.
The photo size I used (cropped in Photoshop) is 5.5 inches x 6.25 inches.
I printed it here at home on my
Epson R2000 printer.
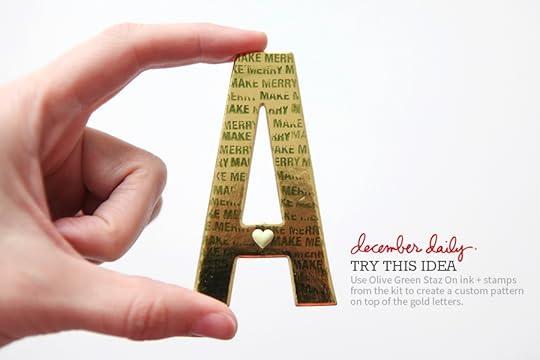
On top of the photo I added a letter A (A is for Anna but could also be for Advent). I played around with stamping using
Olive Green Staz On ink directly onto one of the large gold letters.
As you can see, it's not perfect and it does want to slip around a bit but I still liked the text pattern it created.
If you know it's not going to be perfect then it tends to look a lot cooler when it's messy.
One of those puffy hearts found it's way into the center of the A.
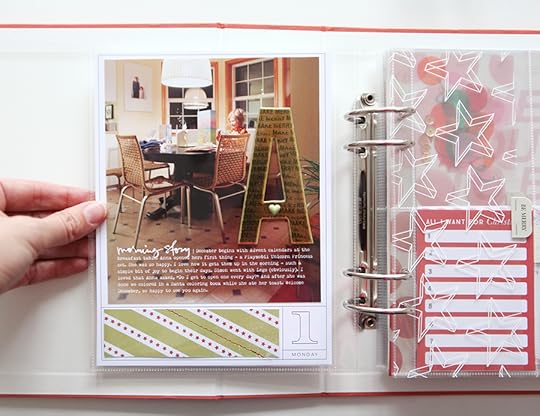
I adhered the A to the photo using Scotch adhesive. I'm thinking (as I look at it now) that I might add a staple too because it feels like it needs to be "grounded" to the page a bit more.
A really simple start to December - because it doesn't have to be complicated and there is joy around every corner if we are willing to look.
Here we go!
SUPPLIES
Click on the images below to link to the products used in this project.


TODAY'S POST SPONSORED BY | LAIN EHMANN
Get fun tips and strategies, and resources for simplifying your December project in the
free “Dazzle Your December” video scrapinar from Layout a Day. Every month, Layout a Day offers free video “scrapinars” for scrapbookers and papercrafters just like you! From techniques to trends, to new uses for old tools and products, we’ve got you covered in these inspiring, interactive sessions. Sign up for our next free session here.
SHARE YOUR DAY ONE
I'd love to have you share a link to your Day One pages below.
Please link directly to your post vs. a general blog link.
[image error]
December 1, 2014
December Daily® 2014 | Let's Begin!
Hello December!
I spent the last few days at the beach celebrating the Thanksgiving weekend with my brother and sister-in-law and her family and my cousin and his family and it was just what I needed to get in the mood for the holidays. Family, food, friends, beach, laughter, naps. The kids and I arrived home mid-day yesterday and I immediately started the laundry, pulled all my holiday boxes and the tree out of the garage, and turned up the Christmas music.
To tell you the truth, this is the first year since getting a divorce that I really feel like decorating.
This year feels different. I'm not sure I can pinpoint exactly what's different - maybe just time. But today, as I got those boxes out I felt joyful.
I started a fire in the fireplace. We watched The Polar Express and Elf (I multi-tasked with pulling boxes in and opening things up and going through the accumulated holiday decor). I set up the tree with Anna's help and my favorite part was her enjoying going through my fabric box of ornaments from when I was a kid. I got out the Advent calendars and prepared myself to settle into December.
As today is December 1, it's the start of
December Daily® and I'm really looking forward to seeing what stories come up this year. I'm thinking I might do my page today (for December 1) about the kid's Advent calendars but I might do something else as well. I'll start sharing my pages tomorrow so I can live the day before I pick a story to tell.
Here's a few things for you to think about as you embark on this project:
1. Find a pace that works for you. You might work on this project each day or you might save up a few days for a longer period of work time or you might wait until the end of the holiday season. People have a so many different ways of approaching this project. For me, I do one story a day. Sometimes that's as simple as adding a photo and a few words to a pocket and sometimes it becomes a multi-page ordeal. I let the story, and the time available, lead me throughout the month.
2. Enjoy the process. If it starts feeling like a job, simplify. If it becomes boring, mix it up. Make this be something that enhances rather than detracts from you holiday season.
3. Read the 25 Ideas And Story Inspirations from a few years back.
4. Remember that it's not about what any one else is doing except you. Embrace your own holiday spirit, your own stories - whatever they may be this year.
5. Look for the joy. Really, that's what this project is about. Find your own joy, even if you have to make it happen for yourself.
You can do this. Absolutely.
I'll be including the opportunity for you to link to your own blogs each day. See below for the foundation page links.
And let's all simply remember this:

TODAY'S POST SPONSORED BY | MAY FLAUM
From scrapbook layouts to mixed media canvases
Craft With May on-line classes are all about happy crafting. Join May Flaum for classes that encourage you to try new techniques and to always enjoy the process. In addition to offering several free courses, May is pleased to offer you a special discount as well – enjoy 25% off the class of your choice by using this link . The discount will be taken automatically, and this offer is good for new orders only through January 1, 2015.
SHARE YOUR FOUNDATION PAGES
I'd love to have you share a link to your December Daily® foundation pages below. Please link directly to your post vs. a general blog link.
[image error]
November 28, 2014
Black Friday Sales + A Silhouette Giveaway
I hope you all who were celebrating had a great Thanksgiving!
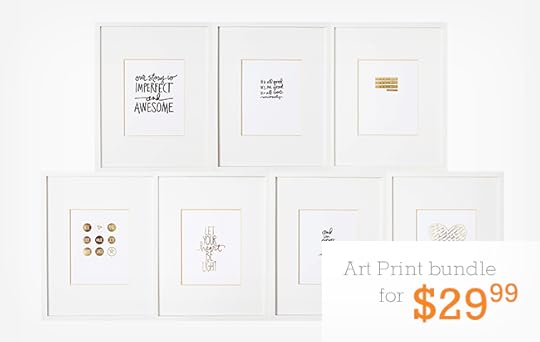
For Black Friday this year I'm offering my Art Print Bundle - all of my art prints together for just $29.99. Give them as gifts this holiday season or save them for yourself.

Heads up that Totally Rad is having their big Black Friday sale that includes my favorite photo editing tool: RadLab. Use the code "BLACKFRIDAY2014" at the checkout to receive 35% off all products in the store.
 GIVEAWAY | Two (2) people will win a Silhouette Portrait.
 Open to US/Canada Residents Only.
SPECIAL BLACK FRIDAY SILHOUETTE OFFERS1 Silhouette Portrait machine & 1 free year to Club Silhouette for $179.99
1 Silhouette CAMEO machine, Designer Edition software upgrade, Dust Cover, 4 Tools and $25 Download card to the Silhouette Design Store for $269.99
1 Silhouette CAMEO machine, Design Edition software upgrade and 1 free year to Club Silhouette for $299.99
1 SilhouetteCAMEO machine, Portrait machine and 2, $25 Download cards to the Silhouette Design Store for $299.99
40% off at SilhouetteAmerica.com (*excluding machines, downloads, download cards, subscriptions and gift cards) PLUS Free Shipping on orders over $25 for the lower 48 states
Please use the code "EDWARDS" at the checkout to receive these special offers between November 27th and December 8th, 2014.
To be entered into this giveaway please leave a comment below (if you are reading this post on Facebook please come to my blog to leave a comment). Comments will be closed at 8pm PST on December 7th, 2014. The winners will be announced Monday, December 8th.

November 24, 2014
December Daily® 2014 | Foundation Pages + Free "Reason Why" Printable
Hey guys!
I took some time this past weekend to get my foundation pages in order for December Daily® and I'm happy to share them with you today.
Here's a look at the steps I went through in getting this album ready for December 1:
1. Organize my page protectors. I use the term "organize" loosely as you'll see: I laid each of the four designs out on my table and put them into the album in this order: full 6x8, 4 pocket (3x4), 2 pocket (4x6) and then the 3-pocket one (4x6 and 3x4 combo). You'll run out of the 3-pocket first and then the 2-pocket next. Once I ran out of those two I just put the rest of the full page 6x8 and the 4-pocket in the back of my album. I want some flexibility. I want to decide I want another 6x8 page for my story today. The order of the page protectors really isn't super important in the long-run (and can make some people more frustrated than others). Also, as you'll see in the video - I have quite a few left over that I'm just keeping at the back of the album to work in during the month if/when I need them.
2. After I got the page protectors in the album I simply began the process of getting a number on most of the pages. I mixed in the December Daily® 2014 Overlay Combo pack with the wood veneer numbers (I embossed those in white) and the big gold numbers (+ a couple others as you'll see below).
3. I cut the three transparencies in half and am using them as fun dividers. I'll probably move them around during the month so that they go with stories I might be telling, but I might also just leave them right where I have them now. I used the Crop A Dile to punch holes in the sides (use a page protector as your guide) and then I folded over the sticker tabs and stapled them in place with a Tiny Attacher. NOTE: There is a "film" - basically a plastic layer on top of the transparencies that you should pull off when you are ready to work with them.
4. After that I really just started playing with paper and numbers and embellishments as you'll see below.
Here's a look at where my album is at right now:
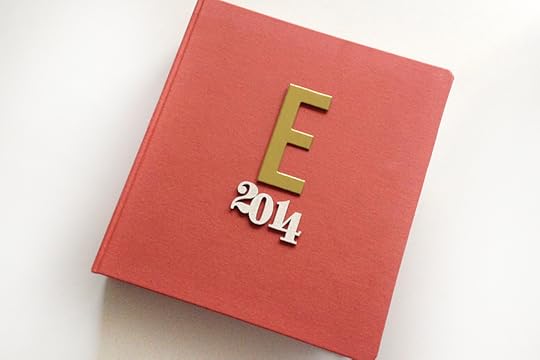
On the cover of my album I added a gold letter "E" for Edwards using red line tape. I embossed the wood veneer numbers using white embossing powder (mine has been contaminated by gold glitter from a previous project so there's a few flecks included here and there). If you want to learn more about embossing I showed how I do it in my Foundation Pages video last year.
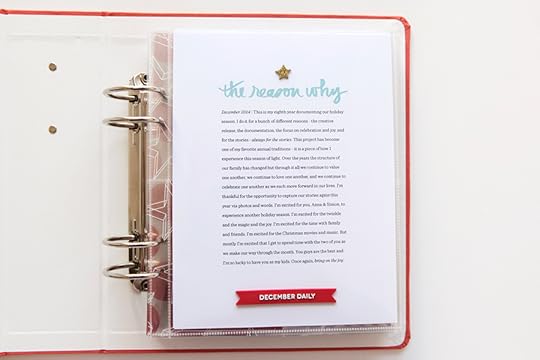
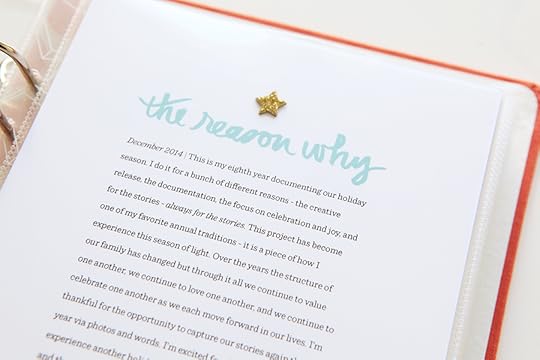
The first page of my album for 2014 is a "reason why" page which is a great way to begin an album like this. Why are you participating in this project? What is your reason why? You can handwrite or open the 6x8 PNG in Photoshop and type in your words. Above "the reason why" I added one of the glitter stars and below I added the December Daily rubber banner (adhered with red line tape).
Today I'm sharing a Reason Why printable/PNG package with you:
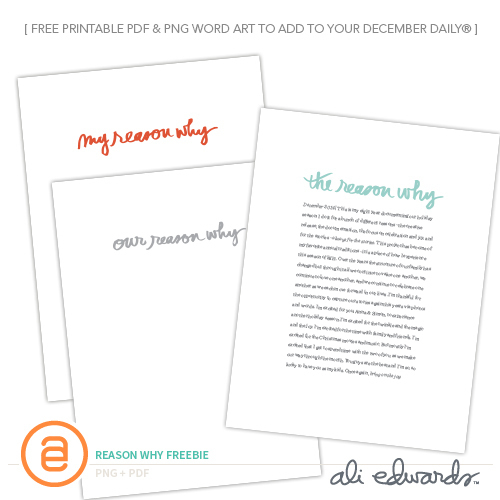
The package includes PNG files and printable PDF files of "my reason why," "our reason why," and "the reason why" so you can choose which one fits best for your own project.
CLICK HERE TO DOWNLOAD THE REASON WHY PACKAGE.
I printed mine on Epson Matte Presentation Paper.
I can't wait to read your reasons why.
After my "reason why" my album begins with December 1. For December 1 I included a 6x8 overlay printable (these can be printout out like this or added to your photo in Photoshop).
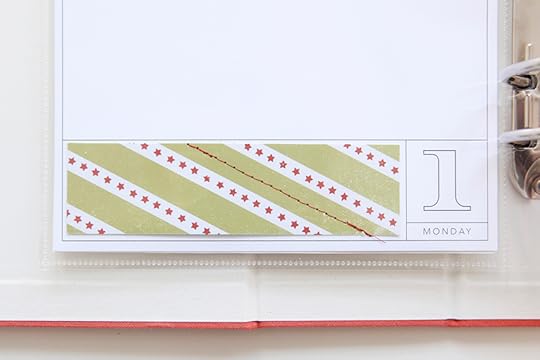
If you are adding pattern paper strips to the printables, the size on the 6x8 that worked for me was 4.5 inches x 1.25 inches. On top of the green and white pattern paper I stamped using red ink + the strip of stars on the stamp set.

Here's the first of the transparent pages that I cut in half. To the middle edge of each I added the small word tab stickers (folded over) from the kit and stapled it in place with the Tiny Attacher. I punched holes in the transparency using the Crop A Dile. Don't forget to pull off that "film" before attaching the tab.
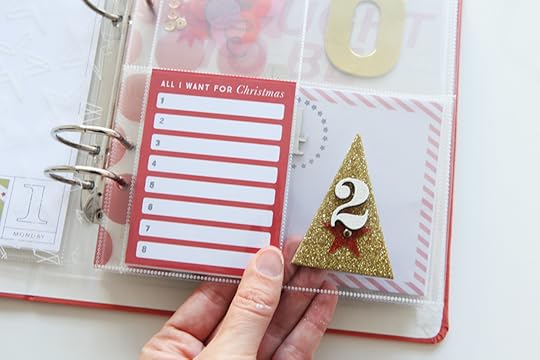
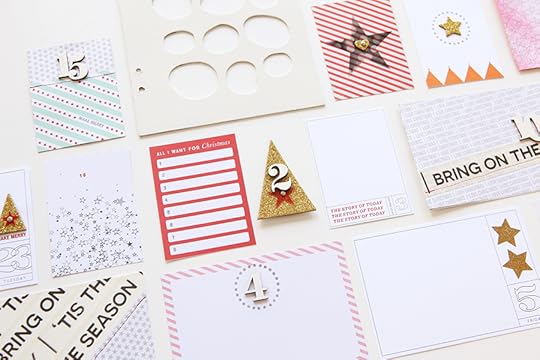
For Day 2 so far I've included the "All I Want For Christmas" card (I stamped those numbers on there using stamps from the kit + Gray Flannel Memento Ink) + a gold glitter tree + a red plastic star + the embossed #2.
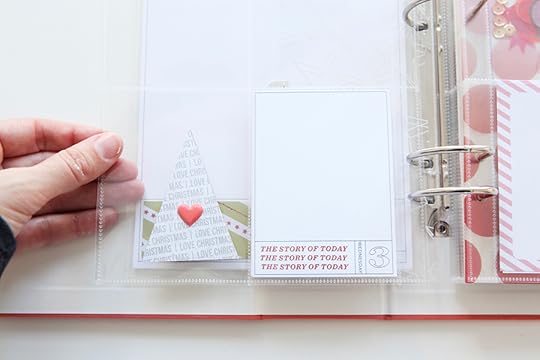
On the back of Day 2 I started Day 3. Behind that gold glitter tree I cut pattern paper to fit and adhered it + a cute little puffy heart (from the kit). On the Day Three card I stamped "the story of today" three times.
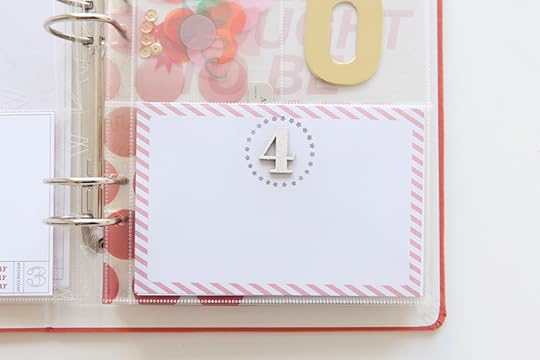
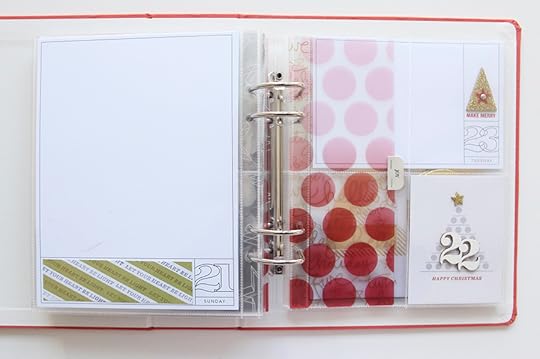
Day 4 includes the pink-border 4x6 card + the star circle stamp + an embossed #4.
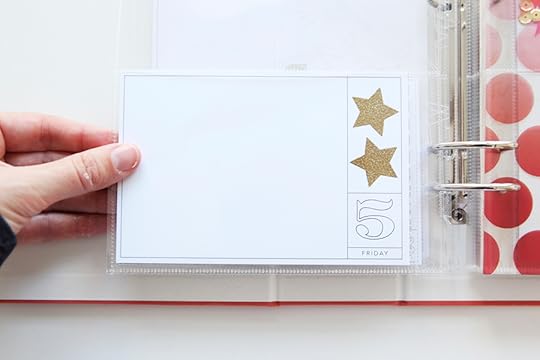
For Day 5 I used the gold glitter to emboss two stars from the stamp set.
Here's the second transparent insert - love these ombre dots.
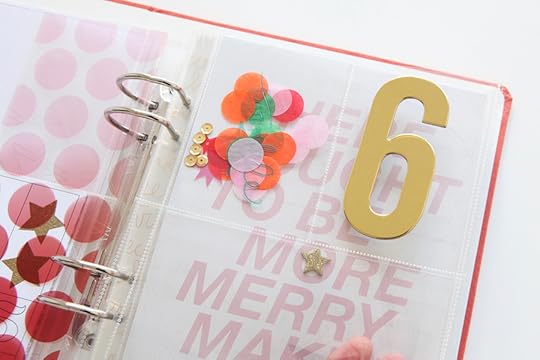
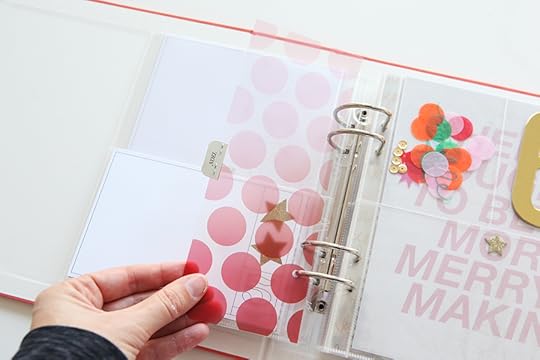
Day 6 is starting with a pocket full of tissue confetti circles + the plastic word twinkle + a plastic star + a few random gold sequins I had laying around. This pocket is going to be stitched closed, along with the #6 pocket, when I complete that day. I want to leave it open in case I want to add something else (or emboss the back of the #6).
I added one of the gold glitter stars to the "o" of "more." This is one of those places where I'm leaving a little room to play during the month (no date set on the page opposite).
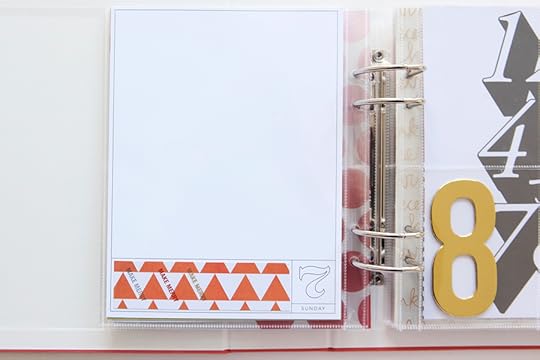
Day 7 is an overlay + some of the orange triangle pattern paper + stamped "make merry" at an angle.
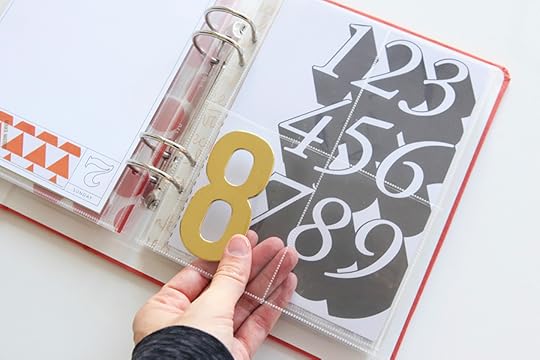
Day 8 is currently just the number 8.
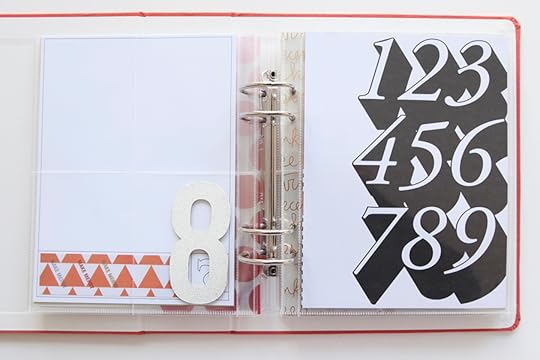
I did emboss the back of the gold 8 - thinking I will probably do that for the other numbers. I like the back with the white vs. the plain chipboard. You can also simply back those numbers with a pattern paper - I just like the idea of keeping some of these pockets see-through.
I'm using that fun number page for Day 9 - thinking I'll stamp "remember this" at the top left and then hand-write the things I want to remember from that day along the edge there. Or not. Just an idea to consider.
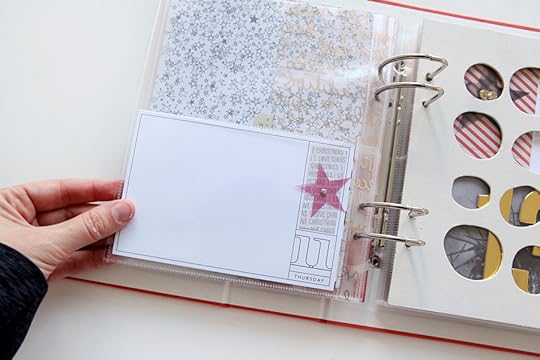
Behind Day 9 I added this star pattern paper - not sure what I'll add to it yet but I like it. You can also see the next transparent divider was added here - no rhyme or reason - just spreading them out within the album.

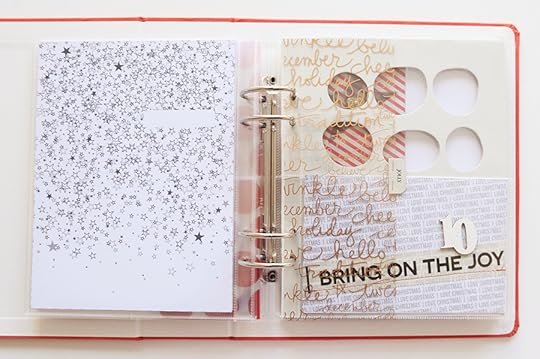
For Day 10 I've started with a pattern paper 4x6 sheet + the masking tape + embossed #10 + a bit of red stitching.
Day 11 so far includes a 4x6 printable + pattern paper + acrylic star + a mini silver brad. I like to use Tim Holtz's Retractable Craft Pick to go through shapes like this (and chipboard) before putting the brad through.
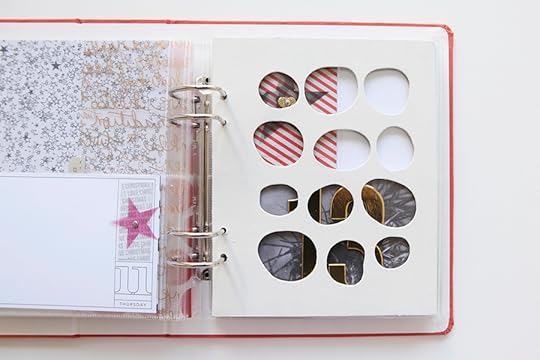
I painted the random circle chipboard page using Martha Stewart Summer Linen Satin. It took about three coats to get it to this consistency. My plan is to use this for Day 12 since there are 12 holes - most likely I'll add some of the chipboard shapes and/or photos or words. My initial plan is to print out a photo to cover up the back or I might just paint the back as well. I'd like to maintain some of the transparency of the holes so I'll be thinking of a way to work around that on the 12th.
I haven't totally tackled the other two chipboard sheets that are included in the kit. I did decided to paint over top of the calendar sheet (same paint as above) and I'm thinking I'll cut that one up and use as insert pages at some point during the project.

Day 13 so far includes the gold numbers adhered to the pinecone pattern. Above it I added one of the bokeh transparent stars + a gold glitter heart + a silver mini brad on top of the red stripe pattern paper.
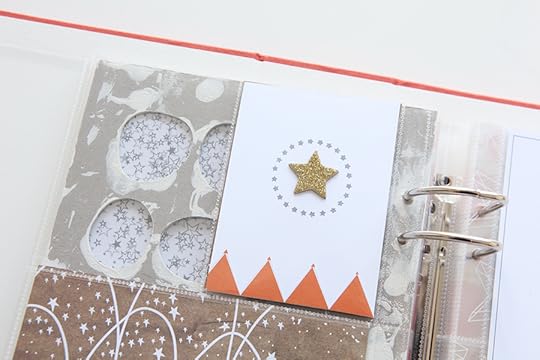
Behind that bokeh star card I added a simple card that includes a gold glitter star + the stamped star circle + some of the orange pattern paper cut and adhered along the bottom.
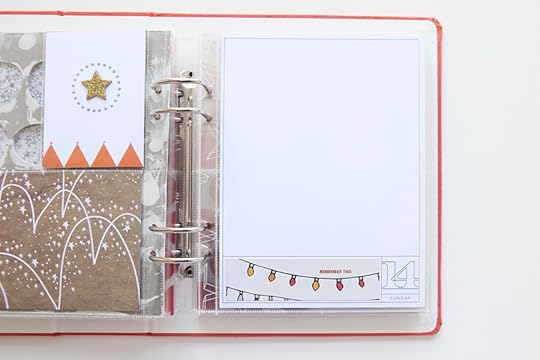
Day 14 includes a 6x8 overlay with a piece of that cute lightbulb pattern along the bottom. I stamped "remember this" using the kit stamps.
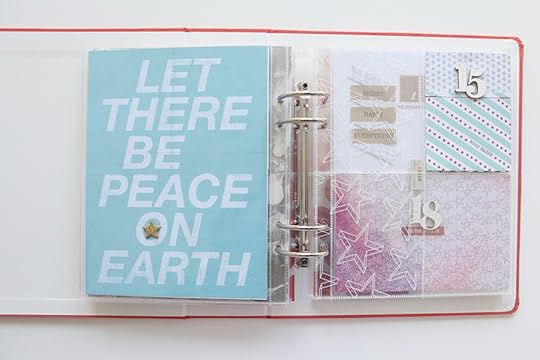
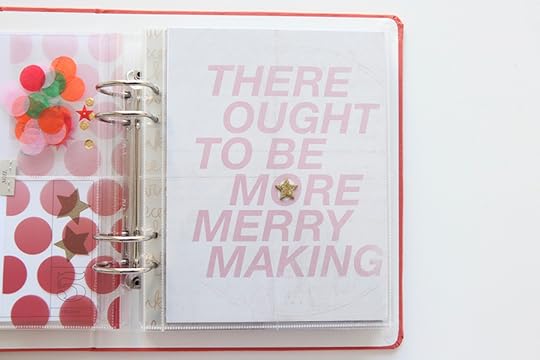
Following that page is the full page "let there be peace on earth" - I followed what I did before on that other full page text page and added a gold glitter star in the middle of an "o."
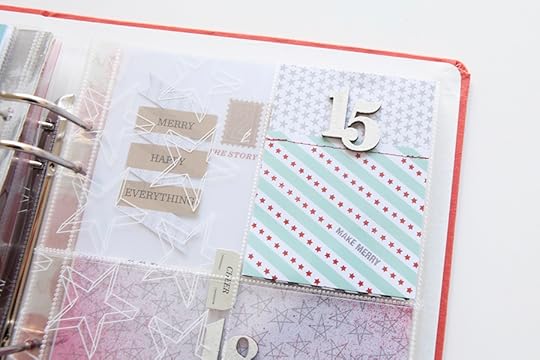
For Day 15 I created a card that includes some of the blue striped pattern paper + the grey star pattern paper + stamped red stars + stamped "make merry" + red stitching + the #15 embossed.
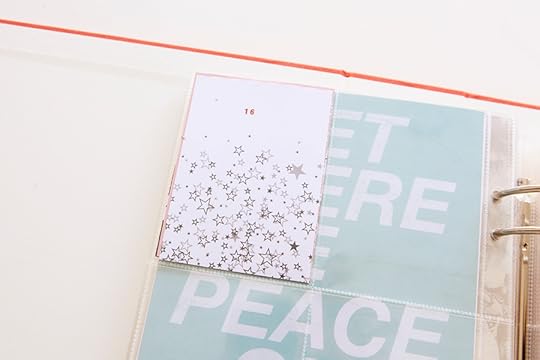
Day 16 features a portion of that 6x8 star page + the number 16 stamped in red using stamps from the kit.

Day 17 includes a 3x4 overlay + red pattern paper + red stitching.
You can also see that I added the second star transparency insert here as well.
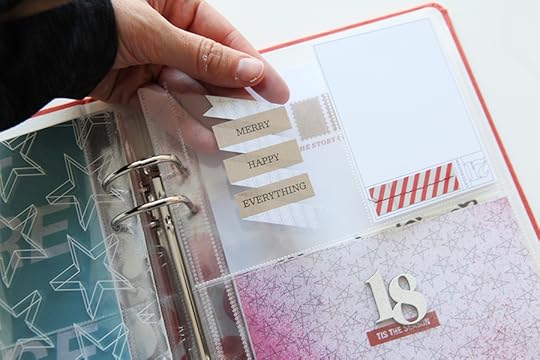
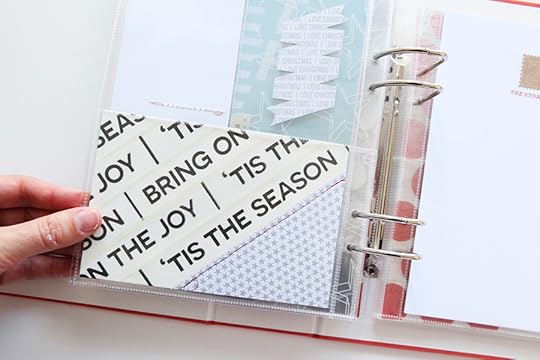
Next to the Day 17 card I cut out "merry happy everything" from the black background and added it to the pocket (love creating see-through opportunities).

That's Heidi Swapp Sweet Cherry Color Shine sprayed on top of the start pattern paper. I stamped "tis the season" from the kit stamp set and then embossed the 18 before adhering.
For Day 19 (still need to do the number) I wrapped some of the printed masking tape around the card and then paired it with the star pattern paper. I also added line of red stitching there.
Day 20 is a white sheet of paper + the "2" and the "0" from the postage stamp sticker set + the story of today stamp.
Day 21 features a 6x8 overlay + green striped pattern paper + "let your heart be light" stamped in green and grey.
I've also included the red dot transparency here with the "joy" tab stapled in place.
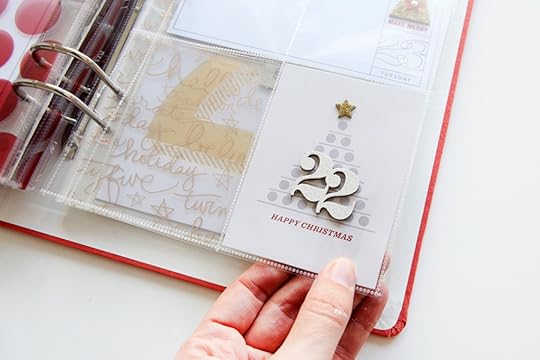
For Day 22 I've started with a 3x4 card (that cute little tree) and then added a gold glitter star + the embossed 22 + a stamped "happy christmas."

Day 23 currently features an overlay card + a gold glitter triangle/tree + a red plastic star + a mini-brad.
The last 1/2 of the transparency is included here.
For Christmas Eve so far I just have the 24 in the pocket. My plan is to stitch them inside.
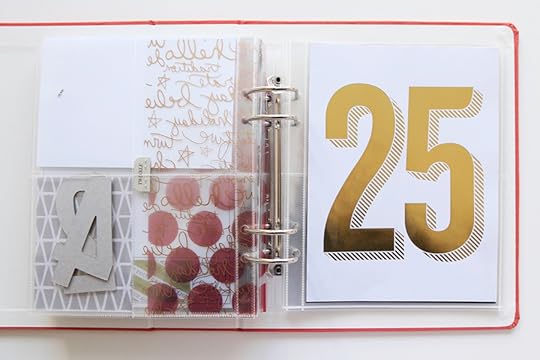
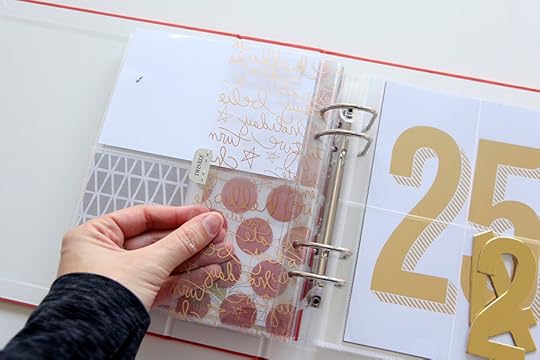
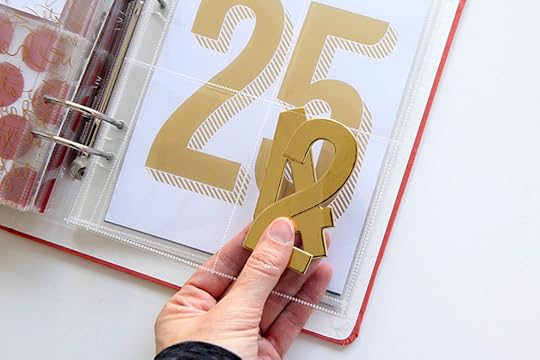
All I have for Christmas Day right now is that awesome big gold foil 25. I'll likely include more page protectors for Christmas Day since we tend to have more photos on that day (and like I said there are quite a few left-over to choose from).

After the 25 I've got the large 6x8 Merry Happy Everything page included for now. I might end up moving that around based on the earlier days or I might use it as a closing page for the album.
I put together a video overview of the album that repeats a bunch of the things I outlined above.
December Daily® 2014 | Foundation Pages from Ali Edwards on Vimeo.
ADDITIONAL SUPPLIES USED IN FOUNDATION PAGESKIT | December Daily® 2014 (most products used above are included in the December Daily® kit)
INKS | Close To My Heart Cranberry Red, Memento Luxe Gray Flannel, Memento Luxe Pistachio
EMBOSSING POWDERS | White and Gold Glitter
EMBOSSING INK | Versamark
HEAT GUN | American Crafts
STAPLER | Tim Holtz Tiny Attacher
ADHESIVE | Red Line Tape, Scotch Rolling Adhesive
HOLE PUNCH | Crop A Dile
SPRAY INK | Heidi Swapp Color Shine Sweet Cherry
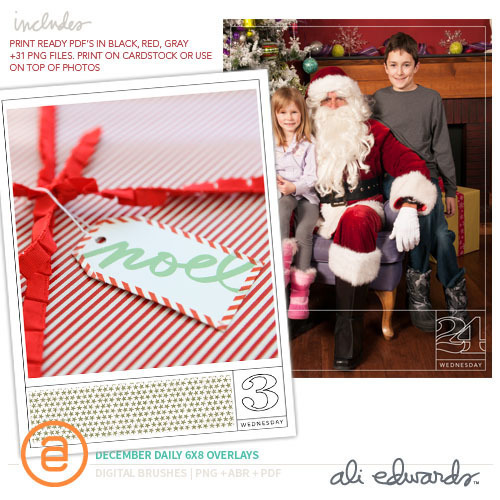
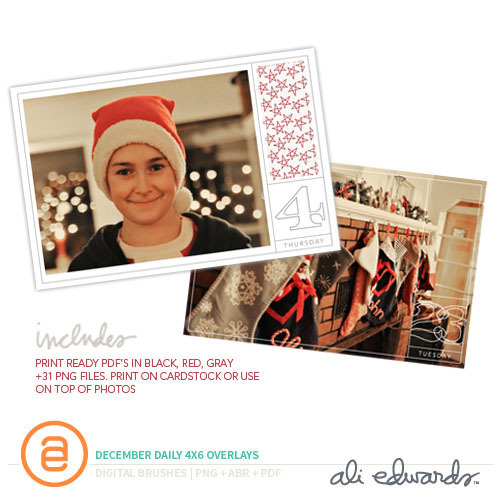
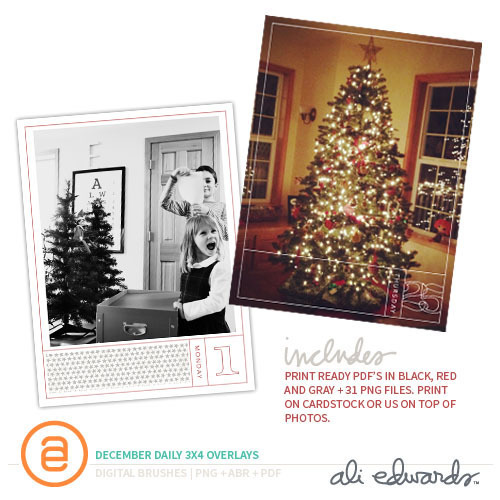
OVERLAYS | December Daily® Overlays Combo Pack
PAINT | Martha Stewart Summer Linen Satin
BRADS | Silver Mini Brads
PAPER PIERCER | Tim Holtz Retractable Craft Pick
SEWING MACHINE | Brother XL2600I

November 20, 2014
December Daily® Digital Products & Printables Now Available & Updates
Hey guys!
Lots of work happening behind the scenes here around here right now which makes for a quiet blog. I pretty much have every project going at once this year: a workshop (Lens Of Joy - if you missed this round I'll run it again sometime next year), December Daily®, Week In The Life™, and the Story Subscription.
Here's a bit about where I'm at with each:
December Daily® | Kits were shipped (expedited 2-3 day) to domestic customers on Monday so you should be getting them any day if you haven't already (minus the album that will be shipped this Friday). International kits + albums will ship expedited this Friday. Thank you for all the kind words of support as we worked our way through getting the albums released from customs and on their way to you. I love reading the positive comments from people who now have the kit in their hands. I'll be working on my foundation pages this weekend and hope to have something to share before Thanksgiving.
Week In The Life™ | I spent most of today (Wednesday) printing photos (slow) and making progress on my album (also slow). I think it might be because I really want to get all those words I included in my blog post + the different sized images.
Story Stamp™ & Story Kit™ Subscriptions | We are in the process of getting the new products into the warehouse and photographed and will launch the Story Kit™ once those are in place and the page is ready. I'm excited to share the next evolution of the Story Subscriptions with you.
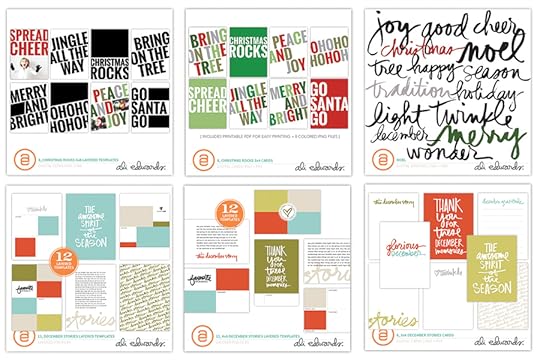
NEW DIGITAL PRODUCTS IN THE SHOPAs you can see in the image at the top of this post I've got a bunch of new digital products for the holidays in my shop. From top left to bottom:
Christmas Rocks 6x8 Layered Template Set (8 PSD layered templates)
Christmas Rocks 3x4 Cards (includes PNG files + printable PDF)
December Stories 6x8 Layered Templates (12 PSD layered templates)
December Stories 4x6 Layered Templates (12 PSD layered templates)
December Stories 3x4 Cards (includes PNG files + printable PDF)
And here's a few more:
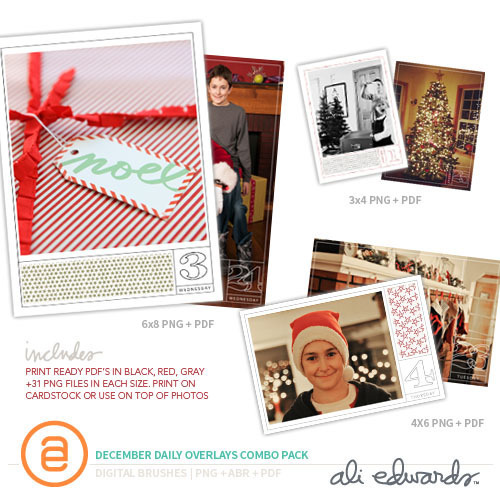
December Daily® Overlays Combo Pack
Interested in learning more about working with digital products? Check out my series of posts on Getting Started With Digital Scrapbooking.
Giveaway Winner Update
The winner of the $250 Minted giveaway is Julie Logosz. Congratulations! Please email Katie at katie@aliedwards.com to claim your prize.

November 17, 2014
New Story Stamp™ Theme Now Available | Daily
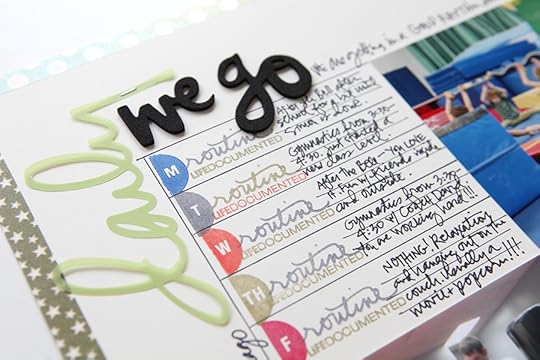
Hello Monday!
Just wanted to let you know that a new Story Stamp™ theme is now live.
This month we are telling stories related to the theme Daily with a stamp set that includes 27 individual clear stamps.
Daily stories are my passion. They ground me in the present and continue to help me develop a life-long attitude of gratitude. This month's stamp set was designed to become a go-to set to encourage you to tell a variety of different daily-themed stories. Mix and match the days of the week with the story themes to document your own daily stories.
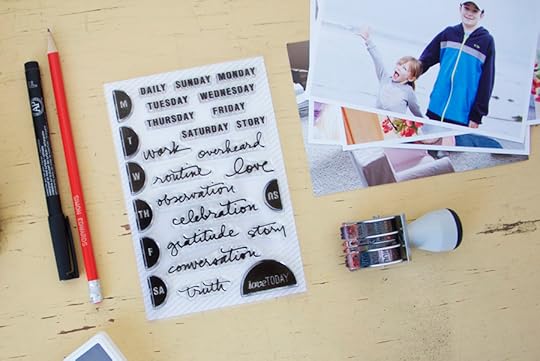
If you are a current Story Stamp™ subscriber the set should be on it's way to you soon and you can access the content in the classroom now. In the classroom under the Lessons tab you'll find the 8-page PDF handout, the process video that walks you through how I created one of the sample layouts using the stamps this month, and a bonus PNG/cut file.
A big thank you to all of you who are currently subscribing. I appreciate your support and your enthusiasm about the content in the classroom and the stamp sets.

If you are interested in more information about how this program works check out the order page here.
More information will be coming in December about the Story Kits™.


