
Ali Edwards's Blog, page 207
December 21, 2014
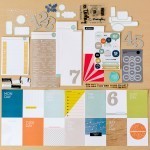
Week In The Life™ 2014 | Saturday In Album
As you've seen so far with my Week In The Life™ spreads, my approach was to tackle the words with a slightly different focus or "lead-in words" each day.
The idea for "Saturdays are for" actually came about as I was developing content from my Story Stamp™ classroom for the Daily theme. I love the idea of using a "this day is for" prompt for either stories about today or about the past. What were Saturdays like when I was a kid? Specific activities? Hanging out around the house? Sports? Working in the yard? Hot dogs and coke for lunch? I love that once the question is presented I'm flooded with a variety of different memories of different times in my life.
You can see/read my Saturday words and photos post here.
Here's a look at how I brought my words and photos from this one Saturday in 2014 all together in my album:
For my journaling I literally started every section with the phrase "Saturdays are for..." and used digital word art from this set (that includes each day of the week in singular and plural):
These Days Are For
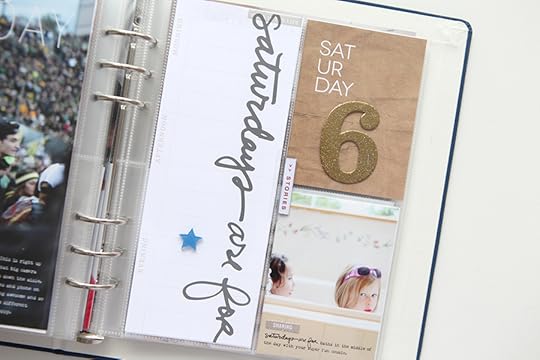
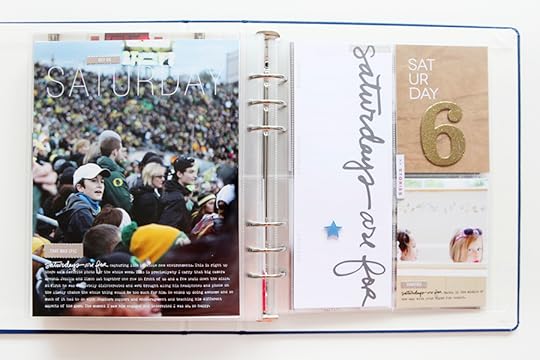
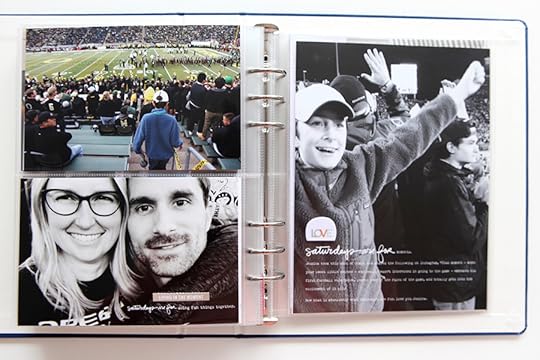
The enlarged photo I used is the one of Simon looking at the field at the football game. It's absolutely a personal favorite of mine for the year.
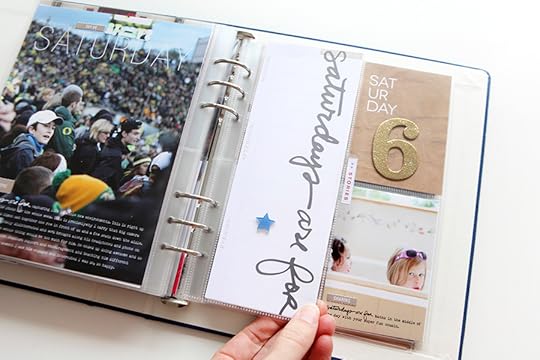
I addition to starting all the journaling sections that way I decided to print a large version of the word art onto the 3x8 timeline card. It's a nice balance with all the word-heavy sections from this day to have something without a lot of words. I added one single blue star as an accent + added the plastic tab like I've done on all previous days + stamped "stories" from the kit.
On the back I used the photo of Simon and my sister that I love, love, love from when we were walking into the Oregon football game.
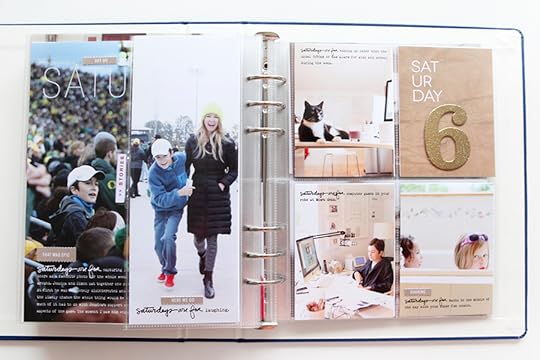
Next up are three 3x4 photos + the day title card + the gold embossed #6.
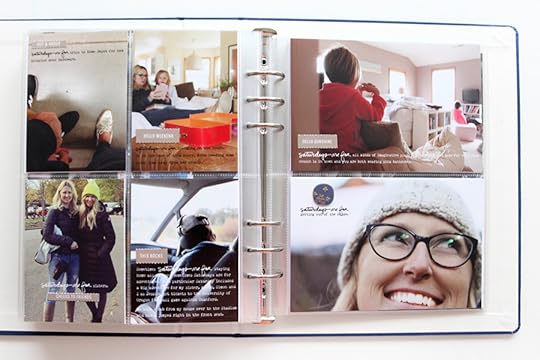
I really like filling these pockets with photos, especially as I look back on them now. Little bits of our life, all right here in this one book.
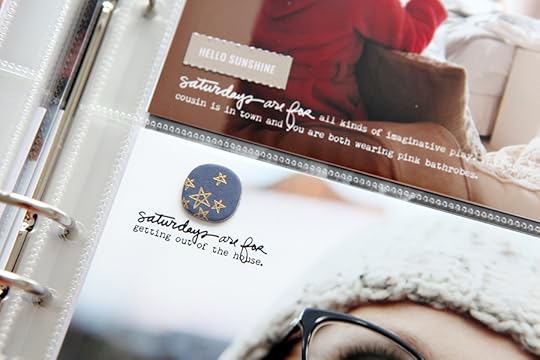
I added the blue and gold star chipboard piece right above my words.
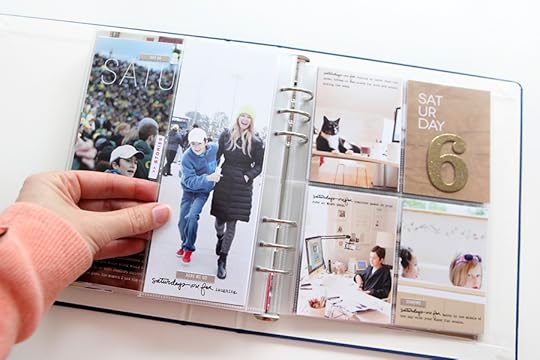
The last spread of the day includes more photos from the football game.
I really love that a project like this can be such a great reflection of the big and little stuff of life. Being able to see that all together in one place gives such a nice perspective on our lives - we are a mix of all of it.

Life is good.
Check out my other completed Week In The Life™ 2014 days here: Monday // Tuesday // Wednesday// Thursday // Friday // Saturday // Sunday


December 20, 2014
December Daily® 2014 | Day Nineteen
Welcome to
December Daily® 2014 | Day Nineteen.
Just want to give you a heads up that the schedule for posting my pages the next couple of days will be a little more sporadic than it has been up to this point as I get ready to celebrate with my family.
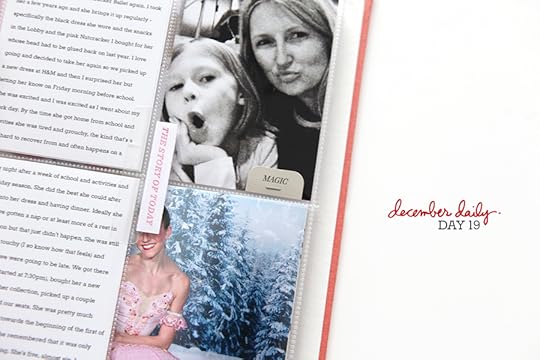
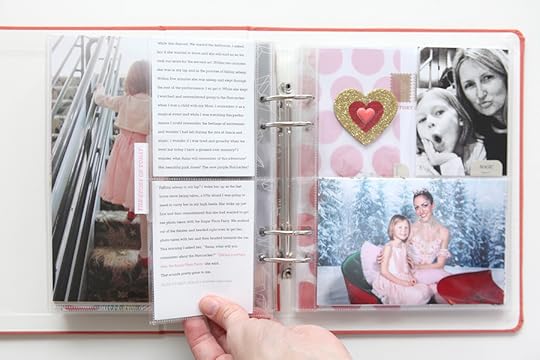
Last night I surprised Anna by taking her to see The Nutcracker. Here's the story that I printed on out onto 4, 3 inch x 4 inch cards:
One of the things that Anna asked for this year was the chance to get to see the Nutcracker Ballet again. I took her a few years ago and she brings it up regularly - specifically the black dress she wore and the snacks in the Lobby and the pink Nutcracker I bought for her whose head had to be glued back on last year. I love going and decided to take her again so we picked up a new dress at H&M and then I surprised her but letting her know on Friday morning before school. She was excited and I was excited as I went about my work day. By the time she got home from school and activities she was tired and grouchy, the kind that’s a little hard to recover from and often happens on a Friday night after a week of school and activities and the holiday season. She did the best she could after getting into her dress and having dinner. Ideally she would have gotten a nap or at least more of a rest in the afternoon but that just didn’t happen. She was still excited, but touchy (I so know how that feels) and worried that we were going to be late. We got there plenty early (started at 7:30pm), bought her a new Nutcracker for her collection, picked up a couple snacks and found our seats. She was pretty much ready to go home towards the beginning of the first of the first act when she remembered that it was only dancing and no talking. She’s five, almost six. I understand sweet girl.
During intermission she danced up behind the seats and asked my to sing her a song while she danced. We visited the bathroom. I asked her if she wanted to leave and she still said no so we took our seats for the second act. Within two minutes she was in my lap and in the process of falling asleep. Within five minutes she was asleep and slept through the rest of the performance. I so get it. While she slept I watched and remembered going to the Nutcracker when I was a child with my Mom. I remember it as a magical event and while I was watching this performance I could remember the feelings of excitement and wonder I had felt during the mix of dance and music. I wonder if I was tired and grouchy when we went but today I have a glossed over memory? I wonder what Anna will remember of this adventure? Her beautiful pink dress? The new purple Nutcracker? Falling asleep in my lap? I woke her up as the last bows were being taken, a little afraid I was going to need to carry her in my high heels. She woke up just fine and then remembered that she had wanted to get her photo taken with the Sugar Plum Fairy. We walked out of the theater and headed right over to get her photo taken with her and then headed towards the car. This morning I asked her, “Anna, what will you remember about the Nutcracker?” “Taking a picture with the Sugar Plum Fairy.” she said. That sounds pretty great to me. NOTE TO SELF | Attend a matinée next time.
Here's a look at the pages in my album:
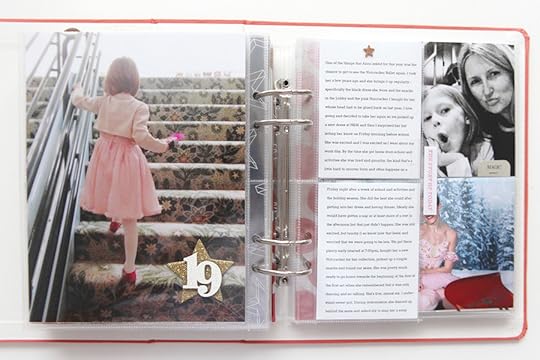
I had more content that I wanted to include compared to some of my past days so I ended up adding an "insert" to hold the story in the form of a page protector cut in half.
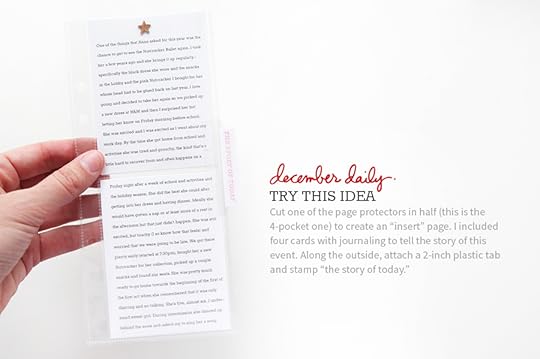
I cut the page protector using my paper trimmer and then broke my story into 4 parts to fit on 4, 3x4 inch cards and slipped them into the pockets.
Along the outside edge I added a
2-inch plastic label and stamped "the story of today" in pink on the white paper insert.
The photos (with the exception of the Sugar Plum Fairy) were taken with my iPhone. Definitely grainy but really the simplest option when it's just me and her and my bag and her stuff.
Here's a look at each of the pages outside the album:

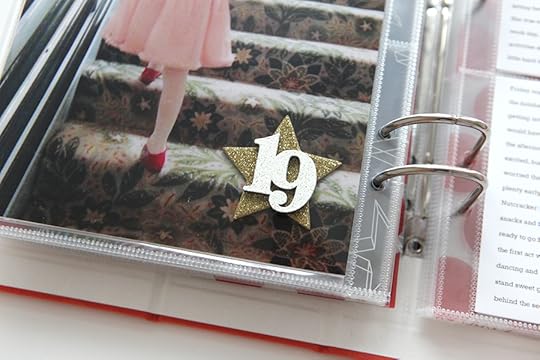
Glitter star + embossed #19.
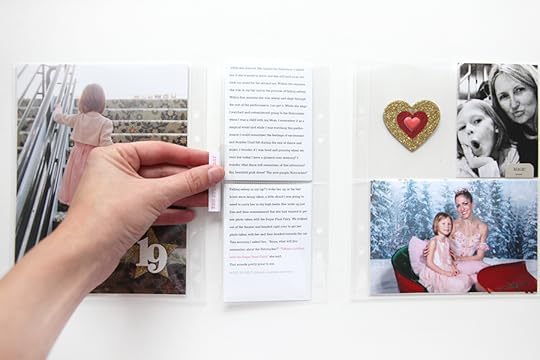
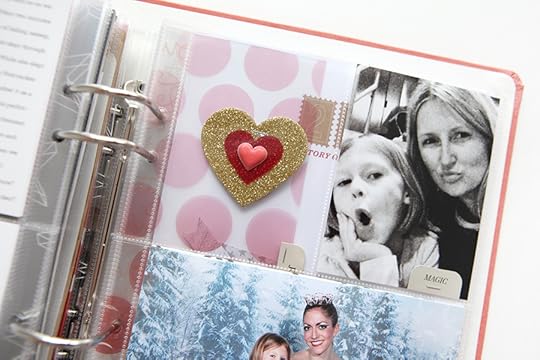
In the pocket next to the photo of Anna and me I layered one of the gold glitter hearts + a red plastic heart + a red puffy heart.
SUPPLIES
SHARE YOUR DAY 19
December 19, 2014
December Daily® 2014 | Day Eighteen
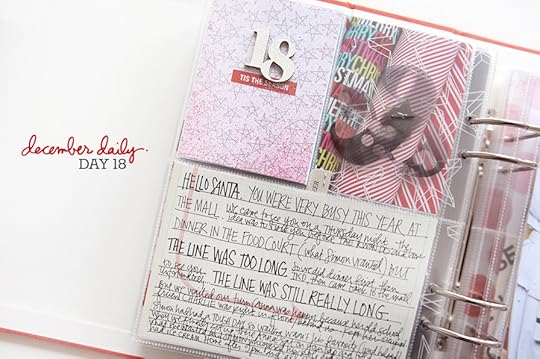
Welcome to
December Daily® 2014 | Day Eighteen.
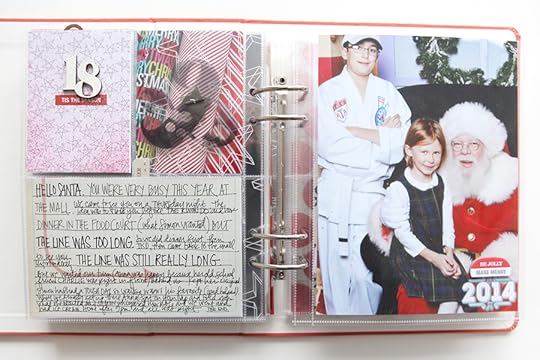
We finally carved out time to go see Santa the other night and today I'm adding that story and an enlarged photo.
This is one of those where you have to buy the photo. This year there was a sign up for no cell phone or other camera shots (which I respected) and I happily paid for one 5x7 photo. The one that ended up in my book (as a 6x8) got scanned in and enlarged so it would fit my pocket and so I could get all the marketing stuff off from around the edges and I could adjust the color which wasn't awesome. The "2014" icon in the bottom corner was unavoidable so I just went with it.
Here's a look at Day Eighteen:
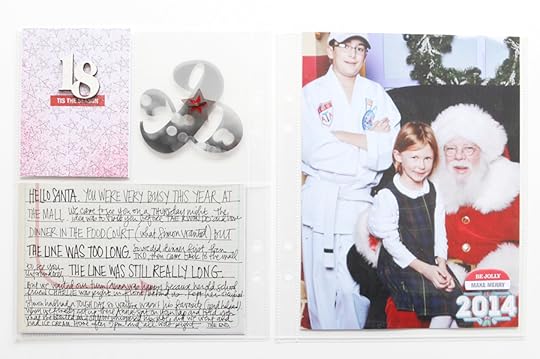
My kids are so totally growing up.
Originally I had the "18" card in here as a 4x6 (from my
Foundation Pages). I ended up cropping that down to 3x4 and moving it to the top pocket.
You can also see in this image that I added one of those little red stars in with the brad from that was used on
Day Seventeen.
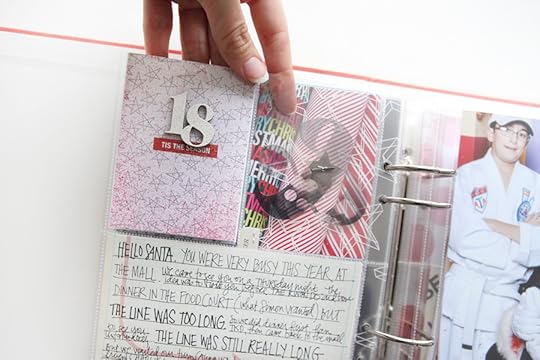
That ampersand pocket is still see-through.
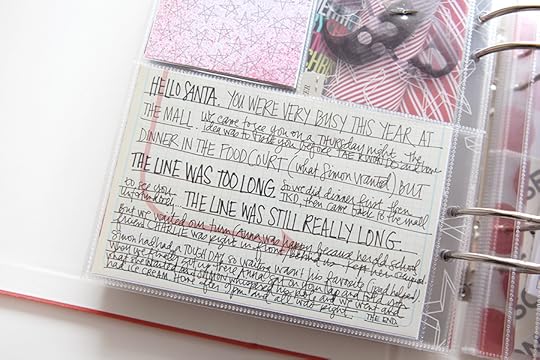
For my journaling I cut a 6x8 sheet of pattern paper down to 4x6 and hand-wrote using a combination of upper case tall letters and cursive letters.
The line was long is basically the "just" of the story.
SUPPLIES

SHARE YOUR DAY 18
December 18, 2014
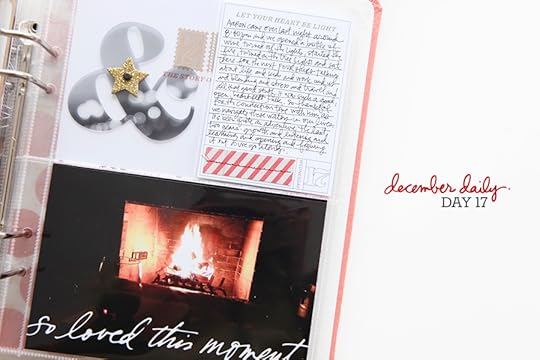
December Daily® 2014 | Day Seventeen
Welcome to
December Daily® 2014 | Day Seventeen.
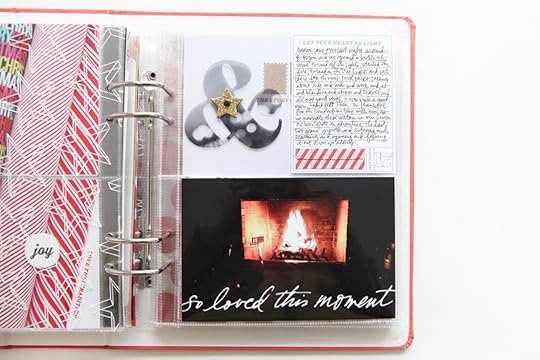
One of my most favorite things in December is sitting in the living room in the dark with a fire in the fireplace and the lights on the tree glowing. I finally took advantage of that with Aaron and a bottle of wine last night and it was
so, so great. It was one of those times, and one of those conversations, where I felt like I was exactly where I was supposed to be in the world.
Here's a look at how I told the story for Day Seventeen:
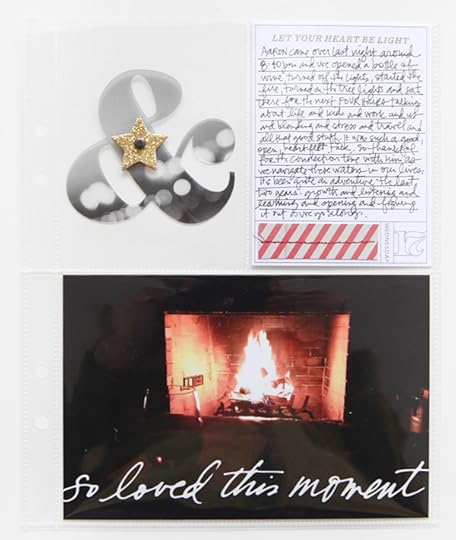
On my 4x6 photo of the fireplace I added "so loved this moment" which is digital word art from this set:
Everyday Life Cursive.
If you'd like to learn more about working with digital elements like that check out my
Getting Started series here.
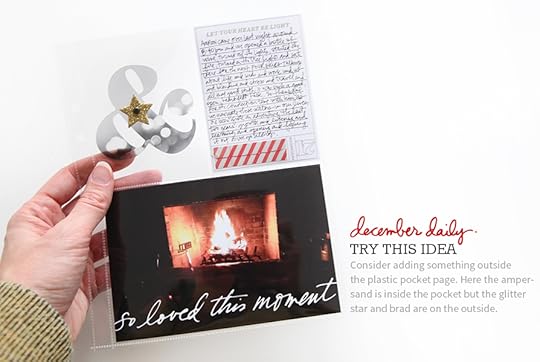
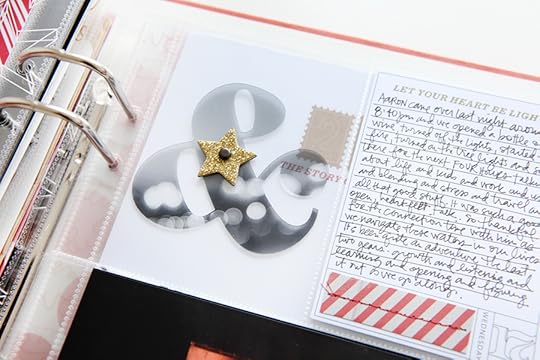
I love these bokeh plastic shapes from the kit this year. I used an ampersand earlier in the album with the drawing that Aaron and Anna did together so it seemed to fit that I would add the larger one here. I slipped it in the pocket and then attached the glitter star to the outside of the pocket (the brad goes through the page protector and the plastic ampersand).
Just a quick little stitch of pattern paper added to the
journal card.
SUPPLIES
SHARE YOUR DAY SEVENTEEN
December 17, 2014
Week In The Life™ 2014 | Friday In Album
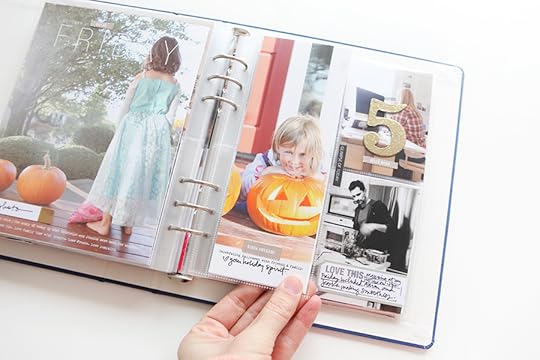
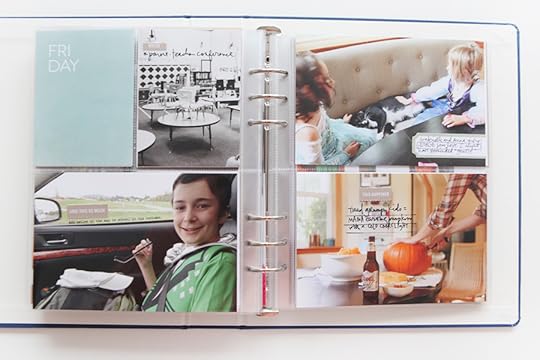
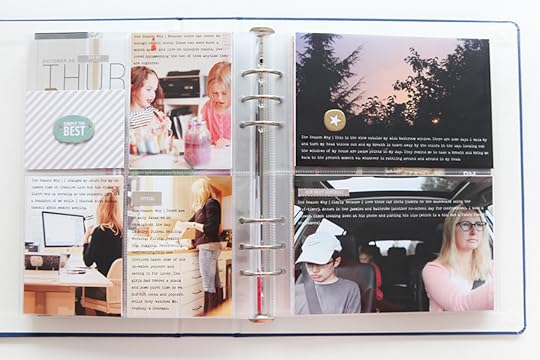
Friday in Week In The Life™ this year happened to fall on Halloween.
This is the day I added no words to my blog post - partly because I was just tired at the end of the day (hey, it was Halloween) when I was putting it together and partly because it showed a very pointed difference from the previous days - an opportunity for all of us to think about how the words play in our projects.
When it came time to get the photos and the words into the album the process was different from previous days because I didn't already have those words easily accessible to just copy and paste onto the photos. Rather than trying to add a bunch more words, I went with small bits of stories added to labels or hand-written directly onto the photos.
I actually really like this as a mix-in to the overall album and is a nice contrast from the rest of the days with all the words.
Here's a look at Friday 2014:
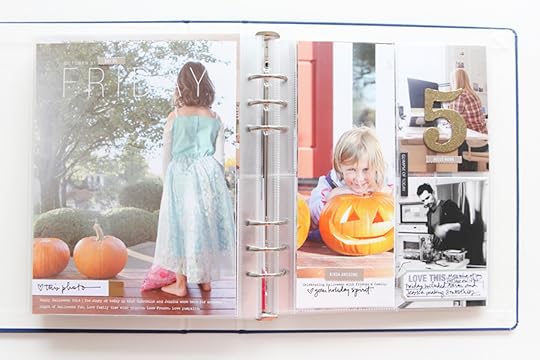
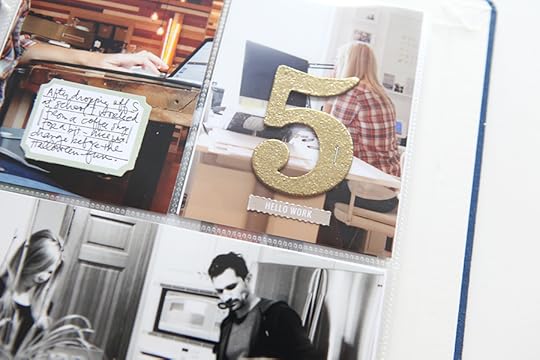
The day begins, again, with an enlarged 6x8 photo of my niece Gabrielle. It was one of my favorites from the day. I added one of the gold-edged labels
Today I decided to go with a photo on the front of the 3x8 card.
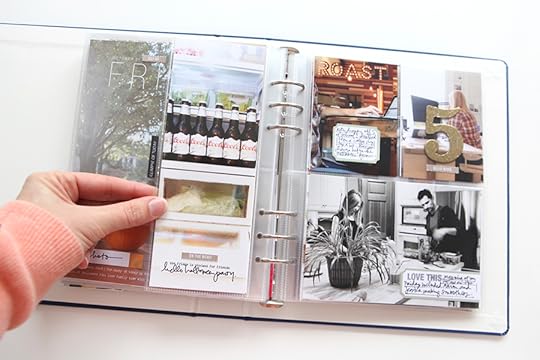
And a photo for the back - which happens to be a shot of the inside of my fridge which was stocked up because we were having people over in the evening.
I like the look of the combination of the perforated phrase + the type + the handwritten words along the bottom.
Those labels are great for adding a bit of context/story to the photos. "Love this" is from my Photos stamp set.

I followed my plan/pattern and gold embossed the chipboard #5. This one got stapled to the photo vs. just hanging out by itself in the pocket so I was able to include another photo.
I'm sure for some people out there this is way too simple.
For me, I'm cool with it as a piece of the whole story. Words + photos + intentional word-based embellishments. Love that.
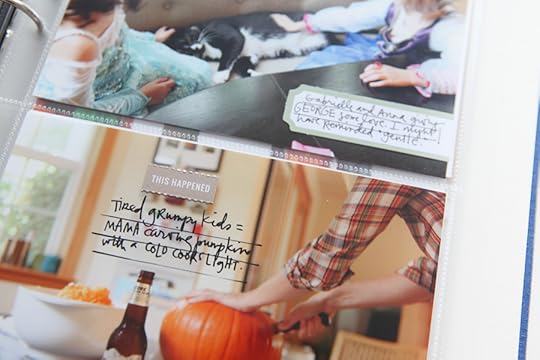
Writing directly on my photo using the Staedtler pen.
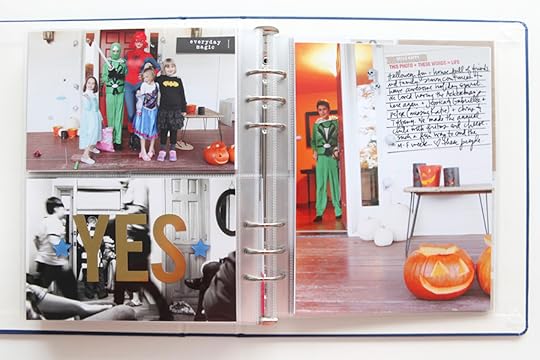
I cut "everyday magic" from one of the 3x4 cards and stapled it to the photo.
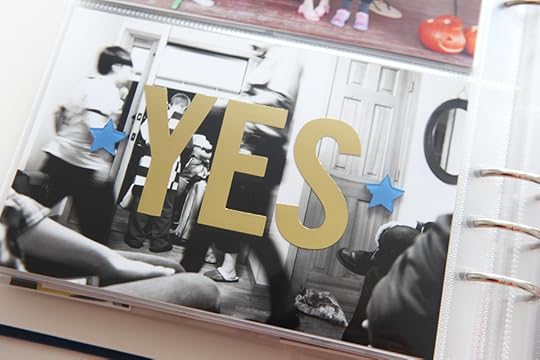
The YES gold letter stickers are from Pebbles. I love how this shot shows the action that was happening around here on Halloween night - it's one of my favorite parts of the night when we sit in my entry way and watch all the kids come to the door.
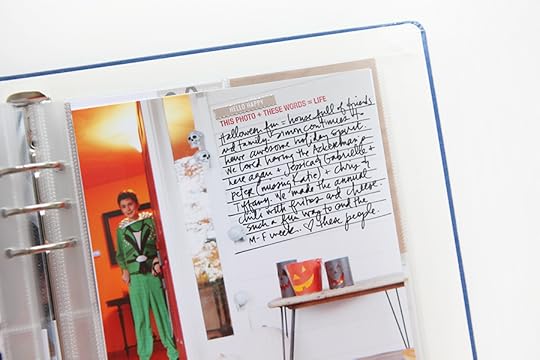
And I ended this day with a large photo of Simon standing in the door. I added my story directly onto the photo.
Check out my other completed Week In The Life™ 2014 days here: Monday // Tuesday // Wednesday // Thursday // Friday // Saturday // Sunday
SUPPLIES
December Daily® 2014 | Day Sixteen
Welcome to
December Daily® 2014 | Day Sixteen.
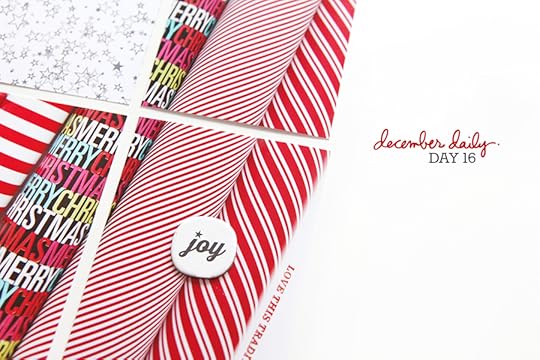
I started wrapping today so it seemed like a good time to take a photo of my current pile of wrapping paper which happens to be mostly red and white. This is my collection from the last few years - the red and white circles are the new addition this year.
How's it going out there? Writing down stories? Taking photos? Finding any time to play? Enjoying the season?
I'm looking forward to spending some time with my parents soon. As hard as it is to have my kids away part of the holiday I'm so happy that I have the chance to go see my parents and get my own one-on-one time with my Mom and Dad. I shared a post I came across recently on my Facebook page this past week that resonated with me and it might with you too, regardless of your own personal situation: Rethinking The Perfect Holiday.
Here's a closer look at Day Sixteen:
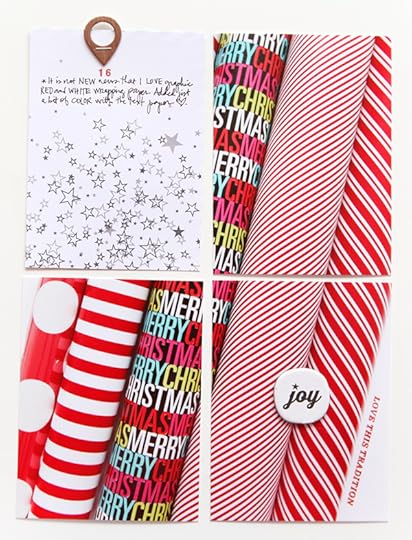
Basically I took a photo of my wrapping paper all laid out next to each other and then printed a 6 inch x 8 inch photo.
I put three of the cut pieces into the pockets and then kept one out, leaving room for the journal card that was already there from my
Foundation Pages.
Another simple idea that can end up looking pretty darn cool. I did intentionally take the photo at an angle so that the rolls of paper weren't straight up and down in the photo.
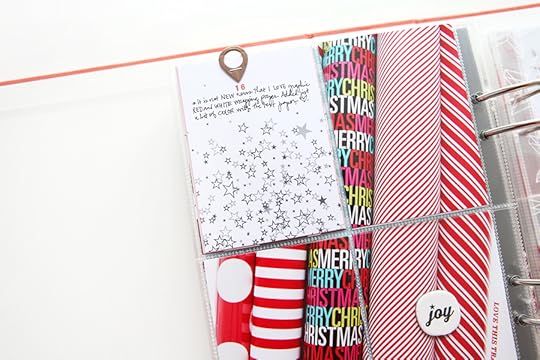
On the top of the journal card (with very short journaling today) I stapled a chipboard geotag that goes up and off the top of the card. On the backside of the geotag I embossed with white powder so you see that rather than the blank chipboard back.
It's just a little story, but who knows, maybe next year or five years from now it will be all green or kraft or gold.
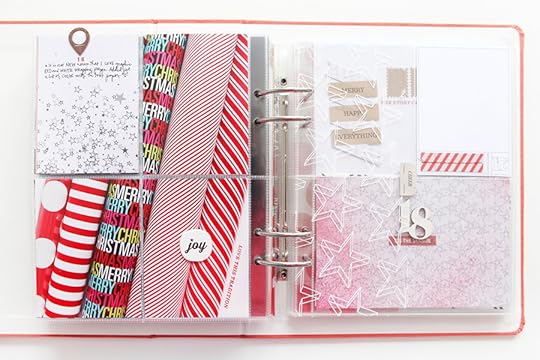
I stamped 'love this tradition" along the edge of the wrapping paper and added the "joy" chipboard circle (it was a speech bubble but I just cut off the bottom to make it a circle).
SUPPLIES
SHARE YOUR DAY SIXTEEN
December 16, 2014
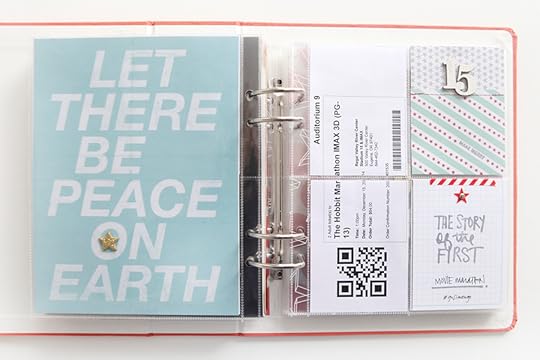
December Daily® 2014 | Day Fifteen

Welcome to
December Daily® 2014 | Day Fifteen.
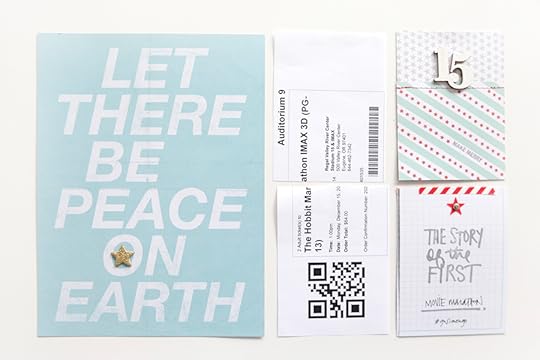
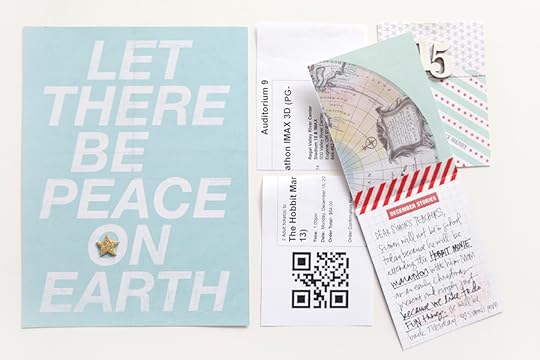
Yesterday I surprised Simon with a day off school and tickets to go to
The Hobbit movie marathon (the first two movies + the new one). We share a love of going to the movies and of the Hobbit and Lord Of The Rings stories. It was an early Christmas/love-you-let's-do-something-fun present for the two of us to do together. I've got something planned for Anna this weekend as well.
Here's a look at how I worked with the story in the album:
I did end up taking one photo at the theater so I might end up enlarging that and using it here or I might do another layout with the full story.
In the pockets on the second page I included our ticket, the date card from when I put together the foundation pages, and a flip-up story card.
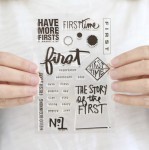
"The Story Of The First" stamp is from this month's
Story Stamp™ set.
Here's more about the flip-up card:
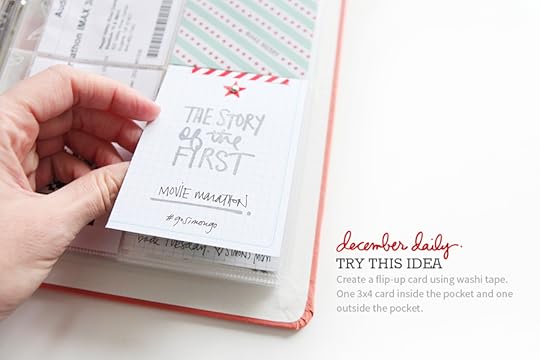
Washi tape is a really easy way to create something like this. I usually do a piece on the outside and the inside. This pattern is from Freckled Fawn.

I stamped "the story of the first" on the outside and used the "December stories" stamp from the December Daily® kit on the inside.
The journaling was in the form of a note to his teachers letting them why he wasn't at school.
SUPPLIES
SHARE YOUR DAY FIFTEEN
I'd love to have you share a link to your Day Fifteen pages below.
Please link directly to your post vs. a general blog link.
December 15, 2014
December Daily® 2014 | Day Fourteen
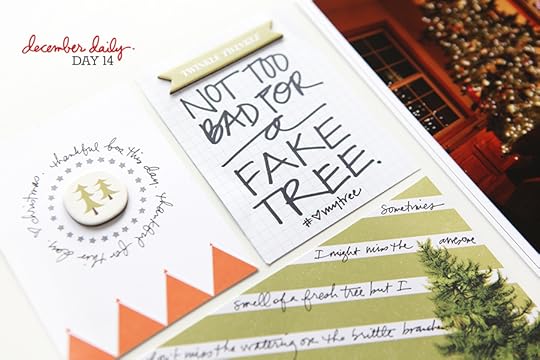
Welcome to
December Daily® 2014 | Day Fourteen.
Yesterday I looked back through the pages I've done so far and decided I needed a photo of my tree at night. I took my DSLR camera downstairs and set it on a table behind the couch. My settings were ISO 1250, 1/8 second shutter speed, and 2.8 aperture (I think that was the aperture - either 2.8 or 4.0).
I love this fake tree.
Also today - heads up that the new Story Theme is now up:
Firsts. Check out the subscription options and more details here (options include Story Stamp™, Story Kit™, and Digital Story Kit™). The classroom content is now available for current subscribers.
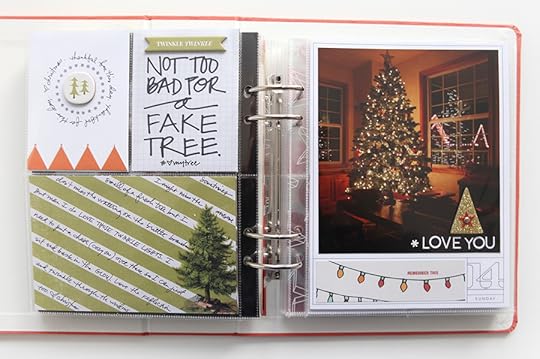
Here's a look at Day Fourteen:
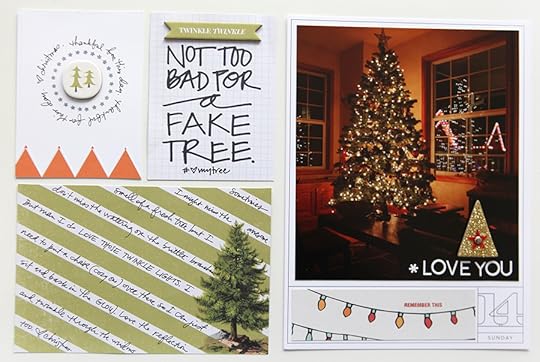
I considered just doing one page for today but ended up sticking with a spread. I moved the circle card from the right pocket to the left and took off the gold glitter star and added the circle tree chipboard instead. I'll use the star somewhere else in the album by adding more adhesive to the back.
As a second 3x4 card I hand-wrote "not too bad for a fake tree" and my story (written on the diagonal lines on the 4x6 card) includes a bit about how it twinkles either way.
On the tree photo page (sized 5.5 inches x 6.25 inches) I added letter stickers from the kit + a glitter tree and one of the red plastic stars.
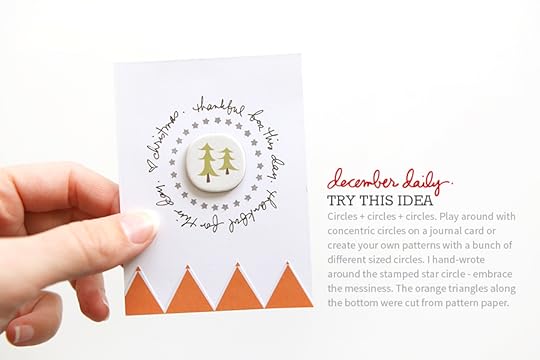
Something to try on one of your pages is playing with concentric circles. Chipboard circle + star circle stamp + messy handwriting around the outside.
Here's a look at everything in the album:
Happy Monday!

Add some jolly bits and pieces of your holiday season to a new My Crush™ Holiday Happenings book by Close To My Heart! To learn more about it,
click here.
Also, during the month of December, with qualifying purchase of $50, you will be eligible to purchase any C- or D-size stamp set from the Annual Inspirations 2014-2015 idea book for only $10. Learn How!
Week In The Life™ 2014 | Thursday In Album

Happy Monday!
My December Daily® post will be up later today. I missed the photo-lighting window of time yesterday so it will go up around 3pm PST today. Thanks for understanding!
In the meantime I'm happy to share with you Thursday from my 2014 Week In The Life™ album:
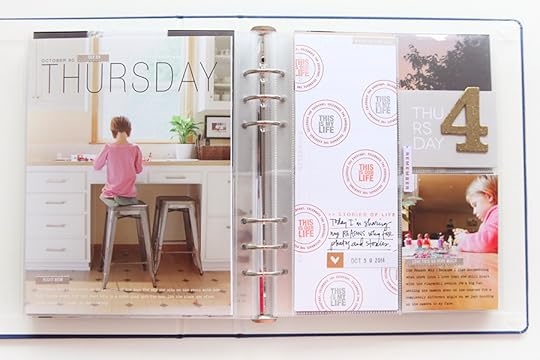
For Thursday I stuck with the same formula as the previous days.
I used my 6x8 layered templates on top of my main photo to begin the day + a perforated phrase (day 01, day 02, etc) + usually some additional journaling on that page.
This enlargement of Anna is one of my favorite photos from the week.
Here's another way to approach that 3 inch x 8 inch page: repeated stamping of the circle stamp + a combination of "this is my life" and "this is our life."
I also used it as an "intro" into how I approached my journaling for Thursday which was to start each phrase with "the reason why." You can read all the words I documented for my Thursday in my blog post here.
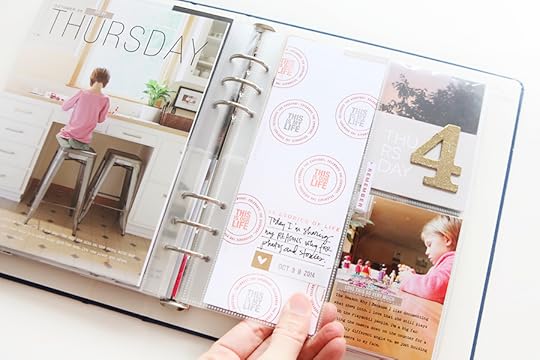
On the back of the 3x8 I added a photo with text again.
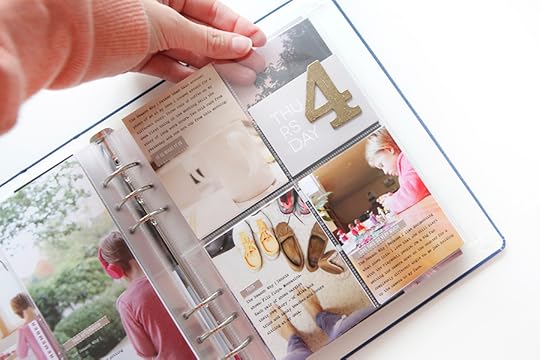
Photos + words. Photos + words.
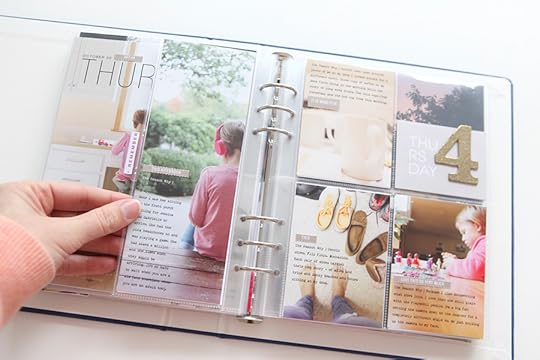
One thing I did different on this 4-pocket page was cut the "Thursday" card smaller to create a peek-through opportunity. I stapled the gold embossed number 4 to the card (you can see the other side below).
Again, my really simple approach in this album was to focus on the photos and the words to go along with them. The perforated words and phrases and the chipboard embellishments add just a little something extra.
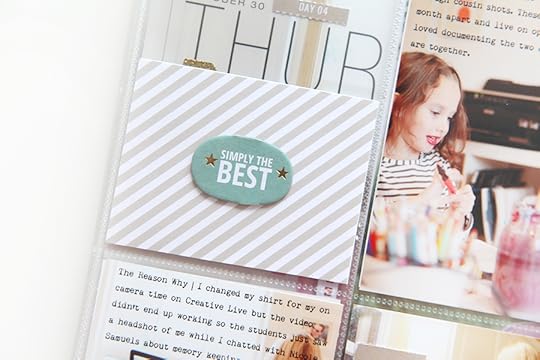
You can see the top of the gold "4" peek out at the top of this card (the back of the "Thursday" card).
Again for today, all my journaling began with the phrase "the reason why." This was the first time I've used that in this way (vs. an intro to a project) and I liked the focus it brought to the words. It's partly the reason why this photo was worth taking and partly the reason why things are the way they are around here (why something is a part of our story).
On the top left photo I stamped "the simple stuff of every day life" onto one of the labels and stapled it to the photo.
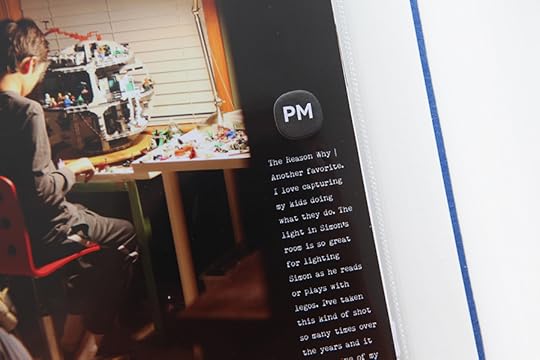
For the final enlargement of the week I included one of my favorite ways to take photos of Simon as he plays in his room. The journaling fit nicely right along the edge in the shadow from the doorway. I like looking for spaces like that to become homes for my words.
Check out my other completed Week In The Life™ 2014 days here: Monday // Tuesday // Wednesday // Thursday // Friday // Saturday // Sunday
December 14, 2014
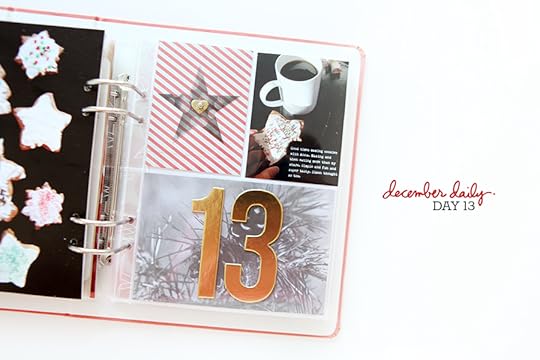
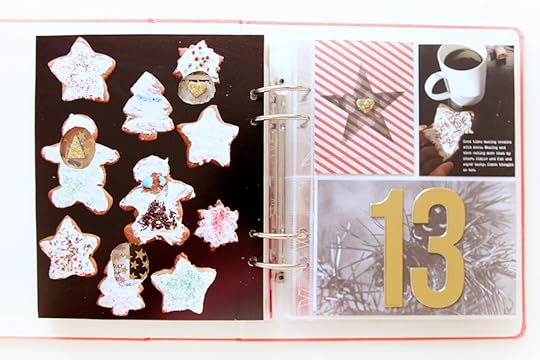
December Daily® 2014 | Day Thirteen
Welcome to
December Daily® 2014 | Day Thirteen.
So remember all that talk about maintaining the three transparent parts of the circles from
Day Twelve? I bagged it. Actually I did it and then I decided I'd rather not have the holes.
Here's what it looked like with the holes:
It worked okay - I was able to cut the holes using the cardstock template I had set aside for today, but I just didn't like it.
Which was okay and totally fine and we all get to choose our own path with these stories and pages.
So no peek-through holes for this page. It might have worked better with a simpler photo (such as a landscape) or even just pattern paper. But man I wanted those cookies in there.
Here's a look at it without the holes:

Better for me. And they tasted pretty darn good too.
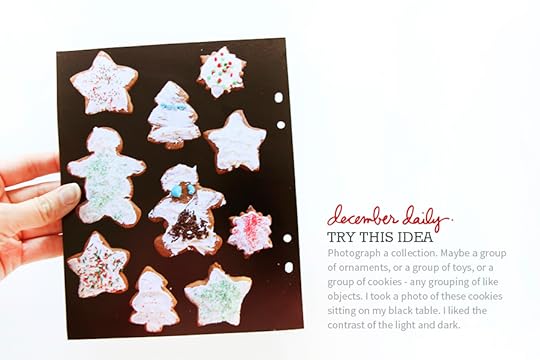
The idea for today is about including a photograph of a group of something - ornaments, cookies, toys, books, etc. I shot these cookies on my black dining room table.
And then I ate more than my share.
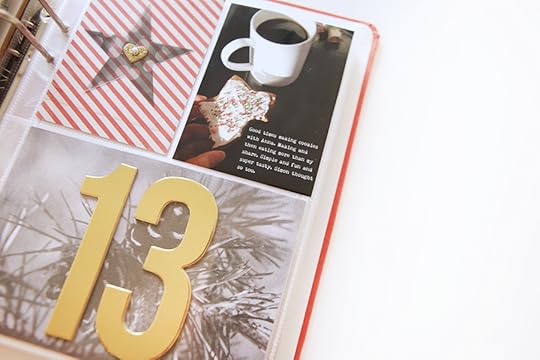
I added a second photo to the other 3x4 pocket left-over from my
initial foundation pages. I added some simple journaling onto the photo before printing.
Hope you are having a great weekend!
SUPPLIES
SHARE YOUR DAY THIRTEEN
I'd love to have you share a link to your Day Thirteen pages below. Please link directly to your post vs. a general blog link.


