
Ali Edwards's Blog, page 208
December 13, 2014
December Daily® 2014 | Day Twelve
Welcome to
December Daily® 2014 | Day Twelve.
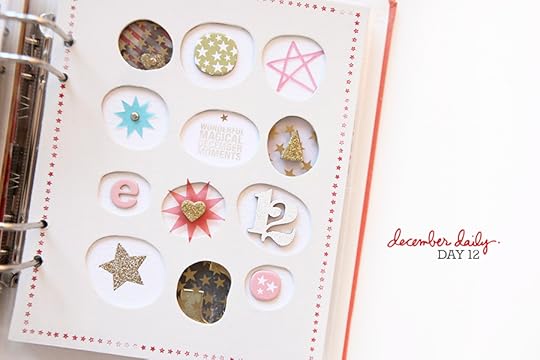
I've been looking forward to this day and being able to play with this die cut chipboard page. In past
December Daily® albums I've done a lot of mixing in different textures and page sizes. I really do love having a mixture of page protectors + things outside of the pockets such as photos adhered back to back, artwork, unique sizes, etc. They just add interest and they are fun to put together.
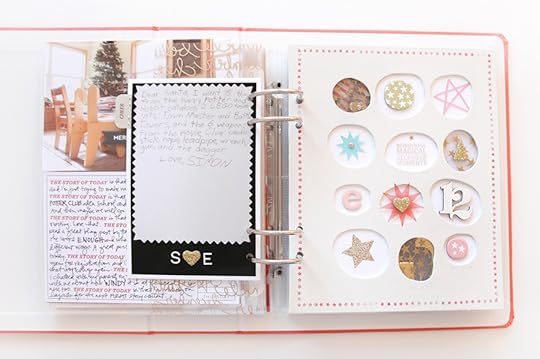
Here's a closer look at Day Twelve:
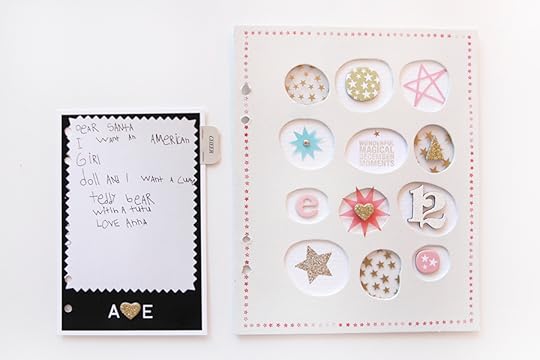
Day Twelve is a combination of two photos adhered back to back (photos of my kids notes to Santa) and the full page die-cut chipboard.
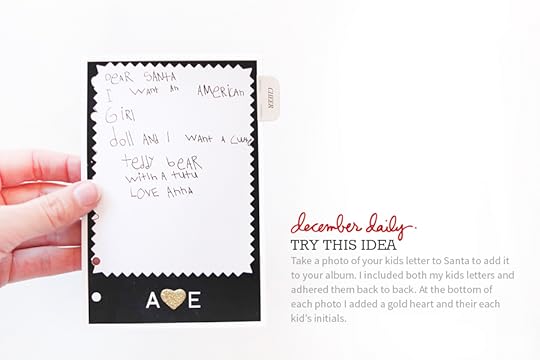
Last night the kids wrote their letters to Santa. I gave them each a zig zag edge card and away they went. I took photos of each one and then printed them and adhered them back to back.
At the bottom of each photo (you can see Simon's note below) I added a glitter heart and their initials (letter stickers). Holes were punched to fit the album rings.
The die cut chipboard page is really purely just for fun.
Because why the heck not?
Most of the embellishments I included here are from the kit. In addition I added some
gold star rub ons from Jenni Bowlin and a small pink chipboard letter "e." The gold rub ons were added to thick pieces of transparency that were glued to the back of the chipboard.
Here's a look at how it came together:
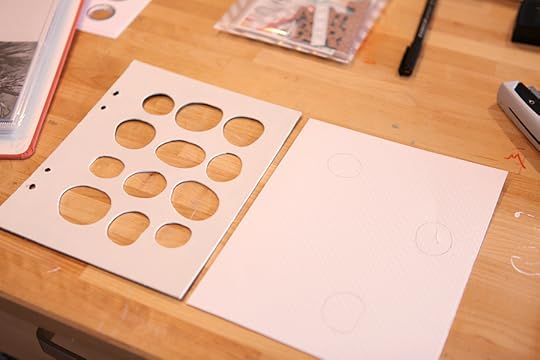
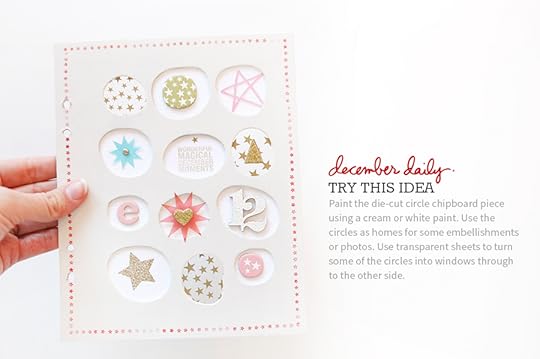
When I put my foundation pages together I painted the front side of the die cut chipboard with cream paint. When it came time to put the page together I cut a piece of cardstock to the same size and then choose three of the circles to trace and then cut out so I would be able to see through to the next page.
I actually ended up cutting two pieces of cardstock. The first one became the back for the embellishments. The second piece of cardstock is to use as a template when I print out a full page photo for Day Thirteen and want to cut holes in the photo to match (to maintain the see-through part).
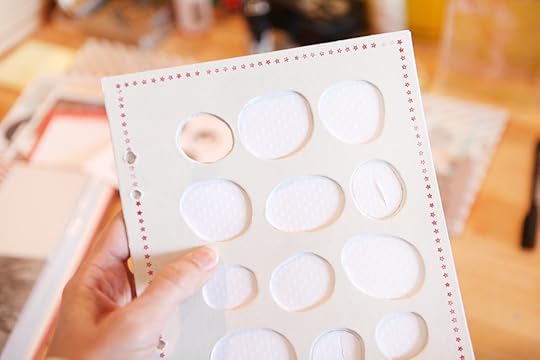
Above you can see the holes after I first cut them.
After I traced the second piece of cardstock I ended up cutting more around the edges of the circles of the white cardstock so you don't see any of the outer edge of the circles.
I also added the star border using
red Staz On ink and stamps from the kit.
Here's what the back looks like:
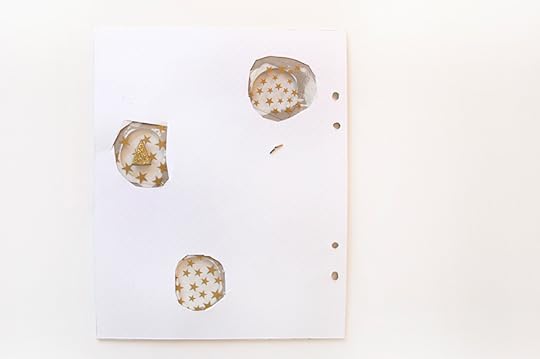
On the back you can see the transparent pieces with the star rub ons. I just adhered those pieces to the back of the chipboard.
Here's a look at these pages in the album:
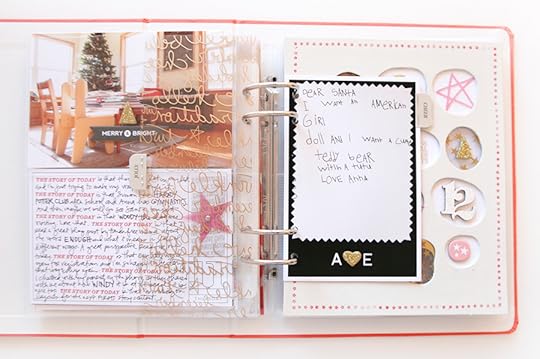
I centered the Santa letters in the middle of the rings.
Simon's Santa letter.
Yep.
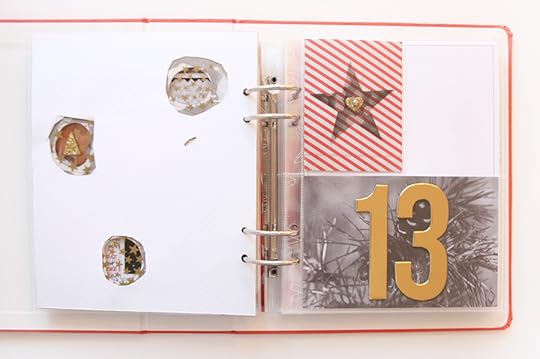
Above you can see what I have for Day Thirteen right now. I plan to print out an enlarged photo and cut three circles in the photo so the see through elements will keep that quality.
SUPPLIES


SHARE YOUR DAY TWELVE
I'd love to have you share a link to your Day Twelve pages below.
Please link directly to your post vs. a general blog link.


December 12, 2014
Week In The Life™ 2014 | Wednesday In Album
My
Week In The Life™ album for 2014 is complete and I'm excited to share the rest of it with you over the next week.
I'm going to keep doing it one day at a time which allows me to add more details vs. one long post and I'll finish up with a video overview to bring it all together.
Here's a look at
Wednesday:
Wednesday continues to have a very decent amount of words in addition to my photos. I'm really proud of that this year and happy that I took the time during the week to really write at the end of each day - having it in
a blog post really made it easy to go back and corral the content when I was ready to work on the album.
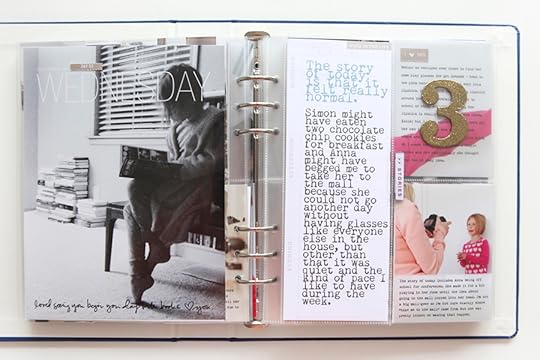
Today is the day where I repeated the phrase "the story of today" at the beginning of each of my journaling sections.
For the enlarged photo I chose to go with this grainy one I took of Anna in the early morning hours in my bedroom. I made it black and white using
RadLab.
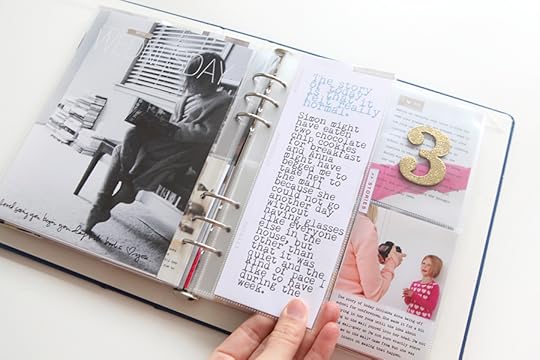
One of the things I wanted to do was show you different ways to work with the 3x8 insert. Some days I've added photos, some days I've added hand-written words and today I added large text.
When I was going back over what I wrote on my blog post for Wednesday these words stuck out to me and I thought they would be cool to add here using a larger type size.
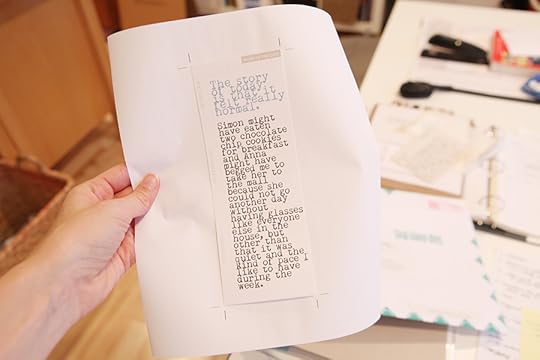
For printing on the 3x8 I created a new canvas in Photoshop (sized to 3x8 at 300dpi) and typed up my journaling. I used a ruler to measure the margins where there was already printing on the card and placed my journaling on the canvas in Photoshop accordingly.
I did one print to see what it would look like before temporarily adding the 3x8 card and running the whole thing through the printer. Sometimes this works on the first try and sometimes I have to run it through, make an adjustment, and do it again. Sometimes I also hold up the two pieces of paper to the light before running it through with the card attached so I can see more clearly where the type is going to end up.
If that all sounds like way too much trouble you could also use bigger letter stamps to add your journaling to this page.
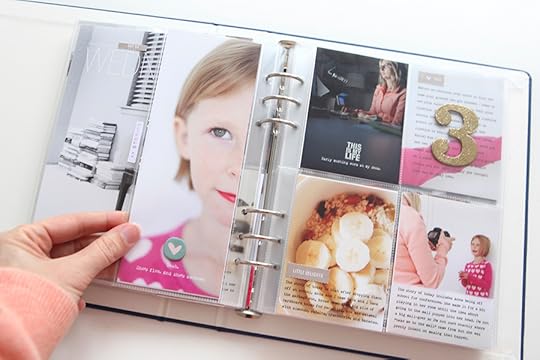
On the back I went with one of the photos I took of Anna. I really like the contrast of the up-close, 1/2 face with all the other farther away shots I generally take.
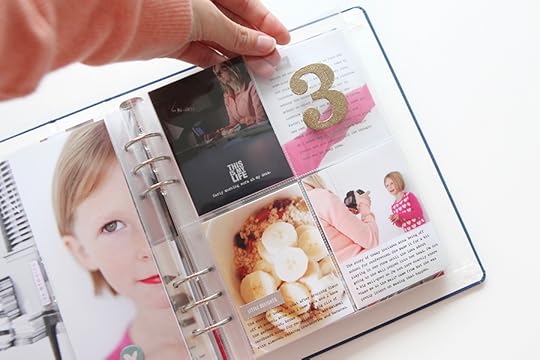
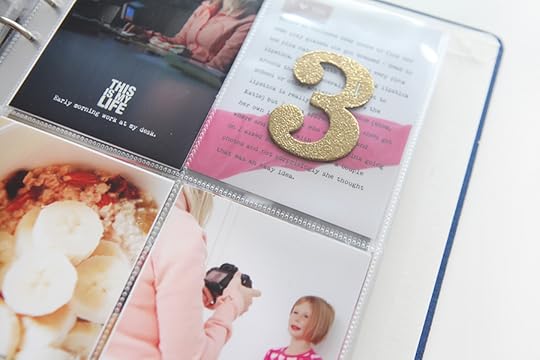
I embossed the #3 with gold again and placed it in the pocket (stapled in place).
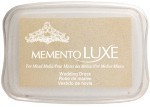
"This is my life" was stamped onto the photo using Memento Luxe Wedding Dress White Ink.
I kept it pretty simple again using those perforated word strips.
On the photo of Anna in the shopping cart I added the text at an angle - partly because the photo has a lot going on and partly because there was a nice strong vertical line in place that was just asking to have text on top.
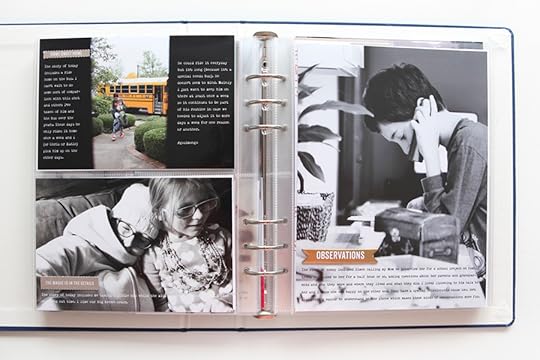
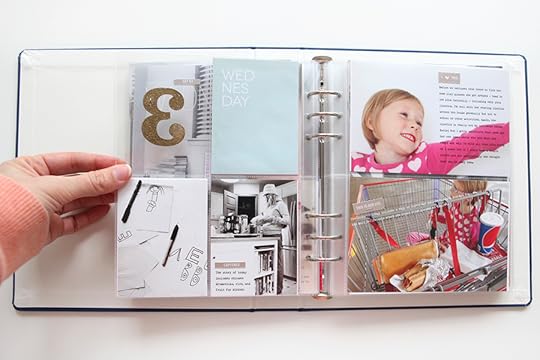
The final spread for Wednesday is again, words and photos. I took advantage of the "white space" on the photo of Simon getting off the bus for more words.
I didn't end up adding any inserted photos or additional photos outside of page protectors today - the page protectors were enough.
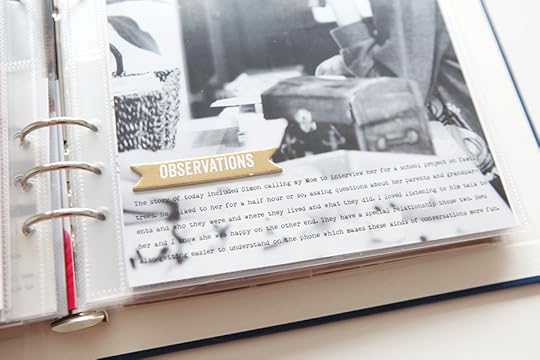
I ended the day with an enlarged photo of Simon + the story of the photo + the chipboard "observations" banner.
Check out my other completed
Week In The Life™ 2014 days here: Monday // Tuesday // Wednesday // Thursday // Friday // Saturday // Sunday


December Daily® 2014 | Day Eleven + One Little Word® 2015 Workshop Open For Registration

Welcome to
December Daily® 2014 | Day Eleven.
So here's the truth: today I sat and stared at this journaling card for way too long.
I went downstairs. I took some photos around the house. I came back upstairs. I stared at the card again.
What do I want to say today?
When that kind of thing happens to me, when I get stuck or feel uninspired, I take it back to the very basics, which is exactly what I ended up doing.
The story of today is... The story of today is... The story of today is...
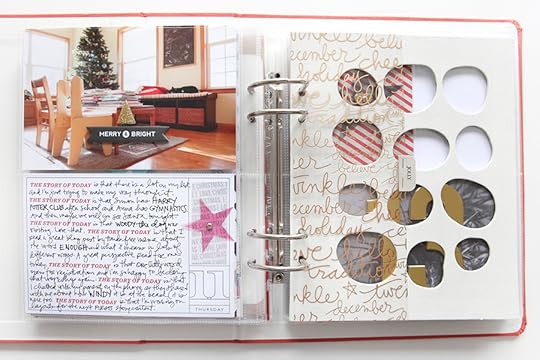
Here's a look at what I ended up with for Day Eleven:
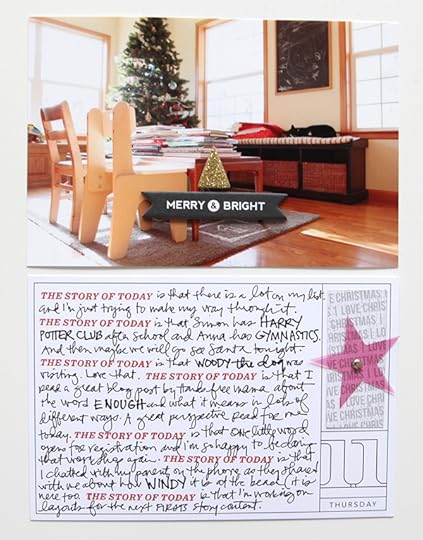
I loved that very everyday shot of books, table, chairs, tree + George sleeping on that little bench. I added one of the glitter trees + the "merry and bright" banner on top of my photo.

It's simple. It doesn't take a lot of time. And it's a slice of what's real around here this holiday season.
And here's what I ended up with for
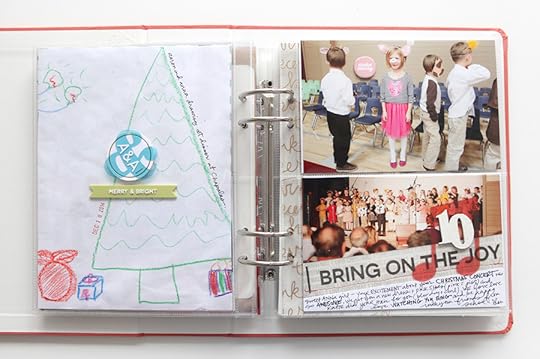
Day Ten (had been waiting to take photos at Anna's Christmas concert):

Seriously. She was great as a singing pig - and she had so much fun.
I decided to add a photo to the bottom card as well (which was in place from my Foundation pages). I really like how it turned out with the diagonal cuts to the photo and the addition of the music note. I just pulled up the #10 and then re-adhered it after I added the photo to the 4x6 pattern paper.

ONE LITTLE WORD® 2015 NOW OPEN FOR REGISTRATION
Just a quick update that the 12-month
One Little Word® 2015 Workshop is now open for registration (and the classroom is open as well). I'll be sharing my word and some thoughts for the year after Christmas.
Full details, supply information, etc can be found
here.
You can read all my past posts about
One Little Word® here.
SUPPLIES


SHARE YOUR DAY ELEVEN
I'd love to have you share a link to your Day Eleven pages below.
Please link directly to your post vs. a general blog link.
December 11, 2014
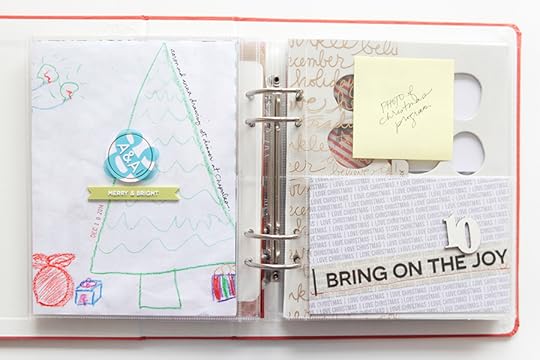
December Daily® 2014 | Day Ten
Welcome to
December Daily® 2014 | Day Ten.
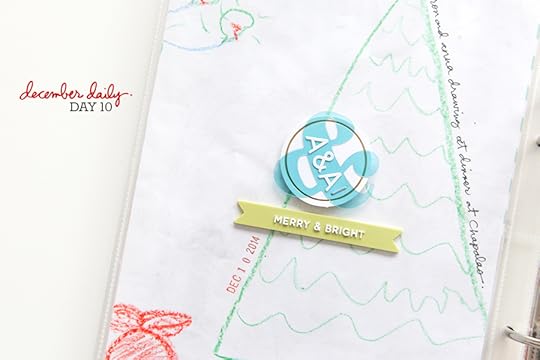
A couple nights ago the kids and I had dinner with Aaron and he and Anna embarked on some holiday coloring while we waited for our meal. I brought the back of the menu home knowing I wanted to incorporate part of the drawings they were doing into my album. I cropped the drawing to 6x8 to fit in the pocket and added a couple embellishments + a date stamp + a couple identifying words on top.
In addition to the drawing, December 10th is also the day of Anna's school Christmas program. I decided to just leave the pocket empty so I can add a photo from that event tomorrow when I have a chance to print and photograph my project during the day.
Here's a look at the spread for Day Ten:
Many of you know I'm a fan of
yellow sticky notes in Project Life®. They work great in this project too as you work your way through the month.

I continue to love the idea of adding "real life" stuff to my projects. For December Daily® it's often drawings, Santa letters, receipts, things I've received in the mail, etc.
You can leave the artwork (or real life stuff) as it is, or add a couple embellishments like I did here. I added the initials "A" and "A" using the letter stickers on top of the plastic ampersand. I stapled the ampersand to a gold foil circle and then used foam dots to adhere that grouping to the art work.
Underneath I added the rubber "merry and bright" banner. Those things are so cool.
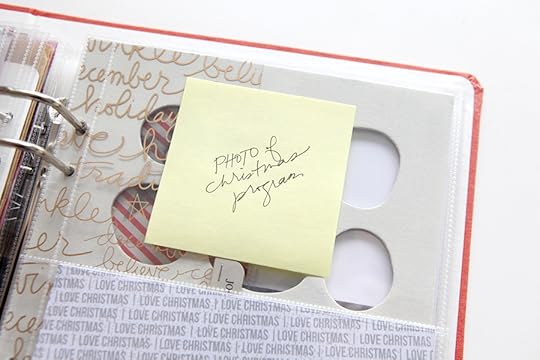
Adding a simple sticky note can help you remember what you wanted to document - it's especially helpful when you aren't sure when you'll get a chance to get back to the project.
You also might notice that I moved the transparent 1/2 page to tomorrow.
Hope you are having a great week!
EDITED: Here's the updated image that includes the photos from Day 10:
SUPPLIES

SHARE YOUR DAY TEN
I'd love to have you share a link to your Day Ten pages below.
Please link directly to your post vs. a general blog link.
December 10, 2014
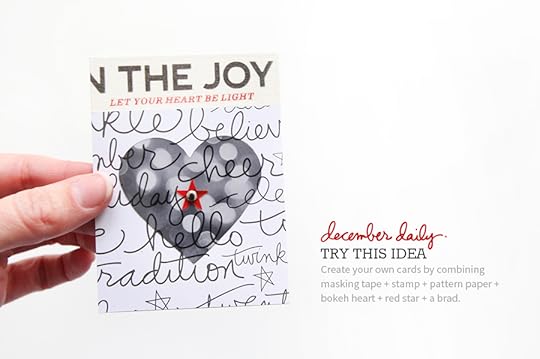
December Daily® 2014 | Day Nine
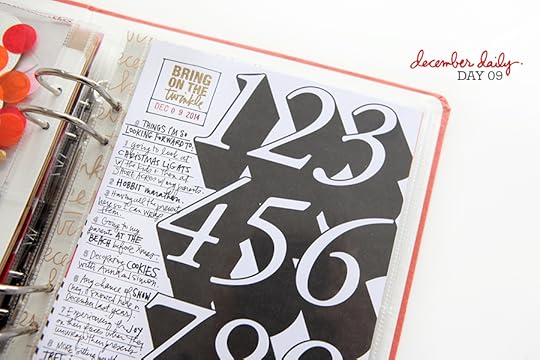
Welcome to
December Daily® 2014 | Day Nine.
Today I'm playing with black and white and numbers and words.
Here's a look at the components of Day Nine:
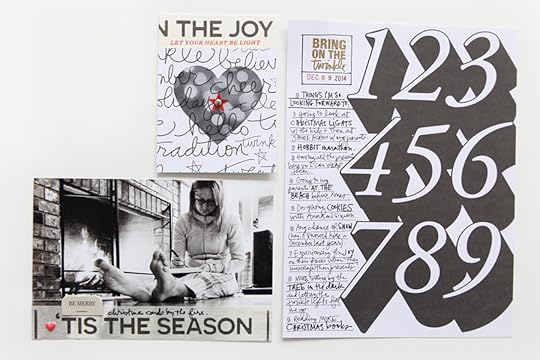
On the left side I created a 3x4 card using some of the supplies from the kit: the masking tape, the "let your heart be light" stamp, the hand-drawn pattern paper + the bokeh heart + a red star + a brad. I paired that with a photo I took using the timer on my iPhone last night of me sitting by the fire working on my holiday cards.
I also knew I wanted to use that number paper for today since it went up to 9 and in the
Foundation Pages video I talked about maybe using it for some kind of list and that's what I ended up doing.
Another idea if you wanted to make it more meaningful would be to write up your own words on a piece of paper and then place the bokeh heart on top - maybe more parts of your story.
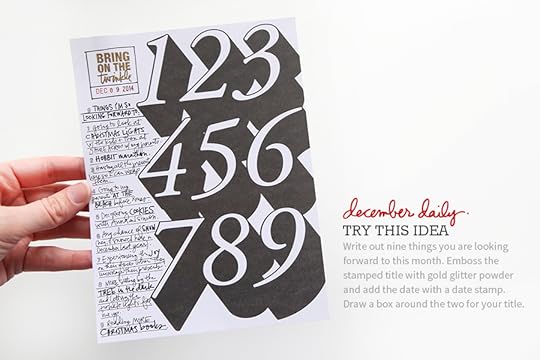
For this page I used the
Gold Glitter Zing again to emboss the title + added the date using a date stamp. I drew a box around the two to bring them together. Underneath I wrote out nine things I'm still looking forward to this year before Christmas.
Those little numbers on the stamp set are totally getting some use this year.
Here's a look at the full spread in the album:

SUPPLIES
SHARE YOUR DAY NINE
I'd love to have you share a link to your Day Nine pages below. Please link directly to your post vs. a general blog link.
SILHOUETTE GIVEAWAY WINNERS
hiwendyhi said...Have wanted a Silhouette for so long now (YEARS!!) and the budget just never allows it. But, I keep trying!! I'll get one someday. :) Thank you for the giveaway fun!!
k4projl said...WOW! This is such a wonderful giveaway! I have been looking at The Silhouette for quite some time, even just yesterday. So many craft projects can be done! :) Thank you for the opportunity! A side note: your December Daily kit rocks!!!!!
Congratulations! Please email Katie at katie@aliedwards.com with your contact information
December 9, 2014
December Daily® 2014 | Day Eight
Welcome to
December Daily® 2014 | Day Eight.
Many of your know I'm a fan of keeping it real in my memory keeping projects. That doesn't mean I include every negative thought and feeling and experience I encounter in my life but it does mean that I often include documentation about the challenges I'm facing or the things I'm wrestling with in my mind and heart.
The holidays stir up lots of emotions in people and I'm no different.
How can we treat each other with even more tender loving kindness during these days of dark and light? Smile at people as we walk by. Open our hearts a little more than we are comfortable with. Forgive. Put ourself in someone else's shoes. Take a broader view of an issue or a closer look at someone else's thoughts/feelings. Take the next step. Write it out.
For Day Eight I decided to write a bit about the emotions and thoughts I was experiencing last night. I paired that journaling with a fun little pocket of goodies and my list of things I want for Christmas. It's simply how life goes - a crazy combination of silly and serious, light and dark, hard times and good times.
My journaling for today:
"Ah, seasons. I was thinking a lot about seasons last night as I sat in Aaron’s living room and watched his kids decorate their tree. I thought about our families and the ways in which we have come together. I thought about Simon and Anna and how they were probably decorating the tree over at Chris’ house and how I hoped they were enjoying it and being in the moment vs. longing for something else (I want this for me too). I thought about the ways in which we move forward and the ways in which we are held back. I thought about giving and receiving and letting go. I thought about traditions new and old and the ways in which my family celebrated the holidays when I was a kid. I thought about imperfections and magic and finding/making my own joy. I thought about expanding hearts. I thought about the seasons of change - how we resist and how we become more flexible through all the days of our lives. I thought about how much I love the season of twinkle lights and how I hope I can bring that joy to the most special people in my life."
Here's to more light than darkness for each and every one of us.
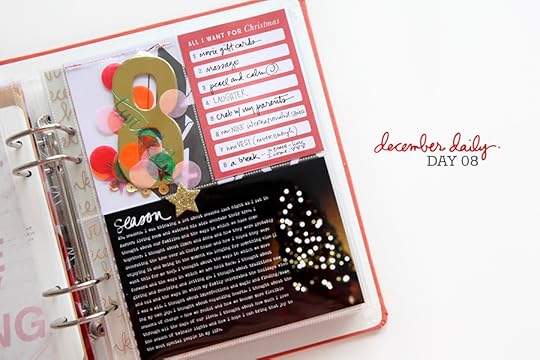
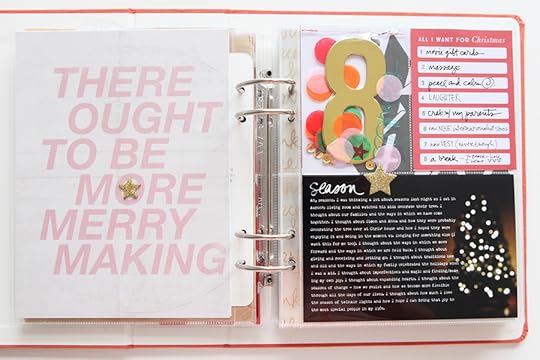
Here's a look at Day Eight:
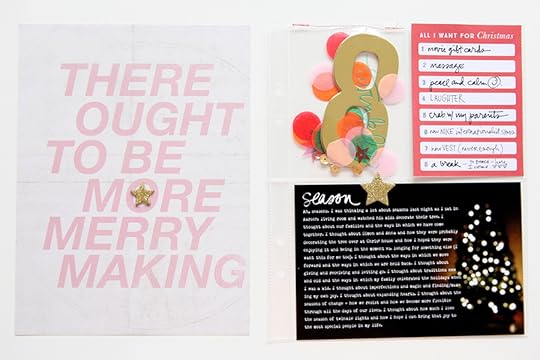
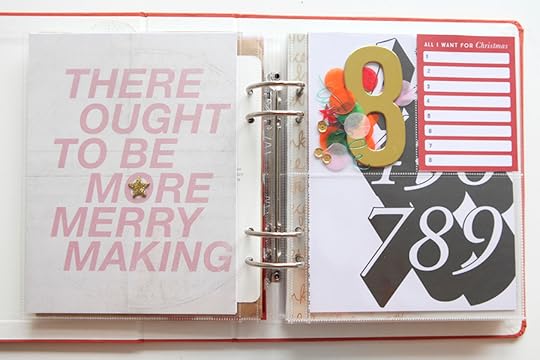
Day Eight pairs a full page 6x8 pattern paper + a pocket holding the large gold 8 and tissue paper circles and the word twinkle + my Christmas list + some thoughts on seasons.
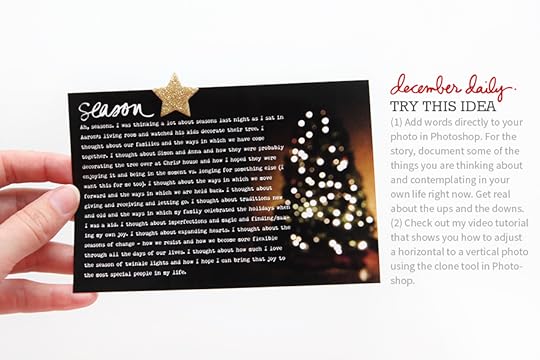
In Photoshop I opened up this photo, made it horizontal vs. vertical (see video tutorial below), added the word "season" from
this set, and then added my story.
I also added the gold glitter star along the top using a glue dot (and I embossed the back using the white embossing powder).
Here's a short video that shows you how to make a 4x6 horizontal photo from a vertical photo using the clone tool in Photoshop.
December Daily® 2014 | Using The Clone Stamp Tool To Transform A Vertical Image To Horizontal from Ali Edwards on Vimeo.
Feel free to let me know if you have any questions about that in the comments.

The pockets are a fun place for adding those extra little embellishments. I just ran the pocket through
my sewing machine to keep it closed.
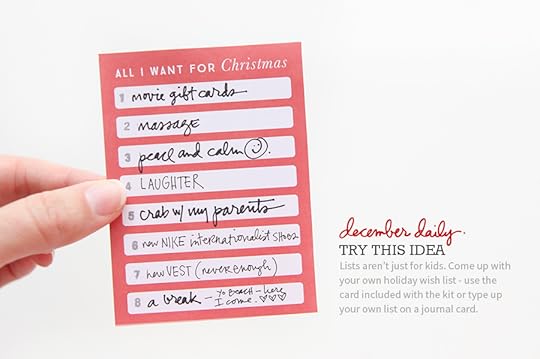
In addition to my thought-filled journaling I love the idea of adding in what I want for Christmas. My kids will be doing their letter to Santa soon (probably this week) and that usually finds its way into my album as well. On the card I used the number stamps from the kit with gray ink.
Here's a look at the whole thing again:
SUPPLIES

TODAY'S POST SPONSORED BY | SCRAPROOM
How much are your photos and time worth? If you said more than $89, keep reading. ScrapRoom Software is the only all-in-one photo software created specifically for scrapbookers, by a scrapbooker. Organize and search the way you want, then find your photos when you need them so that you can get creative when you’re ready. And for Ali’s readers, ScrapRoom is just $89 through 12/31/14, using code: DD2014 at our website. Click HERE to learn more and to watch videos using ScrapRoom with December Daily. Mac and PC.
SHARE YOUR DAY EIGHT
I'd love to have you share a link to your Day Eight pages below. Please link directly to your post vs. a general blog link.
December 8, 2014
AE Digital Creative Team | Holiday Product Inspiration
Today I wanted to take some time to share with you some really awesome samples that my Digital Creative Team has been creating with my holiday products.
As you'll notice, many of these women are what I call hybrid memory keepers - meaning they are using digital products on paper projects (which is a lot of what I personally do too). If you'd like to learn more about getting started with digital scrapbooking (with the goal of purely digital projects or a hybrid projects) check out my series on Getting Started here. Those posts include information on basic file management plus tips on printing and working with many of the products I have available here in my shop and at Designer Digitals.
Each week we are adding new examples created by this team to the product image sliders in my Digital Shop to give you a variety of examples of how the products can be used.
One thing I want you to know is that this team isn't restricted to only using my products in their projects. I like seeing how they combine my products with other cool things available out there for memory keeping.
Below each example we've included the web address so you can go check out their blogs and see what other cool things they are creating. Super thankful for the support they are providing me and looking forward to their future creations. I've also added a bit of commentary next to their names detailing what I like about the page/project.
Here we go:

Noel | A fun set of holiday script. Great for adding to photos or as titles above your journaling.
Here's some cool ideas of how to work with this product from the Digital Creative Team:
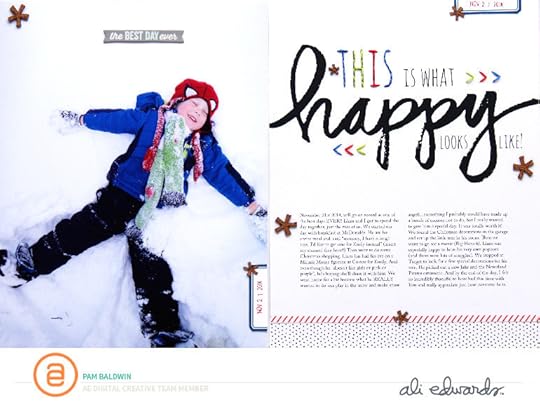
Pam Baldwin | Full page photo + second page for a large title and two columns of journaling. Love it.
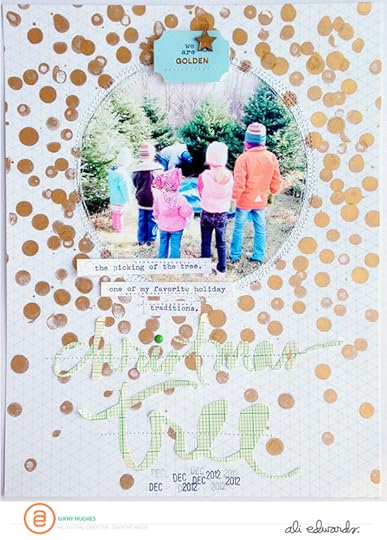
Ginny Hughes | Super in love with the circle image + the gold dots and stitching. Ginny used the Silhouette to cut out the words "christmas" and "tree" from the Noel set.
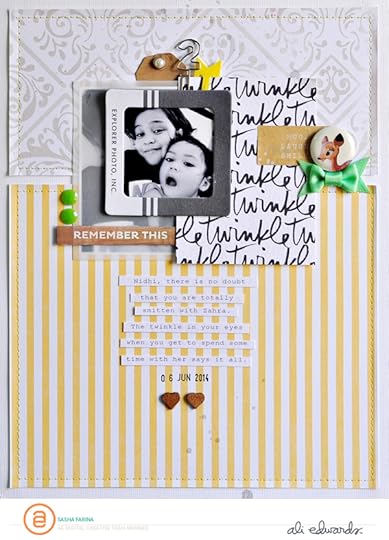
Sasha Farina | A couple things I think are cool about this page: (1) I love the two areas of stitched background pattern paper - something super cool about that separation and (2) I like how she created a simple card by repeating the "twinkle" script over and over again. I also love that this isn't a holiday page - it shows that these words can be used in other projects vs. strictly used during December.
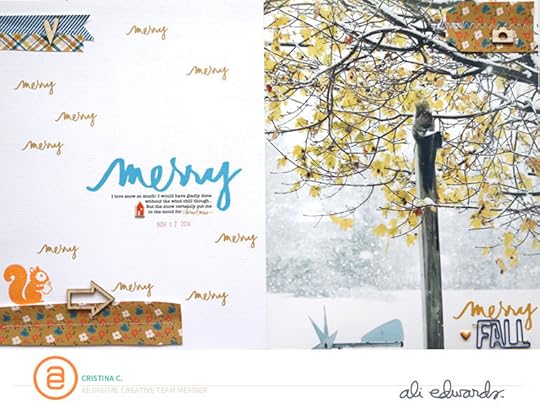
Cristina C. | Two page layout - again loving that she used "merry" on a non-Christmas page. Great full page photo combined with a fun collection of repeated words on the other page.
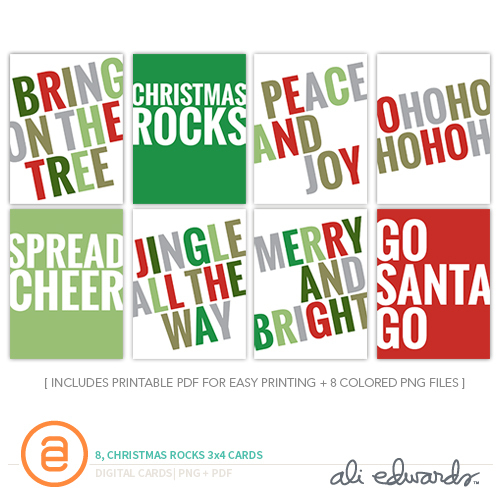
Christmas Rocks 3x4 Cards | Great for adding to pocket pages or on traditional layouts, this graphic and bold set of cards emphasize my love of words and type.
Here's some cool ideas of how to work with this product from the Digital Creative Team:

Kelly Schmidt | I love how this page could easily translate into a December Daily page pairing the 3x4 card with a 3x4 photo. I also really like that grid pattern paper in the background.
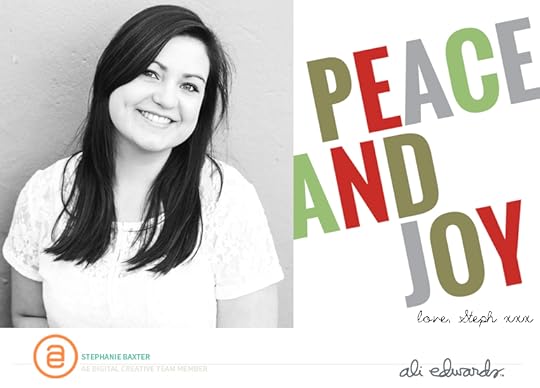
Stephanie Baxter | Stephanie took the design and used it to create her holiday card for this year.
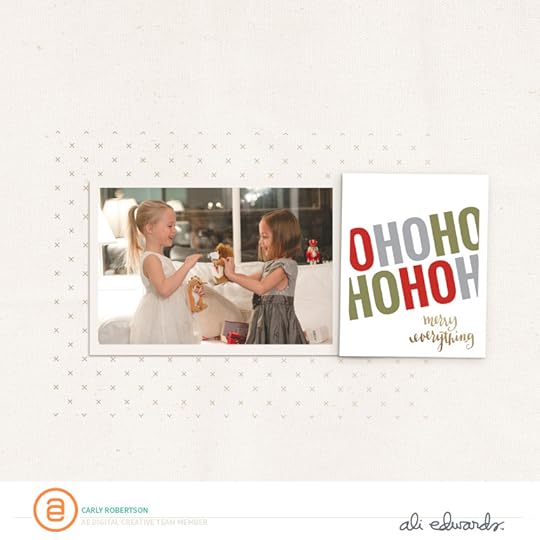
Carly Robertson | Simple and lovely.

Paige Taylor Evans | Paige took the 6x8 version of this design and turned it into a cut file for the Silhouette. Awesome. Read her post about that here.
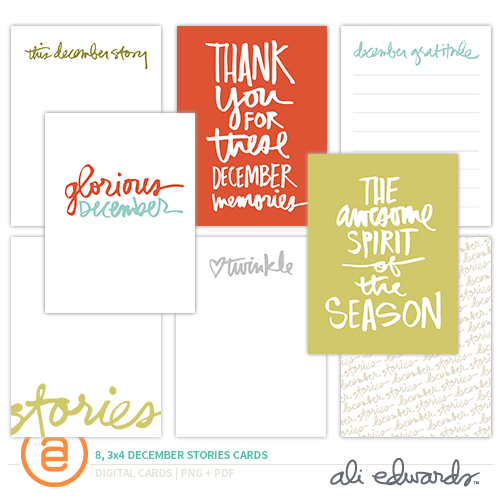
3x4 December Stories Cards | Another 3x4 card set available includes sentiments for documenting your December stories.
Here's some cool ideas of how to work with this product from the Digital Creative Team:

Lindsay Bateman | Love how Lindsay varied the size of the cards here and gathered them all together on the layout.
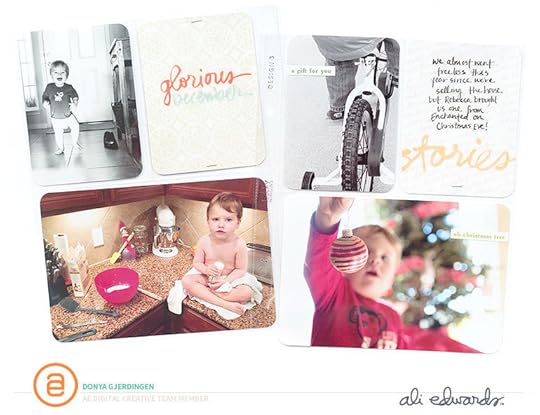
Donya Gjerdingen | Love these cute photos and love how Donya added patterns behind the word art on the cards to customize her pages.
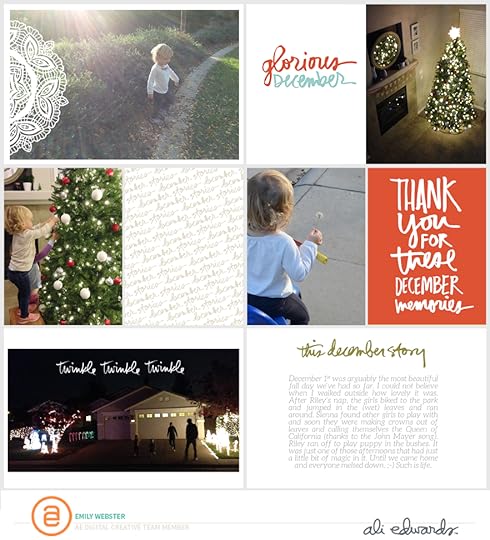
Emily Webster | I love this example from Emily because of it's emphasis on the photos and the words. The products compliment her images and story.

Teresa Victor | Another lovely example of simplicity.
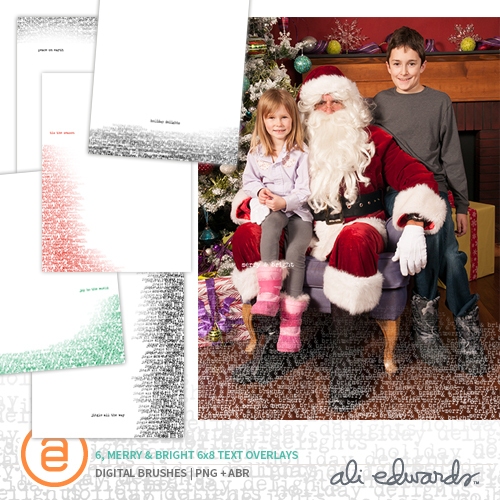
Merry & Bright 6x8 Text Overlays | This product is designed to add word-based texture to your photos or can also be used on it's own to create a home for journaling.
Here's some cool ideas of how to work with this product from the Digital Creative Team:
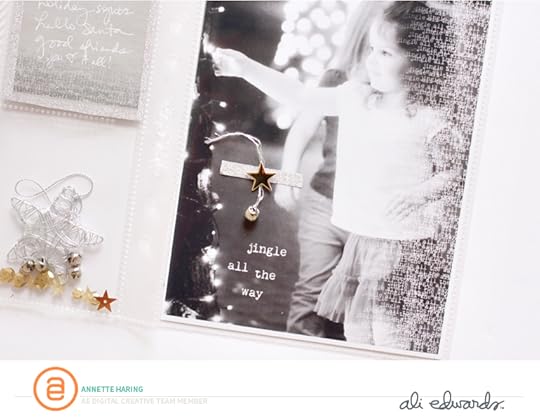
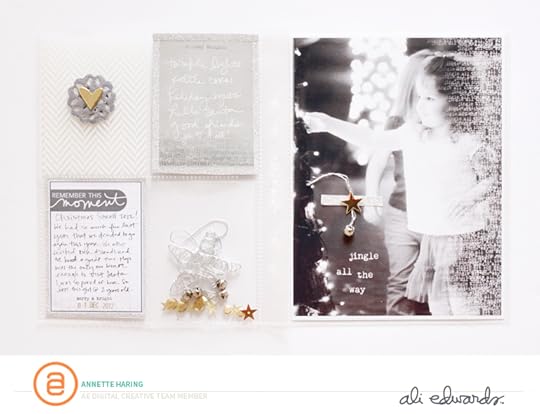 Annette Haring | Love this page from Annette's December Daily that includes the text overlays on top of her 6x8 photo. Love that silver and gold and gray color scheme too.
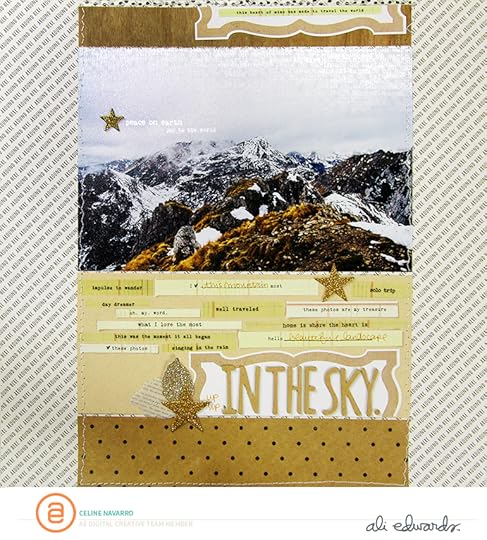
Celine Navarro | Celine used the text overlays on the top of this photo. I love the subtle quality of the words on the photo combined with the rest of the things she's got going on with the layout.
Hope you have a great day!
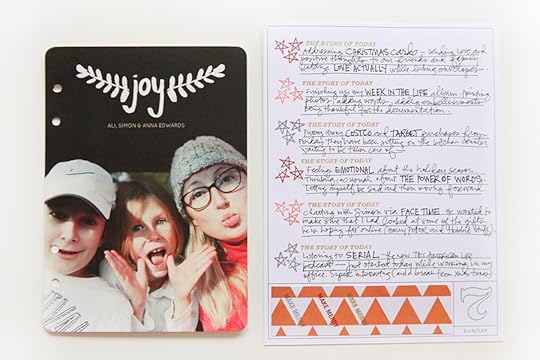
December Daily® 2014 | Day Seven

Welcome to
December Daily® 2014 | Day Seven.
I hope that some of you had a chance to work on your albums this weekend - love seeing them linked here and via Instagram. Thank you for sharing using the #decemberdaily hash tag to make them easy to see via Instagram.
Today I'm going with a combo of our Christmas card + more little stories.
For the last few years I've ordered and/or partnered with
Minted for our Christmas card. They are great quality with lots of awesome design choices and my overall experience with them each time has been really good. You can check out the past cards I've ordered and added to my December Daily® albums here: 2013, 2012, 2011.
You might also notice that this year I went for a photo of the three of us vs. just the kids. I love how this one turned out.
Here's a look at my Day Seven:
I did move a few things around from how I had set up my
Foundation Pages to be able to use the 6x8 Day Seven printable in addition to our holiday card.
You can see what I have up next for tomorrow in my album at the bottom of this post.

Super simple idea. Obviously you can write more of a story about this as well - why you chose the card you did, the story of taking the photo, etc.
Holes punched using the
Crop A Dile.
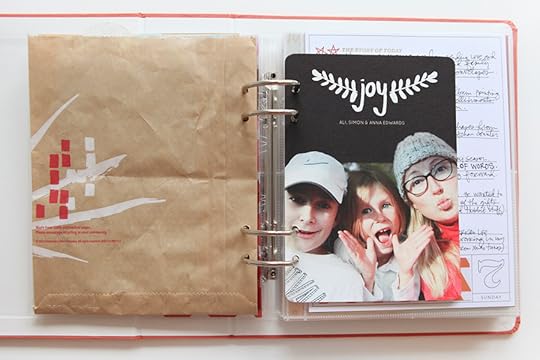
I decided not to do anything with the back of the bag or the back of the photo from
Day Six. I might add something later in the month and if I do I'll share it here. The card could have obviously been placed in the bag too but I really wanted it to be a page itself.
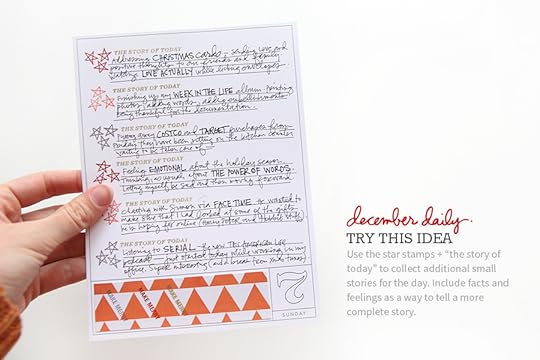
I'm back again with more little stories (similar to
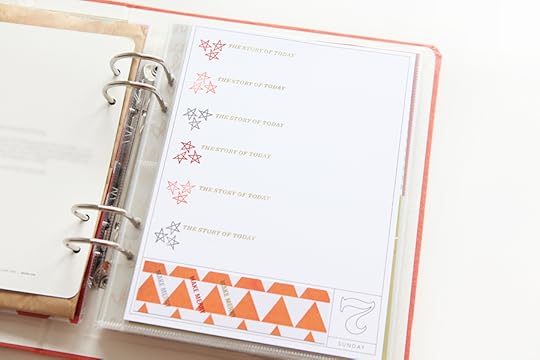
Day Five). The stars stamp + the "the story of today" stamp make a nice little list journaling opportunity.
Here's what it looked like before I added my stories:
And after:
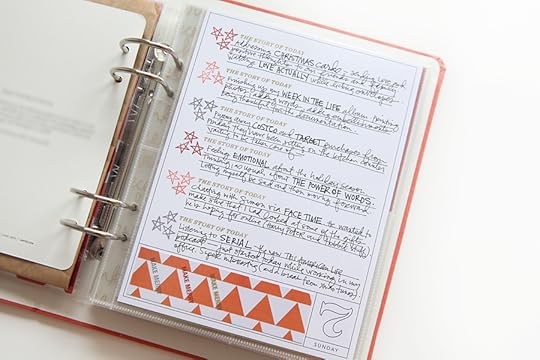
I used the same two pens as
Day Five.
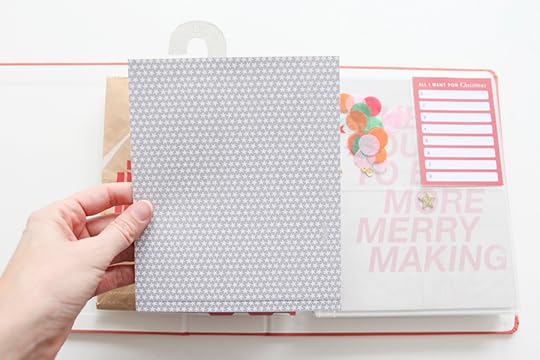
A here's the base of what I'll be working with tomorrow:
Which is perfect since there are "8" spots for what I want for Christmas and I'll add some sort of 4x6 photo in the pocket below.
Have a great Monday!
SUPPLIES


TODAY'S POST SPONSORED BY | MINTED
Ali Edwards' readers can get 20% off Art Prints at
Minted today only (12/08/14) by using the code AE20ART.
SHARE A LINK TO YOUR DAY SEVEN
I'd love to have you share a link to your Day Seven pages below.
Please link directly to your post vs. a general blog link.
December 7, 2014
December Daily® 2014 | Day Six
Welcome to
December Daily® 2014 | Day Six.
I'm hanging out here this weekend working on my Week In The Life™ album and taking breaks to move holiday decor around.
As I decided on my story for today I wanted to pass along this thought: you can let go of worrying about whether something happened on one particular day or another. Don't get caught up in things having to happen on specific days - it's nice when they do but its okay to save up a story for a different day - it's all part of the same season this year.
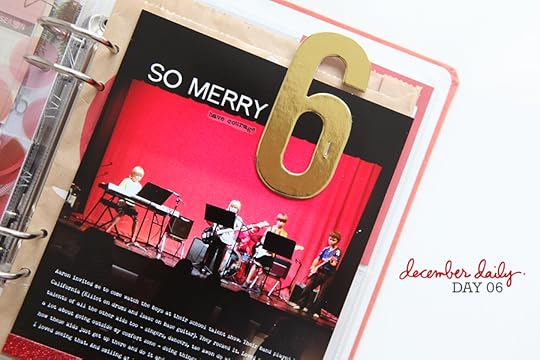
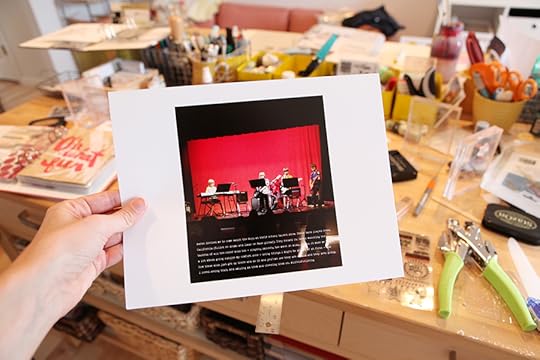
For my story today I'm sharing about going to see Aaron's boys at their talent show that was on the 5th - I'm making it my story for the 6th. And it's all good.
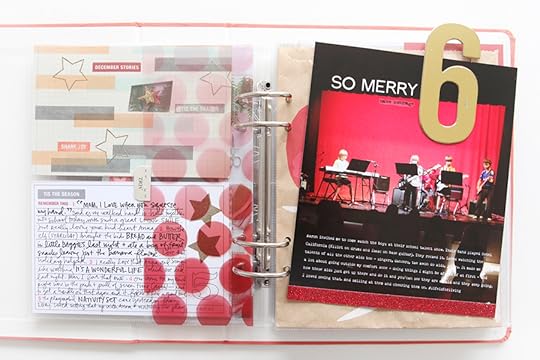
Here's a look at what I came up with for Day Six:
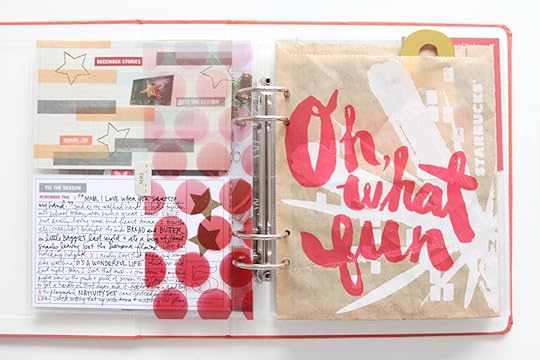
Remember
yesterday how I showed you that I was planning to include the Starbucks bag?
I stuck with that and decided to enlarge a photo with journaling on it (via Photoshop) to fit inside the bag.
The photo I printed ended up being 6 inches wide x 7 inches tall and I printed it on
Epson Photo Paper.
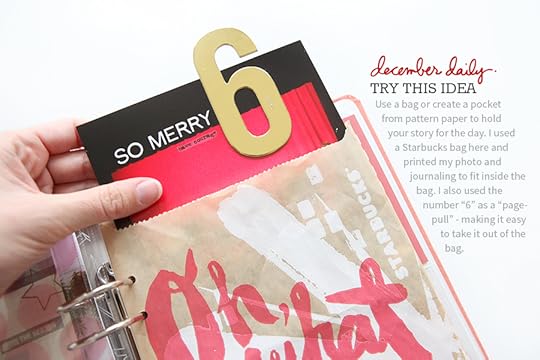
I also really wanted to use that number 6 as a 'pull-tab' for pulling the content (photo and words) out of the bag.
It's something that's easy for your hands to grab when you come across it in the in album.

It ended up working great.
Here's the full page:
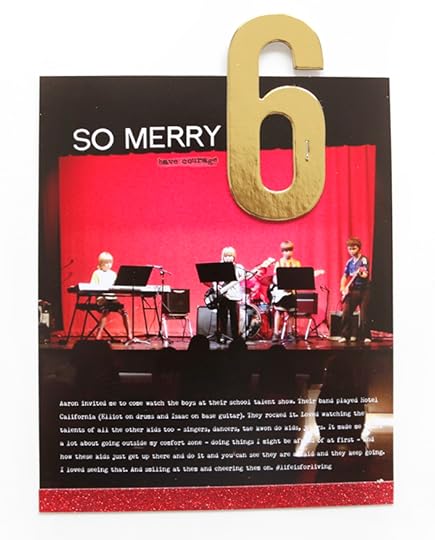
On top of the photo I added journaling in Photoshop (Remington Noiseless, type size 8).
After printing I added the number 6 + the "so merry" using the white letter stickers from the kit (which are awesome) and I used a little
"have courage" rub on from Tim Holtz as it fit my story. I also added some of the red glitter tape to the bottom.
Photo was taken with my iPhone.
Here's what the back looks like for tomorrow:
I'm not sure yet just what I'm going to do with that - I might leave it blank and just do a little decoration. I have to see what my story ends up being for tomorrow first.
Hope you guys are having a great weekend!
SUPPLIES
Click on the images below to link to the products used in this project.
SHARE YOUR DAY SIX
I'd love to have you share a link to your Day Six pages below.
Please link directly to your post vs. a general blog link.
December 6, 2014
December Daily® 2014 | Day Five (And Story Kits™ Now Available For Pre-Order)
Welcome to
December Daily® 2014 | Day Five.
What's on my mind today are little stories.
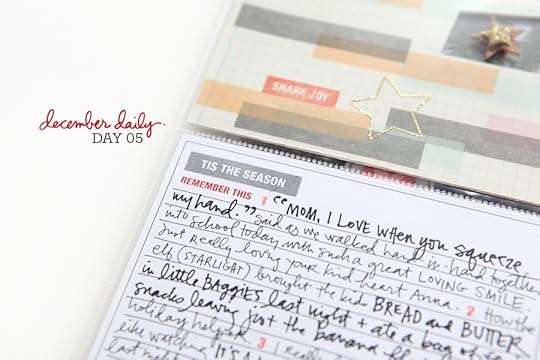
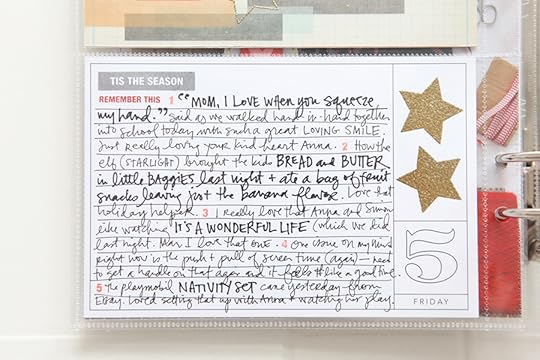
The idea came about when I walked Anna in to school this morning. We were holding hands and walking down the hallway and she said something silly and endearing so I squeezed her hand and she squeezed mine back. "Mom, I love when you squeeze my hand." she said. In that moment I knew that today I wanted to document some of the little stories that I've been noticing and thinking about the past few days - just little bits of our life that are happening as we make our way through December.
When I got back to the car I opened a note file on my phone and started brainstorming some of these little stories and then transferred them to the journal card when I got home.
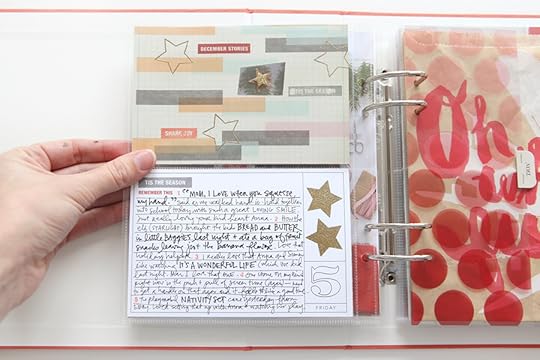
Here's a look at the two cards I ended up with today - yep, a no-photo day because you don't have to include a photo every day:
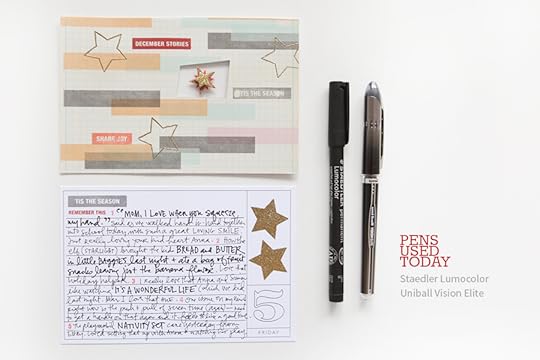
One "decorated card" + one "journal card."
The two pens I used today (I like the contrast between thick and thin) are the
Staedler Lumocolor (Wilna mentioned this previously on a podcast and I had to try it and I really like it and hope to have it in my shop sometime soon) and the Uniball Vision Elite. The Uniball pen is not a specialty archival pen - it's just my favorite regular old pen.
Here's a closer look at each of the cards:
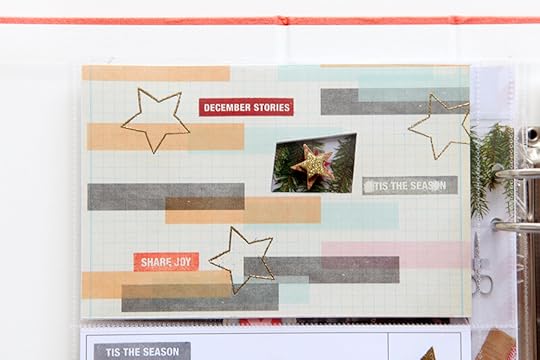
So if you remember
yesterday I shared how I cut that hole where my computer screen was to remove what I was shopping for (I also shared that I backed that photo with this pattern paper).
To add a little something to this pattern paper I used the rectangle box stamps (from the
kit stamp set) using red, orange and gray ink (repeating the look of the rectangle boxes that are already a part of the pattern).
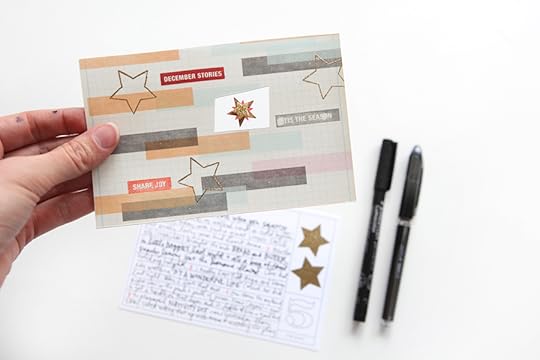
I also embossed using
gold glitter zing three of the outline stars and added one of the small chipboard glitter stars to the little window embellishment to cover up the back of the brad.
On
the journal card I had already embossed the filled-in star using the gold glitter zing as part of getting my foundation pages ready. In addition I added a couple stamps to the top and then wrote out my little stories for the day.
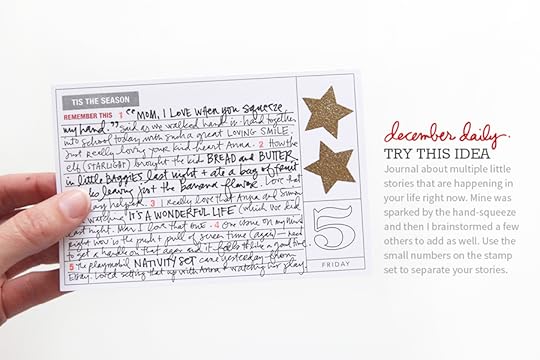
The tiny numbers on the stamp set worked great as separators for my little stories.
Everybody has five little stories to tell today.
Here's a look at both the cards in the album:
And you might notice in the image above that I've already added something for tomorrow.
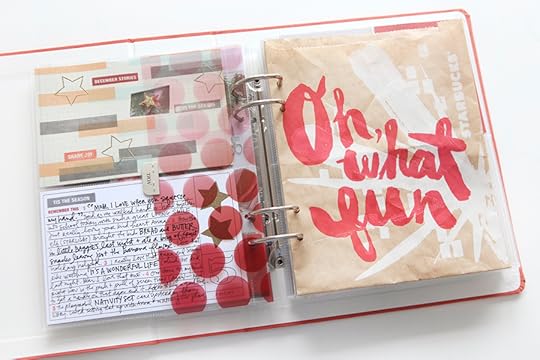
Yesterday I picked up an after-school treat for Anna and ended up keeping this great little Starbucks bag because I love the color and the script and sentiment are awesome and it fits perfectly in the album.
I'm thinking for tomorrow that I will either make something to slip inside (using the bag as a pocket) or will add something to the back for Day 6.
Hope you have a great weekend!
SUPPLIES
Click on the images below to link to the products used in this project.
SHARE YOUR DAY FIVE
I'd love to have you share a link to your Day Five pages below. Please link directly to your post vs. a general blog link.
STORY KITS™ NOW AVAILABLE FOR PRE-ORDER
The big news today is that after months (and months) of planning
STORY KITS™ are now available for pre-order.
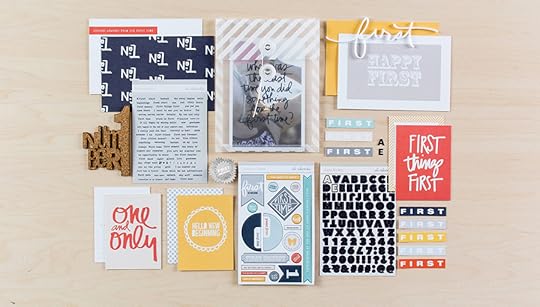
So what is this all about? Story Kits™ are monthly, limited edition story-focused paper crafting kits designed by me. Geared towards memory keepers, these products act as sparks to help document and celebrate the stories of your life.
Each month subscribers will receive an exclusive collection of memory keeping products (
click here to see a full list of what is included this month + images). The goal of the Story Kits™ is to encourage and empower you to craft the stories of your life regardless of your scrapbooking approach (traditional layouts, pockets, minibooks, etc). With that in mind, subscribers will receive access to a members-only area that includes educational content to go along with each monthly theme (multi-page PDF and videos that include how-to's and ideas for getting your stories told) - this is the same classroom as the Story Stamp™. In addition to the inspiration and education, there is a subscribers-only message board and gallery for support and sharing your stories and projects made with the kits.
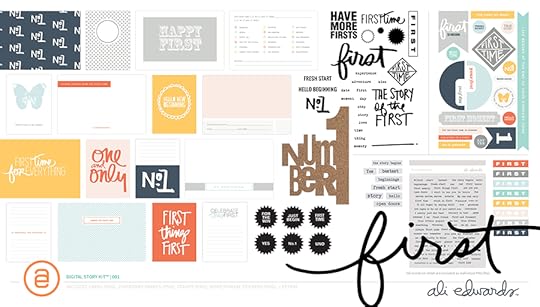
BONUS | Subscribe to BOTH the
Story Kit™ and Story Stamp™ and receive the Digital Story Kit™ FREE (see image below). Your free Digital Story Kit™ will be available on or around the 15th of each month in your dashboard under "My Digital Files" for download.
In addition to the
Story Kit™ and Story Stamp™ I will also be offering a Digital Story Kit™ subscription that will become available on December 15th. This will be a monthly subscription (meaning you subscribe and then it will continue to be auto-delivered to you until you let us know you want to cancel) for $19.99 and you will have access to the same education as the other Story subscriptions.


