
Heather Solos's Blog, page 83
June 15, 2011
Tuna Macaroni Salad Recipe – Great Summer Main Dish Salad
 Bobbie says:
I had a craving for Tuna Macaroni Salad today*, and since it's a perfect hot weather main-dish salad, I thought I'd share it with you, too. I've based this on the way my mom used to make it, but Mom never followed a recipe, so I've come up with my own proportions. Also, she used only mayonnaise, but I prefer the flavor and creaminess of the mayo and sour cream combo in my version.

For a great make-ahead hot weather meal, cook the macaroni in the morning when using the stove might be a little easier to handle, or if your grill has a side burner, do it outside! Mix up the salad and chill until serving time. Pack Tuna Macaroni Salad in a cooler for an easy ready-to-eat picnic meal or a great potluck dish.
Recipe: Tuna Macaroni Salad2 cups elbow macaroni3 cans tuna, drained1 cup frozen peas1/2 cup chopped onion1/4 cup each mayonnaise and sour creamDash of black pepperCook the macaroni until al dente – just tender to the bite. Follow the directions on the package for best results.
While the pasta is cooking, open the cans of tuna and drain them well. Empty the tuna into a large mixing bowl, and add the chopped onion. Measure out the mayonnaise and sour cream and dump those in the bowl, too, and maybe add a dash of pepper to the bowl. (I don't usually add salt, since the tuna usually seems to have plenty.)
When the time for cooking the macaroni is almost up, put the frozen peas into the pot and stir well. When the macaroni is tender, dump the pasta & peas into a colander and rinse with cold tap water until cool. Shake the colander gently to help it drain very well, then dump the macaroni & peas into the bowl with the tuna. 
Gently mix together until well combined. You can serve this immediately, but it's really much better if you make it ahead of time and chill it thoroughly. When you're ready to serve, you may want to add a bit more mayo and/or sour cream, if it seems dry due to the pasta absorbing all the available moisture, or you could stir in just a bit of half & half or milk.
Serve Tuna Macaroni Salad with sliced cucumbers, carrot sticks, or sliced bell peppers for a nice, cool and easy meal on a hot day.
Makes about 6 main dish-sized servings.
* Yes, really. I don't get cravings for chocolate or desserts or sweets. Ever. Mine tend to be related to memories. Occasionally I get a craving for corn bread served with navy beans cooked almost to death, like my grandma used to make. Comfort food for the win.
Bobbie Laughman is a part-time caregiver and freelance writer seeking to prove the existence of intelligent life on the internet. The data so far is scant, but steadfastly she perseveres.
Tuna Macaroni Salad Recipe – Great Summer Main Dish Salad is a post from: Home Ec 101 ©Home Ec 101.com 2007 - 2011


June 14, 2011
How to Grill Fruit
[image error]Brian says:
Fruits are healthy and very good for you, we all are well aware of this fact, but what you might not realize is when you add flame to your fruit basket, a whole new realm is opened up to both you and your dining partners. Grilled fruits can be as versatile as any piece of meat or vegetable that you place on the rack. You just have to know what you're doing and how to be prepared when it comes time to throw a few apples, pineapples or peaches on the barbie.
1. Go Hard or Go Home
Although almost any fruit can be fire grilled, it's in your best interest to stick to the hardier species in your inventory. This includes, but is not limited to: pineapple, assorted melons and pears. These specimens are much more able to take the heat, especially if you plan of cutting them into smaller chunks and pieces. But if you insist on grilling up a batch of summer peaches–or something even softer–be sure to leave the skin on to help the fruit maintain its shape during the cooking process.
2. Brush up
Because fruits (and certain vegetables) have a tendency to stick to cooking surfaces, it's always good to take some melted butter or cooking oil and lightly brush the sides that will be touching the cooking surface. I recommend using coconut oil for both its flavor and high heat stability. If you're feeling extra adventurous, you can use a chili oil to create a sweet and spicy combination that's out of this world.
3. Skew It on the BBQ
As mentioned before, when you feel the need to cut certain fruits to a smaller size before cooking, take some bamboo skewers (because metal ones tend to continue 'cooking' food even after removing them from the grill) and pierce the fruit accordingly. This will keep these chunks from falling through the grating during the cooking process. Using a grill basket (sprayed with cooking oil or butter) will invariably yield the same results.
4. The Outer Limits
Using an indirect-heat cooking method is the best way to produce the best finished product. Indirect means placing the fruit on the outermost sections of the the grilling surface. This will provide a more thorough and even grill without running the risk of burning, scorching or overcooking.
This is relatively new territory for me, but I'm starting to like the idea of adding grilled fruit to my repertoire. As always, new recipes, suggestions and alternative are greatly appreciated. If you have any contributions, I'd like to know about them in the comments section.
Brian Wilder is a writer for Home Ec 101. You can also find him at Things My Grandfather Taught Me.
If you have a question you'd like Brian to answer send it to Brian@home-ec101.com.
Don't forget to stop in and say hello on the brand new Home-Ec101 Forums.
How to Grill Fruit is a post from: Home Ec 101 ©Home Ec 101.com 2007 - 2011


June 13, 2011
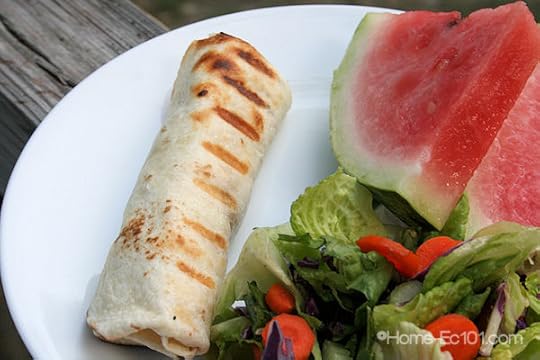
Grilled Chicken Burritos / Chimichangas
 Heather says:
This method is probably only useful if you have a propane grill. I wouldn't want to go through the trouble of lighting a charcoal grill just to grill these chicken burritos for a few moments. However it is well worth wandering outside to slap these on a gas grill or even inside on a *gasp* Foreman style grill. During cooler weather I make chimichangas in the oven. I do not have the patience to deep fry much other than chicken and the occasional donut.
Currently I buy leg quarters when they are on sale, throw -or place gently depending on my mood- them in the slow cooker which is then set on low and placed on the deck or in the garage for 4 – 6 hours. If can avoid the smell of cooking chicken, I do. This also has the added bonus of not heating the house. Please use a little common sense with the placement of your slow cooker. Do not balance it on the railing of a balcony in a high rise apartment -for some reason this brings the farm animal over the castle wall scene from Monty Python to mind. When the chicken is done, separate it from the bones and skin, then shred. If you know the chicken will be used for Tex Mex recipes go ahead and throw in a few cloves of garlic, some onion, or even salsa. Since I hadn't decided on this chicken's fate when it was cooked, it was naked, to prevent flavor clashes.
Stir 2 cups cooked and shredded chicken with 1/2 cup of your favorite salsa. Gee Heather, what a complicated recipe.
Fill 6 tortillas with the chicken mixture. Fold into burritos.
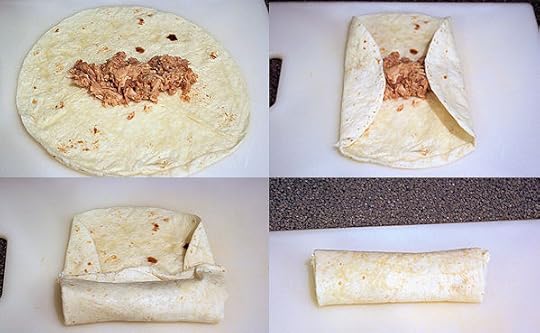
Light the grill, brush with olive oil, and grill directly for a few minutes on each side. Start with seam side down or they may flop open.

Now is where you can get creative, you can serve as is or with your favorite toppings:
Sour CreamGuacamoleEnchilada SauceShredded CheeseIt was about 8 million degrees last night, so we had the grilled chicken burritos plain with just a little sour cream. Ok, fine you caught me, it may not have been 8 million degrees, but it was too hot for effort. A simple salad and slices of watermelon rounded out the meal perfectly.
Enjoy.
Grilled Chicken Burritos / Chimichangas is a post from: Home Ec 101 ©Home Ec 101.com 2007 - 2011


June 12, 2011
Sunday Confessional with a Side of Site Admin
Heather says:
Let's get the site adminstration stuff out of the way. Home-Ec101.com has been having some performance issues; my good friend Michael Carnell and I are working hard to make sure that we get it whipped into shape.
The comment system has been changed, IntenseDebate seems to have been a part of the problem, but certainly not the only cause. I have switched out to LiveFyre which seems to be lighter and faster. It also looks as though it has the ability to host a live chat, which intrigues me with the possibilities. Don't worry, you'll still have the ability to share via your Twitter or Facebook identities if that's what floats your boat. If you just want to say hey and get on with your life that's fine, too.
If you are used to using the categories in the sidebar to navigate, switch to the tag cloud. I've shuffled up the taxonomy of the site to help Google understand what Home-Ec101 is all about.
The forums have been closed temporarily, in case they are a part of the site issues. I'll reopen them after I get back from Type-A Parent Conference.
Now, on to the confession part of the show.
I have two this week, one small and one that I'm not sure is exactly a confession, but it is something I've been struggling with for a long time.
The small one-
I got lazy about sharpening my knives AND I wasn't paying attention to my chopping -there were a few extra neighbor kids bouncing in and out of my work area- I had a knife slip and took off a good chunk of the nail on my ring finger. It's as attractive as it sounds. Knife skills are important, but attention and basic safety matter just as much.
Now the one I'm not sure is a confession and I hope doesn't come across as a plea for attention. (See, there goes my neurotic side and I haven't even managed to spit it out yet.) My oldest son has been diagnosed with a mild form of autism most commonly referred to as Asperger's. For a long time, we didn't want to put a label on him even though we knew that his mannerisms, while similar to our own, didn't fit in with "normal."
My son isn't the type that shuns contact, he gloms onto it in a way that makes many people uncomfortable. He has no sense of personal space -which is ironic because my personal bubble is gargantuan. He's incredibly articulate, his vocabulary rivals that of Anne Shirley. He lives in a world of his own creation, but he's more than happy to tell you all the details, if you glance in his direction. It's kind of cute when a 3 year old invites a perfect stranger over for dinner, it's not so cute when he's 7 and the size of your average 10 year old -he gets his height from Tim and I. He tends to invite random adult strangers to spend the night and thankfully no one has taken him up on is offer. We're dealing with the usual set of challenges with an atypical child with the added bonus of people assuming he's much older. We're working with a psychologist to give him coping skills that neither limit who he is as an individual, but allow him to relate better to others. Most of you know I'm very self-conscious, I won't lie this stuff stresses me out like crazy.
So, it's not exactly a confession, it's just that I'm no longer going to keep that information private.
One of my goals is to be as honest as I can about life. There is joy to be found in the everyday, when we aren't trying to make it fit some unrealistic ideal. I know people who took drastic measures when their version of reality didn't match what they thought it should and this makes me look carefully at what I present to the world. I started this series to encourage people to admit that life isn't magazine and tv perfect. Real life is messy, tiring, and wonderful at the same time. Sure you can't really laugh at everything when it happens -like if you step in dog vomit before coffee- but the rest of us can. After the irritation wears off, it's time to share and laugh at what we all go through in our day to day lives. On the internet it's all too tempting to share the cropped and photo-shopped version of our lives (the one where all of my kids behave perfectly all the time), but that isn't my reality. Is it yours?
So Home Eccers, I ask, what do you have to get off your chest?
Sunday Confessional with a Side of Site Admin is a post from: Home Ec 101 ©Home Ec 101.com 2007 - 2011


June 11, 2011
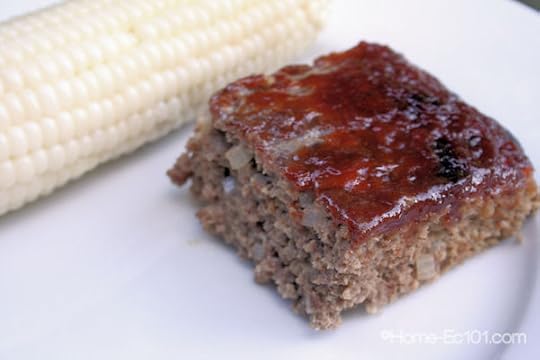
How to Grill Meatloaf
Heather says:
Earlier this week I asked Home-Ec 101 readers to share their questions about grilling. Sandee asked how should I grill a meatloaf?
There are several methods out there on these wild, wild interwebz. Some of them are rather unsettling.
Foil packets are awesome for vegetables, but what foil packets create is an environment to steam food. Let that roll around in your mind for a moment, got that? Ok, now the most popular method I found while double checking my intended method to grill meatloaf was using a foil packet. No, we here at Home-Ec 101 do not steam our ground beef. No. Just no. I think I might make an exception for certain kinds of Asian dumplings, but I've not attempted to make those and that's a very different taste profile.
The best meatloaves are moist, but have that wonderful caramelized glaze. If you weren't going for the glaze, why not just have a meatball?
Try to keep the lid closed while grilling your meatloaf, you're trying to create an environment similar to your oven. If you do not have a rack you can grill in a foil pan or a cast iron skillet, just be sure you are still grilling via the indirect method or you may scorch the bottom of your meatloaf. Consider using carrots or celery ribs to raise the meatloaf off the bottom of the pan. Perhaps I'm a bit picky, but I find a greasy meatloaf completely unappetizing.
Use a thermometer, every grill is different and a thermometer is much more accurate than a timer. Your grill, with the lid down may approach 400°F, while mine was at 350°F. It's going to vary a lot from grill to grill, especially if you are just getting used to grilling. Also keep in mind that thermometers do fail, if you can see that the loaf is nearly done, your ground beef was fully thawed when you mixed it, but the thermometer still says 60°F, maybe it's the thermometer. Take it out and reinsert it in a new place or cut open the meatloaf and take a peek. If the meat is brown, it's not 60°F. Cooking safely is a balance of using tools and using good judgement when the tools fail,as they do on occasion.
Finally, let's talk about surface area. To reduce the amount of time on the grill, you'll want to increase the surface area of the loaf as much as possible. A low, flat rectangle will grill much more quickly than the traditional loaf shape. You'll also have much more area on which to spread the glaze. U
Optional Glaze – just mix together
1/4 cup ketchup1 TBSP brown sugar1 tsp dry mustardGently crumble the meat into a large bowl. The key to a tender meatloaf is to handle the meat as little as possible. To ensure easy mixing, gently seperate the ground bits and make a well (depression) in the center.Sprinkle the breadcrumbs, you can substitute crushed crackers or stuffing mix if desired, evenly over the contents in the bowl.In a second bowl, stir together the milk, beaten eggs, and seasoning. Mix well.Pour the wet ingredients into the well you created in the meat. With clean hands fold the meat toward the center. Do this by grasping the side of the bowl with one hand, to hold it steady. Slide the other under the meat and fold it toward the middle. Rotate the bowl and repeat. Only repeat this step until the meat is just mixed. The less you handle the meat, the better.On a clean work surface pat the mixture into the desired shape, either several mini-loaves* or a single, flat loaf about 1.5 inches thick.Transfer the loaves to a baking rack, over a tray to catch drippings to reduce flare ups.Grill indirectly with the lid closed. Try not to open the grill as this lets the heat escape, increasing the cook time.Rotate the tray halfway through cooking to ensure the loaf is cooked evenly and glaze the meatloaf when the thermometer reads 120F.Preparation time: 5 minute(s)
Cooking time: 1 hour(s) approximate, mini-loaves will take significantly less time, plan accordingly
Number of servings (yield): 6
Culinary tradition: USA (General)
Questions?
How to Grill Meatloaf is a post from: Home Ec 101 ©Home Ec 101.com 2007 - 2011


June 10, 2011
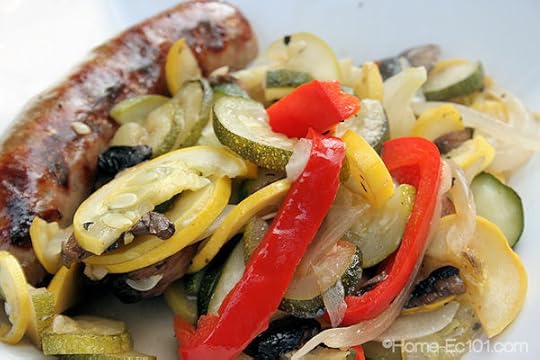
Easy Grilled Foil Vegetable Packets
Heather says:
Get ready to grill. Today we're using foil packets to to turn a pile of vegetables into a fantastic summer side dish. Actually if you look at the portions, the grilled vegetables were the main feature. I would like, at least while we're rolling in produce, for you to consider treating vegetables as your main dish. Spend your time and energy planning your meals around the available, seasonal produce rather than treating slapping a can of green beans in the microwave as an after thought. Just give it a try, you may discover a new world of flavor or you'll hate it, but you won't have caused any harm.
This tutorial is a guide rather than a strict recipe as the amounts are going to vary widely, but the technique remains the same.
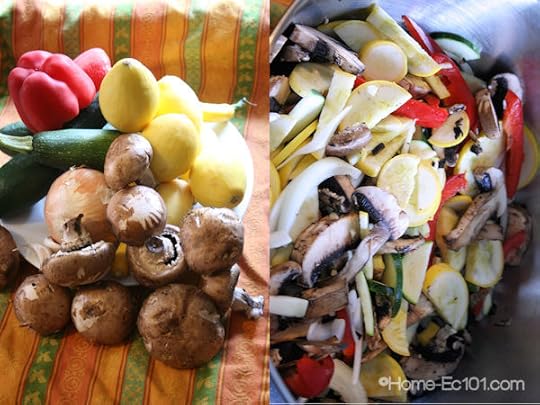 Gather your vegetables and slice or mince as appropriate. These vegetable packets will contain: bell peppers, zucchini, yellow squash, onion, garlic and mushrooms. *Note* Do not be lazy and assume your chef knife can go one more day without sharpening, even good cooks get distracted with less than fun results. Sharpen your knives regularly.
Place the vegetables in a bowl and toss with a little olive oil or homemade Italian dressing. If you choose to omit the dressing and go with straight olive oil, don't be scared to add a sprinkle of your favorite herbs, some rosemary, thyme, basil etc. Choose your seasoning based on the other items being served. Try to carry the same flavors throughout. Since we're serving these packets with grilled Italian sausage, I went with an extra sprinkling of Italian seasoning. If I'd had fresh basil on hand, that would have been in there, too. Let the flavors mingle for a little while. A pinch of salt can be added now or at the table, either way works. While vegetables have wonderful flavor, herbs and aromatics like garlic and onions can go a long way to making them even better. This was almost a summer version of one of our favorite recipes, sausage, peppers, and onions.
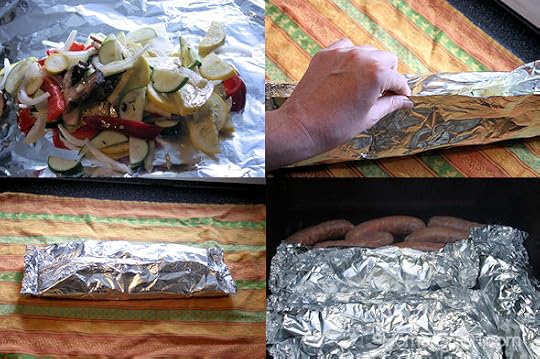
Grab a sheet of heavy duty foil, don't get the wimpy stuff, you don't need it tearing on the grill. Arrange a couple of healthy handfuls of vegetables in the center of the foil. Bring the long sides together and fold over in an accordion or pleat type fold. You want to keep the steam that will develop inside your packet. Fold the short side over a couple of times to close the packet tightly.
Do not juggle with your packets. They are not that sturdy. They should be sturdy enough to handle being turned over.
Heat your grill, these should be grilled 10 – 15 minutes per side on a hot grill. If you cut your vegetables very thinly or used butter, you may want to grill indirectly or pay close attention and grill for less time. Packets with tender vegetables like zucchini and squash will be done faster than packets with sturdier vegetables like carrots and celery.
Enjoy!
Easy Grilled Foil Vegetable Packets is a post from: Home Ec 101 ©Home Ec 101.com 2007 - 2011


June 8, 2011
Simple Radish and Egg Salad
Bobbie says:
Radishes are one of my favorite veggies and while I love them straight-from-the-garden plain, I'd been wondering if there wasn't something more that could be done with them. Well, here's something a little different : a simple radish and egg salad that goes together in a snap. The sour cream and eggs counter the bite of the radishes and onions to make this salad an unexpected and lighter change of pace from the traditional macaroni or potato salad fare found at picnics and barbecues. It would also pair well with many entrées as a new and interesting side dish.
Recently while my sister was visiting from Ohio, we made a lunch of this salad and some sauteed pierogi (which aren't exactly hot weather food, but sometimes you just need pierogi) and we thought they went quite well together. Debbie's not nearly the onion fan that I am: she buys her onions one at a time – can you imagine? So, she thought she might not like the radish and egg salad, as it's rather green-onion-heavy, but she enjoyed it at least as much as I did.
If you're fortunate enough to find radishes in colors other than red, go for it! Some varieties of radish have color all the way through – get a variety of colors if you can for a dish as bright as it is tasty.
Recipe: Simple Radish and Egg Salad1 pound radishes – red or whatever colors you can find3 hard-boiled eggs1 bunch of scallions (or green onions or spring onions)1/2 cup dairy sour cream1/4 teaspoon salt (or more to taste)dash of pepper (or more to taste)1/4 teaspoon dried dill weed (or fresh, if you have it)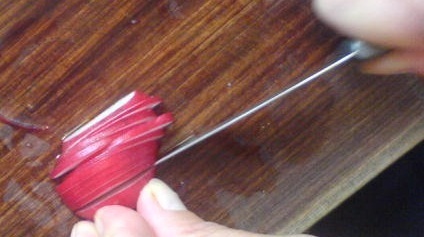 Wash and trim the roots and stems from the radishes. Using a very sharp knife with a thin blade, cut each radish in half from stem to root, then cut each half into slices as thinly as possible.
Peel the eggs, rinse them to remove any remaining traces of shell, then coarsely chop and add to the radishes in a large bowl.
To add to the color of the dish, we're going to use the green tops of the onions as well as the white parts.Wash and trim the roots from the onions, and remove any bits you'd rather not eat. Cut into slices between 1/4 and 1/2 inch wide. Add to the bowl, along with the sour cream, and sprinkle the salt, pepper and dill evenly over all.

Stir with a large spoon or rubber scraper, until all pieces are evenly coated with sour cream. Place in serving dish and garnish with more dill, if desired. Serve immediately, or cover and chill. Refrigerate any leftovers, and use within a couple days.
As a variation, I also tried roasting some radishes, but I was less than impressed with the results, so I'm still looking for more ideas – what do you like to do with radishes?
Bobbie Laughman is a part-time caregiver and freelance writer living in Gettysburg, PA. Bobbie is working to overcome her lifetime struggle with chronic foot-in-mouth. She was recently observed uttering an entire sentence with both feet firmly on the ground. Progress!
Simple Radish and Egg Salad is a post from: Home Ec 101 ©Home Ec 101.com 2007 - 2011


June 7, 2011
The Freezer Was Left Open, Now What?
Dear Home-Ec 101,
My youngest decided to get a popsicle from my deep freezer and didn't bother to make sure the door was closed. I know not to eat the meat products since I am not sure if they thawed and refroze, but what about the veggies? Must I throw out the ten tons of french fries and corn on the cob?
(And yes, I've invested in a freezer door lock with a padlock to guard against future booboos)
Signed,
Thawing in Thermopylae
Heather says:
I have good news and bad news, depending on whether or not you've already thrown everything out.
All of the food in your freezer is fine to cook or refreeze as long as there were ice crystals still in it. If your meat hasn't reached more than 40°F it is still safe to cook and eat. Same with your vegetables. If there are still ice crystals it's perfectly fine to refreeze them as well. What you don't want to do is reach a point where bacteria can multiply quickly, freeze and not kill off all of those bacteria and then thaw again where the bacteria again have a good chance to multiply.
Just as an FYI, vegetables can also harbor bacteria. Have you seen the news from Europe? However, do not freak out contamination like that is much LESS likely in frozen foods that have to be blanched before freezing. I'm just noting this after someone was rather smug about not being affected by a beef recall.
If your freezer door was left ajar for a few hours and some foods partially thawed, not fully, they are safe to use. I'm actually more concerned about the motor of your freezer. I hope the freezer is the type that shuts off while the door is ajar so there wasn't a lot of unnecessary wear on the unit. If your deep freeze was left ajar for several days, you are correct, most of the food is a total loss.
If you have a lot of ground beef to use, simply brown it and store. You can season it if you like, just be sure to label it for its intended future use.
If you have stew beef, go ahead and brown and stew the beef.
Poultry toss into your slow cooker and then separate from the bones to use in a bunch of different recipes. Then use the bones to make chicken stock.
Good luck, I hope this doesn't prove to be too major of a loss.
Submit your questions to helpme@home-ec101.com.
The Freezer Was Left Open, Now What? is a post from: Home Ec 101 ©Home Ec 101.com 2007 - 2011


June 6, 2011
Grill the Griller
Heather says:
It has come to my attention that some of you are not yet comfortable with using a grill. With temperatures soaring, the grill can be one of your best friends when trying to cook dinner without heating up the house. This summer I would like to help you become more comfortable using the grill. So, please share your questions in the comments. I'll answer them both here and in future posts. I promise no question is too basic, I've been grilling for a while so I've lost perspective on what you need to know.
Examples:
Q: How soon should I react to a flare-up?
A: Immediately. Flare ups are caused by dripping fat, this fat catches fire and creates a localized hot spot that will quickly char the outside of your food. As with all other forms of cooking, charring* much like e. coli is undesirable in food (too soon?)
*Charring is not to be confused with the browning that is a result of the Maillard reaction
Q: How do I keep thin steaks from drying out on the grill?
A: Quit playing with them. Seriously, all the poking, prodding, and excessive turning don't do your steak any favors. When cooking steaks over direct heat, I try to move the steak as little as possible unless it's to get away from a flare-up. Put the steak on the grill, give it a quarter turn (not flipping, just turn the steak 90°), flip, quarter turn, remove to a plate to rest for a few minutes before serving. The exact time between your turns is going to depend on the recommended cooking time for that recipe. Some people turn even less, but I have some pride involved in pretty grill marks.
What do you want to know about grilling?
What are your best grilling tips?
Grill the Griller is a post from: Home Ec 101 ©Home Ec 101.com 2007 - 2011


June 3, 2011
The Minimalist Baby, What Babies Don't Need
Dear Home-Ec 101,
I just recently found out I am pregnant with our first baby and ohhhh was it a surprise. My husband and I are just short of our one year aniversery and had planned to stay in our tiny one bedroom apartment for another year to save for a house. We were already bursting at the seams in our less than 600 sf of space and now we are going to be adding baby to the mix. So here is my question, all the baby books and sites have these huge lists of things it says we "need" but what do we realistically need? What are the must have items and what kind of quantities do we really need? Oh and just a note, our building does have inexpensive pay laundry facilities which is good since we are planning to cloth diaper.
Signed,
Where the heck do I put the baby
Heather says:
Congratulations to you and your husband. I promise you, you're not going to miss all the junk and longterm your family will be so much better off.
Babies don't need half the garbage you are told they need. People all over the world have been having babies for thousands and thousands of years without wipe warmers or diaper genies. I want to tell you how encouraging it is to meet a lady like you.
Here are the musts:
YOUa carseatsome clothesdiapersa couple of blanketsThanks to my friend @beanjeepin for putting it so succinctly. Since you're cloth diapering I'm going to assume that you plan on giving breastfeeding a try. I don't know if you will be staying home or returning to work, if you return, you will need a good quality breastpump. That is the one I used, but it was passed down to me and I used it for my second two children and then I passed it on to someone else. If you get a second-hand pump, you can buy new parts rather than a whole new machine. If you formula feed or return to work you'll need a few bottles. *edited to note* Some would caution to use a "closed system medela" rather than the one I linked. Do your research.
As far as cribs and high chairs go, you can certainly make do with a pack-n-play style crib rather than a full one. We also used a high chair that strapped onto an existing chair rather than taking up valuable floor space. The one item "unnecessary" item we got the most use from was a swing. My oldest had colic and until he could walk it seemed he was only happy in the swing. (Yes, I did carry him in a sling, when he wasn't in the swing).
We did splurge on an Amby Cradle for our second child since our experience with our first was so miserable and we were willing to try anything to keep it from happening again. (Uh, I'm not trying to scare you, I promise, just listen to your gut parent feelings.) We got a lot of use out of it and two other families have as well. All of the items we used are in storage until my sisters or another friend has a baby. You see, there is no need to buy most of these things new, with a very strong exception for carseats. Kids only use these things for a short while and then they are donated or put away until they are used again.
Now, it's easy for me to look back and see what I didn't need, but I thought it would be better if I included other people's experiences, too. Yesterday I asked some people to share what they didn't need. Here are their responses:
Keep in mind that many of these responses are from Twitter, so don't knock the grammar.
@idreamofclean lived in 740sf w/ my 1st so I have a while series on small living spaces. I had very little: pack &play instead of crib, no changing table, only a few clothes, foldable bath mat (instead of tub). I had cute baby towels but def not necessry@indybabyplanner Definitely recommend doing a drawer with a changing station on top. Works great and saves space. Did it with both of mine.@notdiyheather did NOT need a wipes warmer or baby swing. Or fancy baby dresses.@kooner923 all i truly needed were my boobs, a comfy chair, spit rags and a sling.@shandonfowler Changing table. Just use a bed and a basket.@betzwhite changing table@mygomom wipes warmers, bassinet if you have a crib, bouncy seat if you have a car seat, stroller that doesn't fit the car seat@webprgirl Um, a million toys .
.Sense a theme with the changing table there?
I also asked in a group on Facebook, here are their responses:
Megan Crume Diaper Genie (we could never get it to work), bottle warmerKelby Carr Most swings… I later found one that was awesome and stuck with it for all kids. But I would wait to buy until they are born. One good bouncy seat is enough. Fancy clothes (why put them in them except for pictures so you kind of only need one… or maybe one and a backup for when you put the one on and they hurl).Kelly Whalen The list is SOOO long. But here are a few items: diaper genie, changing table, swings, bouncy chairs, strollers (only use them when they got older), all the baby lotions and potions, bottles (not everyone will say the same I know),cute baby clothes, baby towels (we just used regular ones), baby bathtubs, really anything that had one purpose we barely used.Robin Elton Anything beyond the most basic toys. And after seeing the documentary Babies, I'm convinced the only toy a baby really needs is a sibling or a dog.****I mentioned that siblings may be hard to produce in short order****Michele Chestnut Diaper Genie and the warm wipe thing… they just dried out too quick.Jodi Fur A really big expensive, heavy stroller. I once cried at the mall because I couldn't get mine to fold and someone honked at me and the baby was like a month old. And then I bought the $20 snap and go that the car seat fits in.Maricris Guadagna Baby Spoons. You don't need them until baby starts solid food. I'd rather get GC and buy diapers
Andrea Updyke baby shoes before they can walk. Get one pair for the picture and move on!Angela England I honestly didn't even use my diaper bagCindi Matthews Some of those baby bouncers that sit on the floor or table & prop kids up and the kids outgrow in 3 weeks.Audrey McClelland Wet wipe warmer. Total fail.Jill Berry Snuggly. I didn't do enough research, so bought a "baby faces mom only" Snuggly. Also I found it almost impossible to place the baby in the Snuggly. I used it once.And via chat from Brian Crawford who moved from the US to France with an infant:
We brought a swing and a pack and play. The pack and play served as the crib and basically that's all we had! And believe it or not we didn't buy too much else. Diapers, yes. But you really don't need all the mountains of stuff that you get for your first baby (well, typical parents get that is – we certainly did).The swing was used as a high chair/dinner table chair. We find the same thing with baby toys. Babies don't tend to play with baby toys. You have to find what engages them, and go with that.
So Home Eccers, what about you? What did you find completely unnecessary when you had your kid(s)? Chime in in the comments.
Submit your questions to helpme@home-ec101.com.
Some of the links in this post are affiliate links.
The Minimalist Baby, What Babies Don't Need is a post from: Home Ec 101 ©Home Ec 101.com 2007 - 2011


Heather Solos's Blog

- Heather Solos's profile
- 12 followers

