
Heather Solos's Blog, page 80
August 1, 2011
Sunscreen Stains
Dear Home-EC 101;
I have a weird question for you.
A few times lately, I've pulled whites out of my washer with yellow stains. Not on the neck or underarms like you might expect, but looking more like I washed a highlighter with everything. Streaks on hems or sleeves, where there were no stains before the wash.
I'm wondering if this is due to some kind of grease. My man works in a greasy environment and while I run towels or sheets between our clothes to make sure no diesel remnants touch my work clothes, I've ruined quite a few things lately.
Any help or advice? I would really appreciate it.
Signed,
Yellowed in Yuma
 Heather says:
Mystery stains aren't fun. To try to help pin down the culprit I contacted this reader and it seems as though the likely culprit for the random yellow stains is sunscreen. Sunblock when it first splashes or smears onto clothing usually isn't noticeable, but once it comes into contact with minerals in water, some of the ingredients in the sunscreen may undergo an oxidizing reaction (like rusting) and leave behind a yellow stain. This is more likely to occur in areas with hard water -as hard water contains significantly more minerals than soft.
Treating sunblock stains is somewhat hit or miss. Lemon juice and sunlight are typically the most effective strategy for dealing with sunscreen stains. Spray the stain with lemon juice and allow to react with the stain for several hours, preferably assisted by a bright, sunny day. Be aware that acids may weaken fibers. Since the clothing is already compromised by the stain, I wouldn't worry THAT much.
Important! Do not try to use chlorine bleach on stains caused by oxidizing reactions, chlorine bleach is an oxidizing agent and will only make these types of stains worse. The same goes for oxygen bleach which is also an oxidizing agent.
Alternatives to lemon juice include CLR (Calcium Lime Rust remover) and vinegar and you should be aware that it may take several treatments to be effective. Rinse thoroughly between treatment attempts.
Sometimes the appearance of yellowish stains on clothing is a sign that a washing machine is about to fail.
Bleached spots on clothing can be caused by a variety of healthcare products.
Send your questions to helpme@home-ec101.com
Sunscreen Stains is a post from: Home Ec 101 ©Home Ec 101.com 2007 - 2011


July 29, 2011
Synthetic or Distilled Vinegar, Is It the Same as Apple Cider Vinegar for Cleaning?
Signed,
Unsure in Udaipur
Heather says:
You're in luck. Distilled and / or synthetic vinegar will work just fine for cleaning.
Recently we talked about solubility, it's the amount of stuff that can go into solution. When we are talking about cleaning solutions, the stuff is usually dirt and oil. We want to the dirt to come off of a surface and go into the cleaning solution where it can be wiped away. Lowering the pH (increasing the acidity) of a solution can increase the amount of dirt that can be wiped up.
Creating homemade cleaners is playing chemist in your kitchen.
Vinegar is a common ingredient in most household cleaners; it's relatively cheap and known to be a safe and effective cleaning agent. Distilled vinegar is your go to for cleaning recipes. You know the pH and therefore have a good idea of its effectiveness as a disinfecting agent. (Do you know the Difference Between Clean, Sanitary, and Sterile?)
Please remember that creating your own cleaning solutions is a great way to save money, but there are a few things to keep in mind.
1) Never mix chlorine bleach and vinegar.
2) Know that acidic cleaners are not safe for some surfaces.
Thank you for sending in your question.
Send your questions to helpme@home-ec101.com.
Synthetic or Distilled Vinegar, Is It the Same as Apple Cider Vinegar for Cleaning? is a post from: Home Ec 101 ©Home Ec 101.com 2007 - 2011


July 27, 2011
Ten Fridge Essentials for Every Man
Whether you're single or a happily married man with children, there are certain things that we need in our lives to keep us, well, grounded. For some, it's the legendary and mythical "man cave", for others it's a fantasy sports team. For me, though, it's the unchangeable list of ingredients and sundries that must occupy the fridge at all times. Consider them the proverbial "glue" that keeps your kitchen, whether well-stocked or not, together.
1. Bacon
Not the crappy, limp-noodle kind. I'm talking about the thick, extra meaty kind. Extra points if you have some pancetta lying around. Great for a late night snack or early morning meal, bacon is a staple that should never be in short supply in your kitchen.
2. Butter
Pounds of it. The saltier the better. They say that butter is the universal lubricant, you know? Okay, well, I'm not exactly sure who "they" are but I fully endorse their proclamation. Saute, bake and baste with it. Put it on a French baguette, croissant or just plain old sliced toast. Whatever you do with it, make sure you're liberal. One great suggestion is to put a nice-sized pat of it on an oven-cooked steak to create a chef's sauce that you can then pour over the finished meat. Delicious.
3. Lemons and Limes
Squeeze them on fish and roasted meats. Use the limes as the "cooking" agent for ceviche or a garnish for a summer, ahem, libation or two. Take it a step further and squeeze a bit in a kitchen cleanser for a fresh scent after you've thrown down in the kitchen.
4. Eggs
Large eggs or bigger. No compromise here. Perfect for everything under the sun. Crack a few to bake with or scramble some up for a 2:30 a.m. snack or perhaps an omelet or two. Cookies, cakes and everything in between.
Bonus – Goes well with bacon and pounds of butter.
5. Mayonnaise
In the south, it's Duke's. Mayo is perfect for sandwiches, binding other ingredients or you can even jazz it up to make a more flavorful variation of a culinary classic.
6. Champagne
If you're the kind of person who doesn't need a grandiose reason to celebrate, then keep a bottle of chilled bubbly in the fridge is mandatory. Keep a couple extra glasses around for you and your spouse (or nice lady friend).
7. Dijon Mustard
Essential for creating an on-the-fly vinaigrette, because I'd like to think you make your own salad dressing every now and again, right?
8. White wine
Not that shoddy "cooking sherry". A crisp and dry white wine. Perfect for anything requiring a white wine sauce (shrimp, mussels, etc.) and absolutely crucial for deglazing saute pans. Also never hurts to pour yourself a glass while slaving over a hot stove.
9. Cilantro
Truly an all-purpose herb. Salsa fresca? If you're not making it, you should be. A staple in most Latino dishes, it perks up tacos, sauces, soups and stews. Oh, and did I mention tacos?
10. Parmesan cheese
Not the processed, crappy kind you get in the canister. Treat yourself and get a chunk of the good stuff, Parmigiano-Reggiano. Shave it on some penne and red sauce or if you have nothing else, some oil, garlic and a healthy shaving of Parmigiano does the trick every time.
Brian Wilder is a writer for Home Ec 101. You can also find him at Things My Grandfather Taught Me.
If you have a question you'd like Brian to answer send it to Brian@home-ec101.com.
Ten Fridge Essentials for Every Man is a post from: Home Ec 101 ©Home Ec 101.com 2007 - 2011


July 26, 2011
Outdoor Lighting Fixture, Cleaning Instruction Clarification
Heather says:
I spent a little while trying to find the specific manufacturer to check their FAQ or customer service contact info. After some intense Googling all I found was a company with a mildly frustrated footnote saying they are NOT the manufacturer of your product. (I feel sorry for those guys, they must hear from consumers a lot). Awesome.
Since manufacturer instructions are not available we're going to apply a little common sense and hope for the best.
Metals and finishes frequently react with cleaning agents and chlorine bleach can act as a corrosive agent with some metals. The manufacturer is recommending you use an alkaline cleaner, followed by a rinse. Alkaline refers to solutions with a high pH, alkaline cleaners typically have bleach in their ingredients. Do not mix cleaning agents. The manufacturer didn't specify a product so dilute bleach or a commercial cleaner with dilute bleach as a base will work just fine for your purposes.
The relatively high pH of the cleaning solution will help remove mineral deposits left by rainfall and exposure to the elements. Rinsing stops any potential chemical reaction from continuing and possibly damaging the finish.
The manufacturer's suggested cleaning frequency is to to prevent a buildup of deposits from occurring that could become difficult to remove or even cause damage to the finish.
Good luck and enjoy your new lighting.
Send your questions to helpme@home-ec101.com.
Outdoor Lighting Fixture, Cleaning Instruction Clarification is a post from: Home Ec 101 ©Home Ec 101.com 2007 - 2011


July 25, 2011
Lemon Shake-Up Recipe — A Refreshing Summer Drink
Ah, summer. The scorching heat, the overwhelming humidity. Fun times. Well, when life hands you lemons, shake things up a bit and make Lemon Shake-Ups. Depending where you live, you may have had these treats at a local fair or carnival. For the uninitiated, a Lemon Shake-Up is basically a freshly made individual lemonade. At the fairs where I've had them, it's a big production: One person operates a big press to squeeze the bejeebers out of a lemon, into a tall, heavy glass. Another person adds sugar, ice and some water. A paper cup is turned upside down over the glass, and someone else shakes it all up to dissolve the sugar. The whole lot is dumped into the paper cup, water is added to fill, et voila – a Lemon Shakeup is served. You'd have to pay four or five dollars for this refreshing beverage and the opportunity to see it being freshly made in front of you.

I'd been reminiscing about this unofficial beverage of state and county fairs, but not about the hassle of actually going to a fair and the expense of paying several dollars for one beverage. For the cost fair admission and ONE Lemon Shake-Up at the fair, I could buy enough lemons to make shake-ups for the whole neighborhood.
Making Lemon Shake-Ups at home means I can choose my own sweetener. Most of the time, I use a stevia-based sweetener such as Truvia or Pure Via. (I like my lemonade on the tart side, so I usually use 3 packets.) Honey and lemon is a great flavor combination, but getting honey to dissolve well in the ice water is difficult, so it's best to first melt the honey in a small amount of very hot water. Once the honey melts into the water, add the ice and lemon and proceed. (As always, do not give honey or anything prepared with honey to infants under one year of age.)
Whatever sweetener you choose, use an amount equivalent in sweetening power to ¼ cup sugar.

Lemon reamer
Personally, I prefer this handheld wooden kind,because I find I'm able to get more juice out of each lemon or lime. I used to have one made of shiny black plastic, which looked gorgeous but was too slippery to get a good grip, so I could hardly
squeeze anything out of the fruit. That tool wore out its welcome almost immediately.
 One-quart jar with lid
If you use a wide-mouth jar, you can put the lemon halves right in for a more authentic shake-up. If not, you can cut the lemon into smaller pieces after you've juiced it thoroughly. Make sure it has a leak-proof lid. This replaces the potential disaster of the tall-glass-and-large-paper-cup shaking method used in the carnival and fair production.
Lemon Shake-Up Recipe1 lemon¼ cup sugar OR 3 tablespoons honey, maple syrup or agave nectar (OR equivalent amount of a sugar substitute – read package to determine amount – remember to dissolve thick syrupy sweeteners in a little hot water first)1 cup ice (crushed or cubes)Cold water
Wash the lemon, and cut it in half. Juice the lemon into the jar using your method of choice. If you prefer your drink to be slightly less "authentic" you can remove the seeds.
Add the lemon halves to the jar. If you wish, you can cut these into smaller pieces first, but it's not
necessary. Add the sugar or sweetener, ice and about a cup of water. Cover tightly and shake until the sugar is completely dissolved. Remove the lid and add enough ice and water to make 16 ounces. Pour into a tall glass, or just drink it straight from the jar. I won't tell.

Bobbie Laughman is a freelance writer who thinks she's normal. Don't try to tell her otherwise.
Lemon Shake-Up Recipe — A Refreshing Summer Drink is a post from: Home Ec 101 ©Home Ec 101.com 2007 - 2011


July 22, 2011
Last-Minute Bean and Corn Salad Recipe
Have you ever been almost, but not quite, ready to serve dinner when a giant light bulb goes on over your head (so brightly that everyone in the room gets an instant tan) because you suddenly realized that all you actually have prepared for dinner is grilled chicken and potatoes? Or burgers on buns? Or…whatever and NOTHING ELSE? If you've never forgotten to plan (and actually prepare) side dishes, you are officially Better Than Me. If you have, then Last-Minute Bean and Corn Salad is a side dish you should keep up your sleeve. (Figuratively speaking, of course.)

Four salad ingredients get tossed in a bowl with four quick dressing elements, et voila! You've got mail salad. And if you're the one who never forgets anything — Hi there! I've always wondered if you really existed or if you were just an urban legend. Don't you forget to try this salad, too, because it's even better if you plan ahead and have the exact ingredients you want and don't have to wing it with what's on hand.
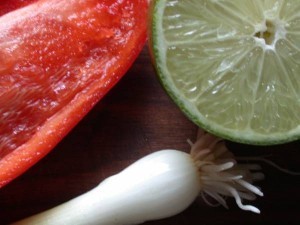
Last Minute Bean and Corn Salad is a very flexible recipe. If you don't have black beans, use pintos, chickpeas, kidney beans, or whatever you have on hand. Use any color bell pepper you wish – I've often used a combination of red and green. The flexibility also goes for the onion – use your preference or what you have on hand. While I used scallions for the photos, I've also prepared Bean and Corn Salad with chopped onion – either red or a sweet onion would be good choices. (I've even used celery when I was out of peppers. Also, the onions can just totally be left out if you don't have any, and it's still very good. And one less item to prep if you're crunched for time!)
My sister recently told me that Bean and Corn salad is also great served with chips, as you would use a salsa. She was right. If you are intending to use it as a salsa, you'll want to finely chop the peppers and onions and use black beans or another variety on the smallish side.
Last-Minute Bean and Corn Salad Recipe15 oz can black beans (or your choice)12 oz can whole corn1 bell pepper (any color, or combination)3 scallions or 1 medium onion, either red or a sweet variety1 teaspoon cumin3 tablespoons lime juice (lemon can be used, but I prefer lime)3 tablespoons olive oil1 ½ teaspoons soy sauce
Open the can of beans and dump it into a colander. Rinse the beans thoroughly then drain well. Dump those into your serving bowl. Open and drain the corn and add it to the bowl.
Clean the pepper and coarsely chop it into about ¼ inch pieces.
Slice the scallions, including the green tops. If using red or sweet onions, chop into pices about ¼ inch in size.
Sprinkle the cumin over all, then measure the lime juice, oil and soy sauce right into the serving bowl.
Using a large serving spoon, gently mix to coat the salad lightly with the dressing.
That's it! If you do what I have done in occasional moments of " Determined To Be Organized and Prepared" and actually had containers of chopped onions and peppers in the fridge this could be an almost-instant salad.
Refrigerate leftovers immediately and use within 2 days.
Last-Minute Bean and Corn Salad Recipe is a post from: Home Ec 101 ©Home Ec 101.com 2007 - 2011


July 21, 2011
How to Remove Soap Residue from Plastic
Heather says:
Soapy tasting plastic is a pretty common problem. Plastic is very porous -it has lots of tiny holes- and soap molecules are quite sticky. This problem is exacerbated when you use too much soap in the wash cycle.
Let's dive back into high school chemistry for a moment -chem nerds bear with me I'm going to over-simplify again. Whenever you put something into water you have a solution made of the solvent -in our case water- and solute -the soap and dirt. Even in perfect conditions only so much solute can be in solution at any given time. The actual amount is affected by things like the temperature of the water, the pH (acidity /alkalinity), and other solutes already in the solution.
Your tap water isn't distilled -or pure water- it has minerals, chlorine, fluoride and who knows what else in it. These solutes mess with how much soap can be in your water at any given time. Detergent molecules are sort of chain shaped, one end loves water and the other hates it. When detergent is in water the water repelling side is attracted to anything that isn't water and this is why it's fantastic for washing. The soap surrounds soil particles and allows these particles to be in solution where they can be rinsed down the drain.
When you have too much soap, those water hating ends are going to be attracted to plastic and there are a lot of tiny holes for those molecules to sneak down into. Each time the plastic gets wet, some of those soap molecules are going to sneak back into solution. This is aggravating when that solution is water on the food you stored or cooked in plastic.
So how do you remove that soapy residue from plastic?
You want to do everything you can to increase the solubility to get those pesky soap molecules into your rinse water instead of your dinner.
To remove the soap currently clinging to your plastic, you want to use water that has had the pH altered to either be more acidic or more alkaline. You can do this by adding either vinegar or baking soda to some hot water and either soaking or swishing your plastic in this. If you add both you get the classic volcano science project that is fascinating to an eight year old, but not so cool when you're the one who has to clean it up.
Bar Keepers Friend is oxalic acid and can be used as a paste to gently scrub your plastic and baking soda is a base that can accomplish the same end with a higher pH. Both of these things are safe for contact with food preparation surfaces, just rinse thoroughly.
If you're still having problems there is a pretty much fail-safe way to remove soap residue from plastic. Home brewers should be quite familiar with this product PBW or Powdered Brewery Wash. You should be able to find it at a home brewing supply store or order it online. (I haven't ordered home brewing supplies before, so I don't have a recommended source). This product is completely safe for food and is designed to rid brewing supplies of any residues that may contaminate a batch.
To prevent soapy residue on plastic:
Do not soak plastic items, do not use too much soap, and rinse quickly and thoroughly in very hot water.
Or switch to glass for storage and reheating, Pyrex 1072164 Storage 18-Piece Round Set here's the set I use and love¹.
Submit your questions to helpme@home-ec101.com.
¹affiliate link
How to Remove Soap Residue from Plastic is a post from: Home Ec 101 ©Home Ec 101.com 2007 - 2011


July 20, 2011
Whitening Whites
Heather says:
You are absolutely right to not reach for regular chlorine bleach. When concerned about preserving color, oxygen bleach is your go to, not chlorine. Both chlorine and oxygen bleach work through the same kind of chemical reactions. These reactions are oxidizing reactions that break the weak bonds of molecules that produce color. Chlorine bleach, in the chemical world it's known as sodium hypochlorite, is a much stronger oxidizing agent. It releases lots of oxygen that bounces around in your washing machine seeking the ruin of souls, I mean color.
Sodium perborate or sodium percarbonate are both sold commercially as oxygen bleach and this is what you need to bleach colored items. Both sodium perborate and sodium percarbonate react in water to create hydrogen peroxide which his quite unstable and breaks down into water and oxygen molecules. Since not as many oxygen atoms are zipping around in your washing machine, they settle for the easiest prey, which is usually the weak bonds on stains.
Fluorescent Whitening AgentsProducts like Clorox 2 usually contain more than just the color busting oxygen molecules. Frequently these type of laundry additives also contain fluorescent brighteners, commonly referred to -in laundry nerd circles at least- as FWAs or flourescent whitening agents. These chemicals make whites reflect light more brilliantly.
Have you ever had an item of clothing look dazzlingly bright in the sun, to the point it was difficult to look at? That's FWAs at work. FWAs are used both by clothing and laundry detergent manufacturers. We as consumers are so used to whites looking crisp and bright that anything less appears dull and dingy.
Soaking your striped and mixed color items in a solution of color safe bleach (like Clorox 2) and water may restore much of the missing brightness. This isn't fool proof, it may take a couple trips through this laundry cycle or it may be beyond repair.
Preventing DinginessTo keep your mixed items -that sounds vaguely insulting, doesn't it?- from becoming dingy over time you'll need to use either oxygen bleach or for best results a product that also includes those FWAs.
Don't overload your washer.
Just as an FYI a frequent cause of dingy laundry is overloading your washer's capacity. Clothing will develop a layer of residue if the washer is overloaded. If there are too many items -or simply too much dirt- in your washing machine the rinse water won't be able to bring those molecules back into solution in the rinse cycle. This is especially true for those of you who live in areas with hard water.
Good luck!
Submit your questions to helpme@home-ec101.com.
Whitening Whites is a post from: Home Ec 101 ©Home Ec 101.com 2007 - 2011


July 19, 2011
Wax and Silicone Build Up on Furniture
Smudged in Smyrna
Heather says:
Are you sure that it's wax build up? Many modern dusting sprays and furniture polishes contain silicone oil to make furniture shiny. This silicone build up is incredibly difficult to remove. Just ask any furniture guy who has had to refinish a piece. Silicone build up is pure, unadulterated evil. Just say no. Keep in mind that switching between wax polish and silicone oil furniture polish or spray can also create cloudy, streaky surfaces. The silicone softens the wax which causes the clouded appearance.
It's important to keep in mind that wood was once a living thing. Wood is a plant, a sturdy one, but once a living organism. The cells within your wood contain water and are capable of absorbing or losing water to the surrounding air. The finish on your furniture helps maintain the proper balance of moisture, the relative shininess of that finish is more about aesthetics.
The build up of wax or silicone is a protective coating for your wood, stripping this coating always has the potential to cause damage. Proceed with caution and always, always, always (do you get it yet?) test in an inconspicuous location before destroying your finish.
But how do you remove wax build up?
Wax build up is a pain to remove from furniture, but not impossible.
Since liquids damage wood it is important to work quickly, use as little liquid as possible, and dry thoroughly after rinsing.
Combine 1 quart white vinegar with 1/4 cup cream of tartar. Apply this liquid to the wax finish in the direction of the grain and rub gently to remove the wax build up. Rinse immediately by wiping with a rag dampened with plain water and then dry.
If wax has built up in crevices, you may be able to use a hair dryer and an absorbent cloth to remove the residue. Place a single layer of the cloth over the surface and heat gently with the hair dryer. Wipe, adjust to a new section of cloth and repeat. Use caution and low heat as heat is also damaging to wood.
Once all of the furniture wax has been removed, allow the piece to dry, and finally follow up with a new coat of either furniture wax or polish.
If you are concerned about mixing your own furniture wax removers, there are commercial wax removers available.
Silicone build up is possible to remove with mineral spirits, but be extremely cautious with the application. Mineral spirits are flammable. Use a soft, lint free cloth to carefully apply the mineral spirits. Dry thoroughly and polish with a furniture polish that does not contain silicone.
Submit your questions to helpme@home-ec101.com.
Wax and Silicone Build Up on Furniture is a post from: Home Ec 101 ©Home Ec 101.com 2007 - 2011


July 18, 2011
Cooking With the Troops Recap
I thought that this weekend's event would be a fun way to give back. I thought I would fly home Sunday evening and dive back into normal life. I thought that Thursday's Quick Note would be the only thing I would say here. I didn't realize how profoundly a small deed like preparing a meal as an act of gratitude would affect me.
I grew up a military brat; I knew military life. However I was lucky, my dad served mostly during the Cold War. He went out and always came home whole and safe.
Those I met this weekend were not so lucky. Many of those I met this weekend gave up their limbs and a normal life so we could continue to live as we do. The families I met at the Fisher House (it's like the Ronald McDonald House for military families) were painfully young. So many of these soldiers are just so terrifyingly young, newly married with brand new families and now futures a world apart from what the one they planned.
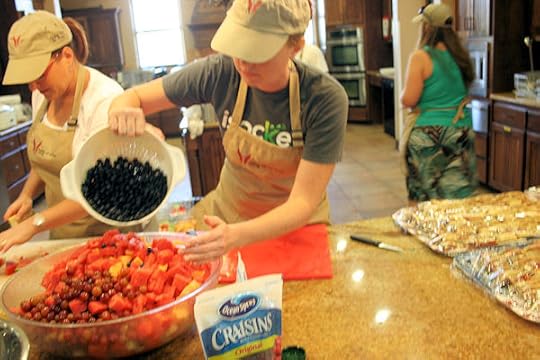
I don't have any pictures of the men and women I met, to share those would be to compromise their dignity and that is something I will not do. What I do have are pictures of the team that came together, from all over this country, to work together and prepare a few meals. I cannot begin to convey how much I admire and respect these people.

I wish I had thought to take pictures of all of the regular volunteers at the Warrior Family Support Center. Wounded soldiers are often assigned to a transition battalion and during this time their job is to get well. Their job is physical rehabilitation and they are stationed at places like Ft. Sam Houston and BAMC (Brooke Army Medical Center). The building (if you go through the above link, there are pictures) is intended to be a home-like environment, a place unlike sterile hospital and therapy rooms.
The facility is beautiful. Don't ask about the butterfly theme unless you have tissues within reach. I'm not usually a crier, but I spent a lot of time staring at the ceiling and blinking back tears.

Volunteers like Rachel cannot be thanked enough. I wish I had thought to take pictures of all we met.
 Val Prieto of Babalu Blog and Dos Cubano Pig Roasts roasted four pigs in La Caja China -boxes specially designed for pig roasting. As an aside, I spent four days immersed in Spanish, cursing every moment I wasted on French in high school.

Yes, it was still dark when they got started. (This picture was taken by Val)
 What you don't see is that it was over 100°F.
I wish you all could meet Marta and her wonderful family. I will teasingly mention that if you're an introvert you may find sharing a car with them a tad overwhelming at times. Carrie Ferguson Weir, a mutual friend, had sent me a message to be on the lookout for Marta "She's a Cuban you, you'll love her."
 Meet Marta, whose heart is many times larger than the tray of 300 Marta's Pastelitos de Guayaba.

Marta's amazing family. Special thanks to Amy (left) for introducing me to Cuban coffee and saving me from the "dirty water" the motel was trying to pass off as such.
The following picture isn't the best from a technical perspective, but I find it captures the environment better than any other I took over the weekend.

I want to introduce you to Ellen Adams of Red Hot Dish. She's a personal chef in Webster, NY. We bonded as foodies and as fellow red heads. She's an amazing woman and I wish you could spend time with her. Not only did she create the menu and prepare dinner on Friday, she also taught the first Home Front Support cooking class, which was a wonderful success. (This class is a huge part of why I am a part of Cooking With the Troops)
 If you needed proof I did more than stand around and take pics, rest assured I would have many more if I hadn't been neck deep in prep work, pot scrubbing and epicly -yes made up term- large batch of couscous making.
 I want to mention Mike Russo who had a joke for every lull in the conversation and in the evenings, when we cut loose, he generously served as designated driver.

Photo Courtesy of Cooking With the Troops
I don't have a picture Here's Bob Miller:
I'm scared if I tried to describe him to you, I wouldn't do him justice and it would leave you with a caricature of who he is. He's one of the outstanding men behind Cooking With the Troops and it was an honor to work with him. Blake Powers, CEO of Cooking With the Troops, worked tirelessly to bring this project to fruition. I can't thank him enough and ridiculous as it may be, I don't have a good picture of him, either.
I'm still processing the experience. I don't have the right words to explain how tough it was to be told "Thank you," when really, "thank you" was why I was there in the first place. The experience was so incredibly rewarding that there is no way it can even begin to be an expression of the gratitude I feel for those who we were trying to serve.
It will never be enough.
 Thank you, Home Ec 101 Readers for being here. If it weren't for you, I never would have had the opportunity to be involved in this project. This won't be the last time I work with CWtT.org and I am deeply indebted to you for the privilege.
Cooking With the Troops Recap is a post from: Home Ec 101 ©Home Ec 101.com 2007 - 2011


Heather Solos's Blog

- Heather Solos's profile
- 12 followers

