
Heather Solos's Blog, page 76
October 11, 2011
How to Peel and Dice Butternut Squash
 Heather says:
We're well into autumn which means the availability of produce is changing. (Those of you in South Florida, Southern California and similar areas can hush, the rest of us have these magical things known as seasons that can affect our shopping habits). Butternut squash is one of my favorites fall vegetables, but preparing it for use in a recipe can be a little intimidating. Once the squash has been peeled and diced, it can be used interchangeably with diced sweet potato, rutabaga, turnips, or even carrots in many recipes. If you are using the squash instead of carrots in a recipe, use a much smaller dice than the one pictured in this tutorial.
*Warning* Butternut squash has a very smooth skin, make sure your knives are sharp and that you use care slicing. I took these pictures myself, when you copy the method, use both hands at all times. (I need an assistant)
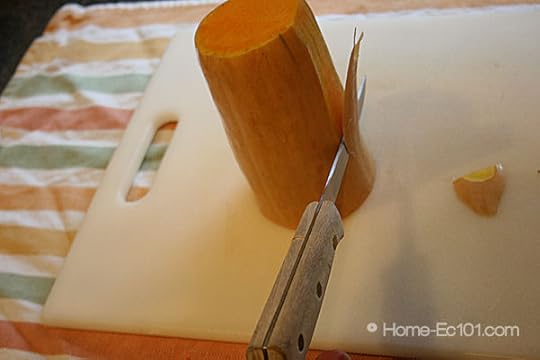
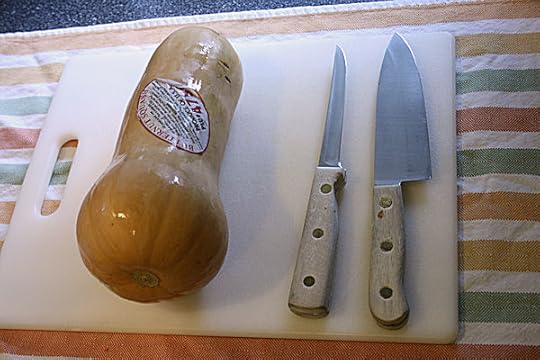 Gather your tools, wash the squash and remove any stickers. This can be done with only a chef's knife, but a utility knife is a little easier to use when removing the skin.
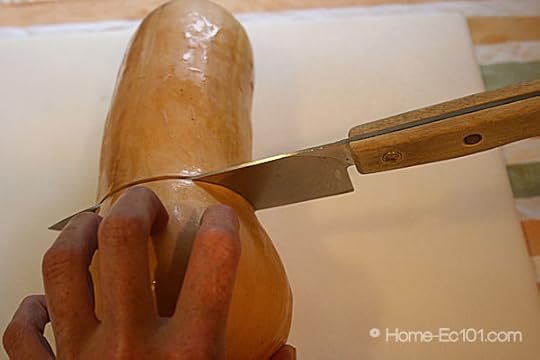 Grip the squash firmly and cut with a chef's knife where the neck meets the base. This will give you two manageable pieces.
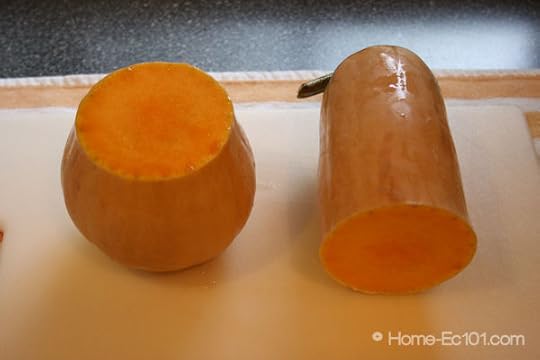
Neat.
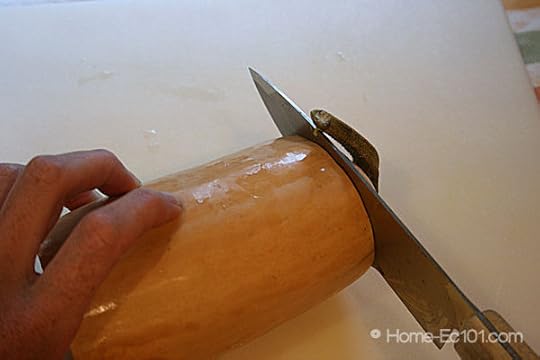
Use your chef knife to remove the stem end of the neck. Grip the squash firmly as it is slippery and may roll.
 Set the neck upright so it is resting on one of the cut ends. If you have a utility knife, switch to it and peel the squash in thin layers. If you have a sturdy vegetable peeler, it can be used for this step.
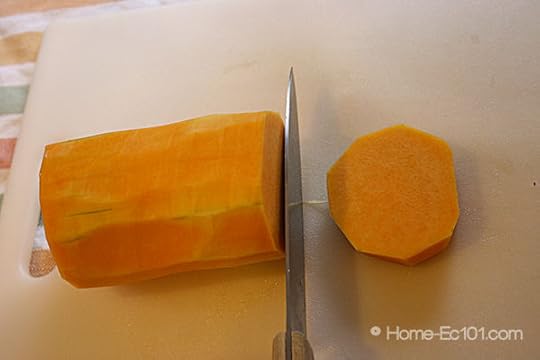 Slice the neck of the squash into rounds. The thickness of your slices will depend on how large you would like the dice.
 One or two rounds at a time, slice into strips, turn the rounds, 90° and repeat the cut to finish your dice.
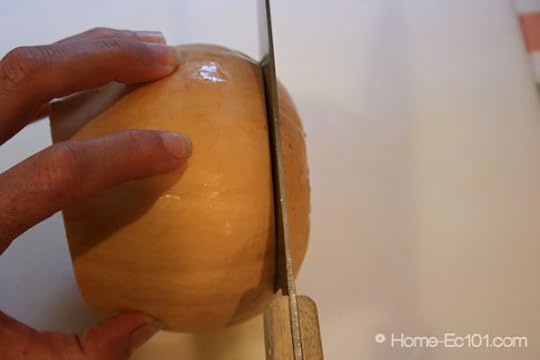 Grip the bulb end firmly and slice off the bottom with your chef knife.
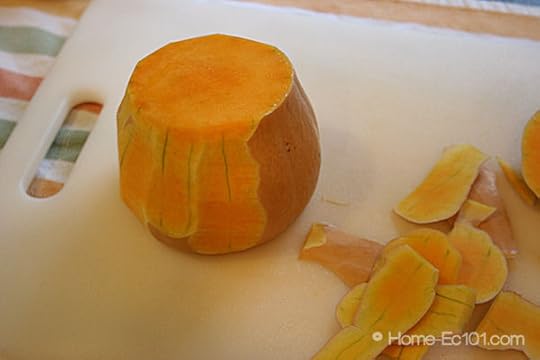 Remove the peel, just like with the neck of the squash.
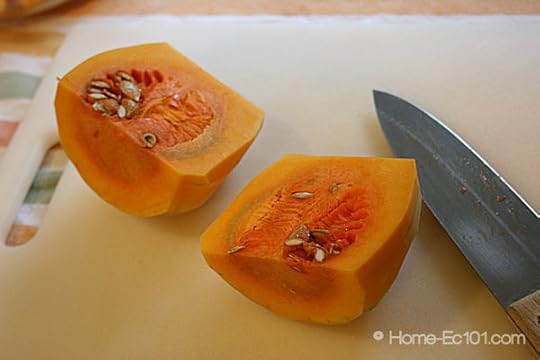 Slice the bulb end in half.
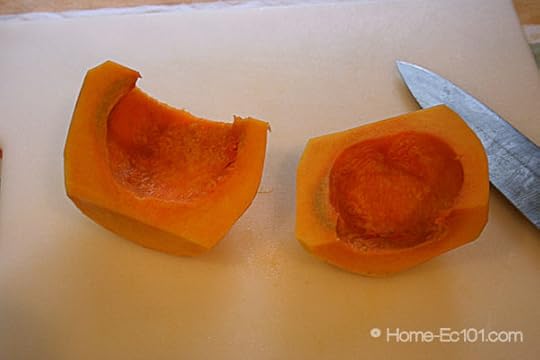 Scoop out (and save the seeds, they can be roasted just like pumpkin seeds).
 Slice the bulb end, as you did the rounds. rotate, and slice again to finish.
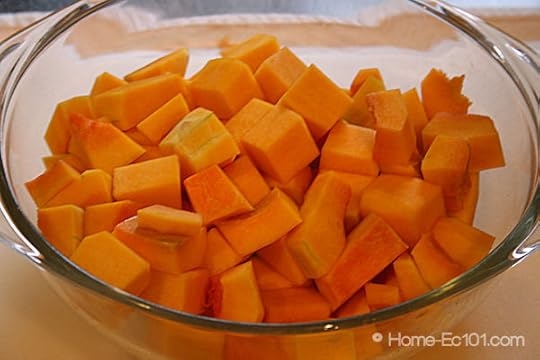 Your butternut squash is now diced and ready for use in recipes.
Good luck!
How to Peel and Dice Butternut Squash is a post from: Home Ec 101 ©Home Ec 101.com 2007 - 2011


October 10, 2011
Home-Ec 101 Weekly Menu Plan #17
Heather says:
After taking a hiatus from creating the weekly menu plans with shopping lists, I'm finally ready to bring back this series. These menu plans are written for a family of 4 – 6, assuming the children are not toddlers with tiny appetites, leftovers are served or packed for lunch. One night a week is referred to as Clean Out the Refrigerator Night, basically a night off for the cook. Sometimes a recipe takes advantage of the leftovers from a previous night, this will be noted, otherwise feel free to shift the menu around based on your schedule.
The printable shopping list is editable with just a few clicks of your mouse and is provided courtesy of SayMmm.com, my favorite way to create and share shopping lists from my recipes.
Submitted to Menu Plan Monday
Home-Ec 101 Weekly Menu Plan #17 is a post from: Home Ec 101 ©Home Ec 101.com 2007 - 2011


[image error]
October 7, 2011
What's the Difference Between Corn Syrup for Cooking and HFCS?
Dear Home-Ec 101,
Okay, so I LOVE to make peanut brittle or pecan brittle…YUM! Its really easy in the microwave. We haven't had a microwave in a while and I miss it for things like my brittle and popcorn.
With all the negative stuff about High Fructose Corn Syrup (seriously, even my husband is now reading labels!) I'm concerned, is corn syrup the same as HFCS? Should I be avoiding recipes that call for light and dark corn syrup, if I'm trying to reduce our consumption?
Signed,
Cryin' over Spillt HFCS
Heather says,
Have no fear, unlike people, not all corn syrup is created equal.
Corn syrup, is a sweetener that has been around for a very long time, it is made from corn starch that has been processed with enzymes. Corn syrup is used in recipes where a grainy texture would be undesirable. It is perfectly possible to make peanut brittle with only granulated sugar instead of a combination of sugar and corn syrup, but the process requires more precision with temperature control. Corn syrup is also used in recipes like pecan pie -I have got to get my mom's recipe on here- where the corn syrup gives the characteristic sticky, but not too sweet experience we (ok, I) love.
High Fructose Corn Syrup or HFCS is corn syrup that has undergone further refining. If you want to understand my personal issues with the pervasive use of HFCS in the modern diet, check out: Dishing on High Fructose Corn Syrup.
As long as your nut brittle remains in the "treat" category rather than a daily dietary staple, you'll be just fine. My main issue with HFCS is many people are unaware of just how much refined sugar they are consuming.
Send your questions to helpme@home-ec101.com.
What's the Difference Between Corn Syrup for Cooking and HFCS? is a post from: Home Ec 101 ©Home Ec 101.com 2007 - 2011


October 6, 2011
Chicken Gumbo
Heather says:
It's fall and it's finally cool enough to switch from salads back to soups and stews and I've been waiting for months to make this recipe for chicken gumbo.
This recipe is a good use for those cheap leg quarters I mention from time to time. This version of chicken gumbo calls for 3 – 5 pounds of bone-in chicken. Thighs and split chicken breasts work equally well, it all depends on your taste and budget. If you are starting out with a whole chicken, go ahead and cut it up to stew, but don't bother separating the thigh from the leg. Don't freak out over the cook time, this dish isn't as complicated as it sounds.
If you must take the route of using boneless chicken, you will need to substitute 2 quarts of chicken broth or stock and omit the salt completely if you use commercially prepared stock. Finally, follow the alternate directions below the recipe.
Don't forget that chicken gumbo is usually served with plain cooked rice, which isn't mentioned in the ingredient list.

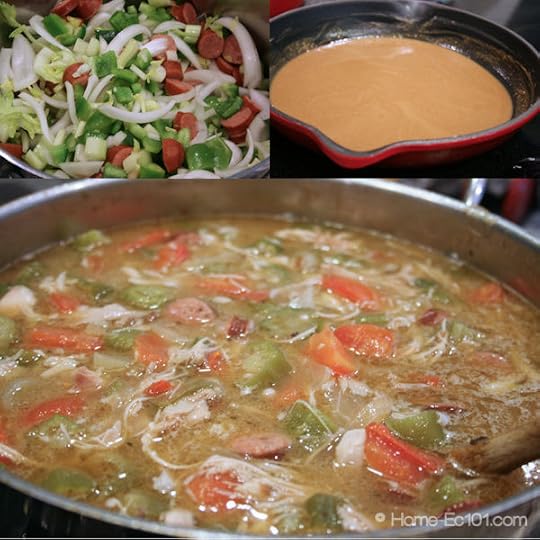 In a large pot (6 quart minimum) add the water, chicken, sausage, onion, bell pepper, celery, garlic, and Cajun seasoning. Bring the water to a boil, immediately reduce to a simmer and cook over low – medium low heat for 2 hours.Remove the chicken, cool enough to handle, and debone, discarding the skin and bones. Return the chicken to the gumbo along with the okra and tomatoes.In a heavy skillet heat the bacon fat or vegetable oil until hot, reduce the heat to low and sprinkle in the flour and stir carefully to begin making roux. Cook the roux until the color is somewhere between peanut butter and milk chocolate, depending on your preference.Whisk the roux into the gumbo and cook over low heat (at a simmer) for twenty minutes.Taste and add additional seasoning, if necessary.In each bowl, stir in a scoop of cooked rice, a pinch of file, and a dash of hot sauce.
Preparation time: 20 minute(s)
Cooking time: 2 hour(s) 30 minute(s)
Number of servings (yield): 8
Boneless chicken alteration
Use 2 -3lbs, weighed before cooking.
Brown the chicken and dice. Skip to the roux making portion of the recipe and make the roux, then add the onion, celery, bell pepper, and garlic directly to the roux, just as you would in shrimp étouffée. Then slowly stir in the chicken stock you have substituted for water and then add the Cajun seasoning, bay leaves, chicken, okra and tomatoes. Stir well and simmer for 20 minutes.
Enjoy!
Chicken Gumbo is a post from: Home Ec 101 ©Home Ec 101.com 2007 - 2011


Cleaning Up After Replacing the Toilet's Wax Ring
Dear Home-Ec 101,
I have an odd problem, but you seem to be pretty good at those. I recently had my bathroom flooring replaced (it's vinyl)and in the process, the toilet's wax ring was also replaced. There is waxy residue where the ring squished out the sides.. I've cleaned up the bulk of the wax, but the sticky film remains. Thoughts?
Signed,
Sticky in Waxahachie
Heather says:
The toilet wax ring or donut is made of some awesomely sticky wax, I can see how this would be a pain to remove. In your case, mineral spirits will probably be your best bet for removing that funky layer of sticky wax. If you haven't already, try using a plastic putty knife to scrape up as much as you can without damaging your new flooring. Apply the mineral spirits with a rag and scrub gently to remove the wax residue.
Always use care with mineral spirits as it is flammable.
If you don't have mineral spirits on hand, check in your garage for a bug and tar remover or Goof Off Heavy Duty. (The regular version of Goof Off is not safe for some synthetic surfaces, be sure to test it in an inconspicuous location if you are willing to take this chance). The use of bug and tar remover is going to depend on the brand, read the label or check the manufacturer's FAQ to be sure it's safe for your flooring material.
Good luck!
Submit your questions to helpme@home-ec101.com.
Cleaning Up After Replacing the Toilet's Wax Ring is a post from: Home Ec 101 ©Home Ec 101.com 2007 - 2011


October 5, 2011
Fixing a Stained White Dresser
Dear Home-Ec 101,
We have a lovely bedroom set of furniture from a big box baby store. In white. One sick child + one classic orange popsicle + one apparently cracked emesis basin + one day = one bright orange stain on the white dresser. I tried a diaper wipe thinking the mess was still wet. It wasn't. Then I hit it with one clorox wipe. Haha. HELP!!!
Signed,
Now I'm sick to my stomach
Heather says:
Lovely.
Before trying my suggestions below, call your furniture manufacturer's customer service line. They may have specific advice for the finish on your piece.
You're probably not going to like my response, but the acidic nature of your child's vomit has likely etched (chemically scratched) the surface of your furniture. Since the surface is already damaged, I'm going to suggest a method that I would NEVER recommend under other circumstances. You can try using either oxygen bleach or chlorine bleach (diluted) on the stained area. There's a very small chance that you may be able to lighten the stain enough that it's no longer as noticeable. Apply either with a rag dampened with the solution and allow it to rest on the stained area for a few moments.
If the stained area is large, refinishing that surface is probably your best bet. I recently attended an event with Angela Statzer where she shared tips for painting wood furniture that you may find helpful.
Best of luck and I hope the kiddo is feeling better.
Submit your questions to helpme@home-ec101.com.
Fixing a Stained White Dresser is a post from: Home Ec 101 ©Home Ec 101.com 2007 - 2011


October 4, 2011
Why Is the Ice Partially Melting in the Automatic Ice Maker Portion of My Freezer
Dear Heather,
I'm so lucky to have a new refrigerator with water and ice in the door (I have arrived!) but in the several months since I got the fridge, the water/ice dispeser has become a little drippy, and there is mildew accumulating around the gasket between the actual maker (in the fridge itself) and the door dispenser. There are other issues that I think may be related as well. Just from typing this out I think the refrigerator door is not level, which would cause the gasket to not be sealed with the icemaker, but can you adjust the doors?
Also, I keep the temp at the manufacturer's recommendations, and I even turned off the energy saver function to see if it would help, but it has not.
Signed,
Clumped in Clute
Heather says:
If you have any type of warranty with your new refrigerator, this is definitely worth a service call. If however, you purchased your appliance with no warranty for service or parts, continue reading.
Just as a heads up, the troubleshooting process for your automatic ice maker is going to be a bit involved as it actually involves two appliances. It helps to consider your automatic ice maker as an appliance within your freezer.
Here's what you know, the ice maker unit is functioning in that it is making ice, cutting the ice, and attempting to dispense the ice. The problem occurs while the ice is stored, waiting to be dispensed. It sounds as though the problem is not with your ice maker, but with your freezer.
You know that the ice is melting partially creating clumps.
You also know that there is excess humidity in your freezer.
The ice dispenser is at the top of your freezer, warm air may be somehow entering your appliance and rising, as warm air does. The warm air is then causing your ice to partially melt, creating the ice clumps that the dispenser cannot handle.
Let's rule out that warm, moist air is not entering your freezer.
Check the flap that seals the chute from the ice dispenser. Sometimes a clump of ice will prevent the flap from closing securely. It's also possible that the flap is warped, if this is the case it should be replaced.
If everything checks out with the flap, it's time to check the gasket around the freezer door itself. Grab a crisp dollar bill; shut the bill between the freezer door gasket the frame. If the bill slides out with no resistance, your gasket is not sealing. If there is resistance, great! That section of your gasket is fine. Start at the top left most portion of your door and continue checking at points around the perimeter. If there is no point at which the bill slides out easily, chances are it's not your gasket. However, it wouldn't hurt anything to wipe it with a damp, soapy cloth, follow with just a damp wipe down, and then treat the gasket with silicone lubricant. (You can find this in the automotive section of big box stores).
If the gasket isn't sealing, clean it well, lubricate it with silicone lubricant and try again. If it still doesn't seal the freezer gasket needs to be replaced. Replacing a gasket is fairly easy fix. Generally you'll find the replacement of a gasket goes like this:
Lift up the inside of the gasket to reveal the hex nuts underneath.Loosen but don't remove the hex nuts, remove the gasket and replace with a new one from your local appliance repair store.Tighten the nuts.Test the seal.Follow the steps in the next section to prepare your freezer and ice maker to go back into regular useIf the problem was NOT the gasket or flap.It's quite possible that a temporary problem, like an ice cube in the chute flap has set you up for this mess. Turn off your ice maker and freezer. Remove the ice storage unit from the freezer completely. Wipe down your freezer with a dilute bleach solution to kill any mildew and then use a few dry cloths to dry your entire freezer. Wash and dry the ice bucket and check for any broken plastic pieces. If everything looks fine, dry the bin thoroughly, and return it to the freezer. Turn the freezer back on and leave it shut for 24 hours. That's an entire day. Do not open the door and do not turn on your ice maker. The freezer a chance to get back to its optimum temperature.
After 24 hours open the door and quickly inspect the interior for frost or excess moisture.
If there's none, great! Turn on your ice maker and return food to the freezer. After each batch of ice gets dumped into the bin, use the ice dispenser to take out a glassful. This will help the bin fill properly.
If there was frost on the inside of the freezer after the 24 hour stabilization period, your defrost thermostat may be malfunctioning. This level of fix is beyond the scope of this article and would most likely involve a service call. The information we've gone over will help you know that the appliance repair person isn't trying to pull one over on you. Go with an appliance repair service recommended by your manufacturer, generally you can find these by calling the customer service line in your appliance manual. If you don't have your manual, search for the model of your appliance along with the brand name, most manufacturers have online versions.
Good luck!
Submit your questions to helpme@home-ec101.com.
Why Is the Ice Partially Melting in the Automatic Ice Maker Portion of My Freezer is a post from: Home Ec 101 ©Home Ec 101.com 2007 - 2011


October 3, 2011
Bitterness in Greek Cucumber and Yogurt Sauce (Tzatziki)
Dear Home Ec 101,
I'm curious if you have a recipe for tzatziki sauce? I've tried several that I've found online and can't seem to get any of them to taste right. There are so many out there and they all use varying amounts of olive oil, lemon juice, dill, garlic, etc. I've tried using just Greek yogurt, I've tried a mix of yogurt and sour cream and I always seem to get a slightly chalky and bitter after-texture. It makes you think that something powdered has not fully incorporated, even though there is nothing powdered in the actual recipe. I've come up with a gyro spice recipe and make gyro meatballs, but want to be able to make the sauce to accompany them! Thanks for any help you can give me!
Signed,
Trying Not to Be Bitter in Bloomington

While I love gyros and the tzatziki cucumber sauce traditionally served with them, I've never tried making them myself, even though it's been on my mental "TRY THIS SOON" list for years. Heather showed us how to make a cucumber and garlic sauce when she prepared Mediterranean Beef Pitas. The sauce recipe is part way down the page. (Scroll all the way down that page to see Heather's youngest demonstrating a cucumber and yogurt facial.)
Even though I don't have a recipe of my own, your question intrigued me, and I wanted to find an answer. Turns out there are a few possibilities, including one I didn't see coming at all.
Buckle up, this may get science-y.
First, the cucumbers: Before you even start the recipe, make sure your cucumbers are not bitter. It may seem obvious, but there's always someone who had no idea – and once upon a time, that was me.
Sometimes cucumbers become bitter because of the weather (too hot, not enough rain) and other times it's due to being grown in poor soil that's lacking in the needed nutrients. Cucumbers can also become bitter with age (hmmm…just like people?) Some varieties are more likely to be bitter than others.
English cucumbers (also called European, burpless, seedless, hothouse, or gourmet cucumbers) tend toward less bitterness, compared to the more common cucumbers found in American markets, making them the cukes to choose if bitterness is what you want to avoid. They'll be pricier than their common cousins, but these longer, narrower varieties have a thinner skin, tiny seeds and a crisper, sweeter texture. Kirby cucumbers can also be used – these smallish, thinner skinned cukes with inconspicuous seeds are great for pickling, but are handy to use in salads or sliced just so, and in some areas they're available year 'round.
As for the chalkiness you mentioned: cucumbers can have an astringent effect on the tongue, causing a dry or chalky feeling in the mouth. The astringency lies primarily in the juice, so thoroughly squeezing the juice from the cucumbers after seeding and shredding or grating them can help to reduce this astringent/chalky effect. You can press the cucumber shreds in a potato ricer, or wrap them in a clean non-terry dishcloth or cheese cloth, and squeeze the dickens out of them.
Now for the possibility that came at me from left field. The olive oil. Go figure.
Olives have beneficial compounds, called polyphenols, which naturally taste bitter. While a bitter cucumber can be quite unpleasant, a bit of bitterness in olive oil is not a bad thing.* In fact, it turns out that bitterness and pungency are considered positive qualities by professional olive oil tasters.**
So, some of the best extra virgin olive oils have an inherent bitterness. Oils made from olives harvested later in the season (which are, therefore, riper) have less of the polyphenol compounds responsible for bitterness and pungency. Oils made from the earlier harvested olives contain higher polyphenol levels, and are therefore, more bitter. The early-harvest oils also tend to have a greener color than the later-harvest ones. In general, the greener the oil, the higher the polyphenol content, and therefore, the more bitterness you can expect. Incidentally, the greener, more bitter, higher polyphenol oils have a longer shelf-life.
And, on top of all that, using your food processor or blender can increase the bitterness of the extra virgin olive oil even more!
The polyphenols in extra virgin olive oil are coated in fatty acids, keeping them from dispersing in a water-based liquid. When you use a blender or food processor to create an emulsion (such as mayonnaise, or tzatziki sauce) the blades break the olive oil into smaller droplets, releasing more of the polyphenols to disperse throughout the food, making the food taste more bitter.
You can avoid this by whisking in the olive oil by hand, as hand-mixing can't break the olive oil into small enough droplets to cause a significant release of polyphenols.
So, what's the bottom line to reduce bitterness and chalkiness in tzatziki?
Choose non-bitter cucumbersSqueeze out all the cucumber juice you canChoose a lighter-colored olive oil, rather than a darker green oneWhisk in olive oil by hand.I hope one or more of these ideas solves your dilemma, and maybe you'll share your gyro spice recipe?
*Bitterness is not universally seen as a negative trait in foods. Many leafy greens are bitter. So is grapefruit, tea and coffee. Mmm, coffee…
**Did you know there were professional olive oil tasters? Me neither. These are people who are trained, like wine-tasters and coffee-tasters, to detect the subtle differences and qualities distinguishing a quality product from one produced using inferior sources or substandard methods.
Bobbie Laughman is an elder caregiver, writer, old school Trekkie and relatively new gramma, who has survived twelve tourist seasons in Gettysburg, PA.
Bitterness in Greek Cucumber and Yogurt Sauce (Tzatziki) is a post from: Home Ec 101 ©Home Ec 101.com 2007 - 2011


September 28, 2011
How to Unclog a Kitchen Sink, Naturally
Dear Home-Ec 101,
Is there a "green" way to unclog the kitchen sink? I really hate having to use heavy drain cleaning chemicals. Thanks!
I have used boiling water (2 pots full) then the drain cleaner set 10= minutes followed by a pot of boiling water again.
Signed,
Clogged in Closter
Heather says:
Depending on the location and the severity of the clog in your kitchen sink, I can say yes, there are green ways to unclog your drain. However, there is a trade off. You're going to have to be willing to deal with some nasty kitchen funk, but with improved kitchen drain habits, hopefully you'll never have to deal with it again.
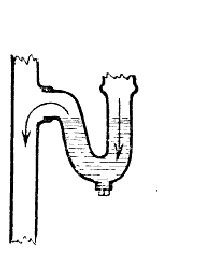
Image is in the public domain due to expired copyright in Norway.
Every drain in your home has what's called a trap. This trap not only serves to hopefully catch mistakenly dropped objects (actually that's not their primary function) they serve to create a water seal that keeps noxious (and dangerous) sewer gases from entering your home. Not all traps look like the one pictured to the right, but they do all serve the same purpose.
Even if your kitchen sink only has one drain with garbage disposal, it still has a water seal, beyond the disposal unit.
But Heather, I asked about unclogging my sink, why all this talk about water seals and traps?
The trap's function also makes it the most typical place for a clog to occur. Please note that I say it's the most typical clog point, tree roots can also cause problems further down the line, but in that case, you'll usually notice problems in several drains.
If the clog is caused by food matter settling in the trap and slowing down water flow, a sink plunger is your go-to.
This article: How to Use a Plunger explains how to unclog a sink drain, as well as your usual toilet clogs.
Grease that has been poured down the sink has often cooled enough by this point that it clings to the walls of the pipe narrowing the drain. Caustic drain cleaners work by breaking down the organic matter, boiling water works my melting the grease and hopefully moving it far enough down the line where it no longer causes a problem.
If the caustic cleaners or boiling water only partially removes the clog, you'll notice the problem reoccurs over and over. It's like those cholesterol commercials where they show the scary plaque buildup in your arteries -only your pipes don't get inflamed and bulge. If your pipes are inflamed, you have problems beyond the Home-Ec 101 scope of authority. You need a professional plumber and perhaps a priest¹ or shaman.
However, standard grease build up can be handled on your own, without chemicals.
Get a bucket, place it under the trap. Loosen the nuts that are before and after the trap. Sometimes they are only hand tightened, but you may need a large set of pliers. You need to be careful not to use TOO much force with PVC or you risk cracking the pipe.
When the nuts are loose², carefully remove the trap. Now clean it thoroughly with hot water (from another sink, I didn't have to tell you that, right?) and a bottle brush or an old rag. This greasy funk is going to SMELL, you probably want to do this outside.
The trap usually connects to another section of pipe known as the trap arm. This is the section that goes from the trap toward the wall. Carefully remove this section and thoroughly clean it, if at all possible.
If your sink is a double sink, there will be a third section of pipe to address, this one will come from the second drain and probably join the pipe descending from the main drain just above the trap. Remove this section carefully and clean it, too.
Before reassembling your plumbing, check to make sure the threads are clean on each end of your pipe sections. The nut that holds the pipe in place must be able to tighten securely to prevent leaks. If there is any debris or you don't tighten the nuts correctly, say you cross-thread it instead of twisting smoothly- you may find yourself with a leak.
You now have two chemical free ways to clear kitchen sink clogs.
To Prevent Future Clogs and Slow DrainsDo not use your disposal unit to process pasta, rice, or chunks of potato. These tend to form gluey masses that love clinging to your trap.
Do not discard any grease in your sink.
When food has been rinsed down the drain, always follow with plenty of very hot water.
Good Luck!
¹With apologies to Fr. Ed, although I'm pretty sure he knows I'm only teasing.
² Too easy.
Submit your questions to helpme@home-ec101.com.
How to Unclog a Kitchen Sink, Naturally is a post from: Home Ec 101 ©Home Ec 101.com 2007 - 2011


September 27, 2011
Can You Use Tomato Paste as a Substitute for Crushed Tomatoes?
Dear Home-Ec 101,
Can I substitute tomato paste for crushed tomatoes for a pasta sauce? If I add water to it, will it taste like a pasta sauce?
Signed,
Pasty in Pascagoula
Heather says:
I actually have gotten this question before, but something tells me it's a little hard to find: Tomato Paste and Crushed Tomatoes.
While tomato paste is used to thicken sauces, simply thinning tomato paste with water isn't going to give you a great pasta sauce. However, if you need to use tomato paste as a substitute for canned tomato SAUCE then use the following substitution for recipes calling for one 14.5oz can of tomato sauce.
1 can (6oz) of tomato paste, thinned with water to equal 14.5 oz (just under two liquid cups)
Thinned out tomato paste will not taste like pasta sauce any more than plain canned diced, crushed, or pureed tomatoes will taste like a pasta sauce, all of these are simply ingredients in your final dish. It's the aromatics -vegetables like garlic and onions- cooked with herbs and spices that really give a pasta sauce character. A note to the foodies, in this instance I'm speaking generally about tomato pasta sauces, not specifically about the 5 mother sauces of French cooking. We'll get into those another day.
To be sure your substitution will work, are you looking for simple marinara or are you thinking more of a bolognese -a meat based sauce with tomatoes? If it's the latter, yes, you can substitute the thinned tomato paste as part of the recipe. In the former case, your results will be very underwhelming at best.
Submit your questions to helpme@home-ec101.com.
Can You Use Tomato Paste as a Substitute for Crushed Tomatoes? is a post from: Home Ec 101 ©Home Ec 101.com 2007 - 2011


Heather Solos's Blog

- Heather Solos's profile
- 12 followers

