
Heather Solos's Blog, page 81
July 14, 2011
Quick Note from Texas
Hi! I'm currently in San Antonio, TX. I don't have my usual level of connectivity, so please excuse the lack of regular posting today. I'm hoping to bring you a recipe for couscous tomorrow from Chef Ellen Adams. I'll be playing sous chef and gopher today and tomorrow as we prepare for the Cooking with the Troops event. I'm hoping Marta from My Big Fat Cuban Family will let me share her recipe for black beans, too. If not, I'm pretty sure I can find where she has shared it in the past. Don't worry, you won't miss out.
I want to thank all of you. It is your support and encouragement that has lead to opportunities, like this one, to give back. I don't have the right words to express how excited I am to be a part of this.
I want to send a special thank you to Rodney from Ace Mart Restaurant Supply for being extraordinarily helpful as we sourced some of the tools we needed.
I'll be posting pictures regularly on my personal Twitter account throughout the next few days and I'll share the rest after I return home.
Send your questions to helpme@home-ec101.com.
Quick Note from Texas is a post from: Home Ec 101 ©Home Ec 101.com 2007 - 2011


July 13, 2011
Cutting Board Basics
First and most important tip for selecting a cutting board.
Just say no to glass cutting boards.Glass cutting boards are slippery and dull your knives. (If your knives are already dull, here's a handy knife sharpening tutorial).
Second:
Own at least two cutting boards, unless you are a vegetarian. It's simpler to avoid cross contamination if you have one cutting board reserved for handling meat products.
Plastic v Wood Cutting BoardsSome people prefer plastic cutting boards on the premise that they are easier to sanitize. However cleaning and sanitizing a cutting board is two step process, first all of the organic soil (food bits etc) must be washed away and then the cutting board needs to be sanitized. You can use dilute chlorine bleach, heat, or properly diluted food grade hydrogen peroxide. Some suggest using vinegar or lemon juice for sanitizing purposes, but I am not comfortable with this recommendation in cases where someone in the home has a compromised immune system -just as an FYI taking an acid reducing medication like Nexium (just an example) reduces your body's ability to fight off ingested bacteria.
Plastic cutting boards may be more vulnerable -depending on the softness of the plastic- to scarring. These scars provide excellent hidey holes for bacteria which makes the cleaning and sanitizing process more difficult. That said, plastic cutting boards can be tossed in the dishwasher, which I find incredibly convenient.
Plastic cutting boards have not maintenance outside of the regular cleaning and sanitizing; they are also fairly inexpensive and should be replaced often as they show wear.
Wood cutting boards are attractive, fairly durable, and those of the hardwood variety are less likely to scar deeply which reduces the ability for bacteria to hang on during cleaning. Wooden cutting boards also seem to have some natural antibacterial properties. (Here's a journal article on this, but it isn't free)
Wooden cutting boards do have some minor maintenance requirements to help maintain their appearance and improve their lifespan. Every other month apply a light coating of food grade mineral oil to your cutting board.
Small scratches typically heal, but if a deep scratch occurs, it can be scraped out using a plane or scraper. Avoid sandpaper as it can leave grit behind that may dull your knives. Follow up scratch repair with another coat of food grade mineral oil.
Do NOT place wooden cutting boards in the dishwasher.
Do NOT soak wooden cutting boards or allow them to sit in a puddle of water. If the cutting board is a solid piece (usually fairly expensive) it may warp and split. If the board is glued together, the water will damage the glue and you may end up with several too small pieces.
Always sanitize your workspace after working with raw meat.
The type of cutting board you choose is mostly based on personal preference, budget, and habits. I use plastic because they are cheap and can easily be tossed in the dishwasher. Down the road I plan on getting a nice hardwood chopping block, but I am aware that it has higher maintenance requirements.
Good luck!
Send your questions to helpme@home-ec101.com
Cutting Board Basics is a post from: Home Ec 101 ©Home Ec 101.com 2007 - 2011


July 12, 2011
How to Clean a Dirty Broiler Pan
I hate messy clean up, too.
Baking sprays are pretty much only useful for preventing food from sticking to a surface where the food is in contact with the pan. If the baking spray is exposed to the heat of the oven, it can polymerize. This just means the fatty chains turn into a polymer -basically plastic. (Yes, this is me playing fast and loose with terms, we're just going for the basic idea.) This coating is quite difficult to remove without the additional joy of burnt on food.
Here's an article I wrote previously: How to Remove Baking Spray Overspray.
You're going to get the same advice for the burnt on food. Grab our good friend Bar Keepers Friend, it's my favorite non-abrasive scouring powder. The active ingredient is oxalic acid; it is very effective and safe for food contact surfaces. Get the broiler pan wet and then sprinkle liberally with Bar Keepers Friend. Find something to do for a few minutes, you want to give the cleaner some time to work. Come back and scrub gently. Finally rinse. If the burnt on crud is especially thick, you will probably have to repeat the process a couple of times, but it shouldn't take much elbow grease at all.
Some people, including LG (which manufactures ovens) recommend using oven cleaner to clean broiler pans and grates. That's up to you. I'm not a huge fan of this idea as it's messy and there are fumes, making the whole process a pain in the rear. Throw in making sure the kids are occupied elsewhere and I'm just not that invested in having a shiny broil pan.
If you get the majority of the burnt on food off of the broiler pan, but there are still stains, please don't stress out about this. When broiling food, you're not going to use the pan juices, there's nothing to worry about. And really, if your friends judge you based on the state of your broiler pan and rack, you need new friends.
In the future you can add a small amount of water to the bottom of the broil pan to catch the fat rather than having it land on the empty pan and scorch. Just make sure you don't put enough water in the pan to touch the grill.
Submit your questions to helpme@home-ec101.com.
How to Clean a Dirty Broiler Pan is a post from: Home Ec 101 ©Home Ec 101.com 2007 - 2011


July 11, 2011
What Are These Tiny Bugs on My Window Sill?
Dear Heather,
This summer I have been noticing these itsy bitsy little grey bugs on my window sills in the kitchen and bathroom. They are so light and tiny I have almost thought they were dust at times. Last week I diluted some bleach on a cloth and wiped down the sills. That seems to have helped. I'd still like to know what are they? How can I stop them? Will I need to see the wizard or can you help?
Sincerely,
Bugged in the Boondocks
 Heather says:
First of all I want to thank you for the evening I spent with phantom crawlies after wandering down the rabbit trail of mite and lice research. Blech. Second to calm down any entomologists -no, spellcheck I most certainly did not mean etymologist- out there, the term "bug" for zoologists and pedants applies only to the order hemiptera. I know you probably don't care, I'm just preventing an email or two.
Since you noted that these were light in color and didn't mention any jumping, my bet is they are booklice or a close relation. Booklice (book lice) are not true lice and are also called psocids. These little bugs feed on mold and fungi and require a humid environment. They tend to hang out in windows as well as in the books that give them their name. Since they feed on molds reducing the humidity that encourages mold growth is the simplest way to control these tiny harmless pests. Your wiping the sills with dilute bleach probably killed their food source and your problem may be solved.
They are harmless so try not to stress too much about it. They aren't causing any damage and they fall into that category of creature that we just try to not think about too much. They aren't destroying property (except in the most severe infestations), triggering allergies like dust mites, or biting like bed bugs. They are mostly just a barely visible nuisance.
I do want to note that occasionally booklice can find their way into pantries where they can infest grains. In that case, you toss the infested grains, air out the pantry and store grains in an airtight container.
Other possibilities for tiny creepy crawlies in window sills.
If you squash these mites and they leave a reddish stain, they are most likely clover mites a common, harmless but aggravating critter that tends to invade windows. To prevent stains on your woodwork, simply vacuum these and call it good. Just don't forget to empty the vacuum or you end up with mites in other places as they can usually crawl back out. Clover mites aren't going to damage anything, they are just wandering around in search of food.
Finally the last usual suspect would be springtails. These little, jumping arthropods feed on decaying leaf litter. If you use mulch near your house they could be wandering around looking for more food. These things are also harmless but can be a major annoyance if they move into your house. If you notice they congregate in a window be sure to check for water damage as they are attracted to organic decay.
Good luck!
Submit your questions to helpme@home-ec101.com.
What Are These Tiny Bugs on My Window Sill? is a post from: Home Ec 101 ©Home Ec 101.com 2007 - 2011


July 8, 2011
Home Project Motivation, What's Your Secret?
While writing the book, I had an excuse to procrastinate every household project on the list. Clean the gutters? I can't, I have chapters due. Trust me, I felt every bit a hypocrite, doing this too. Now that excuse is long gone, the book is safely on the shelves of bookstores. The house has once again been restored to its usual standards of cleanliness, but that list of household projects? The one that goes above and beyond the day to day, it is still mocking me.
About a year ago, my middle child decided to play Spiderman on the towel rack in the upstairs bathroom. It did not go as he planned and left a hole about the size of a fifty cent piece in the wallpapered wall. This is not a bathroom anyone but the most understanding of guests would see.
We've talked about patching the hole.
"We should patch that hole. Do you know where the spare roll of wallpaper is?" and that's about as far as that conversation ever went. Neither of us are big fans of wallpaper, the original owner did a great job decorating, but now that 7 years have gone by, it's time we start trying to make the house look like our own.
So Tuesday evening I went into that room for one reason or another and decided, that's it. The bathroom is getting done this week. I picked at a corner of the wall paper and pulled. It came off the wall with a satisfying rip. I grabbed another section and pulled.
I call this my scorched earth tactic. I can ignore a hole in a pattern; I cannot ignore swaths of missing wallpaper. Wednesday I grounded myself from social media and attacked the paper with dilute fabric softener and an old gift card*. Today will be the patching and painting of three walls. I will paint. Well, I'll paint as soon as I go to the store and figure out what color. I'll do the fourth wall after the patch has had time to cure.
I don't have a decorating gene, so that's never been my motivation. If a room looks clean, that's almost always good enough for me.
I've found that if I have a project, I have to get it to the point of no return while I have even a glimmer of motivation. After that point I can break it into manageable mini-projects to ensure I finish.
What about you?
What is your secret for launching household projects?Are you as bad with procrastinating?
How do you power through?
*There's a side story in there about toilet frogs.
A few months ago, I was walking past the upstairs bathroom and something caught my eye on the inside of the toilet bowl above the water line. I don't know why I had glanced that way. It turned out to be a tree frog. We assumed one of the boys had something to do with the frog in the toilet and we were just thankful that it hadn't jumped on our youngest daughter while she was taking care of business. She's exceptionally girly about bugs, so that may have traumatized her for life.
While I was scraping wall paper, I heard a tree frog calling. I had dismantled the toilet to remove the paper from behind the tank. As I followed the frog call, I realized it was coming up from the empty toilet. I assume the little bugger is up in the sewer vent pipe on the roof. I assure you, from now on, I will be checking for toilet frogs. (The frog is now calling -to mock me, I suppose- as I type and I welcome any suggestions for humanely discouraging toilet frogs)
Home Project Motivation, What's Your Secret? is a post from: Home Ec 101 ©Home Ec 101.com 2007 - 2011


July 7, 2011
Mystery Meats
A far cry from the grade school days when the only thing you dreaded more than Friday homework was the indescribable mound of "meat product" plodded onto your lunch tray every Thursday, scrap meats–or meats that were considered less desirable by the general consumer public–have become something of a precious commodity over the past decade or so.
Jowl, cheek, brains, kidneys, snouts and even whole heads of animals have played host to the bold culinary journey through meat history. It's a scary territory, I know, but with my help I can put you on the right track to tackling the final frontier of the meat realm.
1. Be Prepared
The funny thing about "scrap meats" is that people tend to give them far less credit then they really deserve. Let's put it this way: even on a bad day, I'll take some pan-seared calf brains over a steak or pork chop any day. Want to know why? It's all in the preparation. Knowing how to prepare a good set of kidneys or hog's head is really half the battle. You'll be surprised how much flavor and character can come from the kinds of meats that most wouldn't even think twice about consuming.
2. Make Friends
I know I've mentioned this in the past, but I can't stress this enough when it comes to selecting the right cuts of meat: talk to your butcher! Now, I know that most chain grocery stores don't make it a point to carry the scrap parts of their livestock, but that I can assure you that they know someone that does. If you're lucky enough to have a legitimate butchery in your city or neighborhood take full advantage of this. These people know their stuff and are always appreciative of those who like to test the limits of convention.
3. Texture vs. Taste
That's really what it boils down to. Your best bet is to familiarize yourself with the different textures that each piece of meat brings to the table. This knowledge with help you determine which recipes will work best with your palette. For example, calf brains retain an almost creamy/milky texture once cooked. Sweetbreads (the thymus glands of cows, pigs and lamb) have a flakier, chicken-like texture especially when fried, but packs a really rich flavor.
Brian Wilder is a writer for Home Ec 101. You can also find him at Things My Grandfather Taught Me.
If you have a question you'd like Brian to answer send it to Brian@home-ec101.com.
Mystery Meats is a post from: Home Ec 101 ©Home Ec 101.com 2007 - 2011


July 6, 2011
Why Won't My Gas Grill Get Hot?
Heather says:
Actually I'm quite familiar with your problem and have had several frustrating evenings cursing my gas grill, too. (Hush you charcoal grill owners, I want one of those, too -not instead of).
A gas grill -in this case I'm solely referring to liquid propane- has a safety feature built into the gas regulator that is on the tube connecting your bottle of liquid propane to the grill itself. This safety valve will not open fully until the gas pressure has equalized between the bottle and the grill. If the burners are in the on position, gas is leaving the lines in the grill and this pressure cannot equalize.
Thankfully there is a very simple fix.
Completely shut the valve on the bottle of propane.
Turn off all of the burners. Check to make sure none of your minions have turned on the rotisserie you never use or any other accessories. Double check to make sure they are all shut.
Ensure the lid of the grill is open.
Open the valve on the bottle of liquid propane fully.
Wait a few seconds.
Do a little dance, hum a little tune. Something. Anything, except turn on a burner. If the hose from your bottle of liquid propane is short, you really only need 10 seconds or so unless you are trying to grill when it is VERY cold. If you have several feet of hose, you need to wait a couple of minutes.
Now turn on the burner and light the grill.
It's like magic, no?
No?
Ok, now we move up to phase two. It's time to check for a gas leak. -You should perform this check fairly frequently to comply with safety standards.
Turn off all burners and the valve to the propane tank, too.
Get a spray bottle and partially fill it with very soapy water. (1/3 soap dish, 2/3 water -almost like you were going to blow bubbles)
Now spray the hose connections with your soapy water.
Open the valve on the tank of liquid propane and then carefully inspect each connection. If any bubbles are forming turn off the gas and reconnect and tighten the fittings.
That should fix most problems.
Good luck!
Why Won't My Gas Grill Get Hot? is a post from: Home Ec 101 ©Home Ec 101.com 2007 - 2011


July 5, 2011
Chipotle (Chilpotle) Mayonnaise – Dip and Spread
You say chilpotle, I say chipotle. Either way these tasty smoked peppers turn plain mayonnaise from loathed condiment into, Yes, please, I'll have some more. Can I bathe in it? No? That's too much. Fine, I'll just dip my sandwich in it.
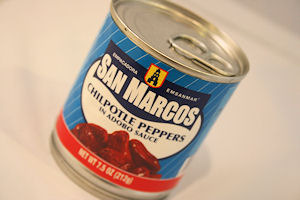 Those of you who live on the West Coast or in the American Southwest will have no way to relate with just how hard some ethnic ingredients can be to find. It's only in the recent past that chipotle peppers in adobo sauce have become available in my local grocery store. It is completely possible that they have been there all along hidden on the bottom shelf. At six feet tall, I tend to overlook these things. My local grocery store has just done major renovations and suddenly I find these bad boys, right at eye level. I snapped up ten cans, because during a zombie apocalypse we will have flavor for our beans and rice.
: Smoky, Peppery Mayonnaise
Generous 1/2 cup of Mayonnaise1 chilpotle pepper, seeded and chopped1 – 2 tsp adobo sauce (optional)1 garlic clove, minced1 squeeze of lime juice ~ 1 – 2 tsp if you use bottledtiny pinch of saltIn a blender or food processor combine all of the ingredients and pulse until thoroughly blendedIf you hate mayonnaise more than I do, try substituting up to 1/2 of the mayo with sour cream.
Preparation time: 5 minutes
Cooking time: 0 minutes
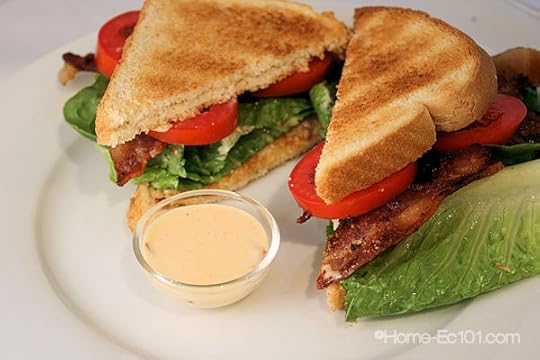
This recipe is not only fabulous on BLTs, as pictured, but it makes a great dip for fries and other fried or oven fried vegetables. It's amazing on fish -I posted this recipe today just so I could reference it for fish tacos in the future. The BLT was just a flash of brilliance for an interesting photograph.(boy am I cocky today or what?) Chipotle mayo is also quite flexible, you can toss in some cilantro or oregano if you'd like.
Just be aware that blending the mayo does make it runny. If you want a thicker dip, blend the other ingredients with 1/4 cup of mayonnaise and then stir that into another 1/4 cup. You'll get the same flavor in a thicker sauce, it just takes a tiny bit more effort.
Enjoy!
Chipotle (Chilpotle) Mayonnaise – Dip and Spread is a post from: Home Ec 101 ©Home Ec 101.com 2007 - 2011


July 3, 2011
Happy 4th of July and an Announcement
I hope all US Home-Ec 101 readers have a wonderful weekend celebrating Independence Day. The rest of you? Well, I still hope you have a happy 4th of July. (Remember that old lateral logic question -Do they have a 4th of July in England?)
I'm excited to announce that I'm working with the charity Cooking with the Troops.
CWtT is a 501(c)(3) non-profit with 4 missions:
![]()
1. Providing a culinary change of pace for U.S. and Allied military personnel — particularly the wounded, injured, and ill — and medical caregivers
2. Providing educational resources, opportunities and transition assistance into food and beverage careers for those who serve
3. Gathering and sharing knowledge with and for troops on the front line and supporting same
4. Providing other direct and indirect assistance to support the care and well-being of U.S. and Allied military personnel and their families.
I met Blake at last year's Blog World Expo in Las Vegas. I happened to be lurking in a hallway waiting for a friend and he struck up a conversation. While we talked, Blake described his vision of teaching military dependents and personnel how to cook; as a military brat, a navy brat to be specific, and a former chef I knew I had to get involved. Military families hold a special place in my heart and I am beyond thrilled to be working with CWtT.
From CWtT's FAQ:
6. You want to educate the families?
Yes. Cooking lessons that used to be passed down in families no longer are. Those wounded are also going to have different nutrition needs. We want to help families learn how to cook good food fast rather than depend on fast food. In the process, we can teach both adults and children food and cooking basics, work with families and caregivers at need on special cases, and also let them all know that their sacrifices are appreciated as well. That we can do so in a tasty and fun way is a bonus.
Do you see why I'm so excited?
Later this month I'm flying to San Antonio, Texas where I'll be assisting with the launch of Homefront Support. As part of this event Cooking With the Troops will be serving lunch -a traditional Cuban feast done by Val Prieto and Marta Darby- to 250 wounded veterans and dinner to 150 by Ellen Adams.
When I'm not elbow deep in prep work or teaching, I'll document the event so you can learn more about the non-profit and its mission. In the meantime, fan Cooking with the Troops on Facebook to stay up to date with their efforts to support American and Allied Armed Forces.
Have a wonderful Independence Day, take the time to thank someone who has helped preserve our freedom, and be safe out there.
Happy 4th of July and an Announcement is a post from: Home Ec 101 ©Home Ec 101.com 2007 - 2011


June 30, 2011
At What Temperature Should I Keep My Freezer?
Heather says:
Ideally the best temperature for your freezer 0°F. If you are going to be freezing a few things (like you're making a big batch of lasagna) bump the freezer down to -10°F several hours or the day before, if possible. The faster foods freeze, the smaller the ice crystals, the less damage to texture occurs.
I'm wondering if you didn't happen to check the temperature in the middle of the defrost cycle? After the compressor has been cycling for a set amount of time it shuts down and the temperature of the freezer can rise during this period. That is normal. What wouldn't be normal is if it's not cycling back on in time. What I would do is buy a cheap thermometer and use that to check the calibration of the one in the freezer. Place the thermometer as low in the freezer as possible and only check after the door has been shut for several hours -first thing in the morning is a good time.
In lieu of that take an ice cube and set it in an obvious place -in the freezer. If the ice cube changes shape, you've got problems and that french door model will be fancifying your kitchen sooner than later.
According to This Old House, refrigerators still have a life expectancy of 14 – 17 years. We have a second hand refrigerator in our garage that must be over 20 years old.
While there was a big real estate boom -and subsequent crash- in the interim many people have opted to remodel their existing homes rather than buying a new home since 2001 and with a kitchen remodel usually comes new appliances. This may be why your appliance guy hasn't seen too many older refrigerators. The conspiracy theorists like to say that appliances are now built with planned obsolescence so they'll have to be replaced more often. I think society's pursuit of the cheap has made sacrifices in regards to quality.
Personally, I'm starting to squirrel away a remodel fund as our appliances are starting to edge close to that life expectancy.
Submit your questions to helpme@home-ec101.com.
At What Temperature Should I Keep My Freezer? is a post from: Home Ec 101 ©Home Ec 101.com 2007 - 2011


Heather Solos's Blog

- Heather Solos's profile
- 12 followers

