
Heather Solos's Blog, page 50
December 20, 2013
Nutella No Bake Oatmeal Cookies
 Heather says:
I was recently thinking about ways to incorporate Nutella into every day? (Kidding, but what day isn’t improved with a spoonful or pretzel-ful of this stuff?) Why not use Nutella in my favorite cookie of all time? If the Santa Claus in your household is a fan of Nutella and a fan of No Bake Oatmeal Cookies, I can pretty much guarantee extra presents for the good little boy or girl who leaves Nutella No Bake Oatmeal cookies out with a glass of milk.
If you have someone on a gluten free diet on your cookie list, good news. This recipe can work for them. If you use Gluten Free Rolled Oats, these cookies are safe! Just be careful to avoid cross contamination with other items in your kitchen. Just as an fyi, regular rolled oats are not acceptable for many people on a gluten free diet. There are often trace amounts of wheat from the processing.
 Nutella No Bake Oatmeal Cookie Recipe
Ingredients:
1/2 cup unsalted butter
2 cups sugar
1/2 cup milk
1 tsp vanilla
4 TBSP Nutella
1 cup semi-sweet chocolate chips
3 cups uncooked oatmeal (rolled oats)
Directions.
In a large mixing bowl stir together the oatmeal, Nutella, and chocolate chips.
In a medium sauce pan heat the butter, sugar, milk, and vanilla over medium low heat. Stir often and be sure to use the spoon or spatula to scrape the bottom of the pan to prevent scorching. Bring the mixture to a full boil, to do this you will need to slowly increase the heat. Be patient, don’t just crank it up to high.
You may notice a distinct change in the feel of the mixture just before it begins to boil, this is normal. Allow the mixture to boil for one minute, then pour over the oats and stir.
The heat from the butter and sugar will melt the Nutella and chocolate chips. Be sure to continue stirring until the oats are thoroughly coated.
Spoon by rounded tablespoon onto a sheet of wax paper and allow to cool. I find a cookie scoop works perfectly for these cookies. Scoop, then squash slightly.
The chocolate will become much firmer as the cookies cool. You can speed the process by placing in the refrigerator, but it is not necessary. If the weather is exceptional humid they’ll be softer.
This yields 3 dozen cookies.
Enjoy.

Copyright Home-Ec101.com 2007-2012


CommentsWorks well with dark chocolate chips and Bob's Red Mill Gluten ... by OlwenBy: Recipe: Nutella No-Bake Cookies « ktroesch by Recipe: Nutella No-Bake Cookies « ktroeschThese look so good!! What a fantastic idea, using Nutella! ... by loves mousse cakesBy: I Like This – December 8, 2010 | My Word with Douglas E. Welch by I Like This – December 8, 2010 | My Word with Douglas E. WelchBy: Holiday Cookie Baking Day #8: …and it all comes to an end | My Word with Douglas E. Welch by Holiday Cookie Baking Day #8: …and it all comes to an end | My Word with Douglas E. WelchPlus 8 more...Related ArticlesFeeling DesperateFriday Free-For-AllGluten Free Shrimp Etouffee


December 18, 2013
Feeling Desperate
The holidays are here and it’s the first time I’ve dealt with them after a year losses and huge life changes. I thought now would be a good time to revisit this post on feeling desperate. Please remember, if you ever do feel completely lost, help is available, whether it’s through IAmAlive.org, 1-800-SUICIDE, 211, or reaching out to a friend. You and your loved ones are worth making that effort. This was originally published on August 18, 2011. ~Heather
Dear Home-Ec 101,
I am a slob. My house is a disaster area most of the time, though I’m starting to realize a lot of it is clutter. My husband hates coming home to this chaos, and while I thrive in some forms of chaos (my desk will never make sense to anyone but me) it’s even starting to get to me. We have two young children, a 2-year-old and a 5-week-old. About this time last year CPS was involved because of the mess, and it’s not an experience I want to repeat.
Do you have any advice on slob salvation?
Sincerely,
Living in Chaos
Heather says:
You are living in one of the busiest and most stressful parenting points of your life.
You are sleep deprived. Your hormones are out of whack.
You have not one, but two tiny, irrational dictators controlling your every move.
New babies are hard. Toddlers? Hard.
A baby and a toddler? That, my friend, is very hard.
I’ve been there twice. My kids are all just two weeks shy of two years apart. (We’re in birthday season right now, they are now 7, 5, 4 -and 16, but I wasn’t around for her earliest years). I started this site while I was pregnant with my youngest and the chaos of life after she arrived made me feel like a hypocrite.
This part is very important, more important than anything else I will tell you today.
If you are fighting this feeling of being completely overwhelmed and that feeling is winning, you MUST talk to your doctor.
He or she is there to help you and post-partum depression is serious, as is antenatal depression.
Will it make you feel better to know that my desk is a mess, too? I stay on top of the rest of the house pretty well, but my work area is a constant battle of paperwork and school books, pencils, pens, and cords.
Today:
When you read this I want you to do a household triage. Today we’re not worried about clutter. Today we are only worried about the things that would cause CPS to be concerned. Today -and the hardest days- we are working around the clutter.
Feed, bathe, and dress the kids.
Make sure there are no dirty diapers sitting out.
If there are animals in the house, all of their waste must be removed immediately.
Take out the trash, especially any food waste that may be on the counters / coffee table.
Dishes.
Empty the dishwasher, load the dishwasher. If this doesn’t take care of all the dishes, fill the sink with soapy water and soak the rest.
If you do not have a dishwasher, rinse, scrape, and stack neatly the dirty dishes. Begin washing as you can.
Laundry
Gather it in a place that makes sense. It’s ok to be behind on laundry, you just have to appear to be making the effort.
These are your mandatory things and on some days even they will feel nearly impossible.
One thing at a time, with the baby and toddler coming first and you coming in a close second. You need sleep and probably a lot more of it. The world will not end if you go to bed at 8pm for the next few weeks. You’re probably getting up at 2, 4, and 6 any how.
TMI personal side note: My kids were all terrible sleepers, six months after my second kid I was so sleep deprived I was hallucinating. I thought I was headed for the psych ward -and scarily was looking forward to the idea of 72 hours of peace- and called my insurance’s hotline. I sat shaking in a psych’s office dreading who knows what kind of diagnosis to be told, “You know there’s a reason they use sleep deprivation as torture.” I’m a very light sleeper by nature and my body just conditioned itself to not fall deeply asleep. I ended up with a prescription for sleeping pills that fixed everything in less than two weeks. I can laugh now, at the time I was utterly terrified.
Do me a big favor and email me your mailing address. I’m going to send you a copy of my friend Tsh Oxenrider’s book Organized Simplicity and one of my book Home-Ec 101: Skills for Everyday Living between the two of us, I’m sure there’s an approach to getting out from under the weight of your clutter.
In the meantime, do you see that yellow sticky note in the upper right hand of this post? Right click it and open the link in a new tab. That will bring you to a breakdown of the weekly chore chart.
Each day of the week has a major chore and a minor chore, if you attend to these consistently, your house will slowly become cleaner, these two chores are outside the bare minimum which includes:
Do the dishes and sanitize food preparation areas
Wipe down the bathroom sink and toilet
Sweep or vacuum as needed
Put your stuff away
Check your schedule
Currently you have well baby visits, well mom visits, etc. Do not miss those.
And please, listen closely when I tell you that life will get easier. At the moment your life has shrunk to pretty much what goes in and what comes out of your babies. It will expand again, I promise. When you have a moment, where you feel good enough to really start cleaning, here’s a strategy for when you’re overwhelmed by mess.
I know a lot of you have been in her shoes, please share with this reader what helped get you through.
Send your questions to helpme@home-ec101.com.

Copyright Home-Ec101.com 2007-2012

CommentsI came across this article a couple months ago, and it is a ... by FaithI m read this Heather because of the parent link up. I think ... by BabypopI am just reading this from the Type-A Parent link-up … and I ... by Vanderbilt WifeI'm so glad that “Feeling Desperate” is doing better. ... by Alice DickCindy, you aren't alone. Consistency helps, but danged if that ... by Home Ec 101Plus 30 more...Related ArticlesFriday Free-For-AllCountdown to Turkey Day 2013: Let’s Get StartedCountdown to Turkey Day 2013, The This Is Very Difficult Edition

December 17, 2013
Sewing Machine Stitches
 Michele says:
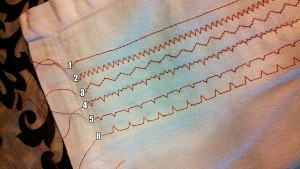
I had intended for this post to teach you how to actually sew using your sewing machine, but when my fingers hit the keyboard I was struck with a huge realization. In writing these posts about machine sewing, I had glossed over one of the most important features of your machine: the stitches. There are zigzags and dashed lines and, uh, is that a triangle?? I know that it’s tempting to use the straight stitch for everything—ask me how long it took me to use the zig-zag stitch for anything but applique—but each stitch has a specific, sometimes necessary, purpose.

1 & 2 – Straight Stitch – The machine version of the straight stitch. You use this stitch for almost everything. Your machine may have two options for the position of the needle for this stitch: center or left. Truthfully, you probably won’t ever need to use the left one unless you have a very specific project, like installing a zipper.
3 – Zig-Zag Stitch – It’s exactly what it sounds like. This stitch can be used to reinforce the edges of your seams, and can be used in place of the straight stitch when working with stretchy fabrics like jersey. Additionally, this is the stitch you will see around the edges of appliques. I often use this stitch when I need to attach elastic to itself, because it allows the elastic to stretch without pulling on the thread.
4 – Three Step Zig-Zag Stitch – This is like the zig-zag stitch, just dashed. You use this stitch for attaching elastic or anything else that needs to stretch a lot. This stitch can also be used for darning, though it can be tricky for beginners to figure out on their own. (I can do a future post if there’s any interest.) I don’t often use this stitch, because the zig-zag stitch usually works just fine.
5 – Blind Hem Stitch – You know what a blind hem stitch is for, right? …Riiiiiight? This stitch works well for curtains and skirt hems and is, for obvious reasons, a million times quicker than a hand blind hem stitch. Just make sure that you’re sewing on the wrong side of the fabric unless you want a really fancy looking visible hem.
6 & 7 – Overcast Stitches – These are used to bind the edges of unfinished fabric to prevent or control fraying. These stitches are a favorite for sheer curtains and frayed denim skirts, jeans, or shorts. You’ve probably seen these stitches used decoratively on the edges of fleece blankets. (If you don’t know what I’m talking about, I can guarantee that you’ll notice it the next time you see a fleece blanket!)
BH – Buttonhole Stitch – When used in conjunction with the buttonhole foot, this function creates a buttonhole based on the size of your button. This will be covered in its own post, as it can be tricky to figure out how to attach the buttonhole foot, let alone work out how to use the thing.
But wait! What about those weird looking stitches underneath the basic stitches? The ones that look pretty and overly complicated? Chances are, you won’t ever use them outside of garment construction or quilting. A majority of them exist for purely decorative stitching which makes them kind of pointless in my book. They all require a special double needle and, outside of the double straight stitch (kind of like you would see on the sleeves of some t-shirts), they’re not worth the hassle for a novice sewist.
Some machines have dozens of stitches, others only have straight and zig-zag stitches, but the seven (well, technically eight) described above are the backbones of machine sewing. Once you understand these, you can do pretty much anything. Come on, Home Eccers! Let’s get out of that straight stitch rut and live a little!
Michele Newell is a housewife turned blogger turned Home Ec 101 contributor. You can read her near daily ramblings at Dreams Unreal.

Copyright Home-Ec101.com 2007-2012
 Related ArticlesYour First Sewing Machine: What’s That Thing Called?Choosing Your First Sewing MachineHand Sewing Essentials: What’s That Thing Called?

December 16, 2013
What Is a Good Alternative for Cheesecloth
Dear Home Ec 101,
I need a good alternative for cheese cloth. I’ve been making a lot of juice lately and I want to strain out the seeds and pulp, but cheese cloth gets expensive quickly. Do you have any suggestions?
Signed,
Strained in Strasbourg
Heather says:
Cheese cloth certainly has its uses and it can be washed and re-used, but and it’s a big BUT, it is rather delicate, frays, and generally becomes more pain than it is worth rather quickly.
Tea towels made from linen are a more durable alternative, but again washing is something of an issue and they must be kept meticulously clean. (Note, pastry cloth is useful if you are looking for an alternative for baking, this question is about general kitchen use.)
So how does the budget and eco conscious consumer strain all the things without filling landfills or draining the budget? heh
You spend a little extra, one time, on a fine mesh strainer, known to chefs as a chinois.
Winco Stainless Steel China Cap Fine Mesh Strainer, 12 inch -- 1 each.


This one is available on Amazon for about $25 give or take as prices fluctuate. This comes in three different sizes an 8″, 10″, or 12″ strainer. You can also buy a pointed pestle to squash food through the mesh. A spoon mostly works, but as foods get down toward the point it can be a little aggravating.
So, if you’re an Alton Brown fan, how do you decide whether or not this is a tool worthy of taking up your valuable kitchen space?
The chinois is useful for:
making stock or bouillon -who needs to tie up a bouquet garnis? Not you.
straining sauces -like caramel
draining yogurt for recipes like tzatziki (cucumber sauce)
draining cooked pumpkin for pies and other recipes – oh look Gluten-Free Pumpkin Pie
canning and preserving
straining -duh
a silly hat for a toddler -the reinforced sides make it more durable than a plain fine mesh strainer.
But Heather, that costs 25 dollars. You’re right, it does. Cheese cloth at the grocery store, because I’m not about to drive all over town to find it generally runs about 4 bucks and I get enough for maybe two recipes, let’s pretend I had the time, energy, and wherewithal to wash and reuse it, maybe I’ll get another one or two uses out of it. So on the generous side let’s pretend I get four uses out of one pack of cheese cloth. That’s in the neighborhood of twelve recipes that I’ll get to make before I’m now playing the I’ve spent more money than I would have on the chinois. This doesn’t take into account the whole, time factor, either.
So, your mileage may vary, if you only do one or two big cooking projects a year, then you’re absolutely right, cheese cloth is the right strategy for your household. If you are getting into scratch cooking, canning and preserving, or like to make sauces, it’s absolutely worth the investment.
What do you think? Would a chinois be a useful addition to your kitchen or simply a waste of space?
Submit your questions to helpme@home-ec101.com.

Copyright Home-Ec101.com 2007-2012
 Related StoriesCan I Freeze an Overnight Apple French Toast BakeGluten Free Shrimp EtouffeeHollandaise Sauce

December 13, 2013
Friday Free-For-All
Heather says:
It has been a long time since we’ve done a free-for-all here at Home-Ec 101.
What is it? Just share what you’ve been up to, if you’re a blogger and want to link to your own recent work, you’re welcome to. Remember keep it to one link in the comment or the spam protection will kick in and send you straight to moderation. I’ll be around most of the day to check in and see what’s happening, so don’t go too nuts, keep it mostly family friendly.
If the site times out after you post your comment, don’t worry, it’ll be fine. I’ve got to spend some more time on the phone with Rackspace to figure out why that’s happening. (The thought of making that call makes me cranky)
What have I been doing? A lot of busy work, on school days I spend 2 hours in the car, which is just a treat,-Hey kids, Big Ben, Parliament! Then there is my day job, feeding the minions, falling into bed, and repeating. I did manage to get the tree up, which is nothing short of a Christmas miracle.
In the last few weeks, I’ve been working on finding a rhythm and getting back into the habit of things like cooking and the chore schedule. That’s the biggest sign that I’m through the worst of it. I finally feel like cooking. Meals are more balanced and we are finally having more planned dinners than concoctions scavenged from whatever it is in the refrigerator. Hopefully I can soon find the energy to photograph the evidence so I can begin sharing with you again. But, it’s progress and that’s all that matters.
If you’re familiar with Hyperbole and a Half, I think I found my piece of corn a month or two ago. It’s just taken this long to come out of the fog.

Copyright Home-Ec101.com 2007-2012
 Related ArticlesCountdown to Turkey Day 2013: Let’s Get StartedCountdown to Turkey Day 2013, The This Is Very Difficult EditionHollandaise Sauce


December 12, 2013
How to Clean a Bath Mat After a Toilet Overflow
Dear Home Ec 101,
I found your article on How to Clean Up After a Toilet Overflow useful, but I was wondering if you could tell me how to clean my daughter’s colorful bath mat?
Thanks!
My Cup Overflows With Gratitude
Heather says
Isn’t adulthood fun?
The good news is that your bath mat is not a table cloth.
If you have a clothes washer, between it, 2 TBSP of household bleach, the dryer, and some sunlight, your bath mat will be more than clean enough to avoid spreading things like e. Coli to the entire house.
First take the bath mat outside and shake it out as much as thoroughly possible. If you can still see some -ahem- organic matter, grab the hose and rinse the bath mat until all visible particles are gone. Wring the bath mat out as thoroughly as possible, while you’re still outside.
Wash the bath mat on the largest load in warm water with regular detergent and then follow that up by adding 2TBSP of household bleach to the rinse cycle.
The University of Kentucky’s County Cooperative Extension says:
Brightly colored fabrics that may fade when chlorine bleach is used at higher levels, generally can be successfully sanitized with 2 tablespoons of liquid chlorine bleach per washer load without significant color loss
Dry your bathmat thoroughly in the dryer, on tumble or low. The rubber backing of the mat will disintegrate if you dry it at higher temperatures. Once the bath mat is thoroughly dry allow it to sit in the sunlight for several hours.
At this point, it’s okay to stop worrying. Bath mats are intended for feet and really, when your child plops down on the bath mat with their bare bottom, they are probably adding more germs to the mat than they could possibly pick up.
Remember your home isn’t an operating room and a sterile environment isn’t necessary to maintain good health. Using proper hand washing techniques, getting adequate sleep, and a good diet will do far more for a family’s overall health than spending too much time and energy on trying to rid your home of all potential germs.
Have fun?
Submit your questions to helpme@home-ec101.com.
Related Posts:
The differences: Organize, Clean, Sanitary, and Sterile
Cleaning Up After a Toilet Overflow

Copyright Home-Ec101.com 2007-2012
 Related ArticlesHow to Deal With Stubborn Body Odor in LaundryDon’t Just Cover Up Musty OdorsHow to remove mildew and musty odor from towels
December 10, 2013
Can I Freeze an Overnight Apple French Toast Bake
Dear Home-Ec 101,
I have an overnight apple french toast recipe that we very much enjoy. Because the ingredients include apples, as well as a syrup/sauce made with brown sugar, butter, and corn syrup – I am wondering if I can prepare this ahead, unbaked, and then freeze. The syrup/sauce is placed in the bottom of the pan, then a layer of apples, followed by the soaked bread on top.
Would this freeze well for final baking the morning of eating?
I am hoping I can hear from you soon so that I could plan to make and freeze this before Christmas.
Thank you so much.
Baked in Bakersfield
Heather says:
The short answer is yes, you can, the longer answer is yes, but. You’ll need to be conscious of a few things to ensure it’s a successful endeavor and know that the texture will be a little different.
You should keep in mind that freezing changes the structure of fruits and vegetables, the apples will still taste the same, but they may not be as firm as they would be if they went from fridge to oven rather than from freezer to refrigerator to the oven.
There will also be extra moisture to be accounted for, mostly from the apples, but some from changes in the protein structure of the sauce. You can adjust for this by uncovering the dish a little earlier in the baking process -most I’ve seen are covered for at least part of the baking. Do not increase the temperature of the oven. The high sugar content of this dish increases the likelihood of burning.
Do not thaw your french toast bake on the counter, please humor me on this food safety issue.
Does the recipe mention whether or not the cook time compensates for starting at 40°F and not room temperature?If there is no mention of storing the dish in the refrigerator you’ll need to compensate for this. Reduce the oven’s temperature by 25° or 50° and increase the cook time. As noted above, this is safer than allowing the dish to come to room temperature.
Enjoy!
Submit your questions to helpme@home-ec101.com.

Copyright Home-Ec101.com 2007-2012
 Related StoriesGluten Free Shrimp EtouffeeHollandaise SauceHomemade Challah


December 1, 2013
Gluten Free Shrimp Etouffee
Heather says:
I love to have people over for dinner; opening my home and sharing my table is my favorite way to show people I care and want them to be a part of our lives. As that circle of people expands -and ages, heh- I’m finding that more and more often I have friends and family with specific dietary needs: wheat allergies, gluten intolerance, and celiac disease are showing up more and more often, so I’m working on expanding my repertoire of recipes I can share.
The pictures of this dish are for the the regular Shrimp Etouffee I posted several years ago. I found the wherewithal to cook, but not photograph this recipe. I’m sure you understand. The final dish is slightly lighter in color as brown rice flour does not stand up as well as the wheat version in roux and I didn’t want to risk the roux breaking as company was en route and my patience was on the wane.
Just like the regular version of shrimp etouffee don’t be put off by the number of ingredients, it’s not as complicated as it looks, the bell pepper, celery, and onion are known as trinity. (If you really want to take a shortcut you can find it the frozen section of some Southern grocery chains)

Ingredients for Gluten-Free Shrimp Étouffée:
2 lbs raw large or jumbo shrimp, peeled and deveined
1 bell pepper – diced
1 onion – diced
1 stalk celery – diced
3 garlic cloves – minced
1 cup brown rice flour
1/2 cup vegetable or peanut oil
5 cups fish or shrimp stock, canned is fine.
3 -4 bay leaves
3 TBSP Creole or Cajun seasoning, divided (Chef Paul Prudhomme’s Magic Seasoning Blends ~ Blackened Redfish Magic, 24-Ounce Canister
 and Zatarain’s New Orleans Traditional Creole Seasoning – 8 oz.
 are both gluten free )
2 tsp hot pepper sauce
2 TBSP Worcestershire Sauce Lea and Perrin’s is gluten free, check your brand carefully
salt to taste
optional green onions as garnish
Before you even turn on the stove, do all of the dicing and deveining. You’ll thank me later. It’s a good time to practice mise en place. Once your shrimp has been peeled, season it with 1 TBSP of the Cajun seasoning and set it in the refrigerator.
Heat the peanut oil over medium heat. When the oil starts to shimmer add the brown rice flour and reduce the heat to low. Whisk thoroughly and continue to stir until there are no lumps. Unlike traditional roux you cannot cook it to a peanut butter or a brick color without losing the thickening properties. Stir it for a few moments until a slightly toasted odor begins to be detectable.
Turn the heat up to medium and add the trinity (the bell peppers, onions, and celery). Stir the mixture until the onions are translucent and the celery has begun to soften.
Add the shrimp or fish stock slowly, stirring constantly. The mixture will become very thick during this and then thin to a stew like consistency. If you want to make it thicker, you can add additional brown rice flour about ten minutes before serving to thicken the dish.
Add the other two tablespoons of Cajun Seasoning, the Worcestershire sauce, the bay leaves, and the garlic. Bring the mixture just to a simmer and cook, stirring occasionally for 15 – 20 minutes. This allows the flavors to develop.
Add the shrimp and stir. Cook until the shrimp is pink and opaque. Serve immediately over rice with hot sauce and green onions for garnish, if desired.
Enjoy

Copyright Home-Ec101.com 2007-2012
 Related StoriesGluten-Free Chicken MarsalaHollandaise SauceHomemade Challah


November 7, 2013
Countdown to Turkey Day 2013: Have You Ever Cooked a Turkey?
Heather says:
Have you ever cooked a turkey? No? Well hosting your first ever Thanksgiving dinner should probably not be your first attempt to cook a turkey. Thanksgiving is a busy enough holiday and even if you’re super organized, there’ll probably be a little self-induced stress, even with a timetable, all of your recipes organized, and knowing your pantry has everything you need. I really don’t want you to stress about the bird, too.

Cooking a Turkey for Thanksgiving
Don’t get too worked up about cooking turkey, really it’s not any different than a really big chicken. If you are feeling any trepidation about cooking your first turkey, and you have never roasted a chicken, I highly recommend you start there.
Why not? You get the benefit of a great roast chicken dinner and you’ll feel more confident on Thanksgiving day.
Here’s a simple how to roast a chicken tutorial. And yes, I seriously need to redo the pictures, as that’s from 2007, well before I learned anything about photography.
So, once you have mastered roasting a chicken, it’s time to look over its slightly bigger cousin, the turkey.
Yes, I have a tutorial for that, too: How to Roast a Turkey. Keep in mind that you don’t have to truss your turkey, I just like the way it turns out. When I went to the Butterball University event last year, they recommend tucking the wings under the shoulders to give a the turkey more of a flat bottom which makes carving easier, but it’s completely a matter of personal choice. Butterball also recommends the more simple basic roast at 325°F for the entire time, instead of the initial high heat blast that I prefer. Again, it’s an each to your own kind of situation. If you prefer that method, Butterball has a great how to roast a turkey video.
Either way, you may need to tent the turkey with foil.
Now, if you are thinking of frying a turkey this year, I have a full tutorial on that, too: how to fry turkey. In this case, skip the chicken. Frying a whole chicken would be possible, but you’d displace a different amount of oil so the experience isn’t exactly the same. If you plan on taking the fried turkey route, buy a practice turkey and just enjoy that thing well before the holiday. You can certainly reuse the peanut oil, unless you burn it. As long as you’re careful you’ll actually be getting more out of your oil investment than if you only used it to fry the Thanksgiving turkey.
If you want to ramp up the flavor even more, consider brining your turkey. Rachel has a fantastic turkey brine recipe that I use as a basis for my own brines. I tend to vary the seasoning to match the rest of the meal. Now keep in mind if you choose to brine and fry your turkey, you’re going to have a very, very dark, probably unattractively so, turkey. That said, once you get under the skin, it’s amazing. If you roast your turkey after brining, your turkey will be darker brown and I suggest using the 325°F roasting temperature suggested by Butterball.
So there we go, an introduction to two basic methods of cooking turkey. How do you cook your turkey or is this your first year? If so, what cooking method are you considering?
Today on the company and cleaning front? Just make sure you’re keeping up with the daily chores -yeah the ones on the post-it note up there ↑. If you have overnight guests coming, you may want to figure out where they’re going to sleep and if you have enough sheets and bedding.
Are you Counting Down to Turkey Day with us?

Copyright Home-Ec101.com 2007-2012

CommentsI cook mine in a turkey roasting bag. May be boring … but it ... by DeneicerHi Gator ~ Have you considered defrosting and doing the brine ... by DeneicerExcellent technique, I have a tutorial on how to spatchcock a ... by Heather SolosI always brine and roast. I typically throw it in a nice bath ... by MindyI've cooked a LOT of turkeys at this point in my life. But it ... by HomemakersDailyPlus 3 more...Related StoriesCountdown to Turkey Day 2013, The This Is Very Difficult EditionHollandaise SauceHomemade Challah


November 6, 2013
Countdown to Turkey Day 2013: Let’s Get Started
Heather says
Thanksgiving is my absolute favorite time of the year. It’s no secret that I love food and I love to cook for others and Thanksgiving Dinner is the Superbowl of company dinners. It’s a chance to gather with friends and family and indulge in the traditional and the exceptional.
Are you planning on hosting your first Thanksgiving dinner? Are you a seasoned pro, but ready to take some of the headache out of hosting Thanksgiving? Well, you’re in luck, it’s time for this year’s Countdown to Turkey Day. (Psst, it’d be awesome if you’d share this series with your friends or family who may be hosting for the first time, too.)
Don’t sweat it, you have plenty of time to plan your Thanksgiving menus and do your Thanksgiving shopping. After all, Thanksgiving is only three weeks away.
Did you see that? Three weeks. Oh boy! This year Thanksgiving falls on November 28, which would usually mean we have a little more time than previous years to get our act together, but 2013 was not a kind year.
1. Decide – When and Where
Sit down with pen and paper and decide where and what time dinner will be served. Create a tentative guest list that notes any allergies or dietary restrictions. It’s easier to plan around a gluten or nut allergy than it is to rework a menu.
Heather – My house, day of, potential for a gluten allergy.
2. Figure Out – Seating and Serving
Before things get crazy look at your guest list. Do you have enough chairs and place settings? Are you serving a casual enough meal that sitting on the floor and using Chinette works? No? Party rental stores often allow chair, china, and glassware rental in lots much smaller than you’d imagine. I’ve rented as few as ten chairs in the past for parties. Reserve what you need ASAP.
Heather – the kids can deal with the Chinette and picnic style, there are potentially 6 under 10, the rest of us can have chairs and be seated if not around the same, table, but adjacent tables.
3. Find the dining room table.
We know what happens, laundry, homework, and life love to find the table. This year’s table is a lot like last, just with a different background. I swear I will mail that cookbook.
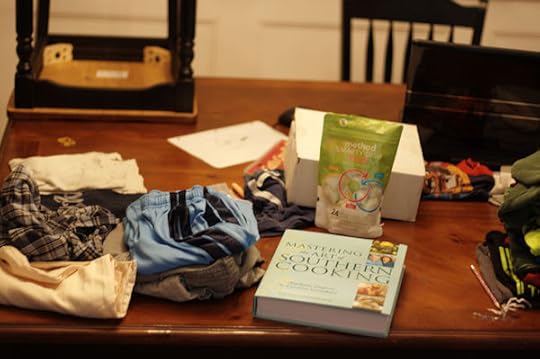
Let’s get this year’s conversation rolling.
Will you be cooking and or hosting Thanksgiving this year? Have you hosted Thanksgiving dinner before? Are you trying it for the first time? What are you looking forward to and what are you dreading about the holiday? How many people will there be?

Copyright Home-Ec101.com 2007-2012
 Related ArticlesCountdown to Turkey Day 2013, The This Is Very Difficult EditionCountdown to Turkey Day 2012: November 8, Finalize the Guest ListCountdown to Turkey Day 2012: The Great Kickoff November 1


Heather Solos's Blog

- Heather Solos's profile
- 12 followers

