
Rinku Bhattacharya's Blog, page 53
August 5, 2017
Ragi Idlis and Milagu Podi
[image error]This summer is a mixed bag. Not a lot of time left for cooking. Most days, by the time I am done fending for the house and my house guest, I am wiped. I have not done a lot of creative cooking or spent time on this site. We have been doing a lot of tiffin dishes like idlis and the like. I am learning to refie my cooking through Aunty’s critiques. These Ragi Idlis with Milagu Podi is an example of such learning.
Ragi Idlis are a notch above their snow white counterparts in complexity.
An idli is a naturally fermented sourdough bread that is traditionally enjoyed for breakfast. The naturally gluten-free batter incorporates lentils and rice and gives you a great fresh start to the day. A podi����is a dry chutney or spice blend that can be made ahead and stored. ��It is good to have on hand when you do not have the time to make fresh chutney. Perfecting my podi game, has taken some feedback from my house guest. We have currently settled on this version. All of this has helped discover another way to actually learn cooking.
[image error]
I have also learned the joys of having an abundant supply of dosa/idli batter handy, the possibilities are endless. From meals for my house guest, to quick meals for kids, dads and then some this is one good thing to have handy. And once you realize the magic of podi, you are all set and squared away. ��This variation uses ragi, or finger millet flour in the batter notching up the nutritional level many good levels.
[image error]
There are many ways to make these idlis, I simply add in a cup of ragi flour to my regular idli batter, and ferment it the regular way. I will say that the ragi idlis harden a little more easily so I try to avoid making too many of them at the same time. The beautiful dark purple brown hue is very pretty and brightens your morning plate.
PrintRagi Idlis and Milagu Podi
Prep Time: 18 hours
Cook Time: 20 minutes
Total Time: 18 hours, 20 minutes
A nutritious and healthy traditional South Indian breakfast recipe that is vegan and gluten-free,
Ingredients
For the idlies1 and 1/2 cups idli rice
1/2 cup urad dal
1 teaspoon salt
3/4 cup ragi flour
For the podi or dry chutney
1 tablespoon oil
1/2 cup channa dal (yellow gram dal)
1/2 cup urad dal (white lentils)
1/2 teaspoon asafotida
15 dried red chilies
2 tablespoons coriander seeds
2 tablespoons cumin seeds
1/3 cup sesame seeds
2 teaspoons brown sugar or powdered jaggery
1 tablespoon amchur powder (I use this instead of tamarind)
Instructions
Soak the rice and the urad dal separately for at least 6 to 8 hours. Grind the urad dal with a little (about 1/4 cup) water until smooth and very fluffy. This is essential to a soft idli. Place in a large non reactive container.Grind the rice with about 1/2 to 3/4 cup of water until smooth with just a little sandy texture. Mix with the ground urad dal and salt. Stir in the ragi flour and mix well. I like to use my hands to mix in the batter.
Cover and place the batter in a warm place for at least 8 hours. The batter will be forthy and smell lightly sour when ready.
Grease the idli mould and add in the batter. Do not overfill.
Steam for about 15 minutes or 25 minutes in the instant pot (like I did). Let it rest for about 15 minutes before serving.
To make the chutney podi, heat the oil and in add in the channa dal, urad dal, asafetida and the chilies, coriander and cumin and roast until gently browned and fragrant. Add in the sesame seeds and the jaggery and amchur powder. Cool slightly and grind to a powder.
Store the unused powder in a cool airtight jar. Serve the idlies hot with the podi.
Notes
Most of the prep time is for soaking and fermenting the grains
3.1http://www.spicechronicles.com/ragi-idlis-milagu-podi/


The post Ragi Idlis and Milagu Podi appeared first on Spice Chronicles.


July 26, 2017
Delhi Chicken Curry with Fennel and Ginger
[image error]I had sampled this Delhi Chicken Curry with Fennel and Ginger on a vacation. The spicing was delicate and ever so subtle and the technique was cooking meat on the bone low and slow. But wait, it does not stop there, this fall off the bone tender meat is pulled from the bone dunked back into the cooking liquid. A generous dollop of thick yogurt is whipped in and you have a meal fit for a king.
Now let me share my guilty pressure with you.
I had about 45 minutes to make dinner, and today is Sunday, which basically means is family dinner day! Aka, a blasphemy if yours truly does no deliver a decent and reasonably delicious meal. Well, this is where the instapot aka electric pressure cook helped. Anyone who knows me, by now probably realizes that my kitchen like most Indian kitchens thrive on pressure cooking. The electric pressure cooker ups the ante since I do not need to attend to the food being cooked.
[image error]
Using the seasonings of the original dish, and boneless chicken thighs this dish comes together pretty quickly. I follow it with stirring in thick yogurt and the result was pretty good. My double guilty pleasure was cooking rice also in the instant pot resulting in the 45 minute meal that made all parties happy.�� Life has been busy but peaceful and happy. A comfortable state of calm, and I am trying to ease back into a more regular posting schedule on this wonderful site. All things being equal it has been a summer of busy tranquility – oxymoron maybe, but sums up my relationship with summer this year well. We have even had our first cucumbers to combat the sweltering heat that we had a few days ago. Life is interesting and bring surprises when we least expect them.
PrintDelhi Chicken Curry with Fennel and Ginger
Prep Time: 10 minutes
Cook Time: 20 minutes
Total Time: 30 minutes
A delicately seasoned very tender chicken curry done in 30 minutes in the insta-pot.
Ingredients
3 tablespoons oil1 tablespoon whole cumin seeds
1 tablespoon freshly grated ginger
1 medium sized red onion diced
1 tablespoon red cayenne pepper
1 tablespoon ground fennel
2 pounds of boneless skinless chicken thighs cut into small pieces
1 teaspoon salt
1 cup whole yogurt
2 tablespoons chopped cilantro
Instructions
Heat he oil and add the cumin seeds and the grated ginger and saute for a few seconds in the base of an instapot or electric pressure cooker.Add in the onion and saute for 6 minutes. Add in the red cayenne pepper and ground fennel and the chicken and mix well. Add in the salt and 1/4 cup of water.
Cover and cook for 12 minutes under pressure (insta pot poultry setting).
Cool and remove the lid. Beat the yogurt and mix into the hot chicken. Test for seasonings and stir in the cilantro and serve hot.
3.1http://www.spicechronicles.com/delhi-chicken-curry-fennel-ginger/


The post Delhi Chicken Curry with Fennel and Ginger appeared first on Spice Chronicles.
July 23, 2017
Summer Inertia – Eggplant Rice with Purslane
Note: I rediscovered this Eggplant Rice with Purslane again. I pretty much made it as in, with a lot more purslane. The kids seem to be happy eating eggplant this way.
This time of year, I move into Fall, with anticipation and joy at the colorful translation of the landscapes. It is also the time of the year, when I do not want to lose sight of some of the good summer recipes that I did not have time to share with you. So, here is my Eggplant rice with Purslane. It is an adaptation of the classic Vangi Bhaat or South Indian style Eggplant Pilaf. The outside is slowing down, but we still get a steady supply of greens and enough lone vegetables to keep us going.
This week seems to have been all about the book, even though I had promised myself when the time came I would not lose focus. I guess, the book is much like a new baby that steals the show from everything else in the house. I remember how unprepared I was for the older one, anxious, nervous and hard on myself. My son Aadi, though more of a handful, had been easier just because I was more prepared and also more willing to be easier on myself. Being a good learner most of the time, I have realized that the it is ok not to be perfect and also learnt to forgive myself for mistakes as a mom.
This has helped me make peace with the fact that I will not be great at promoting the book baby. This being said, it will be special to me.
[image error]
Now, back to cooking, this time of the year I often have several residual summer dishes, that I have to decide whether to blog and share for posterity or just forget and let them meander into nothingness, this fresh and lively pilaf, a riff on the classic version called Vangi Bhat, was certainly worth bringing out and saving for next summer when both the eggplants and purslane will grow.
[image error]
Purslane, grows on its own terms a colorful and nutritious weed. I was exceedingly surprised when I realized that it is quite popular in Southern India, and apparently was also liked and eaten by Gandhi. The taste of this plant varies with the time of the day, it is eaten and usually tends to be tarter in the mornings and more mellow and almost sweet in the evenings.
So, it was a happy and colorful marriage, when I paired it with eggplant and peanuts in this colorful rice dish. Given how much we all liked it, chances are this will be a long lasting late summer marriage. In that, we shall see the duo and welcome them again, next summer.
PrintSummer Inertia ��� Eggplant and Purslane Pilaf
Prep Time: 10 minutes
Cook Time: 25 minutes
Total Time: 35 minutes
A brightly colored light and nutritious one dish meal, this eggplant and purslane pilaf gets a nice tang from the nutritious purslane and crunch from the peanuts.
Ingredients
1/3 cup raw shelled peanut2 tablespoons oil (olive or mustard)
1 teaspoon black mustard seeds
1 small red onion, diced
11/2 teaspoons ginger paste
2 dried red chilies
1 medium sized eggplant, diced
1 cup of basmati rice, washed throughly
2 cups of water
3/4 teaspoon turmeric
Salt to taste
1/2 cup finely chopped purslane
Instructions
In a skillet, dry roast the peanuts until they are a few shades darker and are fragrant, this will take about 5 minutes, and needs to be watched and shaken while cooking.Set the peanuts aside.
In a cooking pot add the oil and heat on medium heat for about 45 seconds.
Add in the black mustard seeds and wait unitl the mustard seeds begin to pop.
Add in the red onion and the red chilies and stir well and saute for about 4 minutes until the onion melts and is transluscent.
Add in the eggplant and stir well. Cover and lower the heat and let the eggplant cook for about 4 minutes, it should be somewhat tender at this point.
Add in the rice and the water and mix well.
Add in the turmeric and the salt and when the water is simmering, cover and cook for about 15 minutes.
Remove the cover, at this point the water should be almost absorbed and the rice fluffy and yellow.
Stir in the purslane and the peanuts and mix with the light hand.
Cover and cook for another 3 minutes and turn off the heat and let the rice rest for 5 minutes before serving.3.1http://www.spicechronicles.com/summer-inertia-eggplant-purslane-pilaf/


The post Summer Inertia – Eggplant Rice with Purslane appeared first on Spice Chronicles.
July 22, 2017
Crispy Lettuce Wraps with Turkey or Lentils
[image error]This recipe is one of the new finds in our repertoire of sort of staples. I have dreamed of these Crispy Lettuce Wraps with Turkey, long before I made them. Now they are a keeper. Since the children liked them so much, I ended up with a veggie version as well. For these blisteringly hot summer days, this is just the kind of dish that will satisfy your cravings and then some.
The vegetarian version uses french lentils and mushrooms for dense and satisfying effect. It has been a busy but fulfilling summer, once where I am learning to feel at ease again. The kids have been busy with camp and dance in preparation for their recital. As for me, I have just been watching the weeks go by. We have had their dance teacher, an enthusiastic��octogenarian��living with us. ��While she is a lovely and low maintenance guest, it is one more thing to fit into an already busy life.
[image error]
As we battle this horrid sweltering heat wave, a room temperature dish like this, might just be what the doctor orders. While my meat-loving boy had a distinct preference for the turkey version, I think either of these will work well. Satisfying and great severed at room temperature, they are everything the doctor ordered and more.
[image error]
So, how has summer been shaping up for you? Have you been cooking or grilling up a storm? Or like me have you just wilted away until the summer weather gets a little gentler? Truth be told, I can never really get away from cooking, but I do temper my enthusiasm just a little when the mercury soars beyond 80. What can I can, I really am a fall and spring kind of person. People like me leave more of summer for people who love it just so much!
PrintCrispy Lettuce and Turkey Wraps (With a Vegan Version)
Prep Time: 15 minutes
Cook Time: 20 minutes
Total Time: 35 minutes
Yield: Serves 6
A lovely recipe that can be done with either ground turkey or lentils for a lovely light summer meal.
Ingredients
1 head of bib or butter lettuce with the leaves separated (It is great to have small crisp tended leaves that form delicate cups for the filling)For the ground fillimng
1 and 1/2 tablespoons oil
1 teaspoon sesame oil
1 tablespoon minced garlic
1 tablespoon fresh ginger
1 bunch of scallions thinly sliced with the whites and greens separated
2 to 4 green chilies, minced
1 pound of ground turkey
2 tablespoons soy sauce
1 tablespoon hoisin sauce
1/4 cup coarsely ground peanuts
For a vegetarian version
Instead of the turkey add,
3/4 cup cooked green lentils
1/2 cup chopped shitake mushrooms
To garnish
1 or 2 tablespoons chopped red bell peppers
1 or 2 tablespoons chopped cilantro
Instructions
Heat the oil and add in the sesame oil.Saute the garlic, ginger and scallion whites for about 3 minutes. Stir in the green chilies.
Add in the turkey or the lentils and mushrooms and mix well.
Add in the soy sauce, hoisin sauce and the ground peanuts and cook for about 5 minutes, until the mixture is cooked through and dry.
Mix in the scallion greens.
Cool the fillings.
To assemble spoon into the lettuce cups and garnish with the chopped cilantro and red bell peppers and serve as a gorgeous summer meal.3.1http://www.spicechronicles.com/crispy-lettuce-wraps-with-turkey-or-lentils/


The post Crispy Lettuce Wraps with Turkey or Lentils appeared first on Spice Chronicles.
July 9, 2017
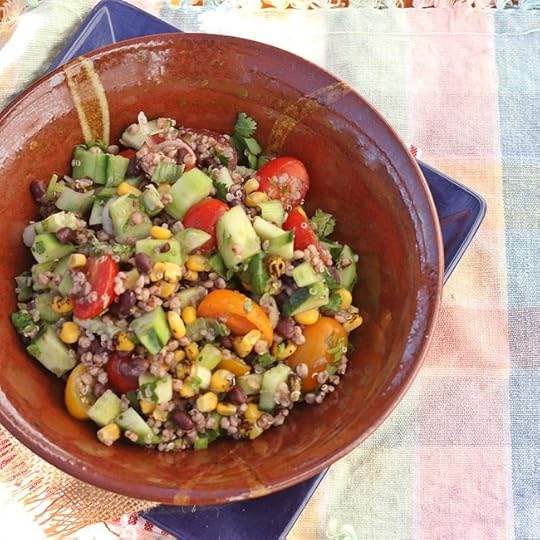
Summer Sorghum Salad for a classic Summer meal
[image error]Today I am back after a while, celebrating a rainy morning and a jeweled Sorghum salad. I am also pausing to celebrate what was, what will be and what can be��� In short I am celebrating a calm, peaceful and tranquil state of mind. This week I had loads to but somehow got sucked into watching Buddha, a woefully slow and but addictive series. I am now back to this lovely salad.
Sorghum is new to my kitchen, I picked it up a while back, seduced by its pretty nutty pink appearance. Last weekend, I dug up all that I had around along with some red adzuki beans that I thought would match the appearance for the colorful grain.
[image error]
What is lovely about cobbling together a summer salad is the sheer abundance of herbs that I have around. This year we no real summer plans, but as always plenty to do. This summery sorghum salad is similar to others I have made with quinoa but with a much bolder dressing.
[image error]
Into this I snipped in some oregano and thyme and chopped up all the cucumbers and tomatoes that I had around. Even when I am creating something completely free falling like this salad I like to google and see what is going on. Just like a bit of counter checking, sort of an assurance that the new things are being handled appropriately. From Martha Shulman, I picked up the tip of cooking the sorghum until it just burst – a good 45 minutes in my case.
[image error]
A old cook���s tip that I have also learnt and applied it to add the dressing to the grain when it is still fairly warm, all of which translates to a well-seasoned salad. My dressing for this was fresh ginger, clementine and lime juice, salt, pepper and fresh herbs.
[image error]
Other than that, things have been busy and fulfilling. We do not have any major vacation plans this summer ��� Deepta is getting ready for her dance debut and catching up on Spanish to get set for her new school. I have gotten somewhat well settling into my new life and world. So all is calm at least for the moment in Curry Garden ville.
PrintSummer Sorghum Salad
Prep Time: 1 hour, 10 minutes
Cook Time: 50 minutes
Total Time: 2 hours
Yield: Serves 6
A refreshing and wholesome sorghum salad that is perfect for these summer days.
Ingredients
For the salad1/2 cup sorghum
11/2 teaspoon salt
1 English cucumber, peeled and diced
1 pint of cherry tomatoes, quartered (about 1 cup)
1 to 2 scallions, minced
1/2 cup fresh corn (about 2 ears of corn)
3/4 cup cooked adzuki beans
For the dressing
1 tablespoon fresh oregano
1 tablespoon fresh thyme
2 tablespoons fresh cilantro
1/4 cup freshly squeezed clementine or mandarin juice
2 tablespoons lime juice
1 tablespoon fresh minced ginger
1/2 teaspoon crushed red pepper flakes
1 teaspoon pink or sea-salt
Instructions
Place the sorghum in a large cooking pot with 4 cups of water. Add in about 1 teaspoon salt and bring the water to boil, reduce the temperature and cook for 45 to 50 minutes. Let it rest for about 10 minutes before draining the grains.While the sorghum is cooking, chop and prep the vegetables and place in a large mixing bowl. The bowl should have the cucumber, cherry tomato, scallions, corn and the beans. Add in the remaining 1/2 teaspoon salt.
Mince the cilantro, oregano and thyme. Place in a jar. Add in the ginger, olive oil, red chili pepper flakes (if using) and pink or regular salt with the clementine and lime juices. Shake well to mix and set aside.
To assemble add the warm grains to a mixing bowl and toss with the dressing. Mix in the vegetables.
Let the salad chill for at least one hour up to 6 hours before serving.
Notes
Most of the cooking time for this recipe is unattended. The actual hands on time is about 20 minutes.
3.1http://www.spicechronicles.com/summer-sorghum-salad/

The post Summer Sorghum Salad for a classic Summer meal appeared first on Spice Chronicles.
June 22, 2017
Rhubarb Raspberry Almond Cake (Gluten-free) (Accidental) – Recipe Redux
[image error]We visited friends on Saturday evening and I almost feel like I snatched the last good day, for a while at least. I remembered rhubarb from our garden and sought out to cobble up a cake to go. The Rhubarb Raspberry Almond Cake happened because, I love baking with almonds. I have lately been working with using some chickpea flour in my regular cake mix. It blends in quite nicely and adds a good protein boost. My typical mixture has been 1 part all-purpose or whole wheat pastry flour, 1-part chickpea flour and 1-part almond meal. While making this cake, I closely followed this recipe fairly closely with my newfound mix. I added added ginger and forgot to add in AP flour. Well a gluten-free cake was born. Who knew?
Accidentally or not, this month’s recipe redux theme was cake.
The texture was dense but really quite flavorful and comforting.
Most of you blog readers know, while I have a lot of naturally vegan and gluten-free recipes on my site they are just that, naturally so! I love chickpea flour or besan. It is quite the workhorse in my house and a lot of other Indian homes. From savory fritters, to sweet fudge it works for almost everything in our household.
[image error]
This cake was a perfect and spontaneous creation, I did manage to get a couple of shots before I whisked it away for a calm and peaceful evening with friends. Here is my Instagram shot, taken of the evening. Peaceful and simple, just what the heart desires sometimes. I have to confess it took me away from my crazy busy project, which I need to get back to today. I also have planned by evening cooking that should hopefully tide me into the week. On tap, I have cauliflower with fenugreek, goan style salmon curry and eggplant pilaf. I just made the pilaf with mint instead of purslane and it tasted all kinds of fragrant.
Today was a good Monday, as Mondays go. Here is wishing everyone a balanced week? May the summer gods be with you. I have promised someone I will be getting out some recipe, and maybe I will by tomorrow. Wondering do you make self-promises that help you accomplish things?
PrintRhubarb Raspberry Almond Cake (Gluten-free) (Accidental)
Prep Time: 20 minutes
Cook Time: 40 minutes
Total Time: 1 hour
A beautiful pink gluten-free cake.
Ingredients
3/4 cup butter, softened�� cup sugar
1/2 pound rhubarb stalks
1 cup fresh or frozen raspberries
1 cup chickpea flour
1 cup almond meal
1 teaspoon baking powder
2 large eggs
�� cup plain Greek yogurt
1 tablespoon slivered almonds
Instructions
Preheat oven to 350��. Butter an 8 or 9 inch cake or tart pan. Slice rhubarb in half lengthwise (quarter if very large).Set aside 8 of the prettiest pieces aside for the top of the cake; chop remaining rhubarb into small pieces.
Place the softened butter and sugar in bowl and beat until fluffy. Mix in the chopped rhubarb and the raspberries. The raspberries will break and offer the mixture a pretty pink color.
In a separate bowl mix the chickpea flour and almond meal with the baking powder.
Beat the eggs with the yogurt.
Add the flours with the egg mixture in batches to the butter mixture. Mix until well incorporated. Pour into the greased pie pan. Carefully arrange the rhubarb stalks over the cake. Sprinkle the slivered almonds over the cake.
Place in the oven and bake for about 35 minutes, until the cake is set and deep pink and fragrant.
The cake will be a dense and earthy cake.
When cooled remove from the pan and cut into wedges and serve.3.1http://www.spicechronicles.com/rhubarb-raspberry-almond-cake-gluten-free-accidental/


The post Rhubarb Raspberry Almond Cake (Gluten-free) (Accidental) – Recipe Redux appeared first on Spice Chronicles.
June 10, 2017
Viceroy Publik House-Bringing the Raj to Stamford
[image error]Viceroy Public House is a whimsical attempt to capture moments of the British Raj. Or stated differently, it is an attempt to recapture the British love affair with Indian food, the pub scene and all things fun. It is often difficult to marry two different influences in the menu, but Viceroy is certainly giving this a brave, bold and well balanced�� effort.
[image error]
Publik House, ���Pub��� for short, was artfully designed by the British, dating as far back as the 1300s. Its focus was that of a gathering place where beer and cider were merely offerings within the pub���s social or political confines. Today, it is still a gathering place with it’s own general of pub-style food.
[image error]
The menu brings classic items like onion pakoras or bhajis as they are more commonly called in the UK, and fusion findings such as a decadent Lobster Tikka Mac and a Mulligatawny Soup, that has stolen my heart and taste buds forever.
[image error]
My version is pretty good, but you should visit Viceroy to check out the original. The general relaxed fun vibe offers something for everyone including a formal dining room that is good for a quieter dining experience.
[image error]
Owner�� Ramya Lakshman had commissioned restaurateur and music aficionado Eric Monte to bring an interesting English/Indian experience to the bi-level townhouse at 211 Summer Street.
[image error]
The crowd working with Viceroy are a happy chatty bunch, very excited about their eclectic baby. When visiting try to grab someone to fill you in about the history and concept. On a fun night, grab a mike and sing along if you fancy karaoke it. With summer on its way, get out and get your self a cold one with spicy chutney speckled noshings to balance your palate.
[image error]
The kitchen team of chef’s teven Bianchini and Kallingapuram Sarith are a formidable kitchen duo, and we should expect more kitchen magic from them as the menu evolves and settles in.
Viceroy Publik House
211 Summer Street
Stamford, CT


The post Viceroy Publik House-Bringing the Raj to Stamford appeared first on Spice Chronicles.
Muligatwany Soup
[image error]This very Anglo Soup – a gorgeous, coconut and spice infused Muligatawny Soup was inspired by my visit to Viceroy. More about that here, but, this was one of those rare concoction that fuelled me to make them right away! I received the recipe from the chef, who explained the recipe just the way a good Indian cook would. A pinch of this and a dash of that! You get the picture.. This version of Muligatawny Soup is vegetarian and uses coconut milk instead of heavy cream.
June has crept over our garden, and suddenly I find it filled with all kinds of good stuff, which I shall certainly expound on more as the weeks and months go by. At the cost of sounding clich��d, we are living in a country that thinks it is a circus. This is when rustling up a comforting bowl of soup helps. A note on the mulligatawny – this is a mild creation that was a British attempt to civilize spicy pepper water. This particular variation is vegetarian loaded with squash and mellow with loads of butternut squash and rich with a splash of coconut milk.
[image error]
The key was to add the coconut milk towards the end. This resulted in a rich and deep taste without too much fat. Along with the curry leaves my variation is speckled with loads with garden fresh cilantro. I am along with other things learning to work and plan around three meals everyday, courtesy the houseguest we are hosting. It has generated a different level of planning and order in my kitchen.��And lot of kitchen noshables, breakfast and snacks of course are very closely aligned in an Indian kitchen.
[image error]
As summer looms upon us, we are getting ready for transitions and other changes. Some big and some small. I have been settling into a new set of work situations, mostly good and mostly busy. In time for all things bright and beautiful we have a sunny cheery bowl of soup.
PrintMuligatwany Soup
Prep Time: 10 minutes
Cook Time: 50 minutes
Total Time: 1 hour
A bright and flavorful vegan take on mulligatawny soup. This one is a keeper.
Ingredients
3/4 cup of red split lentls1 tablespoon freshly grated ginger
1 large tomato diced (about 1/2 cup)
3 cloves of garlic
6 cups of water
1/2 teaspoon turmeric
1 teaspoon red cayenne pepper
1 teaspoon salt or to taste
2 cups of cubed butternut squash
1 teaspoon sugar
1 cup coconut milk
2 tablespoons oil
1 teaspoon mustard seeds
8 to 10 curry leaves
4 tablespoon chopped cilantro
2 tablespoons fresh lemon juice
Sliced almonds (optional to garnish)
Instructions
Place the lentils, ginger, tomato, garlic, water, turmeric, red cayenne pepper and salt in a large pot and simmer for 35 to 40 minutes, stirring occasionally. The lentils should be very smooth and soft.Add in the squash and sugar and cook for 8 minutes.
Add in the coconut milk.
Heat the oil and add the mustard seeds and curry leaves and cook until the mustard seeds begin to crackle.
Pour this over the soup and cook on low heat for another 3 minutes. Stir well.
Add in the cilantro and lemon juice. Serve the soup garnished with almonds.3.1http://www.spicechronicles.com/muligatwany-soup/


The post Muligatwany Soup appeared first on Spice Chronicles.
June 1, 2017
Maple, Coconut, Tapioca Pudding with Mangoes with a pause…
[image error]Maple Coconut Tapioca Pudding with Mangoes was waiting to be made in my kitchen. For a while. This weekend, I needed comfort! And there it was a tapioca pudding with all may favorite flavors rolled into one.
This tapioca pudding was stalled just a little by a pause. An extended pause! Do you every find yourself using a pause in life as an excuse for procrastination? Catching that extra bit of breath? Sneaking in more time than otherwise needed?
I had promised myself during a rough phase last year once life evened out I would pay it forward. So far, I have been keeping my promise in small doses, little amounts the best that I can. One of these escapades has been to help a small local non-profit with their financial universe, taking them to the next level.
[image error]
That has taken up a lot of my time, but, in this current climate all of this seems even more important. It is so important to invest in something that reverses the negativity and brashness of the times that we live in. Maybe I am naive, but I believe that we as people can influence the world.
[image error]
And then for days, when we are a just a little bit down and low, there is this super comforting creation that I call my Maple, Coconut and Tapioca pudding with Mangoes. It really is an accidental creation featuring most of my favorite flavors. It is delicate, beautiful and a breeze to put together. Especially if you are using tiny seed tapioca.
And now without much ado, here is the recipe.
PrintMaple, Coconut, Tapioca Pudding with Mangoes with a pause…
Prep Time: 1 hour
Cook Time: 15 minutes
Total Time: 1 hour, 15 minutes
A comforting dessert that is colorful, simple and vegan.
Ingredients
For the Fruit Layers1 medium sized mango, peeled and cubed
1 cup of fresh raspberries
1/2 cup maple syrup
For the pudding
1 cup coconut milk
1/2 cup almond milk
1/2 cup tiny seed tapioca
1/2 cup brown sugar
To finish
Sliced Almonds
Fresh Sprigs of Mint
Instructions
Puree the mango with 1/4 cup maple syrup and set aside.Coarsely mash the raspberries with 1/2 the maple syrup and set aside. Find 4 glasses or bowls to arrange the dessert, parfait style and divide the mango mixture into 4 parts and place on the bottom of the bowl.
To prepare the pudding heat the coconut milk with the almond milk and bring to a simmer. Add in the tapioca and the brown sugar and cook for about 5 to 7 minutes, until the tapioca is soft and thick.
Let the mixture cool for about half an hour.
Pour evenly over the mango mixture.
Top with the raspberry mixture and chill.
Garnish with sliced almonds and mint and serve.3.1http://www.spicechronicles.com/maple-coconut-tapioca-pudding-with-mangoes/


The post Maple, Coconut, Tapioca Pudding with Mangoes with a pause… appeared first on Spice Chronicles.
May 15, 2017
Creamy Vegan Linguini with Loads of Veggies
[image error]This recipe was something I had developed for my vegan cooking class, at the Hilltop Hanover Farm. I have to confess, I was totally bowled over by the creamy indulgence and rich depth of flavor this dish offered. I had some extra hummus on hand and tried using this as a sauce. The results were quite incredible. Rich tasting, well-seasoned and satisfying!
It has actually taken me some time to get my act together and post this recipe. We will be having a house guest for the next few months. It is the first time, I am hosting someone for so long, outside of my mother and mother-in-law and one way or the other this will teach me how to plan. At least, so I would like to believe.
[image error]
As with everything, I still lust and pine for that eternal well planned life. It started with the days of the palm pilot, yes, believe it or not I actually had one of those. I will confess, probably if I spent less time in the kitchen my life would be simpler. My hours in the kitchen are attributed to more than just the creativity that fuels this site. I enjoy cooking, and consequently we do not have a culture of take out in our household. The closest thing with have to take out routine is Sushi on Mondays. That is because the kids do piano lessons pretty close to their favorite Sushi spot.
It is for days when you want to cook, and want to make sure the family is well fed that this pasta dish comes in handy. It will fill and fit into all your favorite nutritional boxes. It will bring to your table a dish that is rich tasting, satisfying and full off the goodness of a balanced palate of veggies.
PrintCreamy Vegan Linguini with Loads of Veggies
Prep Time: 15 minutes
Cook Time: 25 minutes
Total Time: 40 minutes
Yield: 4 to 6 servings
This pasta is made with a deep rich sauce using hummus as a base. They pasta is made with a chockful of vegetables, garlic, sun-dried tomatoes. The sauce is rich and soft. There is just one caveat you need to eat it fairly quickly. The sauce thickens as it settles and unlike a traditional cream based sauce this does not work well for the pasta.
Ingredients
10 oz dried linguini¼ cup extra virgin olive oil
1 tablespoon freshly chopped garlic
1 tablespoon freshly chopped rosemary
4 scallions chopped, white and green parts separated
1 cup of chopped broccoli florets
1 cup of mushrooms, thickly sliced
¼ cup chopped asparagus
½ cup chopped sun-dried tomatoes in oil, drained
½ cup hummus, homemade or store bought
¼ cup toasted almonds or pine nuts
1 teaspoon red pepper flakes
½ cup chopped cilantro
Instructions
Heat plenty of water in a large cooking pot. Add in 1 teaspoon of salt. Bring to a boil and cook the linguini for about 7 minutes, until al dente. Reserve about 1 cup of the water and drain.In a large wok or cooking pot, heat the olive oil and add in the garlic and gently toast until fragrant for about 45 seconds. Add in the red onion and sauté for about 2 to 3 minutes.
Add in the rosemary and the scallion greens and cook for another minute.
Add in the broccoli, mushrooms and sundried tomatoes and cover and cook for 4 minutes.
In the meantime, mix the hummus with the reserved cup of pasta water.
Add the linguini to the broccoli mixture and toss well. Add in the hummus sauce and mix well. Add in the scallion greens, almonds or pine nuts, red pepper flakes and the chopped cilantro and mix well.
Serve immediately.
3.1http://www.spicechronicles.com/creamy-vegan-linguini-with-loads-of-veggies/


The post Creamy Vegan Linguini with Loads of Veggies appeared first on Spice Chronicles.


![[image error]](https://i1.wp.com/www.spicechronicles.com/wp-content/uploads/2014/08/Eggplant-Pilaf-sq500.jpg)