
Rinku Bhattacharya's Blog, page 55
March 14, 2017
Maple Sesame Chicken from The Migraine Relief Plan
[image error]The Migraine Relief Plan is a new offering from my dear friend Stephanie Weaver at Recipe Renovator. I will tell you about my new favorite Maple Sesame Chicken very soon!
In Stephanie’s posts and offerings, she has been talking Migraine Relief for a while.
In fact, Stephanie talks about about clean eating and healthy living in general. Stephanie is An author, blogger, certified wellness and health coach. She has a Master of Public Health in Nutrition Education and has dedicated her life to eating well and living healthfully.
This book is a comprehensive offering that synthesizes her research, knowledge and offerings. It is clear, well researched cookbook that offers you an 8-week transition plan to reducing migraine frequency and severity.
[image error]
Elements of this plan includes, 75 delicious recipes covering all four meals, shopping lists, tips and techniques. As with all good cookbooks, this book offers healthy recipes for anyone wanting to expand their culinary universe. A gluten-free, low sodium, delicious for meatloaf? I am in! The recipes are gluten-free and low in sodium.
[image error]
As I mentioned, this cookbook can be adapted for most diets that need measurement as the recipes offer a very good nutritional analysis at the bottom. Having said that, you know I would not really share a recipe, if it was not delicious! This Maple Sesame Chicken is something that you will make again and again. It is easy, flavorful and made with mostly pantry staples.
[image error]
I resisted the urge to monkey around with the recipe. I made just one substitution – swapping fresh ginger for the dry as I do not really have any dry ginger on hand. I am probably just a little late in posting this recipe, but I cannot think of a better creation on a snowy and wet day.
[image error]
The smoked paprika is a brilliant addition adding a nice dose of brightness and flavor. I had it over jasmine rice, but will try it with the chard next time. Without much ado, here is the recipe! Make it and try the others in the book!
PrintMaple Sesame Chicken from The Migraine Relief Plan
Prep Time: 25 minutes
Cook Time: 45 minutes
Total Time: 1 hour, 15 minutes
This Asian-inspired glaze is close to teriyaki without being sticky-sweet.
Ingredients
1 bunch green onions2 tablespoons white vinegar (see Cooks’ Note)
2 tablespoons pure maple syrup
2 tablespoons toasted sesame oil
2 cloves garlic
1 teaspoon smoked paprika
1 teaspoon garlic powder
1/2 teaspoon ground ginger
13/5–2 pounds (0.8–1kg) boneless, skinless chicken thighs (5–6 thighs)
1 tablespoon coconut oil
2 tablespoons dry toasted tan sesame seeds
Instructions
Remove the roots and tips from the green onions. Cut the white parts into chunks and put them in a blender. Slice the green parts thinly and set aside.To make the marinade, add the vinegar, maple syrup, toasted sesame oil, garlic, smoked paprika, garlic powder, and ginger to the blender and blend, along with the white parts of the onion, until smooth.
Put the chicken in a large bowl. Pour marinade over chicken. Cover the bowl with plastic wrap and marinate in the refrigerator for at least 30 minutes and up to overnight.
Heat the coconut oil in large nonstick lidded skillet set over medium heat until shimmering. Add the chicken pieces and cook for 5 minutes on each side, or until browned.
Drizzle any remaining marinade from the bowl over the chicken and sprinkle the reserved sliced green onions, stirring to coat chicken. Then, partially cover the pan and reduce the heat to medium–low. Cook for 10 minutes, turn the chicken, and cook for 10 minutes more. Leave a small opening between the cover and the pan so some of the steam can escape.
Remove lid from chicken pan to check chicken for doneness. Cook just until done, either by checking with a meat thermometer for 165°F (74°C), or by cutting open. Sprinkle sesame seeds over. Remove from the heat.
Serve right away or store in the refrigerator for up to 3 days.
Notes
Recipe from the Migraine Relief Plan: An 8-Week Transition to Better Eating, Fewer Headaches, and Optimal Health
3.1http://www.spicechronicles.com/maple-sesame-chicken-migraine-diet-cookbook/


The post Maple Sesame Chicken from The Migraine Relief Plan appeared first on Spice Chronicles.


Turkish Lentil and Eggplant Stew
[image error]I had spied the original version of this Turkish Lentil and Eggplant stew at the food and wine magazine.
I loved the concept. Luscious eggplant, soft lentils and sweet and sour pomegranate molasses, all seemed like a perfect match made in heaven. I was hooked! As with all things, I tweaked this just a little. A little more tomato and some crushed almonds for garnishing and some more herbs for good measure and a star was born.
My children or at least my son, is not a huge fan of eggplant. I keep trying to find ways to get him to learn to enjoy this rich vegetable. This is a summer dish, perfect for those months when the garden is flowing with tomatoes and eggplants. This stew is best made a day earlier, reheated and garnished just before serving.
[image error]
I made a large batch of this stew over the weekend, which is just as well. My visit to the dentist resulted in tooth extraction today. As I rest in bed feeling sorry for myself, this will sustain the husband and the brood for today and snowy tomorrow. I did loads of cooking over the weekend, so I am good for the next couple of days. I am suddenly surprisingly busy, as I get ready to wrap up things here for a new beginning.
[image error]
As, I pick up this recipe again, I realize that I have slept away a lot of the snowy day. Every one in the house feels well rested today. The verdict on this dish was that the daughter did not rave but did take seconds. The husband actually loved it, and the son well, he grudgingly finished it. As for me, I think this dish is relatively easy to assemble with a little planning, I loved its sweet and savory flavors, and love the fact that it adds brightness to the table. Turkish Lentil and Eggplant stew is but a keeper!
PrintTurkish Lentil and Eggplant Stew
Prep Time: 1 hour
Cook Time: 1 hour, 30 minutes
Total Time: 2 hours, 30 minutes
A very fragrant and flavorful stew, that is great served the next day.
Ingredients
For the lentils3/4 cup brown lentils (soaked for 2 to 3 hours)
salt
For the tomato Sauce
1/4 cup olive oil
1 medium sized red or yellow onion, finely diced
4 to 6 cloves of garlic
2 teaspoons freshly ground cumin (optional)
8 medium sized tomatoes such as ripe Roma tomatoes
1/4 cup fresh chopped mint
1 tablespoon chopped thyme
1 tablespoon crushed red pepper flakes
1 teaspoon salt or to taste
For the eggplant and assembly
3 medium sized young eggplants (about 1 and 1/2 pounds)
1 tablespoon kosher salt
1/4 cup olive oil
1/4 cup pomegranate molasses
1/4 cup chopped parsley or mint
1/3 cup sliced or slivered almonds.
Instructions
Boil the lentils in 2 cups of water and salt, until partially cooked. Drain and set aside.Heat the 1/4 cup olive oil and add in the onion and the garlic and saute for about 5 minutes until soft and translucent.
Add in the tomatoes, mint, thyme, red pepper flakes and salt and cook for about 15 minutes, until the tomatoes are soft and the sauce has begun simmering and thickens slightly.
Slice the eggplant and place in a colander and sprinkle with the salt and allow it to rest for about 30 minutes. This can be done at the beginning if you wish.
Blot with paper towels to remove any excess moisture.
To assemble, place some of the tomato sauce at the bottom of a heavy bottomed pot (with a tight fitting lid). Add in a layer of the eggplants, drizzle with a little olive oil and add in the lentils. Follow this order ending with the tomato sauce until all the ingredients are used up.
Top with the pomegranate molasses, drizzle with the remaining olive oil. Cover the pot tightly and cook over low heat for an hour and half.
Let the stew rest for another 30 minutes or a couple of hours before serving.
To serve mix in the chopped parsley or mint, garnish with the almonds and serve with crusty bread.
3.1http://www.spicechronicles.com/turkish-lentil-eggplant-stew/


The post Turkish Lentil and Eggplant Stew appeared first on Spice Chronicles.
March 12, 2017
Pulled Lamb Mediterranean Nachos
[image error]These layered pulled lamb Mediterranean nachos are amazing! They cost me a casserole dish! Inspired by samples of pita bread I received from Toufayan bakeries, who knew!
By posting this recipe I am entering a contest hosted by recipe redux and Toufayan Bakeries.
I was excited to try the offerings as Toufayan is a family owned business and they have a nice assortment of pita flavors. I am positively hooked on to the sweet onion flavor, and the multigrain and the sprouted wheat… Well, I think you get the drift of things. This dish is a double layered creation. It goes something like this – pita chips, layered pulled lamb, pita chips, feta and the good stuff.
[image error]
The casserole I picked was not meant for the hot and cold treatment and shattered on the second round. Luckily for me and Aadi my son who seems to be in love with this dish, I just lost a small amount of the stuff.
[image error]
As I wait for the world to get crazier – yes, I have dental work pending tomorrow. Nothing seems scarier, more worrisome and painful. I hate visiting the doctor, and it seems like that is all I have been doing the past few weeks. Thank heavens for all this versatile, healthy pita bread! Thank heavens for this brilliant brainwave of Mediterranean Nachos.
This recipe might take a little time to piece together, but it feeds an army. Most of the lengthy cook aka the lamb is done unattended. I now have a truckload of home made pita chips. We shall be putting to good use over time.
[image error]
Someone had told me, that I just needed to get through January and things would fall into place. I am not sure about whether that is completely true, but things are as they say headed in the right directions. Baby brother tells me that wedding bells might be ringing!
[image error]
So, before long we might be into lamb season, with Passover and Easter. This recipe might be a great crowd pleasing creation, knocking right at your door.
PrintPulled Lamb Mediterranean Nachos
Prep Time: 20 minutes
Cook Time: 2 hours, 20 minutes
Total Time: 2 hours, 40 minutes
A beautiful creation of fresh pita chips, shredded lamb, feta cheese and fixings. These Mediterranean nachos will hit the spot!
Ingredients
For the lamb2 tablespoons olive oil
1 teaspoon whole cumin seeds
1 large onion thinly sliced
6 cloves of garlic, thinly sliced
4 to 6 lamb loin chops (about 1 and 1/2 pounds of lamb)
1 teaspoon salt or to taste
1 tablespoon dried oregano
1 teaspoon red pepper flakes
For the pita chips
4 loafs of toufayan sweet onion or multigrain pita
olive oil to drizzle
For the rest of the toppings
1/2 cup crumbled fresh feta cheese
1 cup chopped tomatoes
1 medium sized cucumber peeled and diced
2 tablespoons chopped red onion
2 tablespoons chopped fresh parsley
Instructions
Heat the olive oil and add the whole cumin seeds and wait until the seeds begin to sizzle. Add in the onion and the garlic and cook for 5 minutes.Add in the lamb chops and cook for 4 to 5 minutes until the lamb chops are well browned.
Add in the salt, oregano and red pepper flakes and 1 cup water. Cover and cook the lamb for 2 hours on very low heat until the lamb is very tender. You can use a pressure cooker to speed up the time.
Remove the lid and cook until all the water is absorbed. Cool and shred the meat.
While the lamb is cooking, pre-heat the oven to 350 degrees. Cut the pita bread into pieces and separate the layers Sprinkle with olive oil and bake for about 6 to 7 minutes until crisp.
To assemble in a deep bake proof casserole add a layer of pita chips, add the shredded lamb. Cover with more pita chips and add the crumbled feta cheese, and chopped tomatoes. Bake for about 10 minutes until the feta cheese has melted.
Toss with the cucumbers, red onions and parsley! Serve hot and enjoy!
3.1http://www.spicechronicles.com/pulled-lamb-mediterranean-nachos/


The post Pulled Lamb Mediterranean Nachos appeared first on Spice Chronicles.
March 5, 2017
White Bean Puree with Oven Roasted Tomatoes – An pretty easy solution
[image error]This creamy white bean puree with oven roasted tomatoes has been resurrected from the past and gussied up. I do a lot of this resurrection stuff in the kitchen. Often to simplify recipes, in today’s instance, to add a little pizzaz to an old favorite.
What a crazy ride and looks like things are finally settling down, and spring might just be a welcome change. The girl is this close to her fourteenth birthday and if the last few weeks are any indication, she plans on making her teenage years very memorable for me.
[image error]
Next week is a big week for Deepta, but, I shall share all about it next week. Once I have a little more intelligence on her whereabouts.
The original version of this dip was created when I was back to slow cooking. I use my slow cooker happily and extensively all through the year. It is less about fixing and forgetting, since I do tend to supervise and nurture the dish, it is mostly about the quite cooking that does not generate a lot of heat.
I have revived and improved this fish curry that I made last year and of course made this mint and cashew nut slow cooked chicken curry
[image error]
A few days ago, I made this French inspired lovely white bean spread, but I left the slow cooker out of the equation. It is surprisingly creamy, mostly the soft combination of white beans with olive oil and keeps fairly well in the refrigerator. The roasted tomatoes and the baguette come together to make it a light and complete meal. The kind we dream and wait for. This was another successful snack accomplished on a busy day. The puree was whipped together in a blender rather than a food processor giving it a truly, dreamy, creamy texture. This one will stay and keep us happy on many busy days to come.
PrintSlow Cooker White Bean Dip
Prep Time: 10 minutes
Cook Time: 3 hours
A easy and satisfying white bean dip that is rich and healthy without any effort.
Ingredients
For the tomatoes1/4 cup cherry tomatoes
3 tablespoons extra virgin olive oil
For the bean puree
¾ cup white beans ( I used northern and cannelloni beans)
1 teaspoon salt or to taste
2 cups vegetable stock
4 cloves garlic
1 teaspoon freshly chopped rosemary
1 tablespoon chopped thyme
1 teaspoon red pepper flakes
2 tablespoons chopped parsley
1/2 cup extra virgin olive oil
½ lime or lemon
To serve and garnish
1 baguette sliced
Chopped basil or parsley
1 tablespoon chopped fresh parsley
Instructions
Pre-heat the oven to 400 degrees. Place the tomatoes on a baking sheet. Drizzle with olive oil and bake for 25 minutes, until the tomatoes are soft and wrinkled.Place the beans with the salt, vegetable stock and garlic and cook until very tender. This will take about an hour and half on the stove top or 25 minutes in the pressure cooker.
Cool the beans and add to a blender with about 1/4 cup of the cooking liquid or water. Add in the rosemary, thyme, red pepper flakes and the olive oil and blend until smooth.
Lightly toast the baguette if desired.
To serve, spoon the puree over the baguette, top with one or two tomatoes and sprinkle with a little chopped basil.
Place in a blender and add all but 1 tablespoon of the oil.
Squeeze in the lemon juice and blend until smooth.
Notes
The cooking time is done is the slow cooker.
3.1http://www.spicechronicles.com/white-bean-puree-oven-roasted-tomatoes/


The post White Bean Puree with Oven Roasted Tomatoes – An pretty easy solution appeared first on Spice Chronicles.
February 22, 2017
Crispy Fish Tacos for Recipe Redux
[image error]These crispy fish tacos were made last evening. The theme for this month’s recipe redux, is taco tuesday, offering me the perfect inspiration. I have been craving fish fry, and creating crispy fish tacos gave me the perfect excuse to enjoy them as a meal.
A long day of sorts, I came home feeling a little under weather. I was not really sure if I was up to assembling the crispy fish tacos, but all of this actually ended up being easier than I thought. My best part of creating this dish was the cilantro lime crema. The problem – the creama is so good and easy to whip together. We have a new condiment on the table.
This ensemble easily comes together with shredded lettuce and carrots, pickled red onions, fried crispy fish and the crema. I made a largish batch of the breaded fried fish. We are looking at more tacos over the weekend. That way we can get a decent bright picture going.
[image error]
The kids like tacos, and in our house they tend to be more of a weekend thing, rather than a Tuesday kind of thing. Tuesdays or for that matter most weekdays are for uncomplicated things. Food that can be found without much fuss, a combination of staples and pre-made things. What about you? Are tacos a regular on your Tuesday table?
[image error]
As for this green salad, it is a new thing that kids suddenly seem to have rediscovered. I can tell that this time of the year, they start missing the garden, the fresh veggies in general. Don’t we all? Most of the lettuce in spring in our house gets treated simply, much like this green salad. I made the salad this weekend with the lasagna for the robot gang.
Another recipe waiting to find its place on this blog.
PrintCrispy Fish Tacos for Recipe Redux
Prep Time: 1 hour
Cook Time: 15 minutes
Total Time: 1 hour, 15 minutes
A crispy fish taco for taco Tuesday.
Ingredients
Pickled Onions1 red onion, thinly sliced
1/2 cup cider vinegar
For the Crema
1/2 cup sour cream
1/2 cup low fat mayonnaise
1 cup chopped cilantro
1/2 jalapeno
1 teaspoon freshly ground cumin
2 cloves of garlic
For the fish
2 cloves garlic
1/2 red or white onion
1/4 cup chopped cilantro
1/2 jalapeno
1/4 cup all purpose flour
1 egg
Salt to taste
1 and 1/2 pound snapper fillets
1 cup dried breadcrumbs
Oil for Frying
Greens
1 cup chopped lettuce and carrots
6 whole wheat soft tacos
Instructions
Mix the onions with the vinegar and set aside for at least 15 minutes. These keep well in the refrigerator for 2 weeks.Place the sour cream, low-fat mayonnaise, chopped cilantro, jalapeno, ground cumin and garlic in the blender and blend until smooth. Remove from the blender and store in a clean non-reactive container.
In the same blender, add in the garlic, white onion, chopped cilantro, jalapeno, all purpose flour, egg and salt and blend until smooth.
Cut the snapper fillets into 2 inch pieces and toss evenly with the seasoned batter. Coat uniformly with the dried bread crumbs, and place in the freezer for 15 minutes. The fish can be breaded and kept in the refrigerator overnight.
Heat the oil and fry the fish until golden and crisp.
To assemble, place the fish on the tacos, drizzle generously with the crema and toss with 1/4 of the greens.
Add in a few pickled onions and serve.3.1http://www.spicechronicles.com/crispy-fish-tacos-recipe-redux/


The post Crispy Fish Tacos for Recipe Redux appeared first on Spice Chronicles.
February 21, 2017
Strawberry Sondesh and a busy week ahead
[image error]This Strawberry Sondesh, is inspired by something my daughter imagined. Despite the rather motley pink color, they tasted really great.
I love berries. The strawberry influx this time of the year is unnatural inspired by valentine’s day I always pick some up. Deepta will be switching schools this fall, she has to decide which one. Luckily for her, she has obtained admission to all her three choices. She is tied between number 1 and number 2.
So she is wished for Strawberry Sondesh, maybe to help her make up her mind?
To infuse the strawberry sondesh with the strawberry flavor, I prepared a syrup with strawberry and maple syrup. I have to confess the concoction was so good, I ended up having about 1/3 of it plain, and mixed the rest into the sondesh.
[image error]
I did this batch in a huge hurry, but realized along the way that the best temperature to work with sondesh molds is to ensure that the sondesh is just a little cooler. Does not surprise me, as a Bengali confectionery it will not be the hand scarring kind. Today, all things considered was a good day, had a great peaceful afternoon, complete with Sondesh.
[image error]
Tomorrow is a dreaded doctor’s appointment! Nothing wrong with me, just do not like visiting doctor’s and dentists. The kids plan on spending the rest of the week, roboting, let us hope they remain thinking children after all this. I see long hours in the kitchen, thank goodness, I love to cook. But you know that already.
The key to sondesh is good channa or homemade paneer, here is my quick video on that. Just realizing that I need more than cooking to ground me this week. I have been craving all things comforting, the newest craving has been for fish fry.
PrintStrawberry Sandesh and a busy week ahead
Prep Time: 1 hour, 10 minutes
Cook Time: 25 minutes
Total Time: 1 hour, 35 minutes
A strawberry infused version of the Bengali Sondesh.
Ingredients
1/2 gallon whole milk2 limes
1 cup hulled strawberries (about 8), plus one or two for garnishing
1/4 cup maple syrup
1/4 cup sugar
Instructions
Heat the milk in a large wide bottomed pot until it comes to a rolling boil. Turn off the heat and squeeze in the lime juice gradually. Do this with each lime half at a time, and stir to separate. When the milk separates into milk solids and greenish whey.In the meantime place the strawberries and the maple syrup in a small sauce pan and simmer for about 5 minutes, until the strawberries are soft and mushy. Mash the mixture with the back of the spoon to mix well.
Chop the remaining 1 or 2 strawberries into small pieces to garnish.
Gather the solids into a cheesecloth and let the fresh paneer drain for a couple of hours. Knead the drained paneer for 5 to 10 minutes until it is very smooth and your fingers get tinged with the milk fats.
Place the mixed paneer in a heavy bottomed pan. Add in the strawberry maple mixture and the sugar and cook for 6 to 7 minutes, until the mixture begins leaving the sides of the pan.
Shape into decorative shapes using a mold or shape into round balls.
Cool thoroughly and garnish with the chopped strawberries and serve.
3.1http://www.spicechronicles.com/strawberry-sondesh-and-a-busy-week-ahead/


The post Strawberry Sondesh and a busy week ahead appeared first on Spice Chronicles.
February 19, 2017
Sunday Yogurt Chicken Curry – For the brood
[image error]When we visited India this year, the unthinkable happened. The daughter tried and loved Paneer Butter Masala. This love later extended to Butter chicken, resulting in this dish which is infinitely healthier and is what we call our Sunday Yogurt Chicken Curry. I make this so often from instinct that I never really thought of blogging it. Recently I posted a picture on instagram and it caught Sharmila’s eye. She asked for the recipe and here it is.
Other than trying to make a healthier dish that the daughter would like, I really had not given much thought to the dish, but it essentially is a very simple fragrant creation, that gets most of its flavor from a few fragrant spices – cinnamon, cloves and bay leaves. It’s color from tomatoes and Kashmiri chili powder. I used to add coconut milk to this curry once upon a time, but now have realized that it really does not need that extra level of fat.
[image error]
Every household needs one or two dishes that are guaranteed to please the kids, and come together quickly. This dish is one such in my household. It is best served with steamed white rice or any kind of chapati or other Indian bread. I have found the flavor improves considerable if you can marinate the chicken overnight. I have also done it without the marinating and it tastes fine. The addition of the kasuri methi, or dried fenugreek leaves makes a huge difference so do not skip it.
[image error]
The robot season is drawing to an end. I shall miss the chaos. I shall also miss my weekend me time and the time I have had to create so many fun dishes. Maybe, I can use the time to write up some of these fun creations. At the end of the day, it is sometimes just about finding they moment and the inspiration.
PrintSunday Yogurt Chicken Curry
Prep Time: 4 hours, 10 minutes
Cook Time: 45 minutes
Total Time: 4 hours, 55 minutes
A flavorful Sunday chicken curry, that is healthy and easy to to put together.
Ingredients
1 and 1/2 cups whole milk yogurt, separated1 teaspoon ground black pepper
1 tablespoon kashmiri red chili powder
1 and 1/2 teaspoons garam masala powder
2 pounds of boneless skinless chicken thighs cut into 2 inch pieces
2 teaspoons salt or to taste
1 large tomato
1 tablespoon freshly grated ginger
2 to 3 cloves garlic
1 green chili
3 tablespoons oil
1 red onion, diced
2 inch piece of cinnamon, broken
4 bay leaves
1 tablespoon dried fenugreek leaves
1 tablespoon freshly ground black pepper
Chopped cilantro
Instructions
Mix 1/2 cup yogurt with the black pepper, 1 teaspoon Kashmiri red chili powder, 1 teaspoon salt and the garam masala powder and marinate the chicken for 2 to 3 hours.Take the remaining yogurt, Kashmiri red chili powder, salt, tomato, ginger, garlic and green chili and blend until smooth and set aside.
Heat 1 tablespoon of oil in a large skillet and place the chicken pieces in a single layer and sear for 3 to 4 minutes on each side.
Remove from the pan and the remaining oil in the same pan and add the onion and saute for about 5 minutes. Add in the cinnamon and bay leaves and saute for another 3 to 4 minutes.
Add in the yogurt mixture and the chicken and mix well. When the mixture begins to simmer, cover the pan and cook on very low heat for 30 minutes. This does not need much attention, but do not rush the process.
Remove the lid and add in the fenugreek leaves and the black pepper and mix well. Cook for another 5 minutes.
Serve garnished with the cilantro.
Notes
Most of the prep time is for marinating the chicken.
3.1http://www.spicechronicles.com/sunday-yogurt-chicken-curry/


The post Sunday Yogurt Chicken Curry – For the brood appeared first on Spice Chronicles.
Seriously Addictive Potato Chickpea Fries or Bengali Potato Fritters
[image error]This recipe for Bengali Potato Fritters is as essential and as basic as it gets. These potato fries are seriously good!
Hence we also call them Seriously Good Potato Fries.
They are a classic Bengali snack and can be done with any vegetable of your choice the popular favorites being eggplant, pumpkin and potatoes. This particular variation comes to me from my father’s neighbor. My grand mother (thakuma) lived away from the main city and visiting her was usually a planned affair that extended over a day. Their old neighborhood still retained some vestiges of the simplicity of village life. When we visited various people dropped by to chat or just say hello. Without any invitation of warning.
[image error]
One of the places we always stopped by was Loti-di’s home. She was a distant relative who lived adjacent to my grandmother. Widowed at an early age, she had no children and enjoyed living vicariously through my grandmother’s brood. Despite her spartan pantry, these treats were always available on short notice. She did not peel the potatoes and the skin in these fritters add an amazing layer of complexity. Spiked with bits of green chilies, she often offered these with puffed rice or muri and small cups of tea. The ratio of vegetable to batter is important, it should have a thin crisp outer coating enveloping soft well done veggies.
These fritters tend to be huge staples when the rain clouds are dark and puffy and the scent of rain is in the air, the Indian monsoon is a season of palate tingling indulgence for crisp and savory fare, such as these crispy treats. In fact, snowy days incite the same kind of feelings, and I long for these crisp, addictive treats!
I like both eggplant and potato varieties, but as with everything else I eat, I tend to be partial to potatoes. Somewhere a few weeks back, the husband was running fever and needed to get to the immediate care facility. Actually, this was about a week before, the cat and his Christmas day visit to the kitty emergency center. Well, the problem with our house like most houses is that one of the grown ups are sick. It is not quite so easy for the other partner in crime to leave the house and take the sick grown up to the doctor. Taking the “thus far” well little ones to such a place is just asking for trouble.
[image error]
Anyhow, one of the husband’s friends obliged and took him over, so to thank him for spending the Sunday helping us out I made these addictive crispy potato fries. Interestingly, enough even in the midst of actually transcribing the recipe I ended up with a bout of the flu. These fritters tends to be our go to comfort food, and the best part of these fries is that I do not even peel the potatoes. They are always a great hit with the kids!
Once you try them, you will know what I mean. These are great in lieu of french fries, and if you eat them the way we do, you will drizzle some tomato ketchup for dunking and we will be in business.
PrintSeriously Addictive Potato Chickpea Fries or Bengali Potato Pakoras
Prep Time: 10 minutes
Cook Time: 25 minutes
Total Time: 35 minutes
A comforting and addictive rendition of fried potatoes with crisp chickpea batter coating and onions and spices to seal the fun.
Ingredients
3/4 cup of chickpea flour, sifted2 tablespoon rice flour
1 and 1/2 teaspoon salt
1 and 1/2 teaspoon nigella seeds or cumin seeds
3/4 teaspoon turmeric
1/2 teaspoon of red cayenne pepper (if you like it spicy, you can up this to 1 teaspoon)
2 tablespoons chopped cilantro (leaves and tender stems)
2 green chilies, minced
3/4 cup of lukewarm water
1/2 red onion, finely chopped (about 1/2 cup)
Canola or grape seed oil for frying (about 1 cup)
4 medium sized potatoes, thinly sliced (Use organic potatoes, scrub the skins and leave them on)
Instructions
Place the chickpea flour and rice flour in a mixing bowl and add in the salt, nigella or cumin seeds, turmeric, red cayenne pepper and stir well.Add in the lukewarm water and mix well enough to make a smooth batter, thick enough to coat the fries but not too thick.
Stir in the red onion, chopped cilantro and green chilies mix well.
Place the canola oil in a heavy bottom skillet, heat until a dropped bit of the batter, sizzles, dances and crisps up easily.
Dip the potato pieces into the batter to coat uniformly and place in the cooking oil. Add enough to fill the pan leaving enough room to allow the fries to be turned without crowding the skillet. Cook the fries on each side for about 2 to 3 minutes, until crisp and nicely golden. Turn and cook on the other side. These need to cooked in batches and with care to allow the batter to get crisp.
Carefully remove with a slotted spoon and drain on paper towels before serving.3.1http://www.spicechronicles.com/seriously-addictive-potato-chickpea-fries-bengali-potato-fritters-pakoras/


The post Seriously Addictive Potato Chickpea Fries or Bengali Potato Fritters appeared first on Spice Chronicles.
February 17, 2017
Triple Herb Quinoa and Vegetable Chili_Chili and Cornbread Part II
[image error]This triple herb and quinoa chili has a few avatars, but this one is usually my tested and tried one. An heirloom recipe of sorts, it is served with my Sunshine Cornbread, that I had shared here. The journey from arrival to assimilation usually sums up the immigrant experience. My tale is no different. Along the way it is littered with my own unique memories that I carry with me into my kitchen onto our family table.
Food to me is always about context, after all without context there is no meaning. As we get into those evenings of snow and cool spring rain, I welcome the weather with soups and my favorite vegetarian chili. This vegetarian chili is a a memory of a meal that started a deep relationship of sorts.
Of course as I post this tale of assimilation and affection, I cannot help wondering, how American is chili, really? So thank you, Sundar Pichai, as I take a minute to search chili. I find chili cook offs, and musings. Like most traditional dishes and their origins, no real conclusions. This chili complete with a side of cornbread was one of the first winter meals I enjoyed with Bev and Stan. A family that became a surrogate family to me. A surrogate family broadens your boundaries and culinary horizons.
[image error]
Indeed, it was Bev and Stan who helped me shop for and find my first apartment and later my first condominium. They were always there when I needed someone to help me with a second opinion. In my days a novice cook, Bev helped me learn to shop for basics and set up a kitchen. In turn, I taught her the secrets of spices. We often spent cold evenings together savoring comforting bowls of chili.
When I first sampled this chili, I did not even realize that this bean stew had a distinct name. Bev had thought of serving it as the flavors were comforting and closer to home for me. Indeed, now that I have absorbed these flavors and made them my own, I realize the common overtones.
The concept of a legume rich dish, with all the fixings would indeed be very much at home on the North Indian table. This makes it a dish that my (north Indian) husband enjoys greatly. Since, Bev was mostly familiar with the Northern highlands of Southeast Asia (having lived in India and Pakistan) for several years, her association was spot on.
[image error]
As with all dishes, you make your swaps. I use quinoa instead of the bulgur from the original recipe. We lost Bev and shortly a few months later Stan both 91 years old. They had touched many lives in many parts of the world. Theirs was a full life that was well lived. I have many fond memories of many meals from them but this cornbread and chili done my way is probably my most memorable meal attached to this relationship.
My kids call this chili Grandma Bev’s vegetarian chili. A chili that is as warm and comforting as the person it is named after and as flavorful and vibrant as our adopted relationship.
PrintGrandma Bev's Vegetarian Chili
Prep Time: 15 minutes
Cook Time: 1 hour, 30 minutes
Total Time: 1 hour, 45 minutes
Yield: Serves 8 people
A thick and hearty vegetarian chili, best served on that cold and wet day.
Ingredients
1/3 cup olive oil2 medium onions, chopped
2 tablespoons minced garlic
1 tablespoon freshly ground cumin
1 teaspoon red cayenne powder or to taste
1 tablespoon smoked paprika
1 tablespoon chopped oregano
1 tablespoon chopped thyme
2 to 3 bay leaves
4 cups chopped diced tomatoes (about 8 tomatoes)
1 tablespoon tomato paste (optional, but helps with thickness)
2 bell peppers, seeded and coarsely diced
2 carrots, peeled and diced
2 cups of cooked pinto beans
1/2 cup quinoa
1 and 1/2 teaspoon salt
1/2 cup chopped cilantro, plus extra to garnish
To garnish
Chopped cilantro
Sour cream
Grated cheese
Chopped scallions
Instructions
Heat the oil and add in the onions and garlic and saute well for about 5 to 7 minutes.Add in the cumin, the red cayenne powder and the paprika.
Mix in the oregano, thyme and bay leaves with the tomatoes and cook for 5 minutes.
Add in the tomato paste, bell peppers, carrots and pinto beans and 1 cup water.
Stir in the quinoa and salt and simmer the chili for 1 hour and 15 minutes, stirring occasionally, adding more water if needed. Check for seasonings.
Add in the chopped cilantro and mix well and simmer for another 15 minutes and serve with your choice of garnishes.
3.1http://www.spicechronicles.com/triple-herb-quinoa-and-vegetarian-chili/


The post Triple Herb Quinoa and Vegetable Chili_Chili and Cornbread Part II appeared first on Spice Chronicles.
February 10, 2017
Alu Kabli – Bengali Potato and Chickpea Salad
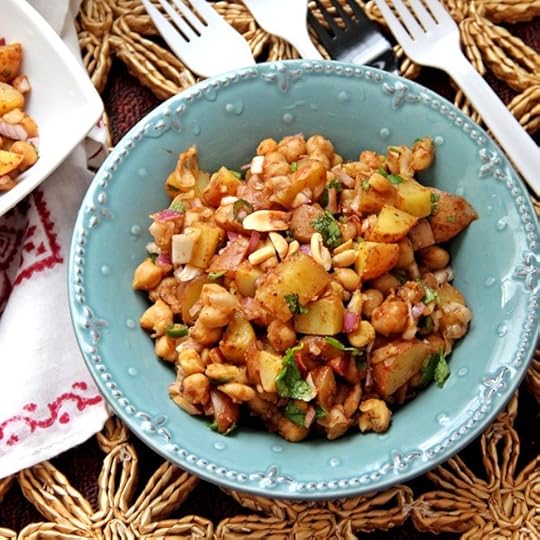 Alu Kabli is a street food or snack, usually savored on rainy days. It is a Bengali Potato and Chickpea salad. Not the wimpy dripping with mayonnaise kind, although there is definitely a place for that.
I made this today, to celebrate the snow day, and am entering it in a contest being sponsored by Potatoes USA and Recipe Redux.
Snow brings me memories of the monsoons. I remember our unbridled joy in playing in the rain, snacking on savory, spicy snacks such as this Alu Kabli.
Alu Kabli was also something that my mother sometimes made for us as a post school snack, combining the nutritionally dense potatoes with protein rich chickpeas. The result is a snack rich in fiber, potassium and energy boosting carbs.
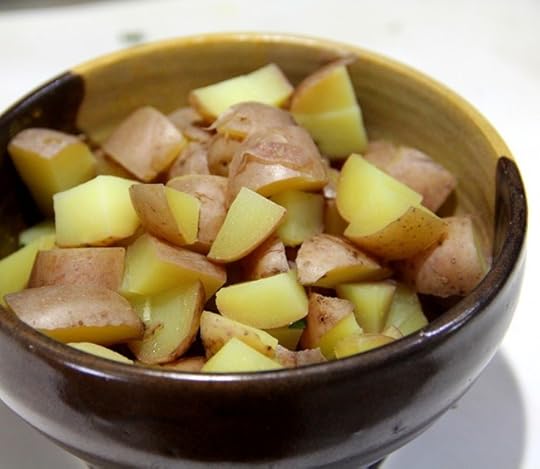
I love using thin skinned red potatoes for this spicy and savory snack. You can use any potato of your choice, even a combination of blue or Yukon Gold varieties. As the snow started falling today, I grabbed the bag of potatoes and placed them to boil. As the water began to simmer, I reflected on the carefree days of childhood. I still love to walk in the rain. Growing up and even today, we love our carbs and we love our spuds. They need to so little to gently bring out comforting soft goodness to our lives.
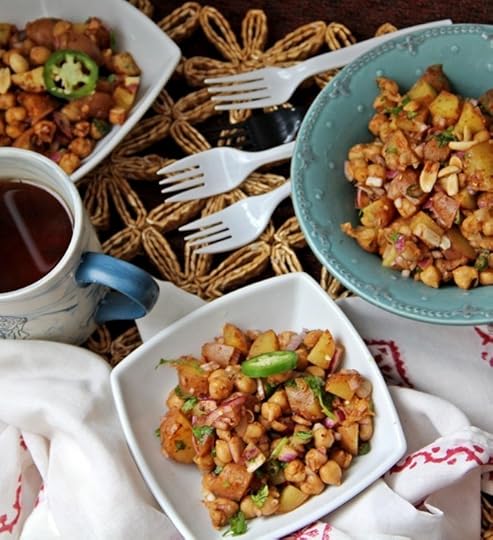
This zesty salad, combines deep tamarind, roasted cumin and cayenne with black salt to create a dressing that is not for the faint of heart. Try it on a cold snowy afternoon or even a hot one when you want a pick me up. A few bites and you will be convinced that all is well with the world. If you are like me you will want a good cup of tea to go with this one. Either way, enjoy your weekend, looks like today is a windy chili one.
PrintAlu Kabli – Bengali Potato and Chickpea Salad
Prep Time: 1 hour, 15 minutes
Cook Time: 20 minutes
Total Time: 1 hour, 35 minutes
Alu Kabli is a classic Bengali style potato and chickpea salad. A nourishing snack, perfect for anytime of the year.
Ingredients
1 and 1/2 teaspoon whole cumin seeds2 dried red chilies or 3/4 teaspoon red cayenne powder
1/4 teaspoon whole black peppercorns
1 tablespoon tamarind paste or 2 tablespoon lemon juice
1 and 1/2 teaspoon black or pink salt
3/4 pound of red skinned or other potatoes
3/4 cup cooked or canned chickpeas
1 small red onion, finely diced
2 or 3 green chilies, minced
3 tablespoons chopped cilantro
2 tablespoons toasted peanuts (optional)
Instructions
Roast the whole cumin seeds and the dried red chilies (if using) in a small skillet, for about a minute until fragrant and smoky. If you are using the red cayenne pepper do not add to the skillet, just roast the cumin seeds.Place the cumin seeds and chilies or cayenne powder and black peppercorns in a spice grinder and grind to a powder.
Place in a small mixing bowl. Ad in the tamarind paste or lemon juice and the salt and mix well and set aside.
Boil the potatoes until they are soft. Cool and dice and place in a large mixing bowl.
Add in the chickpeas, onions and the green chilies and mix well.
Toss with the tamarind dressing. Cool thoroughly. It is a good idea to chill this for about an hour.
Toss with the cilantro and peanuts if using.
Serve as a snack with your favorite rejuvenating beverage.
Notes
The prep time includes an hour for chilling.
3.1http://www.spicechronicles.com/alu-kabli-bengali-potato-chickpea-salad/


The post Alu Kabli – Bengali Potato and Chickpea Salad appeared first on Spice Chronicles.


