
Rinku Bhattacharya's Blog, page 36
July 21, 2019
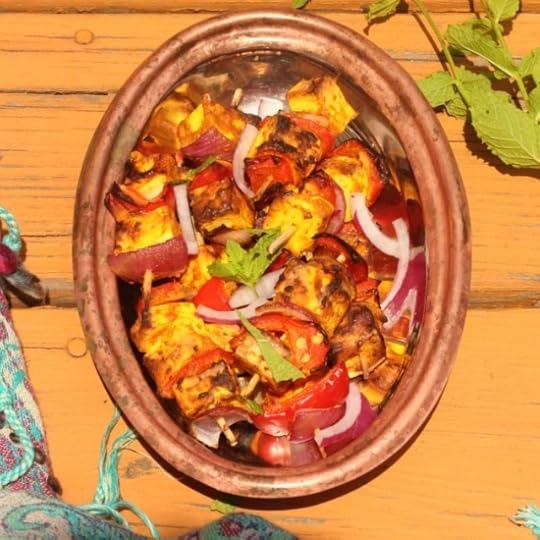
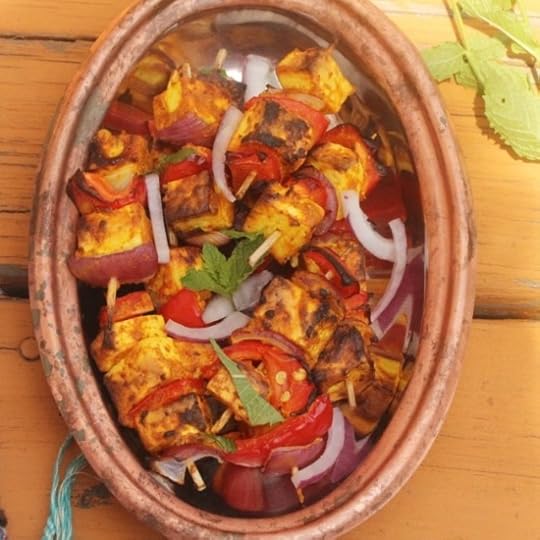
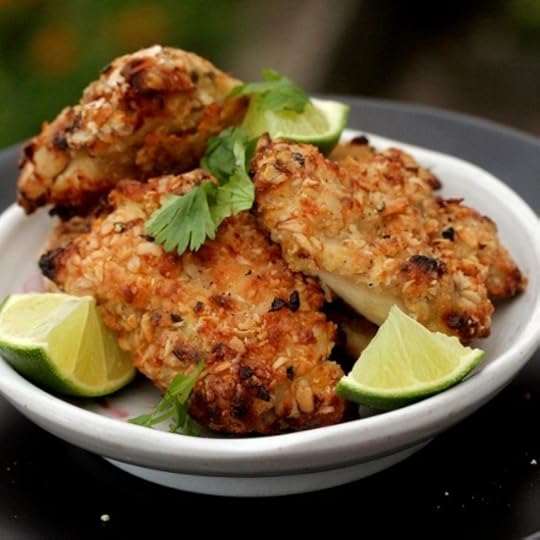
Paneer Tikka or Shaslik
 This recipe for cocktail paneer tikka can be done on the grill or in an air-fryer. This weekend I made this in my Mealthy CrispLid. By the way, the Mealthy products are still on sale on their website, prime day deals with free shipping and stuff. I plan meals a few days ahead, that is the only way I keep up with things. So, I had marinated the paneer and was ready to go, until the heatwave struck. Grilling was out, air-frying was in and all was well.
A shasklik or tikka is essentally a skewered kebab. Usually made with meat, this verson with paneer works well too. I wanted small bite sized skewers, so I used toothpicks for this. They worked very well. Just the perfect accompaniment for the loads of limeade we enjoyed this weekend. The skewers are great as a snack, they are perfect over rice or with a salad as a longer meal. I was good and visited the gym on Saturday, and then succumbed to the heat on Sunday. Ate and slept and watched a couple of versions of Pride and Prejudice. Amazing how many twists there are on the old favorite. I guess, it is a foodie version of the ever popular butter chicken.
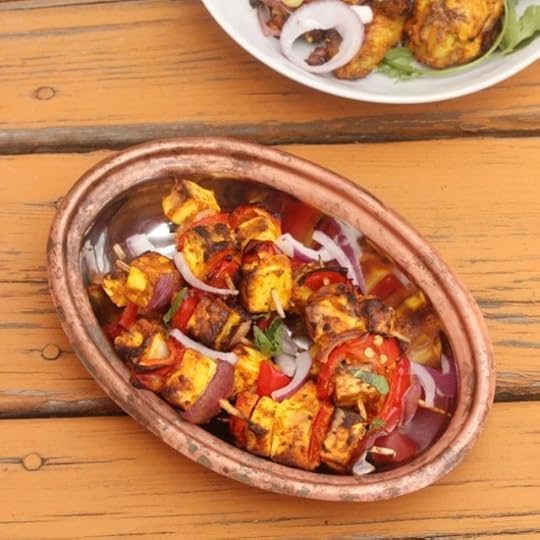
In making this recipe, I played around a little bit with the marinade. The flavors are very basic and uncomplicated. The bell peppers and onions add a nice touch to the mix. I did marinate the mixture overnight, mostly because I mixed things the night before. The actually cooking took less than 15 minutes. The skewering actually is a lot of fun and takes about 10 minutes to make 15 to 20 of these skwers. Easy on the eye, I am happy to have another party ready appetizer that is done without blocking the main oven.
If you like this recipe and want more ideas, do join my Indian Instant Pot Facebook group. Of course Instant Indian my Indian Instant Pot cookbook is ready for order, joining its siblings The Bengali Five Spice Chronicles and Spices and Seasons.
Do not forget to get social with me, Facebook, Twitter, Instagram, Pinterest and even Youtube.
PrintPaneer Tikka or Shaslik

Ingredients
1/2 cup yogurt1 tablespoon garam masala
1 teaspoon turmeric
1 teaspoon red cayenne pepper
1 tablespoon very finely chopped mint (optional)
1 teaspoon salt or to taste
1/2 pound paneer, cut into cubes
1 bell pepper, cut into 1 inch pieces
1 small onion, cut into eights, layers separate
Instructions
Mix the yogurt, garam masala, turmeric, red cayenne pepper, mint (if using) and the salt and mix well.Add the paneer to the mixture and marinate for 30 minutes to overnight.
Using toothpics, skewer the paneer alternating with the pepper and onion. I did two pieces of paneer per skewer.
If air frying like me, arrange on the air fryer basket.
Cook on 450 degrees for 5 minutes. Turn and and cook for 3 more minutes. Serve hot.3.1http://www.spicechronicles.com/paneer-tikka-shaslik/
The post Paneer Tikka or Shaslik appeared first on Spice Chronicles.


July 20, 2019
Raspberry Brownie Cake
 This Raspberry Brownie Cake is done in the instant pot or any electric pressure cooker. It is deliciously heat wave proof!
My son is back from a couple of days away at summer camp. This calls for a celebrations. A chocaholic worthy celebration!
He is thrilled to see this cake.
All the chocaholics are happy. I am happy to find another workable dessert in the instant pot. A cake in the middle of exceptionally hot weather, what more can you ask for.
The texture of this cake is dense and fudge like. It is also tinged with the deep jammy overtones of raspberries.
The raspberries get pureed into the cake batter, and some are used on top to decorate. A good thing about this recipe is its relatively small size. I think this cake makes enough for 6 well-proportioned servings. I would not say no, to a dolop of ice-cream. However, it is perfect by itself too!
The kids are doing, so many different things this summer. I sometimes find it a little daunting to hear about Deepta discovering eating places in NYC. Yet, another milestone! Life tumbles along.. the good, the not so good and everything else in between.
An out of town camp was not quite an option this summer – pricey too! Doing something in Columbia University, is a mid-way compromise. She is happy and loving her world of food trucks, and food in the city. I firmly believe, the big city should be a part of everyone’s growing up adventures. If proximity so allows.
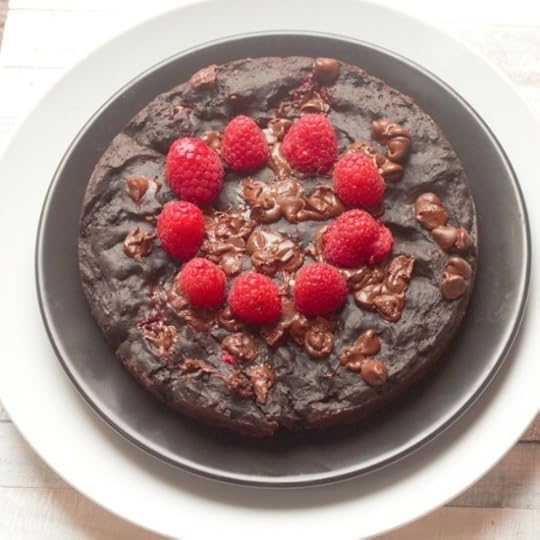
This cake is:
Dense moist and fudge-like
Everything you want in a chocolate cake
The raspberries offer tangy fun notes confirming that raspberries and chocolate are a match made in heaven.
For best results,
Do not overmix the ingredients
Allow a natural pressure release and then decorate the cake.

Just a simple note, the cake is not very sweet as that is how the chocaholics in my house like it. I would shy away from adding more sugar, complimenting it with something like ice-cream instead. This cake actually does taste better the next day, so it is a great make ahead dessert.
If you like this recipe and want more ideas, do join my Indian Instant Pot Facebook group and Legume Love Group. Of course Instant Indian is ready for order, joining its siblings The Bengali Five Spice Chronicles and Spices and Seasons.
PrintRaspberry Brownie Cake
Prep Time: 15 minutes
Cook Time: 35 minutes
Total Time: 50 minutes
Yield: Serves 4 to 6

A dense and fudgelike moist raspberry brownie cake.
Ingredients
For the cake1/2 cup fresh raspberries (about 1/2 pint)
5 tablespoons melted butter
6 ounces dark chocolate, broken into smaller pieces (about 6 squares, I used the trader joes, chocolate bars)
1/4 cup cocoa
1/3 cup sugar
2/3 cup all purpose flour
1 teaspoon baking powder
1 egg, well beaten
1 tablespoon yogurt or sour cream
To finish
1/3 Chocolate chips
Fresh Raspberries
ing powder
Instructions
Prepare a 6 inch cake pan by greasing and lining with parchment paper.Place a trivet in he instant pot and pour 1 cip of water into the steel insert.
Puree the raspberries and set aside.
Place the butter and dark chocolate in a microwave safe container. Heat for 30 seconds. Stir well. Heat for another 30 seconds and mix well until melted.
Pour into a mixing bowl. Stir in the pureed rasberries.
In another bowl, stir in the cocoa, sugar, flour and baking powder iuntil well mixed.
Add in the egg and sour cream into the chocolate butter mixture.
Stir in the flour mixture. Do not overbeat. Pour into the cake pan.
Cover with foll. Place on the trivet. Cook on the cake setting for 30 minutes. Allow a natural release. Carefully remove the cake pan.
Remove the foil, remove the cake on a platter. Sprinkle with the chips on top. in a random fashion.
Place a few fresh raspberries on the top. Serve warm or cool.
Notes
You will need one hour of cooling time.
This cake is best mixed with a good whisk.
The post Raspberry Brownie Cake appeared first on Spice Chronicles.
July 16, 2019
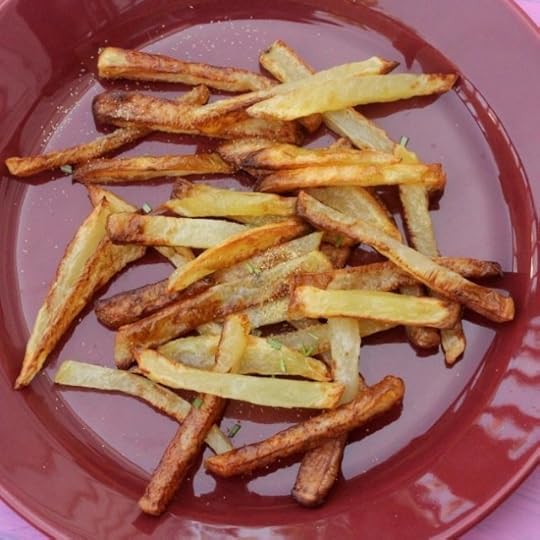
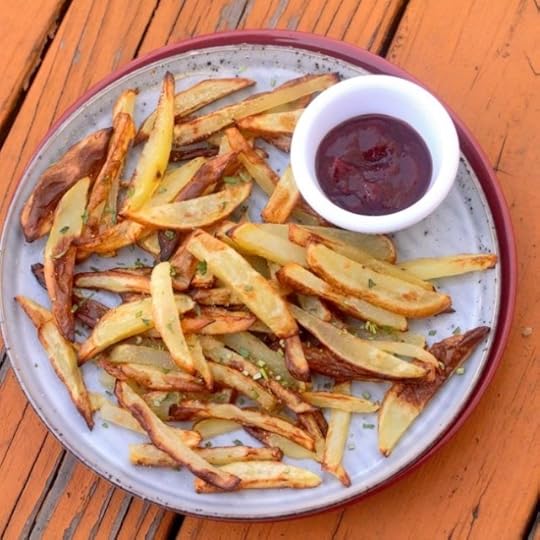
The Best Ever Air Fryer French Fries
After a bunch of trial and error, I am excited to be able to bring you a batch of air-fryer fries that I can stand behind. They are gently crisp outside and soft and creamy inside. Maybe just a little  short of the deep fried version, but really pretty good dunked in ketchup. They are great plain with a hint of salt, and of course perfect with my favorite combination of rosemary and garlic.
The tip that I adopt with a little modification, is the concept of slightly par cooking the potatoes before air-frying them. It is taken from the idea described here. The short video at the end of the post will show you a little visually what I am talking about. The quick plunge helps you with the softer creamy inside which allowing the outside to get nice and crisp.
A few tips to note and remember,
The type of potato does matter in my opinion, I will suggest that you stick to Yukon Golds.
Make sure your water is boiling when you do the plunge.
Drain the potatoes thoroughly, excess water will defeat the purpose.
Salt and season after the cooking.
A couple of seasoning ideas, not that plain with a hint of salt is a bad thing.
Fresh Minced Rosemary and Garlic salt as featured in this recipe.
Minced Thyme
Chat Masala and Fine Chili Powder
These fries need to be eaten right away. Not that it is ever a problem in my house. I have been using the Mealthy CrispLid for my air frying, you can use what ever air-fryer you want. By, the way my rosemary has grown out nicely, so you will see it making the rounds on this space soon. The summer has been a good one so far, lot of nice sunny weekends.
PrintThe Best Ever Air Fryer French Fries
Prep Time: 5 minutes
Cook Time: 30 minutes
Total Time: 35 minutes
A recipe for air fryer seasoned french fries. These are seasoned with garlic and rosemary.
Ingredients
3 russet or Yukon Gold Potatoes (I have a strong preference for Yukon Gold)1 tablespoon olive or canola oil
Salt or Garlic Salt
Minced Rosemary (optional)
Instructions
Place a large pot of water to boil.Peel the potatoes cut into long sticks, about 1/4 inch in thickness, rinse.
Plunge into boiling water for a minute. Drain and dry thoroughly. This is important.
Place the potatoes in a single layer in your air-fryer basket. Cover with the CrispLid or set to 450 degrees and cook for 8 minutes. Shake around and cook for another 8 minutes.
Remove. Place another batch if needed.
Season with garlic salt and the rosemary.
3.1http://www.spicechronicles.com/the-best-ever-air-fryer-french-fries/
The post The Best Ever Air Fryer French Fries appeared first on Spice Chronicles.
July 7, 2019
Bhapa Doi – 3 Ingredient Instant Pot Raspberry Cheesecake
 The Bengali table is filled with lush seductive desserts. Bhapa Doi or Steamed Yogurt Custard is a summer favorite. Adding fruit to it is not unheard of, in India the preferred fruit is Mango. The mango version, tastes pretty amazing. So, I tried this today using my favorite local summer fruit – raspberries. I love raspberries so much my husband has a handful of raspberry bushes in our yard. Thus today Bhapa Doi or the 3 Ingredient Raspberry Cheesecake is born.
This cheesecake is steamed and therefore a perfect match for the Instant Pot or the Mealthy Multipot or any other electric pressure cooker of your choice. Once chilled, it is amazing how close to a real cheesecake it tastes like. I keep this crust less, gluten-free and very close to its Bengali roots.
Ashley at My Heart Beets, gets credit for making the concept of this yogurt cheesecake famous. However, once chilled this dense and rich steamed yogurt does indeed taste like cheesecake. Raspberries have this rich deep jam like taste once cooked, making them one of my favorite summer fruits. I have a recipe for raspberry kulfi in Spices and Seasons, and today I give you this cheesecake or Bhapa Doi.
My recipe is not overly sweet, it is lighter on the condensed milk. The raspberries help cut the sweetness too. This gave my doi or yogurt a somewhat softer texture. Made it just a little bit harder to un-mold. I used smaller ramekins for this, which is really how we do Bhapa Doi. If you use a spring form pan, I do not think you will have any problem with the unmolding.

Bhapa in Bengali means steamed and Doi is yogurt, hence Bhapa Doi.
Despite the slightly fuzzy un-molding, my first thought looking at my creation was a sonnet.
Shall I compare thee to a summer’s day? Thou art more lovely and more temperate.
I realize that this might be a little crazy, when I start saying sonnets to my food. However try making this simple treat and you will understand what the fuss is about.
A couple of things to remember,
You will need to use strained whole milk yogurt or store made Greek Yogurt. Make sure that you are using whole milk yogurt.
Allow the dessert to chill thoroughly before serving. It is very easy to make but you do need to plan the chilling time.
Raspberries are fragile, so use them quickly.
This can be made with any other fruit, such as mango or strawberries.

If you like this recipe and want more ideas, do join my Indian Instant Pot Facebook group and Legume Love Group. Of course Instant Indian is ready for order, joining its siblings The Bengali Five Spice Chronicles and Spices and Seasons.
PrintBhapa Doi – 3 Ingredient Instant Pot Raspberry Cheesecake
Prep Time: 3 hours, 5 minutes
Cook Time: 30 minutes
Total Time: 3 hours, 35 minutes

A fruity summer 3 ingredient cheesecake or Bhapa Raspberry Doi.
Ingredients
1 15 ounce can of condensed milk1 and 1/4 cup of whole milk Greek yogurt or strained homemade yogurt
3/4 cup raspberries plus more to garnish
Instructions
Prepare 4 6-inch ramekins or 1 large springform pan.Place the condensed milk Greek yogurt and most of the raspberries in a blender. Reserve a few raspberries to garnish.
Blend until smooth.
Pour into the ramekins or pan. Cover with foil.
Place 1 and 1/2 cups water in the instant pot. Place the trivet in the instant pot. Place the pan or ramekins on the trivet.
Cover the instant pot. Steam for 30 minutes. Release steam. Carefully remove the ramekins after cooling slightly. Chill for 3 hours or longer. Serve garnished with raspberries.
Notes
Most of the prep time is for chilling the dessert.
3.1http://www.spicechronicles.com/bhapa-doi-3-ingredient-instant-pot-raspberry-cheesecake/The post Bhapa Doi – 3 Ingredient Instant Pot Raspberry Cheesecake appeared first on Spice Chronicles.
July 5, 2019
Masala Fried Chicken (Air Fried)
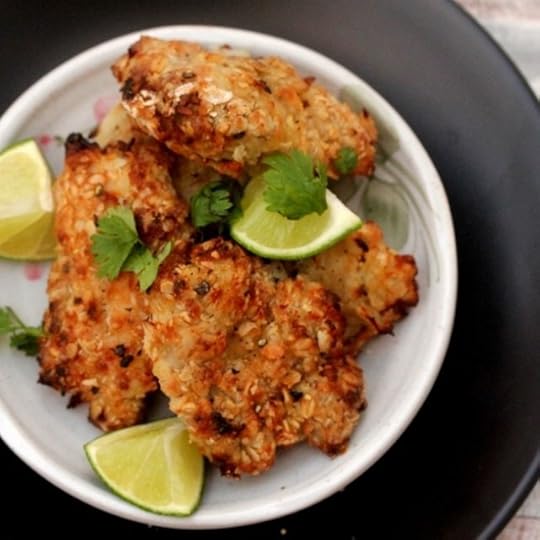 This Masala Fried Chicken is the state of our household today. This masalafried chicken is an adaptation of the fried chicken found in the southern state of Kerala. I have simplified the recipe a little. And lightened it up a lot!
I made this using the Mealthy CrispLid. This new compact air fryer is so much fun! I have a new e-book featuring my exploits. It is a short stack, but does have a fun assortment of recipes. Masala as we know is spice, and yes, this fried chicken includes a lot of flavorful spices. Enough to tantalize all your taste buds. If you are not squeamish about frying, this can be shallow or deep fried as well.
It is soaked in buttermilk and herbs overnight making this quite exceptionally flavorful. I have tinkered with the recipe a few times to get this to where I want it. I started with a typical buttermilk brine and flour dredging. That works but I then wanted some more spice action. So I welcome ginger, garlic, and cayenne into the game.
And then some cracked black pepper. Actually a lot of cracked black pepper. The black pepper is added to the crust. I like the texture. This does give the crust a few black spots here and there. If you do not like the sound of these crisp and grainy bites of spice explosion grind the black pepper finely. If you are on the fence try the coarsely ground black pepper.
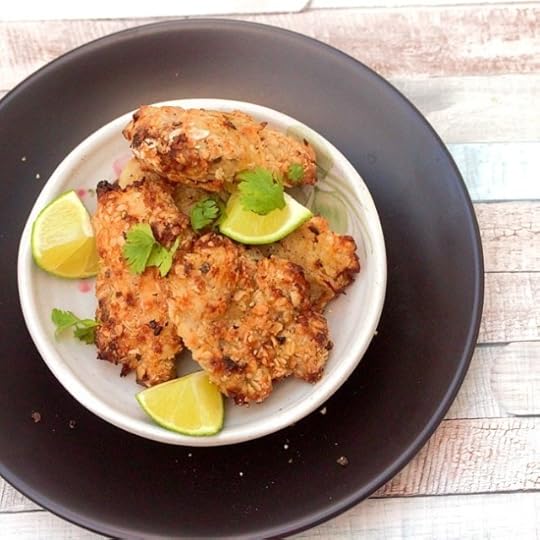
So then I make the crust healthier by adding powdered oatmeal. Well, the good news is that the oatmeal does more that just make the recipe healthy, it adds a nice dose of crunch to the chicken. Currently polling high the family polling ratings. Once coated, this takes about 18 minutes to cook. I have tried the same thing with fish, works like a charm, but with a shorter cooking time.
This fourth is a quite one for me. But, I am happy with eating good food and watching out local fireworks. It is also fun, to look at little kids in the neighborhood finding their share of sparklers. That and splashing around the kiddie pool.
So these can be enjoyed as sandwiches. The can be enjoyed as finger food. As she says here, once you fry the chicken the ball is in your court.
PrintMasala Fried Chicken (Air Fried)
Prep Time: 7 hours, 5 minutes
Cook Time: 30 minutes
Total Time: 7 hours, 35 minutes

A healthier take on classic Indian Masala Fried Chicken.
Ingredients
For the Chicken1 and 1/2 pounds boneless skinless chicken thighs
1/2 cup buttermilk
1/2 inch piece peeled ginger
2 cloves garlic
2 green Serrano chilies
8 to 10 curry leaves (optional, but adds a nice depth of flavor)
1 teaspoon salt or to taste
1/4 cup cilantro leaves
For the coating
3/4 cup rolled oats
1/4 cup all-purpose flour
1/4 cup rice flour (see notes)
1 tablespoon whole black peppercorns
1 teaspoon salt to taste
Oil for drizzling
Instructions
Cut the thighs into halves, trim any extra fat and if needed pound to flatten the pieces a little.Set in a mixing bowl.
Place the buttermilk, ginger, garlic, chilies, salt and cilantro leaves in a food processor and blender until smooth. There will be a tiny amount of texture which is OK.
Pour over the chicken, cover and marinate for a few hours or overnight.
In a food processor add the rolled oats and peppercorns and process until the oats are finely processed. Mix in the rice flour and the all purpose flour.
Dredge the chicken pieces in this mixture until well coated and dry to touch. Shake any excess flour dry.
Place in your air fryer basket. If using the CrispLid like me, place the trivet in the steel pressure cooker insert. Place the stainless steel air fryer basket over the trivet. Place the chicken pieces in a single layer. I did this in two batches.
Drizzle with oil.
Cook at 450 degrees for 8 minutes and turn and cook for another 8 minutes. Remove and cook with the second batch.
Serve with your favorite dipping sauce.
Notes
1. To keep this recipe gluten-free you can swap the all-purpose flour with rice flour.
2. If you do not have rice flour you can use all all purpose flour.
3. For a richer taste, drizzle with coconut oil.
The post Masala Fried Chicken (Air Fried) appeared first on Spice Chronicles.
July 4, 2019
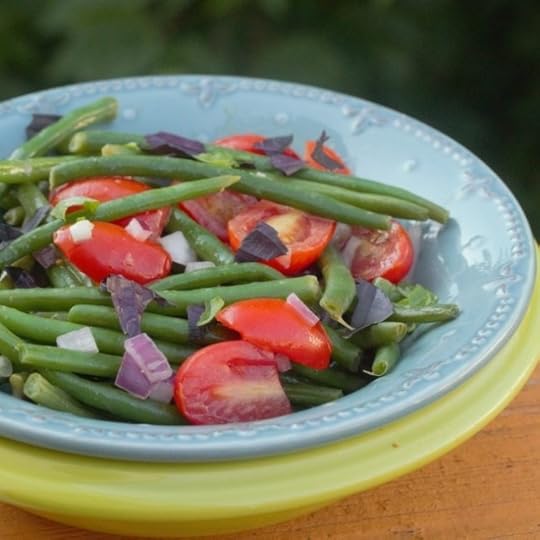
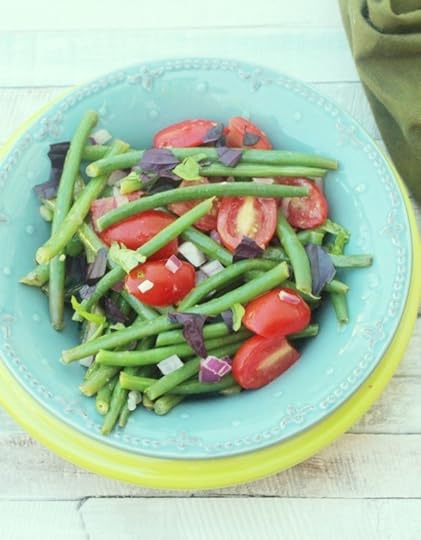
Grape Tomato, Green Bean, and Purple Basil Salad
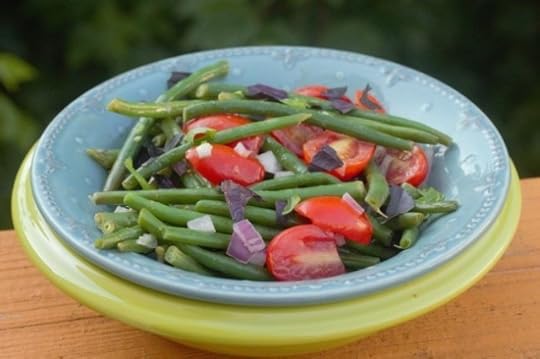 Just like people have staycations, the order of the day today a stay at home picnic. Now it is not a good summer picnic without some good sides and salads. I made this pretty, light and flavorful salad – Grape Tomato, Green Bean and Purple Basil Salad. This year along with the usual stuff in our yard, I am trying my hand at growing a handful of things. Mostly herbs – but for a black thumbed person this is huge.
There are four varieties of basil happening now – and my favorite so far is this purple basil. You will be gradually introduced to members of my plant family as they grow up. For anyone interested the purple basil grows easily, it just needs a lot of water to keep it happy. However, when well watered it responds by growing and showing off its gorgeous large leaves. And the fragrance. ..
It is a quite fourth in our house. Did the Kensico Dam fireworks yesterday. One of those household rituals. Aadi is getting ready to start camp on Monday. The kids have cooked up a bunch of fun things this summer. Enough to to keep themselves entertained and out of trouble.
Intoxicating and heady. I add the leaves at the end for this simple salad. The result is an intense and floral finish. I so want to take tomorrow off. I want to be at home before camp starts for the youger one. Curring the day in the middle will probably be my compromise. This salad thrilled the home crew. Enough for them to nominate it as a contender for the Thanksgiving table. Something not taken lightly in this house.

I made some air-fried chicken, I will share the recipe next. Also, made a batch of fresh paneer. I am playing with visions of making some kind of popcorn paneer.
This salad get some simple flavor from Dijon mustard, garlic, tahini and maple syrup. It is rounded off with olive oil and basil. Simple, balanced, and flavorful. Pure happiness!
PrintGrape Tomato, Green Bean, and Purple Basil Salad
Prep Time: 25 minutes
Cook Time: 5 minutes
Total Time: 30 minutes
A fresh green bean and grape tomato salad finished with purple basil.
Ingredients
1 pound of green beans (preferably the thin french varietySalt for boiling and dressing
1/2 cup organic grape tomatoes
2 tablespoons chopped red onions
3 tablespoons olive oil
1 tablespoon dijon mustard
1 tablespoon while balsamic vinegar
1 clove minced garlic
1 tablespoon maple syrup
1 tablespoon tahini sauce
Lot of freshly ground black pepper to taste
5 to 10 large purple or regular basil leaves
Instructions
Fill a large sauce pan with water and add plenty of salt. Bring to a boil. Add in the beans and boil for 4 minutes. Drain thoughly and add cold water and set aside in a mixing bowl.Chop the grape tomatoes iand to the beans.
Add in the red onion.
In a small bowl add the olive oil, salt, mustard, balsamic vinegar, minced garlic, maple syrup, tahini sauce and the freshly ground black pepper and toss well.
Pour over the beans and mix well.
Let the mixture rest for at least 15 minutes. Coarsely tear in the basil leaves and serve.
Notes
15 minutes of the prep time is to allow the salad to rest.
3.1http://www.spicechronicles.com/grape-tomato-green-bean-purple-basil-salad/The post Grape Tomato, Green Bean, and Purple Basil Salad appeared first on Spice Chronicles.
June 29, 2019
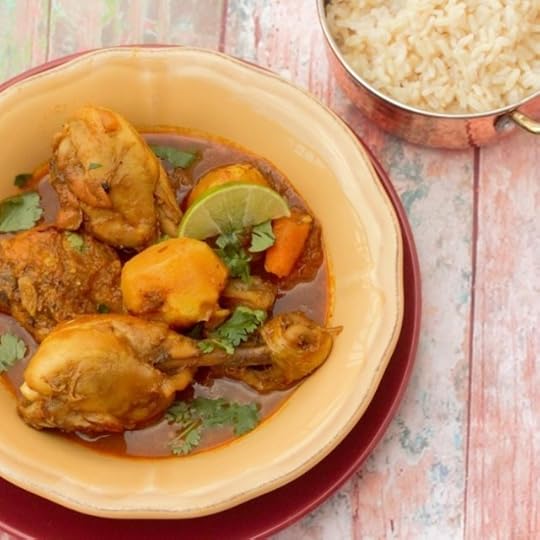
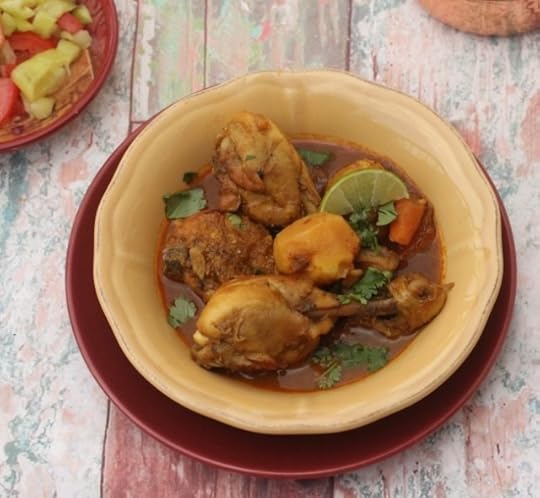
Murgir Patla Jhol – Light and Soupy Chicken Curry
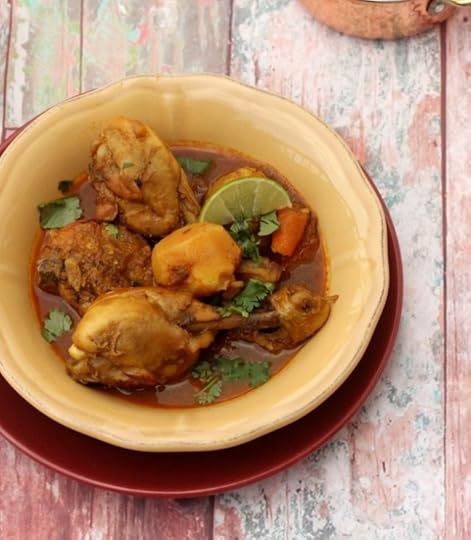 I love to cook something on a Friday night. Despite, often winding down a workweek and usually fitting in some of my grocery runs. It just is my way of saying “Fry Yay!”. Anticipating that today is a hot one I made this chicken curry. This is a soupy delicate creation, heady with fennel, mint and lime. Patla Morgir Jhol is a light and soupy chicken curry that you will find on Bengali tables in summer. Not all spices are made the same, some spices are warming and then there are others like this fennel and poppy seeds that are cooling. A creation like this during summer is actually served with room temperature rice to further brace and combat the heat. The best part is, that all of this comes together with just about 10 minutes of active time.
A combination of a small food processor and the instant pot helps with this. The instant pot adds a little darkness to the color of the gravy, but renders fork tender chicken in about 20 minutes. So, dinner was a happy and breezy meal. I add a mixture of small potatoes and turnips to the gravy. I also sometimes scrape in a carrot or two.
You can even skip the potatoes altogether. Essentially, up to you. This is a simple homey chicken curry that is yours to make your own. I am sharing with you my version, the mint in particular is my summer favorite. We have so much in the yard, so I naturally put it to good use. And, what can be more refreshing that good fresh summer’s mint. I served this with perfectly done brown rice.

Honestly you can enjoy a good bowl of this on its own, maybe with some crusty bread to dunk into the soupy delicate gracy. I do not have much going on for the holiday week. I am toying with the idea of taking the fifth of to make it a nice long weekend.
Now onto the recipe. Just as a note, this works very well as a vegetarian options with cubes of paneer. Dishes like this help me bring the nostalgia of Indian summer to my table.
If you like this recipe and want more ideas, do join my Indian Instant Pot Facebook group and Legume Love Group. Of course Instant Indian is ready for order, joining its siblings The Bengali Five Spice Chronicles and Spices and Seasons.
PrintMurgir Patla Jhol – Light and Soupy Chicken Curry
Prep Time: 5 minutes
Cook Time: 20 minutes
Total Time: 25 minutes
A light and soupy chicken curry, delicately seasoned with lime juice, mint and cilantro.
Ingredients
1 and 1/2 teaspoons fennel seeds1 teaspoon coriander seeds
1/2 teaspoon turmeric powder
1 medium sized red onion, peeled
1 karge knob, ginger
2 green chilies
2 tablespoons oil
1 teaspoon whole cumin seeds
1 and 1/2 pounds skinless chicken on the bone (1 used 6 drumsticks)
3 to 4 baby potatoes, peeled
4 to 6 small baby turnips
1 medium sized carrot, peeled and quartered
Juice of 1 lime plus lime wedges for services
1 to 2 tablespoons chopped mint
1 to 2 tablespoons chopped cilantro
Instructions
Place the fennel and corander seeds in a coffee grinder and grind to a smooth powder. Stir in the turmeric.Place the onion, ginger and green chilies in a food processor or chopper and pulse a few times until finely chopped.
Turn the instant pot onto saute mode and heat the oil for a couple of minutes. Add in the whole cumin seeds and wait until they sizzle.
Add in the chopped onion and saute for 3 minutes, until the onion has softened.
Add in the chicken and the ground spices. Mix well and turn off the heat.
Stir in the potatoes, turnips and carrots. Add 1 and 1/2 cups of water. Cover and set on 4 minutes of pressure and allow a natural release.
Stir in the lime juice and the mint and cilantro. Serve garnished with additional lime wedges if desired.3.1http://www.spicechronicles.com/murgir-patla-jhol-light-and-soupy-chicken-curry/
The post Murgir Patla Jhol – Light and Soupy Chicken Curry appeared first on Spice Chronicles.
June 25, 2019
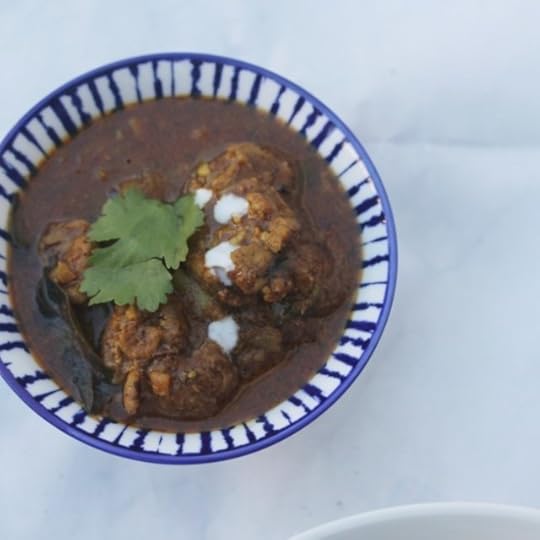
Chicken Kulambu – A spicy flavorful curry (Instant Pot)
 I talked about the cookbook Healthy South Indian Cooking here. Several of the recipes are from the Chettinaad region of Southern India, a region of India I am partial to. I have a recipe for Chettinaad Chicken Biryani and another curry in Instant Indian. This week I adapted a chicken curry recipe for the Instant Pot.
In fact, I actually made this Chicken Kulambu in my Mealthy Multipot as well. A soulful and spicy dish, a little goes a long way.
Redolent with fragrant spices, this is a great curry for a cooler evening, you know the rainy kind. Of course, if you are like me, ever so often you will make room for a soulful curry in summer as well. My variations to the original recipe is to simplify the spice list, add curry leaves and a splash of coconut milk. After all, everything tastes better with a splash of coconut milk. At least I think so. I am fighting time tonight, I want to pack in my beauty 8 hours of sleep. Much needed to brace for tomorrow.

Overall, I have been having so much fun with the Mealthy CrispLid, so much fun playing and air frying my favorite fried recipes. Yes, my next post will be on my newest air fried success. Ideally a deeply seasoned curry like this is great with simple steamed rice or even chapatis. I had some chard rice on hand, so that is what we enjoyed it with. The best part of course is that I had Instant pot yogurt on the side. This summer we have been going through the yogurt like it is going out of fashion. Thank goodness, I make it at home these days.

And, I forgot, the highlight of my day is actually the fact that my son recieved a perfect 100 in his Biology regents. His reward – a handful of coffee M&M’s today. He is holding out for some more stuff from me later in the week. Yes, all food related. No guesses for the way to his heart.
If you like this recipe and want more ideas, do join my Indian Instant Pot Facebook group and Legume Love Group. Of course Instant Indian is ready for order, joining its siblings The Bengali Five Spice Chronicles and Spices and Seasons.
PrintChicken Kulambu – A spicy flavorful curry
Prep Time: 10 minutes
Cook Time: 25 minutes
Total Time: 35 minutes
Yield: Serves 4 to 6
A deeply flavored soulful chicken curry from the Chettinaad region of South India.
Ingredients
2 tablespoons canolla oil1 medium sized cinnamon stick (about 2 inches), broken
1 large bay leaf
1/4 teaspoon whole fennel seeds
1/4 teaspoon whole cumin seeds
1 medium onion, finely chopped
3 garlic cloves, minced
1 tablespoon fresh ginger, minced
6 to 8 curry leaves
1/2 cup chopped tomato (about 1 medium sized tomato)
1/4 teaspoon turmeric powder
2 pounds boneless skinless chicken thighs, cut into smaller pieces
1 teaspoon red cayenne pepper
1 teaspoon garam masala powder
1 /2 teaspoon powdered cumin
1/2 teaspoon powdered black pepper
1/2 cup tomato sauce
1 and 1/2 teaspoons salt
1/4 cup coconut milk
1/4 cup chopped fresh coriander
Instructions
Turn the instant pot onto saute mode. Heat for 2 minutes and add in the canolla oil and heat for another minute.Add in the cinnamon stick, bay leaf, whole fennel seeds , whole cumin seeds and wait until the seeds sizzle, about 1 minute.
Add in the onion, garlic, ginger and stir well for another minute. Add in the curry leaves and tomato and the chicken.
Add in the turmeric powder, red cayenne pepper, garam masala powder, powdered cumin, powdered black pepper and tomato sauce and mix well.
Stir in the salt and 3/4 cup water.
Cover and set on 2 minutes of pressure and allow a natural release.
Remove the cover, stir in the coconut milk and cilantro. Enjoy!
Notes
Recipe Adapted from Healthy South Indian Cooking, Hoppocrene Books
3.1http://www.spicechronicles.com/chicken-kulambu-spicy-flavorful-curry/
The post Chicken Kulambu – A spicy flavorful curry (Instant Pot) appeared first on Spice Chronicles.
Sri Lankan Coconut Lentils – A Taste of Serendib review!
 A few days away can be amazing! If you have been following me on instagram, you will realize that I have been out of the home kitchen. Sure, I cooked up a storm of sorts before I left, and then today I cooked up a bowl of gorgeous comforting lentils. These tempered lentils or Paruppu are from the new cookbook – A Feast of Serendib by Mary Anne Mohanraj. If you remember, I was introduced to Sri Lankan cooking by Rice and Curry. Mary Anne’s cookbook brought home the same evocative rich flavors straight to my home table.
I made a few tweaks and added some carrots to the lentils. However, the coconut adds a nice comforting richness to these soft red lentils making the dish great for a wholesome meal. This particular recipe will make a large batch, making it perfect for an add on for your next party. And, I made an instant pot version! You knew that was coming, didn’t you?
Onto the book, it is my favorite kind of cookbook, filled with home recipes, nostalgia, and comfort cooking at its best. There are over a 100 recipes.

106 to be precise covering appetizers, main dishes – meat, fish, eggs and vegetables, condiments, and desserts. I am working through the book, trying and bookmarking recipes as I go along. I love the authors chatty style and little personal anecdotes. It is just what makes a book special.
I have my eye on,
Ribbon Sandwiches
Tangy Shrimp on Toast
Scotch Eggs
Coconut Custard and
Love Cake
Along with these lentils, I have also tried her Salmon Curry and cutlets with fish.

f you like this recipe and want more ideas, do join my Indian Instant Pot Facebook group and Legume Love Group. Of course Instant Indian is ready for order, joining its siblings The Bengali Five Spice Chronicles and Spices and Seasons.
PrintSri Lankan Coconut Lentils – Paruppu
Prep Time: 5 hours
Cook Time: 45 minutes
Total Time: 50 minutes

A soft comforting rendition of red lentils via Sri Lanka. This can be done stove top or in the instant pot.
Ingredients
2 cups red lentils1 can coconut milk plus 1 can water
1 dried red chili, broken into pieces
a pinch of ground saffron (1 used 1/2 teaspoon turmeric)
1 teaspoon maldive fish (pounded)
2 tablespoons ghee
2 medium onions, finely sliced
6 curry leaves
1 stick of cinnamon
3 strips of lemon rind
salt to taste (about 2 teaspoons)
My additions
1 additional cup of water
1 large carrot, peeled and cut into large pieces
1 teaspoon mustard seeds
2 tablespoon fresh lime juice
chopped cilantro
Instructions
Put the lentils in a sauce pan with the coconut milk, chili and saffron (and the maldive fish if using). Fill the can with hot water and add that as well, this will ensure that you don't water any coconut yumminess. Add another cup of water. Add in the carrot (see my additions)Bring to a boil, then cover and simmer until the lentils are soft, about forty-five minutes. If you are doing this in an instant pot, set to 4 minutes of pressure and allow a natural release.
In another saucepan, heat the ghee and (add the mustard seeds, see my additions) and the onions, curry leaves, cinnamon, and lemon rind until the onions are golden brown.
Add in this mixture to the lentils (you can reserve half the onions to garnish). Stir well, add salt to taste and ensure that the lentils have a soft porridge like texture. If you wish sprinkle with lime juice and cilantro (see my additions).
Serve with rice and curries.
Notes
Recipe closely adapted from A Feast of Serendib by Mary Anne Mohanraj
3.1http://www.spicechronicles.com/sri-lanka-coconut-lentils-taste-serendbib-review/
The post Sri Lankan Coconut Lentils – A Taste of Serendib review! appeared first on Spice Chronicles.
June 17, 2019
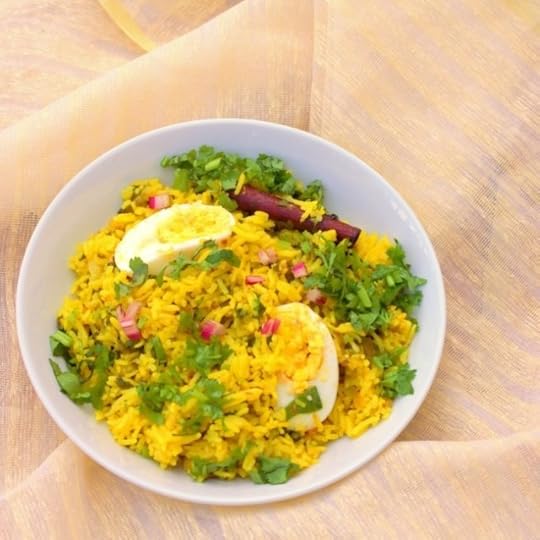
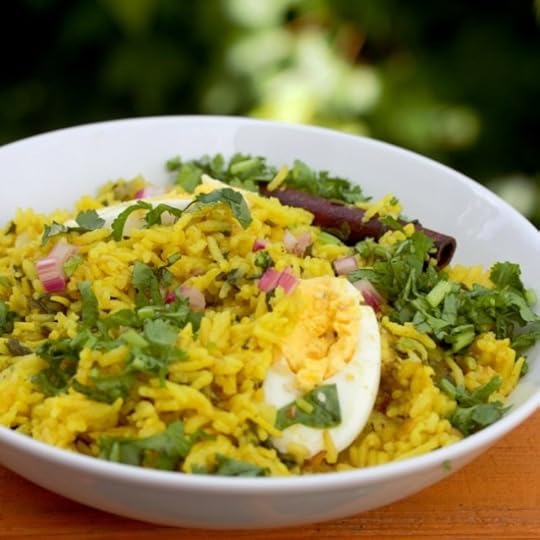
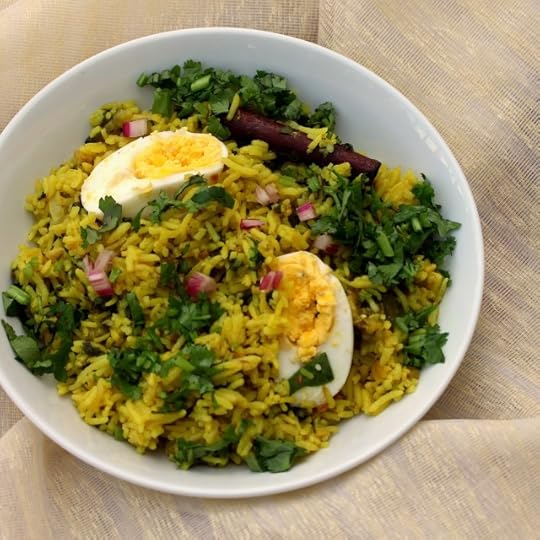
Fragrant Golden Rice with Rainbow Chard
 Well, maybe I should call this post about Fragrant Golden Rice with Rainbow Chard, turmeric is not curry? Perplexed? Intrigued, well read on and you will find out more. The market seasons has started, I am happy to be out and about. This recipe is born in the Rye Farmer’s Market, conceptualized with the amazing rainbow chard that I picked up from Row by Row farm. A local farm with a story as beautiful as their produce. And now to my constant curry or non curry soapbox.
Not all things yellow is about curry! Turmeric is not curry! Rice is rarely about curry, well it might be served with curry, but cinnamon, cloves, and cardamom are fragrant spices with an assertive identity of their own. I hate hearing the word curry out of context. I just recently heard this once too many times at a recent demonstration. As I say it is as absurd as listening to the description of a complex wine and saying, Oh, you mean red wine?
Imagine the horror and disappointment for the wine maker. Soapbox done, let me proceed to this very comforting, fragrant, and homey dish. Did I say healthy. Adding eggs to this dish, along with the loads of rainbow chard already in the mix, makes this a wholesome one pot meal. Just the kind you need to start your week with. This is done either on the stove top or your instant pot or mealthy mulipot.
I have done it both ways, other than the added advantage of the eggs getting done while the rice cooks in the electric pressure cooker, there is not a huge difference in time. So, as always a little score in effort using the electric pressure cooker. I have planted loads of bits and pieces of things. I promise to show and tell once things are a little bigger.
If you like this recipe and want more ideas, do join my Indian Instant Pot Facebook group and Legume Love Group. Of course Instant Indian is ready for order, joining its siblings The Bengali Five Spice Chronicles and Spices and Seasons.
PrintFragrant Golden Rice with Rainbow Chard
Prep Time: 5 minutes
Cook Time: 25 minutes
Total Time: 30 minutes
A hearty one pot meal, featuring seasonal rainbow chard. Done on the stove top or the instant pot.
Ingredients
3 tablespoons oil2 to 3 tablespoons olive or coconut oil
1 teaspoon whole cumin seeds
1 medium sized red onion, chopped
1 bay leaf
2 black cardamoms
2 green cardamoms
1 large stick (about 4 inches) cinnamon
1 teaspoon turmeric powder
1 cup basmati rice
1 and ½ teaspoons salt
2 cups water
2 cups rainbow chard, finely chopped (leaves and tender stems)
4 hard boiled eggs
Fresh Lime Juice to finish
Instructions
Heat the oil and add in the whole cumin seeds and wait until the seeds begin to sizzle. Add in the onions and saute for about 3 to 5 minutes until the onions wilt and turn golden. If doing this in the instant pot, you can set to saute mode and continue in the inner pot.Add in the bay leaf, black and green cardamom, cinnamon, turmeric powder and the Basmati rice and salt and stir well. Add in the water. Cover and cook for 18 minutes. If you are doing this in the instant pot, reduce the water by 3/4 cup, so you will use 1 and 1/4 cups of water and set this to rice mode. Do a quick release after 5 minutes.
While the rice is cooking, cut the eggs into half.
Remove the cover stir in the rainbow chard and egg, and leave covered for five minutes. Stir well.
Sprinkle with lime juice and serve.
3.1http://www.spicechronicles.com/fragrant-golden-rice-with-rainbow-chard/
The post Fragrant Golden Rice with Rainbow Chard appeared first on Spice Chronicles.


