
Rinku Bhattacharya's Blog, page 34
October 18, 2019
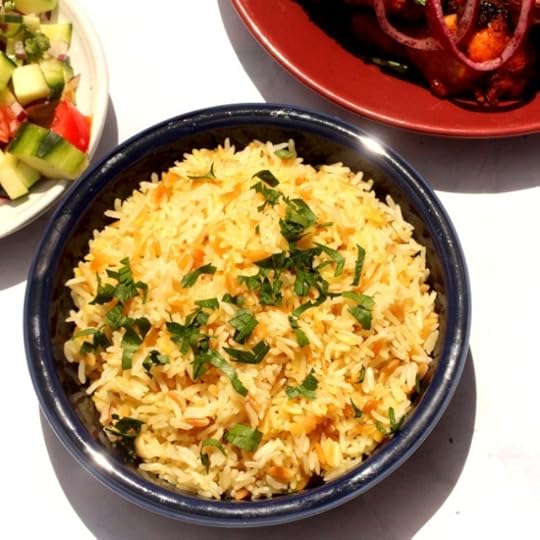
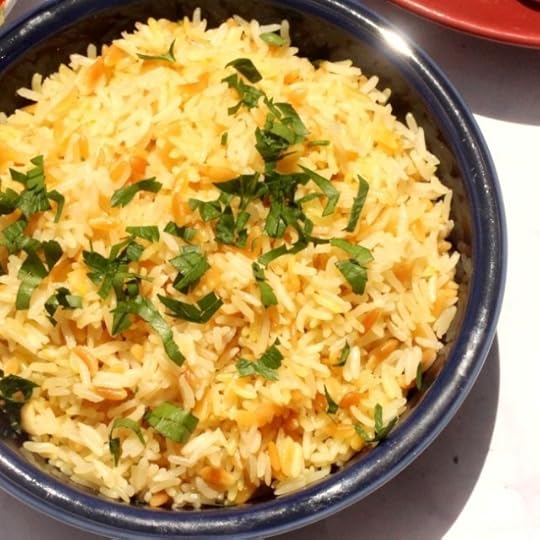
Turkish Pilaf (Instant Pot)
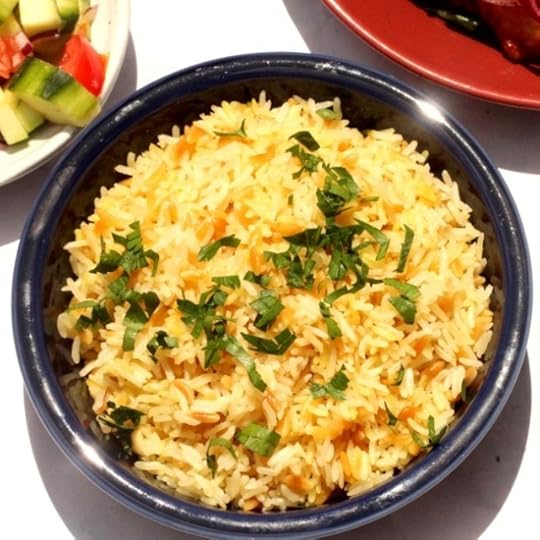 This Turkish Pilaf is a comforting and soulful side that pairs with almost everything. In particular, I love this with grilled dishes. The toasted orzo adds both color and texture to the dish and the rest of the ingredients are pantry staples.
I am coping with some kind of exotic bug. Something beyond just jet lag, but not anything too devastating. Not the best of birthdays. but, my son’s enthusiasm helps making things festive. I came home early, but rested through the evening in the hopes that I can shake this off by the weekend.
I made this chicken curry earlier during the week and paired it with this Turkish pilaf. Thanks to the instant pot, it was a decent meal. At times, my own recipes are my best friend. They tend to be tested and tried, something we liked enough for me to blog and share.

Durga Puja and all, this visit to India was not as good as it could be. BTW, if everyone has a crazy relative, in my case my aunt tops the list. For reasons too complex to contemplate or get into. In fact, sometimes her behavior is just too ludicrous to even imagine. But, then again what would be the world be without your crazy relative.
The distinct feature of this pilaf is the essential combination of orzo and rice. The rest of the ingredients can be dressed up or down to suit your palate. I add in a stick of cinnamon and keep this vegan. I am sure if you have broth around adding it in will enhance the flavor. The instant pot traps in the flavors of the fragrant grains offering a simple and beautiful dish that is perfect for a Friday night meal.
If you like this recipe and want more ideas, do join my Indian Instant Pot Facebook group .
Of course Instant Indian is here, joining its siblings The Bengali Five Spice Chronicles and Spices and Seasons.
Do not forget to get social with me, Facebook, Twitter, Instagram, Pinterest .
PrintTurkish Pilaf (Instant Pot)
Prep Time: 3 minutes
Cook Time: 25 minutes
Total Time: 30 minutes
Yield: Serves 4 to 6
A light and fragrant Turkish Pilaf made in the Instant Pot.
Ingredients
2 tablespoons olive oil1/4 cup orzo
1 cup basmati rice
2 teaspoons salt
1 stick cinnamon
2 tablespoons lemon juice
Chopped Parsley to garnish
Instructions
Turn the instant pot onto sauté mode. Add in the olive oil and the orzo and sauté for 2 minutes, until the orzo turn golden.Add in the rice and toast for another 2 minutes. Add in the salt, cinnamon stick and 1 and 1/2 cups water.
Turn off the saute mode. Cover and set to rice mode. Do a release after 5 minutes or allow a natural release.
Sprinkle with lemon juice and chopped parsley. Serve warm.
3.1http://www.spicechronicles.com/turkish-pilaf-instant-pot/
The post Turkish Pilaf (Instant Pot) appeared first on Spice Chronicles.


September 29, 2019
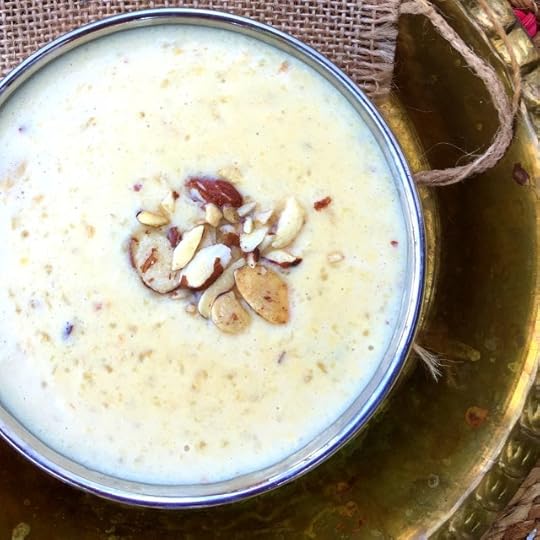
Indian Rice Pudding (Instant Pot)
 Rice Pudding is a comforting simple and luscious dessert, found with a few degrees of variation across India. The consistency I strive for is a creamy, mellow concistency typical of the Bengali rice pudding. As child, my grandmother used to patiently nurse this dessert for half a day, having it ready just in time. Every time I visited without fail.
It is something I knew just happened. Fast forward several years, this is the one treat I can get my family to agree on. Especially, my rather particular daughter. And this is when I started paying attention to the making of rice pudding. This omnipresent dessert is called Kheer in North India, Payesh in Bengali. A key ingredient to the rich conistency is thickening the whole milk low and slow. One of the few things, ok many things that I have difficulty fitting into an on the go schedule. So, I have come up with multiple compromizes to get an enviably good payesh or kheer.
The festive season is here (It is Rosh Hashanah for some, Navratri for others, and the Beginings of Durga Puja for Bengalis). This is an apt sweet offering for the season.
In this recipe, I use evaporated milk. This helps you skip the time needed to thicken the milk. While, some people espouse condensed milk, I find it difficult to control the sweetness so my preference is evaporated milk. I use good quality dark brown sugar in moderation and if you have jaggery around feel free to use it in this recipe.
My stove top version can be found in The Bengali Five Spice Chronicles and a slow cooker version in Spices and Seasons. Today thanks to a demo at the Harisson Public Library I bring to you the Instant Pot version.
A few notes to ensuring the perfect textured rice pudding:
I mostly use white Basmati rice for the instant pot version. You can use any other variety, just watch the time.
The low pressure mode is important.
Allow the pressure cooker to rest for at least 10 minutes or do a natural release. The milk is very hot and tends to spurt out before then.
The rest is easy.
I use sliced almonds to finish, you can add in raisins and or pistachios if you wish.
A general rule of thumb for this recipe is 1 is to 4 milk to rice ratio, plus a little extra to finish.
If you do not have evaporated milk that is fine – you will have a slightly thinner rice pudding.
If you like this recipe and want more ideas, do join my Indian Instant Pot Facebook group and Legume Love Group. Of course Instant Indian is ready for pre-order, joining its siblings The Bengali Five Spice Chronicles and Spices and Seasons.
Do not forget to get social with me, Facebook, Twitter, Instagram, Pinterest and even Youtube
PrintIndian Rice Pudding (Instant Pot)
Prep Time: 10 minutes
Cook Time: 40 minutes
Total Time: 50 minutes

A fool proof comforting and ridiculously easy take on rice pudding.
Ingredients
1 and 1/4 cup of basmati rice3 cups plus 3/4 cup of whole milk (see note)
1 and 1/2 cups (1 12 ounce can evaporated milk) (see note)
8 to 10 cardamoms, gently bruised
1/2 teaspoon saffron strands
3/4 cup of brown sugar
Sliced almonds to garnish (optional)
Instructions
Place the rice, 3 cups of milk and the evaporated milk in your instant pot.Add in the cardamoms and saffron strands and cover the instant pot.
Set to 25 minutes on low pressure. Release the pressure after 15 minutes or allow a natural steam release.
Remove the lid, mix well. Stir in the sugar and the remaining 3/4 cup of milk.
Garnish with the sliced almonds and serve.
Notes
- If you do not have evaporated milk, you can substitute with whole milk or half and half.
- Add in the last 3/4 cup of milk as needed, you want a porridge like consistency.
The post Indian Rice Pudding (Instant Pot) appeared first on Spice Chronicles.
September 28, 2019
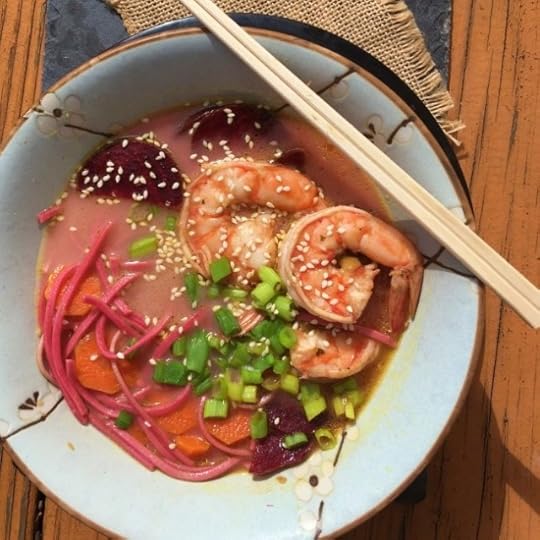
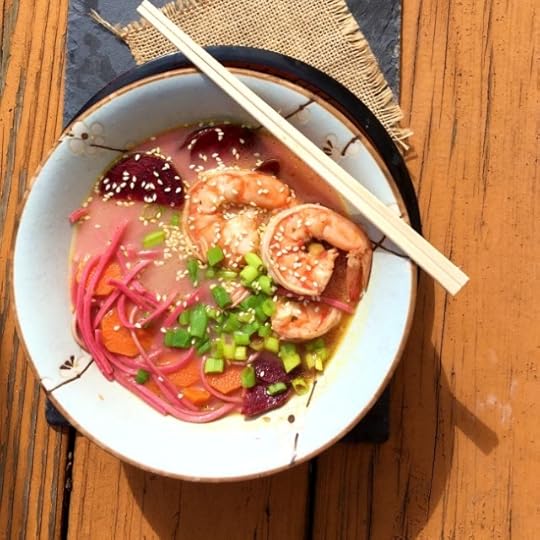
Coconut Ginger Red Rice Noodle Soup
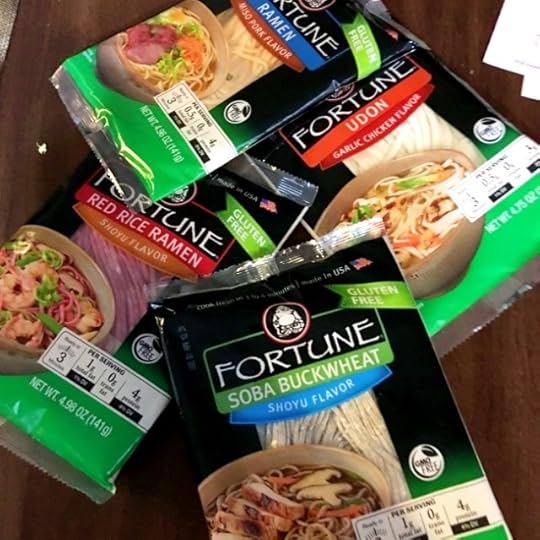
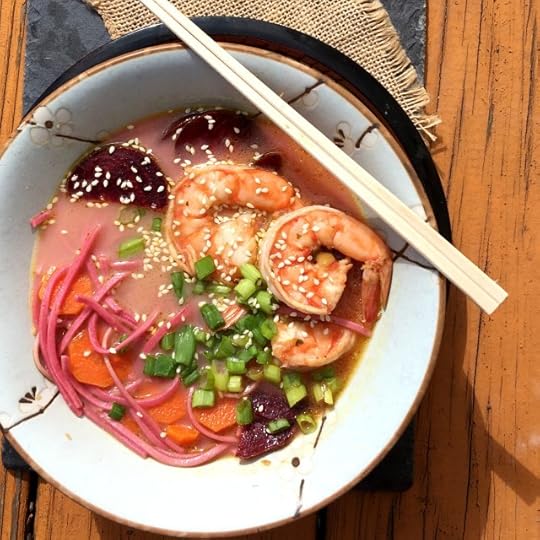 I love playing with noodles. They are my go to comfort food. Which is why, I am thrilled to test out the noodle samples sent to me by JSL Foods. This is a Sponsored Post, the recipe is original and the opinions are my own.
This bright and colorful soup is all about comfort in a bowl. The base is a fresh ginger coconut broth, amped up with sesame oil and some tamari sauce. The beets give the soup a delicate pink color, which matches the red color of the rice noodles. I add in some shrimp for good measure, you have comfort in a bowl.
The visual effect of the red rice noodles from JSL foods adds a really good touch. You can check out JSL foods on Facebook, Instagram, and Twitter. and And you can purchase Fortune Gluten Free Noodle products at Albertsons, Vons, Safeway, Dierbergs Markets and Cub Foods. These Fortune Gluten Free noodles are NEW to market, Shelf Stable and can be found in Asian Dry Grocery Section in grocery stores.”
The basic broth is slurp worthy and perfect for the cooler weather. As always, the ingredients are mostly pantry staples. The dominant flavor is from the ginger and sesame oil with a hint of sweet and savory. A little splash of coconut milk gives the soup both and richness.
A perfect fall weekend kind of lunch, or of course any meal of your choice.
I have loads of packing to complete on what is shaping up to be quite a busy week. I cannot wait to get on the plane to get to Kolkata. My heart and spirits are already there. It is always fun to visit India, but a real treat for me to do this Durga Puja.
The only downside is that the kids will be here. While it gives me more flexibility, a little part of me always misses them when I am away.
PrintCoconut Ginger Red Noodle Soup
Prep Time: 5 minutes
Cook Time: 20 minutes
Total Time: 25 minutes
Yield: Serves 4

A gorgeous ginger coconut red rice ramen soup.
Ingredients
2 tablespoons oil1 and 1/2 tablespoons freshly grated ginger
3 cups water
1 carrot, peeled and thinly sliced
1 beet, peeled and thinly sliced
1 package shoyu tastemaker
1 tablespoon sesame oil
2 tablespoons tamari sauce
1 pound large shrimp, shelled and de-viened
1 cup coconut milk
1 package JSL red rice ramen (see note)
Chopped scallions
Sesame seeds
Instructions
Heat the oil and add in the freshly grated ginger. Stir well.Add the water, carrot and the beet.
Add in the tastemarker/spicepacket, sesame oil and the tamari sauce. Simmer for 15 minutes.
Add in the shrimp and coconut milk and simmer for 4 minutes.
Add in the red rice noodles and simmer for 3 more minutes.
Divide into 4 bowls and serve garnished with the scallions and sesame seeds
Notes
You can subsitute 4 ounces of any other rice noodles in this recipe, and leave the tastemaker out if you do not have it.
3.1http://www.spicechronicles.com/coconut-ginger-red-rice-noodle-soup/
The post Coconut Ginger Red Rice Noodle Soup appeared first on Spice Chronicles.
Coconut Ginger Red Noodle Soup
I love playing with noodles. They are my go to comfort food. Which is why, I am thrilled to test out the noodle samples sent to me by JSL Foods. This is a Sponsored Post, the recipe is original and the opinions are my own.
This bright and colorful soup is all about comfort in a bowl. The base is a fresh ginger coconut broth, amped up with sesame oil and some tamari sauce. The beets give the soup a delicate pink color, which matches the red color of the rice noodles. I add in some shrimp for good measure, you have comfort in a bowl.
The visual effect of the red rice noodles from JSL foods adds a really good touch. You can check out JSL foods on Facebook, Instagram, and Twitter. and And you can purchase Fortune Gluten Free Noodle products at Albertsons, Von's, Lucky's, Safeway, Carr’s, Dierbergs Markets and Cub Foods. These Fortune Gluten Free noodles are NEW to market, Shelf Stable and can be found in Asian Dry Grocery Section in grocery stores.”
The basic broth is slurp worthy and perfect for the cooler weather. As always, the ingredients are mostly pantry staples. The dominant flavor comes from the ginger and sesame oil. A little splash of coconut milk gives the soup both and richness.
A perfect fall weekend kind of lunch, or of course any meal of your choice.
I have loads of packing to complete on what is shaping up to be quite a busy week. I cannot wait to get on the plane to get to Kolkata. My heart and spirits are already there. It is always fun to visit India, but it really has been a very long time since I visited during Durga Puja.
The only downside is that the kids will be here. While it gives me more flexibility, a little part of me always misses them when I am away.
PrintCoconut Ginger Red Noodle Soup
Prep Time: 5 minutes
Cook Time: 20 minutes
Total Time: 25 minutes
Yield: Serves 4
A gorgeous ginger coconut red rice ramen soup.
Ingredients
2 tablespoons oil1 and 1/2 tablespoons freshly grated ginger
3 cups water
1 carrot, peeled and thinly sliced
1 beet, peeled and thinly sliced
1 package shoyu tastemaker
1 tablespoon sesame oil
2 tablespoons tamari sauce
1 pound large shrimp, shelled and de-vienced
1 cup coconut milk
1 package JSL red rice ramen (see note)
Chopped scallions
Sesame seeds
Instructions
Heat the oil and add in the freshly grated ginger. Stir well.Add the water, carrot and the beet.
Add in the tastemarket, sesame oil and the tamari sauce. Simmer for 15 minutes.
Add in the shrimp and coconut milk and simmer for 4 minutes.
Add in the red rice noodles and simmer for 3 more minutes.
Divide into 4 bowls and serve garnished with the scallions and sesame seeds
Notes
You can subsitute 4 ounces of any other rice noodles in this recipe, and leave the tastemaker out if you do not have it.
3.1http://www.spicechronicles.com/coconut-ginger-red-noodle-soup/
The post Coconut Ginger Red Noodle Soup appeared first on Spice Chronicles.
September 26, 2019
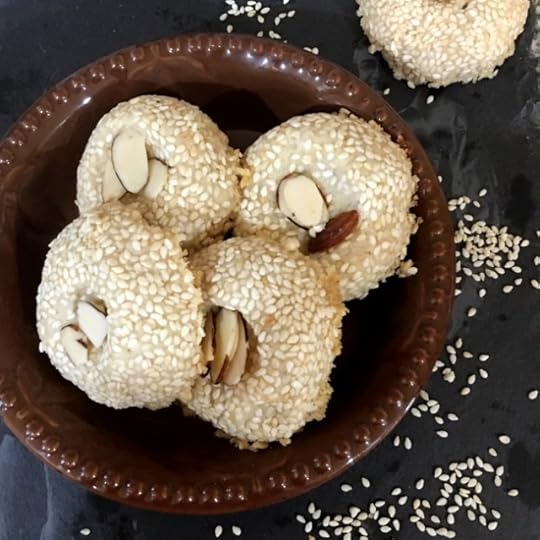
Coconut Sesame Shortbread Nankhatai (Vegan)
 Nankhatai is an Indian shortbread cookie. It gets a sandy delicate texture from the use of semolina and is traditionally made without eggs. It has loads of ghee or clarified butter. In this version, I have substituted coconut oil for ghee, giving the cookies a delicate coconut flavor.
The substitution also results in the cookies becoming vegan. So, all my vegan readers rejoice! Here is a delicate and rich tasting cookie for you too! The best part is that it is ridiculously easy to make.
I do the cooking in my house. I love to cook (well, you knew that!) and I am happiest cooking for my family. There is however a catch! Cooking also is the task I do in our household. This means when I am not there, I need to make sure that food is around. The basic stuff and a little sweetness, just as an icing. These easy to make cookies, ended up being just right for the recent few days that I had stepped out for. Not all the fall color I had expected, but, a great ocean view certainly helped. Among other things left for them, there were these cookies. Delicate, with a crisp crumb these received a whole bunch of compliments.
The sesame seeds are a great addition, in my opinion especially since I have more that I need lying around the house. And the good news is that sesame seeds are very healthy for you. In fact, this cookie needs very little effort, can be passed off as healthy and keeps the household happy. All in all, it is my kind of cookie.

I have another round of meal planning and freezing coming up. I am planning to go to India, in time for Durga Puja. Sans kids. Not all the reasons for this is delightful, but for today the child in me is just super excited to be contemplating to be home for the holidays.
So why is this my kind of cookie:
It pretty much gets mixed in a single bowl
There are enough ingredients that are somewhat healthy – almonds and sesame
Mostly done with pantry staples
Makes my kids happy
So, try the recipe and tell me what you think.
PrintCoconut Sesame Shortbread Nankhatai (Vegan)
Prep Time: 1 hour, 15 minutes
Cook Time: 8 minutes
Total Time: 1 hour, 23 minutes

A delicate and crisp cookie, that makes a perfect sweet treat with a cup of tea or coffee.
Ingredients
3/4 cup almond meal1/2 cup fine semolina
1/2 cup whole wheat or all purpose flour
1/4 cup plus 3 tablespoons white sesame seeds
1/2 cup brown sugar
2 teaspoons freshly ground cardamom (about 20 fresh cardamom pods)
1 cup coconut oil, melted plus oil to grease the cookie sheet
2 tablespoons coconut or almond milk
Sliced almonds to garnish
Instructions
Mix the almond meal, fine semolina and flour in a mixing bowl. Stir in the 1/4 cup sesame seeds and brown sugar, and the the ground cardamom.Place the 1 cup coconut oil in a microwave safe bowl and microwave for 45 seconds to melt the coconut oil.
Pour the coconut oil into the dry ingredient mixture and mix well to mix in the ingredients add the coconut or almond milk if needed to bind.
Place in the refrigerator for about 45 minutes.
In the meantime grease the cookie sheet. I use an 18 by 13 inch pan.
Break off about lime sized pieces of the dough, roll in sesame seeds, flatten and indent the center and place a few sliced almonds in the center. Place on the baking sheet.
Complete the batch in this manner (should be about 18 to 20 cookies)
Pop the sheet pan back in the refrigerator for another 30 minutes.
Pr-heat the oven to 350 degrees, place the cookies in the oven. Bake for 8 minutes. The edges should be golden brown. Turn off the oven and allow the cookies to cool in the oven. The cookies are soft when cooked and turn into a flaky soft texture when cooled.
Enjoy with a good cup of tea!
Notes
The prep time includes 1 hour of time to chill the cookie dough.
3.1http://www.spicechronicles.com/coconut-sesame-shortbread-nankhatai-vegan/The post Coconut Sesame Shortbread Nankhatai (Vegan) appeared first on Spice Chronicles.
September 22, 2019
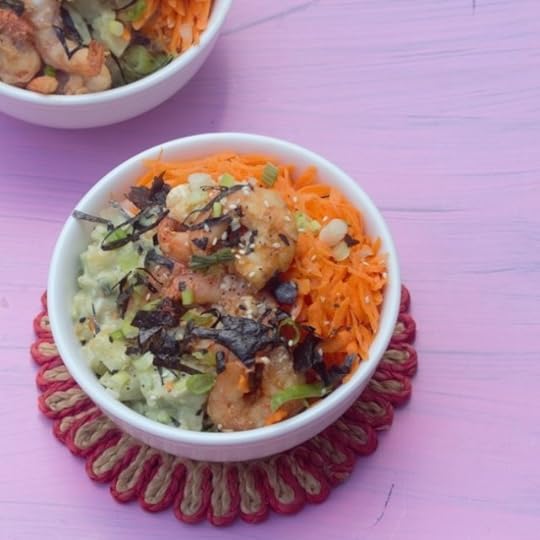
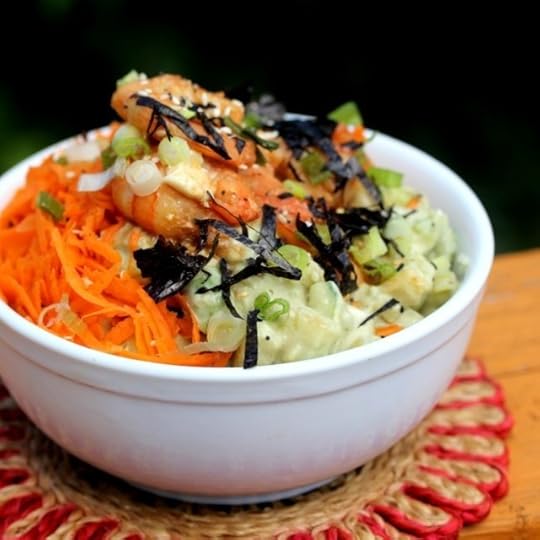
Spicy Shrimp Sushi Bowls
 A little bit of shrimp and inspiration, created these shrimp sushi bowls. I really tossed a bunch of pantry staples together, cooked the rice in the instant pot. The result is dinner salvation and happy children. For a vegetarian version, add in tofu instead of the shrimp. I am serious as simple as that.
So, sushi bowls are a real thing! It is effectively a deconstructed version of sushi. I have done this in a super easy way, just as I do with most things.
This recipe, uses three basic layers.
A seasoned sushi rice layer. I use jasmine rice and it works quite well.
A cucumber avocado salad layer
Spicy Shrimp
All of this is dressed up with nori, sesame seeds and some carrots and scallions for crunch and nutrition. So, there you have it. My kind of a recipe, it is what we call a sushi bowl in my house. And, now to make things easier and more flexible, if you want to skip the rice for any reason of your choice, it is still a very good meal to lean on.
I marinate the shrimp while the rice is cooking and assemble the salad as the rice is cooking and then do a quick flash stir fry for the shrimp. Everything else sort of just gets tossed in. You can actually use sushi grade tuna or salmon. If you want to keep it even more simple try topping it with scrambled eggs. You get the jist.
Fresh shrimp is great, but frozen shrimp that is pre-shelled and deviened works just as well. As they say, it’s all good!
I am writing this post away from home. The next month holds quite a bit a travel for various reasons. The upside, I get to catch up on some shows, I normally do not have time to watch.

My instagram account now has a tapbio link, to help you get to the recipes easily. So, here’s to a wonderful week ahead.
If you like this recipe and want more ideas, do join my Indian Instant Pot Facebook group and Legume Love Group. Of course Instant Indian is ready for pre-order, joining its siblings The Bengali Five Spice Chronicles and Spices and Seasons.
Do not forget to get social with me, Facebook, Twitter, Instagram, Pinterest and even Youtube.
PrintSpicy Shrimp Sushi Bowls
Prep Time: 15 minutes
Cook Time: 20 minutes
Total Time: 35 minutes
A easy take on sushi, these sushi bowls will help you use up loads of veggies and are fun to assemble.
Ingredients
For the Shrimp1 pound shelled and de-veined shrimp
2 tablespoons sriracha or other chili sauce
1 tablespoon sesame oil
1 tablespoon vegetable oil to stir fry
For the rice
1/2 cup of jasmine or sushi rice
2 tablespoons of mirin (rice wine)
1 tablespoon vinegar
1 teaspoon salt or to taste
1 teaspoon sugar
For the avocado cucumber salad
1 large cucumber cubed
2 avocadoes, peeled and cubed
2 tablespoons mayonnaise
2 tablespoons sour cream
To finish
Chopped Nori
Grated Carrots
1 tablespoon black sesame seeds
1 tablespoon while sesame seeds
Instructions
Toss the shrimp with the sriracha and sesame oil and set aside to marinate while doing the other things.Place the rice with 1 cup of water in the instant pot. Put on the rice setting. Mix the mirin, vinegar, salt, and sugar and set aside.
While the rice is cooking, chop the cucumber and the avocado and toss with the mayonnaise and sour cream.
Release the pressure from the rice, this can be done anytime after the rice cycle is done. Fluff the rice and stir in the mirin and vinegar mixture.
Heat the vegetable oil in a pan, add the shrimp and cook for 2 to 3 minutes.
Set out 4 bowls. Divide the rice into these bowls. Top with the cucumber, avocado mixture and the shrimp.
Finally add the grated carrots and chopped nori. Sprinkle with the sesame seeds and scallions. Enjoy.
3.1http://www.spicechronicles.com/spicy-shrimp-sushi-bowls/
The post Spicy Shrimp Sushi Bowls appeared first on Spice Chronicles.
September 17, 2019
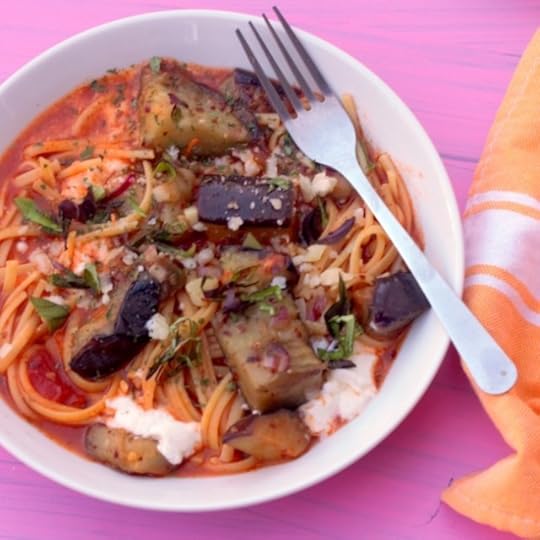
Pasta alla Norma – My way
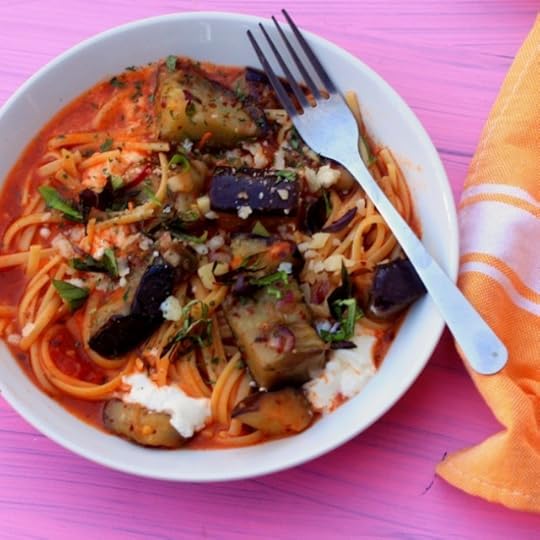 It is pretty easy to tell that I love making pasta, and usually lean towards tomato based pastas. I also love to rework so called classic dishes to make them work in my sphere of life. So, in this case the reworked dish I am excited to present is Pasta alla Norma (my way)
I did cross that “my way” and you will need to read through to find out why.
Either way I promise you, that you will end up with a truly amazing recipe
An amazing instant pot friendly recipe..
The most appealing thing for Pasta Alla Norma for me is the fact that it has eggplant!
What the eggplant, you might ask? Well, eggplant is one such that my daughter adores.. I will love it in its smoky avatar.
True the best ever rendition of smoky eggplant in my kitchen and our house is Baigan Bhartha as in the recipe in my Spices and Seasons Cookbook. The proverbially neglected middle child. I will espouse on that analogy on a different day…

My Way
Today, I will inform you about my take on the “myway refference” . Well my as you may have guessed is my take on a dish. Indeed it is how I now make it. This said other than the eggplant and tomatoes I am yet to truly find consistency on other ingredients.
There is also the Ricotta Salata but ever since I started doing this, no other Ricotta mattered.
So yes, that is the the other sub in this recipe that I offer to you.
So, the my way inference is just that! Everyone has their own interpretation on a dish.
If you are desi like me, we all know, a personal garam masala is sort of truly essential.
So yes, this is my instant pot truly luscious take on Pasta Alla Norma
PrintPasta alla Norma – (Indstant Pot)
Prep Time: 10 minutes
Cook Time: 20 minutes
Total Time: 30 minutes
A super easy instant pot take on this super easy sicilian Pasta alla Norma
Ingredients
2 tablespoons plus 1/3 cup olive oil1 tablespoons minced garlic divided in two
1 medium red onion, finely chopped
1 cup diced tomatoes
8 ounces dried pasta
1 tablespoon salt divided
1 medium sized eggplant, diced
1 teaspoon red pepper flakes
2 tablespoons red wine vinegar
1/2 cup fresh ricotta
Parsley to drizzle
Instructions
Turn on the instant pot to saute mode, add the two tablespoons of olive oil.Add in 1/2 tablespoon of minced garlic and the red onion and saute for 2 minutes.
Add in the tomatoes and the dried pasta with 1/2 cup water. Turn off the saute mode.
Add in 1/2 tablespoon salt.
Cover the instant pot and set on 2 minutes of pressure.
In the mean time add the remaining olive oil in a skillet add in the remaining garlic and the eggplant.
Cook on medium heat turning occatsionally until the eggplant is soft and golden, this will take about 10 minutes.
Sprinkle with the remaining salt and red pepper flakes.
This will allow the instant pot to be done, Allow a quick release and stir well. After 4 minutes. Stir the pasta well and mix in the eggplant and the vinegar.
Serve in bowls with dollops of fresh riccota and pasrley.3.1http://www.spicechronicles.com/pasta-alla-norma-my-way/
The post Pasta alla Norma – My way appeared first on Spice Chronicles.
September 14, 2019
Oatmeal Buttermilk Pancakes – Making Sundays Count
 There are several reasons to spend family time, even away from the home kitchen. You discover things like your son LOVES pancakes.. So, of course, pancakes are in.. And, once you try these Oatmeal Buttermilk Pancakes you will realize there is more to my making them, than just being a doting mom. Yes, as they say, busted… I am in love with them too!
There is however more to amazingly delicious oatmeal pancakes than their deliciousness. They are part of making Sunday’s count. Look, I would love to tell you that I send the children to school with hot freshly made breakfasts everyday. Not, quite. Weekday mornings are a rushed affair – cereal, boiled eggs, and sometimes fruit dominate. Nuts too, thrown in for good measure. This said, I make sure that weekend breakfasts, especially Sunday breakfasts count.

That is why we have the weekend, to do things that we otherwise would have trouble fitting in. That and I always need to justify my deep and unuabashed love for maple syrup. My favorite is of course, our very local Crown Maple syrup. And no, they are not paying me to say this.

These pancakes are melt in your mouth soft. They are made with mostly rolled oats, with enough flour to bind. The trick of course is to allow the oats to soak overnight in buttermilk. And I have made these with both butter and coconut oil. We absolutely loved the coconut flavor that the coconut oil added. If you are in the camp that believes coconut oil is healthy and good for you, this is good news. I usually add it to things to enhance the coconut flavor, I am personally not totally in the camp of replacing coconut oil with other oils such as olive oil, but we love the coconut flavor in certain things and that is where we use it.

And yes, then I pretent that I in the coconut oil is super healthy for me camp. Anyhow, either way, I love the way these turned out. Try them and make your Sunday count!
PrintOatmeal Buttermilk Pancakes – Making Sundays Count
Prep Time: 6 hours, 5 minutes
Cook Time: 25 minutes
Total Time: 6 hours, 30 minutes
Yield: Serves 4

A luscious soft and fluffy pancake made with oatmeal and buttermilk.
Ingredients
1 and 3/4 cups rolled oats1 and 1/2 cups buttermilk
1/2 cup all-purpose flour
2 eggs
2 tablespoons brown sugar
1/2 teaspoon salt
1/2 cup milk
Coconut oil, butter or olive oil for cooking
Maple Syrup to drizzle
Optional fruit to serve
Instructions
Mix the oatmeal and buttermilk and let it rest overnight. This can be done in the refridgerator or outside. If you do this outside, the pancakes will taste a little extra tart but will be lighter in texture.Mix well and add in the flour, eggs, brown sugar, salt and the milk and beat well to form a batter.
Place a cast iron or other griddle on the fire and heat for 2 minutes. Add a little coconut oil, butter or oil to season.
Place a ladleful of batter and turn the temperature on low. Allow the pancake to cook for 2 minutes and carefully flip on the other side and cook for 2 minutes.
Continute until all the batter is used up.
Serve drizzled with maple syrup and fruit if desired.
Notes
Most of the prep time is to allow the batter to soak.
3.1http://www.spicechronicles.com/oatmeal-buttermilk-pancakes/
The post Oatmeal Buttermilk Pancakes – Making Sundays Count appeared first on Spice Chronicles.
September 8, 2019
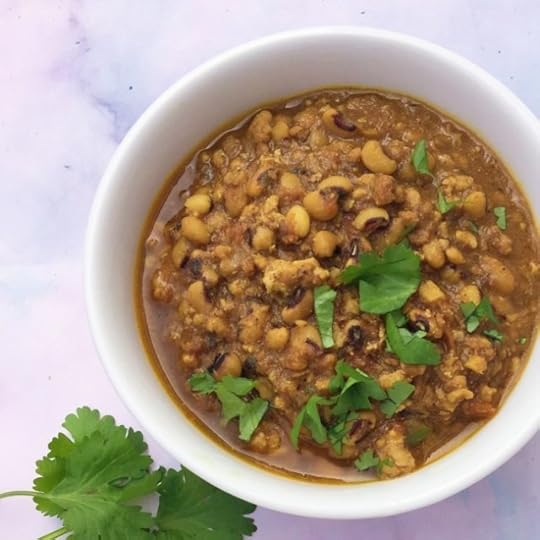
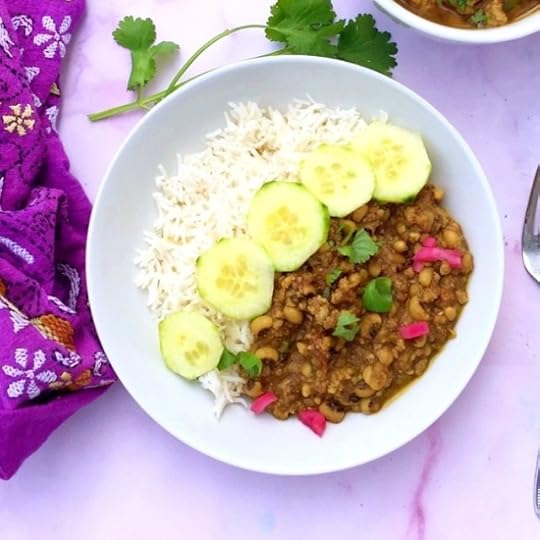
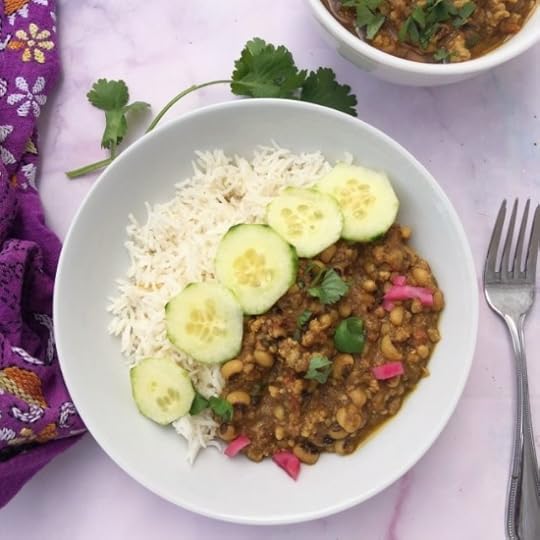
Keema Lobia _Black Eyed Peas with Ground Chicken
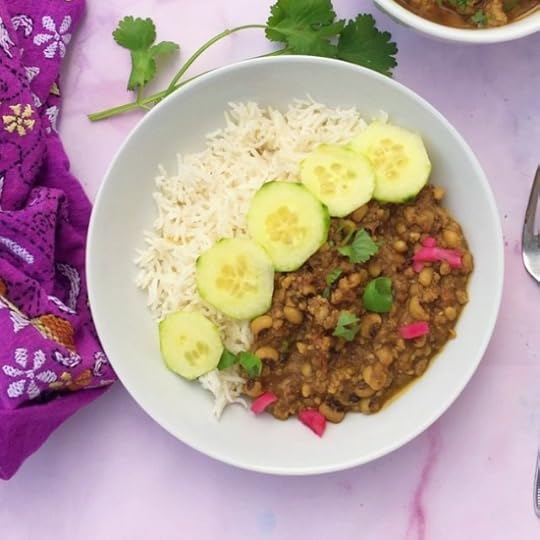 This dish is inspired by the recipe on the Tea for Turmeric site. I have simplified her recipe further, and used ground chicken. It is still Keema Lobia. Keema is the ubiquitous word for ground meat in Hindi, and Lobia is black eyed peas.
So Keema Lobia is Black Eyed Peas with ground chicken in my case. It is happily made in the instant pot.
This is round two, following pre-vacation round one. The dish uses everyday ingredients and keeps well in the refridgerator. Now it is a part of our meal rotation. Comforting, hearty with just enough wholesomeness for a good one pot meal.
Speaking of Tea for Turmeric, I enjoy reading the blog and particularly love her instant pot recipes. I feel they are flavorful and yet practical. Also, love the Pakistani recipes.
I serve this Keema Lobia with with sliced cucumbers and carrots. Oh, and also with some pickled onions.
This makes it a complete wholesome meal. It is almost like a chili of sorts. It reminds me of my Bengali ghooghni.
The weather is donned in a distinct fall in the air kind of spirit. All the comforting spices, make this a perfect seasonal transition kind of meal.
Make yourself a large batch of this humble curry, and you will be thanking yourself through the week. If you are looking for a vegetarian variation of black eyed peas, my punjabi lobia will be a good fit. And honestly, something tells me that this recipe made without the meat is just fine. There is plenty of flavor to see you through.
My new thing this school year is to find some variety with the breakfast series. I think dinner is thankfully in good shape. As good as it gets kind of shape. Enough for me to work in my night walks.
Some of my changes from the original are as follows:
I use ground chicken instead of ground beef.
I do not cook the black eyed peas separately, instead I cook it one shot.
What I do feel is important for the flavor,
The original recipe mentions that the ginger and green chilies are added at the end of cooking. This gives this recipe a very unique flavor, so I do this.
If you like this recipe and want more ideas, do join my Indian Instant Pot Facebook group and Legume Love Group. Of course Instant Indian is ready for pre-order, joining its siblings The Bengali Five Spice Chronicles and Spices and Seasons.
Do not forget to get social with me, Facebook, Twitter, Instagram, Pinterest and even Youtube.
PrintKeema Lobia _Black Eyed Peas with Ground Chicken
Prep Time: 1 hour, 5 minutes
Cook Time: 25 minutes
Total Time: 1 hour, 30 minutes
A comforting melange of black eyed peas cooked with ground meat.
Ingredients
2 tablespoons oil1 teaspoon cumin seeds
1 medium sized onion, chopped
2 cloved of garlic minced
1 teaspoon powdered cumin
1 teaspoon ground black pepper
1/2 pound of ground chicken, turkey or any other meat of your choice
1 teaspoon salt
3/4 cup black eyed peas soaked for at least and hour (see notes)
1/2 teaspoon garam masala
1 tablespoon freshly minced ginger
1 serrano pepper, minced
Chopped cilantro
Instructions
Turn on the instant pot.Add in the oil and heat for a minute. Add in the whole cumin seeds and wait until they sizzle.
Add in the onion and the garlic and saute for 2 minutes.
Add in the powdered cumin and ground black pepper with the ground meat.
Add the salt and stir well.
Add in the black eyed peas with 1 cup of water.. Turn off the saute mode. Cover and set to 8 minutes of pressure. Allow a natural release.
Remove the cover, set to saute mode. Stir in the garam masala, minced ginger and the Serrano pepper. Stir in the chopped cilantro.
Notes
The original recipe calls for using cooked black eyed peas, so you can actually work with a can of black eyed peas, in which case just pressure for 2 minutes.
If you do not soak the black eyed peas, just increase the pressure time by 3 minutes.
3.1http://www.spicechronicles.com/keema-lobia-_black-eyed-peas-ground-chicken/
The post Keema Lobia _Black Eyed Peas with Ground Chicken appeared first on Spice Chronicles.
September 2, 2019
Sweet and Sour Chicken Wings (Air Fryer)
 These chicken wings came together as a last ditch effort to come up with something for my son, and everyone in the house pronounced it as sensational. To quote their exact words – these Sweet and Sour Chicken Wings are so good, they are sensational. And you know what, they are ridiculously easy to make. I made the wings in the air fryer and tossed them with some sauce also made from pantry staples.
If you want some more air-fryer inspiration you can always check out my little e-book.So, my son claims he has never eaten anything sweet and sour. This was yesterday! And his sister, proceeds to describe this. All of this ended up with me being asked to make something sweet and sour. And here is what I have.
Actually, this turned out to be so good, I had to write up the recipe before I forgot. Actually, my way of procrastinating to take an evening walk. I made two variations of the sauce. One with a pop of spice, with Sriracha and one without. They both worked, however, I have to confess that the spicy one eventually won the taste test. It is not a lot of spice, but just enough to make things work.

Chicken wings are not an everyday creation in our house, but, certainly fun when we make them. What I like with air frying these beauties is that, they cook in their own fats (ahem juices). Tossing them in a sauce like this is a breeze. These wings make a great appetizer or an addition to any meal. Last night, I used them as an add on and then later as a noshing snack of sorts.

And, you know what, this recipe is done with practially no chopping, cutting or use of complex ingredients. The scallions that I use for garnish is optional. So there you have it, a ridiculously simple dish that gives your favorite Chinese restaurant a run for its money.
Note: If you do not have an air-fryer, you can use a sheet pan and roast the chicken wings.
If you like this recipe and want more ideas, do join my Indian Instant Pot Facebook group. Of course Instant Indian my Indian Instant Pot cookbook is ready for order, joining its siblings The Bengali Five Spice Chronicles and Spices and Seasons.
Do not forget to get social with me, Facebook, Twitter, Instagram, Pinterest and even Youtube.
PrintSweet and Sour Chicken Wings (Air Fryer)
Prep Time: 5 minutes
Cook Time: 25 minutes
Total Time: 30 minutes
Yield: Serves 4 to 6
Serving Size: 2 to 3 wings

A super easy and delicious rendition of sweet and sour chicken wings. Air fried and done with pantry staples.
Ingredients
2 pounds chicken wings, sectionedSalt and pepper
1 small can pineapple chunks with natural juice
1 tablespoon sesame oil
2 tablespoons soy sauce
1/2 cup tomato ketchup
2 tablespoons sriracha or any chili sauce
Chopped scallions to garnish
Instructions
Toss the chicken wings in salt and pepper. There are about 20 wing pieces and the air frying needs to be done in two batches.Place them in the air fryer basket. No oil is needed.
Turn the heat to 450 degrees, cook for 12 minutes. Turn and cook for another 10 minutes.
In the meantime, Drain the pineapple chunks and reserve the juice.
Place the juice in a pan, add the sesame oil, soy sauce, ketchup and sriracha and bring to a simmer. Cook for 5 minutes
Add in the chicken wings and mix well to coat. The wings should absorb all the sauce.
Stir in the pineapple chungs.
Serve the wings right away with the scallions to garnish.
3.1http://www.spicechronicles.com/sweet-sour-chicken-wings-air-fryer/
The post Sweet and Sour Chicken Wings (Air Fryer) appeared first on Spice Chronicles.


