
Rinku Bhattacharya's Blog, page 30
February 29, 2020
Instant Pot Vegetable Lo Mein
PrintInstant Pot Vegetable Lo Mein
Prep Time: 5 minutes
Cook Time: 15 minutes
Total Time: 20 minutes
An easy version of vegetable lo mein, instant pot and stove top instructions. This is done in about 20 minutes flat.
Ingredients
2 tablespoons oil1 tablespoon sesame oil
1 tablespoon minced ginger
1/2 tablespoon minced garlic
2 tablespoons tamari soy sauce
2 teaspoon sugar
1/2 teaspoon freshly ground black pepper
1 medium sized bell pepper, cut into 1 inch pieces
1 large carrot, peeled and cubed
1 cup of broccoli, cut into pieces
6 ounces buckwheat noodles or any other noodles of your choice
1 teaspoon sesame seeds to finish
Instructions
Turn the instant pot on to sauté mode. Add in the oil and sesame oil. Add in the ginger and garlic and cook for a minute.Turn off the instant pot. Add in the tamari, sugar, black pepper and the vegetables and mix well.
Add in the noodles.
Add about 1/2 cup of water and use this to deglaze the pot. Set to 1 minute of pressure and do a quick release. Remove the lid and mix in the noodles. The mixture will be a little soupy and the noodles a little al dente. Cover and let it rest for 5 minutes.
Sprinkle with the sesame seeds if using and serve immediately.
Notes
Stove Top Instructions
Cook the noodles until tender and drain throughly.
In a large pot, heat the oil and sesame oil and add in the ginger and garlic.
Add in the tamari, sugar and black pepper and add in the vegetables.
Cover and cook for about 5 to 7 minutes.
Remove and stir in the noodles to mix well.
Sprinkle with the sesame seeds and serve hot.
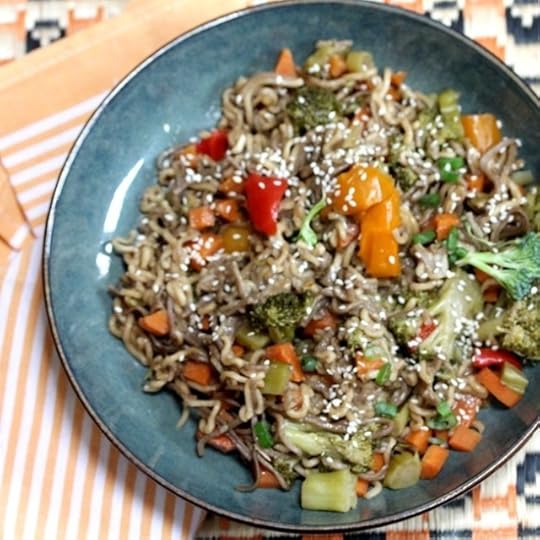 This recipe is something that I use to get my kids to eat all the odds and ends that I find in my refrigerator. This Vegetable Lo Mein is flexible and moreish. Done in the instant pot, it is mostly a push and dump kind of recipe. The only change I make is using buckwheat noodles. It is my new thing. Higher in fiber and actually gluten-free, it is a little more wholesome than regular flour based noodles. That said this recipe works just fine with regular noodles too.

I usually make this with bell peppers, carrots, beans, and broccoli. But really, you can even throw in mixed frozen vegetables if you so desire. In terms of the seasonings, I keep it simple, ginger, garlic, sesame oil and soy sauce. If I feel like it, I might add in a little sugar to balance out the flavors. This recipe takes about 20 minutes all in. I will assure you that it will give your take out a run for its
PrintInstant Pot Vegetable Lo Mein
Prep Time: 5 minutes
Cook Time: 15 minutes
Total Time: 20 minutes
An easy version of vegetable lo mein, instant pot and stove top instructions. This is done in about 20 minutes flat.
Ingredients
2 tablespoons oil1 tablespoon sesame oil
1 tablespoon minced ginger
1/2 tablespoon minced garlic
2 tablespoons tamari soy sauce
2 teaspoon sugar
1/2 teaspoon freshly ground black pepper
1 medium sized bell pepper, cut into 1 inch pieces
1 large carrot, peeled and cubed
1 cup of broccoli, cut into pieces
6 ounces buckwheat noodles or any other noodles of your choice
1 teaspoon sesame seeds to finish
Instructions
Turn the instant pot on to sauté mode. Add in the oil and sesame oil. Add in the ginger and garlic and cook for a minute.Turn off the instant pot. Add in the tamari, sugar, black pepper and the vegetables and mix well.
Add in the noodles.
Add about 1/2 cup of water and use this to deglaze the pot. Set to 1 minute of pressure and do a quick release. Remove the lid and mix in the noodles. The mixture will be a little soupy and the noodles a little al dente. Cover and let it rest for 5 minutes.
Sprinkle with the sesame seeds if using and serve immediately.
Notes
Stove Top Instructions
Cook the noodles until tender and drain throughly.
In a large pot, heat the oil and sesame oil and add in the ginger and garlic.
Add in the tamari, sugar and black pepper and add in the vegetables.
Cover and cook for about 5 to 7 minutes.
Remove and stir in the noodles to mix well.
Sprinkle with the sesame seeds and serve hot.
In fact, I have had some rather greasy and lack luster versions of Lo Mein that really don’t cut it. Since, it is one of my children’s favorite things to order, I have found this rather easy creation. Feel free to vary this with your choice of noodles, vegetables and proteins.
The same seasonings will work, and I have given you a stove top instructions as well. After all, why let the lack of a device get in the way of a good tested and tried recipe. To ensure that this recipe is truly gluten-free, make sure you are using tamari and check your buckwheat noodles.
Soba noodles are traditionally gluten-free but I have seen varieties that have wheat flour blended. I do add in some freshly ground black pepper and finish with sesame seeds. And yes, this recipe is naturally vegan as well.
If you have to pick, do not skip the black pepper. It give it a nice and pleasant heat.
If you like this recipe and want more ideas, do join my Indian Instant Pot and Air Fryer Facebook group .
Pick up a copy of my Instant pot cookbook Instant Indian here, along with The Bengali Five Spice Chronicles and Spices and Seasons.
Do not forget to get social with me, Facebook, Twitter, Instagram, Pinterest . And of course, sharing is caring
PrintInstant Pot Vegetable Lo Mein
Prep Time: 5 minutes
Cook Time: 15 minutes
Total Time: 20 minutes
An easy version of vegetable lo mein, instant pot and stove top instructions. This is done in about 20 minutes flat.
Ingredients
2 tablespoons oil1 tablespoon sesame oil
1 tablespoon minced ginger
1/2 tablespoon minced garlic
2 tablespoons tamari soy sauce
2 teaspoon sugar
1/2 teaspoon freshly ground black pepper
1 medium sized bell pepper, cut into 1 inch pieces
1 large carrot, peeled and cubed
1 cup of broccoli, cut into pieces
6 ounces buckwheat noodles or any other noodles of your choice
1 teaspoon sesame seeds to finish
Instructions
Turn the instant pot on to sauté mode. Add in the oil and sesame oil. Add in the ginger and garlic and cook for a minute.Turn off the instant pot. Add in the tamari, sugar, black pepper and the vegetables and mix well.
Add in the noodles.
Add about 1/2 cup of water and use this to deglaze the pot. Set to 1 minute of pressure and do a quick release. Remove the lid and mix in the noodles. The mixture will be a little soupy and the noodles a little al dente. Cover and let it rest for 5 minutes.
Sprinkle with the sesame seeds if using and serve immediately.
Notes
Stove Top Instructions
Cook the noodles until tender and drain throughly.
In a large pot, heat the oil and sesame oil and add in the ginger and garlic.
Add in the tamari, sugar and black pepper and add in the vegetables.
Cover and cook for about 5 to 7 minutes.
Remove and stir in the noodles to mix well.
Sprinkle with the sesame seeds and serve hot.
The post Instant Pot Vegetable Lo Mein appeared first on Spice Chronicles.


February 28, 2020
Mexican Rice in the Instant Pot
 I made this easy Mexican Rice as a part of a Mexican themed dinner last week. Easy and flavorful, it added just the right complement to the rest of the meal. Except, with a double batch it worked wonders for meal prep during the week as well. Vibrant, colorful, and infused with lots of simple flavors it makes the perfect easy meal or side dish.
I love to serve this with added lime wedges and some tortilla chips. Black beans, corn and a whole load of other vegetables boost the nutritional profile. And the colors, make you feel like this is fiesta time.
The highlight for me was that my little nephew seemed super excited. It is all relative. Everyone’s dinner rotation can seem mundane to their kids. Possibly why we all keep striving to build and add more variety to keep the rotation fresh and vibrant. The seasonings in this rice are practical and mostly about oregano and garlic. In summer, I have been known to do this with fresh oregano and corn.
But, more often than not, this is where I put that Costco bag of organic corn to good use. Other veggies are bell peppers, cubed carrots, and pretty much anything that you might find handy. We love this plain, but a pot of beans can never be a bad idea.

And, then I throw everything into either the instant pot or the mealthy multipot. Speaking of the mutipot, if you are in the market for a new electric pressure cooker their 2.0 might be a good deal. I have found that using the rice setting gets me great results. Fluffy and wholesome. It is one of my favorite settings and given how frequently I use it, that is saying a lot.

So, give this easy colorful dish a try and you will know why it earned me a new young fan.
If you like this recipe and want more ideas, do join my Indian Instant Pot and Air Fryer Facebook group .
Pick up a copy of my Instant pot cookbook Instant Indian here, along with The Bengali Five Spice Chronicles and Spices and Seasons.
Do not forget to get social with me, Facebook, Twitter, Instagram, Pinterest . And of course, sharing is caring!
PrintMexican Rice in the Instant Pot
Prep Time: 5 minutes
Cook Time: 25 minutes
Total Time: 30 minutes

A flavorful and easy take on Mexican Rice, this easy one pot meal can be done in the instant pot.
Ingredients
3 tablespoons oil1 medium sized onion, chopped
1 tablespoon minced garlic
1 bell pepper, diced
1 and 1/2 teaspoons powdered cumin
1 teaspoon crushed red pepper flakes
1 teaspoon smoked paprika
2 teaspoons dried oregano
1 cup basmati rice
1 and 1/2 teaspoons salt or to taste
1/2 cup canned tomato sauce
3/4 cup frozen corn
1/2 cup frozen peas
1/2 cup black beans drained
2 to 3 tablespoons fresh lime juice
2 tablespoons chopped cilantro
Tortilla chips and salsa to serve (optional)
Instructions
Turn the instant pot onto saute mode, add in the onion and the garlic and saute for 2 minutes. Add in the bell pepper and mix well.Stir in the cumin, red pepper flakes, and smoked paprika. Mix in the dried oregano and the rice. Turn off the saute mode.
Add in the salt, tomato sauce and the corn and 1/2 cup water.
Set on rice mode and allow for a natural release. Remove the lid. Stir in the peas and the black beans.
Stir in the lime juice and cover and let the rice rest for 3 minutes.
Garnish with cilantro and serve with a side of tortilla chips and salsa if desired.3.1http://www.spicechronicles.com/mexican-rice-instant-pot/
The post Mexican Rice in the Instant Pot appeared first on Spice Chronicles.
February 24, 2020
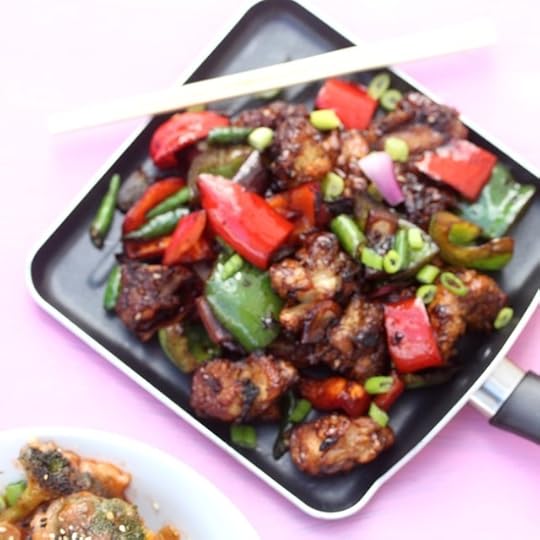
Chili Tofu or Paneer (Instant Pot)
 A stray comment on my group, led to this easy and practical take on Chili Tofu. There really is no particular formula to the recipe, it is another way to spark up tofu. This weekend has been a bit of a struggle to get back into my meal planning rhythm. And, closing it out with this tofu was just what I needed.
It is easy to tell, that I do not like to plan and prep weeknight meals. It is right there for me, along with writing a book proposal, or invoicing for classes. For me, it cramps my spontaneity, but does make the house move faster. As for my husband, an empty fridge makes him nervous. He is usually the one in charge of the weekday meal shift. With prepared food by your truly of course. Anyway, I digress. Most Monday’s my refrigerator has a good balance – veggies, fish, lentils and tofu or paneer. Thursdays, now that is a different story.
Actually, it is for my in a rush weeknight that a dish like this comes in handy. It is tossed and put together with a few key ingredients. I will confess, that the instant pot version is not as pretty as doing it on the stove top. And to do this on the stove is also pretty easy. But, there is that seductive thing about popping things in an forgetting all about them. So, this is where crisping the tofu like in this recipe helps. It gives some texture and heft to this deeply flavorful sauce.

I have added just bell peppers and onions to this dish, feel free to add other vegetables such as mushrooms, carrots, etc to suit your tastes. Also, as is my preference, this sauce does not need any cornstarch, and my magic ingredient is Hoisin sauce. Which takes you back to the beginning – there are no real rules in Indo-Chinese cooking.

If you like this recipe and want more ideas, do join my Indian Instant Pot and Air Fryer Facebook group .
Pick up a copy of my Instant pot cookbook Instant Indian here, along with The Bengali Five Spice Chronicles and Spices and Seasons.
Do not forget to get social with me, Facebook, Twitter, Instagram, Pinterest . And of course, sharing is caring!
PrintChili Tofu or Paneer (Instant Pot)
Prep Time: 5 minutes
Cook Time: 20 minutes
Total Time: 25 minutes
[image error]
An instant pot take on the Indo-Chinese chili tofu. Easy and quick and perfect for that busy weeknight meal.
Ingredients
2 tablespoons oil1 tablespoon sesame oil
1 tablespoon minced garlic
1/2 tablespoon minced ginger
1 large onion, cut into eights, layers separated
1 large bell pepper, cut into 2 inch dice
1/4 cup soy sauce
1/4 cup mirin or other cooking wine
2 tablespoons hoisin sauce
I recipe [Crispy Tofu|http://www.spicechronicles.com/crispy...-
tofu/#sthash.gC1EytAf.dpbs].
6 to 8 Serrano chilies, sliced lengthwise
1/4 cup chopped scallions
Instructions
Turn the instant pot to saute mode and add in the oil and sesame oil and heat for a minute.Add in the ginger and garlic and stir quickly. Turn off the heat.
Add in the onion, bell pepper, soy sauce, cooking wine and hoisin sauce. Mix well.
Cover and cook for zero minutes under pressure and do a quick release.
Toss in the tofu and the green chilies.
Serve garnished with the scallions.
Notes
If you are crisping the tofu from the scratch, you can do it, which the sauce is happening.
If you are using paneer, I think you can get away with crisping.
The post Chili Tofu or Paneer (Instant Pot) appeared first on Spice Chronicles.
February 20, 2020
Kale, Red Onion, and Cheddar Pakoras (Air Fryer)
 I have created a pretty scrumptious take on my Collard and Cheddar Pakoras. Except that I used kale, red onions and carrots. And I air fried these crispy morsels. They taste pretty good served piping hot! We love pakoras in our house, you can tell just my searching for pakoras on this site. So getting them to an acceptable form in the air fryer has taken me several attempts. Just when I was satisfied with these, I got the flu. But, I am almost bouncing back and have to share my recipe and tips and techniques with you.
You can use any green of your choice, I find adding the red onions lends a natural touch of sweetness, like I have done with Kale Pakoras here, and Pumpkin Pakoras here. While it is great not to have the guilt associated with the frying. The real advantage here is that
Now, here is what I did to ensure a good crispy coating. As with anything, when adapting a recipe for an apliance you have to make the necessary changes to get the best results.

Important Fixes to ensure a good crispy air fried pakora
Add a mixture of rice flour, cornstarch and chickpea flour. This ensures a crispier result than just working with chickpea flour.
Use a lighter batter, just enough to help bind the vegetables.
Shred the vegetables finely. Do not use a food processor for the onions, as they result in too much moisture.
Line the air fryer basket with parchment paper if you wish, this will make clean up even easier.
I have not tried this recipe in the oven, but I have tried making this frying instead of air frying. Of course somewhat messier, but I will lot lie the fried ones do taste good but the air fried ones are a pretty close contender.

If you like this recipe and want more ideas, do join my Indian Instant Pot Facebook group and Legume Love Group.
Of course, check out my Instant pot cookbook Instant Indian along with its siblings The Bengali Five Spice Chronicles and Spices and Seasons.
PrintKale, Red Onion, and Cheddar Pakoras (Air Fryer)
Prep Time: 8 minutes
Cook Time: 16 minutes
Total Time: 25 minutes
Yield: Serves 4

A healthy bright and crispy fritter that is mostly guilt free.
Ingredients
For the Pakoras3/4 cup chickpea flour (besan)
1/2 cup cornstarch
1 tablespoon rice flour
1 and 1/2 teaspoons whole cumin seeds
1 teaspoon turmeric powder
1 teaspoon cayenne pepper
1 and 1/2 teaspoons salt or to taste
3 tablespoons oil, plus extra to spray
1 cup finely chopped kale (this should be cut into ribbons)
1 large carrot, peeled and shredded
1 medium sized red onion, peeled and thinly sliced
1/4 cup grated cheddar
1/4 cup chopped cilantro
For the dipping aioli
2 tablespoons mayonaise
2 tablespoons ketchup
1 tablespoon sriracha
Instructions
Mix the chickpea flour, cornstarch, and rice flour in a mixing bowl. Stir in the cumin seeds, turmeric powder, red cayenne pepper and salt. Mix in the oil.Add in the chopped vegetables and cheese and toss to coat.
Add in 1/4 cup water and then add more water 1 tablespoon at a time. Just enough to shape the pakoras. I shape them into small birds nests. This mixture makes about 15 pakoras.
Place a piece of parchment paper in your air fryer basket if desired.
Shape and place the pakoras on the parchment. Place the air fryer cover, set to 500 degrees and cook for 8 minutes. Turn and cook for another 8 minutes.
Serve hot.
While the pakoras are cooking mix the ingredients for the dipping sauce.3.1http://www.spicechronicles.com/kale-red-onion-and-cheddar-pakoras-air-fryer/
The post Kale, Red Onion, and Cheddar Pakoras (Air Fryer) appeared first on Spice Chronicles.
February 13, 2020
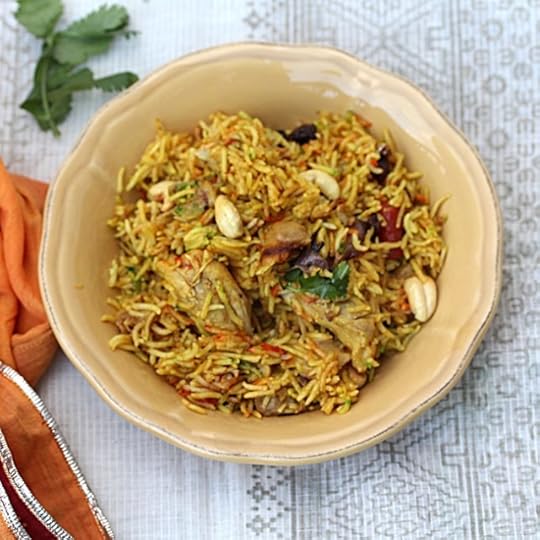
Lunchbox Chicken Biryani
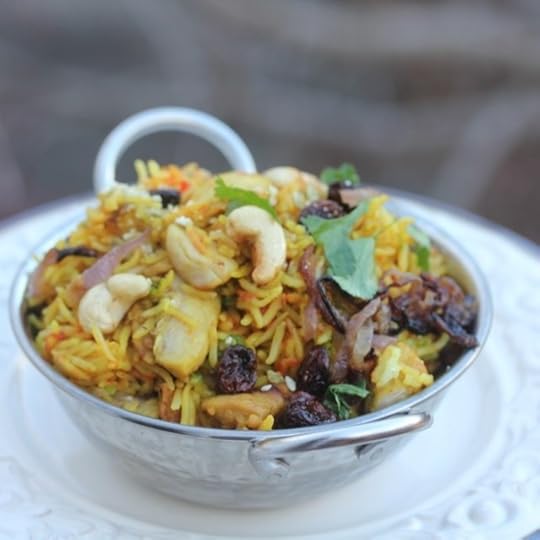 The past two weeks have been crazy busy. My work gets that way sometimes more often than I like. It is for times like this that I need my lunchbox Chicken Biryani. Actually, lunchbox Chicken Biryani is what emerges when you play around with a Chicken Biryani recipe with the objective of making it simple. This is essentially from one of my classes, but I wanted to get this down to something very simple. An easy one pot creation that I can whip up for my lunchbox.
In fact, when the week gets busy it is even more important for me to control my lunchbox. I need to feel connected to homey flavors, and feel satisfied. Kind of the same comfort that one sometimes feels when hugging a cup of hot tea or coffee on a cold winter’s day.
Fried onions give this biryani and deep and rich flavor.
A few essentials for good results,
The marination is important, anywhere between 30 minutes to overnight.
Naturally, the longer the better.
It is important to use good quality homemade garam masala.
Both the stove top and the instant pot give you great results, it is important not to skip the ghee at the end.
Optional Ideas:
At the very last minute, if you are so inclined a little pinch of edible food color can certainly make this look quite fancy.
If like me you are hooked on to blood oranges like me a squirt a little juice over the rice. The color and gentle taste
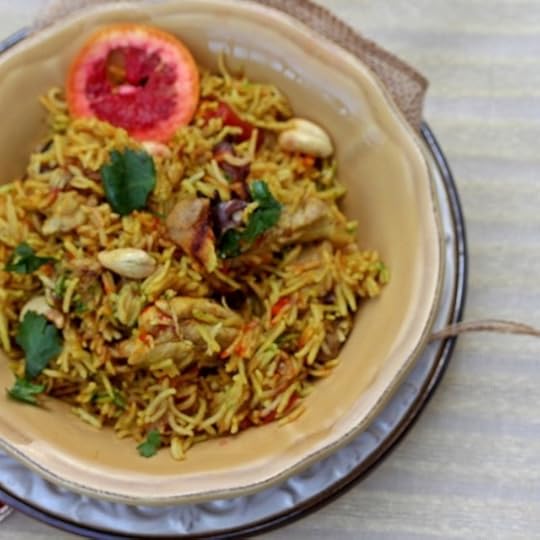
There really is not much else to this version of biryani. It is a good thing to whip up with or without a lunchbox. This is perfect served with a site of raita. In fact, once you nail this, you will happily ditch your takeout biryani, and be much richer for it.

If you like this recipe and want more ideas, do join my Indian Instant Pot Facebook group and Legume Love Group.
Of course, check out my Instant pot cookbook Instant Indian along with its siblings The Bengali Five Spice Chronicles and Spices and Seasons.
PrintLunchbox Chicken Biryani
Prep Time: 10 minutes
Cook Time: 40 minutes
Total Time: 50 minutes
Yield: Serves 4 to 6
An easy but authentic take on chicken biryani. This recipe can be done either on the stove top or the instant pot.
Ingredients
For the Chicken2 pounds boneless skinless chicken, cut into pieces
1 tablespoon minced ginger
1 tablespoon minced garlic
1/2 cup whole milk yogurt
1 and 1/2 teaspoon salt or to taste
For the Rice
1/3 cup oil
2 medium sized red onions, thinly sliced
1 teaspoon cayenne pepper or to taste
1 large bay leaf
2 black cardamoms
2 to 3 green cardamoms
1 cup basmati rice
1/2 cup chopped mint
1 teaspoon salt or to taste
1 and 1/2 teaspoons garam masala
1/2 teaspoon saffron strands
2 tablespoons warm milk
1 and 1/2 tablespoons ghee or clarified butter
1/4 cup cashew nuts or mixed nuts
2 tablespoons raisins
Pinch of edible food color
Instructions
Mix the chicken with the ginger, garlic, yogurt and salt and set aside for 30 minutes. If time permits start this process a few hours earlier to let the chicken marinate well.Turn the instant pot onto saute mode and heat the oil. Add in the onions, and let them cook until golden. Remove about 1/3 of the mixture.
Add in the chicken with the marinade, add in cayenne pepper, the bay leaf and cardamoms.
Turn off the saute mode. Add the rice over the chicken. Sprinkle with the chopped mint and salt.
Add 1 cup of water evenly over the rice.
Sprinkle with the garam masala.
Cover and set on rice mode. All the rice to cook and wait until the pressure releases naturally.
Soak the saffron strands in the milk and set aside.
Remove the cover and mix in the rice and chicken.
Sprinkle the saffron mixture unevenly to allow a varigated color.
Heat 1/2 tablespoon of the ghee and toast the cashews until pale golden. Add the raisins and pour over the rice. Add the reserved fried onions and the remaining tablespoon of ghee.
You can add the food color to further streak the rice. A little goes a long way with this.
Serve hot.
Notes
Stove Top Instructions
This can be done on the stove top the same way as the instant pot. You will need to increase the amount of water to 2 cups. Cover and cook for 20 minutes. Let the biryani rest for 5 to 7 minutes before proceeding with the finishing steps.
3.1http://www.spicechronicles.com/lunchbox-chicken-biryani/
,
The post Lunchbox Chicken Biryani appeared first on Spice Chronicles.
February 9, 2020
Blood Orange Flourless Cake
 This Blood Orange Flourless Cake is inspired by a memory of many years ago. This memory belongs to a time, before the GF rage. Low carb was big. That cake was all about almonds and citrus. It came to my house as a hostess gift. I fell in love and wanted to finish the entire thing all by myself. I sort of did!
The original recipe is featured here.
This time of the year is all about citrus. For me anyway! I had my bag of blood oranges and my memories from ages back. This morning I wanted something. Well, specifically something that I could eat, when I returned from my errands! With no time to look up or fuss with the original, I created this cake.
This one is a smaller cake, done in the instant pot and pretty darn good. In fact, we have been snacking on it ever since I made it. So, it is a perfect almost healthy sweet treat. To top the cake, I have marinated sliced of blood orange in Grand Mariner. All to accentuate the citrus flavor. I am sure you can do other things to it, but as they say why mess with perfection.

As with most of my recipes the hands on time is less than 15 minutes, and then I let the instant pot do its thing. And honestly if Grand Mariner is not your thing, just marinate in something like a mixture of fresh citrus juice and maple syrup.
The one thing I will switch around in my next iteration is to slice the oranges a litte thinner. Who knows, I might even get persuaded to do a sort of upside down thing.

And, here we go bracing for another week. I have a hump day holiday to boot. The kids actually have a four day weekend, that would be nice but I will take whatever I get.
If you like this recipe and want more ideas, do join my Indian Instant Pot Facebook group and Legume Love Group.
Of course, check out my Instant pot cookbook Instant Indian along with its siblings The Bengali Five Spice Chronicles and Spices and Seasons.
PrintBlood Orange Flourless Cake
Prep Time: 10 minutes
Cook Time: 30 minutes
Total Time: 40 minutes

A simple pudding like dense cake, that is all about the citrus and makes a perfect late winter fruit dessert.
Ingredients
For the cake2 blood oranges or other citrus
6 tablespoons butter, softened
3/4 cup sugar
1 and 3/4 cup almond meal
2 eggs
1 teaspoon baking powder
For the topping
1/2 cup Grand Mariner (or sub with 1/4 cup maple syrup and 1/4 cup orange juice)
1 blood orange thinly sliced
Instructions
Zest the oranges. Cut in half and remove the seeds and juice the oranges.Prepare a cake pan by greasing and lining the bottom with parchment paper.
In a mixing bowl mix together the butter and sugar and beat well. Mix in the almond meal and eggs. Stir in the baking powder and mix well.
Stir in the orange juice and zest. Pour the batter into the cake pan.
Cover with foil.
Add 2 cups of water in your electric pressure cooker. Place a trivet with handles in the pot.
Place the cake pan and lower into the steel insert. Place the cover and set on the cake setting for 20 minutes. Allow a natural release. (See notes for oven instructions)
In the meantime marinate the organges in the Grand Mariner for at least 2 hours. This can be done the night before.
Remove the cake from the pressure cooker and invert the cake. Top with the marinated citrus slices and serve.
Notes
Oven Instructions
Pre-heat the oven to 325 degrees.
Grease a round cake pan and line the bottom with parchment.
In a mixing bowl mix together the butter and sugar and beat well. Mix in the almond meal and eggs. Stir in the baking powder and mix well.
Stir in the orange juice and zest.
Pour the batter in the cake pan and bake for 25 minutes. Turn off the oven.
Remove the cake pan and let the cake cool.
In the meantime marinate the organges in the Grand Mariner for at least 2 hours. This can be done the night before.
Invert the cake and remove the parchment paper Top with the marinated citrus slices and serve.
The post Blood Orange Flourless Cake appeared first on Spice Chronicles.
February 2, 2020
Crispy Lime and Garam Masala Tofu (Air Fryer or Baked)
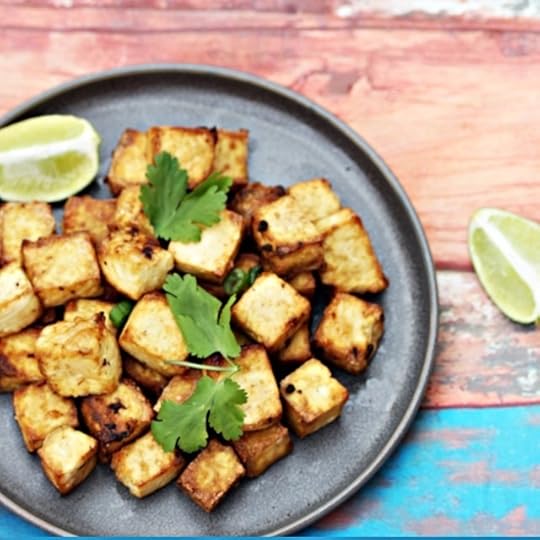 I often have cartons of firm tofu in my refridgerator around. One of my Costco staples. Convinient as it is to have the tofu handy, it still needs some prep, ie pressing, cutting,etc. In the quest for a prep ahead, this recipe for Crispy Lime and Garam Masala Tofu has emerged. Not unlike several other recipes, this satisfies another quest for prep ahead for the week recipe.
These tofu bites are seriously addictive and perfect for guiltfree snacking. The simple flavors are versatile enough to blend with your favorite sauce. In short, I find that they offer the following advantages,
Can be Pre-made and crisped just before cooking
Enjoyed as a snack with any dipping sauce or not
Tossed into any simmer sauce or seasoning to make a more subtantial meal
Reworked with vegetables to add body to a stir-fry
But, really we loved biting into the squares as a snack. Crisp and light on the outside and soft and creamy inside you will fall in love with these. Now I do add some tamari into the marinade, it adds that layer of umami. Come on, if you can use it while making marinara why not use it to add some oomph to Indian food.
For Best Results
Press the tofu (I use two plates with something heavy on top) for about 15 minutes
Marinate the tofu, I do this in the refridgerator overnight
This is has been another one of those on the go weekends. However, I did sleep in today and spent most of the evening hanging around in my PJ’s. I got a few looks of disapproval from the teens, but once they knew that cauliflower mac was in the making for dinner they did not really care how scrouchy I looked. The girl teen has a ridiculously busy month, which means a topsy turvy schedule around the house for us. All the more reason why I need to have some pre-prepping ideas around.

Between lunch box and ensuring the week works well, pre-prepping makes the world go well. However, you will have to make a large amount of the tofu to ensure that some of this remains for pre-prepping, in my household quite a bit gets polished off as a snack.
If you like this recipe and want more ideas, do join my Indian Instant Pot Facebook group and Legume Love Group.
Of course, check out my Instant pot cookbook Instant Indian along with its siblings The Bengali Five Spice Chronicles and Spices and Seasons. Prep Time: 6 hours, 10 minutes Cook Time: 25 minutes Total Time: 6 hours, 35 minutes Yield: Serves 4 to 6 A simple and flavorful take on tofu. This is great as a simple appetizer or can be added to your favorite simmer sauce or stir fry for a meal. Ingredients Instructions Notes To do this in an oven, grease a sheet pan lightly. Place the tofu evenly across the pan.
PrintCrispy Lime and Garam Masala Tofu (Air Fryer or Baked)

2 tablespoons of any vegetable oil such as peanut or olive oil
1 tablespoons tamari
1 tablespoon minced ginger
1/2 tablespoon garam masala (preferably homemade)
1/2 teaspoon red cayenne pepper (adjust to taste)
1/2 cup cornstarch or tapioca starch
1/4 cup lime juice
Cut into cubes. In a large bowl mix the vegetable oil, tamari, minced ginger, garam masala and cayenne pepper and toss the tofu in the mixture. Marinate for a few hours or overnight. Drain any excess moisture.
Remove the marinated tofu and add the cornstarch and coat evenly.
Line the airfryer basket with a piece of foil. Add the tofu spreading evenly.
Cook at 400 degrees for 11 minutes, turn and cook for another 10 minutes.
Remove and place on a serving plate. Drizzle with lime juice and serve hot.
Pre-heat oven to 400 degrees cook for 20 minutes, turn and cook for another 15 minutes.
The post Crispy Lime and Garam Masala Tofu (Air Fryer or Baked) appeared first on Spice Chronicles.
January 29, 2020
Sweet Corn and Chicken Udon Soup
 This recipe for Sweet Corn and Chicken Udon Soup is inspired by the flavors of childhood corn soups. That and samples of Fortune Udon Soup that I received for the JSL blogger contest. The original Indo-Chinese Sweet Corn Soup was ultimate comfort food for me. It arrived on the table with a choice of condiments – vinegar soaked chilies, soy sauce, and a chili garlic sauce. I loved to drop a little soy sauce into the soup and watch the dark salty liquid permeate into the light and pale soup.
Truth be told, even now when I think of Chinese food, I think of this wonderful corn soup that so made childhood special.
Now, I did not want to fuss with things like corn starch, but wanted a substantial meal so, I did just that. The Udon noodles helped with bridging the gap. A lot of corn, wholesome colorful veggies, a bit of chicken (this is optional) and noodles. There you have it a soup to come home to.
 So JSL is a family owned business, bringing a variety of noodle products and wrappers. You can find their products in markets like, Hannaford, PriceRite, ShopRite, and Price Chopper. Now they have all kinds of fun stuff going on, such as a noodle club, and if you do want to try a sample of their noodles, follow the link. I love their cute Chef Yaki mascot. They have been posting the funnest of recipes, on their facebook, instagram and twitter feeds.

The noodles are partially cooked and fresh tasting, so they can be added in right at the last minute. Precisely what I did to get this soup in action.To make this soup, I used a lot of corn. In this case I used frozen organic corn and coarsely pureed the corn to make the broth. The chicken cooks along with the corn to add some additional flavor and gets shredded along the way. Then I added a whole bunch of fresh vegetables – carrots and bell peppers to be exact. And yes, this can be done in either the instant pot or your stove top.

To keep the soup vegetarian skip the chicken, through in some dried shitake mushrooms with the corn. See I am easy that way. My wildcard ingredient here is ginger and I absolutely loved what it did for the flavors. So, do not leave it out. Another satisfying creation to keep the winter meals delicious and cozy. And for the husband, I soaked a batch of chilies in vinegar. Why mess with a tested concept.
If you like this recipe and want more ideas, do join my Indian Instant Pot and Air Fryer Facebook group .
Pick up a copy of my Instant pot cookbook Instant Indian here, along with The Bengali Five Spice Chronicles and Spices and Seasons.
Do not forget to get social with me, Facebook, Twitter, Instagram, Pinterest . And of course, sharing is caring!
PrintSweet Corn and Chicken Udon Soup
Prep Time: 5 minutes
Cook Time: 30 minutes
Total Time: 35 minutes
Yield: Serves 4

A hearty sweet corn, chicken and udon noodle soup, using a few a simple ingredients.
Ingredients
3 cups frozen or fresh corn kernels2 cups water
1 tablespoon freshly grated ginger
1 and 1/2 teaspoons salt or to taste
1 teaspoon freshly ground black pepper
1 and 1/2 teaspoons sugar
1 tablespoon soy sauce
1 or 2 chicken thighs (1/2 pound chicken)
1 red bell pepper, halved and thinly sliced
1 green bell pepper, halved and thinly sliced
2 medium carrots, peeled and shredded
1 package JSL Fortune Udon Mushroom Noodles (see note)
3 scallions very finely sliced
1 tablespoon chopped cilantro
Instructions
Place the corn, water, ginger, salt, black pepper, sugar and soy sauce in a pan. You can add in the tastemaker (if using packaged noodles) at this time as well. Add in the chicken.Bring to a simmer and cover and cook on medium heat for 15 minutes. Remove the chicken and shred the chicken and set aside.
Puree the corn coarsely using an immersion blender. Turn the heat back on. Add in the red and green bell peppers, shredded carrots, and the chicken. Stir in the noodles adding in more water (upto 1/2 cup) if needed. Simmer for 3 minutes.
Turn off the heat, garnish with the chopped scallions and cilantro and serve.
Notes
You can use 1/2 cup of dried mushrooms instead of the chicken.
You can substitute 4 oz of dried udon noodles instead of the fortune brand.
For Instant Pot
Add in the corn chicken and seasons and set to 2 minutes of pressure and release pressure after 4 minutes.
Shred the chicken and puree the corn using an immersion blender.
Turn the instant pot back on to saute mode. Add in the red and green bell peppers, shredded carrots, and the chicken. Stir in the noodles adding in more water (upto 1/2 cup) if needed. Simmer for 3 minutes.
Turn off the heat, garnish with the chopped scallions and cilantro and serve.
The post Sweet Corn and Chicken Udon Soup appeared first on Spice Chronicles.
January 28, 2020
10 Party Friendly Air Fryer Recipes
 Well for a lot of people Superbowl Sunday is more about food than the game. Hint: People like me. I have so much working with my air-fryer. My favorite thing is to be able to rework recipes that are otherwise not so healthy and bring them back to the party. So here are 10 of my favorites, that are perfect for Superbowl or any other party. Yes, lots of ideas of wings, but also other things in between. The best part of this is that all these recipes cook quickly, they are for the most part hands-off and cook without any fuss or mess.
And of course they combine deep flavor in a healthy package.
Just in case you are looking for more things to do with your air fryer you can give my little e-book a look.
Lasoni Gobi is what happens when cauliflower gets ready for a party. With sauce accents, a crispy crust, and a ridiculously addictive sauce. My secret ingredient is a sprinkle of everything bagel spice.

Not all wings are made equal. Once you try these Bang Bang Wings, you will realize how addictive they are. Well, that is if you like things with some kick.

I cannot thing of anything food without throwing in a measure of legumes. Yes, I absolutely love beans and legumes. If you give these well seasoned crispy chickpeas a shot, you will probably be convinced.

And then there are potatoes. I am playing with another well seasoned recipe, but am having a hard time matching these sweet and spicy baby potatoes. They are sticky, spicy and crispy. And vegan to boot.

And some more wings. These Turkish wings might help you seal a theme with humus and any other dip of your choice. And if you want more options, here is a bit on dips that I have bookmarked and promised to put to good use as time passes.
Butter Chicken Tikka is an easy sell. It is all about everyone’s favorite flavors make nice and easy.

7. I am not planning to leave paneer out. I will end up in major teenager dog house. These lovely paneer shaslik skewers always bring a smile from my daughter. An added bonus is that they taste great at room temperature.

And Chili Chicken, my super favorite. Well, I like them all. They are all my recipes but then again what is life without any favorites or preferences.
Kababs come in so many variations. These guilt free and easy chaapli kababs add substance and elegance to most parties.

Finally, if you like fried chicken my Kerala Fried Chicken will keep you happy.

As a side bar, a lot of these recipes will work in your oven. You just need to play a little with the settings.
If you like this recipe and want more ideas, do join my Indian Instant Pot Facebook group and Legume Love Group. Of course Instant Indian is ready for order, joining its siblings The Bengali Five Spice Chronicles and Spices and Seasons.
The post 10 Party Friendly Air Fryer Recipes appeared first on Spice Chronicles.
January 27, 2020
Pasta e Ceci (instant pot/electric pressure cooker)
 The unspoken rule in our household on weekends is that the kids get to demand special food. Alternately, I cook something fun and different. Sometimes when I am back to cobbling pantry staples, I rely on my marketing skills. Like hyping about how this lovely comforting bowl of Pasta e Ceci is an iconic dish from Rome. Well it really is.
But it also really is about a meal cobbled with a few essentials to ensure that we had dinner on the table.
At heart, Pasta e Ceci is about chickpeas and pasta. Depending on your variation you can saute in a classic mirepoix. Throw in some minced garlic for good measure and yes cook the chickpeas into a flavorful buttery soft consistency. Adding in tomatoes also depends on you. Most frequently people add in some good quality tomato paste. When in doubt or unable to find some diced tomatoes work as well. Then there is olive oil, lots off it and fresh rosemary and yes, the pasta!
Try it! You will not be disappointed with the comforting deep flavors. Just what you need after a long day. Honestly, serve with some good garlic bread and you can pass this off as good meal for a crowd. It is after all, all about serving comforting wholesome flavors with panache.

And, my rosemary bush is beginning to flower. The first time ever! All of this reminding me that it is time to prune and trim this fragrant herb to allow it to grow and bless our table for more seasons to come. And, the deep flavorful broth took all of 25 minutes. This entire pot of comforting deliciousness about 40 minutes of which maybe only 5 to 10 minutes of this is hands on effort. Yes, I did soak the chickpeas but that essentially was it.
So, the only thing between getting this wholesome comforting meal on the table is a few simple steps. If you look through your pantry chances are that all the ingredients are possibly already on hand.

If you like this recipe and want more ideas, do join my Indian Instant Pot and Air Fryer Facebook group .
Pick up a copy of my Instant pot cookbook Instant Indian here, along with The Bengali Five Spice Chronicles and Spices and Seasons.
Do not forget to get social with me, Facebook, Twitter, Instagram, Pinterest . And of course, sharing is caring!
PrintPasta e Ceci (instant pot/electric pressure cooker)
Prep Time: 6 hours, 5 minutes
Cook Time: 35 minutes
Total Time: 40 minutes

A rich and flavorful soupy stew made of flavorful chickpea broth and pasta. All done in under and hour in your electric pressure cooker.
Ingredients
1 cup of dried chickpeas, soaked for 4 to 6 hours (see note)1/3 cup olive oil
1/4 cup minced celery
1 medium sized onion, finely chopped
2 medium sized carrots, peeled and chopped (see note)
1 tablespoon minced garlic
1 bay leaf
1 and 1/2 teaspoon salt or to taste
1 cup chopped diced tomatoes (can be canned)
5 cups water
1 tablespoon chopped rosemary
1 and 1/2 teaspoons crushed red pepper flakes
3 oz dried pasta
To finish
3 tablespoons olive oil
Chopped Parsley and Rosemary to garnish
Instructions
Drain the chickpeas and set aside.Turn on the instant pot or electric pressure cooker on to saute mode.Add the olive oil and heat for 1 or 2 minutes.
Add the minced celery, onion, carrots and the garlic and saute for 2 minutes.
Add in the chickpeas, tomatoes, water and chopped rosemary.
Close the instant pot and cook for 15 minutes and release the steam after 10 minutes.
Remove about 1/2 cup of the chickpeas with cooking liquid and puree this mixture.
Add in the red pepper flakes and pasta and cook for about 5 minutes on saute until the pasta is al dente.
Serve in bowls drizzled with olive oil, parsley and rosemary.
Notes
If you do not have time to soak chickpeas cook for 10 more minutes in the instant pot.
The celery, onion, carrots, and garlic can be chopped in the food processor to save time.
3.1http://www.spicechronicles.com/pasta-e-ceci-instant-pot-electric-pressure-cooker/
The post Pasta e Ceci (instant pot/electric pressure cooker) appeared first on Spice Chronicles.


