
Jeffrey E.F. Friedl's Blog, page 26
August 21, 2015
I Played Ping Pong with a 91-Year-Old, and Almost Didn’t Lose
iPhone 6 Plus + iPhone 6 Plus back camera 4.15mm f/2.2 at an effective 29mm — 1/15 sec, f/2.2, ISO 64 —
image data
Vernon and Anthony
their combined age is 103
I played a bit of ping-pong today with a family friend, 91-year-old Vernon Weingart. I almost didn't lose.
ä»æ¥ã¯ï¼ï¼æ³ã®åéã¨ä¸ç·ã«åçãããã¦ãããã¾ããã
ãããã§ããã§åã¡ããã§ããããçµå±è² ãã¾ããã
ç´åå¹´åãé«é½¢è
ãªãªã³ããã¯ã§ã¢ã¡ãªã«ã®äºä½ã ã£ãæ¹ã§ãã
ä»ã§ãå¼·ãã§ãï¼
He was the USA National 2nd-place champion, back when he was younger (in
his 80s), and Ohio State Champion five or six times along the way. Some of his
trophies and medals...
iPhone 6 Plus + iPhone 6 Plus back camera 4.15mm f/2.2 at an effective 29mm — 1/10 sec, f/2.2, ISO 100 —
image data
He is the personification of “kindly grandfather type”, who walks slowly
and with purpose, always has a kind word and an easy smile.
We all knocked the ball around for a while, then as we were about to leave,
he suggested an actual game. A real game with Anthony wouldn't have been fun
(Anthony would have been utterly crushed), but I offered some hope that
he'd have to at least keep one eye open.
We decided on the best two out of three...
And suddenly his demeanor completely changed. Gone was the kindly smile,
replaced by eyes with laser focus and determination. Take no prisoners.
It was a shocking transformation, but in
retrospect it's unsurprising, given his competitive achievements.
iPhone 6 Plus + iPhone 6 Plus back camera 4.15mm f/2.2 at an effective 29mm — 1/15 sec, f/2.2, ISO 64 —
image data
I'm not great at ping-pong, but I'm not bad either. I can inflict some
wicked unpredictable spins, and at times can smash with thunderous power,
even from behind and below the table.
I won the first game after going to deuce.
He won the next two. Both games were close... I suspect that's how he crafted it, to keep
it interesting. He aced me on his serve only once.
We ended with a firm
“good game”
handshake, and a promise that I'll give him a better game next time.
But in my defense, he's not really 91 years old yet... his birthday is tomorrow.


August 18, 2015
A Hazy Visit to Onyu Pass with Arthur and Neil
Panasonic LX100 at an effective 32mm — 1/100 sec, f/8, ISO 200 —
map & image data — nearby photos
Hazy View From Halfway Up
Onyu Pass, Shiga Japan (å°å ¥å³ ãæ»è³ç)
Last month before heading off on my trip to The States to visit my
folks, I did a nice
little bicycle to Onyu Pass and back, an 85 mile (137km) round trip over two other
major passes each way. I was joined by veteran riders Arthur Lauritsen and Neil Holt.
My first visit to Onyu Pass had been during a day of incessant rain a
month prior, and as such the supposedly-spectacular views were shrouded in
clouds. I hoped for something better this time, but was left disappointed
due to the extreme haze of the hot (35â/95â) humid air.
At first glance it may not seem so hazy in the photo above, but that's
the result of a lot of post processing, including the new
“dehaze” feature in Adobe Lightroom.
Panasonic LX100 at an effective 24mm — 1/1000 sec, f/1.7, ISO 200 —
map & image data — nearby photos
è½è¦å³ ããéããæã«ãããªè±çãè¦ã¤ãã¾ããã
I didn't pull out the camera until three hours into the ride when we
came across a field of flowers in front of an old farmhouse while
descending from Nomi Pass. They were pretty, though this camera (or my
skill with this camera) doesn't do them justice.
Panasonic LX100 at an effective 35mm — 1/500 sec, f/2.3, ISO 200 —
map & image data — nearby photos
Money Deposit
flowers are 10 for 200 yen (about $2)
Panasonic LX100 at an effective 35mm — 1/640 sec, f/2.3, ISO 200 —
map & image data — nearby photos
“Fence is Electrified at Night”
for keeping critters out
Panasonic LX100 at an effective 35mm — 1/400 sec, f/2.3, ISO 200 —
map & image data — nearby photos
Arthur Lauritsen
will kindly help you cut your flowers
Panasonic LX100 at an effective 50mm — 1/100 sec, f/6.3, ISO 320 —
map & image data — nearby photos
Old(ish) Farm House
Panasonic LX100 at an effective 35mm — 1/640 sec, f/2.3, ISO 200 —
map & image data — nearby photos
Desktop-Background Versions
1280×800 · 1680×1050 · 1920×1200 · 2560×1600 · 2880×1800
Panasonic LX100 at an effective 24mm — 1/800 sec, f/1.7, ISO 200 —
map & image data — nearby photos
On The Road Again
taken while riding at 25 kph (16 mph)
Panasonic LX100 at an effective 24mm — 1/1000 sec, f/1.7, ISO 200 —
map & image data — nearby photos
Lovely Scenery
taken while riding at 33 kph (21 mph)
3½ hours into the ride we came to the last vending machine before
the hot climb, so I stopped to load up on drinks. Had to wait in line
behind this little frog...
Panasonic LX100 at an effective 24mm — 1/100 sec, f/5.6, ISO 200 —
map & image data — nearby photos
Panasonic LX100 at an effective 24mm — 1/125 sec, f/5.6, ISO 200 —
map & image data — nearby photos
Unamused
seemingly
A separate little friend tried to hitch a ride on Authur's bike...
Panasonic LX100 at an effective 37mm — 1/80 sec, f/5.6, ISO 640 —
map & image data — nearby photos
Not The Safest Location To Stow Away
Luckily Arthur noticed him before riding off
Panasonic LX100 at an effective 24mm — 1/60 sec, f/7.1, ISO 320 —
map & image data — nearby photos
“Look What My Tire Found”
12:03 PM (from start: 4h 34m / 64 km / 39.5 miles)
Panasonic LX100 at an effective 24mm — 1/60 sec, f/10, ISO 800 —
map & image data — nearby photos
Neil Supervises The Tire Change
(sort of... he really just checks email
 )
)The main climb to Onyu Pass is 4.5km
at 8%, which isn't so bad except that there's no tree cover the whole
way except for about 10 seconds about halfway up, and it was a hot humid
windless day.
Neil rocketed up in an astounding
17:28, just missing the course record (among those using Strava) by two
seconds. I took more than 40% longer at 24:44.
Arthur came up some time later looking hot and uncomfortable, but not so
much that he couldn't ham it up for the camera...
Panasonic LX100 at an effective 44mm — 1/125 sec, f/10, ISO 640 —
map & image data — nearby photos
Feelin' Fine
12:54 PM (from start: 5h 25m / 70 km / 43.3 miles)
arriving at Onyu Pass (å°å ¥å³ )
Panasonic LX100 at an effective 75mm — 1/250 sec, f/10, ISO 200 —
map & image data — nearby photos
Panasonic LX100 at an effective 30mm — 1/125 sec, f/10, ISO 400 —
map & image data — nearby photos
Arthur and Neil
at Onyu Pass
After a rest and some snacks, we turned around to head home by the same route we came.
The road up to Onyu pass is mostly clear, but perhaps particularly with a typhoon that had come through
a few days earlier some areas were strewn with rocks.
Panasonic LX100 at an effective 24mm — 1/125 sec, f/8, ISO 400 —
map & image data — nearby photos
Occasional Rocks
It's apparently much better than it was a few months ago when a larger group from Cycling Kyoto came through and got
a total of five flats (from the sharp rocks) among them. No rock-induced flats for us today.
Panasonic LX100 at an effective 24mm — 1/60 sec, f/8, ISO 250 —
map & image data — nearby photos
Interesting Layered Rock
Part of the way down, the view opens up to the valley below and you can
see the road you came in on winding itself up the mountain. The extreme haze made for an unspectacular view, but I've eked a few shots out.
Panasonic LX100 at an effective 37mm — 1/80 sec, f/8, ISO 200 —
map & image data — nearby photos
Neil Descends
he's the spec in the road at the lower left
I waited for
Arthur and Neil to make their way down to where I could see them on the road below,
and I was surprised that it took 5+ minutes for them to get down there. It feels long on the way up,
but somehow I usually think the descent shouldn't take any time at all. But it does.
Panasonic LX100 at an effective 50mm — 1/100 sec, f/8, ISO 320 —
map & image data — nearby photos
Arthur Descending
he's an even tinier speck in the middle of the road
Eventually I made my way down to find them waiting for me in the shade at the bottom of the mountain.
Panasonic LX100 at an effective 35mm — 1/125 sec, f/8, ISO 1000 —
map & image data — nearby photos
The 20km-stretch south of the Onyu Pass area is really lovely and quaint.
Panasonic LX100 at an effective 24mm — 1/1600 sec, f/1.7, ISO 200 —
map & image data — nearby photos
Old Abandoned Something-or-Other
taken while moving at 32 kph (20 mph)
Panasonic LX100 at an effective 24mm — 1/3200 sec, f/1.7, ISO 200 —
map & image data — nearby photos
Abandoned House
taken while moving at 32 kph (20 mph)
Panasonic LX100 at an effective 30mm — 1/640 sec, f/2.2, ISO 200 —
map & image data — nearby photos
Trying (and Failing) to Catch Up To Neil
taken while moving at 48 kph (30 mph)
The road is usually fairly narrow, but during a section that was wider I
wanted to get a photo of Neil from the side, but he was just too fast for
me to catch up to. By the time he slowed down enough, the road was narrower and
the background less interesting...
Panasonic LX100 at an effective 24mm — 1/640 sec, f/1.7, ISO 200 —
map & image data — nearby photos
Neil Holt Finally Slowing Down
taken while moving at 35 kph (22 mph)
Panasonic LX100 at an effective 24mm — 1/1000 sec, f/1.7, ISO 200 —
map & image data — nearby photos
taken while moving at 32 kph (20 mph)
Panasonic LX100 at an effective 24mm — 1/100 sec, f/1.7, ISO 200 —
map & image data — nearby photos
I don't know what the colored ribbons on the trees are. They seem to be
more involved than simple forestry/timber markers, yet not involved enough to be tree huggies. I doubt it's just decoration, but I'm at a loss to guess what it might be.
Very pretty area, though.
August 16, 2015
Delight and Dismay at the Apple Store
The other day I got to witness the most amazing experience of watching
a lady in her 70s touch an iPad for the first
time, and right before my eyes the delight and sparkle on her face
transformed her into a young girl again. It was
magical.
Yet this experience at an Apple Store in Ohio was marred by
some shockingly un-Apple bumps in the road.
I'm in America visiting my folks, and took the opportunity of being here
to help Ann, a family friend in her 70s, buy her
first computer. Until now her most technically-advanced electronics were
a flip-phone and a
television, but she was ready to take the plunge into email and
Facebook. She was familiar with the unrelenting
grief and despair Windows caused her husband, so she wanted something
different. We headed to the Apple Store.
It was packed, which as an AAPL shareholder I always like to see.
We were soon attended to by staff, and I let
Ann interact with them, describing what she wanted a
computer for, and listening to their ideas and recommendations.
First she was shown the lowest-end MacBook Air, a
tiny laptop. My mom has one of these and
earlier at lunch had shown it to Ann, and had raved all about it, so prior
to arriving at the store, Ann and I thought that
she'd probably buy a MacBook Air. Under direction
of the Apple sales staff, Ann used a MacBook Air
for some basic web surfing and email, and seemed pleased. She took to it easily.
Then she was shown the same basic browsing and email on an iPad Air.
Over the course of a few minutes Ann's demeanor
changed from mild interest (she'd heard of these “iPad” things before)
to pure, unfettered delight.
I've never seen anything like it, and I cannot
begin to adequately describe the situation.
Ann has a youth and vibrance that belies her age, with an easy laugh and
smile that I've seen many times, but nothing prepared me for the reaction
written across her face... giddy, unadulterated, sparkling delight.
There's no other word for it.
As she exclaimed “This is it, this is
for me!”, I told her that the sparkle in
her eyes made her look 30 years younger, but in reality the only time I've
ever seen something even close is when a
young child gets the toy they've been wanting. But this was less materialistic, more pure. I imagined a duck living in
the desert for decades not knowing that water even existed, finally
entering a lake for the first time. I feel I'm a better person
just for having witnessed it.
In comparison, the exuberant “amaaaazing”
reaction of my 23-month-old niece to her first iPad experience seems
pale (but if you've not heard the short audio on that post, it'll
certainly bring a smile to your heart).
Anyway, Ann bought an iPad Air, a wireless keyboard, and a case/cover, and Apple staff helped her set it up.
Both before and after the sale, staff spent considerable time with her,
never rushing, never pressuring, always patient. Ann
felt truly the center of their attention, with their concern not for
the sale but for her happiness and satisfaction. It was
a wonderful experience.
That was the good. The rest of this long story is not always so good.
Setup of the iPad involved creating Ann's first email account, and
this is where I got my first surprise of the day.
I figured that they would create an iCloud account for her, but no, to
create an Apple ID they needed an email account from outside the Apple
ecosystem, so they created a GMail account for
her. This struck me as very odd, but hey, they're the experts.
They then used her GMail address to create an Apple ID for her, and set
up her iPad. They helped her install the Apple Store app, then used that to
schedule a free training class at the store next week.
Pleased as punch and floating on air, we went to her house to show her
husband, and we sat for some basic lessons. I
showed Ann how to surf the web, make bookmarks, do email and create
contacts, Facetime video conference, use the camera, check the calendar,
talk to Siri, etc. She took to it very
easily.
But we ran into some problems that I didn't know how to solve.
Disappointment #1 for the day was that the iPad Air Smart Case didn't
seem to fit her iPad Air very well, and the hole for the camera didn't line
up properly. When deciding on what model of iPad to buy, Apple staff had
explained the differences between the “iPad Air” and
the “iPad Air 2” included subtle physical differences like
the location of the camera, so it seemed to me that Ann must have been sold
the wrong case. Yet the labeling on the box for
the case (“iPad Air Smart
Case”) clearly matched the labeling on
the box for the iPad (“iPad Air”) —
neither referenced the “Air 2” we'd seen on packaging for the newer models
— so I was confused.
Disappointment #2 for the day was in my call to Apple Care to ask about
the issue. The lady who answered my call seemed
utterly uninterested in life, doing her job on autopilot just to get to the
end of the shift. I've had more enthusiastic calls with the DMV.
So we went back to the Apple Store and showed the clearly-misaligned
camera hole along with the clearly-matching packaging. I figured we be told
“yikes, sorry about that, here's the proper case”, but instead we
got an inexplicable “Yeah,
sorry, it's hard to explain”.
The guy tried to explain something that he clearly didn't understand
well himself, causing me to finally interrupt him and say “look, she just wants a
case that fits her iPad. She doesn't care what it's called... can
you show her something that actually fits what she just bought?”.
Again the response was unexpected. I thought
he'd say “Sure, just a
moment”, but instead we got a
“I don't know,
but we can go take a look.”. Wow, this was not the Apple Experience I was expecting. How hard can it be?
It was a fiasco. They had a huge wall of cases, with half clearly marked
“iPad Air 2” and the other half clearly marked “iPad Air”. You'd think that it couldn't be simpler,
but in reality all the cases were for the iPad Air
2, including those marked “iPad Air”. Why were they
explicitly labeled differently when they were explicitly for the same
device, and explicitly incompatible with the device for which it was
labeled??? It was beyond surreal.
The guy explained that if you looked on the back of the “iPad Air” package, the little sticker with the
barcode included microscopic text that said “(second generation)”, meaning it was for the iPad
Air 2. The logical person inside of me
wanted to explode at the stupidity of it... not only of the misleading
labeling, but mostly at the unmitigated stupidity of how the Apple Store
handled the display and sales. The guy who sold
Ann the iPad Air explicitly mentioned the differences between the models
and explicitly told her that the iPad Air 2 cases
wouldn't fit her purchase, yet somehow didn't realize that the “iPad Air” cases wouldn't either. This was his job.
How could Apple Staff not know this? The Air 2 has been on sale for almost a year...
were we the first to discover this crazy labeling. Beyond surreal.
In marveling at the absurdity of the situation, I
happened to noticed that one of the “iPad Air”
cases did not have the “second
generation” microtext on the back. Oh, we're
told, this one does fit Ann's purchase. Apple Staff hadn't realized
they had these mixed in there. Of perhaps the 70
“iPad Air” cases on display, I
noticed three that would fit Ann's “iPad Air”.
She didn't like the color, but it was that or nothing, so she exchanged the
case. The guy offered to order her the color of her choice and swap it out when
it arrived, but by this time we just wanted to move on.
(The only plausible explanation for the labeling that I can come up with is that when Apple started selling
cases for the new iPad Air 2, they still had
a huge stockpile of packaging for the original
model that they didn't want to waste, so they shoved the new cases into the
old packaging and slapped the microtext sticker on the back. When that ran
out, new packaging included the proper “iPAd Air 2” on the front,
and this mix of labels we saw at the store reflected the mix of old and new
stock. On the other hand, I
have not been able to come up with a
plausible explanation for how the Apple Store handles this mix as
they do, utter than pure apathy and incompetence.)
Overall, what a disappointing, un-Apple-like experience. Things were about to get worse.
I had two questions about the email app, both leading down holes I never
would have imagined.
The first seemed pretty simple: why is there no “trash” icon when
viewing an email message? How do you delete a message? The identical app on
my iPhone has a trash icon that's obvious and intuitive, but on Ann's iPad
the same spot instead has what looks like a filing-cabinet icon whose
purpose didn't seem apparent, and upon testing we couldn't figure out what
it actually did.
The guy spent a considerable time in the labyrinth of iPad settings and couldn't
figure it out, so we put that on the back burner and moved on.
My second question was about push notifications for new messages. It
didn't surprise me that push notifications wouldn't work when connected
only via Wifi, so I just asked to confirm this.
But no, I was told that they should work. Ann
wasn't getting notifications when I sent test
emails, so the guy dives again into the labyrinth of settings for what
seemed an eternity, only to end up suggesting to switch from GMail to
iCloud for her email.
Just a few hours prior we'd been told that a
non-iCloud account was required, but now we were being told to
switch to iCloud. I didn't want Ann to have to
juggle two email addresses, but no worries, Apple Staff told us, we'll
switch your Apple ID registration to your iCloud address so that you can
completely abandon the GMail address. Geez, okay, why didn't we do this
from the start, but okay, let's do it.
So he create the new account and we explained everything to Ann, who for
the first time in the long day was starting to show signs of being
overwhelmed. Once things were finally set up, test emails from me showed up
on her iPad with immediate notifications as we wanted, so it was worth it.
Then he went to switch her Apple ID registration over to her iCloud address
so that she could completely abandon the GMail address they'd made for her
earlier, and he hit a snag... it wouldn't let him
switch.
Clearly this staff member was outside his area of expertise, but instead
of asking one of his more-experienced colleagues, he starts Googling for
a solution. This did not inspire confidence, and
I “strongly encouraged” him to ask someone for help. He did, and the end
result was that we backpedaled on the whole iCloud thing, reverted back to
GMail, and simply gave up on push notifications. By this
point the store was closing and we just wanted to get out of
there.
But somewhere along the way he had figured out how to get the trash icon
for Ann, so at least we had that going for us.
Overall Ann was thrilled with her first foray into high tech, but wow,
the experiences at the Apple Store sure put a
damper on things. As a tech geek I was mortified, and as an APPL
shareholder I worry how this bodes for Apple's future.
August 9, 2015
Bike-Fitting Session at Vincent Flanagan’s PedalForth Fitting in Kyoto
Nikon D4 + Sigma 35mm F1.4 DG HSM — 1/160 sec, f/1.4, ISO 360 —
map & image data — nearby photos
Getting Nowhere Fast
“Riding” a bicycle posture-fitting apparatus, at PedalForth Fitting in Kyoto, Japan
photo by Thomas Busch
If you ride a bicycle for long distances, as
I
have
been
wont
to
do
lately,
you want to feel comfortable on the bike and ride with a posture that
doesn't lead to injury. If something is so obviously uncomfortable that you
notice it right away then of course you correct it or at least try
something else, but it's the subtle poor riding posture that can
insidiously lead to long-term injury.
I often get numbness in my fingers after a long ride, and my own brother
had to give up cycling after a long ride left him with chronic pain. As I move toward more serious cycling and a more serious bike (and further into
an age where injuries take a long time to heal if they heal at all), I thought I'd take the precaution to do things right by having a session at
Vincent Flanagan's PedalForth
Fitting.
Vincent is a former professional cyclist with an impressive resume...
Australian National Mountain Bike Champion (1991), and two-time All-Japan
National Mountain Bike Champion (1996, 1997). His non-cycling background is
nursing and sports massage.
I thought I'd learn what size bike was appropriate for me, and perhaps
how to adjust the seat and handlebar locations to best suit me, but I was surprised to learn so much more.
But first, let's look at some of what a “bike fitting”
entails. German friend and ultra-marathon runner Thomas Busch, who cycles just to
augment his run training, did a fitting just
before me, graciously allowing me to watch and photograph.
I couldn't photograph (or remember) everything
that went into it, but here are a few of the high points...
Nikon D4 + Sigma 35mm F1.4 DG HSM — 1/320 sec, f/1.4, ISO 320 —
map & image data — nearby photos
Initial Interview
First there's an interview where Vincent asks about your cycling
history, equipment, goals, desires, relevant medical history, etc.
Nikon D4 + Sigma 35mm F1.4 DG HSM — 1/200 sec, f/1.4, ISO 100 —
map & image data — nearby photos
Thomas' Bike
Then Vincent takes an inventory of your current bicycle setup...
Nikon D4 + Sigma 35mm F1.4 DG HSM — 1/320 sec, f/1.4, ISO 100 —
map & image data — nearby photos
Preparing Thomas' Bike for Inspection
Nikon D4 + Sigma 35mm F1.4 DG HSM — 1/160 sec, f/1.4, ISO 400 —
map & image data — nearby photos
Marking the Seat Setback
so it can be measured and, if required, returned to its exact initial position
The shape and construction of the bicycle frame apparently has a strong
impact as to how it rides, but from a rider-posture point of view, only
three things matter: the location of the pedals, seat, and handlebars.
Those are the locations where the rider attaches to the bike, so nothing
else really matters, from a posture point of view.
Everything is measured with respect to the crank axle at the bottom of
the frame. From what I recall, for the seat the
measurements include how far above and behind the crank axle, as well as
its tilt and size and cushioning. For the
handlebars, how far above and forward. For the
pedals, how far from the axle and how they attach to the shoes. Of
course, proper shoes and how they attach to the bike are also
important.
Vincent takes an inventory of your current setup prior to making any adjustment.
Nikon D4 + Sigma 35mm F1.4 DG HSM — 1/160 sec, f/1.4, ISO 320 —
map & image data — nearby photos
Lasers
( it's difficult to see in the photo, except where the laser is painting a red line across Vincent's hand )
Nikon D4 + Sigma 35mm F1.4 DG HSM — 1/160 sec, f/1.4, ISO 200 —
map & image data — nearby photos
Checking Left/Right Balance
if the distance to each brake lever is the same, the handlebars are balanced
Nikon D4 + Sigma 35mm F1.4 DG HSM — 1/160 sec, f/1.4, ISO 360 —
map & image data — nearby photos
Exact Seat Location
Nikon D4 + Sigma 35mm F1.4 DG HSM — 1/160 sec, f/1.4, ISO 280 —
map & image data — nearby photos
Rite of Measurement
laughing at my comment that he looks as if he's about to bless the bike
Nikon D4 + Sigma 35mm F1.4 DG HSM — 1/160 sec, f/1.4, ISO 360 —
map & image data — nearby photos
After taking inventory of the current setup, Vincent takes inventory of
some important body characteristics that influence what kind of riding
posture is appropriate...
Nikon D4 + Sigma 35mm F1.4 DG HSM — 1/160 sec, f/1.4, ISO 560 —
map & image data — nearby photos
Hip Flexibility
Nikon D4 + Sigma 35mm F1.4 DG HSM — 1/160 sec, f/1.4, ISO 1100 —
map & image data — nearby photos
Core Strength
measured via plank
Nikon D4 + Sigma 35mm F1.4 DG HSM — 1/160 sec, f/1.4, ISO 900 —
map & image data — nearby photos
Seat Width
special seat shows where your seat-contact points are
Nikon D4 + Sigma 35mm F1.4 DG HSM — 1/160 sec, f/1.4, ISO 500 —
map & image data — nearby photos
Single-Leg Squat
gives insight into the strength of the foot arch
Nikon D4 + Sigma 35mm F1.4 DG HSM — 1/160 sec, f/1.4, ISO 360 —
map & image data — nearby photos
Back to Basics
checking shoe size with a Brannock device
Finally it's time to measure posture on the bike...
Nikon D4 + Sigma 35mm F1.4 DG HSM — 1/40 sec, f/1.8, ISO 100 —
map & image data — nearby photos
Initial Visual Assessment
Nikon D4 + Sigma 35mm F1.4 DG HSM — 1/20 sec, f/2, ISO 100 —
map & image data — nearby photos
Nikon D4 + Sigma 35mm F1.4 DG HSM — 1/20 sec, f/2.5, ISO 100 —
map & image data — nearby photos
Checking Hip Balance
Nikon D4 + Sigma 35mm F1.4 DG HSM — 1/160 sec, f/1.6, ISO 320 —
map & image data — nearby photos
Preparing for Video Analysis
Nikon D4 + Sigma 35mm F1.4 DG HSM — 1/160 sec, f/2.2, ISO 500 —
map & image data — nearby photos
Nikon D4 + Sigma 35mm F1.4 DG HSM — 1/160 sec, f/1.6, ISO 720 —
map & image data — nearby photos
More Measuring
Nikon D4 + Sigma 35mm F1.4 DG HSM — 1/160 sec, f/1.4, ISO 560 —
map & image data — nearby photos
Clip Adjustment
( why do we still call shoes with pedal clips “clipless”? )
Nikon D4 + Sigma 35mm F1.4 DG HSM — 1/160 sec, f/2, ISO 1000 —
map & image data — nearby photos
Nikon D4 + Sigma 35mm F1.4 DG HSM — 1/160 sec, f/7.1, ISO 3600 —
map & image data — nearby photos
Video Capture
the camera is off to the right, facing Thomas square to the side
Nikon D4 + Sigma 35mm F1.4 DG HSM — 1/40 sec, f/1.4, ISO 100 —
map & image data — nearby photos
Analysis
Nikon D4 + Sigma 35mm F1.4 DG HSM — 1/160 sec, f/1.6, ISO 180 —
map & image data — nearby photos
Discussion
Nikon D4 + Sigma 35mm F1.4 DG HSM — 1/400 sec, f/1.6, ISO 100 —
map & image data — nearby photos
Seat-Pressure Analysis
Nikon D4 + Sigma 35mm F1.4 DG HSM — 1/160 sec, f/1.4, ISO 360 —
map & image data — nearby photos
More Lasers
Nikon D4 + Sigma 35mm F1.4 DG HSM — 1/160 sec, f/1.4, ISO 400 —
map & image data — nearby photos
Final Tweaks
In the end, an experience cyclist may end up finding out nothing more
than “your current setup is good”, and if that's all you get for the $200
fee, it may at first seem steep, but I look at it in the same way as
insurance: you do it because you don't know the result ahead of time. I
spent $1,000 on travel health insurance for the family's RV trip across America
earlier this year. We ended up not needing it, thankfully, but that doesn't
meant it was a $1,000 waste.... it was a prudent hedge against uncertainty.
After Thomas' fitting, it was my turn. Thomas kindly took a few photos along the way...
Nikon D4 + Sigma 35mm F1.4 DG HSM — 1/160 sec, f/1.4, ISO 280 —
map & image data — nearby photos
Checking Leg-Length Balance
Nikon D4 + Sigma 35mm F1.4 DG HSM — 1/160 sec, f/1.4, ISO 320 —
map & image data — nearby photos
Rummaging Though Insoles
I have very flat feet, with no arch in my foot whatsoever. When I did the single-foot squat test, most of my energy was
not spent on lowering my body, but instead on trying to stabilize my body
above my foot/ankle. A normal person with a normal arch wouldn't have to waste that energy.
Vincent then placed a small folded towel under my
arch to provide makeshift support, and the single-foot squat was suddenly
much easier.
This revelation was shocking to me, as I never gave a thought to the
mechanical problems caused by flat feet. Until now, I thought it merely
impacted shoe-fit comfort.
I'd done that single-foot squat test a week prior when I'd stopped by to
make and appointment (and ended up chatting for an hour), so when I came today I brought a
box of various arch-support insoles that I'd accumulated over the years. I didn't have
any cycling shoes at the time, but Thomas lent me his for the fitting.
(As I write this, I'm visiting my folks in The States, and through the magic of Zappos.com I
now have two pair of cycling shoes of my own. It seems that European sizing
is used for cycling shoes regardless of where you are in the world; my
pairs are size 48 from one company and 49 from another.)
Nikon D4 + Sigma 35mm F1.4 DG HSM — 1/160 sec, f/1.4, ISO 560 —
map & image data — nearby photos
Fitting Machine
Nikon D4 + Sigma 35mm F1.4 DG HSM — 1/160 sec, f/1.4, ISO 360 —
map & image data — nearby photos
Seat-Height Adjustment
Nikon D4 + Sigma 35mm F1.4 DG HSM — 1/200 sec, f/1.4, ISO 100 —
map & image data — nearby photos
Video Analysis
Nikon D4 + Sigma 35mm F1.4 DG HSM — 1/160 sec, f/1.4, ISO 220 —
map & image data — nearby photos
Power Test
The bike-fitting machine includes the ability to monitor the power output of your pedal stroke,
and that data, along with much else, is displayed on the computer display...
Nikon D4 + Sigma 35mm F1.4 DG HSM — 1/160 sec, f/1.4, ISO 400 —
map & image data — nearby photos
Currently Putting Out 317 Watts
The machine went up to 450 watts, which I could do easily for a short
period. The pros can do that for long periods, which is why they're pros
and I am not.
In the end I got lots of good tips about posture and shoes and riding
styles, and detailed specific information about what size bike is
appropriate for me. I'm in the process of ordering a “real” bicycle now,
which hopefully will be waiting for me when I return to Kyoto. Then I'll go
back to Vincent to put the fitting's results to practical use in final
adjustments on the new bike.
Overall it was a great experience and I
learned a lot; if you are near Kyoto and
ride often, I highly recommend it. His web site is currently in Japanese only,
but of course he can conduct the fitting in English as well.
Bike-Fitting Session at Vincent Flanagan’s PedtalForth Fitting in Kyoto
Nikon D4 + Sigma 35mm F1.4 DG HSM — 1/160 sec, f/1.4, ISO 360 —
map & image data — nearby photos
Getting Nowhere Fast
“Riding” a bicycle posture-fitting apparatus, at PedalForth Fitting in Kyoto, Japan
photo by Thomas Busch
If you ride a bicycle for long distances, as
I
have
been
wont
to
do
lately,
you want to feel comfortable on the bike and ride with a posture that
doesn't lead to injury. If something is so obviously uncomfortable that you
notice it right away then of course you correct it or at least try
something else, but it's the subtle poor riding posture that can
insidiously lead to long-term injury.
I often get numbness in my fingers after a long ride, and my own brother
had to give up cycling after a long ride left him with chronic pain. As I move toward more serious cycling and a more serious bike (and further into
an age where injuries take a long time to heal if they heal at all), I thought I'd take the precaution to do things right by having a session at
Vincent Flanagan's PedalForth
Fitting.
Vincent is a former professional cyclist with an impressive resume...
Australian National Mountain Bike Champion (1991), and two-time All-Japan
National Mountain Bike Champion (1996, 1997). His non-cycling background is
nursing and sports massage.
I thought I'd learn what size bike was appropriate for me, and perhaps
how to adjust the seat and handlebar locations to best suit me, but I was surprised to learn so much more.
But first, let's look at some of what a “bike fitting”
entails. German friend and ultra-marathon runner Thomas Busch, who cycles just to
augment his run training, did a fitting just
before me, graciously allowing me to watch and photograph.
I couldn't photograph (or remember) everything
that went into it, but here are a few of the high points...
Nikon D4 + Sigma 35mm F1.4 DG HSM — 1/320 sec, f/1.4, ISO 320 —
map & image data — nearby photos
Initial Interview
First there's an interview where Vincent asks about your cycling
history, equipment, goals, desires, relevant medical history, etc.
Nikon D4 + Sigma 35mm F1.4 DG HSM — 1/200 sec, f/1.4, ISO 100 —
map & image data — nearby photos
Thomas' Bike
Then Vincent takes an inventory of your current bicycle setup...
Nikon D4 + Sigma 35mm F1.4 DG HSM — 1/320 sec, f/1.4, ISO 100 —
map & image data — nearby photos
Preparing Thomas' Bike for Inspection
Nikon D4 + Sigma 35mm F1.4 DG HSM — 1/160 sec, f/1.4, ISO 400 —
map & image data — nearby photos
Marking the Seat Setback
so it can be measured and, if required, returned to its exact initial position
The shape and construction of the bicycle frame apparently has a strong
impact as to how it rides, but from a rider-posture point of view, only
three things matter: the location of the pedals, seat, and handlebars.
Those are the locations where the rider attaches to the bike, so nothing
else really matters, from a posture point of view.
Everything is measured with respect to the crank axle at the bottom of
the frame. From what I recall, for the seat the
measurements include how far above and behind the crank axle, as well as
its tilt and size and cushioning. For the
handlebars, how far above and forward. For the
pedals, how far from the axle and how they attach to the shoes. Of
course, proper shoes and how they attach to the bike are also
important.
Vincent takes an inventory of your current setup prior to making any adjustment.
Nikon D4 + Sigma 35mm F1.4 DG HSM — 1/160 sec, f/1.4, ISO 320 —
map & image data — nearby photos
Lasers
( it's difficult to see in the photo, except where the laser is painting a red line across Vincent's hand )
Nikon D4 + Sigma 35mm F1.4 DG HSM — 1/160 sec, f/1.4, ISO 200 —
map & image data — nearby photos
Checking Left/Right Balance
if the distance to each brake lever is the same, the handlebars are balanced
Nikon D4 + Sigma 35mm F1.4 DG HSM — 1/160 sec, f/1.4, ISO 360 —
map & image data — nearby photos
Exact Seat Location
Nikon D4 + Sigma 35mm F1.4 DG HSM — 1/160 sec, f/1.4, ISO 280 —
map & image data — nearby photos
Rite of Measurement
laughing at my comment that he looks as if he's about to bless the bike
Nikon D4 + Sigma 35mm F1.4 DG HSM — 1/160 sec, f/1.4, ISO 360 —
map & image data — nearby photos
After taking inventory of the current setup, Vincent takes inventory of
some important body characteristics that influence what kind of riding
posture is appropriate...
Nikon D4 + Sigma 35mm F1.4 DG HSM — 1/160 sec, f/1.4, ISO 560 —
map & image data — nearby photos
Hip Flexibility
Nikon D4 + Sigma 35mm F1.4 DG HSM — 1/160 sec, f/1.4, ISO 1100 —
map & image data — nearby photos
Core Strength
measured via plank
Nikon D4 + Sigma 35mm F1.4 DG HSM — 1/160 sec, f/1.4, ISO 900 —
map & image data — nearby photos
Seat Width
special seat shows where your seat-contact points are
Nikon D4 + Sigma 35mm F1.4 DG HSM — 1/160 sec, f/1.4, ISO 500 —
map & image data — nearby photos
Single-Leg Squat
gives insight into the strength of the foot arch
Nikon D4 + Sigma 35mm F1.4 DG HSM — 1/160 sec, f/1.4, ISO 360 —
map & image data — nearby photos
Back to Basics
checking shoe size with a Brannock device
Finally it's time to measure posture on the bike...
Nikon D4 + Sigma 35mm F1.4 DG HSM — 1/40 sec, f/1.8, ISO 100 —
map & image data — nearby photos
Initial Visual Assessment
Nikon D4 + Sigma 35mm F1.4 DG HSM — 1/20 sec, f/2, ISO 100 —
map & image data — nearby photos
Nikon D4 + Sigma 35mm F1.4 DG HSM — 1/20 sec, f/2.5, ISO 100 —
map & image data — nearby photos
Checking Hip Balance
Nikon D4 + Sigma 35mm F1.4 DG HSM — 1/160 sec, f/1.6, ISO 320 —
map & image data — nearby photos
Preparing for Video Analysis
Nikon D4 + Sigma 35mm F1.4 DG HSM — 1/160 sec, f/2.2, ISO 500 —
map & image data — nearby photos
Nikon D4 + Sigma 35mm F1.4 DG HSM — 1/160 sec, f/1.6, ISO 720 —
map & image data — nearby photos
More Measuring
Nikon D4 + Sigma 35mm F1.4 DG HSM — 1/160 sec, f/1.4, ISO 560 —
map & image data — nearby photos
Clip Adjustment
( why do we still call shoes with pedal clips “clipless”? )
Nikon D4 + Sigma 35mm F1.4 DG HSM — 1/160 sec, f/2, ISO 1000 —
map & image data — nearby photos
Nikon D4 + Sigma 35mm F1.4 DG HSM — 1/160 sec, f/7.1, ISO 3600 —
map & image data — nearby photos
Video Capture
the camera is off to the right, facing Thomas square to the side
Nikon D4 + Sigma 35mm F1.4 DG HSM — 1/40 sec, f/1.4, ISO 100 —
map & image data — nearby photos
Analysis
Nikon D4 + Sigma 35mm F1.4 DG HSM — 1/160 sec, f/1.6, ISO 180 —
map & image data — nearby photos
Discussion
Nikon D4 + Sigma 35mm F1.4 DG HSM — 1/400 sec, f/1.6, ISO 100 —
map & image data — nearby photos
Seat-Pressure Analysis
Nikon D4 + Sigma 35mm F1.4 DG HSM — 1/160 sec, f/1.4, ISO 360 —
map & image data — nearby photos
More Lasers
Nikon D4 + Sigma 35mm F1.4 DG HSM — 1/160 sec, f/1.4, ISO 400 —
map & image data — nearby photos
Final Tweaks
In the end, an experience cyclist may end up finding out nothing more
than “your current setup is good”, and if that's all you get for the $200
fee, it may at first seem steep, but I look at it in the same way as
insurance: you do it because you don't know the result ahead of time. I
spent $1,000 on travel health insurance for the family's RV trip across America
earlier this year. We ended up not needing it, thankfully, but that doesn't
meant it was a $1,000 waste.... it was a prudent hedge against uncertainty.
After Thomas' fitting, it was my turn. Thomas kindly took a few photos along the way...
Nikon D4 + Sigma 35mm F1.4 DG HSM — 1/160 sec, f/1.4, ISO 280 —
map & image data — nearby photos
Checking Leg-Length Balance
Nikon D4 + Sigma 35mm F1.4 DG HSM — 1/160 sec, f/1.4, ISO 320 —
map & image data — nearby photos
Rummaging Though Insoles
I have very flat feet, with no arch in my foot whatsoever. When I did the single-foot squat test, most of my energy was
not spent on lowering my body, but instead on trying to stabilize my body
above my foot/ankle. A normal person with a normal arch wouldn't have to waste that energy.
Vincent then placed a small folded towel under my
arch to provide makeshift support, and the single-foot squat was suddenly
much easier.
This revelation was shocking to me, as I never gave a thought to the
mechanical problems caused by flat feet. Until now, I thought it merely
impacted shoe-fit comfort.
I'd done that single-foot squat test a week prior when I'd stopped by to
make and appointment (and ended up chatting for an hour), so when I came today I brought a
box of various arch-support insoles that I'd accumulated over the years. I didn't have
any cycling shoes at the time, but Thomas lent me his for the fitting.
(As I write this, I'm visiting my folks in The States, and through the magic of Zappos.com I
now have two pair of cycling shoes of my own. It seems that European sizing
is used for cycling shoes regardless of where you are in the world; my
pairs are size 48 from one company and 49 from another.)
Nikon D4 + Sigma 35mm F1.4 DG HSM — 1/160 sec, f/1.4, ISO 560 —
map & image data — nearby photos
Fitting Machine
Nikon D4 + Sigma 35mm F1.4 DG HSM — 1/160 sec, f/1.4, ISO 360 —
map & image data — nearby photos
Seat-Height Adjustment
Nikon D4 + Sigma 35mm F1.4 DG HSM — 1/200 sec, f/1.4, ISO 100 —
map & image data — nearby photos
Video Analysis
Nikon D4 + Sigma 35mm F1.4 DG HSM — 1/160 sec, f/1.4, ISO 220 —
map & image data — nearby photos
Power Test
The bike-fitting machine includes the ability to monitor the power output of your pedal stroke,
and that data, along with much else, is displayed on the computer display...
Nikon D4 + Sigma 35mm F1.4 DG HSM — 1/160 sec, f/1.4, ISO 400 —
map & image data — nearby photos
Currently Putting Out 317 Watts
The machine went up to 450 watts, which I could do easily for a short
period. The pros can do that for long periods, which is why they're pros
and I am not.
In the end I got lots of good tips about posture and shoes and riding
styles, and detailed specific information about what size bike is
appropriate for me. I'm in the process of ordering a “real” bicycle now,
which hopefully will be waiting for me when I return to Kyoto. Then I'll go
back to Vincent to put the fitting's results to practical use in final
adjustments on the new bike.
Overall it was a great experience and I
learned a lot; if you are near Kyoto and
ride often, I highly recommend it. His web site is currently in Japanese only,
but of course he can conduct the fitting in English as well.
August 2, 2015
Morning Calm at Kyoto’s Hirosawa Lake
Panasonic LX100 at an effective 24mm — 1/100 sec, f/10, ISO 200 —
map & image data — nearby photos
Morning Calm
Hirosawa-no-ike Lake (åºæ²¢æ± ), Kyoto Japan
Desktop-Background Versions
1280×800 · 1680×1050 · 1920×1200 · 2560×1600 · 2880×1800
On a morning bicycle ride other day to Kyoto's western mountains, I made a few snapshots of Hirosawa Lake. It feels like it's a million miles from anywhere, but it's actually just one mile northeast from
the teeming tourist crowds in the Arashiyama area.
Panasonic LX100 at an effective 28mm — 1/2000 sec, f/2.1, ISO 200 —
map & image data — nearby photos
Hazy in the Morning Heat
Panasonic LX100 at an effective 75mm — 1/125 sec, f/7.1, ISO 250 —
map & image data — nearby photos
Heiankyo (å¹³å®é·)
the place I visited here
Panasonic LX100 at an effective 75mm — 1/2000 sec, f/2.8, ISO 200 —
map & image data — nearby photos
Overnight Parking
Morning Clam at Kyoto’s Hirosawa Lake
Panasonic LX100 at an effective 24mm — 1/100 sec, f/10, ISO 200 —
map & image data — nearby photos
Morning Calm
Hirosawa-no-ike Lake (åºæ²¢æ± ), Kyoto Japan
Desktop-Background Versions
1280×800 · 1680×1050 · 1920×1200 · 2560×1600 · 2880×1800
On a morning bicycle ride other day to Kyoto's western mountains, I made a few snapshots of Hirosawa Lake. It feels like it's a million miles from anywhere, but it's actually just one mile northeast from
the teeming tourist crowds in the Arashiyama area.
Panasonic LX100 at an effective 28mm — 1/2000 sec, f/2.1, ISO 200 —
map & image data — nearby photos
Hazy in the Morning Heat
Panasonic LX100 at an effective 75mm — 1/125 sec, f/7.1, ISO 250 —
map & image data — nearby photos
Heiankyo (å¹³å®é·)
the place I visited here
Panasonic LX100 at an effective 75mm — 1/2000 sec, f/2.8, ISO 200 —
map & image data — nearby photos
Overnight Parking
July 30, 2015
The Solemn Uniqueness of Kyoto’s Kuginuki Jizo Temple
Nikon D4 17-35mm f/2.8 @ 17mm — 1/80 sec, f/2.8, ISO 360 —
map & image data — nearby photos
Kuginuki Jizo Temple (éæå°èµ)
Kyoto Japan
Without question, the most unique and solemn temple I've ever come
across in Japan is the small but emotionally-packed Kuginuki Jizo Temple
here in Kyoto.
ä»ã¾ã§åºä¼ã£ãã寺ã®ä¸ã§ãä¸çªé¢ç½ããªããããããã寺ã¯äº¬é½ã«ããéæå°èµã§ãã
æ¥æ¬èªã§èª¬æã¯é£ããã§ãããã¦ã£ãããã£ã¢ã§ã¯èª¬æãããã¯ãã
Its official name is The Shakushoji Temple (ç³å寺), but its name in
the local vernacular, kuginiku jizou (more or less “nail-pulling guardian deity”) reflects
the images of nail and spike pullers that permeate the temple grounds...
Nikon D4 17-35mm f/2.8 @ 35mm — 1/160 sec, f/2.8, ISO 360 —
map & image data — nearby photos
Wall Detail
nail puller and nails
Vertical Desktop-Background Versions
1050×1680 · 1200×1920 · 1600×2560
Until you understand the meaning behind it, it certainly feels quite
odd. But once you understand the meaning (which we'll get to below), you'll
understand why the temple is so solemn.
Nikon D4 Nikkor 50mm f/1.4 — 1/200 sec, f/2.2, ISO 100 —
map & image data — nearby photos
Huge Puller for Railroad Spikes
or the like; it's about four feet tall
As is common with jizo statues (like these), this spike puller has a little bib.
Nikon D4 Nikkor 50mm f/1.4 — 1/640 sec, f/1.4, ISO 100 —
map & image data — nearby photos
Entrance from the Street
with its “shrine name” 家éå±±
The temple is in the middle of what is now urban city, with its only
exposure to the street being a small unassuming entrance. You could walk by
this place every day and never notice it.
The red lanterns across the top have the common name of the temple
(éæå°èµå°),
while the beautifully carved wood with golden lettering has the “mountain name” for
the temple, 家éå±± (karyuzan).
This “mountain name” business is a bit interesting, and I didn't
understood it until a month or so ago when it was explained to me by the lady of
the temple at the
Shimyouin Temple (å¿æé¢) when I stopped by during a bicycle ride....
Sidebar: Temples, Shrines, and Shrines in Temples....
Japan has a lot of temples and shrines, with temples being related to
Buddhism and shrines related to Shintoism — distinct religions
— but all temples in Japan have a long official name with a
sub-name that includes a reference to “mountain”, even if the temple is
located in a completely flat area. This might be considered an ancient
marketing technique to help the Buddhist temple appeal to
Shinto followers: in Shinto, mountains have a “spirit” to be respected,
and so temples include a small shrine with a mountain name.
The “mountain name” for the famous Kiyomizu Temple,
for example, is otowayama (é³ç¾½å±±). There's actually a mountain of
that name 10km (6mi) away (which I rode to the top by
bicycle recently), but I don't know whether or how they might be
related.
Nikon D4 Nikkor 50mm f/1.4 — 1/1600 sec, f/1.4, ISO 100 —
map & image data — nearby photos
Stone Wheel
I don't know the purpose of the stone wheel along the entrance path, but I have a hunch it's related
to prayer wheels.
Nikon D4 17-35mm f/2.8 @ 17mm — 1/500 sec, f/2.8, ISO 100 —
map & image data — nearby photos
Inside
Nikon D4 17-35mm f/2.8 @ 35mm — 1/160 sec, f/2.8, ISO 180 —
map & image data — nearby photos
Deeply Meaningful
long moment in prayer
Nikon D4 Nikkor 50mm f/1.4 — 1/800 sec, f/2.2, ISO 100 —
map & image data — nearby photos
What He Was Grasping
this donated statue is dated 1964
So here's the meaning behind the nail/spike pullers...
Some emotional or physical pains are so intense that they feel like a spike through the heart, so you come here to pray
that the spike be removed.
It's a simple concept made all the more meaningful by the mood at the
temple. It has absolutely no feeling of showy trappings catering to the
tourist; it was a 100% low-key local temple for the benefit of those
who visit. In my visits, I've never seen a tourist (other than myself and those I brought). It's not that kind of place.
Despite no tourists, the patronage was lively, with visitors seemingly
split into two groups: those visiting it simply as their local
temple, and those visiting it for its specific spike-pulling specialty.
Because of the delicate nature of that latter group, I took care not to
photograph people's faces, and went out of my way to not make people feel
they were being watched by the camera. Someone dealing with death or
illness or heartbreak comes here for emotional salve, not to be featured on
my blog.
If you visit, please take care to be on your most humble, respectful, least-intrusive behavior.
The vibe at this place is so unique and wonderful that I seriously
considered whether I should even post about it, worrying that loud touristy
visitors could destroy the mood. Folks who read my blog have, by definition, class and good
taste , so hopefully it's not a problem.
It's always good to keep in mind when visiting any temple or shine (or church
or synagogue or mosque, etc.) that even though it may not be a religious
place for you, it is exactly that for some others, so conduct
yourself accordingly.
Nikon D4 17-35mm f/2.8 @ 17mm — 1/80 sec, f/2.8, ISO 160 —
map & image data — nearby photos
Even The Incense Basin
has an engraved spike puller
The temple itself apparently dates from about 1,200 years ago, but
according to the story given on its
Wikipedia page, the nail-pulling aspect is only four or five hundred
years old. The story given there is that there was a merchant with intense
pain in his hands that nothing could cure. He prayed intently here for a
week, after which he was visited in a dream by the guardian deity and
told that his pain came from someone in a past life with a grudge,
placing a curse on him by driving huge spikes into a voodoo doll
representing the merchant. As evidence, the deity showed the merchant the
spikes. When he awoke from the dream, his pain was gone (the spikes having
been removed and all).
Nikon D4 17-35mm f/2.8 @ 25mm — 1/100 sec, f/2.8, ISO 160 —
map & image data — nearby photos
Desktop-Background Versions
1280×800 · 1680×1050 · 1920×1200 · 2560×1600 · 2880×1800
Nikon D4 17-35mm f/2.8 @ 17mm — 1/80 sec, f/2.8, ISO 250 —
map & image data — nearby photos
Photogenic Lanterns
in front of the main altar
Nikon D4 17-35mm f/2.8 @ 20mm — 1/80 sec, f/2.8, ISO 100 —
map & image data — nearby photos
Wall of Offerings
Nikon D4 17-35mm f/2.8 @ 17mm — 1/80 sec, f/2.8, ISO 180 —
map & image data — nearby photos
Making the Rounds
The main devotional action at the temple involves walking around the small central building. First you collect a number of bamboo sticks
equal to your age...
Nikon D4 Nikkor 50mm f/1.4 — 1/200 sec, f/1.6, ISO 500 —
map & image data — nearby photos
Box of Bamboo Sticks
each with the name and age of someone who donated it as an offering
So, if you're 77 years old, you collect 77 sticks.
You then walk around the building, and when you get to the back wall,
you touch a special something (I don't know what it is)...
Nikon D4 17-35mm f/2.8 @ 17mm — 1/125 sec, f/2.8, ISO 100 —
map & image data — nearby photos
Back Wall
Nikon D4 17-35mm f/2.8 @ 28mm — 1/125 sec, f/2.8, ISO 450 —
map & image data — nearby photos
Back-Wall Detail
Vertical Desktop-Background Versions
1050×1680 · 1200×1920 · 1600×2560
In the photo above, you can see the vertical bar has had the paint long
worn away. That's where folks touch on the way by. In practice, I saw some
folks just stroll by without touching, while others stopped and clasped
their hands together in prayer.
As you continue your way around the building, you drop on stick back
into the box as you go by, and start over again with another trip around
the building, continuing in this manner until the sticks are gone. So, in
total, you make as many circuits as your age.
The temple grounds are quite small, but feel big with as much detail as they have packed into them.
There are numerous little side areas for devotion...
Nikon D4 17-35mm f/2.8 @ 17mm — 1/80 sec, f/5.6, ISO 3200 —
map & image data — nearby photos
“Traditional” Stone Jizo
Nikon D4 17-35mm f/2.8 @ 20mm — 1/80 sec, f/2.8, ISO 500 —
map & image data — nearby photos
Nikon D4 17-35mm f/2.8 @ 17mm — 1/80 sec, f/8, ISO 4500 —
map & image data — nearby photos
Main Altar
Nikon D4 17-35mm f/2.8 @ 22mm — 1/100 sec, f/2.8, ISO 900 —
map & image data — nearby photos
Cute Corner Cozies
on the head-high pointy end of a tin roof
Nikon D4 17-35mm f/2.8 @ 17mm — 1/80 sec, f/8, ISO 2800 —
map & image data — nearby photos
Patchwork Wall
Nikon D4 Nikkor 50mm f/1.4 — 1/200 sec, f/7.1, ISO 1000 —
map & image data — nearby photos
Working Well
this deep well was just a source of water
for cleaning, watering plants, etc
I think this is the first working well I've ever seen.
It's a unique place and truly worth a visit if you can be sure not to disturb the ambiance. The entrance is here.
July 25, 2015
Obama Hosts My First Bicycle Visit to the Sea
Panasonic LX100 at an effective 46mm — 1/125 sec, f/10, ISO 200 —
map & image data — nearby photos
Fruits of My Recent Bicycle Ride
Shirahama Beach, Takahama Village, Fukui Prefecture (福井県高浜町の白浜海水浴場)
1:35 pm (from the start of the ride: 9h 11m / 107 km / 66.4 miles)
Tuesday was the “Sea Day” holiday in Japan, so I took the opportunity to
make my first bicycle ride to the sea. Kyoto is about as far from the sea
as a big city gets in Japan, so even though I've been to a lake that looks like an
ocean, I'd not yet been by bicycle to the actual ocean.
この間のは海の日で初めての海までのサイクリングをしました、京都市内から。二時間の帰り電車を含めて17時間掛かりました。157キロを走って、一番山が多い道を選びました。 獲得高度は2,800mでした。
楽しかった。
Panasonic LX100 at an effective 24mm — 1/4000 sec, f/2.8, ISO 200 —
map & image data — nearby photos
Me and the Mermaids
Mermaid Beach, Obama Japan (人魚の浜、福井県小浜市)
4:32 pm (from the start of the ride: 12h 8m / 145 km / 90.3 miles)
photo by Antti Riikonen
It was a long trip.
I left the house at 4:24am, and returned 17 hours later at 9:33pm,
though two hours of that was the return from the ocean by train. All in all
it was 151km (94
miles) of cycling to and along the ocean, followed by a train back to Kyoto, then another
6km (4mi) of cycling from Kyoto
Station to home.
Befitting the length of the trip, this post is also long.
I was joined by Antti Riikonen, whom we saw shining in this day of mishaps last
month, and Eric Findlay, who I'd run into by chance the day after that ride
when he recognized me from my blog while we were both at the same bicycle
shop.
We met at 4:30am in the early-morning dusk (sunrise was 4:58am) and headed north towards the mountains. Before diving into the mountains
for the real climbs of the trip, we stopped at a convenience store that would be our last access to food for about five hours...
Panasonic LX100 at an effective 24mm — 1/125 sec, f/4.5, ISO 200 —
map & image data — nearby photos
5am Selfie
5:08 am (from start: 44 min / 11 km / 7.1 miles)
Ichihara Lawsons (ローソン 静市市原)
Panasonic LX100 at an effective 24mm — 1/125 sec, f/2.5, ISO 200 —
map & image data — nearby photos
Eric Cooling Off
having just poured refrigerated water over his head
( it was already hot at 5 am )
I picked a route with as many mountain passes as I could fit in...
Hanase Pass (花背峠/760m/2500'),
Sasari Pass (佐々里峠/739m/2400'),
Gonami Pass (五波峠/656m/2200'),
and two smaller unnamed passes.
With this in mind, I took it easy going up the first and biggest climb
of the day, Hanase, only to be shocked the next day when looking at the
stats for that climb that I missed my PR (34:20) by only 10 seconds. Not only wasn't I trying, the road in many places was a shallow river due to runoff
from a typhoon that had hit two days prior, and one can feel the slowdown
as the tires have to cut through the water.
I did keep the camera in the back bag instead of around my neck, so perhaps that sped me up a bit.
Antti wasn't even trying either, it seems, since his time was almost 5
minutes slower than his best, but even then he was 2½ minutes faster
than me.
Panasonic LX100 at an effective 72mm — 1/200 sec, f/5.6, ISO 200 —
map & image data — nearby photos
Typical Misty-River Scene
6:46 am (from start: 2h 22m / 31 km / 19.6 miles)
taken while cycling at 20 kph (12 mph)
It was absolutely beautiful in the mountains, perhaps in part because of
the early time of day. The first six or seven hours of the ride were the
most beautiful I'd ever done.
Panasonic LX100 at an effective 24mm — 1/125 sec, f/2.5, ISO 200 —
map & image data — nearby photos
Antti
6:56 am (from start: 2h 31m / 35 km / 21.7 miles)
taken while cycling at 24 kph (15 mph)
Panasonic LX100 at an effective 24mm — 1/1250 sec, f/2.2, ISO 200 —
map & image data — nearby photos
Eric
7:04 am (from start: 2h 39m / 38 km / 23.6 miles)
taken while cycling at 28 kph (17 mph)
iPhone 6 Plus + iPhone 6 Plus back camera 4.15mm f/2.2 at an effective 29mm — 1/460 sec, f/2.2, ISO 32 —
map & image data — nearby photos
Rescuing a Turtle
亀を救出する
7:58 am (from start: 3h 34m / 55 km / 34.3 miles)
photo by Antti Riikonen
While flying down a long hill between Sasari and Gonami Passes, we came
across a turtle smack in the middle of the lane. Both sides of the road
were extremely steep slopes — one up the mountain as seen above, the other down to a
river — so even if the turtle didn't get smooshed by a truck, his outlook
wasn't good.
I found a slightly less-sleep slope heading down to the river, and left
the turtle in the ferns. Hopefully it's a good spot for him.
Not long after that, at the turnoff to Gonami Pass, we were surprised to
find a cafe that was sort of open. They were hosting overnight
river-rafting customers for breakfast and so weren't really open, but they
kindly spared some coffee for us.
Panasonic LX100 at an effective 50mm — 1/160 sec, f/5.6, ISO 200 —
map & image data — nearby photos
Coffee Break
Tautasya Cafe (田歌舎)
8:11 am (from start: 3h 46m / 58 km / 35.7 miles)
Panasonic LX100 at an effective 24mm — 1/320 sec, f/2, ISO 200 —
map & image data — nearby photos
Panasonic LX100 at an effective 28mm — 1/640 sec, f/2.1, ISO 200 —
map & image data — nearby photos
Making-Them-Wait Selfie
Once on the bike again, it was all new roads for me, starting with my
first ascent to Gonami Pass. 23 minutes later, a the peak we cross into
Fukui Prefecture.
iPhone 6 Plus + iPhone 6 Plus front camera 2.65mm f/2.2 at an effective 31mm — 1/60 sec, f/2.2, ISO 40 —
map & image data — nearby photos
“Gonami Pass”
9:09 am (from start: 4h 45m / 63 km / 39.3 miles)
Panasonic LX100 at an effective 28mm — 1/80 sec, f/4.5, ISO 1000 —
map & image data — nearby photos
Antti Setting Up
for his “Gonami Pass” shot
Panasonic LX100 at an effective 41mm — 1/125 sec, f/4.5, ISO 200 —
map & image data — nearby photos
Signpost
Panasonic LX100 at an effective 24mm — 1/40 sec, f/4, ISO 3200 —
map & image data — nearby photos
Heading Down the Other Side
9:15 am (from start: 4h 51m / 64 km / 39.6 miles)
taken while cycling at 14 kph (9 mph)
Panasonic LX100 at an effective 31mm — 1/320 sec, f/4, ISO 200 —
map & image data — nearby photos
Amazing Views
9:18 am (from start: 4h 54m / 65 km / 40.1 miles)
Panasonic LX100 at an effective 24mm — 1/125 sec, f/4, ISO 200 —
map & image data — nearby photos
First Flat of the Day
while a road crew cleans up after the typhoon the other day
9:43 am (from start: 5h 19m / 67 km / 41.9 miles)
This is Eric's first long mountain ride with his new Trek bike (the one
he was ordering when we met), and so the rock-strewn road was perhaps new
as well.
Panasonic LX100 at an effective 54mm — 1/125 sec, f/4, ISO 640 —
map & image data — nearby photos
On The Road Again
9:54 am (from start: 5h 30m / 68 km / 42.2 miles)
taken while cycling at 42 kph (26 mph)
Panasonic LX100 at an effective 65mm — 1/125 sec, f/9, ISO 800 —
map & image data — nearby photos
More Vistas
that the photos are not doing justice
9:58 am (from start: 5h 34m / 69 km / 42.9 miles)
Panasonic LX100 at an effective 27mm — 1/125 sec, f/9, ISO 320 —
map & image data — nearby photos
Supersteep
too steep even for the road to be cut into the mountain,
the road is a ledge wrapping around the mountain
10:06 am (from start: 5h 42m / 73 km / 45.2 miles)
taken while cycling at 39 kph (24 mph)
Panasonic LX100 at an effective 27mm — 1/125 sec, f/4, ISO 500 —
map & image data — nearby photos
Flattening Out
10:08 am (from start: 5h 44m / 74 km / 46.0 miles)
taken while cycling at 27 kph (17 mph)
Panasonic LX100 at an effective 24mm — 1/500 sec, f/4, ISO 200 —
map & image data — nearby photos
Picturesque River
like so many of them tucked among the mountains of Japan, filled with fly fishermen
10:13 am (from start: 5h 49m / 77 km / 47.7 miles)
taken while cycling at 13 kph (8 mph)
Panasonic LX100 at an effective 28mm — 1/1000 sec, f/4, ISO 200 —
map & image data — nearby photos
Crossing a Small Valley
10:38 am (from start: 6h 14m / 79 km / 48.9 miles)
10:38am - taken while cycling at 24 kph (15 mph)
Panasonic LX100 at an effective 24mm — 1/250 sec, f/7.1, ISO 200 —
map & image data — nearby photos
Panasonic LX100 at an effective 60mm — 1/250 sec, f/7.1, ISO 200 —
map & image data — nearby photos
Gorgeous Farmstead
10:41 am (from start: 6h 17m / 80 km / 49.8 miles)
taken while cycling at 24 kph (15 mph)
After crossing the small valley, we could have continued on a fairly
flat and direct route to the sea, but instead we jigged west for 20km
(12mi), taking a little-traveled road over two unnamed mountain passes. I
don't think we saw a single car for over two hours.
Just after the first little pass at 342m (1,125'), 7 hours after starting the trip, we got our first distant and hazy view of the ocean...
Panasonic LX100 at an effective 75mm — 1/200 sec, f/5.6, ISO 200 —
map & image data — nearby photos
Ocean View (Sort Of)
through the haze of an increasingly-hot day
11:19 am (from start: 6h 55m / 89 km / 55.6 miles)
Along with our first view of the ocean, we got our second view of a flat tire...
Panasonic LX100 at an effective 37mm — 1/125 sec, f/3.5, ISO 200 —
map & image data — nearby photos
Flat #2
Eric's other wheel's tube calls it a day
A bit farther down the mountain there was a little lookout with a nice view of the ocean...
Panasonic LX100 at an effective 44mm — 1/250 sec, f/5.6, ISO 200 —
map & image data — nearby photos
Antti's Best Smile
11:33 am (from start: 7h 9m / 90 km / 56.0 miles)
I didn't realize it while taking the photos, but in looking at them
after the fact, I find it odd to realize that Antti is never smiling in any
of the shots. He's such a pleasant guy to ride with and chat with, such
that I always see him as smiling, but I guess it doesn't come across to the
camera.
Panasonic LX100 at an effective 70mm — 1/80 sec, f/5, ISO 3200 —
map & image data — nearby photos
Respite From the Heat
repairing a flat under an overpass
12:23 pm (from start: 7h 59m / 98 km / 61.0 miles)
taken while cycling at 10 kph (6 mph)
Panasonic LX100 at an effective 28mm — 1/80 sec, f/5, ISO 1600 —
map & image data — nearby photos
This Time It's Antti's Tire
Panasonic LX100 at an effective 24mm — 1/250 sec, f/5, ISO 200 —
map & image data — nearby photos
Curvy Highway
Panasonic LX100 at an effective 24mm — 1/60 sec, f/5, ISO 800 —
map & image data — nearby photos
Denied
public road over a mountain inexplicably closed off
( we had to go through a 700m tunnel instead )
12:51 pm (from start: 8h 27m / 101 km / 62.5 miles)
Panasonic LX100 at an effective 30mm — 1/160 sec, f/5, ISO 200 —
map & image data — nearby photos
Finally About To Arrive
1:18 pm (from start: 8h 54m / 106 km / 66.0 miles)
taken while cycling at 14 kph (9 mph)
iPhone 6 Plus + iPhone 6 Plus front camera 2.65mm f/2.2 at an effective 31mm — 1/2400 sec, f/2.2, ISO 32 —
map & image data — nearby photos
Ocean Selfie
taken with the iPhone so that I could send to Fumie
1:19 pm (from start: 8h 55m / 106 km / 66.1 miles)
iPhone 6 Plus + iPhone 6 Plus front camera 2.65mm f/2.2 at an effective 31mm — 1/1300 sec, f/2.2, ISO 32 —
map & image data — nearby photos
Group Selfie
taken with the iPhone so that I could send to Cycling Kyoto
Panasonic LX100 at an effective 35mm — 1/160 sec, f/10, ISO 200 —
map & image data — nearby photos
Surprisingly Uncrowded
Torihama Beach, Takahama Village, Fukui Prefecture (福井県高浜町の鳥居浜)
1:23 pm (from start: 8h 59m / 106 km / 66.1 miles)
Panasonic LX100 at an effective 24mm — 1/125 sec, f/10, ISO 250 —
map & image data — nearby photos
Touching the Water
to make it official
We moved east along the beach on a beach-front bicycle path, and upon rounding a bend found the crowds that I'd have expected on a holiday...
Panasonic LX100 at an effective 67mm — 1/400 sec, f/10, ISO 200 —
map & image data — nearby photos
Looks Unfun
Wakasawada Beach (若狭和田海水浴場)
1:38 pm (from start: 9h 13m / 107 km / 66.7 miles)
taken while cycling at 14 kph (9 mph)
Without the tree cover of the mountains, the sun was really hot, with a
temperature to being with of 35℃ (95℉). The route called for a
little excursion to a view spot on a nearby mountain, but Eric was
feeling tired, so he relaxed in the shade at a temple while Antti sprinted
up and I plodded up.
It took me 11 minutes to climb the 160m (530') to the top (Antti just nine), and by the time I got there the heat was sucking energy from me at an alarming rate. The view was worth it, though...
Panasonic LX100 at an effective 25mm — 1/500 sec, f/5.6, ISO 200 —
map & image data — nearby photos
View from 165m Up
Yasuragi Park (安らぎ公園)
the beaches we'd ridden past are in the center
( water at right is the sea; water at left is an inlet )
1:57 pm (from start: 9h 33m / 110 km / 68.5 miles)
We descended back to the beaches to collect Eric and load up on cold drinks, and continued East.
Panasonic LX100 at an effective 70mm — 1/2000 sec, f/8, ISO 200 —
map & image data — nearby photos
Aoto Bridge
we'd be going across that later
2:38 pm (from start: 10h 13m / 117 km / 72.7 miles)
taken while cycling at 27 kph (17 mph)
There's a train station across the bridge, and Eric took up my
suggestion to avail himself of it to head home. He was clearly quite tired,
but never once complained or asked us to go slowly or in any way modify our plans. Of course we would have, but he didn't want to impose.
I don't think he estimated the level of the ride quite right, but having
done 118km over more than 10 hours and 2,300m (7,575') of vertical climb,
it was more than enough to be proud of.
So, as Eric headed across the bridge to a train station, Antti and I headed for the next big mountain climb.
Except we didn't make it... it turns out that the road we intended to take becomes rough gravel:
Panasonic LX100 at an effective 43mm — 1/320 sec, f/5.6, ISO 200 —
map & image data — nearby photos
Not Appropriate For Road Bikes
3:27 pm (from start: 11h 2m / 124 km / 77.2 miles)
My usually-meticulous route preparation had failed us this time, as I thought it was paved the whole way. I was bummed because I was really hot and tired, but had resigned myself to just exit my body and do it semi-consciously. I was also hoping to get
great shots from 500m up.
Instead I had to make do with a rare break in the foliage on the way back down the little paved road that we'd done...
Panasonic LX100 at an effective 75mm — 1/400 sec, f/5.6, ISO 200 —
map & image data — nearby photos
3:28 pm (from start: 11h 4m / 124 km / 77.3 miles)
Since the beaches, we'd been heading deeper out onto a peninsula, so had to double back to the bridge to return to the mainland.
Panasonic LX100 at an effective 24mm — 1/800 sec, f/5.6, ISO 200 —
map & image data — nearby photos
View from the Aoto Bridge (青戸の大橋)
of the inlet created by the peninsula.
3:47 pm (from start: 11h 23m / 130 km / 81.0 miles)
Then it was 20km or so along big roads and bicycle paths toward the town of Obama.
Panasonic LX100 at an effective 56mm — 1/500 sec, f/5.6, ISO 200 —
map & image data — nearby photos
4:09 pm (from start: 11h 45m / 138 km / 85.5 miles)
Panasonic LX100 at an effective 25mm — 1/640 sec, f/5.6, ISO 200 —
map & image data — nearby photos
4:14 pm (from start: 11h 50m / 139 km / 86.5 miles)
taken while cycling at 17 kph (10 mph)
Panasonic LX100 at an effective 24mm — 1/800 sec, f/2.8, ISO 200 —
map & image data — nearby photos
Obama Comes into View
4:28 pm (from start: 12h 4m / 145 km / 89.8 miles)
taken while cycling at 35 kph (22 mph)
Panasonic LX100 at an effective 35mm — 1/400 sec, f/3.2, ISO 200 —
map & image data — nearby photos
Taking a Dip in the Ocean
at Mermaid Beach
( I didn't think it was possible to have whiter skin than me, but the boy from Finland proved me wrong )
5:48 pm (from start: 13h 24m / 149 km / 92.7 miles)
Panasonic LX100 at an effective 24mm — 1/125 sec, f/3.2, ISO 3200 —
map & image data — nearby photos
On The Train Back Toward Kyoto
6:59 pm
Antti and I both brought bike bags so that we could bring our bikes on the train. But I'd loaned mine to Eric earlier in the day, and Antti had forgotten his
at the beach. But we stopped by a 100-yen shop and bought some bicycle covers, tape, and Velcro... we then removed the front wheel of the bike and used Velcro to
afix it midbike, then covered everything and taped up the bottom.
I wasn't sure that the train company would let this haphazard cover
through — I'd heard that they were quite strict — so I was
fairly stressed about it, but it turns out to have been just fine. Being
the end of a three-day weekend, the trains were packed and we had to stand
most of the way, but we got a great connection and it took only two hours
to reach Kyoto Station.
A short ride from there to home, and I was enjoying a cool shower by 9:45pm and a cold beer by 10pm.
I was quite achy the next day, but got talked into riding up to Hanase
Pass again. This time I actually did go very slowly, but
it somehow seems to have broken the achy feeling, and I actually felt
better after that.
July 16, 2015
My First Ascent of The Most-Heinous Momoi Pass East
Panasonic LX100 at an effective 24mm — 1/400 sec, f/5.6, ISO 200 —
map & image data — nearby photos
Shooting the Breeze
prior to the ride
I had quite the ride yesterday, finally tackling one of the last big mountain passes in Kyoto, Momoi Pass (百井峠) from the east. It was gruesomely long and steep.
The plan was to start with some relatively-relaxing climbs, but Mone somewhow got a
flat as she arrived, so Andy, the gentleman that he is, stepped in to change it...
Panasonic LX100 at an effective 24mm — 1/125 sec, f/5.6, ISO 200 —
map & image data — nearby photos
Tube Change #1
it turns out not to be the last of the day
Wheel on to wheel off was 5½ minutes, which seems pretty fast to
me. It's apparently possible to change a tube in less
than a minute, but in the real world you have to spend the time to
investigate why the tube went flat in the first place, to make sure that
whatever did it won't just do it again the moment you ride on the new
tube.
Once on our way, we headed up to Kyomi Pass (京見
峠), a rise of 220m over about 3km (720'
over 1.9m) for an average slope of about 7.3%. Knowing that I had the imposing Momoi Pass looming later in the day,
I didn't want to push too hard before that, so
for this initial climb I just settled into a pace that felt natural, and somehow ended up making
a personal best time of 13:59, breaking the
PR that I made last week by 42 seconds.
Woohoo!
Panasonic LX100 at an effective 24mm — 1/125 sec, f/3.2, ISO 200 —
map & image data — nearby photos
Water Spring
Little natural springs like this are sprinkled throughout the mountains.
(We saw a
different one here the other day.) It's common to see folks stopping by
to fill up big jugs to bring home, as the water is apparently very good,
and there's also some kind of religious aspect to it (“sacred water” or the
like). Personally, I'm a bit squeamish about drinking water from a tube
stuck into the mountain, a tube indistinguishable from the many
gutter-runoff drain tubes I see.
The next little climb was the much milder Mochikoshi Pass (持越峠).
Overall it's a rise of 151m over 3.8km (500' over 2.4mi) for an average
slope of 4%, but the last third or so is much steeper. The others were
chatting and taking it more leisurely, so I had a few minutes at the top to
prepare for their arrival...
Panasonic LX100 at an effective 75mm — 1/320 sec, f/5.6, ISO 200 —
map & image data — nearby photos
Michael and Andy
approach the pass
Panasonic LX100 at an effective 75mm — 1/160 sec, f/5.6, ISO 200 —
map & image data — nearby photos
Laughing Finish
Michael is likely smiling at Andy's grimacing, which is likely
class-clown antics. Everyone likes to put on a show when they crest a
pass.
Okay, not everyone... Sakura-san is like the Energizer Bunny...
expressionless, but untiring and never stops...
Panasonic LX100 at an effective 75mm — 1/250 sec, f/5.6, ISO 200 —
map & image data — nearby photos
Manseki rode one of the most famously-tough rides in Japan, Mt. Norikura, a few
days ago, so today he was taking it easy. He's a former professional skier
and ski instructor, so he's used to performing for a camera; his look is very
consistent...
Panasonic LX100 at an effective 75mm — 1/320 sec, f/5.6, ISO 200 —
map & image data — nearby photos
This calls to mind “Manseki on the Attack” from last month.
Next we had a long enjoyable downhill, and somewhere along the line Manseki decided that he was going to hit it hard, so he took off like a rocket.
Andy seemed to have taken it as a challenge, so planted himself on Manseki's rear wheel...
Panasonic LX100 at an effective 38mm — 1/400 sec, f/5.6, ISO 200 —
map & image data — nearby photos
Drafting
taken while cycling at 31 kph (19 mph)
Manseki couldn't shake him, but a rock or something took care of slowing Andy down...
Panasonic LX100 at an effective 38mm — 1/125 sec, f/2.4, ISO 800 —
map & image data — nearby photos
Andy's New Tire
with a special camio by his pet insect Clarance
Panasonic LX100 at an effective 24mm — 1/125 sec, f/3.2, ISO 200 —
map & image data — nearby photos
Tube Change #2
Andy had only one spare tube, so thought it prudent to patch the old tube so that it'd be available should he need it later...
Panasonic LX100 at an effective 27mm — 1/125 sec, f/2.2, ISO 200 —
map & image data — nearby photos
Patchwork
iPhone 6 + iPhone 6 back camera 4.15mm f/2.2 at an effective 29mm — 1/60 sec, f/2.2, ISO 32 —
map & image data — nearby photos
photo by Michale Edwards
While Andy was changing his tire, some folks we'd passed as they rode up came back down and flew by us. I didn't notice at the time,
but check out this guy's bike:
Panasonic LX100 at an effective 27mm — 1/200 sec, f/5.6, ISO 200 —
map & image data — nearby photos
Judging from the look on Andy and Michael's faces, they did notice the cute bicycle.
Panasonic LX100 at an effective 27mm — 1/250 sec, f/5.6, ISO 200 —
map & image data — nearby photos
This member of the group has a bicycle computer mounted on his bike, so I'm guessing that
it's this guy.
After another 150m of vertical climb over Ebumi Pass (江文峠), we made our way farther north,
heading toward the start of the day's big climb, Momoi Pass.
But not before Andy took a short siesta...
Panasonic LX100 at an effective 24mm — 1/200 sec, f/1.7, ISO 200 —
map & image data — nearby photos
Disoriented After a Short Nap
( either that, or making minor adjustments to Sakura-san's derailleur )
Then it was time to reckon with Momoi Pass. The full route is broken into two sections,
the first being to an intermediate pass, Maegahata Pass (前ヶ畑峠). That section has 350m of rise over 4.8km
(1,150' over 3mi) for an average of 7.3%, but those relatively-mild number belie the true horror of this section.
The final mile (1.7km) has an average slope of 12%. This was tough.
The road has a bunch of switchbacks snaking up the mountain, and at one
particularly sharp curve the road was very wide, so I took the opportunity
to try to ride sideways across the road to give me a moment when I wasn't
pitched up at a precarious angle, so that I could safely let go of the
handlebars with one hand and grab my water bottle.
I could grab the bottle, but what I couldn't do was drink; my lungs just
couldn't spare the two seconds of oxygen deprivation that a swig of water
would entail.
I'm not sure what to make of this. Generally, my heart and my legs are
not taxed at all when I ride; it's my lungs that are my limiting factor. I have absolutely huge lung capacity (more than 5L), and I've never run into
another cyclist whose lungs are their limiting factor, so I wonder whether
my iron might be low. I'll have to have it checked out.
Anyway, I made the worst part of the climb in 14:20, which I'm happy to
see is not more than double the best time logged on Strava (8:31). But I must admit defeat because my goal in doing it this first time was not to do
it quickly, but to do it without stopping, and without using my easiest
front gear (a gear that I would not have if I had a real road bike). But I couldn't do it, so gave up and used the easiest gear, and even then only barely
made it without stopping.
It was really tough.
It didn't help that it was 34℃ (93℉). I'd brought plenty of water (actually “Aquarius” sports drink), but couldn't
drink it without stopping and catching my breath, so I did without.
Panasonic LX100 at an effective 75mm — 1/500 sec, f/2.8, ISO 200 —
map & image data — nearby photos
Andy Crests the Pass
Next was Sakura-san, but she looked identical to the shot above (and indeed identical to every shot of her cresting a pass; she's a mountain-killing robot),
so no need to repeat the photo here.
Then came Michael, who had been kind enough to stop at one of the aforementioned mountain springs to wait for Andy and Mone, and douse them with cool water as they rode by.
Panasonic LX100 at an effective 75mm — 1/800 sec, f/2.8, ISO 200 —
map & image data — nearby photos
Focused
I feel a little ego boost to be the first to arrive at a pass (okay, a
big ego boost), but the reality is that both these guys are far stronger
and faster than me, and are merely choosing an easier pace today. For
example, last year Andy did the same climb more than two minutes faster
than my 47:37 of today. Yet despite both being far faster than me, they're
not considered “fast” among the local Cycling Kyoto group, because there
are folks who can do this climb in the 28-minute range. That kind of power
boggles my mind, yet a pro cyclist could probably do it in 15 minutes.
Wow.
Panasonic LX100 at an effective 35mm — 1/80 sec, f/2.3, ISO 1000 —
map & image data — nearby photos
Why I Love Cycling Here
Easy Laughter
I don't recall what Andy was laughing at, but Michael had just poured a
bottle of water over his own head to cool down, so it was probably related
to that. But who knows, Andy had such a fun personality that he doesn't
really need a reason to laugh.
After this the route took us up another 150m (500') to Momoi Pass, but
first it descended a bit to a small village, one I recognize every time I
pass through as being that of the “Purple Irises in the
Mountains” from eight years ago. When I wrote that post I never in a
million years would have believed that I'd ride a bicycle out that far. How things have changed.
Then on to the real Momoi Pass, which Andy had told me was “just a
little push” past the climb we had just done, but it was another mile of
10% grade. I found it easier to do if I tried to pretend that I didn't exist.
Panasonic LX100 at an effective 24mm — 1/125 sec, f/1.8, ISO 200 —
map & image data — nearby photos
Taste of the Descent
that's the road at left, down after a hairpin turn just out of frame
As noted before, it was hot, but on the plus side, it was again proven
how good the Under Armour “Heat Gear” compression shirt is (seen and talked
about here). It makes your sweat evaporate quickly, which keeps you cool. Though it was really
hot, I felt uncomfortable in only two situations over the course of the
whole day: The first was when descending from a pass, where the abundance
of built-up sweat from the climb combined with an abundance of speed on the
downhill, and I got genuinely chilly, especially going down from Momoi
Pass.
Let that sink in a bit. It was 34℃ (93℉), and this shirt made me feel chilly. This is why I own stock in the company.
The second time was back in Kyoto just before the end of the ride, after
having stopped for coffee with Michael. Returning to the bike in the heat
of the day, my shirt had dried and so couldn't do its sweat-evaporating
cooling magic, and I was immediately hot and miserable for a few minutes
until I moved enough to work up a sweat again.
I've extolled the virtues of these garments to folks I ride with, but it's clear no one believes me. Their loss.
Anyway, back to today's ride, after Momoi we lost track of Sakura-san. It turns out that instead of returning to Kyoto
she'd gone back up the mountain to Hanase Pass, but since there was no phone connectivity, she couldn't message us. But we weren't
worried because we know she knows these roads well, having done them with her multiple times in the past.
Panasonic LX100 at an effective 24mm — 1/400 sec, f/5.6, ISO 200 —
map & image data — nearby photos
Andy Acting Silly?
2:26pm - taken while cycling at 25 kph (15 mph)
At one point during the long descent from Momoi Pass (which merges into
the descent from Hanase Pass), I turned around to take a photo of Andy
behind me, and he got into this ridiculously exaggerated “aerodynamic” tuck
for the camera.
Panasonic LX100 at an effective 24mm — 1/400 sec, f/5.6, ISO 200 —
map & image data — nearby photos
I though it was just Andy being silly, until later that evening watching
the Tour de France I saw the pro riders doing exactly the same thing on a
long downhill. They were going up to 4× faster than Andy, but of
course that's only because Andy had to artificially limit his speed because
we were on public roads and not a closed course.
Jeffrey E.F. Friedl's Blog
- Jeffrey E.F. Friedl's profile
- 13 followers


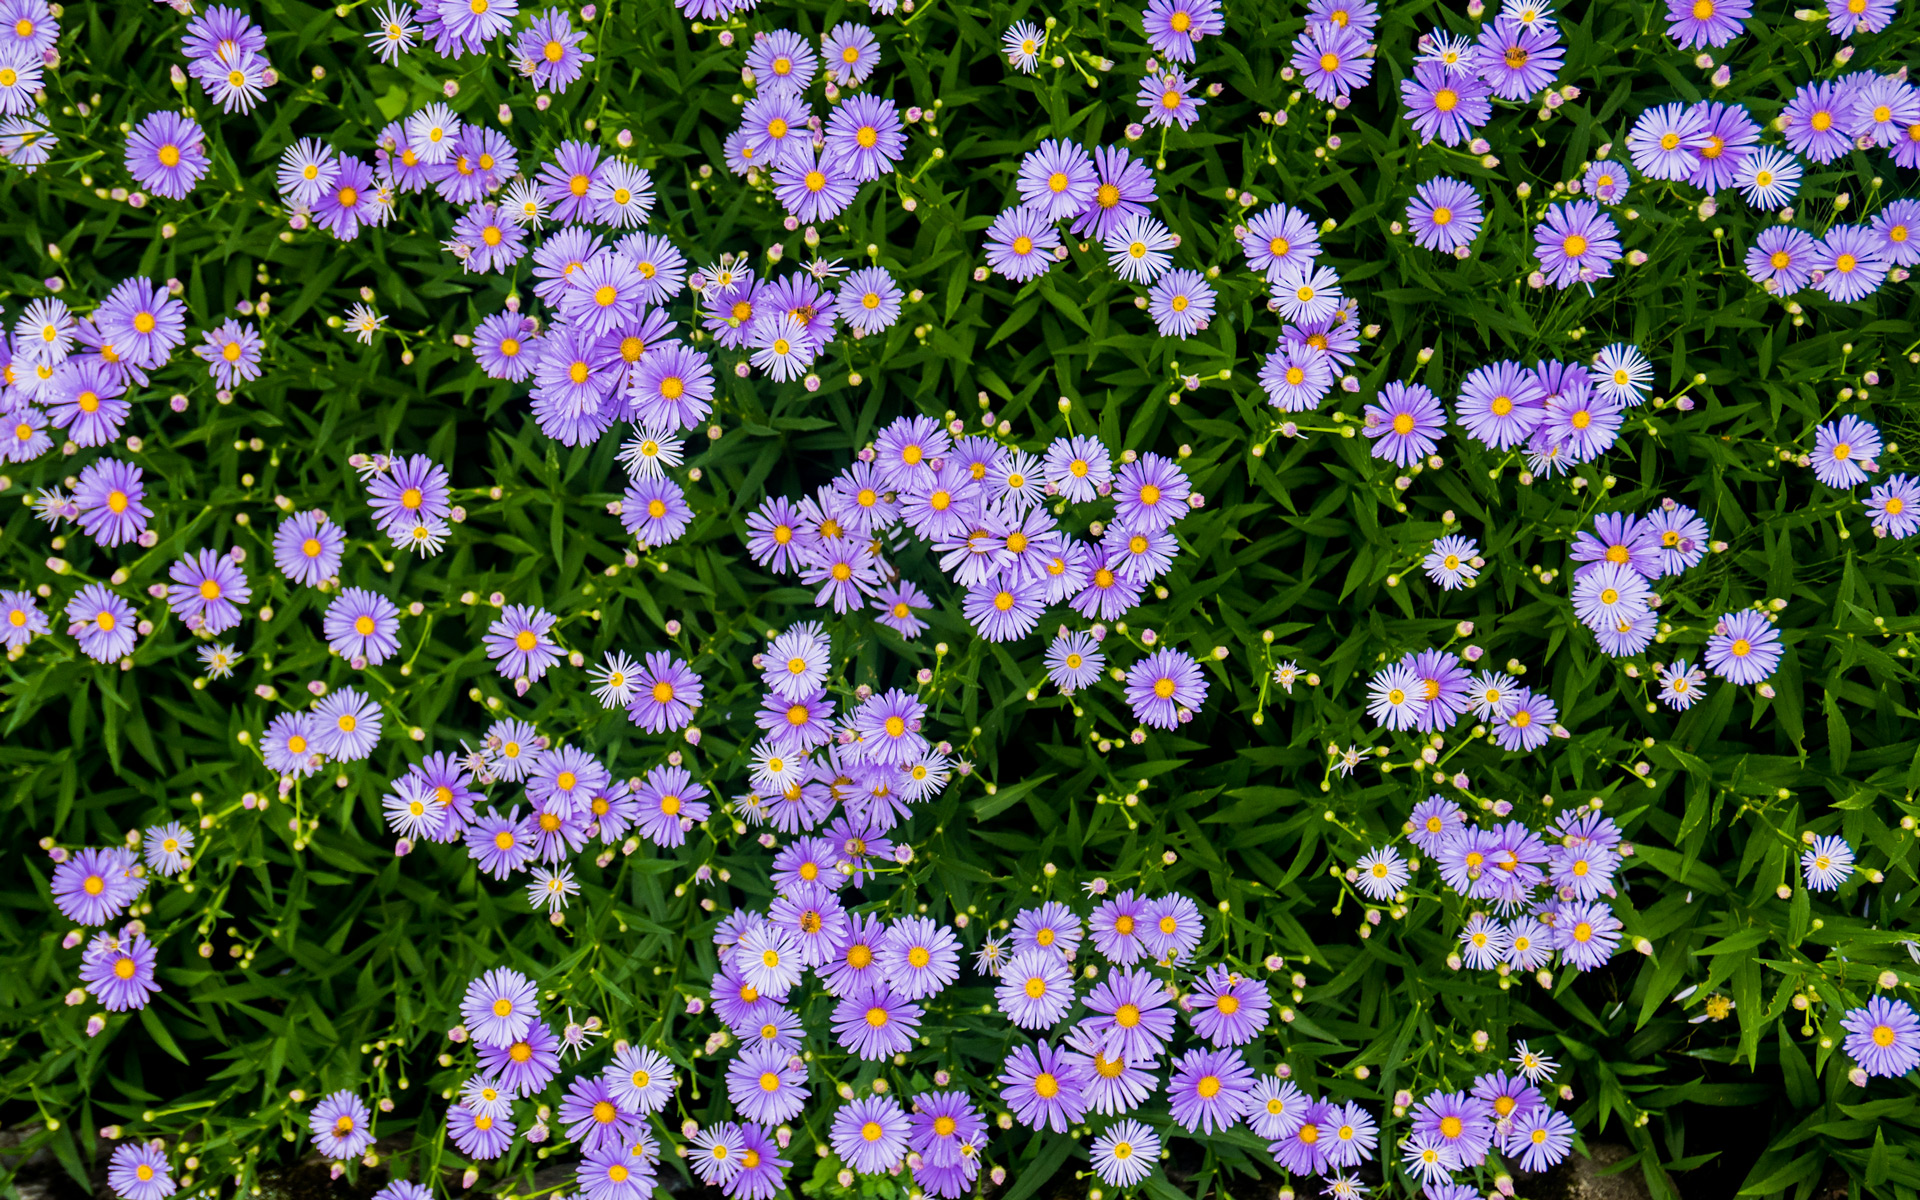
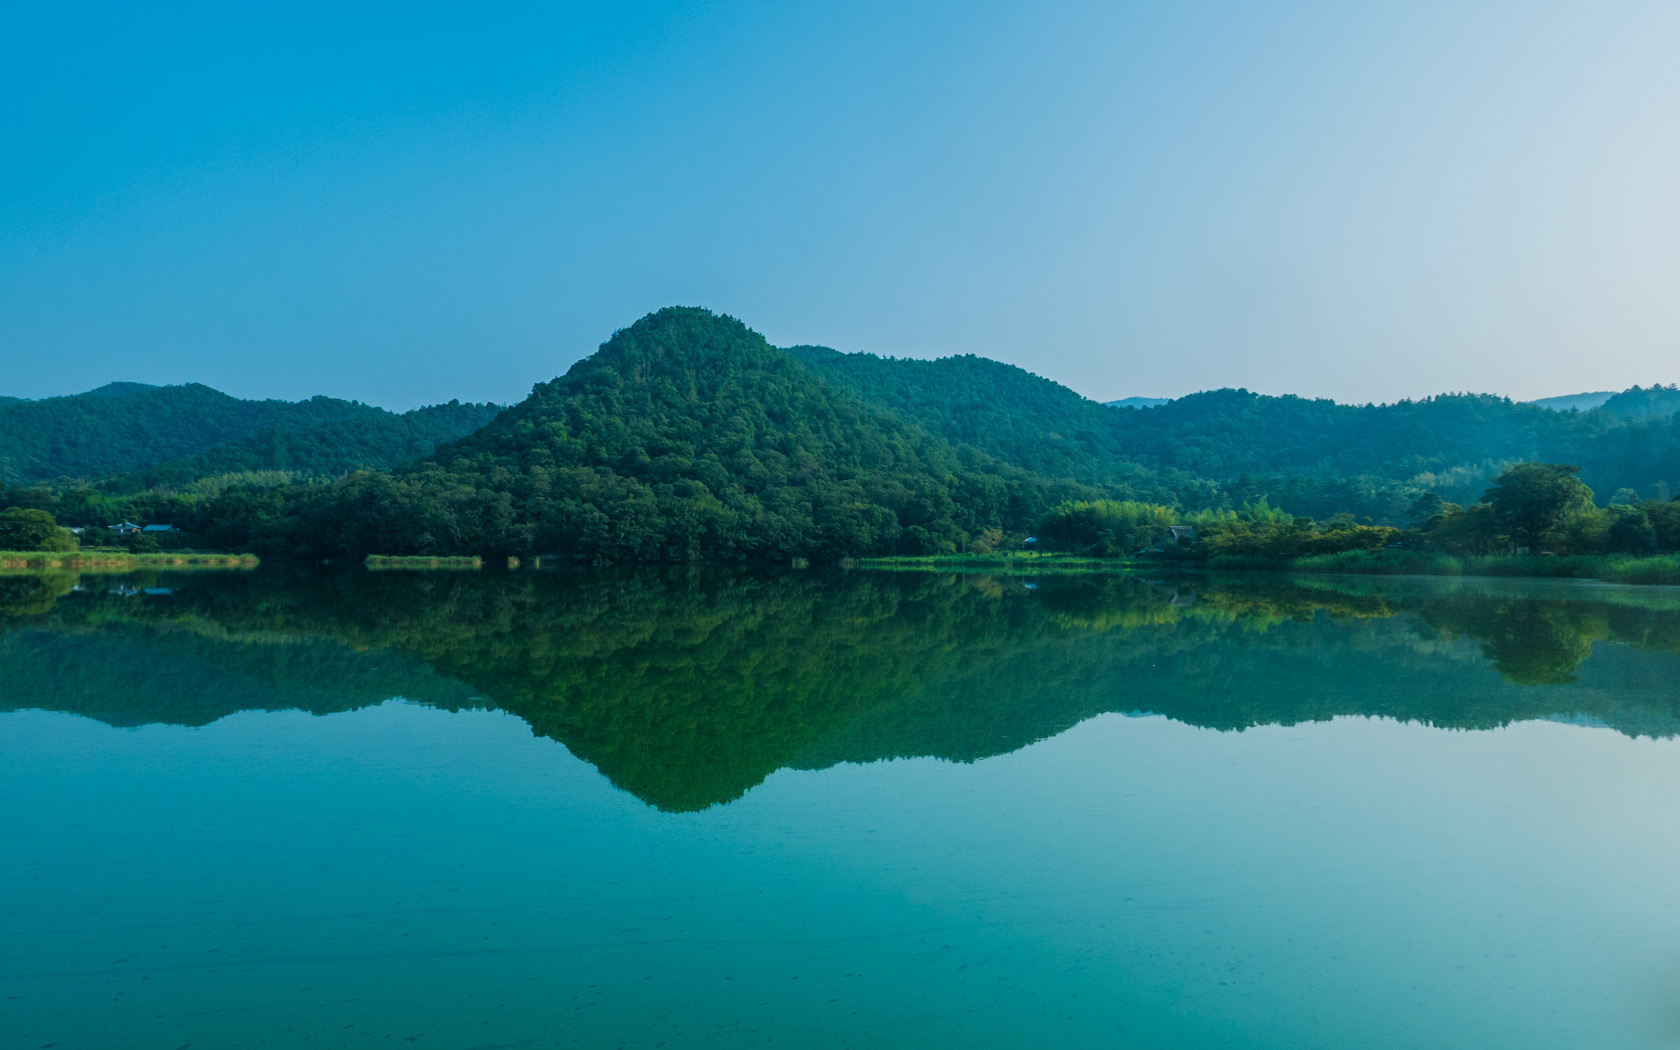
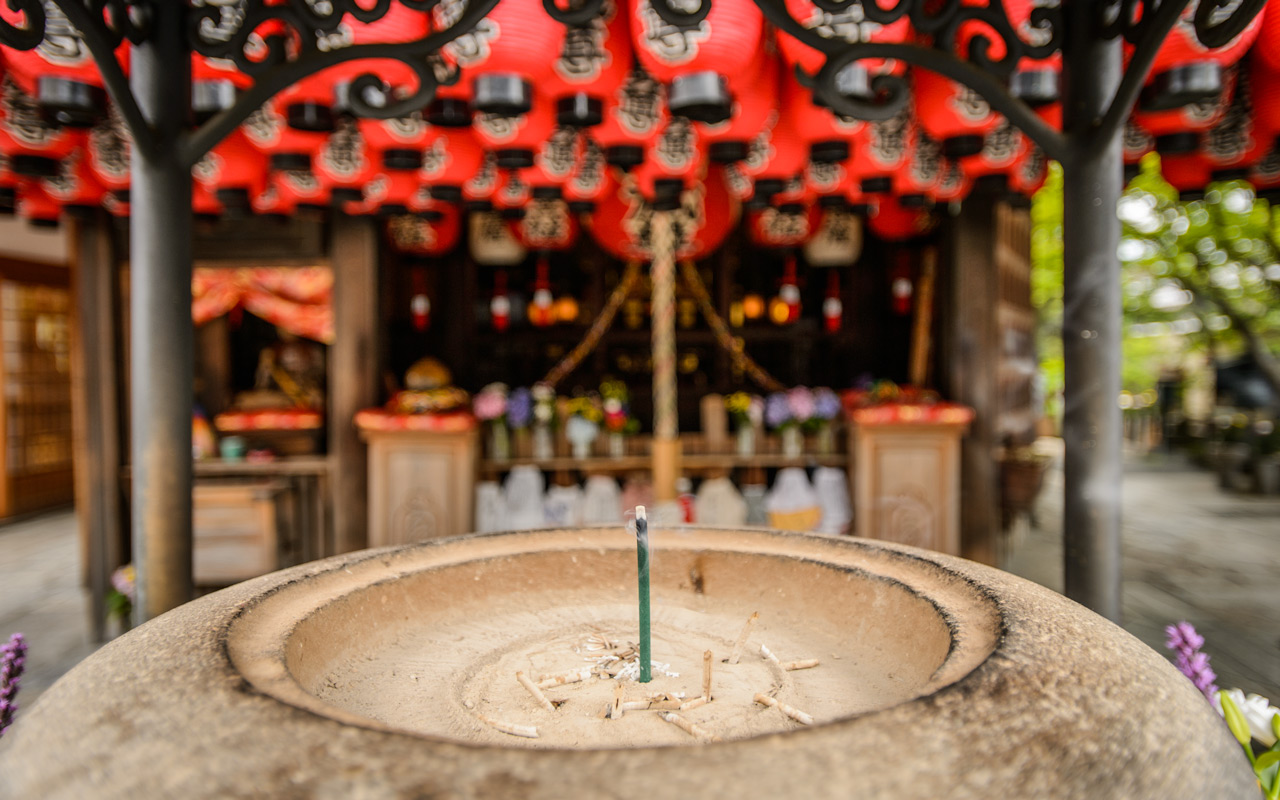
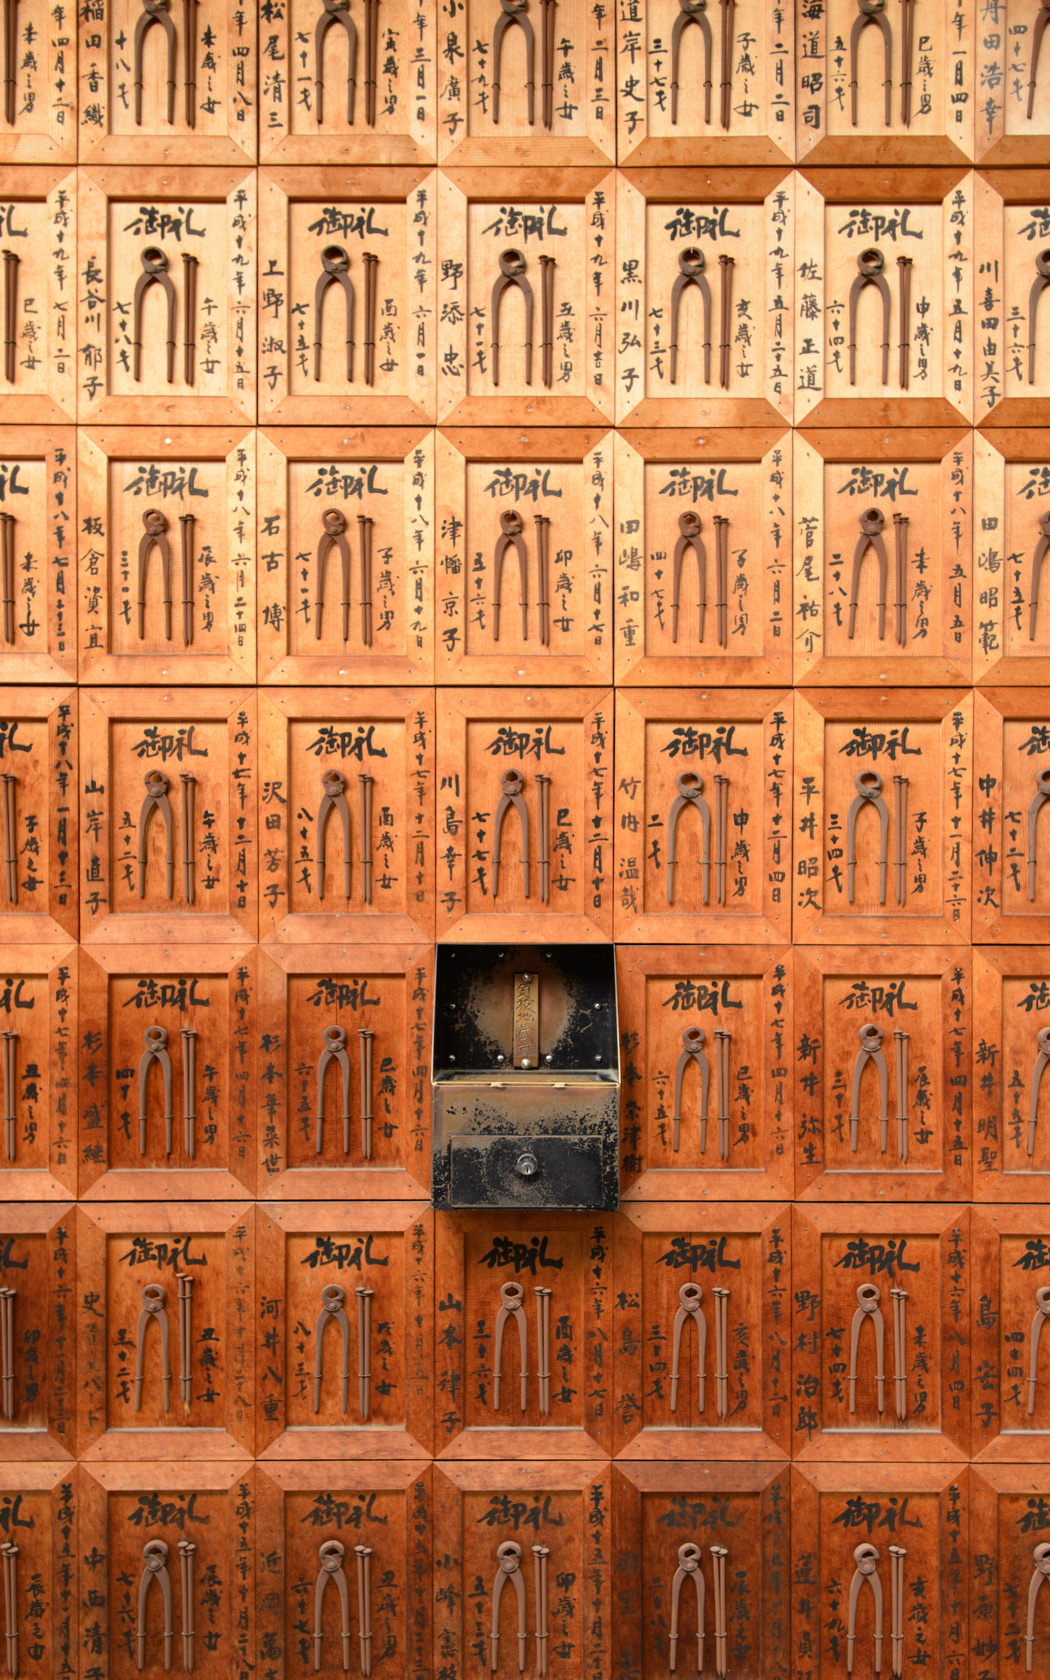