
Jeffrey E.F. Friedl's Blog, page 22
December 4, 2015
Revisiting Fall Colors: Kyoto Mountain Cycling Two Weeks Ago
Panasonic LX100 at an effective 25mm — 1/80 sec, f/1.8, ISO 250 —
map & image data — nearby photos
Meeting Up
in northern Kyoto
Just a quick writeup with some pictures of a nice
group ride that I did two weeks ago with some of the stronger riders from Cycling Kyoto!. I was by far the newest, weakest, slowest, least
experienced among them, but they're a nice fun group so they made me feel welcome.
今回の写真は二週間前のサイクリングの事です。
Panasonic LX100 at an effective 24mm — 1/125 sec, f/2, ISO 200 —
map & image data — nearby photos
A Serious Group
Panasonic LX100 at an effective 25mm — 1/125 sec, f/2.5, ISO 200 —
map & image data — nearby photos
Tomas
fastest guy in the group
( tied with 20 other folks for nicest guy in the group )
Panasonic LX100 at an effective 30mm — 1/125 sec, f/2.2, ISO 320 —
map & image data — nearby photos
Vincent
wearing a ridiculously high-viz yellow jacket that totally overpowers the camera sensor
(This is the same Vincent recently seen doing my bike fitting)
Panasonic LX100 at an effective 30mm — 1/125 sec, f/2.2, ISO 200 —
map & image data — nearby photos
taken while cycling at 32 kph (20 mph)
Panasonic LX100 at an effective 24mm — 1/125 sec, f/1.7, ISO 320 —
map & image data — nearby photos
Joshua and Vincent
power past an old house; taken while cycling at 12 kph (7 mph)
Panasonic LX100 at an effective 25mm — 1/125 sec, f/1.8, ISO 800 —
map & image data — nearby photos
This Time With Autumn Colors
Panasonic LX100 at an effective 25mm — 1/125 sec, f/1.8, ISO 800 —
map & image data — nearby photos
This Time Out of Focus
so I did some “artsy” processing to see what I could recover from it
Panasonic LX100 at an effective 24mm — 1/125 sec, f/1.8, ISO 200 —
map & image data — nearby photos
Andy and Christoph
taken while cycling at 34 kph (21 mph)
Panasonic LX100 at an effective 44mm — 1/125 sec, f/2.6, ISO 500 —
map & image data — nearby photos
The Gang's All Here
taken while cycling at 39 kph (24 mph)
Panasonic LX100 at an effective 24mm — 1/125 sec, f/3.5, ISO 200 —
map & image data — nearby photos
I Guess You Had To Be There
it was really quite pretty in real life
taken while cycling at 29 kph (18 mph)
Panasonic LX100 at an effective 24mm — 1/125 sec, f/2.5, ISO 200 —
map & image data — nearby photos
Tomas and Andy
taken while cycling at 35 kph (22 mph)
Panasonic LX100 at an effective 24mm — 1/125 sec, f/2.5, ISO 200 —
map & image data — nearby photos
I'm Not Sure What's Happening Here
photo by Joshua Levine
Panasonic LX100 at an effective 24mm — 1/125 sec, f/3.5, ISO 200 —
map & image data — nearby photos
All Smiles
Panasonic LX100 at an effective 24mm — 1/125 sec, f/1.7, ISO 500 —
map & image data — nearby photos
All Serious
Panasonic LX100 at an effective 24mm — 1/125 sec, f/1.7, ISO 320 —
map & image data — nearby photos
Gutsy
Tomas trying Andy's Insanely Steep climb
It was wet from a recent rain, so quite slippery.
Discretion is the better part of valor, so Tomas aborted the attempt. I didn't even try. But as
Rick H had suggested, I did measure the slope
with the Compass Tool in my iPhone:
Panasonic LX100 at an effective 24mm — 1/60 sec, f/1.7, ISO 250 —
map & image data — nearby photos
Not So Bad!
only a 20% grade
It looks much steeper than the 21% “Nasty” hill, but it's actually less.
Maybe it's the perspective from being able to stand to its side and view it edge on.
Panasonic LX100 at an effective 25mm — 1/125 sec, f/2, ISO 200 —
map & image data — nearby photos
Colorful Christoph
taken while cycling at 34 kph (21 mph)
Panasonic LX100 at an effective 25mm — 1/125 sec, f/2.5, ISO 200 —
map & image data — nearby photos
Less Color
but more smile
Panasonic LX100 at an effective 25mm — 1/125 sec, f/3.2, ISO 200 —
map & image data — nearby photos
Three Muskateers
Antti seems to have regained his former stature
Panasonic LX100 at an effective 34mm — 1/125 sec, f/2.3, ISO 320 —
map & image data — nearby photos
Friendly Chat
Panasonic LX100 at an effective 75mm — 1/125 sec, f/2.8, ISO 250 —
map & image data — nearby photos
Approaching the Top
Hanase Pass (花背峠)
Panasonic LX100 at an effective 75mm — 1/125 sec, f/2.8, ISO 320 —
map & image data — nearby photos
Fake “Game Face” Competition
Panasonic LX100 at an effective 75mm — 1/125 sec, f/2.8, ISO 400 —
map & image data — nearby photos
Too Fast to Focus
Vincent and I live in the same general part of the city, so after the 80km ride we headed home together. We stopped by Radio Bagel for hot coffee and tasty carbohydrates. Yum.


December 3, 2015
The Scourge (or Beauty) of “Snap To Road” with iPhone Location-Tracking Apps
I've discovered an issue with how an iPhone give location information to apps, an issue that can have a
dramatic impact on the accuracy of location data. The impact is either really good or really bad,
depending on what the app (and you) want to use the location information for.
The issue is that the iPhone can get into a mode where instead of providing apps with your location
directly from its normal location-tracking methods (GPS/GLONASS, WiFi and cell-tower signal strength), it
“snaps” the location to the center of the nearest road it knows about. I call this “snap to road”; internally at Apple, I hear it's called “map matching”.
I can imagine that this feature is really useful for apps providing turn-by-turn driving directions.
It's not so wonderful for how I use location-aware apps: for tracking my cycling
activity, and for geoencoding photos, both of which are harmed by this road-snap effect.
Unfortunately, an app developer (and hence an app user) can not control which kind of data the app gets.
I've submitted the bug to Apple (“CoreLocation:
location snap-to-road can't be controlled by the developer”).
If you are a user of apps, or a developer, you can do some things to mitigate the issue, so that's what this blog post is
about.
First, here's an illustration of the effect in action: the two colors of the track in the image below
are parts of the same continuous track. The part colored red is the first half, an upside-down “L” loop, done without the road-snap effect. You can see that it more or less tracks the outside edge of the road for the whole loop.
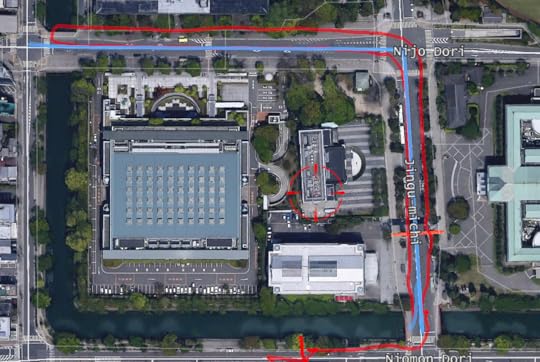
Tale of One Tracklog
colored into two halves, the red without road snapping, the blue with
Then, I did something on the phone that turned on the road-snapping effect, and drove the exact same loop again. This part of
the track is colored blue. The blue line perfectly matches the centers of the roads, and though you can't tell from looking, it's
actually the same loop with both “out” and “back” segments.... they just overwrite each other on their perfectly-straight
road-center lines.
If I were using this track to geoencode photos, I would certainly want to differentiate photos taken on one side of the road
from the other, but this “snap to road” feature destroys the true data, and I lose that ability.
Here's another example, from this cycling trip.
Here, the location track reported to the app is shown in blue. I added the red line to indicate
where I actually rode the bicycle:
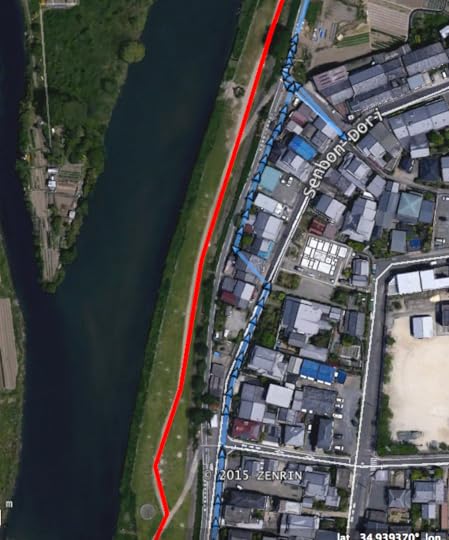
I Wasn't Zig-Zagging
The elevation between a road-side path and the road can be quite different, so besides giving the incorrect history, it can
contribute to incorrect ride-climb data.
This road-snapping feature can also create artificial speed and distance numbers, which contributes to inflated distance and
speed calculations for fitness apps. In the image above, as the road curves away from my actual path, the distance it's saying I'm
covering is longer than the straight-line path I'm actually taking. Longer distance covered in the same amount of time means that both the speed and distance are reported incorrectly.
As a cyclist, the only thing worse than mistakes that shortchange my achievements are mistakes that inflate them.
Then in the middle you can see the track suddenly jig to the left. The road it was snapping my location to has now drifted
too far away, so it decides to snap me onto a closer road that I'm also not on. That jump sees me suddenly accelerate to 87 kph
for the one second required to make the adjustment, then return to the ~30kph speed I was actually traveling at.
Then there's some weirdness that happens as you near intersections... sometimes the road-snapping stuff can't decide which road
you're on, and so it throws you around. You can see it near the top of the screenshot with one data point jutting out to the
right. I was on the riverside path, down an embankment from the road, but as my location came close to the intersection above,
it snapped me momentarily from one road to another, making it seem that I accelerated to ~130kph (80mph) on my bicycle for
two seconds then immediately returned to a more human pace.
Another common manifestation of this problem is seen when stopping at a traffic light, as illustrated here:
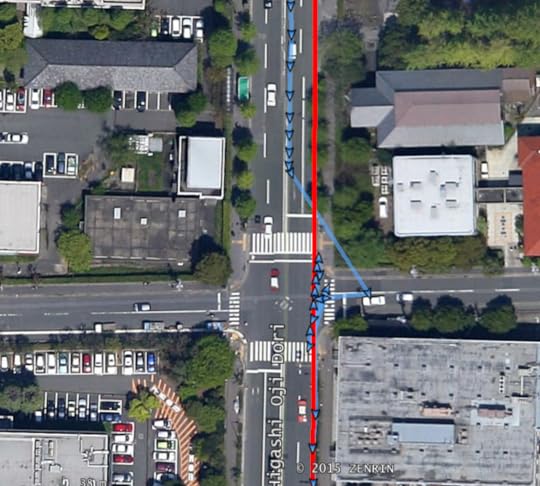
Stopping at an Intersection
Travel is north to south on the image-right side of the road.
Red line is the actual path traveled.
As I traveled from the north, I had to stop at the intersection (on the north-east side of the intersection; this is Japan,
where traffic flows on the left) to wait for the light. While standing still, one expects a location drift from a consumer-grade
GPS/GLONASS unit, but the snap-to-road “feature” can turn it into spiky ordered disorder.
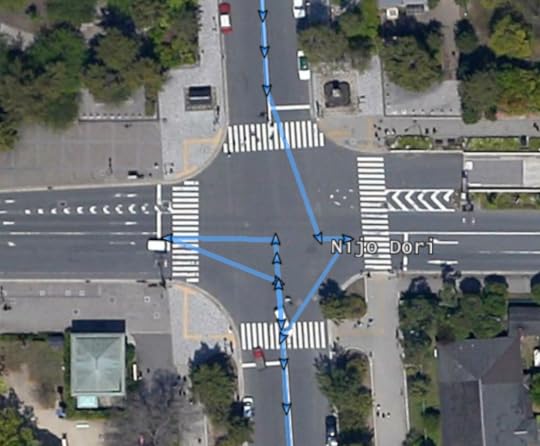
Stopping at an Intersection #2
Actual travel is north to south on the image-right side of the road.
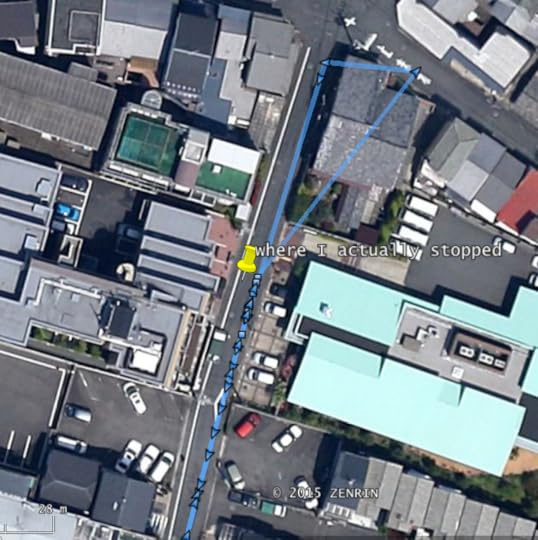
Stopping In Front of a Friend's House
The spike in the top half is manufactured by the road-snap “feature”
There's another wrinkle to the road-snapping issue: it seems to happen only when traveling above a certain speed threshold,
around 20~30kph (12~19mph). This can be inferred in “Stopping at an Intersection” example above. As I traveled at speed from north
to south, the location was snapped to the center of the road until I reached the intersection and had to stop. I didn't accelerate
quickly enough from the intersection to suffer the road snapping, so that part of the track shows the actual path traveled.
Yet, how does this explain the craziness while stopped at the intersection, or while stopped in front of a building in the
example immediately above? If you're not moving, you should be below the speed threshold. My guess is that the non-precise variability found in consumer-grade GPS/GLONASS units (as illustrated here, and especially when the unit
doesn't have a good satellite fix, as illustrated
here) creates data points that meander around your actual location, and if one meanders far enough away,
it can appear to an unsophisticated algorithm as if the actually-stationary phone has suddenly moved far enough away (which means fast-enough away) to invoke the
road-snapping thing, and in its desperate attempt to match that point to the center of some road, we see these spikes that end
just making the “non-precise variability” so much worse.
A cyclist would suffer this problem the most, as it's easy to exceed the threshold. Runners likely won't suffer
it directly so much, except for the “non-precise variability” that can strike when paused.
So, what causes this problem to be turned on in the first place?
When an app tells the iPhone that it wants location information, it has four choices
to indicate what type of app it is. Apple's developer documentation on this is woefully lacking details on the ramifications of the choice, but one can read something into the four names:
CLActivityTypeAutomotiveNavigation
CLActivityTypeFitness
CLActivityTypeOtherNavigation
CLActivityTypeOther
It turns out that this “road snap” feature is enabled except when using “Other Navigation”,
which the docs say is intended for non-automotive navigation, e.g. planes, trains, boats, snowmobiles, etc.
On the surface this makes no sense, because one would think that road snapping would apply to
only “Automotive Navigation”, and certainly explicitly not apply to “Fitness” (predominately
walking, running, and cycling) or “Other”, where one can't make any assumptions on the use of location information.
When one digs in, it makes even less sense. It turns out that if any app requests something other than
“Other Navigation”, all apps get the road-snapped data.
This means that if you don't want this “road snap” feature, you must run only apps that use “Other Navigation”.
Unfortunately, it seems that fitness tracking apps unsurprisingly tend to use the “Fitness” activity type when registering for
location information, so they suffer this problem. I've tested Strava, Wahoo Fitness, and Runmeter (aka
Cyclemeter and Walkmeter), and all invoke road snapping. To be fair, some users may consider this a feature, or consider it a
feature at times and less desirable other times. It'd be nice if an app gave the user explicit control over this, but none of them
do.
The only app I've found that does not invoke road snapping is Galileo Offline Maps, an
app I've been recommending for years for its ability to use high-quality maps while completely offline. In testing this issue over
the last month, the developer has made special builds of his app available to me, so I'd like to think him for help in pinning
this issue down.
I'm a geek about my data (as made obvious here) so I used
to keep tracks of my cycling with multiple apps. I felt I got the best location track from Galileo Offline Maps,
but Runmeter included temperature data and Wahoo Fitness included bicycle speed and cadence. And on top of that I used
GeoTagr as a backup
because other apps tended to spontaneously stop recording my track.
But now I can't use any of them because, as mentioned above, the use of any app with road snapping infects even
non-snapped apps like Galileo Offline Maps. I can't even open up Google Maps, because it too (this time unsurprisingly),
gets the road snapping. So to keep a pure tracklog, I can run only Galileo and no others.
The bug has been submitted to Apple. The bug number is #23737784, implying that there are 23.7 million other bugs
submitted before me, so I don't hold much hope for a response, but it'd be very nice if
Apple documented for developers the exact ramifications of the various CoreLocation activity types.
Apple made the road-snapping feature something an app could explicitly turn on and off.
Apple removed the ability for random other apps to influence the data you get.
I won't hold my breath, but until it's resolved I'll stick with Galileo Offline Maps. It's a bummer, but I've
removed the Wahoo Fitness cadence/speed unit from my bike
because I haven't found an app that can read its data without destroying my cycling track.
November 29, 2015
Bicycle Ride to Osaka with Paul Barr
Panasonic LX100 at an effective 24mm — 1/500 sec, f/5.6, ISO 200 —
map & image data — nearby photos
On the Bike Path From Kyoto to Osaka
taken while riding at 20 kph (12 mph)
As I mentioned in “Confused Kyoto Cherry Trees Bloom Five Months Early”,
Paul Barr and I rode our bikes down to Osaka from Kyoto. It's about 50km each way, so the round trip was about 100km (62mi) total.
Here's our trip on my cycling heatmap.
I'd made the same trip by myself earlier in the week, and
written how windy it was for much of the day,
but the wind during the trip down with Paul was by far the strongest sustained winds I'd ever ridden
a bicycle in, on par with a medium-sized typhoon. It was just ridiculous. I made
a short video trying to illustrate the wind:
It's just as well that we were planning on taking it slowly, because the wind left no other choice. It was Paul's second “real” bike ride, the first having been about 66km (41mi) with lots of mountains
during this ride during
NORU Kyoto's second social ride
(pretty much a repeat of the first ride that I'd written about two weeks ago).
Panasonic LX100 at an effective 29mm — 1/2500 sec, f/2.1, ISO 200 —
map & image data — nearby photos
taken while riding at 23 kph (14 mph)
Panasonic LX100 at an effective 25mm — 1/800 sec, f/5.6, ISO 200 —
map & image data — nearby photos
Navigating the Stupid Gates
I wrote about these stupid gates the first time I rode to Osaka.
Panasonic LX100 at an effective 24mm — 1/800 sec, f/1.7, ISO 200 —
map & image data — nearby photos
Pleasant Mood
and slightly protected from the wind
taken while riding at 36 kph (22 mph)
Panasonic LX100 at an effective 24mm — 1/16000 sec, f/1.7, ISO 200 —
map & image data — nearby photos
Directly Into the Wind
taken while riding at 18 kph (11 mph)
Panasonic LX100 at an effective 75mm — 1/2000 sec, f/2.8, ISO 200 —
map & image data — nearby photos
Approaching Osaka
taken while riding at 18 kph (11 mph)
Panasonic LX100 at an effective 24mm — 1/400 sec, f/6.3, ISO 200 —
map & image data — nearby photos
In the City
taken while riding at 22 kph (13 mph)
Panasonic LX100 at an effective 24mm — 1/200 sec, f/6.3, ISO 200 —
map & image data — nearby photos
Still a Few Fall Colors
taken while riding at 11 kph (7 mph)
Panasonic LX100 at an effective 75mm — 1/500 sec, f/5.6, ISO 200 —
map & image data — nearby photos
Osaka Castle
Panasonic LX100 at an effective 28mm — 1/125 sec, f/6.3, ISO 200 —
map & image data — nearby photos
Made It!
Panasonic LX100 at an effective 25mm — 1/500 sec, f/5.6, ISO 200 —
map & image data — nearby photos
Me
photo by Paul Barr
Panasonic LX100 at an effective 24mm — 1/320 sec, f/5.6, ISO 200 —
map & image data — nearby photos
Circling the Castle
taken while riding at 15 kph (10 mph)
Panasonic LX100 at an effective 24mm — 1/125 sec, f/5.6, ISO 250 —
map & image data — nearby photos
Food Stand
of suspect quality
Panasonic LX100 at an effective 24mm — 1/125 sec, f/5.6, ISO 1600 —
map & image data — nearby photos
Bad Udon
at least it was warm
Panasonic LX100 at an effective 29mm — 1/400 sec, f/5.6, ISO 200 —
map & image data — nearby photos
Heading Back
amid much calmer winds
Panasonic LX100 at an effective 24mm — 1/125 sec, f/8, ISO 640 —
map & image data — nearby photos
Road Less Taken
the road had apparently diverged earlier in the yellow wood
taken while riding at 9 kph (6 mph)
Back in Kyoto, almost home, we came across a sign on the bicycle path we'd noted earlier:
Panasonic LX100 at an effective 52mm — 1/640 sec, f/2.8, ISO 200 —
map & image data — nearby photos
Inviting Sign
for Cafe Morning Glory
Panasonic LX100 at an effective 37mm — 1/160 sec, f/5.6, ISO 200 —
map & image data — nearby photos
Easy Access
down the slope, park bike at A-frame in lot, then across street to cafe
Panasonic LX100 at an effective 24mm — 1/40 sec, f/8, ISO 3200 —
map & image data — nearby photos
Just Desserts
coffee + choco-bannana crepe
The coffee and crepe were both very good and much more than we expected for the ¥1,000 ($8.15). Map links are under the photos... highly recommended if you're traveling by and want a snack.
They just opened last month.
Panasonic LX100 at an effective 41mm — 1/1250 sec, f/2.5, ISO 200 —
map & image data — nearby photos
Long Shadows
taken while riding at 26 kph (16 mph)
We'd left Paul's hotel at about 8:30 in the morning, and returned at about 4:30 in the afternoon,
just before sunset (4:46). Not bad for his second real ride.
November 28, 2015
A Past-Its-Prime Visit to Kyoto’s Ochiba Shrine
Nikon D4 + Voigtländer 125mm f/2.5 — 1/500 sec, f/2.5, ISO 100 —
map & image data — nearby photos
Squished Flat And Turning Orange
formerly-plush carpet of leaves now reduced to old tattered rags
two days ago at the Ochiba Shrine in Kyoto Japan
二日前、岩戸落葉神社(京都市)
My timing is getting all mixed up, but two days ago I posted
about the Ochiba Shrine, with pictures from two weeks ago
when it was in its full carpet-of-leaves splendor. By the time I'd posted it (two days ago) the splendor had
passed; this post contains photos from a visit two days ago.
Nikon D4 + Voigtländer 125mm f/2.5 — 1/400 sec, f/2.5, ISO 180 —
map & image data — nearby photos
Paul Barr
Nikon D4 + Voigtländer 125mm f/2.5 — 1/400 sec, f/2.5, ISO 800 —
map & image data — nearby photos
Nikon D4 + Voigtländer 125mm f/2.5 — 1/400 sec, f/2.5, ISO 280 —
map & image data — nearby photos
Slow Drip
Nikon D4 + Voigtländer 125mm f/2.5 — 1/3200 sec, f/2.5, ISO 100 —
map & image data — nearby photos
Not So Bad
when viewed from afar
Nikon D4 + Voigtländer 125mm f/2.5 — 1/500 sec, f/2.5, ISO 100 —
map & image data — nearby photos
Impostor
Nikon D4 + Sigma 35mm F1.4 DG HSM — 1/1250 sec, f/1.4, ISO 100 —
map & image data — nearby photos
Nikon D4 + Sigma 35mm F1.4 DG HSM — 1/400 sec, f/1.4, ISO 110 —
map & image data — nearby photos
Less-Trampled Area
Nikon D4 + Sigma 35mm F1.4 DG HSM — 1/400 sec, f/2, ISO 250 —
map & image data — nearby photos
Nikon D4 + Sigma 35mm F1.4 DG HSM — 1/400 sec, f/6.3, ISO 1400 —
map & image data — nearby photos
Reverse View
not quite as nice as from the outside looking in
On the way home, we stopped by
the Yama no Ie Hasegawa restaurant for coffee...
Nikon D4 + Sigma 35mm F1.4 DG HSM — 1/250 sec, f/1.4, ISO 6400 —
map & image data — nearby photos
Hot Coffee
Yama no Ie Hasegawa (山の家はせがわ)
And dinner...
Nikon D4 + Sigma 35mm F1.4 DG HSM — 1/250 sec, f/1.4, ISO 6400 —
map & image data — nearby photos
And dessert...
Nikon D4 + Sigma 35mm F1.4 DG HSM — 1/320 sec, f/1.4, ISO 6400 —
map & image data — nearby photos
A visit here is always a nice way to end an outing.
November 27, 2015
Confused Kyoto Cherry Trees Bloom Five Months Early
Panasonic LX100 at an effective 24mm — 1/500 sec, f/5.6, ISO 200 —
map & image data — nearby photos
Chilly Cherry
Kyoto cherry blossoms blooming five months early
五ヶ月早いを咲くの桜
今日、11月27日の撮影です。
Today a ride from Kyoto to Osaka Castle with Paul Barr, early on the trip while still in Kyoto we came across some cherry
blossoms that had apparently gotten confused by the cold spell in October followed by a warm spell earlier
this month... they seem to be blooming five months early!
Some varieties of cherry do normally bloom in November, such as we've
over the years
here,
here, and
here, but their branches are sparsely populated
with blossoms. Today's were full:
今日の出会った桜は十月桜ではないだと思いますが、どんな種類のは分からない。実は、梅や桃ではかも知れません。
Panasonic LX100 at an effective 24mm — 1/2500 sec, f/2, ISO 200 —
map & image data — nearby photos
Paul and the Cherry
at least I think it's cherry; frankly, to my untrained eyes,
it could just as easily be peach or plum, but the bark look like cherry
Panasonic LX100 at an effective 75mm — 1/400 sec, f/5.6, ISO 200 —
map & image data — nearby photos
Whatever they were, they were pretty and out of place.
I made a short video of the blossoms, amid a ridiculous wind.
Panasonic LX100 at an effective 24mm — 1/1600 sec, f/2.8, ISO 200 —
map & image data — nearby photos
November 26, 2015
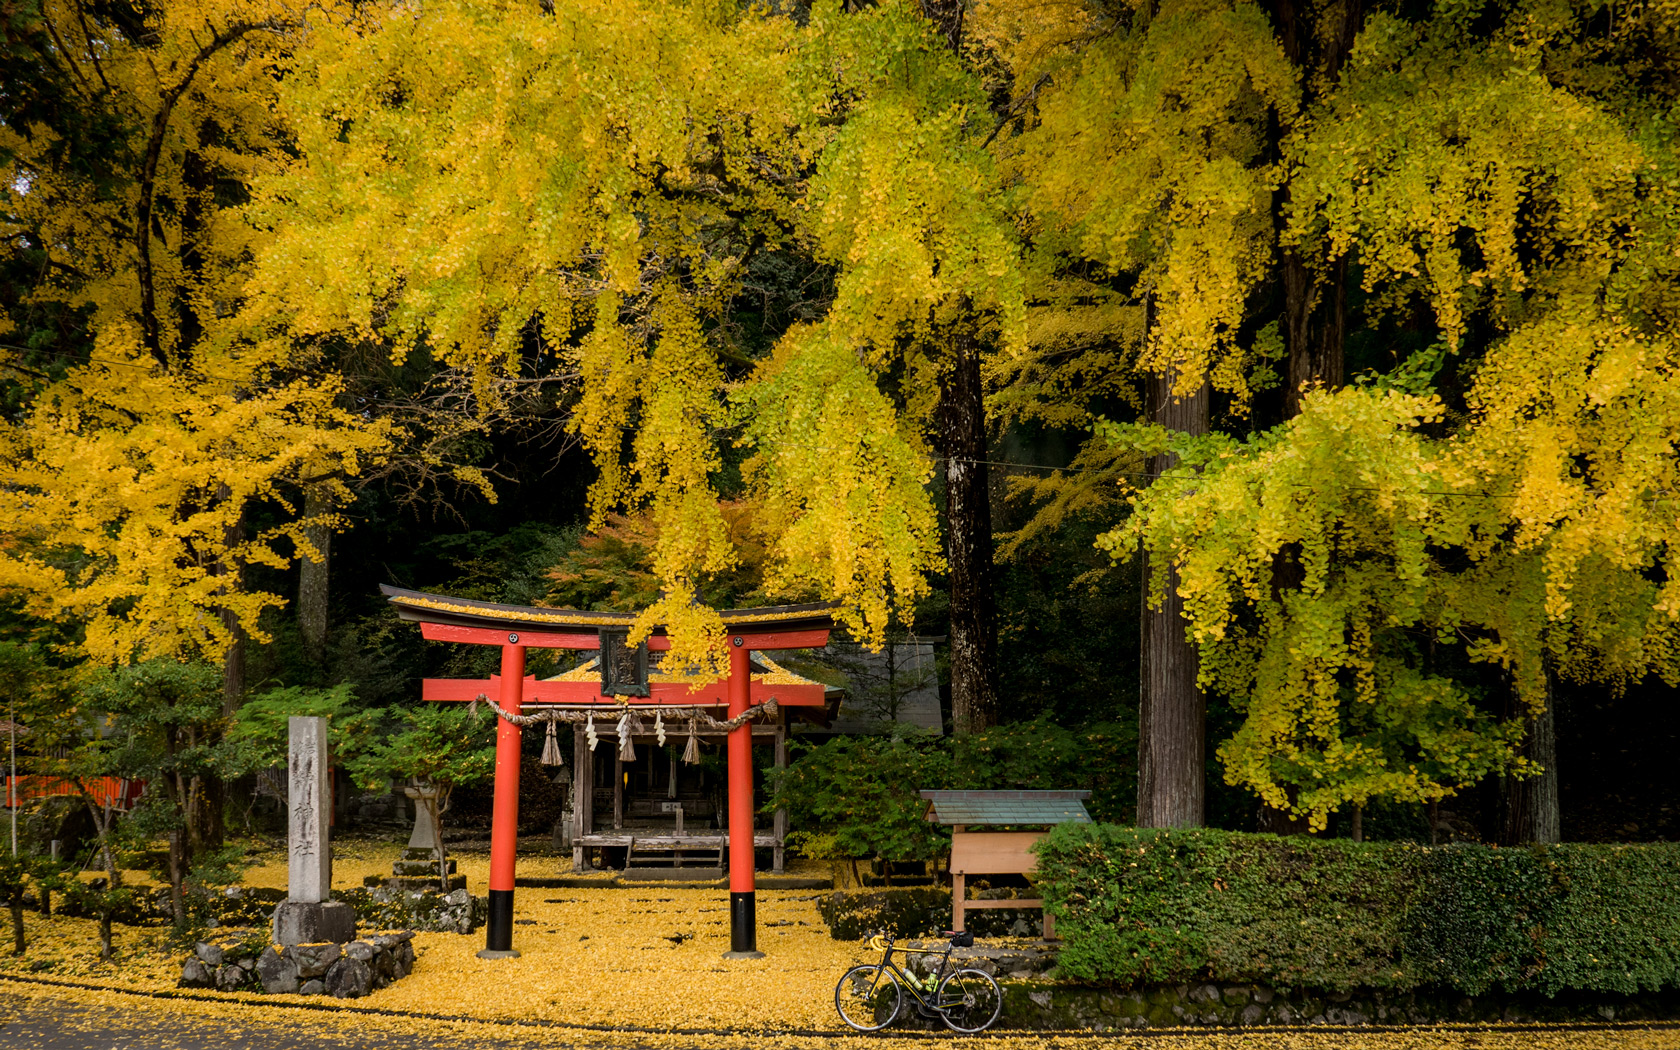
Cycling to Kyoto’s Ochiba Shrine Amid the Fall Colors
Panasonic LX100 at an effective 24mm — 1/125 sec, f/2.8, ISO 200 —
map & image data — nearby photos
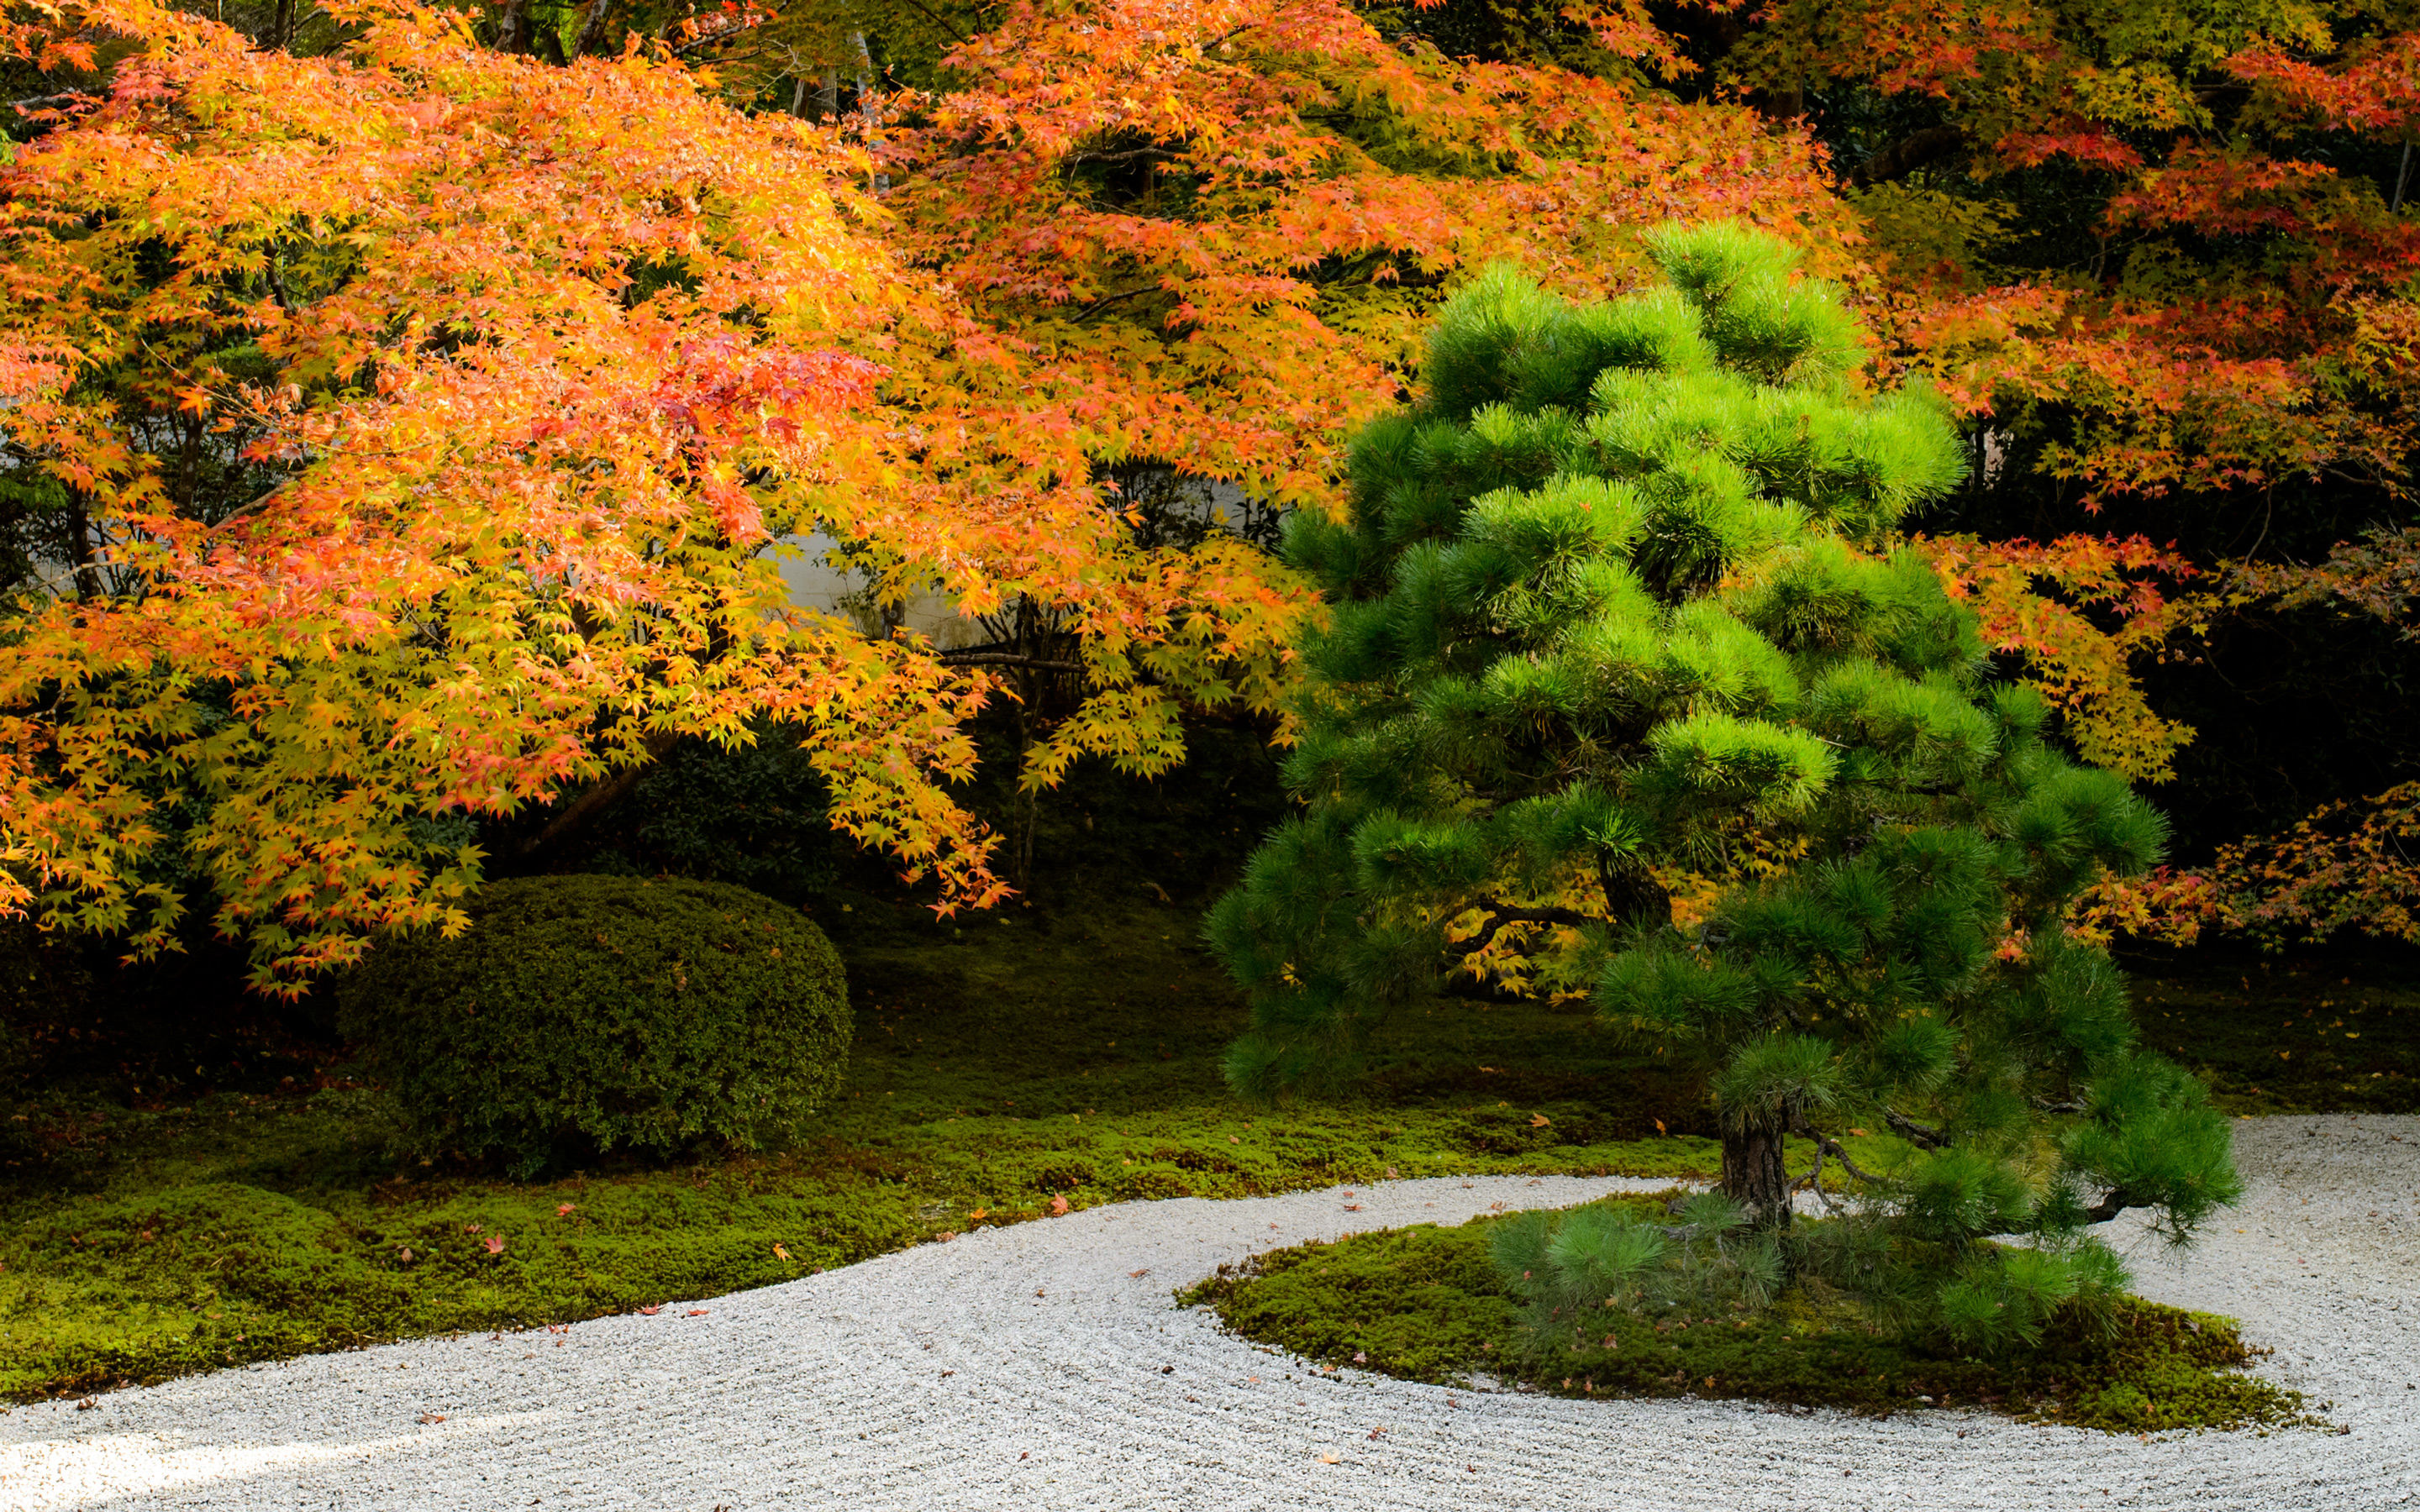
Pregnant With Color
Iwato Ochiba Shrine (岩戸落葉神社、京都市)
two weeks ago (二週間前)
Desktop-Background Versions
1280×800 · 1680×1050 · 1920×1200 · 2560×1600 · 2880×1800
I've been meaning to write about a nice little solo ride I had two weeks ago, to the Ochiba Jinja shrine. It's the same place that I wrote about in
“Great Day in Kyoto’s Colorful Northern Mountains”,
which actually happened the next day.
The course for this day's solo ride can be seen on my cycling heatmap.
The fall colors had been pretty subdued, but with my health back after six weeks of colds/allergy/something,
everything looked beautiful to me.
Panasonic LX100 at an effective 30mm — 1/125 sec, f/4, ISO 200 —
map & image data — nearby photos
“Beware of Bears”
the sign in the tree
on the path up to Kyomi Pass, Kyoto Japan
Panasonic LX100 at an effective 24mm — 1/100 sec, f/1.7, ISO 200 —
map & image data — nearby photos
Near Kyomi Pass
京見峠の近く
Panasonic LX100 at an effective 32mm — 1/125 sec, f/4, ISO 200 —
map & image data — nearby photos
Heading Down the Other Side
Panasonic LX100 at an effective 28mm — 1/80 sec, f/10, ISO 400 —
map & image data — nearby photos
Roadside Stream
Panasonic LX100 at an effective 38mm — 1/80 sec, f/10, ISO 1000 —
map & image data — nearby photos
Someone's Backyard
Panasonic LX100 at an effective 24mm — 1/640 sec, f/1.7, ISO 200 —
map & image data — nearby photos
“Sugitani Maple 1km”
well, that could be interesting
The small sign pointed up what looked like a driveway, but turned out to be an old logging road. I probably shouldn't have taken it on my road bike,
but I tend to throw that kind of caution to the wind and just do it, so I just did it.
At first is was very rough/broken pavement, but then it smoothed out...
Panasonic LX100 at an effective 32mm — 1/60 sec, f/8, ISO 1600 —
map & image data — nearby photos
Not So Bad
pavement and moss, and less slippery than one would think
Panasonic LX100 at an effective 28mm — 1/40 sec, f/7.1, ISO 3200 —
map & image data — nearby photos
A Bit Rougher
Panasonic LX100 at an effective 24mm — 1/125 sec, f/2, ISO 200 —
map & image data — nearby photos
Okay, Time To Turn Around
It was about 1.4km at 9.5% of increasingly rough road, mostly gravel of some sort. It'd be great on a mountain bike or even my
Trek cross bike, but it was no place for a road bike with dainty tires.
Returning the way I came, I had to go very slowly due to the combination of rough road and steepness, and found that
my wrists hurt a lot. After a while I couldn't stand it, and intended to stop to rest my wrists and almost fell over because
I suddenly couldn't unclip my foot from the pedal! (You'll recall that I had
a lot of trepidation about riding clipped in,
but that I also quickly got used to it.)
Luckily I was able to switch my weight over and unclip with the other side. I soon realized
the source of my problem:
Panasonic LX100 at an effective 24mm — 1/125 sec, f/1.7, ISO 400 —
map & image data — nearby photos
1 out of 3
is bad
I had somehow lost two of the three bolts that hold the clips to the shoe! This allowed the clip to swivel,
making it impossible to unclip without dislocating my knee or dismounting. I was in a bit of a pickle
until I got the idea of moving one of the three bolts over from the other shoe. Luckily I had
a multifunction tool with an appropriate hex wrench.
I then continued down almost back to the main road, until I stopped here:
Panasonic LX100 at an effective 24mm — 1/125 sec, f/5, ISO 200 —
map & image data — nearby photos
Unscheduled Stop
my bike blends in so well it's almost ninja-like invisible
Panasonic LX100 at an effective 28mm — 1/125 sec, f/7.1, ISO 1000 —
map & image data — nearby photos
Reason for the Stop
I must have hit a rock just the wrong way
Having faced much worse with my first flat, I put what I learned
in its aftermath to good use, shoving a thick foil cookie wrapper between the new tube and the split in the tire, to stop
the tube from squeezing out and bursting.
With the tire patched up well enough, I continued my ride. I had a second spare tube and a patch kit I could still use on the
first tube, should I need it.
I was in an exploring mood, so took the time to stop on a bridge I often go over for a photo looking down...
Panasonic LX100 at an effective 24mm — 1/125 sec, f/2.8, ISO 200 —
map & image data — nearby photos
Old Bridge
visible from the modern bridge above
Being in an exploring mood, I found the old side road that went down there and took a photo looking back up...
Panasonic LX100 at an effective 28mm — 1/125 sec, f/3.2, ISO 200 —
map & image data — nearby photos
View From Below
I took the side road for quite a while, until it got sufficiently bumpy to have me worry about the tire, so I left the full
exploration of it for another day.
Then I continued north for another 10 minutes and I was at the Ochiba Jinja shrine...
Panasonic LX100 at an effective 24mm — 1/125 sec, f/2.2, ISO 200 —
map & image data — nearby photos
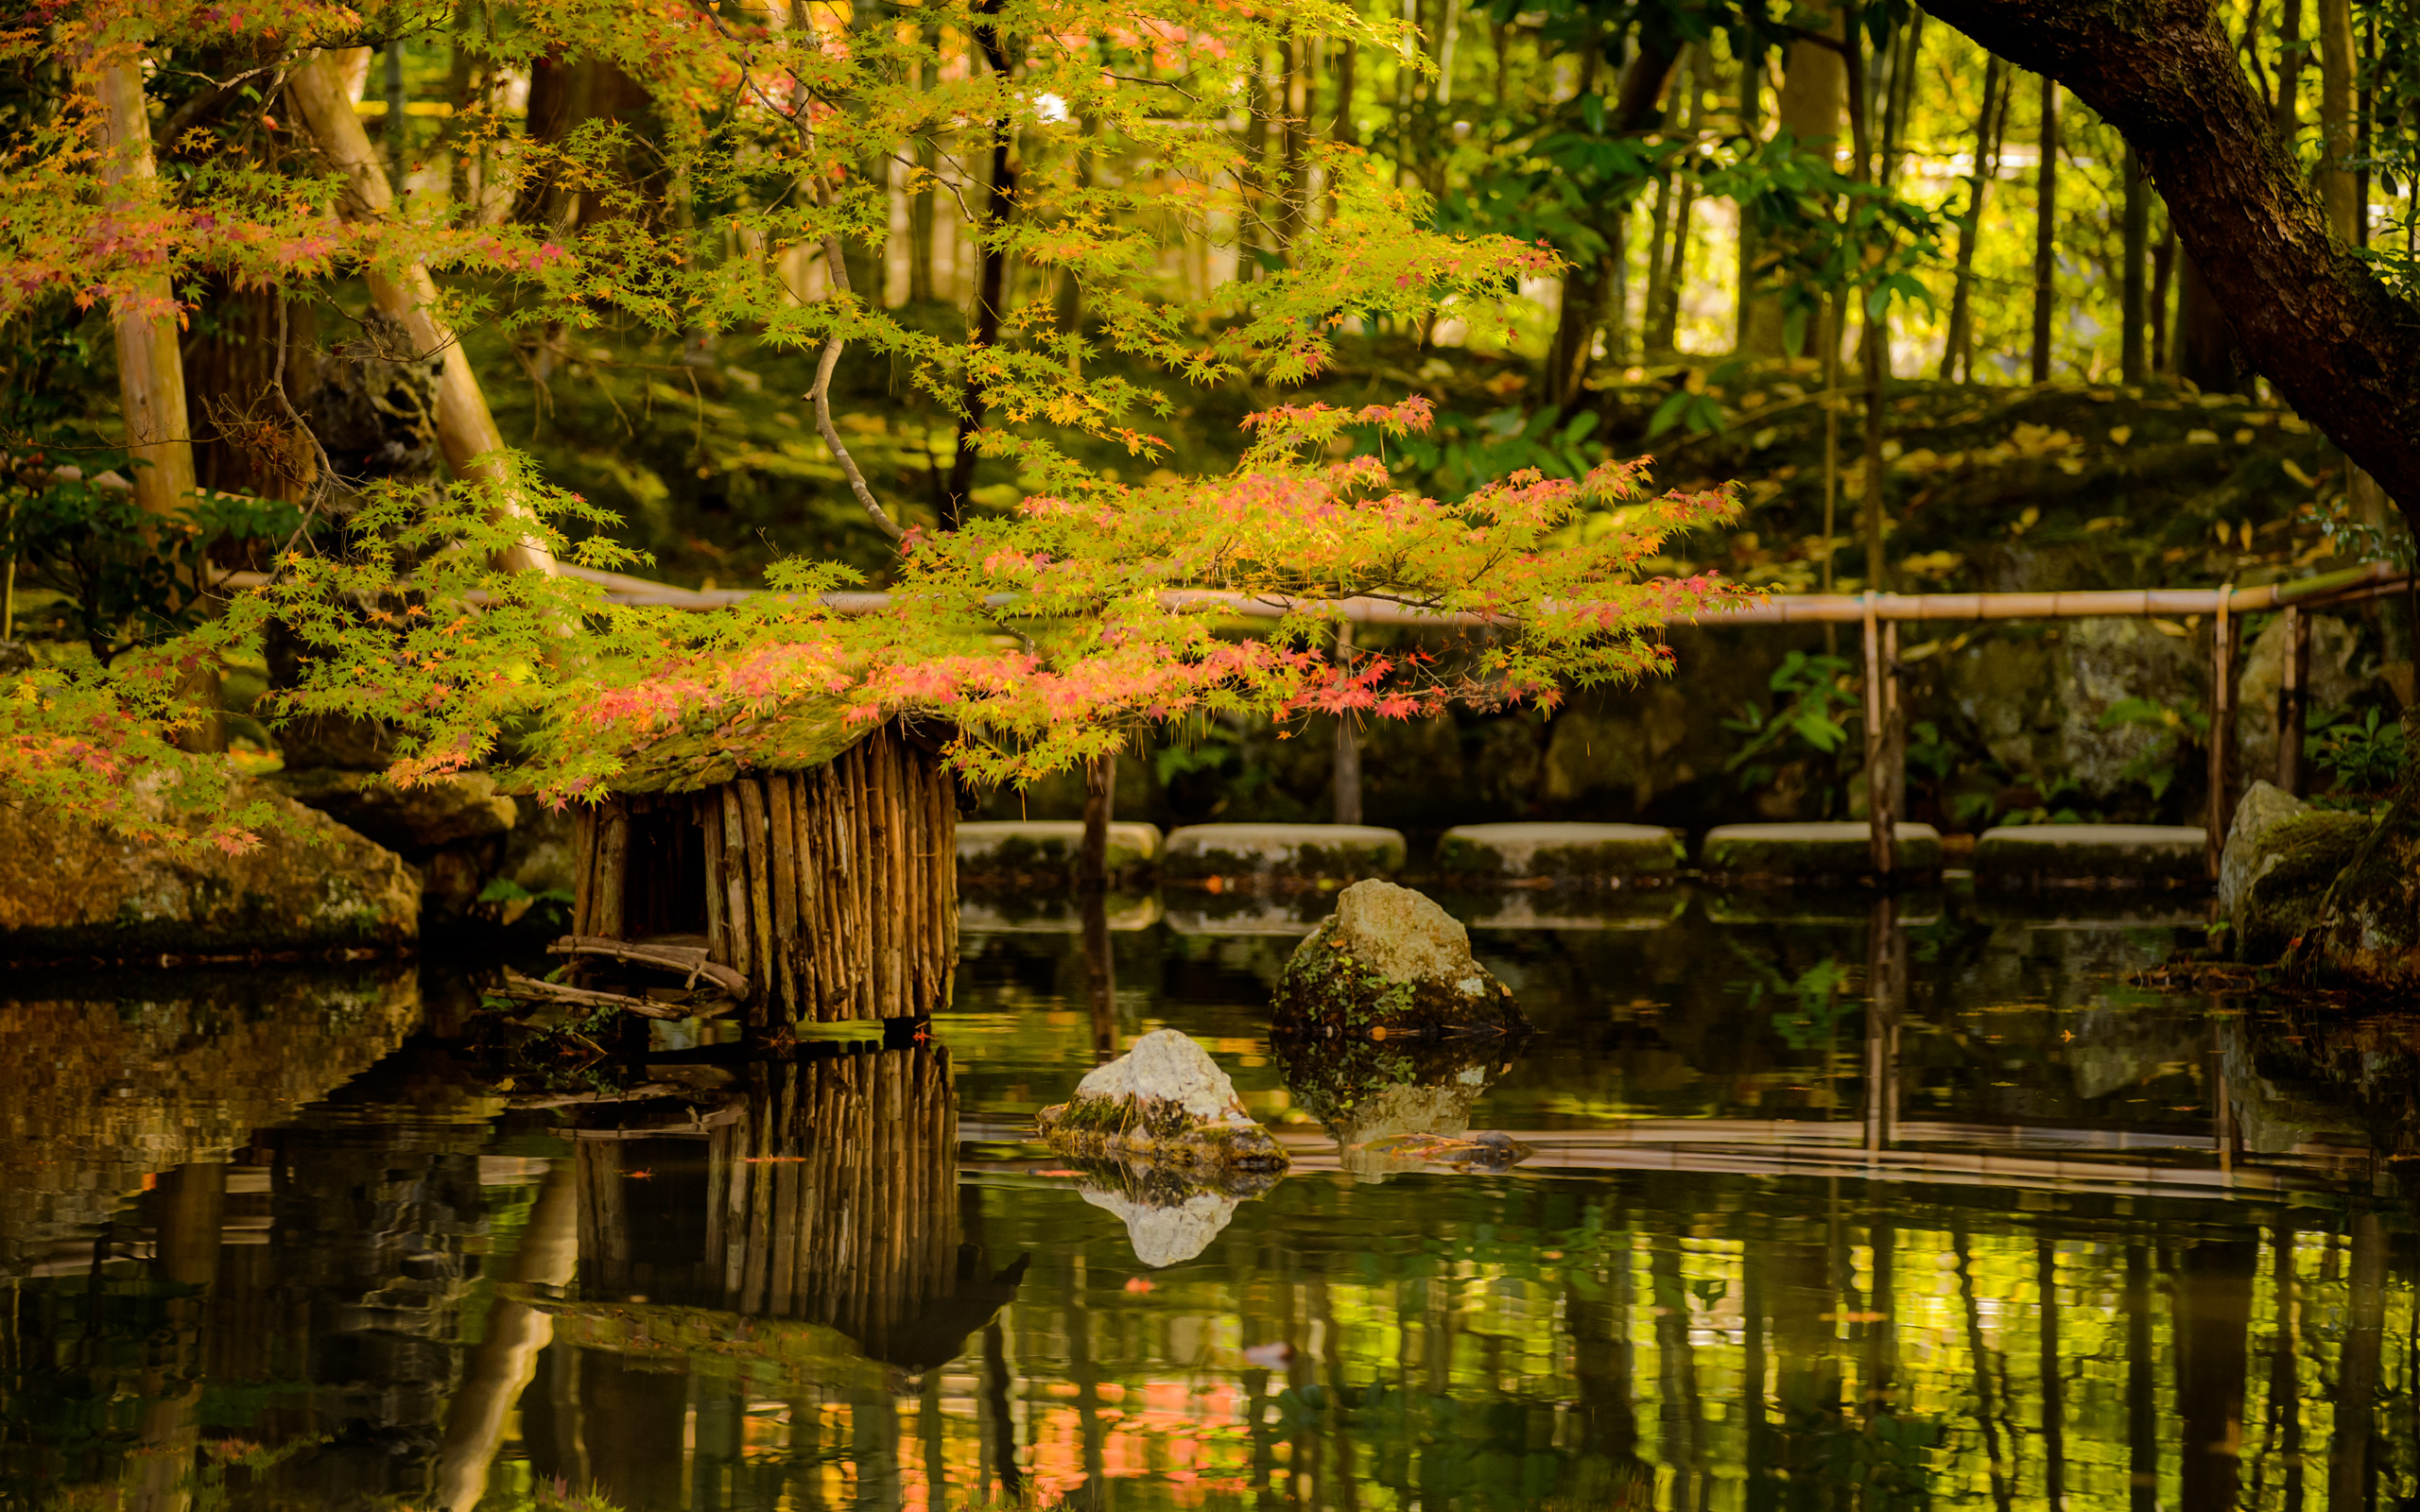
Iwato Ochiba Shrine (岩戸落葉神社)
in all its splendor
Clicking on any of the “nearby photos” links brings photos from years past.
Panasonic LX100 at an effective 24mm — 1/125 sec, f/2.8, ISO 200 —
map & image data — nearby photos
Me
photo by a passer by
Panasonic LX100 at an effective 44mm — 1/125 sec, f/5, ISO 200 —
map & image data — nearby photos
Thick Carpet
I headed back home amidst the autumn late-afternoon light. The view over the Kamo River back close to home was crisk:
Panasonic LX100 at an effective 75mm — 1/125 sec, f/5, ISO 200 —
map & image data — nearby photos
Crisp View
40 minutes before sunset
This was all 16 days ago (Nov 10). I went to the same shrine again today (Nov 26) with Paul Barr, by car,
and found it to be in quite a different condition. I'll report on that another day.
November 25, 2015
Flat, Windless Trip to Osaka; Blustery, Hilly Trip Back
Panasonic LX100 at an effective 58mm — 1/500 sec, f/5.6, ISO 200 —
map & image data — nearby photos
Riding in the Big City
Gorm travels through Osaka City, last June
今年の六月、ゴームさん、大阪市内
taken while moving at 31 kph (19 mph)
Panasonic LX100 at an effective 75mm — 1/800 sec, f/5.6, ISO 200 —
map & image data — nearby photos
Approaching Osaka Station
大阪駅到着
taken while moving at 25 kph (15 mph)
I've ridden my bike to Osaka three times so far. The first time
was this ride in June; I'm using photos from that ride on today's post.
The second time was last month with a non-Cycling friend, and the third
was yesterday, by myself.
A drunk man in the train knocked Anthony's phone to the ground, smashing its screen. Anthony being a kid,
and the drunk man being a drunk man, Anthony felt he could do nothing but suck it up. Part of sucking it up means
visiting the closest Apple Store to have the screen replaced, so I took the opportunity to make a ride of it.
There was little wind for most of the ride down, and few people were out on the path, so I could make good time. It took a bit over two hours (2:03) to make the 52km (32mi) trip, which seemed fast to me, so I expected
that I would have made new PRs (personal records) on all the segments of the trip down.
I didn't. After returning home, checking the data for the ride on Strava
revealed that I had been faster that first time in June, when
I was weaker, had less experience, was stopping for photos, and had a heavier bike. This made no sense to me.
Then I thought about the wind. On that first trip, Manseki had mentioned that we had a nice tailwind that made the ride easier.
I hadn't noticed it. One certainly notices a headwind or a crosswind, and they just sap the energy from you, but I didn't have
the experience to realize how much of a benefit I got from the tailwind.
It turns out that I the benefit was huge... bigger than all the advances I've made in my riding (and my bike) since then.
I have ample experience with the pain of headwinds, which just suck the energy from you like a vacuum set to turbo mode. For
example, last month's 200km speed trial around Lake Biwa had horrible
gusty crosswinds for most of the trip. Every time a big truck passed me, I thanked it for the momentary respite from the wind, a
respite that felt like the hand of God came by to give me a little shove. In the end I made the 180km (112mi) circumnavigation in
6:10, but if the wind had been calm I feel it would have been noticeably faster (or, at least, noticeably easier).
Panasonic LX100 at an effective 24mm — 1/1600 sec, f/5.6, ISO 200 —
map & image data — nearby photos
Umeda Sky Building (梅田スカイビル)
we stopped by during that June ride
While Apple worked on Anthony's iPhone, I tooled around Osaka city a bit, and amused myself with
a short little hill that I was
able to get 7th-best on. That I could get anything close to an overall top-10 told me that no serious riders
had ever given it a serious go while using Strava, but it's still nice to rank.
I actually thought I would have gotten the #2 position based on my own software running on my phone,
which displayed my time for the segment in real time; it said I'd done one of the attempts in 31 seconds.
Oh well, nothing's ever exact with GPS anyway.
I eventually returned to Apple and waited until the appointed time for the repair to be done,
and they apparently waited too because when the time came, they told me they couldn't repair it.
(Why didn't they just tell me when they found out, instead of waiting two hours?) I had to end up
paying for a new phone. )-:
Panasonic LX100 at an effective 24mm — 1/250 sec, f/4, ISO 200 —
map & image data — nearby photos
Leaving the City Center
I'm happy the ride down to Osaka yesterday didn't have a headwind, but the wind kicked up as I approached Osaka,
and got very gusty for the rest of the day. Some screenshots from www.windyty.com:
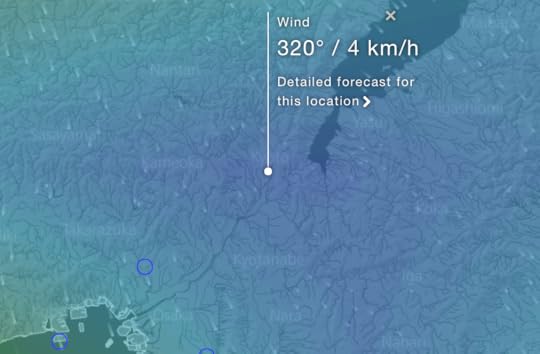
Calm
Kyoto wind yesterday morning at the start of my ride.
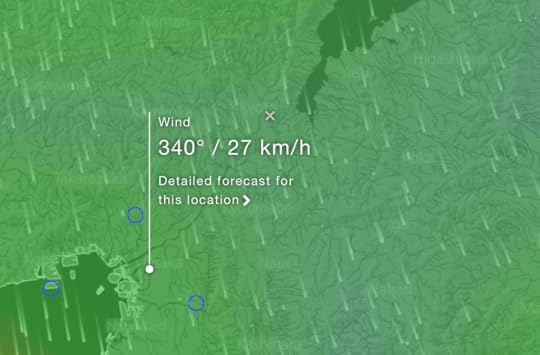
Blustery Noon in Osaka

Gusty
Unfortunately, my chosen route home through the mountains north of Osaka would first require an hour and a half of city riding
directly into the wind.
Panasonic LX100 at an effective 75mm — 1/1000 sec, f/5.6, ISO 200 —
map & image data — nearby photos
You Win Some, You Lose Some
I appreciated the space given to bicycles,
but the thick blue stripes made for a very bumpy, unpleasant ride
Panasonic LX100 at an effective 33mm — 1/250 sec, f/4, ISO 200 —
map & image data — nearby photos
Finally Entering the Mountains
( again, all these photos are from more or less the same route I took with friends in June )
Panasonic LX100 at an effective 75mm — 1/500 sec, f/4, ISO 200 —
map & image data — nearby photos
Hazy Osaka
with all the wind yesterday, it was clearer
Panasonic LX100 at an effective 24mm — 1/640 sec, f/5, ISO 200 —
map & image data — nearby photos
Crossing Paths
a rider heading to Osaka passes us
Panasonic LX100 at an effective 75mm — 1/640 sec, f/5, ISO 800 —
map & image data — nearby photos
“Don't Feed the Monkeys”
$100 fine
Panasonic LX100 at an effective 24mm — 1/125 sec, f/1.7, ISO 2000 —
map & image data — nearby photos
Short Tunnel
Panasonic LX100 at an effective 24mm — 1/640 sec, f/5.6, ISO 200 —
map & image data — nearby photos
Pretty Countryside
standard fare in the mountains all over Japan
The goal in heading north from Osaka was to do the climb to the top of Mt. Myoken (妙見山). We had to abandon that for lack of time before, and I worried that I'd have to do the same yesterday,
with the iPhone repair having taken so long and the sun setting so much earlier, but
I was able to make it.
I didn't spend the time to walk up the steps to the lookout platform — I didn't have my camera with me anyway —
and so I headed East to hightail it home.
Panasonic LX100 at an effective 40mm — 1/800 sec, f/5, ISO 250 —
map & image data — nearby photos
Not Following the Rules
taken while moving at 50 kph (31 mph)
( we could have been busted even if the limit was presenting “miles per hour” )
Panasonic LX100 at an effective 24mm — 1/800 sec, f/5, ISO 200 —
map & image data — nearby photos
More Mountains, More Pretty Countryside
Panasonic LX100 at an effective 24mm — 1/800 sec, f/5, ISO 200 —
map & image data — nearby photos
Manseki Climbing
Panasonic LX100 at an effective 28mm — 1/800 sec, f/5.6, ISO 200 —
map & image data — nearby photos
“Station of the Heart”
weird train “thing” in the middle of nowhere
(I can't read most of the signs, but two say “lookyloos prohibited”)
Panasonic LX100 at an effective 46mm — 1/125 sec, f/2.6, ISO 400 —
map & image data — nearby photos
Descending Toward Kyoto
Having left the house at 7am and expecting to be home long before dark at 5pm, I didn't even think to
bring my so-I-can-see light. I did have
so others can see me lights on both the front and rear, but they aren't enough to take some of the
steep descents on the way home in the dark.
Luckily, I made it down and into the city before dark, though it was well dark by the time I got home around 6pm.
I was a lot more tired last night than I thought I should be, but then I realized today that it was my longest
ride that didn't go around Lake Biwa. Here it is on my cycling heatmap.
The ride bumped my Eddington Number up to 35.
November 17, 2015
Wigglegram of a Pleasant Couple Among the Fall Colors at Kyoto’s Enkoji Temple
Note: this article may not appear properly in news readers.
This article contains interactive aspects that are likely removed by most news readers. Please see this particular article directly on Jeffrey's blog for full functionality.
Nikon D4 + Voigtländer 125mm f/2.5 — 1/160 sec, f/2.5, ISO 6400 —
map & image data — nearby photos
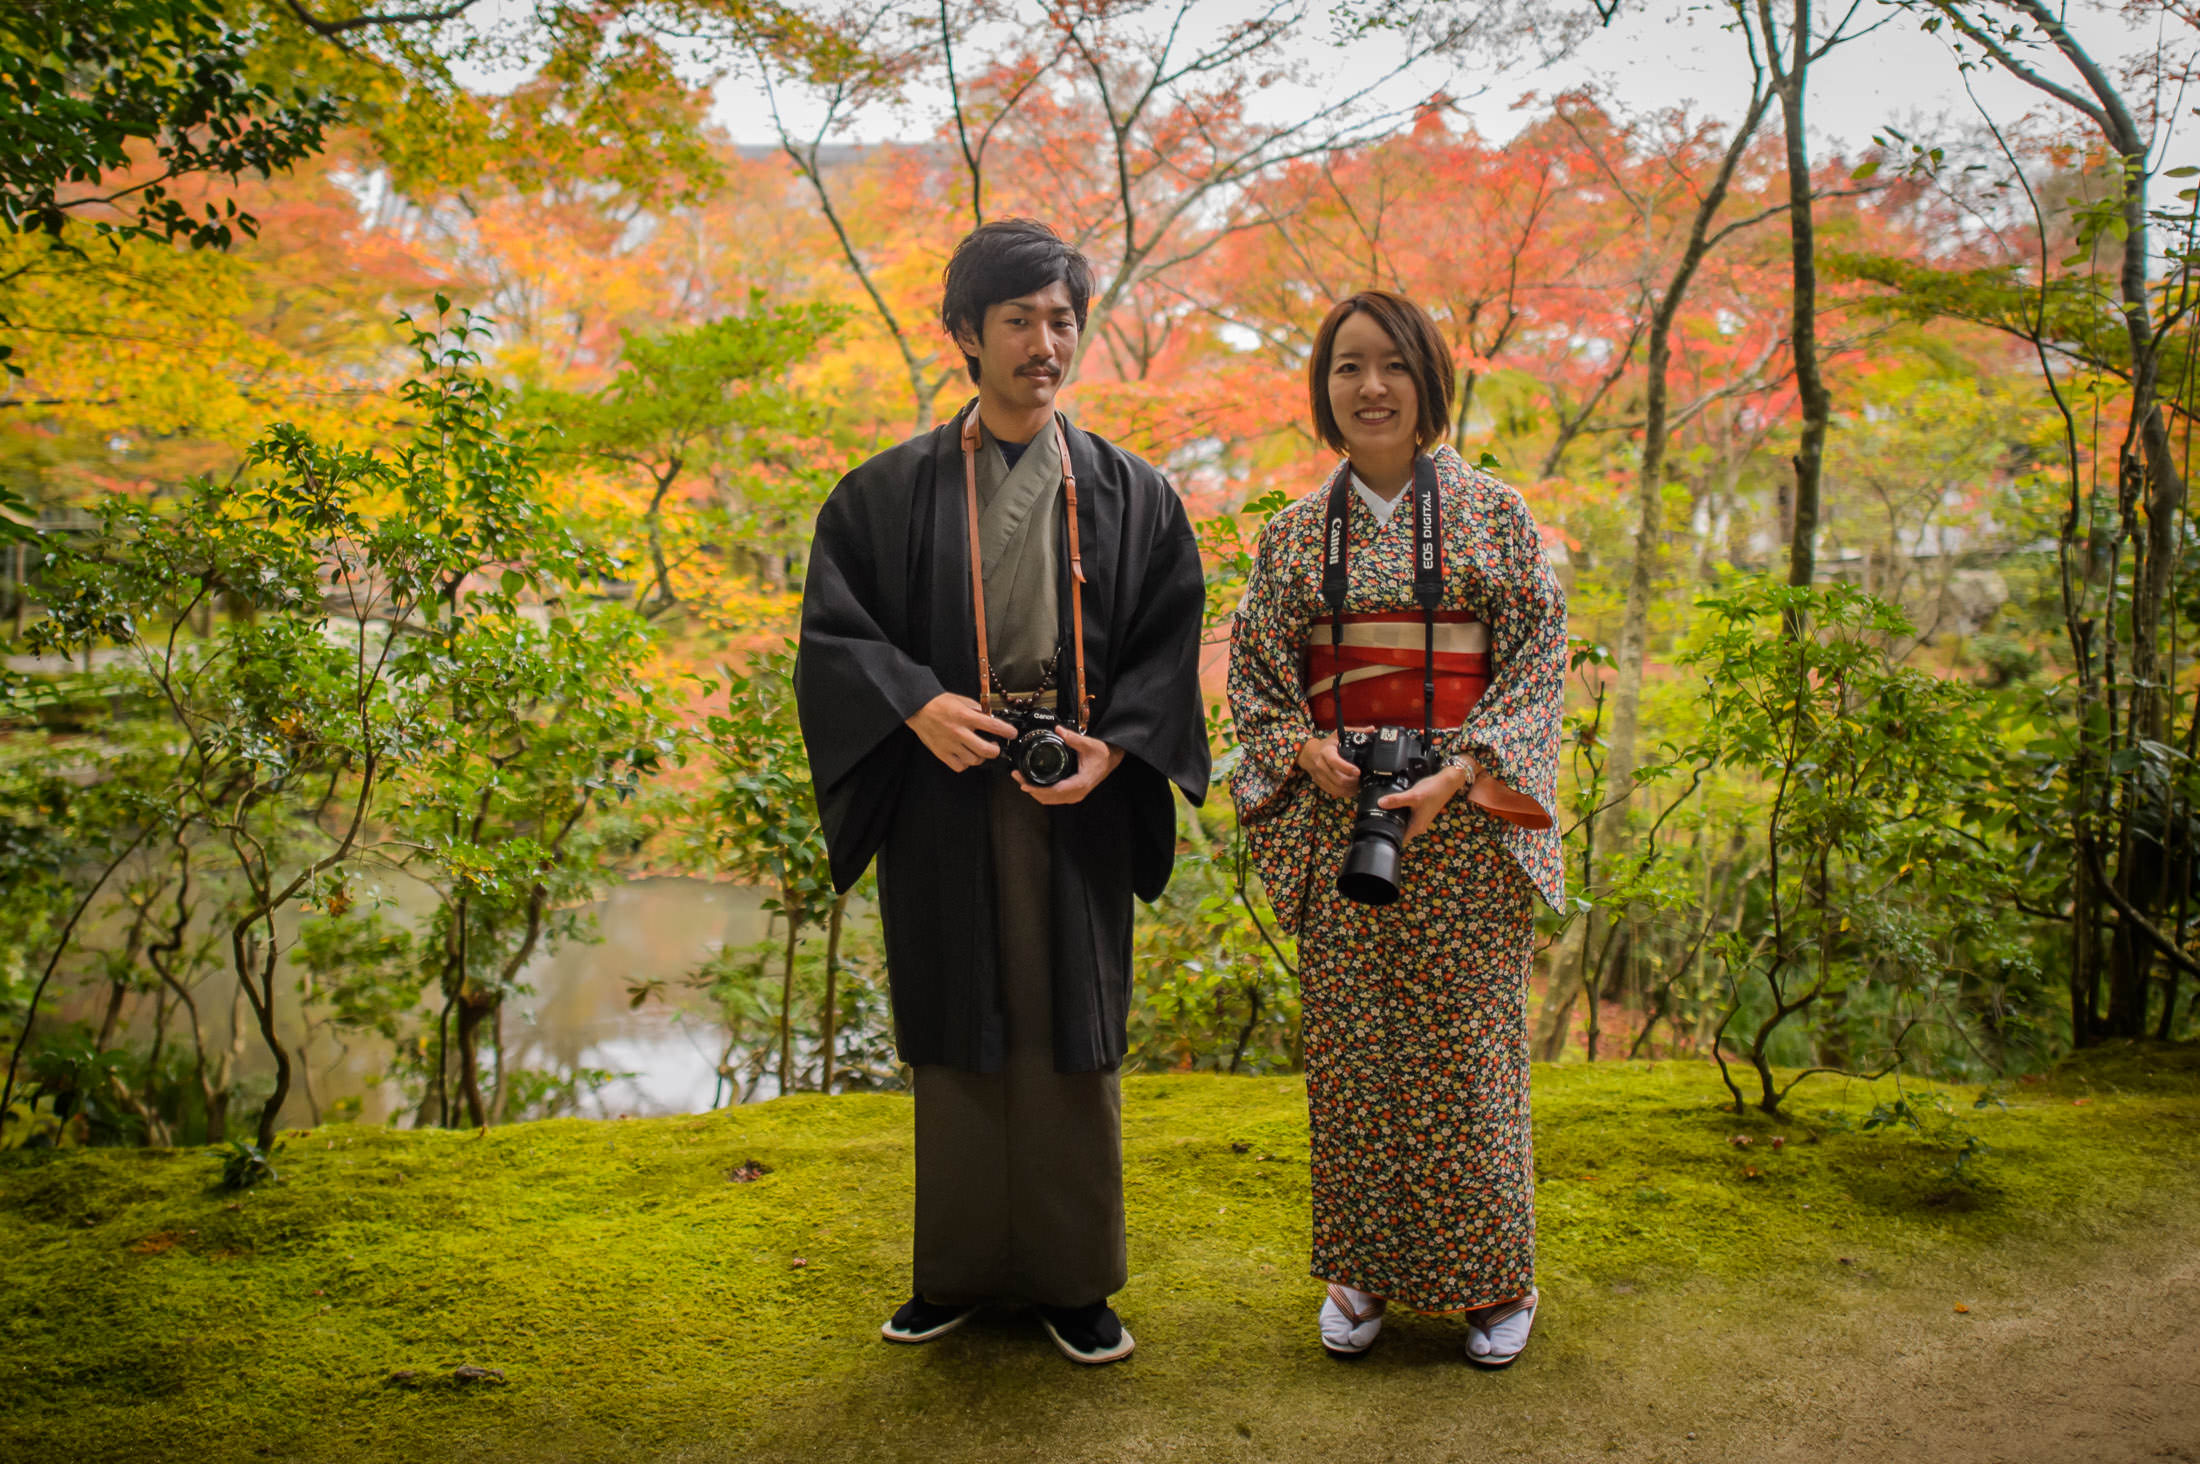
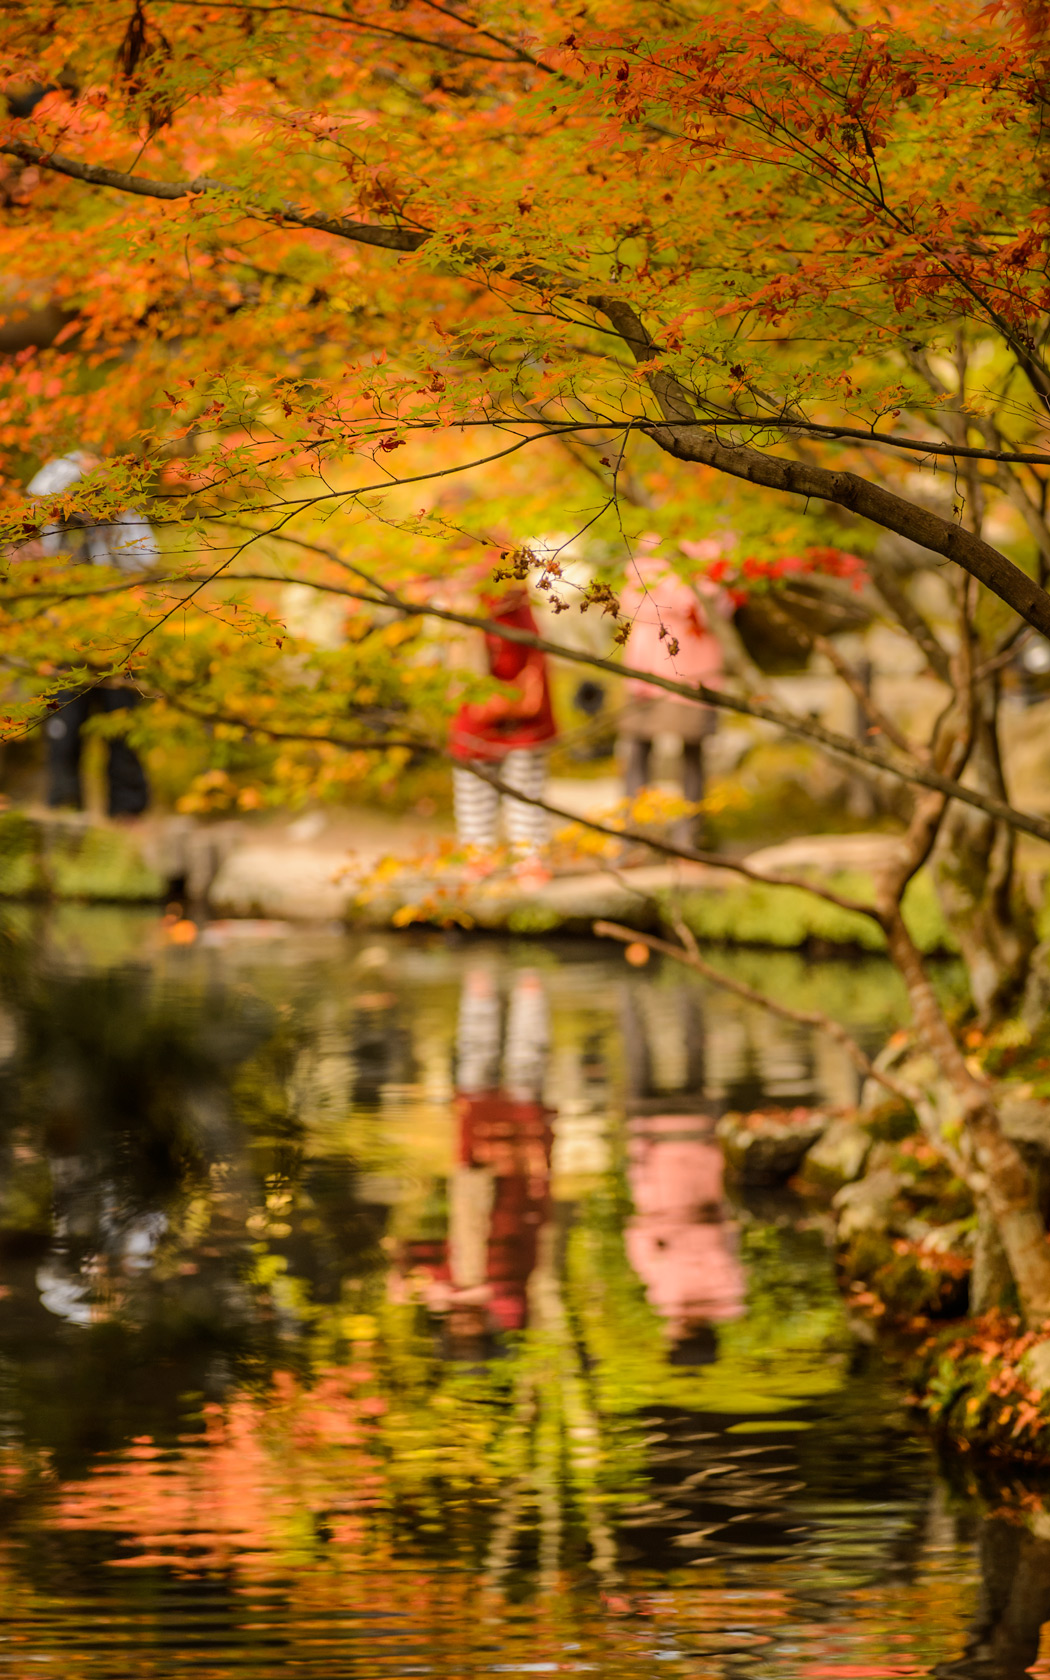
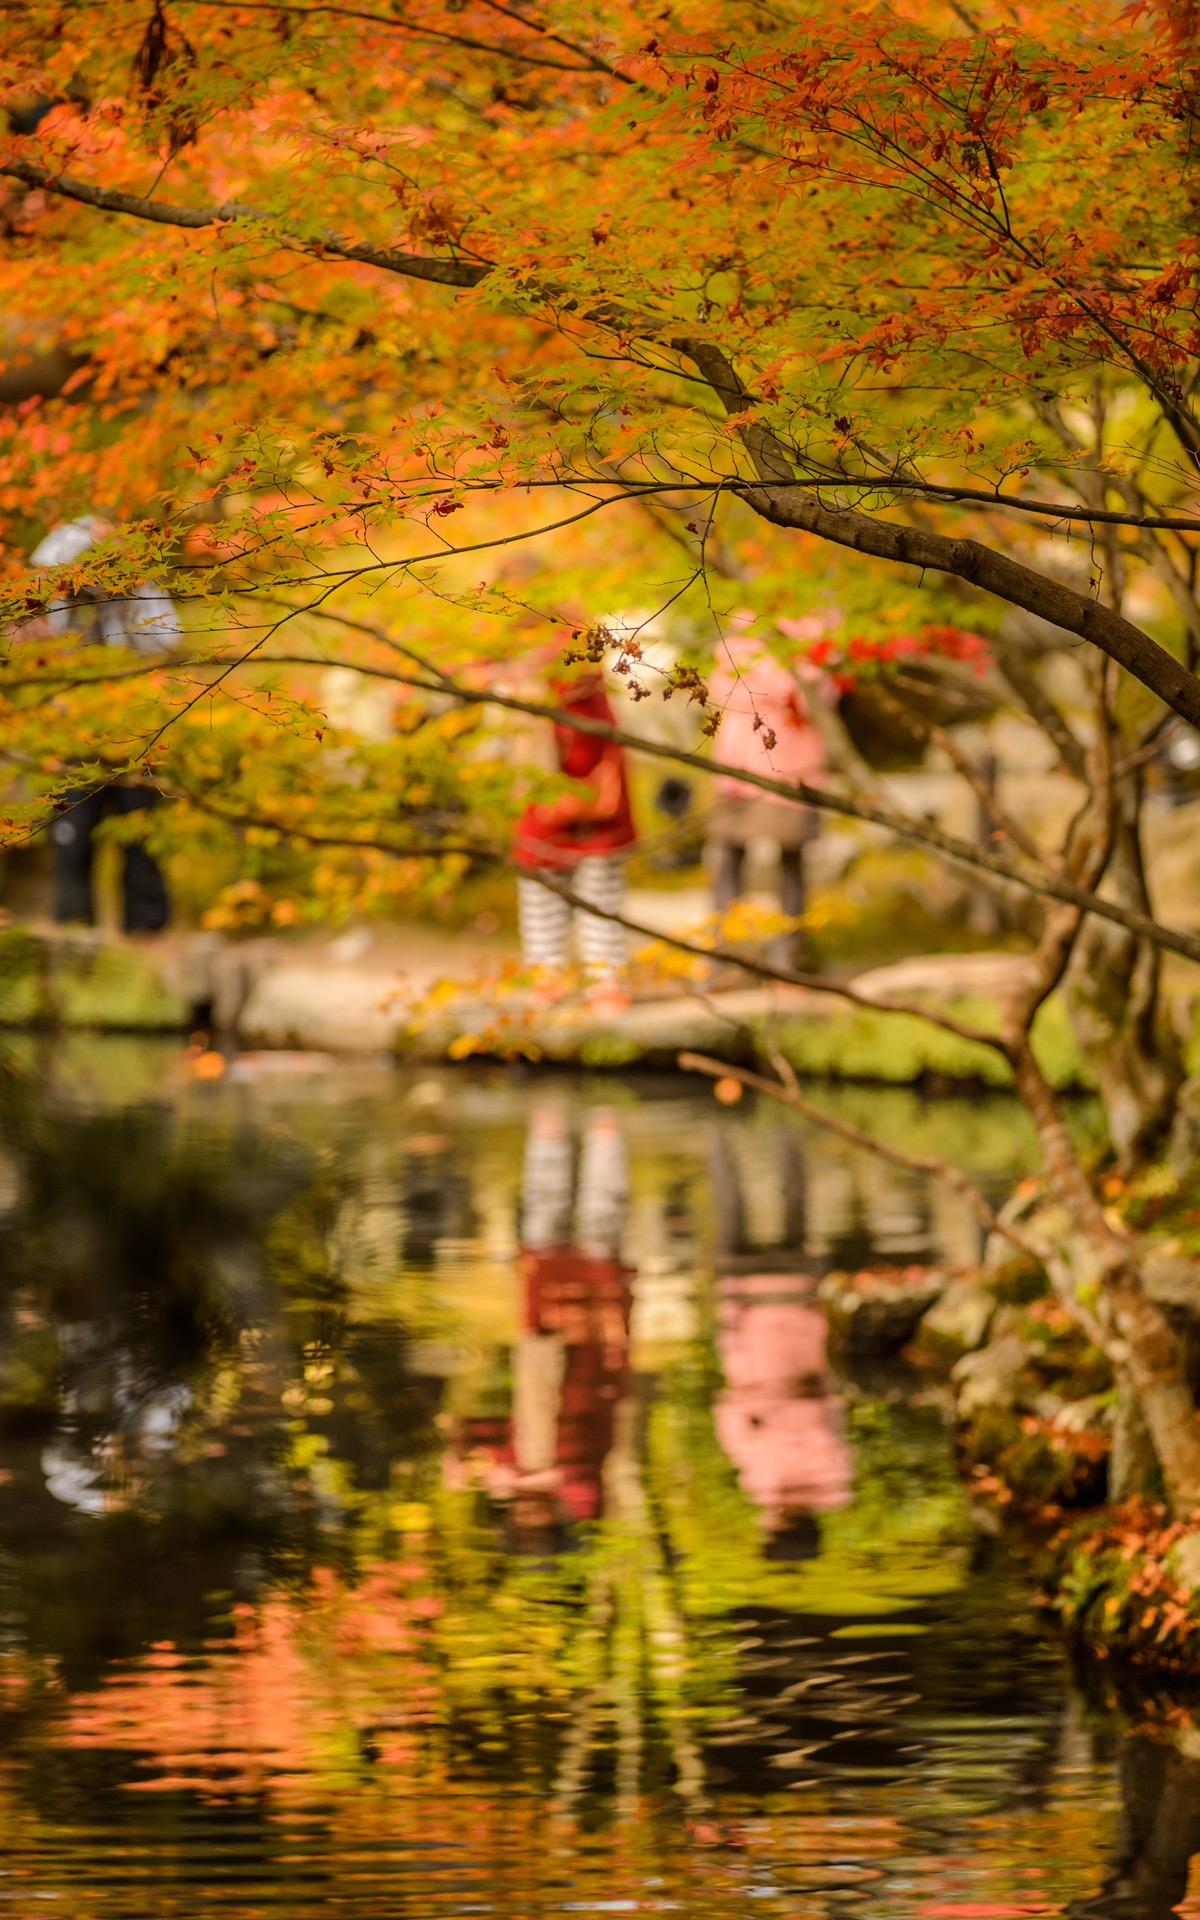
Pleasant Couple
魅力的なカップル、円光寺(京都市)で
at the Enkoji Temple, Kyoto Japan
On a visit to the Enkoji Temple in northeast Kyoto yesterday, this couple in traditional kimono kindly posed for a wigglegram:
div#dOrTrHolyolyQdA img { width:690px; height:459px; visibility:hidden; position:absolute; top:0; left:0; border: solid 10px #311}
Animatable Wigglegram (12 frames) — slowly sweep mouse from side to side to view 3D effect
写真の上をマウスで左右にゆっくり動かすと「3D」な感じが出ます。
=i.length)return 0;else return which;}else{if(which=i.length)return i.length-1;else return which}};t=function(event){if(m>0&&((new Date().getTime())-m)R&&s0){f(c(s-1));console.log(s+":delta is "+delta);L=0.05;R=0.2;T=tilt;}}};d.ontouchmove=d.onmousemove=function(e){if(e.touches&&e.touches.length>1)return true;var x=Math.floor((e.clientX||e.pageX)/BW);var which=c(x>l?s+(x-l):s-(l-x));l=x;if(which!=s){m=new Date().getTime();f(which);}return false;};window.addEventListener('devicemotion',t,false)}
Anyone wearing kimono in these settings is certainly noticed by the camera, and it turns out that my camera had noticed
her earlier, lost in thought in the main garden-viewing room...
Nikon D4 + Voigtländer 125mm f/2.5 — 1/400 sec, f/5.6, ISO 3600 —
map & image data — nearby photos
This was part of Day 2 of Paul Barr's visit to Kyoto, which I'll write more about later. Day 1 was
a visit to the Tenjuan Temple.
To be continued...
November 16, 2015
Paul Barr in Kyoto Day 1: the Tenjuan Temple (Fall Colors and a Wigglegram)
Note: this article may not appear properly in news readers.
This article contains interactive aspects that are likely removed by most news readers. Please see this particular article directly on Jeffrey's blog for full functionality.
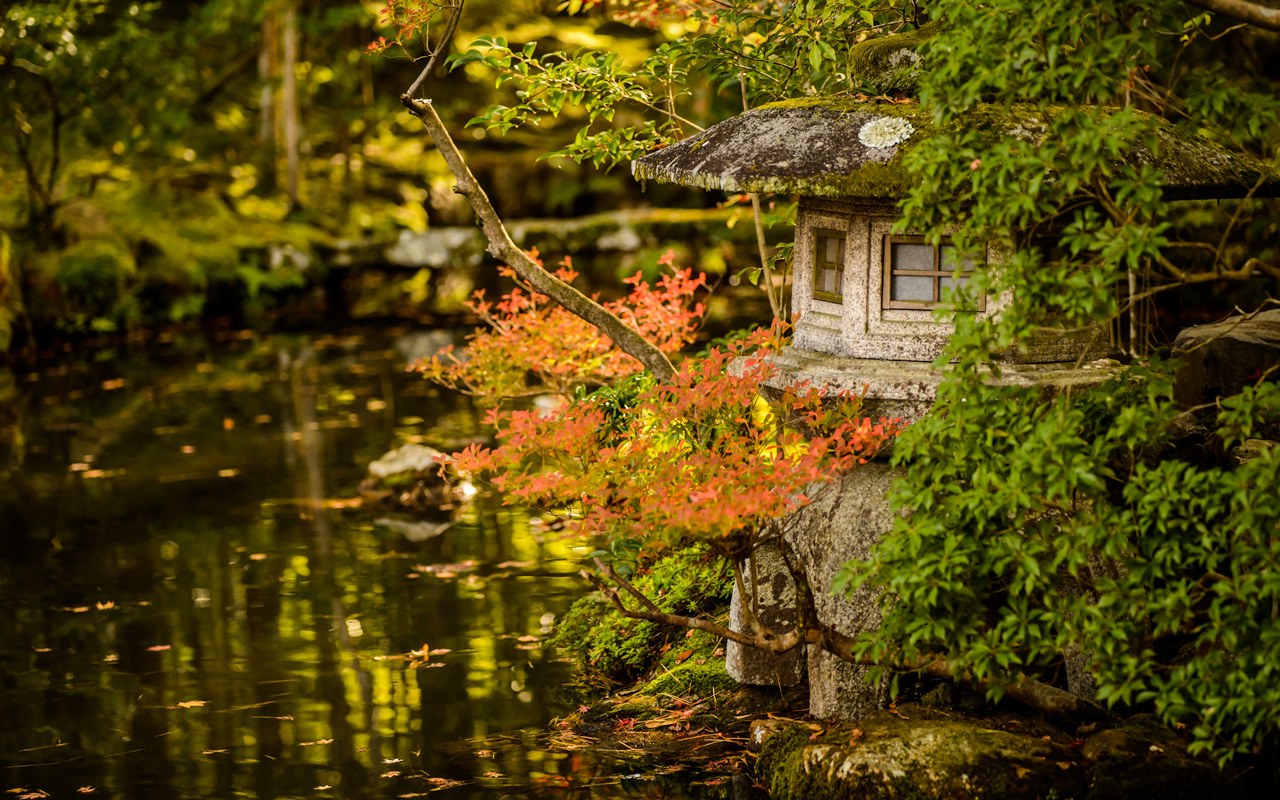
Nikon D4 + Voigtländer 125mm f/2.5 — 1/400 sec, f/2.5, ISO 900 —
map & image data — nearby photos
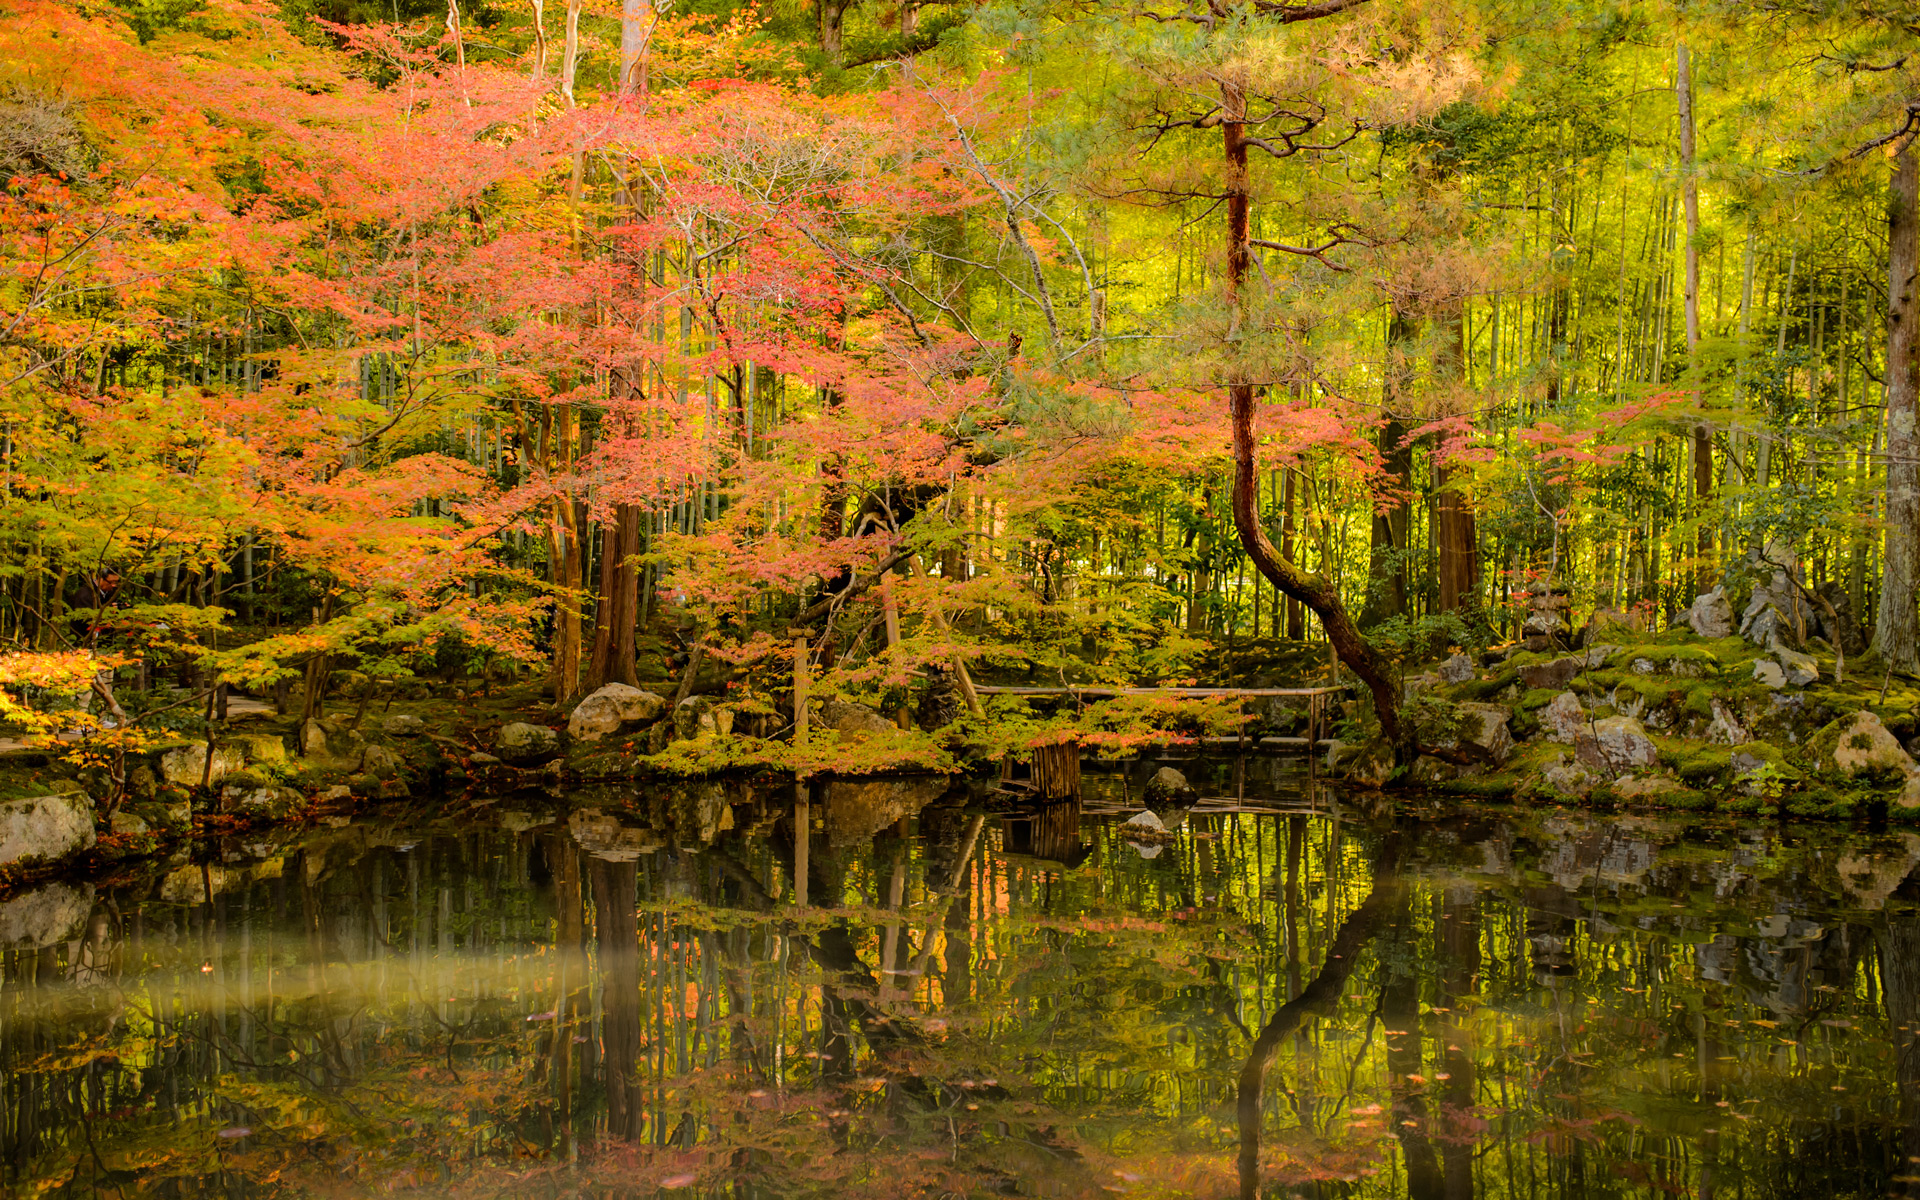
Pondside Stone Lantern
at the Tenjuan Temple (天授庵), Kyoto Japan
Desktop-Background Versions
1280×800 · 1680×1050 · 1920×1200 · 2560×1600 · 2880×1800
Paul Barr, in town this week, and I made a visit yesterday to the Tenjuan
Temple (天授庵) within the Nanzen Temple complex. It was my second visit inside, my first visit here having been three years ago. Earlier this year, though, I did feature the main gate of this shrine covered in snow.
Anyway, the fall colors this year in Kyoto seem a bit subdued, but it
wasn't crowded yesterday and overall was really pleasant. We ended up sitting and enjoying more than
taking photos.
友達ポールさんは来日して、一緒に天授庵行って、もみじを撮影しました。今年は色は薄い方ですが、雰囲気はなかなか良かった。よく落ち着いて、リラックス出来ました。
Nikon D4 + Sigma 35mm F1.4 DG HSM — 1/400 sec, f/3.5, ISO 560 —
map & image data — nearby photos
Garden Entrance
天授庵、庭園の入り口
Nikon D4 + Sigma 35mm F1.4 DG HSM — 1/400 sec, f/3.5, ISO 140 —
map & image data — nearby photos
Paul Snapping a Snapshot for Someone
the moment we entered this lady asked Paul to take a picture for her
知らない人に撮影をお願いされました
Nikon D4 + Sigma 35mm F1.4 DG HSM — 1/400 sec, f/8, ISO 2200 —
map & image data — nearby photos
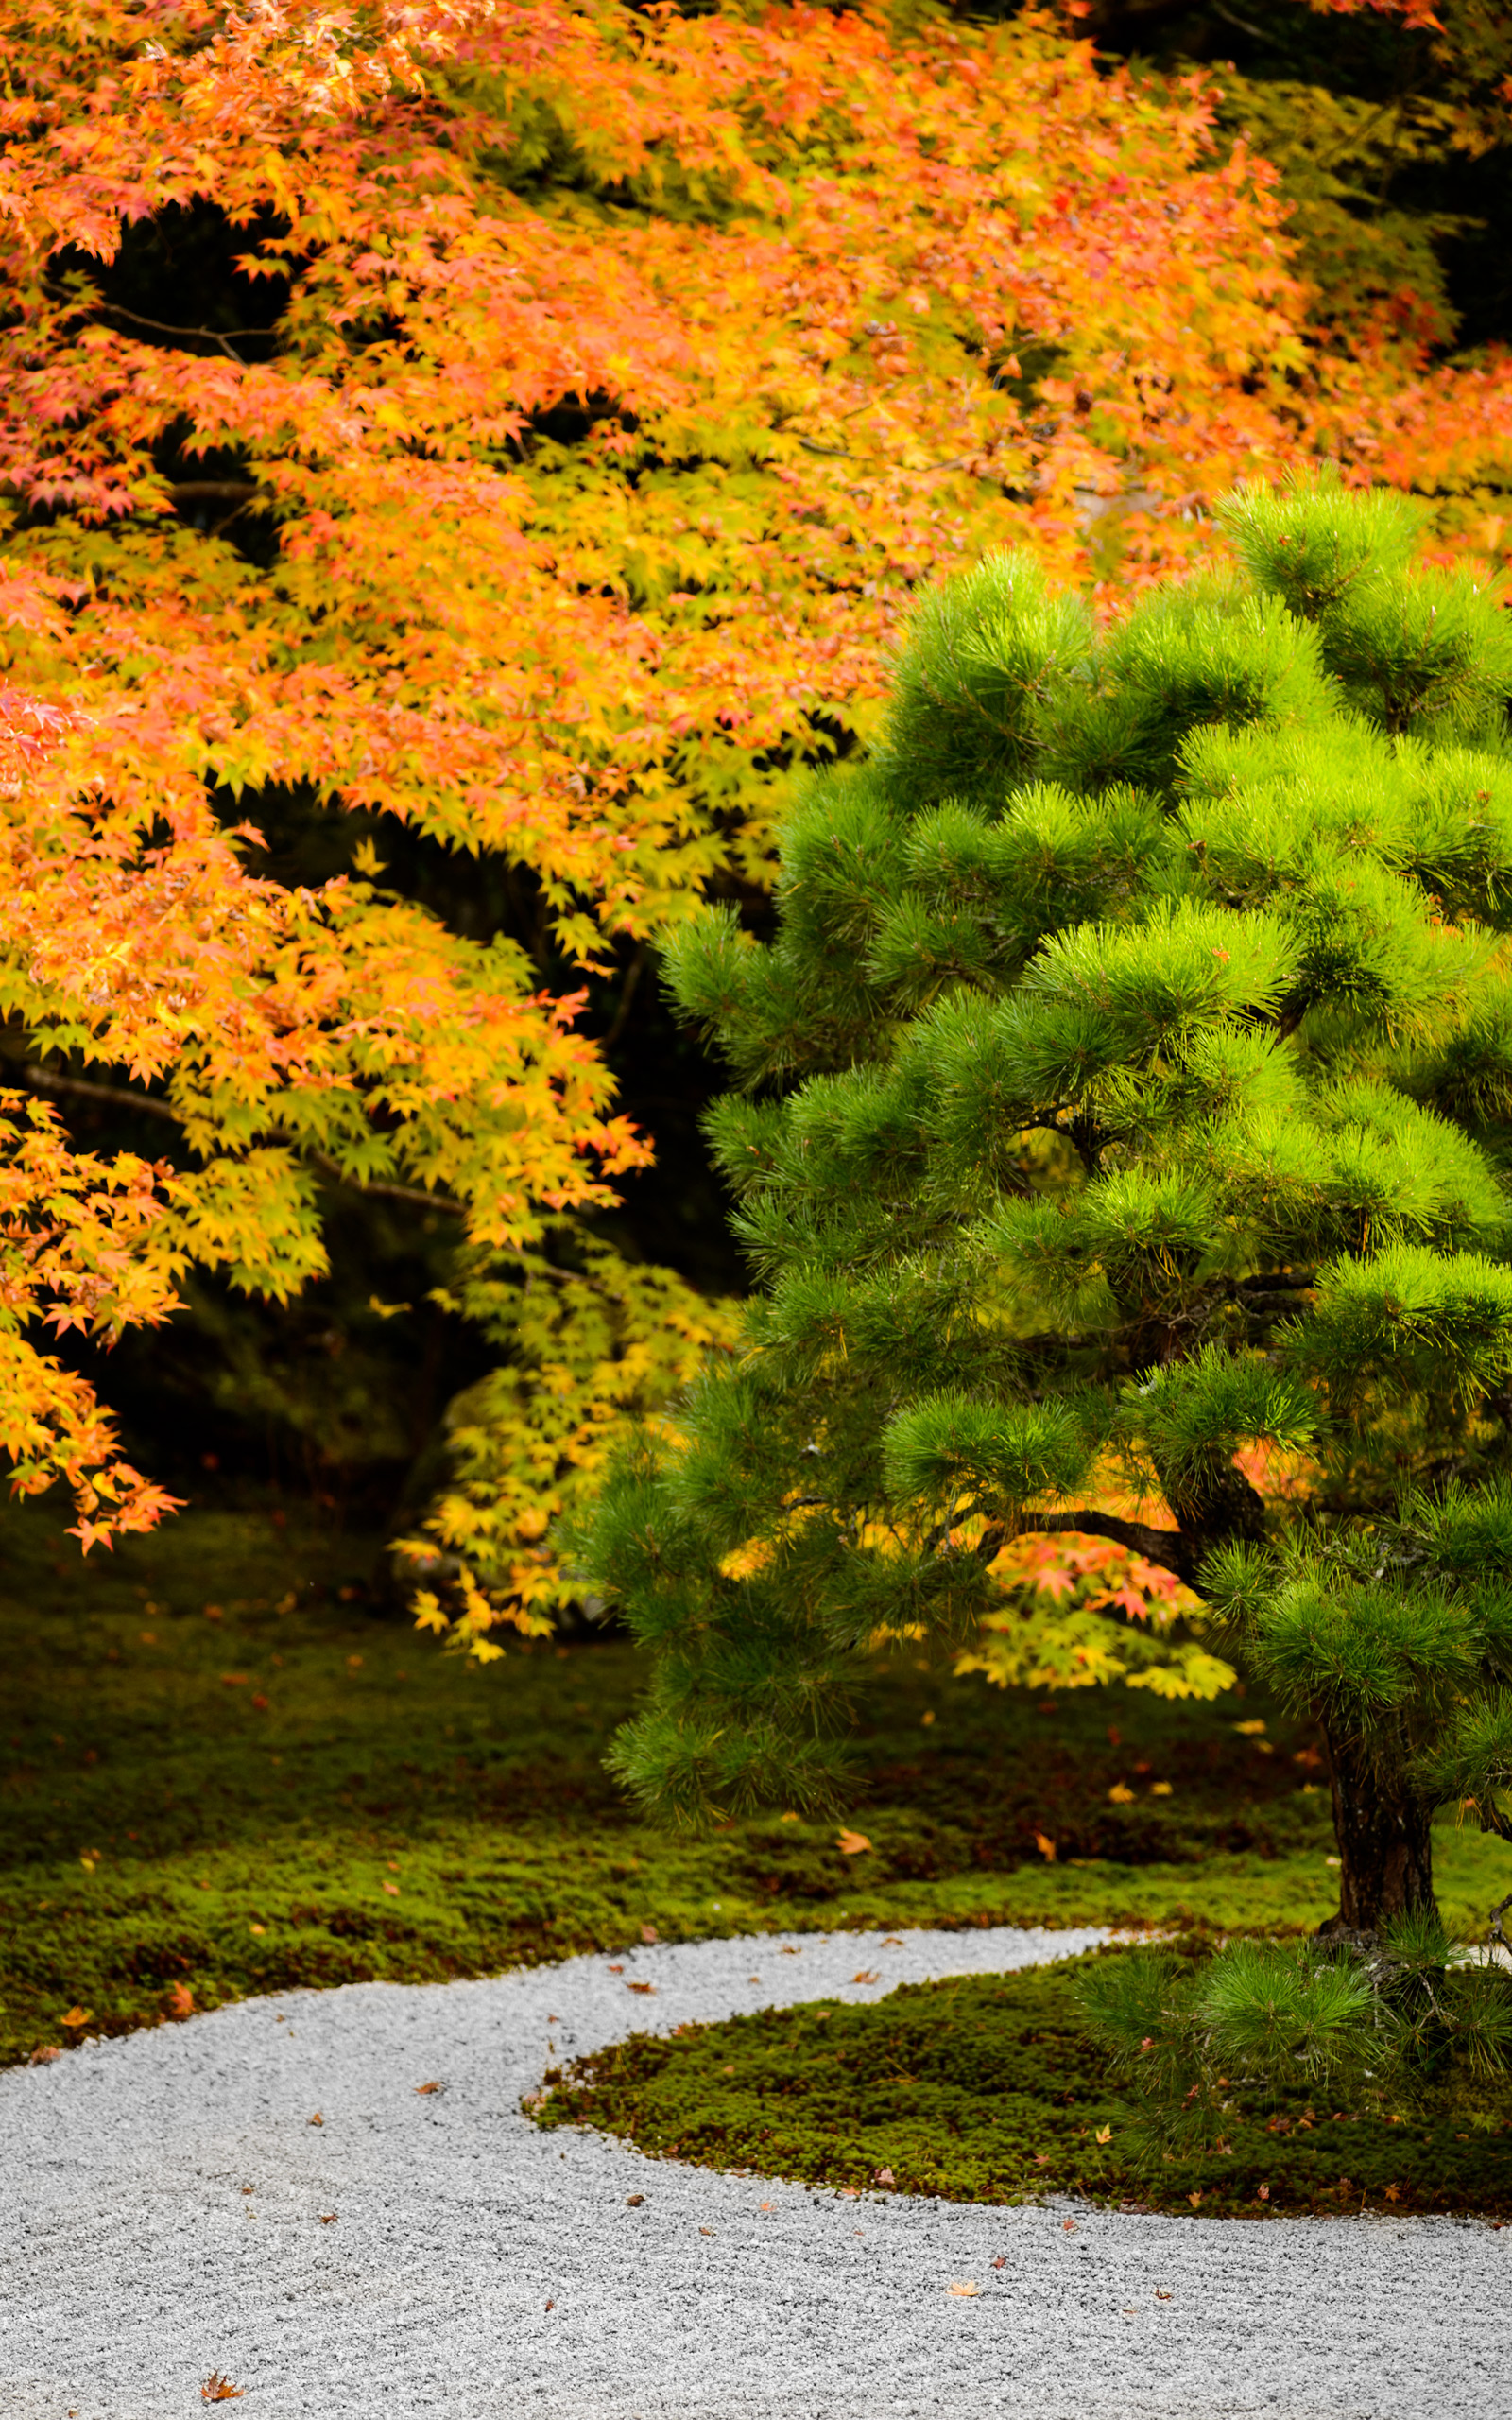
Rock Garden
with fairly subdued colors
天授庵の岩石庭園
Desktop-Background Versions
1280×800 · 1680×1050 · 1920×1200 · 2560×1600 · 2880×1800
Nikon D4 + Voigtländer 125mm f/2.5 — 1/400 sec, f/2.5, ISO 560 —
map & image data — nearby photos
Selfie
Nikon D4 + Sigma 35mm F1.4 DG HSM — 1/400 sec, f/3.5, ISO 720 —
map & image data — nearby photos
Rich Moss
Nikon D4 + Sigma 35mm F1.4 DG HSM — 1/500 sec, f/1.4, ISO 100 —
map & image data — nearby photos
Too HDRish
ハイダイナミックレンジをし過ぎ
With the dark shadows under the overhang, and bright sunlight in the
background, the scene wasn't an appropriate one to try to get everything
in, but I did a
three-burst exposure-bracket sequence. Even though it was handheld,
Lightroom's HDR-merge could handle it perfectly. However, the result was
little changed from the middle source image, but with the added latitude
I could then perform “single-frame HDR” to get a result that
includes detail in both dark and bright areas, but the result just feels
fake.
Nikon D4 + Voigtländer 125mm f/2.5 — 1/400 sec, f/2.5, ISO 6400 —
map & image data — nearby photos
Entrance to the Back Garden
裏の庭園の出入り口
I can't believe it's been three years since I made “Elegance in Kyoto’s Tenjyuan Garden” at this spot, one of my first wigglegrams.
It feels like it was just last year.
I made a similar wigglegram yesterday, being lucky enough to come across two ladies willing to pose:
div#ddAdrHnXwnXwddA img { width:464px; height:700px; visibility:hidden; position:absolute; top:0; left:0; border: solid 10px #311}


Animatable Wigglegram (14 frames) — slowly sweep mouse from side to side to view 3D effect
写真の上をマウスで左右にゆっくり動かすと「3D」な感じが出ます。
=i.length)return 0;else return which;}else{if(which=i.length)return i.length-1;else return which}};t=function(event){if(m>0&&((new Date().getTime())-m)R&&s0){f(c(s-1));console.log(s+":delta is "+delta);L=0.05;R=0.2;T=tilt;}}};d.ontouchmove=d.onmousemove=function(e){if(e.touches&&e.touches.length>1)return true;var x=Math.floor((e.clientX||e.pageX)/BW);var which=c(x>l?s+(x-l):s-(l-x));l=x;if(which!=s){m=new Date().getTime();f(which);}return false;};window.addEventListener('devicemotion',t,false)}
It's been a while since I took a wigglegram, and it shows in how unsmooth my movement was, but my auto-align software
was able to recover some sense of smoothness.
Nikon D4 + Nikkor 24-70mm f/2.8 @ 24mm — 1/50 sec, f/5.6, ISO 1000 —
map & image data — nearby photos
Me
making the wigglegram
私です。ポールさんが撮って下さった写真
photo by Paul Barr
Nikon D4 + Voigtländer 125mm f/2.5 — 1/200 sec, f/5.6, ISO 6400 —
map & image data — nearby photos
Subtle and Relaxed
seems to be the theme this year
ほのかな雰囲気、今年
Desktop-Background Versions
1280×800 · 1680×1050 · 1920×1200 · 2560×1600 · 2880×1800
Nikon D4 + Voigtländer 125mm f/2.5 — 1/400 sec, f/2.5, ISO 1400 —
map & image data — nearby photos
Carp
魚さん
Nikon D4 + Voigtländer 125mm f/2.5 — 1/400 sec, f/2.5, ISO 160 —
map & image data — nearby photos
Window
窓
Nikon D4 + Sigma 35mm F1.4 DG HSM — 1/400 sec, f/1.4, ISO 160 —
map & image data — nearby photos
Path
Nikon D4 + Sigma 35mm F1.4 DG HSM — 1/400 sec, f/4.5, ISO 3200 —
map & image data — nearby photos
Tenjuan's Pond
天授庵の小池
Nikon D4 + Voigtländer 125mm f/2.5 — 1/400 sec, f/2.5, ISO 5000 —
map & image data — nearby photos
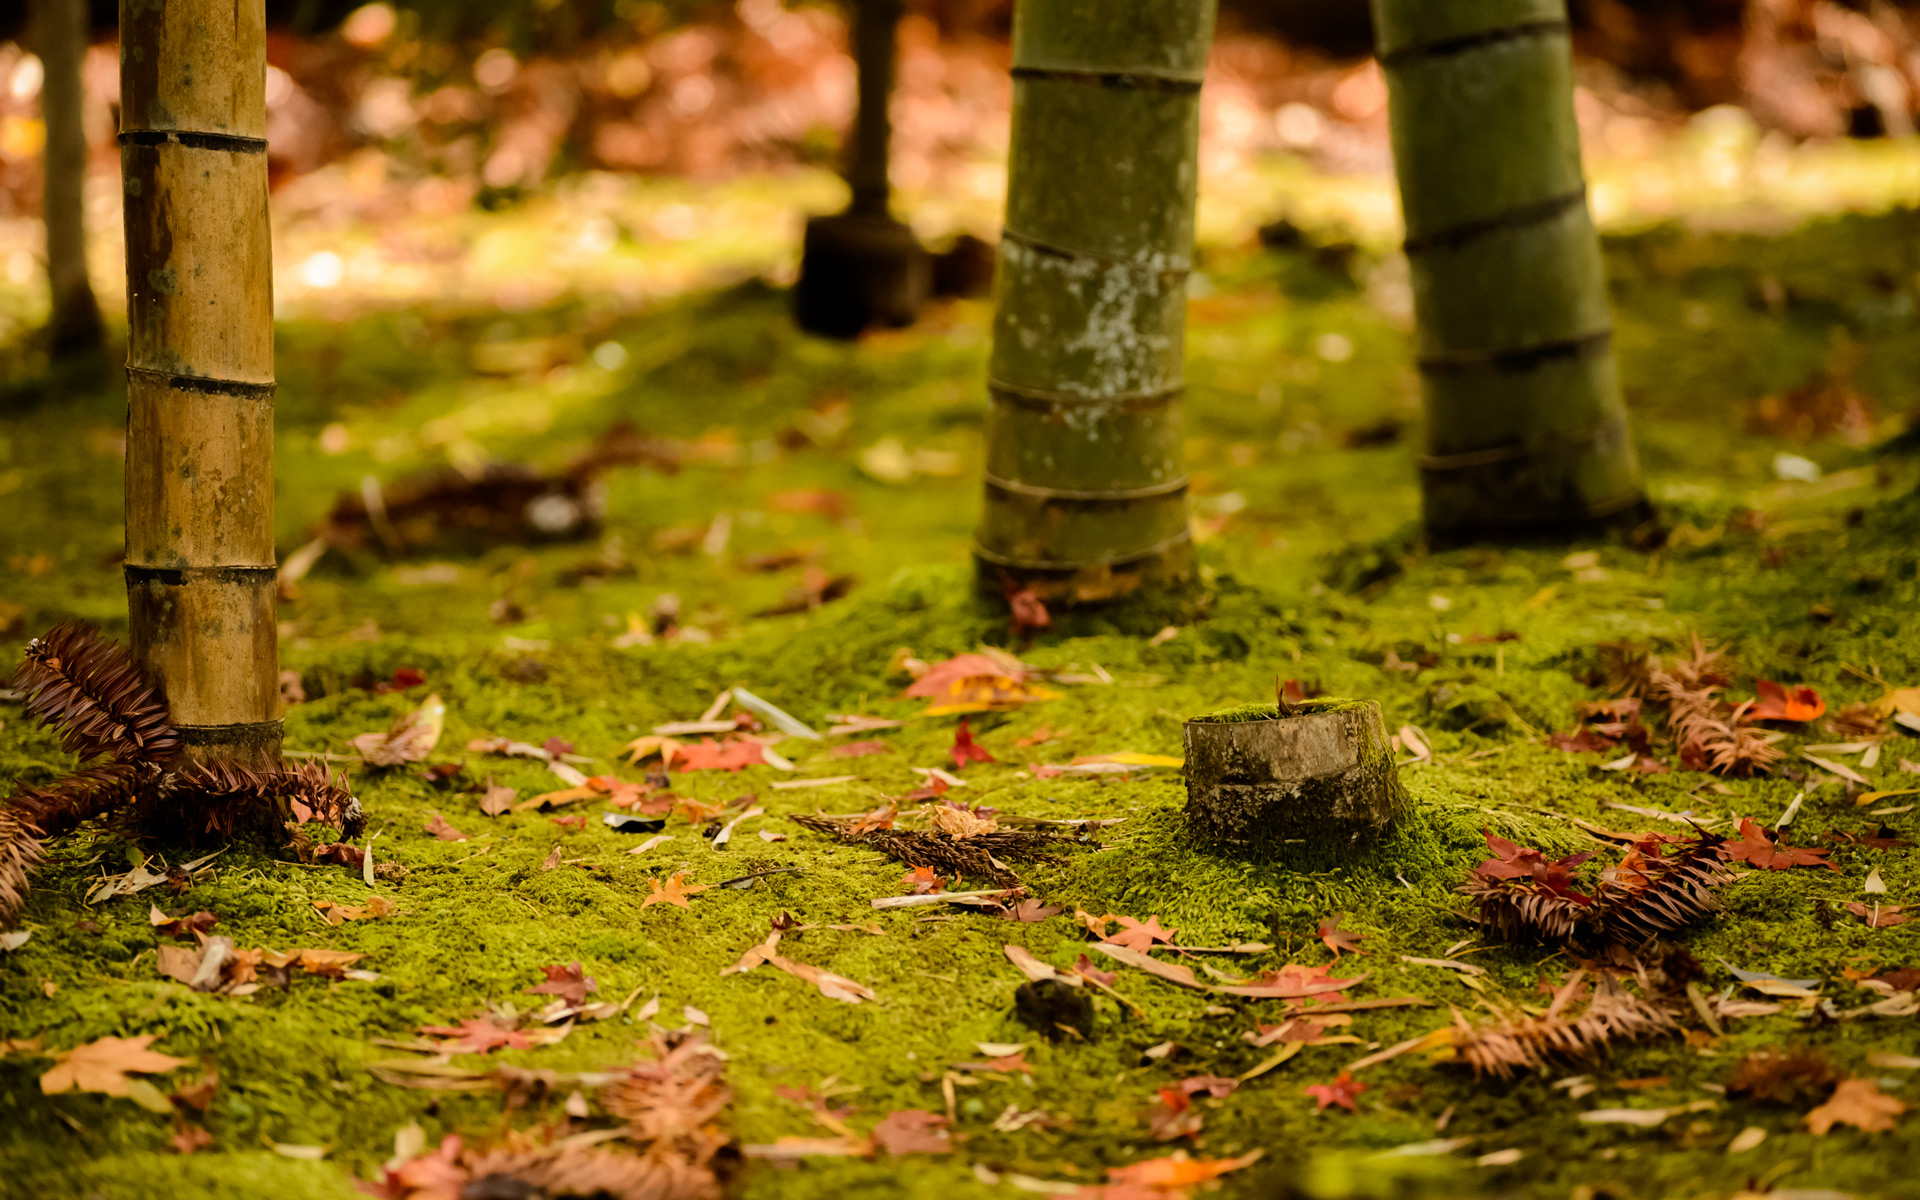
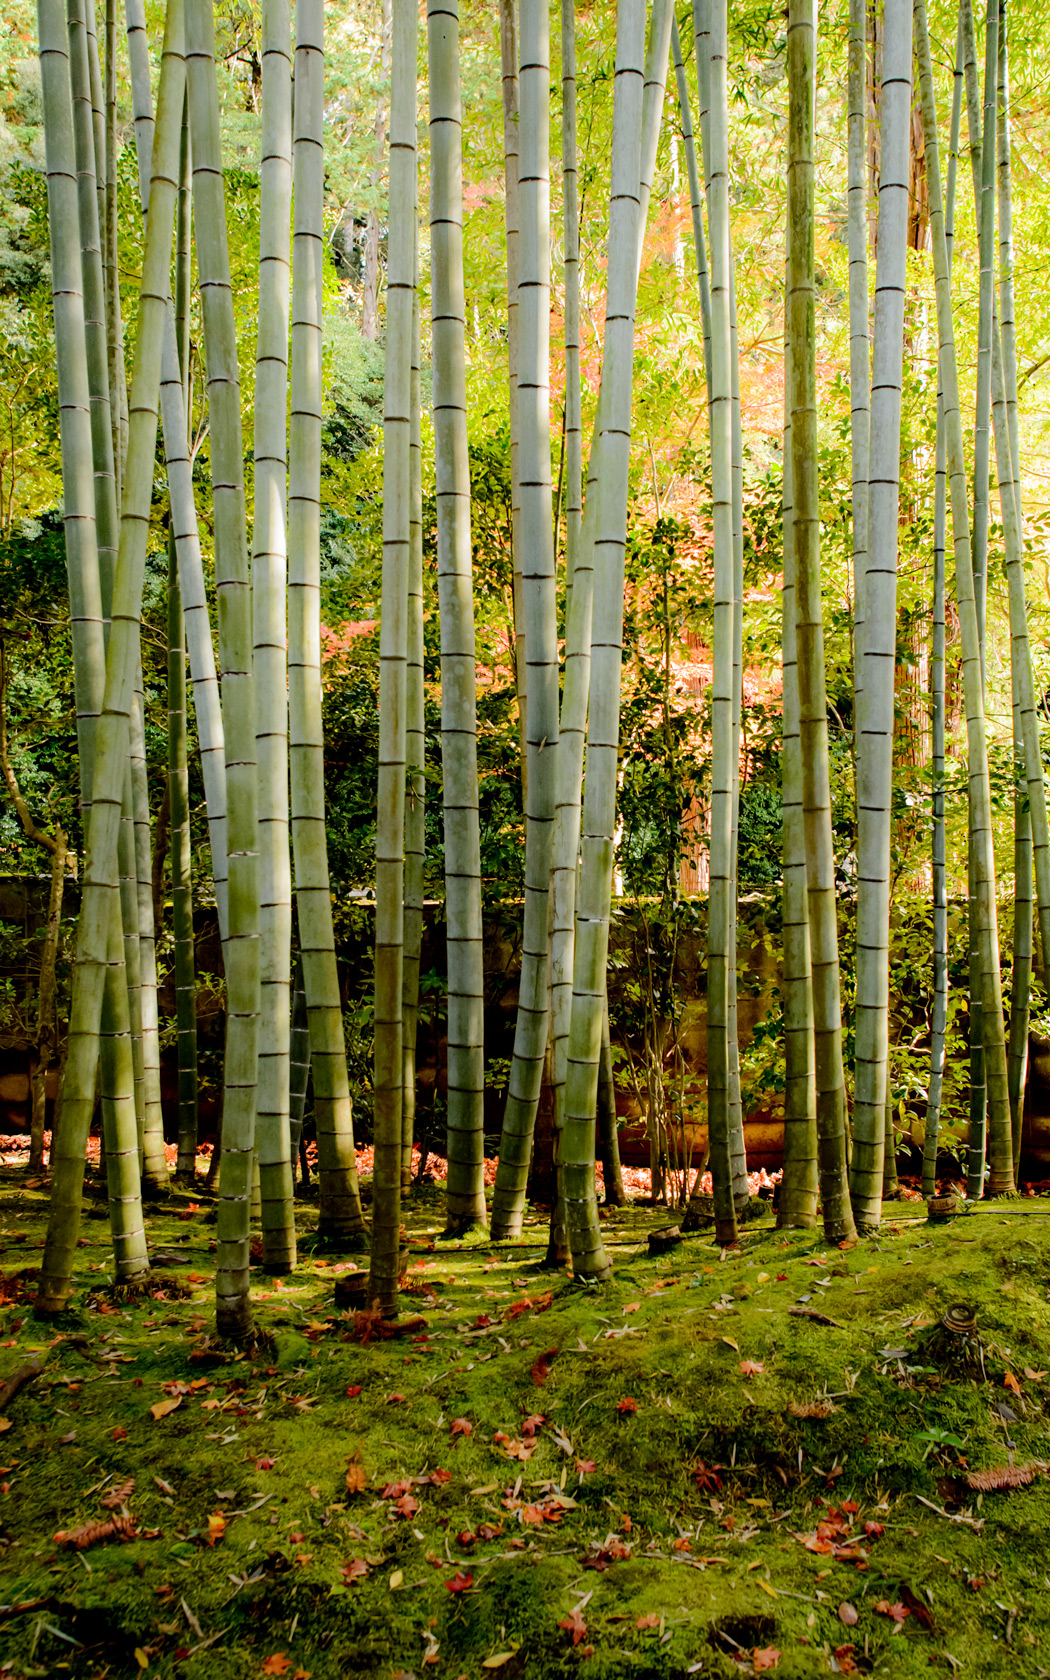
Bamboo and Moss
竹と苔
Desktop-Background Versions
1280×800 · 1680×1050 · 1920×1200 · 2560×1600 · 2880×1800
Nikon D4 + Voigtländer 125mm f/2.5 — 1/125 sec, f/8, ISO 6400 —
map & image data — nearby photos
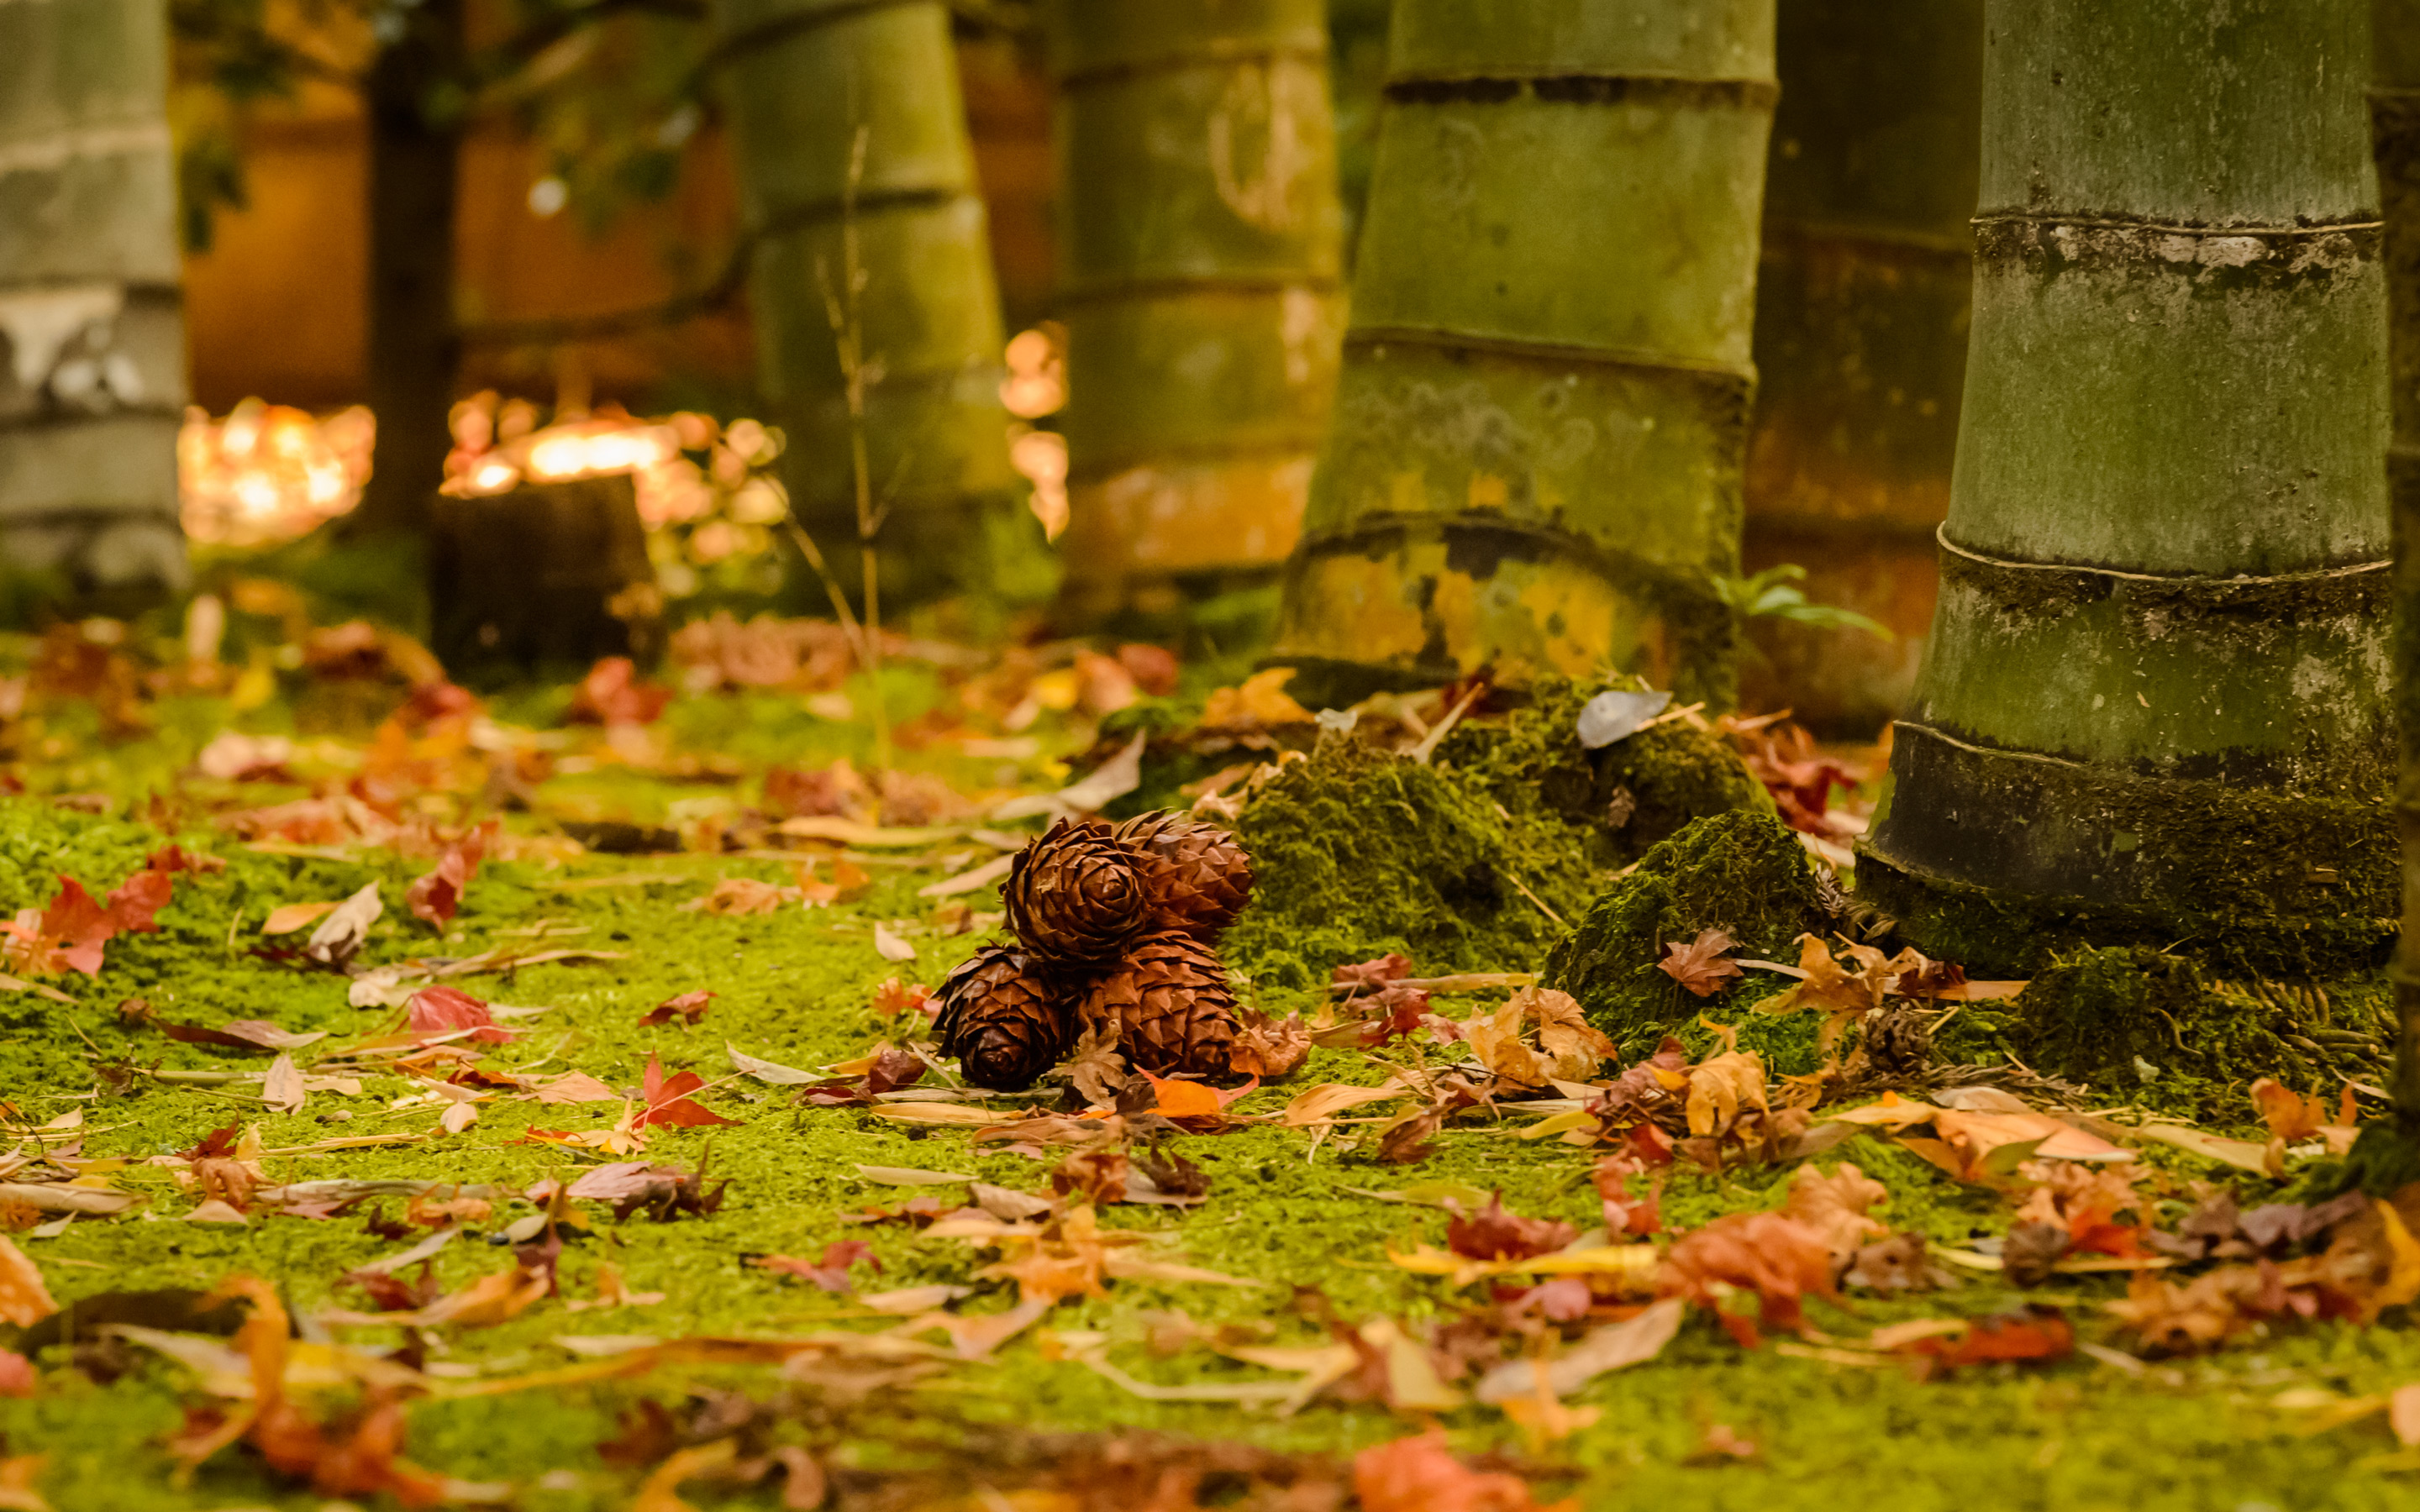
Bamboo and Moss and Pinecones
竹と苔と松ぼっくり
Desktop-Background Versions
1280×800 · 1680×1050 · 1920×1200 · 2560×1600 · 2880×1800
Nikon D4 + Voigtländer 125mm f/2.5 — 1/400 sec, f/2.5, ISO 360 —
map & image data — nearby photos
Vertical Desktop-Background Versions
1050×1680 · 1200×1920 · 1600×2560
Nikon D4 + Nikkor 24mm f/1.4 — 1/320 sec, f/7.1, ISO 6400 —
map & image data — nearby photos
Stepping Stones
踏み石
Even though I was right there in real life, the photo above gives me no sense for the size of the stones,
so when going through my photos, this next image sort of surprised me...
Nikon D4 + Sigma 35mm F1.4 DG HSM — 1/400 sec, f/9, ISO 6400 —
map & image data — nearby photos
With People
for scale
Nikon D4 + Nikkor 24mm f/1.4 — 1/400 sec, f/1.4, ISO 560 —
map & image data — nearby photos
Thick Trunk
heavy with the weight of moss
Nikon D4 + Voigtländer 125mm f/2.5 — 1/400 sec, f/2.5, ISO 3600 —
map & image data — nearby photos
Nikon D4 + Nikkor 24mm f/1.4 — 1/400 sec, f/3.5, ISO 2200 —
map & image data — nearby photos
Simple
Vertical Desktop-Background Versions
1050×1680 · 1200×1920 · 1600×2560
Nikon D4 + Voigtländer 125mm f/2.5 — 1/400 sec, f/2.5, ISO 2200 —
map & image data — nearby photos
Tiny Stone Bridge
短い石の橋
Nikon D4 + Voigtländer 125mm f/2.5 — 1/400 sec, f/2.5, ISO 250 —
map & image data — nearby photos
Nikon D4 + Sigma 35mm F1.4 DG HSM — 1/400 sec, f/2.2, ISO 1800 —
map & image data — nearby photos
Reflection
反射
Nikon D4 + Voigtländer 125mm f/2.5 — 1/400 sec, f/4, ISO 6400 —
map & image data — nearby photos
Nikon D4 + Nikkor 24mm f/1.4 — 1/400 sec, f/2.2, ISO 640 —
map & image data — nearby photos
Nikon D4 + Sigma 35mm F1.4 DG HSM — 1/400 sec, f/2.2, ISO 800 —
map & image data — nearby photos
Desktop-Background Versions
1280×800 · 1680×1050 · 1920×1200 · 2560×1600 · 2880×1800
Nikon D4 + Voigtländer 125mm f/2.5 — 1/320 sec, f/11, ISO 6400 —
map & image data — nearby photos
Tickling a Carp's Nose
鯉さんの鼻をくすぐる
Nikon D4 + Voigtländer 125mm f/2.5 — 1/400 sec, f/2.5, ISO 1100 —
map & image data — nearby photos
Birdhouse?
巣箱かな?
Desktop-Background Versions
1280×800 · 1680×1050 · 1920×1200 · 2560×1600 · 2880×1800
Nikon D4 + Voigtländer 125mm f/2.5 — 1/400 sec, f/2.5, ISO 280 —
map & image data — nearby photos
Vertical Desktop-Background Versions
1050×1680 · 1200×1920 · 1600×2560
Nikon D4 + Voigtländer 125mm f/2.5 — 1/400 sec, f/2.5, ISO 560 —
map & image data — nearby photos
The crowds were not oppressive, so it was thoroughly enjoyable to be lazy, take our time,
stop often to chat, etc. “Pleasant” was the theme of the day.
And speaking of “pleasant”, we capped off the day with chicken and suds at Uroko
(which I had been to just the other day with Carlin)...

iPhone 6 Plus + iPhone 6 Plus back camera 4.15mm f/2.2 at an effective 29mm — 1/4 sec, f/2.2, ISO 100 —
map & image data — nearby photos
Cheers!
乾杯!、「鱗」で
November 14, 2015
Mini Review: Skilhunt H02R Head Mounted Flashlight, For Cycling after Dark
Note: this article may not appear properly in news readers.
This article contains interactive aspects that are likely removed by most news readers. Please see this particular article directly on Jeffrey's blog for full functionality.
This xkcd comic came out today with perfect timing:

Today's xkcd Comic
perfectly appropriate for today's blog post
Last month I was contacted by GearBest and asked whether I'd like to do a review of a
product from their cycling gear or LED lights categories; I'd get to keep the product in exchange for an
unbiased review. Probably they'd seen my headphone review done under similar
circumstances. I get this kind of message every so often and don't usually accept, but a bicycle light piqued my interest.
I chose to try out a small, $50 head-mounted light that I thought might
be useful for nighttime riding:
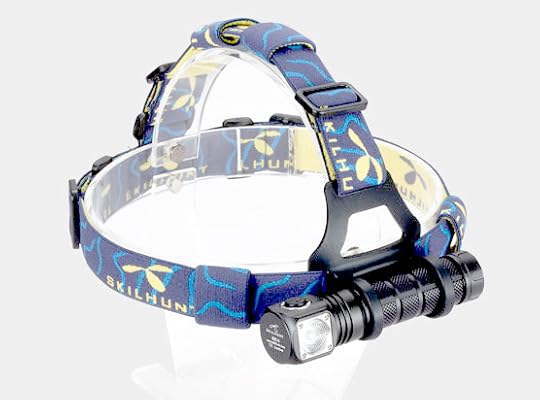
Skilhunt H02 R + Included Headband
The flashlight easily separates from the bundled blue and yellow headband, so you can use the flashlight around the house or
out and about as a normal handheld flashlight.

Skilhunt H02 R
It's quite small... a bit longer than the palm of my hand is wide, and about as
thick around as my thumb. Unlike a traditional flashlight, the beam comes out from the body at a right angle.
It is ridiculously bright for its size.
After dinner with Carlin the other evening, I stopped by the grounds of
the Kyoto Imperial Palace Park, which can be very dark at night, and snapped some comparison photos. Mouse over the
buttons below the photo to see the same scene illuminated with the flashlight's four levels of brightness:
span.b139 { padding: 6px; border: gray 1px solid }
span.sb { font-size: 80% }
Off
Low · 5 lumens
Medium · 120 lumens
High · 400 lumens
Turbo · 860 lumens
mouseover a button to see that image
The five pictures are all calibrated to the same exposure, and accurately represent the experience in real life.
Off shows the darkness without the light. I would not take the chance trying to walk on that path without some kind
of light.
The low setting (5 lumens), which hardly makes a dent in the scene above, is appropriate for reading or in
a tent or other close-in situations where you prefer not to blind yourself. Even at this lowest setting, though, take care not to
look directly into the LED, because is bright enough to be physically painful, as my personal testing for this review reveals. “5
lumens” sounds dim to me, but this lowest level is plenty bright even for walking around.
The next brightness level, the 120 lumens of “medium”, is probably brighter than any triple-D-cell flashlight I had growing
up. It's more than appropriate for walking or, I'm sure, hiking. It's phenomenally astounding to me how bright one tiny
little LED can be. Technology is amazing.
The final two brightness levels, high and turbo, are just more of the same (400 and 860 lumen respectively), and perhaps are
less important for walking or hiking than for search-and-rescue, but as I'll get to in a bit, I think they're important for
cycling.
Now that I've made the basic introduction, let me make it clear that I'm no expert in lights, cycling, or the combination
thereof, so take this review with that grain of salt.
Battery
This flashlight can take three kinds of battery (one “18650”, two “CR123”, or two “RCR123”), none of which I'd ever
heard of before. All seem to be at least not uncommon for use in flashlights. The “18650” is apparently used in Tesla cars.
The flashlight didn't come with a battery, so I bought this 3500mAh
rechargable “18650” and recharger for about $25. Judging by the limited research I did on Amazon, there's quite a range in
power capacity among “18650” batteries. I noticed claimed capacity ranging from 1500 mAh to 4000 mAh. The one I bought had the
largest capacity among batteries that didn't look to me like cheap, dangerous rip-offs. With modern batteries, you do not want to
take chances with inferior quality.
Head-Mounted Light
The flashlight is small, and the combined weight of the flashlight, battery, and head-mount band is not appreciable while
wearing. I found it a bit more comfortable to wear over a cycling cap than on my bare head. In either case, my helmet fit
over top.
Even in the limited testing I've done, I've found definite pros and cons to using head-mounted lighting. So far I've tried it on two night outings:
the first was a 20km ride that was about half
through city, and half along a spooky river-side path of oft-changing quality, and the second was the aforementioned visit to the dark park where I took
the photos above, and then the subsequent ride home through the city.
Pros, head-mounted compared to bike-mounted:
You control where the light shines. Want to see something off to the side or further afield or closer in front? Just point
your head where you want it. Huge benefit that trumps all cons.
Can move your head side to side slightly to create movement in shadows that helps
decipher the 3D nature of the scene, such as rocks and ruts in the path.
Stays with you while off the bike.
Controls, being at the front of your head, are always easy to find.
Cons, head-mounted compared to bike-mounted:
The source of light next to your eyes can exacerbate the hazy effect of fog,
and bugs that happen to be flying by that are suddenly illuminated inches in front of
your eye can scare the bejesus out of you.
While stopped at a traffic light, or other time you're not actively using the light
to see, you have to take care not to absentmindedly shine it in people's faces as you
wait.
The light source near your eyes creates a mostly shadow-less view, which makes it
more difficult to gauge the 3D nature of the scene (though as noted above a slight
swaying of the head can remedy that).
Probably looks silly unless you're climbing out of a cave.
Use for Cycling
The relatively-low 120-lumen power mode is more than enough for walking or jogging,
but for the higher speeds of cycling you need to be able to see further ahead in time,
which means seeing further ahead in distance, so the brighter the better.
Riding along the dark riverside path from Osaka, which sometimes is really nice pavement
and other times pockmarked mud, I felt fine doing 30kph (20mph) with the light at full 860-lumen
power.
Here are two more examples of the light at full power:
span.b824 { padding: 6px; border: gray 1px solid }
Off
Turbo
mouseover a button to see that image
span.b545 { padding: 6px; border: gray 1px solid }
Off
Turbo
mouseover a button to see that image
The temple building and trees in the last example are about 45m~50m away (150' ~ 165' away),
which is almost six seconds away at 30kph.
Back to my experience on the riverside path, I could use the lower power modes when the pavement
was better, but I didn't feel comfortable to go 30kph... I needed to be able to inspect the road surface
clearly as I went, and for this I wanted the brightest light possible.
Unfortunately, the claimed battery life at the brightest “turbo” setting is only one hour, which may put a crimp on an all-night
mountain-path ride. The 400-lumen “high” setting is rated at three hours. Running and hiking would be no problem, I think, as the
120-lumen “medium” mode has a claimed battery life of 11 hours. (The lowest 5-lumen mode has a claimed battery life of five
days.)
They don't specify what capacity battery was used to come up with these numbers. As I noted earlier, I found a huge range in
battery capacities (1500 mAh to 4000 mAh), so I'd expect the same range in how long one can use the light. I wish they'd
have mentioned the battery capacity that the claimed battery life applies to.
The Purpose of Lights while Cycling
I don't ride much at night except for short jaunts around the city, and as such I usually don't need
lights to see, but instead to be seen,
so for normal cycling day or night I use bike-mounted lights on both the front and rear. On the front I use a
Knog “Blinder” front 4-LED square,
and on the rear a
Knog “Blinder” rear 4-LED strip. These are extremely bright
from the “be seen” point of view, but provide almost nothing in the way of path illumination.
A nice feature of these Knog Blinders is that they're rechargeable, and recharge via a normal USB plug.
That means that I can recharge them on very long rides via the
small backup battery that I use to recharge my phone on the go. They last a long time on one charge, so I don't often need
to recharge them on the go, but it's comforting to know I won't be stuck in a long tunnel without a tail light.
I also have a Pedallon LED 100-Lumen Rear Bike Light
that I bought over the summer for $18 (now on sale at Amazon for $13, or the physically same
product at GearBest for $10). It's very bright
(in the “to be seen” sense), but I found the controls a bit over complicated, and the battery didn't last
as long as the (twice-the-price) Knog Blinder. I tend to take long rides, so I prefer the Knogs.
Speaking of controls, the controls for the this Skilhunt H02R flashlight are simple and easy to remember. It has one button. When you press to turn it on, a short click turns it on to the power level it was last at,
while a half-second press turns it on to the dimmest 5-lumen mode, which is really convenient when you want to make
sure you don't blind yourself when turning it on to look at a map. Turning it on via a double-click on the button
puts it immediately into turbo mode.
Double-clicking while it's on puts it into a seizure-inducing turbo-flash mode. A half-second press turns it off. A normal click while it's on, of course, cycles through the power levels.
Aside: Modern Reflexive Material
In addition to being astounded at the brightness of a modern flashlight, I was also amazed at modern reflective material.
These days lots of running clothes come with little design flourishes of reflective material... perhaps just a few
squares the size of a fingernail arranged in some kind of decorative pattern. I thought these were marketing hype,
with little value for safety, but I was very wrong.
While riding down the dark riverside path, folks wearing clothes with these little fingernail-sized patches of reflective
material were visible from very far away, and with the movement of their body highlighting their presence even more. Tiny
fragments of reflective piping in the shoes, or a small tag on a sleeve, etc., were impossible to not notice 20 or 30 seconds
ahead of time. It was astounding.
Most folks out running in the dark had at least something reflective on them, but some folks, notably elderly folks out for a
walk, were generally wearing black and were invisible until bathed in the direct illumination of the flashlight.
From now on, I'll put much more stock in reflective flourishes when shopping for clothes and gear.
Summary
All in all it's a great flashlight with a size/price/brightness combination that I find to be amazing. If I lose it, I would spend my own money to buy another.
Jeffrey E.F. Friedl's Blog
- Jeffrey E.F. Friedl's profile
- 13 followers

