
David Petersen's Blog, page 53
October 6, 2015
Bastian, Fosgitt, Pride & Cook ink Petersen's Mouse Guard
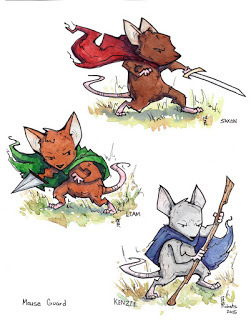
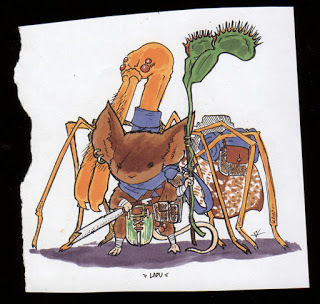
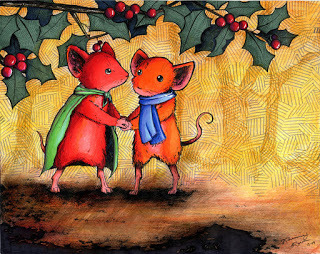
 When I was in Italy last year, I started drawing some Mouse Guard portraits on 6" x 6" bristol. Those were the pieces I have used for my speed-up coloring videos. But a few of them never got past the pencil stage. While hanging out with Bodie Troll creator Jay Fosgitt, Jay said he'd like to try inking something of mine. I happened to have a few of those unfinished penciled mouse portraits in my bag. I handed one to the other artists at the table thinking it would be fun to see how they handled inking in their style on my very loose pencils. Below are the results.
 Jay Fosgitt
 Nate Pride
 Katie Cook
(who also wanted to color hers)
Katie Cook
(who also wanted to color hers) Jeremy Bastian
 I also did one of my own (pencils and inks)Partly as a compare and contrast, but also because all five of these pieces are going to be donated to the charity auction at the New York Comic Con this weekend!
2015 Appearances:New York Comic Con Oct. 8-11Art-Bubble Comics Festival: Copenhagen: Nov. 14-152016 Dates coming soon.


September 29, 2015
Fan Art
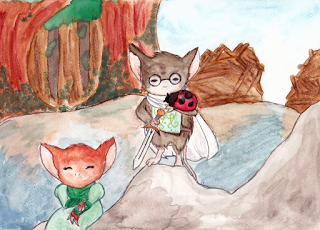
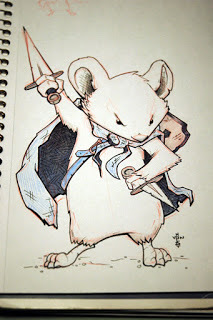
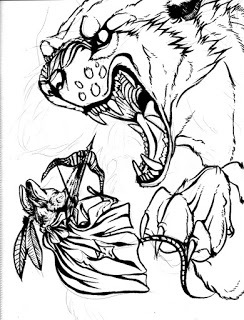
I love that fans are excited enough about Mouse Guard, Legends of the Guard, or the Mouse Guard RPG (and their player-characters) to lend their talents to creating Mouse Guard Fan Artwork! I share this work from time to time on the blog, so here is a fresh batch of work sent directly to me, or pointed out to me online by other fans.
 Corinne Roberts
 Dash Xero
 Erika Vasos
 Ezra Albrecht (age 10)
 "Garcifer"
 Genevieve Gray
 Jacob Cecil
 Javier Urena
 Mack Sztaba
 "Malimar the Mage"
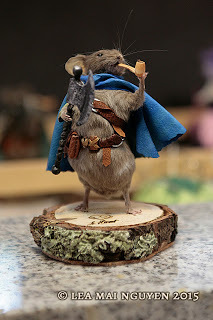 Lea Mai Nguyen
 Mick Gray
 "Goblinhood"
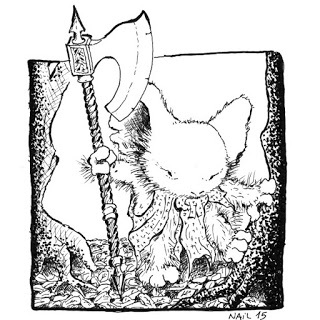 Nail Sari
 Necmi Yalcin
 Rosie Ruzicka
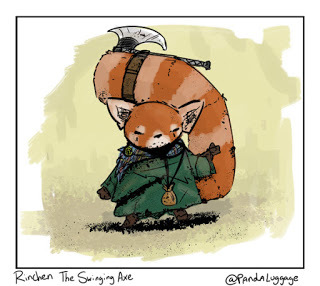 Sasha Thompson (a Red Panda-guard)
 "Shandria"
 Stjep Lukac
 "Supercell"
 "Tabalus"
 Vonholdt
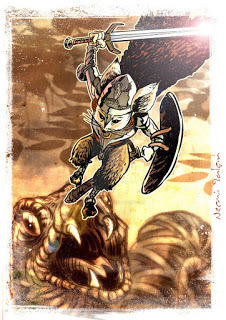
 Sam Tan
 Talbot
2015 Appearances:Long Beach Comic Con: Sept. 12-13Baltimore Comic Con Sept. 25-27New York Comic Con Oct. 8-11Art-Bubble Comics Festival: Copenhagen: Nov. 14-15
 Corinne Roberts
 Dash Xero
 Erika Vasos
 Ezra Albrecht (age 10)
 "Garcifer"
 Genevieve Gray
 Jacob Cecil
 Javier Urena
 Mack Sztaba
 "Malimar the Mage"
 Lea Mai Nguyen
 Mick Gray
 "Goblinhood"
 Nail Sari
 Necmi Yalcin
 Rosie Ruzicka
 Sasha Thompson (a Red Panda-guard)
 "Shandria"
 Stjep Lukac
 "Supercell"
 "Tabalus"
 Vonholdt
 Sam Tan
 Talbot
2015 Appearances:Long Beach Comic Con: Sept. 12-13Baltimore Comic Con Sept. 25-27New York Comic Con Oct. 8-11Art-Bubble Comics Festival: Copenhagen: Nov. 14-15
September 22, 2015
Baltimore Comic Con Yearbook Cover
 Every year the Baltimore Comic Con publishes an art book called the Baltimore Comic Con Yearbook where they feature a creator owned property that guests of the show can contribute a piece for honoring that series. This year, I was asked by Marc Nathan if the theme could be Mouse Guard! With this being the 10 year anniversary for Mouse Guard, it couldn't have been better planned. To the left you can see the finished cover art I created for teh book. For today's blogpost, I'll run through the steps and process to get from concept to the final art.
 Concept/Sketches: I like to include another animal interacting with at least one mouse for any good Mouse Guard stand alone image. This way the sense of scale is featured, and if the other animal is a predator, establishes the tone of the Guard being brave work for such a small creature. I decided to go back to the 1st interaction ever published for Mouse Guard and drew out a snake vs mouse battle. I also drew eggs hatching little snakes to also pay homage to the offspring Saxon and Kenzie encounter in issue 1 of Fall.
 Layout: I scanned the pencil sketches and started laying them out with the specifics of the cover dimensions worked up as a photoshop template (the trim, bleed, space for text, etc). Where the text would go, I dropped in a celtic knot pattern I've used before (on the funeral shroud for Celanawe in Winter). For the background I placed in a photo of a maple branch to see how detailed/minimalist I needed the background to be. I was worried with all the scales, that a detailed background could get too busy, and using this photo as a placeholder helped confirm what I wanted to do.
 Inks: I printed out the digital workup for the cover and taped it to the back of a sheet of bristol board. On my lightbox I was able to see through the bristol board to the printout so I could use it as a guide to ink by. I used Copic Multiliner pens for the inks, the 0.7 & 0.3 nibs mainly. On the right you can see the final inks, but below are some of the process shots I took and tweeted as I inked.


 Flatting: I scanned the inks back into Photoshop and started to flat the colors in. This is the step of coloring where you are just establishing what areas are which colors. Not to worry about light sources, texture, or shading...just flat colors. I wanted the palate to be reminicent of Fall, and while some of the costume details and the sword are off from Lieam's first appearance, I made the mouse Lieam in every other way to harken back to that first issue in 2005. The border around the text was something I inked seprately on a different sheet of bristol so I could easily isolate it color-wise from the stippled celtic knot on the main image.
Final colors: I rendered the colors using the Dodge & Burn tools in Photoshop, but by using the paint brush tool. After I get the light and dark shading and highlights, I go through and select repetitious forms to tint and adjust so that they look a bit more natural (like the snake scales and the maple leaves).The Baltimore Yearbook will be on sale this weekend at the Baltimore Comic Con. It will feature new Mouse Guard artwork by Jeremy Bastian, Kelly Yates, Tom Raney, Rich Woodall, Dean Haspiel, Jose Luis Garcia-Lopez, Billy Tucci, Frank Cho, Brandon Peterson, Steve Conley, Thom Zahler, Jeremy Treece, Andy Runton, John Gallagher, Todd Dezago and Craig Rousseau, Jamal Igle, Matthew Dow Smith, and many many more! More info about the book here
Flatting: I scanned the inks back into Photoshop and started to flat the colors in. This is the step of coloring where you are just establishing what areas are which colors. Not to worry about light sources, texture, or shading...just flat colors. I wanted the palate to be reminicent of Fall, and while some of the costume details and the sword are off from Lieam's first appearance, I made the mouse Lieam in every other way to harken back to that first issue in 2005. The border around the text was something I inked seprately on a different sheet of bristol so I could easily isolate it color-wise from the stippled celtic knot on the main image.
Final colors: I rendered the colors using the Dodge & Burn tools in Photoshop, but by using the paint brush tool. After I get the light and dark shading and highlights, I go through and select repetitious forms to tint and adjust so that they look a bit more natural (like the snake scales and the maple leaves).The Baltimore Yearbook will be on sale this weekend at the Baltimore Comic Con. It will feature new Mouse Guard artwork by Jeremy Bastian, Kelly Yates, Tom Raney, Rich Woodall, Dean Haspiel, Jose Luis Garcia-Lopez, Billy Tucci, Frank Cho, Brandon Peterson, Steve Conley, Thom Zahler, Jeremy Treece, Andy Runton, John Gallagher, Todd Dezago and Craig Rousseau, Jamal Igle, Matthew Dow Smith, and many many more! More info about the book here2015 Appearances:Long Beach Comic Con: Sept. 12-13Baltimore Comic Con Sept. 25-27New York Comic Con Oct. 8-11Art-Bubble Comics Festival: Copenhagen: Nov. 14-15
September 15, 2015
Jim Henson's Storyteller: Dragons Cover
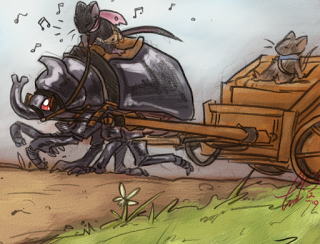
 Archaia is doing a Jim Henson's Storyteller mini series with the subtitle DRAGONS. The 4 issue series will have an original Dragon themed story per issue drawn and written by the likes of Nate Pride, Hannah Christenson, and Jorge Corona. I was asked by my Mouse Guard editor Cameron Chittock (who is also the editor for Storyteller) to contribute a variant cover. To the right you can see my finished cover, but below I'm going to share the process for creating the artwork from start to finish.
 Pencil sketches & concept: Cam and I chatted on the phone about what to do for the variant. Because Archaia needed this early, none of the issues had been finished yet, so I couldn't base my cover on the interior story of any of the issues...but we still wanted my cover to somehow tie into them. So, I proposed that I'd create a new dragon who is pushing carved dragon pawns around deciding the fates of their real life counterparts. Here is my pencil sketch as well as a lightboxed revision I made to the dragon and the 4 pawns (each representing the designs of the dragons in the 4 issues)
 Rough/Pencils: I scanned and assembled my copy-paper pencil drawings in photoshop into a template for the cover. I merged the two dragon drawings and then digitally painted out the setting roughly. The horde of coins gave me a chance to have lots of tiny details...but not really detailed, because they are just repetition of form...and to hide a great deal of Dragon anatomy I didn't want to figure out for this new creature design. The magical chess-board was digitally distorted in from a traditional old magic circle drawing. This is what I then sent off to Cam for him to also show the Henson company for approvals of my concept.
 Inks: Once Henson (and Cam) approved my concept, it was time to start inking! I printed out the rough and taped it to the back of a sheet of Strathmore 300 series bristol. On my lightbox I was able to see through the bristol to the printout and use that as my "pencils" as I inked on the surface of the smooth bristol board. I went a little nuts with the coins...I'd originally planned to suggest a great deal of them, but I couldn't help myself once I started. This was all inked with Copic Multiliners (the 0.7 & 0.3 nibs mainly)
Below you can see a number of in-process photos I took as I inked the cover on my lightbox.


 Flats: This part of the coloring process is just about establishing the various color areas...that the dragon's skin is a different color than his wing flaps, or eyes, or horns, and that the coins are a different color than the background, etc. I'd already made a great deal of my color choices when I did the rough, so this step was mostly about the kindergarden-like task of coloring the right colors inside the lines....but digitally. At this stage, I also added a color hold to all the linework on the board to make it a bit more subtle.
Final Rendering: The last step is to render, shade, highlight, and add texture to the flat colors. I do most of this using the dodge and burn tools in Photoshop with a textured brush.
Flats: This part of the coloring process is just about establishing the various color areas...that the dragon's skin is a different color than his wing flaps, or eyes, or horns, and that the coins are a different color than the background, etc. I'd already made a great deal of my color choices when I did the rough, so this step was mostly about the kindergarden-like task of coloring the right colors inside the lines....but digitally. At this stage, I also added a color hold to all the linework on the board to make it a bit more subtle.
Final Rendering: The last step is to render, shade, highlight, and add texture to the flat colors. I do most of this using the dodge and burn tools in Photoshop with a textured brush. 2015 Appearances:
Baltimore Comic Con Sept. 25-27New York Comic Con Oct. 8-11Art-Bubble Comics Festival: Copenhagen: Nov. 14-15
September 8, 2015
Art Bubble Festival in Denmark Print
 This November, I'll be a guest at the Art Bubble festival in Copenhagen, Denmark! The organizers there asked if I'd create a special print for the festival (as I've done a few times in the past for International visits like the UK and Germany). A good part of my background is Danish (my great-great-grandfather was Johannes who came from Denmark to Michigan). On the left you can see the final print image. In this week's blogpost, I'll be sharing all the step-by-step process for creating it.
 I wanted the print's image to be inspired by Danish heritage and symbolism. With an image search, I found the national coat of arms (three blue lions with nine hearts) as well as some fantasy art of Danish Vikings (I can't find any credit for the artist...anyone know). And with the plan of the background being the Danish flag, my version of the coat of arms, and a viking mouse, I sketched out these drawings on copy paper. I only drew 1 lion and 1 heart, as well as just half the crown, planning to use Photoshop tricks to make sure the patterning matched and was was symmetrical.
 After I scanned in the copy paper sketches, I composited this rough in Photoshop with a mocked in partial Danish flag. The lions and hearts were color tinted to help me see the different shapes and get a clearer picture of the overall design. Oh, another design note, I saw references to Ermine fur in several other regional danish coat of arms, so I made this mouse's cloak ermine...but to help make that more obvious than just being fur, I decided this was a decorative/portraiture/fancy-dress cloak with the head of the long-dead ermine still attached. I printed out the composite and taped it to the back of a sheet of Strathmore Bristol and started inking it on my lightbox. Below are a few in process photos of the inks


 To the left you can see the scan of the finished inks. Because I inked this all on the lightbox, there were no pencils to erase (though I did make an adjustment to the hand holding the helmet that I sketched out on the bristol, so there was a tiny bit of erasing to do). For pens, I used Copic Multiliners...the SP 0.7 and 0.3 nibs. I always try to give my work texture in the inks. Beyond the obvious hatching and stippling, you can see some pattern work and line-type variance: the ring-mail, the cuts on the mouse's head & ears, and the lions & hearts.
 With the inks scanned, the tedious job of coloring known as flatting was ahead of me. This is the part where I just have to drop in flat colors (no rendering, shading, or texture) to establish which parts of the image are which colors. on this piece, I did get close to the final colors in the flatting, but there are lots of times I use garish made-up colors as I flat. I added color holds in this step as well. A color hold is where inked linework gets painted in color instead of black.
 The exciting part of coloring is all the rendering and detail work. To the left you can see a photo I took of my screen as I was working. For all the shading and highlights I use the burn and dodge tools. When I'm using those, I also use a textured brush (a stock brush called "drybrush") so that it adds a bit of randomness to the work as well as that Mouse Guard-ish pebbled texture.
 Here again is a photo of the printed poster art. According to the Art Bubble co-ordinaters, the poster is A3 sized on quality heavy stock. 500 copies have been made and will be sold for 100 Danish Krones ($15) at the Festival in the Round Tower. If there are any left after the festival, Art Bubble is willing to sell worldwide for regular price and postage.
2015 Appearances:Long Beach Comic Con: Sept. 12-13Baltimore Comic Con Sept. 25-27New York Comic Con Oct. 8-11Art-Bubble Comics Festival: Copenhagen: Nov. 14-15
September 1, 2015
Hogwarts RPG Character illustrations
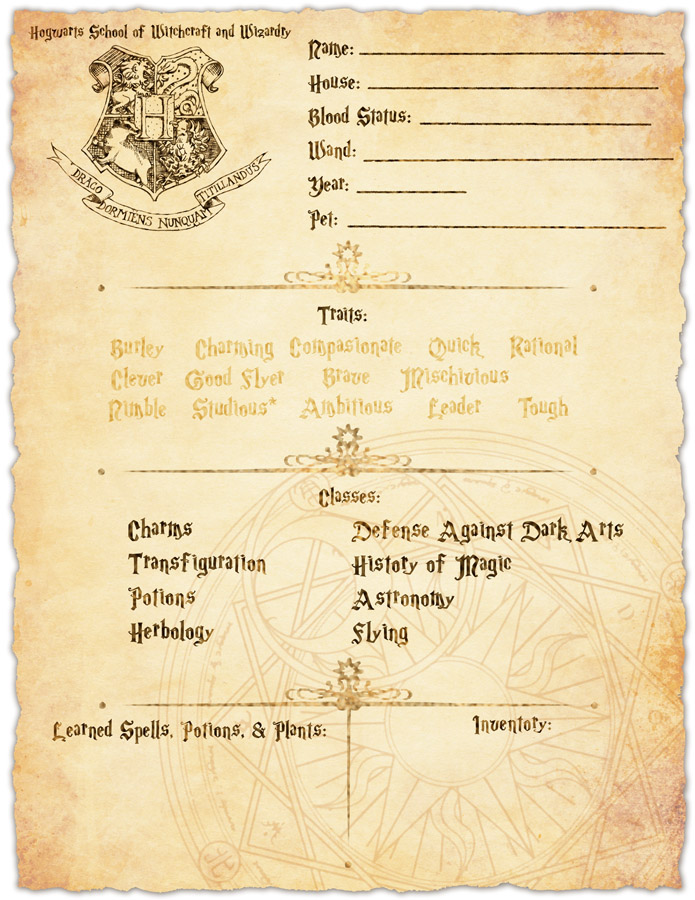 I've been playing a home-made Hogwarts RPG with some artist friends at conventions after the con-floor closes. The system is a loose adaptation of some of Luke Crane's Burning Wheel mechanic of 6-sided dice rolled as pools. 1-2=failure dice, 3= 1/2 success dice, 4-5= successful dice, and a 6 is not only a success but can be rolled again to possibly add more successes. The Game Master sets an objective number for a task/obstacle/spell (ie: 3 successes) and based on their traits, their year level, house bonuses etc., the player rolls a certain amount of dice to try and achieve that objective. Most of the game isn't about rolling dice though, it's about solving puzzles, interacting with other players, unfolding a story, and meeting Non-Player Characters (NPCs).
An artist's favorite part of playing an RPG usually includes drawing the characters. And I'm no exception. So each session, I work on creating a visual for the players for at least one of the NPCs. For today's Blogpost (celebrating the date students should be departing Platform 9-3/4 and boarding the Hogwarts Express for the first day of school) I'm sharing the Character portraits for our adventure so-far.
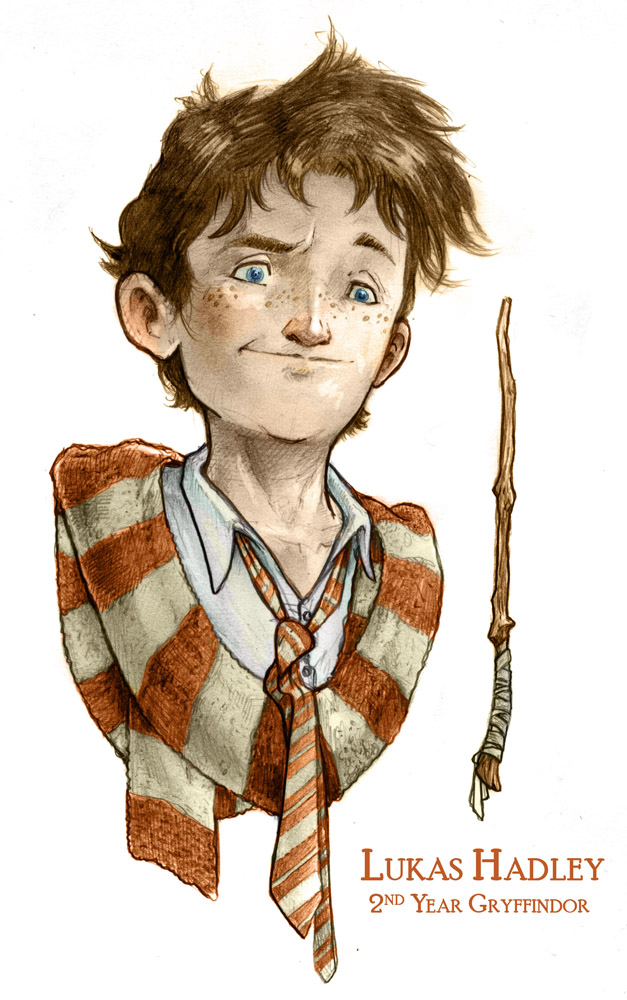 Lukas Hadley: I'll start with my student NPC. Lukas is a Brave, Ambitious Mischivious 2nd year Gryffindor. While the other players start at 1st year, I created a 2nd year who would be able to reasonably show them the ropes or explain things to them in the game, but without being so advanced as to just be able to do difficult tasks for them. I made him a Gryffindor for two reasons. 1) I'm a Gryffindor and he's my representation in the game, and 2) Because they are in a different house, he won't always be there to help. Lukas had a pet toad named Olaf at the start of the adventure...but more on him later.
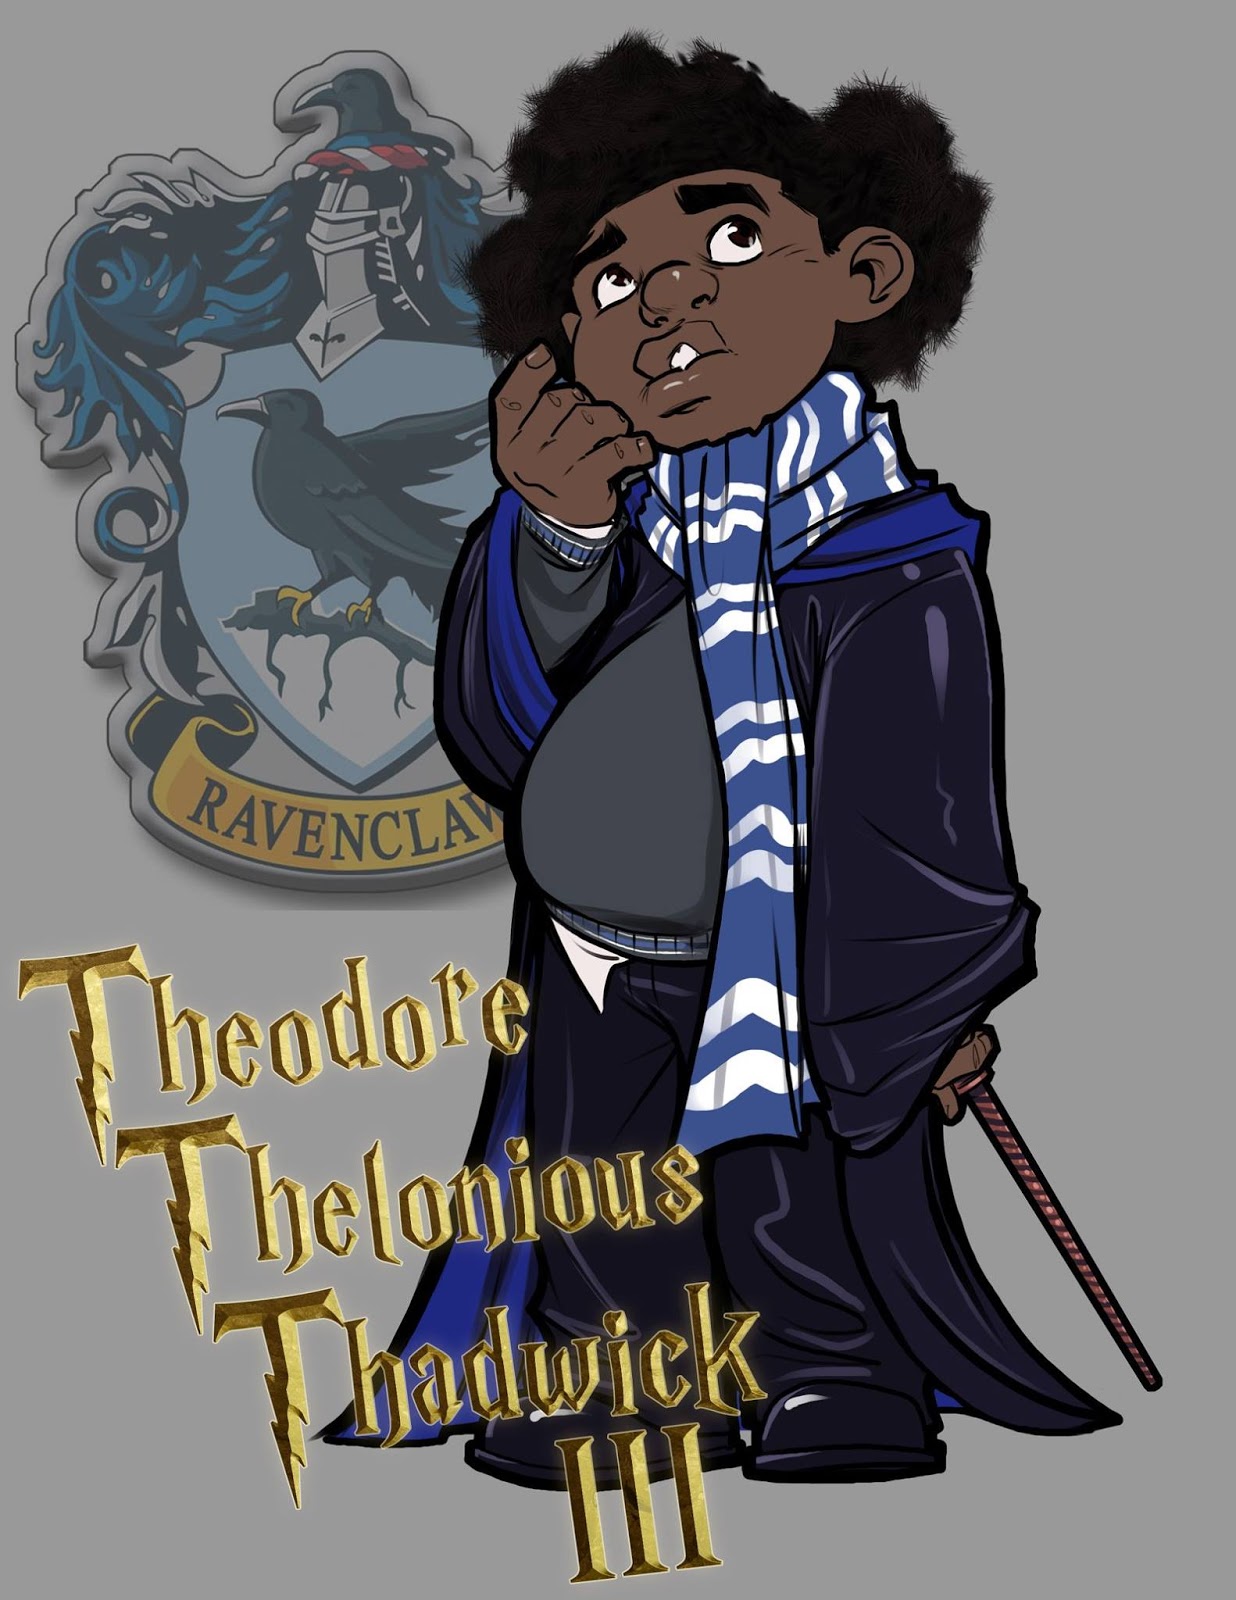 Theodore Thelonius Thadwick III: Theodore is Adam Withers' character (and this is his illustration of him). He's a short Compassionate, Clever, & Studious Ravenclaw first year. His family, who bully him a bit, are all Gryffindors, and he was relieved to be sorted into the house where "Wit beyond measure is man's greatest treasure." He has a pet pygmy owl he calls Captain Hootley and can often be found studying the daily prophet, books in the library, or his own notes to solve the mysteries of the adventure.
 Symphony "Sparks" Chamberlain: Symphony is Comfort Love's character (and this is her illustration of her). Symphony is a first year tough, mischievous, leader who is not happy about being in Ravenclaw or even coming to Hogwarts at all. Her parents were supporters of you-know-who, and after his demise and their placement in Azkaban, she went to live with relatives just before coming to Hogwarts. She'd rather be with her Mom and Dad who she "knows" aren't evil. She's been in detention a few times, docked house points, and even summoned to the Headmaster's office for a talking-to. But, Symphony isn't giving up her idea that Hogwarts is a prison.
  Johnny Claire: Johnny is Jesse Glenn's character (and this is his illustration of him). He's a Mischivious, nimble, charming Ravenclaw first-year with a pet cat named Toblerone Bone. Johnny has purchased banned fireworks from Lukas, wandered the corridors at night, and burgled the Defense against the Dark Arts professor's office with Lukas taking a grey and wrinkled hand of glory. In the most recent session, Johhny found an old slip of parchment in his borrowed homework texts about a mirror on the 4th floor.
 Jack Hume: Jack is Nate Pride's character (and this is his illustration of him). Nate started playing the game a few adventures in when Jesse couldn't join us. We explained the discrepancy with Jack being the patient zero of a Dragon Pox outbreak as soon as he arrived at Hogwarts. By the time Jack was getting well, the Jesse's character Johnny had contracted it and was in the hospital wing getting treatment. Jack is a compassionate, nimble, good-flying first year with a pet toad.
 Gallus Draganov: Our game is taking place the first full school year after Harry's Parents are killed, when he is still a baby and Voldemort was "less than the meanest ghost". Snape has just arrived to teach this year, and so he is not the head of Slytherin House. I created Prof. Draganov to take that mantle. He is also the Defense Against the Dark Art Professor. The players have found that he is from somewhere in Eastern Europe that speaks with a vaguely Russian accent where he was an Auror (Dark Wizard Hunter). I wanted him to look cold and dapper.
  Silvanius Kettleburn: In this time period at Hogwarts, Hagrid did not yet teach Care of Magical Creatures. Up until Harry's third year it was taught by Professor Kettleburn (He retired to spend more time with his remaining limbs). There is some information about him through various Wikis and Pottermore, but I didn't find much of a description of him (other than the specifics of which limbs he is missing). So I blended Col. Mustard from Clue (1972 edition) and Warwick Roost from my Eleanor Oddbody pitch. Baby fire-crabs are crawling on his hat and shoulder to help illustrate his subject.
 Baby Griffin: In the course of the adventure. A wounded baby griffin is found on the school's grounds. The players are trying to figure out what caused it's injuries and if it has any link to some muddy footprints that lead out from an upper window in the Defense Against the Dark Arts Professor's office. What is known is that the griffin ate Lukas' pet toad Olaf. Lukas has no love lost for the beast, which is being co-cared for by Prof. Kettleburn and Hagrid. Theodore (Adam's character) has christened the Griffin "Feathersby"
 Margot Pebblebrook: This 6th year is the female prefect for Ravenclaw and she's also the captain of their Quidditch team. She is tired of the players talking chances that would ruin Ravenclaw's chances of winning the House Cup. In one session, Nate Pride's character, who is good at flying talked to her about possibly seeing if the rules could be bent for him to play on the house team...but since I don't want to contradict the Potter books, no first year will have played on the house team before Harry for about a hundred years and Nate's character Jack has become the equipment manager (giving him access to that equipment, including school brooms). Note: I went with the book's coloring of blue & bronze for Ravenclaw instead of the movie's blue and white/silver
 Aaron A. Aaronson & Kelvin Slydil: With a school full of young witches and wizards, the players need to have some other character names/personalities to bounce off of. These two were characters I didn't give any forethought, but invented in the moments students were needed in the adventure. They are a bit stereotypical in their archetypes. Aaron is inexperienced and excitable while Kelvin is aloof and snotty.
 Filius Flitwick: The familiar and diminutive Charms Professor has shown up many times in the adventure so-far. Not just because he's one of the player's teachers, but because he's also the Ravenclaw head of house. I tried to blend together both movie versions of the character (He was played by Warwick Davis, but after the 2nd movie underwent a dramatic makeeover/re-design) along with my own ideas about Flitwick.
 Professor Albus Percival Wulfric Brian Dumbledore: At the start of the adventure, after the players and their fellow arriving first years traveled across the lake and into the Great Hall for sorting and the start of term feast, it was Dumbledore who gave the exposition for the adventure with his notices and speech. He introduced the teachers and waxed on about how the wizarding world had much to celebrate and recover from with the death last year of Voldemort. And on one occasion, so far, a player has been sent to see the headmaster's office.
 Minerva McGonagall: So-far in the adventure, McGonagall's role has been to sort the first years and a few interactions in Transfiguration class. However, I think she could become a move important NPC as the sessions go on since she is both deputy headmistress and also head of Lukas' house (and therefore the disciplinarian when he ends up in trouble). For my drawing, I tried to avoid the Maggie Smith look and was instead inspire by photos of Margaret Hamilton, the acress who played the Wicked Witch of the West (as well as Ms. Gulch) in the 1939 Wizard of Oz.
 Severus Snape: Besides Potions classes, Snape's most prominent part of the adventure has been when he filled-in for an absent Professor Draganov in Defense Against the Dark Arts. Symphony (Comfort's character) didn't care for his lesson, and so she wrote out suggestions on how he could improve his teaching...and presented it to him the next day at a meal in the great hall. Dumbledore, in a timely fashion, interrupted and escorted Snape off for a nightcap before he could really let Symphony have it (though he did turn the note to smoldering ash in his fingertips).
 Rubeus Hagrid: The most enjoyable NPC for me to play. Having listened to the audio books (both Fry and Dale) I mimic the voice as best as I can while using the character for a bit of humor or help to the players. He's been excited to watch over and care for the wounded baby gryphon. This was my 2nd take on drawing Hagrid for the adventures. I abandoned an earlier version about half-way in because the expression and overall hair shape was just not who I saw as the character.
 Argus Filch: The crotchety, student-hating, and gnarled Hogwarts caretaker has popped up a few times in the adventure, mostly to catch the players out-of-bounds in the castle or roaming around at night. For my drawing of him, I used reference from the actor who played him in the movies: David Bradley. I couldn't really think of any visual way to improve on that actor's portrayal of Filch, so I went with it.
 Pomona Sprout: As head of Hufflepuff House, she's had little to do so-far in the game (No players or NPCs are Hufflepuff students), but she has made an appearance in teaching the players lessons about magical plants like Dragon's Snare. Part of the trouble of roleplaying Hogwarts lessons, is that Rowling doesn't elaborate on what students learn in several classes at various years, so unless I have a specific need for play players to know about a spell or plant, we often gloss over those lessons. For my depiction of her, I wanted to shift away from the movie actress to a friendlier face like that of character actress Pert Kelton (Music Man).
 Cuthbert Binns: His classes in the books are described as boring and dull, so we don't spend much time roleplaying out anything happening in his class...usually it something like "In the afternoon you move from class to class, in History of Magic Binns droned on about a conference of troll lawmakers and it was briefly made entertaining when an escaped turtle sporting a teapot for a shell came meandering into the room from a transfiguration class." I looked at Michael Palin for my depiction of Binns.
 Xanthus Reynard: A business man in the publishing of magical books and tomes. He also collects rare books and, at times opens up his usually locked shop for used books and parchments in Hogsmeade called "Reynards Rare Tomes and Scrolls". The players have yet to meet this character (though he's been referenced...so if Adam, Nate, Comfort or Jesse are reading this, it's their first glimpse of him.
 Ragnod: This goblin is hiding out on one of the small islands in the lake. The 1st year players saw a light flickering somewhere across the water when they crossed the lake in the boats with Hagrid on their first night at Hogwarts. After finding a magical way of summoning boats once used for the now-defunct house crew teams, the players discovered this crusty and salty diminutive goblin with a campsite working away on goblin-made craft-works...notably defying the Code of Wand use from 1691 by crafting & testing wands himself.
 Death Eaters: As this is taking place the year after Voldemort & Harry's parents were killed, there are still Death Eaters on the loose. Sure, many of them have been sent to Azkaban, or are on trial, or in hiding from Aurors...but that's not to say that a few brazen ones couldn't don their hooded masks and cause some chaos. And a few have been brazen enough to test the school boundaries when not making a mess of Hogsmeade.
 Oleg the Salamander: in the latest session, the players found it odd that Lukas had been sneaking around with fire, most recently in a lantern he'd tuck away between classes). They discovered that to replace his deceased toad Olaf, Lukas had pilfered a salamander used for third year Care of Magical creatures classes. Salamanders will only live as long as the fire they are born from continues to burn. So Lukas keeps his new pet alive by keeping the flame lit in the lantern.
If you enjoyed these original Harry Potter inspired drawings, I've putting most of the original rendered pencil drawings up for sale in my online store: http://mouseguard.bigcartel.com/category/non-mouse-original-art
2015 Appearances:
Long Beach Comic Con: Sept. 12-13
Baltimore Comic Con Sept. 25-27
New York Comic Con Oct. 8-11
Art-Bubble Comics Festival: Copenhagen: Nov. 14-15
August 25, 2015
Mouse Guard color video #9
For this week's blogpost I colored a inked Mouse Guard character portrait piece I did for a charity auction. I recorded the process of coloring it in Photoshop and speed up the result x8. Here is the video:
direct link to watch the video on Vimeo:
https://vimeo.com/112832260
Here is a better look at the original inks and the finished piece:


To see more coloring videos visit my Vimeo Video Page:https://vimeo.com/mouseguard/videos
2015 Appearances:Long Beach Comic Con: Sept. 12-13Baltimore Comic Con Sept. 25-27New York Comic Con Oct. 8-11Art-Bubble Comics Festival: Copenhagen: Nov. 14-15
August 18, 2015
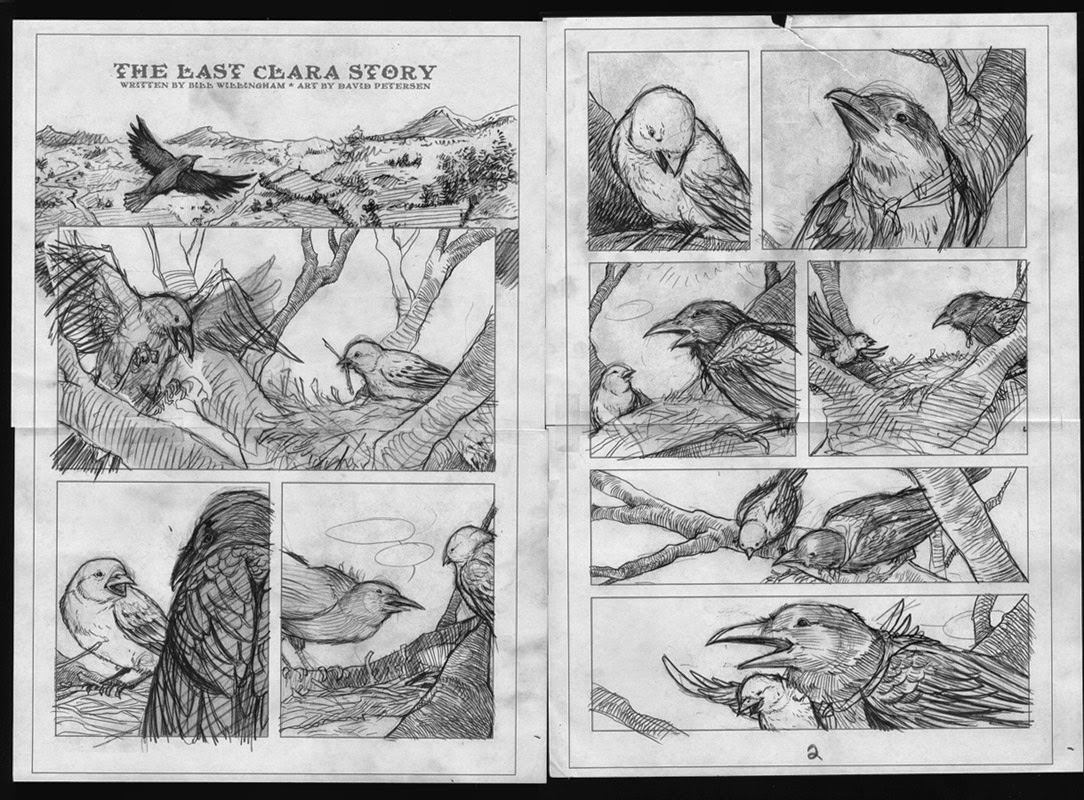
Fables 150: The Last Clara Story
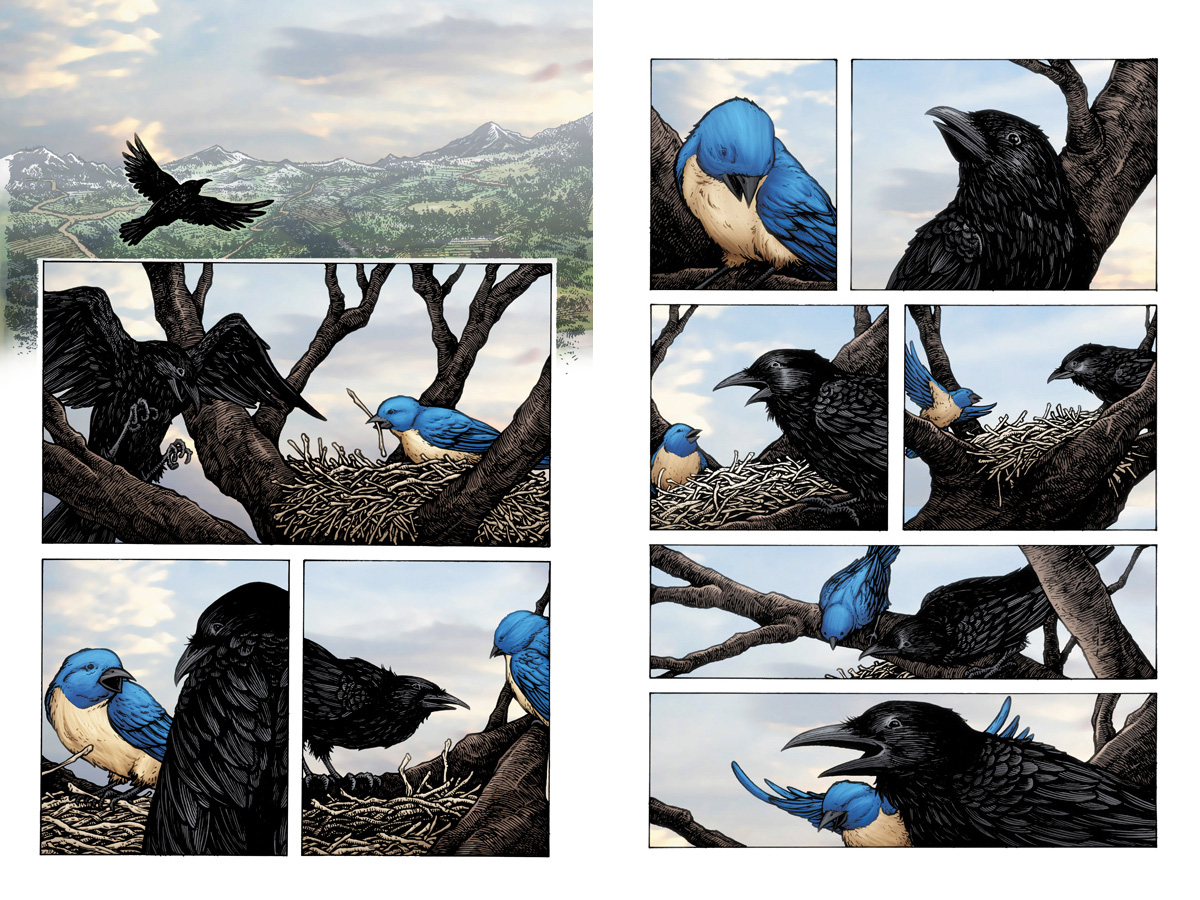
 #150 marks the last issue of Fables. Bill Willingham, who'd contributed a Legends of the Guard story for Volume 2, and had previously asked me to contribute to House of Mystery, asked me to do a 2 page story about the raven Clara. This last "issue" of Fables, which has been out for a bit now, features a great many talented contributors and comes in at 160 pages and is more like a trade paperback than any "issue" you've ever seen.
For today's blogpost I'll be going over my pages for "The Last Clara Story" and the process for getting them done.
 Bill's script was broke the first page into four panels where Clara flies over distant lands and then descends into the crook of a tree to visit with a certain bluebird. The rest of that page and the six panels of page 2 are their conversation (note: I'm being a bit vague here to not spoil the story details).
Over the course of several pieces of copy paper, I sketched out each panel's scene or key element. I tired to incorporate camera angles and/or body language that worked with the dialogue of each panel
 Then I scanned in the pencil sketches and laid them out as pages in Photoshop. Here I was able re-size my sketches and play with panel sizes until everything fit as a page that could still flow for readability. This is also a moment when I can make changes to drawings by enlarging or shrinking elements if I've drawn them out of proportion. The digital composite is then printed out at full size on sheets of copy paper (and taped back together seen here).
 The next step is to ink the pages. I tape the printout to the back of sheets of bristol board. The bristol is the surface I'll ink on. Using a lightbox, I can see through the bristol down to the printout. I use the printout like other artists use pencils, but with my way, I didn't have to draw everything on the page and I don't have to erase the pencils when I'm done. To the right you can see a panel in progress of being inked. I use Copic Multiliners for the linework.
Below you can see both pages fully inked.


This story marks the first time I've not colored my own work for publication. Andrew Dalhouse colored this story for the book and I think he did a great job. Especially with that opening shot of Clara flying high over the landscape.
So farewell to Fables. I look forward to what Bill Willingham and Mark Buckingham have in store for their fans next.
2015 Appearances:Long Beach Comic Con: Sept. 12-13Baltimore Comic Con Sept. 25-27New York Comic Con Oct. 8-11Art-Bubble Comics Festival: Copenhagen: Nov. 14-15
August 11, 2015
Luna Lovegood's Lion Hat
 For her first trip to the San Diego Comic Con this year, my niece Kate said that she wanted to cosplay. Because I'm exhibiting and wouldn't be able to go back and forth with her to the hotel, I suggested that she pick something that was as comfortable to wear as her everyday clothes, no heavy props, no elaborate makeup, no thick bulky costumes. She said she wanted to go as Luna Lovegood from the Harry Potter books...but Luna when she was wearing her lion hat and supporting Gryffindor. The only hitch was, she and her mom could source everything she needed..except the lion hat. So she asked me to help.
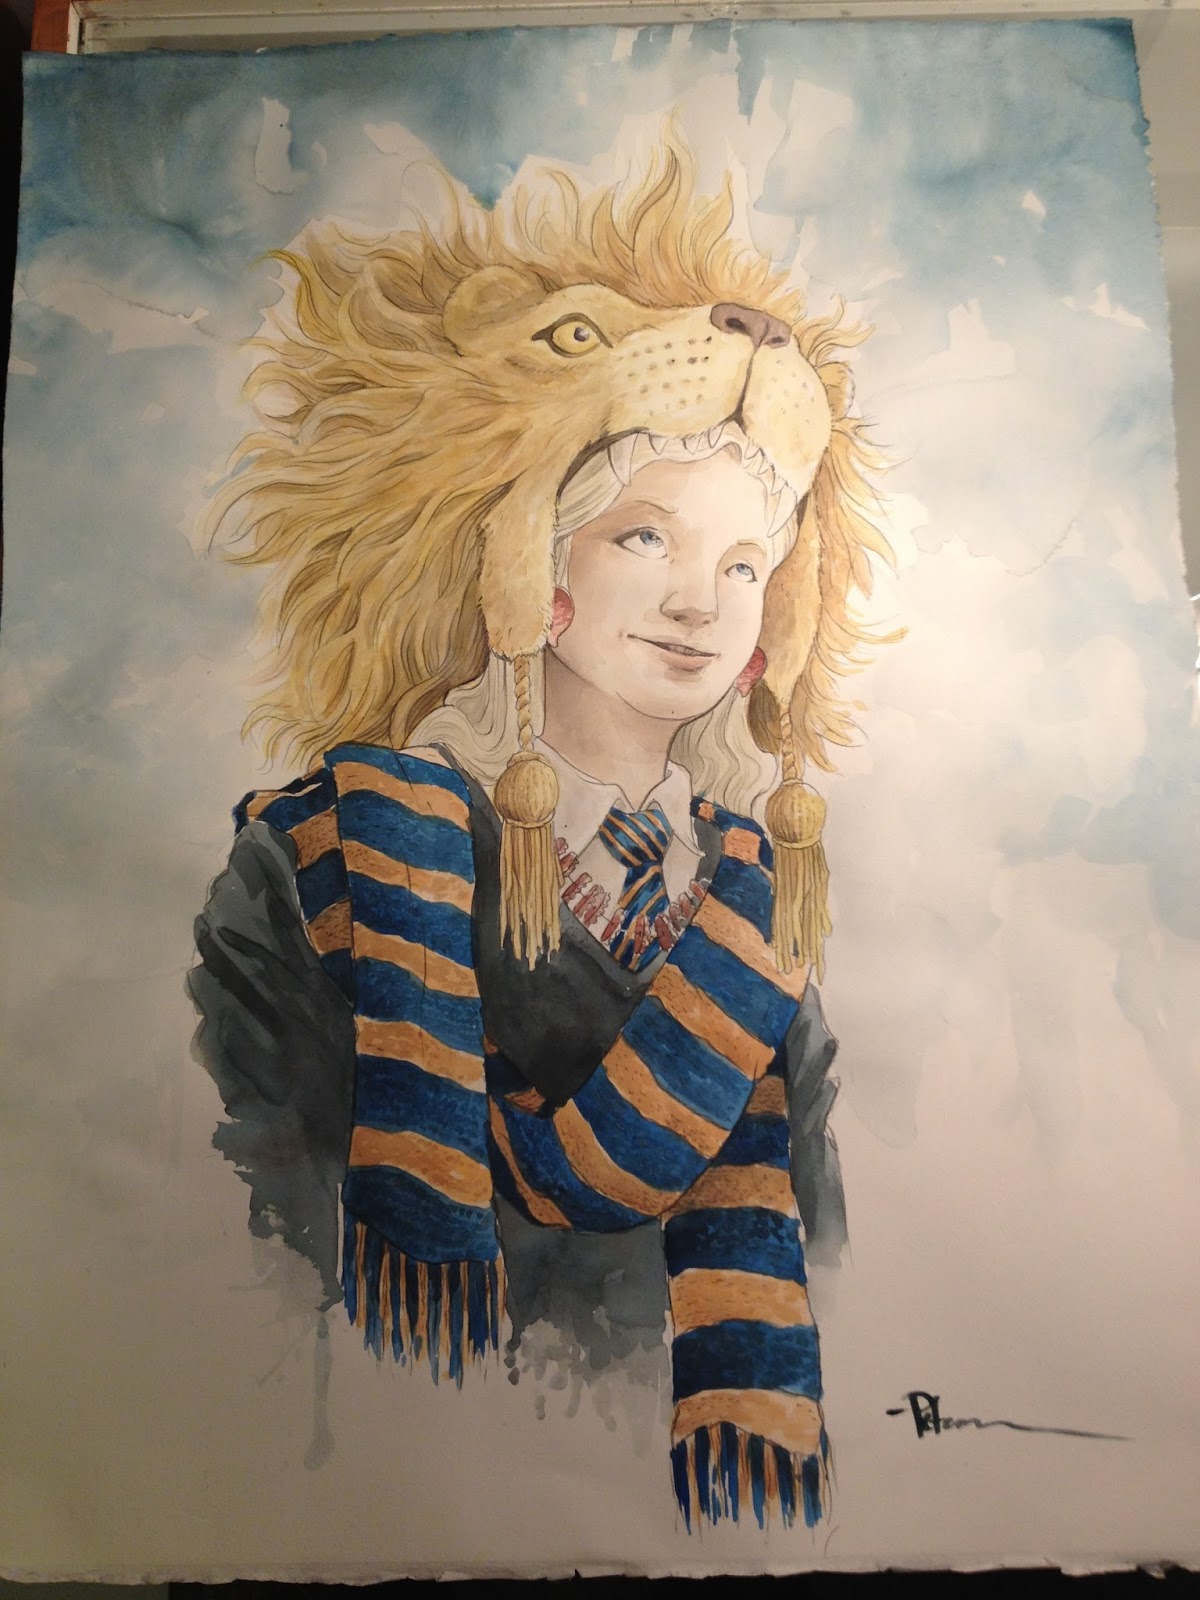 We looked at the version of the hat from the movie, but I'd done a painting of Luna in that hat where I thought my design would work better. The materials were ones that I could obtain and they would also pack well and not end up damaged inside of luggage. The tassels & ear flaps were also something I'd included in the painting that I hoped I could pull off for Kate's hat.
 For materials, Kate and I made a run to a fabric store to get some craft furs, something for the mane, and other misc. The green roll is upholstery foam that I used to make the understructure form of the lion's head. For the mane, I'd planned to do it all with feathers, but a combination of knowing how MANY packets of ostritch feathers from the craft store and the fact that the colors were too stock YELLOW or ORANGE for our more natural fur color meant we went for something different: yarns. I didn't use any thread to sew the hat or any component of it...everything was done with the crafter's best weapon: Hot Melt Glue!
 Unfortunately, I didn't get process photos of the head when I was working the foam shapes or starting to cover the head with the different furs. This is the earliest photo I have of the process when I got the golden fur attached to one side of the hat & flap and glued on an ear. To get the fur to conform to the foam's contour, I just draped the fur over top and then would start making cuts where the fur puckered and wouldn't lay flat. A little drop of HMG to tack it down and then work on to the next area.
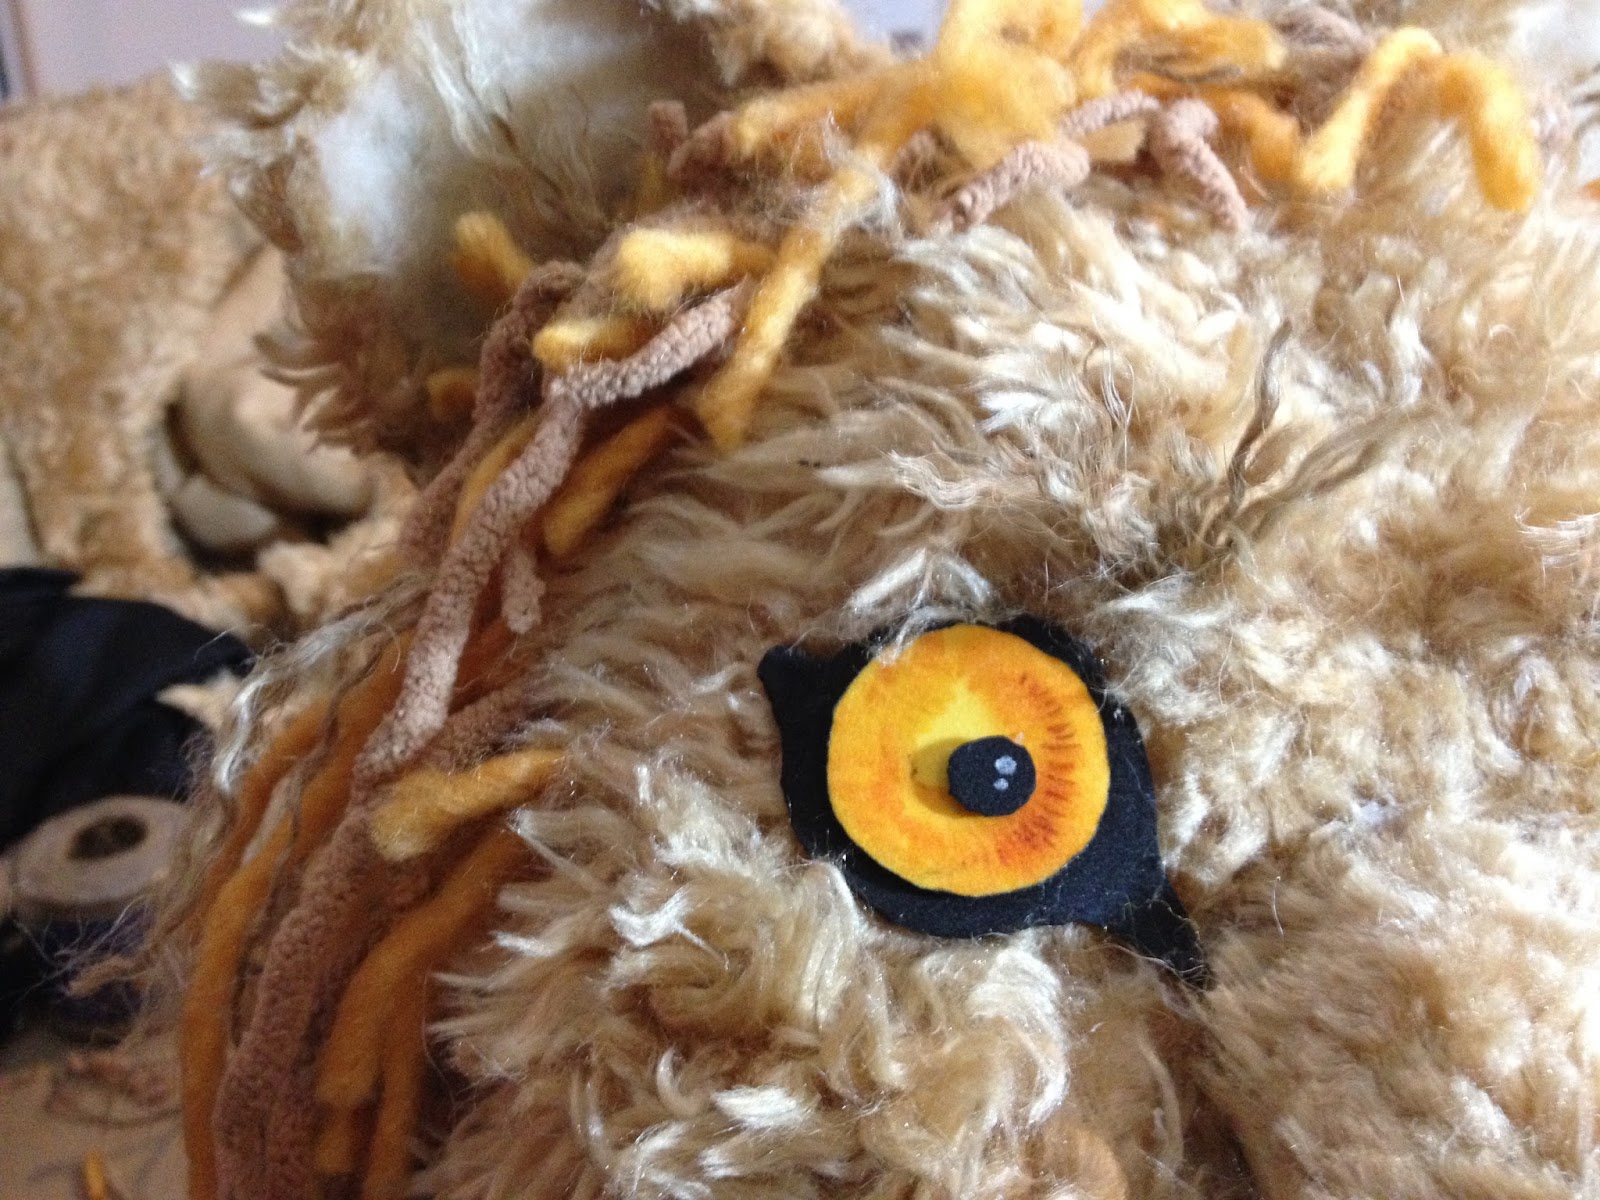 Originally the eyes were going to be these made of yellow and black craft-foam sheets. I used copic markers to add some tone and details to the iris, but ultimately, Julia suggested I use some taxidermy eyes I had stored away (for the same puppetry project I had the fur on-hand for) and we didn't use the flat eyes.
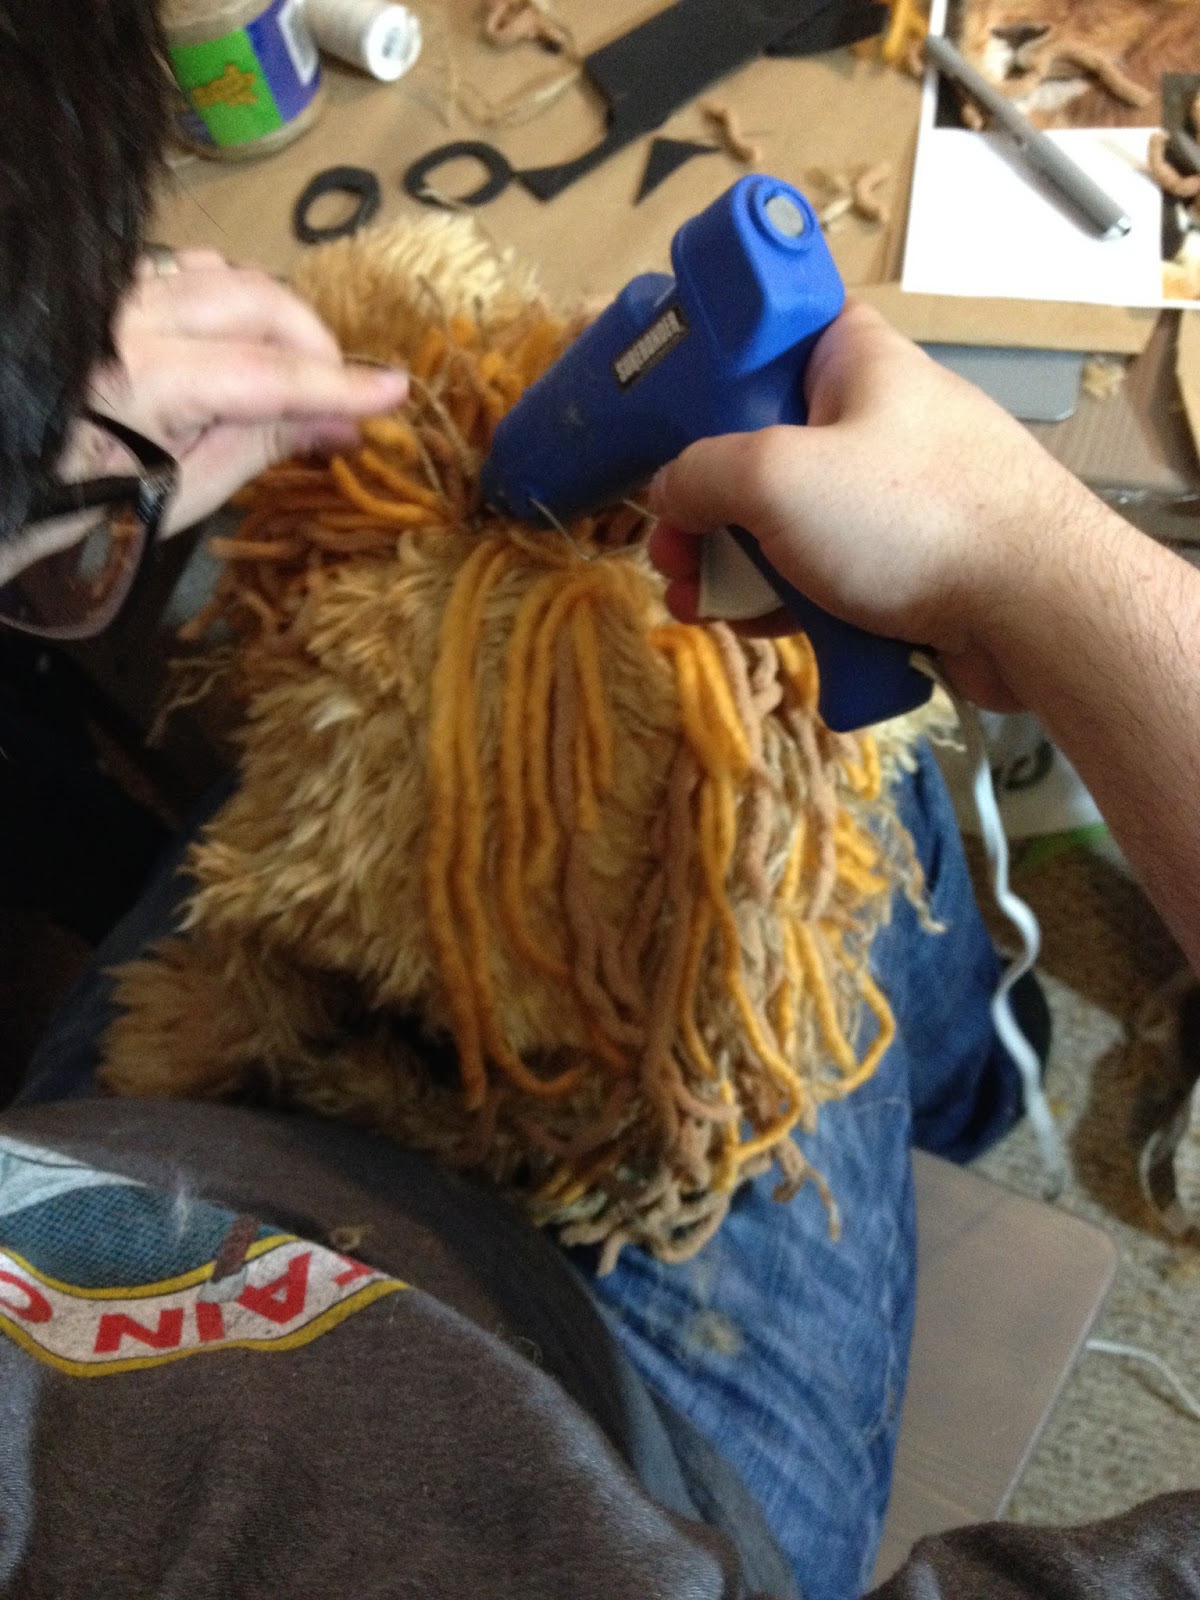 The longest part of the whole process was the mane. I'd take a length of yarn, tie a knot in the middle and glue the knot to the hat so that each glueing resulted in two strands of mane-hair. I glued and knotted and trimmed, and cut, and knotted, and glued for many hours before there was enough mane to look like a bulk of lion hair instead of a sad craft project.
 Kate helped me on and off, but most of the glueing and cutting was a one man opperation, so she worked on a coloring project of her own. Julia sat and pre-cut lengths of yarn at different lengths and knotted them for me, and as always offered her opinion and suggestions for how to improve the hat. She noticed I would get clumps of the same color, and helped point out where I needed to blend in the two colors of yarn and the natural twine in so the mane looked more natural and even.Here are a few last shots of the Lion hat from that night after it was finished, including one of Kate wearing it and one of me wearing it.


Oh, and I also strung up some unused wine corks so Kate's Luna could wear her Butterbeer-cork necklace around SDCC.

2015 Appearances:Long Beach Comic Con: Sept. 12-13Baltimore Comic Con Sept. 25-27New York Comic Con Oct. 8-11Art-Bubble Comics Festival: Copenhagen: Nov. 14-15
August 4, 2015
Treepens Emporium Wands
 Last Christmas, I tried my hand at wandmaking. I like woodworking and chances to work with my hands, so as gifts for my three nieces, I set out to make some wands. However, I wanted to put my own artistic voice in them, so instead of trying to pass these off as some other wand-maker, I opted to scramble the letters in "David Petersen" to become "Vidad Treepens". To the left is a logo I created for the tags.
 I went to my local woodworking supply and found 1" x 1" x 14" stock (I assume for turning wooden pen holders on a lathe) in exotic woods. Grabbing a handful, I made a wand for each niece. Some of the work was done on a jigsaw, some was done with a knife, but most was done with a Dremmel. The styles of the wands were a combination of the wood kinda telling me what shape it wanted to become, and something to echo the personality of the niece who would own it.
 To dress up the gifts, I bought thin wooden boxes with sliding lids, packed them with magical looking fabric, and tea stained some tags affixed with tassels to each wand. The labels were then filled out with the wood species, length and other info. Julia's handwriting is beautiful, so I had her write on the tags. The nieces were all very happy with their gifts, and I was happy to have made them.
 Cut to June of this year. One of my best friends, Jeremy Bastian, was having a birthday, and instead of drawing him something, I decided he too needed a wand. Back at the same woodworking supply shop, I picked up some more of those 1" x 1" x 14" hardwoods (Black & White Ebony and Cocobolo this time) along with a scrap of Black Walnut and a Banksia pod. I'd seen the pods turned on a lathe to make little flower vases, but figured it might make a really cool wand grip.
 Because it was June and not cold like when I made my niece's wands, I could comfortably work outside and use more tools. I used a jigsaw to cut down the rough shape of the wand to get the taper and establish where the grip ended and the wand-shaft began. I also used an old bench grinder my grandfather made out of a broken washing machine's motor. The grinding wheel on it is in need of replacing anyhow, so I didn't mind mis-using the tool to do some more of the rough shaping.
 Further details and contours were done with a knife and a Dremmel (I didn't get a photo of me using the Dremmel unfortunately). Like before the wood kind of "talks" and you make cuts and shave away bits. I was reminded of Michelangelo's idea that the figure it trapped inside of the marble already and that he just carved around it to free it. The intended recipient also plays a part in the look and feel of the wand, but I think the wood has more to say on the subject...
 Besides Jeremy, I'd also decided that I wanted to gift two people from Archaia/BOOM! with wands: My editor Cameron Chittock for his awesome hard work on the Art Of Mouse Guard Book, and Irene Braddish for helping Julia and I with hotel and badges for our nieces who we took with us this year. Jeremy's wand (center) I'd always intended to be the Banksia pod with a Walnut shaft. The Black & White ebony was speaking to me as Irene's...so I started crafting the Cocobolo for Cam....but the wand that was emerging from that piece of wood just didn't feel like Cam to me.
 So I went through my other wood stock options. I had more walnut, a piece of Black Palm I didn't use back when I made the nieces' wands, and some oak. I think I had wand fever by this point. But I thought "As long as I'm already making the mess, why not use up the stock". As I started with a rough shape in the oak on the jigsaw, it was obvious that wand was to be Cameron's. Here are the rough starts to the new Oak, Walnut, & Palm wands along with a more refined Cocobolo and Jeremy & Irene's wands.
 After the creation of a lot of sawdust with the Dremmel, it was time to sand down the wands to get them super smooth for stain and finish. I only used 3 different colors of stain on these seven wands (The pine one third from bottom was one I'd carved all by hand before I made my nieces' wands, but it still needed to be finished). The stain was rubbed on, then left to dry overnight before I sealed them with a spray urethane. Unfortunaely, the can or urethane I used didn't dry super-dry. It felt a bit tacky to the touch even after a day of drying. (the can says it drys in 4 hours!)
  To counteract the tackiness, I buffed out each wand on a buffing wheel to get them feeling "like glass" Julia says. It's a long process that heats up the finish and hardens it as I go. A few of the wands needed to be tricked out even more after the buffing. The oak wand for Cam (middle) got a cool turkish style tassel added to the grip's opening, and the Walnut wand to the left of it got a leather wound grip. "Vidad Treepens" had set out to make 1 wand and ended with 6 new wands.
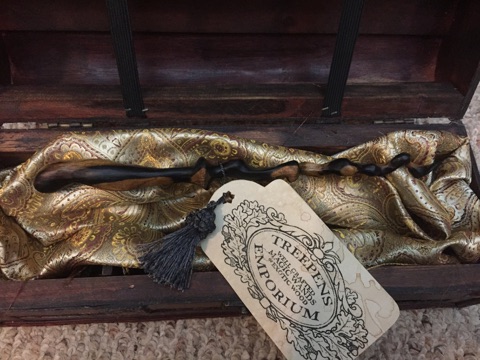
 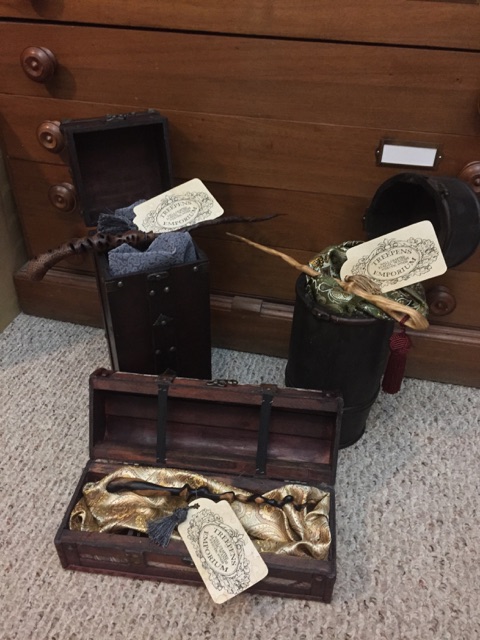 For the three wands being immediately given as gifts, I ordered wine boxes to use as the storage container. I couldn't source the same boxes I'd used in December for my nieces' wands, and while online found these instead. They are bigger, but a lot more decorative and distinctive. The tags were printed and coffee stained with Julia handwriting the specifics of each wand for their owners:Jeremy's: Banksia & Walnut, 14-3/4"Cam's: Oak, 13-1/4"Irene's: Black & White Ebony, 10-1/2"


I then decided to exhaust my hardwood supplier's selection of small pieces and made another batch of wands. I'd received enough interest from fans of my work who were interested in the possibility of owning a 'Treepens' Wand that I plan on offering this batch up for sale. To purchase, go to my online store: http://mouseguard.bigcartel.com/category/wands
You can see a lineup of many of these to the left, and below are individual detail photos of all the wands.
 Banksia wand grip
 Oak Grip with tassel
 Black & White Ebony Wand 10-1/2"
 Black Palm Wand 11-1/2"
 Walnut Wand 11-1/2"
 Cocobolo Wand 11-3/4"
 Black Palm Wand 12-1/4"
 Olive Wood 11"
 Leopard Wood Wand 13-1/4"
 Madrone Burl Wand 11"
 Leopard Wood Wand 13"
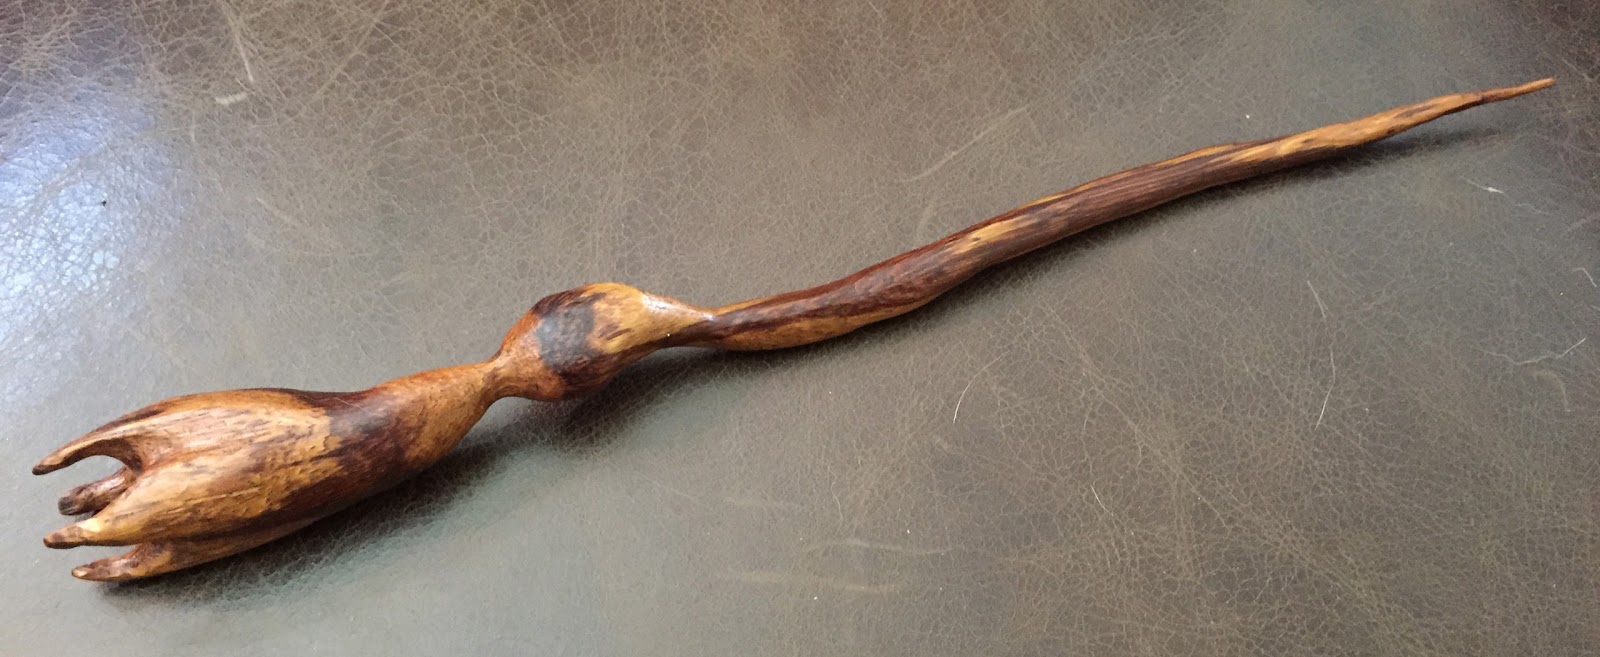 Marblewood Wand 12"
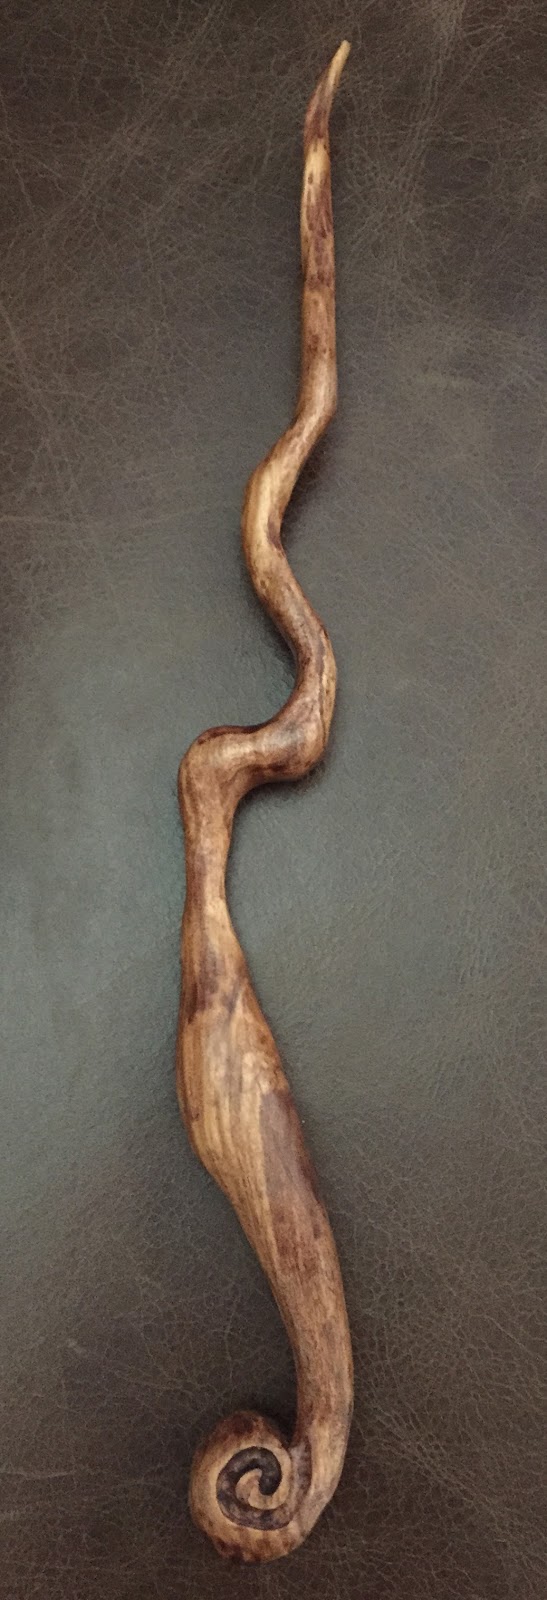 Olive Wood Wand 11-3/4"
 Shedua Wand 12"
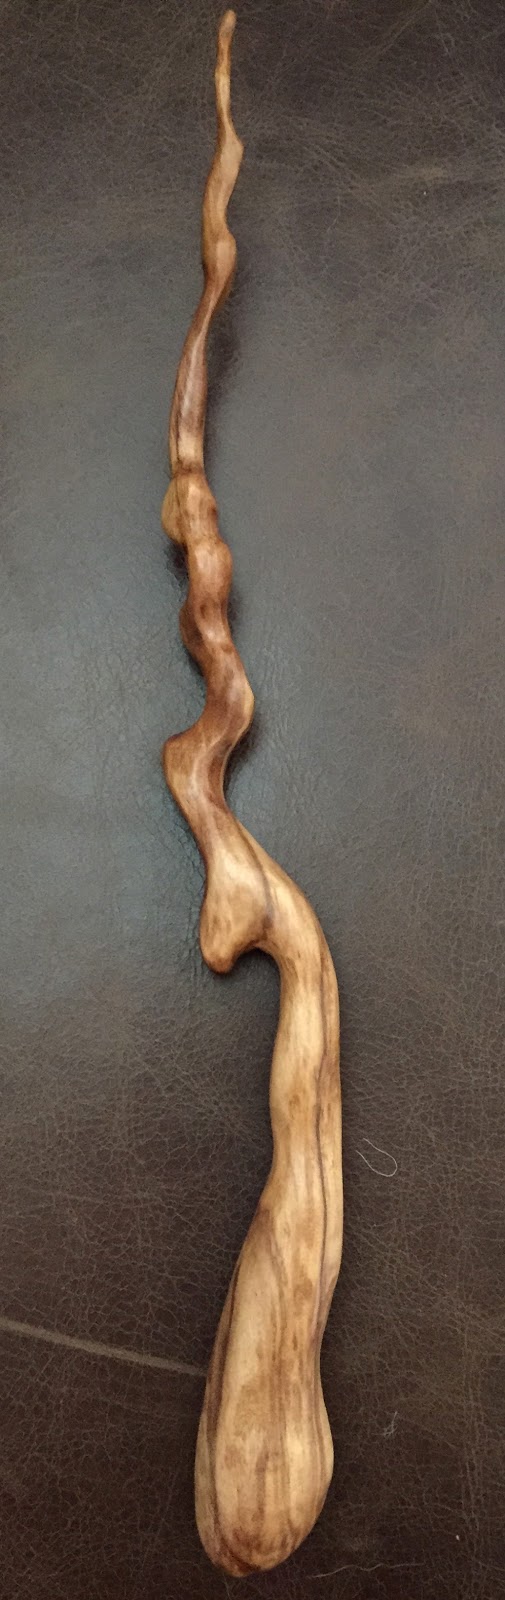 Olive Wood Wand 12-1/4"
 Teak Wand 10-1/4"
 Black Walnut Wand 10-1/8"
 It was fun to get back to some woodworking, make some gifts for people, and get away from the drawing board. But I didn't realize how time consuming it was to do the wands the way I wanted to. At most, I could get 2 wands fully carved in a day (though one day I did get 3 done...but it was a long day) And that didn't factor in all of the staining, and finishing (and their drying times.) I don't know when or if I'll be afforded the time to make any more of these. So consider Vidad Treepens retired for the time being.
 2015 Appearances:Long Beach Comic Con: Sept. 12-13Baltimore Comic Con Sept. 25-27New York Comic Con Oct. 8-11Art-Bubble Comics Festival: Copenhagen: Nov. 14-15
David Petersen's Blog

- David Petersen's profile
- 339 followers
David Petersen isn't a Goodreads Author
(yet),
but they
do have a blog,
so here are some recent posts imported from
their feed.

