
David Petersen's Blog, page 52
December 15, 2015
From the Vault: Jesters
 While doing some sorting in my studio, I cam across 10 pages of a comic Jesse Glenn (The real-life Kenzie) and I worked on together at the turn of the century. So for today's blogpost, I'm opening "The Vault" and sharing with you the origin & concepts for JESTERS as well as all of the pages that were completed, and two recent drawings I did of the characters.
Part of the reason for sharing this is that after the Art Of Mouse Guard came out, I realized how cathartic and rewarding for others it can be to share embarrassing older work, to show artistic development and that everyone has work they are no longer proud of.
 Jesters started as Halloween costumes in 1995 Jesse cobbled together for he & I. The only store bought elements were the hats; the sashes were National Honors Society sashes, the shirts were old ones of Jesse's, and the chords were from High School Honors. After the Halloween party where these were used, I couldn't help but think that these characters would be a good starting point for a comic story. Two medieval spies, swashbucklers, and adventurers, who are loyal to the king, pose as fools to infiltrate enemy monarch's courts, and merchant's feasts in service to their king. Who would suspect the Jesters?
 But, it wasn't until 2000, when Jesse started writing a script that anything more came of it. Jess had just re-read some Alexander Dumas that inspired him to craft a banter-filled story about political intrigue with the king and our heroes mistakenly jailed at the start. Jesse didn't break the script up into pages or panels, so I just started making notes on the printed script pages for where I though good breaks were or where I thought was the limit of what I could fit on a single page.
It was my first time illustrating comic pages from a written script (and echoes of this process are still with me in Mouse Guard today)
 To the right are two watercolored "covers" (I don't know how I thought these could work as covers...each only showing half of the duo...and in no context...or even background.
Below are the 10 finished pages (as much as Jesse had produced script for). I was still in my phase of trying to emulate Mike Mignola's work to cover up my shortcomings at illustrating (especially when drawing people)
JESTERS PAGES2000-2001


Now for the growth part of the post. I have no plans to do anything with JESTERS at the present time, but these old characters still rattle around inside my head and every now and then ask to be let out and updated. I find it a useful exercise (us the From the Vault tag at the bottom of this post to see more examples).
 The first of these was drawn & rendered in pencil and then digitally colored and manipulated. I stuck closely here with the original designs of the characters costumes (though I avoided the Insane Clown Posse-style face paint and just hinted at the happy and sad faces a bit more subtlety.
  And the second was done all in grey Copic markers (I'd originally planned to paint them in watercolor, but for some reason I broke out my rarely used markers instead) and digitally colored. Here I deviated from their original costumes, not just in style, but also in color (making a nod to the Saxon & Kenzie nature of the two)
As I said, I don't know if Jesse or I will ever do anything with Jesters, but digging out the old work, reviewing old files, and making some new artwork feels like visiting old friends.


December 8, 2015
Scratch-built Strandbeest model
 After watchine a video Adam Savage linked to early this year, I became fascinated with Theo Jansen's Strandbeests. And while my niece Emma was staying with us for a birthday weekend, I showed her the videos of various Strandbeests walking on the beach. She was captivated. And I thought it would be nice to build a table-top model of one...but instead of buying a kit, I opted that Emma and I should scratch build one together. I watched a few more videos, and looked at a few of the model kits online, then Emma and I hit a craft store or two and bought various sizes of popsicle sticks, dowels, florist's wire, round toothpicks, and glue.
 I'd broken down the leg into a simple diagram I traced on to the craft paper we used to protect my dining room table. On the right you can see a single leg assembly with the diagram on the paper below. Once we had our plan, and I could visually decribe to Emma what we were doing, I put her to work cutting and drilling popsicle sticks, and then glueing sub-assemblies. Emma had never used a hobby knife or a drill before, so it was exciting for me to teach her how to use them, and exciting for her to do something so new to her.
  After hours and hours, Emma conked out, and I finished the assembly in the wee digits of the morning. But, it still needed fine tuning. The model Strandbeest has sat in my studio since March, unfinished and fragile, until I got the urge a few weeks ago to repair, tweak, and polish off the last bits of the model. To the left, you can see the finished version, which may not look too different from the older photos above... Directly below, you can watch a video of our hand-crank model in action, then further below, I'll document some details and share the rough plans.
Popsicle Stick Strandbeest from David Petersen on Vimeo.
 I put clear tubing spacers between each leg joint to allow less wiggle and slop as everything moved
 The front chassis that holds the axles was never completed originally. So, I completed what needed to be done, and reinforced both ends to prevent racking and to avoid catastrophe.
 All of the moving joints are pinned with round toothpicks that have smaller cuttings of the same material glued across the ends to form a capital "I" shape. Many of these needed minor repairs and re-gluing.
 With the chassis secured, I was able to trim down the length of the axles. I left a bit of them showing so that seeing the crafted materials were part of the model's charm.
 Rough plans & notes for those inspired enough to try their own hands at one.
December 1, 2015
Swords & Strongholds Videos
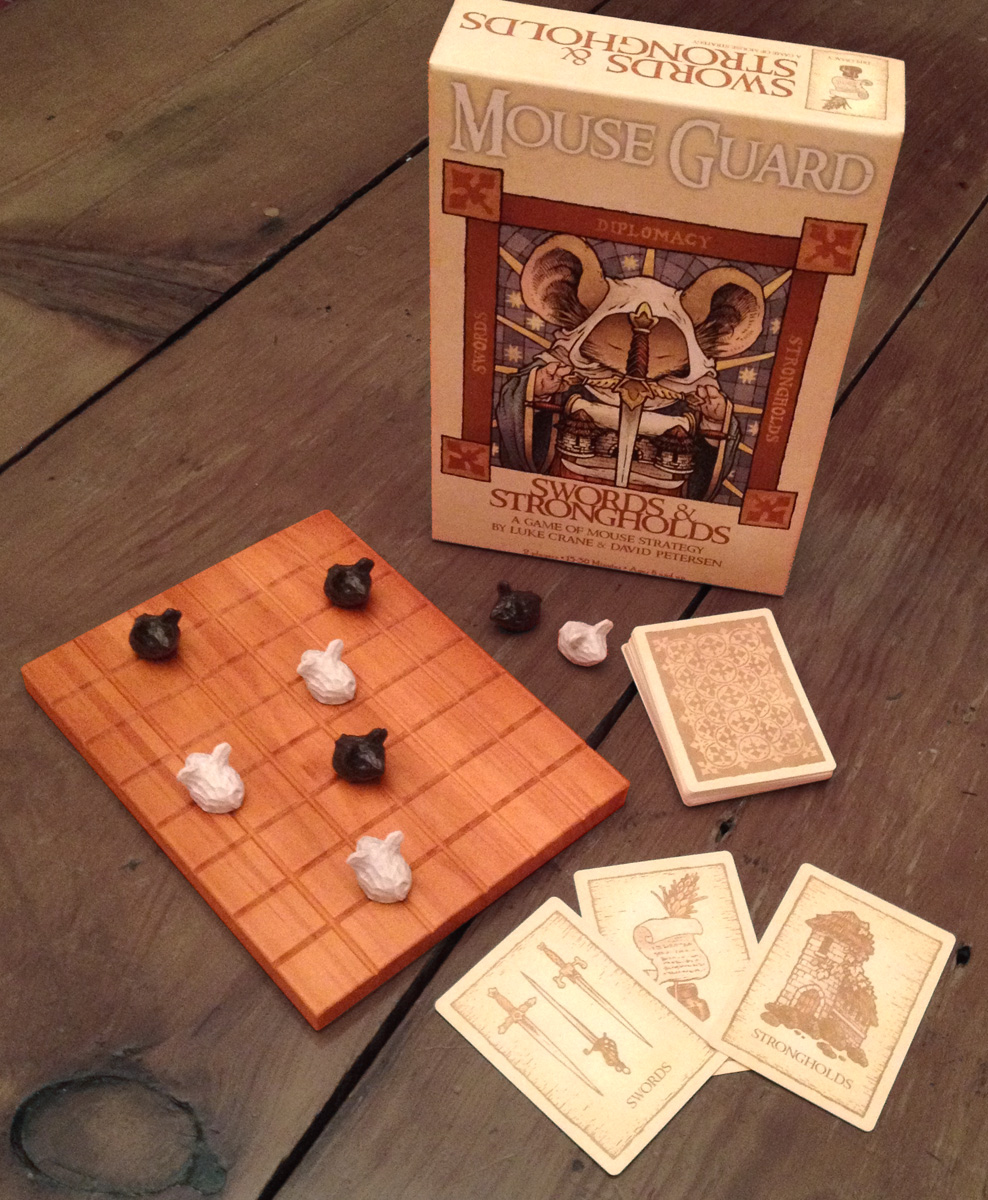 With the Mouse Guard board game Swords & Strongholds now available to everyone, I wanted to publish a blogpost with all the information for the game in one place.
This is a two player game of mouse strategy from the pages of Mouse Guard. It takes 15-30 minutes to play and comes with a wooden game board, 8 mouse pawns, a deck of 30 cards, and a rule sheet. (at the bottom of this post you can find ordering info)
Luke Crane & I (with the help of the guys from the Geek Nights podcast) made 3 videos to show how to play, answer questions and show and example of a full game played:
Game Rules & How To Play
Common Questions: FAQ & Clarifications
Play Example: Luke vs David
Purchasing info:
Swords & Strongholds is $30 and available for direct purchase here:
https://www.burningwheel.com/store/index.php/mouse-guard-swords-strongholds.htmlhttps://www.burningwheel.com/store/index.php/mouse-guard-swords-strongholds.html
The game is also distributed through Diamond and Alliance, so your local comic or game shop can order copies to stock their shelves with.
2016 Appearance Dates coming soon.
November 24, 2015
Recent Commissions
This week I'm sharing commission pieces done for my last few conventions of 2015.
 Monty Python Holy Grail scene as mice(full process blogpost here)
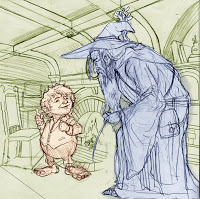
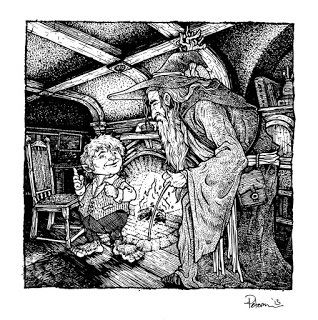 Gandalf & Bilbo in Bag End(Pencil composite layout below)
 Musical mouse playing the harp to a fox
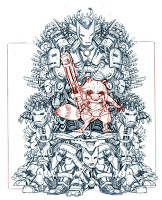
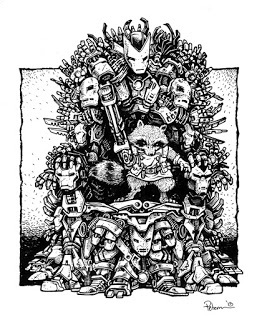 Rocket Raccoon atop the Iron-Man throne for a Marvel-GoT mashup(Pencil composite rough below)
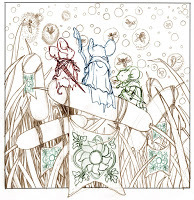
 Saxon, Kenzie, & Lieam enjoying a Summer festival of fireflies(pencil composite below)
 Mr. Sunflower from Fables being observed by Guardmice(pencil composte sketch below)

 Monty Python Holy Grail scene as mice(full process blogpost here)
 Gandalf & Bilbo in Bag End(Pencil composite layout below)
 Musical mouse playing the harp to a fox
 Rocket Raccoon atop the Iron-Man throne for a Marvel-GoT mashup(Pencil composite rough below)

 Saxon, Kenzie, & Lieam enjoying a Summer festival of fireflies(pencil composite below)
 Mr. Sunflower from Fables being observed by Guardmice(pencil composte sketch below)
November 17, 2015
Spongebob Comics #50 Pinup Process
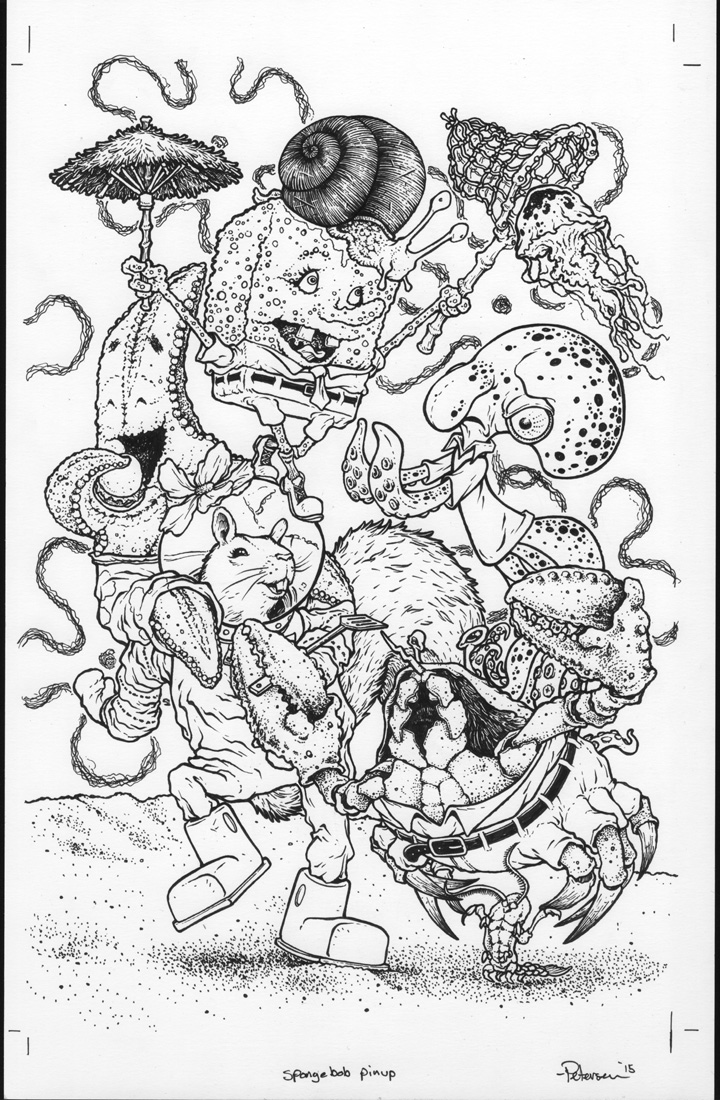
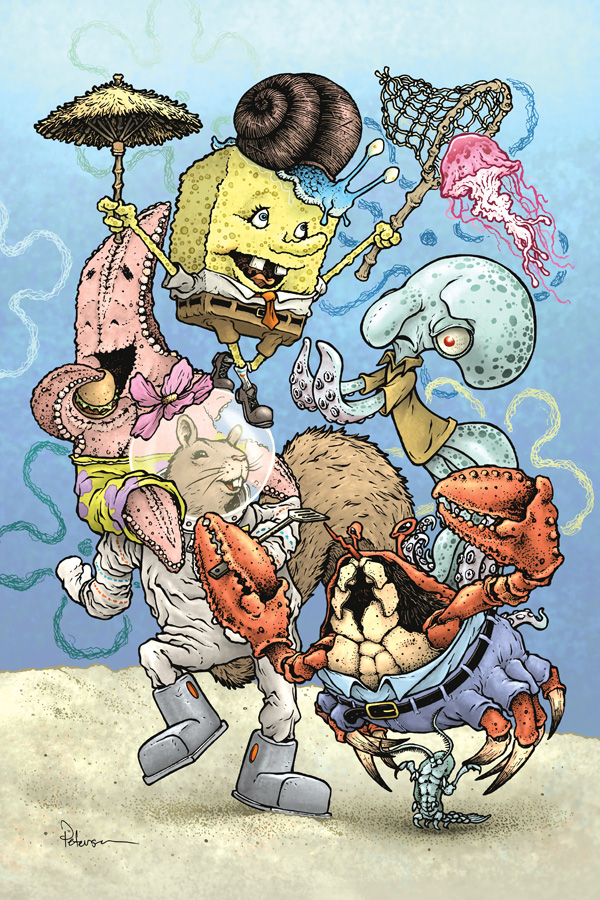 I was aksed by Spongebob Comics editor Chris Duffy to contribute a pinup for the Spongebob #50 issue. I watched some Spongebob shows back when my nieces were very little, so the job sounded fun and I took it. To the left you can see the final art, but in this week's blogpost below, I go through the step-bystep process to create the artwork for this pinup.
 Sketches & 1st Layout: Chris asked that I make sure I included Sandy Cheeks (the squirrel character) since I'm known for drawing furry woodland creatures. I'd been planning on doing Squidward, but decided to go for his suggestion of including Sandy, and while I was at it, include the entire main cast. I only had the rough idea that the characters would be piled up perhaps 3 people high, in some underwater, friendly-rivalry game of chicken. I drew Sandy more like I would in Mouse Guard, though still stylized, and then all the other characters closer to on-model from the show.
 I assembled these sketches in Photoshop into a composition. I tinted each character to help me see who was who in a mess of overlapping grey sketches. I didn't know how all the characters would stack, but fooled around with it until I had something that worked. Luckily there even seems to be a bit or a narrative: Spongebob is trying to catch a jellyfish, Patrick is eating a Krabby Patty, Sandy is having fun with her friends, while Mr. Krabs is angry at Patrick for eating an unpaid-for meal, and Squidward wants nothing to do with the antics of all involved. Oh and Gary the Snail is meowing...I just didn't add a word balloon.
Turned this in for approval and......
 Got a note back about the characters. The problem was two-fold. The characters were close to on-model, but not close enough...so that it looked unsettling....and that was also because I'd drawn Sandy purposely off model, so she didn't match. Chris was hoping I'd really let my style show with the characters and not even try to draw them as they'd appear on the show. So I went about redesigning each character tracing over my 1st layout on a lightbox to keep the character poses and shapes about the same, but altering the characters to look something more like a blend of the cartoon designs and their real-world counterpart creatures/objects.
 I scanned those redesigns back in and re-assembled the layout. I'd drawn Spongebob like he was made of kitchen sponge, but not that he was a kitchen sponge, but a creature with eyes and teeth and life. Same held true for Patrick, Squidward, Gary, and Mr. Krabs. In fact Krabs was the hardest because I had to fit a crab into pants and a shirt and get him to roughly fir the same space the original drawing occupied in my 1st layout.
I sent version 2 off for approval AND....
 ALMOST!...but I didn't know that while the character's name is Squidward....he is actually an octopus (an inside joke often referred to on the show)...so a quick change to the shape of Squidward's head, and I had an approved layout! I think the final version is a better piece than the original, it just took a lot of re-drawing to get there.
I printed this out on my home printer on copy paper and then taped that printout to the back of a sheet of Strathmore bristol to start inking.
 The inks, all done with Copic Multiliners (the 0.3 & 0.7 nibs mainly) took a bit longer than I'd expected. All those new details in the Petersen-style redesigns added to that process. I also wanted to carefully think out what lines I knew I was going to color hold (like Spongebob's pores, Squidward's spots and eye details, inside Sandy's helmet, the floating flotsam in the background, the sand, etc. so that I wouldn't have too many places they intersected with lines I wanted black in the color art. Planning ahead like that can save a great deal of time when isolating the lines for color holds in the color stages.
 I scanned the finished inks and started the flatting. Most of the color choices were made for me by the designs from the cartoon, but I did have to make some alterations and a lot of minor saturation/value changes so the piece still worked together and in my style. Like the thinking ahead for the color holds, flatting is a lot about prepping a file so that as you render it, you can easily re-isolate separate parts to give them the right shading and texture without affecting the area next to it.
 the last step was to render the characters using the dodge and burn tools in Photoshop with a textured brush. To the left again you can see the final artwork which is in Spongebob Comics #50!
2015 Appearances:Art-Bubble Comics Festival: Copenhagen: Nov. 14-152016 Dates coming soon.
November 10, 2015
RPG Hardcover & Boxed Set Video
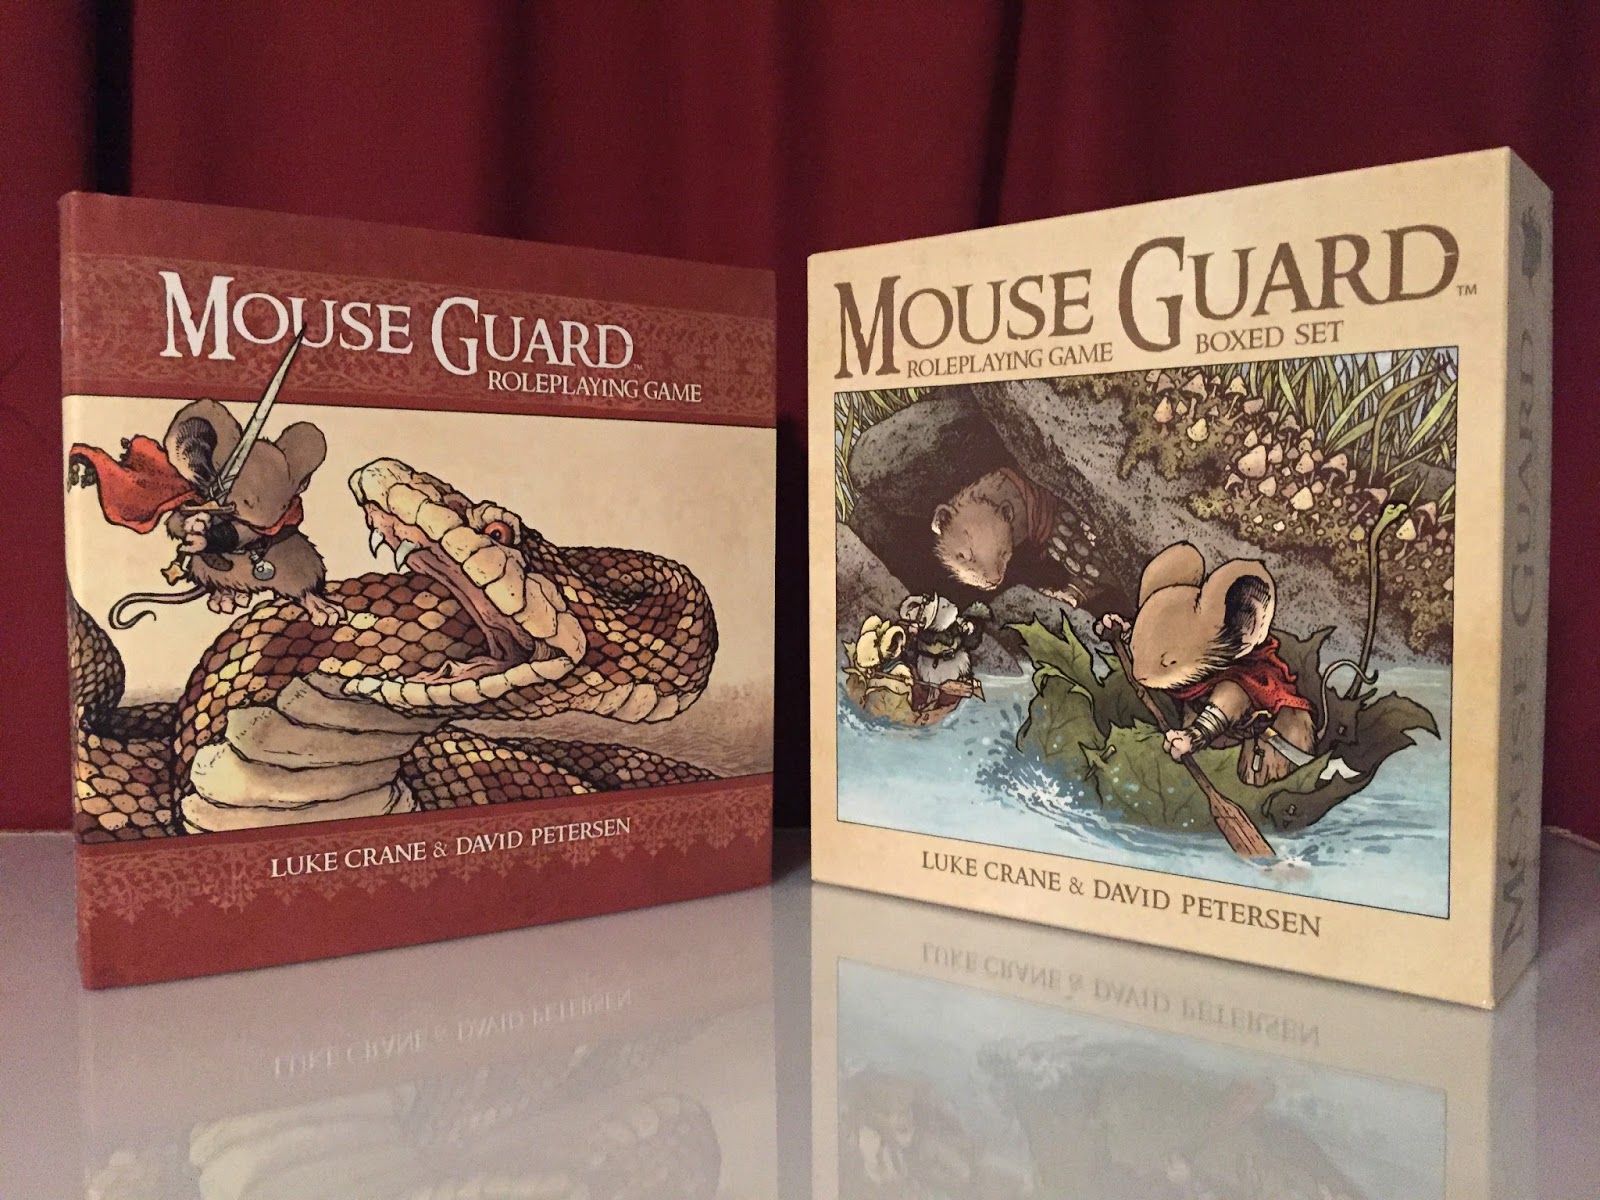 The 2nd edition of the Mouse Guard RPG Hardcover Rulebook and the Boxed Set are now available through your local gaming and comic retailers (if they didn't stock a copy, they can still order one for you through Diamond).
To make it clear what is included in each of these products is and what is needed to play, I made a video to explain:
RPG Info from David Petersen on Vimeo.
Something I didn't go into in the video is what the differences are between 1st and 2nd edition. Luke Crane outlined these on the Burning Wheel Forum for the Mouse Guard RPG:
"We've been gently tweaking rules and reediting the book, both in the text and art. It's been my pleasure to have David involved at every step of the process. [He]...sat with me as we recreated all of the patrols using the revised recruitment rules. It's been great to work so closely with him.
I tried to keep the changes to Mouse Guard is minimal as possible. I like Mouse Guard. It's light and open, while providing enough structure that the game moves along without too much effort. The main areas that changed:
Conflict: Thor & I simplified the individual team and multiple team rules. It's all very straight-forward now.
Wises: We gutted wises and ported over the systems from Torchbearer. This necessitated some minor changes to the Traits rules, too.
Recruitment: I rejiggered Recruitment to make it faster and to make the characters slightly more skilled to start, with a solid base of skills."
Cards: Weapon, Action, and Condition cards and their rules/clarity in the Boxed Set were also updated and significantly improved.
More 2nd Edition RPG BlogpostsHardcover Rulebook Art ProcessBoxed Set Cover Art ProcessNew Card Art
 RPG Promo Art Process Blogpost
2016 Appearance Dates coming soon.
November 3, 2015
Legends of the Guard Volume 3 Hardcover
 Tomorrow the third volume of Legends of the Guard comes out! I love getting to do the Legends of the Guard series because I get to work with so many amazingly talented folks who lend their artistic voices to the myth and lore of Mouse Guard. Today's blogpost is about the Hardcover and all the awesome stuff that will be collected inside.
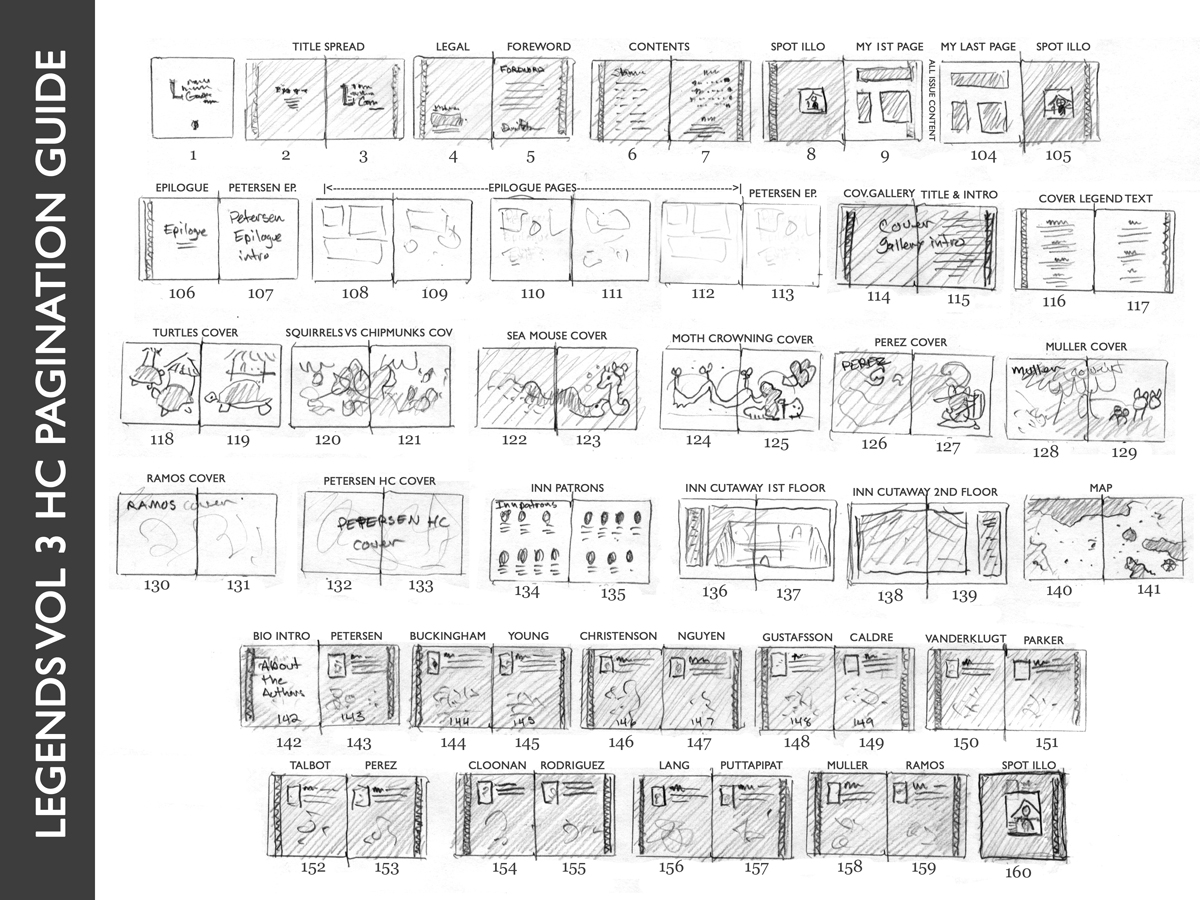 To the right you can see my hand-drawn pagination guide editor Cameron Chittock and I used to assemble the volume. As you can see all the contributor stories are included (see below), but so are all the covers (including variants by Eric Muller, Humberto Ramos, and Ramon Perez), a new map, a 2nd floor cutaway of the June Alley Inn, and an epilogue by Lauren Pettapiece (see further below)
Stories and Contributors:
 The Gosling & the Ghost: Mark Buckingham
 The Mouse and the Moon: Skottie Young
 The Armor Maker: Hannah Christenson
 The Fall of Briarwall: Nicole Gustafsson & C.M. Galdre
 Fallen: Dustin Nguyen
 The Dancers: Kyla Vanderklugt
 Nain Rouge: Mark Nelson
 The Inventor: Jake Parker
 The Tale of Abdiel's Heart: Ramon Perez
 The Lament of Poor Lenora: Becky Cloonan
 The Watcher's Stone: Ryan Lang
 Deep and Dark: Aaron Conley & Fabian Rangel Jr.
...and..an epilogue with pages from me:

and Lauren Pettapiece:

The hardcover has a two page spread dedicated to learning a little more about the patrons in the June Alley Inn this time around.

You can also take a look back to past blogs about the process of creating each cover:
Issue #1 Cover ProcessIssue #2 Cover ProcessIssue #3 Cover ProcessIssue #4 Cover ProcessHardcover Cover ProcessVariant Covers
So enjoy Legends of the Guard Volume 3 Hardcover for all it's stories and extras!
2015 Appearances:Art-Bubble Comics Festival: Copenhagen: Nov. 14-152016 Dates coming soon.
October 27, 2015
Mouse Guard RPG Promo Process
 My Italian publishers for the Mouse Guard RPG asked me to create an image to help promote the game being available there. And since the 2nd Edition recently was released here in the US (and the Boxed Set going up for sale soon), I decided to make a promotional image that would work here as well.
The Mouse Guard RPG is one of those most-asked about items from fans. I'm very proud of what Luke Crane created as a way for friends to get together, and share the duties of storyteller as they create their own adventures of mouse daring-do.
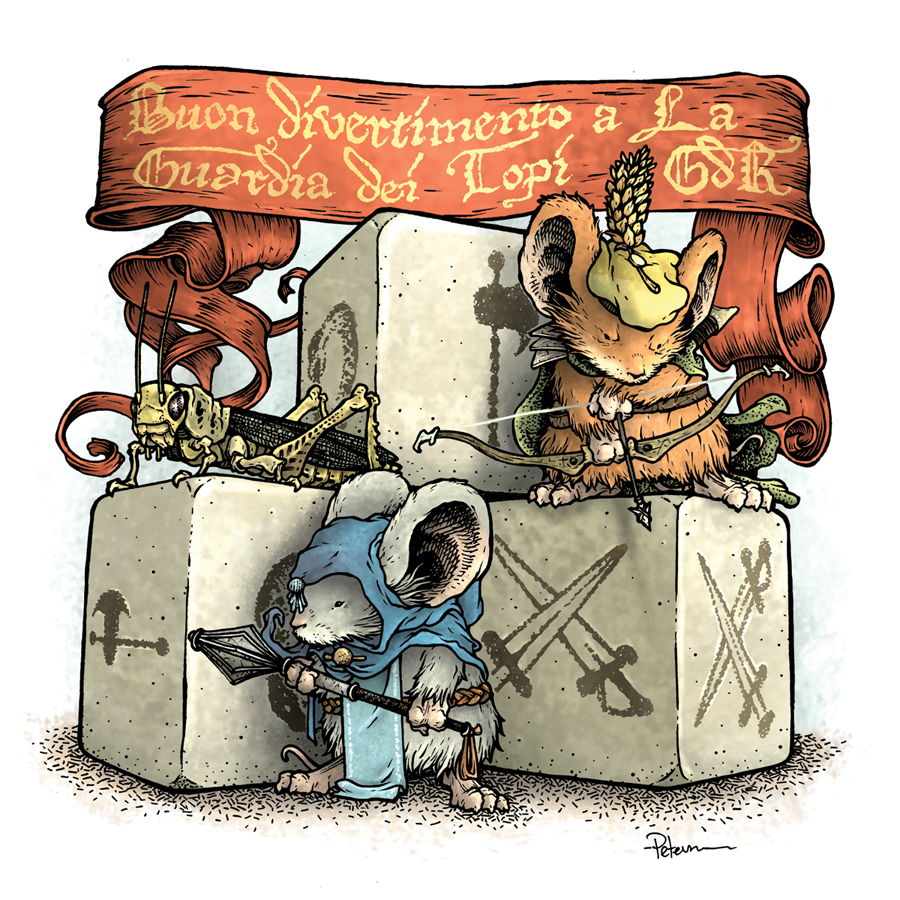
So, for today's blogpost, I'll go over how I created the artwork on the left, as well as a version with different text in English.
 I knew I wanted the image to feature dice as a landscape. And since Mouse Guard has it's own special dice, I opted to use those. This pile of three gave me enough to have some surfaces for characters to be, but also feature all three unique sides and symbols. I positioned these a few different ways before coming up with this arrangement and taking a photo with my iPhone.
 For the characters, I drew three. I'd planned to draw the three from the 2nd Edition cover of the RPG. But I decided to only draw two. Now I can't recall if I was thinking that drawing the grasshopper would give the piece some visual variety and improve it....or if I was just lazy and didn't feel like drawing the mouse with the sword.
These were all drawn on a sheet of copy paper.
 Using the help of Photoshop, I put the drawn and photographed elements together. I also did a Google image search to find a decorative banner piece I could lay in (I manipulated the tails of it to fit my format). Doing this composite step allows me to make proportion and size changes to the drawings. I can quickly see if the mice should be bigger or smaller, or fix anything I drew out of proportion (It also allows me to only draw half of the bow and then mirror a duplicate on so it's symmetrical).
 The Photoshopped composite is then printed out on copy paper and taped to the back of a sheet of Strathmore 300 series bristol. On my lightbox I can see through the to the printout and ink on the bristol surface like the printed lines are my pencils. I used Copic Multiliners to ink with. And as you can see, I didn't ink the text in the banner, but separately, once in Italian and again in English.
Below you can see the final colored versions again. Please feel free to use them online to promote the Mouse Guard RPG (at your shop, for a local game you are running, or to show your local store how much you want the game)


2015 Appearances:Art-Bubble Comics Festival: Copenhagen: Nov. 14-152016 Dates coming soon.
October 20, 2015
Signed & Überdoodled Books
 I know not everyone can make it out to a convention or an appearance, and so it's not always easy to get a signed copy of Mouse Guard books.
Well, starting today, I'm selling off my remaining 2015 convention stock of Mouse Guard books I have on my studio shelves!
http://mouseguard.bigcartel.com/category/books
 For the Fall, Winter, Legends, and Baldwin hardcovers, I've signed and doodled my traditional mouse head in each copy. These books are all being sold at cover price because, just like at conventions, I DO NOT CHARGE FOR MY SIGNATURE!
To the right you can see the Baldwin the Brave books getting signed. For this year-end book sale, I signed and doodled about 150 copies of the various books so-far and will be playing catch-up with the rest as orders start to ship out.

For the larger 12" x 12" Art of Mouse Guard and Winter B&W editions, I've Überdoodled each one with a unique mouse drawing. No specific drawing can be requested, these books will be picked at random when an order is placed.
Below you can see many examples of the Überdoodles. (excuse the blurriness, I took these with my phone as I completed each one)


http://mouseguard.bigcartel.com/category/books
*Orders with multiple books will be charged separate shipping, but IF we can combine shipping into a single affordable package (depending on quantity, weight, and sizes of books ordered) we will refund the excess shipping charges after the order is placed.
2015 Appearances:Art-Bubble Comics Festival: Copenhagen: Nov. 14-152016 Dates coming soon.
October 13, 2015
Monty Python Holy Grail with Mice...again
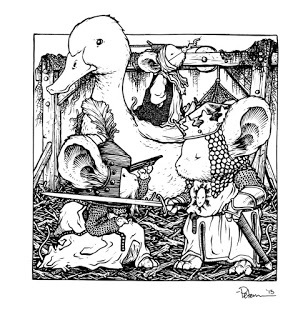
 This week's post is in honor of the 40th anniversary of Monty Python & The Holy Grail. I was asked to do a commission back in July for Boston Comic Con of a scene from Monty Python and the Holy Grail, but with mice. I'd done a Mouse-parody of that film before (with all the knights fleeing the killer bunny), but since then I've changed my commission policies to not do "mice-as" pieces. However, I bent my rule, because A) The final image does look like something out of the pages of Mouse Guard and B) I love Monty Python and that movie and couldn't turn down the chance to revisit the characters...as mice.
 The scene: Arthur knights Bedevere and invites him to join him at Camelot as a Knight of the Round Table. This is just after Bedevere conducts a medieval-logic-chain on how to prove someone is a witch (the result being they must weight the same as a duck). I started with the components on copy paper: Arthur and Bedevere (paying careful attention to the costume details from the movie), the woman who was dressed as a witch, a duck (I figured the duck bit would still be funny since this time the duck is obviously much heavier than the mouse) and the Terry Gilliam draped Medieval scales).
 With those components scanned in and assembled into a 7" x 7" composition (with the duck's head breaking the border) I printed out the assembled composition and taped it to the back of a sheet of 12" x 12" Strathmore Bristol and inked it on a portable LED Light Pad at a friend's house with Copic Multiliners (the 0.7 and 0.3 nibs mainly). These inks were the final commission piece delivered at Boston Comic Con for the customer. But I got a good scan of it before I handed it off.
And then, partly for fun, and partly because I think this piece will find it's way in to the 2016 Sketchbook, I colored it in Photoshop. I colored it live for an audience on both Periscope and Ustream. Sorry if you missed it, I didn't record it. But follow me on Twitter for updates of when/if I do more live art brodcasts online.
With those components scanned in and assembled into a 7" x 7" composition (with the duck's head breaking the border) I printed out the assembled composition and taped it to the back of a sheet of 12" x 12" Strathmore Bristol and inked it on a portable LED Light Pad at a friend's house with Copic Multiliners (the 0.7 and 0.3 nibs mainly). These inks were the final commission piece delivered at Boston Comic Con for the customer. But I got a good scan of it before I handed it off.
And then, partly for fun, and partly because I think this piece will find it's way in to the 2016 Sketchbook, I colored it in Photoshop. I colored it live for an audience on both Periscope and Ustream. Sorry if you missed it, I didn't record it. But follow me on Twitter for updates of when/if I do more live art brodcasts online.2015 Appearances:Art-Bubble Comics Festival: Copenhagen: Nov. 14-15
2016 dates coming soon.
David Petersen's Blog

- David Petersen's profile
- 339 followers
David Petersen isn't a Goodreads Author
(yet),
but they
do have a blog,
so here are some recent posts imported from
their feed.

