
Beth Cato's Blog, page 30
April 7, 2021
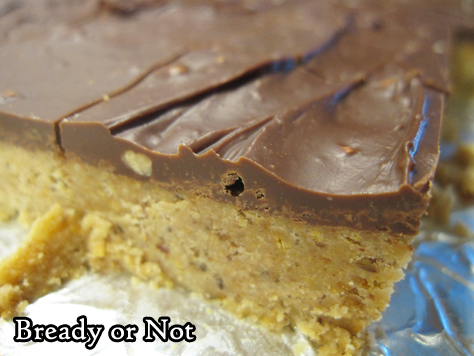
Bready or Not Original: No-Bake Peanut Butter Bars
When you need a dessert in a hurry, these delicious No-Bake Peanut Butter Bars are the way to go.
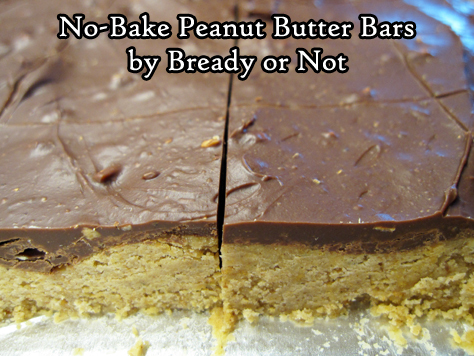
I especially enjoy this recipe because it doesn’t involve the oven, which is a wonderful thing during Arizona summers.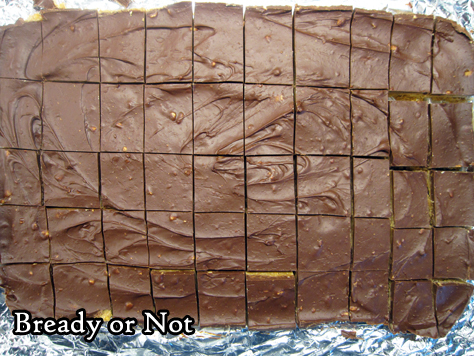
These bars come together in minutes thanks to a microwave, and they only need a few hours to set. You end up with an entire casserole dish of candy bars. Yum.

Use crunchy or creamy peanut butter. I used a jar from Trader Joe’s that had flaxseeds mixed in, and my son didn’t like it. This recipe gave me a way to use it up by sending the result with my husband to work!
This would be an easy recipe to dress up, too. Add sprinkles, nuts, or cacao nibs atop the chocolate. Have fun with it!
PrintBready or Not Original: No-Bake Peanut Butter BarsThis quick and easy microwave-based recipe uses most of a pound jar of peanut butter to whip up a whole casserole dish of delicious candy bars.Course Dessert, SnackCuisine AmericanKeyword chocolate, no bake, peanut butterAuthor Beth CatoEquipment13x9 panlarge microwave-safe bowluneven spatulaIngredientsBars2 cups peanut butter crunchy or smooth1 cup unsalted butter 2 sticks2 cups graham cracker crumbs2 cups confectioners' sugarGanache1 1/2 cups chocolate chips semisweet, dark, milk, or a mix1/4 cup peanut butter crunchy or smoothInstructionsLine a 13x9 pan with foil and apply nonstick spray or butter.In a large microwave-safe bowl, melt together the peanut butter and butter by zapping in short increments and stirring well between each pass. Once they mix together, stir in the graham cracker crumbs and confectioners' sugar. Spread the mixture into the prepared pan. Use a hands or maybe a piece of waxed paper and a heavy glass to compress the layer as much as possible.Use the same microwave-safe bowl to bowl for the chocolate chips and peanut butter, again zapping in brief increments and stirring well between each burst. Once they can mix together smoothly, dump dollops atop the layer in the pan. Use an uneven spatula to even out the chocolate to the edges.Chill in the fridge for at least 2 hours.Use the foil to lift the contents onto a cutting board. Let sit for about 10 minutes, enough time to soften the chocolate so that it doesn't shatter when sliced. Use a long knife or sharp bench knife to cut bars. If desired, cut off edges first to produce neater pieces to share.Store bars in a sealed container in the fridge with waxed paper between the layers. Keeps for days.OM NOM NOM!

April 2, 2021
Book Blog: Machinehood by S.B. Divya
I review everything I read and post reviews on Goodreads and LibraryThing. That’s not enough. Good books are meant to be shared. Therefore, I’m spotlighting some of my favorite reads here on my site.

Machinehood by S.B. Divya
out now in print and ebook; BookShop, B&N, and Amazon [affiliate link]
From the Hugo Award nominee S.B. Divya, Zero Dark Thirty meets The Social Network in this science fiction thriller about artificial intelligence, sentience, and labor rights in a near future dominated by the gig economy.
Welga Ramirez, executive bodyguard and ex-special forces, is about to retire early when her client is killed in front of her. It’s 2095 and people don’t usually die from violence. Humanity is entirely dependent on pills that not only help them stay alive, but allow them to compete with artificial intelligence in an increasingly competitive gig economy. Daily doses protect against designer diseases, flow enhances focus, zips and buffs enhance physical strength and speed, and juvers speed the healing process.
All that changes when Welga’s client is killed by The Machinehood, a new and mysterious terrorist group that has simultaneously attacked several major pill funders. The Machinehood operatives seem to be part human, part machine, something the world has never seen. They issue an ultimatum: stop all pill production in one week.
Global panic ensues as pill production slows and many become ill. Thousands destroy their bots in fear of a strong AI takeover. But the US government believes the Machinehood is a cover for an old enemy. One that Welga is uniquely qualified to fight.
Welga, determined to take down the Machinehood, is pulled back into intelligence work by the government that betrayed her. But who are the Machinehood and what do they really want?
A thrilling and thought-provoking novel that asks: if we won’t see machines as human, will we instead see humans as machines?
I received an advanced copy of this book via Netgalley.
The year 2021 has just started, but I already know this is one of the best new science fiction books I will read this year. It’s that good. Divya has created an utterly immersive future that is plausible and spooky all at once.
Welcome to a future Earth where designer drugs help people work and think faster in order to keep them competitive with advanced machines. Everyone has personal drone clouds that broadcast their activities to the world, with strangers casting money into their tip jar for deeds done well. Welga is a tough woman working in higher echelons of security when a client is killed by a new terrorist group. The Machinehood is demanding rights for bots–or else they’ll shut down the pill trade and tech networks, essentially ending modern civilization. Welga tries to find out who and what the Machinehood really is, even as her own health begins to shatter. This is a read that ponders some very deep philosophical questions: what is a machine? what is sentient life?
Some scifi books with advanced tech this deep are so full of jargon they lose me within the first chapter. This book didn’t. Divya builds details at the right pace. This isn’t a book just about hard scifi, though. It’s packed with genuine heart. Every character feels complex and realistic, as does the incredible diversity of ethnicities, religions, and genders. With the stakes so high and the plot so deep, I wondered if everything could pull together in the end–it did. The ending is satisfying and strong, and left me a little sad that it was all done.
Truly a stellar work, and the first one to go on my novel award nominee list for 2021.
March 31, 2021
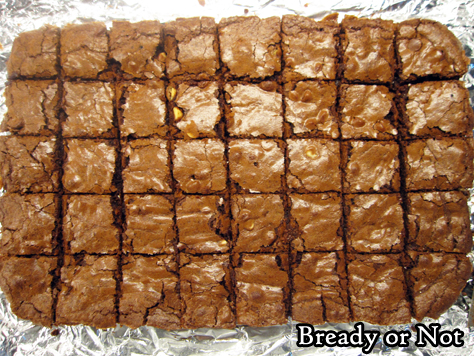
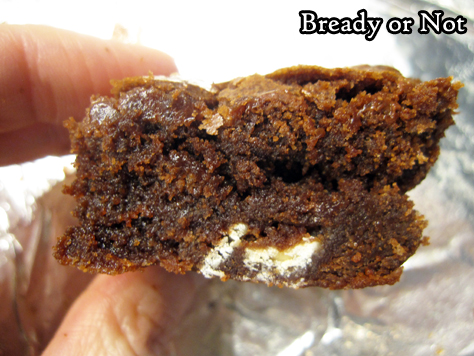
Bready or Not: Triple-Chocolate Brownies
These Triple-Chocolate Brownies are loaded with three kinds of chocolate, cocoa, and a unique blend of flours: all-purpose along with chickpea flour.
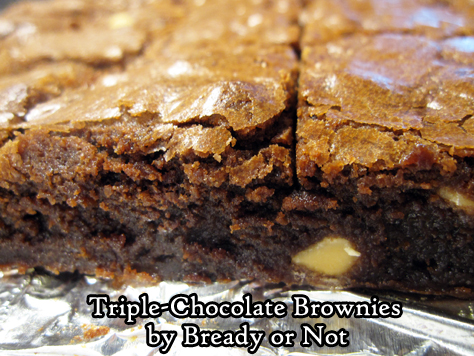
What does the chickpea flour do for the recipe? Well, it handles moisture differently. That makes these dense, moist, in a texturally more complex way than the usual all-wheat-flour brownies.
The flavor is also more complex. Soon after baking, these brownies taste almost like they have breakfast cereal mixed in. You can tell something is different.

Like a lot of chocolate baked goods, though, these taste better after a day. In these brownies, that means the complicated flavors deepen. They taste more chocolaty, more delicious.
If you don’t want to fuss with a big bag of chickpea flour, check out your local grocery or natural goods stores that have flours in bins. In the Phoenix area, that includes Sprouts and WinCo.
Once you make these brownies, though, you may want to make them again soon, so maybe a larger amount of chickpea flour isn’t a bad thing.
Modified from February 2020 Bake from Scratch/Bob’s Red Mill lesson.
PrintBready or Not: Triple-Chocolate BrowniesThese luscious brownies are loaded with three kinds of chocolate, cocoa, and a unique blend of flours: all-purpose along with chickpea flour. These brownies will taste better after a day to chill in the fridge. Modified from February 2020 Bake from Scratch/Bob’s Red Mill lesson.Course Dessert, SnackCuisine AmericanKeyword brownies, chickpeas, chocolateAuthor Beth CatoEquipment9×13 baking panIngredients1 1/2 cups semisweet chocolate divided1 1/4 cups milk chocolate chips divided1 cup unsalted butter 2 sticks, cubed1 cup white sugar1 cup brown sugar packed1 1/4 cups all-purpose flour1/2 cup chickpea flour1/4 cup Dutch process cocoa powder sifted2 teaspoons kosher salt1 teaspoon espresso powder4 large eggs room temperature, lightly beaten2 teaspoons vanilla extract1/2 cup white chocolate chipsInstructionsPreheat oven at 325-degrees. Line a 13×9 pan with foil and apply nonstick spray or butter.Using a double boiler on the stove top or a microwave-safe bowl in the microwave, melt together 1 cup of dark chocolate/semi-sweet chocolate chips, 3/4 cup milk chocolate chips, and butter. Heat until it can be stirred smooth. Remove from heat and stir in all of the sugar. Set aside.In a medium bowl, mix together both flours, cocoa powder, salt, and espresso powder. Set aside.Return to the chocolate bowl. Mix in the eggs and vanilla. Gradually fold in the dry ingredients, and follow up with the rest of the three kinds of chocolate chips. Spread the batter evenly in the prepared pan.Bake until the center passes the toothpick test, about 35 to 40 minutes. Cool completely at room temperature or speed the process in the fridge. Use the foil to lift the contents onto a cutting board. Slice into bars.Store in an airtight container in the fridge up to a week. Like many chocolate baked goods, these brownies will actually taste better after the first day as the flavor intensifies.OM NOM NOM!
March 29, 2021
Poetry reading and interview on YouTube: “A Purring Cat is a Time Machine”
Todd Sullivan is accumulating a wonderful number of author showcases and interviews on YouTube, and included me in his series on How to Read Poetry. I read my poem “A Purring Cat is a Time Machine,” originally published in Daikaijuzine, and then answer some interview questions on poetry. Enjoy!
March 24, 2021
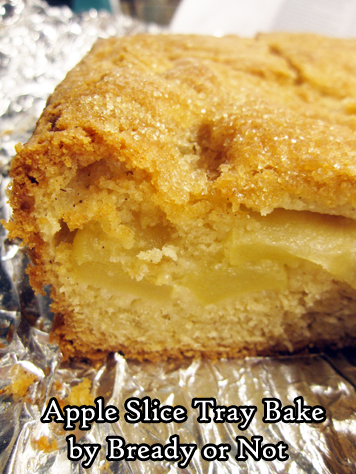
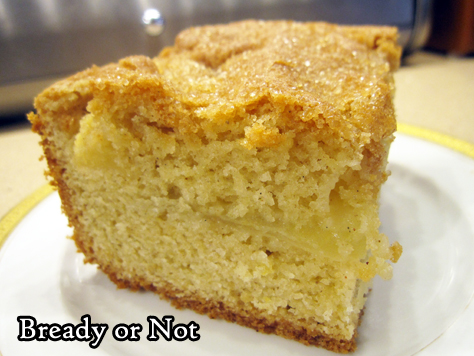
Bready or Not: Apple Slice Tray Bake
This Apple Slice Tray Bake would simply be an Apple Cake to most Americans. Whatever you call it, it’s packed with apples and delicious.
This is third consecutive recipe I’ve modified from the Bake from Scratch Magazine July/August 2020 Ireland-themed issue. I still have a few more things I want to try in the coming months, too!

I’ve found that French, Irish, and British apple cake recipes tend to be lighter on sugar and spices than typical American recipes. The focus is really on the apples.
I used Honeycrisps here, which are one of my favorite apples to eat outright or bake with! Two big apples will work.
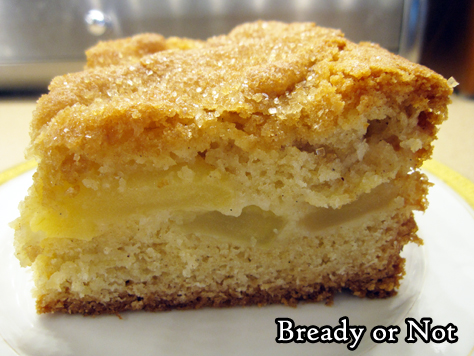
This bakes up light, lofty, and cakey, with a sugar-crusted top and a lovely flavor of apples throughout. The pieces freeze and thaw very well, too, meaning you can enjoy this like it is fresh but spread over days or weeks!
PrintBready or Not: Apple Slice Tray BakeThis Irish-style apple cake is lighter on spices and sugar than American versions, letting the natural, pure sweetness of apples shine through. (Note that the all-purpose flour, salt, and baking powder could be replaced by 3 1/3 cup self-rising flour.) Modified from Bake from Scratch Magazine July/August 2020 Ireland-themed issue.Course Breakfast, DessertCuisine irishKeyword apple, bars, cakeAuthor Beth CatoEquipment9×9 baking panuneven spatulaIngredientsApple layer:2 large baking apples Honeycrisp work well1 Tablespoon lemon juice1 Tablespoon white sugarCake:1 1/4 cups unsalted butter (2 and a half sticks) room temperature1 1/2 cups white sugar4 large eggs room temperature1 1/2 teaspoons vanilla bean paste or substitute vanilla extract3 cups all-purpose flour3/4 teaspoon salt4 1/2 teaspoons baking powder1/2 teaspoon cinnamon1/8 teaspoon allspice2 Tablespoons turbinado sugarInstructionsPreheat oven at 350-degrees. Line a 9×9 pan with foil and apply nonstick spray.Peel and core the apples, then slice to about 1/4-inch thickness. Place slices in a large bowl and toss them with lemon juice and 1 Tablespoon white sugar, until apples are coated. Set aside.In a big mixing bowl, beat butter and white sugar for several minutes, until blended and fluffy. Add eggs, one at a time, mixing in well and scraping bowl afterward. Add vanilla. The batter may look curdled, but that’s okay.In a separate bowl, stir together flour, salt, baking powder, cinnamon, and allspice. Gradually mix the dry ingredients into the wet.Spread about half of the batter into the pan, using an uneven spatula to form an even layer. Arrange apple slices, flat side down, to cover the batter entirely. Top with the remaining batter, using the uneven spatula again to even out as much as possible. Sprinkle turbinado sugar all over the top.Bake until the middle of the cake passes the toothpick test, which will be from 1 hour to 1 hour and 15 minutes. Cover pan with foil about halfway through to prevent it from browning too much.Let cool in pan for an least 10 minutes, then use foil to lift cake onto a cutting board. Slice into squares. Tastes best warmed and at room temperature. Pieces can also be shrouded in plastic wrap and frozen for later enjoyment.OM NOM NOM!March 17, 2021
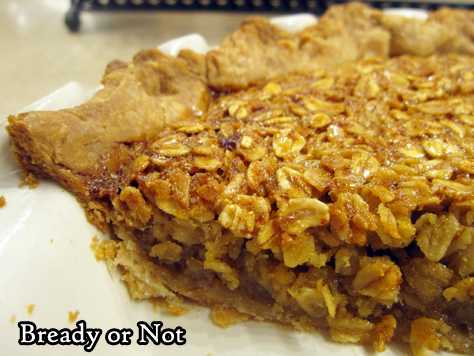
Bready or Not: Honey Oat Pie with a Cinnamon Pie Crust
This is a pie like none I have made before: like a gigantic chewy oatmeal cookie with a spiced crust, embodied with a refreshing zing of whiskey.
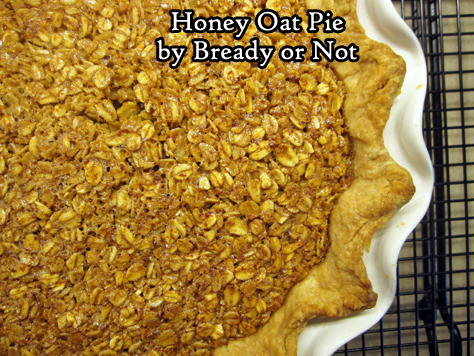
This Honey Oat Pie in a Cinnamon Pie Crust will blow your mind in the best of ways. Texture wise, it is moist and chewy without being soggy (be sure to use old-fashioned/rolled oats!).
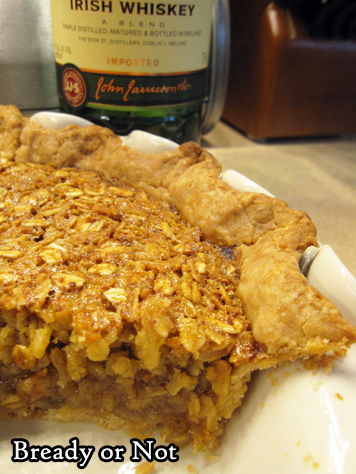
Flavor-wise, you taste the toasted oats, a wonderful mix of warm spices, and the freshness of the whiskey. There’s only a tablespoon and a half in there but the flavor of the whiskey still comes through.
I used Jameson Irish Whiskey, in keeping with the origins of the original version of the recipe: the July/August issue of Bake from Scratch Magazine, my favorite food magazine these days.

I imagine you can omit the whiskey from the recipe without it being detrimental to the taste or texture, but I haven’t tried that myself.
This is a great pie to have for breakfast (the alcohol’s effect burns off in baking), or snack, or dessert.
PrintBready or Not: Cinnamon Pie CrustThis basic pie crust comes together quickly and would complement many sweet pie recipes. Mix up, chill the dough for at least an hour (or freeze for much later), and you can form the crust and go from there! This makes enough dough for ONE pie shell. Modified from Bake from Scratch Ireland Issue July/August 2020.Course Breakfast, DessertCuisine AmericanKeyword pieAuthor Beth CatoEquipmentfood processorpie plateplastic wrapIngredients1 1/2 cups all-purpose flour1 1/2 Tablespoons white sugar1 teaspoon kosher salt1 1/2 teaspoons ground cinnamon1/2 cup unsalted butter 1 stick, cold, cut into chunks3 Tablespoons ice water plus more if neededInstructionsIn a large food processor, pulse together the flour, sugar, salt, and cinnamon. Add the butter pieces. Pulse until they are almond-sized, then add the ice water. Pulse until mixture can form a ball, adding a touch more water if needed to make it cohesive.Turn out dough onto a lightly floured surface. Gently knead to shape into a disk. Tightly encase in plastic wrap and let chill in fridge for at least an hour, or up to a few days. Dough can also be frozen for up to two months.OM NOM NOM! PrintBready or Not: Honey Oat PieThis rich and chewy nut-free pie is like an oversize oatmeal cookie with a pleasant zing of whiskey. That’s right, whiskey. Modified from Bake from Scratch Ireland Issue July/August 2020.Course Breakfast, Dessert, SnackCuisine American, irishKeyword alcohol, oats, pieAuthor Beth CatoEquipmentpie plateparchment paperpie weightsIngredientssingle-layer pie crust1 1/3 cups old-fashioned oats also called rolled oats2/3 cup brown sugar packed1 1/4 teaspoons kosher salt1/4 teaspoon ground ginger1/8 teaspoon ground nutmeg1/2 cup light corn syrup6 Tablespoons unsalted butter melted1/3 cup honey1 1/2 Tablespoons Irish whiskey such as Jameson2 teaspoons vanilla extract4 large eggs room temperatureInstructionsPreheat oven at 400-degreesPrepare pie crustLet pie dough soften at room temperature for 10 to 15 minutes. Lightly flour a surface and roll out dough to a 12-inch circle and transfer it to a 9-inch pie plate. Press into plate to shape, crimping edges as desired. Freeze crust until firm, about 15 minutes.Drape a large piece of parchment paper over pie crust. Fill to the top with pie weights.Bake crust until edges are turning golden, about 10 to 15 minutes. Carefully remove weights and parchment paper.Bake crust an additional 10 minutes to set. Cover the edges with foil if it is getting brown too quickly. Set aside on rack to cool while the filling is assembled.Prepare fillingReduce oven temperature to 350-degrees.Line a rimmed baking pan with parchment paper. Place oats in pan.Bake them until they are lightly toasted, about 10 minutes, giving them a stir or two during. Set them aside to cool.Lower oven temperature again, this time to 325-degrees. Move the oven rack to the lower third of the oven.In a big bowl, mix together the brown sugar, salt, ginger, and nutmeg. Add the corn syrup, melted butter, honey, whiskey and vanilla, making sure to scrape the bottom of the bowl. Add eggs one at a time, stirring well after each addition, and end by incorporating the oats until they are coated. Pour everything into the parbaked crust.Bake until the filling is set and slightly puffed, about 40 minutes. Check on the pie about halfway and cover the edges the foil if they are getting too brown. The done pie will register at 200-degrees if checked with an instant thermometer.Let pie cool completely on rack before slicing in. Store covered by foil in the fridge or at room temperature. Keeps for several days.OM NOM NOM!March 10, 2021
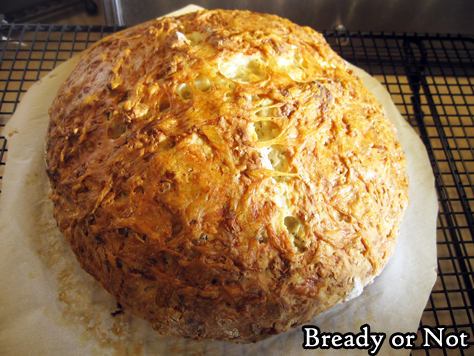
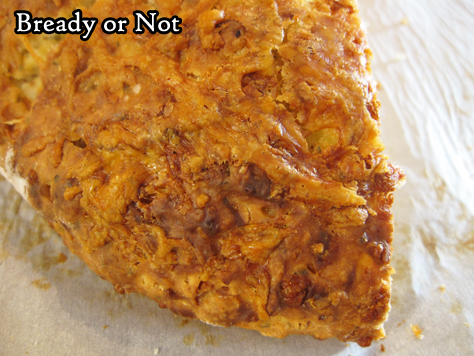
Bready or Not: Irish Cheddar Soda Bread
If you know me at all, you know I love cheese. One of my forever favorites is Kerrygold Dubliner, which I can buy in bulk at Costco almost all the time. That makes the use of a hefty amount of Dubliner all the more affordable in this amazing Irish Cheddar Soda Bread.

Of course, you can use another kind of Irish cheddar, or cheddar from anywhere in the world. Whatever you use will be delicious and amazing in this bread.
This recipe is the first in a series of re-worked recipes from a fantastic issue of Bake from Scratch Magazine last year. The July/August issue was all about Ireland, with loads of Irish recipes, and I had a blast baking my way through and making my own versions of deliciousness.
(Truly, if you love to bake, I highly recommend Bake from Scratch. I get a lot of food magazines, and it is my favorite. I find several things I want to make in each issue, which I can’t say about any of my other subscriptions.)

This bread is perfect along with a roast or soup or stew, or all by itself with a generous pat of butter (Kerrygold being best, of course).
You might think I’m getting paid to endorse this Kerrygold stuff and Bake from Scratch. I wish! No, I’m just a total fan.
PrintBready or Not: Irish Cheddar Soda BreadIf you love bread and cheese, oh wow, is this the recipe for you. Use a good Irish cheese like Kerrygold Dubliner, and to really make it amazing, Kerrygold butter as well. Modified from Bake from Scratch Magazine July/August 2020.Course Bread, Side DishCuisine irishKeyword cheese, quick breadAuthor Beth CatoEquipmentparchment paperinstant thermometerIngredients3 2/3 cup all-purpose flour1 1/2 teaspoons kosher salt1/2 teaspoon baking soda1 cup Irish aged white cheddar cheese (113 grams) coarsely grated, divided2 teaspoons dried parsley or other herbs1/2 teaspoon black pepper2 cups buttermilk or substitute soured milk, see noteInstructionsPreheat oven at 450-degrees. Line a baking pan with parchment paper.In a large bowl, stir together flour, salt, and baking powder. Add about 2/3 cup of cheese, herbs, and pepper. Form a well in the middle and add the buttermilk. Use a hand to mix everything, kneading and clawing everything together; note that the dough will be very sticky and clumpy.Once it can be patted into a round, transfer it to the parchment paper. Reshape a bit if needed. Dip a knife in some flour, and slash an inch-deep X broadly across the top of the round; this is to release steam and, according to folklore, evil fairies. Sprinkle the remaining 1/3 cup of cheese on top.Bake for 15 minutes. Reduce oven temperature to 400-degrees. If the round is already looking quite brown, carefully cup some foil over the top.Bake for another 20 minutes. The bread is done when it is browned and registers 200-degrees or more on a digital thermometer. If the bottom is tapped, it should sound hollow.Let cool for about 30 minutes before cutting in. Bread is best served warm; easily reheat slices in the oven later. Pieces can also be frozen.OM NOM NOM!NotesTo substitute soured milk, place a tablespoon of lemon juice or vinegar in a large liquid measuring cup, then add milk to the 2 cup point. Let sit for 10 minutes to coagulate, then add to the dough.
March 3, 2021
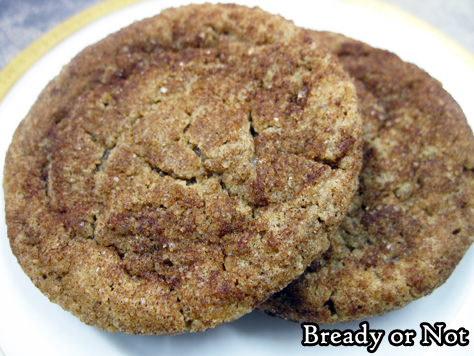
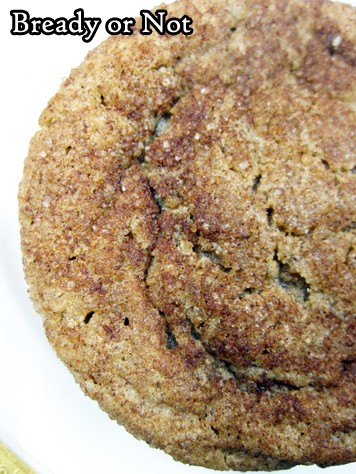
Bready or Not Original: Cinnamon-Coffee Cookies
These Cinnamon-Coffee Cookies do it all. They are warmly-spiced with a coffee-forward flavor.

Plus, they are soft and chewy, which really is how I prefer cookies to be. Crunchy cookies are good, too, but cookies like this? Oh yeah.
My husband’s work lives on coffee. Needless to say, they adored these cookies–with coffee. Bring on the caffeine in all forms, right?
The ingredient list for this looks long, but that’s because it has lots of spices. It really comes together pretty fast. If you want to speed things along at baking time, mix together the dry ingredients the day before.
These cookies will brighten your day. Have them for breakfast. Or a dessert. Or a mid-afternoon pick-me-up. The baked-in espresso (plus that sugar) will do a lot to brighten your day!
PrintBready or Not Original: Cinnamon-Coffee CookiesThese Cinnamon-Coffee Cookies soft and chewy, and loaded with a warm mix of spices, along with a pleasant jolt of caffeine. This makes about 28 cookies using a tablespoon scoop.Course Dessert, SnackCuisine AmericanKeyword coffee, cookiesAuthor Beth CatoEquipmenttablespoon scoopIngredientsDough2 teaspoons espresso powder1 Tablespoon hot water1/2 cup unsalted butter 1 cube, room temperature1/2 cup shortening3/4 cup white sugar3/4 cup brown sugar packed2 teaspoons ground cinnamon1 teaspoon baking powder1/2 teaspoon ground nutmeg1/4 teaspoon baking soda1/4 teaspoon salt1/4 teaspoon ground cloves2 eggs room temperature1 teaspoon vanilla extract2 1/4 cups all-purpose flourTopping1/2 cup turbinado sugar or other raw, coarse sugar1 1/2 teaspoon ground cinnamonInstructionsIn a small bowl, stir the espresso powder into the hot water until it is dissolved. Set aside.In a big bowl, beat together the butter and shortening. Add both sugars, cinnamon, baking powder, nutmeg, baking soda, salt, and cloves. Follow up with the eggs, vanilla, and liquid espresso. Beat in the flour until just incorporated. Wrap dough in plastic wrap and chill at least 2 hours; otherwise, the dough will be very sticky and hard to work with.Preheat oven at 325-degrees. In a small bowl, stir together the topping ingredients.Use a tablespoon scoop to form dough into an round ball. Roll in cinnamon-sugar. Place rounds spaced-out on cookie sheet, flattening each to a fat disc.Bake for about 10 to 12 minutes. Let set on cookie sheet another 10 minutes before moving them to a cooling rack. Completely cool, then place in a sealed container at room temperature.OM NOM NOM!February 24, 2021
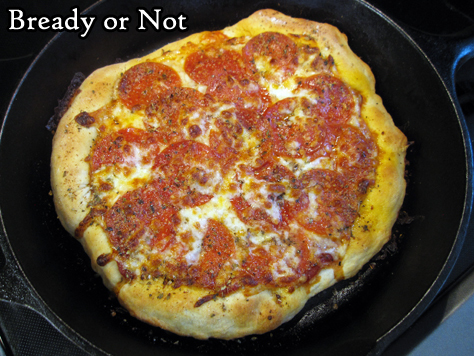
Bready or Not: 5 Minute Artisan Pizza Dough and Cast Iron Pan Pizzas
Today’s Bready or Not is a 2-for-1 deal: a recipe for fast and easy pizza dough, followed by the process I use for divvying up that dough to make small but thick cast iron pan pizzas.

The basic dough recipe is modified from the great book Artisan Bread in 5 Minutes a Day. [Affiliate link] Yes, this dough really comes together in 5 minutes. It also keeps for up to 2 weeks AND can be frozen.
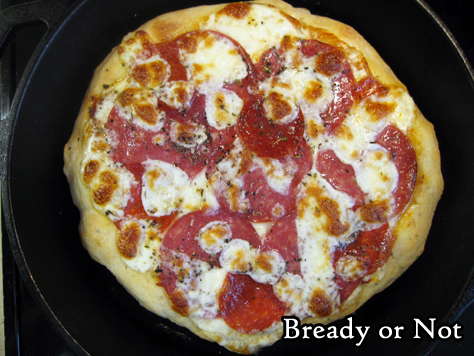
The method for making mini pizzas in a skillet is one I practiced a few times several years ago, then made a LOT during 2020 as my husband was working from home more often. I perfected it to the point where I had to write it down–and share here.
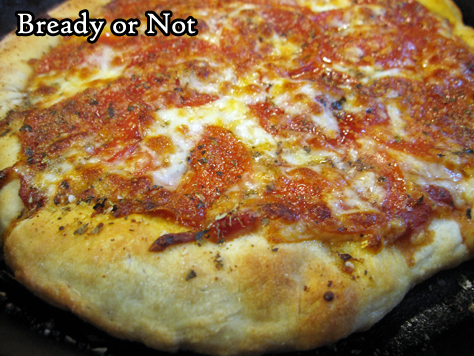
The pan pizza recipe is pretty much an outline to show the timing on the shaping, rise, and crust-cooking, but the ingredients are all up to you!
PrintBready or Not: 5 Minute Artisan Pizza DoughThis makes enough pizza dough for a large pizza or 3 10-inch ‘pan’ style pizza. The dough is ready to use after only a few hours, and will keep in the fridge for as long as two weeks. Modified from the book Artisan Bread in Five Minutes a Day by Jeff Hertzberg, M.D., and Zoe Francois.Course Main CourseCuisine American, ItalianKeyword pizza, yeast breadAuthor Beth CatoIngredients1 1/3 cups warm water2 Tablespoons olive oil1/2 Tablespoon white sugar3 1/4 cups all-purpose flour3/4 Tablespoon kosher salt2 teaspoons pizza seasoning or Italian seasoning, optional2 1/4 teaspoons active yeast or one packet store-bought active yeastInstructionsPlace the water, olive oil, and sugar in a big mixing bowl, stand mixer, or food processor. Add the flour, salt, and seasoning, if using. Start mixing together, then sprinkle in the yeast. Mix until just combined.Keep in same bowl, if desired, or transfer to another bowl that is greased. Loosely cover top with plastic wrap or towel and let dough rise at room temperature until it flattens out on top, about two hours.Dough can be used now but is much easier to handle when cold. Refrigerate in a non-airtight container and use within two weeks. Dough can also be frozen in freezer bags, for up to a month, and defrosted later in the fridge.OM NOM NOM!
PrintBready or Not Original: Cast Iron Pan PizzasAbout a 2-pound batch of dough, such as the 5 Minute Artisan Dough recipe on Bready or Not, will make three hearty personal pan pizzas in a 10-inch cast iron pan. This process takes about 45 minutes. The remaining dough can keep in the fridge for about 2 weeks.Course Main CourseCuisine American, ItalianKeyword beef, cheese, pizza, pork, yeast breadAuthor Beth CatoEquipment10-inch cast iron skilletIngredientshandful pizza dougholive oildesired toppings and seasoningsInstructionsPreheat oven at 450-degrees. Add about a tablespoon of olive oil to a cast iron skillet and place the pan in the oven to heat up.Grab a good handful of pizza dough, or as much as desired to bake today. Oil a small space of counter or table as well as hands, and gently stretch and press out the dough to a rough circle. If it tears, patch with other pieces of dough as best possible. Let dough rest for about 20 minutes.By this time, the oven should have preheated. Use a potholder to pull out the skillet. Carefully swirl the hot oil in the pan to coat the bottom and set pan down on a safe surface. Carefully, again, place the dough in the pan.Bake crust for 6 to 10 minutes, until it is set. Pull out of oven and add desired toppings.Put pizza in oven for another 6 to 10 minutes, until crust is golden and toppings are cooked to desired level. Let pizza cool for about 10 minutes, then slide onto a plate or other surface to slice and eat.OM NOM NOM!
February 17, 2021
Bready or Not Original: S’mores Cake Mix Bars
Cake mix is fantastic ingredient to keep in the pantry for a quick-fix dessert. It’s easy to doctor into something extraordinary, such as with these S’mores Cake Mix Bars.
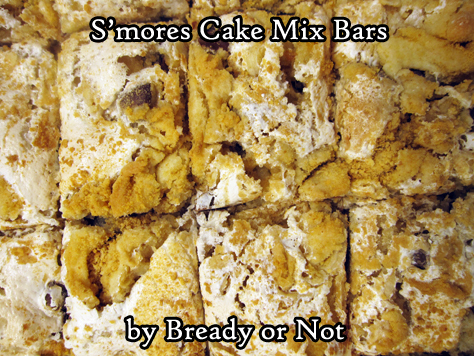
This is a treat that doesn’t taste like cake mix at the end. It’s just sweet and wonderful, courtesy of the lovely combination of ingredients.

I used ready-made graham crackers crumbs here, but really, you could probably use various kind of vanilla cookies, smashed, to mix in. Vanilla wafers or even Golden Oreos would be good substitutes.
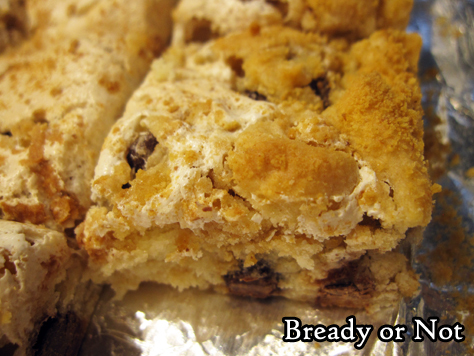
I love bar recipes like this where ingredients are swirled together at the end. There is something visually delightful about that marbled look.
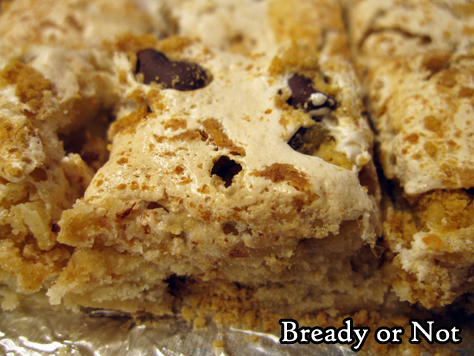
Be sure that when these bars are sliced, they are stores with waxed paper between the layers. Marshmallow makes things a bit sticky! And delicious.

PrintBready or Not Original: S’mores Cake Mix BarsThis original Bready or Not recipe uses cake mix for a quick-fix delicious dessert that doesn’t at all taste like cake mix. It’s just plain delicious.Course Dessert, SnackCuisine AmericanKeyword bars, cake mix, chocolate, marshmallowAuthor Beth CatoEquipment9×13 panwaxed paperIngredients1 box white cake mix or yellow cake mix or French Vanilla1/2 cup unsalted butter 1 stick, melted1 teaspoon vanilla extract2 eggs room temperature1 cup semisweet chocolate chips7 ounce marshmallow fluff jar1/2 cup graham cracker crumbsInstructionsPreheat oven at 350-degrees. Line a 9×13 casserole pan with foil and apply nonstick spray or butter.In a large bowl, mix together the cake mix, butter, vanilla extract, and eggs until no dry crumbs remain. Fold in the chocolate chips.Pour batter into the prepared pan and even out surface. Add the graham cracker crumbs in little piles scattered across the top. Use a butter knife to partially swirl the crumbs into the dough. Add dollops of marshmallow fluff across the top. Again, swirl the marshmallow into the dough, coating it with graham crackers in the process. Don’t combine everything too much–there should still be visible swirls and varied textures.Bake at 350-degrees for 20 to 25 minutes, until edges are golden and contents look set.Completely cool at room temperature or speed process in the fridge. Use foil to lift the contents onto a cutting board. Slice into bars. Store in a sealed container with waxed paper between the stacked layers.OM NOM NOM!


