
Bill Loguidice's Blog, page 98
September 13, 2016
Unboxing the ZMorph 2.0 SX Full Set
As a follow-up to my prior first look, I thought I would do a photo-based unboxing of the ZMorph 2.0 SX Full Set, which arrived at the office yesterday.
To summarize, the ZMorph 2.0 SX Full Set is a 3D printer for 1.75mm filament extrusion, CNC milling, laser cutting and engraving, and thick paste extrusion (e.g., chocolate decorating). It’s not inexpensive, but with all of these amazing capabilities available with easily switchable, magnetically attached parts in a desktop unit, it actually costs far less than expected.

The first thing you notice is how impressively huge the shipping box is. It’s oversized and quite heavy. I’m glad to have my wife and business partner here to assist me.

The first layer upon opening the box.
Shown in the first layer are the toolhead and related boxes. These include:
Thick Paste Extruder
Dual Pro
445 NM Diode Module
CNC Pro
CNC Milling Fun Pack
Also in the first layer is the Quick Start Guide and related materials, as well as a plastic accessories and tool box (containing, among many other items, a Touch Probe for calibration).

Getting a bit deeper in the first layer.
Going a bit deeper, we find a cardboard sleeve containing BuildTak, a power cable, a network (NIC) cable, and miscellaneous sample 3D prints in orange. Note that the 3D-printed tube cracked into two pieces, presumably during shipping, but more on that later.

The last bits of the first layer.
For the last of the first layer, we find Yellow PLA and Dark Blue PLA, both 1.75mm/500gr, a USB cable, and a CNC table/platform.
For the second and final layer, we get to the ZMorph 2.0 SX itself:

There it is.

Our youngest of three daughters inspects the packing materials after we gently placed the printer on a table for final overwrap removal.

Placed on its dedicated desk, where I will soon begin the actual setup process.

Another angle.

A closer look at the sample prints. The ultra thin tube is particularly impressive. It’s not surprising a piece of it snapped off in transit.

Another angle.

Extreme close-up!
I will now turn my attention over the next few days to the quick start setup and provide follow-up postings, which will no doubt provide far more detail on everything that’s included. After that, there will be some feature articles here and elsewhere, so be sure to stay tuned on all the usual channels.
The post Unboxing the ZMorph 2.0 SX Full Set appeared first on Armchair Arcade.


Atari Flashback 7 (2016): The Official Game List
AtGames has announced the official game list for the Atari Flashback 7, which will be available from top retailers starting in October 2016 for $59.99 SRP. I’ll have a full review right here on Armchair Arcade soon.
The Atari Flashback 7 classic game console features 101 built-in favorites. These games include legends like Frogger and Space Invaders™, as well as all-time Atari 2600 classics like Centipede™, Jungle Hunt, Missile Command®, and Pong. Two wireless controllers, styled after the Atari 2600 originals, are included, as well as two legacy controller ports for optional wired joysticks or paddles.

Atari Flashback 7
The official game list for the Atari Flashback 7:
3-D Tic-Tac-Toe
Adventure
Adventure II
Air Raiders™
Air·Sea Battle
Aquaventure
Armor Ambush™
Asteroids®
Astroblast™
Atari Climber
Backgammon
Basketball
Black Jack
Bowling
Breakout®
Canyon Bomber™
Centipede™
Championship Soccer™
Chase It!
Circus Atari™
Combat®
Combat Two
Crystal Castles®
Dark Cavern™
Demons to Diamonds™
Desert Falcon®
Dodge’Em
Double Dunk™
Escape It!
Fatal Run
Flag Capture
Football
Frog Pond
Frogger
Frogs and Flies™
Front Line™
Fun with Numbers
Golf
Gravitar®
Hangman
Haunted House™
Home Run
Human Cannonball™
Indy 500
International Soccer™
Jungle Hunt
Maze Craze
Millipede™
Miniature Golf
Miss It!
Missile Command®
Motorodeo
Night Driver™
Off The Wall
Outlaw
Polaris™
Pong (Video Olympics)
Radar Lock
Realsports® Baseball
Realsports® Basketball
Realsports® Soccer
Realsports® Volleyball
Return to Haunted House
Saboteur™
Save Mary
Sea Battle
Secret Quest
Shield Shifter
Sky Diver
Slot Machine
Slot Racers
Solaris
Space Attack™
Space Invaders™
Space War
Sprintmaster
Star Ship
Star Strike™
Steeplechase
Stellar Track™
Street Racer
Strip Off
Submarine Commander
Super Baseball
Super Breakout®
Super Challenge™ Baseball
Super Challenge™ Football
Super Football
Surround
Sword Fight™
Swordquest: Earthworld
Swordquest: Fireworld
Swordquest: Waterworld
Tempest®
Video Checkers
Video Chess
Video Pinball
Warlords®
Wizard
Yars’ Return
Yars’ Revenge®
The post Atari Flashback 7 (2016): The Official Game List appeared first on Armchair Arcade.
Sega Genesis Classic Game Console (2016): The Official Game List
AtGames has announced the official game list for the Classic Game Console, which will be available from top retailers starting in October 2016 for $59.99 SRP. I’ll have a full review right here on Armchair Arcade soon.
The Classic Game Console features 80 built-in games and an integrated cartridge port to play almost all of your favorite Sega Genesis and Mega Drive classics. Celebrating Sonic the Hedgehog’s 25th Anniversary, a selection of the era’s best Sonic games are included, along with all-time favorites like Mortal Kombat I – III and Golden Axe. New for 2016 is save game support for the included Phantasy Star series and Sword of Vermillion role-playing games. Two wireless controllers, styled after the Sega Genesis originals, are included, as well as two legacy controller ports for optional wired gamepads.

Classic Game Console
The official game list for the Classic Game Console:
Alex Kidd in the Enchanted Castle
Alien Storm
Altered Beast
Arrow Flash
Bonanza Bros.
Chakan: The Forever Man
Columns
Columns III
Comix Zone
Crack Down
Decap Attack
Robotnik’s Mean Bean Machine
ESWAT: City Under Siege
Eternal Champions
Fatal Labyrinth
Flicky
Gain Ground
Golden Axe
Golden Axe II
Golden Axe III
Jewel Master
Kid Chameleon
Mortal Kombat I
Mortal Kombat II
Mortal Kombat 3
Phantasy Star II (includes save game support)
Phantasy Star III (includes save game support)
Ristar
Shadow Dancer: The Secret of Shinobi
Shinobi III: Return of the Ninja Master
Sonic & Knuckles
Sonic 3D Blast
Sonic Spinball
Sonic the Hedgehog
Sonic the Hedgehog 2
Sword of Vermilion (includes save game support)
The Ooze
Vectorman
Vectorman 2
Adventure in the Park
Air Hockey
Black Sheep
Bomber
Bottle Taps Race
Brain Switch
Break a Fireline
Bubble Master
Cannon
Checker
Chess
Cross the Road
Curling 2010
Dominant Amber
Fight or Lose
Flash Memory
Hexagonos
Hidden Agenda
Hide and Seek
Jack’s Pea
Jewel Magic
Jura Formula
Lost World Sudoku
Mahjong Solitaire
Meatloaf Rotation
Mega Brain Switch
Memory
Mirror Mirror
Balls
Mya Master Mind
Naval Power
Panic Lift
Plumbing Contest
Skeleton Scale
Snake
Spider
T-Rex Memory Match
Wall-Breaking
Warehouse Keeper
Whack-A-Wolf
Yawning Triceratops
The post Sega Genesis Classic Game Console (2016): The Official Game List appeared first on Armchair Arcade.
September 12, 2016
Review: AIO Robotics AIOGREEN PLA 3D Printer Filament
After reviewing the AIO Robotics AIOWHITE PLA 3D Printer Filament, which won an Armchair Arcade Editor’s Choice award, I was anxious to see the end result of the free filament offer that came in that package. Within a few weeks of completing the required steps, the AIOGRAY filament arrived, with the only difference being that instead of arriving surrounded by a custom fit cardboard box, it came sealed in a USPS envelope mailer.
Unfortunately, most likely due to the way it was handled during shipping, the filament spool arrived warped and ultimately proved unusable. Fortunately, even though this was part of a free offer, AIO Robotics was kind enough to send out a replacement spool, this one AIOGREEN, which arrived without incident or damage.

The filament ready to be loaded.

The filament is now loaded. Note that in order to better keep smaller 0.5 kg spools on the New Matter MOD-t in place, I printed and now use the Half Kilo Spool Converter, which is that brown bit on the black spool. You can find it in the New Matter store and it works brilliantly.
Being the geek that I am, I would liken AIOGREEN to a Hulk green, and it may very well inspire me to print a Hulk figure. However, for now, I just ran through a standard battery of print tests (Highest Quality, 210 degrees Celsius) on my New Matter MOD-t 3D printer.
The first was an emoji figure from the New Matter store. I chose the puke emoji because of the extra detail in that figure and how I thought the green color was kind of appropriate. As you can see, it printed wonderfully, with smooth lines and no slips, particularly compared to his friends, which printed a little rougher and had some layer slipping.
A video posted by Bill Loguidice (@bill_loguidice) on Sep 11, 2016 at 8:23am PDT

The puke emoji with two of his friends. New Matter’s Pearl PLA Arctic Blue filament has great color, and the standard New Matter Pink is also nice, but neither matches the smoothness of AIO Robotics filament.
The other test print was the infamous 3DBenchy, which is used as a torture/quality test of sorts for a 3D printer’s capabilities. I previously had failures with this model, so I thought that this would be a good way to really see what this filament is made of. As you can see, it responded well.

The front of the 3DBenchy. I still have some post print clean-up to do to remove the stringing in the open areas, but overall it came out as a nice, clean print.
A video posted by Bill Loguidice (@bill_loguidice) on Sep 11, 2016 at 7:09pm PDT

The rear of the 3DBenchy. This is a tough model to work with. I had to run it through Sli3r (Cura just spun endlessly trying to process it) to repair all of its issues, then create a clean STL file to load into the MOD-t’s Web interface. To help prevent slipping on my well-used platform, I used classic blue painter’s tape.

The underside of the 3DBenchy.
While I will say the results I’ve gotten with this filament are just as good as with the AIOWHITE, I think it would be redundant to hand out another Editor’s Choice award. It’s certainly worth one, though, and, particularly if you have a MOD-t printer, proves that AIO Robotics should be your PLA filament brand of choice.
Pluses:
Good green coloring
Great output without special settings
Minuses:
Nothing!
The post Review: AIO Robotics AIOGREEN PLA 3D Printer Filament appeared first on Armchair Arcade.
August 27, 2016
First Look: Delta Go Desktop 3D Printer
After a successful Kickstarter campaign several years back that resulted in a $499 kit printer and $749 assembled version, Deltaprinter is back with a slick new, lower cost, and more consumer friendly product, the Delta Go. With a list price of $499.00, and selling at just $449.00 for a limited time, the Delta Go is definitely competitively priced. In fact, in that same purchase price, you get a one year commercial subscription to Autodesk Fusion 360, which normally costs up to $40 a month!
Besides its striking tower-like design, the Delta Go doesn’t skimp on technical features. While I’ll provide a spec list below, key features include auto-leveling; an LED panel that reacts to the heating and cooling of the hot end, as well as lets you easily see your prints on the aluminum bed; and swappable nozzles.
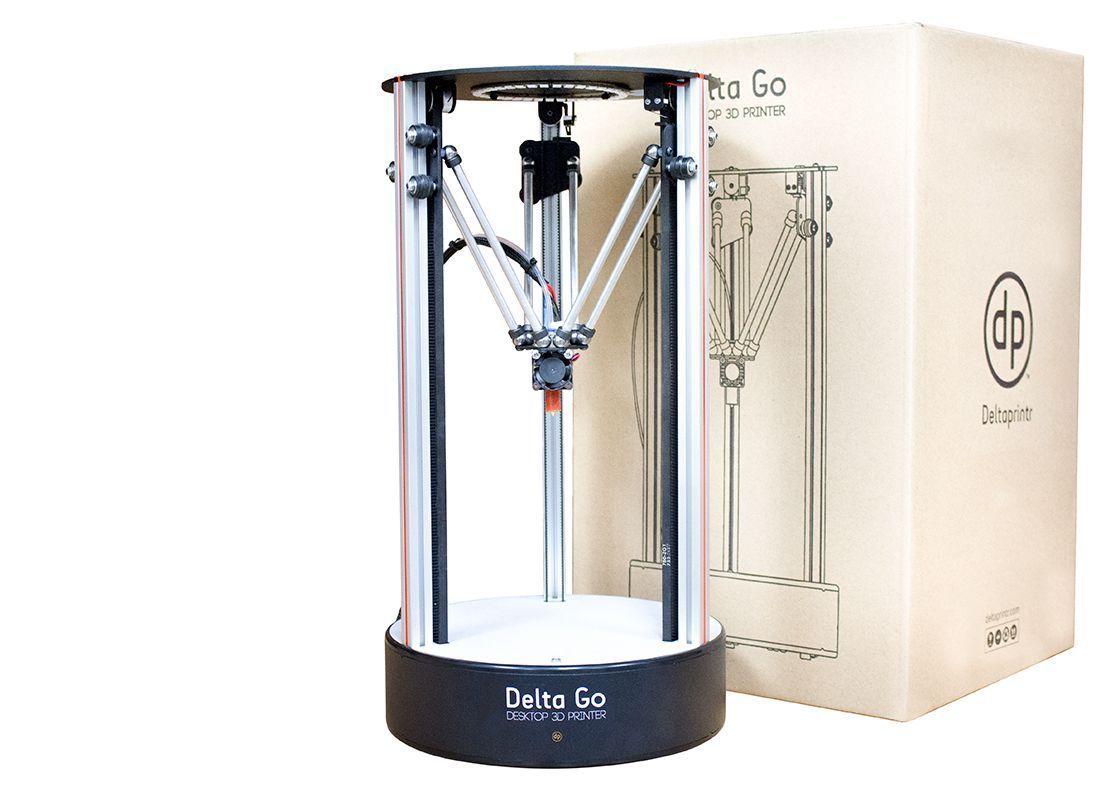
Delta Go Desktop 3D Printer
Starting in September, I’ll be presenting an unboxing of the Delta Go, as well as releasing articles related to its functionality on both Armchair Arcade and TechRadar. In the mean-time, what follows is the official spec listing for this interesting 3D printer.
Printing
PRINT TECHNOLOGY
FUSED FILAMENT FABRICATION
BUILD VOLUME
11.5 D X 12.7 H CM
[4.5 D X 5.0 H IN]
LAYER RESOLUTION
100 MICRONS
FILAMENT DIAMETER
1.75 MM [0.069 IN]
FILAMENT COMPATIBILITY
ANY TYPE OF MATERIAL
NOZZLE DIAMETER
0.4 MM [0.015 IN]
PRINT FILE TYPE
STL
Temperatures
AMBIENT OPERATING TEMPERATURE
15-26°C [60-78°F]
STORAGE TEMPERATURE
0-38°C [32-100°F]
Software
SOFTWARE BUNDLE
CURA
SUPPORTED FILE TYPES
STL
OPERATING SYSTEMS
WINDOWS (7+)
MAC OS X (10.7+)
Mechanical
CONSTRUCTION
POWDER-COATED STEEL AND ALUMINUM
BUILD SURFACE
ALUMINUM
STEPPER MOTORS
1.8° STEP ANGLE WITH 1/16
MICRO-STEPPING
XY POSITIONING PRECISION
11 MICRONS [0.0004 IN]
Z POSITIONING PRECISION
2.5 MICRONS [0.0001 IN]
Size and Weight
PRODUCT DIMENSIONS
21.8 D X 40.6 H CM
[8.5 D X 15.9 H IN]
SHIPPING BOX
18 x 10 x 10 [IN]
PRODUCT WEIGHT
3.6 KG [8 LBS]
SHIPPING WEIGHT
(INCLUDES ACCESSORY KIT)
4.5 KG [10 LBS]
Electrical
POWER REQUIREMENTS
100–240VAC; 0.75-0.41A;
50–60 HZ; 100W
CONNECTIVITY
USB
The post First Look: Delta Go Desktop 3D Printer appeared first on Armchair Arcade.
August 24, 2016
Review: AIO Robotics AIOWHITE PLA 3D Printer Filament
Finding quality PLA filament for a 3D printer can be tough. It seems like filament is similar to supplements, in that just about anyone can start up a company to produce the stuff. One of the safer ways of purchasing filament is from companies like AIO Robotics who also produce their own printers. You can be pretty confident that a company like that has to produce a good quality product, otherwise it will reflect badly on their marquee product.

What you get in the box.
In the past, for my New Matter MOD-t 3D printer, I’ve used both New Matter filament and filament from MakerGeeks.com (you can see some print samples from my TechRadar article). While I had good results from those standard 1.75mm filaments, there was a bit more stringing, particularly from the MakerGeeks.com stuff, than I’d like.

I was very happy with the print quality and overall performance of the filament.
Although my adventures in 3D printing are still in the relatively early days, I do know that it’s difficult to get a good white color. Apparently a lot of the white PLAs out there are more of an off-white than a true white. So, kudos to AIO Robotics right off the bat for creating a nice white shade here with their AIOWHITE PLA 3D Printer Filament.

The completed Desk Headphone Clip. It has an excellent finish.
Of course, looks aren’t everything. Fortunately, AIO Robotics got the performance right too. Using the default settings on the Web interface for the MOD-t, which keeps the nozzle temperature at a modest 210° C when building on its non-heated bed, the output is fantastic. There are few stray filaments and a nice smooth texture on object walls. This stuff is a dream to build with.

The completed Water Twister. Although I was disappointed with how the model actually worked, it was well rendered.
AIOWHITE PLA Key Specifications:
0.5 kg (1.10 lb.) size spool (AIO Robotics recommends this size over 1 kg rolls due to reduced weight and improved performance)
1.75Mm filament diameter (dimensional accuracy +/- 0.02Mm)
Comes vacuum packed in a resealable bag with desiccant inside a fitted box
Recommended extrusion/nozzle temperature 190° C – 210° C (374° F – 410° F)
Spool Diameter: 8″
Spool Width: 2″
Spool Hub Hole Diameter: 2″

The top half of a South Park Kyle Broflovski model. After I print the other half of the model to make a standing figure, I’ll try to paint it with acrylic paint. As you can see, the raw quality is excellent.

Another angle. This was printed at 75% scale to fit on the MOD-t’s print bed.
While I was fortunate to get this particular filament while it was on sale, I’d still happily pay full retail for this kind of performance. As such, I’m happy to give the AIO Robotics AIOWHITE PLA 3D Printer Filament an Editor’s Choice award for 2016.

Armchair Arcade Editor’s Choice Award 2016: AIO Robotics AIOWHITE PLA 3D Printer Filament
Pluses:
Good white shade
Great output without special settings
Minuses:
Nothing!
NOTE: As a nice bonus – at least in my box – was an offer for free filament if you purchase from Amazon and follow the directions indicated. I applied, but as of this writing have not received redemption confirmation.
The post Review: AIO Robotics AIOWHITE PLA 3D Printer Filament appeared first on Armchair Arcade.
August 13, 2016
Review: iRestore Laser Hair Growth System (Part 1)
The iRestore Laser Hair Growth System sounds like one of those too-good-to-be-true miracle products. The working mechanism is believed to increase blood flow in the scalp and stimulate metabolism in catagen (end of growth phase) or telogen (resting phase) hair follicles, resulting in the production of anagen (active growth phase) hair. With a reasonable scientific theory behind it and my own pressing need to assist hair regrowth on a balding 43-year-old male head that is no longer responding like it did to the minoxidil I’ve been using since my 20s (I’ve been partial to the foam version since it was introduced), I figured it was safe to give it a shot.

The box.

Opening the box.
There’s not much to the package. You get the helmet with wired remote control and an AC adapter that plugs into the remote. There’s also a Quick Operation Guide and a more extensive manual. There’s also a bundle with a battery pack for extra portability (the battery pack is also available for separate purchase), but I’m just reviewing the standard model. Considering each every other day treatment session lasts only 25 minutes, having to be near an AC power outlet is not a major inconvenience.

The contents.
There are several factors that determine whether this system is appropriate for you.The iRestore is designed to treat androgenic alopecia (hair loss that occurs due to an underlying susceptibility of hair follicles to shrinkage due to the influence of androgenic hormones) and to specifically promote hair growth in men 18 – 48 and women 18 – 60. Going by the Norwood-Hamilton Scale for men, the iRestore can be used on types IIa, III, IIIa, II-vertex, IV, IVa, and V. Going by the Ludwig-Savin Scale for women, the iRestore can be used on types I-1, I-2, I-3, I-4, II-1, and II-2. All other types are not appropriate.

A closer look at the inside of the helmet.
There are also skin classifications that should and should not use the iRestore. On the Fitzpatrick Scale, types I, II, III, and IV, are good. All other types are not appropriate.
Despite nearing my 44th birthday in October and thus fast approaching the 48-year-old cap, I fortunately fall well within the compatible range on the other scales. I’m reviewing this product after 18 treatment sessions, which works out to a little over a month, and have continued my daily minoxidil routine (usually twice daily applications). I’ll be providing before and after photos, although keep in mind that the full cycle runs 16 weeks, after which time you go on a maintenance routine. I’ll save Part 2 of this review for after the full 16 weeks are up, which will be in another three months or so.

Lasering my head.

Another angle.
To begin a session, plug the AC adapter into the wired remote, then into a wall outlet. Put the helmet on your head and make sure the cross-bar rests on your forehead. Press POWER, then START/PAUSE. After 25 minutes, your session is over; the system beeps and the red lights stop shining on the top of your head. It’s straightforward and painless.

Before and After.

Before and After.
As you can tell from these early before and after photos, there has been no change in hair growth. If anything, I’ve lost hair, although there are definitely other factors in play like different lighting, angles, and time between haircuts. Nevertheless, I look forward to seeing the results after three more months of usage, when I’ll write a follow-up and be able to deliver a definitive conclusion.
Pluses:
Painless
Simple to use
Minuses:
Expensive
Helmet is a bit bulky
Thanks to iRestore for the review unit.
What follows are the session dates and starting times for Part 1 of this review:
Session 1: Saturday, July 9, 2016 09:54 PM
Session 2: Monday, July 11, 2016 11:01 PM
Session 3: Wednesday, Jul 13, 2016 11:11 PM
Session 4: Saturday, July 16, 2016 5:54 PM
Session 5: Sunday, July 17, 2016 10:05 PM
Session 6: Tuesday, July 19, 2016 10:55 PM
Session 7: Thursday, July 21, 2016 11:37 PM
Session 8: Saturday, July 23, 2016 10:50 PM
Session 9: Monday, July 25, 2016 11:01 PM
Session 10: Wednesday, July 27, 2016 11:59 PM
Session 11: Friday, July 29, 2016 11:06 PM
Session 12: Sunday, July 31, 2016 11:55 PM
Session 13: Tuesday, August 2, 2016 09:50 PM
Session 14: Thursday, August 4, 2016 10:50 PM
Session 15: Saturday, August 6, 2016 10:47 PM
Session 16: Monday, August 8, 2016 11:08 PM
Session 17: Wednesday, August 10, 2016 10:35 PM
Session 18, Friday, August 12, 2016 10:09 PM
The post Review: iRestore Laser Hair Growth System (Part 1) appeared first on Armchair Arcade.
August 11, 2016
First Look: ZMorph 2.0 SX Multitool 3D Printer
The three most popular non-electronic forms of making are 3D printing, CNC routing, and laser engraving. It’s common enough to own or have access to at least one of those machine types, or maybe even two, to make such activities possible, but rare to have unrestricted access to all three. Amazingly, the ZMorph 2.0 SX Multitool 3D Printer, thanks to its easily interchangeable toolheads and included software, delivers all three functions in a single desktop unit.
Starting in September, I’ll be presenting an unboxing of the Z-Morph 2.0 SX, as well as releasing articles related to its functionality on both Armchair Arcade and TechRadar. In the mean-time, what follows is some key marketing information about this impressive machine.
The ZMorph 2.0 SX
A clever design.
ZMorph 2.0 SX features a new and faster worktable switching system that complements ZMorph‘s well known, interchangeable toolhead system. The new worktables simply click-in, using a magnet mounting system. Going from 3D printing to CNC and laser has never been easier.
The multitool 3D printer allows you to use over 30 types of materials, from 3D printing classics like ABS, PLA, and HIPS, to materials a typical 3D printer can’t handle like wood and machining wax, as well as PVC foil, EVA foam, and more. You can mix, combine, and experiment with any of them, and above all, you can use the perfect material for your project, not just plastic.
ZMorph 2.0 SX features an expansion slot on the X carriage with a magnet mounting system. This unique concept allows connecting add-ons for special jobs in no-time. So if you need more cooling power, you just click in an additional fan. Simple.
The Toolheads

Toolheads make switching between distinct functions straightforward.
All ZMorph toolheads use the same connection system and need only a few quick steps to be replaced. It’s like using a power tool with interchangeable heads — one machine with several different functions. The current selection of toolheads are:
1.75 mm Plastic Extruder
3.00 mm Plastic Extruder
DUAL PRO (allows use of two different materials at once)
CNC PRO
Laser Toolhead
Thick Paste Extruder (allows extrusion of ceramics, chocolate, cookie dough, and more!)
The Software

The Voxelizer software.
ZMorph multitool 3D printers use ZMorph‘s dedicated Voxelizer software. It’s the only software that takes full advantage of the printer’s versatility. It’s free, works with most file formats, allows advanced model editing thanks to its voxel-based technology, and it’s fast and easy to use.
Specifications

The key takeaway here is the virtually limitless configurations that are possible.
Construction
Aluminum 6 and 3 mm (precise and very rigid), stainless steel 2 mm and 3mm; PET 3 mm; and ABS.
Interchangeable nozzles: 0.2 mm, 0.3 mm, 0.4 mm.
Interchangeable toolheads.
Interchangeable worktables.
Add-on slot.
Heated worktable: hardened glass 5 mm, silicone heater 140 W, temperature up to 120C.
Dimensions
Working area: 250 x 235 x 165 mm.
Dimensions: 530 x 555 x 480 mm.
Weight: 20 Kg with packaging (basic version).
Positioning Precision
14 microns for X and Y axis, 0.625 micron for Z axis.
Resolution
50 – 400 microns.
Electronics
Sunbeam 2.0 with ARM LPC1769 processor, equipped with 5 stepper motor drivers: 3 for XYZ axis, 2 more for double material extruder. Internal drive accessible via USB.
Display
LCD color touchscreen.
Communication
USB and LAN (access to WiFi after connecting to WiFi router). Standalone printing supported via panel + internal SD card.
Use Cases

A shot of the sample pack, which showcases one end result from using all three major ZMorph functions.
As you might expect, there have been some extraordinary projects by some talented individuals that were made possible thanks to this printer. Click here to see just some of them.
The post First Look: ZMorph 2.0 SX Multitool 3D Printer appeared first on Armchair Arcade.
August 9, 2016
Review: 8Bitdo SNES30 GamePad and Retro Receiver for SNES
If you’re looking for a good wireless option for your Super Nintendo (SNES) controller compatible system, 8Bitdo has two separate offerings that form a complete solution. The most important offering is the Retro Receiver for SNES, which plugs into an SNES controller port and wirelessly connects PS4, PS3, Wii Remote, Wii U Pro, and all 8Bitdo controllers, including the 8Bitdo SNES30 GamePad, which I’m also reviewing. As a final bonus, the Retro Receiver for SNES is compatible with Windows and MacOS computers via the X-INPUT protocol.

The packaging for the 8Bitdo offerings.
The other offering, the SNES30 GamePad, is a Bluetooth wireless controller styled like the original SNES gamepad. Besides working with the Retro Receiver, it also functions as a Bluetooth joystick, Bluetooth keyboard, in iCade mode, in Emu-Touch Screen mode, in Wii remote mode, in RetroN 5 mode, and as a wired USB controller, with more functions promised. Those additional functions can be added via firmware updates, which is also possible on the Retro Receiver.

Opening the SNES30 GamePad box.

The contents.
In the attractive packaging for the SNES30 GamePad, you get the controller itself, standard USB cable to charge the built-in 480mAh Li-on battery, SNES 30th Anniversary keychain, and paperwork. The packaging for the Retro Receiver is simpler, coming in blister packaging, and includes the controller port dongle and a standard USB cable for connecting to a computer. The instructions are on the back of the packaging insert.

What you get with the Retro Receiver.
Although both devices offer a tremendous range of functionality, I primarily bought this for use with the amazing Retro Freak (which I reviewed back in 2015), which does not have a wireless option. To use an SNES (and other) controllers with the Retro Freak, you need the Retro Freak Controller Adapter, which comes with the Premium bundle, or is available for purchase separately.
Here’s how I got both the Retro Receiver and SNES30 GamePad to work on the Retro Freak:
I charged the controller.
I plugged the adapter into the controller adapter on the Retro Freak.
I turned the Retro Freak on.
I pressed the pair buttons on both the adapter and the controller.
I was almost immediately able to move around in the Retro Freak’s menu system.
I selected the standard SNES controller setup in each Retro Freak emulation system’s menu.
I started playing wirelessly like it was a normal SNES controller plugged into the controller port with a wire.
It really is remarkable how seamlessly it all works. While I like the SNES30 GamePad, it’s not quite as nice as the original SNES gamepad. There’s a bit more bounce to the d-pad, for instance. Overall, though, I have no significant complaints, particularly for a third party design. It’s definitely a controller I’ll make regular use of.

These 8Bitdo products offer a solution to the one real problem with the Retro Freak.
The Retro Receiver on the other hand is unequivocally extraordinary. It delivers the holy grail of classic gaming, bringing true wireless capability to legacy hardware (or hardware that uses legacy controller ports) with no perceptible lag and no fuss configuration. It just works, period. That’s why the Retro Receiver for SNES is receiving an Editor’s Choice award for 2016.

Armchair Arcade Editor’s Choice Award 2016: 8Bitdo Retro Receiver for SNES
8Bitdo SNES30 GamePad
Pluses:
Wireless
Lots of functionality
Excellent packaging
Minuses:
Doesn’t quite capture the feel of the SNES original
8Bitdo Retro Receiver for SNES
Pluses:
Wireless for SNES compatible controller ports
Lots of functionality
Works out of box
Powered by controller port
Minuses:
Nothing!
The post Review: 8Bitdo SNES30 GamePad and Retro Receiver for SNES appeared first on Armchair Arcade.
August 7, 2016
Review: AULA Wings of Liberty White 104-key RGB Mechanical Keyboard with Blue Switches
The AULA Wings of Liberty White 104-key RGB Mechanical Keyboard ($79.99) is a no-frills, premium keyboard. It’s equipped with generic blue switches, equivalent to Cherry MX Blue switches, which are favored for typing-intensive tasks. Blues are generally considered amongst the loudest switches, but this particular implementation is not perceptibly louder than other keyboards using different colored switches that I’ve used in the past. In any case, as expected, these blue switches give a tactile bump, as well as an audible click, when pressed even about halfway, so the responsiveness is quicker than other colored switches, which explains why heavy typers tend to favor them.

The box.
In the package you’re supposed to get the keyboard, quick start guide, and key puller. Unfortunately, this doesn’t appear to have a quick start guide or a key puller. It does has a very small double-sided sheet of paper that may be the quick start guide, but it appears to be in Chinese.

Opening the box.
Even without a key puller, as is the norm for most mechanical keyboards, the keys are easy enough to pull off yourself when needed for maintenance or replacement. In fact, the Enter key on the numeric keypad fell off on mine during shipping. Fortunately, it was quite easy to pop back on securely.
As mentioned earlier, this is no frills, so there are few customization options here. You plug it in, and it works. It was recognized right away on my docked Microsoft Surface Pro 3 running Windows 10. There are four activity lights above the number pad that indicate things like Caps Lock and Scroll Lock, however, plus there are hard-coded secondary functions on the function keys, which are activated by pressing FN on the lower right of the keyboard.
There’s a guide on the interior of the box, but since it’s not in English I was only able to figure out a handful of the functions so far. These are (with the FN key): F1 = Previous, F2 = Play/Pause, F3 = Next, F4 = Stop, F5 = Mute, F6 = Volume Down, F7 = Volume Up, and F8 through Pause (except for F12) = Light Switching.

It has a striking look.
The light switching switches between various running lighting patterns. The latter is neat to see, but has little practical use. You can use FN plus the Home key to go back to the default lighting (steady on), and FN plus up or down arrows will raise or lower the brightness, respectively.

This key was easy to secure.
There are two clips on the bottom of the keyboard you can unlock to raise the top of the keyboard at an angle. You can also remove the wrist rest, although I’m not sure why you’d want to since it’s small and unobtrusive.
If you’re looking for a good mechanical keyboard for heavy typing and don’t need a lot of customization, you can do a lot worse than the AULA. I really love its compact size and like the responsiveness of the blue switches when I’m typing up a storm.
Pluses:
Solid, heavy keyboard stays in place
Quality construction
Good price
Blue switches really are great for typing
Minuses:
Limited customization options
No key puller
No English quick start guide
Trial and error with the function key combinations
Thanks to AULA for the review unit.
The post Review: AULA Wings of Liberty White 104-key RGB Mechanical Keyboard with Blue Switches appeared first on Armchair Arcade.


