
Bill Loguidice's Blog, page 102
May 16, 2016
Review: BTSKY Professional 144 Piece Watch Tool Kit
Previously, I reviewed a simple watch tool that helped me remove the links on two third party Apple Watch bands (bracelet-style). That small selection of tools got the job done, but it was strictly limited to removing and inserting pins on a watch band. The BTSKY Professional 144 Piece Watch Tool Kit, on the other hand, not only replicates that functionality, but also does just about everything else you’d ever need done to a watch. The best part is, is you’re not going to pay all that much more than the smaller kits.

The storage case.
In the package you get the following items:
Zipper Storage Case
Instructions/Inventory List
Link Remover (for bracelet-style watch bands)
Watch Case Opener Knife (opens rear covers)
Watch Case Holder (10 – 45mm diameter watch cases; helps keep watches in position when working on them)
Stainless Steel Tweezers (for removing and inserting batteries)
Spring Bar Tool (strap removal)
Watch Back Pry Opener (yellow handle; opens rear covers)
Three (3) Precision Anti-magnetic Screwdrivers (removes battery cover)
Three (3) Pin Punches (remove watch chain)
18 Interchangeable Chucks (used on watch case opening)
Adjustable Case Opener (to open watch case)
Three (3) Link Remover Spare Pins
Two (2) Sping Bar Tool Spare Tips
108 Watch Strap Spring Pins

What you get.
So, while the interchangeable chucks and spare watch strap spring pins make up the bulk of the 144 pieces of the kit, it still includes every tool you’ll probably ever need. It’s a great deal that will pay for himself after avoiding just one trip to the watch shop/jeweler.
Thanks to BTSKY for the discounted review unit.
The post Review: BTSKY Professional 144 Piece Watch Tool Kit appeared first on Armchair Arcade.


Review: EnacFire 6 Pack microUSB Cables
microUSB cables are used to sync and charge everything from Android devices to game controllers. As such, it’s always handy to have one or two extras around. It’s also handy to have different lengths available. The EnacFire 6 Pack takes care of both of those needs.
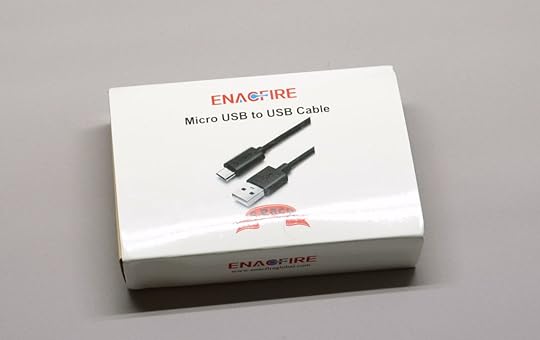
The box.
In the package you get one 1 foot, three 3 foot (the common length that comes with most devices), one 6 foot, and one 10 foot cable. All are USB 2.0 certified for transfer speeds up 480Mbps. EnacFire also makes the claim that their cables can provide up to 7% faster charging over other brands of cable. While I was unable to test maximum transfer or charging speeds, these cables performed as expected in normal usage.

What you get.
While there is nothing that especially stands out about these cables other than that they seem well made and durable, this is an especially economical way of procuring a wide variety of lengths. In fact, depending upon what cable you might otherwise buy, you can spend as much as or more for that one cable than you would on this pack of six cables.

A cable freed from the package.
One thing in particular I do want to point out is the generous 18 month warranty from date of purchase. If you have any issues with any of the cables, you can simply contact support@enacfireglobal.com for support, adding to the already notable value.
Thanks to EnacFire for the discounted review unit.
The post Review: EnacFire 6 Pack microUSB Cables appeared first on Armchair Arcade.
May 15, 2016
Review: Commodore SX-64 Keyboard Replacement Solution (plus 64JPX Red)
Commodore’s SX-64 was an ahead-of-its-time, transportable color computer based around the core technology in the legendary Commodore 64 (book). Unfortunately, the SX-64’s external keyboard is notoriously failure prone. In fact, of the two keyboards I have, one is completely dead and one barely registers a key press (and in fact lately appears to have stuck key signals, so it’s even worse). Sadly, replacement keyboards are incredibly difficult to find and often involves buying another complete system, which, if you’ve shopped for SX-64’s of late, you know is not cheap. Fortunately, I did find one solution to many an SX-64 owner’s dilemma, and that’s an offering from Jim Brain at Retro Innovations.

Retro Innovations Adapter

How the SX-64 is supposed to look.
Although the options are a bit confusing, if you go here, you can select the SX64 to/from PC option. My selected configuration was as follows: (Configuration: SX64 to/from PC, Joyport Sockets: No, Assembled? Yes). After about a month, I received my assembled board, which was ready-to-go.
The design is simple enough. You take your SX-64 keyboard cable, plug that into the SX-64 as usual, then plug the other end into the slot on this device. You then plug a PS/2 compatible keyboard with a Mini-DIN6 plug into the PS/2 port on the device. At least that’s the theory.
Unfortunately, it appears that the standard SX-64 cable does not fit into the connector on the board (I tried both of mine), which I confirmed with Jim Brain via email (I wish he had made that known on the Website or even in our prior email exchanges). Although he recommended just using a regular DB25 cable (which it turns out is recommended on his other site), all of my DB25’s didn’t fit either. My only choice was to snip away the plastic on the SX-64 keyboard cable connector end, which you can see in the photo.

Ugly snipping, but it now fits.
As you can also see in the photo, my snipping handiwork with my Xuron 170-II Micro-Shear Flush Cutters was not great (I had to be particularly careful to not snip any pins!), but it gave me an excuse to order some files to fix it up later (they should also be good for helping to beautify a modification I made to the removable lid on one of my Coleco Adams).

How it all connects.
Anyway, for the replacement keyboard, I used a small form factor PS/2 keyboard from MCSaite I got for use with the MCC-216, complete with separately purchased keyboard stickers that go over the PC keys so they match their equivalent C-64 keyboard functions. All told, it’s not a bad way of working on a Commodore (although a quirk of this keyboard is that I have to manually turn off the Num Lock, which is on by default after startup), plus, because this keyboard also works over USB, I can use it with a regular PC emulator (I also tested old Dell and Microsoft full-sized PS/2 keyboard that worked just fine as well). Since this is actually my first time setting up the stickers, I do note that there does not appear to be an equivalent to the C-64’s [ and : combo key, as well as Restore. It was the same on all of the keyboards I tried.

I tried different keyboards.

Another angle.
I do also have to note that this setup failed to work at first, even after many hours of troubleshooting. After some back and forth emails with Jim Brain, he directed me to the product’s Website, where I was able to see what the jumper settings should be. It turns out I received the unit with J5 jumpered incorrectly. Once I fixed that, everything worked exactly as it should. On the plus side, in theory I also have the jumper settings there to configure this for use with my C-128DCR in case I ever need to use a different keyboard with that (fortunately, its original keyboard is in perfect working order as of now). I’ll just need to supply my own compatible DB-25 cable.

The original SX-64 keyboard (left) and my cheap sticker keyboard (right).
While this is not my ideal solution for Commodore’s transportable – I’d much rather have a working original keyboard – this does allow me to actually use one of my two SX-64s (of course one works better than the other), where before, it was beyond frustrating (and eventually, unusable). It’s not a cheap offering (and having to modify one of my original cables was particularly annoying), but it’s something that should last and has the benefit of working with more keyboard types should the need arise (NOTE: If you have a spare C-64 or VIC-20 keyboard lying around, this may very well be an even better solution).

The 64JPX Red.
I also tried out Nicholas Coplin’s 64JPX (JoyPad eXpander) Red for Commodore and Atari Computers and Consoles. The color designation indicates its compatibility, with the red allowing Sega Genesis or Mega Drive controllers to work more safely with older systems like the SX-64.
Interestingly, the 64JPX also offers other enhancements, like auto-fire, racing mode (use buttons instead of up/down, which is often used for accelerating and braking on one button systems), waddle mode (sports game left/right waddle simulation, e.g., when you need to move the joystick really fast left and right to run) and creep mode (platform or run-n-gun movement slow-down, e.g., when you need to position yourself perfectly on a platform, you can use the B button to “creep” left or the C button to “creep” right, the equivalent of a light tap on the joystick). Accessing one of these modes is simple. Press Start, then A, B, or C, as indicated in the PDF manual for the respective desired mode, then press Start again.

The 64JPX in action.
In my testing with both an original Sega Genesis gamepad and an Asciiware third party joystick, everything worked as expected. However, it’s important to note that this only worked in joystick port 1 on my SX-64, and caused stray characters to appear on the screen when plugged into port 2. So if you plan on using this with an SX-64, I’d probably steer clear. Nevertheless, while I’ve never personally had an issue with using Sega Genesis controllers directly on my older systems, there are enough reports of blown joystick connectors out there to make me reconsider my cavalier attitude towards it. I’m glad to have the 64JPX for use with my other 8-bit systems.
The post Review: Commodore SX-64 Keyboard Replacement Solution (plus 64JPX Red) appeared first on Armchair Arcade.
May 10, 2016
Review: Levenhuk Rainbow 50L Biological Microscope
The Levenhuk Rainbow 50L Biological Microscope is a premium home-use instrument. Whether for straight up experimentation or educational usage, or for practical tasks like seeing fine detail on a circuit board, the Rainbow 50L is packed with a killer combination of features and added value.

The box.
The lightweight plastic microscope comes in an oversized plastic storage case with snap enclosures. Inside the case are various accessories, a complete Levenhuk K50 Experiment Kit, and a user manual, all of which it also houses, with room for more.

Taking it out of the box.

Opening the case.
The microscope is equipped with three multi-coated glass objective lenses with magnifications of 4x, 10x, and 40x, and which are selected by rotating the revolving nosepiece. Included is a 2x Barlow lens, which, as you might suspect, works to double any of the magnifications. All told, the out-of-the-box magnification range goes up to 800x.
One particularly nice feature of the Rainbow 50L is its built-in double LED illumination system. If you had a similar experience to the one I had all those years ago when still in school, then you probably remember that if we didn’t use transparent slides and ultra-thin samples, then our microscopes weren’t of much use due to lack of light. In fact, that’s what ultimately doomed my own experiments with a cheap microscope I had asked for and received as a child. Fortunately, because of the Rainbow 50L‘s adjustable upper and lower lighting setup, you can not only observe transparent and semi-transparent objects, but also objects that are opaque like a coin or aforementioned circuit board.

Setting up.
Following the instructions in the user’s manual, setup is simple. You move the sample stage to its lowermost position, install the two included AA batteries in the battery compartment beneath the unit (or use the included AC adapter), insert the eyepiece into the eyepiece tube (then into the microscope body, of course), and then adjust the illumination brightness. Finally, you place your specimen on the stage, secure it with the holders, then look through the eyepiece and focus (or further adjust the illumination).

Magnification even using the lowest setting is extremely impressive.
The Levenhuk K50 Experiment Kit is a nice inclusion and makes diving into observations quick and easy because it includes both ready-made experiments, as well as experiments you prepare yourself. The kit comes with a user’s guide, forceps, a hatchery for Artemia (brine shrimp), microtome (tool used to cut thin slices of material), five blank glass slides, dust cover, pipette, four flasks, and five samples. The four flasks contain brine shrimp, yeast, sea salt, and pitch, respectively. The five samples are: fly’s limb, onion, cotton stem, slice of a tree trunk, and pine.

This is a great family activity.
My two oldest daughters, 11 and 9, loved using the kit with the microscope. I’ll almost certainly be buying additional experiment kits for them to use with this once they finish all of the existing activities. It’s definitely a well thought out, well-built, family product that we’ll no doubt continue to make use of in the years to come.
Thanks to Levenhuk for the review unit.
The post Review: Levenhuk Rainbow 50L Biological Microscope appeared first on Armchair Arcade.
May 9, 2016
Review: Syhonic 8 LED Solar Powered Garden Light
The Syhonic 8 LED Solar Powered Garden Light is a compact, wall-mountable security light. After charging in the sun, its eight LEDs, which provide for up to 160 lumens of brightness, automatically go on at night any time its passive infrared (PIR) sensor detects movement.
The box.
In the package you get the light itself, mounting hardware, and instructions. The unit is nice and small and, as you can see in the photos, quite attractive. It’s also weather-resistant (IP64 rated) and heatproof.
Of special note is the “diamond lampshade” design, which helps soften and evenly distribute the light from the LEDs. Once fully charged, this unit should provide greater than eight hours of usage.

What you get.
As long as you can place it in an area where sunlight hits, then Syhonic’s offering makes for an excellent, no-fuss security light.
Thanks to Syhonic for the review unit.
The post Review: Syhonic 8 LED Solar Powered Garden Light appeared first on Armchair Arcade.
May 8, 2016
Review: Ausdom M07 Wired and Wireless Bluetooth Headphones
The Ausdom M07 Wired and Wireless Bluetooth Headphones is a feature-rich headset that not only works wirelessly over a Bluetooth 4.0 connection, but can also work over a standard 3.5mm audio cable (included).

The package.

The box.
You get the headset itself, a user’s manual, a 3.5mm male-to-male audio patch cable, and a standard microUSB charging cable. Once charged, you’ll get about eight hours of normal usage or over 30 hours of standby time for its phone-enabled features, which features CVC 6.0 noise cancellation technology. Any music control or phone functionality will vary by device and of course won’t work when using a wired connection.
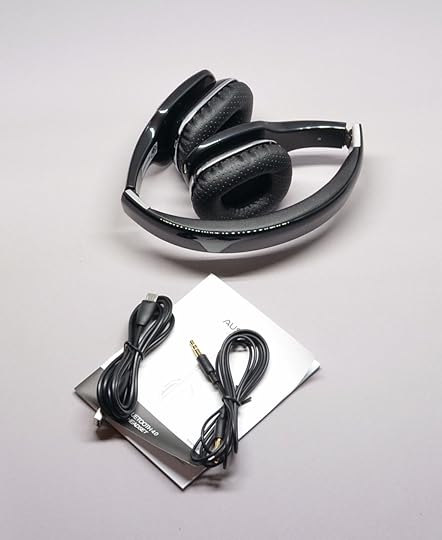
What you get.
The 3.5mm audio jack (AUX), built-in microphone, audio control features, and microUSB charging port are all located on the sides of the headset. The band is fully adjustable, as well as foldable (for portability), and the ear pads/cushions are fairly nice and soft. The ear pads are very much on the small side for my ears, going on top of my ears instead of over them, the latter of which being what I prefer. While I personally feel these would probably fit best on those with particularly small ears, like teenagers or children, this is a common style for adults, so don’t necessarily take my opinion of the fit as the be-all and end-all.

The headset is pretty stylish.
Audio quality over Bluetooth is clear with nice bass. It can get really loud if you want with no noticeable loss of clarity.
Thanks to Ausdom for the review unit.
The post Review: Ausdom M07 Wired and Wireless Bluetooth Headphones appeared first on Armchair Arcade.
Review: Ausdom S-M07 Wired and Wireless Bluetooth Headphones
The Ausdom S-M07 Wired and Wireless Bluetooth Headphones is a feature-rich headset that not only works wirelessly over a Bluetooth 4.0 connection, but can also work over a standard 3.5mm audio cable (included).
The package.
The box.
You get the headset itself, a user’s manual, a 3.5mm male-to-male audio patch cable, and a standard microUSB charging cable. Once charged, you’ll get about eight hours of normal usage or over 30 hours of standby time for its phone-enabled features, which features CVC 6.0 noise cancellation technology. Any music control or phone functionality will vary by device and of course won’t work when using a wired connection.
What you get.
The 3.5mm audio jack (AUX), built-in microphone, audio control features, and microUSB charging port are all located on the sides of the headset. The band is fully adjustable, as well as foldable (for portability), and the ear pads/cushions are fairly nice and soft. The ear pads are very much on the small side for my ears, going on top of my ears instead of over them, the latter of which being what I prefer. While I personally feel these would probably fit best on those with particularly small ears, like teenagers or children, this is a common style for adults, so don’t necessarily take my opinion of the fit as the be-all and end-all.
The headset is pretty stylish.
Audio quality over Bluetooth is clear with nice bass. It can get really loud if you want with no noticeable loss of clarity.
Thanks to Ausdom for the review unit.
The post Review: Ausdom S-M07 Wired and Wireless Bluetooth Headphones appeared first on Armchair Arcade.
Review: Syhonic Outdoor Solar Spotlight
The Syhonic Outdoor Solar Spotlight is a new generation of the popular solar spotlight product. It’s waterproof (IP65 rating) and heatproof, and can be secured in the ground with the included spike or wall mounted with the included hardware.

The box.
The spotlight itself has a single button for Low, Off, and High brightness. Low brightness lasts approximately 14 hours, while high brightness (about 200 lumens) lasts approximately 8 hours. In my testing, even the low brightness was suitably bright thanks to the four LEDs (4×50 lumens max). With its built-in light sensor, it automatically goes on at night and automatically turns off and charges during the day.

What you get.
The oversized solar panel adjusts 180 degrees, while the spotlight portion adjusts 90 degrees. The combination of the two should allow for optimal positioning regardless of where you place it.
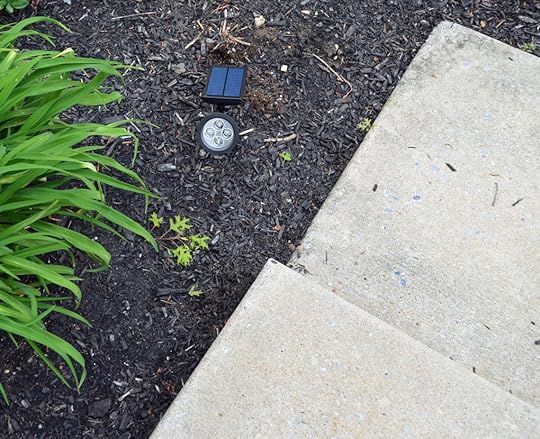
It looks good.
The built-in lithium rechargeable battery (3.7v, 2200Mah) should last about three years, making for a long-time fixture in your yard.

Another angle.
Thanks to Syhonic for the review unit.
The post Review: Syhonic Outdoor Solar Spotlight appeared first on Armchair Arcade.
Review: Go2Link Aluminium 4 Port USB 3.0 Hub with Charging Port
The Go2Link Aluminium 4 Port USB 3.0 Hub with Charging Port is a way to transform a single USB 3.0 port on your computer into something far more versatile. While this is backwards compatible with USB 2.0 and USB 1.1/1.0, you’ll obviously only get near the 5Gbps and other performance levels with USB 3.0.

The box.
With the power switch off, all USB ports are also powered off. With the power switch on, all five USB ports are available, including a single maximum 1500mA charging port.

The device.
It’s a nice unit, although the relative bulk makes it a bit less portable than you might hope. This is really most at home for use with a desktop computer or if you have a larger travel computer bag. However you plan on using it, though, it should still easily prove a valuable device to have in your collection.
Thanks to Cloud Electronic Technology for the discounted review unit.
The post Review: Go2Link Aluminium 4 Port USB 3.0 Hub with Charging Port appeared first on Armchair Arcade.
Review: Feelle 6-Outlet Power Strip with 6 USB Charging Ports
Feelle makes a useful range of combination multistrip AC power and USB charging outlets. There’s a three USB, three outlet model, an eight USB and six outlet model, and a six USB and six outlet model, the latter of which is the one I’m reviewing.

The box.
As stated, besides the six AC outlets, there are six USB charging outlets. Two of the USB outlets are 5V/2.4A for larger devices like tablets (or for faster charging of smaller devices that allow for that), and the other four are 5V/1A.
The whole strip is rated for loads up to 1625W/13A, complete with overload protection. There’s also the expected surge protection and other standard safety features.

The overall design is excellent.
As you can see from the photos, the spacing between the AC and USB outlets is fairly generous. A nearly six foot cord rounds out the notable feature-set. If you’re looking for a good, versatile power strip, the Feelle makes a fine choice.
Thanks to Feelle for the discounted review unit.
The post Review: Feelle 6-Outlet Power Strip with 6 USB Charging Ports appeared first on Armchair Arcade.


