
Gretchen Hirsch's Blog, page 5
February 9, 2016
Country Singer Dress
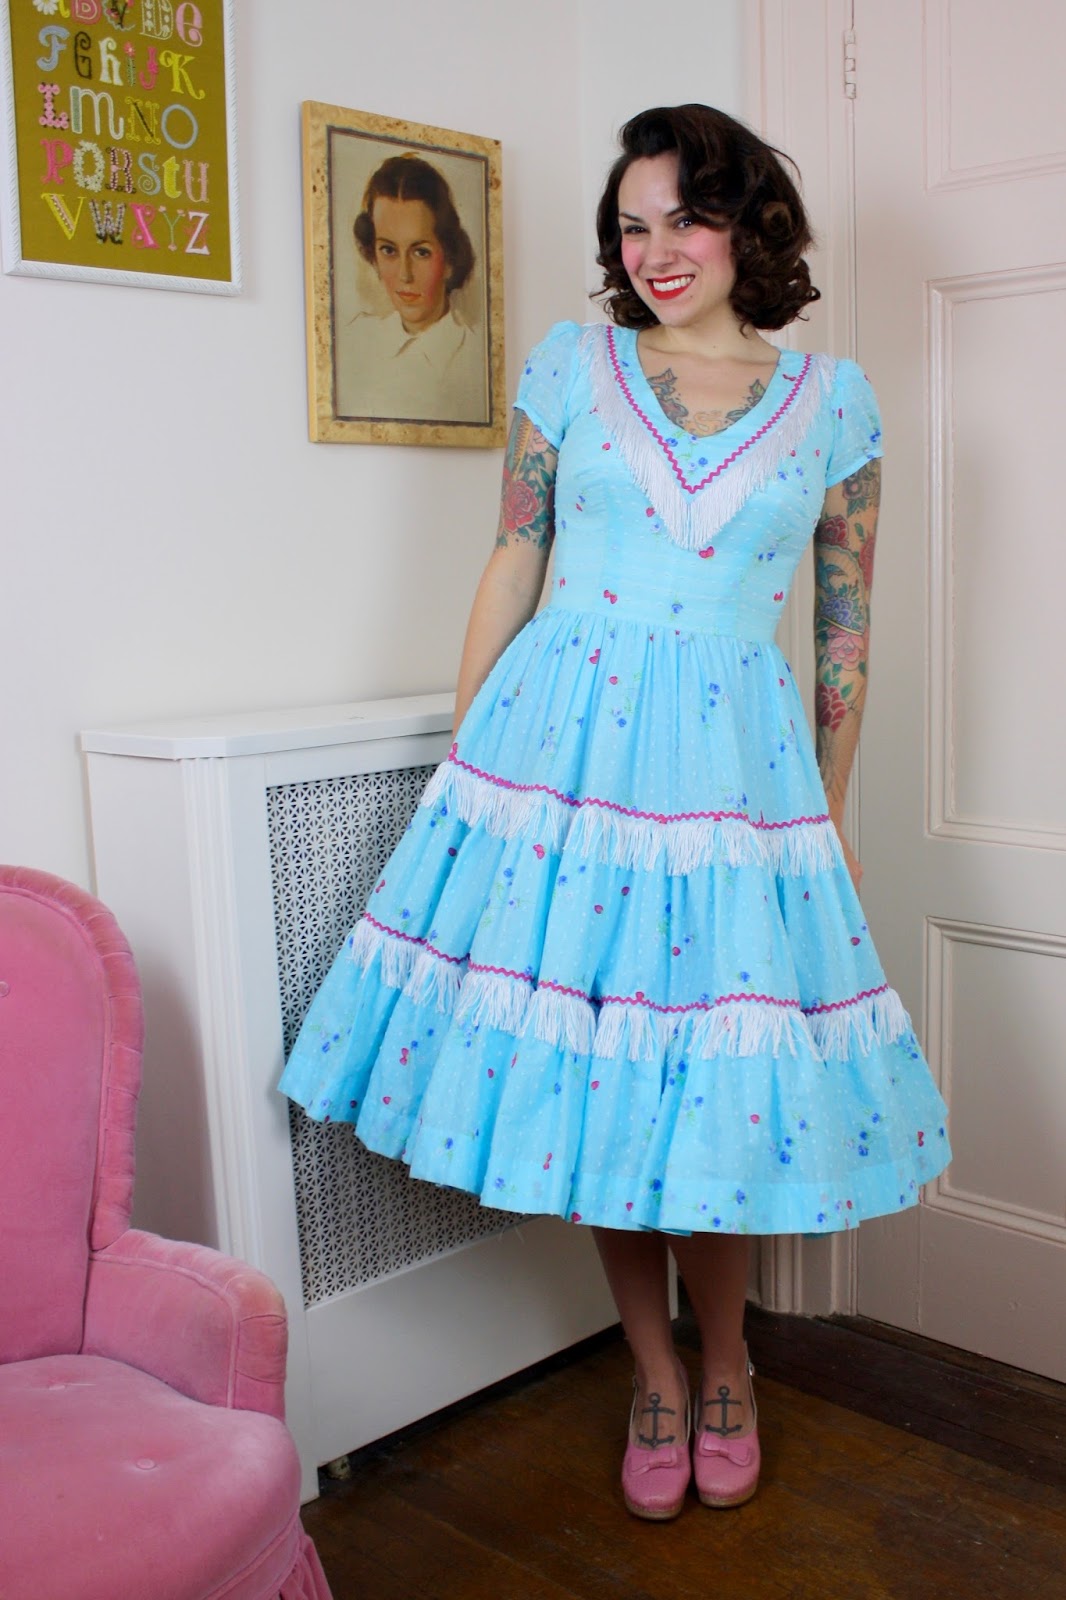
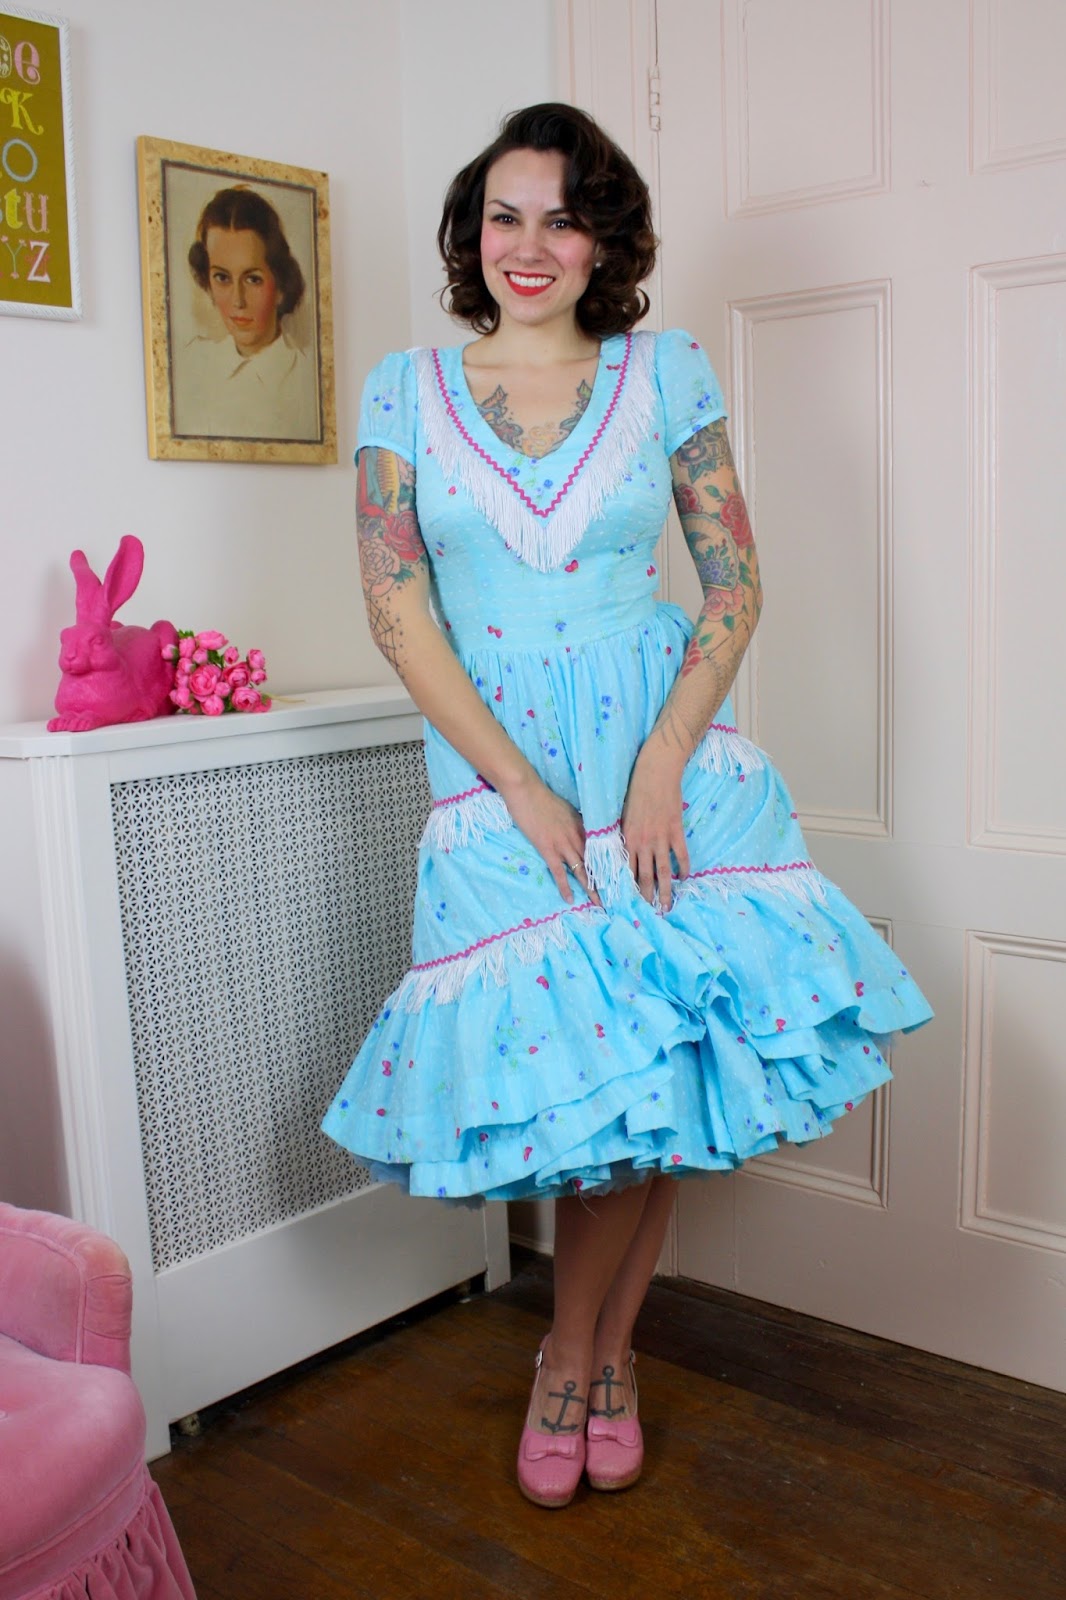
 Quite a while ago, I discovered this vintage Western style dress on Pinterest and was never able to get it out of my head.
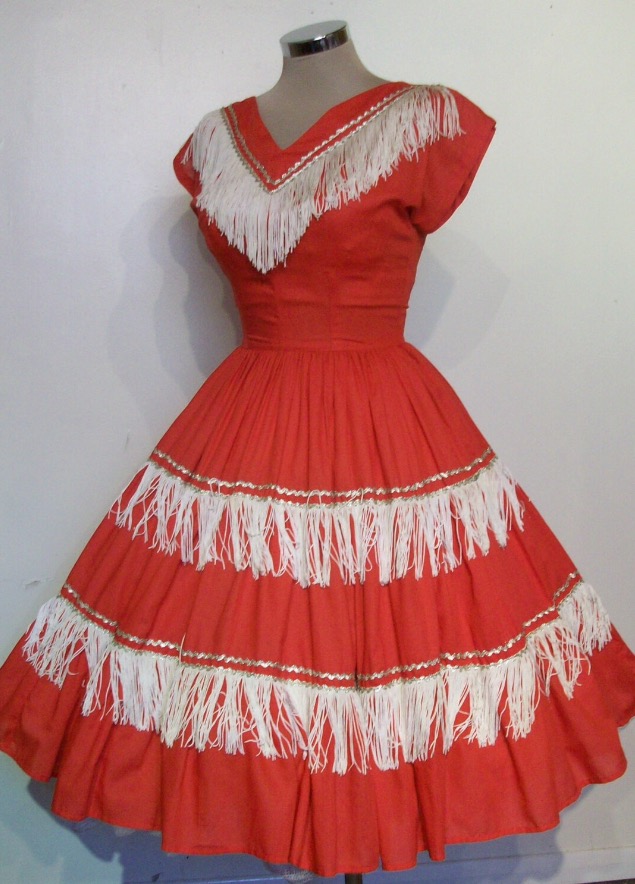 I just adore that combination of rick rack and fringe! And it's so clever how the fringe is sewn into the seams of the tiered skirt. I knew I wanted to copy the dress at some point, and it finally happened. I think I've mentioned here that I sing in a little local rockabilly band, and I needed a good performance dress. Obligatory guitar shot!
 The pattern I used is from my upcoming book Gertie's Ultimate Dress Book. It's a variation on the Plaid Rockabilly Dress.
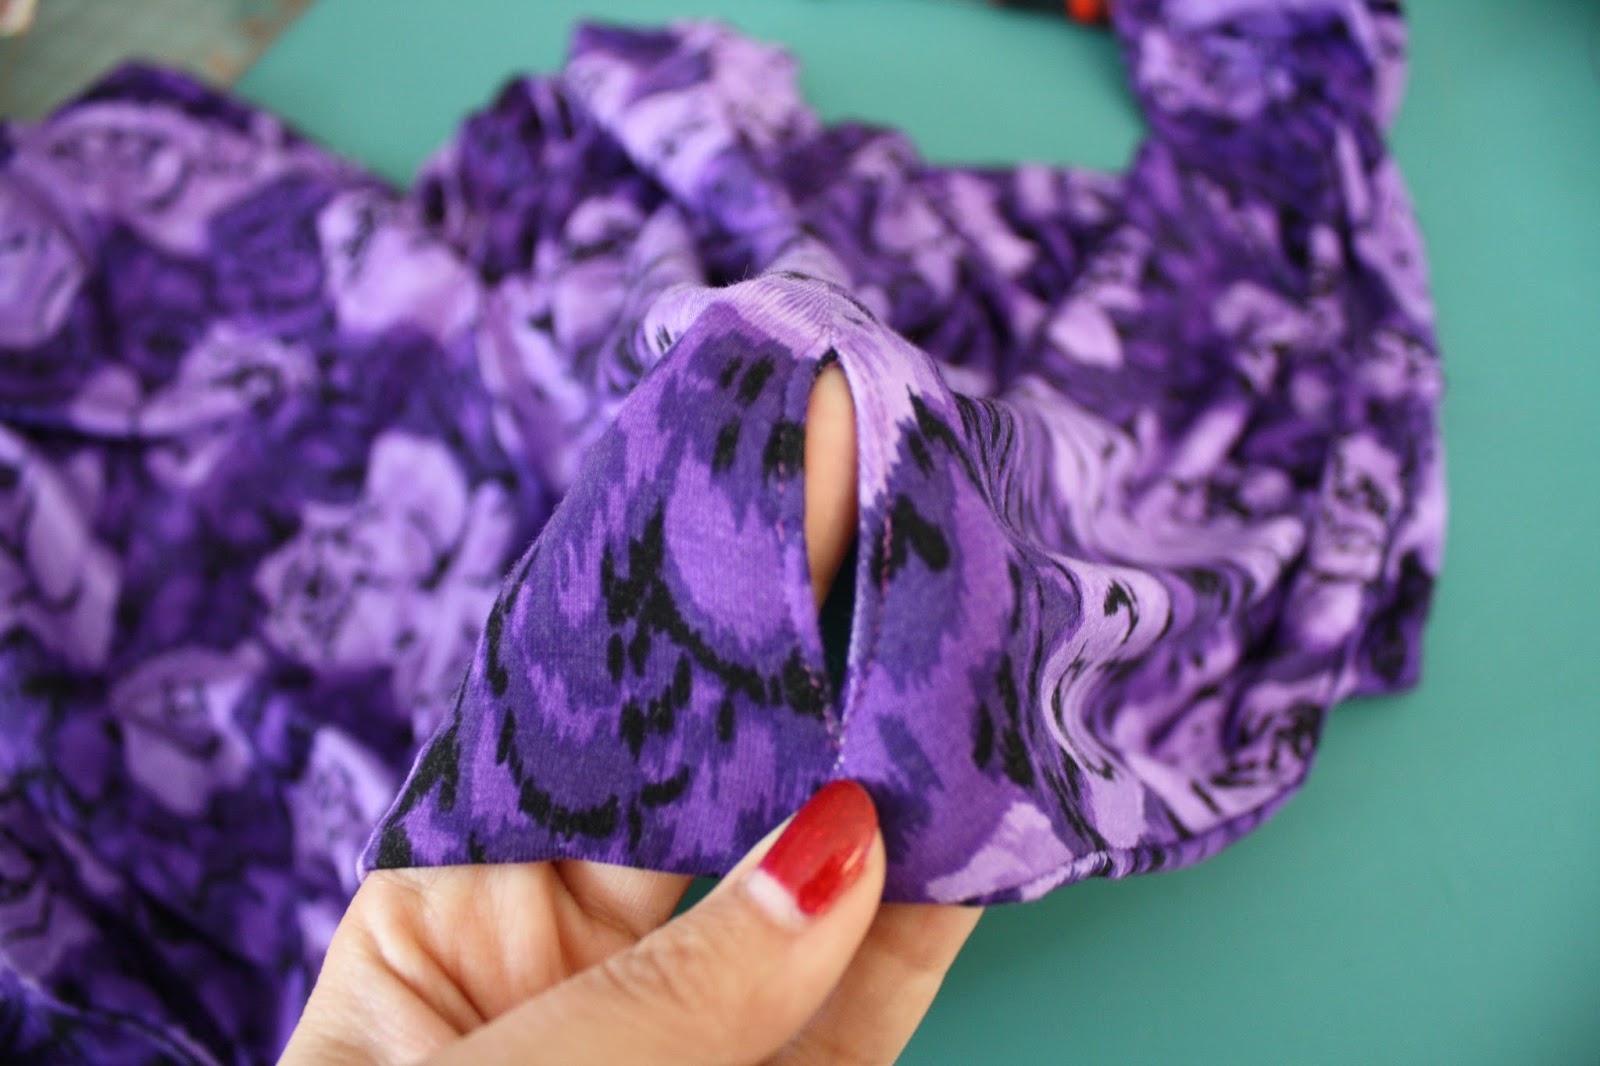
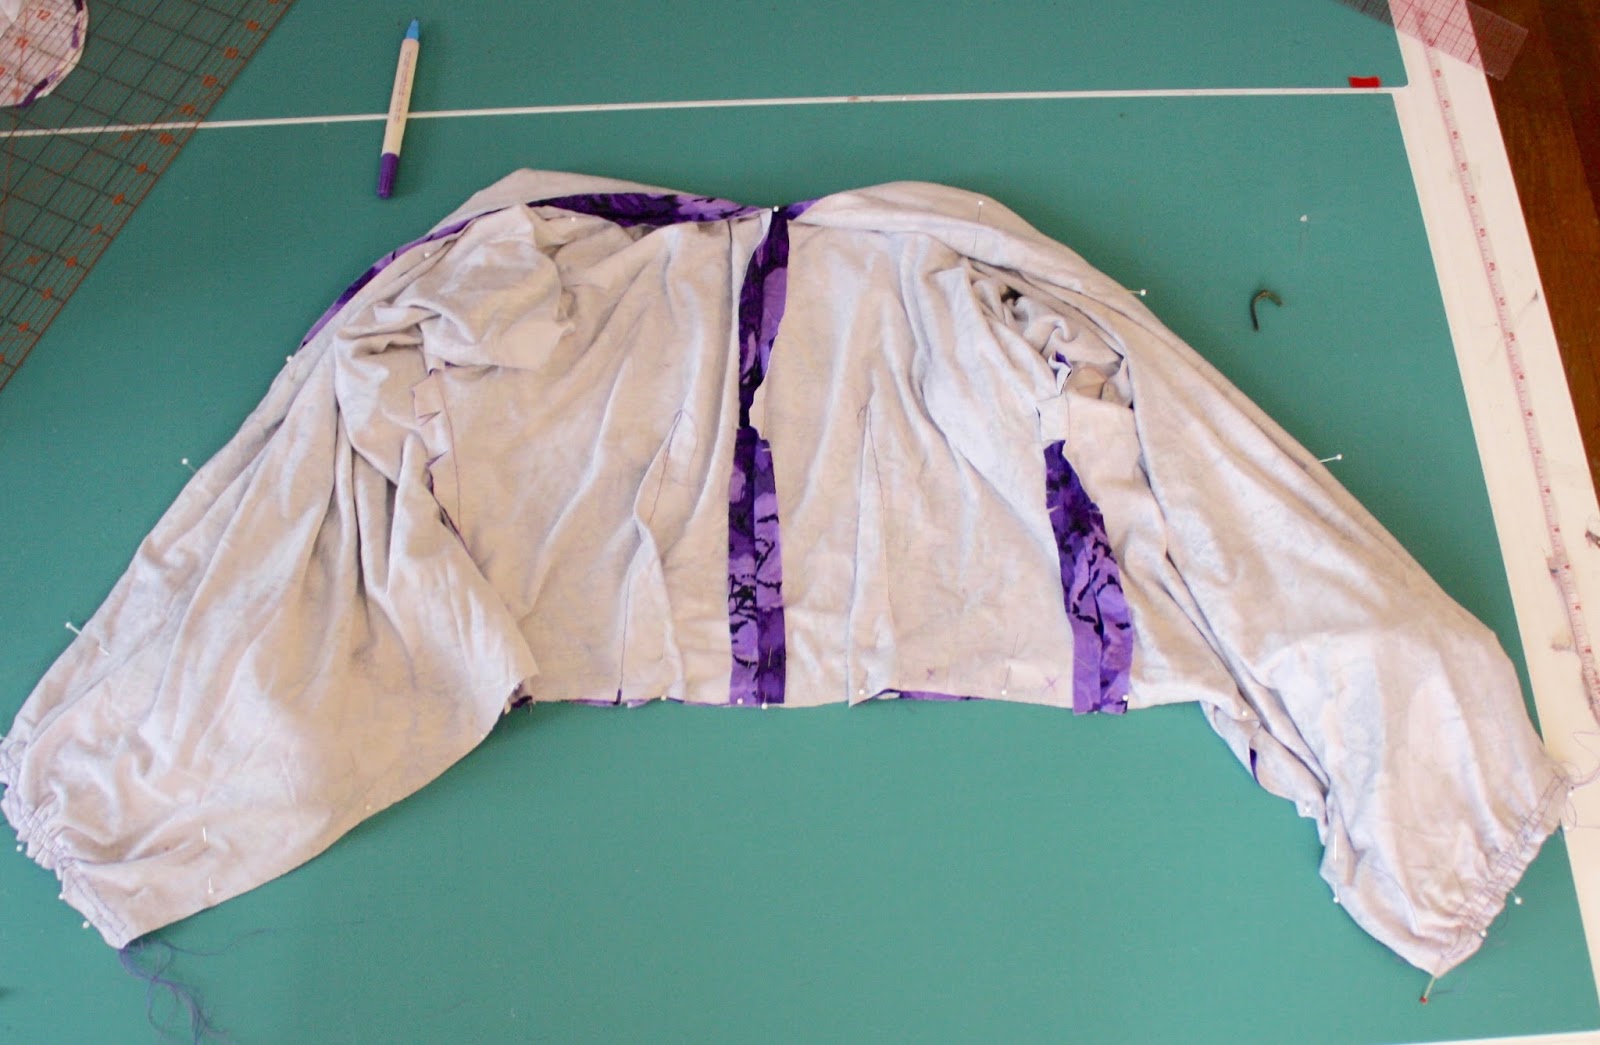
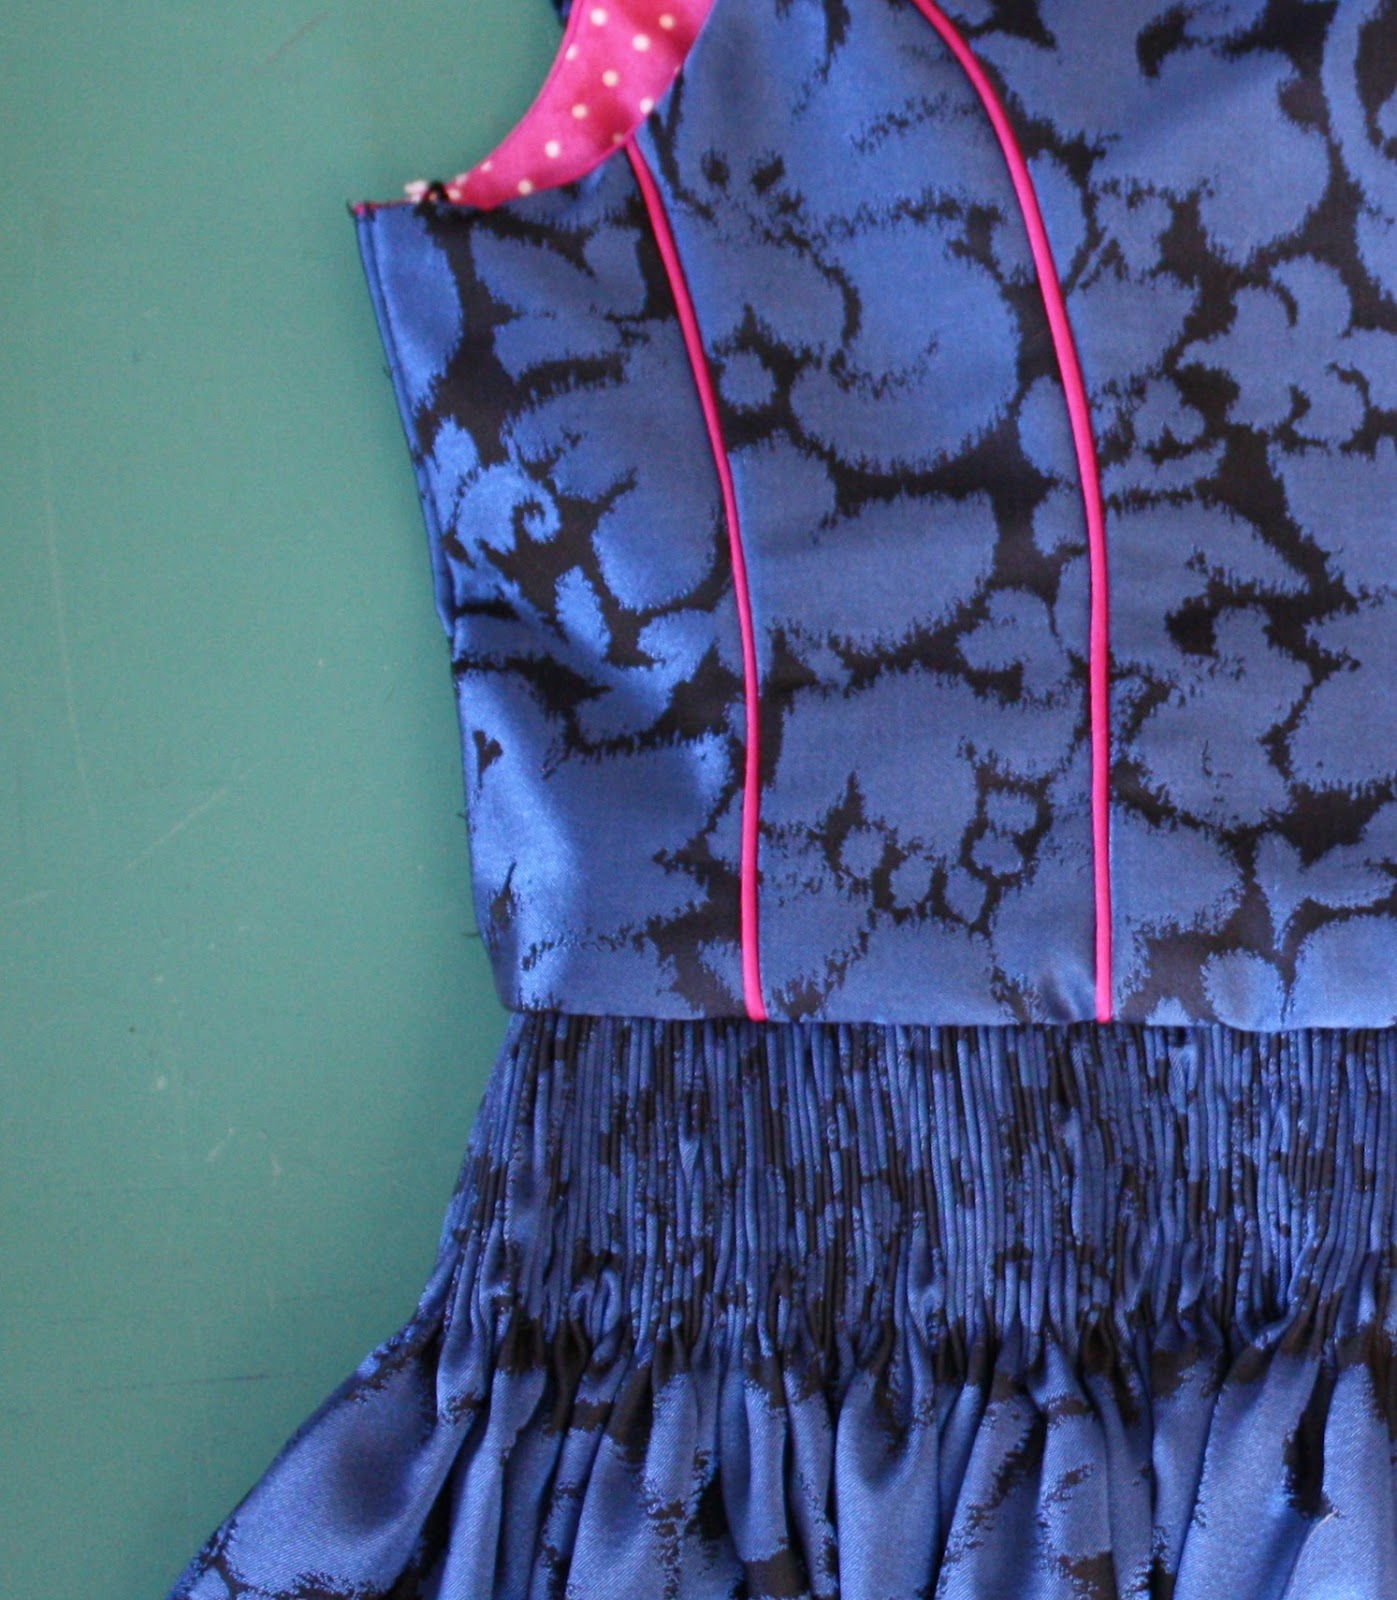
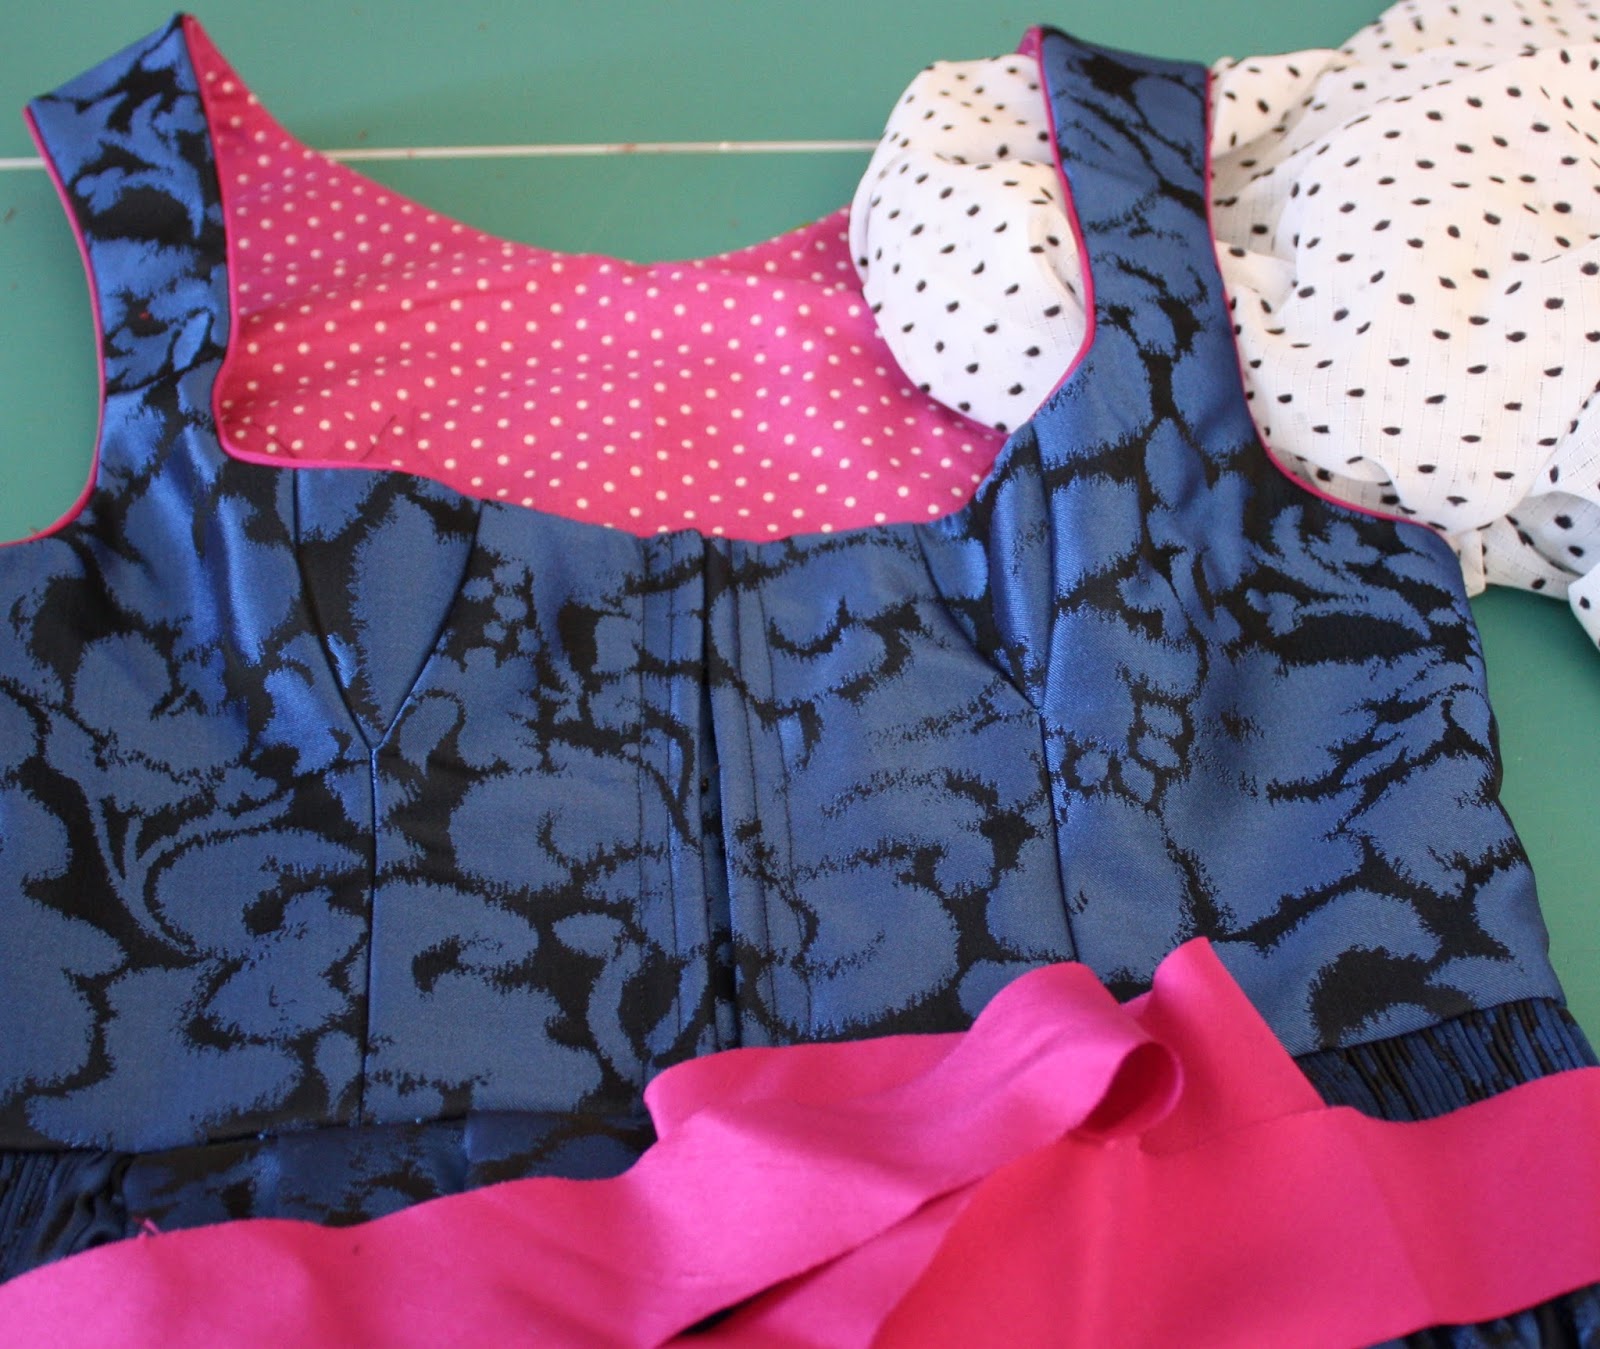
 As I've mentioned, the book has included patterns for interchangeable bodices, skirts, and sleeves. This design uses the Basic Bodice (V-neck variation), Puff Sleeve, and All-Around Pleated Skirt. I did a little trick where I sewed the neckline facing to the wrong side of the bodice, and then turned it to the turned it to the outside, so it's a design feature on the outside of the dress. This gives you a place to insert trim, like this rick rack.
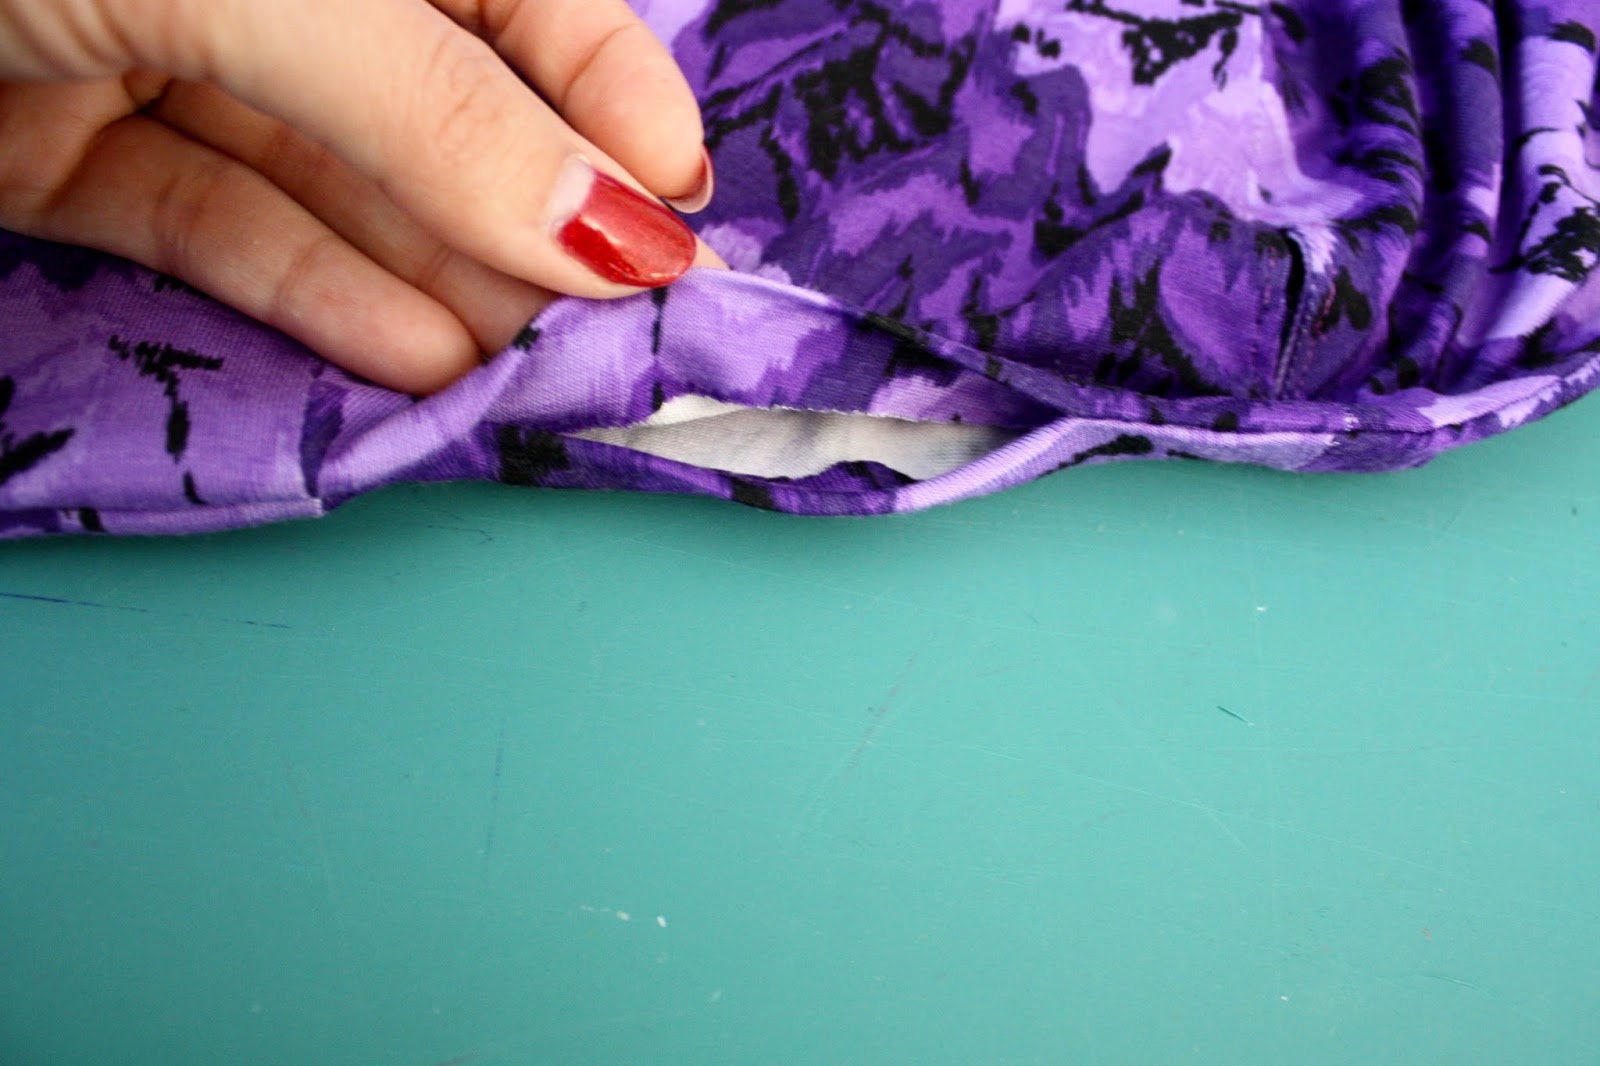
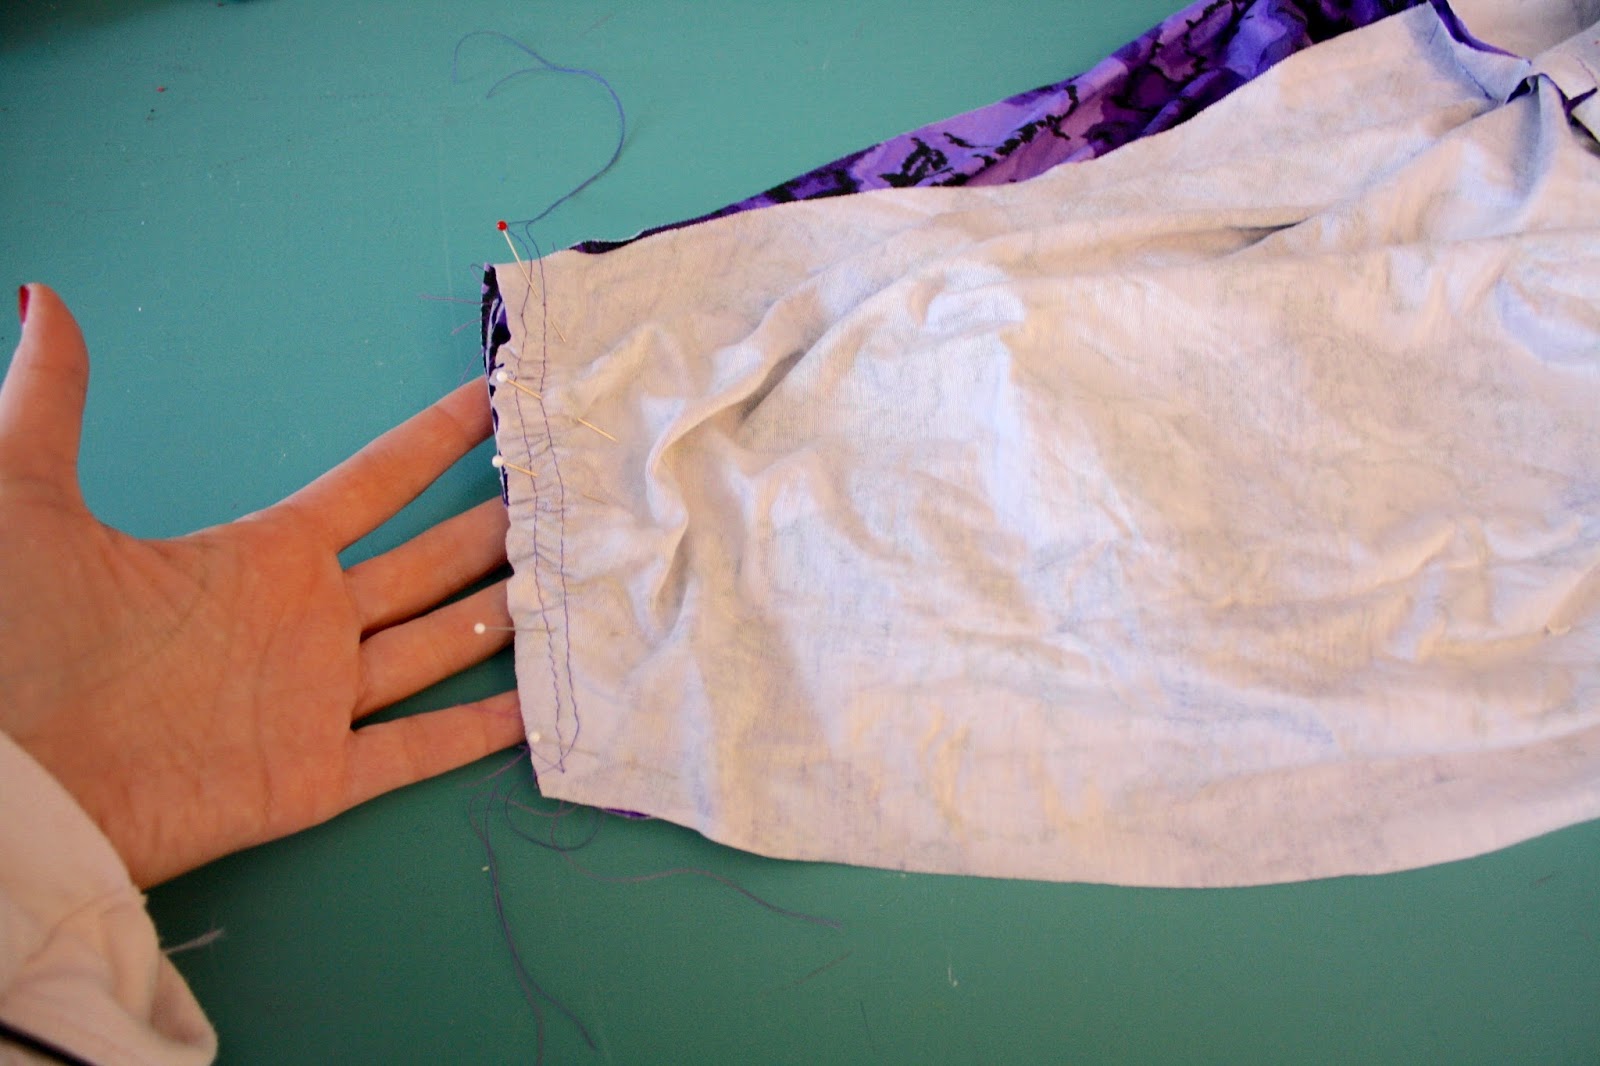
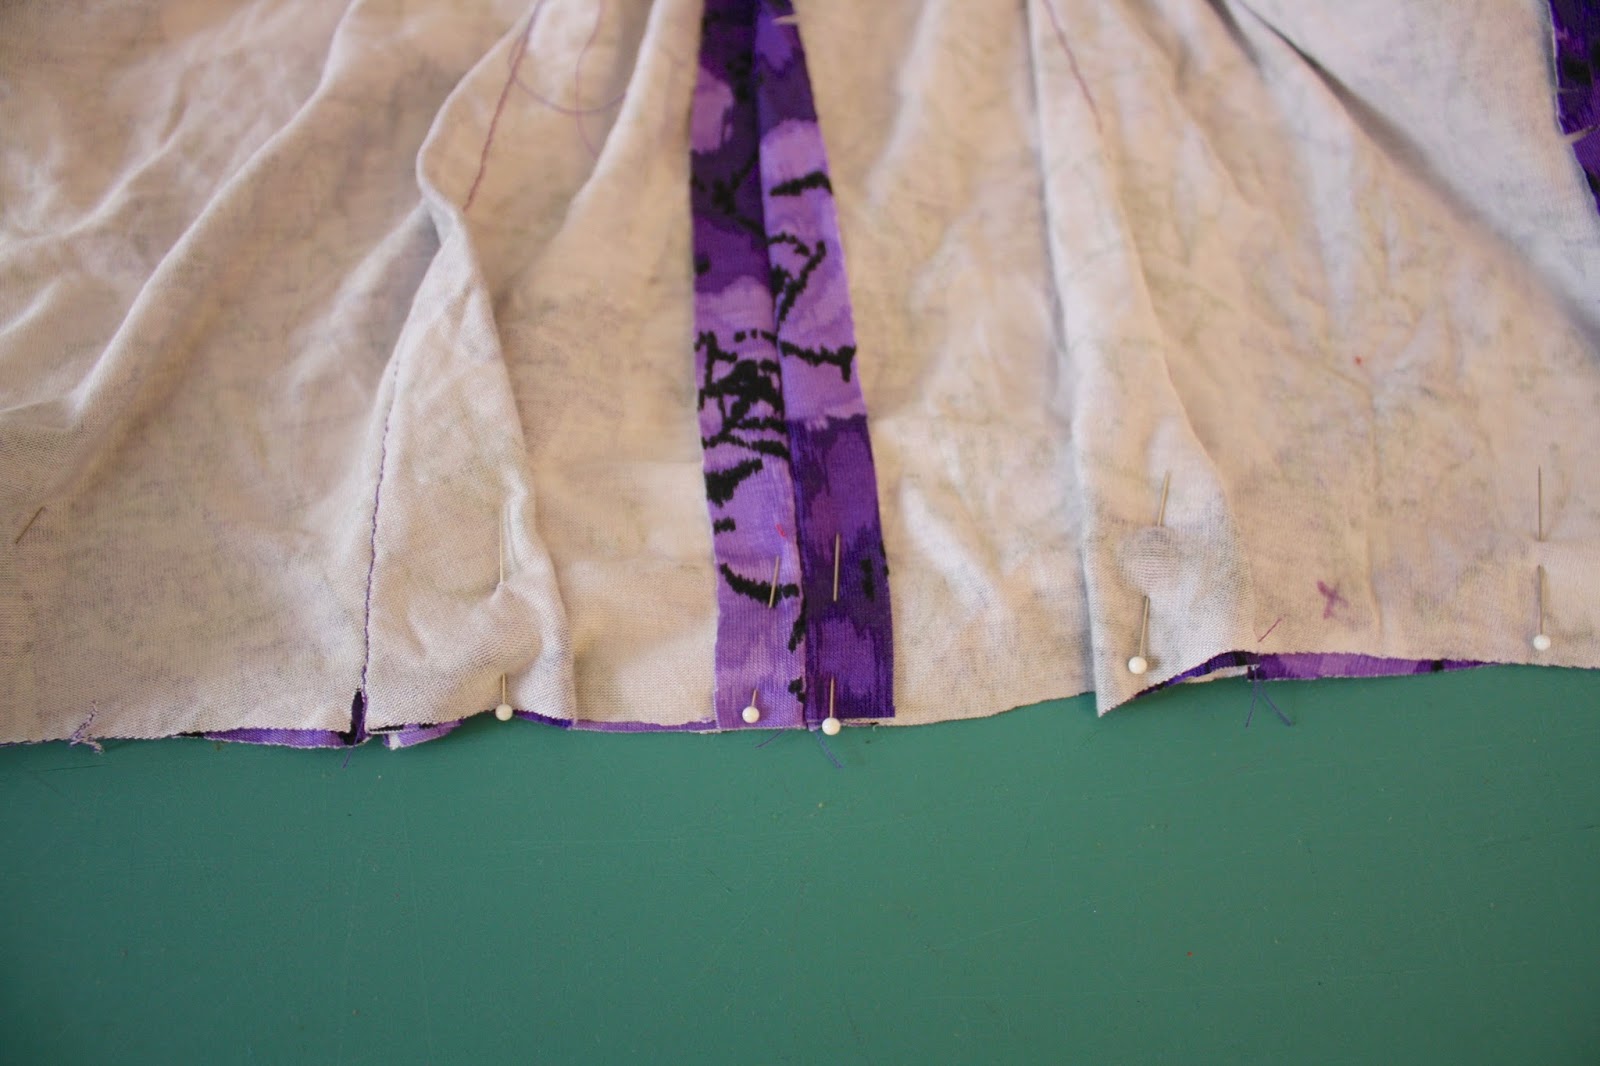
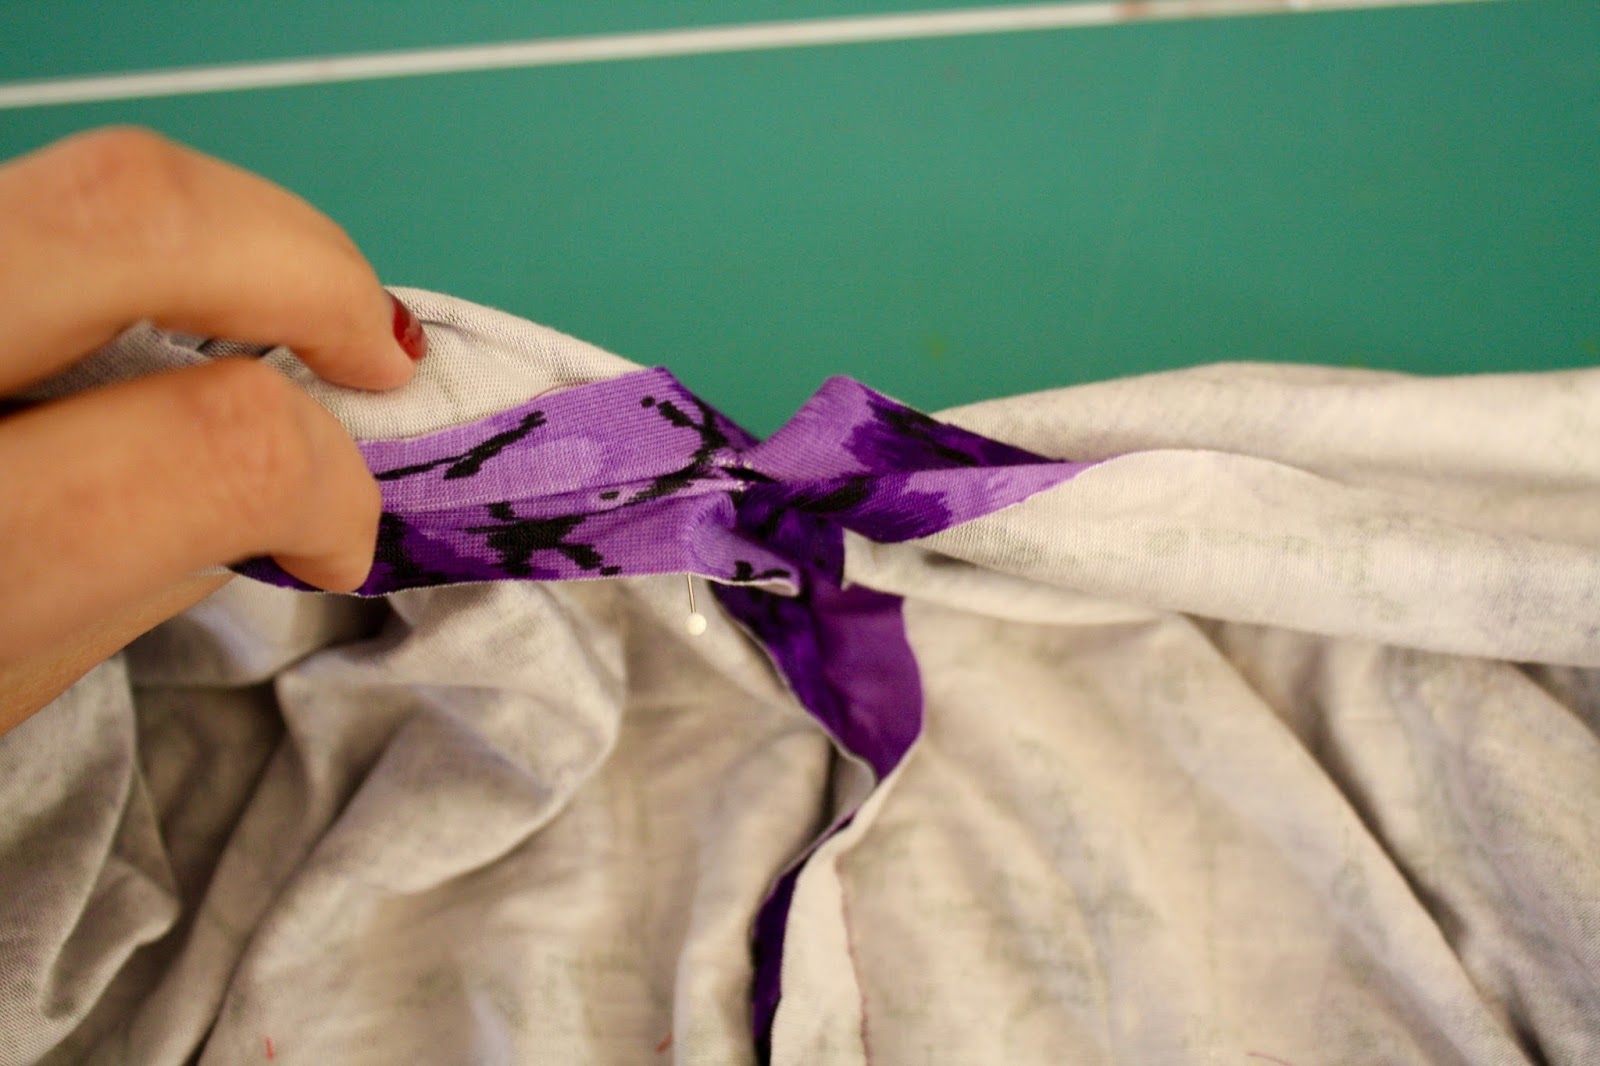
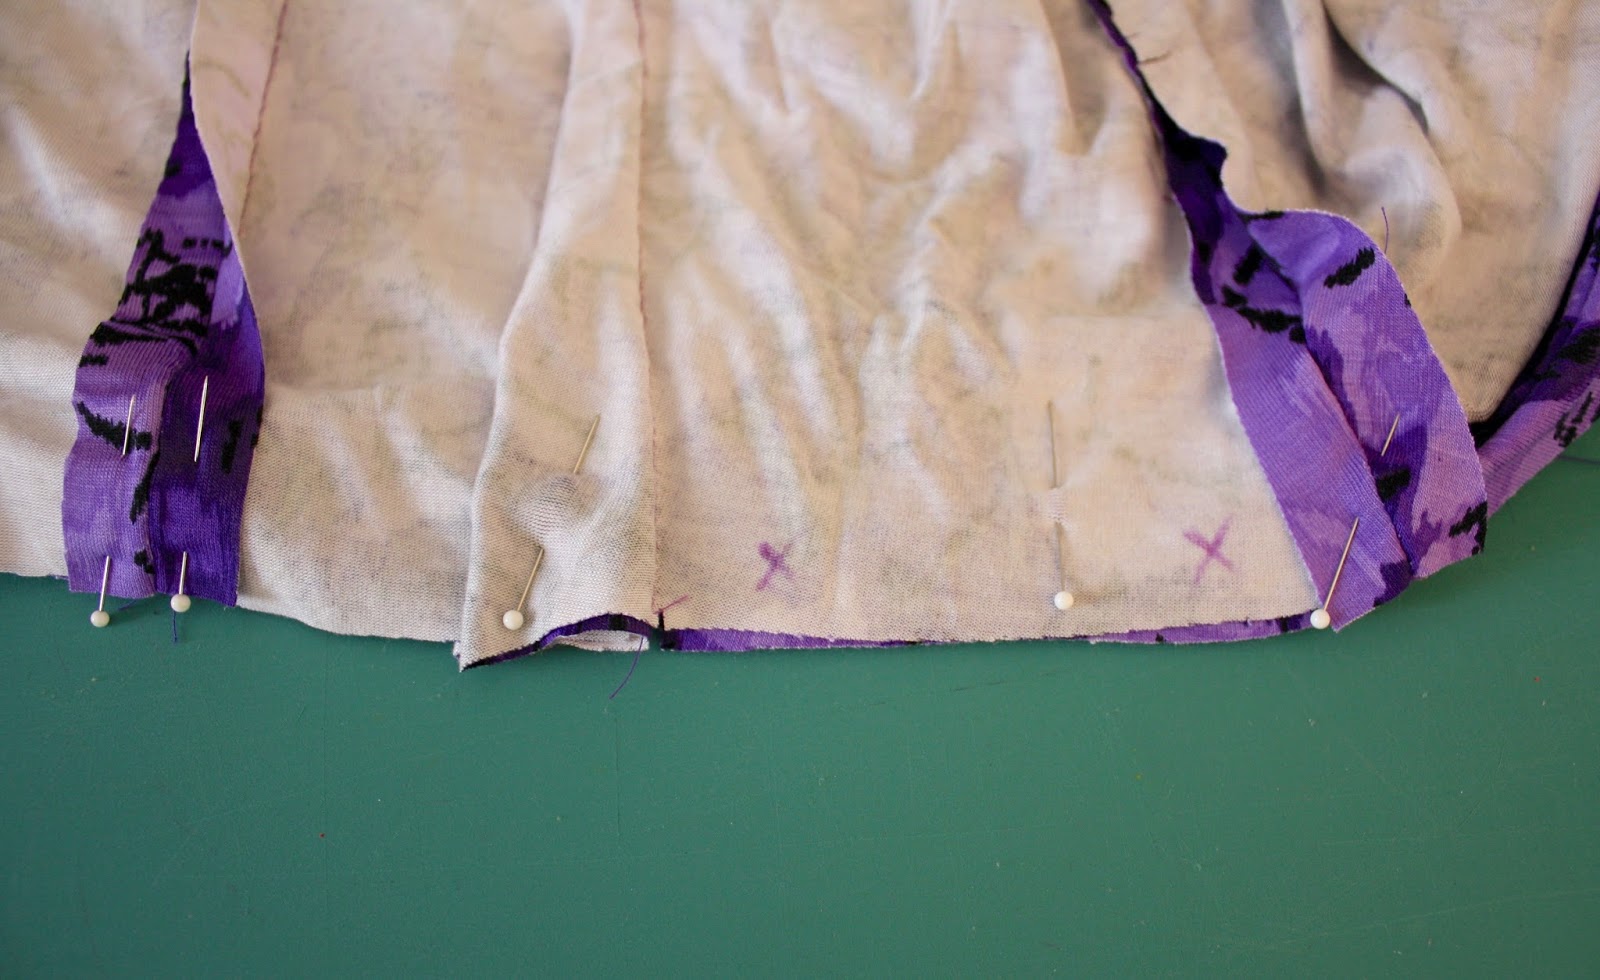
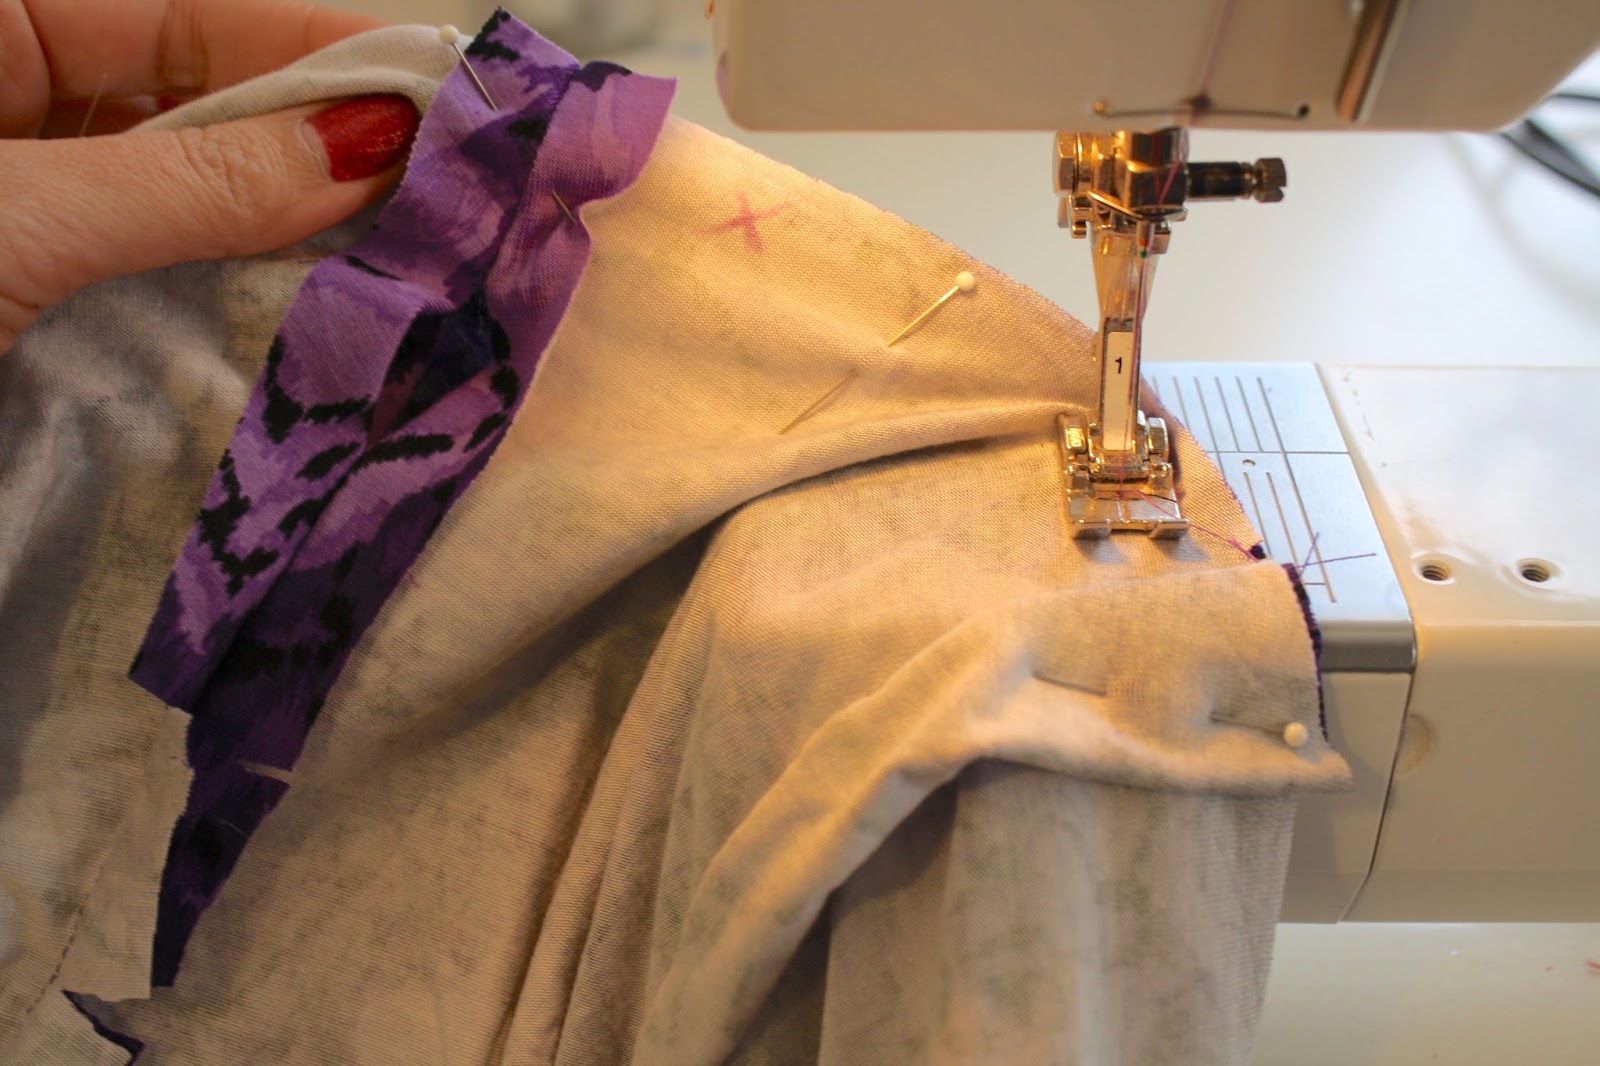
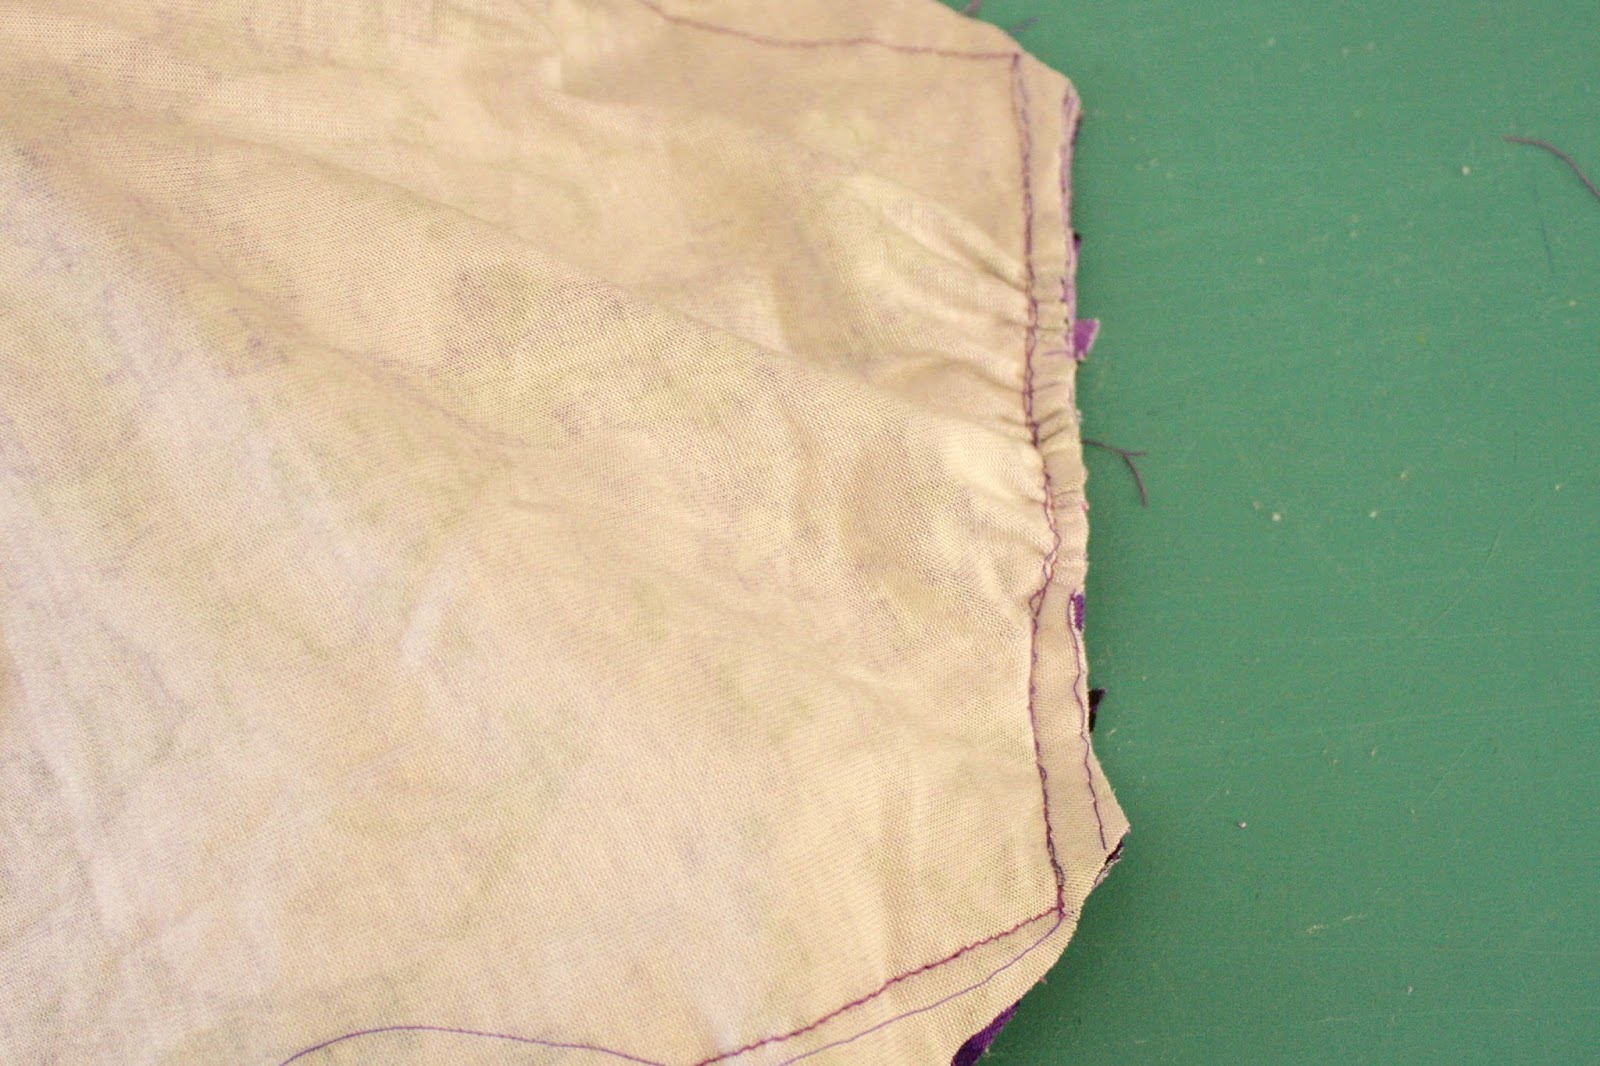
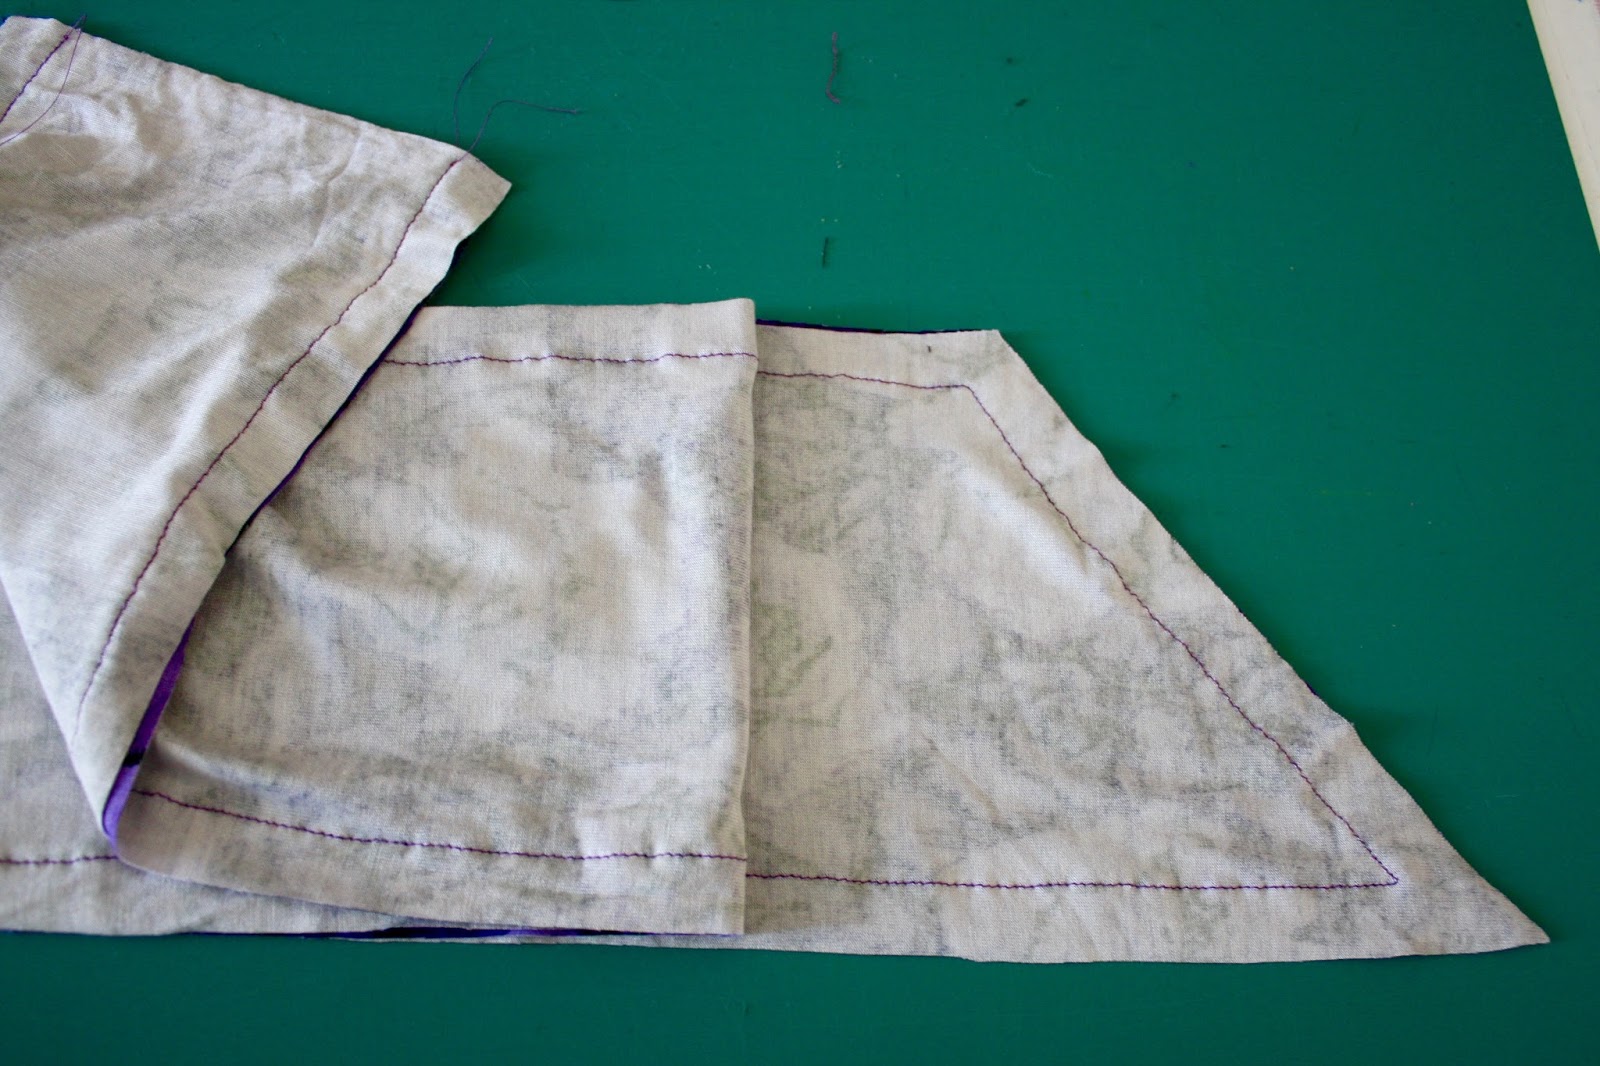
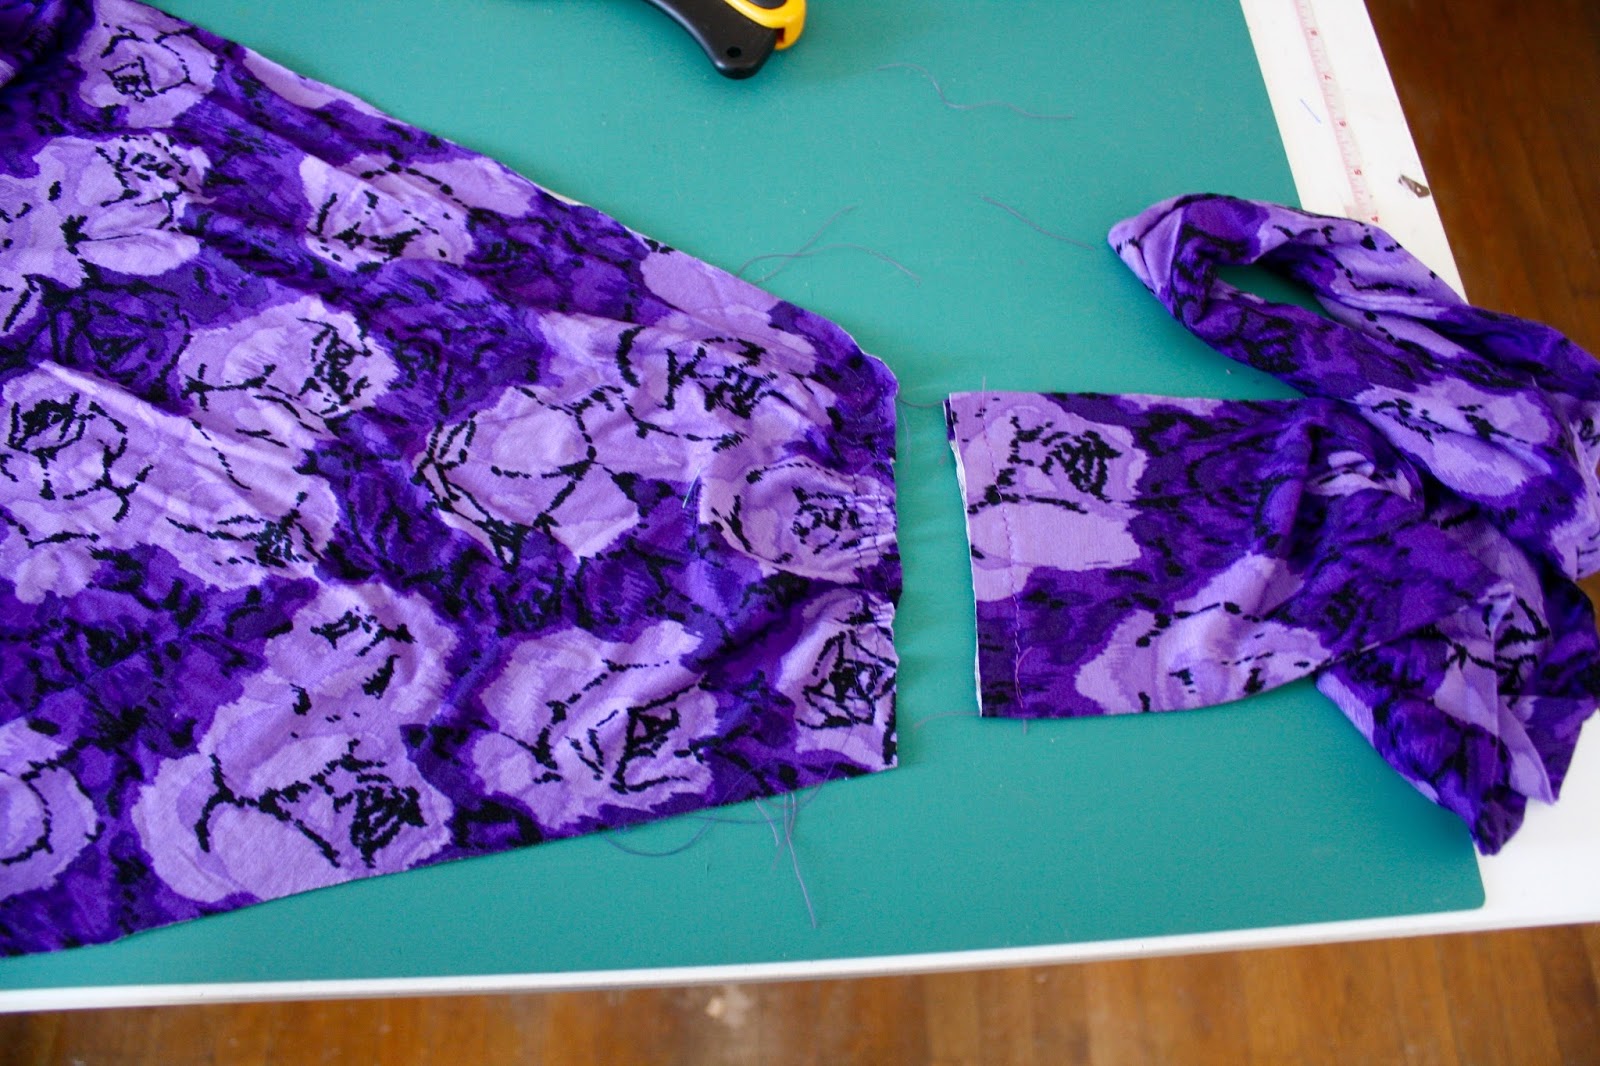
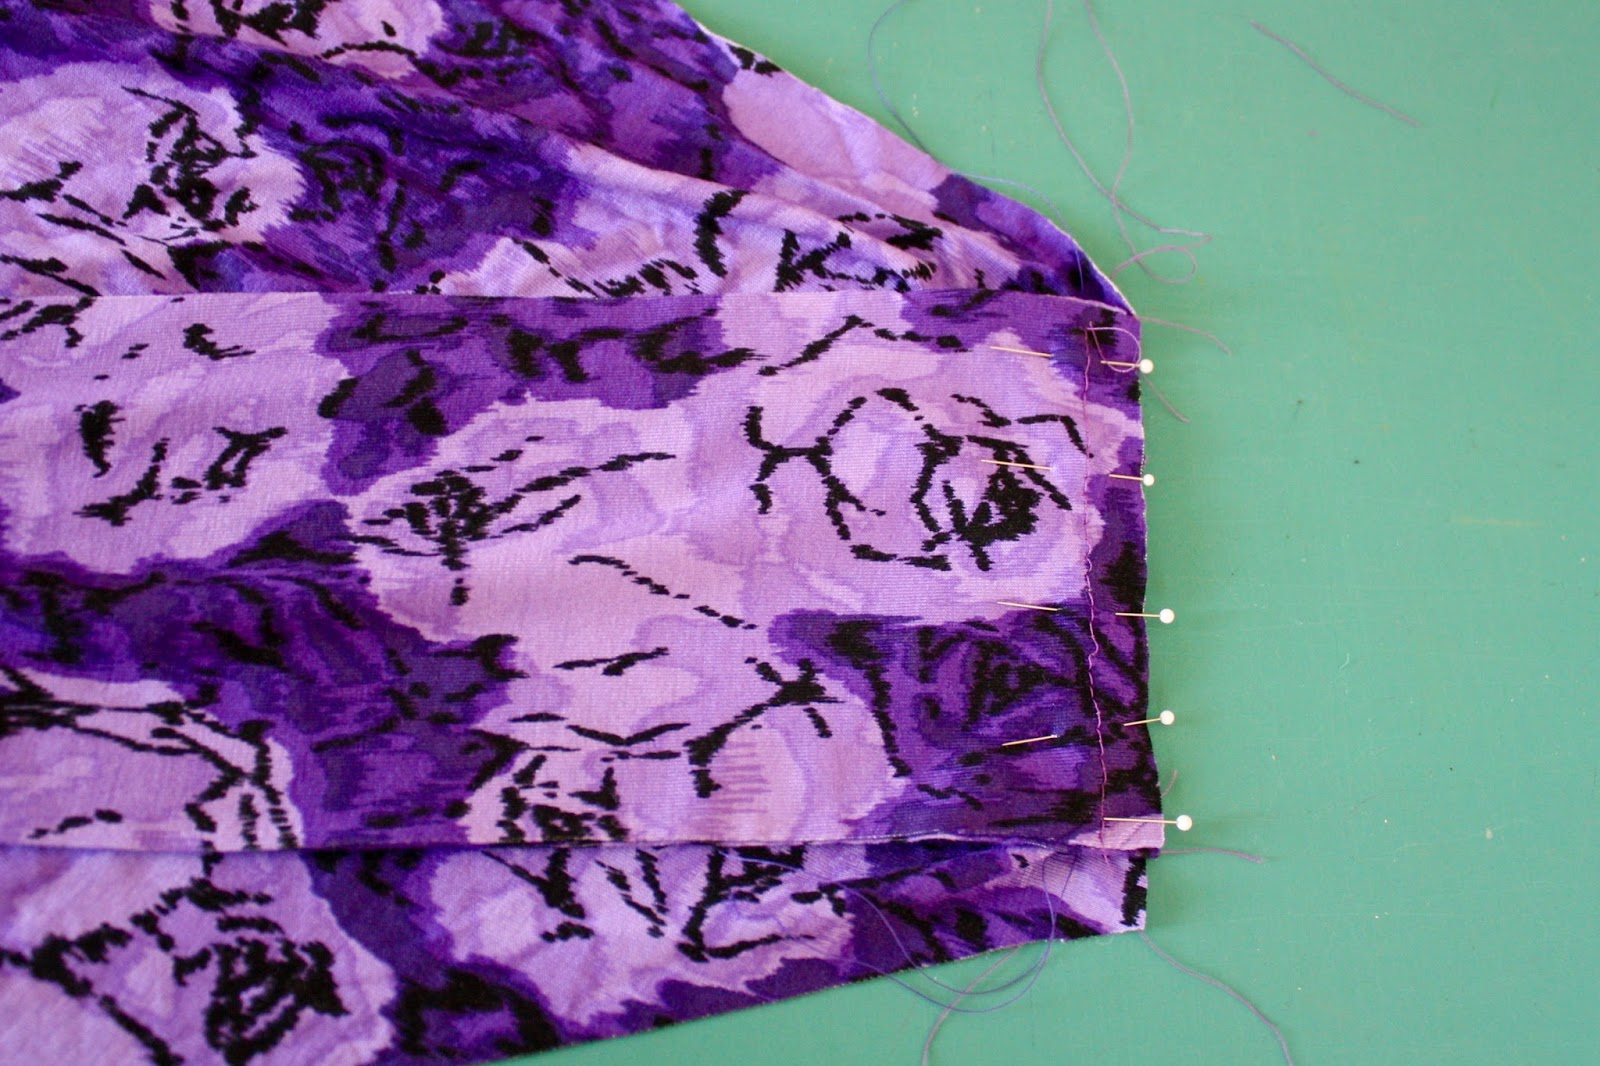
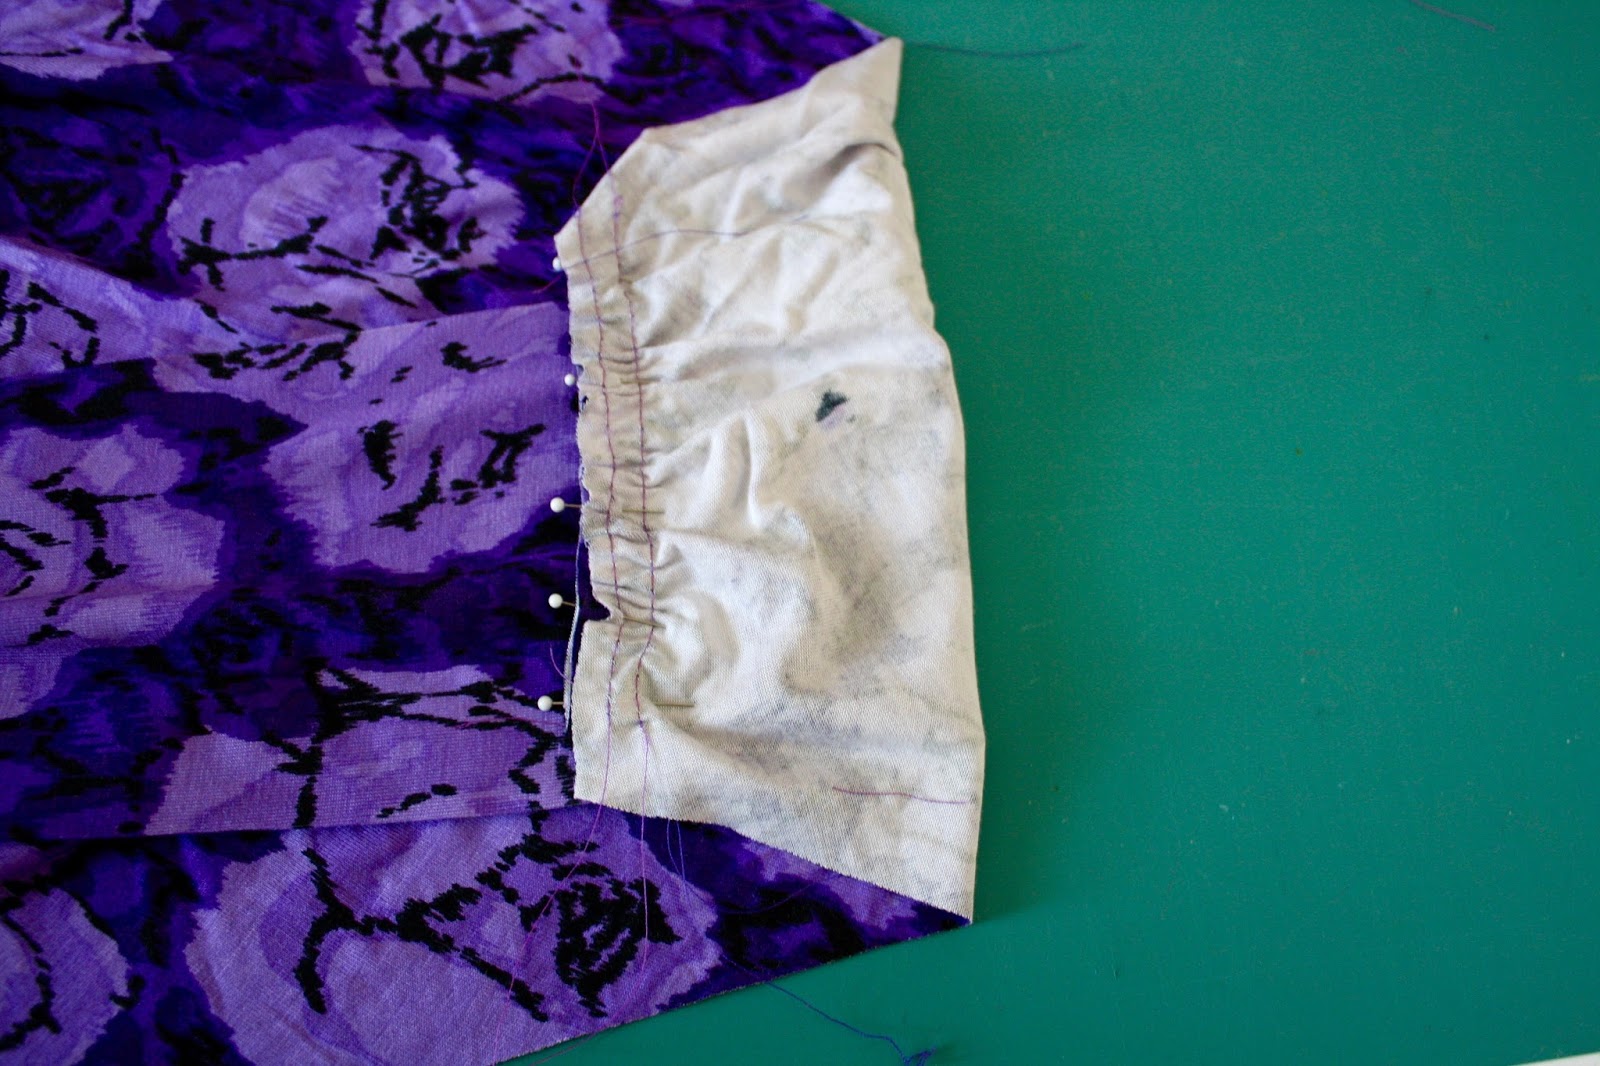
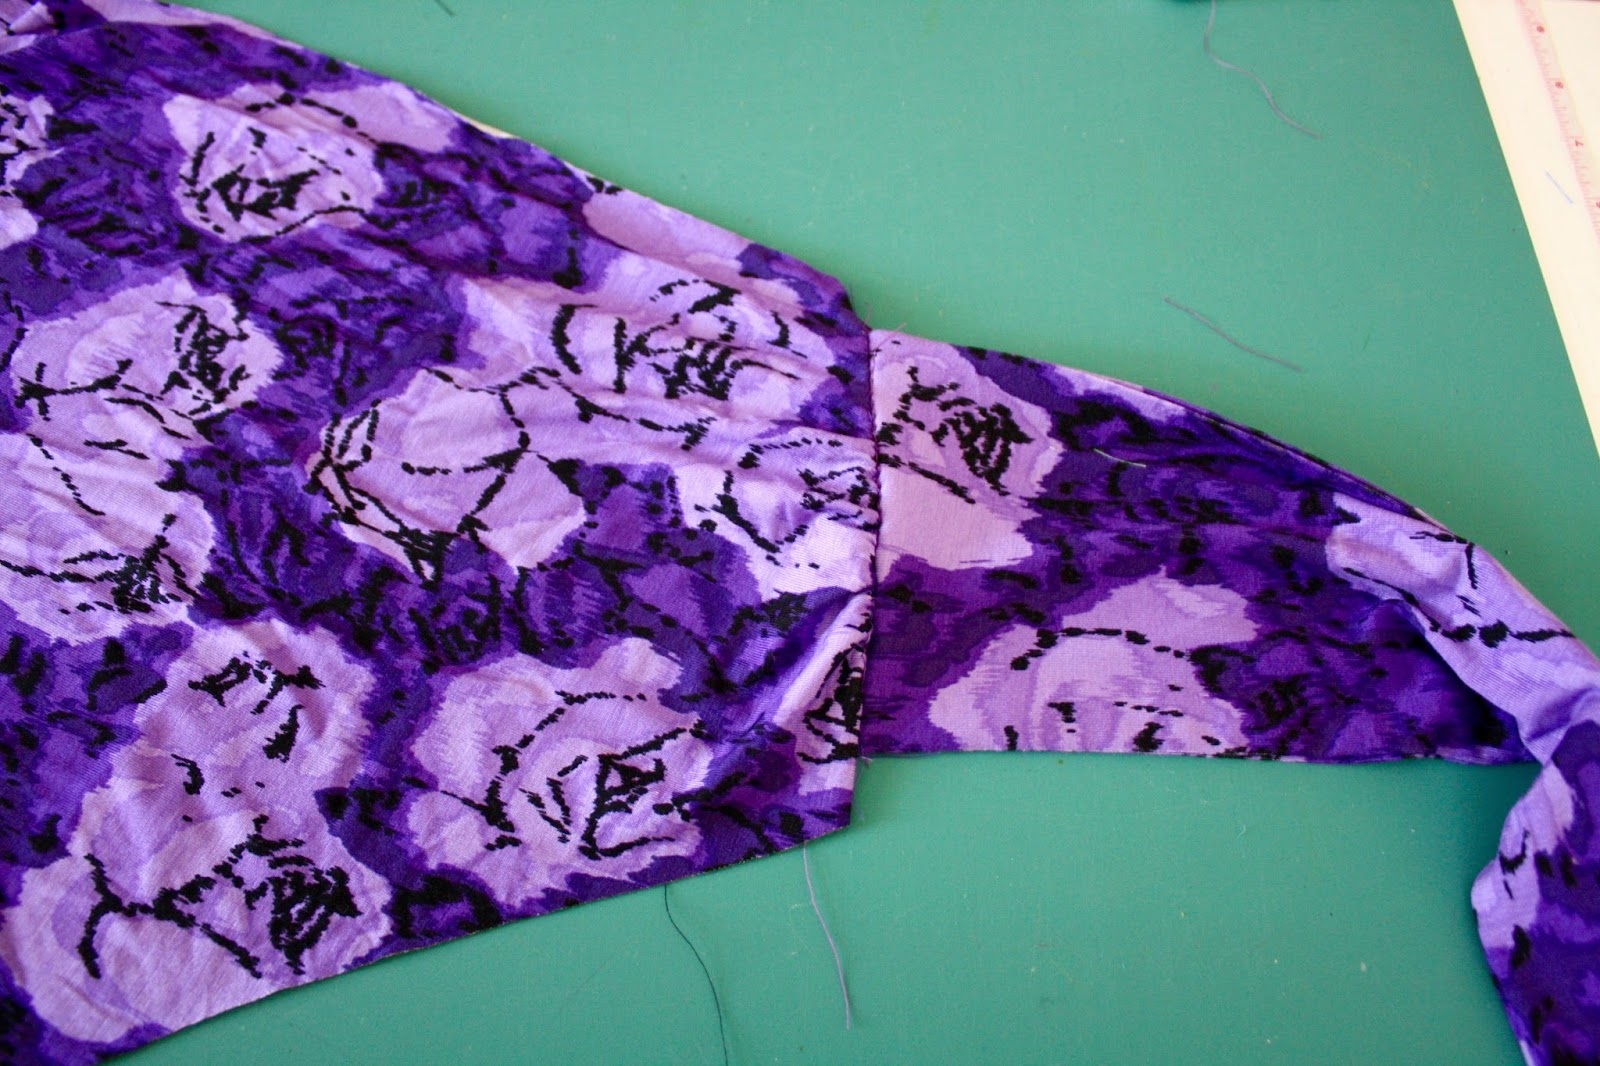
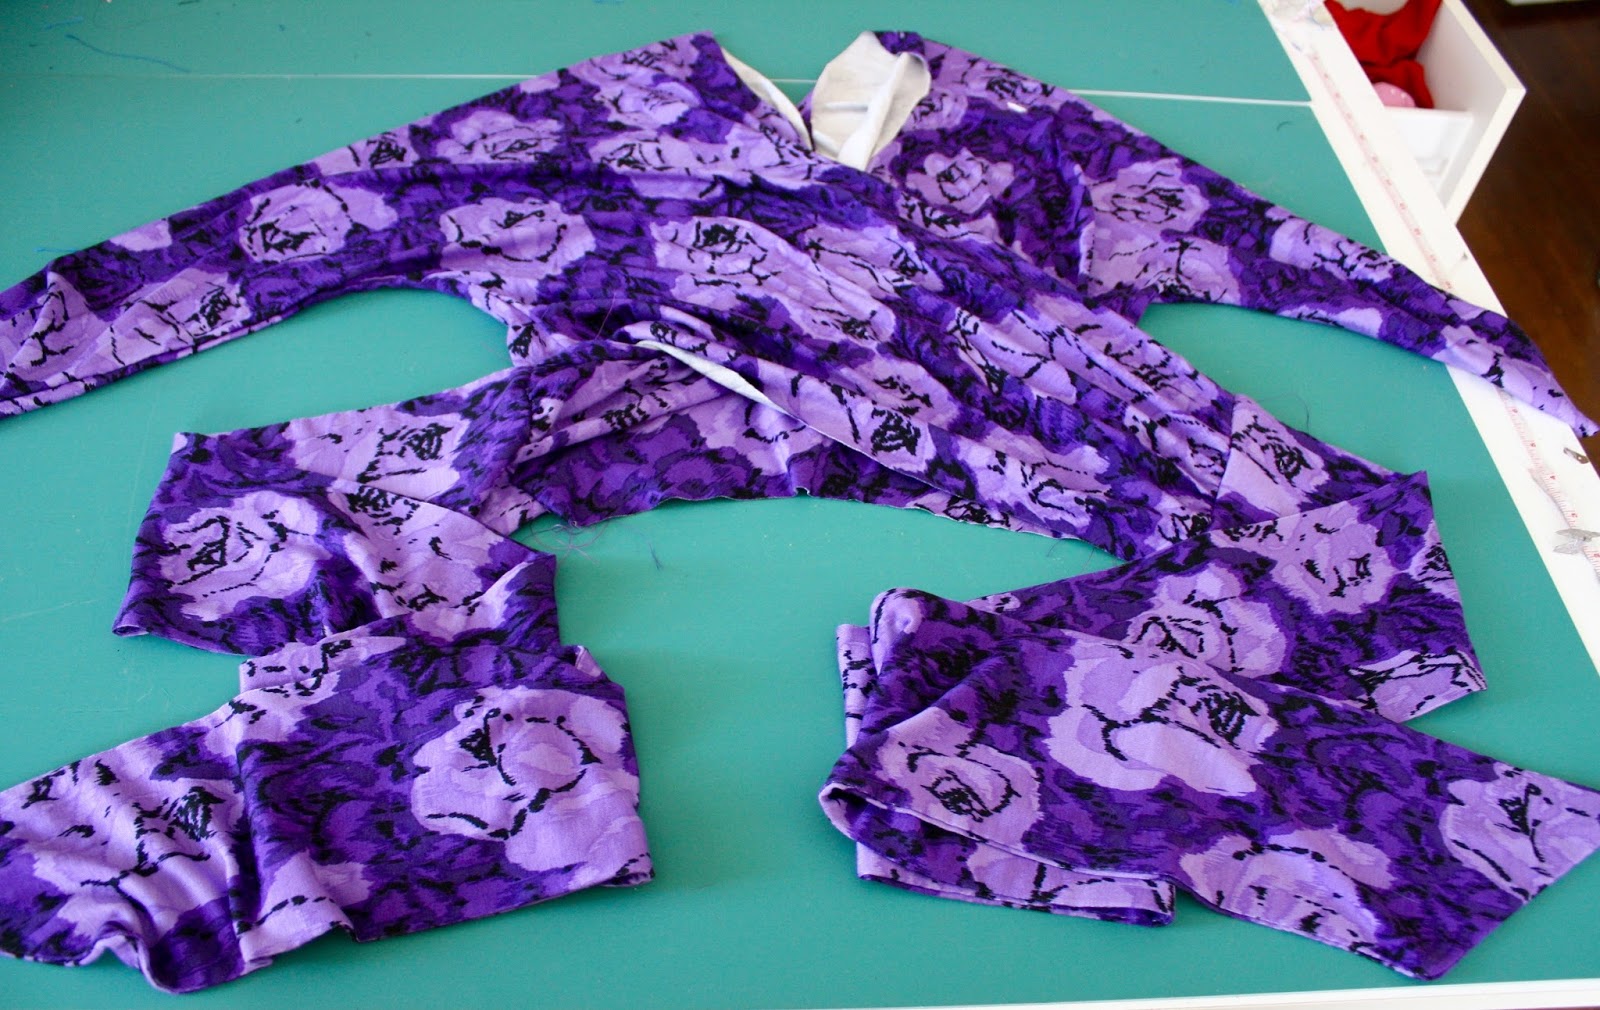
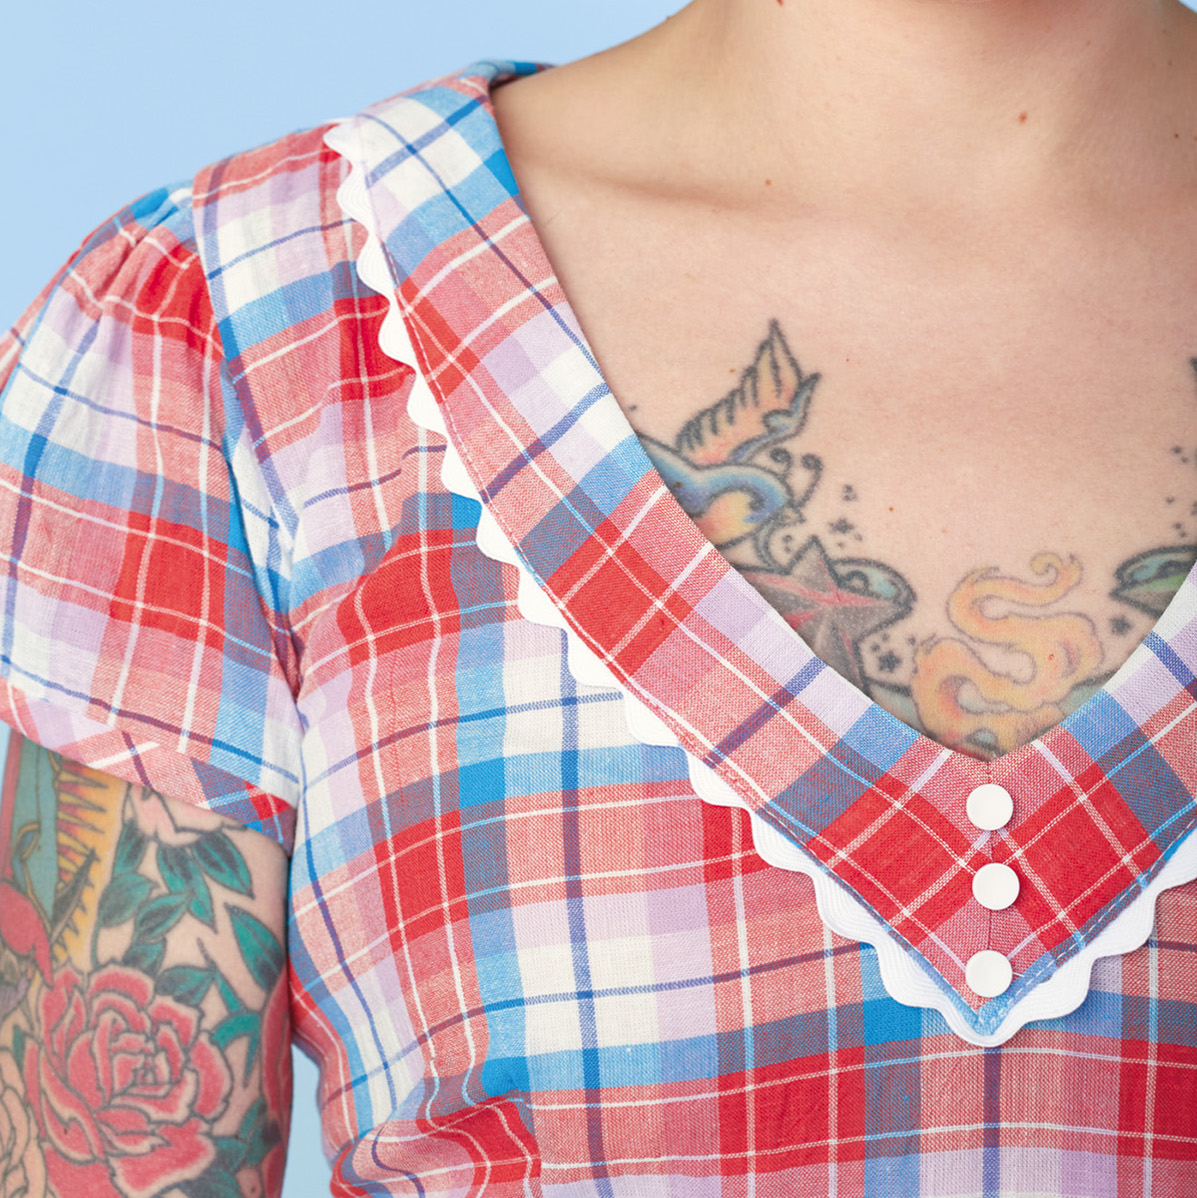 So for my Country Singer dress, I did the exact same thing with the exact same pattern pieces, with one big exception: for the skirt, I shortened the pattern piece to about 10 inches, and gathered it at the waistline instead of making the pleats on the pattern. Then I cut reeeeeaaaaalllly long 10" strips of fabric to make the lower tiers, and used a ruffler foot to form the gathers. I inserted fringe into the seams of the tiers, and then topstitched rick rack above the seams.
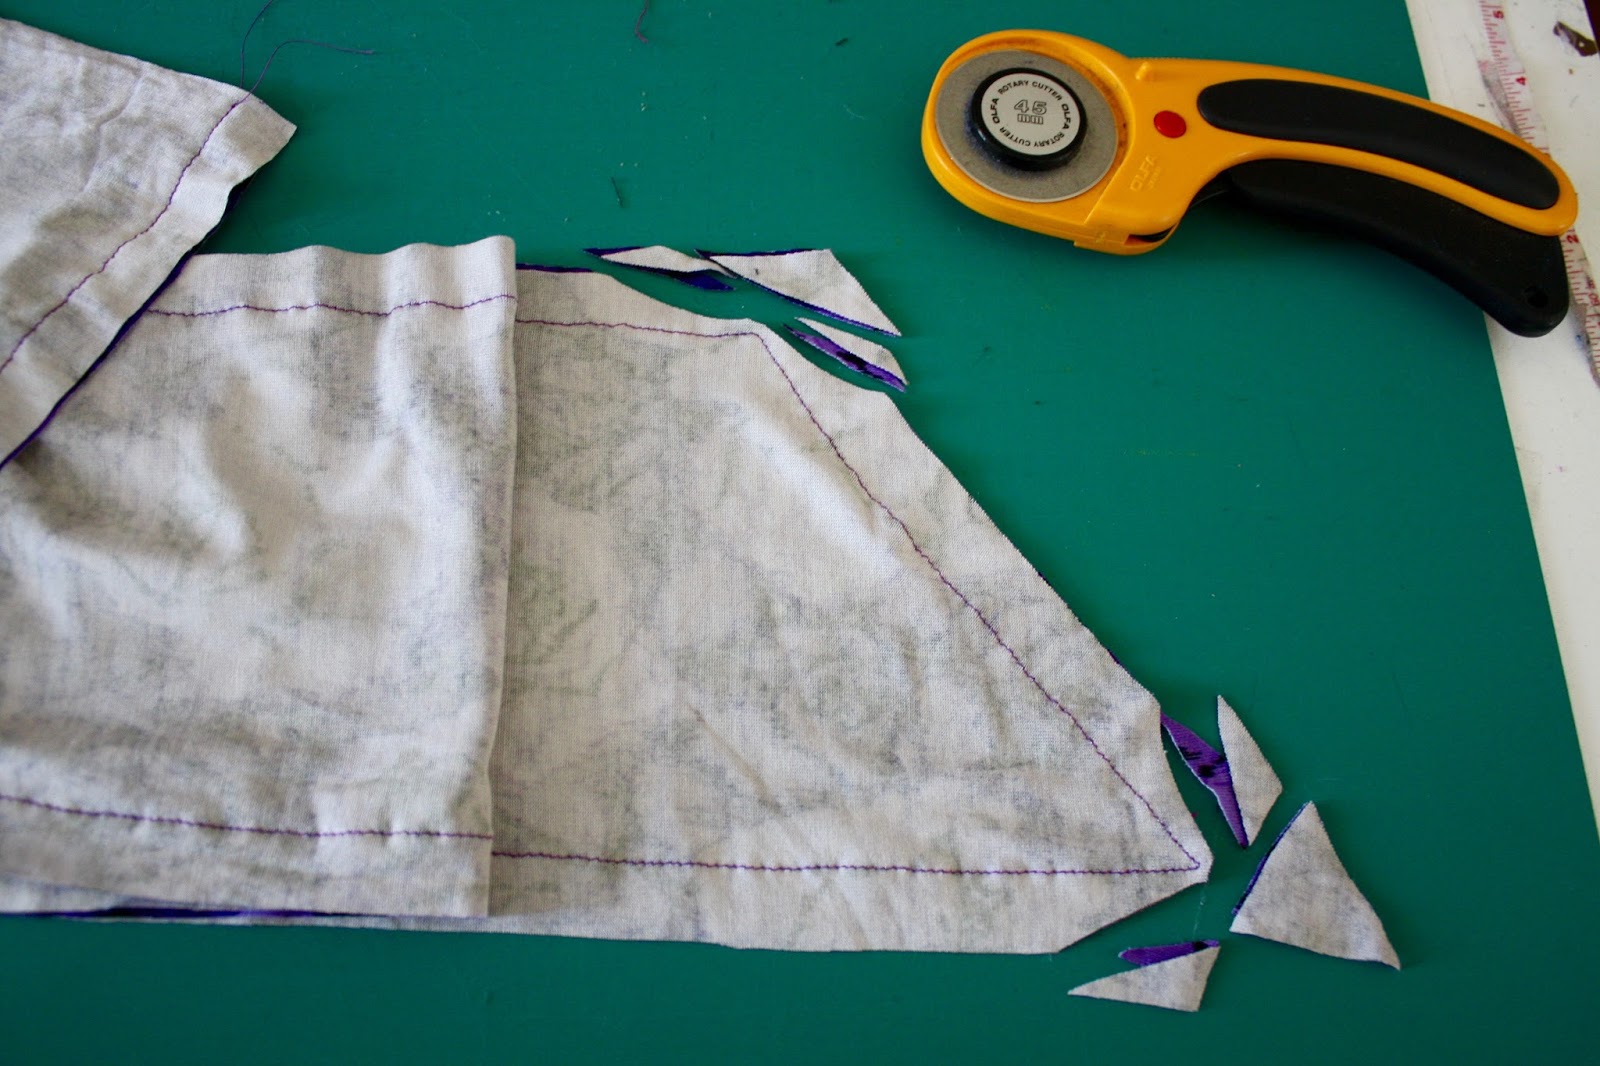
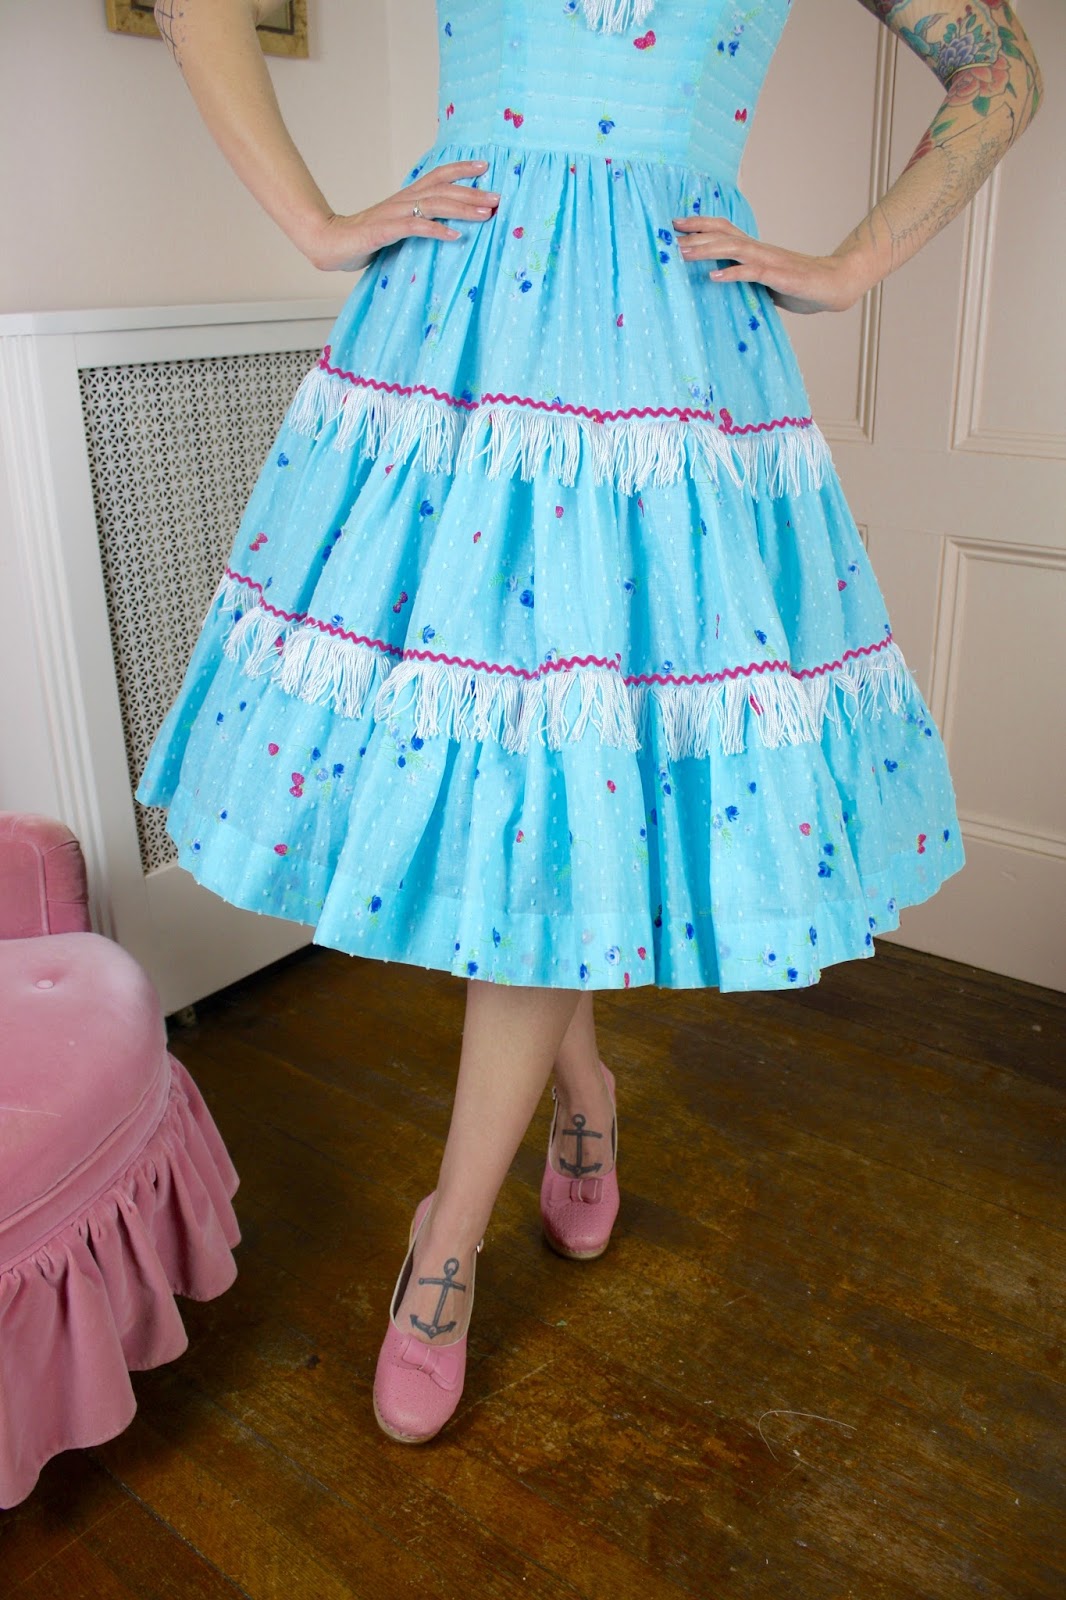
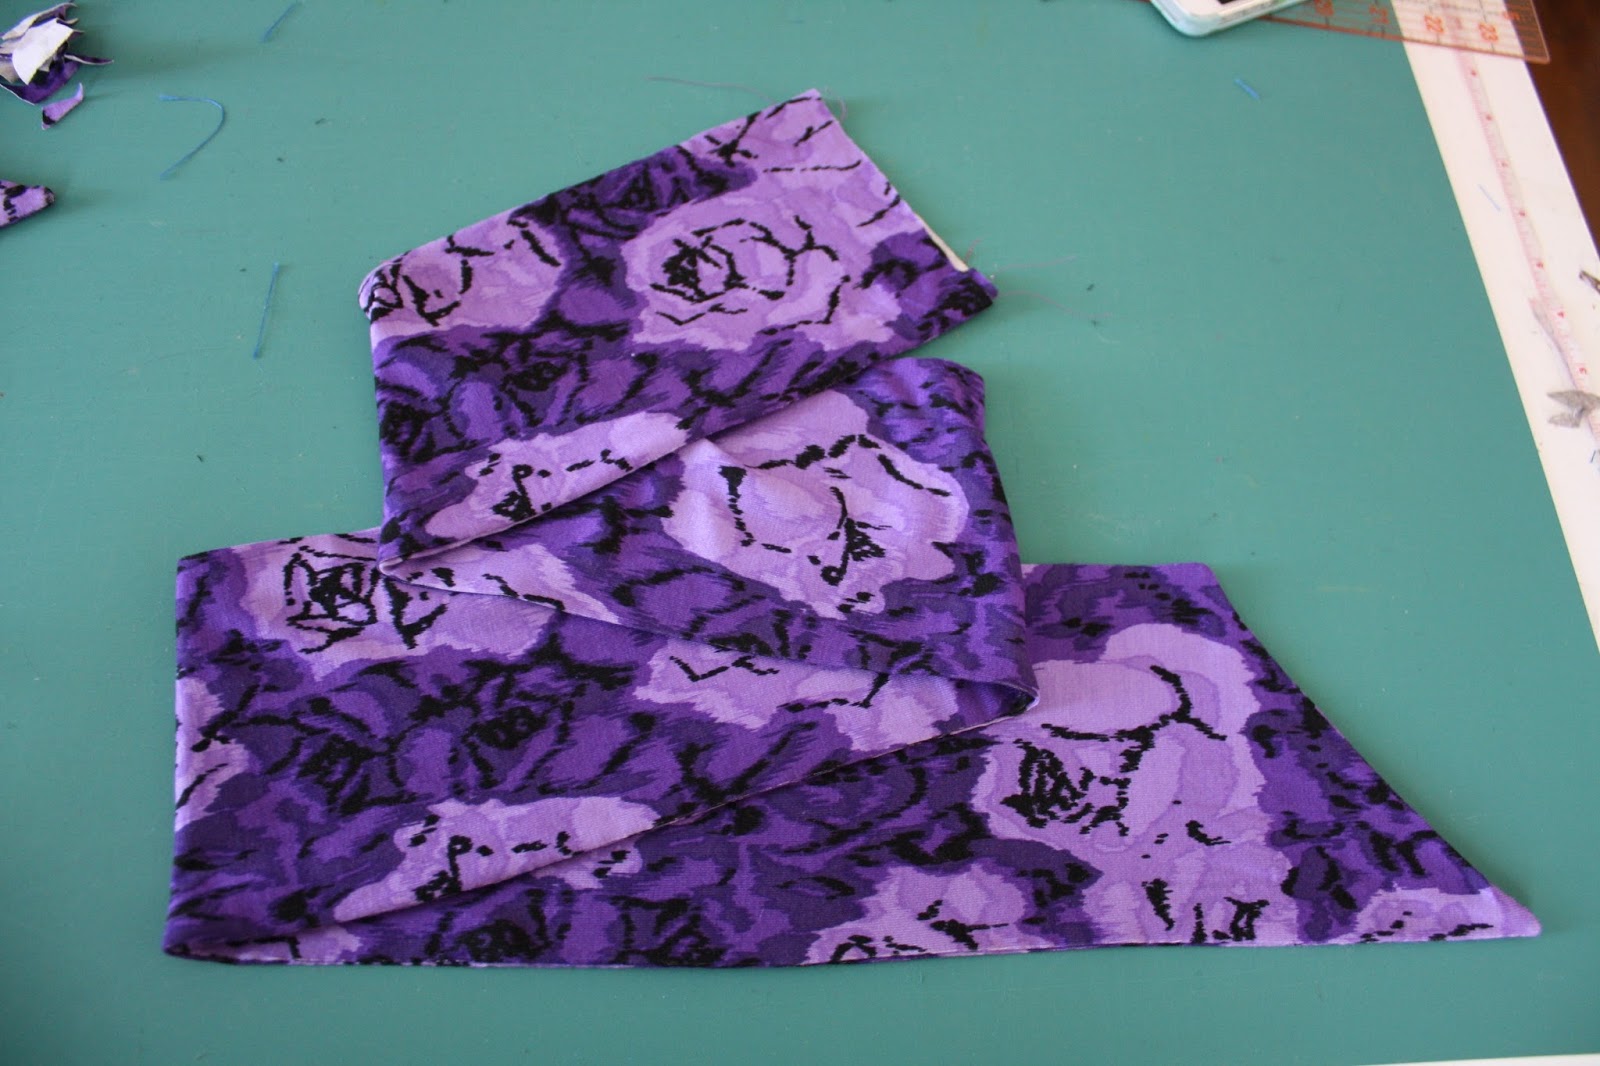
 This used an obnoxious amount of fabric. The lower tier is over ten yards long!
I used the same neckline facing trick as in the book, but inserted fringe instead of rick rack.

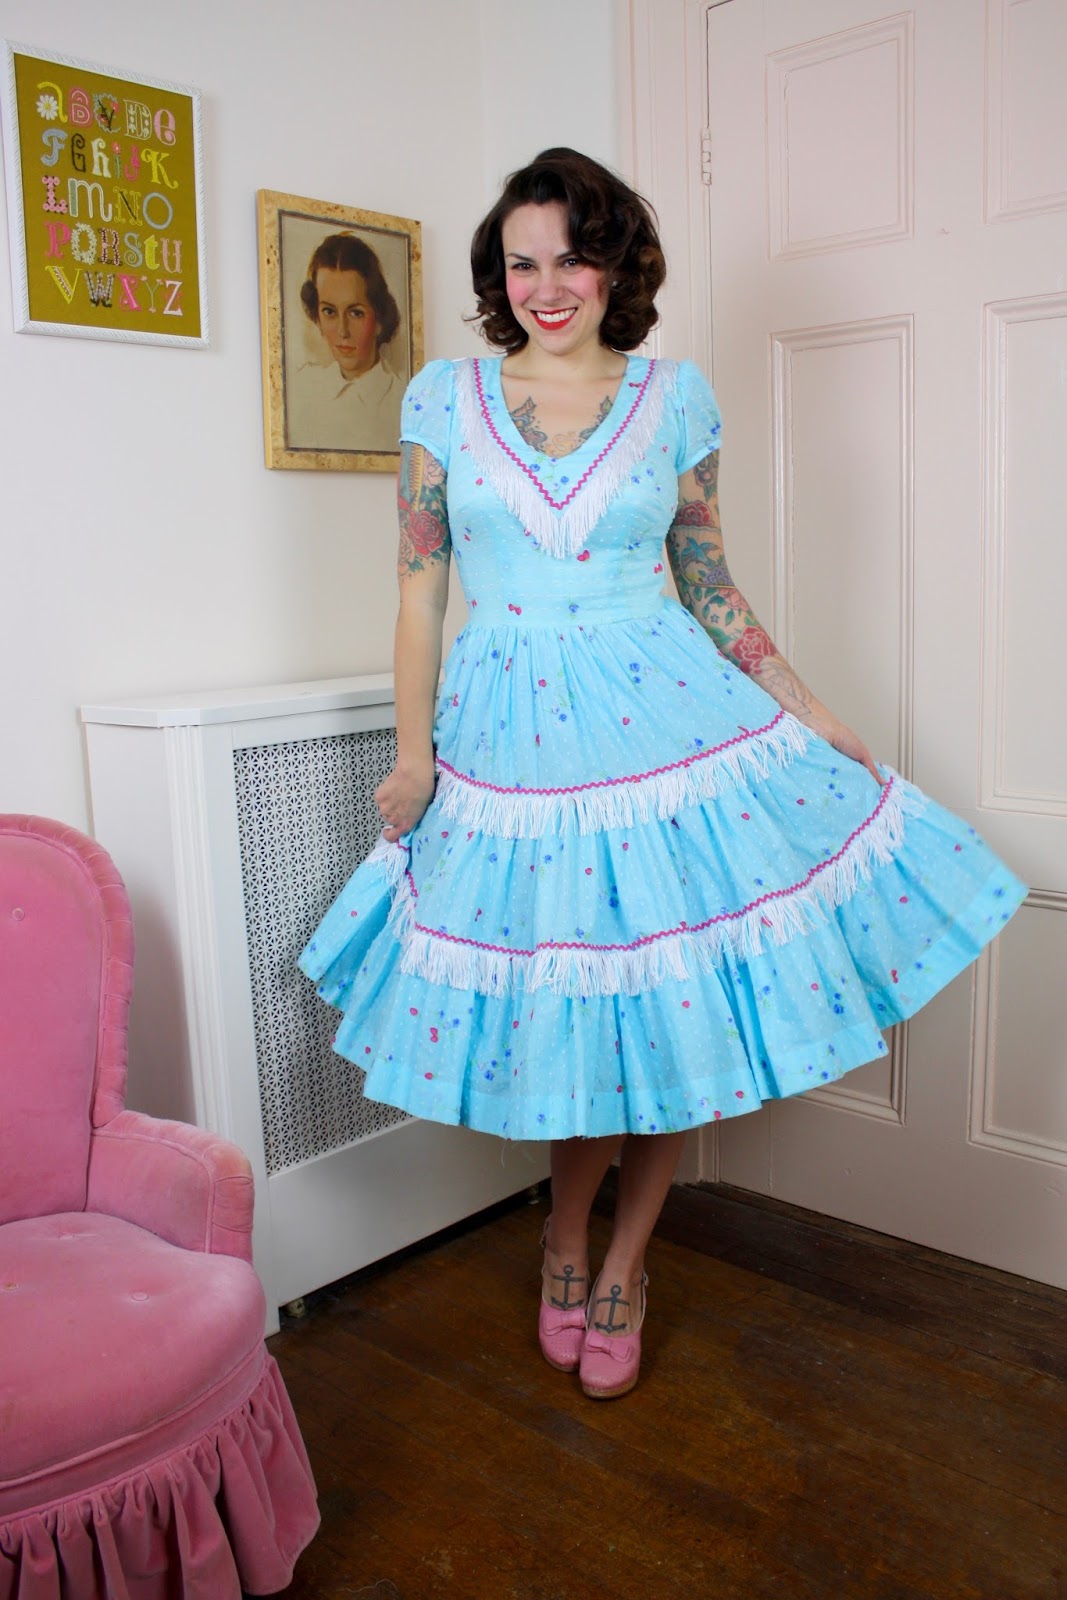
I love how it turned out! (That's a portrait of my grandmother next to me. Isn't it amazing?)
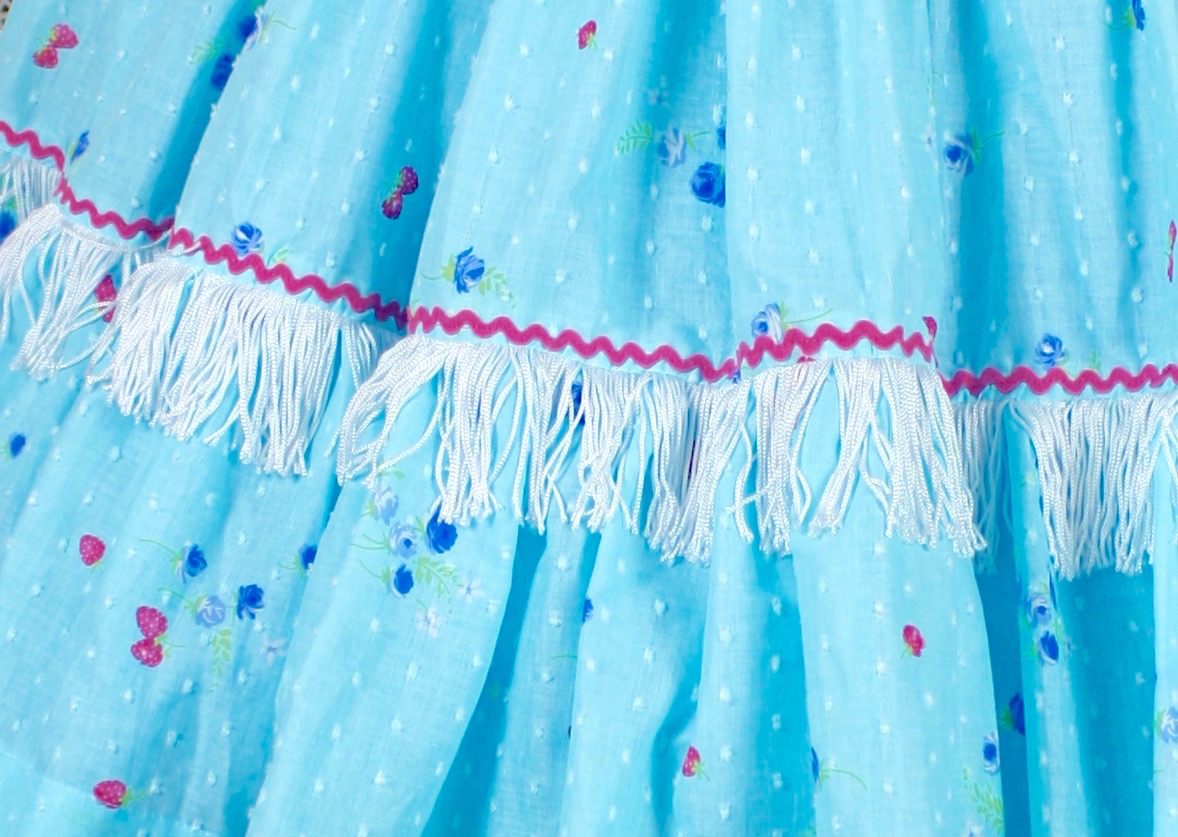
 Hey, what's that fabric? It's a design from my upcoming spring collection! It's a dotted swiss cotton with strawberries and blue roses. Swoon! Here's a close up of the texture. It's not available yet, but I promise to post about it as soon as it is.
 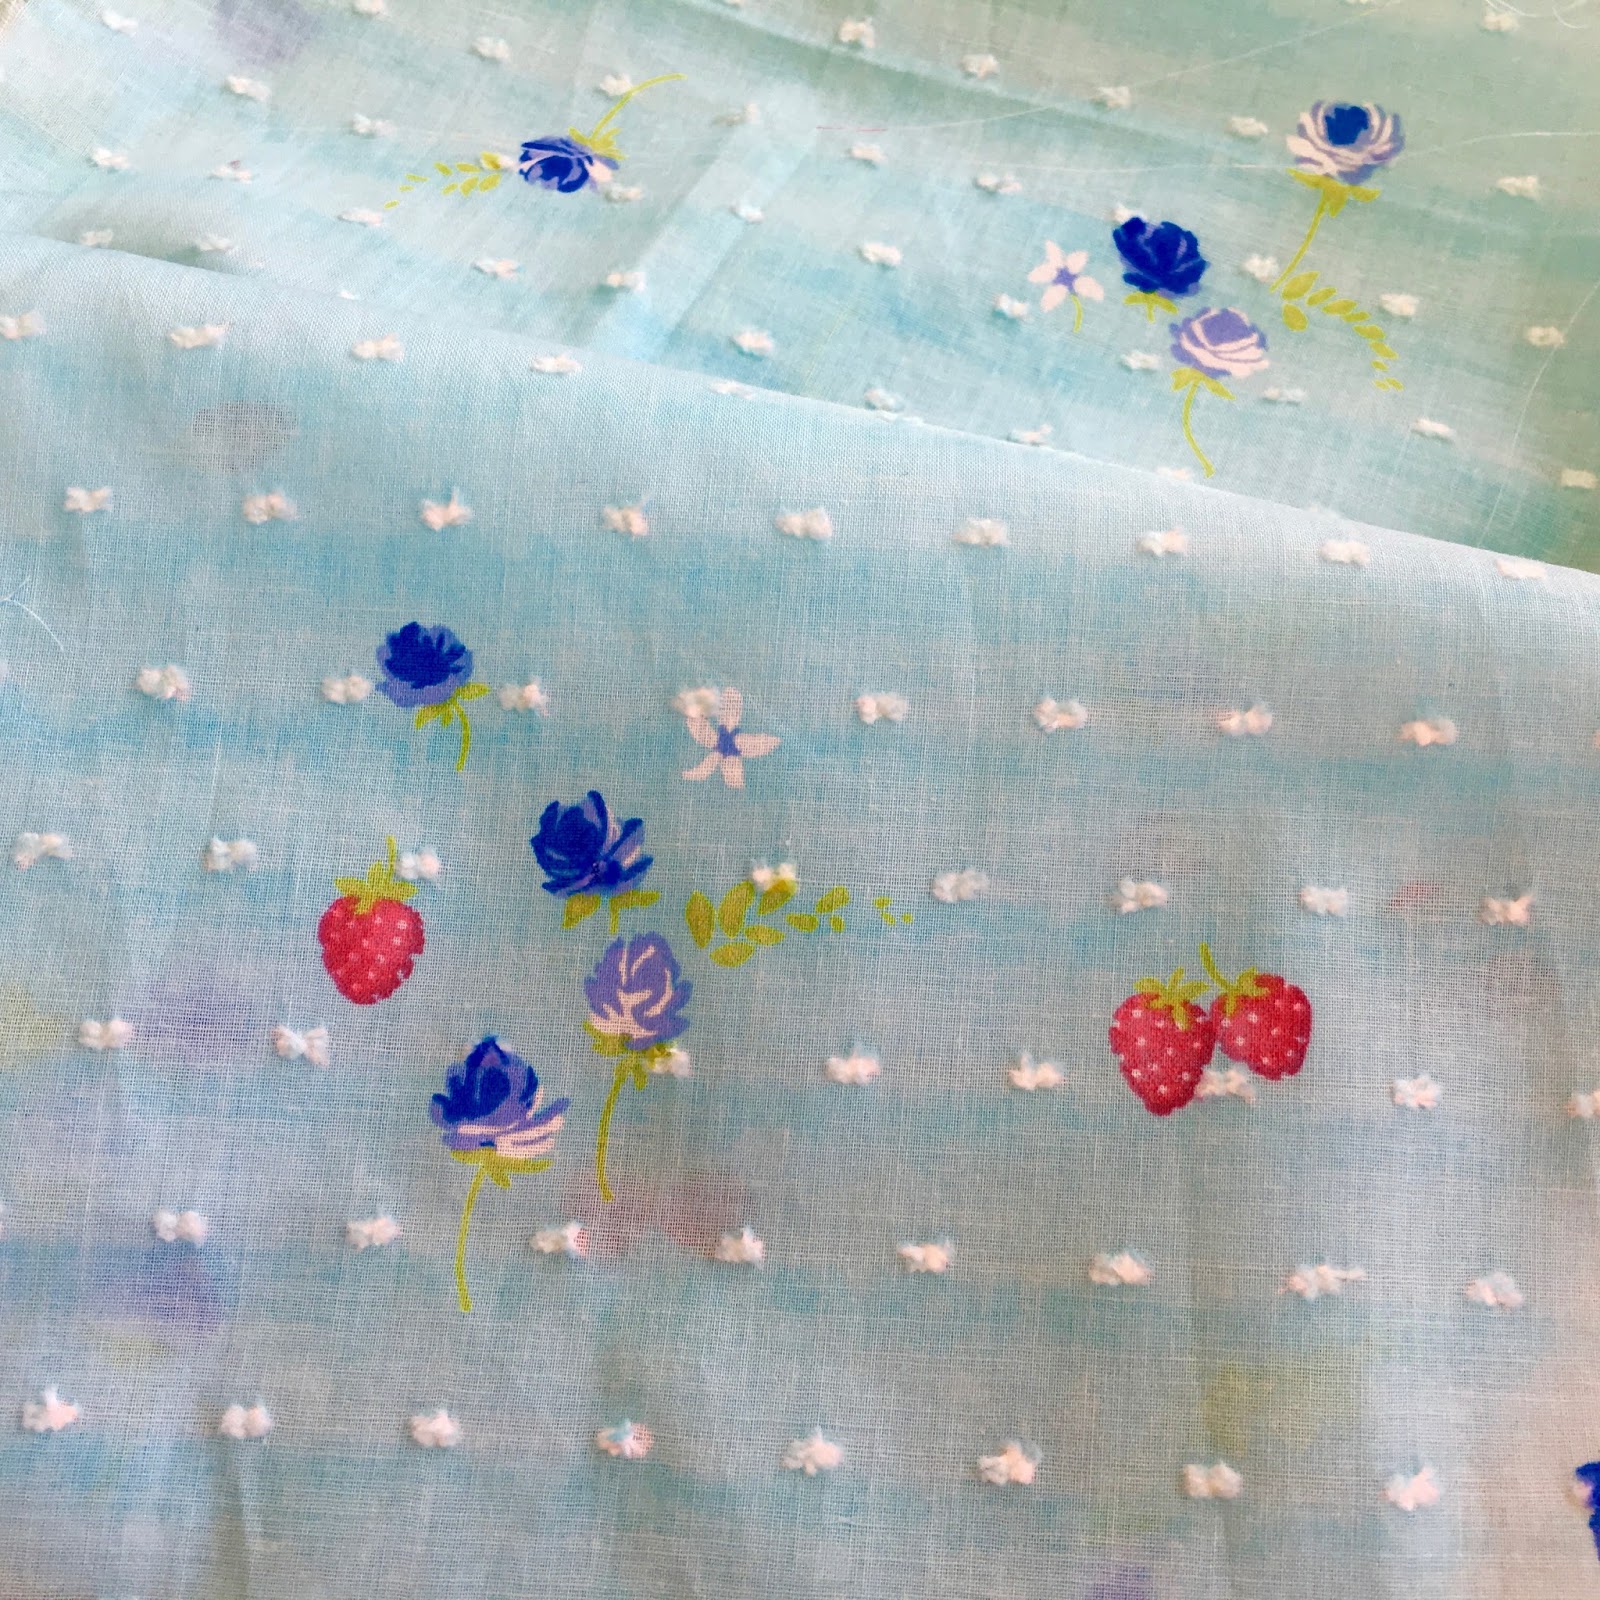 Side view with super big Country Singer hair! (I just discovered this product and it's a total game-changer). The puff sleeves have a little binding at the hem.
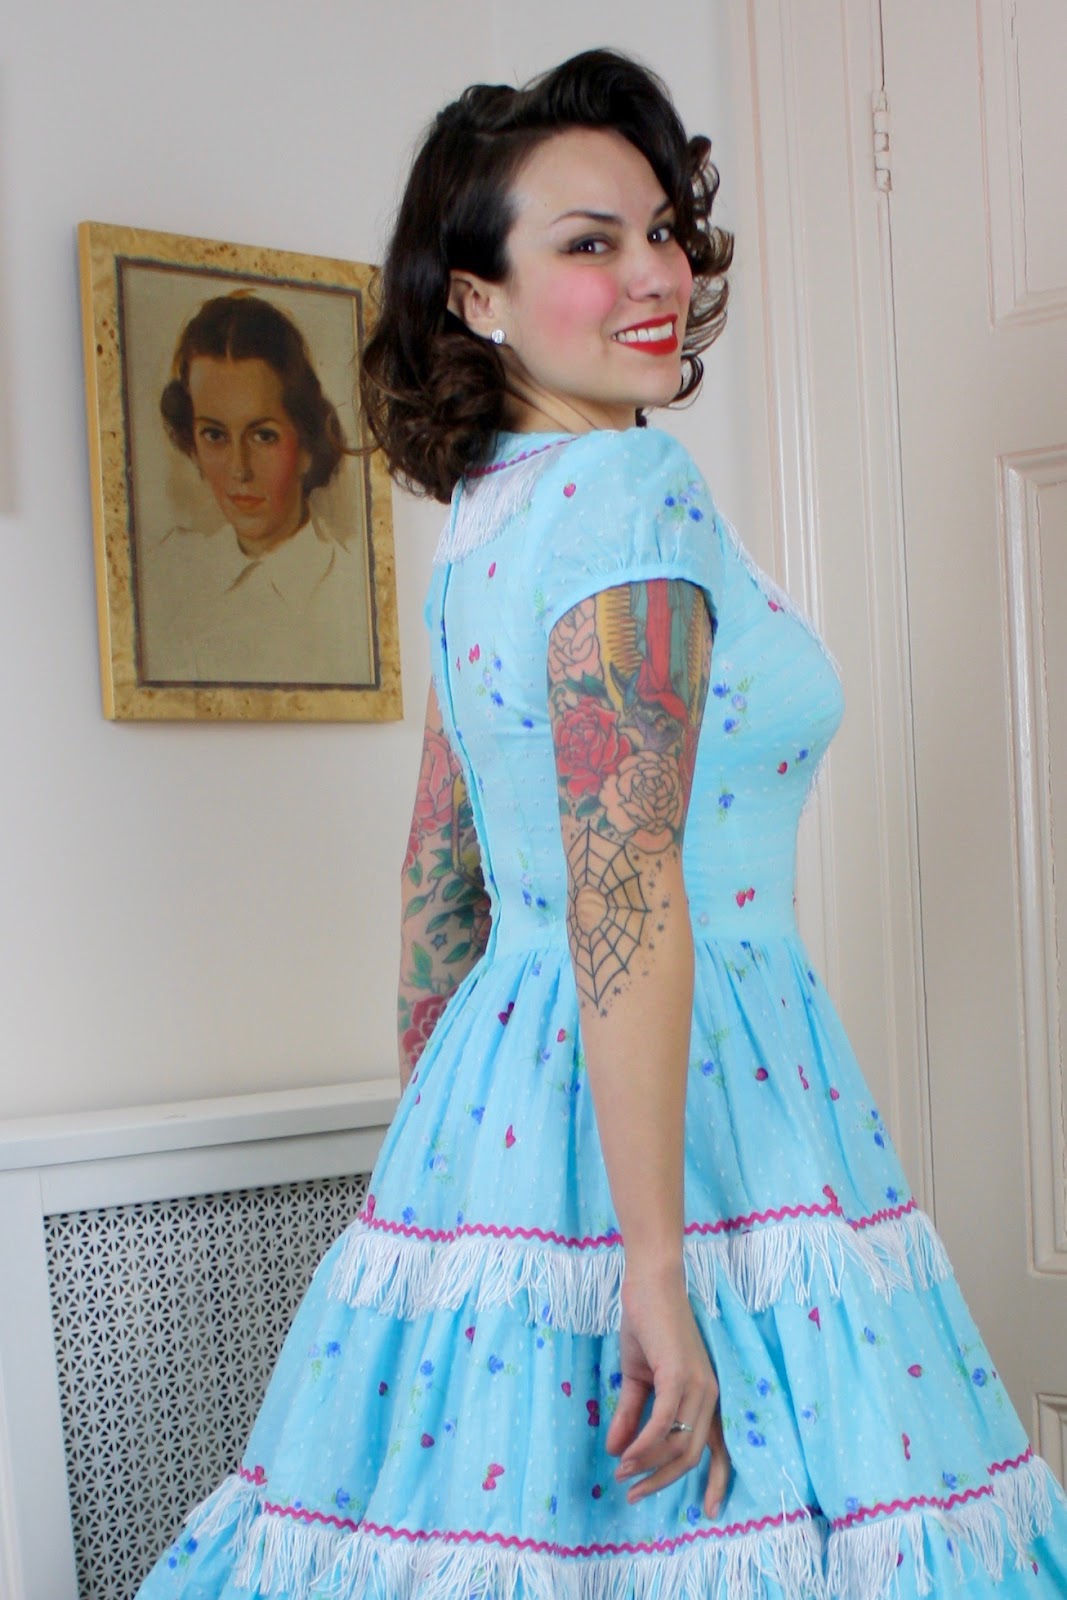
I lined the bodice only in white siri cotton. I found the perfect color crinoline to wear under the skirt. This is the Hell Bunny 25" petticoat in turquoise.
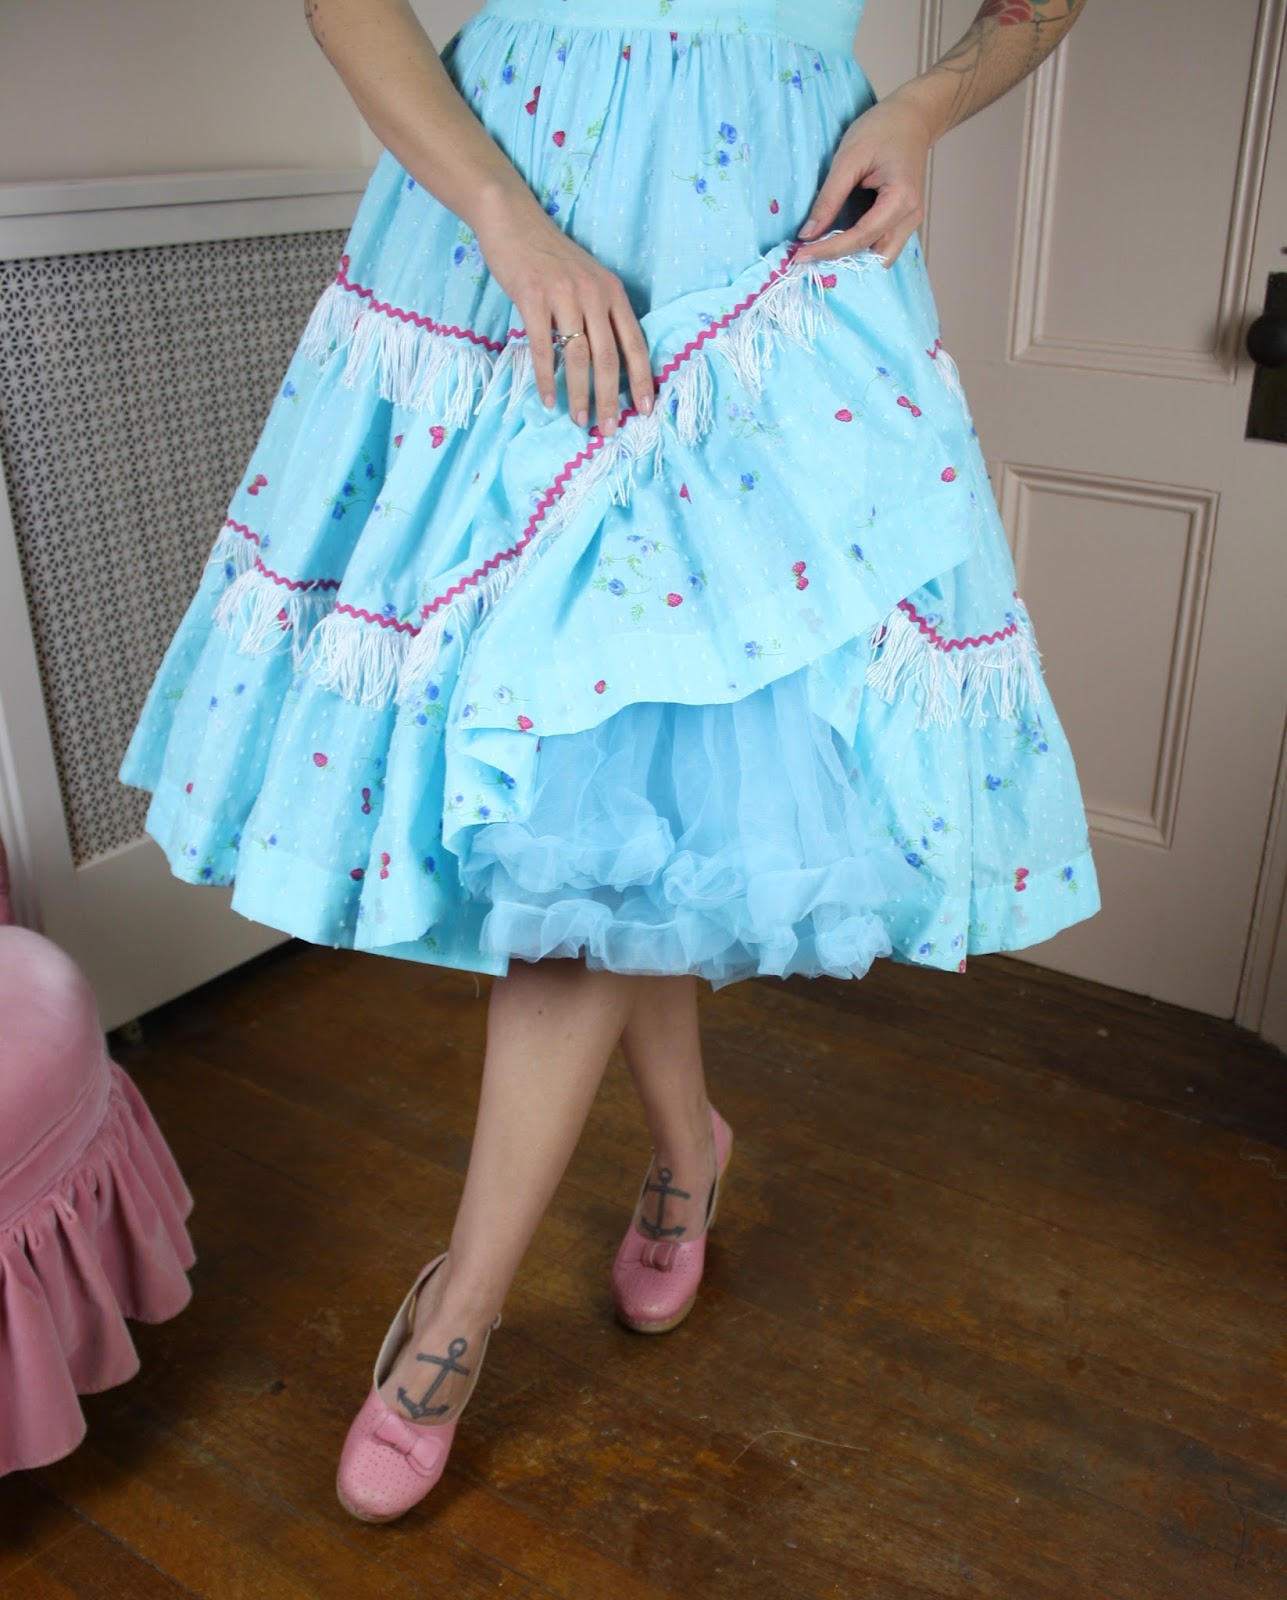 It makes the skirt even swingier.
 And since I always get foundation garment questions, I'm also wearing a longline bra and high-waisted panty to get a really smooth line. Wearing vintage-style foundations definitely helps to achieve the right silhouette.
 I wore this to a performance at an Irish dive bar, and got some hilarious comments from the local drunks, including: "Are you Cinderella?!" and "Did you just come from a rodeo?" Sigh.
 Anyway, the book has the pattern pieces for this design (without tiers), as well as detailed instructions. It's coming out in less than a month now! I'll be posting more photos and designs as we get closer.


February 8, 2016
New Spring Butterick Patterns
I'm super excited to show you my new Butterick patterns for spring! I have two new dress designs, both of which are shown in my new fabric collection. The fabrics will be coming to Joann Stores in the next couple months, and I'll be sure to do a separate post about them.
First up is B6322, a corset-styled dress with ruching. This one was directly inspired by a sweet little pink dress from the '50s that I found at a vintage show.
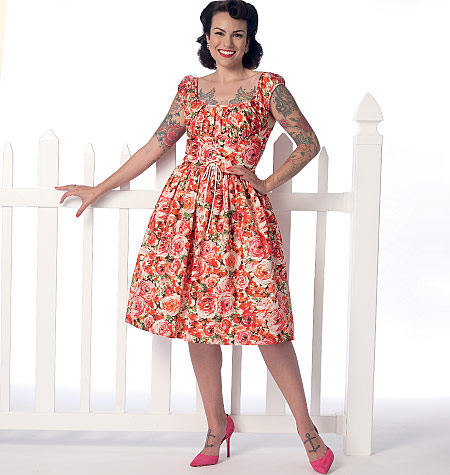 It's super dirndl-y, which is funny because I designed this before I left for that trip for Germany that got me all dirndl-obsessed. I guess it was fated!
 It's shown above with a crinoline, and below without one.
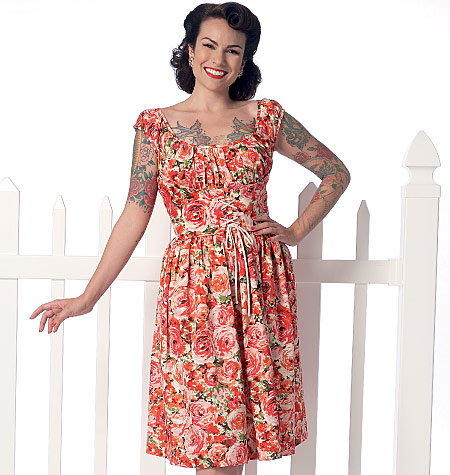
It has a low scoop back.
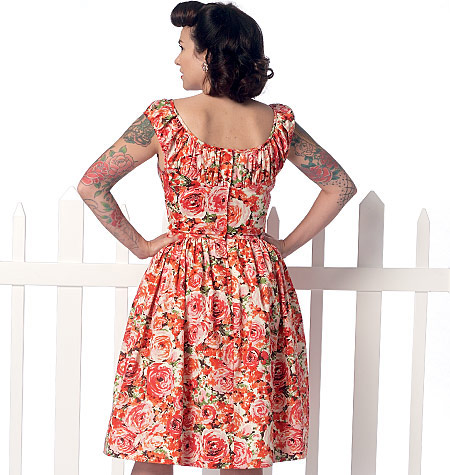
This fabric is a cotton sateen in pink floral, which will also be available in blue if that's more to your liking!
 There's binding around the neckline and armholes for a clean finish.
I made this recently in a border print sateen too! You may recognize this fabric design from last spring (it had a grey background), and now it's going to be available in two new colors--yellow and aqua.


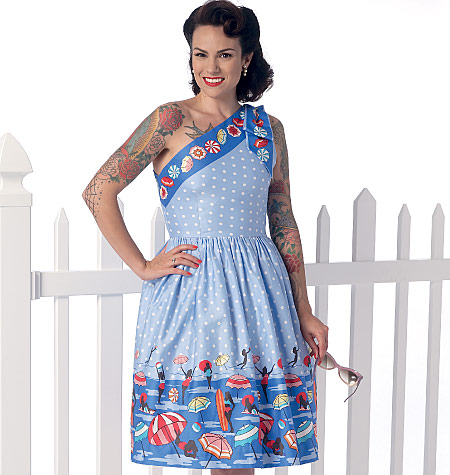
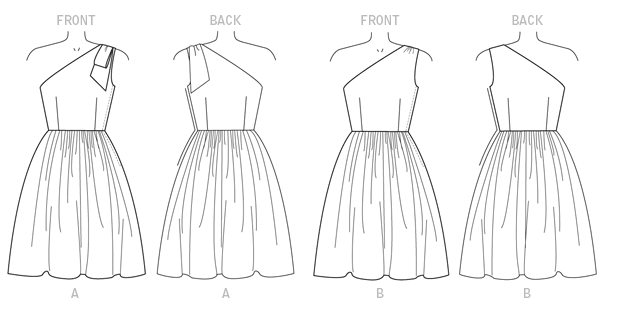
 Next up is B6323, a one-shoulder dress that's also great for showcasing border prints.
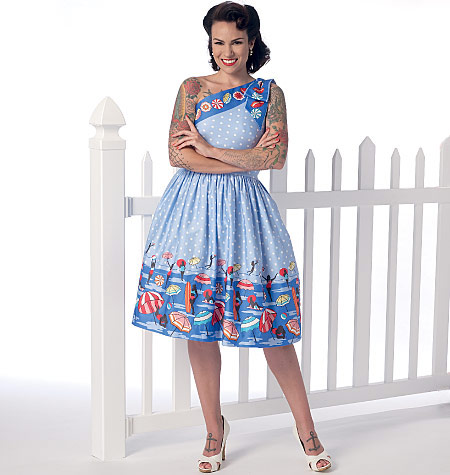 It's shown in one of my new favorite spring fabrics, a really fun beach print with polka dots, umbrellas, and retro girl silhouettes. There's a small border of umbrellas on one selvage, which can be used across the neckline and for the shoulder bow.
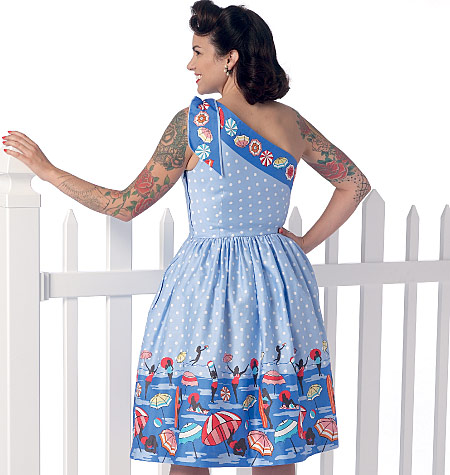
The small border continues in the back.
 Of course, you can also sew up this dress in a non-border print, as illustrated here. This rendering also shows a new fabric, a yellow and ivory rose print in rayon challis.
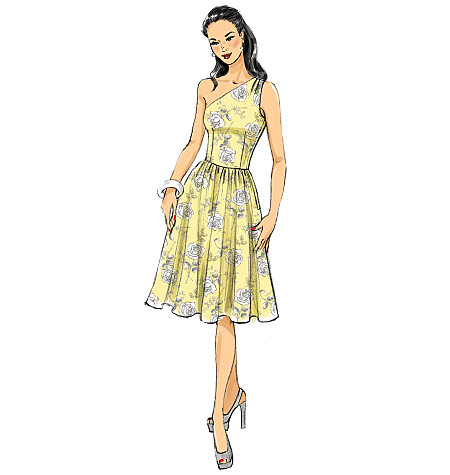
Make it with or without the shoulder bow.
I'll have more news on the fabrics soon! I hope you like the new patterns.
January 21, 2016
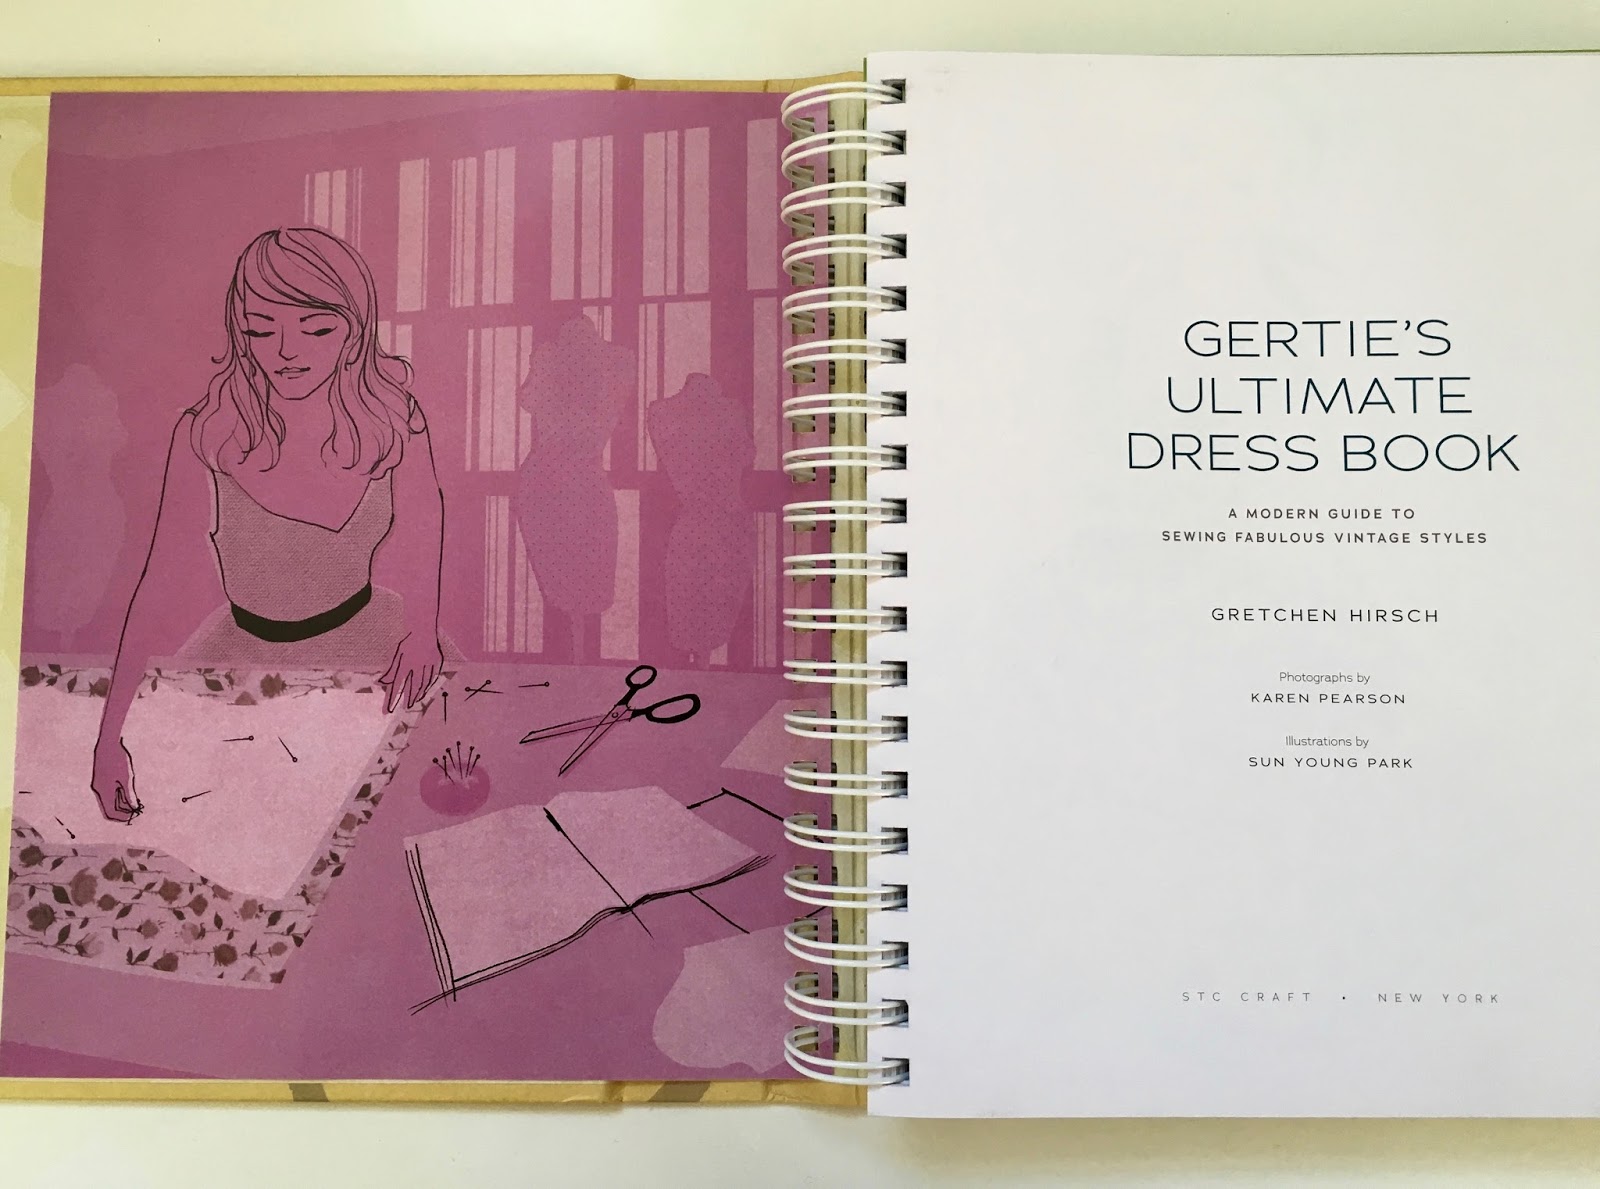
My New Dress Book! A Sneak Peek
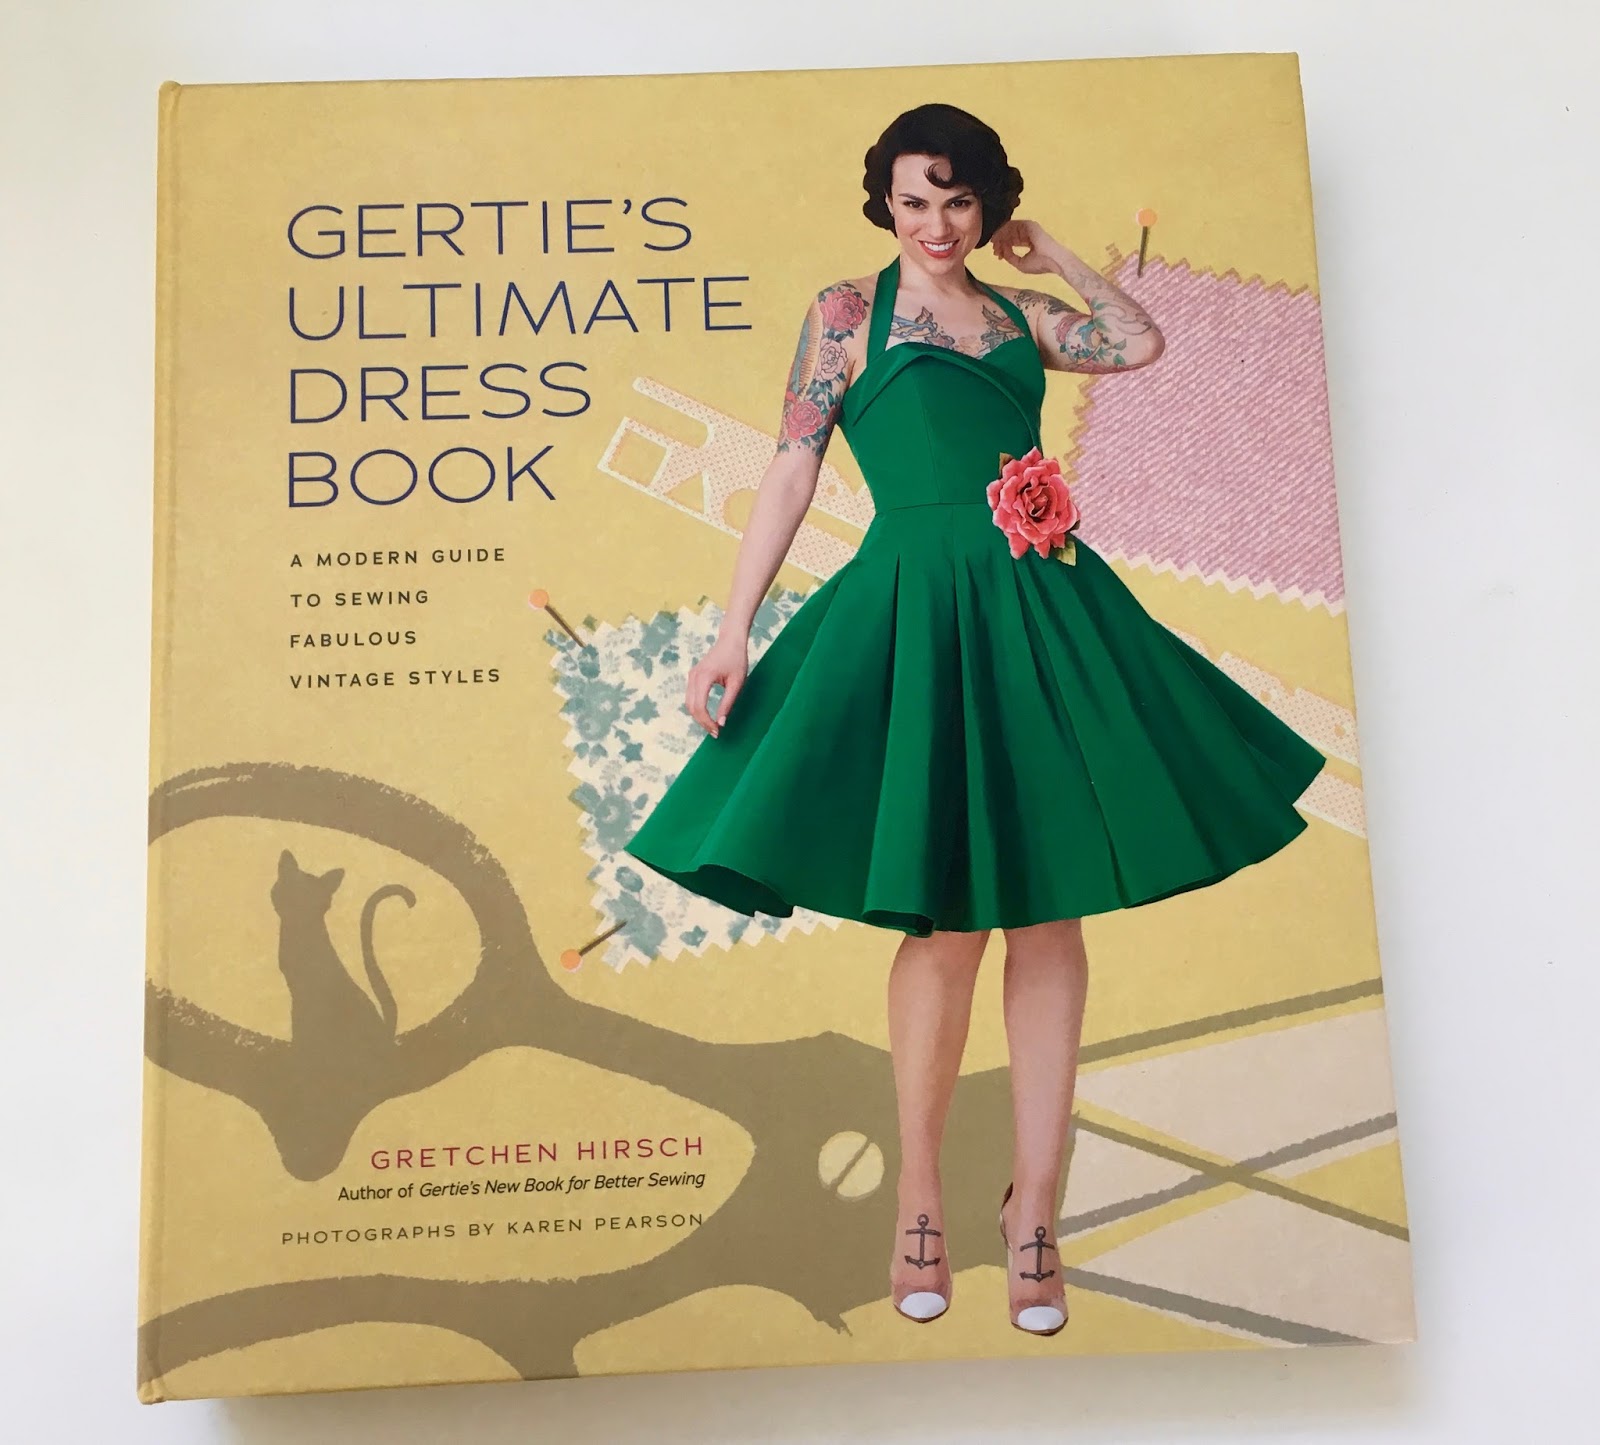
I just got my copy of Gertie's Ultimate Dress Book and I couldn't wait to share a few pages with you! It's such an exciting day when the postman brings that first copy. This is my biggest book yet and I practically sewed my little fingers off making all the dresses!
Like my other books, it was illustrated by Sun Young Park. Her tonal chapter openers are so gorgeous.

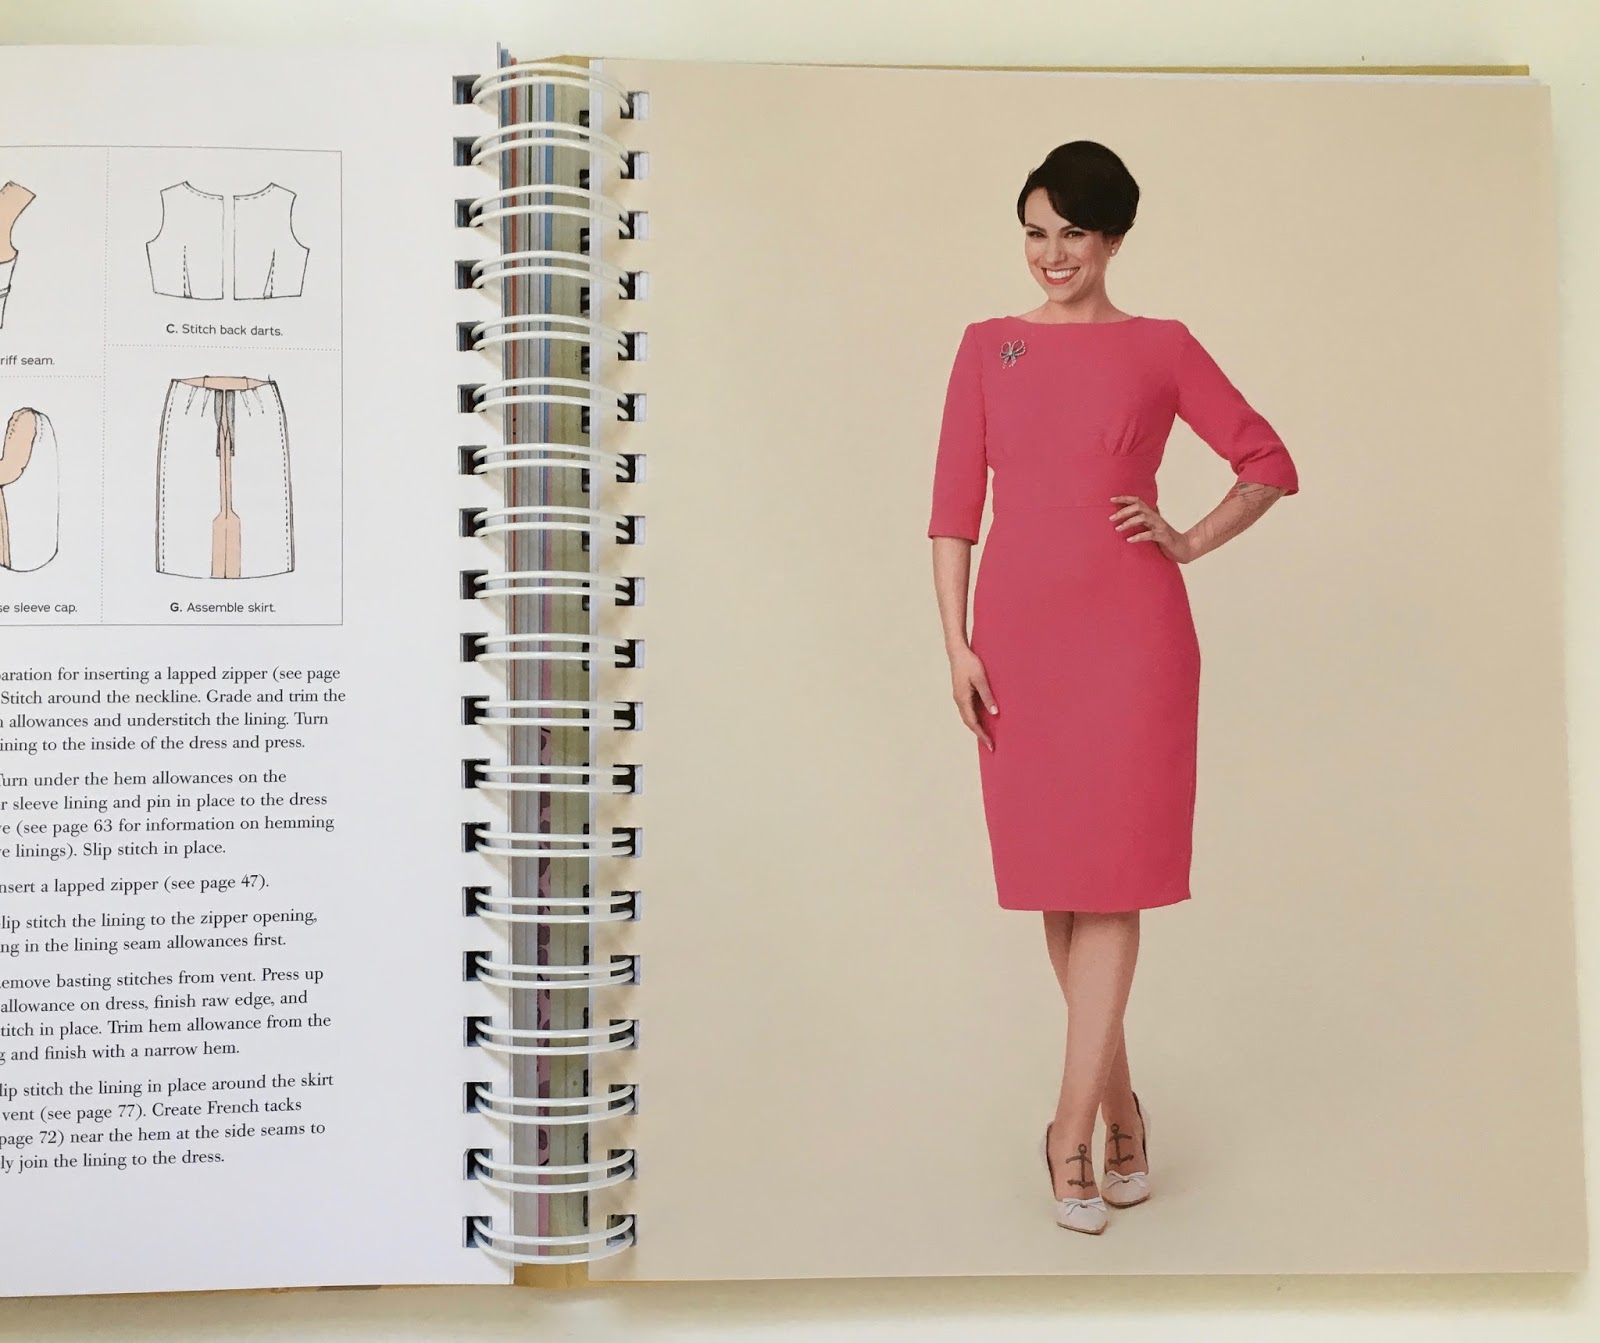
And here are a few of the dresses! The lovely photos are by Karen Pearson. With 23 designs, there's something for everyone. And the mix-and-match aspect of the patterns means that you can change things up to your own taste. (There are five bodices, six skirts, six sleeves, collars, cuffs, and more!)
There are simple day dresses . . .

Fun party and date dresses . . .

Office wear . . .
And even a wedding dress!

I'll be doing some posts with more details on the patterns and designs, but for now I just wanted to give you a little bit of the flavor of the book.
More to come!
December 31, 2015
Knit Wrap Top Sew-Along #7: Final Steps!
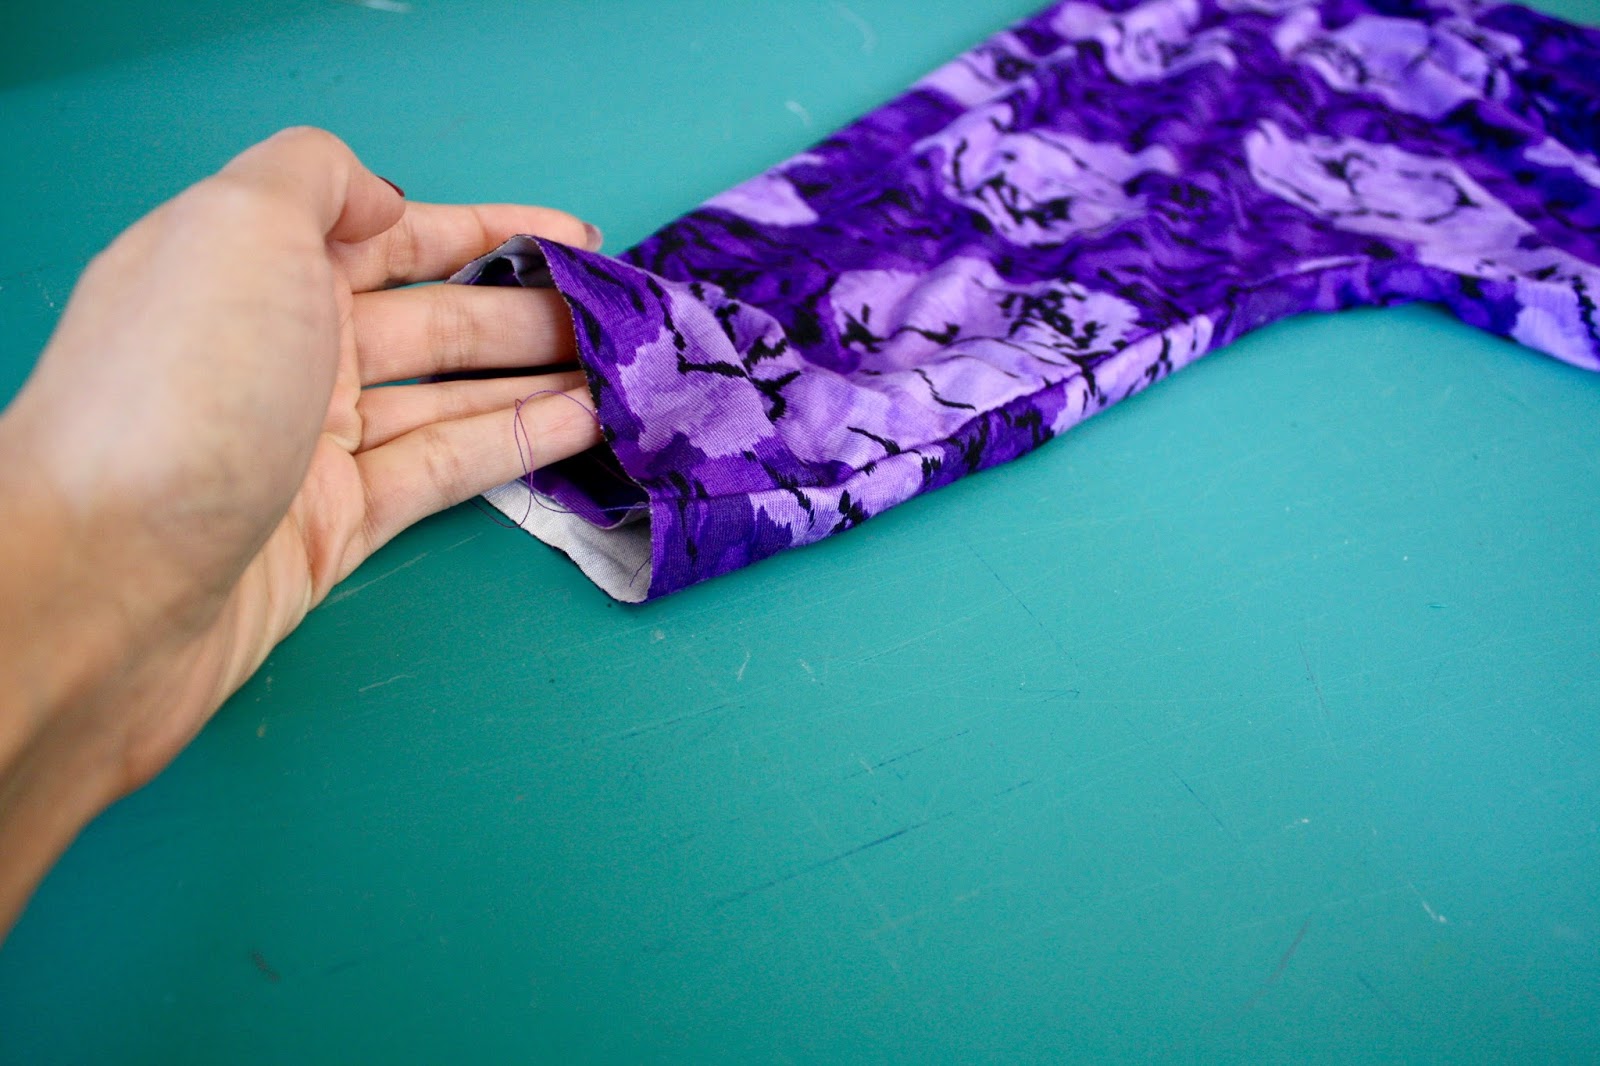
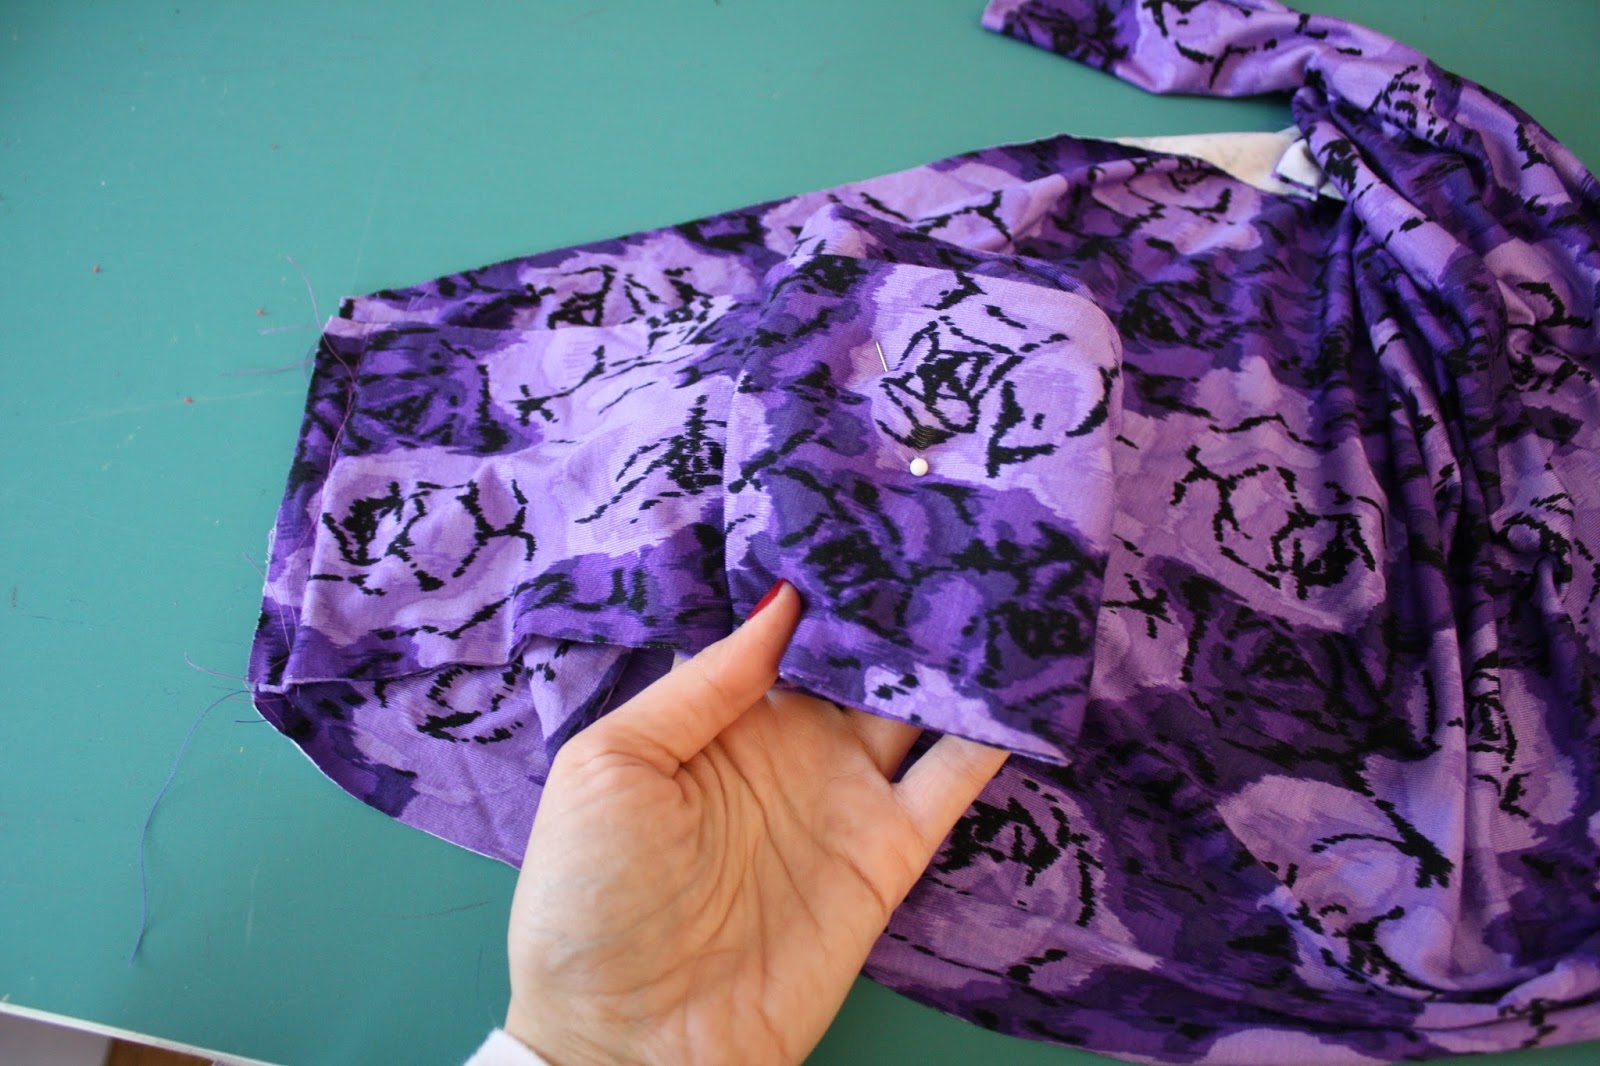
 Ready to finish your top? I promised to show you a cool trick to hem your sleeves by machine, and here it is. This is a good trick to know for hemming any lined sleeves by machine.
You'll be starting with your top right side out, and you'll have two sleeve layers inside each other.
Turn in the seam allowances on the sleeves (in just one little spot) the way they will be sewn. So the seam allowances will be turned in and facing each other.
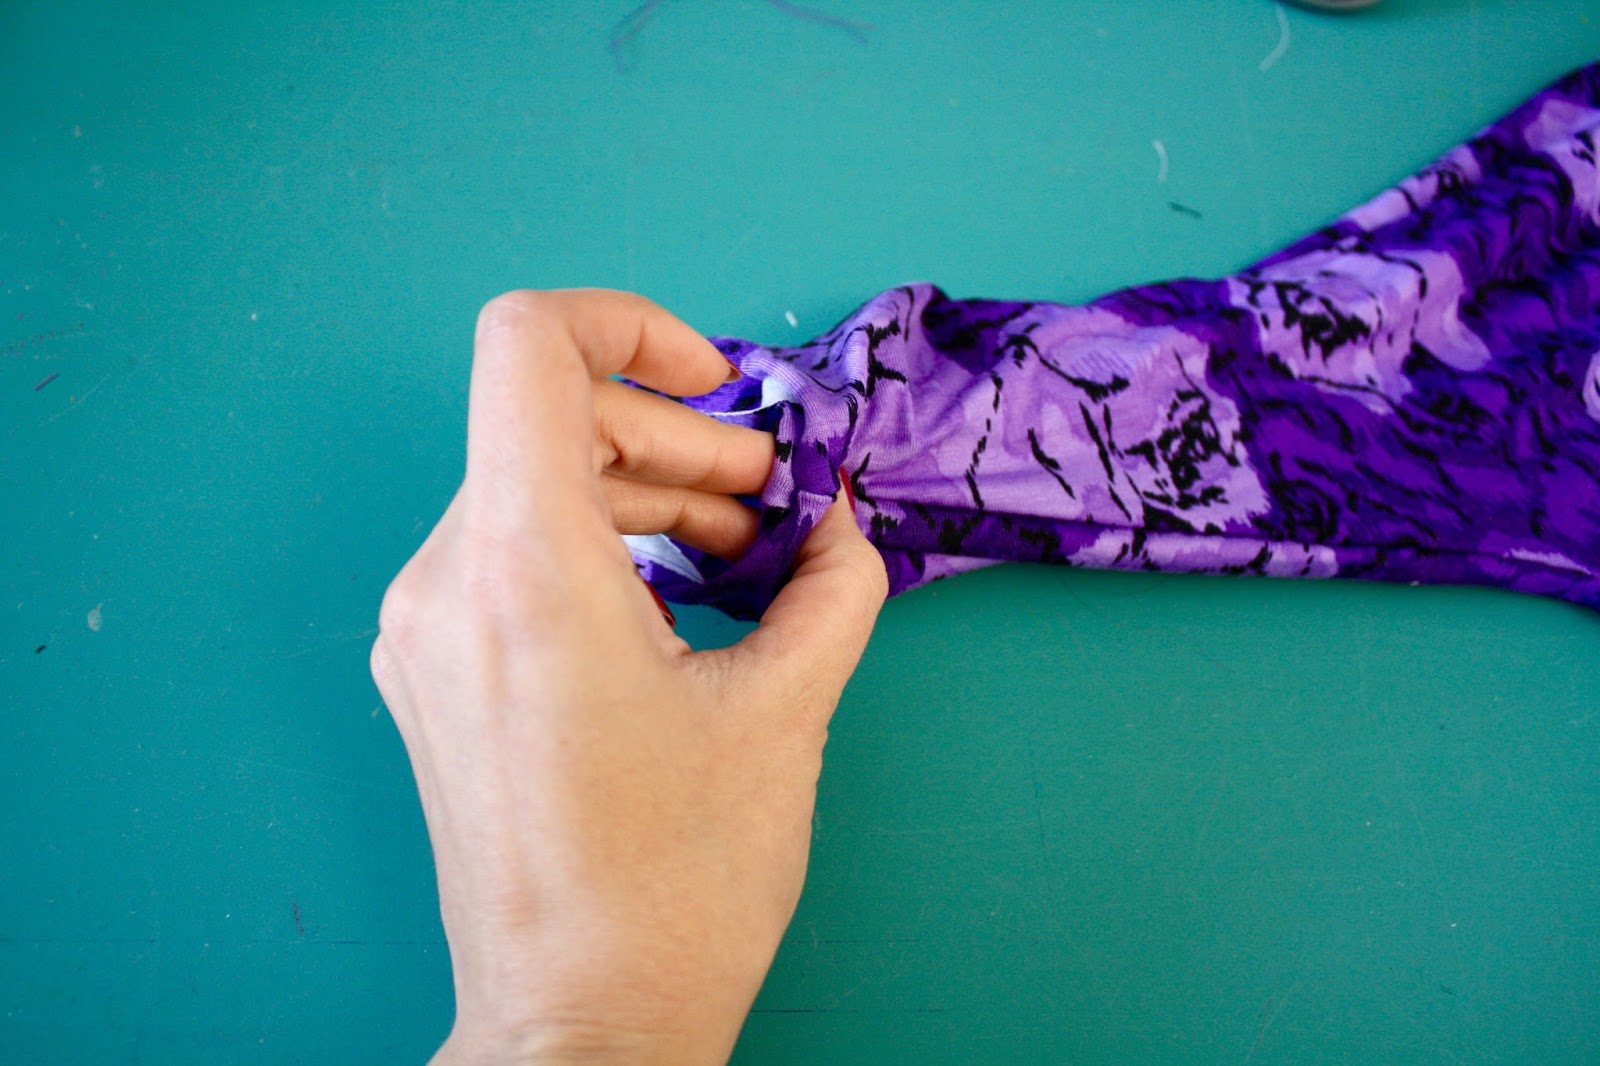
Next, dig into the sleeves a bit so that you can pin the seam allowances this way from the inside. Don't worry too much about how this is done, just that the two layers are pinned together the way they will be sewn.
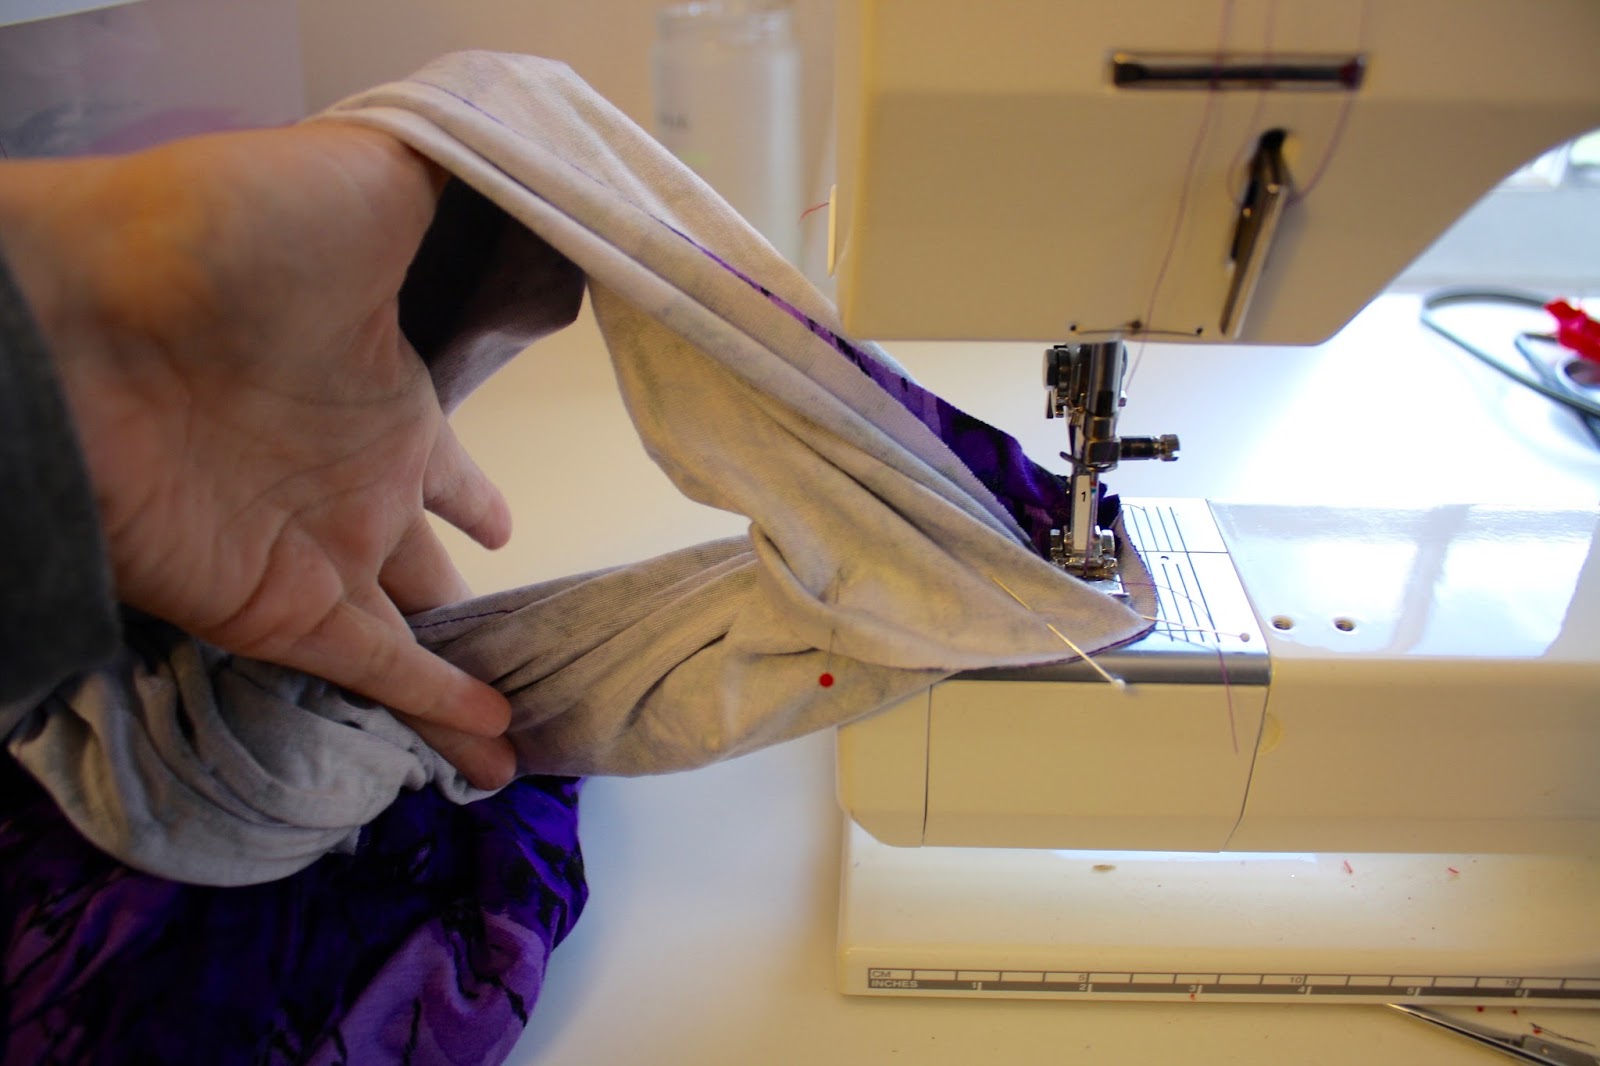
Remember that opening you left in the waistline? Dig in there with your hand and pull out the sleeves that you pinned. They'll look like this.
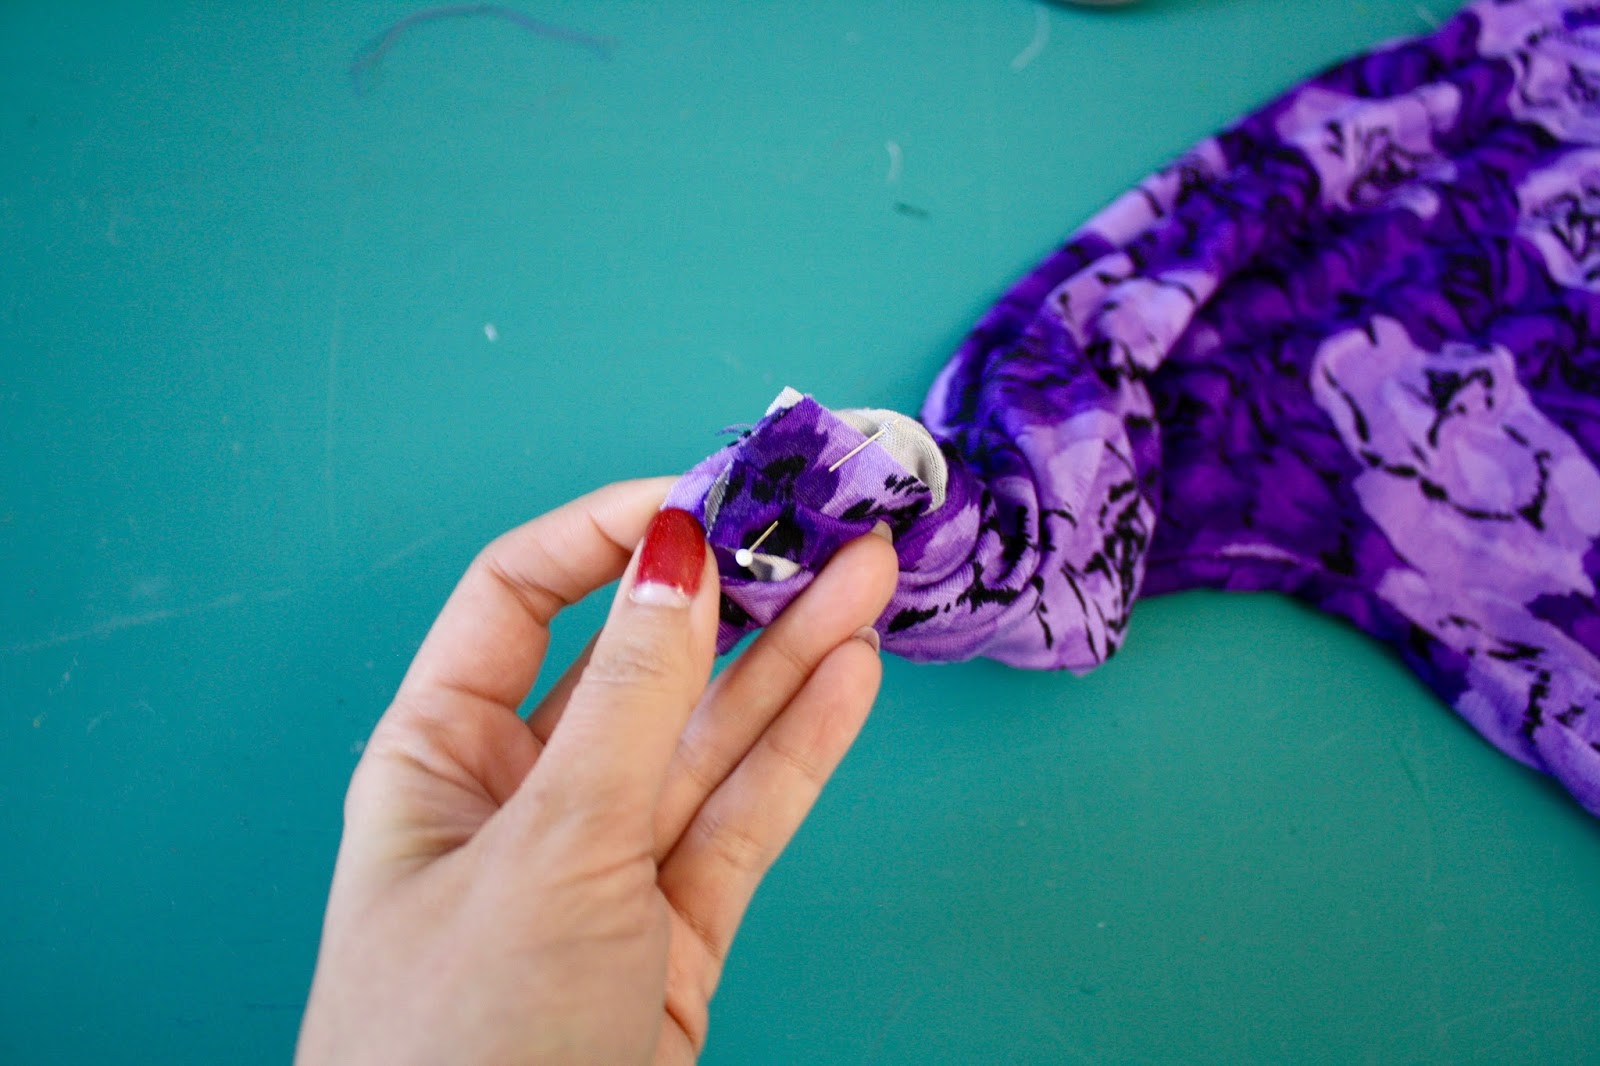
Now, pin the sleeve raw edges together all the way around. It's funny looking, like two elephant trunks touching and then getting pinned together at the edges.
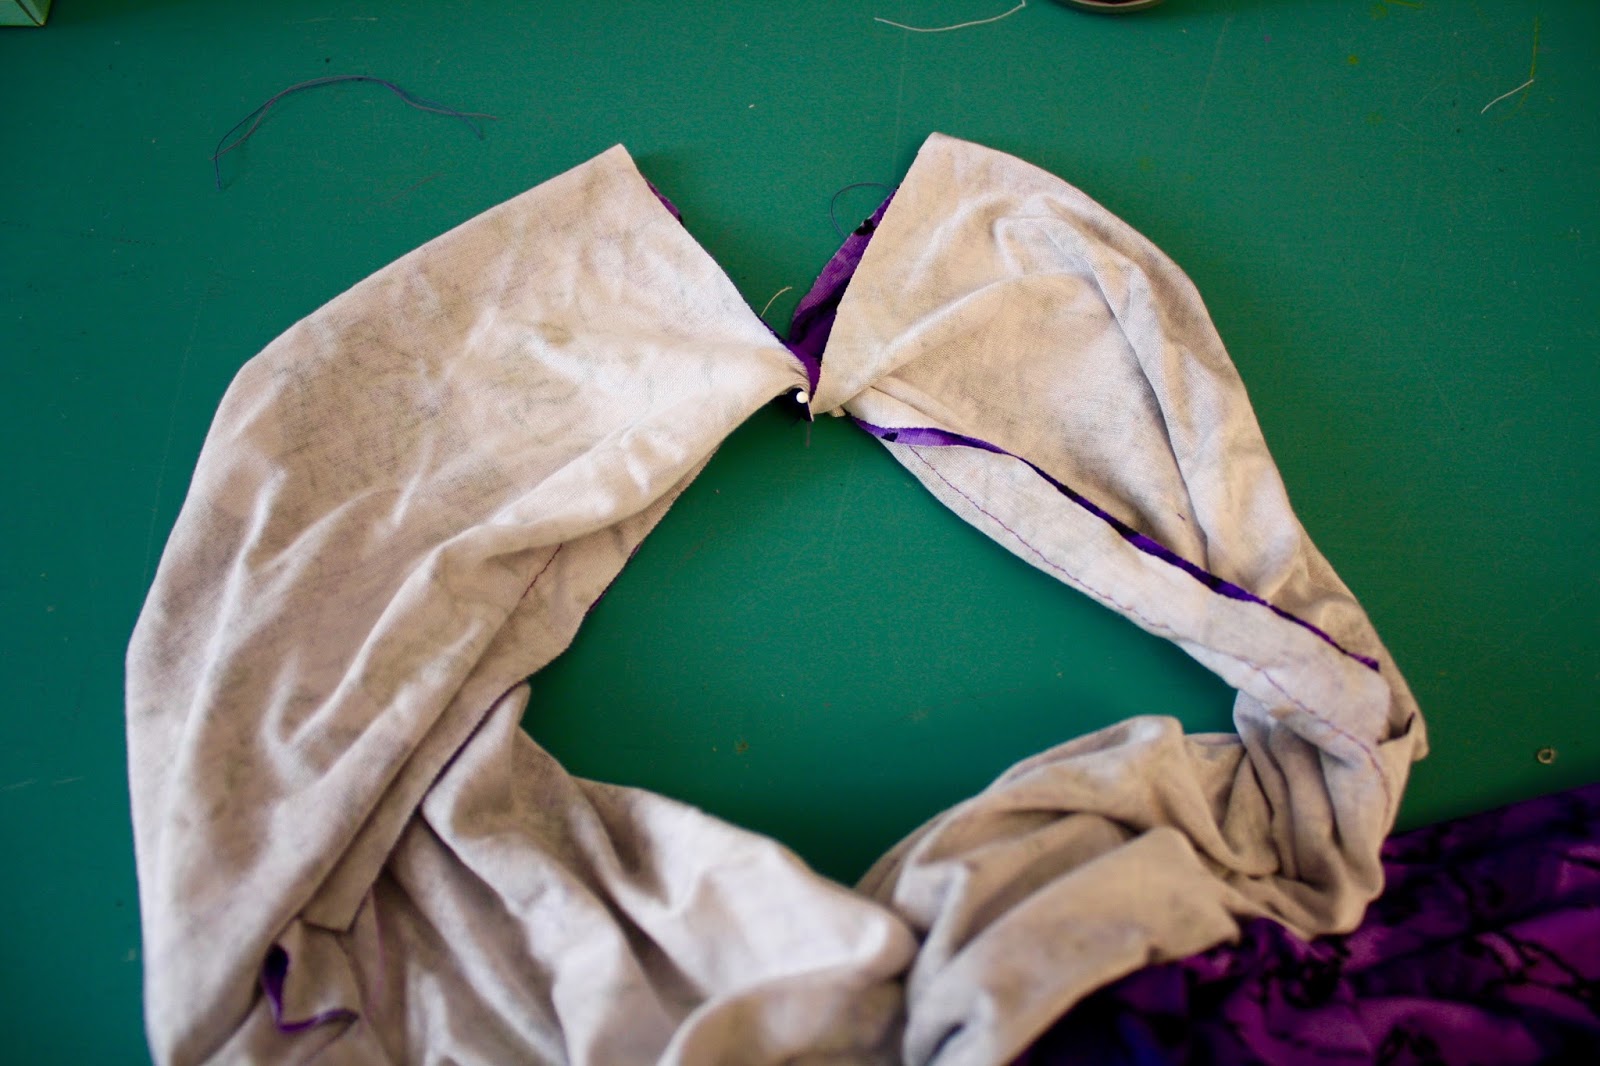
Take to the machine and sew around the edges you pinned. Use a straight stitch and stretch the fabric as you sew. I'm pulling up the two sleeves here so you can get a better idea of how the sewing works.
Here's what you'll have.
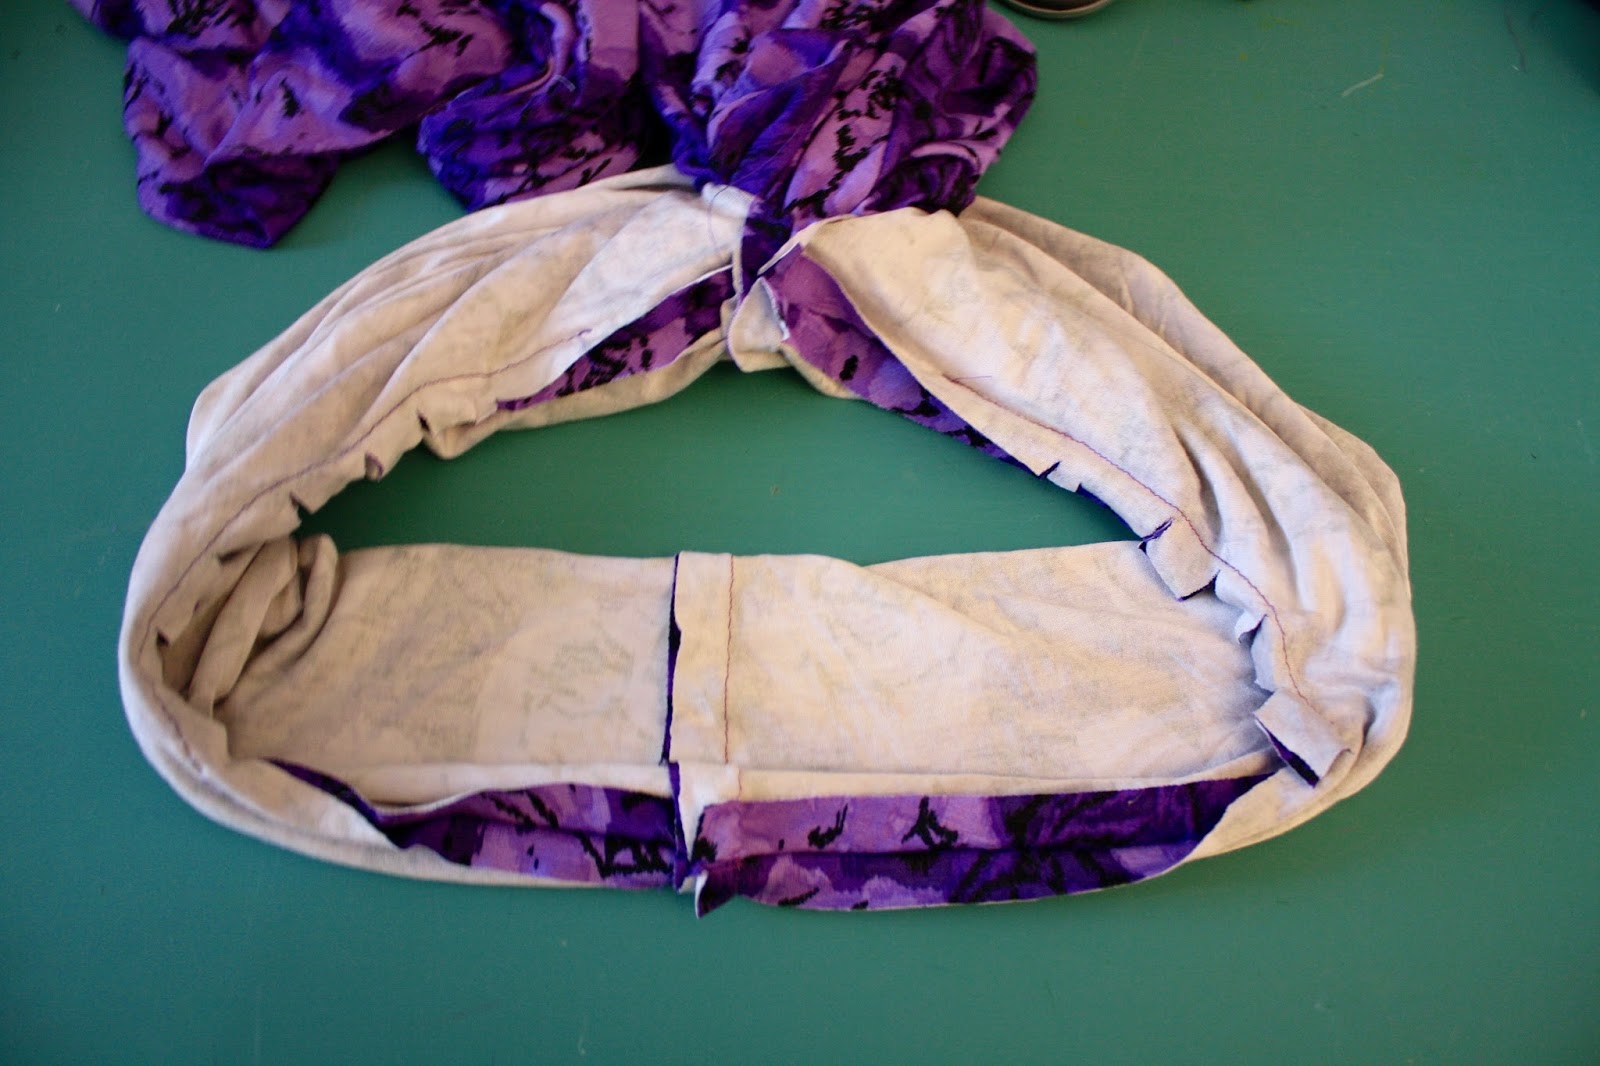
Push the sleeves back into the opening and put one sleeve inside the other. The sleeve hem is finished! You'll want to give it a little press.

Repeat the above steps with the other sleeve.
Next, we're going to edgestitch the side opening for the ties. Remember these?
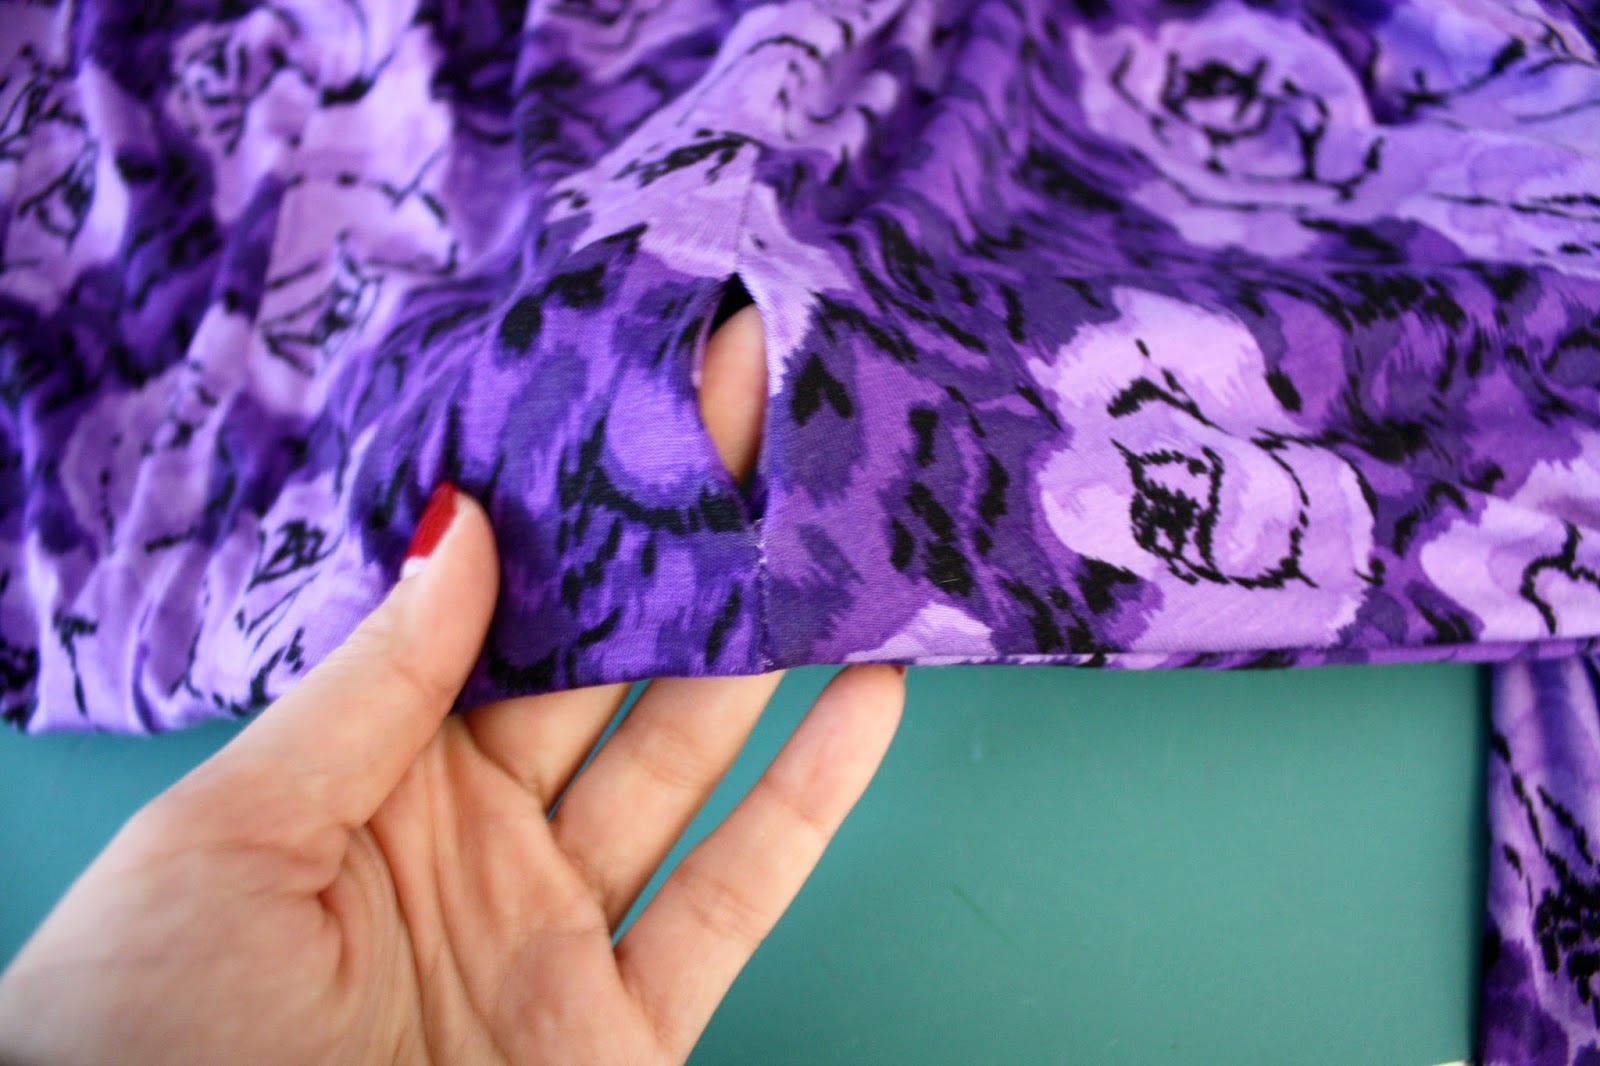
Make sure those seam allowances are turned in, pin them in place, and then edgestitch around the opening.
Your final step is to hand stitch the opening at the waistline closed. A slip stitch or ladder stitch is great.

Hey, your top is finished! Give it a light press, lightly pressing all the edges flat. It's ready to wear!
December 30, 2015
Inspiration: Pee-Wee's Playhouse Christmas Special
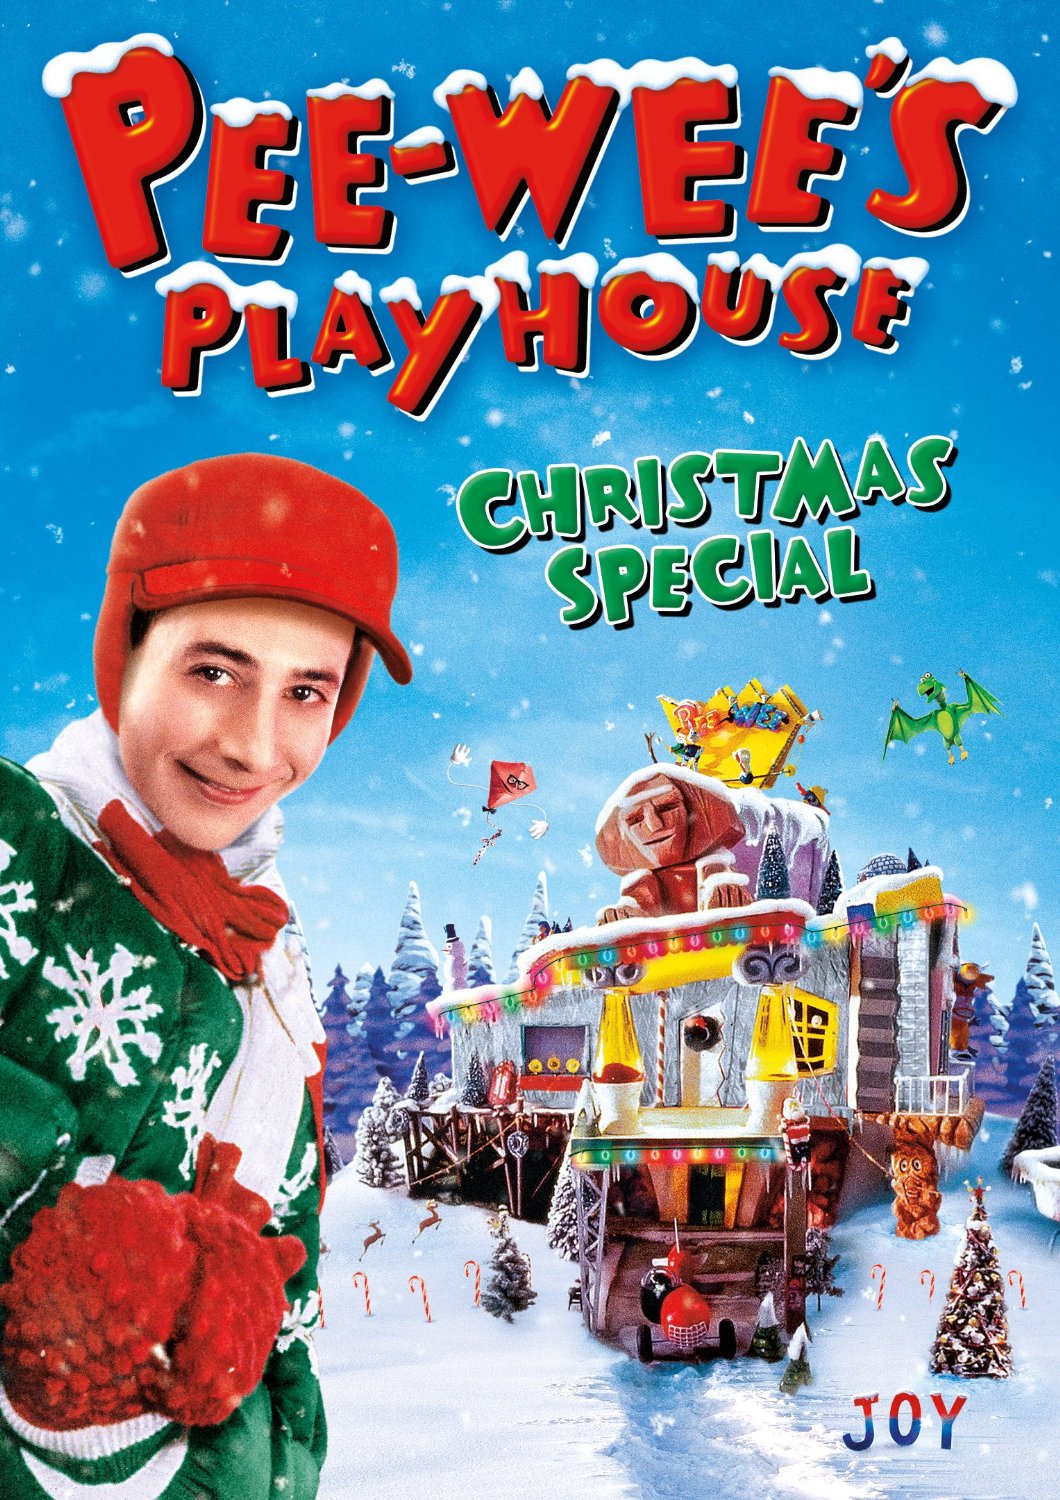 I was going through some boxes recently and discovered a completely new, shrink-wrapped copy of
Pee-Wee's Playouse Christmas Special
. How did such a treasure get packed away?! Because, readers, it is indeed a treasure. This 1988 gem is everything we love about the playhouse, plus a stellar list of guest stars. It has Cher! Little Richard! Oprah Winfrey!
I was going through some boxes recently and discovered a completely new, shrink-wrapped copy of
Pee-Wee's Playouse Christmas Special
. How did such a treasure get packed away?! Because, readers, it is indeed a treasure. This 1988 gem is everything we love about the playhouse, plus a stellar list of guest stars. It has Cher! Little Richard! Oprah Winfrey!Costumes will be of upmost important to readers of this blog, I suspect. Let's take a look at the best of the best.
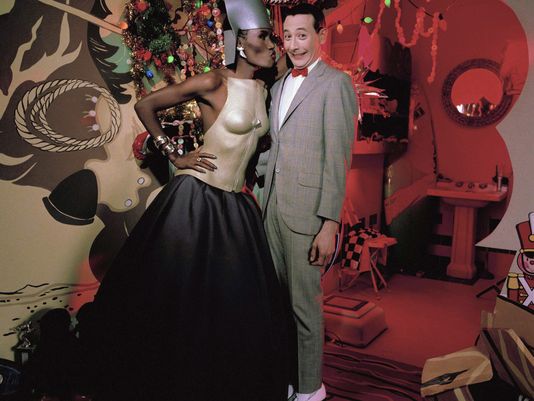
Annette Funicello appears wearing a '50s themed outfit, complete with felt circle skirt appliqued with a Christmas tree.
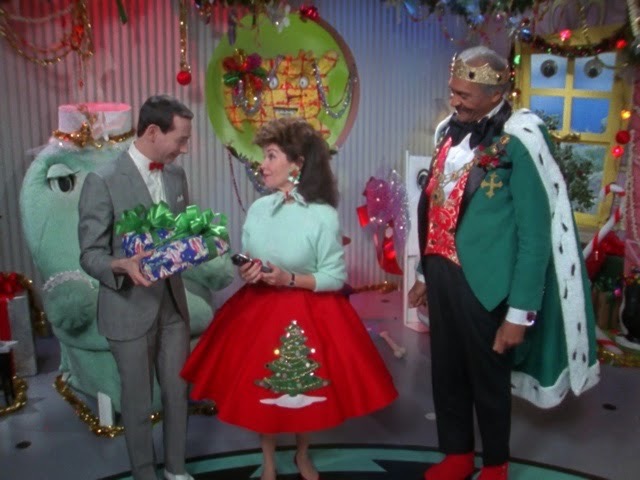
This special also introduced me to the wonders of the Del Rubio Triplets, whose "dulcet tones" are accompanied by mini-skirted (emphasis on the mini) ensembles.

Charo sparkles in a sequined beret and leotard-thing. She does "Feliz Navidad" ("Hit it, Konky!") while Pee-Wee stumbles about trying to hit the piñata.
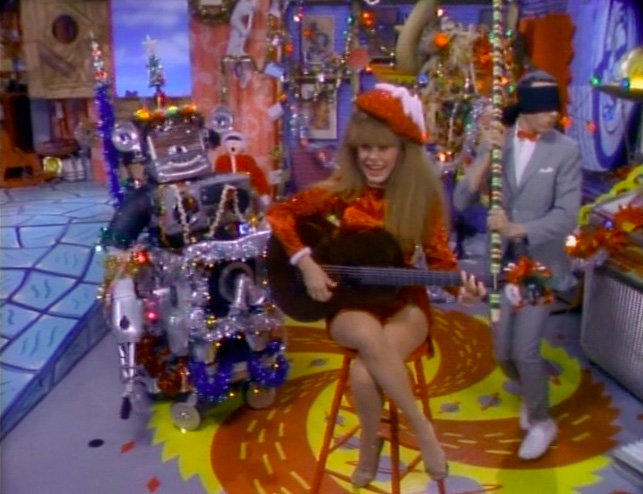
In my eyes, no one can outshine Miss Yvonne, the Most Beautiful Woman in Puppetland (and I've written about my love for her style before). And boy, does she outdo herself in the costume department.
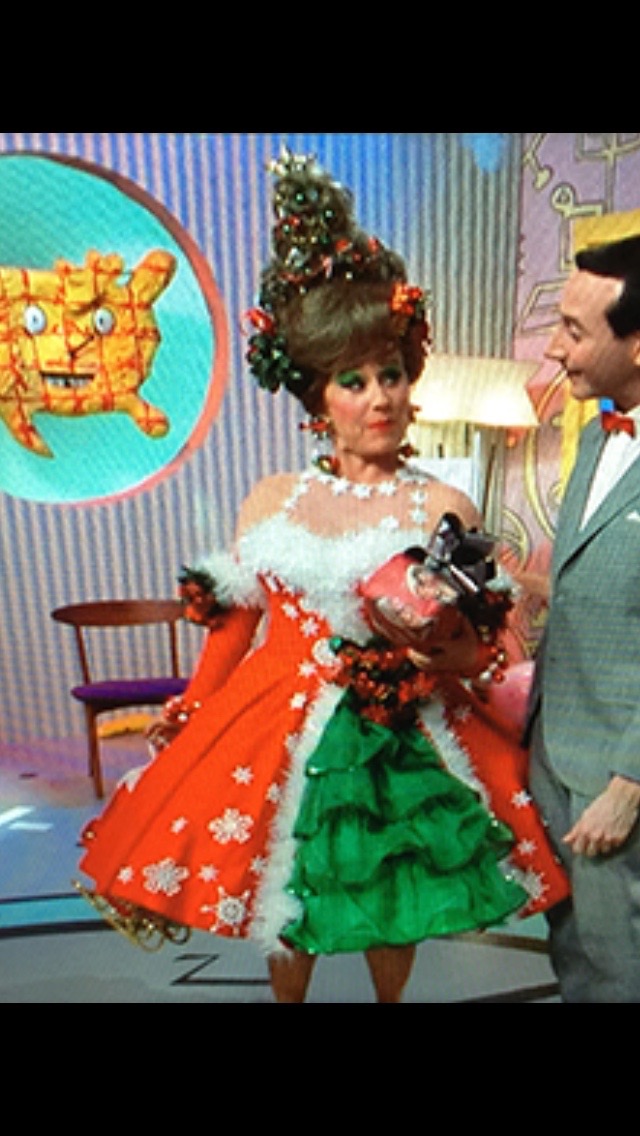
In fact, my own holiday dress was inspired by her this year: strapless, red velvet, with greenery accessories!
There are a few misses, costume-wise, in the Pee-Wee special. Grace Jones wears . . . this.
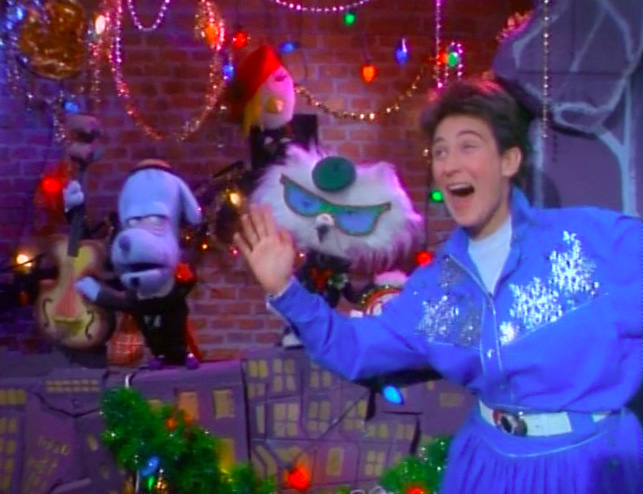
K.D. Lang is an all-around disaster, in a self-consciously extra wacky version of Jingle Bell Rock. I would normally approve of a snowflake applique western shirtdress, but hers is so unflattering. Fast forward, readers!
All in all, however, this Christmas special is a treat! It's now taken up permanent residence next to my DVD player to be enjoyed any time of year. Watch it now to start planning your ensemble for next year, or just to squeeze in some last minute holiday cheer before New Year's.

December 29, 2015
Knit Wrap Top Sew-Along #6
Okay, we're honing in on the final steps of our B6285 wrap top sew-along. Unfortunately, this project just gets harder and harder to photograph--at points it just looks like a big tangle of jersey! I'll use a mix of the pattern illustrations and my photos, but if anything is unclear, please ask me about it.
After the last steps, you should have two tops: one has the ties attached and other does not. Now we're going to stitch these two tops together!
Take the top with ties attached and bundle up the ties so that they stay out of the way--they will not be involved in the next steps, and they need to stay between the layers and not get caught in ANY stitching. I suggest rolling them up into little ball-like bundles and securing them with a large pin. Here I am holding a bundle. (See? So hard to photograph!)
Now, grab the top without ties. Put the two tops together, right sides together and pin all around the outer edges. The sleeves do not get involved in this step, and the tie "bundles" stay out of the action too.
When pinning the front edges, adjust the gathers on the non-tie top to fit the other piece.
Make sure your seam allowances stay open and your darts pressed toward center back.
Pinned all around, your top will look kinda like this. Note how the sleeves are just hanging out bunched up in the armholes, doing nothing.
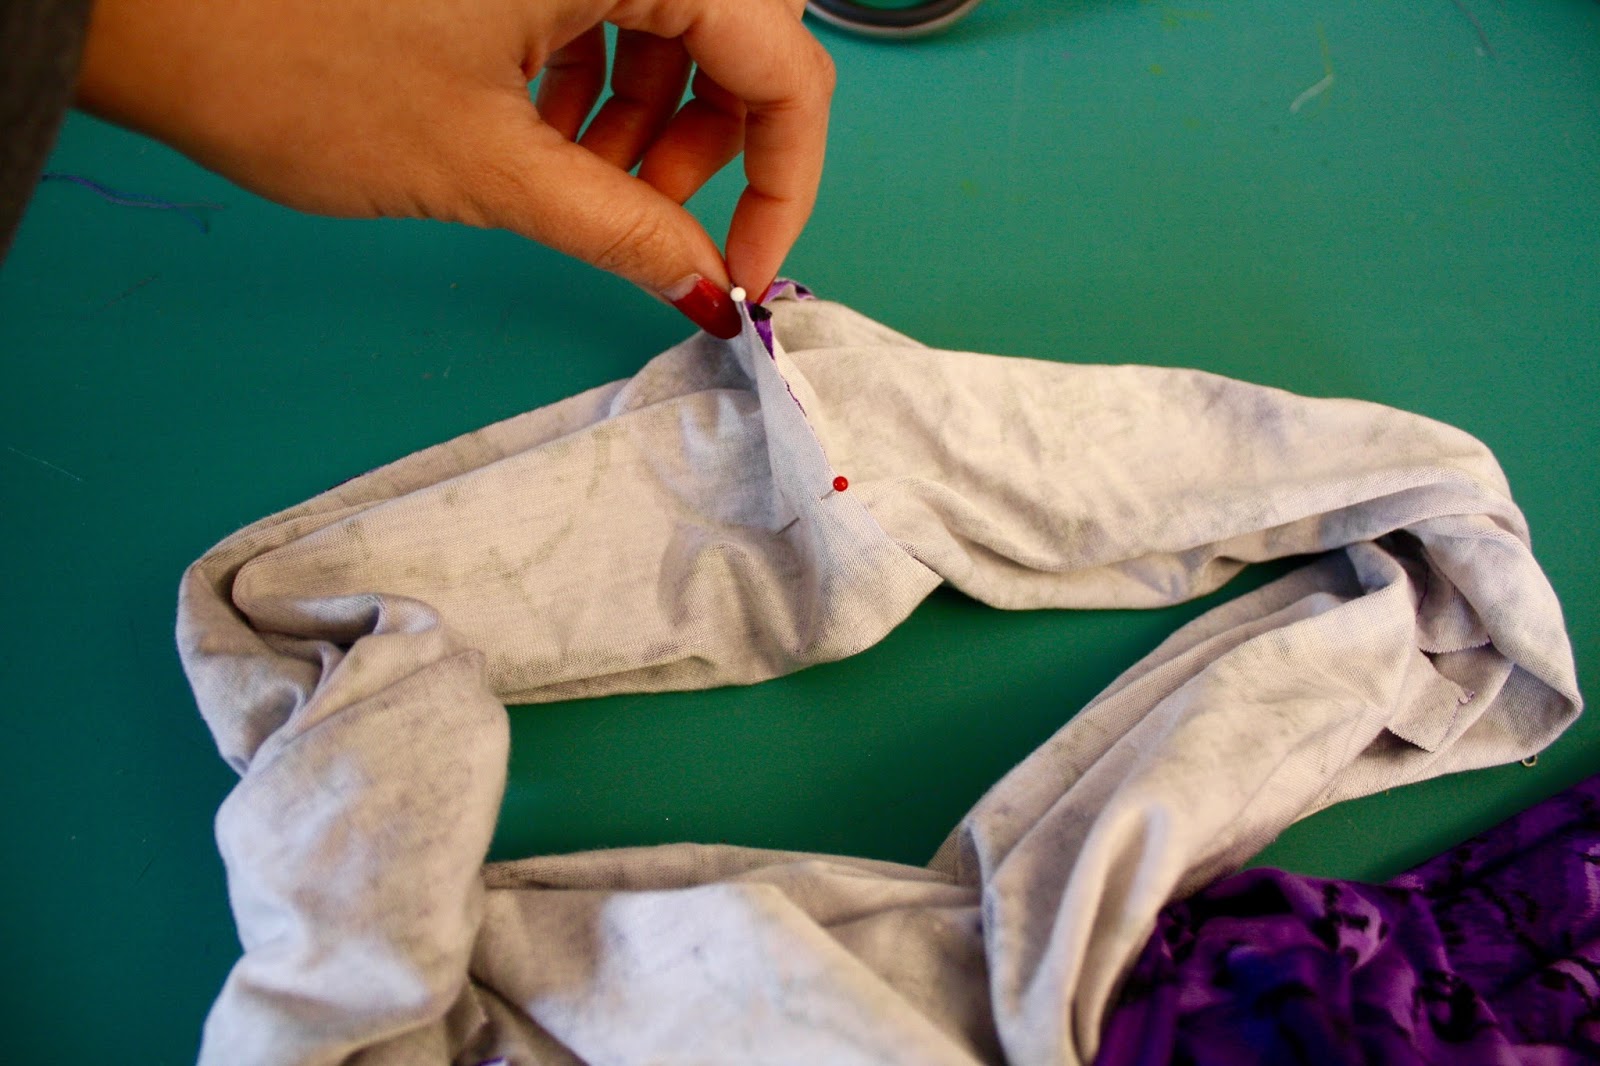
The trickiest place to pin and sew is the center back neckline, were two seams meet. Don't worry too much about this during the pinning.
We're going to sew all the way around the outside edges of these pieces, leaving a three-inch gap to turn everything right side out. The back waistline is a great place to do this. Find a spot and give yourself X-marks so you know where to begin and end your stitching.
 Here are my X-marks, between one of the back darts and side seams.
Start sewing the two pieces together, using a straight stitch and stretching the fabric slightly as you go. Start at one X-mark, and end at the end other, leaving your three-inch gap unsewn.
Keep in mind that you will be pivoting at the corners at the front (above and below the gathers).
When you get to the center back neckline, where those seam allowances meet, stitch all the way up to the point, leaving the seam allowances free. Backstitch. Then "break your stitching." This means pull your project completely out of the machine and cut the threads.
Re-start your stitching (don't forget to back stitch) on the other side of the seam allowances, pushing the seam allowances out of the way so they don't get caught. You'll have several lines of stitching that meet at one point, and your seam allowances will remain free.
This illustration shows it best:
 In the large illustration you see the first side of the stitching at the back neckline, and then the small circle illustration calls out the other side.
 After you've completed your stitching, trim down the corners on the front and trim down the gathered seam allowances.
Now, you can turn the whole thing right side out and press.

Important: for now, LEAVE the opening unstitched! In the next step, we'll need it to sew the sleeve hems. The next post will be the final one, and it will come on Thursday!
December 28, 2015
Dirndl Progress
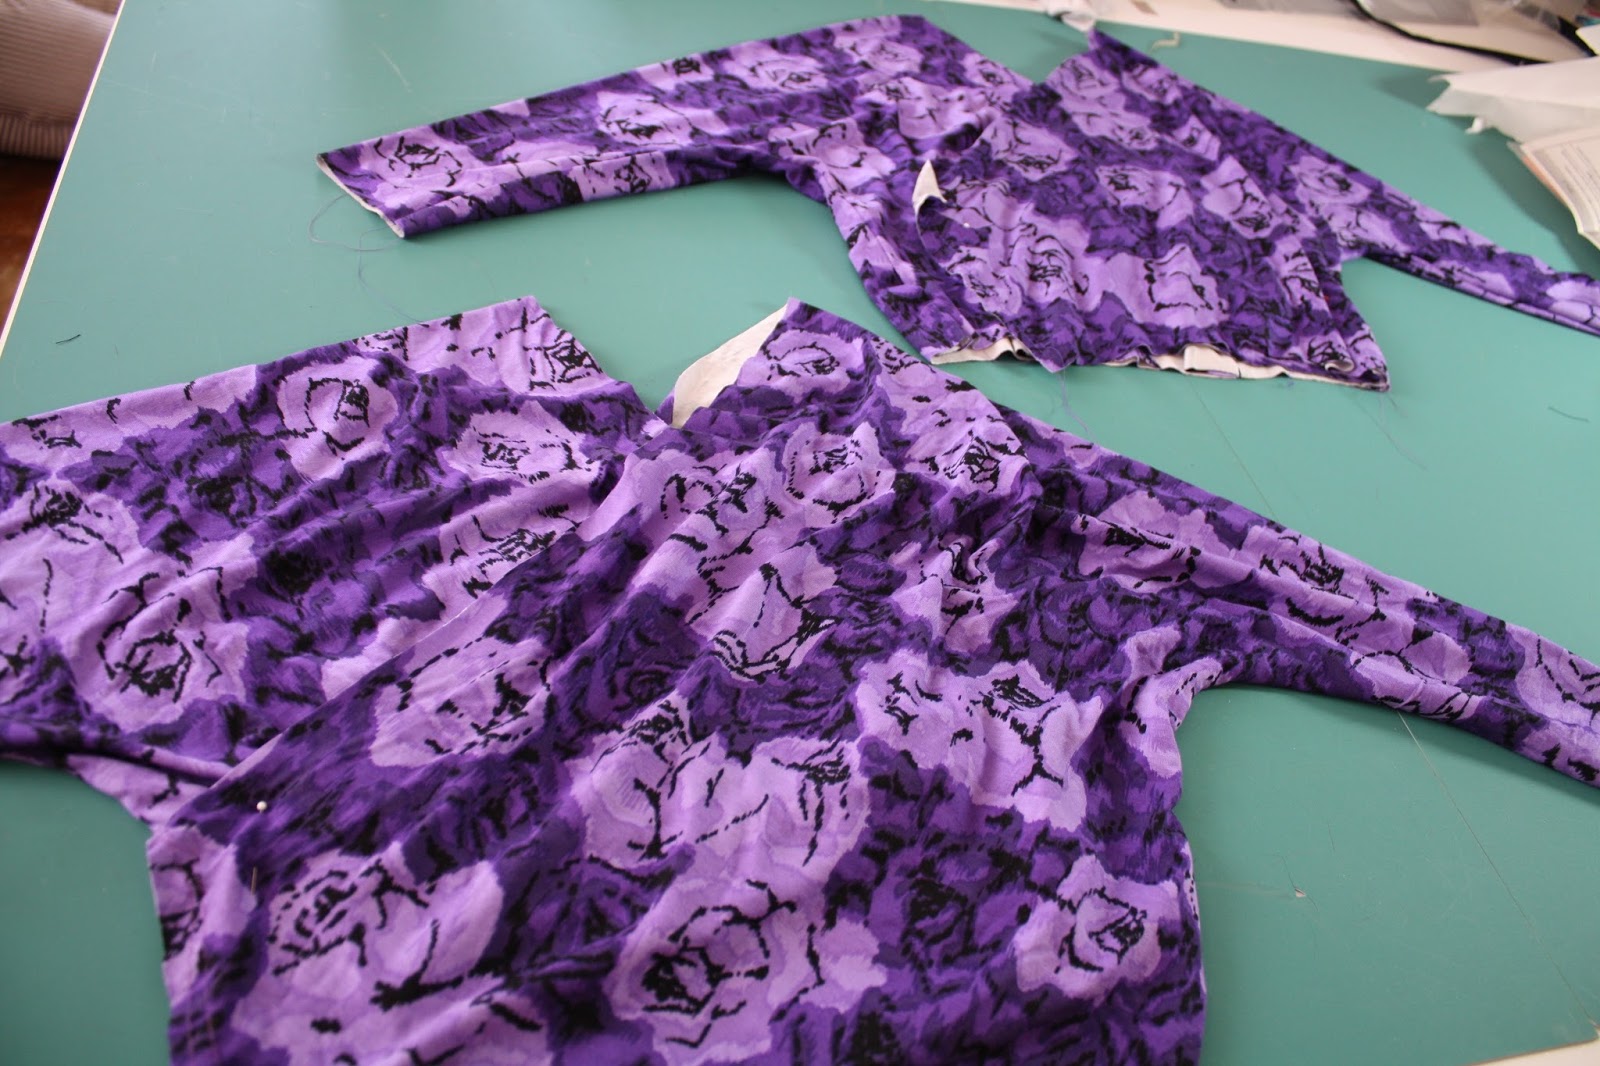
 Well, I'm back home from my wonderful Austin Christmas trip and surveying the crazy state of my sewing room. I left it in a mad flurry of different projects: the sew-along knit wrap top (final posts coming this week!), my Christmas dress for my card with Henry, and then the dirndl I've been obsessing about.
I wrote about making this dirndl months ago, and I'm finally doing it. The thing is, it's such a big project--and a type of sewing I knew little about. So of course it's consumed me to the point where I once woke up in the middle of the night to work on because I couldn't sleep! Yep, it's a sewing obsession.
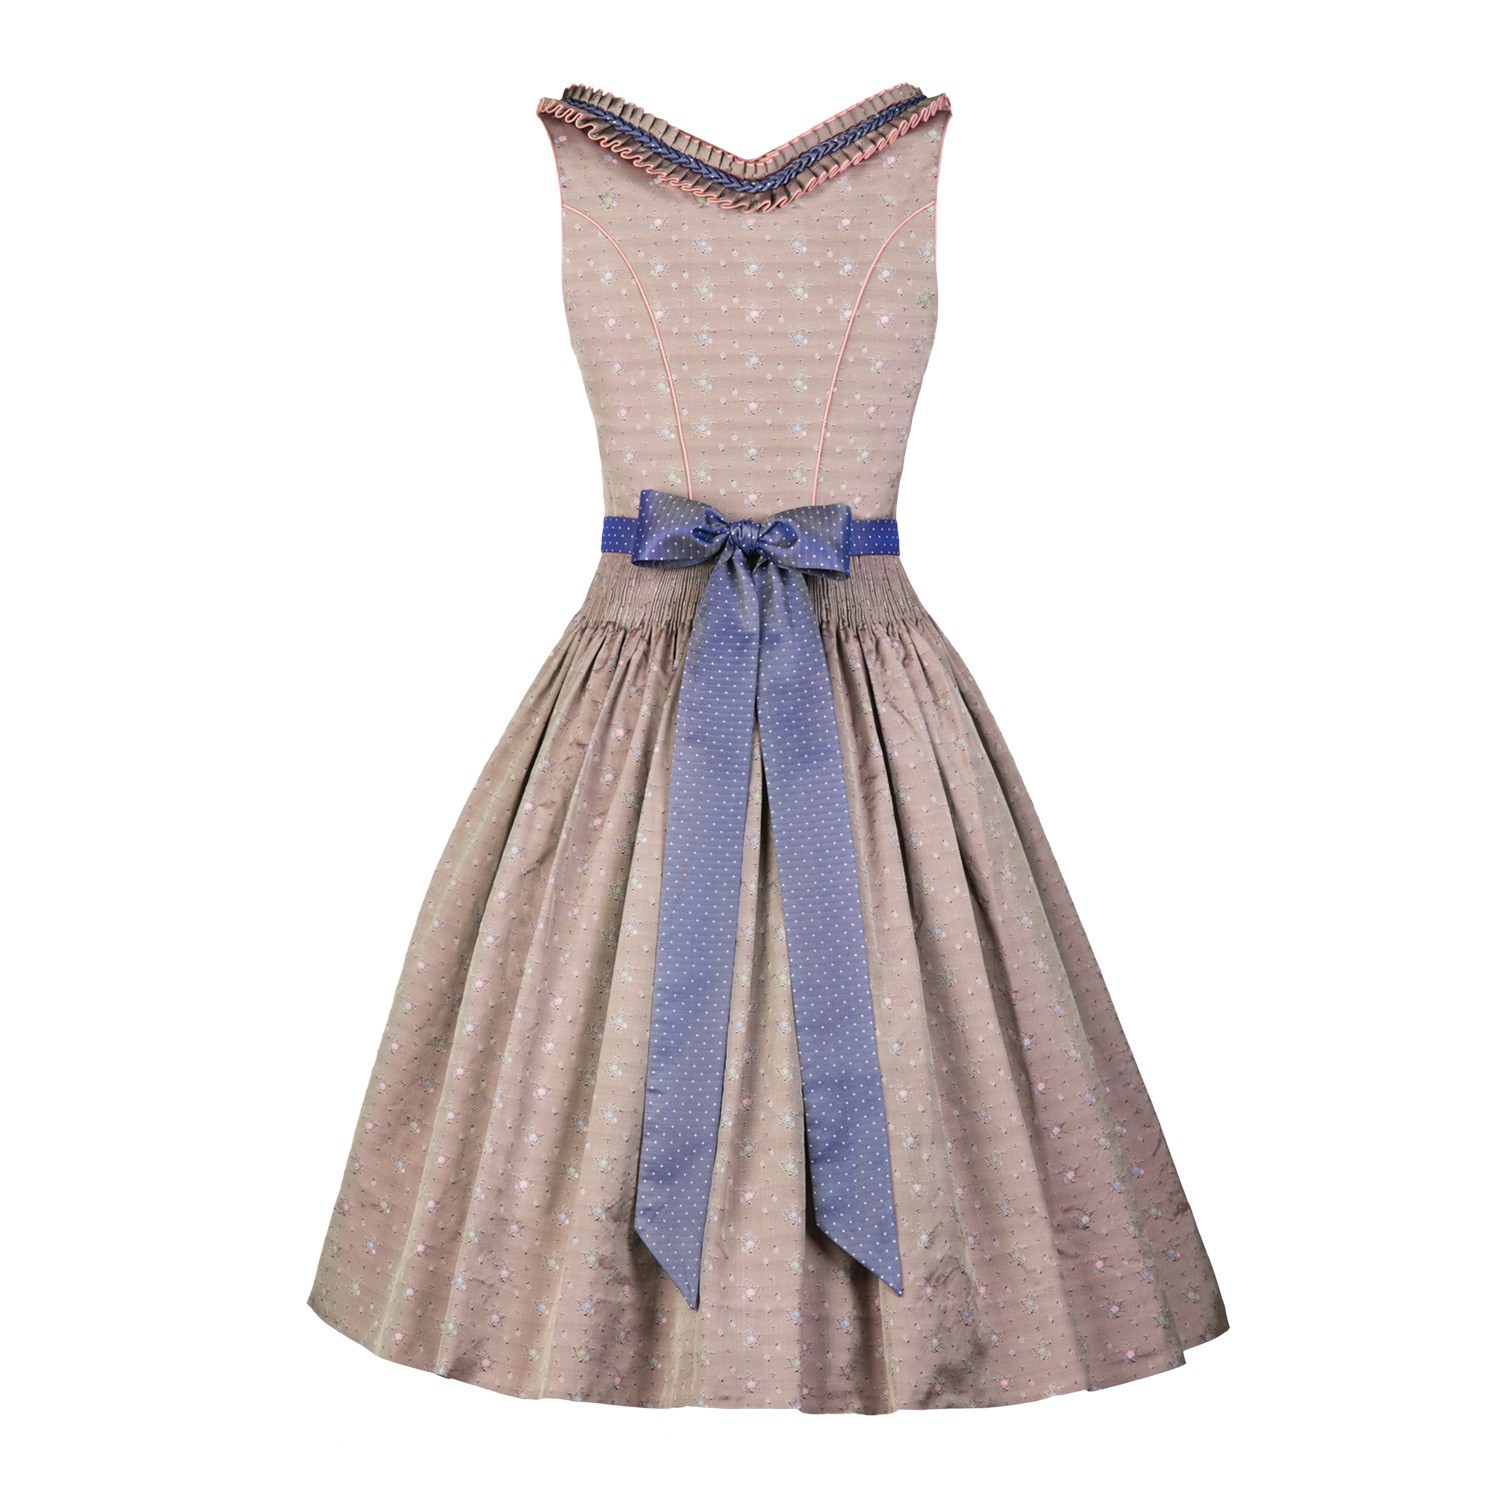
I started with Burda 7443, but I've made about a million changes to the pattern. The lucky thing is that I now have two high-end dirndls that I'm using as research: one from Tostmann Trachten and one from Lena Hoschek. I love them both dearly, but the Lena Hoschek one has been my primary inspiration. It has something about it that I find completely sublime.
 I used tiny piping on the bodice back princess seams and all around the neckline and armholes, just like the Lena Hoschek dirndl. The main fabric is one of my fall jacquards and then the piping is in a contrasting shantung.
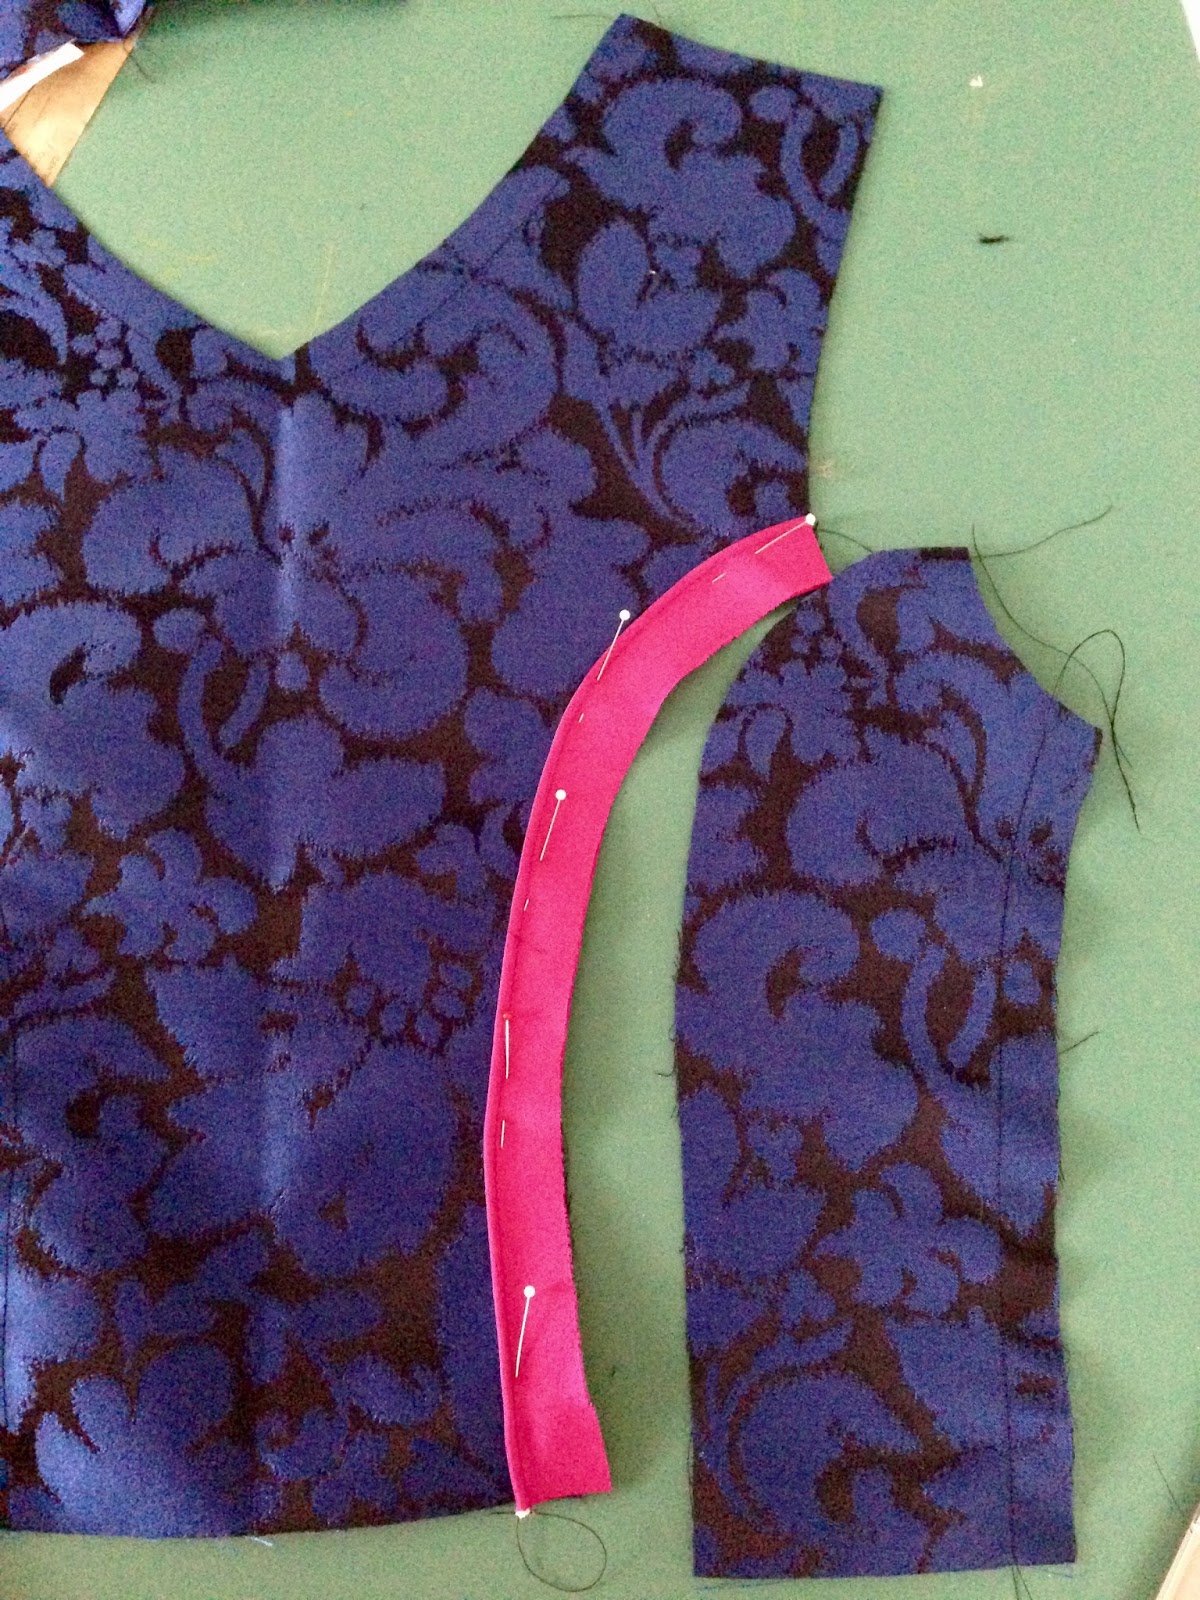
One of my favorite things about the Lena Hoschek dirndl is the skirt: it's fully lined and has hand-stitched rows of shirring all the way around (except under the apron, where there are pleats).
 I debated about whether to imitate this detail for my very first dirndl; it seemed ambitious to the point of stupidity. However, that is often my specialty! So I dove right in. I used polka dot quilting cotton for the lining, which also served as my guide for making the hand rows of shirring.
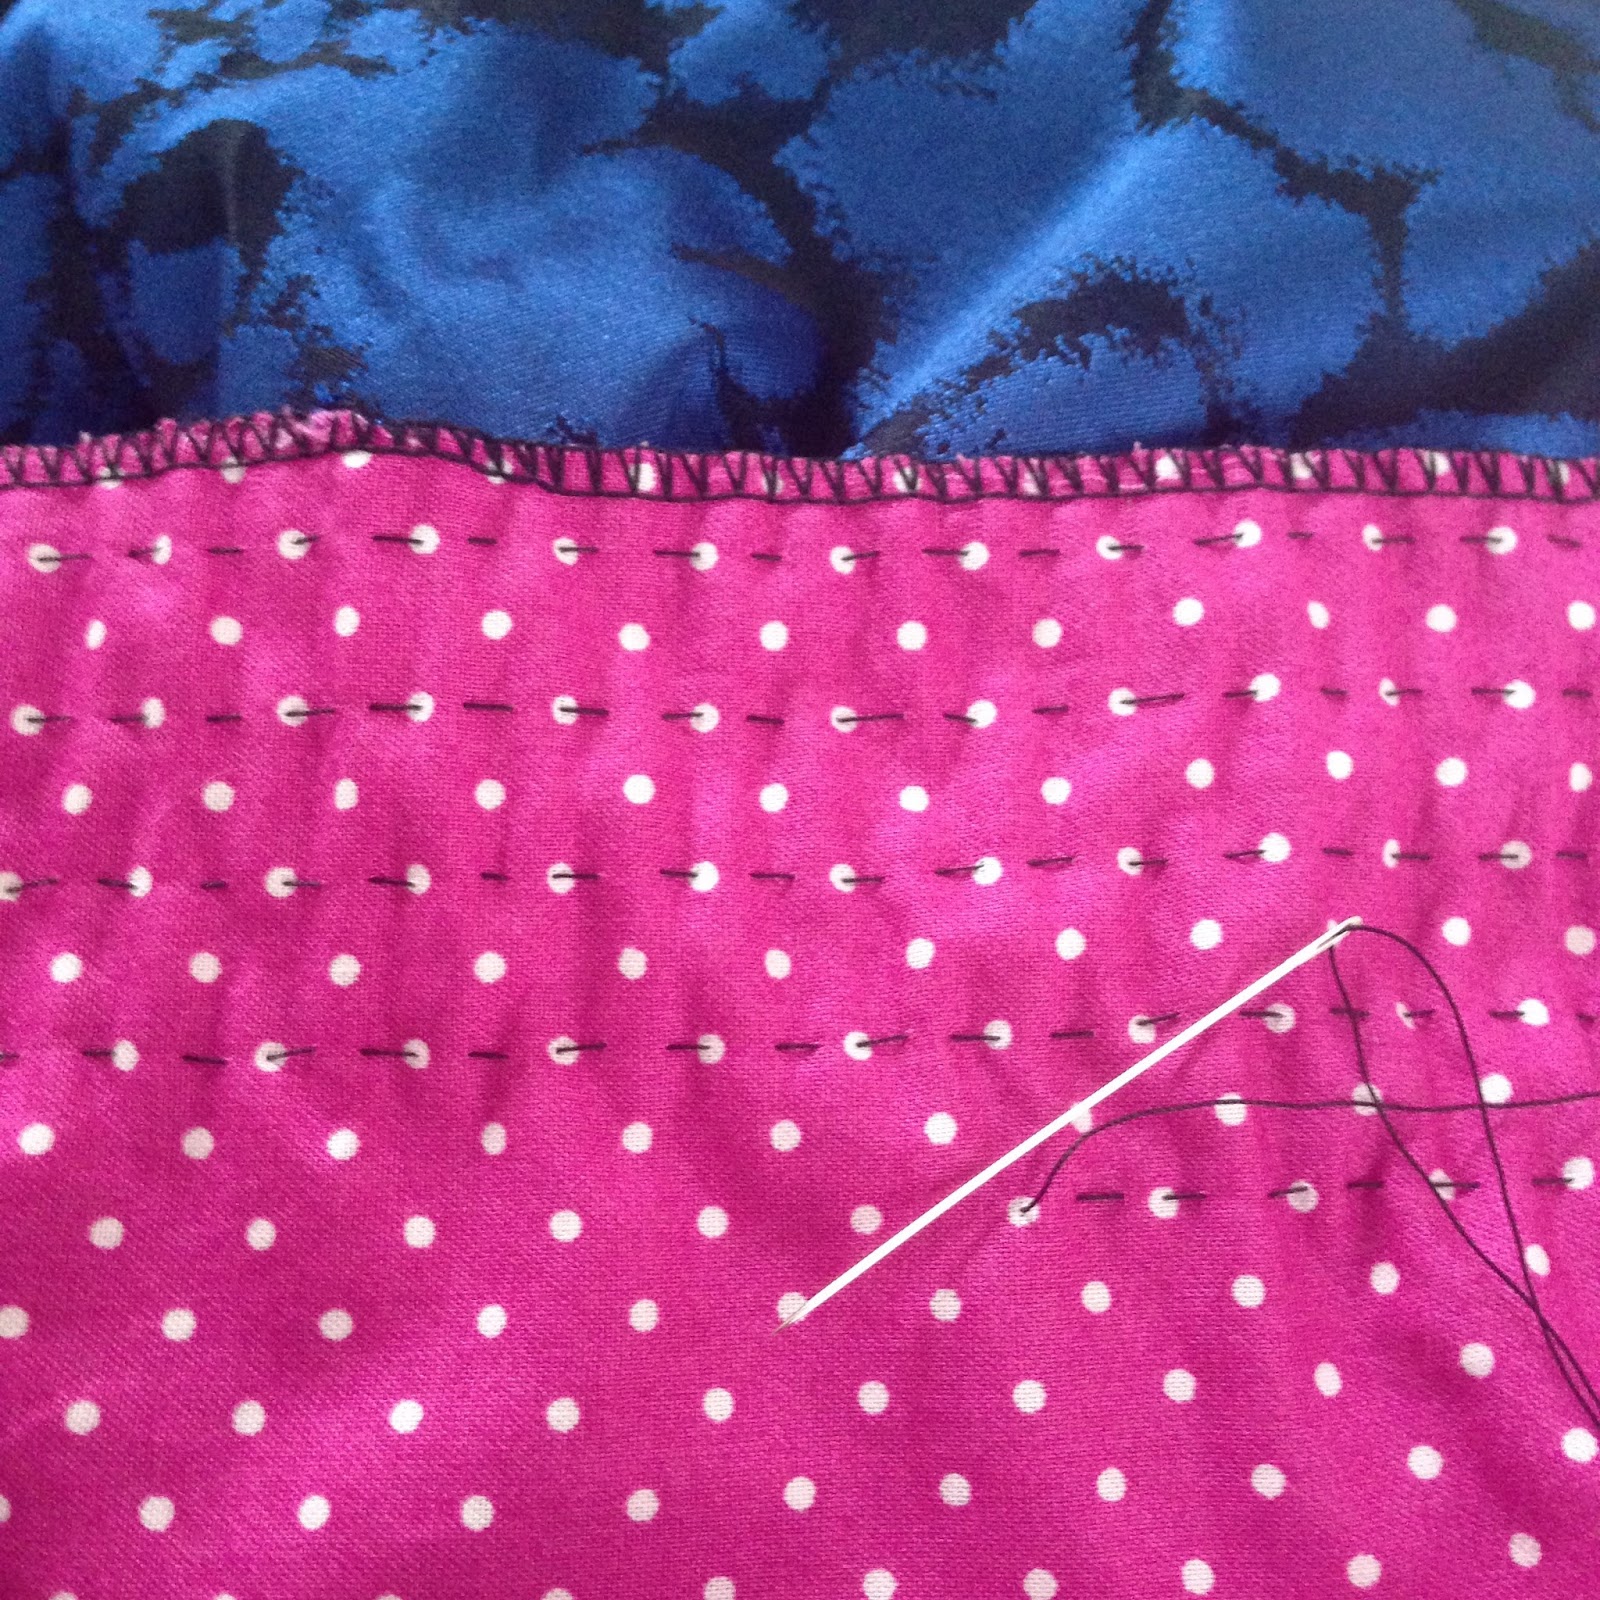 These rows had to made along long stretches fabric--almost three yards. Great for the middle of the night when you can't sleep. If the stitches somehow get alternated on one row, you have to re-do that part. Ask me how I know!
Anyhoo, the shirring finally came together in a rather lovely way, though nowhere near perfect.

I decided to use hooks and eyes at the center front bodice opening (rather than the called-for zipper). This meant changing the pattern a little (it now needed self-facings at center front), and also adding a placket that serves as a little modesty panel underneath the hooks and eyes.
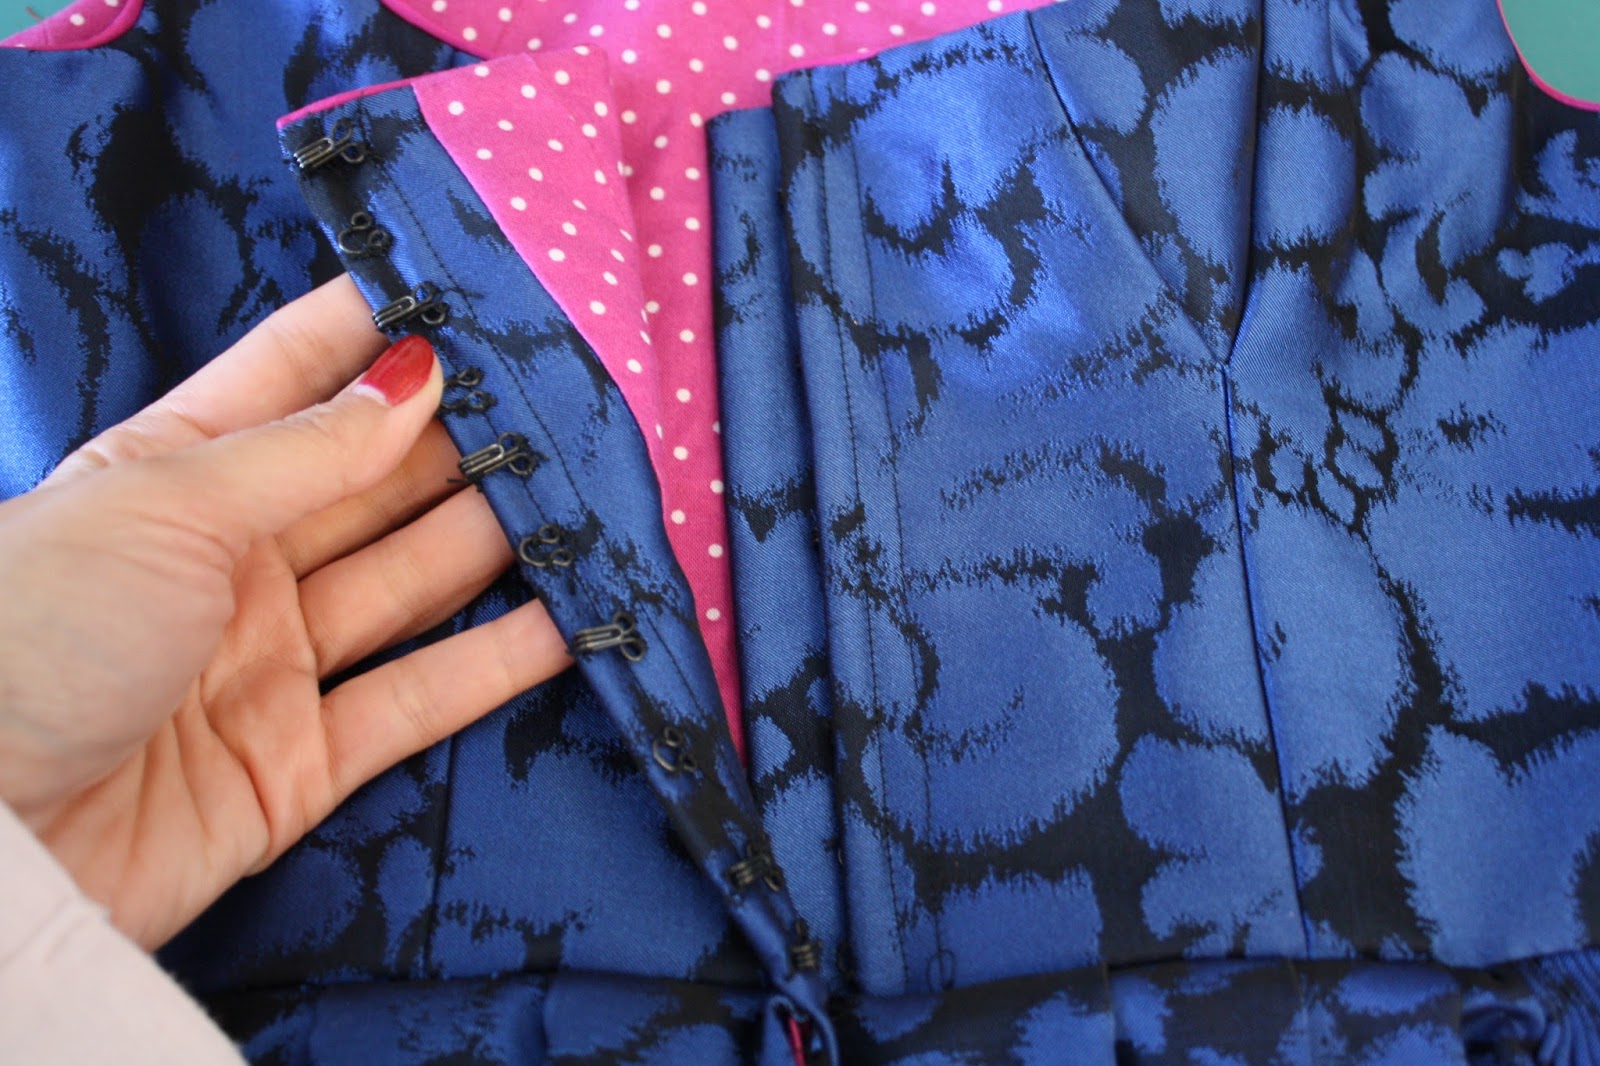 I used steel boding on either side of the center front. It has another row of vertical stitching next to the boning channel, which helps keep the layers together where the hooks and eyes are sewn (I learned this from my Tostmann dirndl).
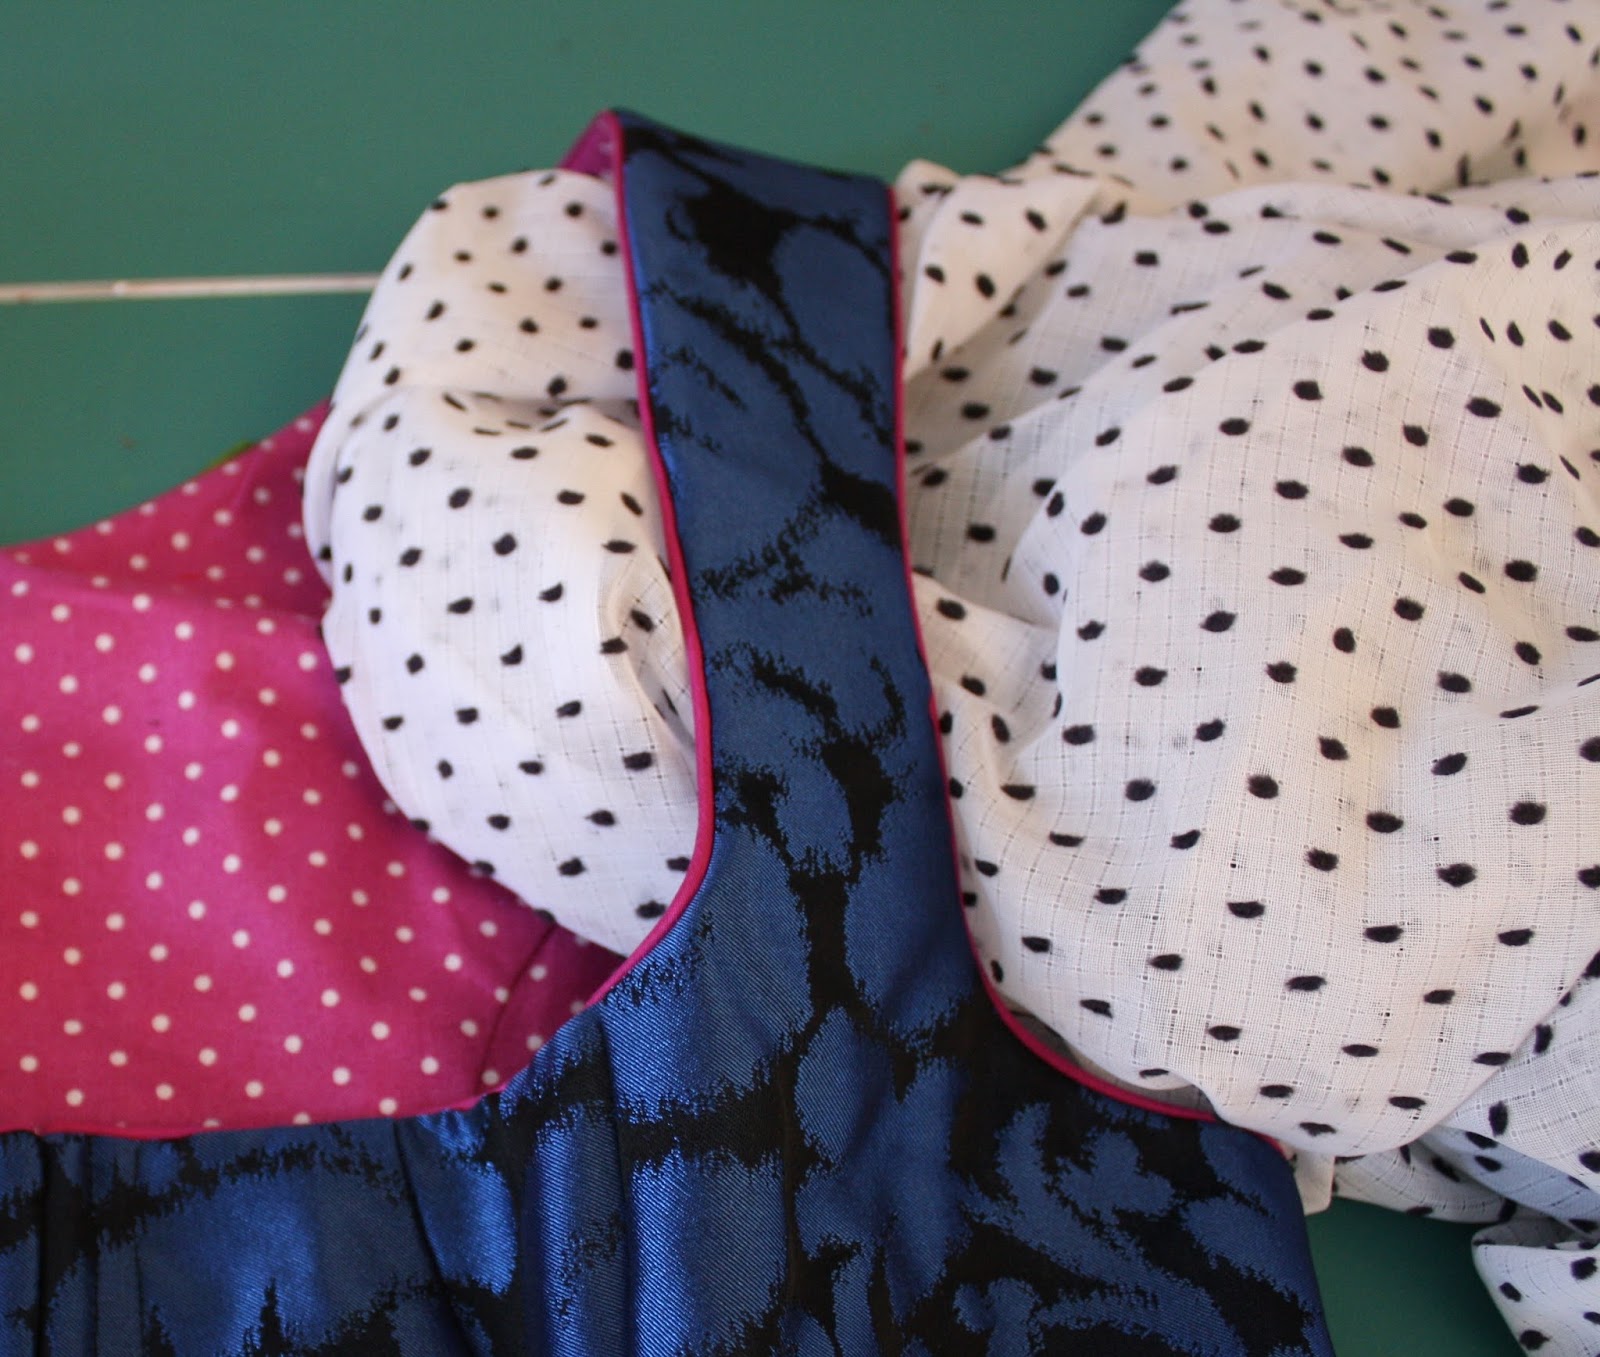
I've also been playing around with trim at the neckline, I know I want something very 3D and girly, in the vein of Lena Hosheck. This ruffle won't quite do, but it's on the right track. I also want to try a piped box-pleated trim.

Of course, I also have to make the blouse! I picked out this white with black swiss dots.
And then there's the apron, which will be in the same fabric as the piping on the bodice.
 So there's still quite a lot of work to be done, and I have to give attention to several other things at the moment. But I thought I'd share a bit of my process as I go. Wish me luck!
December 25, 2015
A Pink Christmas

Merry Christmas, all! I don't think I've ever put up a picture of my beautiful pink Christmas tree, one of my most prized possessions. I decorated it with vintage pink glass ornaments, and my Durer bunny from Vienna sits under the tree on a bed of white felt.
I had a little trouble with the light on this particular day, but I kind of love how these photos have a grainy vintage vibe.
I also thought it would be a good opportunity to do a sneak peek of a dress from my upcoming Gertie's Ultimate Dress Book . This is a the "Cranberry Boiled Wool Dress." It has a '40s vibe, with a princess-seam bodice, short sleeves, and an a-line skirt.
One of the best things about boiled wool, besides its lush feel, is that the edges don't ravel. So I made a cute little raw-edged bow for the neckline. Here's one of the shots from the actual book photoshoot.
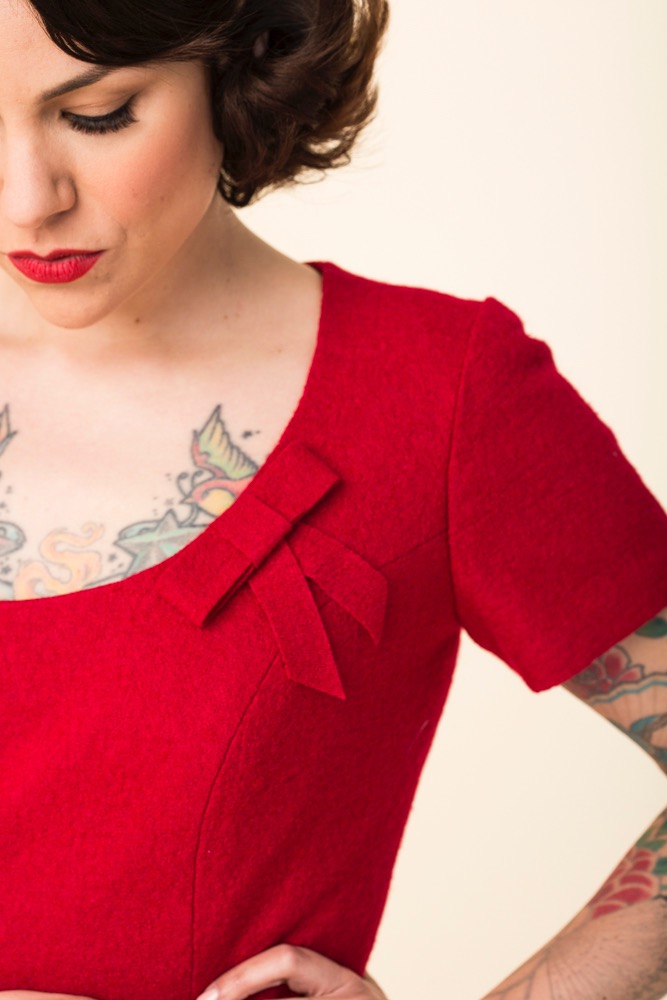 Photo by Karen Pearson In other news, I'm in Austin, Texas for the holidays! I've never been here before but I totally love it. Great vintage shopping, a cool sewing studio, and dress weather year-round? Sign me up!
Happy Holidays, everybunny!
December 21, 2015
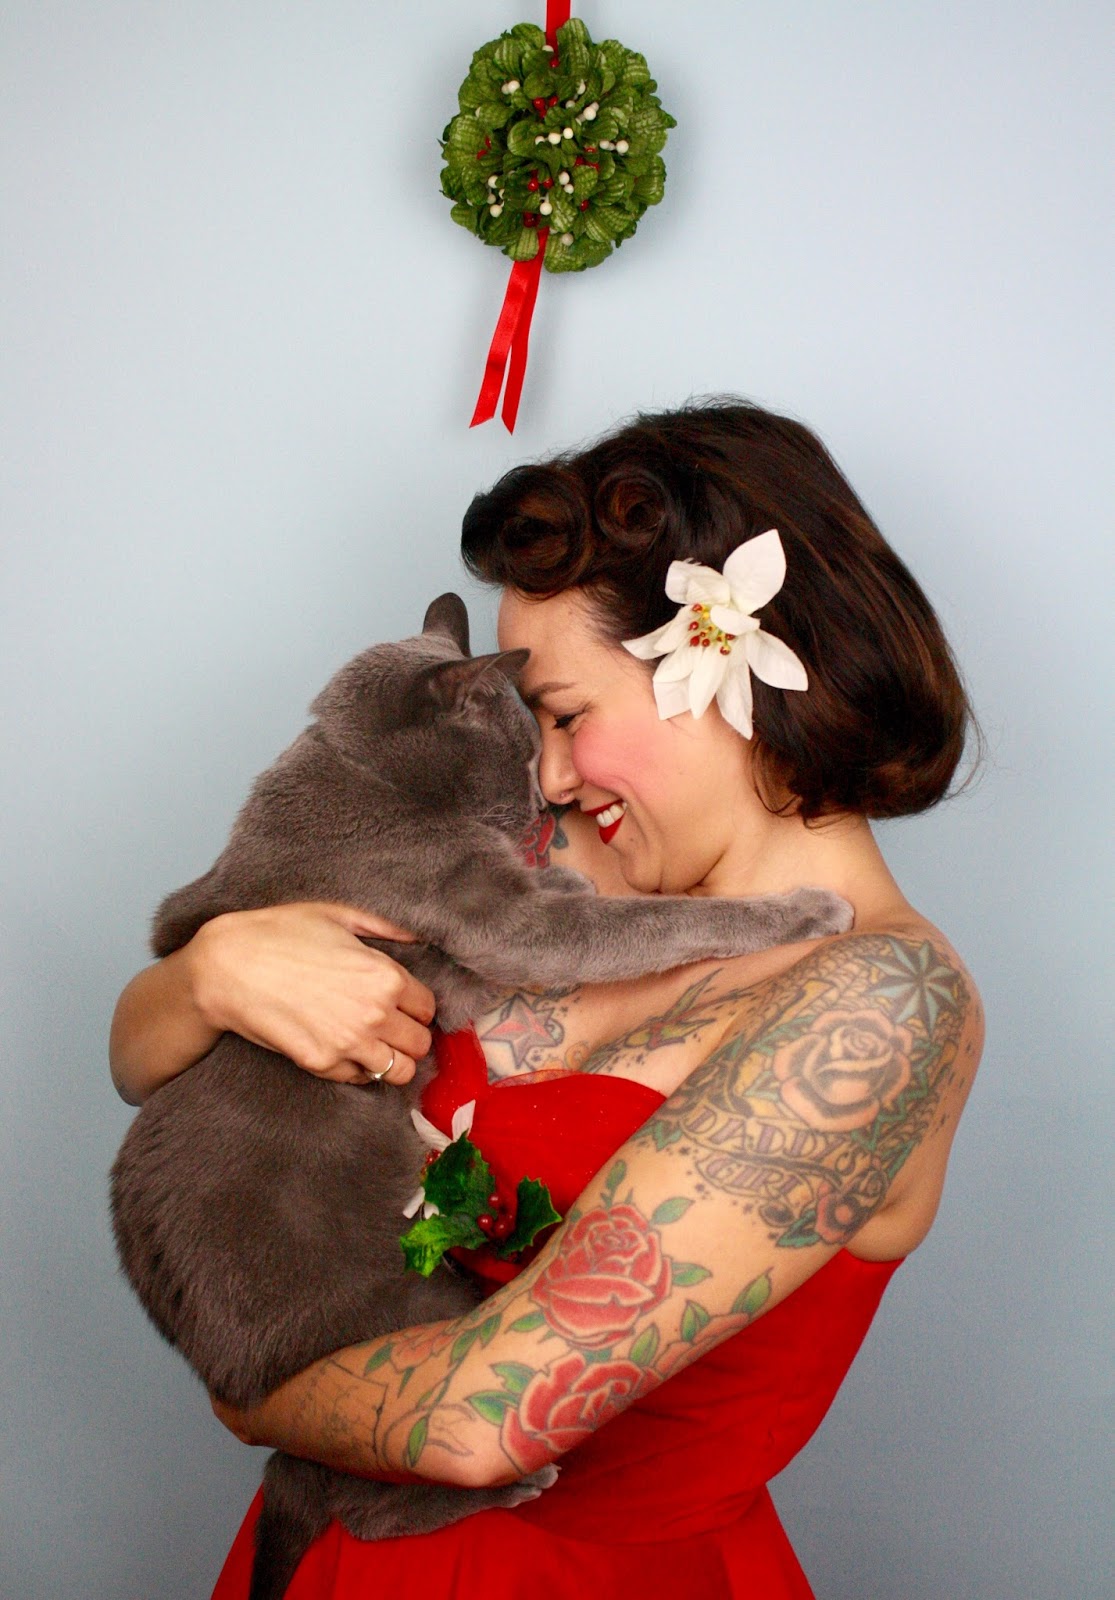
Under the Mistletoe with Henry: Our Official 2015 Christmas Card!

Henry and I are basically like the Kardashians, so this year we decided we needed to release an official holiday card. And here it is!
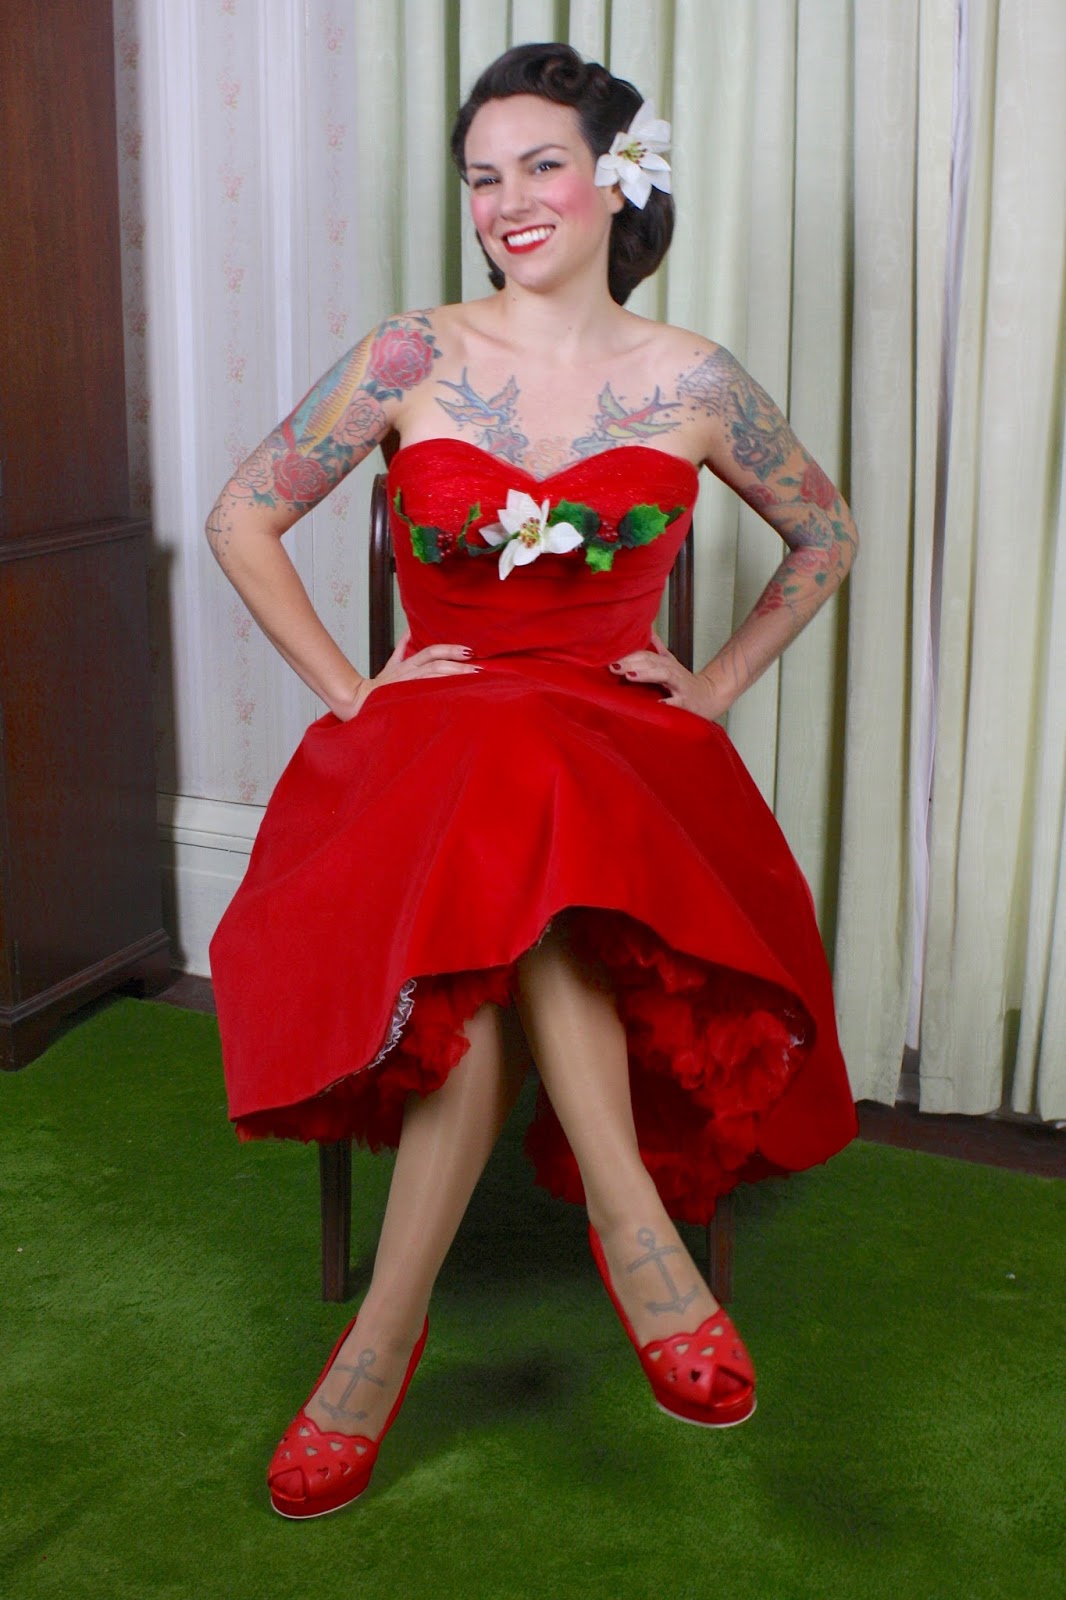
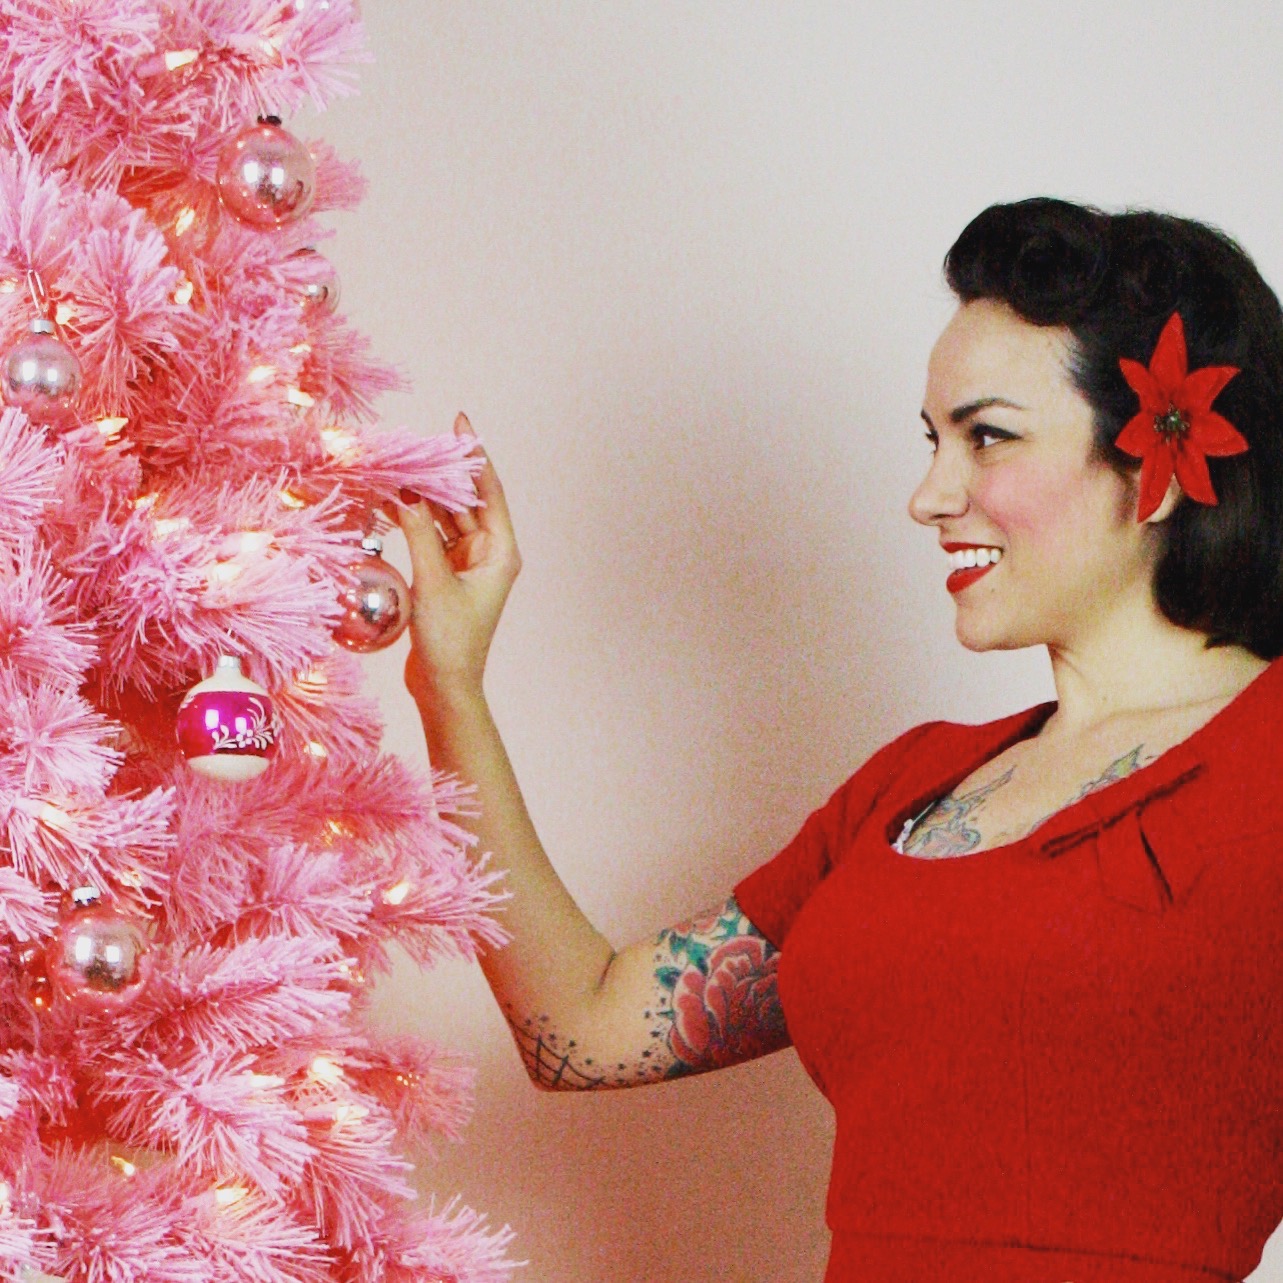
I described my vision to Henry: mistletoe, a light blue background, and a red velvet strapless cocktail dress. He listened in eager wonder. I explored the idea of an outfit for him, but he politely declined. I think he realized that "over-designing" might dilute my artistic vision.
Henry watched me frantically sew the red velvet dress. To be honest, I think he was a little dubious that I would finish it in time.
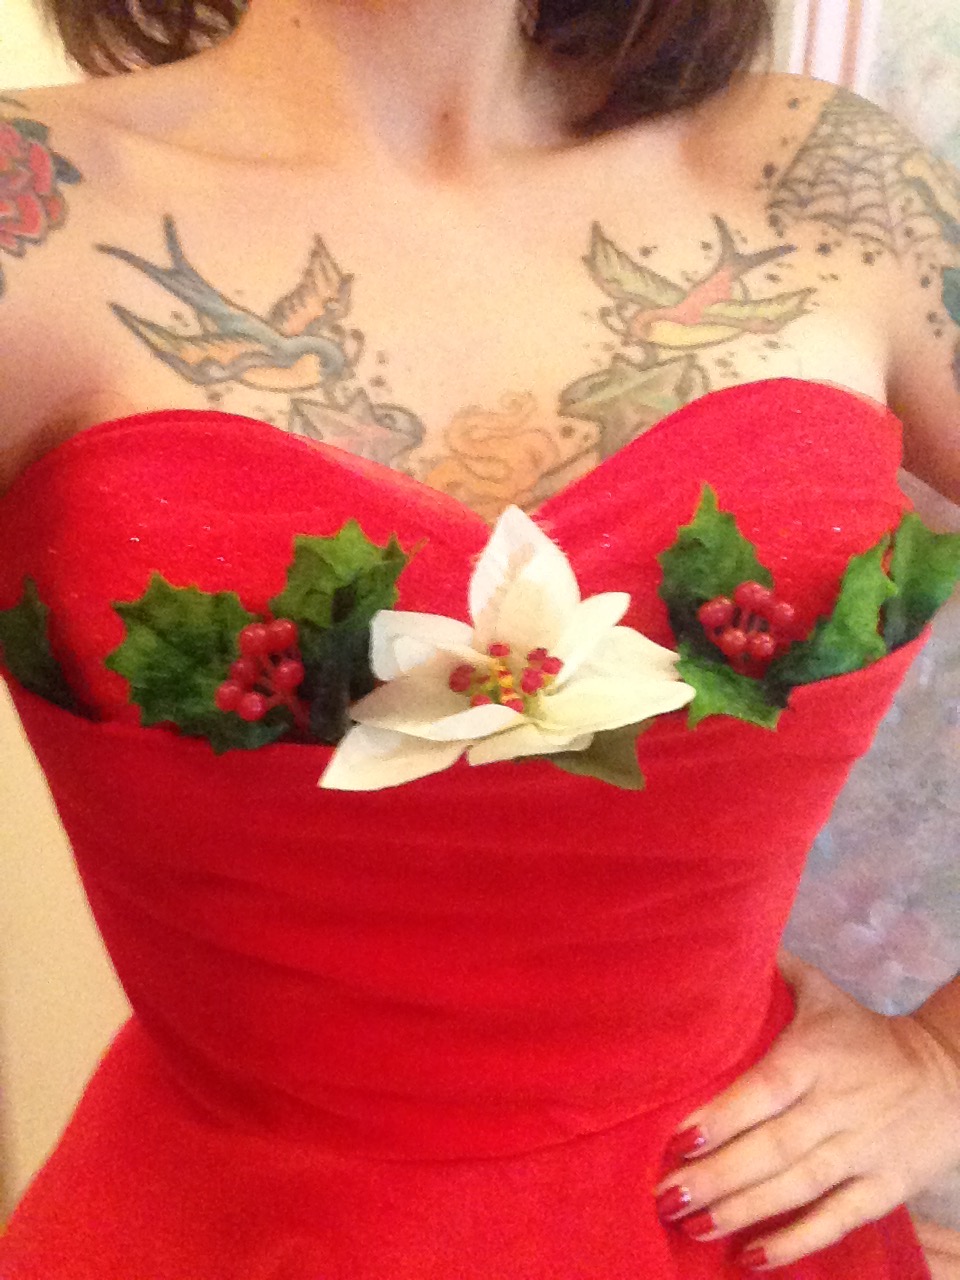
I used pattern components from my upcoming book to make the base dress: a princess seam sweetheart strapless bodice and three-quarter circle skirt. Then I added a gathered sparkle tulle neckline, a bias overlay on the front bodice, and faux poinsettias and holly to the bustline. It's an easy way to make a '50s style "shelf bust" over a basic bodice and I'm planning to do some sort of tutorial on this. I spent lots of time arranging the flowers and taking selfies to check the placement.
At last the dress was finished and it was time for the big photo shoot. To be perfectly honest, Henry was a little reluctant once the camera was set up. I think nerves got the best of him. After a little warm up, we got some good shots . . .
And some not so great ones . . .
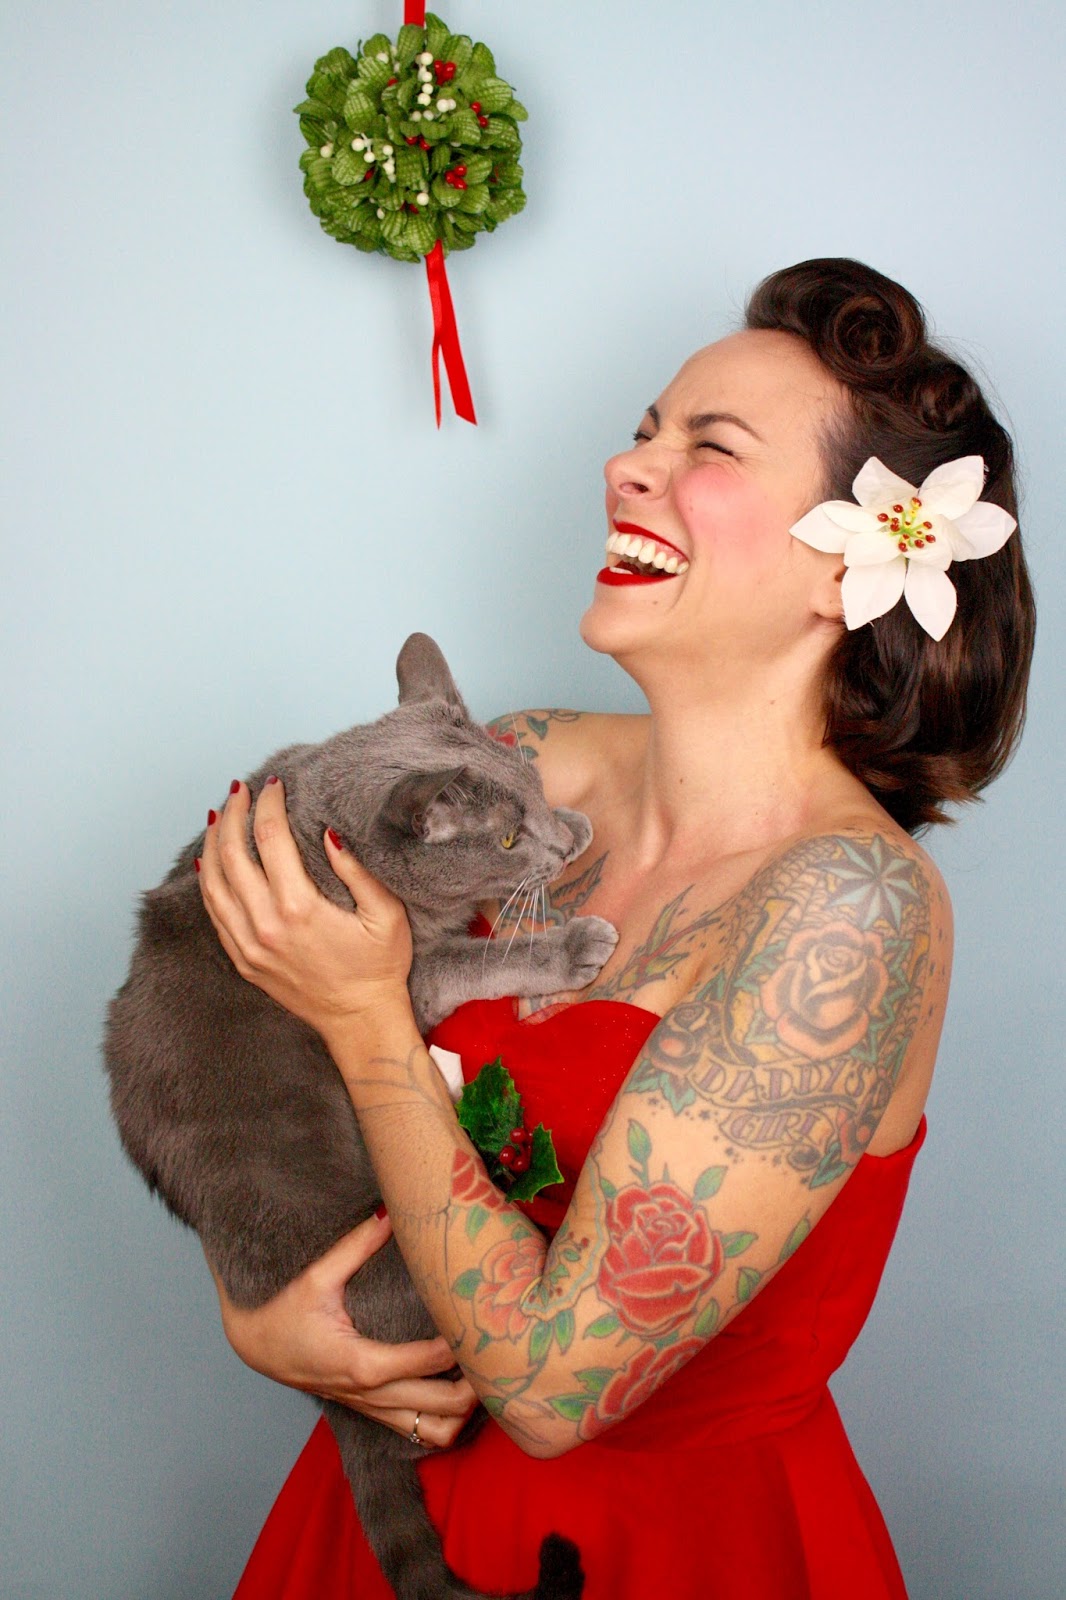
But in the end, the choice was clear!
And here it is, our very first official Christmas card.
 Happy Holidays, all!
December 16, 2015
Knit Wrap Top Sew-Along #5: Steps 6-8
 At this point, you should have two of the main top, as outlined in the last post.
Note: We're skipping step 5 in the directions (turning in the sleeve hem seam allowance) because I'm going to show you a nifty way to sew the sleeve hems by machine.
So we are now on step 6! This is where we sew the ties. You cut out four of pattern piece #2, and now we're going to sew them together in pairs. Put two of the tie pieces right sides together and stitch them together, leaving an opening at the short end of the tie. Use a straight stitch and stretch the fabric slightly as you sew.
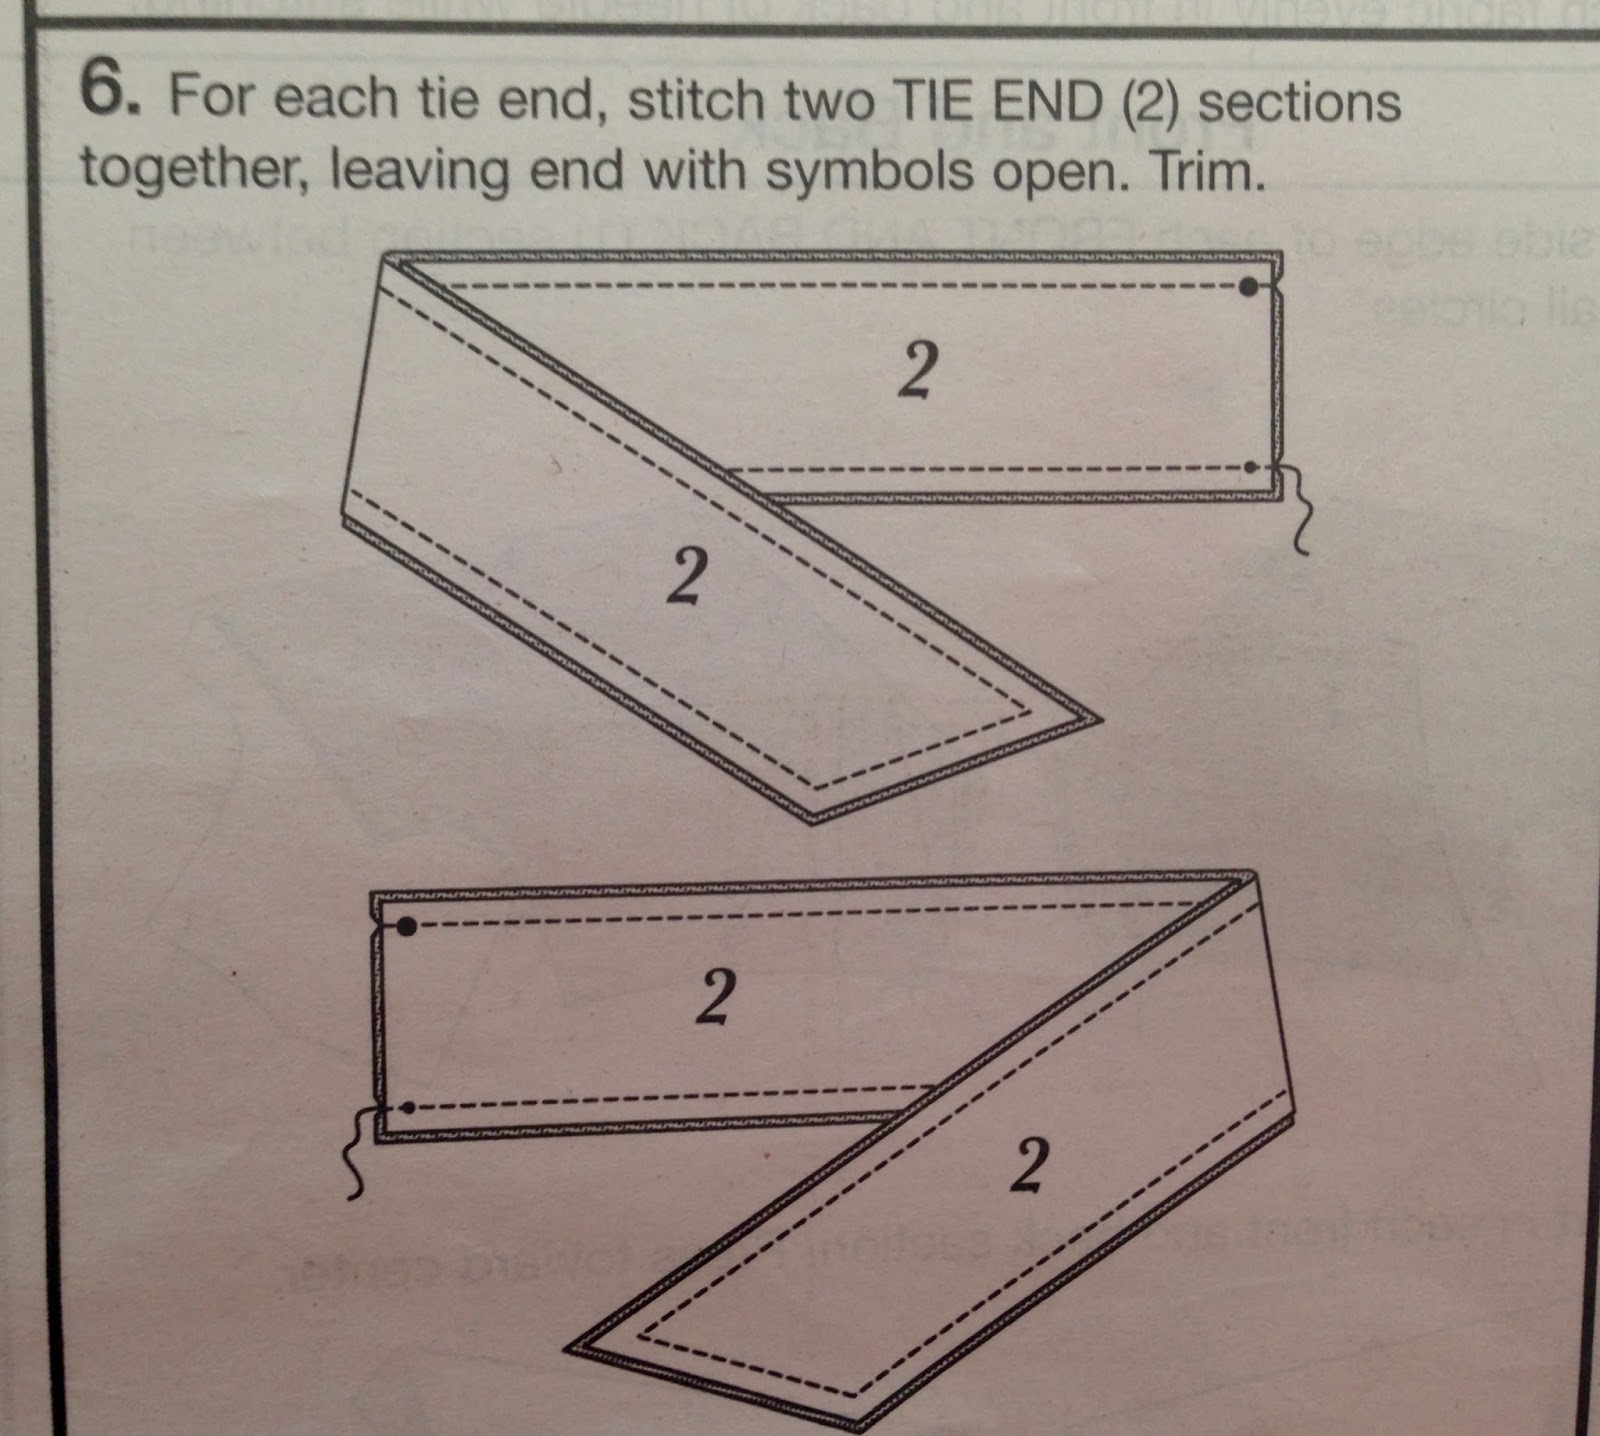
Next, trim down the corners of the tie to remove bulk.
Turn the tie right side out. This is easy to do by just sticking your hand in and pulling the tie right side out. Make sure the corners are pulled out for a sharp appearance. Press the tie flat.
 Baste the short ends of the tie together, using a long machine stitch (4-5mm) and a 1/2" seam allowance.
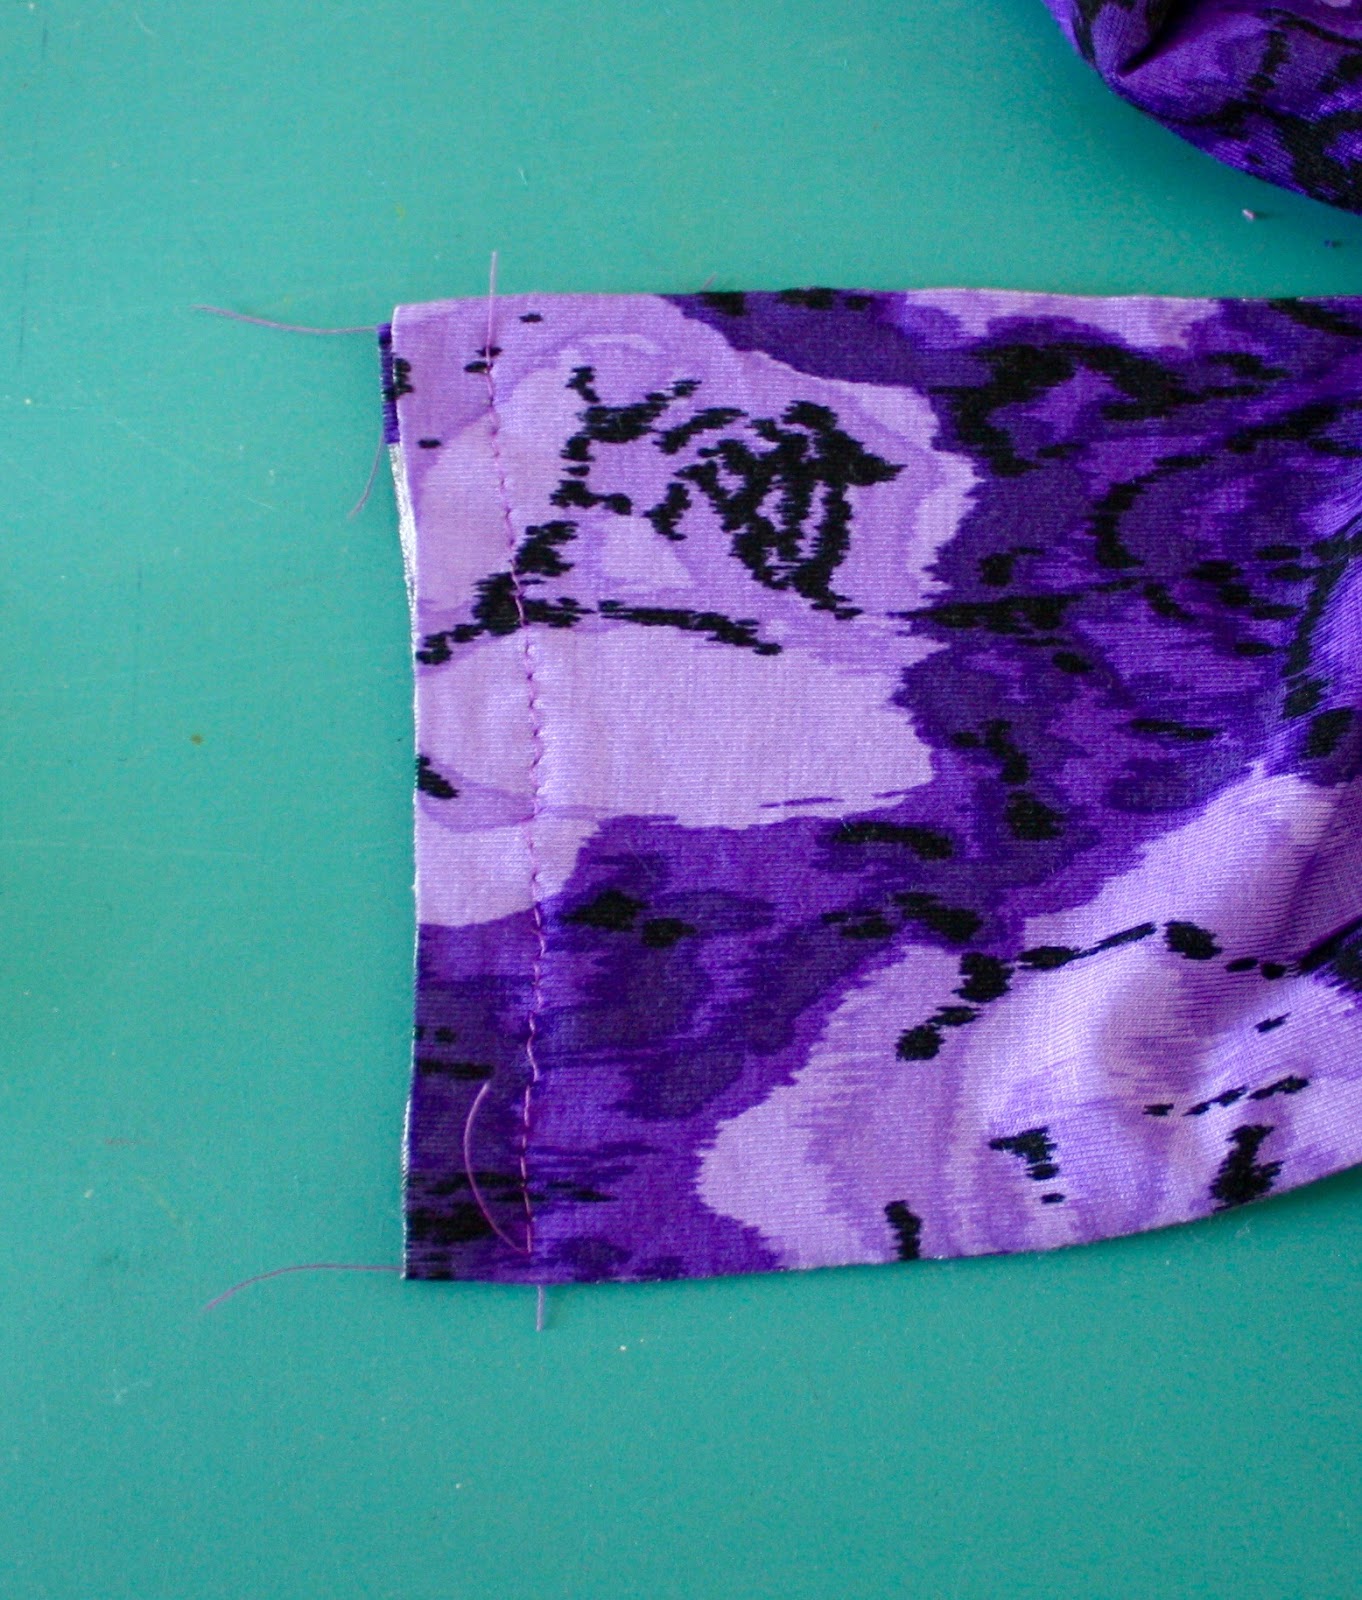
Repeat this whole process with the other set of ties.
Next, we're going to baste the ties to the top where you created the gathering stitches. First, pull the bobbin threads of the gathering stitches. You want to pull them enough so that the ties will fit between the circles on the front piece. Adjust the gathers as necessary.
Pin the tie to the gathered portion so that it fits between the circles you marked after cutting. you'll have a seam allowance on the top and the bottom.
Stitch the ties to the top with a long basting stitch and a 1/2" seam allowance.
You now have both ties attached to the top!
In the next installment, we'll sew the lining to the top. And then we're practically done!
Gretchen Hirsch's Blog

- Gretchen Hirsch's profile
- 49 followers
Gretchen Hirsch isn't a Goodreads Author
(yet),
but they
do have a blog,
so here are some recent posts imported from
their feed.

