
Gretchen Hirsch's Blog, page 12
July 30, 2014
Butterick 6031: Panty Tutorial!
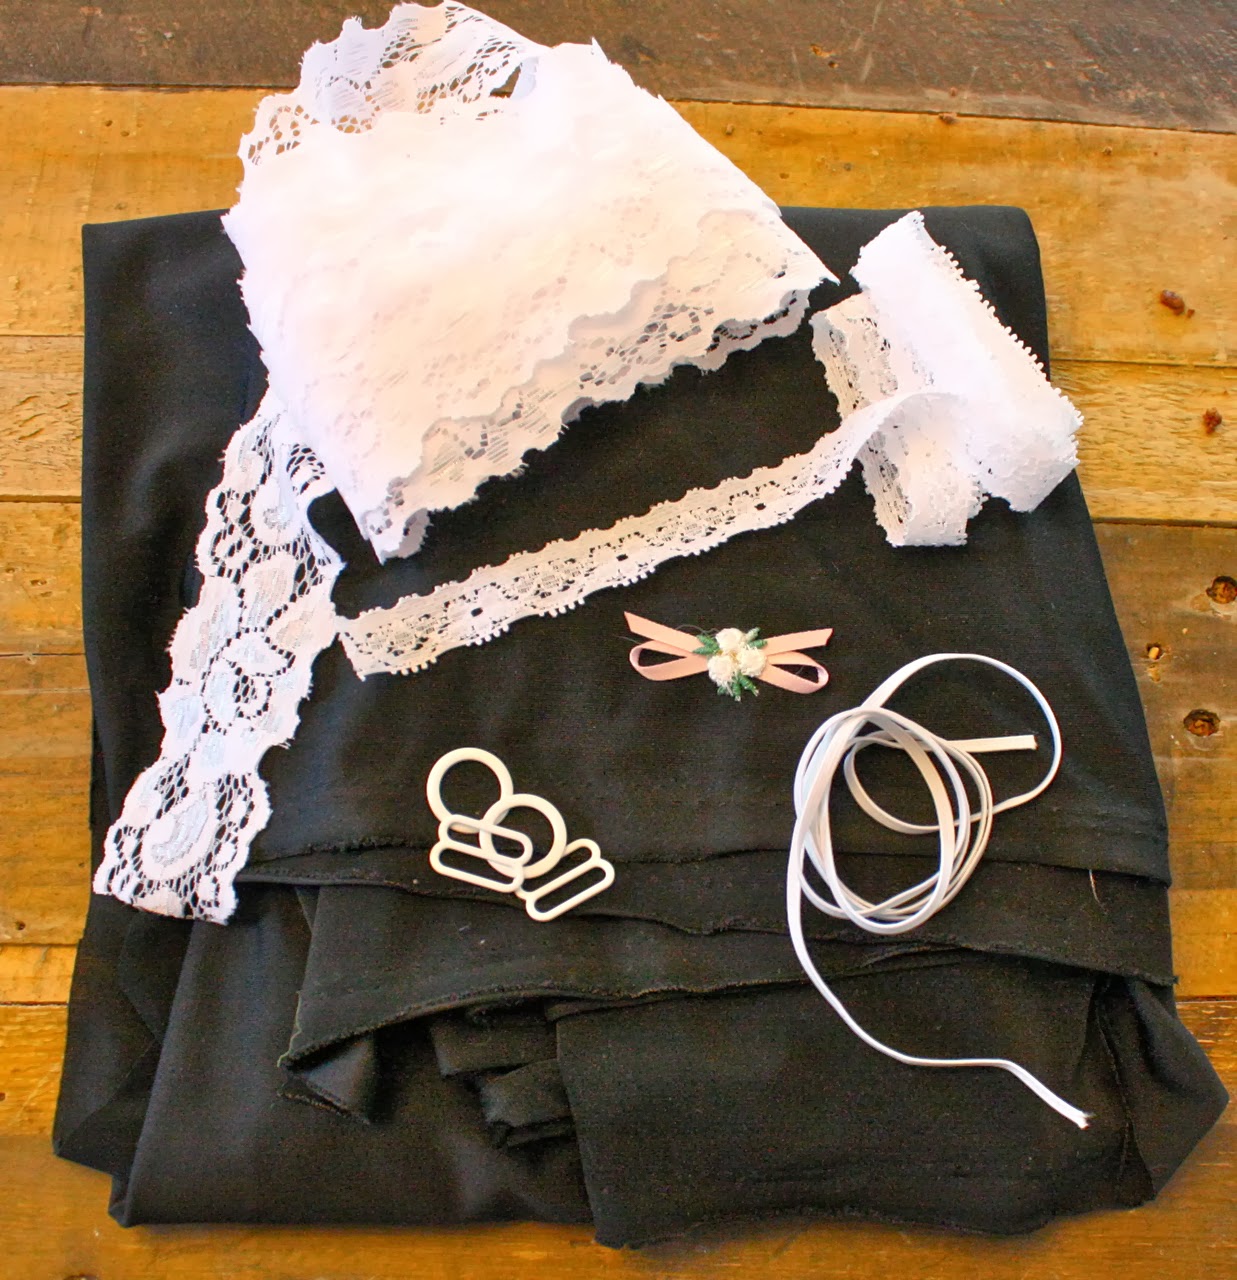
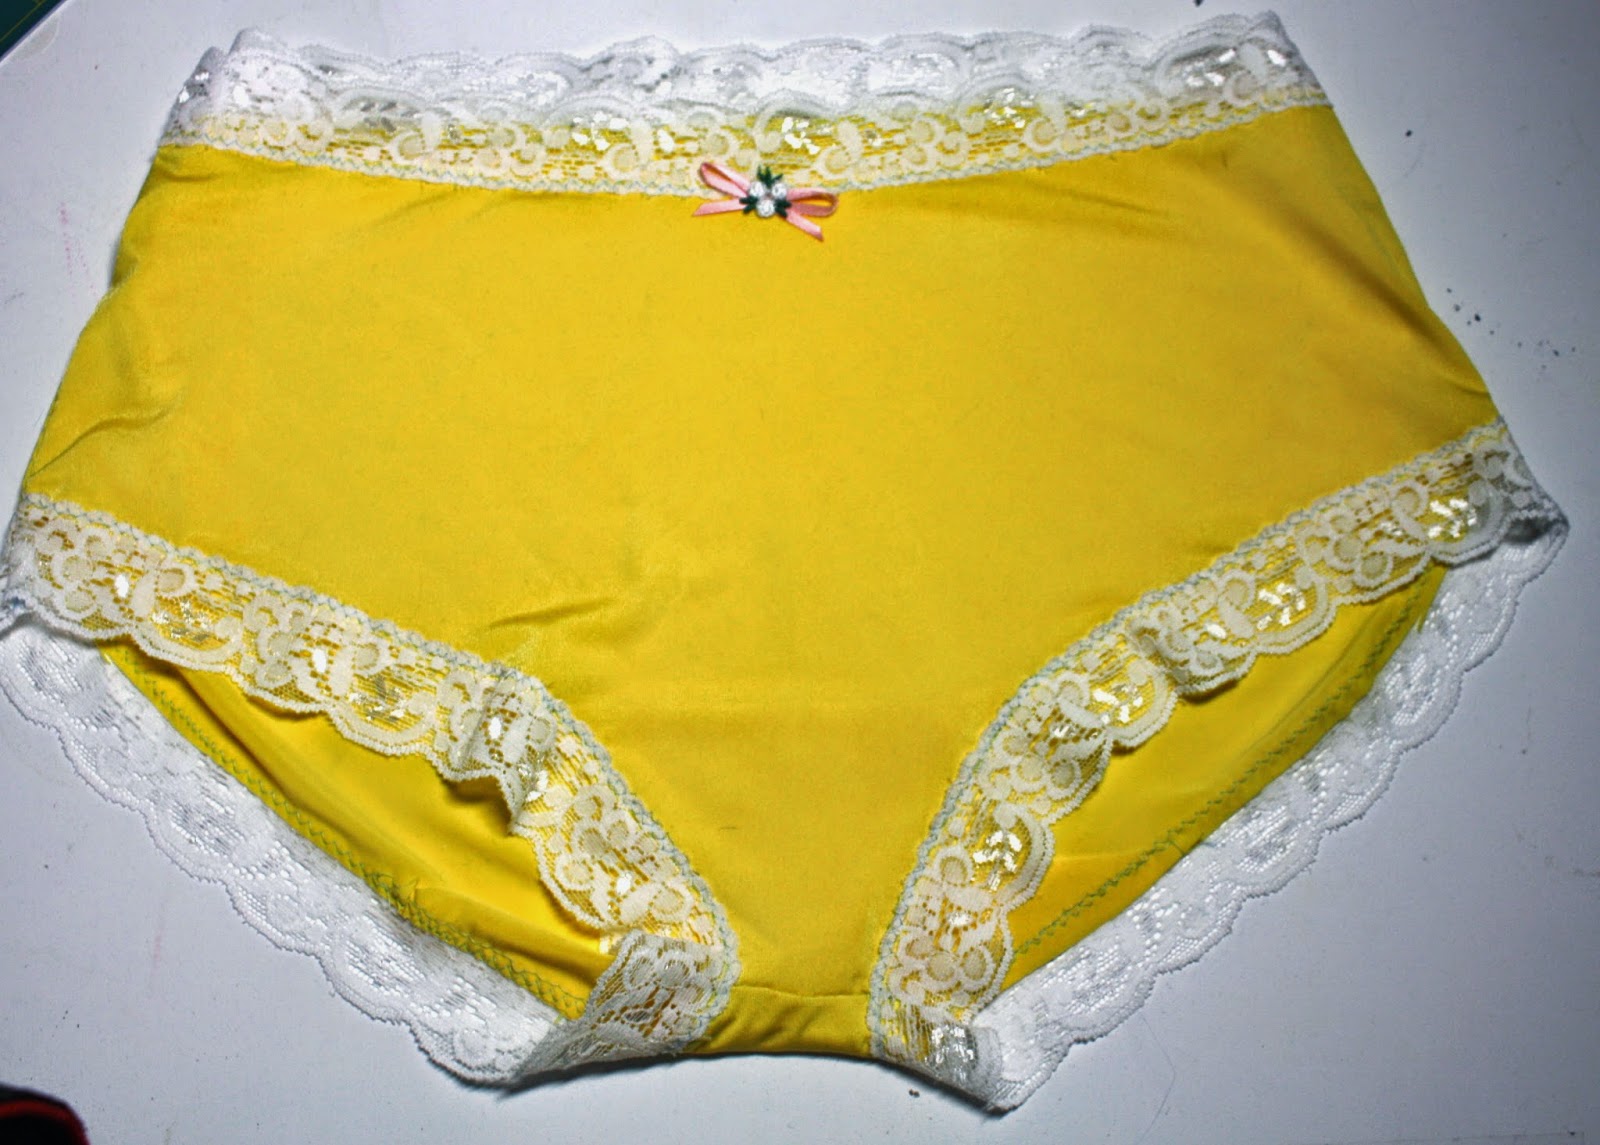 Panties, at long last! Here's a step by step tutorial for making the undies from Butterick 6031, my lingerie pattern. (See the slip steps in these posts.)
Before we start, perhaps you're wondering, "why the heck would I make my own panties?" Let me tell you, the reasons are numerous. After you make one pair of these, you can tweak the pattern to your personal preferences. I designed these to be my perfect undies: boyshort-esque, with adequate butt coverage, flat lace trim, and a higher-than-usual rise (though not Bettie Page high). The design came from my frustration at finding lingerie I liked the fit of. Second was my frustration at the cost of lingerie. $23 for a pair of panties that rides up all day? No, thank you. Once you get the technique down, you can make a pair of these in about 20 minutes and the cost of supplies is incredibly economical.
Convinced? Okay! Let's get started. First, make sure you have a stretch needle in your machine.
You'll have three pattern pieces cut out: the front, the back, and the lining. You'll also need a length of wide stretch lace trim.

With right sides together, sew the front to the back at the crotch seam: set your machine to a narrow zigzag (about 1 mm wide by 2.5 mm long) and stitch with a 5/8" seam allowance. Then stitch again with a 1/2" seam allowance. Trim next to your second line of stitching. Finger press the seam allowance toward the panty back.

Get out your lining. Place the lining over the crotch seam, on the wrong side of the panties. Pin in place.
 Baste the lining to the panties with a narrow zigzag (1 mm wide, 5 mm long). Use a scant 1/4" seam allowance.
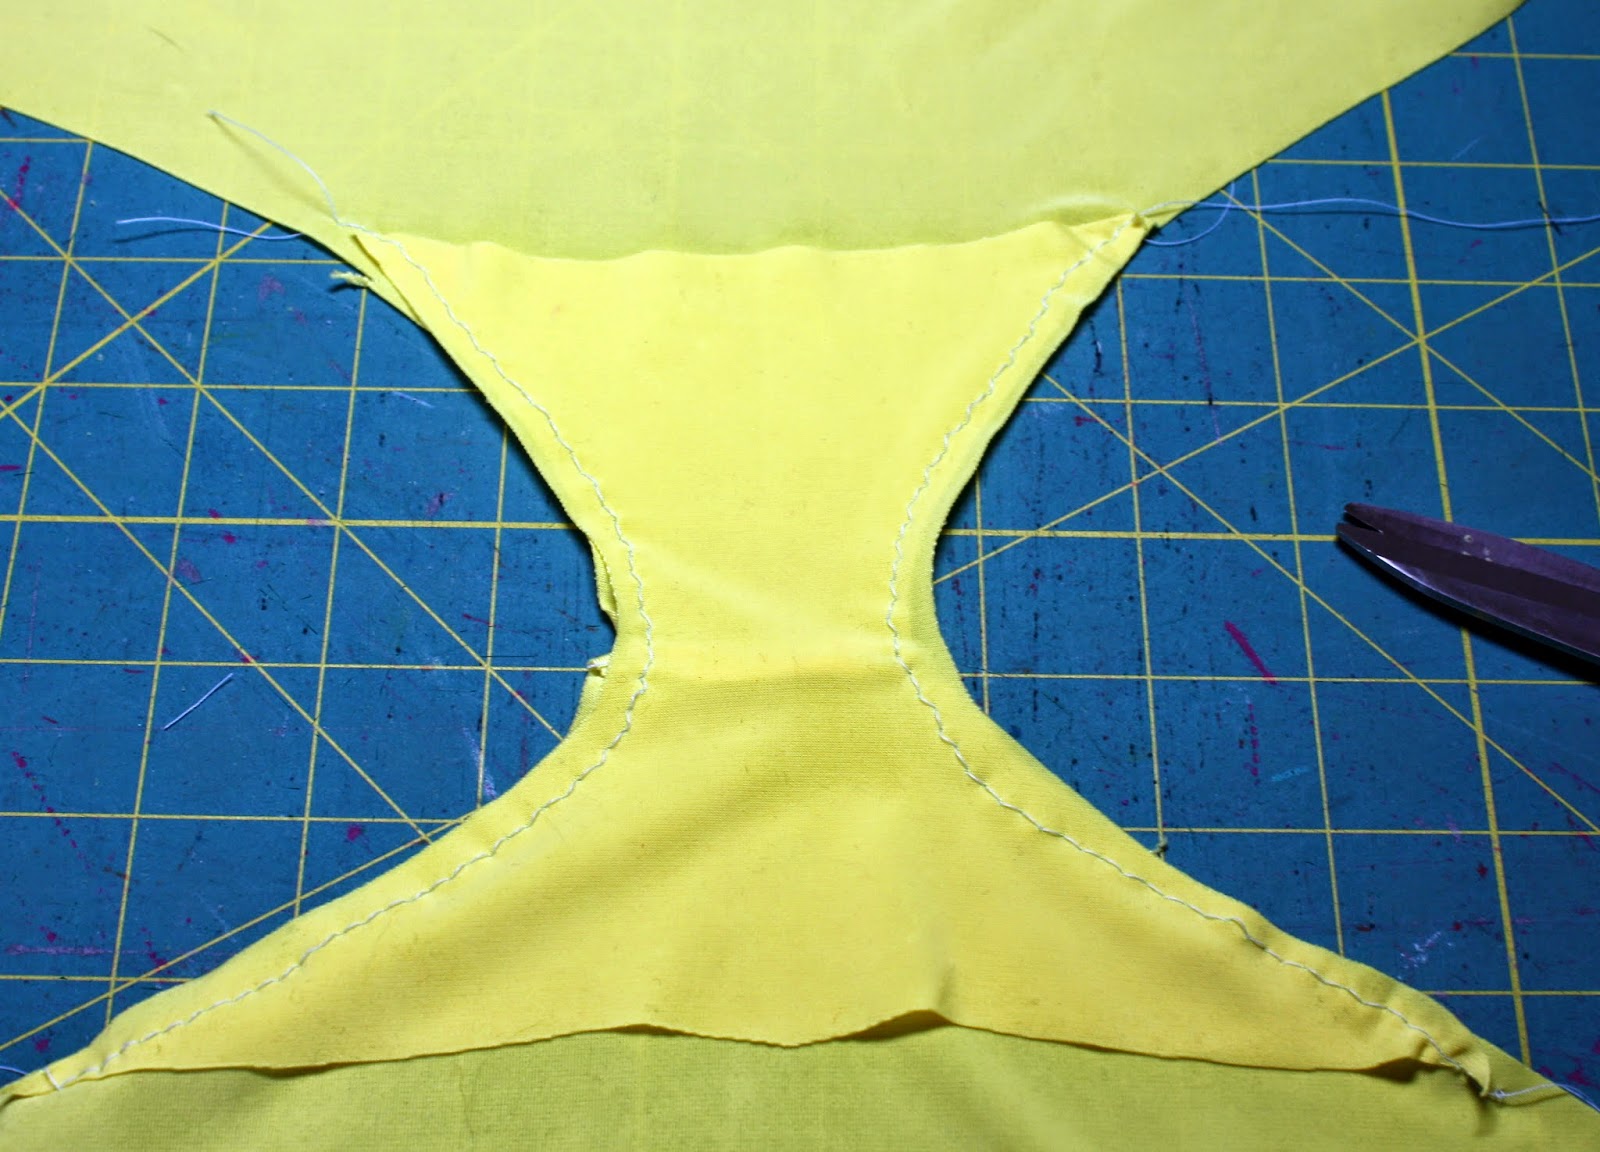
Now get out your stretch lace. On the upper edge of the panty front, place the lace on the right side so that it's overlapping the edge of the panties by 1/4". Pin in place. The lace should not stretch at all as you're pinning or sewing it.

Stitch in place close to the lower edge of the lace with a square zigzag (2.5 mm x 2.5 mm).

Repeat with the upper edge of the panty back.

Now open out the panties and repeat the lace pinning/stitching process with the leg openings. Here's how it will look pinned.
 You have lace on all the edges, and the side seams are still open.
 With right sides together, pin the side seams together.
 Stitch in a double-stitched seam with a narrow zigzag, and then trim away the seam allowance.
 Finally, place a bow at center front (at the bottom of the lace) and hand stitch in place.
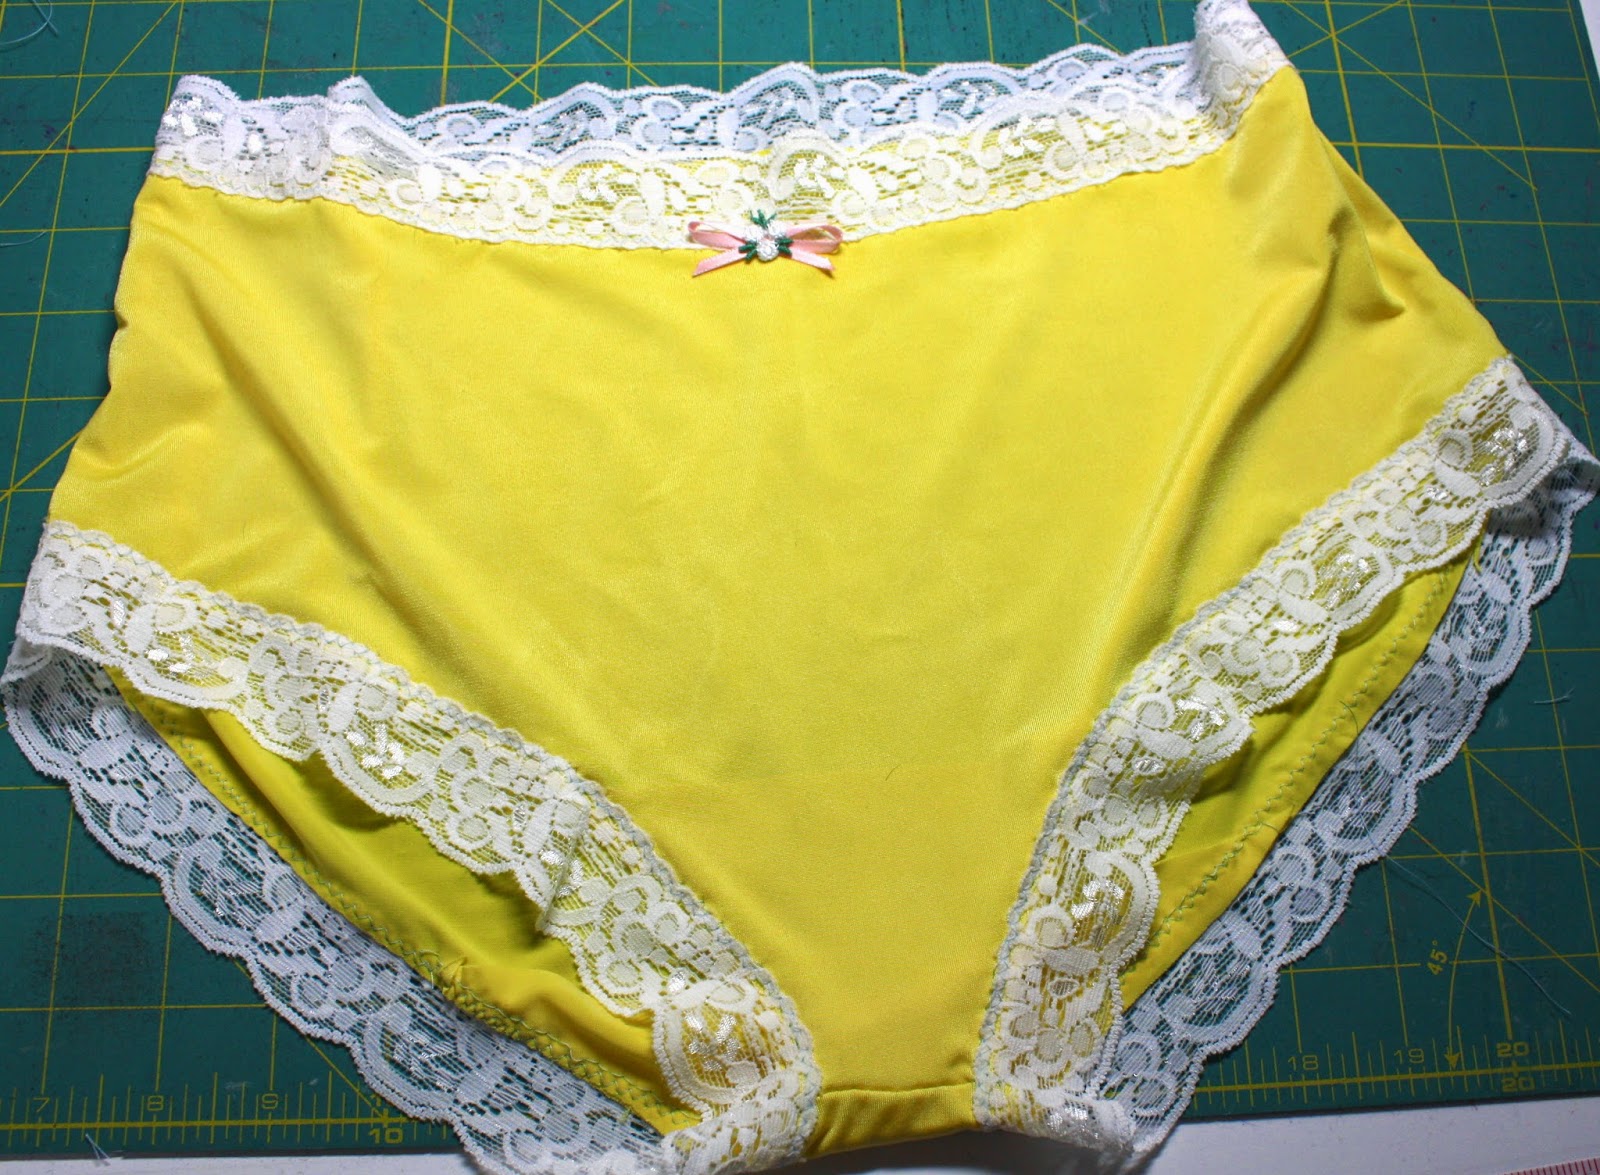 That's it! Pretty easy, huh? After you've worn them for a day, you'll have an idea of changes you want to make: you can have them cut higher or lower on leg openings, have a higher or lower rise, etc. If you want a retro high-waisted look, you can also use super-wide lace just at the waist opening.
Hope you enjoy! Now go forth and make panties.


July 11, 2014
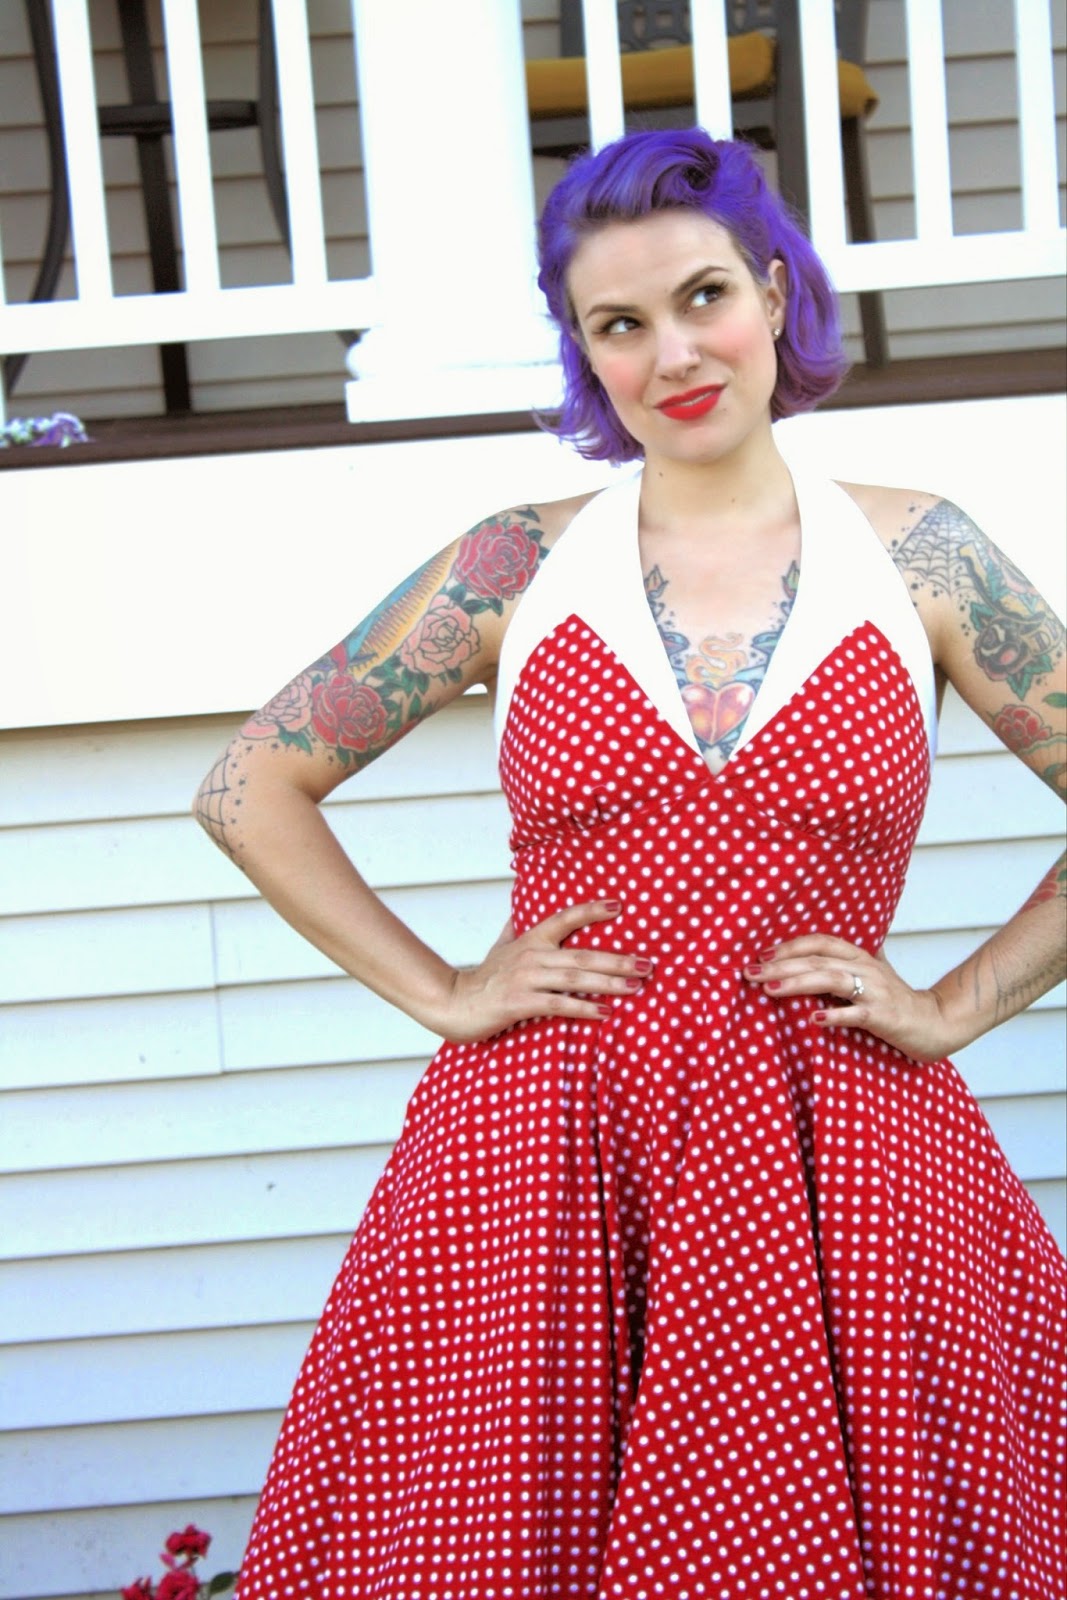
Butterick 6049: A Festive Halter Dress
 When this pattern was released on the Butterick website, I was instantly smitten. In fact, I loved it so much I made a near-replica of the model garment.
 I think the bust detail is so cool. It reminded me immediately of this Tatyana dress from Modcloth. (Warning: those points are a little tricky to sew!)
This is one of the quickest projects I've sewn in recent memory. I was at my parent's house in Arizona and decided to give it a try. I made a muslin and then the rest of the dress in half a day. Super satisfying. I got the fabric at the local quilt shop out there. The white halter is Kona Cotton and the rest is a quilting broadcloth cotton print. It softened up nicely by prewashing.
I would definitely recommend making a bodice muslin of this design. The bodice was significantly too long for me, both in the halter portion and in the midriff. It also was very wide underneath the armpits, so I narrowed it. The size 14 was too big for me overall. I took it in at the side seams, but wish I had taken more out at the waist.
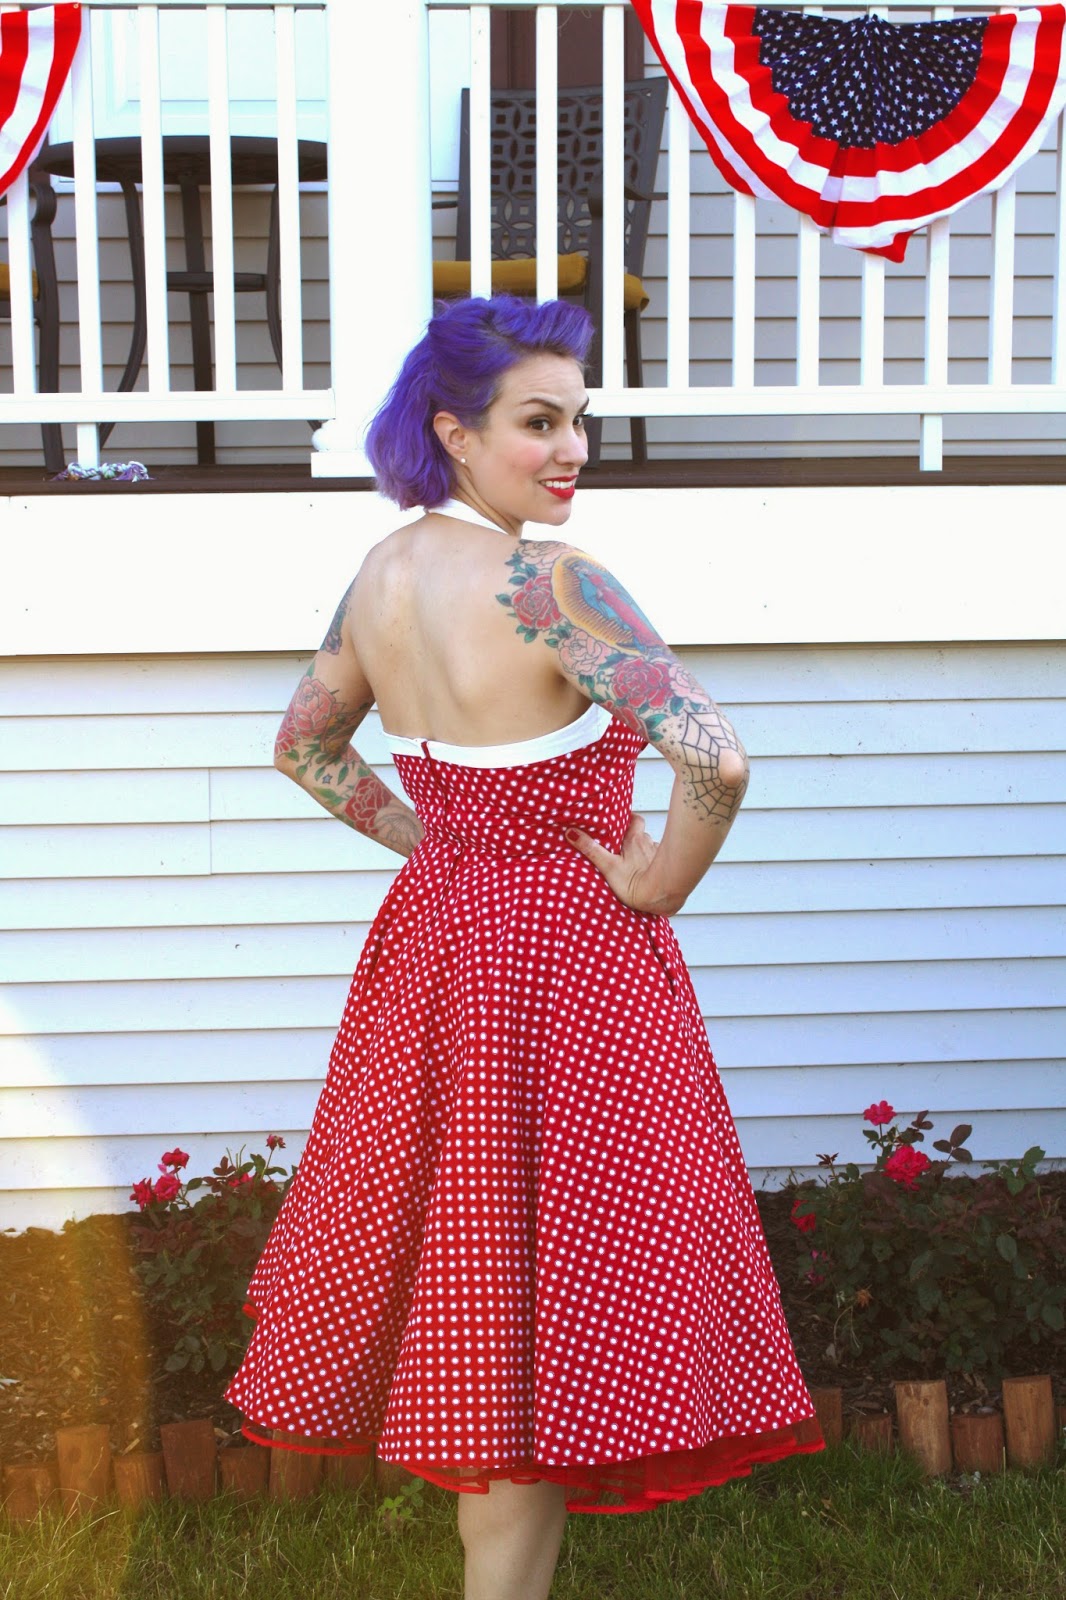 If I were to make it again, I would put a bit of boning in at the side seams and on either side of the zipper for support so the lower back doesn't wrinkle. I didn't have any of that stuff with me in Arizona, so I decided to do without. I did add bra cups, post construction.
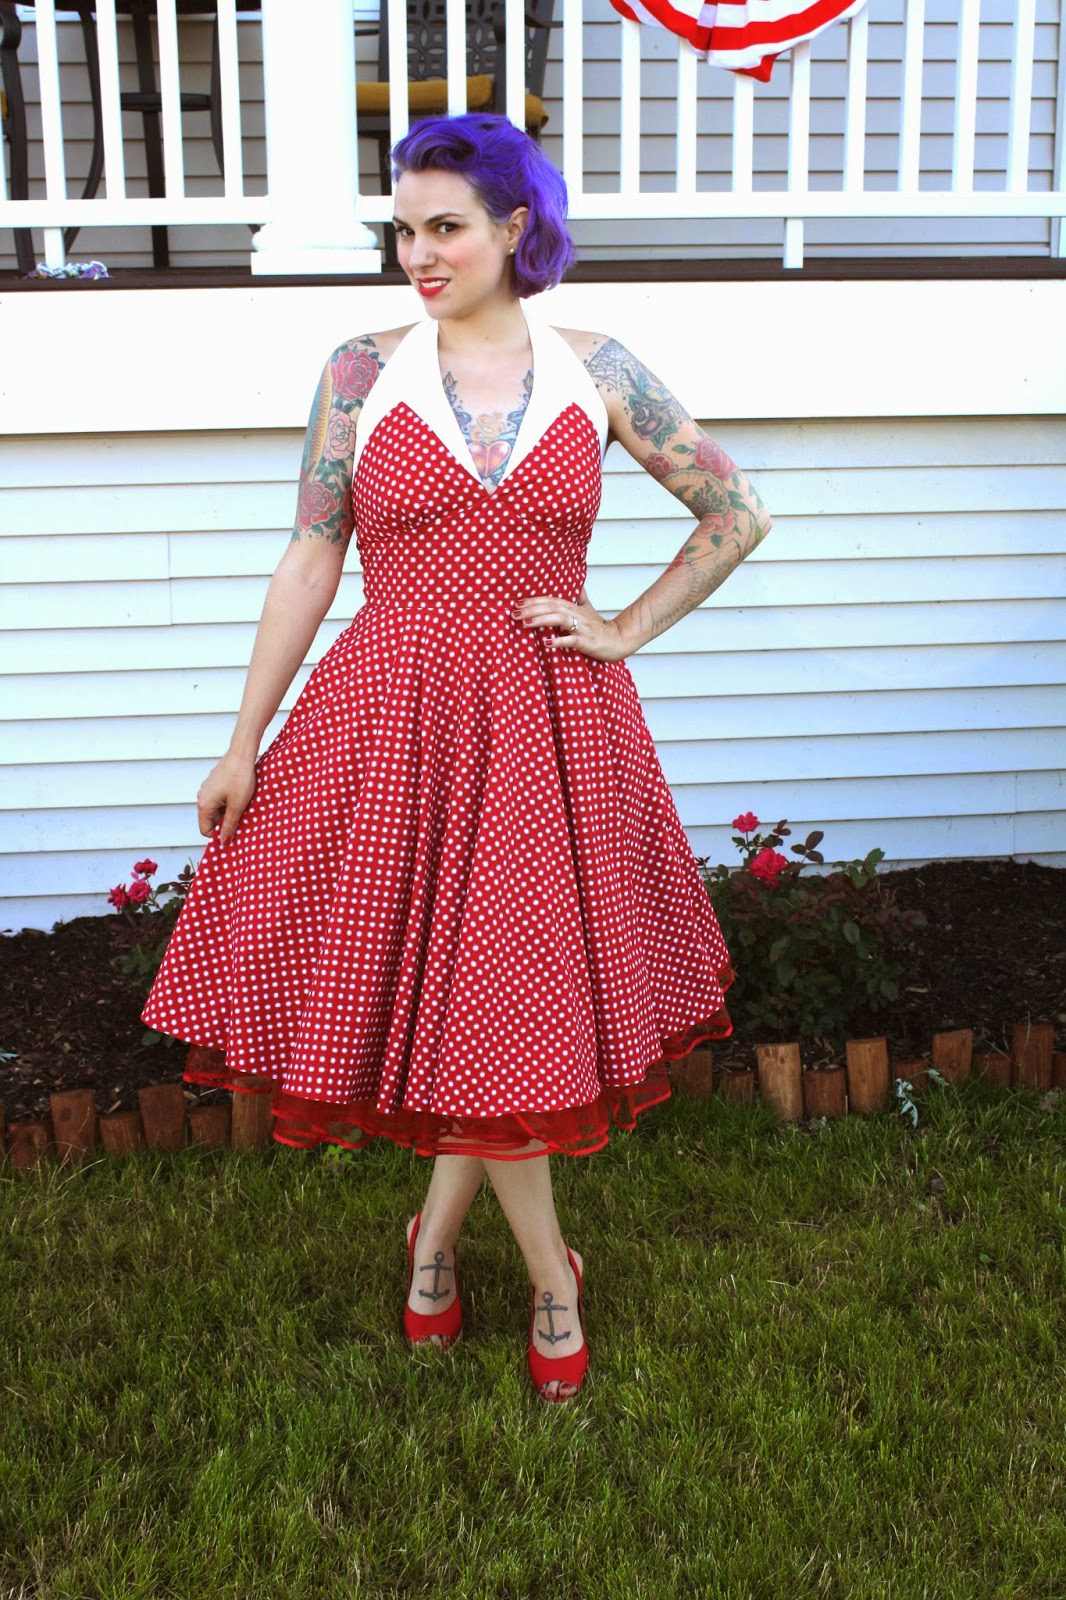 The skirt is a full circle (with pockets, yay!). I wore it with a crinoline peeking out for dramatic effect, since I wore it for a 4th of July performance. It looked pretty great on stage (if I do say so myself). The skirt kept blowing up, since it was a windy day, so I was glad to have the crinoline underneath.
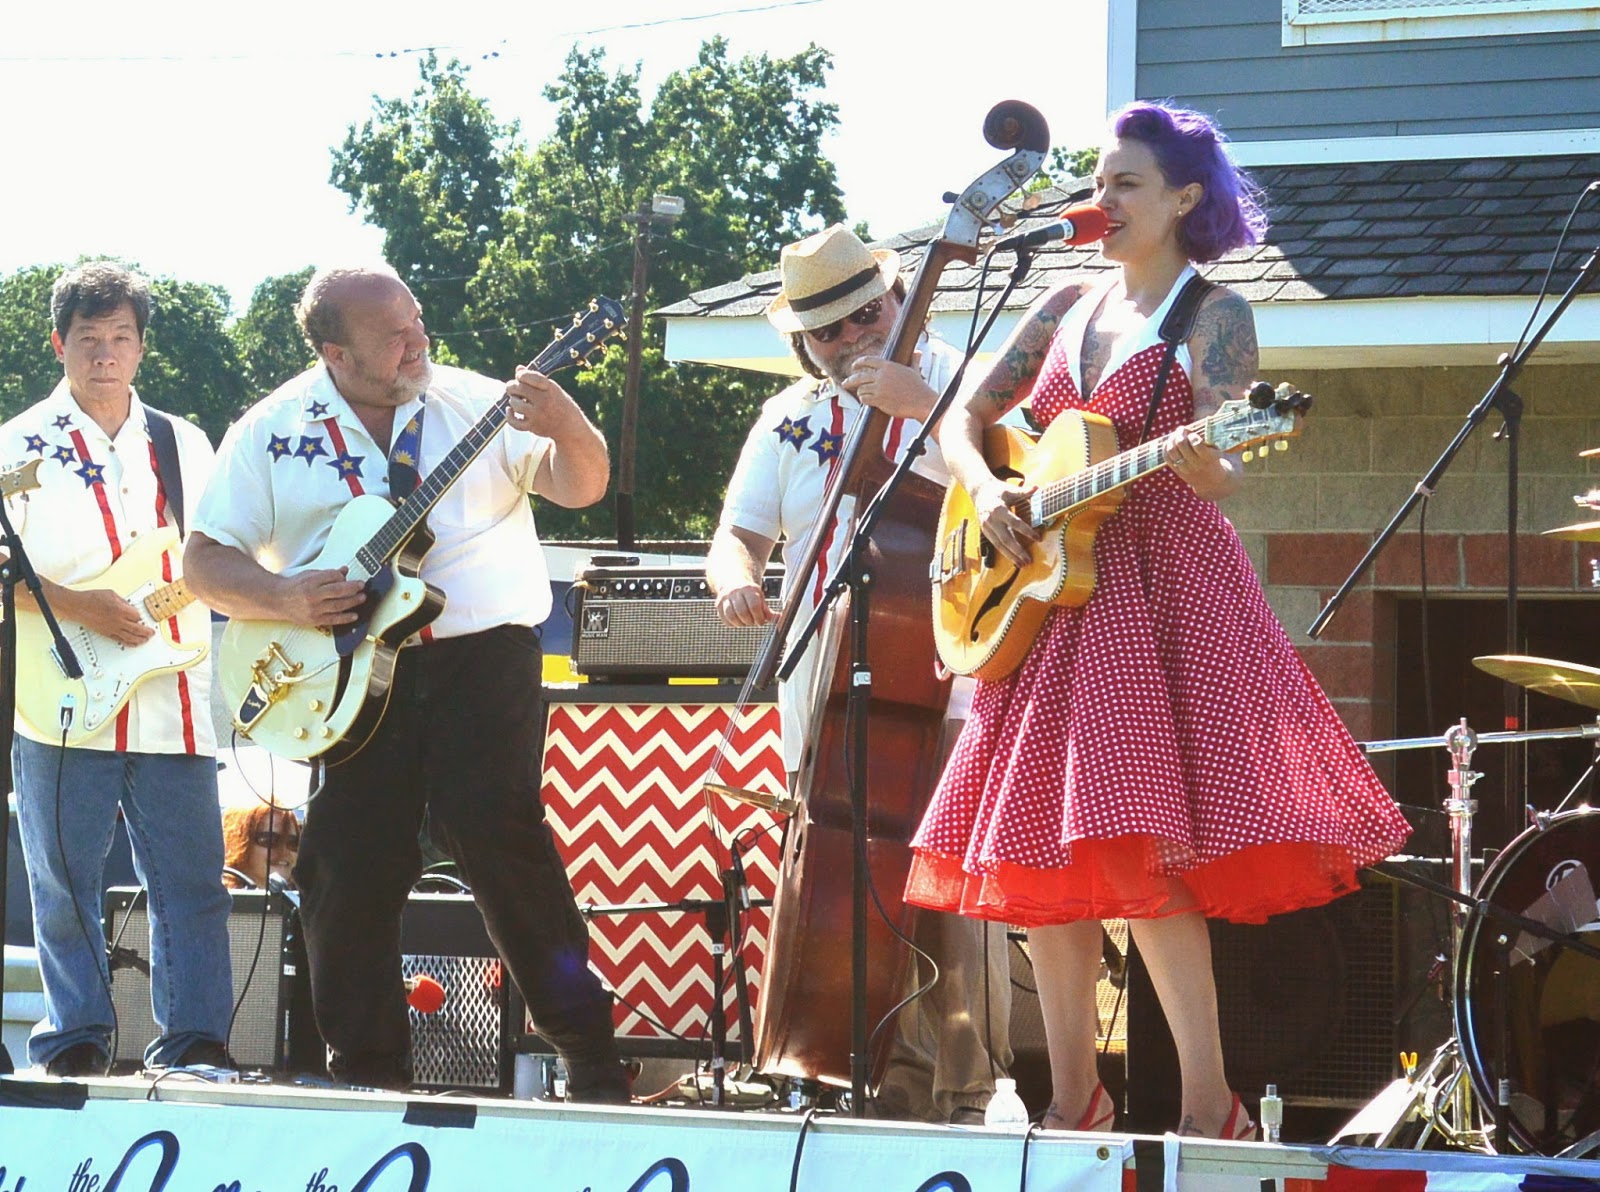
Overall, I highly recommend the pattern but do know that you'll probably need to spend some time fitting it--and you may wish to size down altogether. I'll probably be making this again this summer--aqua and white, perhaps?
July 7, 2014
Slip Kits Are 20% Off!
 Hi all! I have a bunch of slip kits in stock and ready to ship. All the steps for the slip sew-along are posted, so I thought I'd have a little sale. I still have kits in black, red, and yellow, in both regular and plus sizes. Please visit my Etsy shop for details. The kits include everything you need to make my vintage-inspired slip pattern, Butterick 6031.
Use the code YAYSLIPKITS to get your 20% off! And check out the slip sew-along posts here:
Slip Sew-Along #1: Inside the Kit, Plus Other Supplies
Slip Sew-Along #2: Pre-treating Your Fabric
Slip Sew-Along #3: Picking a Size and Making Adjustments
Slip Sew-Along #4: Bust Adjustments
Slip Sew-Along #5: Cutting and Marking
Slip Sew-Along #6: Sewing the Bra Top
Slip Sew-Along #7: Sewing the Front and Back
Slip Sew-Along #8: Sewing the Lace Hem
Slip Sew-Along #9: Introducing Gertie's Sewing Show!
Slip Sew-Along #10: Sew On Your Bow
July 4, 2014
I Have a Theme Song!
When I started doing Gertie's Sewing Show, I asked my friend/bandmate Mark if he would do a little guitar intro for the show. Not only did he do that, he wrote an entire freaking jingle and it's possibly the best thing I've ever heard. It's basically my blog in a song. Have a listen!
Here are the lyrics, in case you missed any. Because they are awesome.
Your gal may be a beautyShe might be tall and lean
She might have shiny golden hair and eyes and teeth that gleamShe might ride around in Cadillacs and only buy top shelf
Well my gal drives an Elna
So she dresses like herself
You might think that yours is perfectBut pal you oughta know
My gal is the finest
'Cause she's sew, sew, sew!
There are beauties who are bigger and honeys who are small
If pretty comes in every shape, who needs one size fits all
One'll go for Hayworth, the other loves Monroe
Me, I want the gal who's just sew, sew, sew!
Mark told me the idea came from pondering how every woman doesn't think she's pretty enough, or she's just "so so." Which evolved into "sew sew", which evolved into the awesomeness that is this song.
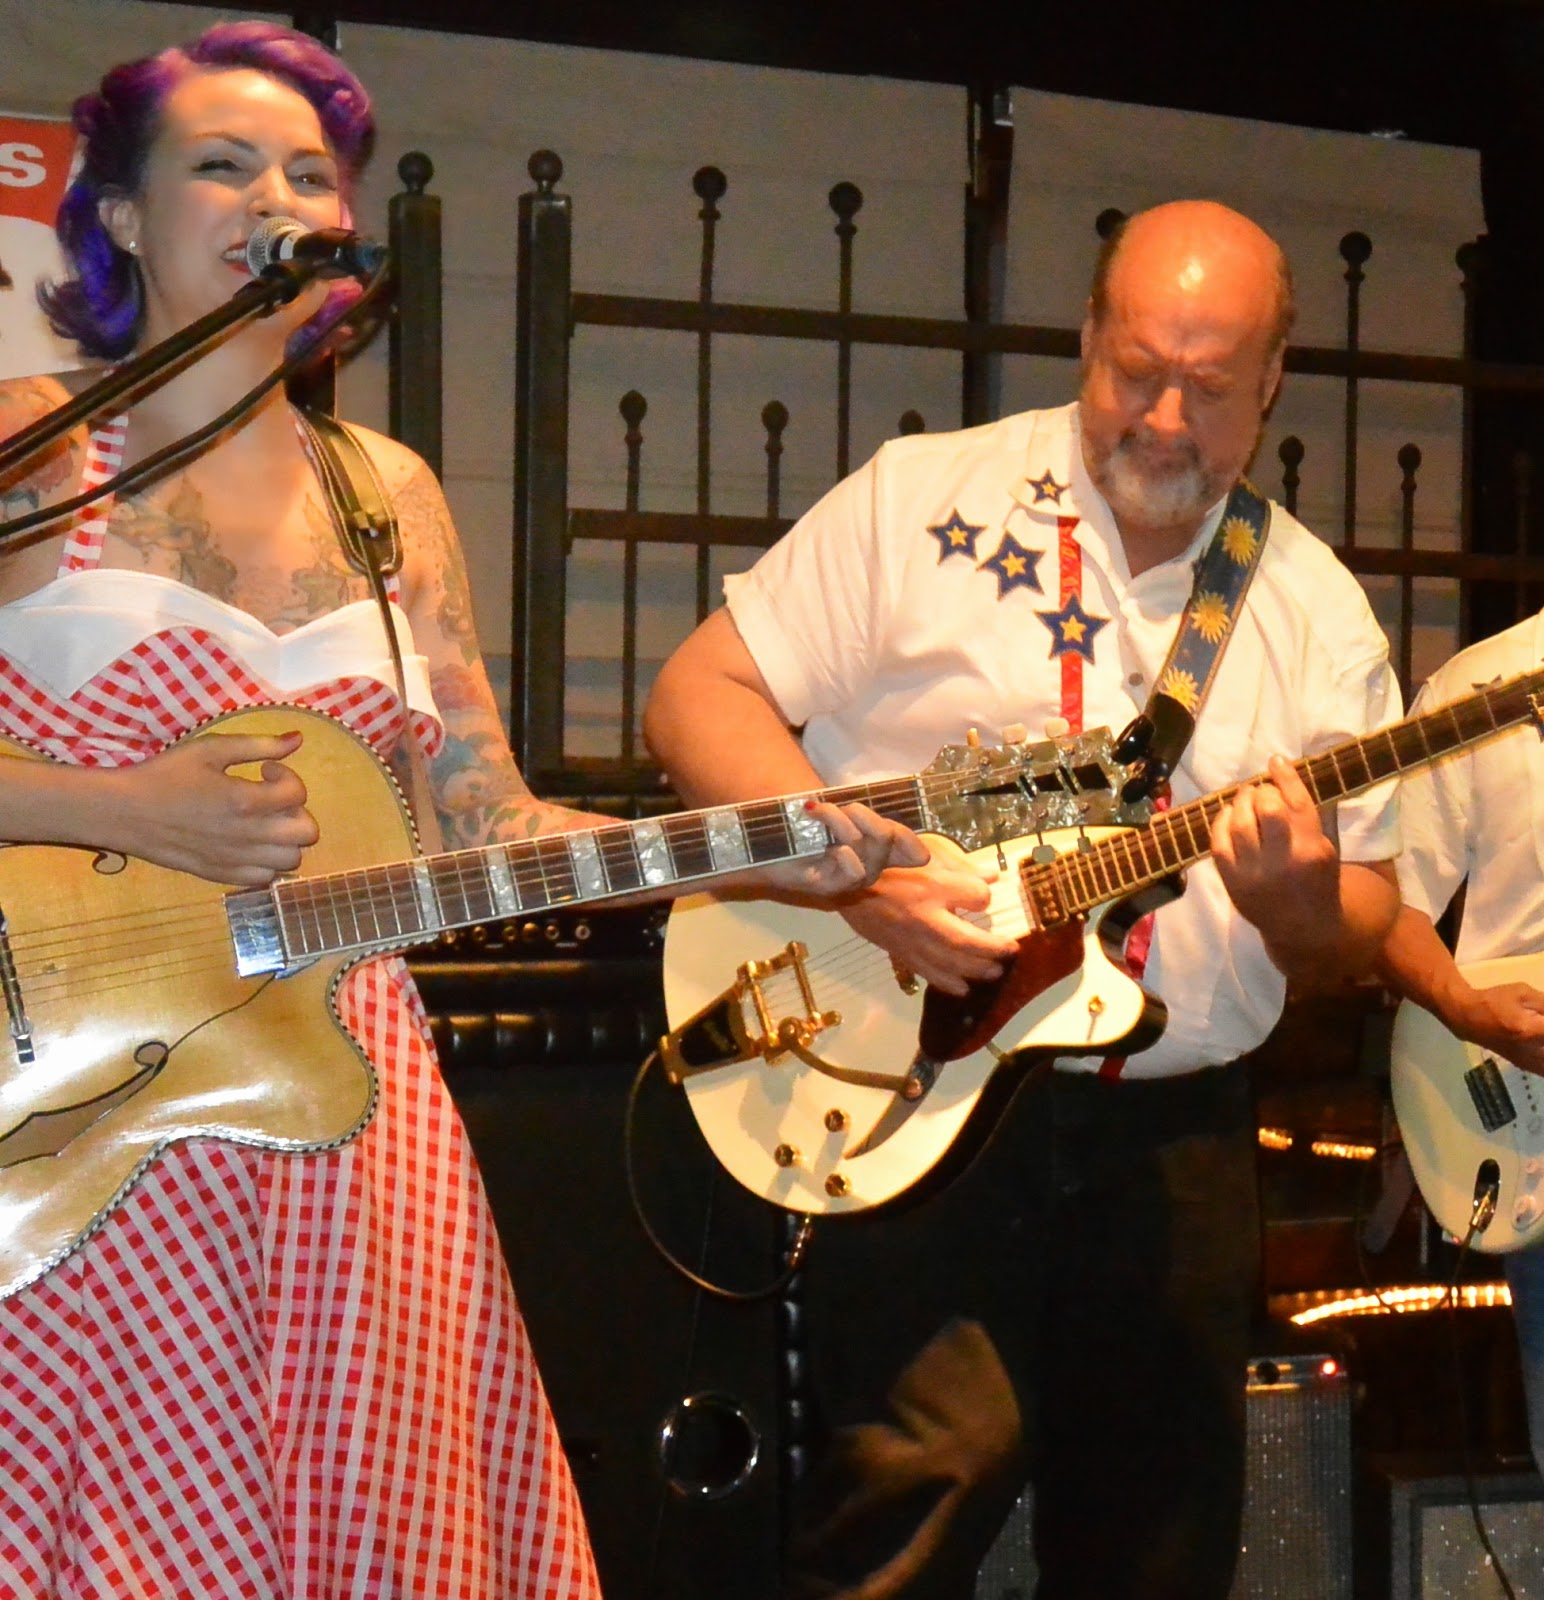
Another thing you should know about Mark is that he's an amazing hand embroiderer and he made all the guys in our band custom shirts. This is from a little show we played last night. Those stars are hand appliques!

(More to come on my dress, which is a modified version of my pattern Butterick 6019. I made it for the show and haven't had an opportunity to have good pictures taken yet.)
Hope you enjoyed the theme song! Thank you, Mark!
Here are the lyrics, in case you missed any. Because they are awesome.
Your gal may be a beautyShe might be tall and lean
She might have shiny golden hair and eyes and teeth that gleamShe might ride around in Cadillacs and only buy top shelf
Well my gal drives an Elna
So she dresses like herself
You might think that yours is perfectBut pal you oughta know
My gal is the finest
'Cause she's sew, sew, sew!
There are beauties who are bigger and honeys who are small
If pretty comes in every shape, who needs one size fits all
One'll go for Hayworth, the other loves Monroe
Me, I want the gal who's just sew, sew, sew!
Mark told me the idea came from pondering how every woman doesn't think she's pretty enough, or she's just "so so." Which evolved into "sew sew", which evolved into the awesomeness that is this song.
Another thing you should know about Mark is that he's an amazing hand embroiderer and he made all the guys in our band custom shirts. This is from a little show we played last night. Those stars are hand appliques!
(More to come on my dress, which is a modified version of my pattern Butterick 6019. I made it for the show and haven't had an opportunity to have good pictures taken yet.)
Hope you enjoyed the theme song! Thank you, Mark!
June 24, 2014
Gertie's Sewing Show, Episode 2!
It's here! The next installment of my new sewing web series. This one is a sewist's review of the exhibit Charles James: Beyond Fashion, now showing at The Met Museum. I'm joined by my lovely fellow sewing nerds Allyson and Fleur.
The purpose of Gertie's Sewing Show was to be "nonstop excitement for the sewing nerd." Not just tutorials, but a dialogue about the things that make us go "Ooh!". Infotainment, if you will. I hope you enjoy it.
Check out my snazzy new intro! Music courtesy of guitar genius and songwriter extraordinaire Mark Ellison (thanks, Mark!). Editing and such done by dear friends Martin Kemp and Fleur Hoare. Entire series made possible by Elna sewing machines.
Don't forget to subscribe to my YouTube channel so you never miss an episode. Upcoming episodes include a tutorial on using spiral steel boning and a look inside some really awesome vintage dresses. Sewing nerds unite!
June 18, 2014
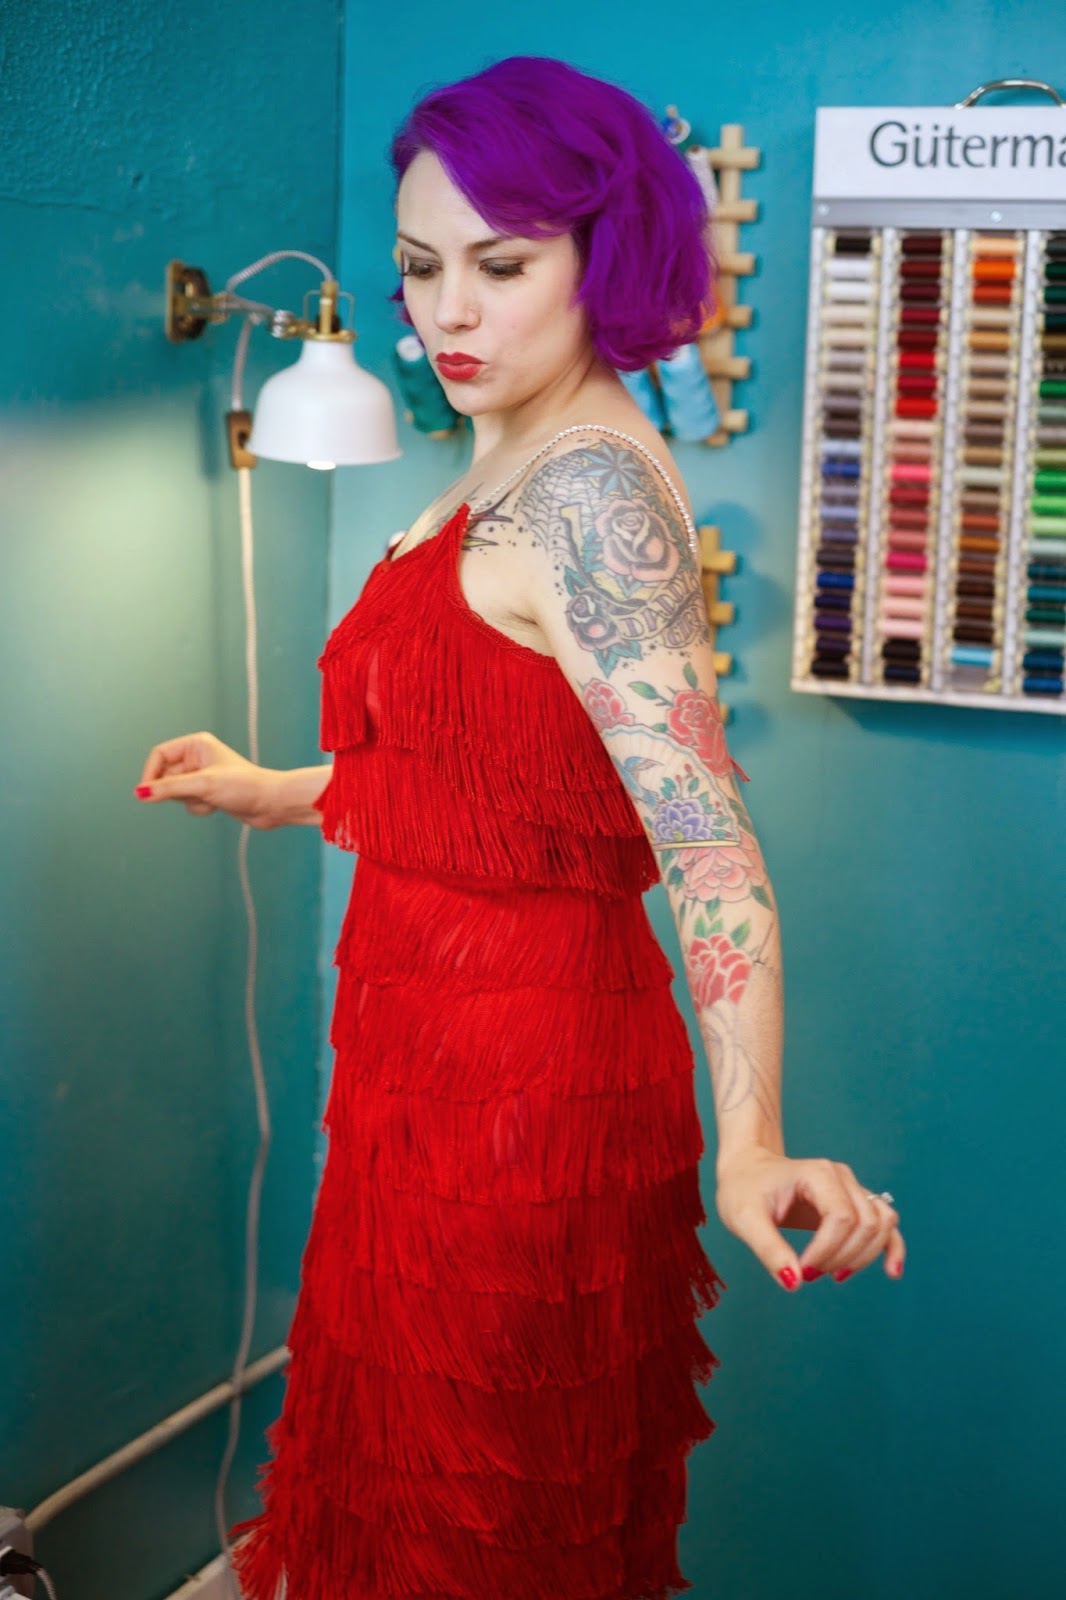
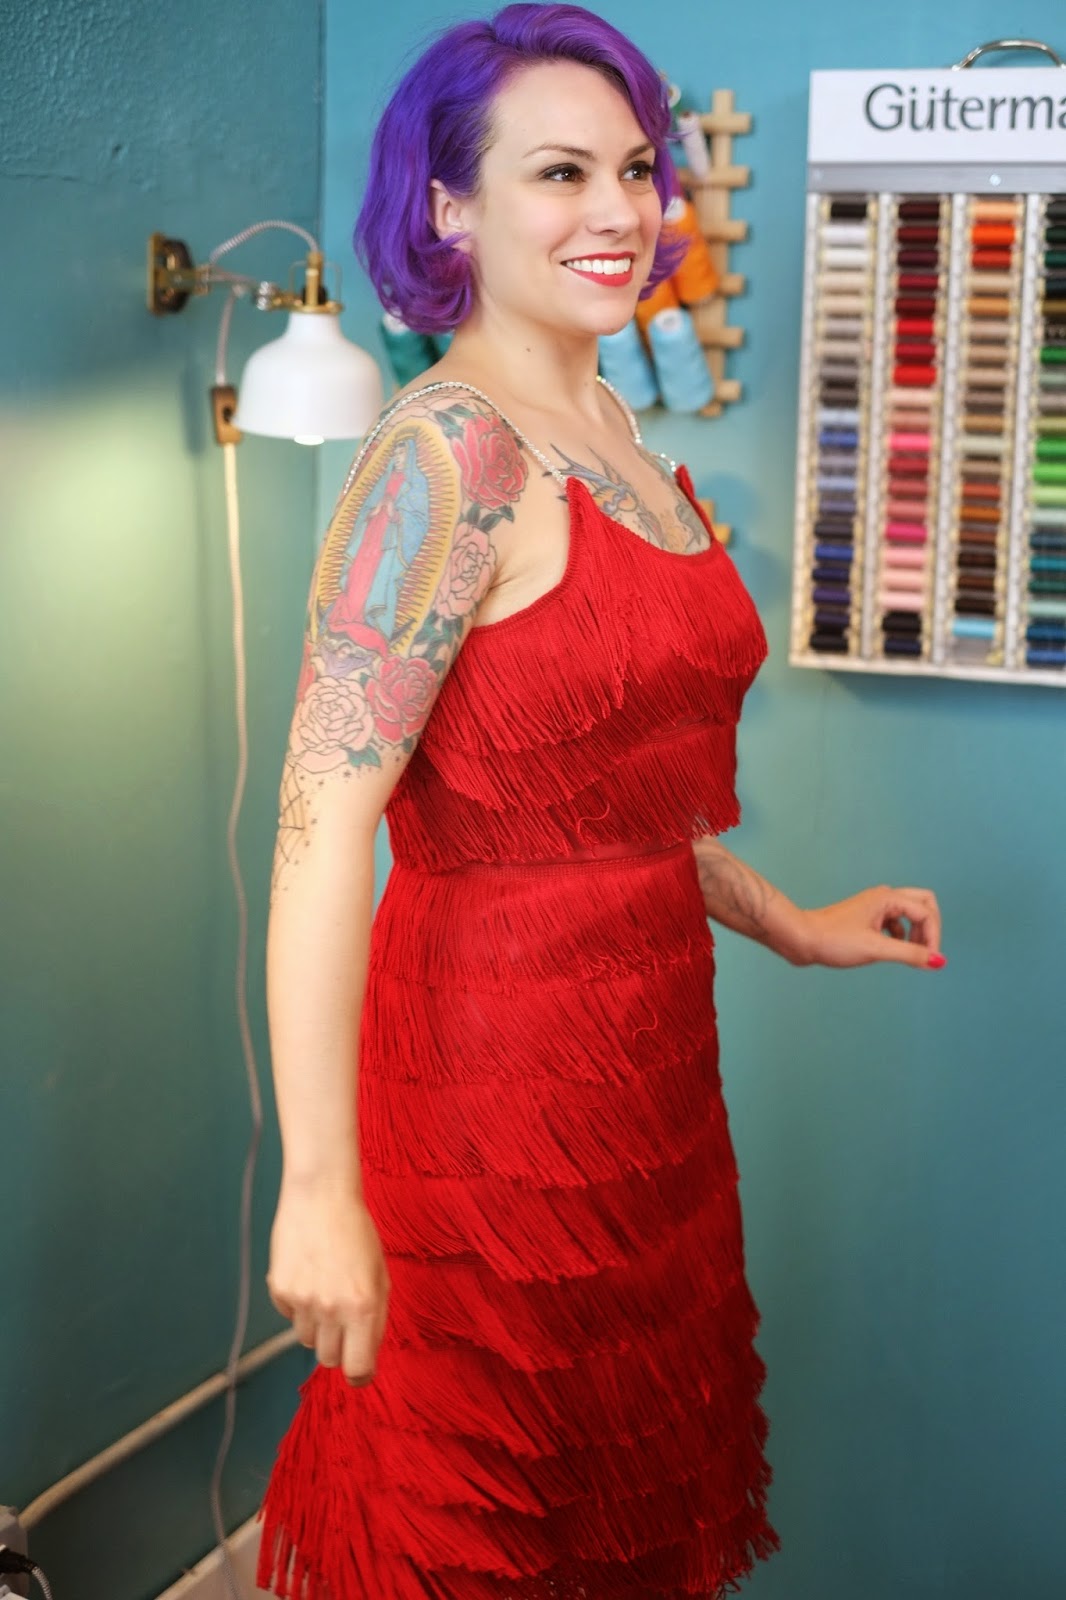
Wanda Jackson-Inspired Fringe Dress

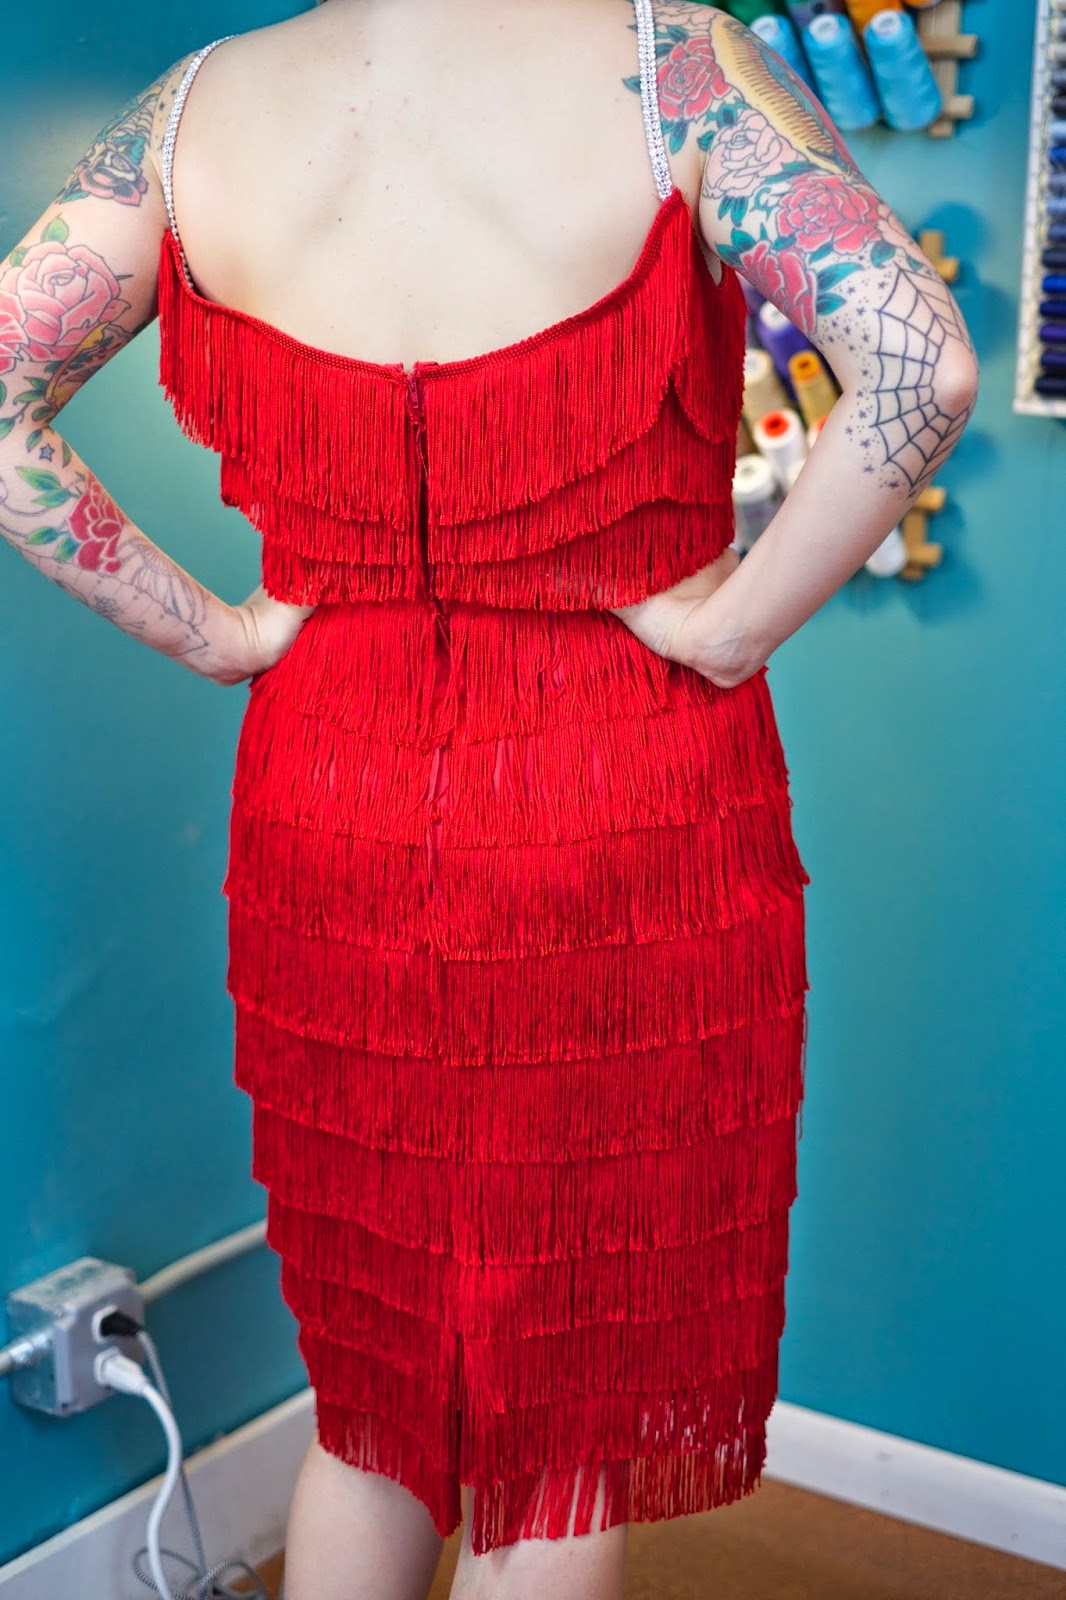
I made this dress in April and never blogged it, can you believe it? This fringe dress was directly inspired by Rockabilly singer Wanda Jackson, who used to wear the hell out of cute little fringed sheath dresses.

Now she wears the hell out of fringed jackets.

Anyway, I made the dress for a performance at our local bowling alley, where I was lucky enough to get to sing several Wanda songs (this was for one of the rock band boot camps at Beacon Music Factory, if you're curious).

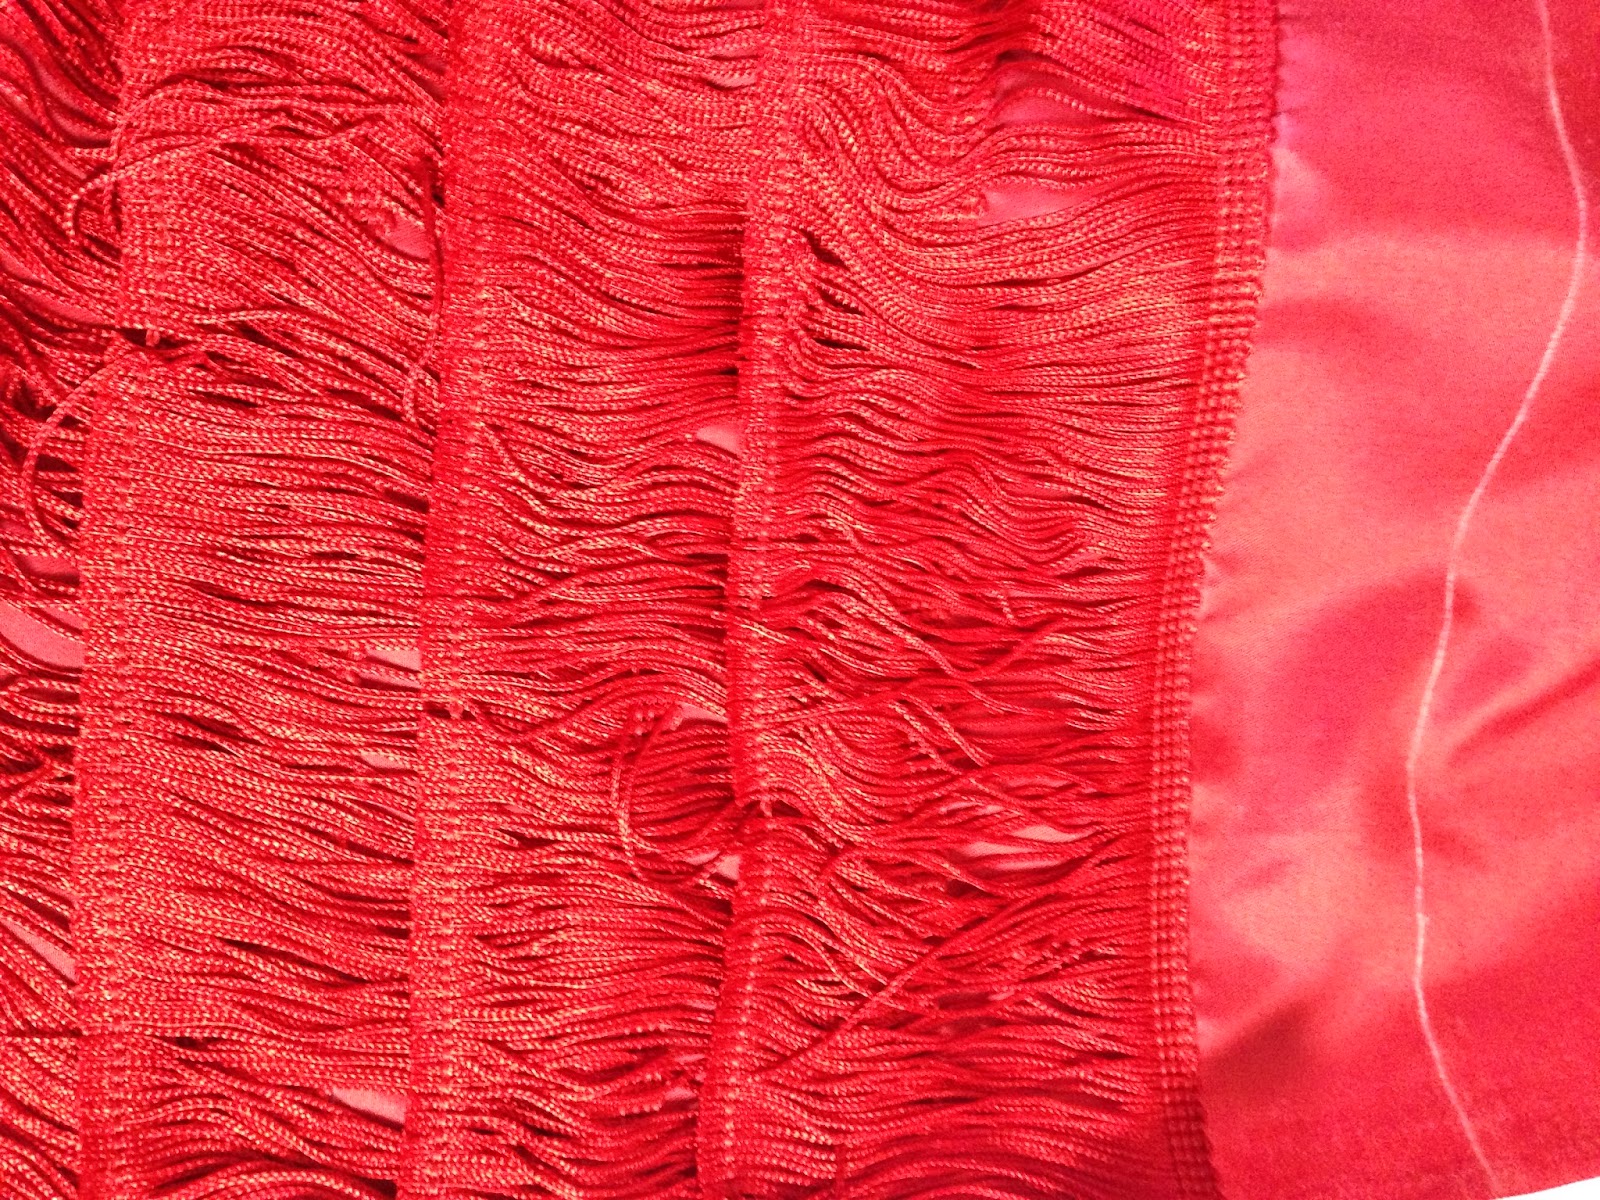
I managed to get 40 yards (!) of red chainette fringe at Daytona Trimming in NYC--if you buy the bolt, you get 50% off. How could I resist? I had enough fringe to make a test version, the dress itself, and trim some really cool shirts for my band mate fellas.
And I still have a ton of red fringe.
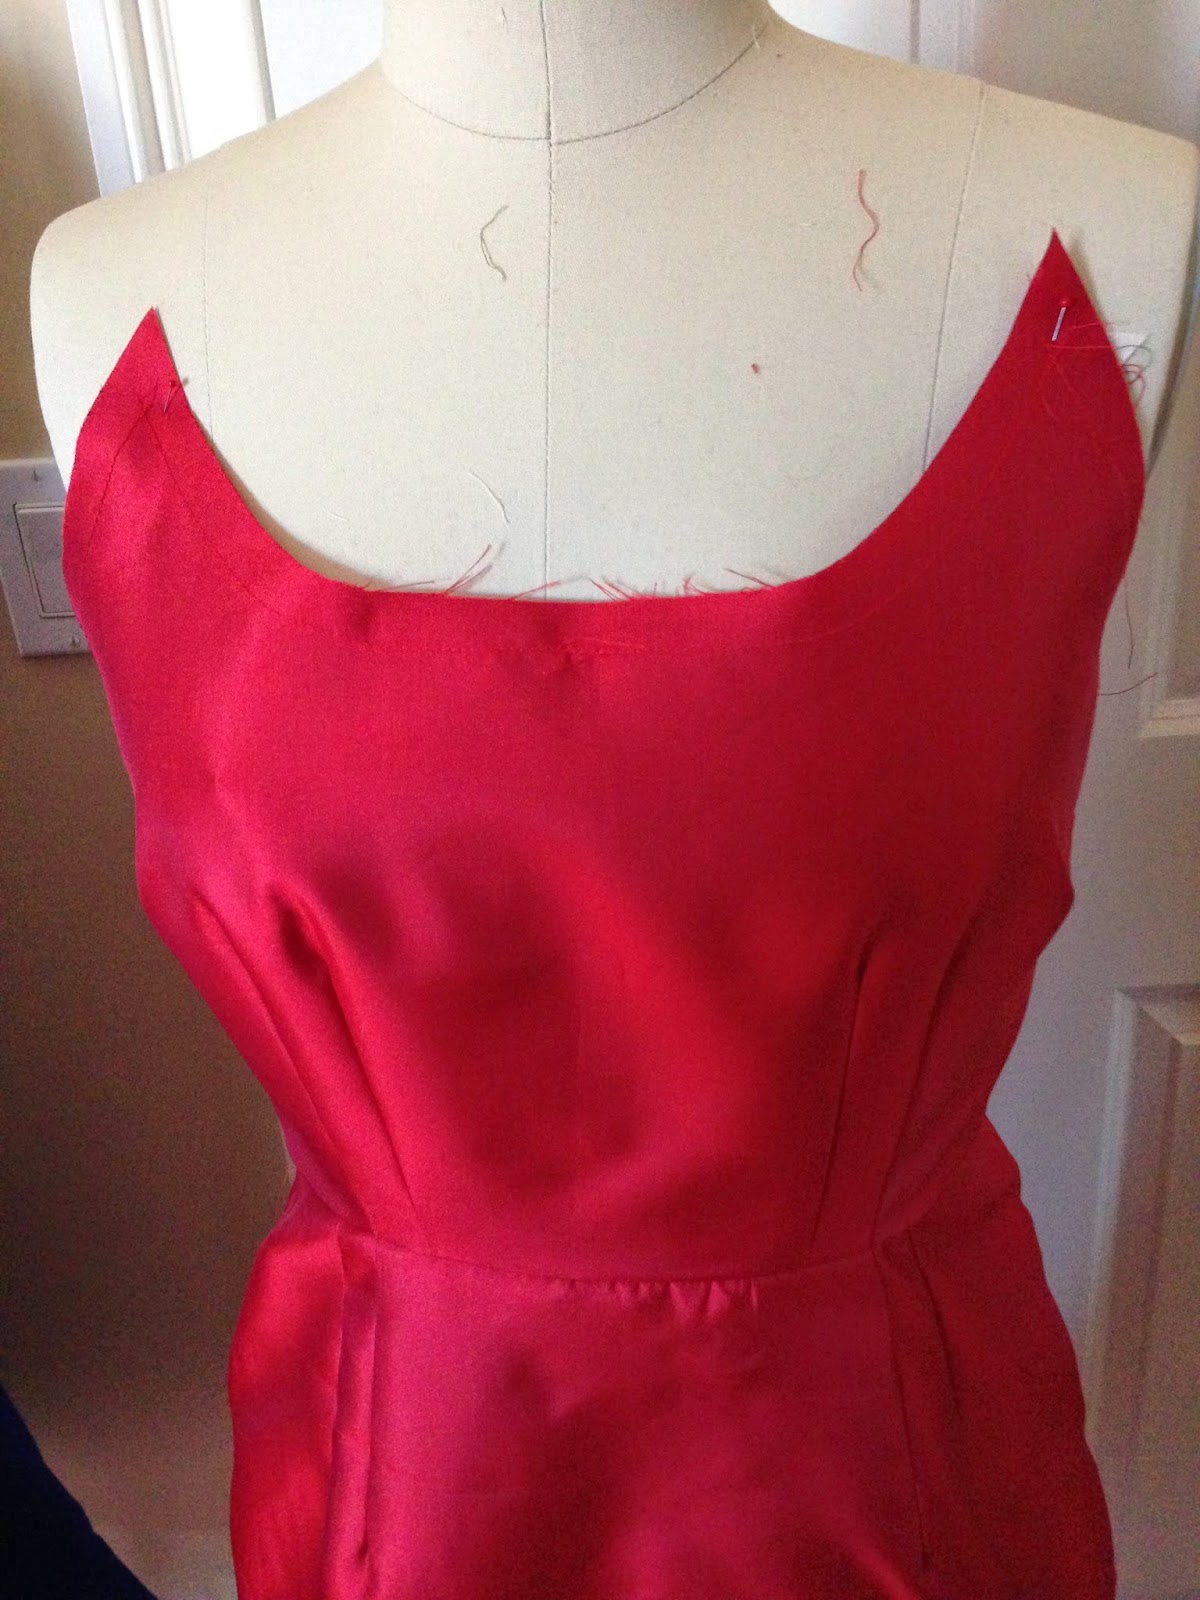
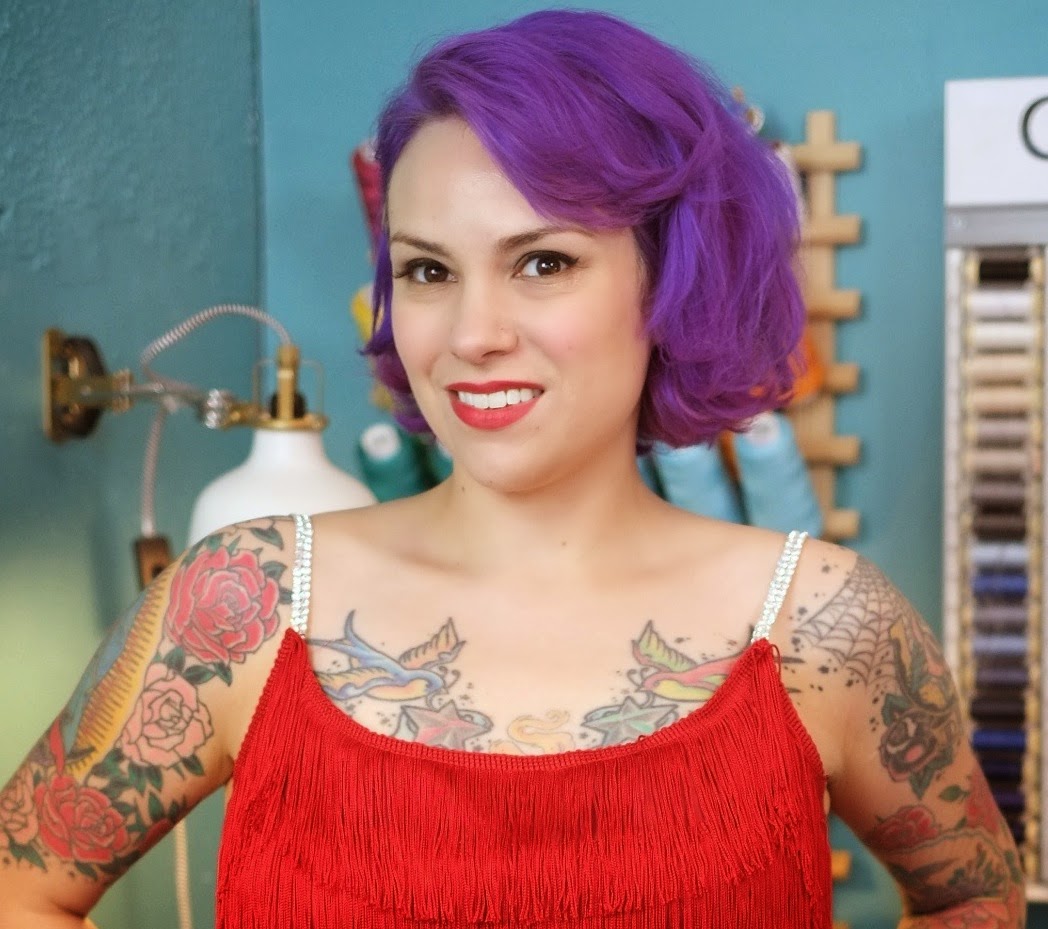
The pattern is, believe it or not, the Sultry Sheath from my first book. I just re-drew the front and back necklines to form a scoop with peaks at the top, and then added rhinestone straps.
The dress itself is made out of silk zibeline, which I'd never sewn with before. I originally wanted faille, but they were sold out in red. I knew I needed something strong enough to support several pounds of fringe, and the zibeline was perfect. It has a lot of body, so it was the perfect base. Here it is, mid-fringeing. It was almost a shame to cover it up.
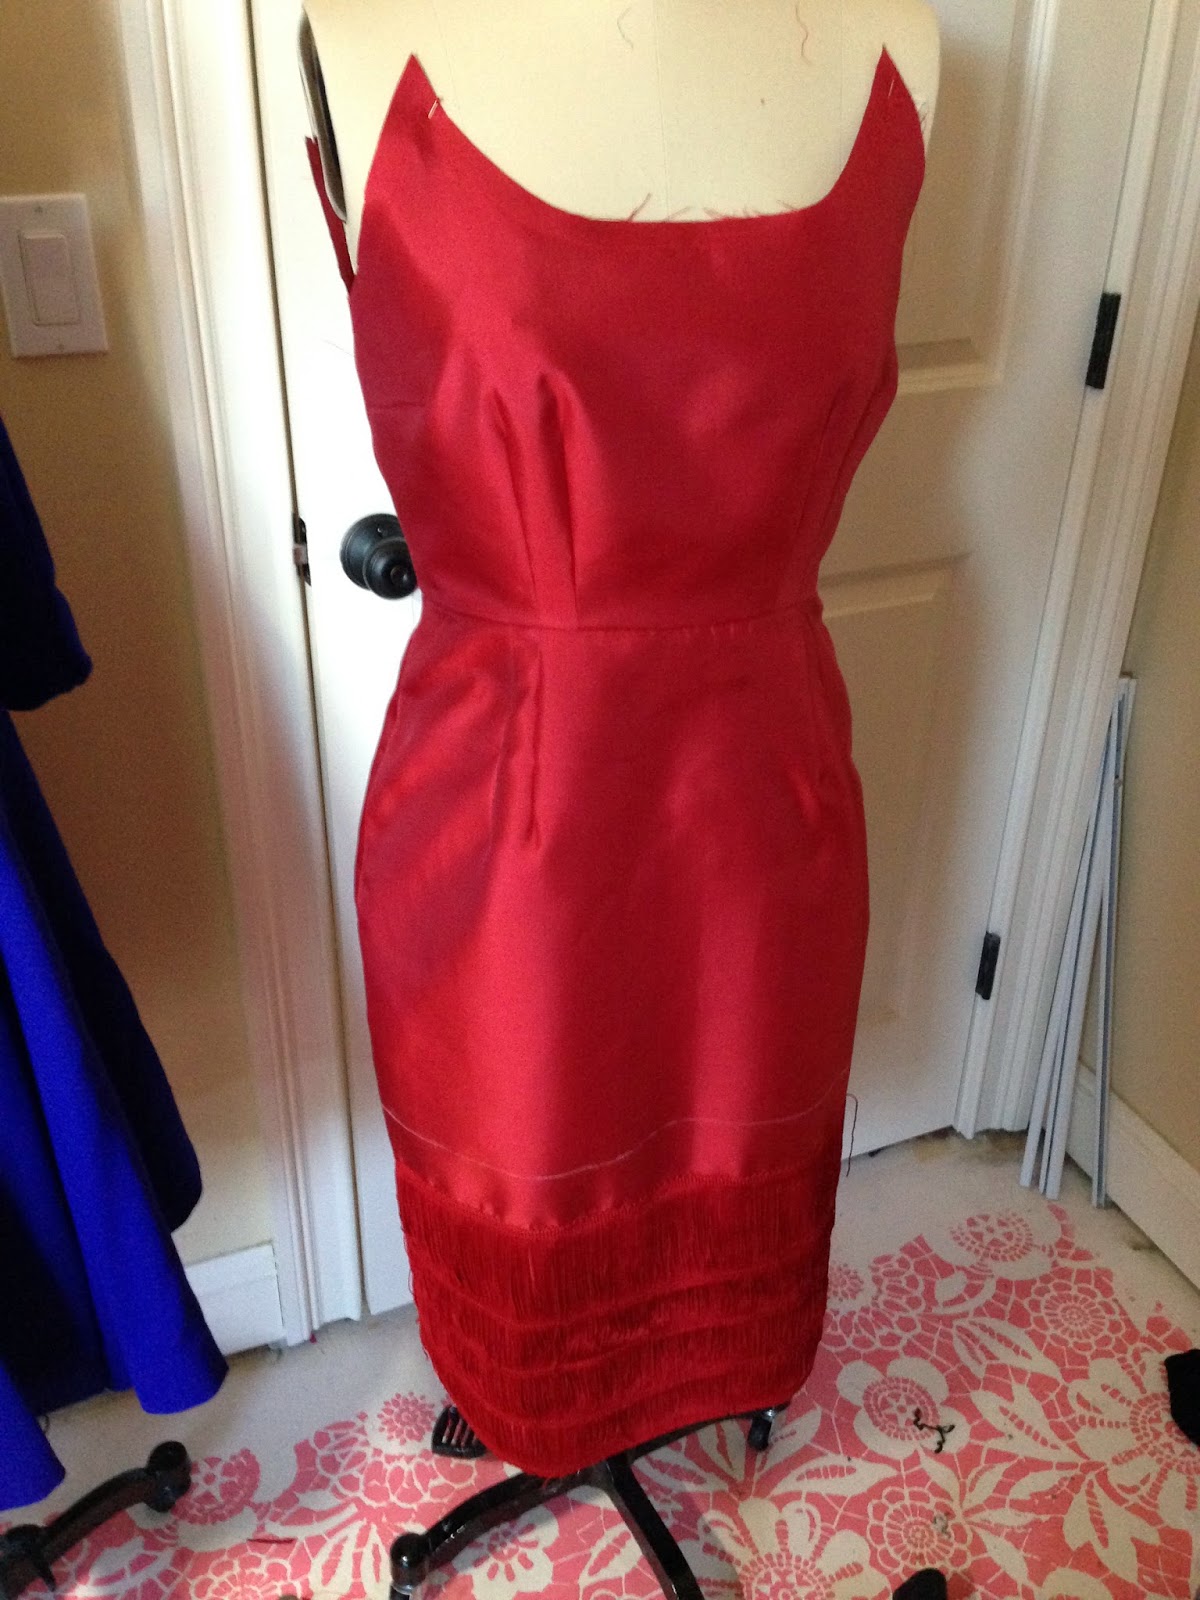
I put the dress together in the base fabric first, then sewed fringe rows so they were overlapping by about 1". The top was trickier, since it needed to follow the lines of the the bodice. I did a test in muslin first.
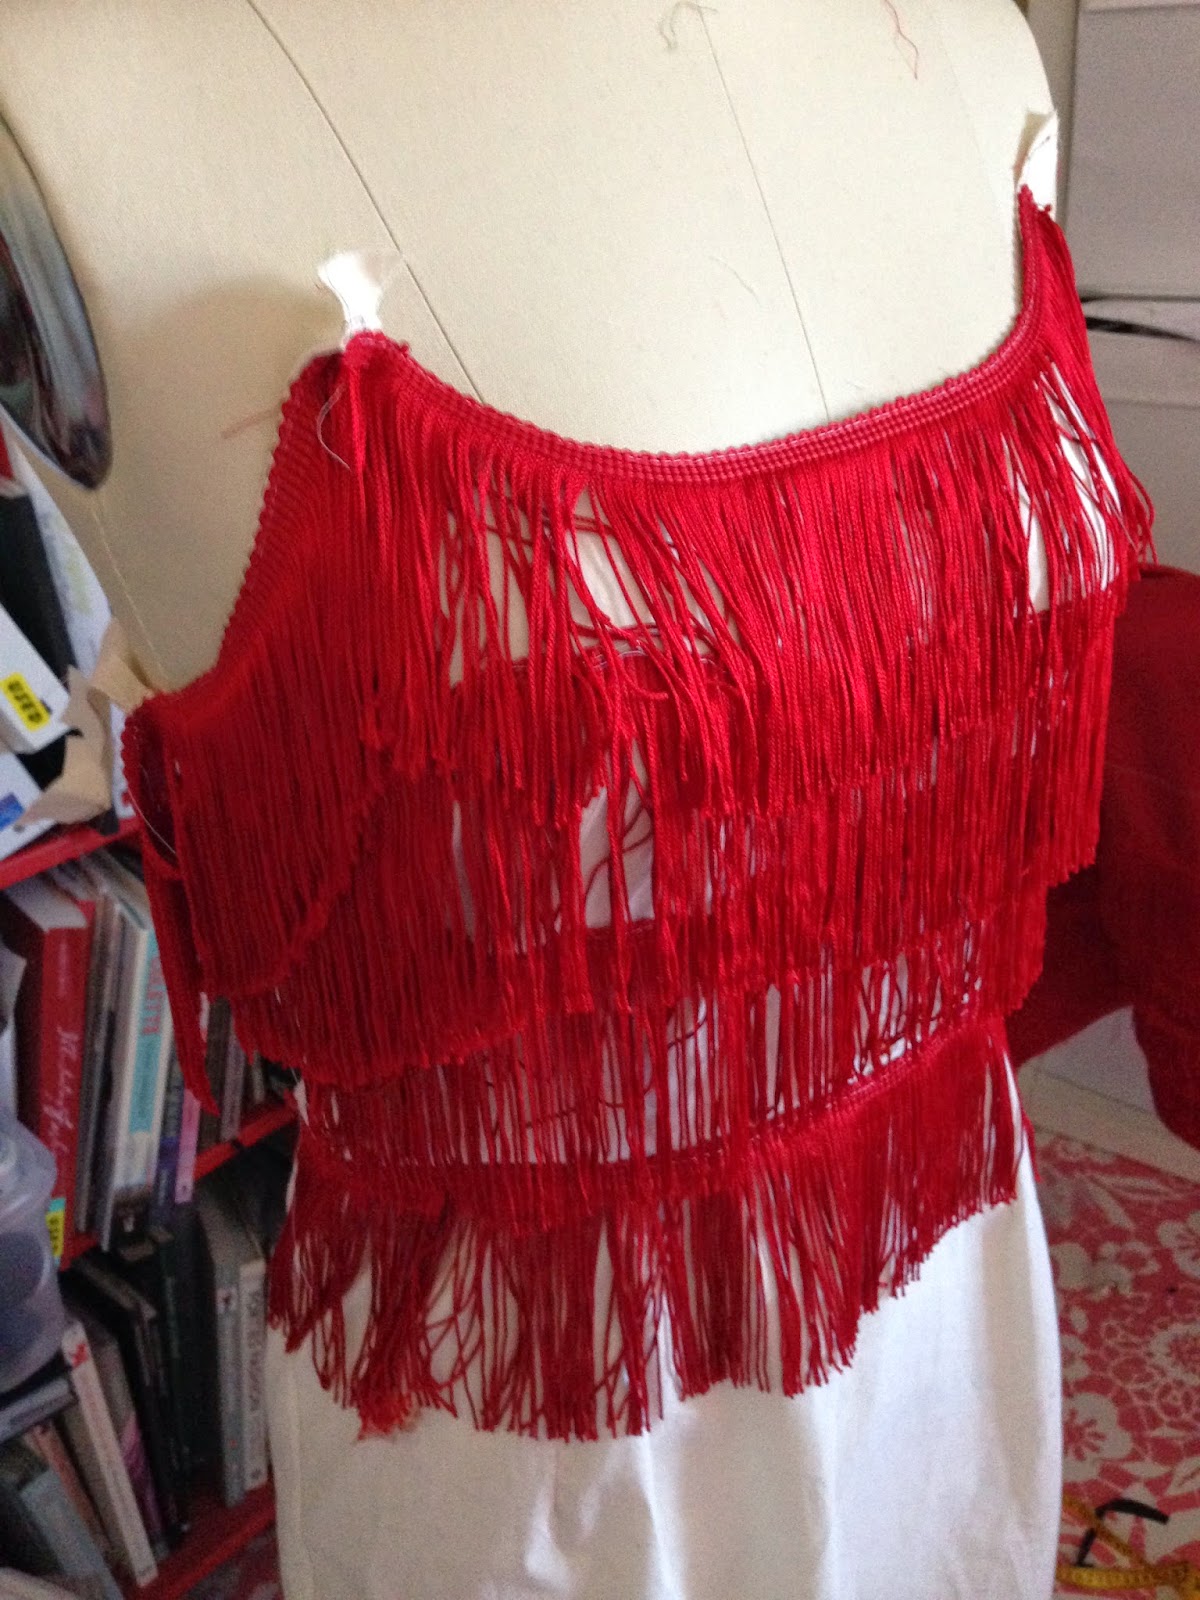 I found that the fringe worked best when it ended at the waist, and then started again at the skirt, so that the fringe doesn't obscure the waistline.
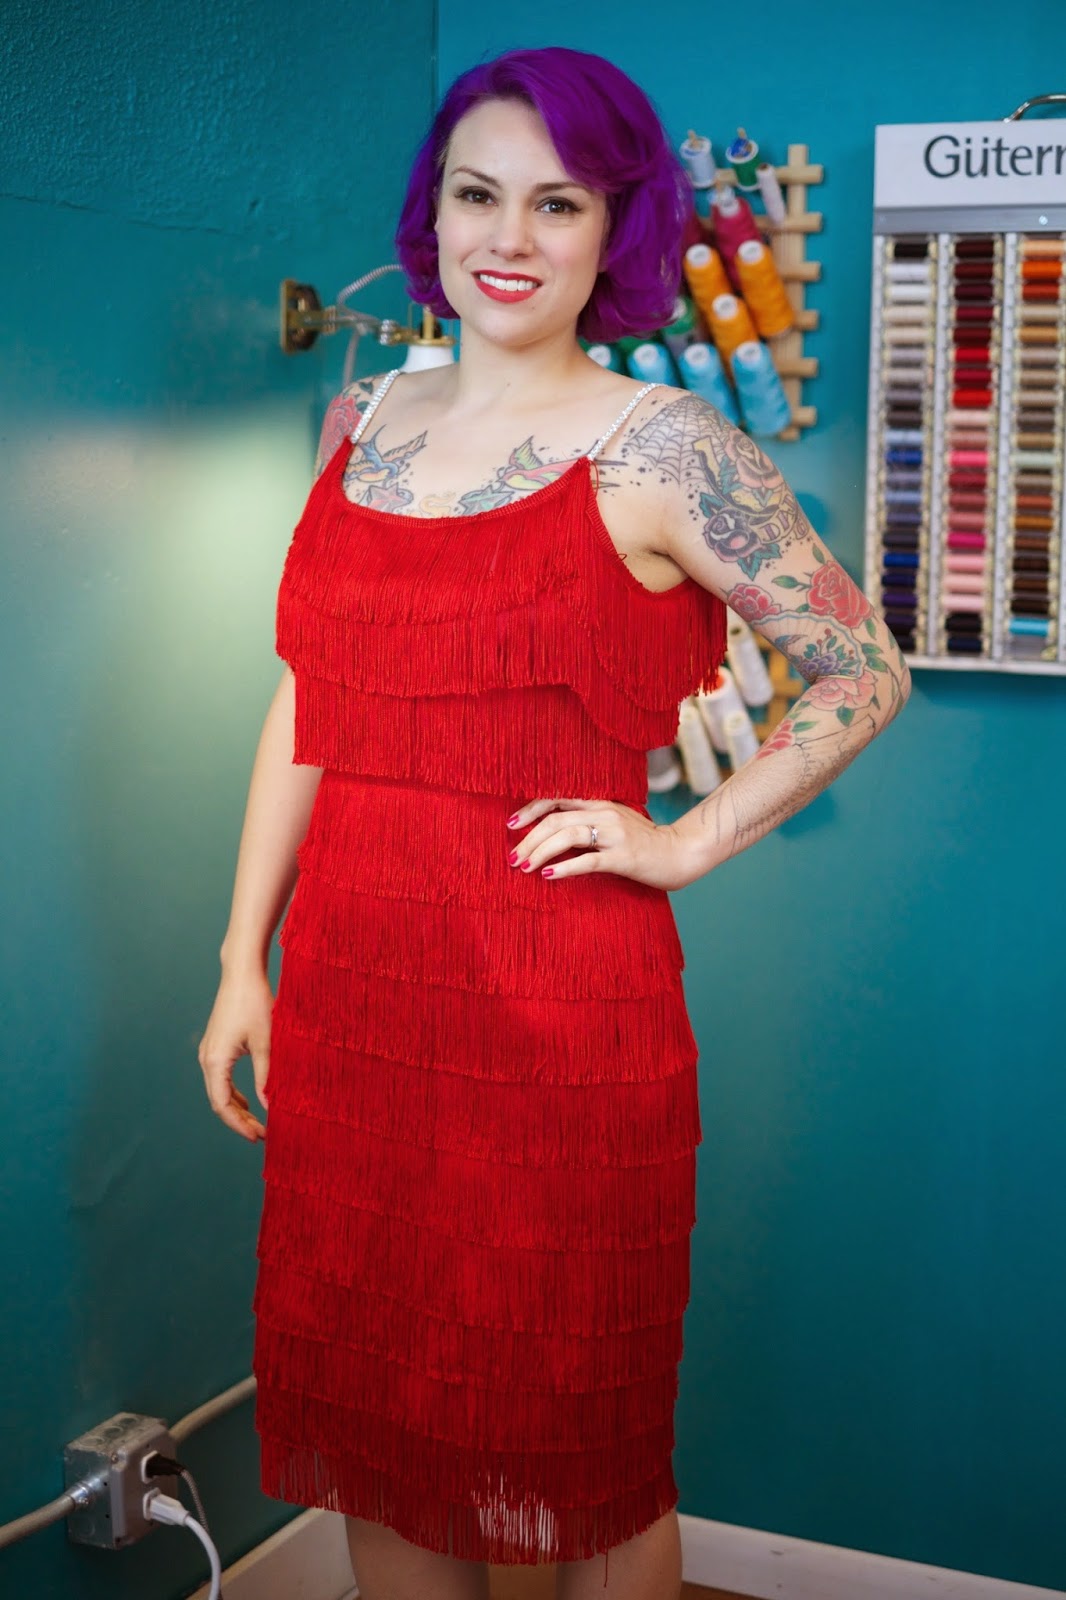
Chainette fringe has a braid at the top, which I left exposed at the neckline.
Then, I just turned in the neckline seam allowances at hand stitched them in place. The silk crepe de chine lining is hand stitched on top of that seam allowance. (Or it would be, if I'd gotten around to sewing the lining in before the performance. Whoops . . . It's on my ironing board, still waiting to be sewn in.)
Fun fact: It's called chainette fringe because it comes with a row of chain stitching at the bottom of the fringe, which holds it together during construction. Once the fringe is sewn in place, you get to pull out the chain stitch, releasing the fringe. Honestly, that's the most fun thing ever.
The best thing about the dress is the way it moves! So much fun to wear.
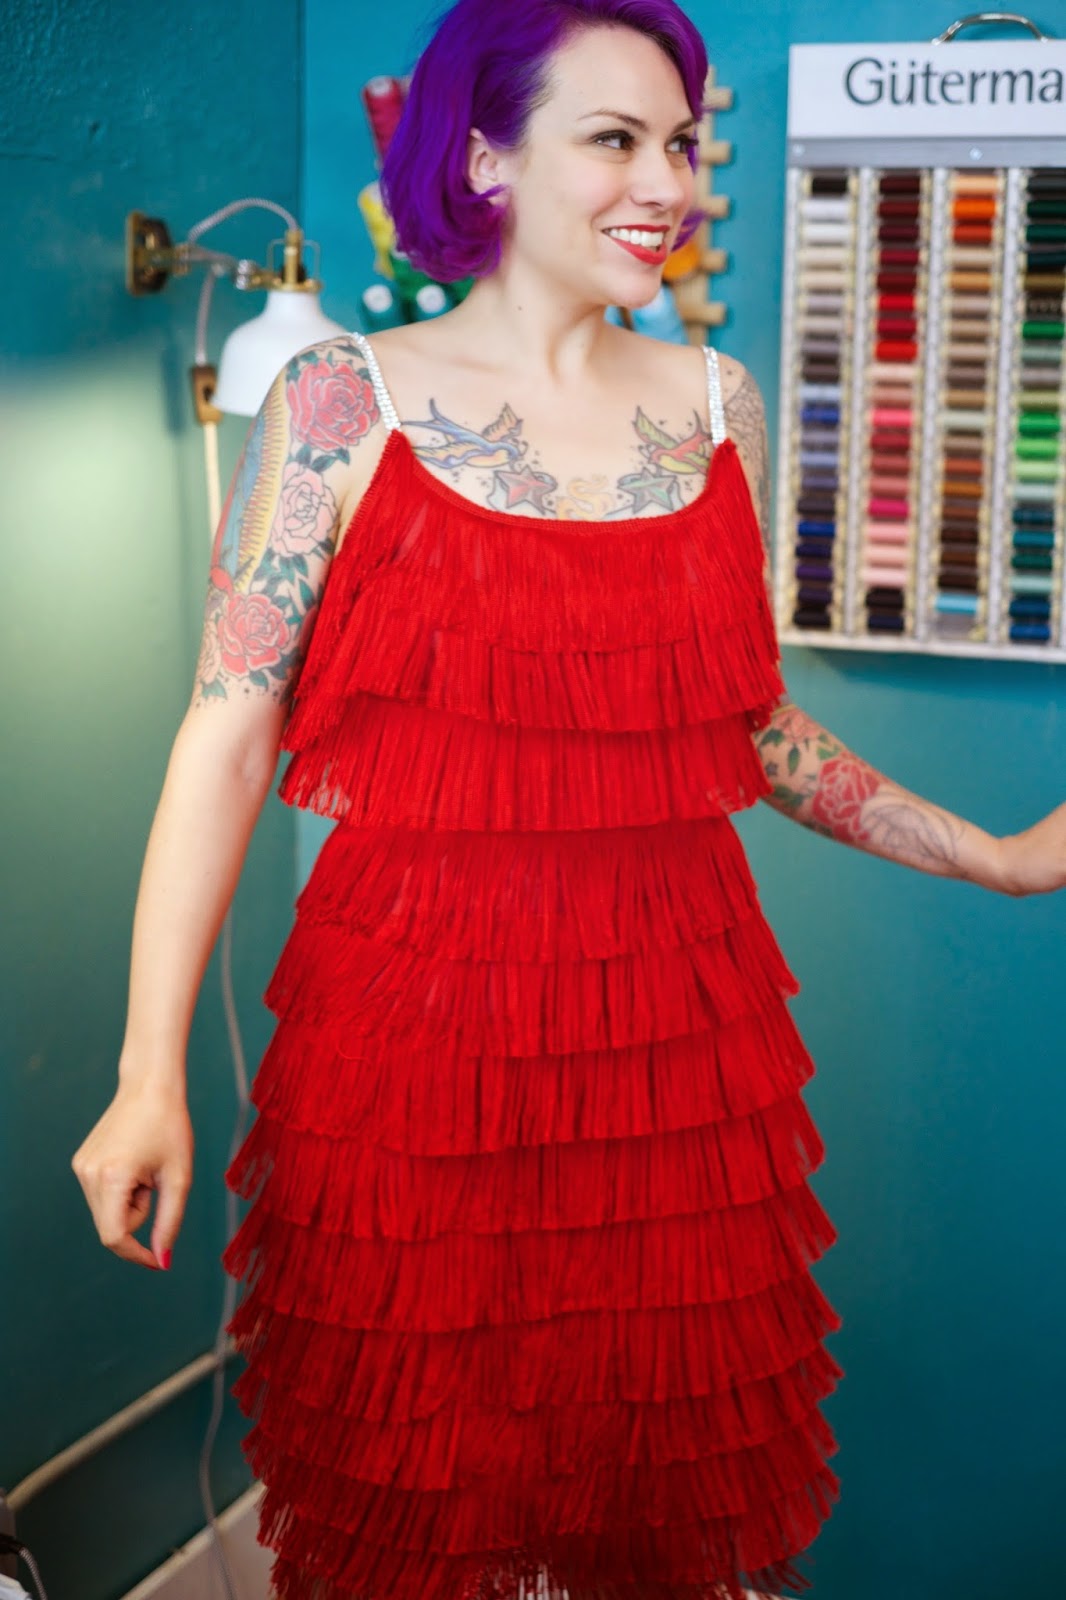
 The other great thing is that I've now gotten over my obsession with fringe, so I don't have to fondle it longingly every time I go into a trim store.
Gretchen Hirsch's Blog

- Gretchen Hirsch's profile
- 49 followers
Gretchen Hirsch isn't a Goodreads Author
(yet),
but they
do have a blog,
so here are some recent posts imported from
their feed.

