
Emily Henderson's Blog, page 61
February 23, 2024
Great Statement Lamps You Can Put In The Middle Of The Room

What happens when all you want is a cool lamp that can go in the middle of the room, not blocking any views? Or heck, just make a bland corner more exciting?? You grab a “small” statement lamp, of course! On our Zoom call last week, Emily was talking about the need for this kind of roundup. “Jess, can you find some cool statement lamps but ones that can also go in the middle of a room? Think short and chunky.” This is my favorite kind of request. One where I can search the interwebs, finding truly awesome things while potentially playing a podcast:) But as a lot of you know, lighting is one of my favorite decor categories so my excitement level was high. Did you see my Etsy roundup? That was me holding back! So to start, I’m showing you 11 of my top picks then at the end an even bigger roundup because I couldn’t help myself.
While not all of these lamps are cute little chunkers, they are all mostly around 10″-ish tall. Why? Well, if you have a large space where visually a big ole table lamp on a side table between two chairs looks right scale-wise then great, but a lot of the time that large scale can be overwhelming to the eye. On the other hand, you still want it to add some excitement to the room and have your lamp not blend in with everything else. The goal is to complement, not overwhelm which is why a smaller size can be ideal.
Zoe Lamp
Ah, one of my truest lamp loves. I will try to not talk about this one anymore until you see my bedroom reveal (an exciting update might be happening this weekend!) but it’s honestly just SO GOOD. As soon as I showed Emily over Zoom, she almost immediately hit purchase, wracking her brain for where a perfect spot would be. The check pattern might feel a little trendy but the craftsmanship of the wood and shape, as well as the colors, I know will look incredible forever. Think how amazing this would be in a traditional home. Unexpected and so exciting.
But what’s extra great about it is the size – 11.5″W x 7.75″D x 9.5″H. It’s small but not a wallflower visually and gives off such a delicate warm glow. Plus, there are no bad angles:)
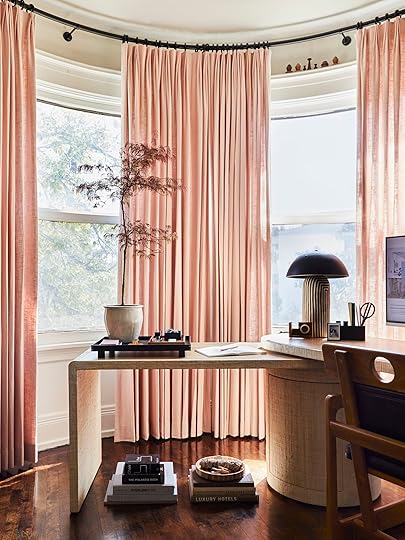 design by jess bunge | styled by emily bowser | photo by sara ligorria-tramp | from: moto reveal: jess’ home officeTera Lamp
Another personal rec:) So while this one will cost you a bit, you can feel and see the love that was put into each one of these lamps. I got to borrow a medium-sized one for my office area shoot and let’s just say I didn’t want to give it back. Heartbroken would also be an accurate word to describe how I felt. Anyway, while I love all of their lamps I am partial to the striped one. It just adds so much to a space without being loud and good luck having a guest come over that won’t compliment you on it.
Lineage Lamp
But let’s say you want more ambient lighting/a slightly more affordable price tag. Enter this cutie. I love the pattern, love the color, and it’s going to light up a room beautifully! It also looks so versatile stylistically. For instance, it could easily bring some life to a minimalist organic style home, add some pretty texture to a modern space, or some earthiness to a more traditional space. Plus it sits at a sweet 11.25″ tall:)
B-4 Table Lamp
I have been eyeing this lamp for so long now (can you tell now I have a problem??). I just haven’t found the right place for it. Maybe in my next home. I just love the colors (there are a few more colorways if these aren’t for you), the shape is incredible, and it’s overall just a unique-looking lamp. The light from it would be so pretty and could work effortlessly with so many styles. Be playful with your lamps! Take risks!
Ellery Tripod Table Lamp
So I started with the heavily patterned ones but now we’re moving onto shapes being the prominent feature. While this lamp might not scream “STATEMENT” to everyone, I think it’s a great contender for a lot of people and their homes. First off, you have the woven shade. It’s textured, beautiful, and lets a warm light through. Then how can you not love that base?! Now, it’s not chunky but the ball details are awesome and this one sits a little taller at 14.75″ so the added height helps make up for a lack of chuck:)
Formosa Stone Table Lamp
Our short king!! This 8″ stud is SO COOL. I love how they took a fairly common marble ball base and made that brass shade a star. It’s modern but also feels classic which of course means it is super versatile:) I’ve loved this lamp from the moment I saw it and it will forever be on my favorites list.
DEJSA
If I saw this lamp on a different store’s site and it was priced at $200 I wouldn’t bat an eye. But this soft yet sickeningly cool IKEA lamp is only $55!! The ambient light would be so pretty and I love the shape so much. Also, those light neutral colors make it you know…SO VERSATILE. Ha. What I also love is that while it’s not huge, it also isn’t small standing at 11″. This is such a great find and not just because it’s affordable.
Nena’ Table Lamp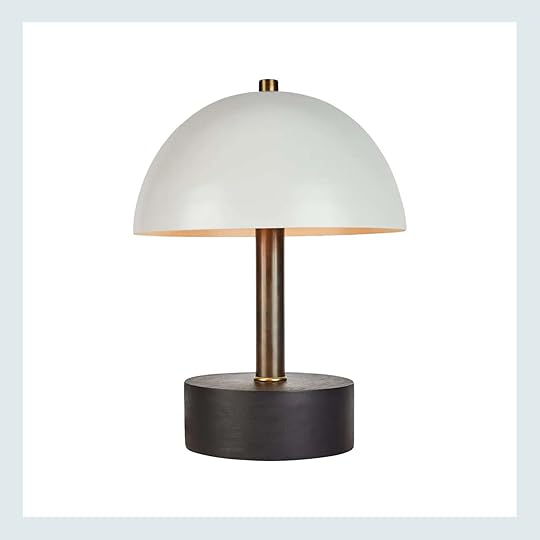
Another chunky monkey that’s so chic! Again, this lamp might not be like the patterned statement lamps but its proportions are really fun. Check out how thick that base is! Plus I also love the array of materials they used in what could be written off as a fairly simple lamp. I promise the look and visual weight of this lamp will have all of your friends asking about it.
Flowerpot V9 Rechargeable LED Portable Table Lamp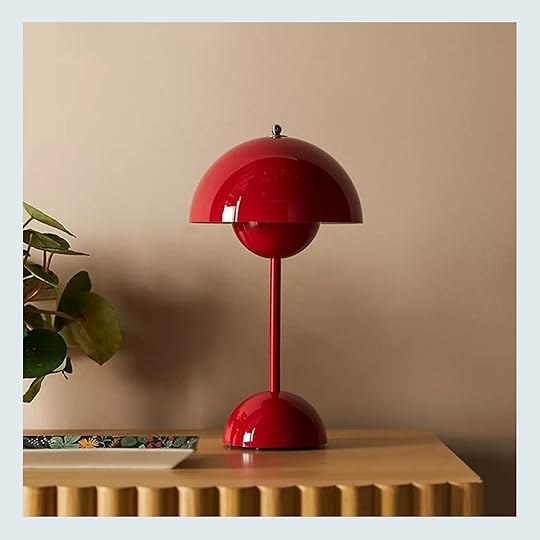
Unexpected red theory anyone?? So not only would this lamp look sick in any home as a crazy fun pop of color, but this lamp in particular is cordless! That’s right, no need to worry about it being near an outlet or tripping over a cord. But if red isn’t your jam it comes in five other happy bold colors. A vintage-inspired style lamp that would make the best kind of statement.
Hyperion Table Lamp
Ok, so if you like the idea of red but that red hot cherry color is too much, then here is a stunning “Scarlett” colored option. So not only does this color say “bold and sophisticated,” it’s also the color of the year. Everyone is diving into this moody red and we are loving it.
Nam Table Lamp C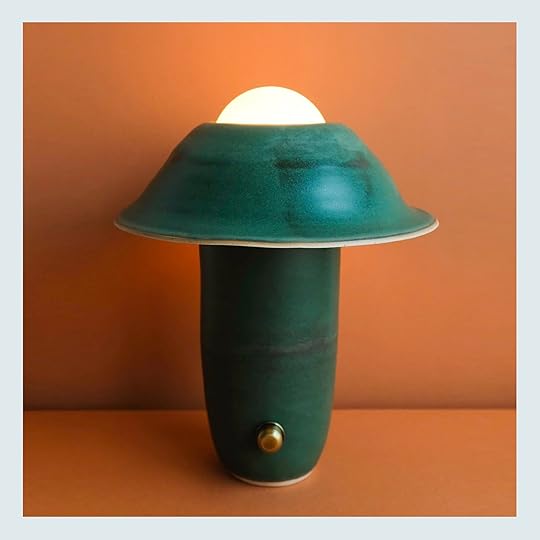
Last but not least another boldly colored lamp in a wildly cool shape is this guy. In case you aren’t aware of Claude Home, they have the most curated and beautiful collection of vintage and artist goods. Look at this lamp too that makes me feel emotional looking at it!! They are one of my favorite follows and this lamp is an example of why. While not cheap, the specialness of it is radiant. It comes in other colors but this jewel-toned green made my heart leap. Someone please buy this lamp and send photos of how you style it.
My heart rate is actually elevated now. Ha. And it might keep going up because here are a bunch more lamps that I loved and pinned.

1. Arundel Up Light | 2. Fabric Table Lamp | 3. Layla Table Lamp | 4. Colin King Ceramic Table Lamp | 5. Truro Table Lamp | 6. Raku Rechargeable LED Table Lamp | 7. Setago Rechargeable LED Portable Table Lamp | 8. Rocco Table Lamp | 9. Silas Table Lamp
OK, happy lamp shopping if you are in need and please don’t forget to step a little outside your comfort zone. I promise it will pay off:)
Love you, mean it.
Opening Image Credits: Photo by Sara Ligorria-Tramp | From: Living Room Update – AGAIN – Our New Sofa, My Dream Floral Chaise And The Pop Of Red I Always Wanted In My Life
The post Great Statement Lamps You Can Put In The Middle Of The Room appeared first on Emily Henderson.


February 22, 2024
Introducing Our Home Gym Reveal (+ My Workout Routines & Complicated Feelings About It All)

Welcome to the finished “mini gym”. Otherwise named: “You-Can’t-Pretend-You-Don’t-Have-The-Time/Space-To-Workout-Because-You-Are-Lucky-Enough-To-Have-A-Dedicated-Space-20-Yards-From-Your-Bedroom-So-Get-Your-Ass-Out-There-And-Spin-With-Cody”. It’s a real luxury of extreme convenience and squashes most of my excuses (I’m writing this post in my workout clothes, approaching 2 pm and I still haven’t done it, ha). About halfway through the building of this structure (once meant to be a greenhouse) we realized that during “the great long dark” (November – March in PNW), working out is our #1 anecdote to coping with those winter blues so maybe we should prioritize that over other things (like growing seedlings). So even if this doesn’t permanently stay as a gym (it’s such a pretty room that it could have a gorgeous tiled floor), for the foreseeable future it is where we go to make an icky day a little better, get some endorphins, adrenaline, dopamine, and move our bodies. Sometimes it’s just for 20 minutes, other days for an hour and a half (including a plunge). Keep reading and I’ll walk you through it all…

Windows | Sconces | Paint Color
She’s a cute little building, with the prettiest windows from Sierra Pacific, a short funny door (not intentional), and of course, those awesome copper lights that match our house. Shooting this in winter is more challenging (thus the stuffed plants in the fully empty veggie garden on the left) so I’m excited to style it all out come spring. This building is pretty small, 12×15 so fits just the things we actually USE, not the extra fun stuff we MIGHT use. We made a video tour of this space that you can watch below, just wait for the quick ad to play...
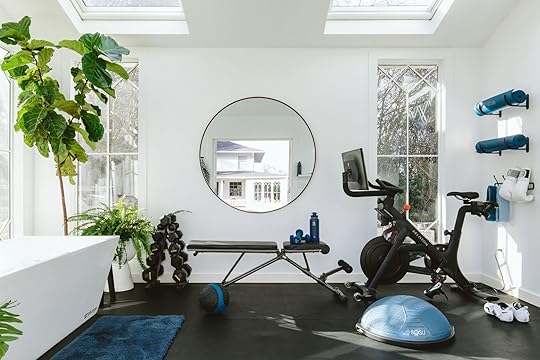
Wall Color | Windows | Skylights | Flooring | Cold Plunge | Blue Mat | Mirror | Weights | Weight Rack | Bench | Weighted Ball (similar) | Blue Weights (similar) | Water Bottle | Balance Trainer | Peloton | Mat Hooks | Yoga Mats | Wall Rack | Bands
Here’s what we have going on: I love to Peloton, practice yoga (mostly at studios), and lift weights or basic strength training. Brian boxes and lifts weights. We both cold plunge and have since 2020 – a full post coming at you soon. We knew that we could get a fancy workout/wall unit for that back wall, but both of us like to keep the workouts fairly low-tech (more on our routine below). So for now we have our machines, a simple bench, free weights/band/ball/bosu, and space enough to roll out a mat or two.

(TW: body shaming + talking about intentional weight loss) I hung that huge mirror (just over $200) which looks good but I might take it down because found that I judge my body the whole time and say really terrible things to myself (turns out that gaining some weight publicly, in our patriarchy, under the eye of social media requires some deprogramming and y’all, I’m WAY BEHIND on my deprogramming sessions). It’s a myriad of disappointments with myself, both physical and mental. I didn’t predict how much I’d judge myself instead of just focusing on how wonderful it is to be able to move my body. The shame around the shame is almost worse than the initial body shame. I just learned these are called meta feelings – like when you KNOW you shouldn’t feel something about yourself but you do and then you are mad at yourself for feeling the secondary feeling. You KNOW that objectively your inner thoughts are fucked up and wrong but you can’t stop the rumination – a lot of that. It’s like my eyes don’t talk kindly to my brain and I KNOW it’s a patriarchal situation. Trying to remain the size I was when I came on the internet is likely an impossibility at my age, and yet my inner expectation is that I look just like I did 15 years ago. I also very much realize that I’m not uniquely struggling or overweight. I thought I had left a lot of my vanity and expectation to be a certain size/shape when we left LA, but turns out my patriarchal vanity is right inside of me, still very alive and well (and SO LOUD). I’m both a victim and a perpetrator of it and I’m disappointed that I’m not better, more evolved than this. So yeah, Imma take down that mirror and see if I can instead focus on how grateful I am to have a body that can move me around in this beautiful world and life…and P.S. The photos you’ll see here are me after weeks of exercise and dieting, I just want you to have the accurate context. I know that this is a very dicey subject and that just talking about weight can be perceived or received as contributing to diet culture. But I also know that I’m not alone in this gross situation and that it’s just stupidly hard to fit into this world as we are expected to, regardless of how “small” you are. We have been told AND have told ourselves all the negative body things for decades, and it’s just so hard to deprogram. I’d love to say that I’m just focused on being healthy and that is definitely also true, but I’d be lying to pretend that I don’t want to change things a little. The daily messages we receive from society at large are really hard to combat. See? SO MUCH DEPROGRAMMING NEEDS TO HAPPEN). I have so much compassion for all women, I know so few who don’t, on some level, struggle to want to be the thing that we are told is “the good thing to be” and the subsequent disappointment around not being able to do just that. Cue the Barbie monologue (and the universal weeping of all women who felt seen and heard, omg I’m sobbing right now…). I also, of course, know that all people struggle with unattainable societal standards but for today, I’m speaking from my personal experience and the majority of women in my life.

But listen, moving your body is crucial to our mental health, it just is. If we take all the other shit about changing your body off the table, what remains is that it simply feels very good to move, get your heart rate up, make your muscles stronger, and flood your body and brain with endorphins. I need these endorphins in order to make good decisions for my business, they help me be in a good enough mood to bring positivity to my team and family. I won’t have a hard a conversation unless I’ve exercised that day and if I’m feeling anxiety it immediately reduces it. It takes a bad day and makes it ok, and it takes a good day and makes it GREAT. At least for me. It’s just not an option to not move my body.
So here is my workout routine (on a good week and without that pretty hair and makeup, LOL). 4-5 x a week.
1. Cardio: I Peloton for cardio because I don’t push myself on my own (I HATE running) – sometimes 20 minutes, but since January I’ve really been pushing myself to do 45 minutes. I love Cody and Sam Yo the best and legit enjoy hanging out with them and screaming Katy Perry.
2. Strength Training: Dude. All the research about how important it is to build and retain muscle especially for women has convinced me. Recently, I was influenced by ChrisLovesJulia who turned me on to the Playbook with trainer Hannah Pointer. I signed up for her 6-week program. I throw on a podcast or watch The Bachelor while doing it (it’s mostly weights/strength training) and the time FLIES. The next day I can rarely move the muscle that we have exercised – she really burns it out and I’m sore in such a satisfying way (It has only been 3 weeks, but I love how it’s scheduled and gives me a clear program)
3. Enjoyment: It is my firm belief that you have to enjoy whatever workout you do or you won’t prioritize it in your daily lifestyle long term – I like the above workouts a lot, but my two favorite ways to exercise will always be yoga and power walking in nature with a friend (or podcast/pups). I mean, if I could do anything for the rest of my life it would be yoga with Vinnie in Santa Monica (YogaWorks, IYKYK) and then weighted hill power walking with Dax and Monica (The best podcast ever: Armchair Expert). But it’s just so hard to get to a studio yoga class near me (is it too much to ask for a 6:30 am or 8 pm class nearby?) and I find most of the yoga apps too easy/boring to do the job.

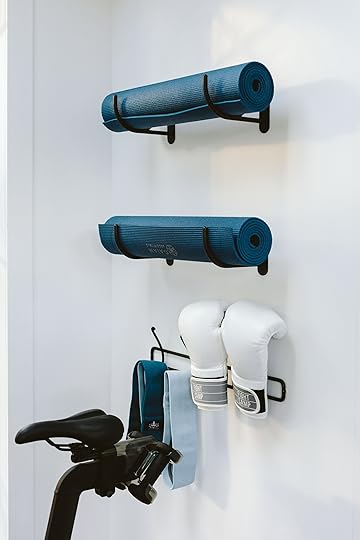
Peloton | Mat Hooks | Yoga Mats | Wall Rack | Bands
Back to design…I was at Rejuvenation and found these large hooks and while I’m not sure what they are meant to be for, I thought they would be perfect for my yoga mats. And then I hung a Target hook rack underneath for Brian’s boxing gloves and my resistance bands. Y’all, it works so well and looks pretty darn cute if you ask me.
Wait, Are you Watching The Bachelor While You Workout???
Why yes, yes I am. I was going to put a Samsung Frame in here so I could stream mindless shows that I never get to watch but then Peloton launched their partnership with YouTube TV. So I downloaded it and checked that box…UNTIL I REALIZED IT WAS THE WORST THING EVER. Y’all, 0/10 do NOT recommend (unless I’m doing something wrong). I hope someone from Peloton or YouTube is reading this and can help. YouTube TV costs, get this, $72/month. THAT’S FINE. I think that we need to pay for other people’s talent/work and I have a privileged budget to do so. It also seems worth it since I was thinking I’d be out here 4-5 times a week and otherwise have zero time to catch up with the Housewives or my Bachelors. But there are, NO EXAGGERATION, 8 minutes of commercials every 5 minutes of actual TV. Like after every scene is a break to commercial for 8 minutes. Then! Get this! The app kicks you out every 20 minutes making you have to resign in, find the show you were watching, and then guess what???? It starts with 8 minutes of more commercials with no way to skip forward. I know I’ve been spoiled with streaming, but it’s a big NO THANK YOU BITE (our kids have to at least take a “no thank you bite” when trying new foods and then they can stop if they don’t like it). But I’m so bummed because it’s such a good idea and if the ads were just less in quantity and less often it would be fine (and yes, I’ve updated my software and it still kicks me out). Someone please ping me when this gets better and I’ll give it another shot, but they just lost one of their target demographics here and at $72/month I can’t imagine there are that many of us willing to pay this in addition to everything else. My team was in here with me shooting and they couldn’t believe how bad it was, too.

So instead of continuing my ridiculously priced terrible YouTube TV/commercial subscription, I’m going to bring my laptop in here to watch the most adorable Bachelor in years, Joey, marry the most endearing contestant, Daisy while I flutter my legs and do my wall sits.
Wait, Do you Box Now, Bruh?
FightCamp Boxing | iPad | Water Bottle
I mean, I have boxed. But I strangely get tennis elbow when I box frequently (???) so this is what Brian is absolutely addicted to and has been since 2020 (I am good at leaning, as demonstrated). This is FightCamp, a boxing app that has personal training, with trackers in the gloves and he absolutely can’t get enough of it. Seriously, FightCamp Should reach out to get quotes from him, no one has sold more FightCamps to his friends than my fitness influencer husband, Brian RIPPED Henderson. He’s dripping sweat after 24 minutes and seems to really like me so much more afterward:) Also, the benefit of this isn’t just the app with the trainers, it’s also that you don’t have to hang it from a beam and it’s much more stable. So it could be in a guest room, in a small closet, etc. Just needs less support and less space. It’s pretty genius.


The iPad is on a little ledge on the right (by the water bottle) and he watches the app while he punches and kicks the hell out of the bag (which can be full of sand or water – you choose). Anyway, it’s very specific, isn’t cheap, and takes up space, but Brian can’t stop telling his friends about it because he legit enjoys the punching of things workout so much.
What Is That Flooring? Is It Rubber?Yes. It sure is. We got this flooring because FightCamp comes with a huge rubber mat to help it from sliding around when my man punches it with all his might. But the mat was super thick (with a big rim) which was fine when it was on its own but in here it was really chopping up the space and taking away precious yoga floor real estate. So we decided to put a rubber gym floor throughout the whole space (including under the plunge). It’s fine, but it shows every speck of dirt and is waterproof but not porous so we have to mop up every time after we come out of the plunge. I suppose no matter what we would’ve needed to. We did it ourselves and bought it from rubberflooringinc.com. I think next time I would do one with the flecks in it so it looks cleaner longer.

Oh, she loves to laugh…We have basic weights for now but I just bought these since they turn dumbells into barbells without buying more equipment (and they are awesome, reel coming soon).


Free Weights | Dumbbell Converter | Weight Rack | Bench
And Hot Tip – ferns are super messy. These look good in the shots but we had to remove them because they were causing a big old mess every time anyone bumped them. But the big pretty fiddle leaf fig stays  The weights, rack, and bench are all from Amazon BTW, had good reviews and so far so working great.

Robe | Towel | Standing Light | Plant Stand Planter (similar) | Slippers | Cold Plunge | Bath Mat | Black Stool (similar) | Fiddle Leaf Planter (similar) | Stacked Planter (similar)
Yes, we have a fancy cold plunge. I love it very, very much (the whole family does, besides Charlie – NOT A FAN). I had a lot of embarrassment around this plunge, but if I were say a male influencer I would own the fact that I have what is universally considered a great biohacking and mood-boosting health device, ala Andrew Huberman. But people judge women for spending $$$ on what seems like WOO WOO stuff. So I’m going to go full Huberman and own it. I love this plunge so much and do it 4-5 times a week. I’m writing a whole post about it so more to come. This is from Plunge and while there are cheaper ones on the market (I had a cheap one at first and it didn’t work out), this one is excellent (and the newer models are even better). It’s expensive, but around the same price as a hot tub so it’s really just about your value system (and of course, they have payment plans). If you are wondering if it’s for you, I would just take cold showers and baths for a while and make sure you are someone who loves the feeling of cold plunging – it’s not for everyone (but the feeling afterward is incredible and lasts for hours). I am absolutely addicted to it, as is Brian, so this was something we really really wanted. Again, more to come later.
How Do You Light This Room?
We put in the world’s cheapest/not ugly overhead ceiling fan ($100! and not bad) which has a light and it actually looks great. But the light is too bright for me in the mornings so I bought this lamp from IKEA in the back there (the tall Japanese-style fabric lamp) which creates a really lovely overall glow – especially in the pitch dark mornings. And I’m a huge fan of that black and white check robe (I’m giving it as a main gift this year) and I bought two Business & Pleasure striped towels on sale for $29 which are so cute. Shout out to my Nike slides and Target bathmat.

Thanks for reading y’all. And I sincerely hope that this post, this gym, my words, or my body didn’t trigger anyone. That is never my intent. But I do want to have vulnerable conversations even if it seems like I’m not the right person to have them. We all live in this hard world and suffer varying degrees of patriarchy. I hope that my thoughts about my patriarchal hang-ups can help anyone not to feel alone. We shouldn’t let any mirror dictate our self-esteem unless it’s the one we hold up for ourselves or others to remind us of how beautiful and strong we are, just the way we are. Now, actually believing that is the real work.
Anyway, not a day goes by where I don’t recognize how lucky/privileged I am to be able to workout here. I’m extremely thankful and grateful, every single day. And thankful to you all for being here. xx


*Design by Annie Usher and Emily Henderson
**Styled by Emily Henderson (me!)
***Photos by Kaitlin Green
The post Introducing Our Home Gym Reveal (+ My Workout Routines & Complicated Feelings About It All) appeared first on Emily Henderson.
February 21, 2024
We Quickly Built Our “Mini-Gym” (Greenhouse? Poolhouse? Flex Space), Rushed It, Changed Our Minds A Few Times, And Now We Love It – A Real Farmhouse Messy Saga

Where do you start with this one? This is one of those projects that was my little fantasy – a bucolic tiny building that would anchor the yard, and play a supporting role in this domestic fantasy I had for this property (and my life). I could see clearly, it would be so wonderful, but Brian wasn’t on the same page. He just didn’t really care about this one which turns out is ok. At one point he said, “We don’t have to have the exact same level of enthusiasm for every single thing In life, just do it,” which I actually really appreciated. But because it’s such an expense I wanted him to want this greenhouse-turned-mini-gym as much as I did, (he was more concerned about the pigs and alpacas TBH, LOL). Sure, he works out most days and theoretically wanted somewhere dedicated to doing that, but I just couldn’t get him to meet me on my same “this is going to be so beautiful!!!!” enthusiasm level. So after getting “permission”, I pulled rank (he said, and I quote, “Just steamroll me – this one is yours”) and with my brother and a fast contractor, Scotty, we threw this building together.
But while I originally wanted this beautiful little greenhouse so badly (I could just SEE it in my head), it also wasn’t a priority for me work-wise last spring. Things might have been rushed and ideas might not have been flushed out. I had bigger fish to fry and a lot of them. And yet I’m so happy to say that it’s a little tiny dream situation that I’m incredibly grateful for (I call it “No Excuses” for obvious reasons).
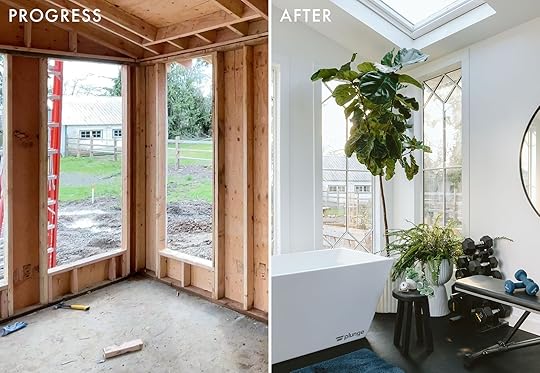
A Fantasy But Also Part Of A Long Term Investment Plan photo by kaitlin green | from: the backyard makeover
Also, let me be clear – this property will eventually be an income, a business with its own revenue stream. Likely not til the kids have graduated and it will likely remain our home, but with almost 3 almost flat acres so close to Portland I feel confident that with the right business plan we can rent it for a variety of purposes (ahem, because I seriously doubt we’ll ever get out of it what we put into it if we just sell it out right in 10 years). So as I was designing the whole space I was also thinking long term resale, renting it out for shoots, for retreats, small events – all the things. Continuing to invest in making the property as desirable, functional, and beautiful as possible felt wise because there are sooo many unknowns in the future of digital and social media, but beautiful real estate and in-person spaces to connect in, I believe, will always be desirable. Let’s walk you through it:
A Greenhouse – Yes! That’s It! I Want A Greenhouse (Until I Didn’t)Even after we turned this property into a flat mud pit during the construction, I could see the opportunity for a greenhouse (this is WAY before we even thought of putting in a Soake pool). To grow my seedlings! I thought. To write amongst the vegetables! I fantasized. And yes, I am a real garden enthusiast (with little to no experience) and I really did have dreams of feeding my family from our very own vegetables. I grew up with a massive veggie garden plus our neighbor during Covid had an abundant harvest they shared with us generously. I found extreme joy in the daily picking of my salads and cooking with seasonal vegetables and fruits – I was SOLD). And still am. But then a happy accident occurred…
Our Sunroom Windows Came In Slightly Wrong
It took me a second to figure out what looked off but the beautiful custom windows from Sierra Pacific were missing a shadow bar (a piece of material in between the two panes of glass that gives the illusion that the grid pattern goes all the way through – thus “simulated divided lights”). The windows were gorgeous and yet this flaw was very obvious in the sunroom – a room that we’d be shooting in for the rest of my life. A huge compliment to the Sierra Pacific Customer Service Team – they agreed immediately that it had to be changed (they’ve since streamlined their custom window process to make sure it doesn’t happen) and our new windows came in 6 weeks. I begged them to keep these windows (obviously they worked so well on the property and were very specific to our house) and they said yes as long as I actually use them and not just hoard them til they collect dust. So this humble little greenhouse was about to get GORGEOUS windows…PLUS…
We Needed A Shed Or Structure To House The Pool Equipment photo by kaitlin green | from: soake pool reveal and review
As the yard was under extreme construction we felt the pressure to make huge long-term decisions NOW, so we chose to do the Soake pool (quite possibly the best high-end decision we’ve ever made – skip a good car y’all, this year-round pool is incredible). The Soake pool, albeit small, has the typical pool equipment that needs to be housed in a structure with a roof (or inside a pool house). So all of a sudden I had more motivation to build this thing (and fast) to pass our pool inspection (which we needed to get because we had to extend the gas, electrical, and plumbing out there). Let’s be honest, I was also driving the pool train – Brian was again more focused on the sports court (which I have mixed feelings about LOL) and the pigs/alpacas (of which I think are a hilarious and wonderful addition to our lives). This whole thing sounds ridiculous, unbelievably privileged, and yet here we are. This is our story and you likely came here to hear a personal account of one’s “renovation that got out of control”, as ridiculous as it all is.
We’d Do It Fast, Cheap, And Very Bare BonesWhile I didn’t want it to be janky, we were so done spending money and I was determined to do it as fast/cheap as possible and not worry if it was perfect. This is an outbuilding, not our bedroom. ARCIFORM was slammed doing our house and frankly, they were too high-end and expensive for this project (which I fully respected – different levels of projects require different budgets). From my perspective, we had these pretty windows, we’d put drywall in between and call it – GREAT. DONE. It would have basic electrical (one overhead light and some outlets), no plumbing (which admittedly is probably dumb not to have), and just a mini split for heat and AC (that still doesn’t work, LOLOLOLOL). So I hired Scotty, a new contractor with a lot of framing experience and he was ready to go with a crew. But before I totally messed this up, I smartly got help to make a clear plan.
The Plan…
I hired Annie Usher – the architect on my brother’s house to draw up some basic plans for them to work off of. She put in the dimensions of the windows, we talked about having some drywall to block wherever we put the pool equipment (so a window wasn’t highlighting that stuff), and threw in some also leftover French doors that we weren’t using. GREAT! I handed over the plans and Scotty got to work. He quoted $17k for the building which included framing, roofing, window/door install, basic electrical, and drywall (I believe). We had to pour a pad of cement (which I think was $7k) which fun fact made us have to move some irrigation lines (everything is a thing!!!), but this all seemed reasonable. Painting inside and out was an additional couple of grand. Things cost money. I know this. This felt fair, we’d pay it over months and Scotty and his guys could start like the next day (what a dream). Let’s go!
OH WAIT!!! Before you go around thinking that $25k is a crazy high or worse, that it’s super normal – you should know that we got this quoted by a design/build team (not ARCIFORM) for $75k earlier (they would do the drawings and execute with construction). So that could be why we ended up saying YES quickly on $25k – it’s all relative and that actually felt like a good deal to us. (I just want to say that I find using real large figures so flippantly to be very triggering to myself and also opens up a vulnerability that I’m honestly still not comfortable with – these numbers are just huge and the economic disparity in our country is extreme. But I’m not HGTV and I’m not going to lie about things costing $1,700. I hope that the numbers can help inform your decisions on your home).
How Big Is It? Did You Have It Permitted?


One of the ways we kept it moving quickly was that we made sure it was under 200 feet, therefore avoiding having to get it permitted. Annie took the windows and made sure they functioned for whatever flex space we wanted but kept it under 200 square feet.
What Style Is This? Is It Still A Greenhouse? (Nope)At this point, I could tell that this space was going to be so pretty that there was no way I was going to let it be full of dirt. I thought that it was going to be my writing office for the afternoons after the kids came home. Listen, my gardening dreams weren’t over, I just likely will buy small veggies already started (or steal from my parent’s greenhouse – they are retired and much more adept at this whole seedling situation). But I still wanted the option for it to be a greenhouse! There is no drainage in the floor but we were told that that could be added/drilled at some point as well.
All Was Good And Fine Until…I couldn’t believe how fast Scotty and his team threw up this building – within days. Talk about satisfying! I came back from a trip and noticed that the roof line came lower than the windows in the front. They didn’t on the drawings. This is where I did what I wouldn’t do for a client should I have one again ever. I said “Well… it’s good enough!”. The options were to either re-roof it or reframe the windows lower. Both are doable. Both cost thousands. Instead, Scotty had the good idea to cut back the rafter tails (a detail we brought to the front of the house) and we were able to lift the roof a bit. It’s still lower than intended, but it’s only ok.

We had 4 leftover exterior doors from our house – a big slider (which was too big) and 2 French doors – or so I thought. We had planned these but once the roof came down the doors couldn’t swing open and they weren’t meant to swing in (they would take up SO much space inside if they did as we planned on leaving doors open in the summer if we were in there). We thought long and hard about cutting down the doors but it was a lot of finagling that we all felt very little confidence it would actually work. Plus it was holding up the siding going up. So I made the decision to do something temporary and think about it later. We bought a readymade set of doors that are definitely shorter than the windows, but Scotty framed it so that if/when we find the perfect vintage doors or customize a beautiful set of doors (that can clear the roofline) we can change it out. Of course, I looked into getting taller, not custom doors but they were $2,400 and just so boring (and still a few weeks out). I figured we’d do the cheap, fast, and potentially wasteful thing and put these in for now knowing that someday I might change them to prettier doors (or not). They’ve actually stopped bothering me and I think if I planted a climbing plant on both sides of the door, one that went up and over the doors your eye wouldn’t notice it…
Siding, Roofing, Trim, And Paint – Mostly Leftover MaterialsScotty did such a great job of working with what we had and matching/supplementing when needed. We wanted it to match the house and we had leftover materials – GREAT. Remember the materials aren’t what is expensive in most building projects (well, certainly can be during inflation) but it still saved us hundreds if not low thousands and reduced our hoarding of materials. I forget what we had left and what he had to buy – he just kinda took care of it which I really appreciated.
It was pretty much a room by the end of last summer, but without the electrical and flooring done we didn’t use it til almost December. There were a lot of little loose ends to tie up and Scotty and I had an unfortunate communication issue that ended our relationship (first time ever which I felt badly about but at the same time not willing to take all of the responsibility, but definitely some of it). This left the building 80% done for a long time and the mini split is still not hooked up (it’s cold in the mornings so we have a space heater for now).
What Flooring Did You Put Down?
Before you wonder why we didn’t do something prettier in here there are two very good reasons:
We had planned a cold plunge in here and therefore the flooring needed to be waterproof. Brian’s Fight Camp (boxing app + equipment) needs to sit on rubber so it doesn’t topple over. A big rubber pad would have chopped up the space so much and would have made it hard to put down yoga mats. So we figured the whole floor could be a gym floor (??)Because we are unsure if this is going to be a gym for 10 years this flooring was easy to install and will be easy to remove should we want to tile it or do something more beautiful.After about 15 minutes of Google researching, Brian chose this black rubber flooring that came in large rolls (to be cut and laid together, no glue or any fancy materials) ready to be delivered the following week. It was a few hundred dollars, is a great padding for weights to drop on (and a natural yoga mat in a way), and is waterproof. So waterproof, in fact, that it takes days to dry up a splash from the cold plunge (like the water just sits on top)

We installed it over the weekend together, realizing that the all-black is less forgiving than the flecked pattern. But after a while, it all evens out (and we have “gym shoes” that we put on the second we get in there – no outside shoes allowed).
So there you have it – the “mini building that could”. The reveal is TOMORROW, I feel extremely grateful to have this flexibility in our life (not to mention the daily encouragement to work out). Sadly, the outside is so “wintery” and not beautiful right now so we aren’t going to shoot the whole exterior til spring has sprung).
Come back for the reveal to see what is inside (one thing starts with a cold and ends with a plunge). While it may not be a gym forever, for now, it’s honestly – almost – perfect for Brian and me.
The post We Quickly Built Our “Mini-Gym” (Greenhouse? Poolhouse? Flex Space), Rushed It, Changed Our Minds A Few Times, And Now We Love It – A Real Farmhouse Messy Saga appeared first on Emily Henderson.
February 20, 2024
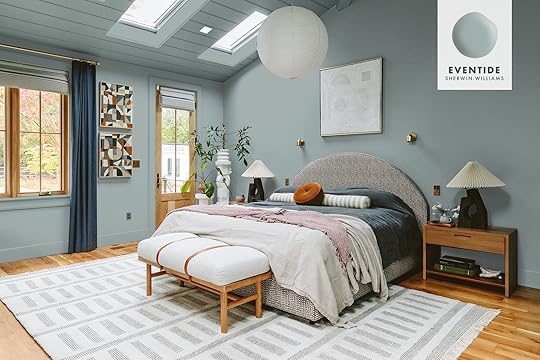
Should I Re-Paint My Bedroom A Lighter Shade That I Just Fell In Love With????


A very fun and dangerous game you can play goes like this, “If you could snap your fingers what would you instantly change about your room?” The answer is worth pursuing. Now, before you actually change anything, play that game over and over, over the course of months and if the answer is still the same thing, then change if/when you can (I’m not sure if this means you “win” or “lose,” but you’ll know the answer). When we chose this paint color I was 80% sure it was the one – not 100% but I felt confident enough to spend the $2,500 and 2 days to get it done (it was that expensive because it was two different sheens and we painted the ceiling, too). But I failed to remind myself of the best and most obvious paint color rule – small swatches show a little bit of the color, a whole room shows a LOT of the color. In other words, whatever color is in the pigment just becomes more when bigger (seems very “duh” right now). I really, really, really like this room, I do. At night, I LOVE this color (Debonair by Sherwin-Williams) and when it’s super cloudy and I’m cozied up in bed I also love it. It’s PERFECT for a room that doesn’t get a lot of natural light and you want it to feel cozy and warm. But this room is sooooo well lit and when the skylights are open and the room is blasted with light it’s just 30% too bold and intense for me (I actually LOVED it with just one coat, but after the second I got nervous but it was too late).
 THE TWIST: Why I am Even Considering Repainting?
I was going to wait and just not deal with it (again, it’s not a big enough bummer to prioritize it into my design schedule or budget) but then I painted my brother’s laundry room the most magical color, Eventide by Sherwin-Williams, and I walked in while all the cabinets fronts were hanging, drying in the family room (a room with very similar light to our bedroom) and immediately was like, “oh dear, this is the color, the exact color I was going for in our bedroom.” You see Eventide can look gray or pastel in small doses so when I considered it I was fearful that it would look depressing or even too baby, but once you get it in a full room it becomes much bluer, much happier with ZERO depressing tendencies at all. It’s incredibly soothing, happy, calm, and yet still a color – it’s not a typical neutral (blue is a neutral for me LOL) and once I saw it I wanted it in our bedroom NOW.
But my color confidence is on the mend. I feel like my “picker” was off last year and it’s just finding its way back. So I asked Gretchen to photoshop the color onto the walls, with the hope of feeling 95% confident. Oh and here’s a fun fact, the only way to feel 100% confident about a paint color is if you’ve painted a whole room before in a similar light. There are SO MANY colors that I would have thought were “meh,” until I was in a room on all four walls. Evergreen Fog is another example. Sure it was the color of the year a few years ago but I wasn’t that into it until we painted my brother’s family room that color and MY GOODNESS, every time I go in I’m like “this color is so beautiful and perfect.”
Anyway, here is my bedroom in SW Eventide.
Option #1: Eventide With White Ceiling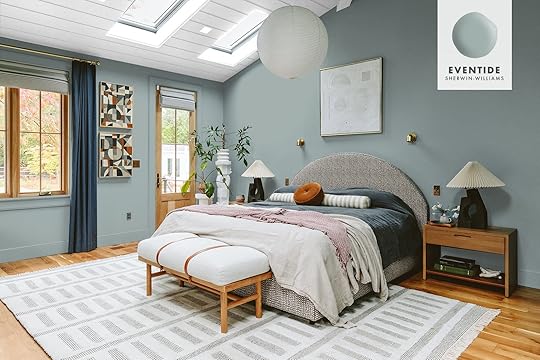
Y’all, I KNOW it’s not that much different but it just dials it back a bit and its more soothing. I’m not convinced I love it with the print of the bed, but that bed just looks sooooo much better in person IMHO. But the Eventide does in fact look so much better for the vibes that I want in here. Of course, if we are repainting we have an opportunity to paint the ceiling back to white (and not that cool of a white, a bit warmer). I prefer the skylights on white ceilings but hmmm, not sure…

I like it. A lot. Not sure about the white ceiling still and I want to make sure I love it with the window treatments…
Option #2: Eventide With White Ceiling AND Trim
Here you can see what it would look like if the trim were painted white in addition to the ceiling. I actually really thought that I was going to like this, but it makes the room way busier and it was a solid, immediate NO. Now maybe if the white were a bit warmer or grayer I don’t know… maybe there are just too many windows and doors to trim around. It’s just too much contrast for me for this room.

It’s fine, but…not my fave…
Option #3: Eventide Flooded Everywhere…
There she is. Walls, ceiling, and trim – all Eventide. I’ve even thought about taking it down to 75% (so adding some white to it) but again, I’m nervous about doing anything wrong these days (I feel like I am brave in so many ways, but I’m just so sick of getting paint colors wrong, which now that I think about it was just our white in the living room and the gray/lavender in the family room, no wait and the red front door…).


Now when you look at the pictures next to each other I agree that Debonaire does POP more, but consider this: the photoshopped version on the right doesn’t have the movement of the light on the walls like Debonaire did but is that because it’s not a true photo? Would all those pretty shadows and the spots that are brighter/darker still happen with Eventide? (I think so, right?). So if I had to choose between these two “photos” I’d choose Debonaire, but I promise that living in this room is just too intense so in person I want Eventide.


When I look at this side of the room I do wish I had more of an accent color over here, but in person, I love that it’s restrained and simple – just tones of blue, wood, and some mauves.
BTW I accidentally read a few comments (not here) the other day about me, which I immediately regretted, of course. If you have judgment about my design process including if/when I change things, I totally can see that. I think it’s really helpful to know that literally everybody, no matter how many years of experience someone has, tries and fails in their field (especially when risk-taking) and either has to never admit it out loud or has to redo it and gets to learn from it. For me, the former isn’t an option (my personality doesn’t allow me to keep shit inside), so I choose to publicly do the latter (which is often painful for me, but it’s the path I’m more comfortable taking). But if you are hoping that there is a creative or a designer out there who does everything perfectly the first time, it’s simply not true and is never going to be true. They just probably don’t have the type of platform where they can publicly admit them.
*Original Photos by Kaitlin Green
The post Should I Re-Paint My Bedroom A Lighter Shade That I Just Fell In Love With???? appeared first on Emily Henderson.
February 19, 2024
The Best Presidents’ Day Sales From Anthro, Target, Schoolhouse, Madewell, And More

Welcome to our first sale guide of 2024! The holiday? Presidents’ Day. Our mission? To vet and share the best sales on furniture, decor, appliances, beauty, fashion, and self-care. (It’s a big job, but we’re happy to do it.) Below, you’ll find EHD-approved lighting, discounted objets that’ll make your home sing, affordable outdoor furniture (just in time for Spring!), keep-forever clothing, and SO MUCH MORE! Let’s kick it off with our bread and butter – the home deals!
Furniture & Decor Sales
54Kibo Lamp | Anthropologie Plates
54KiboSale: 15% off site-wide with code BPSALE.
Approved Picks: A Geometric & Fresh Table Lamp | The Statement Mirror We Adore | A Punchy Light Fixture in a Designer-Approved Palette
Sale: Up to 60% off select pieces, plus an extra 20% off with code GET20.
Approved Picks: An Affordable, Classic Metal Spindle Bed That Ships Fast | California Casual Wooden Bar Stools | This 5-Piece Outdoor Sectional with Near-Perfect Reviews
Sale: An extra 40% off sale styles.
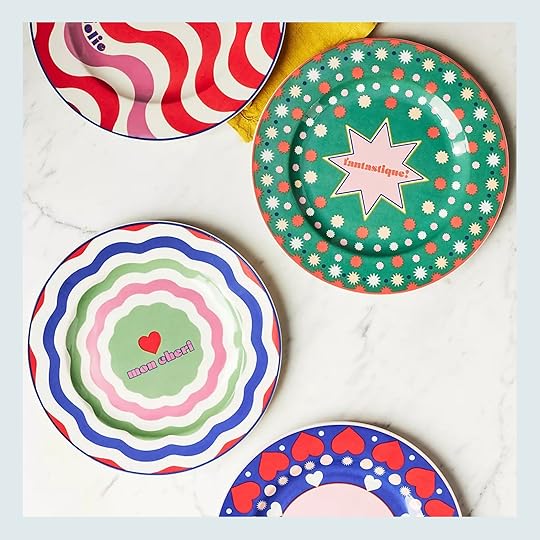
Approved Picks: A New-Meets-Old Wicker Floor Lamp | Some Cheery, French-Inspired Dessert Plates (Fantastique!) | Elevated Burl Switch Plates
Sale: Up to 30% off over 500 pieces.
Approved Picks: A Lidded Rattan Basket Set (Under $100!) | Walnut Dresser with Graphic Pulls | A Comfy Lounge Chair with Mid-Century Lines
Sale: 20% off site-wide.
Approved Picks: The Best Plush Robe We’ve Tried | Em’s Go-To Comforter (The Lightweight One!) | A No-Fail Build-Your-Own Bedding Bundle


CB2 Bench | Crate & Barrel Lanterns
CB2Sale: Up to 60% off furniture, bedding, decor, tabletop, and more.
Approved Picks: Designer-Loved Drinkware from $1.56 (!) | A Chic Sleeper Sofa with 31 Fabric Options | A Leather & Metal Bench That Channels BDDW on a Budget
Sale: Up to 60% off select furniture, decor, kitchen, entertaining, and more.
Approved Picks: The Lighting Clearance Section is STOCKED | An Iconic Mixer in an Exclusive Mint Hue | Refined Metal Lanterns (Just In Time for Spring!)
Sale: 25% off site-wide; 40% off select pieces with code PRESIDENT24.
Approved Picks: $75 High-End Turkish Towel Set | Sweet Dress-Up Blankets for Kids | A Cozy & Textured Cable Knit Throw
Sale: Up to 50% off select styles.
Approved Picks: Quiet, Statement-Making Large Glass Vase | Black Marble Cabinet Knobs (Only $3.99/Each!) | Organic Modern Stoneware Vase
Sale: 20% off Herman Miller ergonomic chairs and select desks, storage, lighting, and more.
Approved Picks: The Iconic Aeron Chair | An Always-Chic Eames Hang-It-All | The Most Design-y Ergonomic Chair Ever Made (With a Price Tag to Match)

Industry West Credenza | Joss and Main Outdoor Dining Chairs
Industry WestSale: 25% off site-wide with code PRESIDENTS.
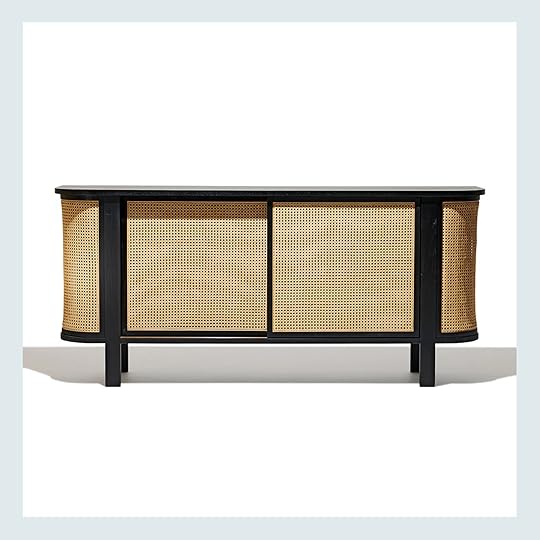
Approved Picks: Leather and Wood Lounge Chair with Sexy Lines | Mal’s Beloved Cane Sideboard | A (Genuinely) Unique Selection of Statement Shelving
Sale: 25% off all rugs – new and vintage – plus free shipping with code RUGS25.
Approved Picks: Vintage Yastik with Hits of Cobalt | Vintage Oushak with Shocks of Aqua | Vintage Veese, Perfect for Layering
Sale: 25% off site-wide; markdowns up to 70% off with code PREZDAY.
Approved Picks: A Charming (and Giftable!) Kangaroo-Shaped Match Strike | Whimsical & Unique Pendant Lighting | The Internet-Favorite Vice Collection
Sale: Up to 60% off select pieces, plus an extra 20% off with code TAKE20.
Approved Picks: A Sturdy Entry Console with Open AND Closed Storage | Durable Outdoor Dining Chairs in a Classic Thonet Shape | A Streamlined-Meets-Rustic Credenza
Sale: Up to $50 off select locks and bundles.
Approved Picks: The Level Lock+ Connect | The Level Bolt
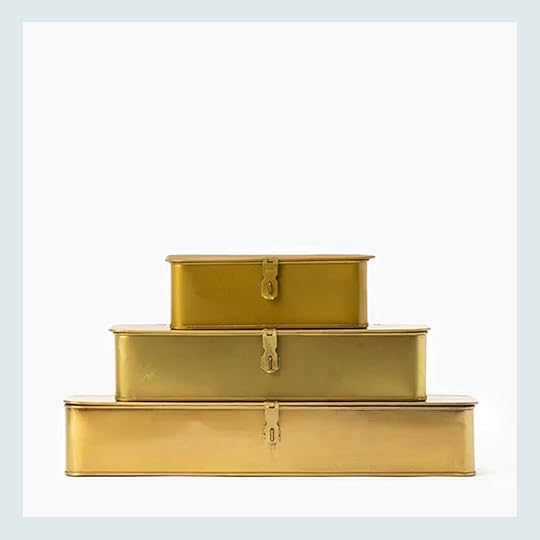
Lulu and Georgia End Table | McGee & Co. Brass Boxes
Lulu and GeorgiaSale: 15% off orders over $500; 20% off orders over $2,500; 25% off orders over $5,000.
Approved Picks: Em’s Living Room Sofas | The New SSS Collection (That Landing Page!) | A Fresh Side Table by an EHD Alum
Sale: 10% off orders over $150; 20% off orders over $300; 25% off orders over $650.
Approved Picks: The Nancy Silverton Knife Set We Swear By | 7 Piece Keep-Forever Cooper Cookware | Em’s Go-To Cast Iron Dutch Oven
Sale: Up to 30% off site-wide.
Approved Picks: Chic Brass Boxes (Ideal for Hiding Remotes!) | Organic Stools with A Special 3-Leg Base | A Deeply-Discounted White Oak Cabinet ($1,200 Off!)
Sale: 20% off site-wide with code LUV20.
Approved Picks: The New Zoe Feldman Collection | Some Renter-Friendly Plug-In Picture Lights | A Show-Stopping Table Lamp with a Bold Metal Shade
Sale: 15% off site-wide with code PRES2024.
Approved Picks: Em’s Outdoor Lounge Chairs | A Stackable, Airy, Minimal Outdoor Dining Collection | A Large & Sturdy Fire Table

Pottery Barn Vases | Rejuvenation Bed Frame
One Kings LaneSale: Up to 40% off site-wide.
Approved Picks: The Roll-Arm Sleeper I’m OBSESSED With (Colonial Blue is SO Pretty!) | A Sweet Walnut Table with Carved Bobbin Details | A Set of Timeless Gourd Lamps
Sale: Up to 50% off select furniture, bedding, decor, and more.
Approved Picks: This Half-Priced Woven Canopy Bed | Handcrafted Vases with Special Details | Outdoor Planters that Channel an English Cottage
Sale: Up to 50% off furniture, hardware, lighting, mirrors, and more.
Approved Picks: Lighting We Just Installed in an In-Process Project | An Heirloom-Quality Wooden Bed Frame | A Leather Basket with an Unexpected Shape
Sale: An extra 20% off site-wide with code USA.
Approved Picks: The Ivory-and-Cream Merrick | The Works-Anywhere Oregon | The Graphic (and Jute!) Raleigh
Sale: Up to $1,600 off select appliances and TVs.
Approved Picks: The 55″ Frame TV ($300 Off!) | Some Bespoke, Customizable Appliances | Efficient Washer and Dryer Sets


Schoolhouse Pendants | Target Wingback Chair
SchoolhouseSale: Up to 60% off select furniture, bedding, lighting, and more.
Approved Picks: A Modern Quilt We Own & Love | A New Pendant with 1970s Lines | A Luxe Plaid Mohair Throw
Sale: 25% off all Semihandmade doors with code EMHENSEMISALE. (This is a better deal than their public sale. The code is valid through 2/29!)
Approved Picks: All Cabinet Doors!
Sale: Up to 35% off and free shipping on select favorites, plus up to 25% off dining furniture and tabletop essentials.
Approved Picks: This Works-Anywhere Bobbin Console | A Hand-Carved Coconut Shell Flush Mount | A Beachy Bone Inlay Mirror
Sale: Up to 40% off furniture, decor, bedding, and more.
Approved Picks: A Soft Gray Studio McGee Console Table | A Velvet Wingback that Looks WAY More Expensive Than It’s $280 Price Tag | A Warm, Simple, Refined Wood Mirror
Sale: 25% off select planters, tools, and watering.
Approved Picks: Some Square Galvanized Outdoor Planters | A Cute Self-Watering Ceramic Pot | An Elegant Indoor/Outdoor Urn

Urban Outfitters Ceramic Box | West Elm Coffee Table
Tuft & NeedleSale: 20% off mattresses, bedding, and accessories.
Approved Picks: The Mint Hybrid Mattress | A Goldilocks-Perfect Body Pillow | A Clean, Minimal End Table
Sale: 10% off site-wide, plus free shipping on orders over $300.
Approved Picks: Cheap AND Excellent Customizable Curtains (I Swear!) | The Roman Shades Em Can’t Stop Installing | All Essential Window Treatment Hardware
Sale: An extra 40% off sale styles.
Approved Picks: This $51 Geometric 5’x7′ Rug | Some On-Trend Burl Wood Veneer Coffee and End Tables | A Rosy Ceramic Stash Box
Sale: Up to 70% off furniture, decor, home upgrades, and more.
Approved Picks: A Grounding, Organic Coffee Table | This Huge, Deeply-Discounted Arched Floor Mirror (Only $115!) | A Functional Swivel Chair in a Variety of Performance Fabrics
Sale: Up to 60% off furniture, bedding, rugs, outdoor, and more, plus an extra 15% off clearance with code EXTRA15.
Approved Picks: A Design-Forward Coffee Table at a Great Price | A Budget-Friendly Brass Objet | This Bestselling Bumper Chaise Sectional


Anthropologie Wide-Leg Pants | Free People Barn Coat
Abercrombie & FitchSale: 15% off site-wide, plus free shipping on orders over $99.
Approved Picks: The Go-To Trouser of Millennials Worldwide | A Simple & Classic Bomber Jacket | A Skort (!) So Flattering (!!) That It Went Viral (!!!)
Sale: An extra 40% off sale styles.
Approved Picks: My All-Time Favorite Pants (Seriously) | An LBD That Works at the Farmer’s Market AND On a Date | A Flattering Floral Dress, Perfect for Changing Seasons
Sale: 25% off select styles.
Approved Picks: A Slouchy, Cool-Girl Crewneck Pullover | A Sexy Long Sleeve to Dress Up OR Down | A Barn Coat Straight from a Nancy Meyers Movie
Sale: 50% off jeans, sweats, tees, and more.
Approved Picks: Trendy Denim from $39 | A Shirtdress for Work AND Weekends | A $22 Peter Pan Top, Ideal for Spring Layering
Sale: 20% off site-wide with code FLASH20.
Approved Picks: Em’s Beloved Sauna Blanket Starter Kit | Red Light Face & Neck Mask Bundle


Nike Sneakers | Nordstrom Birkenstocks
J. CrewSale: 30% off site-wide, plus free shipping and an extra 50% off sale styles with code SHOPNOW.
Approved Picks: My Favorite Pleated Pull-On Midi Skirt | A Sweater Jacket That Only Looks Expensive | An Oversized Blue Twill Top (Very Chessy-Meets-2024)
Sale: Extra 30% off sale styles with code EXTRAEXTRA.
Approved Picks: This $34.99 Alpaca-Blend Sweater | A Sweet Black and White Enamel Barrette | Vintage-Inspired Wide-Leg Jeans with Cute Patch Pockets
Sale: Extra 25% off select styles with code GET25 (for members); 20% off select styles with code GET20 (for non-members).
Approved Picks: Em’s Favorite Everyday Sneakers | A Comfortable Long-Line Sports Bra | Some High-Waisted Biker Shorts with Gentle Support
Sale: Up to 50% off select styles.
Approved Picks: Timeless Ray-Ban Wayfarer Sunglasses | Half-Priced Skims Shapewear | Gen Z’s Other Favorite Shoe, the Birkenstock Clog
Sale: 30% off select styles; up to 75% off clearance.
Approved Picks: An Easy-to-Wear Fit-and-Flare Chambray Dress | $23 Linen Blend Midi Dress in a Springy Stripe | Budget-Friendly Wide Leg Jeans for Every Size


Sephora Roller | Target Sandals
PactSale: 15% off site-wide; 20% off orders over $150; 25% off orders over $250 with code WARMUP.
Approved Picks: Arlyn’s Favorite Underwear | Throw-On-and-Go Twill Shorts | The Perfect Romper for Errands, Laundry, or Hair & Makeup Appointments
Sale: Up to 50% off select makeup, skincare, and beauty tools.
Approved Picks: $20 Essential Face Brush Set | A Budget-Friendly De-Puffing Facial Roller | Some Illuminating Body Oil with Near-Perfect Reviews
Sale: 20% off jeans, tees, and shoes for all.
Approved Picks: The T-Shirt I Will Never Stop Recommending (Under $5, Too!) | Teen-Approved Cargo Jeans | An Affordable Dupe of Em’s Buckle Sandals
That’s it for today! See you back here tomorrow – we have an awesome week of content on the books. If you’re lucky enough to have off today, make sure to enjoy it, okay? Happy Monday! xx
Opening Image Credits: Photo by Kaitlin Green | From: Our Mudroom Reveal: A Dog + Storage-Focused Space That Is Possibly My Favorite Room In Our House
The post The Best Presidents’ Day Sales From Anthro, Target, Schoolhouse, Madewell, And More appeared first on Emily Henderson.
The Best President’s Day Sales From Anthro, Target, Schoolhouse, Madewell, And More:)
Welcome to our first sale guide of 2024! The holiday? President’s Day. Our mission? To vet and share the best sales on furniture, decor, appliances, beauty, fashion, and self-care. (It’s a big job, but we’re happy to do it.) Below, you’ll find EHD-approved lighting, discounted objets that’ll make your home sing, affordable outdoor furniture (just in time for Spring!), keep-forever clothing, and SO MUCH MORE! Let’s kick it off with our bread and butter – the home deals!
Furniture & Decor Sales54Kibo Lamp | Anthropologie Plates
54KiboSale: 15% off site-wide with code BPSALE.
Approved Picks: A Geometric & Fresh Table Lamp | The Statement Mirror We Adore | A Punchy Light Fixture in a Designer-Approved Palette
Sale: Up to 60% off select pieces, plus an extra 20% off with code GET20.
Approved Picks: An Affordable, Classic Metal Spindle Bed That Ships Fast | California Casual Wooden Bar Stools | This 5-Piece Outdoor Sectional with Near-Perfect Reviews
Sale: An extra 40% off sale styles.
Approved Picks: A New-Meets-Old Wicker Floor Lamp | Some Cheery, French-Inspired Dessert Plates (Fantastique!) | Elevated Burl Switch Plates
Sale: Up to 30% off over 500 pieces.
Approved Picks: A Lidded Rattan Basket Set (Under $100!) | Walnut Dresser with Graphic Pulls | A Comfy Lounge Chair with Mid-Century Lines
Sale: 20% off site-wide.
Approved Picks: The Best Plush Robe We’ve Tried | Em’s Go-To Comforter (The Lightweight One!) | A No-Fail Build-Your-Own Bedding Bundle
CB2 Bench | Crate & Barrel Lanterns
CB2Sale: Up to 60% off furniture, bedding, decor, tabletop, and more.
Approved Picks: Designer-Loved Drinkware from $1.56 (!) | A Chic Sleeper Sofa with 31 Fabric Options | A Leather & Metal Bench That Channels BDDW on a Budget
Sale: Up to 60% off select furniture, decor, kitchen, entertaining, and more.
Approved Picks: The Lighting Clearance Section is STOCKED | An Iconic Mixer in an Exclusive Mint Hue | Refined Metal Lanterns (Just In Time for Spring!)
Sale: 25% off site-wide; 40% off select pieces with code PRESIDENT24.
Approved Picks: $75 High-End Turkish Towel Set | Sweet Dress-Up Blankets for Kids | A Cozy & Textured Cable Knit Throw
Sale: Up to 50% off select styles.
Approved Picks: Quiet, Statement-Making Large Glass Vase | Black Marble Cabinet Knobs (Only $3.99/Each!) | Organic Modern Stoneware Vase
Sale: 20% off Herman Miller ergonomic chairs and select desks, storage, lighting, and more.
Approved Picks: The Iconic Aeron Chair | An Always-Chic Eames Hang-It-All | The Most Design-y Ergonomic Chair Ever Made (With a Price Tag to Match)
Industry West Credenza | Joss and Main Outdoor Dining Chairs
Industry WestSale: 25% off site-wide with code PRESIDENTS.
Approved Picks: Leather and Wood Lounge Chair with Sexy Lines | Mal’s Beloved Cane Sideboard | A (Genuinely) Unique Selection of Statement Shelving
Sale: 25% off all rugs – new and vintage – plus free shipping with code RUGS25.
Approved Picks: Vintage Yastik with Hits of Cobalt | Vintage Oushak with Shocks of Aqua | Vintage Veese, Perfect for Layering
Sale: 25% off site-wide; markdowns up to 70% off with code PREZDAY.
Approved Picks: A Charming (and Giftable!) Kangaroo-Shaped Match Strike | Whimsical & Unique Pendant Lighting | The Internet-Favorite Vice Collection
Sale: Up to 60% off select pieces, plus an extra 20% off with code TAKE20.
Approved Picks: A Sturdy Entry Console with Open AND Closed Storage | Durable Outdoor Dining Chairs in a Classic Thonet Shape | A Streamlined-Meets-Rustic Credenza
Sale: Up to $50 off select locks and bundles.
Approved Picks: The Level Lock+ Connect | The Level Bolt
Lulu and Georgia End Table | McGee & Co. Brass Boxes
Lulu and GeorgiaSale: 15% off orders over $500; 20% off orders over $2,500; 25% off orders over $5,000.
Approved Picks: Em’s Living Room Sofas | The New SSS Collection (That Landing Page!) | A Fresh Side Table by an EHD Alum
Sale: 10% off orders over $150; 20% off orders over $300; 25% off orders over $650.
Approved Picks: The Nancy Silverton Knife Set We Swear By | 7 Piece Keep-Forever Cooper Cookware | Em’s Go-To Cast Iron Dutch Oven
Sale: Up to 30% off site-wide.
Approved Picks: Chic Brass Boxes (Ideal for Hiding Remotes!) | Organic Stools with A Special 3-Leg Base | A Deeply-Discounted White Oak Cabinet ($1,200 Off!)
Sale: 20% off site-wide with code LUV20.
Approved Picks: The New Zoe Feldman Collection | Some Renter-Friendly Plug-In Picture Lights | A Show-Stopping Table Lamp with a Bold Metal Shade
Sale: 15% off site-wide with code PRES2024.
Approved Picks: Em’s Outdoor Lounge Chairs | A Stackable, Airy, Minimal Outdoor Dining Collection | A Large & Sturdy Fire Table
Pottery Barn Vases | Rejuvenation Bed Frame
One Kings LaneSale: Up to 40% off site-wide.
Approved Picks: The Roll-Arm Sleeper I’m OBSESSED With (Colonial Blue is SO Pretty!) | A Sweet Walnut Table with Carved Bobbin Details | A Set of Timeless Gourd Lamps
Sale: Up to 50% off select furniture, bedding, decor, and more.
Approved Picks: This Half-Priced Woven Canopy Bed | Handcrafted Vases with Special Details | Outdoor Planters that Channel an English Cottage
Sale: Up to 50% off furniture, hardware, lighting, mirrors, and more.
Approved Picks: Lighting We Just Installed in an In-Process Project | An Heirloom-Quality Wooden Bed Frame | A Leather Basket with an Unexpected Shape
Sale: An extra 20% off site-wide with code USA.
Approved Picks: The Ivory-and-Cream Merrick | The Works-Anywhere Oregon | The Graphic (and Jute!) Raleigh
Sale: Up to $1,600 off select appliances and TVs.
Approved Picks: The 55″ Frame TV ($300 Off!) | Some Bespoke, Customizable Appliances | Efficient Washer and Dryer Sets
Schoolhouse Pendants | Target Wingback Chair
SchoolhouseSale: Up to 60% off select furniture, bedding, lighting, and more.
Approved Picks: A Modern Quilt We Own & Love | A New Pendant with 1970s Lines | A Luxe Plaid Mohair Throw
Sale: 25% off all Semihandmade doors with code EMHENSEMISALE. (This is a better deal than their public sale. The code is valid through 2/29!)
Approved Picks: All Cabinet Doors!
Sale: Up to 35% off and free shipping on select favorites, plus up to 25% off dining furniture and tabletop essentials.
Approved Picks: This Works-Anywhere Bobbin Console | A Hand-Carved Coconut Shell Flush Mount | A Beachy Bone Inlay Mirror
Sale: Up to 40% off furniture, decor, bedding, and more.
Approved Picks: A Soft Gray Studio McGee Console Table | A Velvet Wingback that Looks WAY More Expensive Than It’s $280 Price Tag | A Warm, Simple, Refined Wood Mirror
Sale: 25% off select planters, tools, and watering.
Approved Picks: Some Square Galvanized Outdoor Planters | A Cute Self-Watering Ceramic Pot | An Elegant Indoor/Outdoor Urn
Urban Outfitters Ceramic Box | West Elm Coffee Table
Tuft & NeedleSale: 20% off mattresses, bedding, and accessories.
Approved Picks: The Mint Hybrid Mattress | A Goldilocks-Perfect Body Pillow | A Clean, Minimal End Table
Sale: 10% off site-wide, plus free shipping on orders over $300.
Approved Picks: Cheap AND Excellent Customizable Curtains (I Swear!) | The Roman Shades Em Can’t Stop Installing | All Essential Window Treatment Hardware
Sale: An extra 40% off sale styles.
Approved Picks: This $51 Geometric 5’x7′ Rug | Some On-Trend Burl Wood Veneer Coffee and End Tables | A Rosy Ceramic Stash Box
Sale: Up to 70% off furniture, decor, home upgrades, and more.
Approved Picks: A Grounding, Organic Coffee Table | This Huge, Deeply-Discounted Arched Floor Mirror (Only $115!) | A Functional Swivel Chair in a Variety of Performance Fabrics
Sale: Up to 60% off furniture, bedding, rugs, outdoor, and more, plus an extra 15% off clearance with code EXTRA15.
Approved Picks: A Design-Forward Coffee Table at a Great Price | A Budget-Friendly Brass Objet | This Bestselling Bumper Chaise Sectional
Anthropologie Wide-Leg Pants | Free People Barn Coat
Abercrombie & FitchSale: 15% off site-wide, plus free shipping on orders over $99.
Approved Picks: The Go-To Trouser of Millennials Worldwide | A Simple & Classic Bomber Jacket | A Skort (!) So Flattering (!!) That It Went Viral (!!!)
Sale: An extra 40% off sale styles.
Approved Picks: My All-Time Favorite Pants (Seriously) | An LBD That Works at the Farmer’s Market AND On a Date | A Flattering Floral Dress, Perfect for Changing Seasons
Sale: 25% off select styles.
Approved Picks: A Slouchy, Cool-Girl Crewneck Pullover | A Sexy Long Sleeve to Dress Up OR Down | A Barn Coat Straight from a Nancy Meyers Movie
Sale:
Approved Picks:
Sale: 20% off site-wide with code FLASH20.
Approved Picks: Em’s Beloved Sauna Blanket Starter Kit | Red Light Face & Neck Mask Bundle
Nike Sneakers | Nordstrom Birkenstocks
J. CrewSale: 30% off site-wide, plus free shipping and an extra 50% off sale styles with code SHOPNOW.
Approved Picks: My Favorite Pleated Pull-On Midi Skirt | A Sweater Jacket That Only Looks Expensive | An Oversized Blue Twill Top (Very Chessy-Meets-2024)
Sale: Extra 30% off sale styles with code EXTRAEXTRA.
Approved Picks: This $34.99 Alpaca-Blend Sweater | A Sweet Black and White Enamel Barrette | Vintage-Inspired Wide-Leg Jeans with Cute Patch Pockets
Sale: Extra 25% off select styles with code GET25 (for members); 20% off select styles with code GET20 (for non-members).
Approved Picks: Em’s Favorite Everyday Sneakers | A Comfortable Long-Line Sports Bra | Some High-Waisted Biker Shorts with Gentle Support
Sale: Up to 50% off select styles.
Approved Picks: Timeless Ray-Ban Wayfarer Sunglasses | Half-Priced Skims Shapewear | Gen Z’s Other Favorite Shoe, the Birkenstock Clog
Sale: 30% off select styles; up to 75% off clearance.
Approved Picks: An Easy-to-Wear Fit-and-Flare Chambray Dress | $23 Linen Blend Midi Dress in a Springy Stripe | Budget-Friendly Wide Leg Jeans for Every Size
Sephora Roller | Target Sandals
PactSale: 15% off site-wide; 20% off orders over $150; 25% off orders over $250 with code WARMUP.
Approved Picks: Arlyn’s Favorite Underwear | Throw-On-and-Go Twill Shorts | The Perfect Romper for Errands, Laundry, or Hair & Makeup Appointments
Sale: Up to 50% off select makeup, skincare, and beauty tools.
Approved Picks: $20 Essential Face Brush Set | A Budget-Friendly De-Puffing Facial Roller | Some Illuminating Body Oil with Near-Perfect Reviews
Sale: 20% off jeans, tees, and shoes for all.
Approved Picks: The T-Shirt I Will Never Stop Recommending (Under $5, Too!) | Teen-Approved Cargo Jeans | An Affordable Dupe of Em’s Buckle Sandals
Sale:
Approved Picks:
That’s it for today! See you back here tomorrow – we have an awesome week of content on the books. If you’re lucky enough to have off today, make sure to enjoy it, okay? Happy Monday! xx
Opening Image Credits: Photo by Kaitlin Green | From: Our Mudroom Reveal: A Dog + Storage-Focused Space That Is Possibly My Favorite Room In Our House
The post The Best President’s Day Sales From Anthro, Target, Schoolhouse, Madewell, And More:) appeared first on Emily Henderson.
February 18, 2024
The Link Up: Em’s Favorite New Pillow Dupe, The Tights That Have Stepped Up Mal’s Outfits, And Some Great Products For Greasy Hair

Happy Sunday everyone! We were busy as usual this past week and have a very fun reveal coming at you this week!! Not much else to report so let’s get to these links:)
This week’s house tour is of creative director, Jonathon Burford, and Jesse Rudolph of Ome Dezin‘s wildly playful yet peaceful home. One’s style is “artful sensationalism” while the other prefers “clean, calming moments that nod to nature.” If you’re thinking, “I have to see how those two styles work,” you are right. Go see their truly beautiful home here!
From Emily: The original hard round disc pillow seems to have been invented by our favorite French designer/architect – Pierre Yovanovitch. While it took a while to come to market in America, once it did I bought two from Lulu and Georgia immediately (SSS’s collection). I LOVE mine very much. But when I was at Target last week I found their version and BOY is it good (and far more affordable). Now this pillow is 100% for visual decoration – it’s hard and just not very comfy. But I love the look of it when done right (like on our bed when I actually make it to show it off). So for those of you wanting to appreciate this simple trend, but on a more affordable budget there you go (plus the velvet is really good in person and the colors are spot on).
From Jess: I am having a BIG Galentine’s weekend currently with a dinner and a brunch. If you don’t have any Galentine traditions, I know they seem silly but I promise they really are the best. This was actually the first year I forgot to plan my own. Whoops! Now, the dinner is a new addition this year with a very fun (but slightly pricey twist). Each gal needs to bring three full-size versions of a favorite makeup, skin, or haircare product. So while yes, it can (and did) easily add up, you are also going home with three beloved products. Of course, you could do a travel-sized version of this or put a lower price limit. But I decided that since I’m all about hair care this year, I would buy this detox shampoo as my contribution. I think it’s great, is HIGHLY recommended by hairdressers, and says it works on all hair types which I feel is important to consider when everyone has different needs. I’m excited to see how this goes and will report back next week with what I get:)
From Gretchen: I popped into Target the other day to find a few things we needed for an upcoming shoot/reveal at the farmhouse. There were just so many good finds (Jess wrote about most of them here) that were so hard for me to walk away from. I physically couldn’t leave the store without buying this glassware, though. I’m actually proud of myself for only buying the coupes in green. If I didn’t already have a tableware hoarding issue, I might’ve left with the whole dang shelf. Each colorway is just so dreamy and could be really fun to mix and match, too! They’ve got coupes and wine glasses–both stemless and stemmed–in blue, gray, teal, and pink.
From Mallory: My new favorite outfit hack: patterned tights!!! I bought these the other day and absolutely LOVE how they transform any LBD…it’s the easiest way to make a boring outfit look really really special. Plus I got SO many compliments on them. Give the patterned tights look a chance I’m telling ya!!
From: Caitlin: Where are my fellow greasy-hair folks at?! You know – the ones whose hair starts looking like second-day hair after only 8 hours? The ones who have tried to the no poo (“no shampoo, for the uninitiated), to disgusting and disappointing ends? I SEE YOU. And, after 17 years of testing, I have found THE BEST DRY SHAMPOO FOR OUR TRICKY HAIR TYPE. Enter: this aptly named HG dry shampoo, which means that my greasy tendrils can now go FOUR WHOLE DAYS without washing!!! Like, I just took a Zoom call with four-day-old hair! And it looked freshly coiffed!!! It’s the only dry shampoo I’ve tried that’s actually made my hair feel a little cleaner, instead of just improving the appearance. (And I’ve gotten a lot of compliments on the Rosemary scent, but it is pretty strong – just be warned. My hair is light brown and it does leave a cast, but it’s super easy to shake out. And if the website is sold out – it usually is – you can also grab them at your local Sephora or Ulta.) I keep two cans on hand at all times but I’ll be stocking up this President’s Day!!! Yay for (finally) clean hair!!!
From Arlyn: Contrary to popular belief, LA gets cold. And my heat only seems to like to function upstairs, where it gives us all it’s got and then leaves us shivering downstairs. So while cruising the Target aisles on the hunt for a few V-Day surprises for the fam, I eyed this sweatshirt and pants and scooped them up. AND OMG THIS IS WHAT CELESTIAL CLOUDS MUST FEEL LIKE. I’ve never felt anything so soft on my body. Like…ever. Maybe my newborn’s hand. That’s it. I’m thinking of grabbing the two in the dark green, too.
Thanks for reading and see y’all tomorrow. xx
Opening Image Credits: Photo by Tessa Neustadt | From: Our Master Bedroom – Finally
The post The Link Up: Em’s Favorite New Pillow Dupe, The Tights That Have Stepped Up Mal’s Outfits, And Some Great Products For Greasy Hair appeared first on Emily Henderson.
February 17, 2024
On The Hunt For Comfy And Cute Spring Break Sandals – Here Is What I Found

When did shoes stop being sold in stores?? I went to the mall and came back with almost nothing. Many of my favorite brands are online only so I have to order, try on, and return (which is NOT my favorite use of time and the earth’s energy). This year we are headed to Hawaii in March for spring break, which I haven’t been to in over 20 years and I’m DRIPPING with excitement (mostly because it has been pretty darn drippy up here). I find that sandals, more than any other shoe, often don’t last more than two years because of the wear of outdoor activities in the summer (and up here on the farm things go even faster because of the dirt). So most of my sandals are pretty thrashed and it was time for a couple of pairs that would check multiple boxes.
I want comfortable (duh), a bit of a lift if possible for arch support but also because I still like the longer leg look :), versatile (daytime and nighttime), casual but not boring. Oh, and I don’t need any sexy/strappy sandals (and I have a bunion) so these are definitely on the more practical and understated side. Here we go:
Darker Platform Sandals
I was very excited about these and they are EXTREMELY comfortable and cute. The base has this padding that is so soft and cushy. My only issue with them was, for me, the tone. I don’t it think works well with my very pink legs/feet and my feet are super wide so these made them slightly wider. I kept them in here because they are legit so cute and comfy, but not the best fit for my shape/skin.
 Platform Slides – SO CUTE

Well, SHOOT. These are so cute, extremely comfortable, so versatile, and very stylish. Ignore Buttercup’s side-eye. My main issue with these is the price. I don’t know how to justify the cost considering they will likely get beat up being so light. At first, I thought they were a “HELL YES” and if you have a large budget then get them – they are SO CUTE. But after thinking about it for a while, I think others check more boxes and these are too splurgy to just get for fun.
 Cute Throw And Go Mules With A Peep Toe
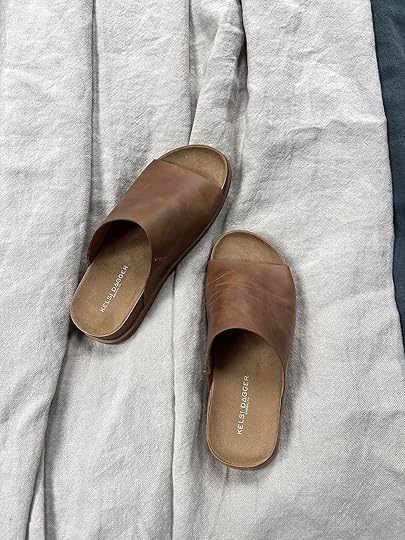

These might look boring but I know that I’ll wear them ALL THE TIME. I already do. I bought them a few weeks ago and I find that I throw them on to jump in the car to run errands frequently (cute with socks). If you have Birkenstocks you might not need these.

Madewell T-Shirt | Shorts (similar)
Excellent plane shoes as well…
Cute Everyday Walking Sandals

GAH. I don’t think I’m selling these here but these are solid walking sandals. They are giving “saltwater sandal” vibes but with a cute platform and a white/black stripe (and not waterproof). So comfy, with a bit of style, still understated (as you can tell I’m not into super strappy statement sandals – likely because my feet don’t invite that level of exposure).

Keep reading, but I think these are a solid YES.
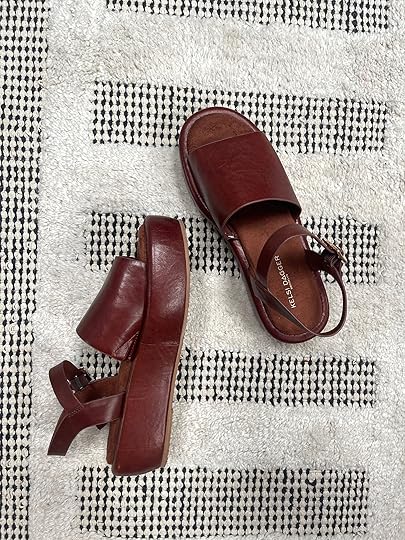
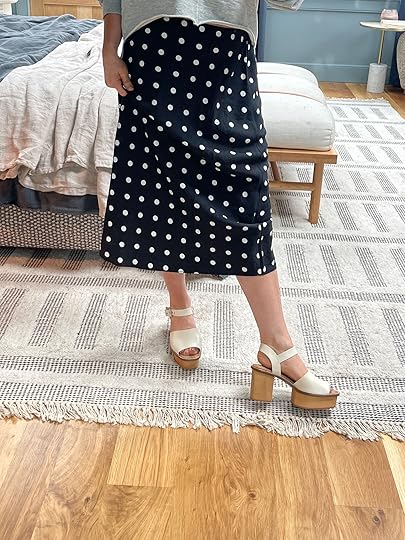
Groove Heeled Platform Sandals
Fine, these are likely not going to be brought on spring break because of bulk and I don’t think I’ll need fancy nighttime shoes, but I promise I have almost zero heeled summer shoes and these are so comfortable (for heels) and cute. These would look awesome with ankle socks. The sweatshirt is from Anthro and the skirt is Madewell (and awesome, so lightweight, easy to throw on, and doesn’t wrinkle).
 Teva Flatform Sandal

These were a “hell yes” until I found another pair of Teva’s from last year I have that are still in great shape. So with the intent not to hoard, I’m going to return them, But y’all they are GREAT.
 Fisherman Sport Sandals

I haven’t really dove into the fisherman sandal yet. These are so comfortable, but I don’t think this is really me… Not sure why but after staring at them and picturing them with my wardrobe they aren’t a “hell yes.”

After trying these all on yesterday I went back into my closet to check out what I did have to make sure I’m not being stupidly overconsumptive and buying shoes for outfits that I already have a shoe for. I have my Arizona Birks (so cute, but honestly I don’t love Birks as much as the rest of the world for comfort reasons ironically), last year’s Tevas (olive green), of course, my flip flops (Tkees), and Havianas. So I think I only really need the heels (not for spring break) and the salt water vibey sandals (unless I find my Nisolo’s from last year that are on sale right now for $69 BTW). I also really like these (on sale for $69). Lastly, I ordered these from Emerson Fry which I haven’t received yet so we’ll see (splurgy but I’m a massive fan of that brand, made in the USA, small batch, always flattering, a good fit, etc). And then I still have these from last year that are SO CUTE. Maybe I only need one pair, y’all. Seems like I’m not that desperate after all Hopefully, this helps if you are in the sandal market
The post On The Hunt For Comfy And Cute Spring Break Sandals – Here Is What I Found appeared first on Emily Henderson.
February 16, 2024
Fix It Friday: Watch How Just a Few Colorful Design Swaps Completely Overhaul 6 Reader-Submitted Rooms (w/ Real Photos!)

Welcome to another installment of Fix It Friday! This week’s episode delves into color, specifically how to take a lot of your existing items in a room and refresh the palette (or create one when there doesn’t seem to be one). As a refresher, Fix It Friday is a new series Jess introduced where we take reader-submitted rooms and help them by offering suggestions for how to make them just a little bit better. So far, we’ve tackled bedding and foyers, and as I mentioned, today is all about color.
If you’re a reader who has been around for a bit, you know it’s kind of my thing. I love it. Finding new palettes, unique pairings, and just seeing things come to life with a dash of daffodil or a peppering of paprika. So I thought. EASY! Send me your photos of a room you feel stuck on, color-wise, and I’ll whip it into shape.
But, I actually found it a bit difficult not to want to strip the room to the studs and essentially just redesign things. NOT because the rooms were bad, but because what I noticed when evaluating all the 20+ rooms we got, no one really had an established color scheme to work from, so it kind of felt like starting from scratch.
But Fix It Fridays are supposed to be about easy, quick and impactful changes, and telling a reader “hey, maybe let’s add paneling and change all your draperies and strip away all your textiles and start over” wasn’t, uh…the point. So I checked myself, looked at all the submissions with fresh, less ambitious eyes, and thought…”If this were my sister asking me what to do, or my best friend…what would I tell them to do?”
We’ll get to what that ended up being for the six rooms I picked, but first, I have a few considerations, because this wouldn’t be an EHD post without them, would it?
Things To ConsiderWith any room, always try to go into it with some colors in mind. When you just start piecing things together, especially if it’s over several months or years, it can get very confusing both for your brain and the design to not have a loose plan. You want to be able to look at your space and think, “it’s missing some of the yellow I planned for” instead of “I have no clue what to do right now and feel frozen.” There are multitudes of articles on the internet that tell you how to build a color palette, so I’m not going to do that right now in this one little bullet point. Instead, here’s a trick for someone just getting started in the color game: pick three colors…honestly, any three colors you like because most times, they’ll go together (believe it or not). Then, take those three colors and make sure you’re varying the saturation and tone of them throughout your room in the rug, paint, decor, art, and textiles. The biggest mistake I see in a colorful room is using the same shade of the same color over and over again. If blue is one of your colors, use navy, slate, dusty blue. The undertones of the color should be the same, but the “volume” of it can change. You. Need. Contrast. A lot of the homes I saw for this post had beige walls with beige window coverings with beige carpet. Cool. Fine. But then a grey or beige sofa sat in that room and it was all just a bowl of mashed potatoes. You need to introduce contrast and set things apart. For example, add a rug between a light floor and a light sofa to make both their own things, rather than visually run into one another. Window treatments can be the same color as the wall, but it needs to feel purposeful (though I prefer going either 2-3 shades darker or lighter for, you guessed it, contrast). Try to spread color throughout a space in both expected and unexpected ways. If you have some blue in a rug pattern, pull that out by using a blue accent chair, for instance. But then add a blue tassel to the knob of a cabinet or pick a pillow with blue piping. Those are the little moments you don’t always expect that make for interesting design.I just want—nay, need—to preface everything I share from this point forward with the following statement: color is intensely personal. It’s like underwear. Or maybe a glasses prescription. You may look through a set of frames and think “Wow! I can see so clearly now!” while the person standing next to you will suddenly go cross-eyed and not be able to pick out an elephant in a sea of flamingos. And besides being personal, it’s also uniquely influenced by the space the colors go into. South-facing windows? North-facing windows? Tons of greenery outside of windows? No windows at all? It can change everything. So while I am making suggestions here, let’s use them more as an inspiration for what might be possible. I would never, ever recommend someone just go and buy the paint color I’m saying without ever testing it in their homes.
Okay, I could go on FOR-EH-VER, but we’re not here for that. We’re here to get our advice on!
But first, let’s study a few pretty colorful rooms, mostly just to get our whet our palates for palettes (word nerd here, sorry). All of these happen to be my own projects because it’s easier for me to talk about the “whys” when I actually know them.
 photo: sara ligorria-tramp | design: arlyn hernandez | styling: emily edith bowser | from: 3 years in the making then an unexpected move: arlyn’s bedroom reveal Is a lesson in the beauty of “unfinished” design
One of my favorite things to do is to use color sparingly but in very bold ways. If you really look at my last bedroom, it’s mostly neutral. A neutral rug, furniture, curtains, key bedding pieces, and light earthy wall paint. But a mustard velvet bed, an olive quilt, and a green blockprint lumbar are all it took to turn this into a “colorful” bedroom. Be daring, people.
 photo: veronica crawford | design: arlyn hernandez | styling: emily edith bowser | from: arlyn’s rental kitchen reveal just might have you wishing you had brown—or even cherry— cabinets (yes, really)
In my breakfast nook, I wanted to complement the red tones of the cabinets on the other side of the room, so I went with green, a direct complimentary color. But to avoid things looking like Christmas, I shifted the hue of the green to sage and emerald, rather than textbook “green.” And because I always work from three colors instead of two, I mixed in mustard in the fabric of the chairs since it nearly disappeared against the yellow tones of my wood furniture. Oh, and that unexpected touch of color I mentioned earlier? That comes in the lampshade trim, pulling red ever so delicately across the room. (And okay yes, there’s also blue and lilac and rust in here, but that’s mostly just the styling, not the design.)
 photo: sara ligorria-tramp | design: arlyn hernandez | from: arlyn’s moody dining room reveal is all about the insane power of paint
Friends, I miss this little jewel box of a dining room SO MUCH. I will always have a special place in my heart for it. I know that. But anyway, I wanted to show you an example of creating contrast and separation. The dining chairs and table are very close in color to the oak floors, so a rug with a delicate texture and pattern split those up. I didn’t want to detract from the moment in here—the walls and ceiling—so I kept the rug neutral. The dining banquette pulls blue from my sofa in the adjoining room to connect the spaces visually but without trying too hard. And a touch of rest velvet never hurt ANYONE or ANY SPACE.
 photo: sara ligorria-tramp | design: arlyn hernandez | from: reveal: arlyn’s bright & happy rental living room makeover
This is the first room I ever designed top to bottom, and looking back at it, I’m sure I’d make some changes if today me were working on it, but I still think it pulled out what I was going for: bold but breezy. Again, using one strong color without being shy about it makes a huge difference. Then that blue is echoed in some of the prints of the throw pillows, in some accessories, and balanced by a near complementary color—rust, instead of orange—and my secret weapon always: ochre or mustard.
Okay, let’s get into some reader rooms.
Wake Up The Palette
From our reader: “I’ve been struggling to make my primary bedroom look finished. It feels bland with the lack of contrast between the green rug, blue curtains, and white. I’ve wanted to change the curtains for months but can’t decide on a color. However, I’m open to all suggestions!”

First up to bat! A fairly neutral bedroom. When I read the reader’s prompt, I had to do a double take at the “green” rug and the “blue” curtains, tbh. I’m guessing it’s just not reading correctly in the photo, but also…we can fix that. If you want to make a color more pronounced, you just have to add more of it somewhere else. Color pulls stronger the more of it there is. Without knowing much about this reader’s style, I can make the deduction that they were going for calm and serene in their bedroom space, so I didn’t want to disrupt that. I’m working with their existing sort-of palette of neutrals, soft blues, and soft greens. I think we can keep the curtain panels and add on to them (hopefully they still sell them) to give them more of a full look because they feel a little too whispy to me.
The white bedding and the white lamps and the beige (gray?) wall are falling a little flat, so we can punch things up by going with a soft blue with gray undertones (the same blue Emily used in her primary bedroom, too—Sherwin-Williams Debonair), adding a dark blue quilt that make the curtain panels feel less intense, and bringing green up into the bed from the rug via a lumbar pillow and a subtle stripe on the sheets. Some pretty, warm leather trays on the nightstands would add a touch of cognac, which can be echoed in some art that the area above the nightstands is calling out for! Oh, and I think it could be cool if she were to paint the tall, narrow cabinet between the windows the same color as the wall (and maybe move it out of that spot so the curtains can have a fuller look?).
Here’s what that would look like:

Striped Sheets | Blue Quilt | Bedspread | Framed Canvases | Trays | Lumbar Pillow | Paint | Curtain Panels
New Slipcover, New Life
From our reader: “I love, love, love your posts and feel like I am emailing a celebrity crush – haha. We recently repainted the room a new wall color and have no regrets about that. But as we’ve started to put back our furniture, some of the old stuff doesn’t look right and the room has lost its zing. I know we need to add pillows, plants, and something to the mantle but I am just feeling STUCK. I want this room to have life and not look like a baby shower. I’ll add that this room gets almost no natural light. It’s north-facing and the front of the house blocks the sun from reaching that one big window. So again, we need color! I’m thinking of switching out that Sixpenny Neva sofa slipcover for the plum version as a start. Also, I just bought [the vintage painting above the left side chair] from Etsy and am obsessed. I’d like to use this as a jumping-off point.”


Number 1: I will always pick you for a post if you tell me you feel like you’re emailing a celebrity crush. Done deal. Number 2: I also have big giant windows that are basically decorative because the sun can’t penetrate beyond a fence I have in my front patio or the trees surrounding the property. Bummer. So…let me see how I can help.
I agree that the existing color palette feels a bit underwhelming with the paint color. I can’t quite put my finger on why though. Possibly the soft rug and the soft sofa cover and then just the heaviness of the blue chairs. But I’m not in the business in this post of changing people’s furniture, so adding in a few punchy pieces and creating a new color palette around the vintage artwork she loves is the name of the game.
I opted to pull the plum slipcover she mentioned because she’s already considering it. I think that would be lovely paired with the blue chairs, and work great with the painting. From the painting, I’m also pulling some greens that show up in the new rug via teal and in some ribbon trim I think she may be able to retroactively add to the Roman shades that are disappearing against the wall. The space to the right of the fireplace is aching for some height as all the furniture is roughly the same visual height. I found this absolutely gorgeous cabinet that carries the warmth of the floors without adding a new wood tone into the mix. This introduces an opportunity to use pretty decor pieces, collectibles, books, and small art of her choosing to flush out her new color palette.
A little blue in some vases I found makes the chairs feel more intentional than just the pop of blue they are now. The rug also weaves the plum from the art, the sofa and some new decor items I found through the different visual plains (top, middle, bottom).
Take a look at what I picked as inspiration (as a reminder, my intention is not to tell this person to just go and buy all this stuff, but rather to see what might be possible within the confines of their existing furniture with a few add-ons).

Throw Pillow | Sofa Slipcover | Blue Glass Vase | Pedestal Bowl | Hurricane Candle Holders | Blue and White Vase | Ribbon | Plant | Display Cabinet | Rug
Take It To The Next Level
From our reader: “My struggle is what to do with these walls in my little powder room! I feel like it’s almost there…but missing something. Do I need to paint the walls dark? Put in a gallery wall? Wallpaper? Help!”

This powder bathroom is a classic case of a room design that didn’t plan for color. It planned for finishes, but not color. And that’s totally fine! Neutrals are colors, too, but they need to be used intentionally and with purpose. This spot feels a bit unfinished, like the reader mentioned.
Since she was open to wallpaper, I pulled one of my favorites: Strawberry Thief by Morris & Co. It’s just a delight of a wallpaper while having some gravitas…perfect for a small bathroom. It also plays beautifully well with rich warm wood tones like that of the vanity, doors, trim, and floors. This paper gives us an immediate color palette of blue, green, cream with a touch of red so that’s what I rolled with. The floors could really use a rug to add visual interest (but also comfort to anyone using the room), and I pull this Schoolhouse rug often because I love the shade of green and the speckling of blue. It’s graphic but quiet and modern. A waffle towel is my new favorite way to introduce texture to a bathroom, and I like the border of coral here with the wallpaper. I would love to see two medium-sized framed prints above the towel bar and two small prints stacked vertically to the right of the sink. And since we’re here, let’s swap that neutral vase for something a little more striking.

Wallpaper | Diptych – Left | Diptych – Right | Vase | Towel | Rug | Blue Art Print | Strawberry Art Print
Have Some Fun In A Playroom
From our reader: “This is my family room that also doubles as a toddler play area. We have a really neutral living room so I wanted to do something more colorful in here but I’m out of ideas. I wanted to do a Memphis design-inspired color palette (I’m really drawn to the Nathalie du Pasquier Manifesto prints as an example) but I’m lost. I need help with a rug, pillows, art, etc! “

This reader had me at Memphis style because anyone who could be into that is NOT AFRAID OF ANYTHING. This family room slash playroom falls into the mashed potato category I talked about earlier. And I don’t say that as an insult. It’s SUCH an easy category to fall into. Picking expensive furniture in a color you think you might tire of is scary, so we’re told to go with neutrals. But then carpets are typically neutral in homes that have them, and walls start out neutral before graduating to something bolder. My answer, at least for this room? Change the walls and bring in a rug.
Oh, and I know what it feels like to have a living space that half belongs to a kid. A friend (kindly) said my living room looked like a high-end daycare once. So, if this is a family space that functions as a kid-first area anyway, I figured…let’s have some fun with it. This looks like a basement possibly, with low ceilings and very little natural light, so I didn’t want to go all dark and moody since it’s a space for her kids. A swirly twirly wallpaper is the perfect way to bring those wild Memphis graphics in but in a way that’s calmer and gives you the room to add in other art and prints. I pulled a complementary blue for the ceiling and trim to complete the look.
She mentioned Nathalie du Pasquier Manifesto prints which are incredible. Three of them over the sofa instead of the shelf with varied art would feel more intentional to me, so I think she could go that route and then display the existing art on other walls of the room. Instead of adding a floor lamp next to the sofa that a child will 100% try to topple over, I went with a swing arm wall sconce to add some light but also pull red from the artwork into an unexpected place. The rug I picked is from Emily’s line, and I think it would be perfect in this space because it’s modern, punchy, and delivers a lot of impact without being too busy (that’s what the art and wallpaper are for). Also, it’s plush, which would work better on the carpet than a flatweave which would punch up (don’t forget a rug pad!). Some fun new pillows and a throw will be a welcomed contrast to the neutral sofa.
Red Art Print | Blue and Yellow Art Print | Green and Blue Art Print | Sconce | Blue Ball Pillow | Throw | Striped Pillow | Velvet Pillows | Wallpaper | Paint | Rug
Refresh & Style
From our reader: “We live in Seattle so would love a warm color for our living room and ideally something that contrasts with the white trim. Thank you!! Love y’all’s work!”


A reader of few words. But no worries, I’ve got you. I absolutely adore the cove ceiling and leaded glass transoms over the picture windows. What a charming home! And if there is anything I learned from painting a room in my own home with a cove ceiling is that you take that paint all the way up and across. There is no natural stopping place for that paint. They tried to create one here which I think actually makes the ceiling feel lower than it is. This acts like an empire waist on my chesty figure…just draws attention instead of detracting. So first things first, we find a new paint color and we go all the way. And while we’re at it, I know they mentioned their white trim, but let’s make this room glow with a lighter peachy hue rather than the white. They might not go for it, I realize, because it would involve not just the baseboards and door surround but also those window frames. But a girl can dream. I’m suggesting English Scone which I used in my bedroom makeover because it feels warm, soft, happy and bright, which sounds just right for a place like Seattle that could use a break from the gloom.
Now that we have the walls tended to, the small rug in the entryway should be reconsidered. Let’s turn that whole area in front of the fireplace into part of the entryway by bringing in a 5×8 rug. It was tricky to find something that played nice with the rug under their sofa but I think this one is in line with a traditional style in a color that works with the sofa. Plus, this one is washable, which would come in handy in a foyer with heavy foot traffic.
And I think we can make that little cafe curtain work a bit harder with a quiet yet present plaid fabric. (Pssst: I think this would be beautiful in cafe curtains in the entire great room area so give them a little privacy without stealing the beauty of those windows). I also went ahead and picked out some clean-lined decor for the mantel plus a trailing plant which every fireplace needs. For the foyer table, I’m suggesting a fabric lampshade to add some more color, and a cool scalloped bowl for keys, etc. Lastly, if you look at the photos of the whole room, you know there’s a fairly large empty stretch of wall to the right of the television, so I picked a large canvas print in vibrant colors that might be nice to see right when you open the door.

Peach Paint | Light Peach Paint | Rug | Taper Holders | Marble Tray | Canvas | Plant | Fluted Bowl | Pillow | Fabric | Lampshade
Dark To Darling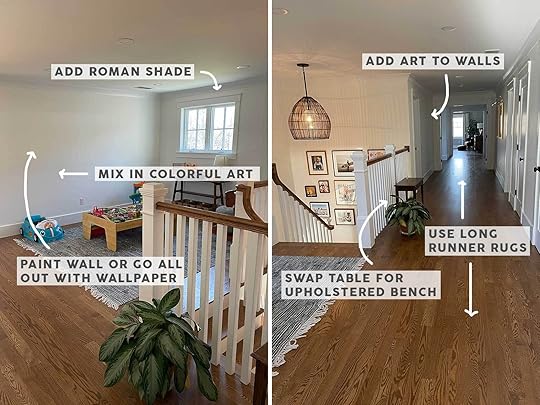
From our reader: “Our upstairs hallways gets minimal sunlight and always feels dark and dull. How can I brighten it up with all this open concept-ness?! The color here and throughout the whole house is [Benjamin Moore] Simply White with [Benjamin Moore] Chantilly Lace trim, and in this hallway, the yellow undertones reallllly come out. (Please excuse my dirty floors.)”
Okay, ::cracks knuckles:: I’m going to change things up a little here. I don’t have much to go off from these photos to understand this reader’s aesthetic leanings, but the home’s style reads traditional yet updated “farmhouse” (I’m using this term very loosely), and the existing rug tells me they like bleutrals with some texture but not a ton of pattern.
So…what did I decide to do? Bring in some pattern that’s subtle, quiet and soft rounded up by some modern yet playful blues. In a dark space that feels dull, color can go a long way, but pattern can go further. This reader may throw this whole thing away and I’d be totally fine with that BUT I would want them to at least pull an idea for the broad strokes concepts I’m coming up with. I also know this is tricky because it’s hard to completely understand what the walls do around that staircase. I’m going to guess the wall with the window extends out and down to the first level via the stairwell, which makes what I’m going to suggest possibly moot, but there’s also a chance that wall stops and meets a perpendicular wall that goes down the staircase. I wouldn’t stop short of suggesting they carry the paper or the paint in my moodboard below down the stairs to draw the eye up from the first story.
ANYHOW, since it looks like the landing is a playroom, I also wanted to stay youthful and not overly serious in my picks. The speckled Rebecca Atwood wallpaper is a happy little place between adult and sophisticated kid (that’s a category, right?). But because it might be a bit too much in a long hallway and upstairs landing like this, I could suggest adding in some wall paneling and painting that trim work and all other woodwork a whispery putty-like clay. The little window is a great opportunity to use a Roman shade in a playful print like a gingham that still fits the vibes of the home’s architecture. And because I noticed a large gallery wall of family photos, I think some stately framed photos of the family in black and white on the empty wall to the right of the window would look amazing.
Now, the hallway needs a rug…or two or three. The one I found is 12 feet long, and without measurements, it’s hard to know whether that would fit but if anything, get two of these and leave a small gap between them. The gray-blue of this rug works with the existing playroom rug, and the dashes add to the pattern story of the walls and shade. There seems to be a little table near the railings that doesn’t feel like it has a purpose, so let’s make that a moment instead with an upholstered bench in a deep marigold (a great color for a darker space in need of some joy). Apart from that, I recommend adding more art to the walls down the hallway. I think a few stacked pieces of their choosing no larger than 12×16 with matting would work wonders.

Wallpaper | Paint | Runner Rug | Frames | Bench | Roman Shade | Choose a Happy Life Print | Woman in Dress Print | Formes Print
And there you have it! I had so much fun with these and hopefully, you saw some of my reasonings which helped you to grasp some of my color philosophies. I know it’s not easy. It can feel high stakes to play with color and it go wrong. But something I often tell people who choose neutrals only from a place of fear (rather than truly liking neutrals) is that beige and gray are colors, too, and in that same vein, you can tire of them, as well. Don’t be afraid of painting that wall, of picking that wallpaper you’re daring to try, of going for the green armchair instead of the cream one. You can always completely turn around a color palette by just making a few swaps, even when bright anchor pieces.
You’ve got this. And to all the readers who let us into their homes, thank you for letting us share and for trusting us. It’s my pleasure to help in any way, and hopefully, there were takeaways here for those homeowners we featured. We have many more, so if this post does well, I’m happy to keep going with this.
Your friend in (colorful) design, Arlyn
Opening Image Credits: Design by Emily Henderson | Photo by Kaitlin Green | From: How I Convinced My Friend To Paint Her Room Really Dark: A Kid/Dog-Friendly Basement Makeover With Article Furniture
The post Fix It Friday: Watch How Just a Few Colorful Design Swaps Completely Overhaul 6 Reader-Submitted Rooms (w/ Real Photos!) appeared first on Emily Henderson.
February 15, 2024
The Best Home Decor At Target Right Now

Welcome to a curated virtual Target home decor run! So instead of having to cart down aisles upon aisles, this is an actual quick trip where you are only presented with the best (aka our current favorites:)). Emily was really inspired by a recent Target trip and thought that it would be fun to share what we are all loving. Target is not slowing down on the beautiful yet affordable pieces, so if you are in need of a lamp, coffee table, accent chair, glassware, etc. we might have covered today. Grab your cart and let’s go.

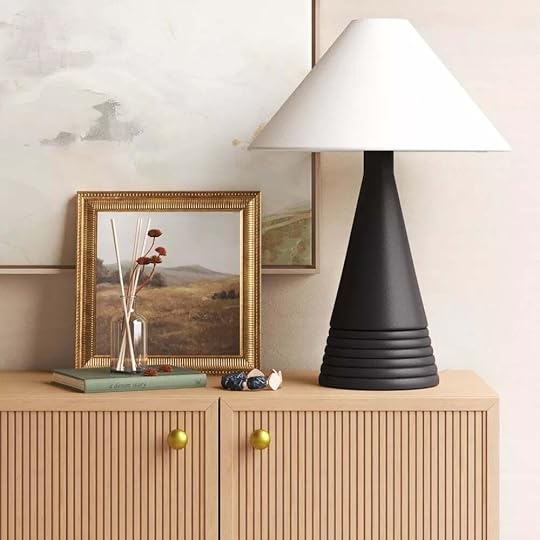
I have been realizing for the last few years that lamps may be one of my top love languages:) They are both beautiful and functional so what more could you ask for?! Well, affordability is one, which is why Target is the perfect lamp store (among other things, obviously).
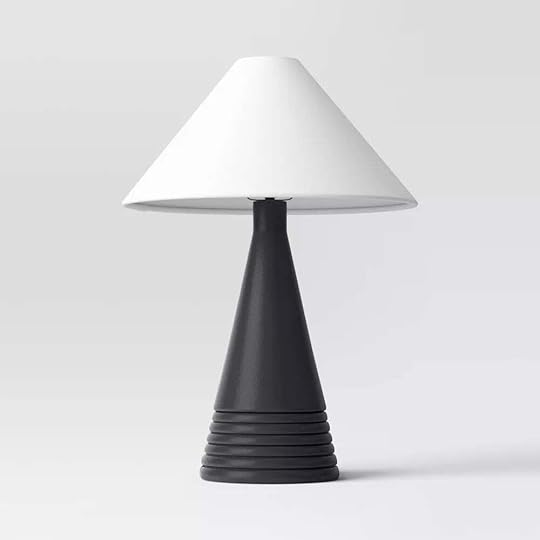
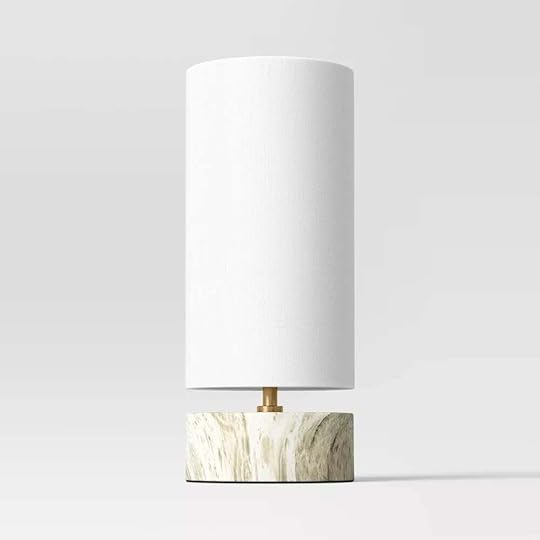
Ceramic Table Lamp | Faux Marble Mini Table Lamp
I know we’ve talked about that black lamp before but for an obvious reason – it’s awesome! It’s not overly ornate but still has interesting details. Also, it’s so versatile. I can see it in a modern room, with a farmhouse vibe like Em’s house, as a cool contrast to a traditional space, etc. This is a lamp that you’d want to keep for a long long time. Then that sweet yet chic green marble lamp is so wonderful. It’s mini so it’s the perfect little accent that would add instant cool sophistication with a hint of color. How fun would this be in a kitchen or bathroom??

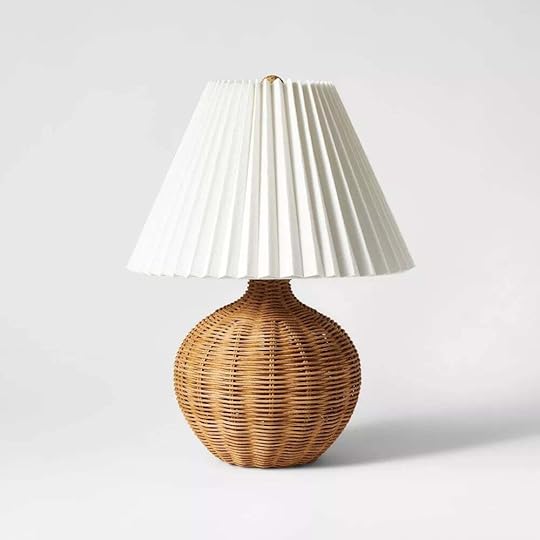
Oval Table Lamp with Pleated Shade | Natural Wicker Table Lamp
Gimme those pleats! I love how both of these lamps mix the clean, traditional pleat with an organic material base. It’s such a nice contrast. The warm and bold color of the oval lamp is so pretty and neutral enough to work with lots of different color palettes. Then the wicker is, of course, the best at working with every color out there and I love the tone of this one (plus it’s not overly glossed, thankfully). Putting this lamp into a room will add texture and visual interest immediately so I highly recommend it!
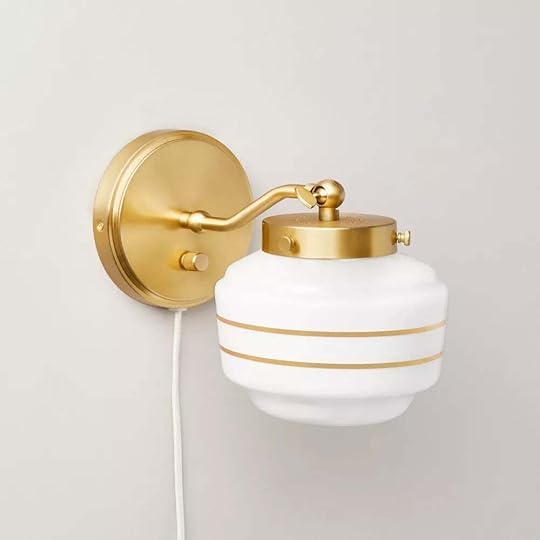
Milk Glass Striped Wall Sconce
Hello, Hearth & Hand! For those of you with a more traditional style, this plug-in sconce would be so sweet in your home. For the price, it’s so pretty and has great details! Even the cord is fabric which I much prefer with plug-ing sconces where the cord is super visible.

One major thing Emily noted from her Target trip was the art. She really thought the pieces were so pretty and you know Em is particular about her art:) Let’s see our top 3…


Citrus Harvest Framed Wall Canvas | Moody Trees Framed Wall Canvas | Hillside Sketch Framed Wall Art
I mean, look at these! They definitely aren’t your run-of-the-mill genetic art pieces. The citrus still life is so pretty and the variation of colors creates so much beautiful movement (the irony, amirite??). Then the “moody trees” piece looks legitimately old and is stunning. It would add instant depth to your room. Then finally the sketch. I’m a sketch girl at my core so I am a huge fan. I also love how it’s framed in a float mount.
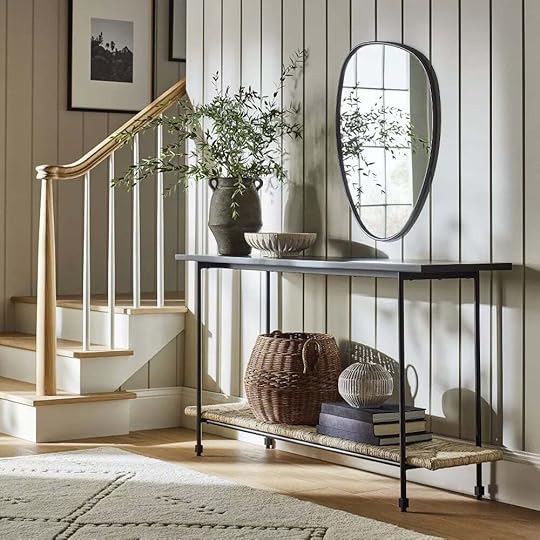
Target is getting cooler and trendier by the day. It’s time to talk about this mirror…
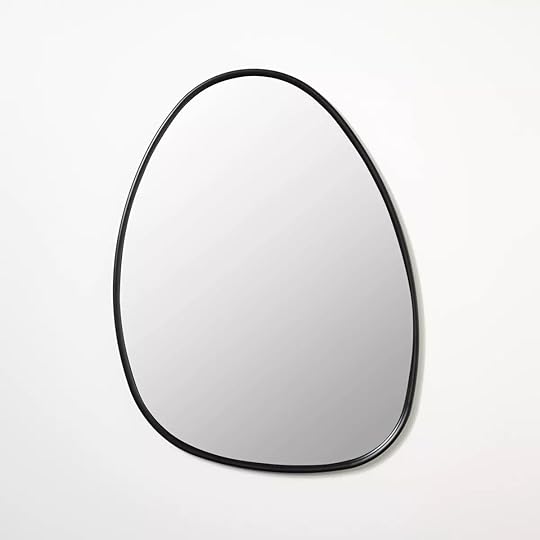
Amorphic-shaped mirrors have been becoming more and more popular so it’s nice to have a more affordable option like this one. It’s a great size at 22″ x 30″ and if you look in the styled photo above it really can freshen up an otherwise traditional style. But it’s definitely versatile so if you need a mirror, no matter your style, maybe shake things up with this one!
Now let’s get into some bigger pieces…bookcases/cabinets!

Bookcase with Drawers | Glass Accent Cabinet
Do you see these beauties!? Tall, pretty details, and both have open and closed storage which is ideal. I love the brass fingerhole pulls on the light wood bookcase so much. It just gives it such an elevated look and feel. Also, the sizes of the drawers (2 slim on top of a deeper one) make it look more expensive. Then for the black cabinet, not only is it perfectly in the modern traditional style category but it could make a great entry cabinet! Shoes can go behind the doors (if not too muddy), keys and mail on the shelves, then maybe some hooks on the side of the cabinet or on the wall next to it:)
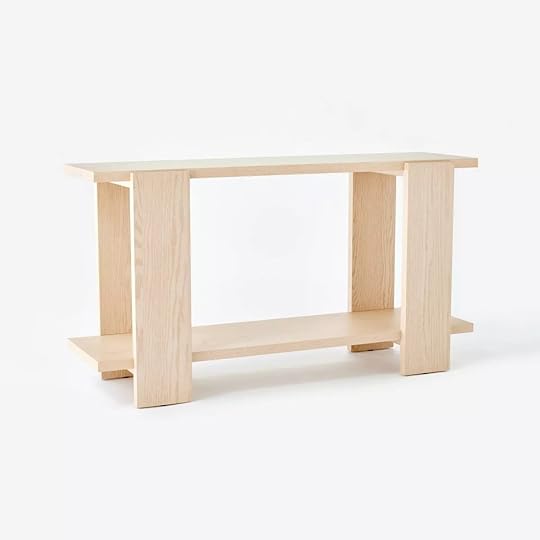
Keeping with the entry theme, I really love this bleached oak console table. It’s giving California Casual 2024 but is timeless enough that it won’t look outdated anytime soon. Simple, cool, and pretty:)
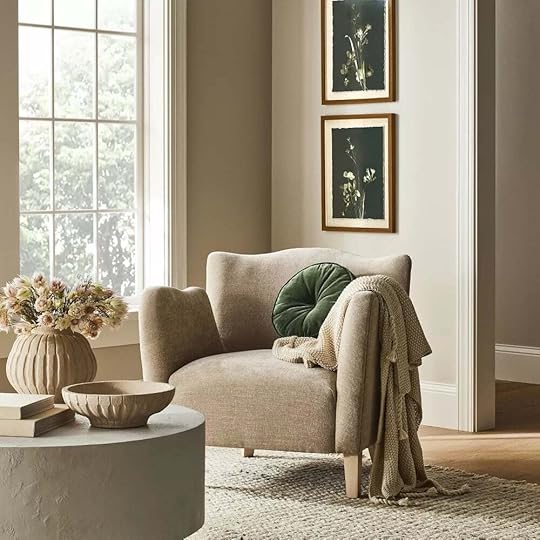
Let’s sit down and get comfortable.


Swivel Accent Chair | Wing Arm Accent Chair
The faux shearling swivel chair is so pretty and a great dupe for all of the very expensive similar versions currently on the market. It’s clean, inviting, has a beautiful shape, and of course, swivels! Would be great in a living room or a bedroom (or a nursery:)) Now I know I’ve talked about that wing armchair before because I think it’s such a cool and slightly more daring shape than a lot of what Target offers. It actually gives me a vintage vibe leaning Parisian. The proportions are very cool and looks like a chair you could hang in for a long time.
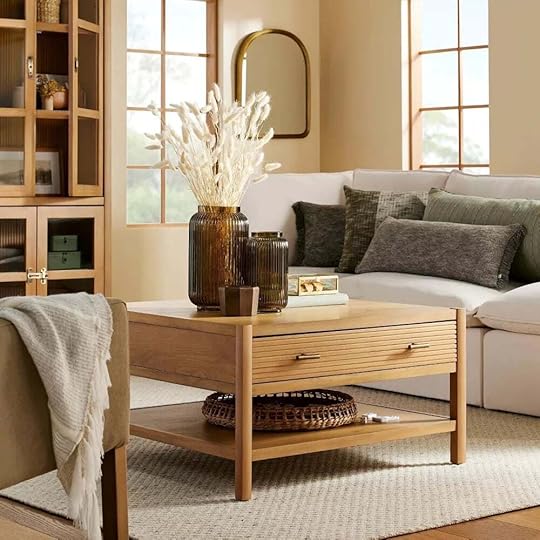
Emily also recently was talking about her search for large coffee tables. So when I saw this one I knew I needed to share it with the class.
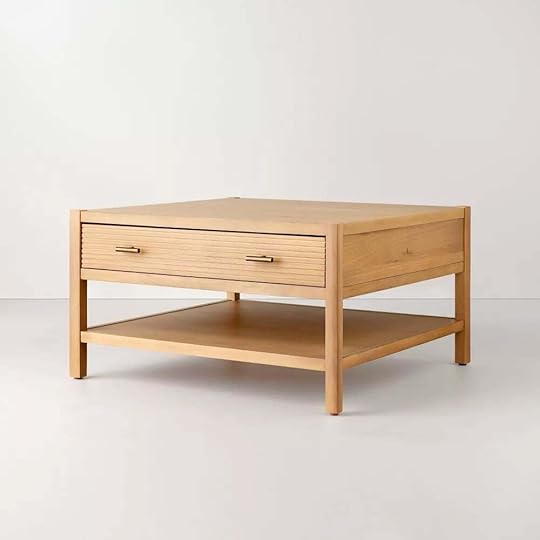
Square Coffee Table with Drawer
Ok, so she’s allllmost a square coming in at 32.99″ x 31.50″. And while not a huge coffee table, I’d say it’s also not a bad size either! The wood tone is so pretty, the small groove detail on the drawer (yay, storage!) is great, and the brass pulls are simple and versatile. Plus there’s an added shelf for things like coffee table books!
I think we can all get behind affordable hardware so let’s see what Target has come up with!


10″ Vintage Cuffed Drawer Pulls (Set of 2) | Vintage Library Drawer Bin Pulls (Set of 2)
Now, we are of course massive fans of Rejuvenation’s hardware but understand that they aren’t for everyone’s budget (especially when you have A LOT of cabinets and drawers). These look like a great budget alternative! The pulls are classic and under $13 for 2. The other pulls are so sweet with some wonderful details. 10/10
Target is trying to make our bathrooms chic!
Wall-Mounted Brass Ladder Towel Rack
I love this wall-mounted brass ladder towel rack. Depending on if you have more than one person using the bathroom daily you might want two but how cute would this be in a guest bath? Hotel vibes!
Now, let’s set a pretty table.
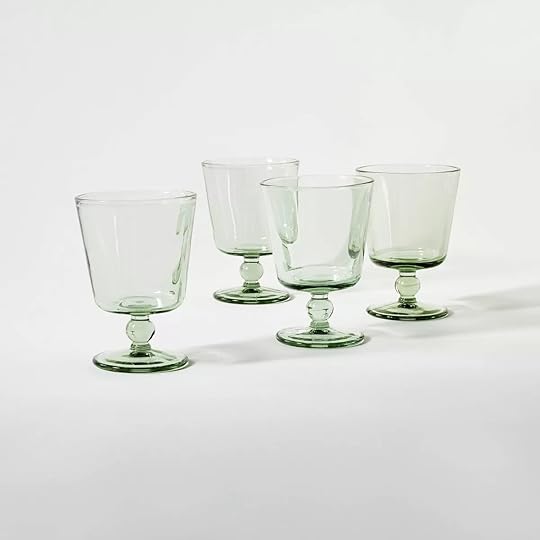

Glass Drinkware Set (Set of 4) | Windowpane Oiled Tablecloth | Acrylic Tumblers (Set of 4)
I love love a multipurpose beautiful (and affordable) glass! That green set is the perfect fun neutral color, with that sweet ball detail. And those glasses could be used for water, a cocktail, a mocktail, wine, etc. No notes. Then on the far right are those stunning baby blues that won’t break if you drop them! Perfect for inside or outside. Finally, I love the design of this tablecloth. Simple but sweet and adds just enough pattern to your tablescape.

I love a beautiful ceramic object and this one fits the bill perfectly. The curve is so pretty and it’s 10″ tall which is great! It’s not always easy to find affordable, tall, cool sculptures. Objects like this just help to add that added layer of visual interest.
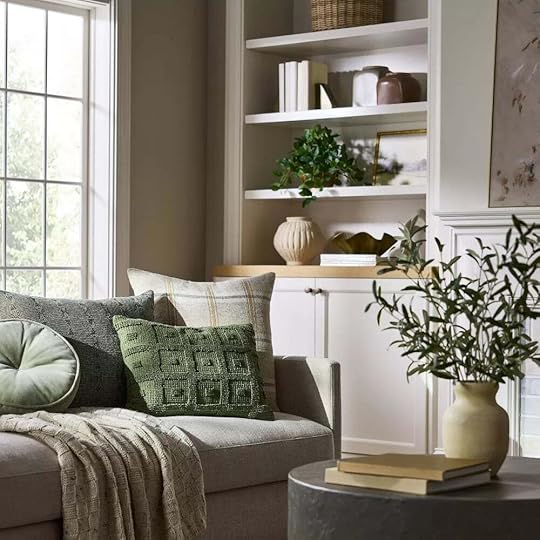
To end this fun little shopping trip, let’s get cozy!


Velvet Round Throw Pillow | Textured Grid Lines Dobby Throw Blanket | Tufted Geo Lumbar Throw Pillow
Sunday you’ll read about Em’s love for that round pillow Let’s just say, she’s a big fan. It also comes in 2 other colors! Then I love the look of this blanket. The reviews are great saying it’s super soft and a perfect medium weight. But I love the tonal pattern and cute fringe. So versatile! Comes in a few other colors too:) Lastly, is a pillow I suggested for my first Fix it Friday post about bedding. I just love the texture, pattern, and size. You could use it in any room with almost any style. This also comes in a few other color options!
Alright, time to pack up! If you were looking for something specific I hope this helped! Come back tomorrow for a Fix it Friday with a special guest:) It might help you even more!
*Photos via Target
The post The Best Home Decor At Target Right Now appeared first on Emily Henderson.
Emily Henderson's Blog

- Emily Henderson's profile
- 10 followers

