
Emily Henderson's Blog, page 255
July 6, 2019
45 Summer Dresses (Organized By the Kind of Bra You’d Likely Have to Wear With It…Or Not)

The women of EHD have no problem talking about boobs and our bodies freely at work, especially when important research for a blog post is at stake. Fun fact: the words and ideas you see on this blog are often a result of a collaborative group effort—whoever is writing will often ask the opinions of everyone in the office because we believe the group is stronger than one (and multiple perspectives are important and necessary). All of that is to say: we talk to each other. We hear each other, and we genuinely love that we are all different. So, when the topic of summer dresses came up, we got together and starting talking about what dresses we were into right now and what we realized this week was not necessarily profound, but we don’t notice it being talked about very often. We all unanimously agreed that when dress shopping, our specific bra preferences and needs were the #1 consideration. We want to be comfortable and, of course, feel good in what we wear, and for some reason, dresses give us some issues when it comes to the ladies. Some of us NEED to wear a bra—no exceptions. Some prefer a bra but can work with a dress that offers a bit of support. Myself, for example, will not go near a strapless bra because I find them so uncomfortable so often just go bra-less. SO, today we present our very first summer dress roundup by bra specifications. Let’s get to it:

1. Soft Utility Jumper | 2. The Cotton Weave Picnic Dress | 3. Bouquet Flutter Shirtdress | 4. Striped Wrap Maxi Dress | 5. V-Neck Tiered Cover Up Dress | 6. Midi Sundress | 7. Tie Belt Ruffle Trim Midi Dress | 8. Calista Gingham Linen Midi Wrap Dress | 9. The Jig Dress | 10. Faux Wrap Maxi Dress | 11. V-Neck Dolman Sleeve Dress | 12. River Island Belted Shirt Dress | 13. Patterned Dress | 14. Ruffle Sleeve Cotton Maxi Dress | 15. Smock Waist Peasant Midi Dress
Here we have your bra-friendly dresses. I have noticed a lot of the time a dress will seem bra compatible, but then you click on the site and notice it is backless. UGH. So annoying. We took the liberty of taking that stress out of your life by making sure each one of these does not have a surprise backless feature, or a weird cutout. You can rest easy knowing your bra is safe and unnoticeable here.

1. Loft Plus Off the Shoulder Button Down Midi Dress | 2. Monique Dress | 3. Denim Tie-Strap Button-Front Sundress in Star Jacquard | 4. Daisy Midi Dress | 5. Warehouse Linen Midi Dress With Buttons | 6. Emmie Dress | 7. Crochet-Strap Tiered Midi Dress | 8. Loft Plus Flower Branch Jumpsuit | 9. Women’s Plus Size Floral Print Dress | 10. Gingham Linen-Blend Cropped Plus-Size Jumpsuit | 11. Fit & Flare Plus-Size Tiered Maxi Dress | 12. Tie-Detail Dress | 13. Blue Life Summer Breeze Maxi Dress | 14. Faithfull Farah Smocked Midi Dress | 15. Smocked-Back Dress in Gingham
Anyone have recommendations for strapless bras that ACTUALLY stay put (particularly for a DD+ sized chest)?? I have never found one that doesn’t slowly inch downwards and have me fishing down my dress trying to pull that sucker back up all day long. It’s a problem. However, some of these actually appear to have some decent support (#4 and #9 for example) so you could probably skip the bra altogether (my dream). But, if you like a strapless bra, these dresses are going to work with that, for sure.

1. Lula Midi Dress | 2. Jade Midi Dress | 3. Satin Came Dress | 4. Troulos Lace-Up Midi Dress | 5. Floral Backless Maxi Dress | 6. Lille Mini Dress | 7. Signorinia Mini Dress | 8. Golden Skin Ruffle Hem Sundress | 9. Leopard Print Culotte Jumpsuit | 10. Juliette Dress | 11. Crochet-Trim Lace Up Cami Dress | 12. The Delphine Dress | 13. Tall High Neck Low Back Mini Dress | 14. The Lincoln Dress | 15. Frances Midi Dress
This category is for those who prefer to let ’em loose and free. A choice we fully support by the way (pun intended). I really do like going braless TBH, but it isn’t always shall we say, appropriate. I don’t have small boobs, so the circumstances are limited as to when I can don my outfits sans bra. HOWEVER, have you heard of this trick that the celebrities apparently do?? They duct tape their boobs. I am not even kidding. I am pretty sure Kim K even posted about it once. So when in doubt, tape your boobs, I guess? JK, that is horrible advice. Anywho, a lot of these dresses are either backless or have a tie-back situation but a trick we like to do is wear a white T-shirt underneath. It’s results are twofold: You can wear a bra and you can dress down a more formal looking dress (like #3).
Okay, that is all for today. What are your bra recommendations? Do you have any tricks for avoiding nip slips when a dress is rather tricky to work with in the chest region? Tell us your secrets.
‘Til next time
The post 45 Summer Dresses (Organized By the Kind of Bra You’d Likely Have to Wear With It…Or Not) appeared first on Emily Henderson.


July 5, 2019
Finally A DIY Anyone With A Paint Brush Can Do: A Series Of The Best Paint Ideas On The Internet
 image via yellowtrace | design by ester bruzkus
While I am currently a white-wall loving female, there was a time long long ago where my teeny tiny, zero natural light, New York “apartment” donned a cherry red accent wall with a surrounding 5-inch bright white border (paired next to a turquoise and gold Anthropologie wallpaper…). Sure, it was bold. Suuuurre, it was a questionable color choice for the space. BUT it was berry happy…ha, get it? Paint has the power to do that, to make a space fun and happy but at a FAR better price point than say Anthropologie wallpaper that sweet, dumb 23-year-old me thought she should splurge on. The great thing now (as opposed to eight years ago) is that there are so many incredibly cool, chic yet easy examples online that with a quick trip to your nearest paint store could be on your walls in a matter of hours. So if your room needs a refresh or you are yearning for something more than your average white wall, I have a ton of ideas that even the most hesitant DIYer could tackle. Plus, do you want to know what the best part is? Paint can be painted over. So aside from the money lost on paint, you can very easily change your mind. Emily herself will admit to doing this on plenty of different occasions. Let’s get to it so you can go get some paint.
Pardon my what will no doubt be endless referencing to my recent vacation but I was sitting in a cafe called Bristo Levante in Barcelona (that was obnoxious I know and I’m sorry) and I noticed that the calming pale pink wall color stopped about a foot short of the ceiling. Was that the first time I had seen this? No. But I was reminded of how simple yet impactful it was. AND EASY. Here are some visuals of what I am talking about.
 image via kammy
See how pretty and non-daunting this is? Get some a paint, tape, painting tools and you are in business. Our biggest tip for drama is to challenge the proportions of the standard chair rail height (about 3 feet). That means to go higher or lower than that height. For example, take the creative genius of Chzon and how they chose to play with a low height of the navy blue paint in the Henrietta Hotel in London. This small detail makes a huge, chic impact.
 image via chzon | design by chzon
One trend I have noticed and am here for is the use of limewash instead of the average paint sold in hardware stores. It creates a beautiful texture that not only gives depth to a space but really brings a wall to life. This treatment is not sold everywhere so you might need to do a little Google search and because of the texture isn’t super easy to cover up so renters should really think about how much they are willing to invest when they move out.
 image via the design files | design by chelsea hing
Moving on up…and by that I mean ceilings. Now if you really want some killer visual impact, paint your ceiling either a dramatic color or create a cool pattern. Not sure about this idea? Well, I am here to convince you otherwise…
 image via site unseen | design by elisa ossino
My heart hurts I love these dark ceilings (above and below) so damn much. I honestly can’t decide which one I love more. I think why they both work so beautifully is due to the high contrast of light and dark. There is still a sense of airiness because each space is so well balanced. This is something you should absolutely keep in mind if you are wanting to dive into this for your home.
 image via remodelista | design by pierre yovanovitch
If the solid look isn’t your jam and you want to go for some crazy cool stripes, well, below you’ll find my two favorite inspiration photos. First, let’s start with Sarah Sherman Samuel‘s forest green geometric creation for her son’s room. What I (we) love about Sarah is her ability to design a home for someone like Mandy Moore but then get super DIY and in a matter of hours create this awesome geometric ceiling design with nothing but paint and tape. It should also be mentioned that she eyeballed it. She is that good, people. My heart was actually racing as I watched her instastories and seeing how fast and loose she did this. I mean she is a pro so it wasn’t actually fast and loose but as someone who hems and haws over the tiniest of any design decision in my home, it was a rollercoaster of amazement and stress. The best part about this ceiling though is that anyone can do it…you just might need to measure because most of us aren’t Sarah.
 image via sarah sherman samuel | design by sarah sherman samuel
This next ceiling example I fell for as soon as I saw it. Not only do I love the overall design and color but the creativity to incorporate the sconces is simply too good. It’s playful, cool and with some planning wouldn’t be too hard to do something similar. Also, yes the stripes go across the entire ceiling and it’s very awesome. And while red might be a BIT bold for most of us, this could be so stunning in a colorblock look or even a subtle tone-on-tone (like a slate blue wall and a blue just a shade or two darker).
 image via elle decor russia | design by amber road
This next idea is THE drama queen of paint jobs. And while dramatic due to it’s dark and moody hues, it’s also kind of the easiest as zero painter’s tape is required because every last inch of the space is the same color. Yes, I mean walls, ceiling, doors and trim. Let’s dive all in.
 image via site unseen | design by elisa ossino
Quick and easy, no? Just lots and lots of really beautiful paint. 
July 3, 2019
All the Best 4th of July Sales For Your Home & Body
 photo by jason frank rothenberg for rachel ray every day
We are not sure when American holidays became synonymous with retail sales, but we are not complaining. If a 4th of July sale gives you that needed excuse to buy the one thing you’ve been eyeing for months, we support you. So, if you are interested in perusing sales before a day full of friends, fireworks and BBQs, we have you covered. And if not, we hope you enjoy TWO days off because working the day after the fourth is frankly un-American. Fair warning: the sales here are VERY good, and I admittedly splurged a bit while preparing this post, so you can’t say you haven’t been warned.
July 2, 2019
12 DIY Headboards That Everyone Will Think You Actually Bought

Happy Tuesday of a (hopefully) short holiday week! Contributing writer Laurren here. Today, I want to talk about my first and longest-running Pinterest search: DIY headboards.
You know when you’re decorating a room, like, say, a living room, and there’s that one piece of furniture you’re not really stoked on (for me it’s always a chair) but overall the room is still pretty good, so you take your sweet time replacing it? Bedrooms aren’t like that. The bed is pretty much the main event there—you can’t have a bad headboard/bed and a good room, so it’s important you get it right. But they’re also expensive, which may lead you down the path of many who dared to venture before you: “Can I DIY it?”
Eight years ago, that very thought sent me down a Pinterest rabbit hole from which I’ve never resurfaced. It’s not that there aren’t DIY projects out there, there just aren’t a lot of good ones. (“Good” to me means something I can make in a weekend and would want to buy if I saw it in a store. Basically, a DIY headboard that doesn’t scream DIY…or involve a crash course in woodworking and a shed full of power tools.)
Since I suspect I’m not alone in my hunt—and because I know you guys are great DIY-ers as evidenced here and here and here—I thought I’d share with you the EHD-approved fruits of my Pinterest labor.
So here it is, 12 totally doable headboard ideas you might actually want to DIY (this weekend?)…no wood pallets, barn doors, or old shutters in sight.
 image by sara ligorria-tramp | from: a colorful, happy home makeover for an incredibly deserving family
First up is the headboard Velinda designed for the team’s most recent Flash Makeover to spruce up and customize a bunk bed. All the DIY details are over on that blog post and remember, it can go straight on a wall (instead of the wood back of a bunk bed). How fun would this be in a geometric or floral print, too?
 image via sarah sherman samuel
Using a copper pipe, bits of leather, and two denim floor cushions from Urban Outfitters (though no longer available), designer Sarah Sherman Samuel crafted this cozy headboard for a nook in a guest bedroom—and we love it.
 image via l’essenziale
 This project is similar in style to Sarah’s, but its creator, Anna Kovalchenko, made the blue cushions instead of using a readymade option. Another plus to a DIY hanging headboard like this? If you take a risk with color and tire from it quickly, you’re not out big bucks. Just switch it out with something new. (We’d love to see this tutorial executed in a patterned fabric.)
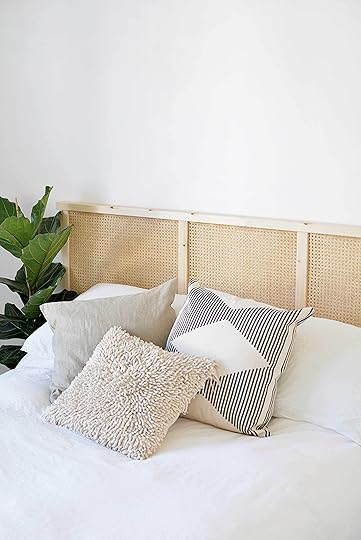 image via burkatron
Who doesn’t love an IKEA hack? Caroline of Burkatron made this beginner-friendly headboard using a $12 IKEA Ivar end panel and some cane webbing. (She seriously just stapled the webbing to the frame and trimmed the excess with scissors—so smart!) We love this project as is, but it would also be fun to experiment with painting the frame black. (If you need help visualizing, check out this piece from Urban Outfitters.)
 image via woventable
A bit more labor intensive than the previous projects, this 8 foot-DIY is the brainchild of Arizona-based designer Katie Hastings. She crafted these canopy headboards for her twin boys’ bedroom after not being able to find something similar in stores. (We love that she chose a fun, graphic pattern for this more traditional headboard style.) To get the rundown on how to make your own, check out Katie’s story highlights on her Instagram account.
 image via Treasures and Travels
Have two hours to spare? That’s all the time you need to whip up this colorful headboard by Tegan and Lindsay of the blog Treasures and Travels. This DIY is super versatile (think of all the fun color possibilities!) and no previous weaving experience is needed (just make sure you have a little space to stretch out).
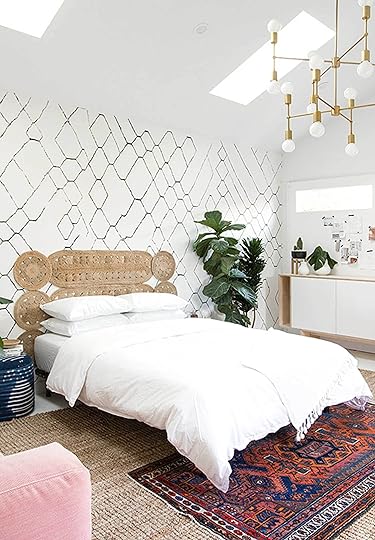 image via sarah sherman samuel
Looking to break up a patterned wall or add a little texture to your space? This clever DIY—another genius idea by Sarah Sherman Samuel—is as simple as nailing a few jute mats and runners to a wall. (Seriously!)
 image by tessa neustadt | from: brady’s DIY channel tufted headboard
Ah, the project that launched a thousand Pins! This obviously wouldn’t be a DIY headboard roundup if we didn’t include THE DIY of all DIYs, Brady’s channel tufted creation. It looks like a lot of work—and it will take some time—but skill-wise, Brady says it’s really not too bad once you break it down. You can use any fabric you want as long as it’s upholstery weight, which brings us to our next DIY…
 image via design*sponge
Grace Bonney of Design*Sponge and her wife, Julia, tackled Brady’s DIY for their master bedroom using a spotted indigo fabric, and the results are stunning. Instead of covering the box spring to match, as Brady did, they opted to pair the headboard with a white platform bed.
 image via angela rose home
A simple (and doable!) wingback-style headboard is a hard DIY to find. Most are not very beginner friendly or are covered in nailhead trim, which we suspect in the case of a DIY is less about style and more about hiding imperfections. That’s what makes this project by Angela Rose Home so great—not only is it beautiful, but it also requires zero sewing skills. Make it extra easy on yourself by having your local hardware store pre-cut all the wood pieces for you.
 image via house tweaking
Okay, so we’re not 100 percent sure how this headboard was made—the house is an Airbnb that Dana Miller stayed at and photographed to feature on her blog House*Tweaking—but from what we can tell, it’s likely as simple as cutting a piece of plywood to size, wrapping it in batting, placing a vintage wool blanket over the front and stapling it taught in the back. The shelves are likely attached with a bolt and washer from behind (make sure to predrill those holes in both the shelves as well as the wood piece of the headboard…oh and the fabric).
 image via fabric paper glue
This headboard by Mandy of Fabric Paper Glue was built to accommodate the low walls and pitched ceilings of her attic master bedroom, but we think it would be beautiful in any space. Even better? The whole thing cost her just under $200.
Okay, that’s it! Have you DIYed your own headboard? We’d love to see it! Make sure to share it on Instagram using our #ShowEmYourDIY and #ShowEmYourStyled.
The post 12 DIY Headboards That Everyone Will Think You Actually Bought appeared first on Emily Henderson.
July 1, 2019
Mountain House Monday: Behind the Scenes of the Shoot and WHAT HAPPENS NEXT?

After almost two years working on this project, we have finished the mountain house. That’s. just. nuts. I’m up here with my family for my kids’ summer break and pretty much living a dream. Yes, there is a huge sigh of relief and yes, I’m intentionally trying to NOT think about what’s next (but the brain doesn’t stop). We shot it last week for a magazine (you might have been following along on Insta stories), and it’s styled out completely with flowers, pistachios, branches…the works.

Its insanely fun to sit in your own work that you are proud of, let alone show it off to grandparents, friends and my brother’s family. Next week, when I get back from vacation, we are picking and announcing the winner of the “I Design, You Decide” contest (with a fun surprise for you guys, too). But here are some fun behind the scenes of the shoot, without showing you too much (House Beautiful wants things to be kept relatively a secret ’til the issue comes out August 13th).


A huge thank you to my design and production team Julie, Emily B., Velinda, Erik, Sara and Veronica for a long week of work and, of course, the editorial and marketing teams (Arlyn, Jess, Ryann, Grace and welcoming Caitlin today!) are now gearing up for the massive reveal. We are trying to figure out the best way to roll it out (learning from Portland’s reveal mistakes) and right now have landed on doing our version of a “Shark Week” where we do back-to-back reveals that are packaged up in a way that makes sense for experiencing the house so it doesn’t last for weeks/months. We’d be sure to do a big push prior so everyone can get pumped and know it’s coming, and you know what you’re coming back for every day for the week. It will take time to edit the photos, pull together the resources and write the posts. Additionally, we want to take a ton of video and social stuff so you can really see and experience it in different ways.
While we’ve already revealed a few rooms (kitchen, kids’ room, powder bath), this would be mostly everything else, all together.
This doesn’t mean we’re giving up on Mountain House Mondays. We’ll be leaning into more of renovation information for those of you who want to learn more. Things like picking materials or lighting for an entire house at once, or details to pay attention to that you might not think to (like what we learned about designing our stairs and railings). We’ll even address what really went into recladding our entire A-frame ceiling. Some of you will fall asleep, but for any of you who are pre or mid-renovation, you’ll want to know these things because BOY, LESSONS WERE LEARNED.
Although, I’m VERY happy to say that fewer lessons had to be learned than in Portland. I suppose that’s how it works; you gain experience with each project, learn more and more, make fewer and fewer mistakes and while you’ll never learn it all (by nature of every project needing to be different and unique), I feel like a MUCH better designer now than I did a year and a half ago. Which means that yes, we might be taking on some very selective residential client work to document for you guys…
So if any of you have suggestions or requests on how we roll this out (remember that each room has 10 photos at least with a lot to say and partners to shout out so we can’t do it all at once) OR if you have requests on other mountain house topics that we can cover until the reveals, please let us know in the comments. We want to show you how the sausage is made, but only if you like reading about this sausage.
June 30, 2019
The Link Up: The Summer Bag Emily is SO Excited About (+6 Other Juicy Team EHD Recommendations))
 image source
 Reunited and it feels so good! Our little EHD fam is finally all back together. We know vacations are “important” for mental health and whatever but we REALLY miss each other when we are apart for an extended amount of time. Needless to say, the catching up was pretty nonstop and lots of new recommendations were rapidly being traded on the daily. Here are our new favorite finds this week…
Emily’s exact words were, “I WANT THIS.” The Henderson’s are doing a lot of schlepping this summer, so it’s so nice for Em to have a smallish bag for her essentials (wallet, sunglasses and phone). This way they don’t get lost in her bigger beach bag. Also, it’s 25% off right now!
Not only does this house, owned by Claire Mazur and Chris Roan, have Jess’ all-time dream chair (the chunky leather and wood beauties in the opener photo) but it’s a stunning tonal oasis that had some layout issues they had to get creative with.
Velinda got turned onto a friend of a friend, Mike Beavers, who does incredible woodworking projects and she’s dying to collaborate soon/find a spot for one of his chairs in her home.
Grace told us all to GO. WATCH. season 2 of Fleabag on Amazon Prime. She first discovered Phoebe Waller-Bridge in Crashing in 2016 and has been hooked on her shows ever since. Fleabag season 1 was honestly so long ago (way before the rest of America fell in love with her because of Killing Eve), but season 2 came out fairly recently. She writes so well and makes you think about “life things” and she really gets it and sometimes, like in this season, makes you question (in a good way) your own beliefs, to the point that you’re crying for the lead character at the end of the season finale.
On Jess’ vacation, she made a stop in Marrakech, Morroco, and naturally bought a rug. She felt it was nearly mandatory and wasn’t mad about it. She stumbled about Les Nomades de Marrakech, a huge and amazing rug shop that also sells online! She can 100% vouch for the beautiful designs and super high quality.
Arlyn first saw this Calpack backpack during a trip to Target HQ on one of the very stylish press team members but then she lost track of the brand and was so sad. THEN she saw someone talking about it on Instagram and she took it as a sign from the retail gods to buy it. She’s been looking for a new work bag for probably two years that would hold her 15” laptop along with her wallet and personal items and THIS IS IT. It’s gorgeous, very reasonably priced, and she promises everyone will compliment you on it (if you care about that sort of thing…don’t lie, you do). P.S. We ALL complimented it the moment we saw it.
Ryann has been coveting this shirt by The Line by K for SO long and finally bought it this past week. It is the perfect combination of comfortable and sexy. She wants to wear it every single day for the rest of her life.
There ya have it! Enjoy the rest of your weekend and hope you are pumped for is hopefully a great, short holiday week.
The Link Up: The Summer Bag Emily is SO Excited About (+9 Other Juicy Team EHD Recommendations))
image source Reunited and it feels so good! Our little EHD fam is finally all back together. We know vacations are “important” for mental health and whatever but we REALLY miss each other when we are apart for an extended amount of time. Needless to say, the catching up was pretty nonstop and lots of new recommendations were rapidly being traded on the daily. Here are our new favorite finds this week…
Emily’s exact words were, “I WANT THIS.” The Henderson’s are doing a lot of schlepping this summer, so it’s so nice for Em to have a smallish bag for her essentials (wallet, sunglasses and phone). This way they don’t get lost in her bigger beach bag. Also, it’s 25% off right now!
Bowers’ cousin Leah lives in Charleston, South Carolina, and turned her on to this up-and-coming local (to her) artist, Katherine Dunlap. If you are looking for colorful and soulful art, look no further. She is particularly drawn to her pool scenes. Katherine also recently did a collab with artist Chambers Austelle and their styles work together beautifully.
Not only does this house, owned by Claire Mazur and Chris Roan, have Jess’ all-time dream chair (the chunky leather and wood beauties in the opener photo) but it’s a stunning tonal oasis that had some layout issues they had to get creative with.
Velinda got turned onto a friend of a friend, Mike Beavers, who does incredible woodworking projects and she’s dying to collaborate soon/find a spot for one of his chairs in her home.
Grace told us all to GO. WATCH. season 2 of Fleabag on Amazon Prime. She first discovered Phoebe Waller-Bridge in Crashing in 2016 and has been hooked on her shows ever since. Fleabag season 1 was honestly so long ago (way before the rest of America fell in love with her because of Killing Eve), but season 2 came out fairly recently. She writes so well and makes you think about “life things” and she really gets it and sometimes, like in this season, makes you question (in a good way) your own beliefs, to the point that you’re crying for the lead character at the end of the season finale.
On Jess’ vacation, she made a stop in Marrakech, Morroco, and naturally bought a rug. She felt it was nearly mandatory and wasn’t mad about it. She stumbled about Les Nomades de Marrakech, a huge and amazing rug shop that also sells online! She can 100% vouch for the beautiful designs and super high quality.
Sara finds this whole series on personal salaries so interesting, informative and just plain juicy.
Arlyn first saw this Calpack backpack during a trip to Target HQ on one of the very stylish press team members but then she lost track of the brand and was so sad. THEN she saw someone talking about it on Instagram and she took it as a sign from the retail gods to buy it. She’s been looking for a new work bag for probably two years that would hold her 15” laptop along with her wallet and personal items and THIS IS IT. It’s gorgeous, very reasonably priced, and she promises everyone will compliment you on it (if you care about that sort of thing…don’t lie, you do). P.S. We ALL complimented it the moment we saw it.
Ryann has been coveting this shirt by The Line by K for SO long and finally bought it this past week. It is the perfect combination of comfortable and sexy. She wants to wear it every single day for the rest of her life.
Veronica says these linen pants are soooo comfy and cheap and come in three different colors. She’d wear them every day if she could! If you want them to be baggy, she’d suggest going up one size because they do shrink in the wash.
There ya have it! Enjoy the rest of your weekend and hope you are pumped for is hopefully a great, short holiday week.
June 29, 2019
Because You Asked: My Favorite Workout Clothes, Sneakers & More
 photo by eronica crawford for ehd
It’s about that time where I start to think about implementing more exercise in my life. I’m TERRIBLE at pushing myself and find myself listening to Armchair Expert (Dax Shephard’s podcast which is GREAT) and just walking if I don’t listen to a workout app (see below). But the other day, in an attempt to get my active juices flowing, Brian and I went MOUNTAIN BIKING. I am talking the extreme kind where people are wearing pads all over their body and jumping off ramps which was wildly fun if not kinda terrifying. We are currently shopping for our summer sporting routine up in this mountain town that we can do either together or as a family so we don’t just sit at the beach and drink rosé all day. Mountain biking was definitely the top of the list and this weekend we are trying kayaking (is that an actual workout?), paddleboarding and rock climbing (there is a close-by rock climbing outdoor gym which would be fun to get into). What else do people do?? Pickleball? Tennis? Water skiing? Dunno. Anyway, you guys DM me all the time asking what I’m wearing when I workout so we pulled together a quick post with all my current favorites and as always, we want to hear your suggestions, too.
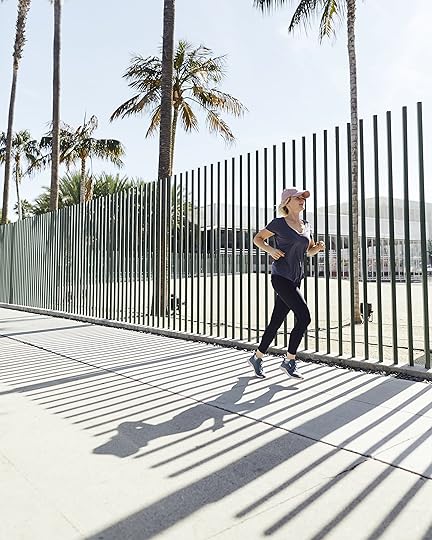 photo by sara ligorria-tramp for ehd
That was my uniform for a while, mostly because the cuts were good, flattering and comfortable. But that shirt is no longer available so I’m kinda in the market for a new shirt (I don’t love tank tops on me). This one was great because it was fitted enough, but not tight and came down in the front, up on the sides and had a scoop neck: all cuts that I really like (while staying put and not bouncing up and showing tummy while running). I just ordered this one so I’ll let you know the verdict. But what I DO know is the following seven things are my regular go-to fitness items that I can recommend:

Lululemon Baller Hat, $38:
I don’t really know why I like this hat so much but I do. It’s not like I have tried on every hat out there and can say with conviction that it’s the best one, but it looks cute, is lightweight and is really simple. I’ve been wearing it for over a year (since Souptember—OMG do you remember Souptember?) and I haven’t washed it once so that’s where I’m at as a human being. Whatever you do, DO NOT think it’s okay to borrow your husband’s favorite hat for any cardio exercise. He looked at me afterward and was so confused why I would think that is okay. Whoops!

Lululemon Speed Up Tight, $108:
These are my favorite pants for most activities because my phone, wallet and/or ID can fit in the zipper pockets. The waist has a thick band making it so it doesn’t cut in and is kinda high waisted. Nothing drives me more nuts than my tummy coming out and over my workout pants while running or doing yoga and then constantly having to pull up the waist. These stay put and keep things in.

Fabletics Seamless High-Waisted Mesh 7/8, 2 for $24 (with VIP membership):
I just got these and really like them (although I wish it had a pocket). The bright red is VERY good and the mesh feels a little more stylish. Plus, I like that when I’m hiking around with the kids in the woods behind our house they can find me easily. Without the VIP membership, they are $65, but if you like new gear every month then they are really inexpensive (I was super skeptical about any workout pant being $12 TBH, but I ended up really liking the fit).
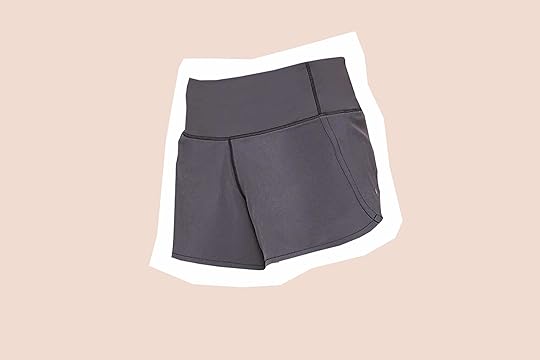
Lululemon Run Times Short II, $58:
These are really great running shorts. The waistband is thick and semi-high-waisted so, again, everything stays in its place. They also have a pocket in the back to hold a card or ID (great for going on runs in your neighborhood). They have a 4-inch inseam so they don’t ride up your bum, or you know, other places.

Nike Free TR8, $100:
I’m a Nike loyalist, being from Portland and two of my best friends work there. I typically ask them what is the best shoe for running and they both said quickly this one. I then went on to beg them to open up a store close to me so I could try on more workout clothes because workout gear (and swimsuits) is the one thing that I really don’t like buying online. Let me rant about that for a second—I have now, NO JOKE, bought and returned nine swimsuits this season, keeping only one of them. It’s just so annoying. I wish there was one big swimsuit store that we could go to try everything on in person because it’s such a waste of time and packaging to try and return so many. I have a few more on the way (just ordered this one) because I’m now on the hunt for suits that are more modest and stay put because when hanging out with father-in law, brother, friends husbands and, of course, young kids, I like to opt for ones that are less revealing and all my favorites suits show a lot of the ladies. Let me know if you guys want a post about what I actually bought, love and feel comfortable wearing.
But back to these shoes. They are lightweight, cute and comfortable. I feel like I can run fast in them and are easy to pull on and off (have you heard of my disdain for laces and tying my shoes? Who’s got the time??)

XTFree Bluetooth Wireless Sweat Resistant Earbuds, $50:
These are my go-to headphones. Again, I haven’t tried every one on the market, but I have a few different wireless headphones and prefer this every time. They stay put, have the controls on the cord (not on the actual earpiece like some others which means you can accidentally turn them off if you are adjusting them) and they stay in my tiny ear holes. I have found that much cheaper ones are, well, cheap, but I’ve spent more and have not felt that it’s worth the dough.

Aaptiv Workout App, $14.99/month or $99/year:
I have a theory that personal trainers (like interior designers) might be going away for most people except the highly wealthy because of apps and the Internet, which make is just so much more convenient and cheaper. I’ve had personal trainers over the years and while I love having them, trying to coordinate time (they are always booked in the morning) and, of course, the fee (in LA they start at $80 if you want them to come to you) is pretty cost prohibitive. I’ve tried group classes to save money but with my schedule, it’s really hard to find the right class at 6 am. LONG STORY SHORT, I’ve been doing Aaptiv since Souptember and it’s the only real way that I’ll workout and even remotely push myself. I know that if I had a personal trainer, I’d get pushed more, but it’s a good substitute that is FAR more convenient and affordable. I’ll often just go on a 22 minute run with intervals and lunges (Akeem is my favorite trainer) and then if I’m up for it, I’ll try an 8 minute HIIT workout or strength training right after. Just the intervals, which include sprinting, get my endorphins up and change my day drastically. Again, it hasn’t really gotten me a six-pack because I don’t do it enough or hard enough but it’s good for maintenance and stress relief. I haven’t tried the yoga yet and if anyone can recommend the best power yoga instructor on the app, that would be awesome.
 photo by veronica crawford for ehd
I’d love recommendations on sports bras and shoes that are really supportive for tennis because while I played in high school and was actually pretty good at it, the last time I played was 8 years ago and I sprained my ankle pretty badly. Any good shoes for lateral moves? Any recommendations for good family outdoor summer sport or activities? What age can kids start rock climbing? We’ve tried hiking and we just end up carrying them…help.
June 28, 2019
“What’s Good?”: A Local’s Guide to All the Best Places in NYC
 image source
If any of you read my MOTO intro, you know I have a deep love affair with New York City (as do many of the other team members). The culture, people, energy, FOOD are all pretty perfect in my book. But sadly despite living there for over five years, my book on what is new and fresh in the city that never sleeps is quite frankly outdated outside of my ol’ faithfuls. Whenever I go back, I rely on my best friend Casey to take me to all the wonderful new places that have popped up since my departure. She’s basically the go-to travel insider for everyone she knows (and not just for NYC but for almost any major city in the world). How she does it, none of us will ever know but damn am I glad she does. So when the edit team got to talking about doing a travel guide series, I immediately piped in to say Casey had to be part of this because I knew she would make it special. I tend to feel utterly underwhelmed by almost every city guide I read. What I want is to know about great places actual locals go to (with a hint of must-see tourist stuff) or just anything off the beaten path…and that is what this list is. Sorry no bagels or pizza here, but a curated list of everything you will want to see, do, eat and drink in one of the best cities in the world during the summer.
First, let’s start with some insider New York City travel hacks, because understandably, the city can feel a little overwhelming at first so these tips are here to make it a little less stressful and a lot more enjoyable…as it should be. I will let Casey take it from here.
 image source
NYC Ferries are a great way to see a new view of the NYC skyline while commuting on the river from Manhattan to other boroughs.
If you are in NYC for two or more days, I would suggest a weekly metro card to get the most out of your subway travels. $33 for a weekly versus $2.75 every time you enter the subway.
Take the subway to the bus and you will get a free transfer.
If it’s a nice day, walk any bridge to get from Brooklyn to NYC. The Williamsburg Bridge is my favorite way to commute from the Lower East Side to Williamsburg.
I would always suggest walking or taking the subway to get around the city but if you are up to it, Citi Bike is a bike sharing service available all over the city.
If you are headed out of JFK, preload your metro card with $5 before you get to the airport. This way you can transfer to the air train at JFK without waiting in line.
Citi Bike stations are all over the city offering an easy, affordable way to bike with passes from an hour to a full day. Download the app and start your biking adventure!
TodayTix app is great to get discounted Broadway show tickets (without standing in a crazy line in Times Square).
NYC Ferry App: purchase your ticket ahead of time and avoid the ticket lines.
Resy app for all your restaurant reservations. If a place is not available, set a notification and the app will update you when it becomes available.
Transit app to help you get around the city and never miss a train.
 image source | space: devocion
Devocion (Flatiron & Williamsburg): Let’s talk about a coffee shop that is not only simply beautiful and very EHD approved but 100% Colombian coffee, origin to roaster in 10 days! The draft cold brew is my favorite with a guava croissant.
Sweatshop (Williamsburg): This mini Australian coffee shop has a menu that serves up the best avo toast and brekkie bowls with indoor/outdoor seating as you watch all the hipster pass by.
Variety Coffee (Chelsea, UES, Williamsburg): I used to see everyone on the subway on their morning commute with a Variety coffee cup. When I finally checked it out for myself, I got it. The iced almond latte infused vanilla syrup was THE BEST!
Butler (Williamsburg & Dumbo): You can’t go wrong with anything on this menu but I highly recommend picking up a fresh pastry or the breakfast empanada. Plus, the views sipping your coffee at their Dumbo location overlooking the Brooklyn Bridge is not too shabby.
Merriweather (West Village): Grab a cup of coffee in the heart of the West Village as you watch the cutest dogs walking down Hudson Street.
Seven Grams Caffe (Tribeca): They call their in-house baked pastries “bakes”, which they made fresh daily…everything from vegan bites to freshly baked croissants, though the best is the baby Nutella babka.
Abraco (East Village): This was one of Jess’ favorite spots when she lived here and for good reason. It’s family owned, delicious and their olive oil cake is to die for.
 image source | space: oxomoco
Sonnyboy (Lower East Side): It’s a small menu but when I took Jess and Julie here, we were eyeing everything on it! The stracciatella and beef tartare did not disappoint. The burger is a must, with shoestring fries and a Tromba tequila cocktail.
Wayla (Lower East Side): The backyard is incredible with ample space. New Yorkers don’t even know what to do with all the room, let alone having this outdoor space on the Lower East Side. The chef, who is from Bangkok, makes the best papaya salad outside of Thailand, and the moo sarong is a must!
Don Angie (West Village): Probably the hardest reservation but definitely worth it! Here is a tip: Make multiple notifications on the Resy app to snag a last-minute table.
Kings County Imperial (Williamsburg): The Williamsburg location has a backyard dining area and they maintain three gardens that grow a variety of ingredients for their menu. The Manhattan location has $1 dumpling with $5 dollar tall boys on happy hour.
Smith & Mills (Tribeca): You can easily miss this tiny place but once you go through the double sailor doors, you are entered into a mini oasis hidden in Tribeca. Cocktails, a burger and a bowl of white wine mussels are the best. If they have a wait, hop next door to their sister restaurant Yves for a drink at the bar.
Misi (Williamsburg): Misi is another place that is hard to get a reservation for but set those Resy notifications before your trip to grab a seat at the bar overlooking the kitchen. The pasta is made in-house daily and the charred marinated peppers with creamy whipped ricotta are insane.
Freemans (Bowery): Talk about ambiance. You have to walk down a little alley in the Bowery, and as you approach the end, you will see the restaurant Freemans. Grab a cocktail at the bar as you wait for your table in this quaint old school house.
Oxomoco (Greenpoint): Greenpoint’s only Michelin-star restaurant, and they received it within the first year being open. They definitely lived up to it with the dinner menu. Everything from the tacos, to Carne Brava and the frozen paloma are a dream. Another great spot with people who have dietary restrictions.
Jones Wood Foundry (Upper East Side): If you want really good British food and are on the UES then absolutely check out this restaurant. Jess used to work at a restaurant with the same chef so she can 100% vouch for the deliciousness.
Caracas (East Village & Williamsburg): This Venezuelan arepa bar is a lunch MUST for Jess whenever she comes to town and I love it, too. The East Village location is very small and neither take reservations but they’re worth the wait. The De Pabellon is our favorite but you really can’t go wrong. Also very affordable.
 image source | space: jack’s wife freda
Atla (NOHO): This restaurant felt like I was back in Mexico City with the guacamole and oversized purple tortillas. The build-your-own fish milanese tacos are delicious and you have to try the geyser gose verde michelada with homemade avocado tomatillo mix.
5 Leaves (Greenpoint): No reservations here but grab a coffee from their side window and enjoy the scene in Greenpoint as you wait. Favorites: The ricotta hotcakes with foot long bananas and a side of homemade honey butter.
Shuka (SOHO): My friends and I wanted everything but the whipped feta + pistachio, fried halloumi with spice yogurt and green shakshuka were our faves. We had such a great experience we ended up going two weekends in a row for brunch. Also, a must is the baklava cinnamon rolls! This place is great for a mixed group of friends since you can have brunch being gluten-free, vegan, pescatarian, vegetarian, or a meat eater.
Ruby’s Cafe (Nolita): Enjoy incredible coffee as you sing along to every N’SYNC or Britney Spears song from the 2000s. The breakfast menu is large and offers everything but I would say the egg sandwich with a side of french fries is a solid choice. Or opt for the green egg bowl.
Mother’s Ruin (Nolita): It’s a GREAT bar but the brunch is killer. The crab cake benedict (Jess’ favorite) and fried chicken sandwich are staples. Don’t leave Mother’s Ruin without having a dressed up Tecate and their waffle parmesan fries. Tell Scotty or Jacob that Jess Bunge and Casey sent you.
Sundays in Brooklyn (Williamsburg): You must order the famous malted pancakes with hazelnut maple praline to start. The cocktail menu is always changing with some of the most innovated and over-the-top presentation for each cocktail. Everything on this menu is incredible, you can’t really go wrong.
Jack’s Wife Freda (West Villiage SOHO, Chelsea): It’s just so good and won’t disappoint.
 image source | space: supermoon bakehouse
Economy Candy (Lower East Side): Basically, a child’s dream is stepping into Economy Candy. You’ll find vintage candy…and anything you could possibly imagine from all around the world.
Supermoon Bakehouse (Lower East Side): This futuristic bake shop has reinvented the croissant. They feature a monthly soft serve and the lemon poppy seed cruffin is a cross between a croissant and muffin (get it).
Van Leeuwen Ice Cream (East Village): A New York staple ice cream shop that has the freshest ingredients serving dairy and vegan ice cream for all! Plus, they are open late every night.
Dana’s Bakery (Upper East Side): The funfetti mookie is my FAVE! A macaroon in the middle of a cookie. Every month, they have a new macaroon and mookie special.
By the Way (Upper East Side): Hands down one of the best vegan, gluten-free bakeries in NYC. The linzers cookie, raspberry bars and Amy funfetti vanilla cake are MUSTS.
Levain Bakery (Upper West Side): Everything is baked daily with gluten-free options. The dark peanut buttery dark chocolate cookie or the famous 6 oz chocolate chip walnut cookie shouldn’t be missed.
Milk Bar (Mulitple Locations): Order everything from the crack pie to the cereal soft serve and grab some funfetti truffles to go!
 image source | space: grand banks
Dutch Kills (LIC): Passing by, you would never know about this hidden gem, under a freeway overpass. The cocktail menu is always changing but this bar is a staple in the neighborhood. Their sister bar is Fresh Kills in Williamsburg.
Fairfax (West Village): This quaint wine bar feels like you are at home in your best friend’s fashionable living room. They offer the best orange wine (also, check out their sister restaurant, Jeffrey’s Groceries for a great New England oyster selection).
Lover Boy (Alphabet City): Mother’s Ruin opened Lover Boy in Alphabet City, and I love this place in the summer when they open the front doors. Check out their dressed up Tecates.
Last Light (Bowery): This rooftop bar in the Bowery has amazing 180 views of uptown and downtown. Love the big booth and ample outdoor space. Plus, a $7 beer and $12 cocktail is kinda unheard of for a hotel rooftop bar in Manhattan. Enjoy this space while it’s under the radar.
The Springs (Greenpoint): This bar is great in the summer, offering a huge backyard where you can lounge drinking all the rosé or cocktails you desire. When a New Yorker finds a large outdoor space, it is everything!
Grimms Brewery (East Williamsburg): My sister found this bar and it has turned into a great spot to hang with a big group of friends. They are known for serving the best sours but if that’s not your jam they have different types of beers all brewed in house. A pop-up food vendor is in the back along with a DJ spinning vinyl most nights.
Diamond Lil (Greenpoint): I found this place through a friend for my birthday and it was the best. The cocktails were delicious and the green velvet mini booths were the cutest.
Dante (West Village): This bar opened in 1915 on MacDougall Street in the heart of the village. Still has the old school New York vibe with every negroni you could possibly want to try. A tip for this spot is their happy hour on Sundays!
Grand Banks (Tribeca): Only open in the summers and it can get packed but it’s worth the wait. Order oysters, apps and a cocktail as you overlook Manhattan on the Hudson River! Make sure you sit at the bar at the back of the boat to get the best seating.
Fish Market (Financial District): On Mondays and Tuesdays, order off Mama’s menu with whole $16 lobsters on happy hour (be sure to get the fried pork rice as a side). The owner Jeff likes to do free shots of Jameson with nearly everyone who comes inside.
 image source | space: brooklyn flea dumbo
Brooklyn Bridge Pop Up Summer Pool offers a free way to cool down. Get there early to secure your time slot.
North Brooklyn Farm is simply the best-hidden gem. Open to the public offering free yoga, farm to table dinners, DJ nights on the farm or go hang in the farm admiring the flowers and vegetable gardens.
Free Summer Stage concert in Central Park
Picnic in Central Park with the NYC Philharmonic
Brooklyn Flea and food trucks under the Manhattan Bridge (DUMBO)
Rooftop Cinema Club is a cheap way to have a different experience than the free summer screens all over the city in NYC parks
Natural History Museum
Spy Museum
 image source | space: color factory
Elizabeth Street Garden (Nolita): Nolita’s only large open park filled with flower beds, activities for kids, and a nice area to relax.
Domino Park (Williamsburg): When Domino Park opened last summer, it became a staple in the neighborhood. This park is not only beautifully designed but you can lounge on the grass picnicking with your own lunch or order tacos from Tacocina. This park has an incredible playground, beach volleyball court, dog park, and ample seating overlooking all of Manhattan.
Brooklyn Bridge Park (Dumbo): I would say this is the largest park with the most activities available for every type of person. It is fun to take the ferry over and walk through the park. Each pier offers various activities from roller skating, bbq pits, swings, food vendors, art installations.
Color Factory (North Tribeca): The Color Factory finally landed in NYC and I couldn’t be happier when the tickets were released. This museum is interactive showcasing all different types of artists and their art installations. Every room is filled with unique activities that show color in a different way. The photos and fun are endless! Plus, don’t leave without picking up a Color Factory neighborhood map to go on a scavenger hunt throughout the city. Extending your experience beyond the Museum to the streets of New York City.
Bowery Street Mural (Bowery): I love how this mural changes every few months featuring new street art. The best is when you stumble upon the artist creating their new project as everyone around them goes about their day. Favorite piece of art to see on the streets of NYC and a fun photo opt while you are downtown.
Canal Street Market (Chinatown): This market is a great place for when everyone wants to eat/try something different. Various NYC vendors offering amazing food and local shops where you can find unique gifts for yourself or a friend.
The Roxy Hotel Movie Theater (Tribeca): Live jazz brunch on the weekends or go experience a vintage movie at the Roxy Hotel theater on a hot NYC summer day when all you want is AC and a seat.
Governor’s Island: This day trip is best for a picnic or to bike ride around the island. Pick up a map to see all the free activities for kids, check out the long slides, or hang out in hammock valley to take a nap. This year, you can even go glamping in yurts on the island.
Rockefeller Park: On the weekends, Rockefeller park has free kid activities along the Hudson River. Enjoy fun games to play in the park. It is stroller city over there but a great place to bring your kids to blow off some energy.
Head all the way uptown to check out the Cloisters, an extension of the Met showcasing medieval art in a French monastery.
 image source | space: moma
Movies in the Park (All Over): It’s one of the best free and fun things to do on a warm summer night.
The MoMA: Go on Friday nights from 4pm to 6pm for free admission.
The Met: Admission is a suggested donation. Each summer, the Met showcases a new art exhibit on the roof. Grab a drink on the rooftop to get breathtaking views of Central Park.
Brooklyn Museum: The first Saturday of every month has free admission from 5pm to 11pm.
The Staten Island Ferry (Financial District): If you want to see the Statue of Liberty but don’t need to go on the island or want to pay, then hop on the Staten Island ferry. It departs every 30 minutes, is free and even serves beer. You will get pretty close to Lady Liberty and skip the hassle.
Hope you were able to take that ALLLLL in. It’s a lot but once you are there, you will be so happy you have this guide because you will undoubtedly have the best time and feel very cool doing it. Also, if you have any further NYC questions, feel free to DM Casey on her Instagram. If we continue these guides, what cities are you interested in? Where are you going? We want to help make it awesome.
The post “What’s Good?”: A Local’s Guide to All the Best Places in NYC appeared first on Emily Henderson.
June 27, 2019
Countertops 101: All the Details on Marble, Quartz, Quartzite (& What’s Right for You)

Hi everyone, it’s Grace, Social Media Manager for EHD and trained interior designer. You haven’t seen my name around these parts much, but I’m always in the background, promise. When Emily and Arlyn asked me to take a stab at writing this post, between all the fear that flashed through my eyes and the sirens that went off in my non-writer head, I had to laugh. Ironically, in college, I had a couple of geology classes that I thoroughly enjoyed. We had to memorize so many rock types, which stone turns into what, and also be able to identify them from a photo or sample on command. I surprisingly aced those classes and enjoyed all the lectures, so naturally, I thought being a geologist was my calling. Because obviously all you need in order to become a geologist is be great at memorizing all the rocks! My young and naive self told my dad about my amazing career discovery and he literally laughed at my face while reminding me that geologists go and spend time on the ground under the sun. I hate going outside and spending time in the heat (my kryptonite). Crushed and dejected, I was, I tell ya. But just because I couldn’t pursue that path doesn’t mean you can’t benefit from the things that have refused to be memory-dumped out of my brain from those days.
Today, we’re talking to you all about stone slabs for your home, how to pick them, and the pros and cons of each. And while EHD has had its fair share of kitchen and bathroom designs, we’re by no means the absolute pros, so to fill in the missing pages from our own research, Brooke, our amazing contact at Bedrosians (where we got most of our slabs for the mountain house), set up a call so we could pick the brains of a few people in the company. Going for natural stone can be a commitment, but stick with us and you might just end up with the stone of your dreams.
There are a lot of options, most you wouldn’t be using in your everyday space like a kitchen or bathroom, so we’ll only go through some of the more popular ones in the market right now. But first, there are three things to consider before running out and buying that milky white marble with gorgeous blue-gray veining you just saw on Instagram.
1. What is your lifestyle?
Listen up! This is, hands down, the most important tip of all (and everyone that we talked to at Bedrosians agreed—thanks Michael and Anna!). Think about your lifestyle and how you are as a person. Dig deep, guys. Are you an extremely busy person who is normally running late in the morning and don’t have time to meticulously clean up a massive spill as you frantically run out the door, or are you a helicopter parent to your surfaces? This is a safe space. There is no judgment here. You can be honest to yourself. Wherever you lie on this spectrum, there is a perfect stone for you. For instance, as I’m sure you’ve heard, marble is soft and picks up stains easily while something like an engineered quartz or even natural quartzite are much harder stones that resist chipping, scratches and wear-and-tear.
2. Where is this stone going to go?
Now that you know your capabilities, think about where you want to put this dream stone of yours. Kitchen countertop? Bathroom vanity counter? Shower floor and surround? A wall feature? In each of these areas, the stone will be exposed to different kinds of traffic, liquid (wine, citrus, vinegar, products, etc.), and level of moisture. Certain stones will definitely work better in some areas than others, though that’s not to say that they should never be used in non-recommended areas. We just want you to be aware of the stone’s limitations so that you know how to properly care for it.
3. What’s your budget?
Make sure you come up with a realistic budget for yourself (with maybe a cap on how much you’re willing to spend) before you start choosing and wanting to buy everything to your heart’s desire. To give you a quick rundown about pricing (don’t worry, we’ll go into specifics in a bit), on average, granite and marble are generally similarly priced, travertine and limestone are cheaper, and quartzite is more expensive because it is harder to find and quarry. In general, these are the factors that determine the price of your stone:
Actual stone slab (the main driver for which is transportation cost as it has to be quarried, transported, and shipped from the site)
Availability (if it’s rare and there isn’t a lot of it, then it’ll cost more)
Fabrication cost (how many cuts are needed, how many seams are there, plus extra if you want it honed or leathered)
Installation
Stone is usually sold polished, but some might be available pre-honed. For our stone slabs in the mountain house that were honed or leathered, our fabricator found a guy who was able to add the finish for about $650 a slab.
 from left: image source | image source | image source
Marble
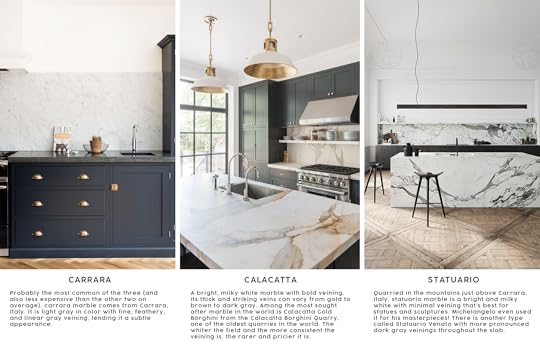
Let’s chat about marble first because in case you’ve been living under a rock (ha!), you know that people are absolutely obsessed with marble. I know that you know that we here at EHD are obsessed with it, too. (I mean, how can you not be?! Have you guys seen that Montclair Danby marble in the Portland kitchen and media room wet bar?
While there are many different types of marble (the variety of colors in veining is from the different minerals present in the areas that they are quarried from), the most popular ones are Italian marble. You might have heard of them: Carrara, Calacatta, and Statuario. Keep in mind though that for whichever type of marble you’re looking at, there are different grades within each type depending on where exactly they were quarried from (meaning that cost can really vary, though on average, marble is about $50-$100/sq ft, but a rare Roman Calacatta Gold marble could range from $80-$260/sq ft).
 from left: image source | image source | image source
But now you’re asking, “Which one is the best and most low-maintenance of all??” I wondered the same thing, so I asked our friend Michael again. Short answer: there is no difference between the three in terms of porosity (ability to absorb liquid). All marble, no matter where it is quarried from, is composed of calcite. So while it looks like a tough material, calcium is still going to be sensitive to acid no matter what. Lemons, wine, vinegar, and other acidic items are not marble’s friend and will cause etching. The acid essentially dissolves an area of your marble surface as it reacts with calcite; think science class volcanic eruption experiment minus the mega explosion!
A similar problem can happen on marble flooring, as Anne from Bedrosians’ PNW market told me. In one of their showrooms with polished marble flooring, daily foot traffic over the years has self-honed a pathway and you can see a dullness contrasting with the polished stone on the rest of the floor. But do not despair, not all is lost! You can still have your house where marble dreams are made of! Here’s how:
Get a sealant for your marble (or any other kind of natural stone) and make sure to reseal it every couple of years. Your fabricator will usually do this for you during install, but for future reapplication, you can get a $20 to $60 a bottle from your local hardware store. An impregnating seal is recommended by stone companies for harder stones due to the solution being made up of smaller molecules, allowing it to get into the stone a lot easier.
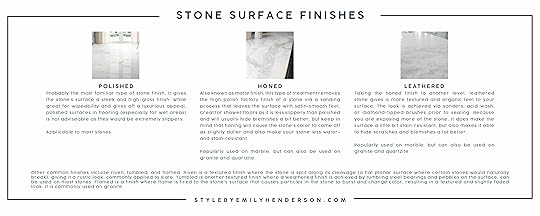
You can choose to hone or leather your marble to help hide blemishes, etching, or dullness (though this will also etch your marble a little bit easier). Honed marble will give you a matte and smooth finish, while leathered marble will give you a matte and textured finish. In simplistic terms, the textured finish is achieved by going at your marble with a sander and acid wash.
Every one to two years (depending on the amount of action your marble gets), have a professional come in to repair your surface for a couple hundred dollars (depending on what it’s been through). They’ll bring in their sandpaper or polishing pads and make your marble look pretty damn close to new again! Don’t be afraid that it is easily scratched and is not acid-friendly because YES, marble can be restored, and the patina that it gets over time is also a desired look by some (like Emily!).
Very important note: Sealing will not necessarily prevent your marble from etching, or from getting scratched for that matter. It’s not the hardest of stones in the grand scheme of things; Michelangelo did sculpt from it after all. Make sure you’re using a cutting board and wiping spills right away. If you think of looking at marble on a microscopic level, picture the letter “W” with the troughs being tiny little pores that get filled with sealant; in this scenario, the pores get filled and become protected, but on some level, the three tips of the “W” are still exposed and prone to being etched or stained.

Granite
Granite is a silica-based rock that typically has a speckled look from crystallized minerals that formed and cooled underneath the earth’s surface. I read on this one geology website that in the stone industry, granite is any stone that you can see visible grains from that are much harder than marble. This is where you get your granite varieties (the standard speckled granite is probably pegmatite and something with visible bands is probably gneiss, but let’s not get into that). We’ve all seen the usual builder-grade kitchen countertop, but similar to marble, there are different levels of granite, some with very beautiful flowing patterns and mottling in various colors. You can get a more standard granite for the low, low price of $2/sq ft even, but on average it is similarly priced to marble at $50-$100/sq ft. Once you get to the mid to upper ranges though (think $90/sq ft and up), you can get some really pretty stone with lots of different colors that make up its pattern.
Because it is considered to be a hard material (read: scratch-resistant), it’s great for kitchens and areas that will take a beating. If areas do get chipped, repairs are fairly easy as you can get a professional to refill chipped or cracked areas with some granite dust and epoxy resin, color-matched to your specific stone. It’s not as porous as marble, so you don’t really have to worry about staining and wiping spills right away. (Tip: Ask your fabricator or installer for the type of sealer they used on yours so you can get the same one for future reapplication; sometimes different sealants react badly with one another.) Granite is also one of the more heat-resistant stones so no need to worry about having to place a too-hot baking sheet directly on the counter. That said, be careful with slow cookers and such appliances that retain heat for long periods as they might crack your surface.
If you’re able to find a slab that speaks to you, it can kind of be just as pretty as marble (for a relatively similar price), but without all the upkeep and maintenance of actual marble.

Quartzite
Not to be confused with quartz (which I’ll address later), quartzite is characterized by streaks and striations that are kind of similar to marble, and can also come polished, honed or leathered. But unlike the softer marble, quartzite is much harder and durable (a 7 on the Mohs Hardness Scale—marble is a 3…diamonds a 10, for instance). Just like with every other natural stone, it should be sealed during installation, and resealed over time, to protect it from stains and other abrasive materials. (Strong chemicals, in general, could ruin a stone’s sealant over time.) Because it is not a very porous material, is scratch-resistant, and is not sensitive to acid, it’s a great alternative for shower surrounds and hard-working kitchens. Remember that striking emerald stone you guys picked for the Mountain house kids bath? That’s quartzite! It’s also UV-resistant so they are great for indoor and outdoor use without having to worry about fading issues from sun exposure.
So now you’re thinking, “Enough already, Grace, you’ve sold me on quartzite!” GREAT! My job here is done. Almost. You might be surprised to find out that marble is in fact not the most expensive of stones out there. That distinction goes to none other than our quartzite friend over here; on average being $60-$120/sq ft though it can definitely get even more expensive. Our stone expert friend Michael says that because quartzite is typically harder to find and quarry (it’s such a hard material that they need diamond cutters for the job), its price and fabrication costs can cost you a pretty penny. But hey, if you’ve got the change to spare and you’re looking for a striking and low-maintenance natural stone alternative to marble, quartzite just might be the one for ya!
If you’re looking for other options that won’t break the bank as much, but will most likely endure many accidents and mishaps, you should consider composite stones, aka engineered stone. Guys, meet quartz and porcelain!
 image by sara ligorria-tramp | from: it’s finally here! the mountain house kitchen reveal
Quartz
Quartz countertops are not to be mistaken with the mineral quartz (read: rose quartz, amethyst, and the likes, yes, I’m talking about those same crystals that you have in your intention corner for positive vibes). In the stone industry, quartz countertops are a type of engineered stone made up of loose quartz mineral aggregates, mineral pigment, and a binder (usually resin).
I’m sure we’re all familiar with the cream surface with tiny little speckles throughout, but quartz can actually come solid or even textured as well. And you might be surprised to find out (as was I) that you can get it in a polished, honed, lightly textured, or rough finish. They can be used in practically the same way as natural stone, as countertops, vanities, cladding, and even flooring.
Emily used quartz counters (White Cliffe Matte from Cambria) in the mountain house kitchen, but went with a solid color to let the wood of the cabinetry shine. It’s a stylistic choice, but also a lifestyle choice because she didn’t want to spend her time up there babysitting countertops.
And because they’re engineered and makes use of resin as their binder, they’re non-porous (aka very resistant to staining), durable, acid-friendly, and generally requires no additional sealing. A low-maintenance stone for a “low-maintenance” gal like me! You can cut all the lemons you want for your spa water and peel all the oranges you need to get that perfect twirl for your old fashioned. But quartz’s greatest feature is (kinda) also its greatest downfall: that same resin used to bind it in production makes the stone sensitive to heat! So unless you want burn marks on your precious countertop, don’t put extremely hot things on it! And by extremely hot, I mean anything above 300F. That’s what a trivet is for guys! Or a towel, that works, too.
Btw, if you’re thinking of using quartz for that outdoor kitchen you’ve been dreaming of, you should know that it’s not very UV-friendly like quartzite. When placed outside, there’s a high chance that sun exposure will cause fading and none of us would want that for you.
 photo by sara ligorria-tramp | from: velinda’s tiny kitchen makeover takeover
 Porcelain
Porcelain slab countertops, on the other hand, are a newcomer (relatively) in the stone industry game…in the US at least, I’ve read that it’s been around in Europe for a while. Similar to your porcelain dinnerware, when used in this capacity, it has some more additives and is fired at a higher temperature which makes it extremely hard and strong.
It is very much resistant to chipping, scratches, and general wear and tear (Velinda has them in her home and basement kitchenette—above, Bedrosians Magnifica Basalto porcelain countertop slab—and loves them), though that’s not to say that it won’t ever crack or break, with enough blunt force, it can. I also read somewhere that ceramic knives could potentially scratch your porcelain surface (because they fall under the same grade in the hardness scale). Oh, and remember when I said earlier that quartz can’t take the heat? (I’m so punny, ha ha.) Porcelain, because it literally took the heat during manufacturing, has no problems handling hot pots or tools! No more worrying that your curling wand will burn your pretty stone (just your pretty hair?).
One of the best things about using porcelain countertops is that you can use high definition inkjet printing technology to get photos of natural stone (or any pattern really) printed onto your porcelain slab. Your stone company should have a database of high-resolution patterns that you can choose from. INSTANT CALACATTA MARBLE OF YOUR DREAMS! Without the upkeep and commitment required from the real deal. Our other friend Anne from Bedrosians said that the process is much like office printing, but on a grander scale. A large computer-controlled printer installed in the manufacturing plant applies mineral glaze components instead of ink. The image files are pulled from the computer and imprinted onto the slab; the more images used, the less the pattern repeats, making it look as realistic as natural stone. (Bonus Perk: the glazing aspect means no additional sealant is required to protect the surface from moisture and staining).
 image source
I know I said I’m all for quartzite, but I think I’m all about porcelain now. And did I tell you that you can even install it directly over an existing countertop? And and and! Because it’s made out of clay, it’s considered to be a very green material that can be recycled for use in other products at the end of its life cycle.
And because we know that’s A LOT of information to remember, we put together this handy dandy matrix for you to save and reference when it comes time to pick stone and surfaces for your home.

Now, there are a few more natural stones on this sheet above which we haven’t touched on yet (like limestone and soapstone) since those are less popular, but here’s a quick crash course in case you want to know:
Limestone and travertine are both sedimentary rocks formed out of layers of compacted sandstone and seashells. These two have a high calcite content like marble (in fact, marble WAS limestone in a previous life) so they are very sensitive to acid and could corrode in a similar way to marble. Limestone, usually ivory and beige in color, has that beautiful rustic texture that is popular in use as pavers, tiles, and slabs in exterior designs. Travertine, used mainly as a building material, is also a popular choice for facades, flooring (great as pavers), and wall cladding. In the last few years that I’ve spent scrolling through Houzz, I’ve seen a lot of people use it in bathrooms. It comes in a polished or honed finish, and filled or unfilled. Travertine naturally has holes that can be filled in with a mixture of stone dust, water, and glue. It isn’t typically used as a slab countertop, but more as an outdoor flooring or cladding material where it is often desirable to leave it unfilled with a chiseled finish to add to its rustic look.
Soapstone is a talc-based stone that can range from gray to charcoal to black in color with little to no veining. It also happens to be the softest mineral out there. This means that while a lot of people use this as a working kitchen countertop (or science labs in school settings), it is very prone to scratching. Not to worry though because you can erase these scratches with mineral oil, which also acts as its sealant and is great if you want to go for a darker look.
BEFORE WE LEAVE YOU, IT’S BONUS TIP TIME!
Once you picked your stone type based on budget, lifestyle and placement, there are still other decisions to be made such as stone thickness and edge profiles.
Let’s start with thickness: Natural stone slabs typically come in a thickness of either 2cm or 3cm. 2cm is the standard practice here in California because of labor laws, FYI. That 1cm difference between the two slabs apparently makes the thinner option weigh half as much as the thicker option, and causes less accidents in fabrication and installs. The rest of the country generally uses 3cm slabs, which eliminates the need to both install the stone over plywood and have extra edge pieces.
On to edge profiles: We figured a graphic could do most of the talking here, so here are all the options in one quick reference sheet:
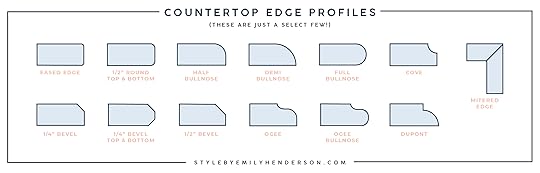
Eased edge (which is also just your basic straight finish) is not usually an upgrade, but most of these other profiles are and can range from $20-$36 per linear foot, so make sure to account for that in your budget if you have a stylistic preference.
And that’s all we have for you today. You’re ready to get your stone on! Hopefully, you feel like you have more information to make the best choice for your home and your lifestyle, but please ask more questions should you have them. If we can’t answer them, I know the readers here probably can because you all are a wealth of knowledge from your own projects.
We know this was a very nuts-and-bolts post, and probably not the sexiest topic, but if you have any requests for other useful posts like these that would help you (or would have helped you) in a renovation, let us know. We’re happy to put on our backpacks and take out our notebooks to school ourselves and then pass on the information in a digestible format.
The post Countertops 101: All the Details on Marble, Quartz, Quartzite (& What’s Right for You) appeared first on Emily Henderson.
Emily Henderson's Blog

- Emily Henderson's profile
- 10 followers

