
Emily Henderson's Blog, page 232
January 22, 2020
The Right Way To Make Your Bed – Our 5 Best Formulas

 photo by tessa neustadt | from: the griffith park master bedroom reveal + get the look
Today, folks, you will learn the RIGHT way to make your bed. At this point in my styling career, I can say that I am a bed-making (styling) expert, just like my parents dreamt for me as a child. I did it, mom and dad!! But like anything, when you’ve done something for years and when you’ve made HUNDREDS of beds, you forget that it’s not that simple for everyone. There are a million ways to make a bed, but not all of them look good, so we have some formulas that are fool-proof, GUARANTEED to work and give you that inviting bed of your dreams. Plus there are likely a few mistakes and misconceptions that you should know to avoid.
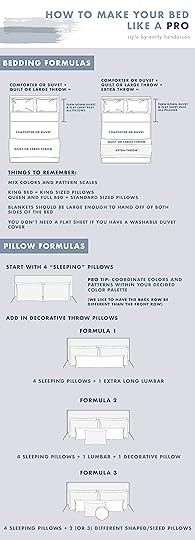
First, the most challenging element of the bed – THE PILLOWS.
Formula #1: 4 Sleeping Pillows + 1 Extra Long Lumber =
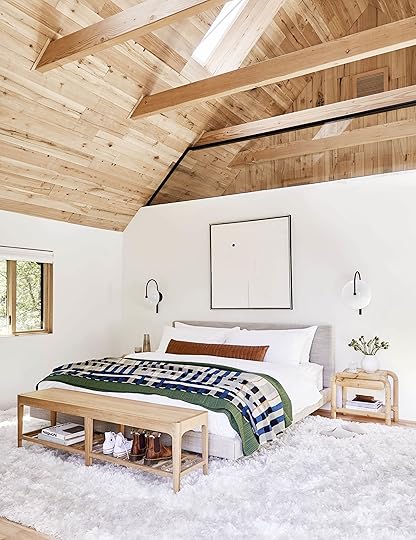 photo by sara ligorria-tramp | from: mountain house reveal: our calm scandinavian master bedroom
This is a formula that WORKS and is actually so simple and minimal, while making the bed look pulled together. Four back pillows and one long lumbar and you can be DONE.
Yes. I believe in 4 ‘sleeping’ pillows (as shown through all of these examples). Sure you only put your head on one while you sleep, but you need both for the ‘sitting up’ portion of the evening (reading or watching TV…..ooooohhhhh). Consider each layer a ‘set’ and yes, the sets can be different (but keep both pillows within the set or pair the same). You might want a more firm pillow behind your squishier ‘sleeping’ pillow for the leaning. Plus four pillows simply look way more inviting and balance the length and width of the bed better.
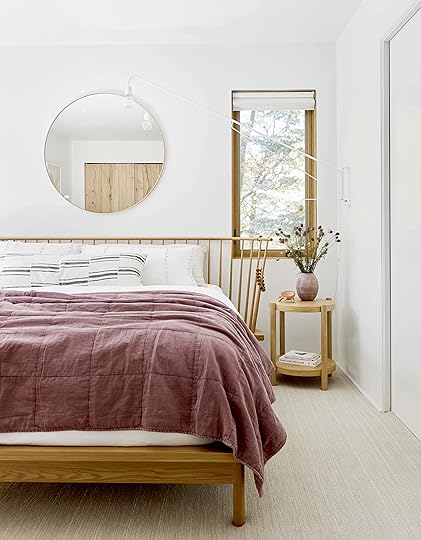 photo by sara ligorria-tramp | from: mountain house upstairs guest bunk bedroom reveal
By the way, if you are DYING to know my favorite insert for sleeping it’s this one.
Ironically the softer the pillow the harder it is to style for photos so I have an inventory of ‘prop’ pillows that are fluffier and firmer. But I like a squishy (yet not flat) pillow. Sara has a memory foam pillow and I almost fired her upon announcement. Monstrous.
VERY IMPORTANT: If you have a king bed, you HAVE to have king pillows. A standard size will look just way too small.
 photo by melissa oholendt | from: the curbly bedroom makeover
Like I said your two sets of pillows can be different – we like to have two different colors or patterns. Sometimes it’s subtle and sometimes higher contrast (to pull in say, the throw blanket at the end).
HOT TIP: You don’t need euro shams. They are the square pillows that often went in front of your sleeping pillows in lieu of two more sleeping pillows. We still use them now and again, but you don’t NEED them and they can make a bed look fussier, more ‘decorated’. I wouldn’t say they are ‘out’ but just not as in as they used to be.
 photo by david tsay | from: a simple eclectic guest bedroom
Also before we leave this formula here are six of our favorites:

1. Oversized Oblong Pillow Navy | 2. Cream Lumbar Throw Pillow | 3. Woven Waffle Pillow | 4. Striped Double Weave Lumbar Throw Pillow | 5. Temara Block | 6. Off The Grid Extra Long Lumbar Pillow
FORMULA #2: 4 Sleeping Pillows + 1 Lumber + 1 Decorative Pillow =
 photo by tessa neustadt | from: our master bedroom reveal + get the look
We are building from minimal to more decorative now. I realize that this doesn’t seem THAT different, but sometimes you want to style it to have one more color, pattern or layer. If that’s what you are into, keep that lumbar and add a square, circle or smaller rectangle pillow (I actually have TWO long lumbars on the mountain master bed now that I haven’t shot, but I love it – I have a larger linen one with the smaller leather one in front of it).
 photo by tessa neustadt | from: brady’s bedroom makeover with parachute + shop the look
GOOD HACK: Brady’s bedroom (above) has a large king sham playing the role of the ‘lumbar’ which totally works, then he put an additional rectangular lumbar in front (I don’t think I can ever say lumbar again, it’s such a terrible word).
 photo by sara ligorria-tramp | from: refreshing your bedroom with target
As you can see the double lumbar still in action (although the one in front is obviously just a rectangular pillow).
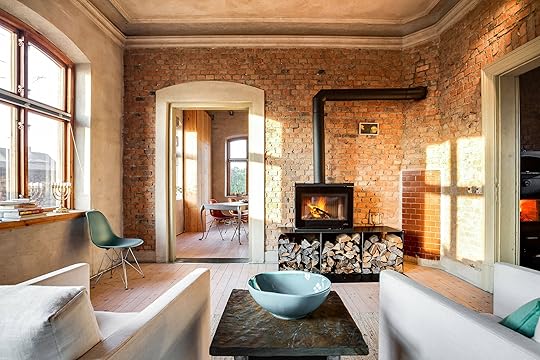
 photo by tessa neustadt | from: the griffith park master bedroom reveal + get the look
For those of you who love geometry, you can indeed mix a round/circle pillow with a narrow lumbar like we did in that bedroom.
FORMULA #3: 4 Sleeping Pillows + 2 (or 3) Different Shapes/Sized Accent Pillows
 photo by tessa neustadt | from: styling to sell: the (new) master bedroom
If you like yourself a throw pillow (or maybe you have these already around and don’t want to buy a lumbar) then this formula is for you. We love using 2 or 3 different sized (and shaped) pillows in front of your base four. It’s important to have one that is around 24″ to really ground the mini collection – especially on a king (a queen/full could handle 20″).
A good formula we use is one large, one medium and one small. Hand me the Pulitzer prize NOW. Also yes they can all be different colors, patterns, and textures. Certainly, pull in the colors of the headboard and your blankets/throws at the end. You don’t want a really saturated or strong color as a quilt and then nothing to balance it out at the top of the bed. Again, pull from those colors. We wrote a whole post about mixing pillows HERE and rounded up many combos that we love.
 photo by tessa neustadt | from: scott’s bedroom makeover with leesa + get the look
You can definitely just do 2 like we did up here (please check out that blanket styling action – boyfriend (aka Scott) LOVES some blankets).
 photo by tessa neustadt | from: little girl’s playful bedroom reveal + get the look
HOT TIP: We love a round pillow. It really breaks up all the squares and rectangles that are innate in a bed. Also looking back at that bed (above), it could have used a quilt at the end and it does defy the formulas below you are about to see, but it’s ok and we didn’t get arrested for our lack of layering. But if we could go back in time I’d add a quilt or blanket to break up the line of the bed frame and give it more of an inviting and relaxed look. Here are some of our favorites:

1. Anchal Crescent Pillow | 2. Fringe Round Throw Pillow | 3. Round Lush Velvet Pillow | 4. Velvet Ruffle Round Throw Pillow | 5. Velvet + Wool Circle Pillow | 6. Winnie Eyelash Round Throw Pillow
 photo by tessa neustadt | from: styling to sell – the (new) master bedroom
I gasped when I saw that above photo thinking that the first throw pillow was too small, but then I realized it was a lumbar – THANK GOD.

See? Proof. PHEW.
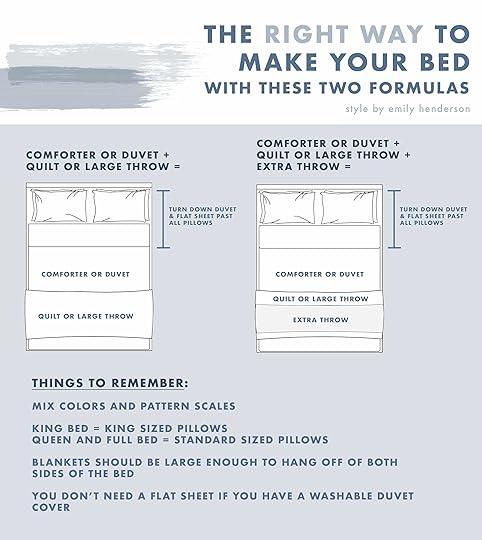
Here is a handy graphic to help you remember our pillow formulas:

Now on to your bedding – the quilts, throws and comforter portion of the bed that can be equally paralyzing to style.
The Bedding Formulas:
 photo by sara ligorria-tramp | from: mountain house reveal: our soft yet secretly sultry downstairs guest bed + bath
HOT TIP: You don’t need a flat sheet if you have a washable duvet cover. It’s only required if you have a less washable comforter or quilt.
FORMULA #4: 1 “Fluffy Component” + 1 “Flat Component” =
 photo by sara ligorria-tramp | from: makeover takeover: julie’s huge (and diy packed) bedroom upgrade
I know there are more ways to style the bedding but we like the simplicity of choosing one that is more “fluffy” for lack of more scientific term – either a duvet with an insert or a comforter (typically less washable, but just as fluffy). You can also definitely have two “fluffy” components or two “flat components”, but we like at least two “blanket components” in total. I hope you are taking notes …. there will be a test.
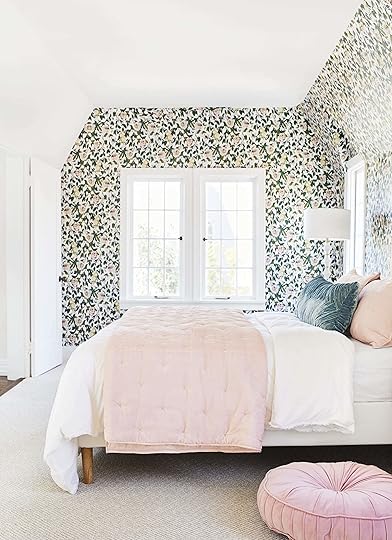 photo by sara ligorria-tramp | from: a romantic glam bedroom makeover with opalhouse by target
HOT TIP: When styling a bed to look the most inviting, it’s crucial to fold the comforter/duvet (and potential flat sheet) back far enough that it clears the 4 back pillows. This adds depth and texture, plus if your fitted sheet is a pattern or color then it pops out more which is more fun. It’s like the cuff of a sleeve underneath your sweater – it’s just a little pop of something else that makes it look interesting.
You want your bed to say, “come on in” and folding it back a bit does that. It does NOT have to clear your decorative/accent pillows, in fact, it is better if it’s layered on top, thus bridging those two surfaces.
 design and photo by emily cosnotti of the sweet beast | from: house tour: original woodwork, moody walls & a gasp-worthy wallpaper
EXCEPTION: Emily of the Sweet Beast only used TWO back pillows and laid them flat to show off her low but beautiful headboard. This is absolutely acceptable – the bed looks slightly less full but seeing the pretty spindles of the bed adds additional texture and style (plus it lets more natural light through).
If you want to go one step further, like the graphic above here you go …
1 “Fluffy Component” + 1 “Flat Component” + 1 Extra Throw =
 photo by tessa neustadt | from: sara’s bedroom reveal
If you are a true layering addict, then this is for you – add an ADDITIONAL blanket mostly to add more color/style/pattern/texture and sculptural shape. We like to have the bottom layer be more structured, typical fold, then the top one to have more of an organic shape.
PET PEEVE: Please, guys, BOTH blankets should be long enough to at least fall over both sides of the bed – not to the floor, but to look properly scaled to the bed, they shouldn’t just sit on top (although we’ve done it when we’ve had to and no one got arrested or fired).
 photo by sara ligorria-tramp | from: reveal: how we brightened up a room (and some deserving lives) with velux skylights
The blankets should be different in order to add contrast in color or texture. Like above, the bottom blanket is more structured and folded conservatively, while the top one has more movement and fringe. If we had just used the navy blue blanket it would have been too strong of a color moment to balance out the top of the bed. It would have overwhelmed the bed, visually, so the white breaks it up and calms it down a bit.
Here are some great “large enough” bed blanket options:

1. Winter + Summer Cotton Coverlet | 2. Yarn Dye Stripe Ringspun Cotton Bed Blanket | 3. Candlewick End of Bed Blanket | 4. Sweater Knit Bed Blanket | 5. Handwoven Dorado Blanket | 6. Belgian Flax Linen Blanket
But if you have a throw blanket from your living room and are desperate – this is acceptable …
 photo by tessa neustadt | from: how we styled elliot’s bedroom to sell + get the look
You may throw a blanket casually to create a sculptural shape and add interest. It’s a little ‘stylist-y’ and ideally, it would be bigger. But it’s better than folding it straight and having it look way too small, like a mistake. This just looks kinda pretty and effortless.
I had no idea how much I had to say about making a bed, and frankly, I could say more. There are no actual rules and we’ve gone outside these formulas many many times, but I also think having a couple guaranteed ways to help guide the styling is so helpful, even to US. Looking back through my years of styling I can see that my favorite beds fell into those formulas and the ones where I went outside just weren’t as successful.
In case you want to pin this, or maybe you respond to graphics – we pulled together our formulas in one place.
Now please, please go and make your bed and tag us on social so we can see and reshare. Use #showemyourstyled and show us those beds.
The post The Right Way To Make Your Bed – Our 5 Best Formulas appeared first on Emily Henderson.


January 21, 2020
The 5 “Accent” Color Trends We Are Extremely Excited About in 2020
 design by chzon | photo by karel balas | via dezeen
We here at EHD like to consider ourselves design risk-takers with a decent amount of design common sense (aka design ideas you might actually want in your own home). Especially when it comes to color. But to be fair, who doesn’t love to ogle over or dream about a bold colored living room? However, unless you are the type of person that is actually willing to take the risk and paint your living room say, cobalt blue, then the reality of “color trends” tends to be moot. Now, how we like to look at color trends is by thinking of them more as “accent” color trends. Let’s be honest, the colors we paint our walls generally stay pretty much within the same color palettes every year. Yes, there was a time period when gray was king, dark blue became a popular bold option and last year the cool beige movement was in full force. But most of us are unwilling to take that scary leap into colorful walls.
So what better way to bring in the hot colors of the year than by dabbling with a vase, accent chair or fireplace surround (ok, that’s still scary but at least less surface area)? It’s fun, easy, typically more affordable and way less labor-intensive if you end up changing your mind. But then again maybe some of these will make you want to take a leap… So without further ado, let me introduce the colors of 2020. It’s going to be a colorful year and we can’t freaking wait.
1. Cool Mint
 design by dean studio | photo by daniel salemi | via dezeen
This color has been popping up ALL OVER and I am personally on board. It feels fresh and happy but still (no pun intended)…cool. This is actually one of the only colors that I think the “colored wall averse” types could get on board with. It’s both visually soft and packs enough punch which makes it a great accent color.
 design by india mahdavi | photo by architectural digest france
I think the trick here is to make sure it’s paired with bold, modern shapes and/or colors. A great example is this seat cushion. It’s a perfect, softer (but still fun) accent to the other more bold details of the space. If you don’t do this type of pairing, you run the risk of your home feeling like a dated seaside retirement home. Not that that’s bad but likely you will want to wait to dive into the “retirement chic” look until you need to.
 design by tsai design | photo by tess kelly | via the design files
See? I told you it works as a wall paint color. In this kitchen by Tsai Design, the contrast of very cool-toned green with the warmth of the natural wood and modern leather handles perfectly balance with each other. The color is quiet but still brings a lot more personality than a white wall would have.
 via sight unseen & the swedish design museum
But as you can see just popping in a few pieces makes a huge impact. It’s neutral enough but the color sprinkled in adds a surprising and fresh feel.
2. Ruby Red
 design by sisällä | via the design files
Remember when Emily asked herself if she could handle a bright red accent in her living room? Well, that was for good reason because reds are back people. But we are predicting that while we plan to see bright red too, it’s the dark ruby red that will be the star this year.
 design by sally breer & adrie costanza | photo by laure joliet | via etc for short
Look at how lush and downright delicious it is?! Ruby red is the kind of color that says you are confident and passionate about your design choices because this is about as bold as it gets.
 design by flack studio
Since this color is so visually powerful we think that including it into your space in smaller doses, like a planter or tile accent, is the way to go if you love it but want to leave your walls more on the neutral side.
 design by david flack | photo by sharyn carins | via est living
This color has us very excited about what 2020 has in store for our eyeballs.
3. Cobalt Blue
 design by jessie schuster | photo by joshua mchugh | via domino
If you are looking for a jolt of energy into your space and like the color blue then ladies and gentlemen, cobalt blue is for you. This color started to come on the scene with the explosion of the postmodern trend. It was squiggles, tubular furniture, and cobalt blue. So while 2019 was its modern-day birth year, 2020 is going to be its big year.
 design by sophie lou jacobsen | photo by william geddes | via clever
This is definitely one of those colors that we recommend in small but impactful accents for most people. We, of course, would never want to discourage someone with a strong cobalt blue design vision but guys it’s a BIG color to have a lot of in one space. See how great it is with just that built-in bench designed by Sophie Lou Jabsobsen?
 design by richards stanisich | photo by felix forest | via est living
You might be wondering what the difference between cobalt and the 2020 Pantone color of the year, Classic Blue is…The answer is electricity. I know that may sound like nonsense but cobalt is the brighter, cooler and more electric version of its classic counterpart.
 desing by reath design | photo by laure joliet
As shown in all of these photos, it’s a great color for any room or style that needs that touch of unexpected. It has magical powers to instantly make any room cooler.
4. Chartreuse
 design by studio shamshiri | photo by stephan kent johnson
Yes, the color of the liqueur of Parisian monks is also one of our 2020 colors. It’s as if lime green and neon yellow had a baby in France. Beautiful but only palatable when sparingly used. Ok, I think that’s enough with the alcohol comparisons.
 design by reath design
Chartreuse has been very hip on the fashion side of things. And as Emily has always said, expect what’s on the runway to creep into interiors. But honestly, I like it. It’s unexpected and with the right amount can easily spice up a traditional styled room or bring some electricity to a modern space.
 design by carrier & company | photo by sam frost studio | via architectural digest
See that little chartreuse knot up on that shelf? It’s fun and youthful and makes me want to know who the heck these cool people are. Chartreuse is on the loose:)
5. Emerald Green
 design by reath design | photo by laure joliet | via remodelista
Now for our last and final color trend prediction… Emerald green. It’s pretty hard no to love this color. It’s rich, happy and makes us think of emeralds which are undeniably beautiful. But much like the other saturated colors on this list, it is design gold because of the life it breathes into a space.
 design by tahma smith | photo by prue ruscoe | via est living
What is so wonderful about emerald green is that it brings a ton of richness to a room without overpowering it. It has more of a “hey, just happy to be here,” vibe instead of a “HEY, LOOK AT HOW BOLD I AM,” which ruby red does a better job of as shown perfectly in this photo and room designed by Tahma Smith.
 design by timothy balon | photo by mariko reed | via domino
So because of it’s more “calming” effects, we think you can go a little bigger on the accent you choose but maybe still be careful if you decide to go all-in on a wall color.
That’s it for our color trend predictions…for now. We are sure to see more surprises as the year progresses and don’t worry, we will definitely be reporting on those too. But all we have to say now is have fun with color. Life is too short for it not to be at least a little colorful. And if you are stuck when it comes to wall paint colors we’ve got you with this list of our favorite neutrals and this list of our favorite non-neutrals.
So what do you think? Are you jumping for joy that some jewel tones are here? Are you scared of color and wish this list never grazed past your eyes? Do you have any favorites? Let’s talk about it.
Love you, mean it.
The post The 5 “Accent” Color Trends We Are Extremely Excited About in 2020 appeared first on Emily Henderson.
January 20, 2020
Today, We Remember Dr. Martin Luther King Jr.

“Whatever affects one directly, affects all indirectly.”
No matter where we are, where we come from, what we look like, who we love, or what faith we practice, we can ALL lend our voices to support one another and make a positive difference in the lives of those around us. There has been so much progress made in the years between MLK’s life and now, and yet there is still so much more progress to be made. Whatever you’re doing today, I hope it’s filled with love. After all, “I have decided to stick with Love. Hate is too great a burden to bear.”
We read the kids this book often. I’ve written about it before, but trying to explain the whys of racism (as well as slavery and assassination) to my kids as a white mom is confronting and challenging (yes, I realize that even using the word ‘challenging’ in the subject matter is problematic). I don’t want to tell them all the horrors of the world yet, but I also want to arm them with information, empathy, and help them form a confident perspective when it comes up at school, because it will. I want them to be the first ones to shut down any negative comments in that arena if and when they do come up. How do you explain such past ignorance??? When we read that book they look at me with their 4 and 6-year-old innocent confusion, like “why would they (we)?” and I’m supposed to be the all-knowing mom. I say something about fear and ignorance, but internally I’m just like “I. Don’t. Know”.
So Dear Dr. Martin Luther King, Jr., my kids and I read your words. You were a modern-day prophet, and while you made human mistakes, you changed the world dramatically for the better with your words and activism.
They played this at my church and there wasn’t a dry eye. His words are indeed powerful.
Thank you, Dr. Martin Luther King, Jr. Today (and every day) my kids and I (and the EHD office) will indeed remember you.
xx
The post Today, We Remember Dr. Martin Luther King Jr. appeared first on Emily Henderson.
January 19, 2020
The Link Up: Emily’s New Personalized Necklace, Veronica’s Trick To Staying Organized, & A 5 Ingredient Recipe Cookbook
 design by reath design | photo by laure joliet | via architectural digest
Happy Sunday folks. We are officially more than halfway through the longest month ever, the Monday of months if you will, and man does it feel good. This is about the time everyone is starting to feel anxious about their resolutions and maybe even a little discouraged. If this is how you are feeling we are here to say you are doing GREAT and also, it is okay to let go of resolutions that don’t suit you. As Kris Jenner would say, “you are doing amazing sweetie”. Now, let’s get to those EHD recommendations:
From Emily: “Brian saw my gift guide and bought me a customizable necklace that says ‘Bird and Bear’ on it (for Birdie and Charlie Bear) and it’s just so sweet and dainty and special to me. I think we all know this, that personalized gifts are kinda the best, so thank you Brian (speaking of, Sara made me two framed pottery pieces that I will shoot and show you but her weekend hobby is really turning out to be a talent (and benefit to me) – follow her Instagram account to see what she’s cooking up in the ceramics kitchen).”
Sara’s current favorite cookbook is 5 Ingredients: Quick And Easy Food. It is only filled with recipes that consist of 5 ingredients each. From Sara: “While we’ve been super busy finishing some house renovations this has been the only book I have out, and it’s just SO ACCESSIBLE.”
HOUSE TOUR: Reath Design is quickly becoming our new favorite firm because the way they mix color, pattern, and shape makes our hearts skip multiple beats. So when Architectural Digest debuted their newest project this past week we were kind of excited (and by “kind of” we really mean “EXTREMELY”). Here’s to more homes packed with all of the colors!
From Veronica: “If you’re looking for an affordable wall calendar to keep you organized, look no further because I found the perfect one!”
Jess is a gal that loves shoes and these puppies she got for Christmas are her current crowned jewel. The shape is super flattering and the wood sole is so beautiful.
Caitlin was really excited about our recent partnership with Food52 and DOUBLY EXCITED when she found out one of her friends had bought the essential cookware set. She got to try it out over the weekend and y’all, the nonstick skillet and the measurements in the stockpot are both UNREAL. 10/10, highly recommended!!! (it’s also on sale right now!)
Ryann’s favorite jeans as of late are these in washed black. They are SO comfortable but hold their shape really well even if you wear them multiple days in a row (which Ryann unabashedly does).
From Mallory: “Skin routines are utterly confusing to me, which is why I don’t have one. I have no idea where to start, so I’ve been asking everyone I know and I thought, hey, you guys probably know. If you have any product recommendations or simple, approachable skincare routine outlines PLEASE HELP ME.”
And if you haven’t already accidentally binge watched Cheer like Julie has then get to it. This docuseries on Netflix follows along the Texas cheer team of Navarro Community College. If you still have the mindset that cheerleaders are not athletes, think again. Also, Monica Aldama, come be our life coach.
This is where we leave you, but not for long. See you tomorrow. xx
The post The Link Up: Emily’s New Personalized Necklace, Veronica’s Trick To Staying Organized, & A 5 Ingredient Recipe Cookbook appeared first on Emily Henderson.
January 18, 2020
5 Easy Tips To Bring A Little “Spring” Into Your January Fashion Wardrobe

I’ve got a fashion problem that I think is pretty relatable. And even if it’s not, it’s VERY important as far as this blog post is concerned, so stay with me. Here it is: We wait all summer to wear our Fall/Winter sweaters so the second the weather hits below 60 degrees it’s time to bundle the heck up in the coziest of outfits. We wear these sweaters, scarves, coats (you name it), with utter joy and excitement… until now. Hello, January. We’re officially halfway through this very cold weather nonsense and at this point, we’ve worn just about every sweater we can find in our closets. And frankly, they’re just not feeling as cute or cozy as they did that first day we put them on.
If you relate to this at all, I have some bad news and some good news. The bad news is that it IS still winter and weather-conducive outfits are a must. But the good news is that the end is in sight (at least here in LA), and we’re dressing for it. We partnered with Nordstrom to give you easy tips and inspiration on how to revamp your current wardrobe in a way that makes it feel like it’s *almost* warm outside, and spring is just around the corner.
Let’s start by curing your winter blues with some spring blues… you’ll see what I mean.
1. Add a Bright, Springy Color in an Unexpected Way

Sweater | Blue Beret | Jeans | Plaid Shirt (Blue Laney)
This tip might not seem revolutionary to you yet, but let me further explain. It’s less about the color and more about how you incorporate it. Blue has always been one of my favorite colors, and I kicked it up a notch with this bright piece. But instead of having it show up in a sundress or sandals, it’s in a beret which is undeniably a winter accessory. My point is you can add a little pop of color in your scarf, winter boots, or even ear muffs (if you’re really cold) to make you feel just a little closer to spring. People have been telling me that berets are in and I can’t wait to utilize this guy to make my wardrobe at least 17% more on trend in 2020. My 23 year old employee wore one the other day, so I *know* berets are cool.

Sweater | Blue Beret | Jeans | Plaid Shirt (Blue Laney) | Booties | Bracelets
Also, please note that this blue isn’t just coming outta left field. The blues are subtly and strategically incorporated in the flannel under my white sweater, which I’d be lying if I said I perfectly color-matched without the help of my best friend, Suzanne. So here’s the HOT TIP: It’s easier to add a bright color like this when you use your layers to tie it all together. Plus, it’s probably cold (maybe even FREEZING) where you are which means you should be wearing layers. I would never let you walk out of the house without them.
2. Don’t Shy Away From a Bold, Large Scale Print

Sweater | Jeans (similar) | Shoes | Headband | Clutch | Necklace (similar) | Bracelets
How could I call this an Emily Henderson fashion post if I didn’t include at least ONE striped article of clothing?? The answer is I couldn’t (and hopefully you like that kind of thing because this is stripe 1 of 3). Okay, let’s break this down a bit. This look would be a bit boring if there wasn’t a bold pattern happening in the sweater. Large scale patterns are the easiest way to inject dimension into your outfit and make it POP without the risk of adding a crazy color. Now that we’ve established the importance of the sweater, let’s chat accessories.
I’m newly dabbling in this headband trend (thanks to Sara who did it incredibly well in our Holiday Outfit post). I’ve realized it’s the greatest way to dress up a basic ponytail so it looks like I actually tried, which is always nice. I highly recommend this one if you’re in the market.
When it comes to layering jewelry, I was lost. I usually wear a rotation of the same pieces. But luckily I have my friend Suzanne conveniently located next door to be my guide (and to provide her house for say, this fashion shoot). She helped me layer these necklaces and bracelets and I could not be more into how it looks.
3. Keep the Sweater, Lose the Boots

Sweater | Jeans | Hat | Shoes | Bracelets
If you haven’t noticed, I’ve worn some form of snakeskin print shoe in every outfit thus far and at this point, I’m basically the Flo (Progressive Insurance woman) of snakeskin print. I’m just really into it recently. The only difference is that no one pays me to talk exclusively about snakeskin shoes. I just do it anyway. There are only two more things I’ll say about why they’re all so good and then I’ll stop – I promise. 1.) They truly are a neutral and go with everything, and 2.) The pattern spices up Every. Single. Outfit. And does it WELL.
For those of you who are STILL not convinced, I’ll shift to the sneaker trend in general. It’s no secret that sneakers are awesome everyday shoes and you can find them in a variety of different colors prints and patterns. I just LOVE these snakeskin ones (ok, now I’m doing talking about snake skin). Here’s the HOT TIP: If you’re bored with your winter boots, it’s easy to take your go-to sweater-jean-boot combo and spice it up to make it sweater–jean–sneaker. It’s much more spring-appropriate plus I hear it’s what the cool kids are wearing these days. Let those ankles breath, folks.
4. Throw a Sweater Over a Dress (or a “Brian Button-Down”)

Sweater | Dress | Boots | Bracelets
There’s a good hack here, guys. It’s real easy to put a sweater over a dress OR a big button-down shirt. The dress/sweater combo can be a hard one to nail for me because it’s hard to find the right “drapey sweater/dress” combo. But these two were perfect and I highly recommend. Now I do have a secret dress hack and it’s called the “rob something from Brian’s closet” that I’ve used once or twice before. But if you don’t have a “Brian’s closet” then this dress is super cute.
5. Add a Lacy, Victorian Collar Under Your Winter Sweater

Sweater | Top (similar) | Jeans | Shoes | Bracelets
A part of me sometimes feels like an old victorian lady, and I really do like to let that shine. Unfortunately, this old woman look is surprisingly much harder to achieve in full when you’re dressing for warmth, BUT that won’t stop me from letting my little victorian collar pop out of my sweater. Speaking of, this sweater is Madewell and it’s VERY GOOD. I love the color of it, everyone at the shoot said it was “hip,” and I like looking hip 
January 17, 2020
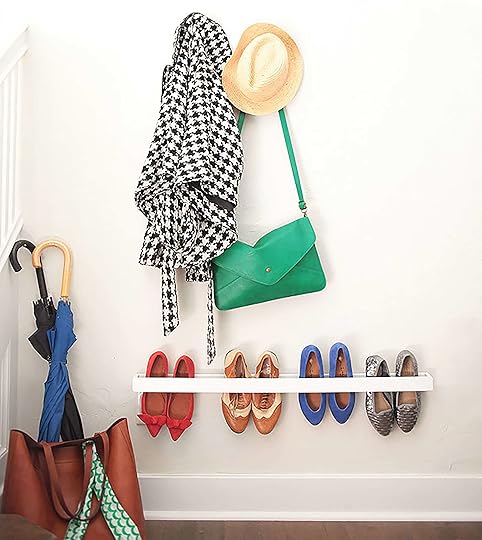
My Former DIY Stylish Organizing Ideas And The Affordable (And Stylish) Options I Would Actually Buy Now
I’m neither terribly organized or adept at DIYing, and yet years ago I was the DIY contributor to Redbook. I had totally forgotten about it when Ryann found the above photo and we realized that most of these projects are actually still smart and good. PLUS now that it is years later I can tell you what I really think about them and give any tips and BTS insight that I couldn’t do for the magazine article.
First up, that DIY Entry Shoe Organizer (above). Now when we made this 7 years ago, there were no readymade shoe racks and now there are (I would likely just buy this in white). Sure, ours is prettier and more simple, but the wood we used was really slim and getting it to stay together with nails and glue was a challenge. It needs to be narrow so it holds the shoes, but not so narrow that you can only get ballet flats in there.
Also, DO NOT choose white painted wood, it got scuffed immediately (as did the walls, actually). It could be lacquer, but if you are going to DIY this, make sure that you use pretty sealed (matte) wood and make it slightly more special. Otherwise, just buy it. I also think that coat hooks like this could work for shoes and would look kinda cool. Here are some others on the market that I am pretty into:

1. Wall Mounted Shoes Organizer | 2. Esdella Shoes Rack | 3. Spine Wall Shelves | 4. Eden & Co. Rack | 5. Esdella Shoes Rack Organizer | 6. Step Up Large Shoe Shelf
How To Turn A Dresser Into A Kitchen Island

This one cracked us up. We loved the idea of it, but all the bells and whistles cost like $300, which was hilarious for a ‘DIY kitchen cart’. So here’s the deal – IF you already have a dresser and you NEED a kitchen cart, this DIY is full of so many great ideas. But do not go out and buy that Ikea dresser and pimp it out like this (just buy a cute kitchen cart). The leather, those castors, the brass towel holder – it all added up and it definitely felt like ‘polishing a turd’ situation – putting so much money into a piece of furniture that can’t really handle too much wear and tear. Now if this were a vintage dresser, solid wood, then sure invest in making it look really pretty and unique, just don’t go buying this and invest too much money into it when there are good/already done kitchen carts out there. (BTW our job was to show ideas, rather than ‘you should do exactly this, but the magazine wanted things that could be sourced – aka that people could purchase if they wanted to’).

1. Black Rolling Cart | 2. Metal, Wood and Leather Bar Cart | 3. Mid-Century Bar Cart
DIY Wooden Dowel Coat Rack

This is cute and fun. I’d likely choose a different color palette now (or hell, just raw wood). It was dowels and rope, that’s it. It doesn’t have a large footprint for only holding 4 things and yes it can be easily knocked over. I actually bought this coat rack for the mountain house out of desperation because I needed it the next day and I really like it. No matter what coat rack you choose, it will be covered in garbage quickly if you actually use it, so keep that in mind. But for a cute project I’m still into that DIY we did.

1. SONGMICS Coat Rack Stand | 2. Devon Coat Rack | 3. Porch and Den Suede Metal Coat Rack | 4. Topline Hat & Coat Rack | 5. Toby Coat Rack | 6. Levy Coat Rack
DIY Garment Rack

Ok, this one was a stretch, but here goes. IF you have leftover ladders then this is clever and fun (and there are tons of ways to customize it). Or heck if you find a couple of vintage wood ladders at a thrift store then consider this. What I like about it rather than a store-bought is A. you are using what you already have’ and B. you can customize it a lot with paint colors and additional hooks. Plus, it’s unique. But it was a lot of work for a product that sure, you can buy readymade. Here are the ones that we love:

1. Foldable Bamboo Clothes Rack | 2. Cameron Clothing Rack | 3. Single Rail Bamboo Garment Rack
DIY Jewelry Block

These jewelry blocks went VIRAL you guys. It was the early days of Pinterest and people freaked out about them. I even had an Etsy designer reach out and ask if they could make them and sell them. Since I wasn’t selling them (I said ‘yah go for it’ because I’m the worst business person ever). They are totally cute, but this year I needed a necklace organizer but didn’t want to make one and I bought this one off Etsy and love it. Here are a few more that are similar and affordable:
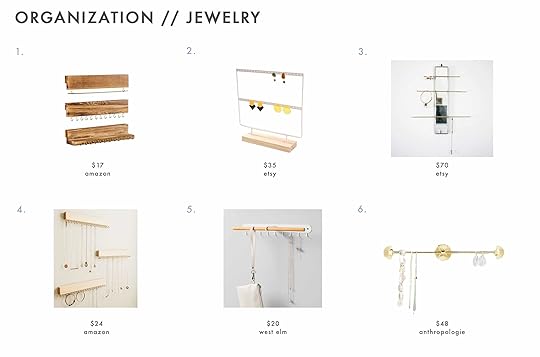
1. Y&Me Jewelry Organizer | 2. Wood Earring Display | 3. Stained Glass Mirror Jewelry Hanging Organizer | 4. Modern Home Jewelry Organizer | 5. Wall-Mounted Accessory Holder | 6. Graham Jewelry Organizer
DIY Office Wall Pockets
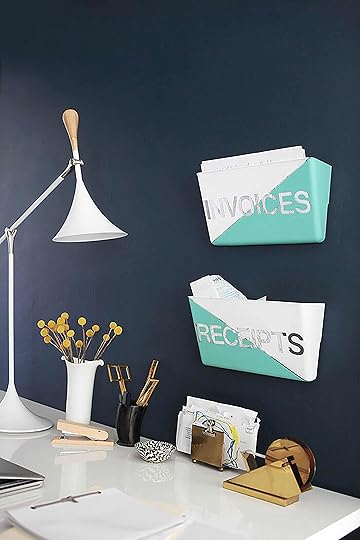
Those wall pockets are actually really cute if you want to be able to really customize colors and words. We used alphabet stickers and tape and just spray painted them, then peeled off the wall pockets. You could do stripes or any other pattern, too.
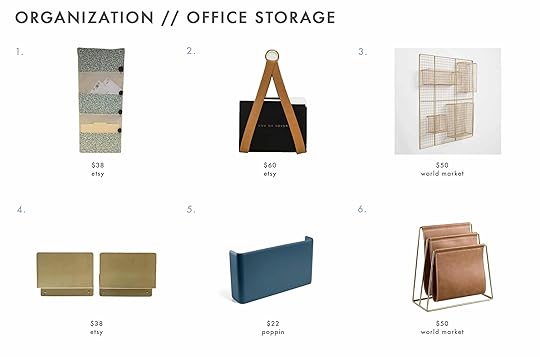
1. Pocket Wall Organizer | 2. Leather Hanging File Organizer | 3. Gold Wire Adjustable Wall Organizer | 4. Wall Mount File Holder | 5. Slate Blue Wall Pocket | 6. Brown Faux Leather Grayson File Holder
As I’ve said before, a part of “my new year, old me” mantra is to do more DIY’s because I forgot how much fun I had doing these. Are there any DIYs you are curious about that you want us to try? Do you guys remember any of these/have you tried them? If so I would love to see photos
January 16, 2020
Inside The Design Process – Six Ways To Save Money When Working With A Designer (And Five Reasons You Want To Work With One)

Velinda here, with part II of our “Inside The Design Process” post. And apparently I’m supposed to tell you how you can get away with paying your designer less…
Turns out, there’s no way of paying a designer less! The End.
Fiiiiineee. I get it, truly. I’ve never been able to afford a designer either, WHICH is sorta why I became one by default. As we discussed in the last post, full service interior design can be an unaffordable service for many and it is truly a luxury commodity. On the other hand, if you’re diving into a major makeover there are a few good reasons ($$$) why your budget could actually benefit from hiring a designer. But we’ll get to those in a little bit…
Throwing back to Part I of this post, you’re easily looking at $4 – 6K for a single room makeover if you’re working with a designer. And that likely doesn’t cover any major renovations or the actual purchase of pieces. It can quickly add up to be what the pros call “a wad of cash,” but many designers are actually willing to find ways of working with you, if you seem like a lovely client. So let’s talk about what you can do to work with a pro while getting away with paying less (guys, are we sure this post is necessary? FINE).
Six Ways To Save Money When Working With A Designer
First, six money saving tips. Contracts with some designers may limit these options, but knowing they exist can help open a conversation!

1. Make Your Own Purchases
Once the sourcing is done the time it takes to purchase all those items can add up quickly. If your designer can stop at sourcing (including determining sizing for something like a rug) and then hand the list off to you for purchasing you could save hundreds. If you want custom or to-the-trade, you may need your designer to handle the purchasing. But, unless a contract with your designer states that you must allow them to handle all of the purchasing, there’s nothing stopping you from doing the big box store ordering on your own time. There are a few limitations to this strategy, one of them being that you might loose out on any potential to-the-trade-only discounts your designer may be able to get you, even if they are charging a commission on purchasing.
2. Cut Down On The Custom Pieces
Besides being potentially expensive to build, anything custom takes time to design. Sometimes, a lot of time. If dollars are tight, ask your designer to work with already-fabricated pieces or big-box store items only. If there’s anyway to squeeze it though, let your designer get original somewhere. You’ve got a designer on hand, so why settle for builder-grade only?
3. Handle Your Own Install
Yes, ideally your designer is on sight making sure the spacing and heights of each piece is perfect and final styling touches are on point. But if you can’t afford that service, do your best on your own and call your designer if you get stuck. Sara’s been handling most of the install at her house on her own, sending me pictures along the way. Since we’re photographing the space for the blog I’ll plan on being there one day before the shoot for a final install where we’ll decide where art gets hung, make sure the rugs are in the right place, and finalize accessories. But to save money on my time (aka my hourly rate), Sara’s been handling the accepting of deliveries, unpacking, and install of the pieces on her own.
4. Serve As Your Own Project Manager
This really applies to bigger projects and renovations, but it’s not for the faint of heart. And you’d better be organized or it could be costly. You can take over more than purchasing and installing, if you’ve got the guts and the designer is willing to hand over the reigns. Serving as your own project manager goes beyond clicking “complete purchase” and unpacking a cabinet when it arrives. Keeping track of budgets and coordinating with vendors (like electricians or carpenters) can be time-guzzling. And if you’re paying for that time, costly. But before you pin on your “manager” name tag keep in mind that fumbles in project management can cause delay and frustration for all involved. Which is why paying someone experienced to handle it can be well worth the cost.
Imagine your bathroom tiles are delayed due to being backordered. That means the tile installer you booked can’t install them anymore, and they don’t have another opening in their schedule until the following month. Which also means that when the bathroom vanity that you already ordered arrives you have no where to store it while you wait on the tile install. Or maybe your sconces arrive in the wrong finish. Now the vendor needs to be notified, the sconces need to be sent back and reordered, and the electrician has to be rescheduled. It’s a small inconvenience on it’s own, but these little things add up. Not to mention managing all of these things while also working/parenting. So be real with yourself when considering whether or not you should take this on. It’s risky… enough so that some designers won’t be open to handing over the responsibility. But people do it all the time (I did it for my own house), and if you’re up for it and funds are tight then it’s worth asking about.
5. Come In With Clarity & A Strong Inspiration
Use Pinterest to show your designer where you hope to go and what you love. Coming in with your own ideas and expressing the things you know you want will skim hours of guess-work off the process. Clear direction can cut down on a lot of back-and-forth time (which is all billable). Often clients come to designers because they don’t have this clarity and need help finding out what their style looks like, but if you have even a rough design direction it’ll save a penny.

6. Pick & Choose What Projects You Bring A Designer On For
You might not need a designer for every step of the process. Maybe you feel confident when it comes to furniture shopping, but just want someone with a professional eye to help you choose paint colors for the house so it all feels cohesive. Or maybe you have ideas for your living room – lists of products you think would work, concepts for a floor plan layout, and a feeling that you’re this close to being able to pull it off by yourself – but you want someone to validate your ideas, help you choose the right rug size in the pattern you like, and help you decide which of the three coffee tables you’ve pinned would work best with your existing couch. Not all designers will take on these types of small projects, as they might not have the bandwidth when also working on larger, higher paying projects. But there are definitely designers out there willing to offer one-time consults, tackle smaller space projects like laundry rooms, or help come up with plans for trouble areas of a larger room (like a media center).
Five Reasons You Should Hire A Designer
And now, five financial favors your designer can do for you, and why it’s worth hiring a designer if it’s within your budget. Trust me – a designer
January 15, 2020
Inside The Design Process – How Much It Really Costs To Work With A Designer

Design nerds, this post is for you. Velinda here, and today I’m talking spreadsheets, budgets, and survey data – all the good stuff that comes with the design process for an interior. Non-design nerds, I apologize. No eye candy today. Just dense, leafy-green style information. But I promise that if you just give this post a chance you might find something interesting/healthy. Pretend for the duration of this post that you’re thinking about hiring an interior designer for a space in your home. I’m going to cover what you could expect in terms of cost and time when working with a designer. But wait, are you an interior designer yourself, or thinking about becoming one? We’re counting on you to join the conversation down in the comments with your own perspectives.
How We Charge For Design Services Here At EHD
We’re in the final stretch of the “Working with a Designer Series” (start here if you’re catching up), where I took on the role of Sara’s interior designer for her living room, dining room, and TV room. We’ve got the first reveal just around the corner, and we are bursting at the seams with excitement to finally shoot this thing. But first, it’s time to give you the promised tell-all piece on budgeting for a designer and the final tally of how many hours were spent when designing Sara’s spaces. That’s the big question, right? HOW MUCH DOES THIS WHOLE THING COST?!
But first, a disclaimer from Emily –
“Hi guys. We have an unusual model here at EHD because the blog and partnerships are the bulk of our business, not residential clients (we can’t do everything). So considering most of our projects are blog-content productions, sponsored projects, or friend/feel good makeovers, our process is a bit different than your typical residential design firm – we make our money on the backend, but need projects that can move fast, with people we love and trust, and thus they let us have more creative control. When I did have clients I charged $200/hour for me (when I remembered to bill thus the real problem – and now I’m realizing that I wasn’t charging enough), and I think for a senior designer like Ginny was at the time $150, and $100 for a junior designer. Now we have what we call a ‘friends and family rate” which is $75/hour for my design team’s time which we charge simply to cover overhead costs (like payroll, office space, insurance, 401K, etc., for the EHD designers on the project). I don’t charge my time because these truly are my friends or family and I don’t like to charge them for me but I simply can’t lose money and go out of pocket for the time spent from my design team. In exchange for the design services, we get to document the whole process and shoot the spaces. It’s weird, I know, and we’ve only been doing it for a few months so I’ll let you know how it goes.
Love, Emily”
I’m back (me, Velinda) and in order to properly put this post together for you, I needed to find out what interior designers out in the “real world” were charging these days, and how they were doing it. I didn’t want to make up rates or guess randomly. So first I did some research. I reached out to other designers we know and respect, all working at different experience levels in their careers and in different cities across the US (to whom we promised to keep anonymous, but THANK you to these generous folks!). They really helped to fill in the gaps between what we do here at EHD and what some of the industry standards currently are. All of our research moving forward is based on the answers we received. We’d all love to be Sara (whose designer was in-house, thus FREE to her)… but alas, research suggests that’s not the standard model. Who knew!? So then, what should you expect?
I can promise one thing; the design process will take more time than you expect. And I’ll be honest, it’ll partially be your fault. But more on why you’re to blame later. Suffice to say, like anything in life (namely kitchen and bathroom remodels) good things take time. Let’s start with the design you’ve been following – Sara’s house:
The Time and Money Breakdown Of Sara’s Makeover Takeover Project
The total amount of time I’ve spent on the design process (so far) is right at 80 hours. That’s prior to installation services, which will likely add another 10 or so. That also doesn’t include the 55 hours spent on blog content for the project, but since you likely won’t be documenting the whole process for a blog we’re gonna deduct those hours from our tally. Using our current EHD friends & family rate of $75/hour rate here’s how Sara’s project would break down:

PLUS – Blog Administration & social shoots (writing 4 blog posts, shooting multiple stories/IGTV & YouTube videos, linking/crediting all sourcing, creating visuals for blog posts, etc.): 55 hours*
* This is EHD-process-specific, though it can pertain to other design processes that benefit from trade for press sponsorships; clients can potentially share in benefits from this model, but consider the extra time it might take.
Believe it or not, 90 hours isn’t that long. Given we designed three small rooms; living, dining, and TV, plus knocked out a custom cabinet design, we’re on track for a conservative timeline. Despite appearing (and often being) “fun,” designing is time-consuming work. My investigating revealed you can easily expect a single room makeover (complete design: concept/color palette, floor plan, sourcing furniture/accessories, and installation) to take 35-50 hours and span the course of up to 8 or 9 months. Kitchens take even longer. Structural changes usually mean additional time and the possible addition of pulling permits. Then a full renovation or new build is likely to take between 18 and 24 months. You’re looking at easily spending close to $6,000 per room for a full, designer-done makeover without major renovation, materials, or pieces. (Designers, what’s your experience? Are these estimates ringing true? And what if you’re touching a kitchen or bathroom??).
So pretending Sara had been paying our “friend rate” of only $75/hr, she so far would have paid $6,714 for my services. But turns out, $75/hr isn’t near the industry standard. Research shows designers charging hourly typically average between $100-200/hour. “High End” interior designers or decorators are charging $200-300/hr, and “Luxe” professionals can be close to $500/hour. This aligns seamlessly with what a professor once told me, “Straight out of school, you should charge $75/hr. At the peak of your career, expect to be charging between $350 -$375 an hour. It’s hard to get a designer for less than $100/hr.” Cool, cool, I guess…but holy moly! That’s going to add up.

For this project, Sara helped reduce my hours by doing some of her own sourcing, purchasing, and communicating with vendors. Sara coordinated all deliveries and did her own product inspection/inventory. I’d give Mac and Sara a B+ on being “easy to please and quick to make decisions,” which made this process more “cost-effective.” They were fairly good at communicating desires they had upfront and we shared a vibe/vision overall. Still, there were times where one would thumbs up right away and the other would pose questions, want more options, or want each piece to be stand-alone “wow” vs. “within the room wow.” And that’s totally fine. But those moments meant additional sourcing hours. Overall, I’d use them as a great model for how much back-and-forth might be “average” for a particular, yet not-hard-to-please client.
Given my currently-limited knowledge of client work and design firm business models, I’ve always wondered how you account for the potentially limitless back-and-forth, re-designs, or modifications that might come up in a design process. If charging hourly, what’s to be communicated in advance about overall estimates when (here comes the “your fault” part) one client may have only one round of notes while another wants to go back and forth for weeks? Or if one client only needs a mood board to get excited, but another needs fully-flushed 3D rendering to understand the vision, which can take several hours to create. There are so many client X factors! So are there better models than hourly?
My professors spoke of this “ever-evolving, post-online-shopping-industry” that replaced standard models of the past. I was just too young to experience this shift (I was a late-blooming, decade-older-than-the-rest design student). Luckily, our designer friends had some solutions and are budgeting in contingency or overestimating in their proposals to allow for the X factor of clients’ particularities.
How Other Interior Designers Track & Charge For Their Design Services
So, now let’s turn to our anonymous special guests and get some REAL answers. I can’t thank these pros enough for their generous, business-savvy insight. The following are the questions posed to our seven experts and their responses. Quick note, these pros are all in major US cities (Portland, Vegas, Los Angeles and New York), so if you’re in Duncan, Oklahoma, or something, you’ll probably need to call around to see if there’s truth in these numbers (or check down in the comments). Okay, here we go:
Do you charge a flat fee or hourly rate, if so, what is your hourly rate or how do you calculate the flat fee?
Everyone questioned charges a little differently for different types of project, but rates seem pretty standard across the board. Most charge hourly, but a few charge flat fees (based on sq. footage) for ground-up or hospitality gigs.
The mean (or average) rate of people polled was $182/ hr. Here are a few sample answers:
“It depends! The range is $150 – $350 an hour depending on whether it is operations based, or design (creative). If it is a larger budget ($100,000 or more), we charge a percentage of that budget as a flat fee.”
“I bounce around between an hourly rate and flat fees. For bigger jobs (like new builds and renovations) I typically charge hourly since they go on for so long. Sometimes on smaller jobs that are just a few rooms, I set a flat fee. $150/hour-ish.”
“I charge hourly, which was $150 but recently increased to $175.”

How do you account for paying assistants/a team? Is their time itemized separately or included?
The answers to this question were a bit more varied. Some designers account for the different levels of experience in their team by using a “blended” rate, while others charge different hourly rates for different team members.
“I have a separate line item for design assistants or 3D modeling/drawing hours.”
“We charge an hourly rate. My hourly rate is $195 for myself as the principal designer, $135 for project managers, and $95 for junior designers.”
“We log all our time individually. Initially, we had separate rates of $150 general manager, $100 assistant, but now we do a blended rate of $175 no matter who works on the project.”
How do you typically make accurate time estimates for a project, given the client X factor? Do you overestimate?
Though the specifics varied, a common occurrence was evident; most designers have this element addressed/outlined in their contracts.
“We’ve become more accurate with every project we do, but we feel it is better to overestimate a little bit. We send weekly updates so that our clients can see how time is adding up. We usually give a heads up if we feel the time will surpass what we’ve estimated.”
“I can ballpark a time estimate based on previous projects of a similar scale. There’s no way for me to know if the client will be someone who makes quick decisions or sends me back to the drawing board 100 times until we get started. I’m sure I actually under-report a lot of my hours because it can seem crazy that I spent 1 hour designing an entire living room but 75 hours searching for the perfect lampshade!”
“We try to look at past jobs and match the scope, and estimate based on those. We typically underestimate. Because we do not charge a flat fee, we tell our clients that these are mere time estimates, and can vary greatly. I always equate it to an attorney meeting with their client for the first time. There is no way to predict what something will cost until we’re deep into the project.”
“We include a 20% contingency on all jobs to allow for scope creep. If it goes over, we will get the client’s approval to go into contingency. It’s nice to have this written into the original contract, as it saves time getting an additional contract approved. We can pull reports in Harvest (a time tracking app) at any time, and we try to do this weekly.”
How would you handle going over time estimations?
“Ooof. This is a tough one, but we just let them know from the outset that the more we do (call, order, email, discuss) the more it costs – it all goes on the clock and to keep that in mind!”
“We tell the clients upfront that we account for ALL BILLABLE TIME, which includes any electronic communication, phone calls, driving time, etc. We tell them that the more decisive they are the less they will have to spend on us. This is another reason we stick to an hourly model over a flat fee.”
“Every client is different, spending a little more time upfront for creative alignment will help establish trust and ultimately saves time in the end. Weekly check-ins by phone, in-person meetings, connecting on a personal level, all help foster trust, too.”

Do you ever charge commission on furniture?
This is a common practice among designers, who are often able to secure furniture and accessories at a discounted “trade” price. A designer will purchase the pieces for their client at a discount, then charge a commission on the piece (usually a percentage of the discounted cost) to help account for all the little amounts of time that aren’t trackable. Often a client will still end up paying less than if they had bought the piece retail themselves.
“For clients that require a little more of a “white-glove” service, I’ll charge commission on furniture considering I’m handling all the purchasing. If I pass along my discount then I have the clients place all orders themselves and they’re in charge of dealing with shipping/receiving/storing, etc.”
“Always. We typically mark up 30% from our industry rate, which means the client is still paying less than retail (most retail furniture has a 2.5x mark-up).”
“Yes, purchasing is required on all contracts (except hospitality) and is a flat rate of 35%. The client is also responsible for paying a receiving company, where products get checked for damages, quality, etc., and our firm monitors these updates against the purchase order. Products get delivered according to the construction schedule, and a final install of furniture is done at the end of a project.”
“Yes. 30% on wholesale, vintage, and custom. We don’t give clients our retail trade discount so they are paying what they would be if they purchased it themselves.”
Any favorite software or tips for logging project hours and invoicing?
There were definitely variations in billing practices, with some billing bi-monthly and others billing once a month.
I’ll start with EHD. We use Harvest for logging hours and expenses, and Google Sheets or Airtable for a lot of project management and orders. Harvest was the most common time tracking and invoicing software reported by our small sample, with Ivy following, and Fohlio for purchasing. Spreadsheet-nerds will be happy to know those are still a popular-player, too.
In Conclusion…
Now knowing standard hourly rates, let’s reassess Sara’s “designer budget” with a more accurate rate of $182/hour (which is an average based on the hourly rate results from our survey):

I LOVED Sara and Mac’s project, but Sara could never have actually afforded me. And that makes me sad. (Sara would like to add that this is a very RUDE, but a true assessment.)
But, designers, you want to remain competitive with your rates. Your knowledge and resources are uniquely valuable (project-undertakers, be wary of hoping your contractor will moonlight as your designer. That can be an expensive mistake!). It’s a tricky tightrope to balance on, as you don’t want to be SO expensive you aren’t able to secure work, but not so low that you aren’t able to make a living. At the lower-end of the scale, you may actually lose work. Potential clients might wonder why you’re “so cheap” and assume you’re not a professional or lack experience. As with anything, there’s something to be said for not taking the cheapest option.
Alas, a fully-executed design by a professional seemingly remains a luxury service (one well worth it, if you can afford it!). But if these fees don’t fit your budget, DON’T GET DOWN. There are still ways you can possibly work with a designer, and I’m going to share those with you in a second post coming soon.
There is, of course, always the “do it yourself” model. Non-design school trained team members like Arlyn, Bowser, and Jess are all self-made success stories that exemplify the fact that all you need is a Pinterest board, a good flea market or two, a pinch of taste, and the time/patience to pull it off. And don’t worry, Sara is being forced to design her own bedroom and master bathroom, so she’s not sitting in lap of luxury – aka my lap – for too much longer. She’ll pull it off though, she’s done it before (see her old apartment below).
I have to confess, doing all the research for this post lined up serendipitously with my and Bowser’s recent leap into taking on our own clients. Spreading freelance wings can be scary, but now I feel like I have so much more information to work with. Emily B. and I have decided to test our own newborn-models by extending the EHD “friends and family” rate (of $75/hr) to our first 5 clients.
Finally, to all the designers reading this post – are there any other methods you have tried that don’t weed out the “non-luxe” client? Partial designs, consults, e-design? I just want to keep working with cool people, like Sara and Mac, who might not necessarily have the budget to hire a designer. (Sara’s not my boss anymore, so now you know I mean it.) Okay, the end for real. BUT STAY TUNED for Part II, where I share a few ways to save when working with a pro, and why working with a designer (even partially) might be an expense you can’t afford to cut….
Catch up on all of Sara’s Makeover Takeover: Sara Buys A House Part I: Six Tips For First Time Home Buyers | Sara Buys A House Part II: The Renovation | The Designing Begins: A Floorplan Design Agony | The Designing Continues: Time To Pick Furniture | The Final Design Plan | A Fireplace Design Agony | Sara’s Moody TV Room Plan
The post Inside The Design Process – How Much It Really Costs To Work With A Designer appeared first on Emily Henderson.
January 14, 2020
The 9 Best 2020 Bathroom Trends We Wish We Had Right Now
 design by beata heuman
We try to be really good at keeping our promises. We told you in our 2020 kitchen trends post that we would be back with more trends this week, and I am pleased to give you our 2020 bathroom trends report (since it was the other favorite last year:)). Last week we talked about the dream of the “fantasy kitchen” but if you ask me, the “fantasy bathroom” is right up there. I mean it’s really too close to call because who doesn’t ALSO want a beautiful bathroom to leisurely bathe and pamper themselves silly in? So to help plan your fantasy bathroom mood board or maybe a real mood board if you’re lucky, we have compiled nine trends that we’re banking on seeing all over the interwebs this year. Some are unexpected and some (in our opinion) are a long time coming (in a great way). Let’s put on our shower caps and see what 2020 is going to look like…
1. Color Saturated High Gloss Tiles
 design by soho house los angeles | photography by sebastian boettcher
Yep, 2020 is new, colorful, AND shiny. Now, most bathroom tiles have at least a subtle sheen to them because, well, they need to be water-resistant (duh) and easy to clean (which a gloss provides). But what has not been in vogue is the super shiny gloss. Matte has been ruling for far too long and 2020 is here to stage a coup.
 design by thomas walter of atlelier ordinaire | photo by amandine & jules | via domino
What is also VERY EXCITING is that bold colors are finally taking a tile stand. To be clear, we will never not love a clean white/neutral bathroom but we are also, more than ever, ready to see bold and even jewel-toned tiles. This royal blue below is so much more eye-catching than if it were a simple white and we are here for it.
 design by flack studio | photography by sharyn cairns
2. Unexpected Tub Shapes
 design by scarlett gowing | photo by paul raeside |
 It can seem as though there is not a lot of wiggle room when it comes to tubs shapes. Oval and pill-shaped guys are basically it, right? To that, we say not quite (rhyme not intended). This beauty above nearly stopped both Julie and I in our tracks. The footed detail somehow makes that big tub look visually light. All I want to do is jump in, relax, and enjoy what looks like an incredible view. It’s such a beautiful and modern alternative to the classic clawfoot tub.
 design by sarah sherman samuel | photo by matthew williams | via domino
Now, these next two bathrooms were designed by our favorite trendsetting designer, Sarah Sherman Samuel. Both of these tubs are somehow simple yet unique at the same time. The unexpected shapes really take these bathrooms to the next level without screaming, “Hey, look how cool I am.”
 design by sarah sherman samuel | photo by jason frank rothenberg | via domino
We will say though that a round tub may not be the ultimate lounging tub due to its shape. However, it could be great for little kids since lounging isn’t their bath goal? Regardless it looks extremely cool.
3. Unconventional Double Vanities
[image error]design by chzon | photo by karel balas
Since we were just talking about unexpected tub shapes let’s keep the good times rollin’ with two new big ways double vanities are changing it up. The first is the double “single” vanity. In the Portland Project master bathroom, Emily and the design team chose to install two single vanities on either side of a door. While that looked amazing, this is not that. This is a deliberate design choice to place two single vanities next to each other instead of one vanity with two sinks.
 design by reath design | photo by laure joliet
It seems like an interesting choice since you would likely lose counter and maybe some storage space. But it does look pretty cool if done right (which these two designers absolutely did). The one perk, however, is that it’s an easy way to avoid the ever sweet, “you’re stuff is on my side!” dispute that typically happens in bathrooms shared by siblings…or was that just me and my brother??
 design by liz hoekzema of klh homes | photography by dionel fisher | via domino
The other double vanity trend we feel is on the rise and that we LOVE (if you have the space), is the double vanity island. Look how amazing this one is, designed by Liz Hoekzema of KLH Homes. It’s innovative, smart and SO beautiful. Sign me up, please!
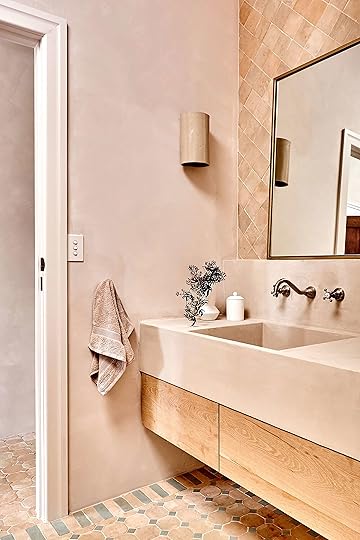
4. Natural Stone Sinks
 design by hernandez greene | photo by eric pasiecki | via architectural digest
Behold the beauty of the natural, raw stone sink. Does your heart skip a beat too?? I started seeing these pop up more and more at the tail end of last year and my little eyeballs could not get enough. While these guys are total stunners, they are likely best suited for a beautiful powder bathroom since they are such a statement and likely hard to clean with everyday use.
 design by amber interiors | photo by tessa neustadt
 The design genius of Amber Interiors has been using these beauties in her recent projects as shown in these two beautiful bathrooms. They truly add so much texture to a space that you don’t need much in the way of accessories or art. They are just that visually interesting.
 design by amber interiors | photo by tessa neustadt
 If this is what bathrooms in 2020 are going to be like, I am extremely happy. But to be fair, I am sure they have a hefty price tag so they will remain in my personal fantasy bathroom.
5. Wide Grout Lines
 design by sarah sherman samuel
Ok, full transparency, we did talk about this trend last October in this new grout ideas post. BUT I am bringing it up again because it’s too good and important not to. This is a trend that we are betting will find a big voice in 2020 and I for one can’t wait to hear it (well, see it – sinks don’t talk).
 design by bigger than the three of us
6. The Tub Nook
 design by crosby studios
Let’s talk a little more about tubs, shall we? I think that if a freestanding tub isn’t your thing or you don’t have the space for one then you should highly consider a tub nook. This trend is taking the traditional tub layout and making it cozier (aka better).
 design by pablo chappelli | photo by ricard romain | via elle decoration nl
Aside from its initial purpose of being a place to clean yourself, a tub or bath should be a place of escape. A tub nook is exactly that, a cozy escape that looks beautiful. I now want nothing more than to feel like I am in a stylish bath cocoon.
7. Raw, Earthy Tile
 design by georgia ezra | photo by amelia stanwix | via the new
I know that colorful, shiny tiles are in for 2020 but so are really natural textured tiles (with zero sheen). There is just no in-between. Just like in the kitchen trends post, these tiles are incredibly beautiful but also a bit rough to the skin if you install them on the floor. We don’t want to discourage you if it’s your dream but maybe just invest in some pretty bathroom rugs or really good, thick socks.
 design by rory dobner | via drummonds
Don’t get me wrong, I understand the appeal because my eyes are in love with this look. We think it may be best in a powder room where you and your guests are likely to be barefoot less.
8. Asymmetrical Mirror & Sink Combos
 design by viya home
We really love this trend even if it’s not the most practical because almost anything asymmetrical in design is good by us. It keeps things interesting for the eye. So if you are looking to create a cool moment in your bathroom why not try an asymmetrical mirror?
 design by chzon | photo by karel balas | via archilovers
So when you are thinking about asymmetrical mirrors in a bathroom, there are two ways to do it. You can chose a mirror that is asymmetrical in its actual shape like the two photos above. Or you can install a regular mirror asymmetrical to the sink like in the two photos below.
 design by sarah sherman samuel | photo by jason frank rothenberg | via domino
We really love this particular look because if you think about it you don’t really need to look at yourself when you are washing your hands or brushing your teeth. So placing a sink to one side and then installing a large mirror to the center of the vanity (instead of a sink) looks extremely cool and a purposeful design choice.
 design by 2LG Studio | photo by megan taylor
9. Swap Out your White Seat Cover (Rental-Friendly!)
 design by mark lewis interior design | photo by rory gardiner | via remodelista
Now, changing out your toilet seat cover is not a new idea but it is absolutely having a comeback in 2020. Plus it’s a great, easy, and affordable way to upgrade your bathroom (and toilet).
 design by lilly bunn | photo by emily gilbert | via elle decor
This is actually something that I have been planning to do in my own bathroom because it is going to instantly change the look and feel of the space and it’s SO rental-friendly. Ideal, right?!
 design by heidi caillier design | photo by haris kenjar photography
If this wood seat doesn’t convince you I don’t know what will. It just brings so much depth and texture. I can’t believe I just said that about a toilet accessory. O boy I can’t wait to see what other insane 2020 design-related things I will end up saying this year. Only time will tell.
This is where I leave you (for today, of course). These nine trends are pretty darn dreamy and once again we hope that your design imagination has been sparked because at least to us, there is nothing better. BUT what do you think? Are any of these now on your dream renovation list? Are any of them too crazy to even consider? Tell us because we love hearing your thoughts.
Love you, mean it.
The post The 9 Best 2020 Bathroom Trends We Wish We Had Right Now appeared first on Emily Henderson.
January 13, 2020
Let’s get Personal: THE BLOG TURNS 10!!! What do you want to know????

Singing happy birthday to a blog feels odd. Psychotic, almost. Mostly because a blog is just a series of thoughts/words typed on a piece of technology so aggressively that 6 of the keyboard letters are visually unrecognizable. But I did sing, because she is all grown up and deserves that song. Ten years ago my MIL told me that she couldn’t read my blog because she doesn’t have a blog – that’s how little we knew about blogs back then.

I started my blog “The Brass Petal” on January 4, 2010, which I didn’t realize was such a great ‘START’ date (January 1st was a Thursday so you’d have to be a monster to not wait til the Monday). I liked “brass” before the gold rush of the 20-teens, and flowers more than most at the time… or now. Thus the name “Brass Petal.”
10 years in the insane wild west of digital media is more like 70 years in a normal business – dog years, really. The level of pride that I feel is only matched by my level of shock that this is my life, then trumped by my level of gratefulness for you. You have made this all worth it.
So here we are. Just me and you.

Do you know what celebrating 10 years means? I get the excuse to tell those of you who are into it, all of it. The older one gets the more one has this need to reflect on their beginnings, how they’ve changed for the good *and bad*, and figure out where they are going – what is next? Add in the fact that I’m an external processor and generally need to talk about those things…
The quick recap:
“Born and raised Oregonian, young Emily was 30 years old when she moved from New York to LA. A former dog-walker, piano teacher, and bartender she shed her provincial life to become a prop stylist for magazines and advertisers before hosting her own TV show and becoming a “design influencer.”
Writing your own obituary is highly entertaining. By the way, I literally walked dogs for one year and yet I insist on it making my resume to ensure I look grounded despite my success – A secret apology. She picked up literal sh*t for a year – she must be normal…
Moving on…
In 2010 I started a blog, got bored, auditioned for HGTV’s DesignStar, won, hosted my show “Secrets From A Stylist,” had zero kids (at the time), two cats (RIP), and a then-rocky marriage to my best friend (super solid now).
Going back to the beginning…
How did this blog start????
As I said, 10 years ago today(ish), I wrote my first blog post on The Brass Petal. The first post was a true masterpiece of information and inspiration and deserves a reprise.
Here you go:

Same me, just more offensive and with fewer capital letters. I wasn’t “woke” yet, because obviously I would write “healthy and fulfilled in my career” now. I was obviously being hyperbolic for comedic intent, but perhaps that’s not funny anymore. But the “ah 2010, here you are, I figured this would happen” bit still kinda cracks me up. Note the use of not my photo, with no crediting or referencing. I think I probably took a screenshot, or worse, took a photo of a magazine and uploaded it onto my Blogspot. These were the dark ages.
It was before Pinterest. Before Instagram. This was meant to be a journal – a creative outlet that I could reference and you could possibly share.
The intent was clearly not to have a business. I was 30, working as a stylist, living freelance-paycheck to freelance-paycheck. The internet was a baby and social media was barely in its womb. Oh, I do hope I keep having birthing analogies throughout this post…
So I started writing the blog, but then it became how to get followers. Here was my “strategy.”
I did it the old fashioned way – the sandwich board of marketing – an annoying mass email to literally every single email address in my contact list. Select all, copy, paste. I spared no one from receiving the following:

Such bravery. I was one day in, ONE DAY, and I emailed it to everyone I knew. I guess I felt that I was going to stick to it.
I didn’t stop there…
I also emailed all the bloggers that I followed with custom emails – this one was to Anne Sage – but Joy (OhJoy!), Coco Kelley, Apt 34, Oh Happy Day and many more that I’m still friends with were included.

So I got a mini following, which at the time was huge.
I wrote Peabody award-winning articles like this one about my friend Jen:

Other titles would include: “art that I want to make sweet love to” or “blue bells.” It was irreverent without being offensive. Happy, yet rebellious. I wrote every day, without an editorial calendar or nary an assistant. I didn’t need it. It was fun and easy.
Three months later I auditioned for DesignStar out of sheer desperation to shake myself out of my new-to-LA depression. The blog helped me get on the show. “Bloggers” and “stylists” were just becoming buzzwords so it was good timing, not without hard work, but yes very good timing.

Winning a reality show on HGTV (which was huge at the time) changed my life forever – in an absolutely positive way. After I won and began “Secrets From a Stylist” the blog exploded… or what felt like an explosion. I literally had no idea how many people read because that wasn’t the motivation. There were always a ton of comments. I couldn’t wait to write every night (which isn’t that different from now, depending on the post).
It’s hard to talk about the growth of the blog without including “Secrets From a Stylist” – my TV show. It had an almost cult following thanks to you guys, until HGTV decided to move to “real estate and renovate” format and canceled most design/decorate shows.
The show/work was so fun, full of mostly vintage and mass-market (but this was before 2-day shipping – we had to plan and shop IN PERSON). When your style is mostly vintage and thrift, it’s automatically super eclectic – SO feast your eyes on these.


So after 10 years, I’ve been asking myself a lot of WHYS?
Why did people read this blog or watch that show?
It was very specific. I wasn’t a great journalist nor did I have any authority or design credentials. I’ve thought about this a lot recently to help me figure out why I’m here and what is next. Here’s what I came up with:
I think there was a hole in the design world that I somehow filled. The “thrift-store, girl next door” if you will. I can’t explain it any other way, and frankly, it’s accurate.
I had a little budget but mostly so much time to search, thrift, and DIY. I had no design skills but a strange amount of bravery. I also had no shame or embarrassment in failing and then telling everyone about it. There has always been a hole in the market for honesty amongst the elitist interior design world. I knew that I liked vintage things that were weird and old and when I put them together it looked like a thrift store, but an attainable, approachable one full of personality. It was full of color, pattern, risks, and no embarrassment.
How did I “manage” both the blog and TV show?
It was a lot. I worked 70 – 80 hours a week. We shot 7 am-7 pm, six days a week. I wrote the blog while in hair and makeup and when I got home at night. Orlando and I shopped flea markets on Sundays for the next week’s reveal. The blog was a random, stream of consciousness babble, full of endless grammatical mistakes due to speed and haste (can you even imagine how much worser it were, Boomers?).
There was no rhythm or predictability to it, barely any linking to products, I didn’t format photos correctly or label any images properly so that Google would know what they were. A photo of a room from “Secrets From a Stylist” would literally be labeled “img.679” or whatever my DIGITAL camera called it. Some photos were wide and some were small. It was so ugly. I had no analytics or idea of traffic. I just wrote, pressed publish, and chatted with you in the comments.
In 2010 I had no employees, the blog made zero money, and I had almost zero anxiety. Just excitement.
Back then I wasn’t trying to grow my audience. I just wanted to hang out with you. When you come up to me and tell me that you feel like you know me, the truth is you do. Omg, this post is becoming highly emotional for me, the flight attendant is certainly concerned why I’m crying… and I just started. We have 9 years to go…
At first, when I wrote this post I thought I would go year by year with the highs and lows, traffic numbers, where the revenue shifted, employee growth, lessons/mistakes, etc. But the series would be so long and for those not closely following it would seem boring (if not highly self-indulgent). So I’d love to know what you guys would like to know.
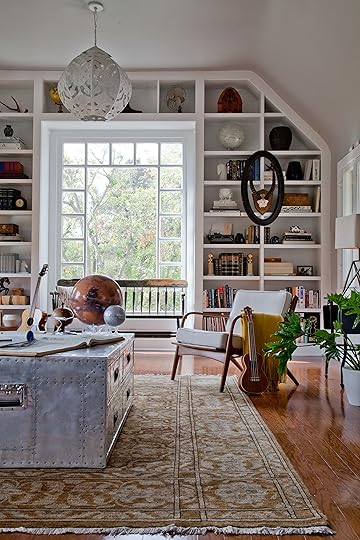 photo by bethany nauert
Here is what I’m thinking:
HINDSIGHT IS 2020 ADVICE: The real steps that I took, either on purpose or accident, that I can now see led to growth and success.
EMPLOYEES: How I went about hiring, paying, and growing a team of freelancers and employees and what lessons I’ve learned (spoiler – so much).
FINANCES: How I initially grew the business, financially, how I knew what to charge and when (and for what), and how we make money now. No one understands how bloggers or “influencers” make money – but it’s actually pretty simple (in a complicated and totally fascinating way).
BIGGEST MISTAKES: This will likely be peppered into the other “finances” and “employees” categories, but don’t worry I have way more in every category of life. And no these aren’t of the design variety.
NEXT STEPS: What do I see happening next? Where do I want this to go? Why don’t I have residential clients anymore and will I ever pursue a furniture/accessory line?? What is the future?
All of those will be full of advice – not what you should do necessarily, because different personalities will make different decisions. But insight. Mine. I just don’t want to be too self-indulgent, so tell me what you’d like to know and then if they don’t fit into a post I’ll do them on Instastory (or save for the podcast).

I can’t leave this post without a massive THANK YOU. To all of you who have been here from the beginning, I wish I could throw you a party. Some of you just arrived, and many of you it’s been 3, 5, 7, 10 years and regardless that’s a lot of YOUR life spent here. And so many changes. And so many “I’m back” posts… You’ve seen me grow up so much and change so much. For all the times those of you who are truly loyal have defended me in the comments, I thank you so so so so much. I’m trying, just like you, to bridge the gap between the person I am and the person that I want to be. Sometimes I fall in and lose myself. It’s all normal and I’m not too hard on myself, or maybe I am, but that’s just my nature. If self-awareness were an Olympic sport I’d want to train to compete. People have no idea how it feels to have feedback on their lives every single day – both positive and negative. It’s truly enlightening and has made me such a better person – or maybe a less worse person. Readers, you complete me
Emily Henderson's Blog

- Emily Henderson's profile
- 10 followers

