
Emily Henderson's Blog, page 193
October 31, 2020
The Top 10 Things You Loved And Bought Last Month: October Edition (Plus one Big Ticket Item We Did NOT Expect But 100% Approve)

Happy Saturday folks. Today we are back with a new favorite series of ours (here was last month’s). It’s one where we get to really analyze what products you guys loved and bought via the site and it happens to be delightful and intriguing data to compile. I am not one that is blessed with a “number crunching” brain but this type of data is FASCINATING to me. It is really fun seeing what you guys click on and it helps us understand what type of product recommendations you want to see from us in the future. It is also super validating when one of us recommends something we love and you all trust us enough to try it out yourself. Not to mention, there is a bit friendly competition around here to see who’s recs made it to the top 10 


October 30, 2020
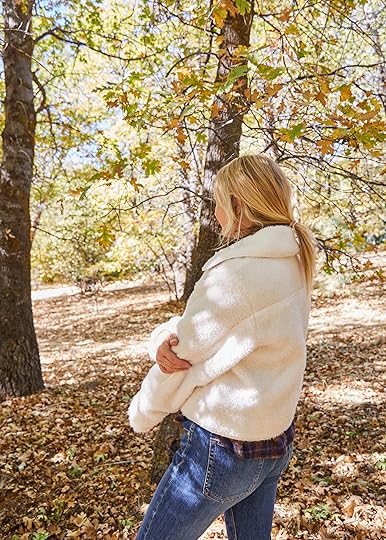
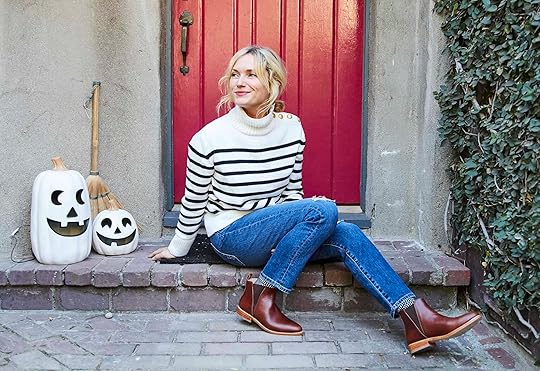
New Fashion On My Body: The One Where I Dressed Like A Fisherwoman, Wore 6 Great Coats, AND An All Star Pair Of Boots

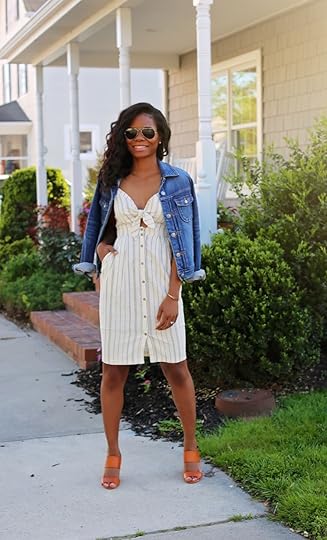
It’s been a while since we did a new, original fashion post but we were all itching for some new shots, many perhaps where I dress like a fisherman. Listen, I’m out of practice, my fashion-forward friend couldn’t help me, and besides! there is an annual kids trout competition up here next weekend and girlfriend wants to get in the local paper. So, this week Veronica drove up and we safely shot me donning 6 different coats outside (along with pants, shoes, shirts, and underthings, duh). I even did my own hair and put on, how do you say, makeup?
So are you ready for the first real fashion shoot in who knows how long?? Here we go…
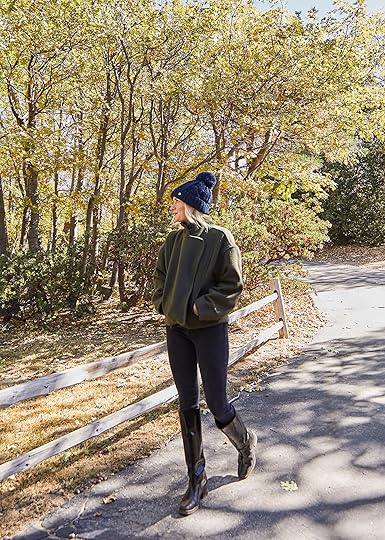

I’ve already determined the winner of this coat roundup and it’s THOSE BOOTS. But first, the coat. This might be my favorite as it is different enough from what I already owned and that excited me. It’s short and boxy, with a tall collar, and dropped shoulders. It was wide enough to easily layer (a huge plus) and hit the top of my pants in a way that still felt flattering and not overwhelming. It was a HIT. And that olive green color is so fall meets winter.

Now onto these wonderful boots. I just got these or I would have put them in the boot post last week. What makes them so good? Glad you asked. They are wide, tall, and stiff which makes them almost like the profile of rainboots in a really cute (and yes, flattering) way. AND YET, these are black leather, square-toed, and have a chunky comfortable heel. I wore them with very skinny black jeans and I felt cute (even cool) for the first time in months. Perhaps we are turning the corner in this quarantine and starting to care more about our outfits and looks? HAHAHA. Nope. Not quite yet for me, but cute fall/winter boots that make you feel even remotely that way are a great start.


Coat | Jeans | Boots | Beanie (similar)
Now here is a non-basic and yet totally classic/utilitarian denim jacket. I welcome Wrangler into my life anytime. This guy is AWESOME. Boxy (but a bit longer) skinny sleeves/fitted armpits, cool big square pockets, corduroy details … it’s good. Good for layering. Good for just looking cool in fall. My only issue with it is that for those of us who have larger love pillows, the pockets add some bulk so from some angles it wasn’t too flattering, but they lay flat (the pockets, not the love pillows) so it wasn’t a big deal.
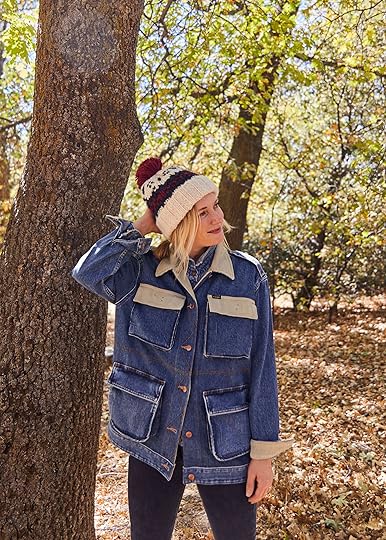
Almost everything else besides coats (and those epic boots) I already had. The beanie is from J.Crew (but sadly sold out) and the rain boots are from Target.
Coat | Jeans | Shirt | Boots | Beanie (similar)
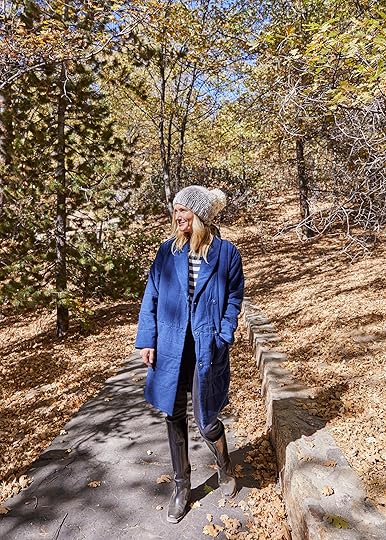
Next up is a QUILTED. DENIM. BLANKET. COAT. I have been touting the trendiness of quilted denim for months and it just never hit (I have a quilted denim ottoman, yards of vintage quilted denim – just waiting for the perfect piece of furniture to cover/ruin). So yes, this one is so big and cozy and layerable. It’s roomy so size down (unless you want to layer large sweaters underneath it). She has cute button details, a big chunky neck collar, and such a happy but subdued color. Side note: when I write these posts I kinda feel like I should have been that game show host voice that calls out all the features on the fridge on, say, The Price Is Right. No?
Anyway, I wore it with what has quickly become one of my favorite t-shirts that I forgot about – a signature design from one of my favorite home stores in LA (Lost and Found), but here is a great one, too. Paired again with those great boots and this time a slouchier beanie.
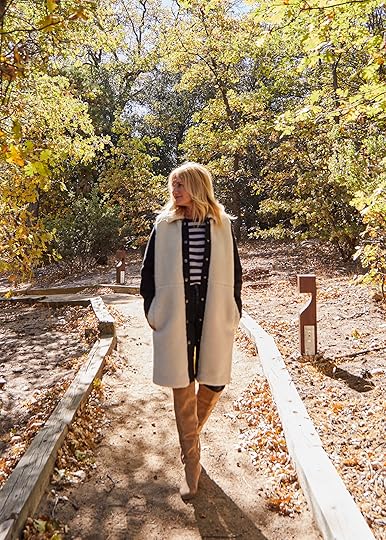

Here’s where I really start to feel like a real lady. Sure, same pants, old boots and same t-shirt as before but I’ve never met an ‘elegant’ teddy until this one. The slim black arms make it actually flattering (I have a real love/hate with teddys as they are just like wearing a blanket – comfortable but bulky). This one feels proper and elegant in a way that makes me wonder if someday when we live in a city again I might want to impress people. Also guys, I haven’t had my hair done since February. All summer I went to a salon called ‘supermarket sun-in or lemon juice’ and frankly it kinda worked up until now (I know it’s not good for your hair, but neither was taking the risk to drive 2 hours to a then – city full of covid just to ALSO bleach your hair … but yes Johnny Ramirez might be coming to some dull hair very soon).

Now this cropped teddy is for those you want volume up top in both the bodice and the sleeves. I’m on the fence about it. I loved the color (a pretty cream) and the collar (seeing this collar everywhere) and the crop (hits the top of jeans in a good way), but the proportions are bulky. I know that this is a thing, that people are into oversized everything so if you are one of those people then this lady is for you (I’m wearing XS and I’m normally an S, but I guess if you are into the oversized thing then you might want to oversize anyway?). I wore them with my favorite dre jeans (why my favorite? Low rise, roomy waist that never cuts in, skinny crotch that is flattering and the perfect boy legs, oh and a good cropped length). Speaking of jeans, my team did a great denim roundup a couple weeks ago and after 2 years of wearing these would love the same version without holes. Does that exist?
I then wore them with my 15-year-old FRYE boots (I got them for my 7th birthday!). But really, I splurged on them when I was 23, wore them for years, and I’ve schlepped them from New York, to Santa Monica (fun fact we lived there for 6 months before DesignStar), then Silver Lake, Glendale, Los Feliz, and now up to Lake Arrowhead. They’ve been in a box the entire time. They are FINALLY back in style (I’m sure they never left, but I wasn’t that into them until now). But guess what???? Those mother-loving puppies chewed up the top TWO NIGHTS AGO. Like after 15 years of hoarding these, waiting for them to return to the zeitgeist to only now that they get chewed up by one Buttercup Henderson. Luckily part of their charm is how rustic they are so I’m embracing the rip and returning the dog to the pound.
Up next are two denim jackets I’ve had for a while but they are still so good and available.
Jacket | Shirt | Jeans | Boots | Beanie
The classic sherpa lined Levi jacket never gets old. Pair it with an organically ripped up vintage sweatshirt (ooh SNAP, those pups could come in handy yet! Maybe if I wear a sweatshirt around like underwear and leave it out they’ll be “inspired” to give it that vintage look full of holes that we love??! They are VERY into my underwear. Flattering, I know!). These jean jackets can be bulky too, by the way, but the crop and style are good. So if you have larger love pillows size up (or don’t layer over sweatshirts).

I wore them with my favorite “standing jeans” – aka the ones that are awesome and I would totally wear on a date or if I wanted to look cool but I can’t sit down in them). Here is the link if you also like to only stand wrapped in uncompromisable stiff denim that compromises your oxygen intake and digestive capacity. Finish off the look with some bulbous Doctor Martens that make me feel young, and make my feet look large – which is another thing I know people are into – chunky, HUGE shoes. But since I have small feet they can handle getting a boost of volume.


Jacket | Jeans | Shirt | Beanie (similar)
I was recently purging SO MANY CLOTHES at our LA home to move out but before I did I made one of my best friends, Suzanne, come over and make sure I wasn’t going to regret much. Due to my years of these fashion posts, I had acquired a lot of clothes (and thus a lot of waste – shame on old Emily). I think I had 6 denim jackets. She made me keep those two. The sherpa one is a no-brainer but I was shocked by this one. I said “Oh I thought you said denim jackets are ‘basic’ and you made me stop wearing them last year.” She was like, “oh right yes, that was last year, they are back now I meant to tell you”. OH ok, cool, but she clarified – only oversized, or boyfriend in a ‘my clothes are too big for me’ kind of way. I get that it’s a look but it’s not my look. But this one is oversized, but still fitted in armpits (not too snug, but armpits properly flattered). It has some stretch making it more comfortable. Now that I think about it the only thing ‘boyfriend-y’ about it is the length. I know it looks kinda boring, but I wear it all the time. I feel cute in it and it’s super comfortable (I find that a lot of denim jackets are just too stiff and uncomfortable, this one is not… I realize that sounds hilarious/ironic considering in the last shot I was sporting jeans that prohibit my ability to take a large breath). But I truly do really like it.

Blazer | Jeans | Shirt (similar) | Boots
Lastly, I got suckered in by good styling to try out this blazer. Like I need a BLAZER RIGHT NOW. But this one is really flattering with cute leather details. But for whatever reason, I couldn’t make it look awesome. I think it’s likely because being in a forest wearing a blazer is totally weird. I will say this, if you are going back to the office and you want an unpredictable yet tame blazer to convince your boss or team that you have innovative ideas, this blazer is very very cool. I just don’t need a blazer because I live in the mountains. So my review is GREAT, but I just don’t need it.
There you go. Since we live up in the mountains without the postal service a lot of coats didn’t make it here in time (if you are looking forward to the demise of USPS I’d love to regale you with the annoyance it is to only have a P.O. box). Hopefully, you’ll never live in an area that isn’t incorporated and pay 2-day shipping that turns into a 12-day arrival. Long story short there were many coats I ordered to try that simply haven’t even gotten here yet (and thus have been canceled and returned). So if you are curious what else I love, we included an additional roundup. I have no idea how comfortable, flattering or wonderful they are but I do really, really like them. May we someday try on things in a ‘dressing room’ again, so as to not have this game of ‘buy and return’ that is in of itself highly wasteful. My goal with these posts is to help you buy with confidence to NOT have to return. xx

1. Chateau Puffer | 2. Wool Double-Breasted Coat | 3. Faux Fur Teddy Coat | 4. Dolman Quilted Denim Jacket | 5. James Jacket | 6. Rianne Blazer | 7. Fred Faux Leather Biker Jacket | 8. Straight-Cut Wool Coat | 9. The Corduroy Chore Jacket
**Photos by Veronica Crawford
The post New Fashion On My Body: The One Where I Dressed Like A Fisherwoman, Wore 6 Great Coats, AND An All Star Pair Of Boots appeared first on Emily Henderson.
October 29, 2020
Winter Lighting Hack: The Perfect Soft Glow Light To Make Staying In The Only Thing You’ll Want To Do (+66 Of Our Favorites)
There’s no question that the impending cold weather is bringing up some fear and sadness due to the fact that the sanity-saving outdoor activities are swiftly coming to a close (we do have a tricks here to expend that a little). BUT as we were talking about ways to help all of you make the most of cozier days at home, lighting naturally came to mind and more specifically that warm soft glow that can magically warm the soul.
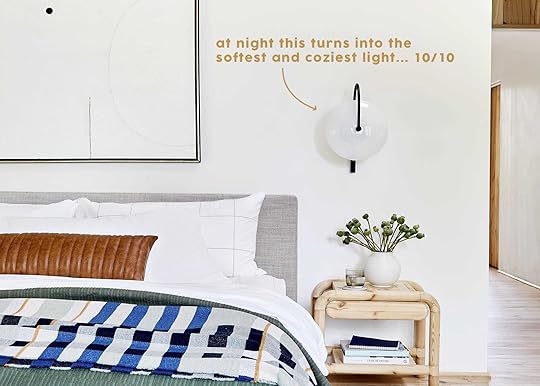
Actually, I decided that for this post I was going to sit in my living room, dim my Noguchi paper pendant and let the delicate, warm light it emits be the backdrop. Is this “method blogging??” Indeed, there is just a natural peace that comes with sitting in a softly lit room. So let’s go a little deeper on how to get/what to look for when “a soft glow” is the goal. Then, because I have little control when it comes to rounding up beautiful lighting, there are about 66 options (floor lamps, table lamps, and plug-in sconces) for you to shop from if you don’t have the source to get some “glow” of your own.
P.S. I WISH that we had shots showing how beautiful these lights are at night but alas you will have to trust us. Also maybe we need to make night shoots a thing:)
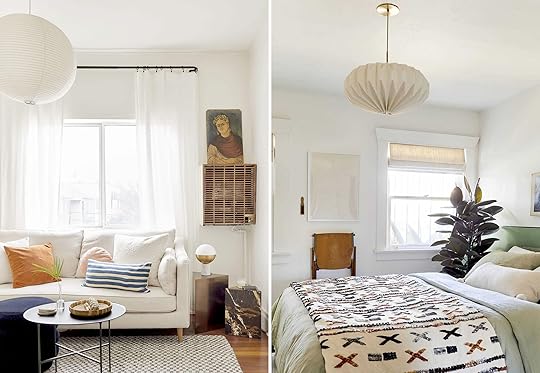
photos by sara ligorria-tramp | left from: moto reveal: jess’ living room | right from: julie’s huge (and diy packed) bedroom upgrade
Here are your options. You can A. choose a natural material lamp that has a natural off-white color like Julie and I did with our pendants. B. buy a lamp whose whole purpose is to be glowy (you’ll see what I mean below) or C. choose either an amber, low wattage, or dimmable soft white light to create the glow you want. Actually, as I was researching lightbulbs, a lightbulb went off in my head. The less blue light the better! If “night mode” on your computer is meant to protect your eyes (it’s an amber-toned filter for those who don’t know), wouldn’t you want that same type of light in our home… especially in the evening when you are trying to wind down for bed?? My answer is yes.
I also want to be clear that we LOVE fun, colorful lamps and lampshades. Here and here are two posts proving that. BUT for this post, we wanted to go a bit more neutral and soft rather than moody and romantic (which is also a great call;)). Let’s get into it…
 photo by sara ligorria-tramp | from: a quick update: the changes i’ve made to my la living room
Julie wrote a post this year about floor lamps because honestly, we felt that the design world had gone very “sconce” and we wanted to remind you all that floor lamps are ALSO where it is at. They can bring that sculptural moment your room needs and the light to bring a happier mood. These are my favorites for maximum soft glow potential.
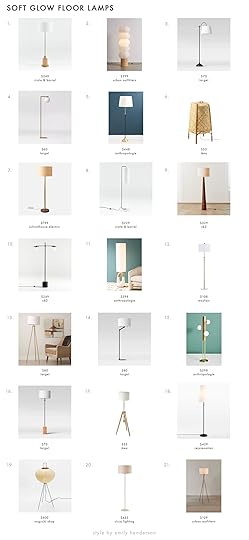
1. Bridaine Wood and Brass Floor Lamp | 2. Tabitha Floor Lamp | 3. Metal Floor Lamp | 4. Globe Floor Lamp | 5. Parasol Floor Lamp | 6. Knixhult | 7. Great Jones Floor Lamp | 8. Oralee Glass Cylinder Floor Lamp | 9. Brixton Acacia Floor Lamp | 10. Siren Floor Lamp | 11. Vivian Floor Lamp | 12. Emily Henderson.
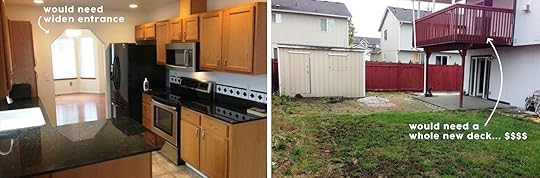
Albie’s About To Buy Her First Home But Saying No To A Big Reno AKA “Project Pressure”… It’s a Real Thing
Albie Fact: I’m a lifelong renter…happily. Even after marriage and a baby, we’ve never been in any rush to buy a house. Why not? Because we weren’t in any rush to take on everything that comes with homeownership — no one wants to be house rich, money poor!
2020 — in true “wtf” fashion — however, got us rethinking our life as renters; in truth, we realized it’s a life we’ve outlived and now we’re ready to take the plunge into homeownership.
Making the decision to buy a house is already a huge one, and it involves a ton of pressure — self-imposed — to choose the right one for my family but to also choose one that allows me to really flex my design skills. I’d be kidding myself if I pretended like my home isn’t basically my own personal showhouse. But buying, especially for the first time, burns enough mental calories to last a lifetime; so adding on anything additional would lead to a complete mental spiral. Think about it…the home buying process is one that is undeniably daunting, from the cost to the search to the paper intensive final steps. I don’t expect everything to be perfect right out of the gate — process-wise — so I am definitely not expecting perfection from the home itself.
Naturally, as a designer and stylist, I can’t help but fantasize about what I’d do to my future home — I even have a Pinterest board to manifest our future home — but after a lifetime of renting, while I am riddled with big design ideas, I also refuse to succumb to “project pressure”.
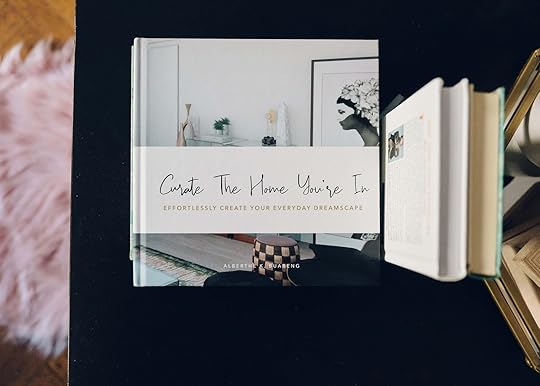 photo by mariah texidor | yes, that’s my book!
What is “project pressure”?
So glad you asked!
For starters, it’s something Jess & I came up with when talking about renter-friendly projects we’ve tackled — a whole different kind of project pressure by the way. Loosely defined, project pressure is the pressure to tackle every and any project imaginable in a new home, likely before even actually living in said home.
Between design shows and social media, it’s really easy to get swept away in wanting to knock down walls, upgrade fixtures, and remove everything…even what’s bolted to the floor. But why?
How do I know what I really want out of a future home before spending an entire fortnight there? Yes, I said fortnight. Are there things that I can assess beforehand as a “must have” or “must go” — i.e. carpet & popcorn ceilings? Absolutely! But knowing that I’m buying a home, even if not for a lifetime, I think I’ve earned some time to think things through, take my time, and design in phases.
Now, if tackling projects is your jam…go for it. If you actually want a fixer upper…I’m rooting for you. But I think we’ve all gotten caught up in the notion of our homes needing projects…I mean, imagine a world where we just all move in and sit down. What would I write about without a project to do?!
*cue the sarcasm*
I remember earlier this year deciding that I would no longer tackle any more projects in our 2 bedroom condo — I was all project’d out — and I wanted nothing more than to enjoy and live in the home that I’d spent the past 3 years designing & redesigning. To be honest, even though I knew there was so much more that I could do, I just got tired of tinkering. I had project fatigue! I wanted a break. I wanted to reset the way I felt about the way I lived.
 photo by me | fall 2018 orc
About 6 months after that decision, I decided it was time to finally tackle a room I’d been avoiding the entire time — the living room. I am certain that without that design respite, I wouldn’t have gotten that new surge of inspiration. The possibility of having my own home — ya know, that I own own — is a different kind of inspiration. No one to ask for permission. No worries about putting it all back. No one to answer to but ourselves. But if it ain’t broke and it’s not impeding me from enjoying the new home, what’s the rush. Just because I can, it doesn’t mean I should.
 design by me | photo by mariah texidor
Where does project pressure come from?
To be completely honest, most project pressure is external — home design shows, social media, our personal circles — but a large part of it is definitely self-inflicted.
So many design shows highlight the benefits of getting a fixer-upper which, for a lot of us, may translate to the “need” to find the worst house ever so we can love it back to life. On the other side of that, with social media (really, just Instagram) and Pinterest we’re inundated with everyone’s “highlight reel” home content and, lemme tell ya… homeowner imposter syndrome is real. “Is my house pretty enough?” “Is my house picture-perfect enough?” The feeling that you have to out project your last project for the sake of content may sound crazy but it’s a thing! These feelings of not doing enough or having enough or creating enough are something I read about all the time in my DMs and my answer is always the same:
No one else lives in our homes so the rush to the proverbial design finish line benefits no one else but us, for better or for worse.
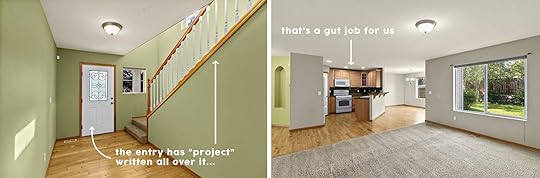
Now that I browse home listings like they’re Pinterest, I can instantly tell which homes will bring on an insane number of projects (translation: I hate everything but see “potential” in the home) versus those that will allow me to live in and enjoy the house for weeks & months before feeling the need to do work. Here’s what I know — I will never buy a fixer-upper, but I don’t need brand new. The sweet spot in the middle where it’s “turnkey” but I can also tinker is how I know I can curb any potential project pressure.
Let’s browse a few of the listings we’ve looked at while I continue…
 the first house we looked at
How am I saying no to project pressure?
Following so many home influencers and DIYers and interior designers, I’m not immune to wanting to take a paint brush to my home; but also know that the “newness” that we strive for when tackling back to back to back projects can quickly wear off…not to mention how quickly the costs can add up!
I’m not looking at any listings where I have to dig around with a magnifying glass to find the home’s potential. I don’t want potential. I’ve lived with “potential” as a renter my entire life, and potential = project pressure! I’m looking for homes where the current status will allow me to flex my creativity to make it our own, but is good enough that we can live with it as is if need be.
 house two
I’m also really honest with myself and having regular conversations with my husband about our must-haves and deal-breakers…down to the tiniest detail. For example: we would both prefer an open concept kitchen so we’ll likely never go for a home with a closed-off kitchen because it would mean a huge renovation; but we’d be willing to concede and go for a galley kitchen because the layout is a compromise we can live with and any potential renovation wouldn’t be as daunting as a full gut job. Knowing this ahead of time helps us manage our expectations and set somewhat realistic timelines for the projects we’d want to tackle.
 house three
Lastly, being hyper-aware of our finances — nothing like thinking about homeownership to force you to really start adulting — puts us in a position to know exactly what we’ll have the financial bandwidth to handle. It’s the ultimate reality check (see what I did there).
Is it easy? Not even a little bit. With everyone getting back to home, every day there seems to be a new project being revealed on my timeline every time I scroll. And did I mention that right now we’re in the middle of the One Room Challenge? Inspiration and projects everywhere!
 design by me | photo by mariah texidor
I know that while we’re thinking about homeownership, I won’t stop fantasizing about what that home will look like, but the resistance to actually do a bunch of projects is worth it if it means taking my time and not feeling crushed under the weight to keep up with everyone else’s project pace.
Have you ever experienced project pressure? You know…after scrolling the interwebs or watching all your neighbors COVID renos, are you feeling the itch to grab a wet saw and install some tile? P.S. don’t. Have you given in or have you been able to resist? Let’s talk about it.
Opening Image Credit: Design by Albie K. Buabeng (me) | Photo by Mariah Texidor
The post Albie’s About To Buy Her First Home But Saying No To A Big Reno AKA “Project Pressure”… It’s a Real Thing appeared first on Emily Henderson.
October 28, 2020
The Best Peel and Stick Wallpapers For Your Rental Apartment (Or Really Any Space) + Help Mallory Choose One For Her Bathroom


How many of you live in or know someone who has a “white box” room? As many of you probably know, making an uninteresting “white box” room interesting is a challenge a lot of us need to overcome. We also know it’s even MORE difficult when we rent that white box and it’s a studio apartment that needs to be your bedroom, kitchen, living room, laundry room, dining room, and office space all in one. Wait, is that just me? Cool.
Regardless, my point is that no matter what your white box is: a bedroom, living room, studio, etc, you can make it interesting by slapping wallpaper on your walls. I heard from the many of facebook comments on this post that yes, wallpaper sucks to put up and take down (and it’s not renter-friendly)…UNTIL…the glorious peel and stick was born.
Peel and stick wallpaper is slowly taking over the world, and honestly I would not be mad if it was my president. There are so many delicious options, but it can take a long time to sort through the not-so-delicious options to find a wallpaper that’s love at first sight.
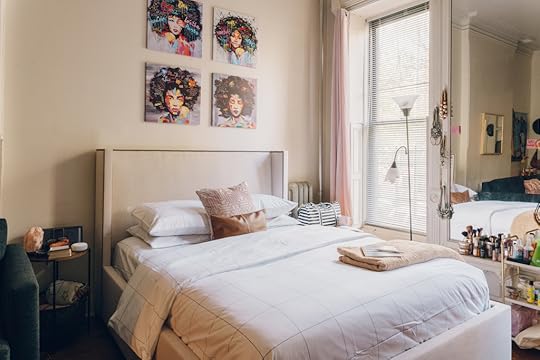
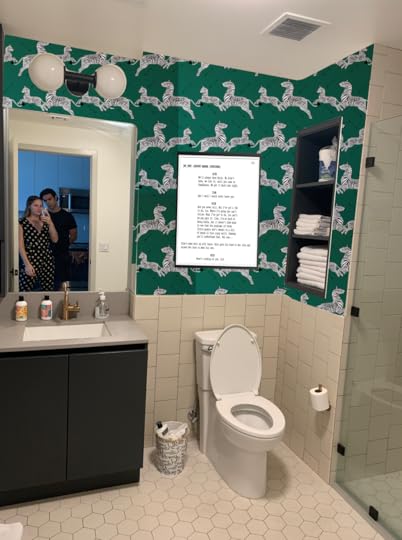
So for anyone who has been following along my MOTO saga (if you need a refresher click this post and this post)…I’m excited to say I have an update (sort of). By update I guess I just mean my walls look like this…


bed (similar) | bedroom wallpaper | couch | rug | sherpa | nightstand | lamp | bathroom wallpaper
It’s called DESIGNING people. Welcome to the process. I probably have 6 more wallpaper samples coming in the mail, so if you think this is overwhelming, just wait to see me in 1 week. Anyway, I know you’re all wondering (or maybe you’re not wondering, but this is really just a one-sided conversation until we get to the comments, so here it is) WHY do you have so many wallpapers in so many different spots in a STUDIO? Are you gonna wallpaper your entire box! HA, no, (well, never say never), but I’m really trying to find the RIGHT wallpaper (aka love at first sight) and I’m sort of hoping that putting them all over the apartment will inform me on where to put it. The problem is I’ve fallen in love with a lot of wallpapers (both of these for sure), so now I need to look around and minimize because I want my walls to be tastefully decorative, yet still a lil loud & filled with personality. Is that too much to ask?
To do “research” I went back to see when and where EHD has used temporary wallpaper –– please see the below for examples if you’re curious as to what I found:

Now this one is a classic & is so fun (it’s also great inspo for all the home offices that are being forced to be designed, so keep this in mind :)) I love it. It’s cute and precious but let’s get a lil steamy and take it into the bedroom for a moment:

 photos by sara ligorria-tramp | left from: a boho 70s inspired bedroom | right from: a romantic glam bedroom makeover
Now THAT’S how you do a peel and stick bedroom amirite?? These are so fun & I’m VERY into it. Which one do you vibe with more? Do you love both? Hate both? If these wallpapers aren’t your cup of tea, don’t worry about it…we rounded up a BUNCH of goodies down below…take a peek!! ALSO, I thought for the longest time that a “wall mural” was just something you painted all across your wall and were reserved for the little ones. BUT GUYS. Peel and stick “adult” wall murals are a thing and it basically is just any wall mural that’s not a repeating pattern. I learned this the hard way after googling “large scale peel and stick wallpaper” 100 times with no luck finding what I wanted. Then something popped up that said “wall mural” and it was all over. So basically we’re gonna show you the best WALLPAPERS and WALL MURALS (in different categories) that are all peel and stick!! Let’s start with the wallpapers…here we goooo!

1. RoomMates Grasscloth Peel & Stick Wallpaper Gray| 2. Two Step | 3. Chillin’ Cheetahs Removable Wallpaper | 4. Cara Removable Wallpaper | 5. Ladder | 6. Weave Peel & Stick Wallpaper | 7. Batik Tropical Leaf Wallpaper | 8. Coral Peel & Stick Wallpaper| 9. Endless Highway Wallpaper | 10. Tan Floral Wallpaper | 11. Palm Springs Wallpaper | 12. Azteca Wallpaper | 13. Tree Toile | 14. Zebra Wallpaper | 15. Metallic Leaf Wallpaper | 16. Leaf Wallpaper | 17. Flock Wallpaper | 18. Birds in Trees Toile | 19. Stone Sediment Wallpaper | 20. Botany Wallpaper | 21. Tick Mark Wallpaper

1. Atmospheric Wall Mural | 2. Batik Forest Wall Mural | 3. Midnight Garden XIV Wall Mural | 4. Vintage Bird Wall Mural | 5. Village Wall Mural | 6. Navy Blue Watercolor Wall Mural | 7. Crystal Geode Wall Mural | 8. Freya Boudoir Floral Wall Mural | 9. Red Sun Wall Mural | 10. One Non-Custom Wall Mural | 11. Awaken Non-Custom Wall Mural | 12. Vintage Landscape Wall Mural | 13. Wallshoppe Removable Mural | 14. Light Floral Wall Mural | 15. Minimal Marble Wall Mural | 16. Abstract Minimal 6 Wall Mural | 17. Edges Wall Mural | 18. Terracotta Floral Wall Mural | 19. Etched Arcadia Wall Mural | 20. Color Streak Wall Mural | 21. Birch Woods In Winter Wall Mural
THEY’RE ALL SO GOOD AND VERY ADULT-Y. It’s so hard to find wallpapers that don’t look like a kids room (and while some of these could definitely still look cute in a kid’s room), these will absolutely work in an adult-y house or apartment.
So now let’s get back to my adult-y apartment (and it’s my first real non-college apartment ever so I need your help). I’ve photoshopped literally every wall in the space (and I’ll show the full design plans to you soon), but I really am torn between these two wallpapers in the bathroom. I’m not 100% sure if I’m going to wallpaper the living room/bedroom yet (and if you see a wallpaper or mural you love for a bedroom/living room part of a studio…holla at me in the comments) but let’s just start here and see which wallpaper we should go with in the bathroom:

I had a love at first sight moment with both of these wallpapers and now the time has come to marry one and let the other go…which one does your heart like more?? WHICH ONE DO I GO WITH PLEASE LET ME KNOW.
I can’t wait to watch this wallpaper faceoff go down…thanks everyone for being my design therapist. Hope this roundup helped you find a wallpaper & now I would be forever grateful if you helped me choose mine
October 27, 2020
But How Do You ACTUALLY Even Buy Land??? Caitlin’s Secret Side Project and A FULL Step By Step Guide
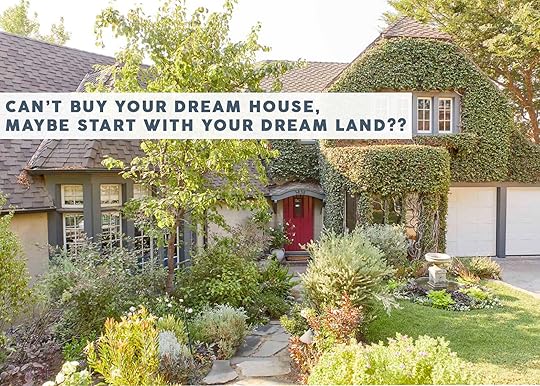
Guys. I have a confession to make. I haven’t been *totally* honest with you about my house-hunting journey. I have lied by omission! Here’s the thing: a couple of months ago, a reader named Christa commented on my first post and wrote, “This is why so many people in LA buy places in Lake Arrowhead or weekend desert cabins – they keep the apartment close to work, and buy something for their weekends.”
And that got my WHEELS TURNING. (Thanks Christa!) I’ve since tried – and failed – to buy an actual, existing, habitable home in LA…but while all this has been going on, I’ve also been exploring the idea of building something in Joshua Tree. The timing for a new build isn’t technically awesome right now (construction materials are at a premium – the world is knee-deep in quarantine-fueled home improvement projects), but since planning and permitting both take a while before construction can start, I figured I’d set some email notifications and keep tabs on the area in the event that something awesome comes up.
So while finding a fixer-upper in LA proper is still my goal, I’ve made early contact with a high desert contractor and I’ve enlisted Arlyn’s architecture-pro husband, Charles, to join my team as a draftsman if the right plot of land comes around. (Not to get too ahead of myself, I’ve also bartered with Julie for design help on my still non-existent future home in exchange for a place for her to stay while rock climbing.)
But since I’ve recently become the point of contact for “hey, can I build a house here?” questions in my friend group and since I’ve found that a lot of “how to buy land” posts pretty much begin and end with “make sure you do your due diligence!” and “talk to your county” (I WILL! BUT HOW?! WHO AM I LOOKING FOR?), I wanted to collect everything I know – what to google, who to contact, and what really matters – into one place where it can hopefully help some other folks take the mystery out of land-buying. (AND you can see some land that I looked at…so it’s basically like we’re shopping together, right? Like best friends, yeah???)
 mario will be able to answer this question on his own by the time i’m done here!
Step One: Finding Your Land
There are really five main ways to find land to build on. This is my *personal* order of preference, but it’s worth noting that I’m a regular person and not a developer or someone with a vested interest in buying land quickly.
Drive Around
Very analog, but there are deals to be found if you have the patience to spend some time physically traipsing around! To speed up your search, pull up Google Maps satellite view and do some aerial overviews of your favorite neighborhoods or regions. Make notes of large, open spaces or undeveloped plots along with nearby cross streets. Drive out, get lost, and keep an eye out for ‘For Sale’ signs. This is actually how Joy (of Oh Joy!) found her home – she wrote about her process here – so y’all, THIS WORKS.
Redfin, Realtor, Zillow, or Other MLS Sites
At this point, I’m pretty loyal to Redfin. It’s where I found both properties I’m going to walk you though today!
 me: “i’m only looking for land in joshua tree!”
also me: “maaayyyyybbeeeeee i’ll look for land in LA while i’m at it, i guess”
Down below I’m going to walk you through some of the language you’re going to want to keep an eye out for, but these sites make it super easy to set your budget and location parameters. I get real-time updates on land in my chosen areas that fit my requirements, which is fun and definitely not at all distracting.
If you’re just starting to look and you’re the same type of neurotic as me – you know, like, you need to see every single listing available in your price range – I’d also recommend kicking off your search on your state’s MLS (which, as I’m sure you can deduce, you can find by searching “(my state) MLS“, which will quell all of your fears and guarantee that you will 100% see every. single. listing. currently available on the market.
Land Broker
A land broker is a real estate agent who specializes in land sales. You can find one in your neighborhood by googling “land broker (ideal area)” (GROUNDBREAKING!) or you can make a note of any listing agents on Redfin, Zillow, etc. currently representing sellers. You’re going to want to avoid double agency (no one really wins when the agent represents both parties!) but it could give you a lead on some potential partners.
You can also totally work with a regular relator – the contracts and contingencies are fairly similar – but it can be nice to have someone who *only* does land deals guiding you through the process if it’s your first time.
Craigslist
DO NOT KNOCK CRAIGSLIST, Y’ALL. It’s a digital version of a ‘For Sale By Owner’ board in a coffee shop. Obviously, you’re going to want to do your due diligence – and yes, we are about to get into that, thank you for asking!! – but if you’re looking to make a deal without a ton of outside interference, this is your spot. You’re going to want a real estate attorney (at least!) to look over any agreement, but this is the best spot I’ve found to meet folks who are weary of paying out commission to real estate agents.
An anecdotal side note: I recently found a house that was listed for $539,000 being marketed on Craigslist for $475,000. It had fallen out of escrow 3 or 4 times and they were looking for a quick close, but it was 100% LEGIT. YOU GUYS. Craigslist is where it’s secretly at!
Land-Specific Sites
We’ve got Landwatch. There’s Lands of America. Maybe you’re a Land and Farm type? Or you could go Land Central. Perhaps The Land Spot? Can I interest you in some Land Elevated?
There are SO MANY OF THESE, but for the most part, they seem to lend themselves a little more to those looking to purchase a lot of acreage or those interested in a rural or homesteader life. If that’s you, great! If you’re looking for a smaller or more suburban parcel, I’d lean towards one of the earlier options.
Step Two: Decoding The Listing
OKAY, SO. Let’s say that you’ve found a piece of land in an area you love and at a price point that works for you. THAT’S GREAT! Let’s get in the weeds. (Metaphorically, but also…maybe literally, if you’re buying something that’s been sitting for a bit.)
There are four big, esoteric terms that are pretty specific to land purchasing. Let’s review!
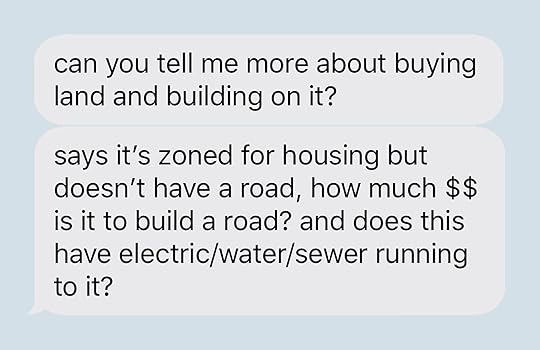
Paper Street
 it’s not an ode to taylor swift’s ‘paper rings,’ believe it or not
Paper streets are SUPER common. It means that while the road is outlined on city or county maps, it’s never actually been built. The bright side here is that you won’t need to get an easement from a neighbor to build a driveway or to gain access to your home. The bad news here is that you’re going to have to figure out how much it costs to build a road, which can be debilitating depending on your area’s requirements.
RTI
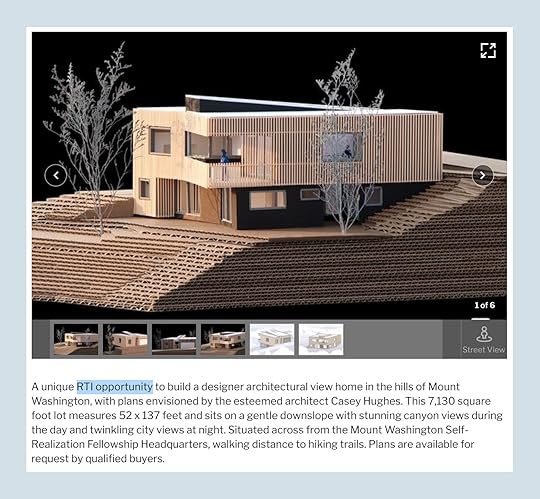 the cost for this empty lot + plans + RTI permits? a nice lil’ $595,000
Stands for “Ready-to-Issue.” These lots are sold at a premium and come bundled with architectural plans and permits that you’ll receive upon close of escrow. Another term to search for here is “shovel ready.”
You’re going to want to double-check permits with the city, obviously, but these take a WHOLE lot of pressure off of you. In LA, being shovel-ready with permits RTI adds at least six figures to the raw land cost. Pros: you can just get started with the build of your home, which is a real treat in a competitive market. Cons: if you’re the type to look into building a new home from scratch, don’t you want something that’s exactly how you imagined it?
Carry
 not physically tho!
Instead of working directly with a bank or credit union, you’ll be able to work out an agreement with the seller directly. I’ve seen these offered at around 20-50% down and paid off over 5-10 years, but it’s totally dependent on the seller and your relationship with the seller. These are great if you’re just looking to get land ASAP, but they *do* make it a little tricky for those who will need a construction loan to build on their land. (You’ll be in a better case bundling your land + construction loan, WE’RE GETTING THERE, I swear!!!)
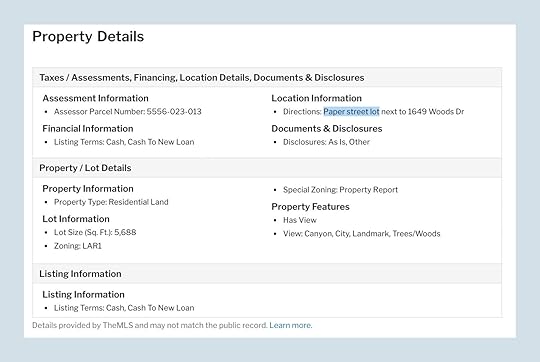
APN (+ Other Alphabet Soup)

Assessor’s Parcel Number. Every property you’ll ever buy – including homes – has one of these, but they’re SUPER important here. Alternative terms with similar meanings:
AIN (Assessor’s Identification Number)PIN (Property Identification Number)PID (Property Identification)
An APN is basically a long string of numbers assigned to your parcel for record-keeping and tax purposes. You’re going to want to make a note of the APN for any lots you’re interested in – it’s how you actually figure out the location in question. (Spoiler: you know that aerial view you see on your real estate site of choice? IT’S USUALLY WRONG. Woof! The APN will help you find the real one.)
Step Three: Vetting Time
Check Zoning
What to Google: Zoning (your city) | (Zone type from ad) (your city) | Land planner + (city) | APN lookup + (your city)
Who to Email for Help: The City or County Planner
 3 easy, breezy steps!
If it’s not mentioned in the listing, you’re going to need to dig around for the zoning information. It helps if you have a vague idea of what you’re looking to build or house on your new property. Certain residential types ban ADUs, RVs, or livestock. (Want chickens? MAKE SURE YOU CAN HAVE THEM!)
You can typically find these restrictions with a bit of googling, but I am here to sing the praises of city planners. They were incredibly helpful in my own search – it was jarring to ACTUALLY see my tax dollars at work! – and they’re great at getting back to folks quickly. The bureaucratic process behind permitting takes a long time. A city planner responding to your email DOES NOT take a long time.
Email them the APN in question, tell them that you’re interested in purchasing the parcel and that you just want to verify that you can build to your specifications. It takes 3 minutes and it’ll clear up any early issues before you get your heart too set on a piece of land that can’t deliver on your dreams.
PS. Ask your planner about the long-term plans for the area. *Your* ideal lot may be zoned residential, but it may also be next to the future home of a highway or stadium. If that’s up your alley, GREAT! If not, you’ll dodge a bullet.
Look For Previous Permits
What to Google: Building permits (your city) | Building records (your city)
Who to Email for Help: The Department of Building and Safety (a Planner can also help you find the right contact if you get stuck or if you’re in a smaller town)
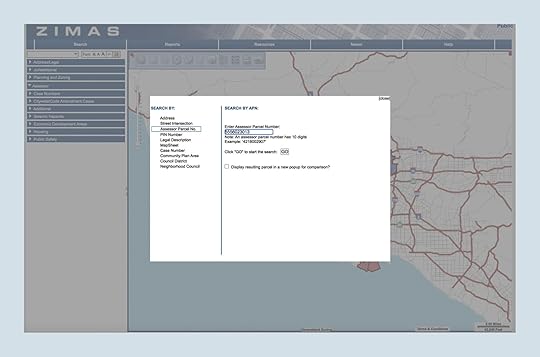
Los Angeles has a pretty neat, easy to use site called ZIMAS. (Zoning and Information Map…S??? Search? Maybe?) These vary across the US – I included the one for San Bernadino County up above – but yours will probably have the same general spirit and functionality.
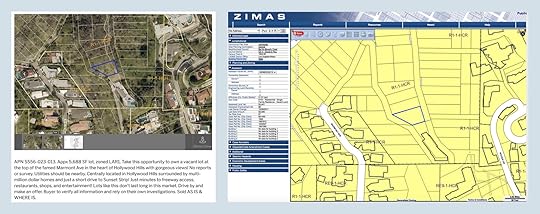 a side-by-side of a previous listing you saw alongside a ZIMAS check
I like looking for permits early in the process – your local Building Department will have a complete record of submittal if you see that someone tried to build on the property for the long time and failed, it may just be worth moving on to the next place. (LOL DO AS I SAY, NOT AS I DO.)
 no permits on this hollywood hills location, which is spooky!
In a true catch-22 situation, if you’re in a more urban area and no one has tried to build on the property, you should take a second and figure out why. Is it actually accessible? Too small to make the construction costs worth it for developers? Or…maybe it lacks…
Utility Access
What to Google: You’re gonna have to get on the phone for this one
Who to Email for Help: I’m so sorry
AH. Utilities. The killer of hundreds of my isolationist desert dreams. So yes, while you can technically build anywhere if you’re able to drop cash on a well AND solar panels AND a septic system…that sh*t adds up.
An easy rule of thumb: If there are inhabited homes on either side of the property in question (in close enough proximity), you should be golden. If you see power lines in the background of listing photos, you can *potentially* hook up to those. If there’s a paved road in front of the property, you have a 50/50 shot at water. And a lot of rural areas don’t have city sewer systems, so you’re just going to have to budget for that one.
 power line spotted!
Some notes: I know you have privacy dreams, the further back you put your home from the “street” – I say this as a lady looking at land off dirt roads – increases future costs of hooking up city utilities.
This is the opposite of a millennial solution – and honestly, someone should fix it! – but if you want to know if you can connect to services in your area, you’re going to have to hop on the actual phone with folks from Water and Power. You can’t do it online – you’re gonna need to provide the APN and you’ll have to pray that you’ll be connected to the right person who can provide a rough estimate. You will have to be very kind and it will take a lifetime. I KNOW IT STINKS. But once you have some clarity, you’ll be able to move forward, so it’s kinda worth it, right?
Road Access
What to Google: This is a straight-up call or email
Who to Email for Help: Bureau of Engineering
If your plot in question is off a paved road, YOU’RE LUCKY. Move along! If not…
Sometimes, you can just build a driveway. Sometimes, you need to build a full-on road. I learned this the hard way. Email the Bureau of Engineering and ask if the APN in question requires road frontage. Get clarity on how much frontage is needed, who’s responsible for the cost and for maintenance, and ask if it’s absolutely necessary (in a nice way).
 a prime example in NOT BEING FOOLED BY ROAD ACCESS
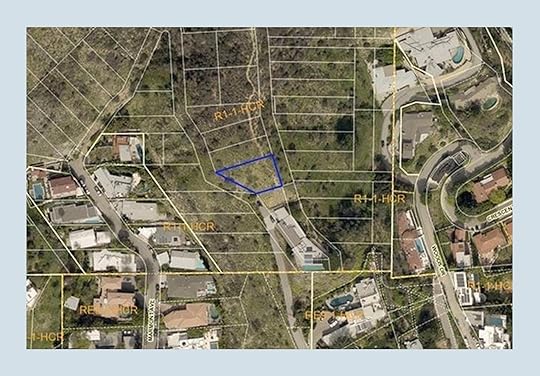
But okay, let’s try this out in practice. I found this lot just up the road from the Stahl House (a very famous home in Los Angeles that you have definitely seen in TV/movies/advertisements) and it was only $65,000. The property line just touched the existing road, so I did some research to see if this could be a driveway-only situation.
The dealbreaker? This plot of land isn’t connected to that road. NOPE. Folks, that is a private road/driveway to a home that I’m sure is beautiful. This parcel being sold is landlocked and she needs A WHOLE LOT OF ROAD built. Do you see that stretch of avenue to the left? Do you see how it goes up in a v-shape before ending in front of the property in question? THAT’S THE ROAD someone would have to build to get access.
Moral of the story: double check your roads. ALWAYS. It’s not fun but it’s very important.
Other Miscellany
If you have a high-level knowledge of your area, you should be able to weed out some plots on site. Example: in Joshua Tree, it’s now illegal to cut down a Joshua Tree. If you’re buying a plot of land with nothing but vegetation, it’s going to stay that way. NO HOUSE FOR YOU. You’ll discover any glaring issues when you start your studies – the joy of your contingency period! – but it’s nice to be able to walk away up front without dropping a dime.
Also, make sure you get cell phone service. The odds of it vastly improving between the time you see your land for the first time and the time you close are NIL. Nobody wants to spend a day on a construction site in a dead zone! It’s not great!
Step 4: Finding Financing and Making an Offer
You have 4 options here.
You can buy land for cash. If you’re hoping to get a construction loan to build your future home, this is a great option. Banks like when you own your property outright AND you may be able to use the value of the land to offset your downpayment.The owner can carry. Y’all work out something amongst yourselves. You can find a land loan. These are few and far between in the age of corona, but not totally impossible to find. You can make an offer with a long escrow period so you can secure a construction loan for the cost of the land and your future home. These are tricky (you’ll have to come up with full building plans) and sellers are hesitant to accept these types of offers (because coming up with full building plans takes a very long time!) but if something has been sitting for a while, you could give this a shot.
If you’re totally lost on where to even start looking for a land or construction loan, check out a local credit union or reach out to someone from your national bank chain. When I was trying to figure out financing for the hill house, I arbitrarily emailed a guy who seemed pretty high up in the real estate financing world at Bank of America (my bank of choice #notsponsored). He called me within 30 minutes – again, INSANE how people will really go out of their way to help you build a house – and although it wasn’t a fit for BoA at the time, he introduced me to several smaller banks who would help.
Step 5: Tests, Surveys, and Reports (Oh My!)
SO. Let’s say you found a place, you found the $$$, and you’re in escrow. What happens in the contingency period for land? WHAT GETS INSPECTED?
Well. IT VARIES, OKAY? And honestly, a city/county planner may be your best point of contact – they can refer you to specific documentation for your area that will clarify what studies and reports they need on file before they’ll issue a permit.
In the meantime, though, here are some things that may come up:
Surveys: In addition to clearly defining the boundaries of the property and making note of all easements, potential encroachments, and nearby service lines, a survey will highlight your building “envelope.” Your city or county may have certain requirements about how far your house must be from the sides of the lot or how far back it has to be…or it may have minimum/maximum size limits. A survey will clarify exactly what you can build and where.Topography: In addition to telling you all the details about the elevations of the property, a topography report should flag any big environmental concerns. Environmental Impact: If you’re going to need to remove a bunch of vegetation to start construction, you should make sure that it’s not endangered. (If it is endangered, this report will figure out how you manage ramifications OR it’ll prove that the whole thing’s a wash and that you should cut your losses and back out. Soils: This one is HUGE in LA. Is your house going to slide down a hill? Do you need to drill 60 feet into the ground so that it doesn’t slide down a hill? SOILS KNOW THE SECRETS. It’s important everywhere, though, as it’ll determine what sort of foundation you need.Crop & Timber Yields, Well Water Quality and Flow, Road Maintenance: These are more common in VERY rural areas, so they’re not necessarily in my wheelhouse (yet).
Step 6: CLOSE THAT BABY!
If your reports come back in the clear and your financing is secured, YOU DID IT. You bought improvable land! Congratulations on taking on a very big, very stressful multi-year project. I KID, I KID. It’ll be worth it.
But this is where I leave you (for today, at least!). Questions? Any land-buying and dream-home building folks out there want to tell me their story? (Or want to talk me out of building something?) LET’S CHAT IN THE COMMENTS, YEAH?
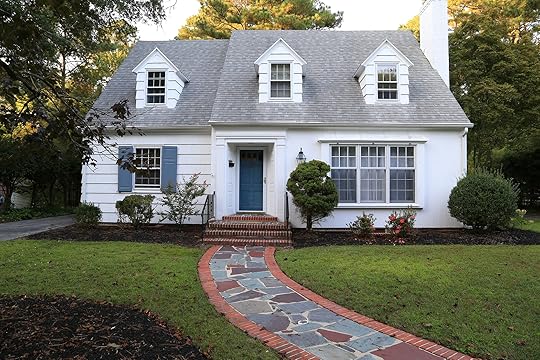
Opening Image Credit: Photo by Sara Ligorria-Tramp | From: My Secret Front Yard Is Finally Revealed
The post But How Do You ACTUALLY Even Buy Land??? Caitlin’s Secret Side Project and A FULL Step By Step Guide appeared first on Emily Henderson.
October 26, 2020
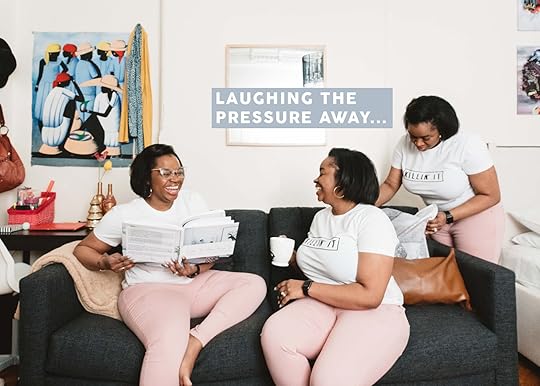
Today’s The Day!!! Introducing the EHD Mentee… The Very Talented Keyanna Bowen
Today is the day! We launched our first mentorship program this year and while there were many great candidates (seriously), there was one that really stood out. Keyanna. Simply because she is extremely talented in design, has a great voice, and lots of solid on-camera and production skills. We want to be part of changing the landscape of the design world and frankly, she is too talented not to have a larger audience to follow, watch, listen, and be inspired by. So today I’m introducing you to Key and publishing a slightly updated version of her application essay (so you can see why she was the choice for our first mentee) and she’ll show you the first project that she will be documenting on here and on her blog. Welcome, Keyanna!!! (and don’t forget to follow her on blog, East and Lane and her Instagram).
Hi, I’m Keyanna, but friends (ie. you guys) call me Key! I can’t even express how thrilled, honored, excited, nervous, humbled, etc. etc. etc. I am to be the first EHD mentee and can’t wait to share this journey with you all!
So here’s a little bit about me/my blog. And by “little bit” I mean a lot a bit. Because if you’re going to divulge your life and dreams to millions of EHD readers, you minus well go all in…
But first, a little video I made with the EHD team (just wait for the ad to play)!
Ok now let’s get into it.
I live in a very small, rural town on the Eastern Shore of Maryland (shout out to all the small-town dwellers out there). After graduation (I have a degree in Broadcast Journalism from Howard University), I moved back home and quickly realized the lack of creative opportunities in my small town. I had two options: 1. move to a big city with more opportunities, or 2. create my own. I chose the latter. And that’s how the blog started…
In 2015, I purchased a DSLR camera, put back on my journalism/storytelling hat, and launched East & Lane as a creative outlet to share my passion for home, design, wellness/lifestyle, and small-town living. At its core, East & Lane is about cherishing the love of home, wherever that may be. As the girl who opted to dream big in a small town, my motto has always been “bloom where you are planted.” My hope is that readers leave my site feeling inspired to curate a home and a life they love — no matter where they live. Because I believe, living your “best life” starts, at home.
So what have I been doing with my blog these last 5 years?
Well, let’s just say I have an on-again, off-again (mostly off) relationship with my blog. I haven’t posted on my blog for a while for a myriad of reasons (mostly self-sabotage). From imposter syndrome to the mere overwhelm of trying to figure out a content marketing strategy paralyzed me from pursuing my dream of full-time blogging. Not to mention, the lack of diversity in the design blogosphere made me question if a Black (small-town) gal like myself can be successful in an industry that happens to be very White-washed.
However, despite the recent tragedies in the world, I’m grateful for movements that have taken place to help #AmplifyMelanatedVoices and create more diversity and inclusion. Finally seeing BIPOC design bloggers and creatives getting the recognition and exposure they deserved gave me hope and determination for my own blog. Although creating inspiring content has always been my mission, I feel like I’ve found a new purpose for blogging–one that is much bigger than me or design… It’s no longer about the money or success (although getting paid for blogging would be AWESOME), but I truly just want to be a hope and inspiration for my community and for girls (young and old alike) who look like me — because representation matters!
They say before you start any endeavor, you need to know your “WHY”. You guys, are my “why”. My community is my “why”. Representation, diversity, and inclusion are my “why”!
I now have a fire burning inside of me like never before to turn my blogging dreams into reality. But in all honesty, even though I’m clear on my “why”, I am completely clueless on the “how”. So having the support and guidance of the EHD team on an upcoming project is truly a dream come true.
Oh, and if you’re thinking, that’s great you found your “calling”, but what do you actually do for a living? Well, teaching myself how to use a camera to take pictures for my blog actually lead to a career in interior photography (Sara Tramp you’re my idol). So freelance photography is how I “pay my bills” (with the help of the hubs, of course). But I’ve also dabbled in everything from design, to styling, to real estate, to construction project management, and I recently graduated from carpentry training school! Any other multi-passionate creatives out there who want to do/be more than just one thing? So yea, I’m a bit of a Jill of all trades, but I know I can merge all these passions/skillsets to create some inspiring and resourceful content for my blog.

I’m very lucky to have a uber-talented husband. His name is Daniel, but friends (ie. you guys) can call him D. He’s a musician but also does videography on the side and shoots/edits videos for me in exchange for hugs & kisses! (it’s almost like an Emily and Brian situation;))
Now, let me tell you about the project I pitched for my EHD Mentorship application…
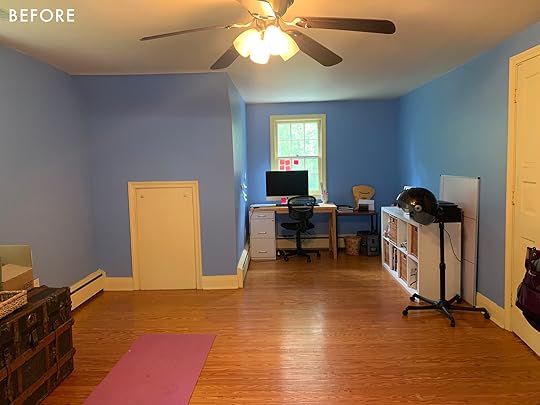
D and I recently moved into a new rental. I say “recently”, but it’s actually been 2.5 years…time flies when you’re having fun in a pandemic. The home is an adorable 1950s cape cod. We love the neighborhood and all the charm and character of the exterior, but the interior is very dated! I’ve always wanted to buy a fixer-upper to makeover, but we aren’t ready to buy. So when we found a dated rental I saw it as a chance for me to flex my design muscle, and make some blog content. I’ve partnered with my landlord, and he’s agreed to give me a small (read: tiny) budget to update some rooms. I’ve already tackled the kitchen, which I documented on my blog and YouTube (here and here), and my home office is next on the project list.
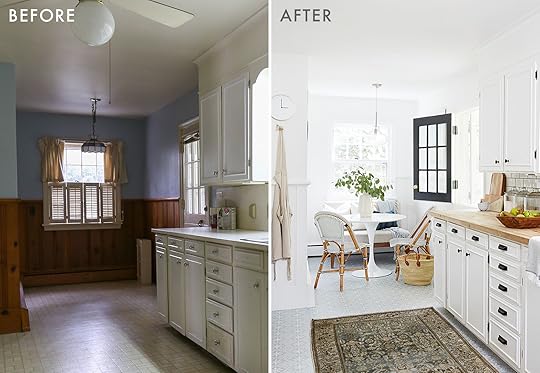
Warning: What I am about to show you may be disturbing…
HERE IT IS.

My home office. The space where I spend 99.9% of my day. The space that I’m supposed to be creative in and produce inspiring content. Perhaps this is why I haven’t been able to get my blog off the ground — how can anyone be creative in a space that looks like this? The plan is to transform it into a dual purpose space. I need it to function as an office/creative space, but also serve as a guest room if/when this pandemic ever ends. Even though the room is hideous right now, it has lots of potential. So stay tuned for more.
(Hoping my cute pup will distract from the hot mess of a room.)

So there ya have it! My life and dreams summed up for you guys to judge get to know me 
October 25, 2020
The Link Up: The $17 Dress Birdie Won’t Take Off, The BEST “Lip Balm” Jess Has Ever Tried, and Our New Go-To Mules

We hope that you all had a good week, that your weekend has felt as calm as this living room looks and the week ahead will be the good kind of spooky:) Let’s get to this week’s links because we are really excited about them…
This week’s house tour is an Australian beaut! The talented ladies of Three Birds Renovations are in the process of revealing their 12th house reno and there are a ton of special details to check out. We highly suggest following along for the rest of the reveals!
From Emily: The NEW halloween soundtrack that we have on repeat…Dbone (Derik) is a great friend of mine and it seems about time that we had a new soundtrack for this holiday. His album is like an updated Monster Mash, with that vibe that is upbeat but spooky. If you are decorating this weekend or need some festive music for next weekend give it a listen.
Also From Emily: Birdie loves anything with sparkles or unicorns, so for her birthday we got her this dress and this jacket and it’s all she’ll wear now.
From Mallory: This peel and stick wallpaper is SO CUTE and is the brainchild of the Black Home and Verna Fogg. We personally LOVE peel and stick anytime & this one is very high end. I’m a big fan of the black and white but it also comes in gold which is also great. Check it out!
Also from Mallory: I know what I’m getting my friends and family for Christmas. And yes, I’m already in the holiday mood, and yes I have started listening to some Christmas music… don’t @ me. But more importantly, I linked this in a previous link up as my favorite new chapstick/lipstick/blush/eyeshadow (it’s Sara’s fav too). The brand is so cool and gender-neutral so it is truly for everyone. Plus they just came out with a new color that’s cute and subtle that I’m also obsessed with. Next on my list is to try out this red color (bc who doesn’t love a red lip) and then I’ll report back on how it is.
If you are looking for some design eye candy with some a few fun reno tips, this article from Domino interviews, EHD favorite, Amy Kehoe and Todd Nickey. They have impeccable style and if you needed another example showing off this week’s trend post look no further.
From Malcolm: Hilton Carter has been highlighted a couple times here on the blog, but let me tell you… I ordered his book “Wild Interiors” a few weeks ago, and whenever I have a free second, I find myself ogling over it. Literally. Every single page is filled with photos of the most beautifully green homes, along with tips and tricks on how to keep specific plants alive (which I desperately need). He’s also a local creative (for me, living in DC), and is currently in the process of renovating a home that will be uniquely catered to plants. Give him a follow! Do it, I say!
From Caitlin: When I was buying a sweater from ABLE for last week’s cardigan roundup, I also slipped these mules into my cart and OMG I love them!!! I was not ready for the snakeskin trend last year (remember when Em did a whole post about it?) but these look so cute with all the pants I’ve tried them with (mint wide legs, jeans, black crops, etc.) and they also make my ankles look AWESOME, which is something I did not know was possible and have literally never noticed before with any pair of shoes. I wore them to pick up a bunch of tile samples from the office earlier this week which involved carrying heavy boxes down two flights of stairs and they were comfortable and secure the WHOLE TIME (very impressive!) so now I just need to spread the good word. They are on sale right now for $70 (and they also come in cheetah print and in regular leather, if those are more your style) and I JUST REALLY WANT EVERYONE TO TRY THEM.
Also From Caitlin: IDK if anyone here has ever used Rinse — they pick up your laundry and return it all clean and folded — but I just got a $30 coupon in my email and figured I’d share the wealth. I don’t use Rinse super frequently and TBH I haven’t at all since I started working from home, but they’ve saved my life a few times when I was really overwhelmed and didn’t have time to get to my laundromat. $30 goes pretty far with them and it’s worth treating yourself as we head into a super dark and depressing indoor winter! Plus, the bags that they give you are actually super nice (I use them to haul my own laundry to the laundromat, hah) so if you’re in one of their service areas and wanna test it out, it does have my “worth an occasional splurge” stamp of approval!
From Jess: I tend to hoard my Sephora points. I just like knowing I could maybe get something exciting that would require my whole loot someday. But about a month ago I decided to “splurge” 100 points (I think) and get the sample size of SUNDAY RILEY C.E.O Glow Vitamin C + Turmeric Face Oil. I had heard so many good reviews about the company (mainly from my coworkers) and thought I would sample this “not cheap” oil and see for myself. And sadly for my wallet (after the sample goes), I will absolutely be buying the real deal. It makes my skin feel great and truly makes my skin glow (instead of its normal dull sheen). I want my walls flat… not my face. I also highly recommend it because it’s doesn’t irritate my sensitive skin!
Also From Jess: Never in my life did I think I would be personally recommending nipple cream to the whole internet but here I am. Yes, you read that right and no I am not pregnant. After my cousin did a ton of research on the best hydrating lip balms, nipple cream kept coming up! (due to the magical powers of lanolin). So when I safely went to visit my cousin for my vacation this year, with the driest and most cracked lips I’d had in a long time, we headed to the drug store to pick up this nipple cream made of 100% all-natural lanolin. I can’t even begin to tell you how wonderful it felt on my lips and how quickly they started to heal. It was amazing! Now I know that carrying around nipple cream may not be everyone’s idea of a good time, so this lip balm is in very cute packaging and also has lanolin in it.
And now for your quick roundup of the best 10 sales this weekend…
Target is running a BOGO 50% off on select Halloween items with guaranteed delivery by 10/30. (If you need a pick-me-up, take at all these pets modeling costumes. SO CUTE.)Take up to 50% off best-sellers and 25% off everything else at Madewell with code SNEAKPEEK. (We all own these wide-leg pants in different colors – they look awesome on all of us – and we also all love the fit of this style of jean.)Grab discounted KitchenAid appliances and accessories over at Wayfair this week.Buy any 3 mascaras at Nordstrom and get the lowest-priced one free. (Also, you can grab a $10 promo code if you schedule an in-store pickup for any item.)Take an extra 40% off sale items at Anthropologie. (We love this long-sleeved saffron blouse.)Serena & Lily is offering 40% off site-wide with code LOVEHOME. (According to our data, this is one of your all-time favorite coffee tables.)There’s a buy more, save more event at J. Crew Factory right now – 20% off 2 items, 30% off 3 items, and 40% off 4 items with code SAVEMORE. (Plus, take up to 60% off kids’ holiday styles. How cute is this girls’ tartan dress?)Grab up to 25% off lighting at Pottery Barn. (This chandelier is very Parisian art deco!)Save 20% on upholstery and custom orders at Jayson Home.Hanna Andersson is offering up to 50% off kids’ and baby apparel and up to 40% off everything else. (These striped pajamas – as seen on Emily – are included!)
Thanks for another great week on the blog and be sure to come back tomorrow for A VERY exciting post we have been dying to share with you all!! xx
Opening Image Credits: Design by Three Birds Renovations
The post The Link Up: The $17 Dress Birdie Won’t Take Off, The BEST “Lip Balm” Jess Has Ever Tried, and Our New Go-To Mules appeared first on Emily Henderson.
October 24, 2020
My Ultimate List of Tried And True Fall Shoes (That I Wear Season After Season)

I’m on a big ‘only buy what I need’ personal campaign over here, with some exceptions here and there of course (I MIGHT be shooting our first original photography fashion post next week – I miss them). So instead of me buying new fall shoes, I realized that I have a ton that I LOVE from seasons past that are still available. Welcome to my “review and recommendation” post with a big linkup of all the ones that I love and would buy if I needed new fall shoes at the end. Today we are talking boots, clogs, and mules – the fall shoe collective trio that is basically my favorite.
My Favorite Boots:
Leonore Faux Fur Lined Chelsea Boot
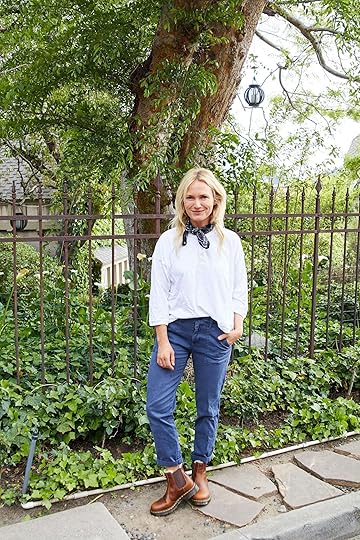 photo by veronica crawford | from: my new insanely comfortable “mom-friendly” weekend wardrobe
These were the first Dr. Martens in my entire life. And if you want to sound like a total tool you can also call them Doctor Martens like me. The sheer pronunciation shift from Doc to Doctor ignites a giggle that says ‘you are old and weird’ but in a really endearing way. I LOVE THEM. They have the classic chunk and clunk of the brand but in a warm leather and simple profile. And the ankles tuck so well into pants. I just started wearing them again this season and want to recommend them hard.
Cloudy Waterproof Chelsea Rain Boot
 photo by veronica crawford | from: 18 pairs of fall boots a review of the good, the great, and the so-so
I still have these and have worn them repeatedly during damper days. They are kinda stiff which bothered me at first, but they are affordable and keep their shape (and yes, loosen up). I’m a fan.
Hudson Waterproof Boot
 photo by veronica crawford | from: 18 pairs of fall boots a review of the good, the great, and the so-so
Admittedly when we shot this last year this is NOT the outfit that sells these boots. But these boots are WONDERFUL winter boots. They are waterproof, warm, can be trudged through the snow and there is no chance of anything getting into them because they are so high. I know they might not be for everyone’s lifestyle but for us in the snow with the hiking in our back yard, these boots are awesome.
Classic Chelsea Boot
 photo by veronica crawford | from: shopping my closet for fall & wearing some (ethically made) shoes that I love
These are still my go-to’s for daytime comfort that are still strangely flattering. Because of how they are designed, they slim my wider feet and tuck up nicely into all my jeans. They are so comfortable (and sustainable).
The Cowboy Boot
 photo by veronica crawford | from: why i am suddenly dressing like a toddler
 Admittedly I’m not really selling these boots in this shot, but those cowboy boots are still my favorite when I want to add a huge dose of “I care”. They are splurge-y, but I have worn them a ton over the last two years and the pony doesn’t get dirty. I like them more with socks and pants.
The Regan Boot
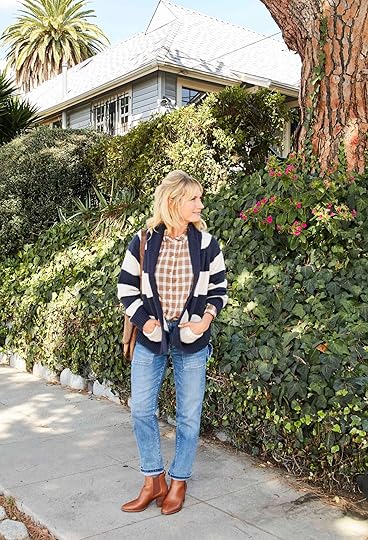 photo by veronica crawford | from: six fall sweaters i’m loving (+ how to wear them)
These are my classic Chelsea boots with a heel. They are so comfortable, tuck into pants easily, and work with anything.
Pikolinos® Vicar Boots
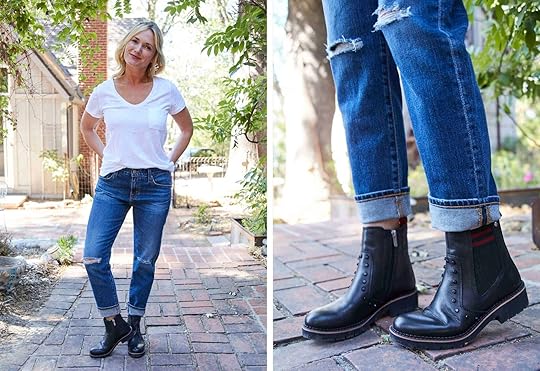 photo by veronica crawford | from: a fashion review: new clothing on my body and how I like them (or not)
That photo on the left isn’t my favorite pose ever but these boots remain #1 in rotation. It’s hard to explain why. They look like normal boots but they are so lightweight and comfortable that I can’t help but opt for them almost every day. Two of my friends have bought them after wearing them. They are just strangely cute and comfortable with no cumbersome heel or constricting toe.
My Favorite Clogs:
Amber Orchard Clog
 photo by veronica crawford | from: my favorite current clogs – a review
 UGH. I can’t wait to have an occasion to wear these again, but I still LOVE these clogs. They are so comfortable and cute and you know I love a nude shoe with a heel.
Belems Clog
 photo by veronica crawford | from: my favorite current clogs – a review
 I didn’t end up keeping the blue ones in this photo, but I did keep the snakeskin ones that I can’t wait to wear more consistently (with socks and tights). But looking at that photo I’m wishing I kept both pairs.
The Ayanna Clog
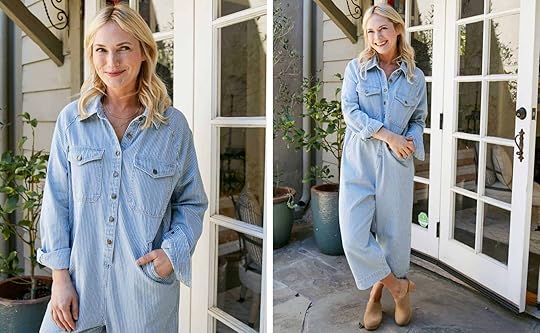 photo by veronica crawford | from: my casual, cool spring weekend wardrobe
These Madewell clogs are so cute, classic, and affordable. Oh wait, and very comfortable as all clogs should be. They are the chunkier version of the Rachel Comey’s that I’ve been obsessed with forever.
My Favorite Mules:
Mariella Mule
 photo by veronica crawford | from: why i am suddenly dressing like a toddler
 I used to wear these mules all day every day. They have the perfect short heel and are so comfortable. Up in the mountains, I get too much dirt and leaves in them in the woods, but as soon as we start going to public places these are my go-to’s.
Paloma Mule
 photo by veronica crawford | from: 5 fun and unexpected summer office outfits
The taller version of this mule is a classic that is convincing me right now that I need to make occasions to wear real shoes. My Vans and sneakers are getting all the use these days, but maybe soon Brian and I will book a safe outdoor dinner date and maybe I can wear real shoes. If my feet can handle it …
Now if I WERE in the market, here are the 2020 fall shoes I am loving right now:
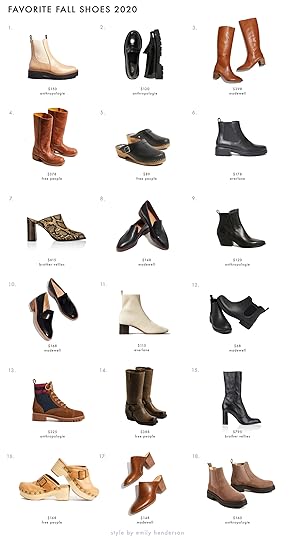
1. Sam Edelman Laguna Chelsea Boots | 2. Super Platform Loafers | 3. The Carlotta Tall Boot | 4. Frye Campus 14L Boots | 5. Alma Clogs| 6. The Modern Utility Chelsea Boot | 7. Lauryn Mule in Dandelion | 8. The Frances Loafer | 9. Dolce Vita Sammey Ankle Boots | 10. The Alex Heeled Loafer in Leather and Suede | 11. The Glove Boot in ReKnit | 12. The Chelsea Rain Boot | 13. Cecelia New York Theo Hiker Boots | 14. Frye Harness 12R Boots | 15. Lauryn Boot in Midnight | 16. Culver City Clogs | 17. The Harper Mule | 18. Suede Platform Chelsea Boots
Alright, that is all for today. Happy Saturday and happy shopping! xx
Opener Image Credit: Photo by Veronica Crawford | From: Shopping My Closet For Fall & Wearing Some (Ethically Made) Shoes That I Love
The post My Ultimate List of Tried And True Fall Shoes (That I Wear Season After Season) appeared first on Emily Henderson.
October 23, 2020
The Warm Weather May Be Fleeting But We Still Want To Stay Outside – 6 Elements For Creating A Cozy Outdoor Winter Lounge

Earlier this week we had a meeting with a wonderful blogger (more on her coming soon) who lives in Minneapolis where 6 inches of snow had just fallen. WHAT?! In New York, temperatures are now in the below 60 range and in LA, it was actually overcast for the majority of yesterday, flirting with us hard and giving us hope sweaters could be worn outside comfortably and instead of just in our air-conditioned homes. This change in weather (more in some areas, obviously) is bittersweet, to say the least. Our outdoor spaces, for those lucky enough to have one, have been ESSENTIAL to our mental well being. Since now Emily is actually living in a place with real “weather”, she posed this very important question for us all to think about: How can we help the readers enjoy their outdoor spaces for as long as possible?? So after some discussion, we came up with six key elements. It’s not rocket science but they are pretty important if you have any hope of staying comfortable outside until the snow really takes over. YIKES.
Let’s warm up, huh?…
Fire Pits
 photo by sara ligorria-tramp | from: the ultimate outdoor movie night and campout with intel
First and foremost, this is one of my favorite photos of Emily and Birdie. That mother-daughter bond is so darn special. But I digress. We are here to talk about the other heartwarming thing in this photo… The fire pit.
We talked about fire pits earlier this year when summer hit because whenever you can sit outside, a fire pit is ALWAYS a great purchase. Plus, you know, smores.
HOT SMORES TIP: Velinda and her wife Katie buy Reese’s Thins as a chocolate option and I am telling you it was the game changer I didn’t know I needed in my life… also I really miss our game nights.
Shall we get into the great pits that are still available…

1. Steel Wood-Burning Fire Pit | 2. Concrete Propane Fire Pit | 3. Steel Wood-Burning Fire Pit | 4. Cast Iron Fire Bowl | 5. Ceramic Wood-Burning Fire Pit | 6. Concrete Fire Pit Kit | 7. Long Rectangle Fire Pit | 8. Wood-Burning Fire Bowl | 9. Steel Propane Fire Pit
Well, I like all of these because I picked them out but I really love how #1 has that great lid. Plus it has a little rack inside for grilling. Speaking of lids, #5 steals my heart for many reasons. First I love that bold color (it also comes in black and white), it has TWO lid options (the other making it a usable coffee table) and it just has a great modern yet unique shape. But if you are down to use propane #2 is simple, pretty, looks like it gives off great heat AND you can set your glass on the lip. Win-win.
Let’s keep this heat, hot…
Outdoor Space Heaters
If a large open fire isn’t your thing or it’s not safe for your space, an outdoor space heater is your next best “keep you warm” bet. It’s just important to know if you prefer an electric or a propane-fueled one, and also the size. The bigger the space, the larger the heater (or number of heaters :))
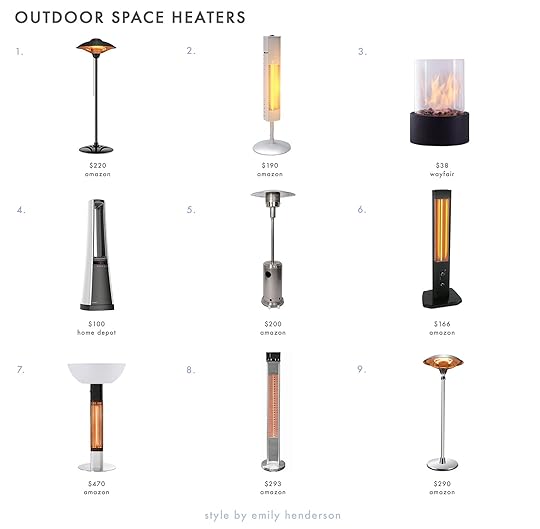
1. Electric Outdoor Patio Heater | 2. Indoor/Outdoor Standing Heater | 3. Metal Bio-Ethanol Outdoor Tabletop Fireplace with Flame Guard | 4. Electric Ceramic Oscillating Space Heater | 5. Outdoor Patio Heater Standing Gas LP Propane Heater | 6. Orbit Tower Heater | 7. Electric Patio Heater with Adjustable LED Light | 8. Freestanding Patio Heater | 9. Electric Patio Heater Outdoor Standing
Now the space heaters of my childhood were exclusive to #5. Or at least those are the only ones I remember. But I was pleasantly surprised that there are more options that are somewhat affordable. Take #1 and #9. They are the modern (and electric) version of #5. I love how sleek they look. Also, #1 gives off a little vintage vibe to me with that top. I also love #3 because it’s so cute and small and perfect for a tiny outdoor patio or balcony. It’s almost a cross between a fire pit and a space heater. Lastly, the top of #7 changes colors if you want it to. Talk about a party;)
Outdoor Lanterns
 photo by tessa neustadt | from: a blush and blue patio holiday party
This element is more of a mood-setter rather than giving you functional heat. Despite your body needing a little extra warmth, your eyes still want to be delighted with pretty details. Lanterns are great for that because they look good the entire day. I don’t think we have every styled an outdoor space without at least one if that shows you how passionate we are about lanterns. We really love them, y’all.

1. Metal Outdoor Lantern | 2. Rutherford Bamboo Lanterns | 3. Black Metal Lantern | 4. Bolleke LED Indoor/Outdoor Lantern | 5. Indoor/Outdoor LED Candle Lantern | 6. Clear Glass Cheyenne Lantern | 7. Indoor/Outdoor Flameless Candle Lantern | 8. Metal Outdoor Lantern with Black Hood | 9. Rattan Solar Lantern with Handle
There aren’t too many available outdoor lantern options that I really loved but these all are awesome gets. #1 looks classic but has modern lines, #2 and #9 will add a layer of visual texted (our favorite saying), #4 is a fun new take on a lantern and lastly, #6 might be my favorite. They won’t be great to keep outside 24/7 but they sure are pretty.
Outdoor String Lights
Another all year round classic and EHD outdoor must-have. String lights make everything better. Ultimate ambiance. I don’t know about you but as soon as I flip those babies on I feel like I’m instantly either on vacation or transported to some magical, relaxing place. If you don’t have them we HIGHLY recommend you fix that.

1. Indoor/Outdoor Incandescent String Lights | 2. String Lights with Satin Globes | 3. 100′ Outdoor 100 – Bulb Globe String Light | 4. Edison String Light with Clear Bulbs | 5. Simple String Lights | 6. Edison Bulb String Light
#1 and #5 are a fun gentle twist on the classic cafe string lights. From there it really depends what you prefer. Do you like black with a teardrop blub like #6, or a round bulb like #3, or an opaque glass like #2?? #4 is great if you want to create a very light and minimal outdoor space.
Outdoor Blankets
 photo by sara ligorria-tramp | from: 5 outdoor ideas & hacks that’ll instantly add style (& save you money)
Now for the coziest of the elements… blankets. We think that outdoor blankets should be thick, washable, durable and of course, add some design sparkle to your outdoor area. You have to also decide if you would prefer something water-resistant. But the most important thing is to make sure you love how the blanket feels when you are wrapped in it. Let’s get into it.

1. Cabin Fleece Throw | 2. Sherpa Weighted Blanket with Removable Cover | 3. Nanoloft Puffy Blanket | 4. Dual Cable Throw | 5. Soft Cotton Throw | 6. Pendleton Yakima Camp Blanket | 7. Microplush Weighed Blanket with Removable Cover | 8. Reversible Fleece Throw | 9. Cotton Throw | 10. Mountain Classic Camp Blanket | 11. Indoor/Outdoor Buffalo Check Blanket | 12. Knit Throw | 13. Woven Luxury Throw | 14. Waterproof Outdoor Blanket | 15. Over-Tufted Cotton Throw
Since it’s winter (and the holidays are FAST approaching) I love #1, #8, and #14. But #2 and #7 have removable covers which is ideal for easy washing without sacrificing plushness. If you are a water-resistant fan then #3, #10, and #14 are great options that also look cozy to wrap yourself in…basially blanket sleeping bags.
Outdoor Weather Domes
Ok, this is one is pretty crazy and in all of my years at EHD (which is 4 tomorrow), never would I have thought weather domes would be recommended:) Aesthetically they aren’t what we would call beautiful. However, considering the state of the world and wanting to grab at any ability to have a somewhat comfortable “outside room” to hang out in in the winter sounds pretty great. 2020: The year of practical and not always beautiful purchases. Now for the questions… Does anyone have one? Do they work? They seem like a GREAT option but would love to know your thoughts.

1. 10′ X 10′ Weather Pod | 2. Bubble Tent Garden Dome | 3. 15′ X 15′ Weather Pod
With these three it’s really about size/price point. #2 is clearly THE luxury option but the other two look like perfectly awesome options:)
Well as we know winter is coming and I hope that this post gave you a little hope that extending your outdoor time might be possible (I know it also very much depends on the state or country). So enjoy the rest of you fall and for those that live in cold climates let us know if you have any other suggestions! Let’s all help us stay outside for as long as possible:)
Love you, mean it.
Opening Image Credit: Photo by Sara Ligorria-Tramp | From: The Ultimate Outdoor Movie Night and Campout with Intel
The post The Warm Weather May Be Fleeting But We Still Want To Stay Outside – 6 Elements For Creating A Cozy Outdoor Winter Lounge appeared first on Emily Henderson.
Emily Henderson's Blog

- Emily Henderson's profile
- 10 followers

