
Emily Henderson's Blog, page 196
October 9, 2020
The Most Sustainable & Eco-Friendly Places You Can Shop For Furniture Right Now
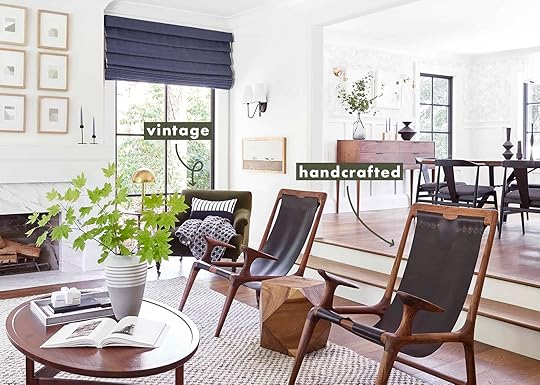
The first piece of furniture I ever bought was a console table from Craigslist that I intended to use as a TV stand. I was broke, it was cheap, and I was happy to be buying something second hand. When I brought it home, it looked absolutely horrible. I knew immediately I would need to purchase something else to replace it and eventually would have to figure out what to do with this console table that was now on my hands. It’s impulsive decisions like this that ruin good intentions and I still kick myself for not considering the table’s measurements (a ROOKIE mistake). Now, a year later I am a lot better at making furniture decisions but there is one thing that lingers over every purchase I make: the environment.
I know access to new handcrafted sustainable furniture is a privilege and unfortunately, the most sustainable path is rarely the most convenient or affordable. To be completely transparent, the topic of sustainability feels daunting and even debilitating until I remind myself that small changes are still important changes. By buying vintage and second hand, supporting companies that participate in fair-trade practices, and purchasing quality furniture that lasts, I can use my consumer power and begin to shift the practices of the industry as whole. In fact, there are already brands that are making revolutionary changes to the way we think about the production and distribution of furniture.
Before we get to the brands pioneering sustainable furniture, I’ll start with our favorite online vintage resources so you can score that unique vintage piece you’ve been dreaming of.
Etsy

1. Midcentury Avalon Teak Desk | 2. Set of 2 Bentwood Thonet Side Chair | 3. Vintage French Style Hand Painted Solid Wood Writing Desk | 4. Mid-Century Modern Blue 3-Seater Sofa | 5. Lounge Chair 70s | 6. Upholstered Vanity Stool | 7. Baroque Throne Sofa | 8. Vintage Dresser | 9. Mid Century Vintage Burnt Orange Velvet Wingback Chairs
Etsy is 100% my favorite resource for furniture and decor. I’ve scored some of my favorite vintage pieces from Etsy at really reasonable prices. (I suggest always messaging the seller directly and asking if there is any wiggle room on price. It never hurts and you’ll be surprised how often people will be willing to negotiate).
Why it’s sustainable: Buying vintage or second hand reduces waste caused by new production of furniture.
Pricing: From $-$$$
Hot Tip
Enter your zip code in the search column on the left to search for furniture being sold in your area. You can message the seller and most will agree to arrange pick up times so you can save on shipping costs and reduce even more waste.
Chairish

1. Pink Curved Sofa & Pillows | 2. Casa Cosima Hayes Spot Table | 3. Mid Century Modern – Swiss Classic Chair | 4. Mid Century Side Table | 5. Post Modern Bench | 6. Vintage Mid Century Modern Danish Style Wooden Bed | 7. Vintage Italian Alabaster Tazza | 8. Vintage Boho Pencil Reed Radiant Sun Side Table | 9. Mid Century Modern Walnut Caned Birdseye Chair
Chairish is an EHD favorite site for sourcing vintage furniture online. The site has every type of furniture, art, and decor for any style sold by retailers and individual sellers all over the country. Also if you haven’t ever purchased from Chairish, you actually put in a bid with the vendor. They then can accept or counter back. It’s extremely exciting.
Why it’s sustainable: Buying vintage or second hand reduces waste caused by new production of furniture.
Pricing: From $$-$$$$
Everything But The House
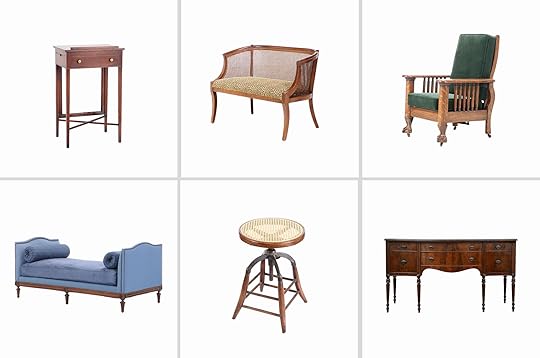
1. Colonial Mahogany Lecturn Stand with Embossed Leather Top | 2. Caned Bow Back Upholstered Settee Bench | 3. Oak Flat Arm Upholstered Arm Chair 4. Upholstered Settee with Bolster Accent Pillows | 5. Industrial Adjustable Height Cane Seat Oak Stool | 6. Federal Style Walnut Sideboard, Mid-20th Century
Everything But The House is an affordable online auction for home goods. Sellers put their items up for auction and each item starts bidding at $1 so you can get really INSANE deals if you keep your eye on a really great piece. Also, all sellers offer local pick up so if you find something in your area, you can score some reallly unique vintage finds for cheap.
Why it’s sustainable: Buying vintage or second hand reduces waste caused by new production of furniture.
Price Range: $$
Hot Tip
For vintage and second hand furniture in your area, be sure to check out local listings from places like Craigslist, Facebook Marketplace, Let Go, and Offer Up.
Now on to the companies making new products in new, sustainable ways…
Woodward Throwbacks
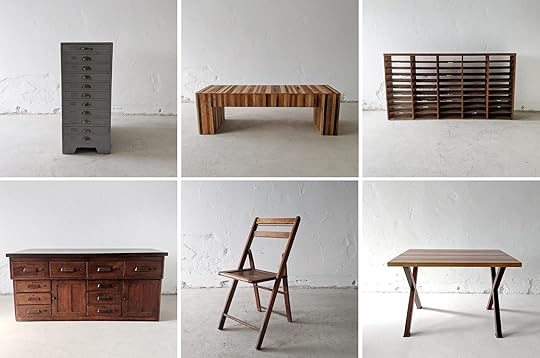
1. Salvaged Hardware Chest of Drawers | 2. Leah Lathe Bench | 3. Salvaged Shelving Unit | 4. Science Lab Kitchen Island | 5. Vintage Wooden Folding Chair | 6. Teak Table
Woodward Throwbacks began with the founder’s Bo Shepherd and Kyle Dubay riding their bikes around the city searching for reusable materials. What started as a hobby became a business and what they have created is a rad brand line that is sustainable and affordable.
Why it’s sustainable: Woodward Throwbacks uses recycled and salvaged materials to make their furniture. They keep their designs simple enough so they can mass produce in their hometown of Detroit and work to employ locals, renovate vacant buildings and be a model for modern manufacturing.
Price Range: $$
Sabai Design
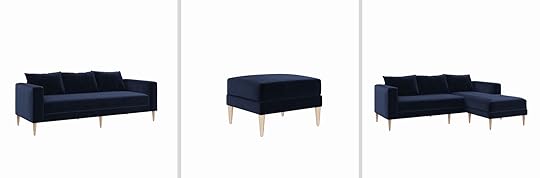
1. The Essential Sofa | 2. The Essential Ottoman | 3. The Essential Sectional
Sabai Design makes essential furniture that is beautifully designed, well made, and affordable. They make only three products (so you know they are expertly made) and offer them in 7 colors and fabrics. Plus, you can customize seat cushions and leg color to fit your exact specifications.
Why it’s sustainable: Sabai Design uses fabrics made from natural fibers and recycled water bottles, FSC certified wood, certiPUR-US certified foam, and recycled fiber pillows. Their boxes are 100% recycled, they use no plastic in packaging, and the leg bags double as produce bags!!
Price Range: $$
Dims

1. Caldera L Coffee Table | 2. Rove Side Table | 3. Cleo Chair | 4. Eave Desk | 5. Barbican Trolley II | 6. Composed Vanity II
Dims makes quality furniture without the retail markups. They strive to make great designs that are attainable and responsibly made. Plus LOOK at those incredible designs.
Why it’s sustainable: Dims sources all their ash wood from sustainably managed forests, certified by the Forest Stewardship Council. Their finishes and adhesives are GREENGUARD certified, meaning they’ve been independently tested to meet the world’s most rigorous standards for low chemical emissions. And when they work with steel, they only use the finest powder coating that is free from harmful VOCs and heavy toxic metals.
Price Range: $$-$$$
Floyd Home
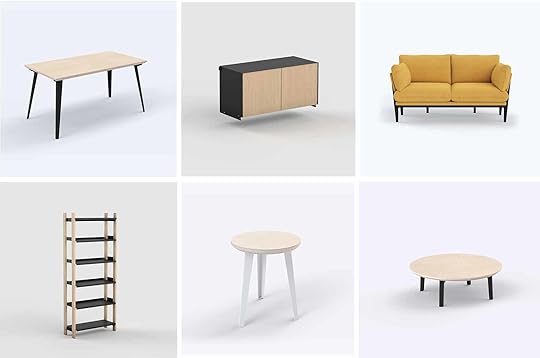
1. The Floyd Table/Desk | 2. The Cabinet Add-On | 3. The Sofa | 4. The Floyd Shelving System | 5. The Side Table | 6. The Coffee Table
Floyd specializes in timeless and durable furniture. Their sleek designs are versatile and minimal so they can be integrated into any space.
Why it’s sustainable: Floyd began because they were tired of disposable furniture. With their designs, they emphasize addressing the needs of how people are living today with simple, timeless design while using the most durable and sustainable materials.
Pricing: $$
54kibo
1. Line Chair | 2. Milo Ottoman | 3. Ite Ottoman | 4. Djembe Side Table | 5. Walking Bench | 6. Ite Chair
Everything from 54kibo is made by African designers and handpicked to bring Contemporary African Design to the forefront worldwide. Also if that side table looks familiar then you are correct! Emily used it in her living room and Julie used it in Suzanne’s bedroom.
Why it’s sustainable: 54kibo highly curates their collections to ensure that the products are sustainable and ethically produced. This ranges from designers working with local artisans to produce the pieces to upcycling materials to mindful packing.
Price Range: $$-$$$
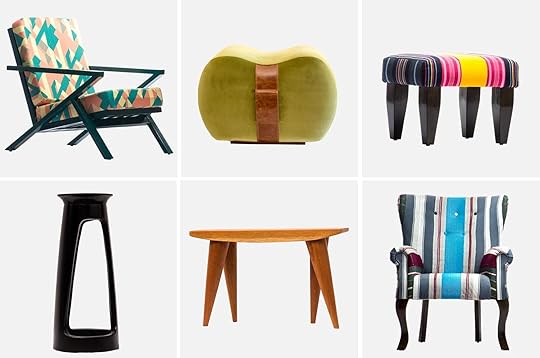
Wehlers

1. A Chair | 2. A Lounge Chair | 3. A Stepstool
Wehlers is essentially the leading furniture company when it comes to eco-friendly practices. Their ethos is “Designing for the conscious consumers who refuse to compromise on quality and design.”
Why it’s sustainable: Wehlers not only practices sustainability, they also help their designers, suppliers & customers to become more sustainable. They emphasize that well designed, sustainable products are the starting point for a sustainable interior. Wehlers closes material loops and takes its responsibility when it comes to utilizing materials. All of their furniture has a high content of reused materials and if they do require new materials for a product, they use as many renewable and local materials they can find.
Pricing: $$$
Goodee
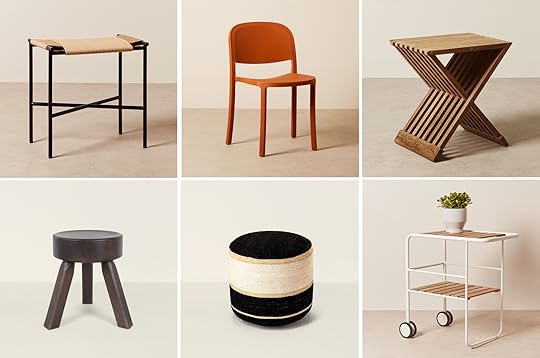
1. Vent Stool | 2. 1 Inch Reclaimed Chair | 3. Fionia Stool | 4. AML Stool – Dark Pine | 5. Kilim Pouf 01 | 6. Fuori Serving Trolley
Goodee is a curated marketplace that reveres artisans and makers who produce goods ethically and sustainably. They have everything from furniture to accessories at reasonable price points, and everything is beautiful.
Why it’s sustainable: Goodee works exclusively with artisans and products that make a positive social or environmental impact.
Price Range: $$-$$$
Mater
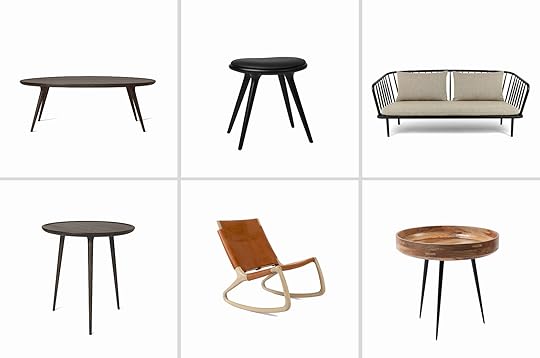
1. Accent Oval Lounge Table | 2. Low Wood Stool | 3. Mollis Sofa | 4. Accent Cafe Table | 5. Rocker | 6. Bowl Table
Mater is a Copenhagen-based modern furniture design studio that champions progressive ethical and environmental standards.
Why it’s sustainable: Mater strives to avoid and minimize any adverse impact on society, by following ethical and sustainable production criteria and creating products that will both stand the test of time and inspire the consumer to cherish and savor them. They use the most sustainable materials available and strive towards making quality furniture that will last. The majority of the Mater collection is labeled and manufactured in FSCTMcertified wood and the aluminum products are sand-casted of partially recycled, aluminum scraps, like old car components and bicycle wheel.
Pricing: $$$
Medley
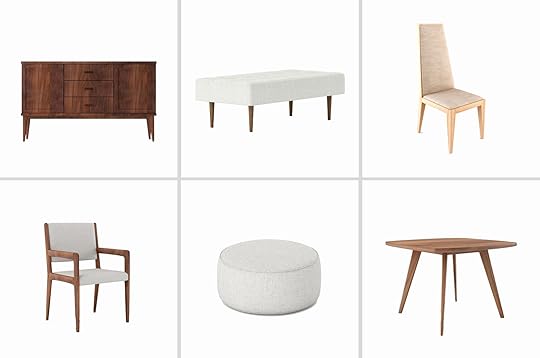
1. Harrison Credenza | 2. Pax Bench | 3. Wiam Dining Chair | 4. Jasmi Dining Chair | 5. Norah Pouf | 6. Danu Square Dining Table
Medley makes midcentury-inspired pieces that are sleek, elegant, neutral, and versatile (think mountain house!!).
Why it’s sustainable: Medley products are made with the most eco-friendly materials and are designed to last. They source wood from FSC certified forests, use bamboo (which grows rapidly so is more sustainable), and the cleanest synthetic choice on the market.
Pricing: $$$
The Citizenry
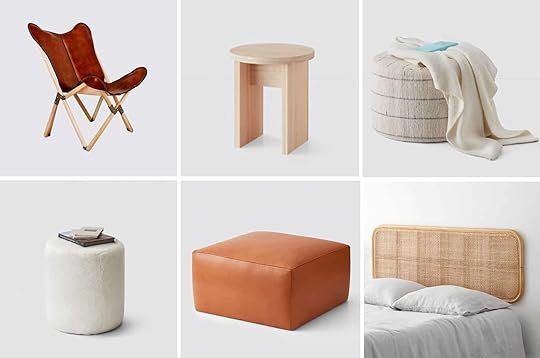
1. Palermo Tripolina Chair | 2. Side Table | 3. Sanjay Ottoman | 4. Round Leather Ottoman | 5. Square Leather Ottoman | 6. Lokon Cane Headboard
The Citizenry is another EHD favorite. We’ve worked with them several times before and can attest to the long-lasting and beautiful craftsmanship of their pieces. Everything is made in small batches and they work directly with artisans which reduces costs and waste.
Why it’s sustainable: By personally traveling to each country and using only local materials, they establish sustainable relationships with our artisans. From there, they sell directly to the consumer so there is no middleman and in doing so make handmade goods, crafted with the highest quality materials, at more reasonable prices than traditional luxury boutiques.
Pricing: $$-$$$
Alright friends, if you’ve made it this far, thank you for joining me and I hope you found some new companies to keep in mind when you are looking for the next piece for your home. I am sure there are sustainable brands I missed so please drop them below and have a LOVELY Friday and weekend. xx
Opener Image Credit: Photo by Sara Ligorria-Tramp
The post The Most Sustainable & Eco-Friendly Places You Can Shop For Furniture Right Now appeared first on Emily Henderson.


How To Choose An Exterior Paint Color + Our Favorite Shades AND Combos
We may be an interior design blog… but today, we’re changing lanes and chatting exteriors. That’s right folks: this morning, it’s all about the CURB APPEAL. The weather is cooling down and many of us are heading into a long weekend, so what better time than today to lay out a plan for a nice lil’ exterior paint update?
But before we jump straight into the color recommendations, I wanted to share a quick process for planning that will save you BIG BUCKS as you decide on which samples are worth picking up and testing. Y’all, I learned a whole bunch about exterior paint — like, did you know that a color on brick will dry lighter than the same color on stucco or siding? I could write a whole lot more about why this happens (I definitely fell into a google-hole as I researched), but instead, I’ll offer the point: I have a couple of things to keep in mind that will help you hone in on the right color and will save you from buying a million tiny cans.
So in the interest in speeding up your decision-making process and keeping some dollars in your pocket… we begin with a quick guide. LEARNING IS FUN, RIGHT? (If you don’t need the primer, just scroll down a little bit. I won’t be *too* offended.)
Step 1: Study Your Home
I know that you know what your house looks like…but take a step back, and really give the ol’ girl a GOOD LOOK. Some questions to ask:
Is my roof warm-toned or cool-toned? If you have something black or neutral, the world’s your oyster! If you have a terra cotta roof, you may want to lean into warmer colors. If you’re rocking green- or blue-tinged shingles, consider sticking on the cooler end of the color palette. Also, take a second to peek at the fascia: is it visible? Do you want to paint that, too?Do I have any existing stone or brick? If you’re not planning on painting your masonry, you can’t go wrong by choosing a primary house color that corresponds with the undertones in the stone.What about tiles or pathways? If you’ve spent money installing concrete tile or a walkway to your front door, what color is it? This whole Q&A section really comes down to figuring out if you should be sourcing from warm-toned or cool-toned colors. (P.S. Paint is kind of like lipstick — there are still things like cool reds out there! You’re not cut off from a color just because it’s traditionally warm or cool — this will just help narrow down which part of the spectrum you should be picking from.) What I am actually painting? This is when it gets complex. How much are you changing? Shutters? Trim? Columns? Window mullions? The front door? It’s easy to make 2-3 colors across the house look professional. An example: If you want to keep your white mullions (or if they’re ingrained in your window), consider testing out a white house with black shutters and a green front door. Or vice versa! The options are endless — and if you really want to run with a whole bunch of colors, you can! — but it’s easiest to pick 2-3 colors and to run with them.
Step 2: Decide On Your Color Inspiration
THE FUN PART. You’re already here! This is easy, and I’m sure you already have a general idea in mind. Maybe you want to test out the dark exterior paint trend…or maybe you’ve always dreamed of a cute red cottage place…or maybe your Pinterest board is filled with bright white and blue homes in Santorini. Whatever your inspiration, take what you’ve learned about your house and finalize your dream plan (…in the abstract. We’ll get to picking actual colors next).
Step 3: Consider the Light
AH, LIGHT. The true trickster! Here’s the thing: painting outside is NOT EVEN A LITTLE BIT CLOSE to painting inside. I thought it was similar and I. was. wrong.
Let’s talk science: it’s outside. The light is way brighter and way more blue than you think. (Is this science? Am I doing it right?) So let’s say you’re scanning swatches online and you think you’ve stumbled upon the perfect light greige or a great bright white — I am here with the sad truth that those colors are going to pull way lighter (and blue-r!) outside.
A key tip: instead of buying every shade on a color swatch, try just picking up your favorite choice and the color that’s 1-2 spaces down. We’re going to get into some of our favorite tried-and-true picks below because it’s seeing paint in action is invaluable…but if you happen to fall in love with a picture, just keep our good pal THE SUN in mind.
The sun and your environment — like your yard, your garden, a pool, or any hardscaping — will change the way that light reflects. Imagine this: a color on a house in the middle of the sparse and golden Joshua Tree desert will pull drastically warmer than that same color painted in the middle of a lush green Oregon forest, because the light will be bouncing around the space differently. So many factors!
And for those with masonry — like I mentioned earlier, stones suck up paint in a whole different way! Priming stone with something like this will be key as you attempt to maintain color steadfastness — the brick will be able to absorb the primer instead of the paint, which will keep you from having a *slightly* mismatched house.
Step 4: Try It Out
CRITICAL STEP, obviously. While you can do the old EHD trick of painting samples onto watercolor paper and taping it up to your house, I’d recommend testing paint straight on the siding or stucco in question. You’re going to want to see how your exterior surface absorbs the color — these materials can be more finicky than their indoor counterparts — as well as how the samples stand up to any weather, like rain or dew.
You’re gonna want to keep an eye on those paint samples morning, noon, and night. (What’s more exciting than watching paint dry? Watching a whole bunch of dried paint that basically looks the same and trying to decide which is best!)
Step 5: Decide
If you’re having decision paralysis, it’s okay to phone a friend. Or, you can grab a trial to the Community and ask us! Or…if they all seem good and they’re just too similar…flip a coin. You were measured and thoughtful and smart in your planning and selection process — it’s going to look AMAZING. 
October 8, 2020
The Top 10 Things You Guys Loved & Bought Last Month (#1 May Be A Big Surprise)


We’re trying out something new today –– something we thought we’d wanna know as a reader (and hopefully it’s something you wanna know too). Every month we get a full breakdown (from the one and only Caitlin) of what sold that month and what didn’t. It’s probably the meeting where we have the most fun, usually because we make it a happy hour so there’s typically some alcohol involved. While going through our September report, we thought to ourselves “you know what would be fun? If we made this a post and the readers can get involved in the fun of learning what everyone liked & was buying this month.” So that’s just what we’re gonna do today, folks. I highly recommend you grab a drink, because this is basically the Oscars of Emily Henderson Design. The nominees for top items sold last month are…
10. Whiskey + Oak Candle
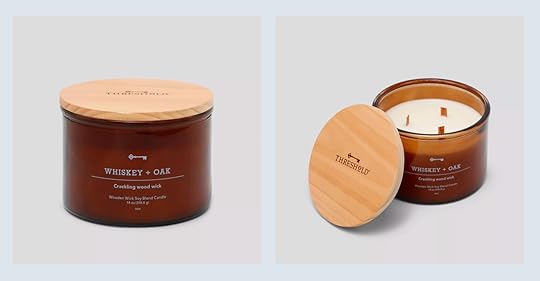
I love when a candle makes the list for a number of reasons. The first is that they’re (usually) pretty affordable (this one’s only $16), and second is that I’m a firm believer that you can never have too many candles. Hence why I currently have 7 in my small studio apartment. And before you ask, no I DON’T light them all at once, I’m not a monster. This candle is particularly great because it’s whiskey and oak scented, which to me really screams Fall. It also has one of those thick wood wicks so it makes a lil crackling sound when it’s lit. Kinda like a fireplace but much smaller.
9. Ruffle Cardigan

Madewell was having a HOT sale (and it’s still going on) so I constructed a full outfit, added it to my cart, then put it in the link up (as one who works for EHD does). This was the cardigan I linked, which is comfy, cozy, and gives me all the fall feels (and the bottoms may be on this list too *cough*spoiler alert*cough*number 7*cough). But back to the cardi, this one is so good because it’s got a lil ruffle on it and for some reason I’m only buying what I call “architectural sweaters” this year, which means they need to have a ruffle or cool structure to them in some way. This fit the bill perfectly (and it does so in cream and brown…take your pick).
8. Wood Floor Lamp
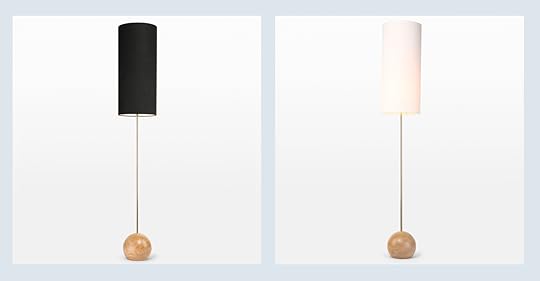
I was happy to see this lamp from one of our latest projects: Suzanne’s bedroom reveal. This lamp is sorta like family, it’s been around a long time and in a number of our projects, and it just keeps getting better with age. I love it with the black shade OR the white shade. Plus you can also get the lamp with a black bottom instead of the wood if you’d rather. I should just write a love letter to Rejuvenation or maybe marry them…one of the two.
7. Straight Leg Jeans

Okay so if you read the spoiler alert, you may not be that surprised about this one. BUT may I just point out that Madewell is the best and we love their jeans maybe too much…so I understand why this made the list. Madewell jeans are one of the finer things in life and the whole team loves them! Plus they last forever and are undeniably cute.
6. Chunky Knit Bed Blanket
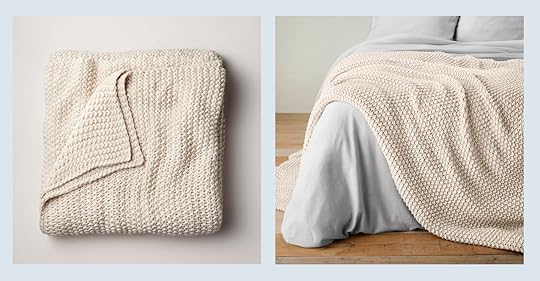
I’m just gonna come out and say it: I was on the fence about this blanket but now that it made this list I had no choice but to purchase. This was in our “how to get better sleep post” that was in partnership with Target’s new line, Casaluna, and BOY OH BOY is that collection good. Take it from someone who is not personally sponsored by Target…this stuff is some of my favorite Target has ever had to offer. There I said it. Check out the clay and sky blue bedding while you’re at it because I’m in loooooveeeee.
5. High Rise Flare Jeans

So the high rise flare jeans win the battle against straight leg jeans this time…perhaps because flare jeans are coming BACK WITH A VENGENCE. Oh and they work great w a boot (again, read: fall). Which do you guys prefer?
4. Studio Mcgee x Target Console

It’s easy to see why you guys liked this so much…I mean she’s beautiful AND affordable –– we couldn’t ask for more. Also, the caning on this guy is *chef’s kiss* Speaking of Target collections that are very good, the Studio Mcgee x Target one is all around 10/10.
3. Tan France x Etsy Collection

There wasn’t just one piece from here because it’s THAT good. Everything is magical and beautiful. Exquisite work Tan & Etsy. Keep it comin.
2. T-shirt Dress

Our sweet precious Arlyn linked this $12 wonder in the link up a few weeks back. The most hilarious part about this being #2 is the fact that we’re pretty sure we linked this before (like last year maybe?? That feels like 12 years ago) and you guys loved it as much then as you do now. Just saying this might be the best $12 ever spent because it NEVER goes out of style (and it’s comfy so that’s a big plus). Now the moment you’ve all been waiting for… DRUM ROLL PLEASE…
1. Matching Family PJs

PAJAMAS! YOU GUYS! First, I gotta say this makes A TON of sense for #1. First off, it comes in mens, womens, children, and even dog sizes, so it truly appealed to everybody. Secondly, Emily bought it and was the one to link it, meaning we’ve all been #emfluenced pretty decently (we always are).
So what are yer thoughts? Did ya like this? It was an emotional rollercoaster journey to get us here, but through the shock, happiness, and fear, we pulled through and made it to the end. Drop a comment and let us know if we should keep doing this or if this had zero interest to you. We’d love some good ole feedback. Happy Almost Friday!
Opening Image Credit: From Emily Henderson.
Sara’s Closet Reveal – The Bold Design Moment She’s Been Craving

Welcome back to another post here on Styled By Sara Tramp. Might as well change the name, since this is my THIRD time on the blog this week. Didn’t I stop working here at the end of August? I am, OF COURSE, joking. I just happened to be working on three different posts that all coincidentally went up this week for various different reasons. I also love being here, getting to text Jess daily, and really just pretending I’m still a full-blown EHD team member.
Today, for your eyeball’s pleasure, I’m serving up my primary closet reveal. But first, as always, let’s trip down memory lane.

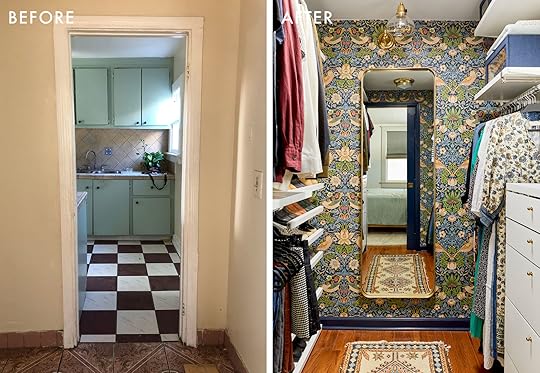
Here are the floor plan I always come back to, because it really clearly illustrates the changes we made to the house. As you can see, originally the area that is now the primary closet was just a pass-through room. It’s likely where the previous owner put their washer and dryer, and it’s where the entrance to the primary bathroom was located. It was also the only way to enter the primary bedroom. But you had to walk through the kitchen to get there, which felt a little weird.
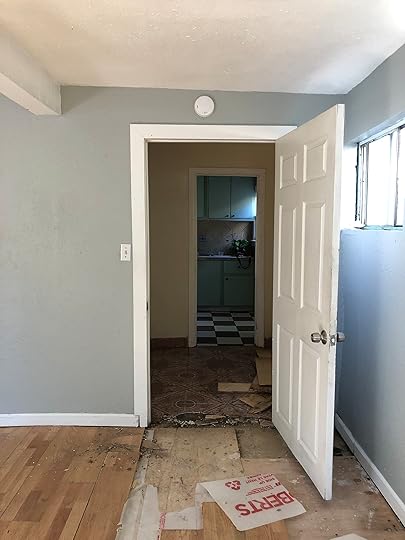
We actually never spent a single night in the back part of the house before it was renovated. As soon as we bought the house we started in on demo, and the back half of the house was gutted. Early on in the reno process, I knew I wanted to figure out a better floor plan for the back part of the house. And that included turning this awkward space into the primary closet.

Originally the closet for the bedroom was a box, built into the back corner of the room. We got rid of that, put the entrance to the bedroom where the closet once was, and closed off the access from the kitchen into the bedroom.
And here’s what that awkward little room looks like now . . .
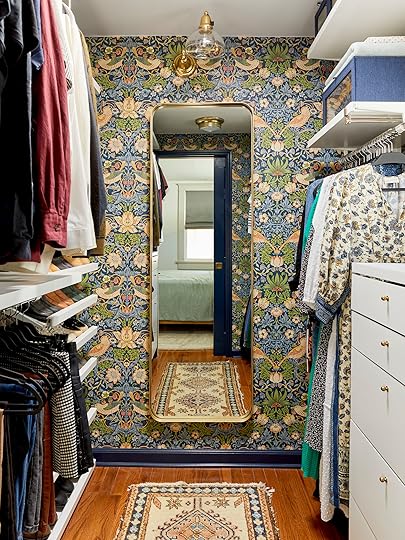
*Excited squawking noises* It’s my first every walk-in closet, and it feels like SUCH a luxury. A real dream come true, to have a closet I can stand in instead of stare at. There are so many exciting parts to this teeny tiny space, I don’t know where to start.

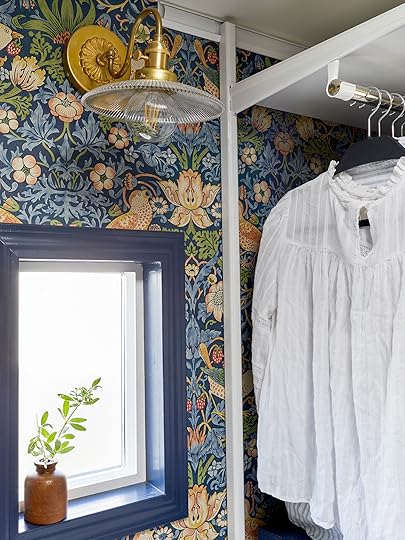
I feel like the very first thing that’s going to catch everyone’s eye is the wallpaper. I knew I wanted to wallpaper this whole room, but was originally planning on leaning a little more neutral. After showing my initial wallpaper choices to the EHD team though, they all convinced me to go BOLDER. So, I revamped my choices and finally decided to go with Morris & Co.’s “Strawberry Thief” because it felt whimsical, bold, and still true to the Craftsman roots of the house. It’s probably the best decision I’ve ever made, in the history of our home. Maybe better than opening up the living and room and dining room by knocking down the partition wall. Maybe even better than painting the TV room dark. I HAVE SO MANY GOOD IDEAS (and twice as many bad ones).

Now our walls are covered with sweet little birds, stealing strawberries, and beautiful florals. Fun story – I originally wanted to wallpaper this room floor. To. Ceiling. But I didn’t consult Julie or Mark (our wallpaper installer) before ordering the paper. So when Mark arrived he was like “I think we’ll barely be able to cover it all, but we’ll make it”, to which I replied “oh GOOD! I’m most excited about the ceiling!” Cue the blank stare he proceeded to give me. I then had to decide really quickly whether I wanted him to install the paper sans ceiling, or have him come back several weeks later once I’d ordered more. I’m impatient, and the moral of this story is to measure once and then always have someone else double-check your measurements because you likely have no idea what you’re doing.

In retrospect, I’m actually really happy we didn’t do the ceiling. I’m sure it would have been really fun, but the white actually keeps the space from feeling chaotic, and ties in our white closet system to the design (which I’ll get to in a minute).
Now, we just happened to be painting the front guest room/office at the same time as we were installing the closet, and I just happened to realize that the color we were using on the walls in the office was a perfect complement to the colors in the wallpaper. So we used the leftover paint on the trim in the closet. And I felt like a genius. Still do, if I’m being honest. The color is called Goodnight Mood, and it’s from Clare Paint. If you think it looks good in here, just wait until you see it up on an entire wall. It’s a dream!

HOT TIP: Paint your baseboards and trim BEFORE you wallpaper. I don’t know why this didn’t occur to me, but it left me hand-painting all the baseboard and trim by hand, without tape, for fear of damaging the wallpaper. It took FOREVER, but I did develop a very steady hand.
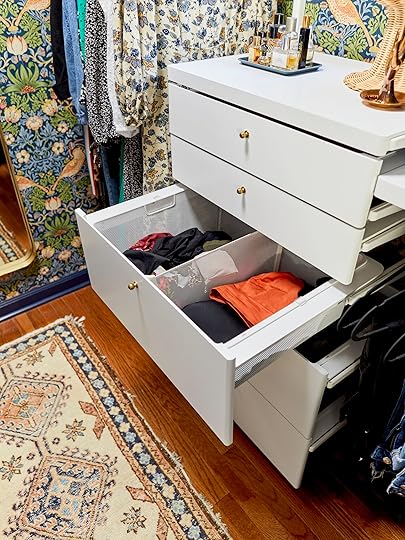
Ok, let’s talk about the other elephant in this room – the closet system.

Mirror | Navy Sweater Boxes | Hangers
We partnered with The Container Store Custom Closets for this space, and let me tell you, the process was AMAZING. Truly. Even if they didn’t partner with me on this project, I would still say the same thing.
I have one word for you – Barb.
Instead of designing the closet myself, we used The Container Store’s in-home virtual design service, which paired us with Barb, who is possibly the best closet designer in all of Cleveland. Possibly in the whole world. Trust me, it’s not easy to figure out how to use pre-made systems in custom spaces. I had tried to do it previously using a different closet system, and spent many frustrated hours pulling my hair out. It took Barb all of about 45 minutes, via a Zoom call with both Mac and I, to create our dream closet. And because she knew what she was doing, I knew that it was going to work. She screen-shared with us, and I watched her build our closet in real-time, taking into consideration all our different needs.

THANK YOU BARB. Next, we got the final design emailed to us, ordered all the pieces, and scheduled an installer through The Container Store. All the closet pieces were delivered the day before install to our home, and then our installer showed up (wearing a mask, of course), and had our closet up and running in about 4 hours. It would have taken us at least twice that to install it ourselves, and likely would not be nearly as secure.

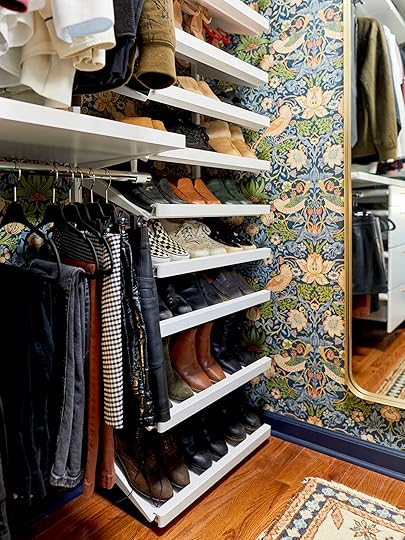
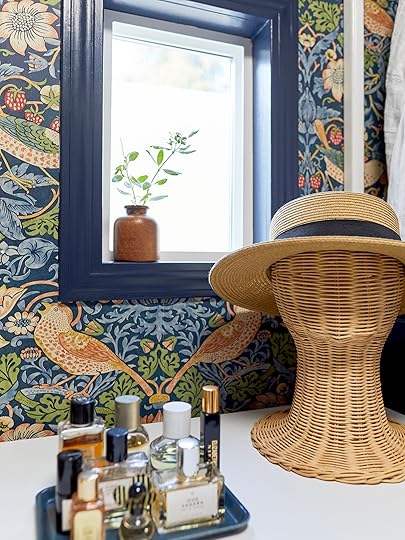
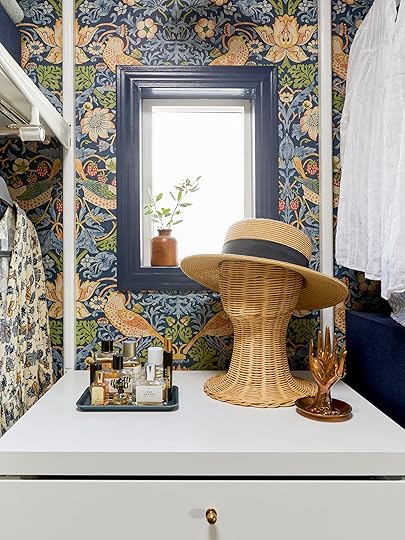
And now that we’re living with the closet, I just want to thank Barb one more time, because this closet is SO functional. It’s got taller hanging storage for Mac, a section of full-length hanging for my dresses, just enough shoe storage, and Barb was even able to design something that included my custom vanity area idea! For my perfumes!


I also now have a valet rod – A really functional little contraption I never knew I needed, but use to put together outfits, pull things for packing, and steam clothing.

The Container Store has four custom closet lines that way you can choose one that fits any size space, style, or budget. The particular line I used is called Elfa Décor, which is a step up from their most basic closet system. This is still a closet, so function was first and foremost for us. Luckily, the Elfa Décor line has all the functionality of the Elfa Classic line, but with the beauty of wood and deluxe options including real wood shelves, drawers, and trim in a variety of finishes.

And just in case you’re also in the market for a new closet system, you can get up to 25% off an Elfa custom closet during The Container Store’s annual Custom Closets sale going on through 10/11. ASK FOR BARB H. OF CLEVELAND! Haha, I’m sure all their closet designers are amazing, but Barb will always hold a special place in my heart. Barb, if you’re reading this, you’re the real MVP of this closet.

Alright, what’s next. I knew we were getting brass light fixtures in the closet, so I decided to keep the brass element going and sourced these adorable vintage brass drawer knobs from an Italian seller on Etsy called Troilo Art Vintage. When they came I thought I had made a huge mistake (I make several a day) because they were so tiny. But Mac said they looked good to him, and Em later reinforced this by commenting on how cute they were. They’re both right, they’re ridiculously charming, and I love the touch of vintage they bring into the space.


Onto more brass – a favorite topic of mine – let’s talk about the light fixtures. Both the ceiling and articulating sconce (with a clear dome shade) over the mirror are from Rejuvenation, one of my absolute favorite places to shop for lighting options.


You might think that having an articulating sconce over our mirror was a deliberate design decision. Ah, well . . . maybe I should let you keep thinking that, instead of revealing that it was a hail Mary attempt to disguise the fact that we installed the junction box off-center (per my design plans). And that it just happened to solve our problem perfectly. In fact, disregard everything I just said. I’m a professional designer, you should hire me, and I definitely won’t make you install an entire wall of kitchen cabinets over the course of two days only to realize that they all have to move over 1.5 inches (dad, I’m still really, REALLY sorry about that one in particular).
MOVING ON . . .
The light fixture over my little vanity area, on the other hand, is a custom piece from Lightwork Design Co., who I found on Etsy. I had seen a few sconce options that I liked, but nothing that I LOVED for this specific area. I wanted something special, with some vintage soul to it, but was having a hard time finding something that was actually vintage and hardwired. I reached out to Michael via Etsy, hoping he might have some more inventory, and he wrote back saying he could actually make me something custom. He sent me a few ideas, and this beautiful piece was born! It’s one of my favorite things in the closet, and I also love that it came out of a collaboration with another real human over the internet.
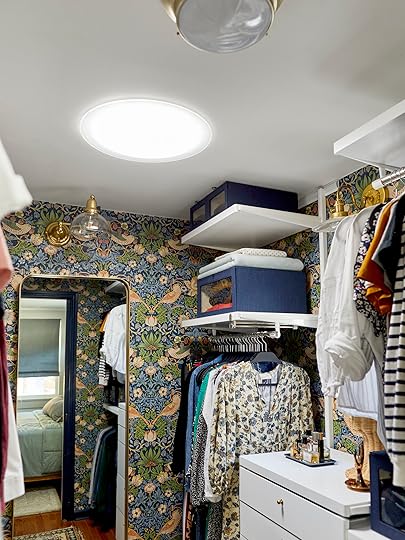
But we really don’t have to turn on the light very often in this closet. Why? Because between our window and our SUN TUNNEL, we’ve got all the daylight we need. YES, that is a Velux Sun Tunnel installed in our ceiling, and it’s another successful design idea I came up with. It’s like a skylight, but smaller, and tunnel-shaped, and came with two different diffuser options to control the amount of light the tunnel lets in. It brings in so much beautiful, natural sunlight into what would otherwise be a pretty dark closet.


And lastly, I found the perfect vintage rug at the Rose Bowl almost a year ago, with no idea where it was going to live. But now I know it was destined for this purpose. At least during this stage of its life. Who knows what amazing things it’s seen before living with me, and what it will see even after I’m gone. That’s one of the things I love about vintage items so much, their lives extend so much further than ours.

The closet turned out to be a little bit of a passion project for me, and I really feel like I found MY style and design voice pulling it together. I’m definitely going to be bringing more of this boldness into the other areas of the house I’m still working on. Every time I look in there, I still get giddy.

Thanks for hanging in for such a long post about such a small space! And a huge thank you to everyone who partnered with me on this little project, and the EHD team for all their opinions and support on this (and every) project I undertake. What’s up next for me? Maybe a sneak peek into my kitchen, or an office reveal. But I’ll have something good for y’all again real soon. Until then, xx.
**Design and Photos by Sara Ligorria-Tramp (hilariously, that’s me!)
The post Sara’s Closet Reveal – The Bold Design Moment She’s Been Craving appeared first on Emily Henderson.
Sara’s Primary Closet Reveal – The Bold Design Moment She’s Been Craving
Welcome back to another post here on Styled By Sara Tramp. Might as well change the name, since this is my THIRD time on the blog this week. Didn’t I stop working here at the end of August? I am, OF COURSE, joking. I just happened to be working on three different posts that all coincidentally went up this week for various different reasons. I also love being here, getting to text Jess daily, and really just pretending I’m still a full-blown EHD team member.
Today, for your eyeball’s pleasure, I’m serving up my primary closet reveal. But first, as always, let’s trip down memory lane.
Here are the floor plan I always come back to, because it really clearly illustrates the changes we made to the house. As you can see, originally the area that is now the primary closet was just a pass-through room. It’s likely where the previous owner put their washer and dryer, and it’s where the entrance to the primary bathroom was located. It was also the only way to enter the primary bedroom. But you had to walk through the kitchen to get there, which felt a little weird.
We actually never spent a single night in the back part of the house before it was renovated. As soon as we bought the house we started in on demo, and the back half of the house was gutted. Early on in the reno process, I knew I wanted to figure out a better floor plan for the back part of the house. And that included turning this awkward space into the primary closet.
Originally the closet for the primary bedroom was a box, built into the back corner of the room. We got rid of that, put the entrance to the bedroom where the closet once was, and closed off the access from the kitchen into the bedroom.
And here’s what that awkward little room looks like now . . .
*Excited squawking noises* It’s my first every walk-in closet, and it feels like SUCH a luxury. A real dream come true, to have a closet I can stand in instead of stare at. There are so many exciting parts to this teeny tiny space, I don’t know where to start.
I feel like the very first thing that’s going to catch everyone’s eye is the wallpaper. I knew I wanted to wallpaper this whole room, but was originally planning on leaning a little more neutral. After showing my initial wallpaper choices to the EHD team though, they all convinced me to go BOLDER. So, I revamped my choices and finally decided to go with Morris & Co.’s “Strawberry Thief” because it felt whimsical, bold, and still true to the Craftsman roots of the house. It’s probably the best decision I’ve ever made, in the history of our home. Maybe better than opening up the living and room and dining room by knocking down the partition wall. Maybe even better than painting the TV room dark. I HAVE SO MANY GOOD IDEAS (and twice as many bad ones).
Now our walls are covered with sweet little birds, stealing strawberries, and beautiful florals. Fun story – I originally wanted to wallpaper this room floor. To. Ceiling. But I didn’t consult Julie or Mark (our wallpaper installer) before ordering the paper. So when Mark arrived he was like “I think we’ll barely be able to cover it all, but we’ll make it”, to which I replied “oh GOOD! I’m most excited about the ceiling!” Cue the blank stare he proceeded to give me. I then had to decide really quickly whether I wanted him to install the paper sans ceiling, or have him come back several weeks later once I’d ordered more. I’m impatient, and the moral of this story is to measure once and then always have someone else double-check your measurements because you likely have no idea what you’re doing.
In retrospect, I’m actually really happy we didn’t do the ceiling. I’m sure it would have been really fun, but the white actually keeps the space from feeling chaotic, and ties in our white closet system to the design (which I’ll get to in a minute).
Now, we just happened to be painting the front guest room/office at the same time as we were installing the closet, and I just happened to realize that the color we were using on the walls in the office was a perfect complement to the colors in the wallpaper. So we used the leftover paint on the trim in the closet. And I felt like a genius. Still do, if I’m being honest. The color is called Goodnight Mood, and it’s from Clare Paint. If you think it looks good in here, just wait until you see it up on an entire wall. It’s a dream!
HOT TIP: Paint your baseboards and trim BEFORE you wallpaper. I don’t know why this didn’t occur to me, but it left me hand-painting all the baseboard and trim by hand, without tape, for fear of damaging the wallpaper. It took FOREVER, but I did develop a very steady hand.
Ok, let’s talk about the other elephant in this room – the closet system.
We partnered with The Container Store Custom Closets for this space, and let me tell you, the process was AMAZING. Truly. Even if they didn’t partner with me on this project, I would still say the same thing.
I have one word for you – Barb.
Instead of designing the closet myself, we used The Container Store’s in-home virtual design service, which paired us with Barb, who is possibly the best closet designer in all of Cleveland. Possibly in the whole world. Trust me, it’s not easy to figure out how to use pre-made systems in custom spaces. I had tried to do it previously using a different closet system, and spent many frustrated hours pulling my hair out. It took Barb all of about 45 minutes, via a Zoom call with both Mac and I, to create our dream closet. And because she knew what she was doing, I knew that it was going to work. She screen-shared with us, and I watched her build our closet in real-time, taking into consideration all our different needs.
THANK YOU BARB. Next, we got the final design emailed to us, ordered all the pieces, and scheduled an installer through The Container Store. All the closet pieces were delivered the day before install to our home, and then our installer showed up (wearing a mask, of course), and had our closet up and running in about 4 hours. It would have taken us at least twice that to install it ourselves, and likely would not be nearly as secure.
And now that we’re living with the closet, I just want to thank Barb one more time, because this closet is SO functional. It’s got taller hanging storage for Mac, a section of full-length hanging for my dresses, just enough shoe storage, and Barb was even able to design something that included my custom vanity area idea! For my perfumes!
I also now have a valet rod – A really functional little contraption I never knew I needed, but use to put together outfits, pull things for packing, and steam clothing.
The Container Store has four custom closet lines that way you can choose one that fits any size space, style, or budget. The particular line I used is called Elfa Décor, which is a step up from their most basic closet system. This is still a closet, so function was first and foremost for us. Luckily, the Elfa Décor line has all the functionality of the Elfa Classic line, but with the beauty of wood and deluxe options including real wood shelves, drawers, and trim in a variety of finishes.
And just in case you’re also in the market for a new closet system, you can get up to 25% off an Elfa custom closet during The Container Store’s annual Custom Closets sale going on through 10/11. ASK FOR BARB H. OF CLEVELAND! Haha, I’m sure all their closet designers are amazing, but Barb will always hold a special place in my heart. Barb, if you’re reading this, you’re the real MVP of this closet.
Alright, what’s next. I knew we were getting brass light fixtures in the closet, so I decided to keep the brass element going and sourced these adorable vintage brass drawer knobs from an Italian seller on Etsy called Troilo Art Vintage. When they came I thought I had made a huge mistake (I make several a day) because they were so tiny. But Mac said they looked good to him, and Em later reinforced this by commenting on how cute they were. They’re both right, they’re ridiculously charming, and I love the touch of vintage they bring into the space.
Onto more brass – a favorite topic of mine – let’s talk about the light fixtures. Both the ceiling and articulating sconce (with a clear dome shade) over the mirror are from Rejuvenation, one of my absolute favorite places to shop for lighting options.
You might think that having an articulating sconce over our mirror was a deliberate design decision. Ah, well . . . maybe I should let you keep thinking that, instead of revealing that it was a hail Mary attempt to disguise the fact that we installed the junction box off-center (per my design plans). And that it just happened to solve our problem perfectly. In fact, disregard everything I just said. I’m a professional designer, you should hire me, and I definitely won’t make you install an entire wall of kitchen cabinets over the course of two days only to realize that they all have to move over 1.5 inches (dad, I’m still really, REALLY sorry about that one in particular).
MOVING ON . . .
The light fixture over my little vanity area, on the other hand, is a custom piece from Lightwork Design Co., who I found on Etsy. I had seen a few sconce options that I liked, but nothing that I LOVED for this specific area. I wanted something special, with some vintage soul to it, but was having a hard time finding something that was actually vintage and hardwired. I reached out to Michael via Etsy, hoping he might have some more inventory, and he wrote back saying he could actually make me something custom. He sent me a few ideas, and this beautiful piece was born! It’s one of my favorite things in the closet, and I also love that it came out of a collaboration with another real human over the internet.
But we really don’t have to turn on the light very often in this closet. Why? Because between our window and our SUN TUNNEL, we’ve got all the daylight we need. YES, that is a Velux Sun Tunnel installed in our ceiling, and it’s another successful design idea I came up with. It’s like a skylight, but smaller, and tunnel-shaped, and came with two different diffuser options to control the amount of light the tunnel lets in. It brings in so much beautiful, natural sunlight into what would otherwise be a pretty dark closet.
And lastly, I found the perfect vintage rug at the Rose Bowl almost a year ago, with no idea where it was going to live. But now I know it was destined for this purpose. At least during this stage of its life. Who knows what amazing things it’s seen before living with me, and what it will see even after I’m gone. That’s one of the things I love about vintage items so much, their lives extend so much further than ours.
The closet turned out to be a little bit of a passion project for me, and I really feel like I found MY style and design voice pulling it together. I’m definitely going to be bringing more of this boldness into the other areas of the house I’m still working on. Every time I look in there, I still get giddy.
Thanks for hanging in for such a long post about such a small space! And a huge thank you to everyone who partnered with me on this little project, and the EHD team for all their opinions and support on this (and every) project I undertake. What’s up next for me? Maybe a sneak peek into my kitchen, or an office reveal. But I’ll have something good for y’all again real soon. Until then, xx.
**Design and Photos by Sara Ligorria-Tramp (hilariously, that’s me!)
The post Sara’s Primary Closet Reveal – The Bold Design Moment She’s Been Craving appeared first on Emily Henderson.
October 7, 2020
My Spooky (And Super Simple) Kid-Approved Halloween Decor
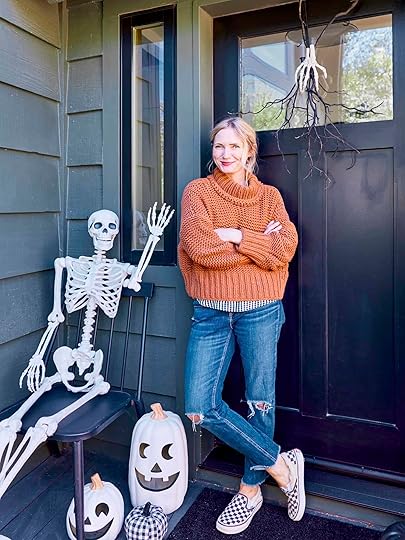
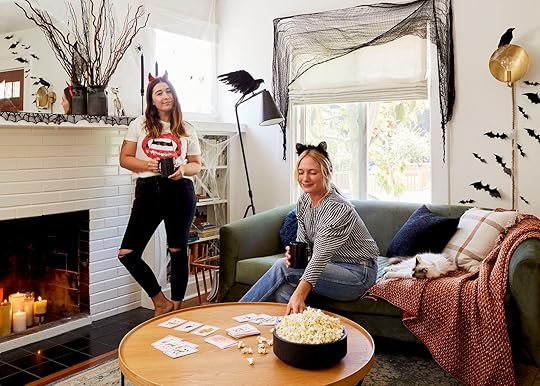
You know what is scarier than that 5′ spider? The “holiday extreme” version of me because I’m going to decorate for ANY holiday this year. This is only “stage one” because the month is long and I am desperate to stretch it all out and have any excuse to decorate, craft, and DIY with the kids and makeup/implement lots of new “seasonal rituals”. We really NEED the holidays this year and because we can’t celebrate them like we usually can with friends/kids, I feel excited to find new ways to make this feel special for all of us. If you are on the fence about doing these things early trust me that when we brought out our Halloween bins last week it really changed the energy in the house, in a really good way. Even Brian Henderson suggested starting early and was met with 3 enthusiastic YES’. And since it looked pretty dang cute (and the kids were so proud of their DIYS) Sara popped up and shot it with me (safely).
So this year for Halloween decorations we have a combination of using what we’ve already had for years, some super easy DIYs, and added a few new affordable pieces that had high impact (hello 5′ spider). Here we go.
We Kept It Neutral
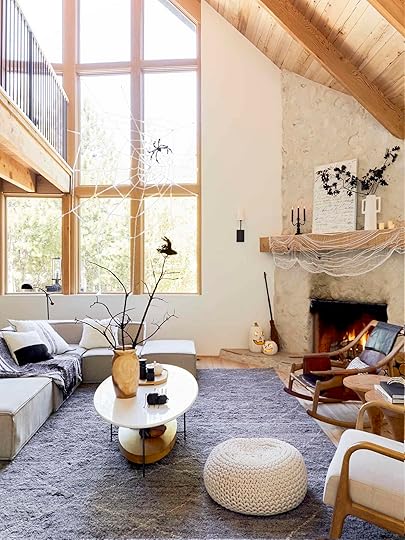
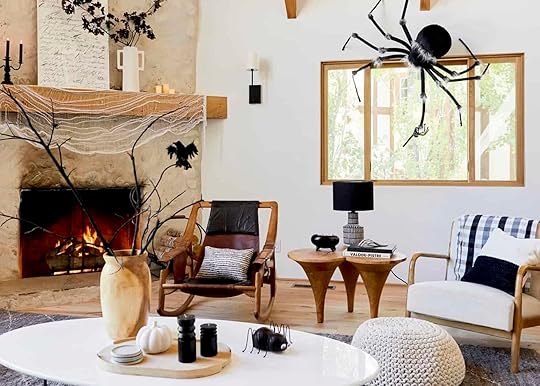
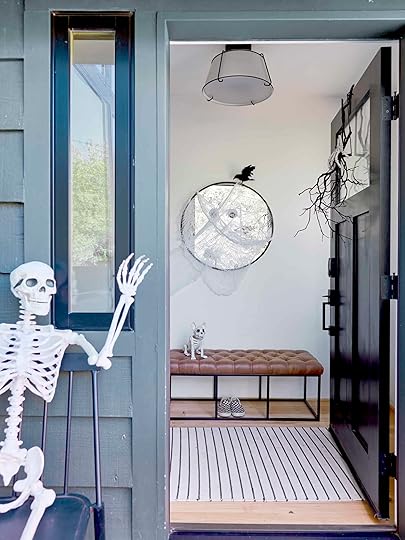
You might be like my daughter who innocently asked, “but mama where is the Halloween orange color?” and my answer felt as pretentious as it still does – I just wanted it to be more calm, tonal, and neutral. The truth is I live way better on a daily basis with less bright colors around, a truth that I’m not sure has only to do with this house, or me forever. I figure once we go get real pumpkins that should satisfy her traditional holiday values (layer 2, near the actual holiday). I brought in a lot of black (spiders, birds, branches) and white (webs and pumpkins) but since we were living with it for a month I didn’t want it to be a Halloween explosion because my “clutter body disorder” would rear its head (which can be VERY scary).
We used the white spider webs that we’ve had for years (but are still available) on the big A-frame windows (with clear command strips). It is so high impact (and covers such a large amount of real estate) for $10. Over the years we’ve figured out how to hang it the easiest, but I still miss Emily Bowser helping me do it.

It’s “Kid-Friendly Spooky” (But Not Scary)
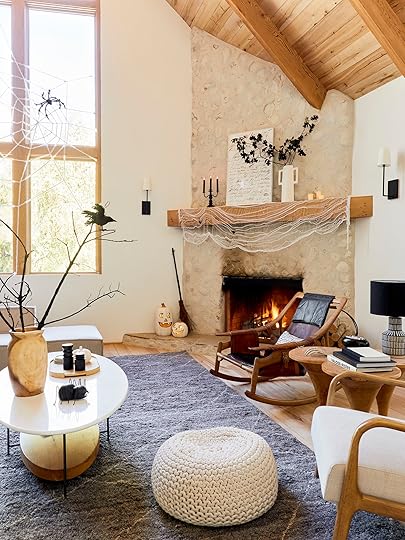
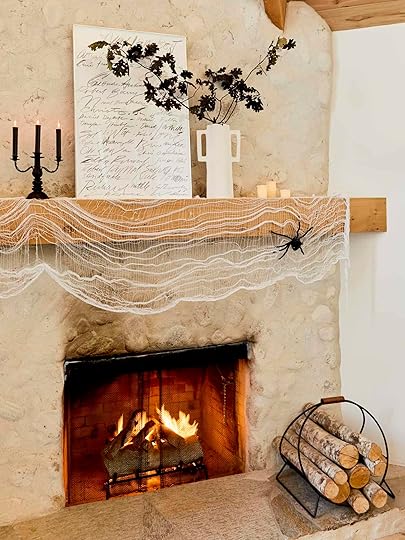
What does “kid-friendly spooky” mean? Well, it’s embracing spiders, ravens, skeletons, candles, and pumpkins, but not blood and gore and stuff that actually scares the crap out of them (mostly so they don’t wake us up with nightmares). The white fabric on the mantel is called “spooky fabric” and it does the trick pretty fast (for a party you could throw it over all furniture like a haunted house). We’ve had those light-up pumpkins for 4 years now and love bringing them out every year (and they are plug-in so you can leave them on without running out the battery). The glow at night is a great ambiance.
Birdie and I spray painted sticks for the coffee table and the mantel arrangements – SO EASY. If you wanted to go one extra step (or say if we were to have friends over for Halloween) I would put spiderwebs on the branches with spiders. But I felt that this was enough for now. I also spraypainted the broom black (it had cute autumnal tones on it, but I wanted it to be simpler).

Repeat Motifs (To Reduce The Chaos And Make It Easy On You)
As you can see almost everywhere there are spiders, webs (or fabric), skeletons, and black sticks. SO EASY, and everything thus far is really affordable.
Go For High Impact Pieces That SCREAM Halloween
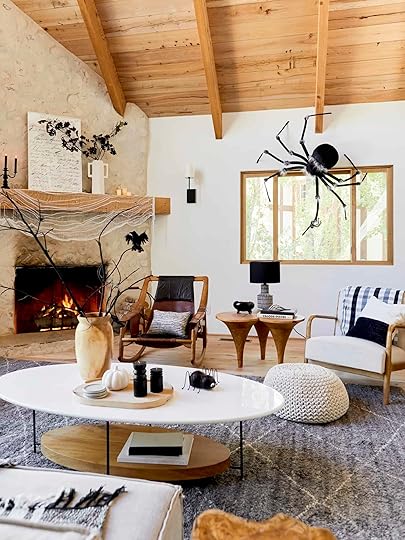
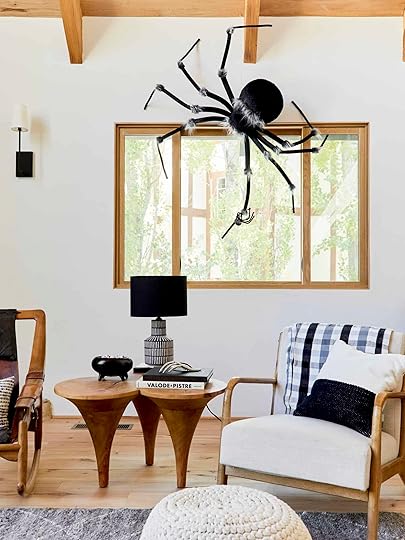
That huge spider is AMAZING. It wasn’t super cheap ($30) but it was so easy to hang (command strip and fishing line) and immediately gave it that graphic punch that the room needed. The big white web on the A-frame windows is great (but quiet) so I love how this spider acts like a huge Halloween sculpture on the wall (and I think it looks awesome breaking up a window or even art).
On the table, we have a footed black bowl (no longer available from West Elm) full of eyeball candies (of which the kids beg for all day every day and I’ve GOT to put them away) and a skeleton hand. And yah, I switched out some of the pillows, books, and throws to be in our color theme.
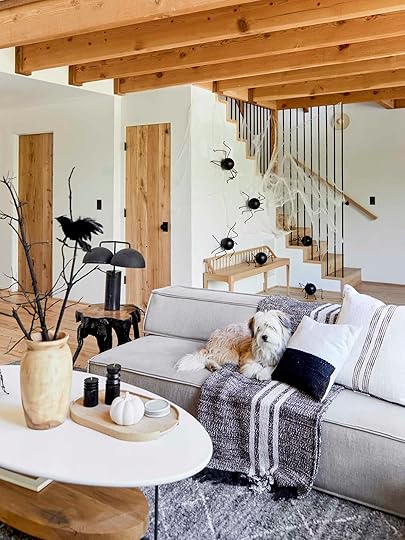
Easy And Fun DIY Spiders
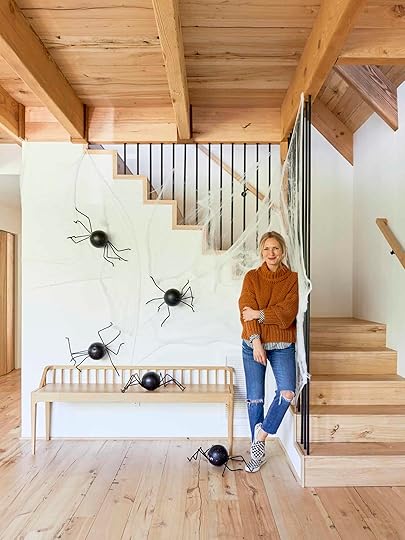
I saw these on the Pinterest and was like, “yah, those look easy” and they really were. The kids helped with them and all we had to do was paint our skeleton “Boris” (my friend’s french bulldog) which I find hilarious that he’s waiting at the door so patiently and to finish off, covered the mirror in spooky fabric, a bird and some large googly eyes. Again, if you want to amp it up throw some web on the stick, but once I took in the full room I just felt like the spooky stick was enough (this is how I end up over decorating, by considering each vignette before the whole space).
It was pretty darn easy.
Hot Tip
Cover any mirror with spooky fabric or web - so easy and cheap and says Halloween immediately without adding barely any clutter.
INTRODUCING SKELLY
Skelly is saying hi so I guess we should introduce her.
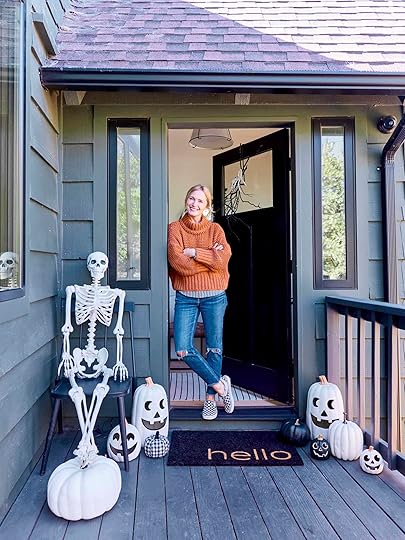
I decorated the front door with the rest of the pumpkins that I already had (that pumpkin “ottoman” is new) and made a hanging “wreath” out of sticks and another skeleton hand. I put Skelly on one of our outdoor chairs and I’m KICKING myself that I didn’t put a witches hat on her head or dress her up somehow AND I forgot to make her wave in this shot. It’s hard to be up in the mountains with less access to stuff (but it also makes me spend way less money and I do zero returns).
There she is. She is $40 at Target and well worth the splurge. I wanted to put her everywhere in the house (and she has been out since September 25th so she’s sat in a lot of chairs). Those pumpkins do light up but we didn’t have a black extension cord so I’m going to get one before Halloween.
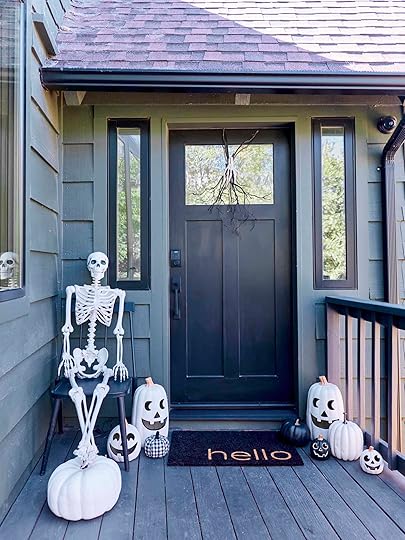
Again, I made that “wreath” from dead manzanita sticks, spray painted black tied with a black zip tie, and then added in the hand. We just hung it on our wreath hanger (but a command strip would work, too).
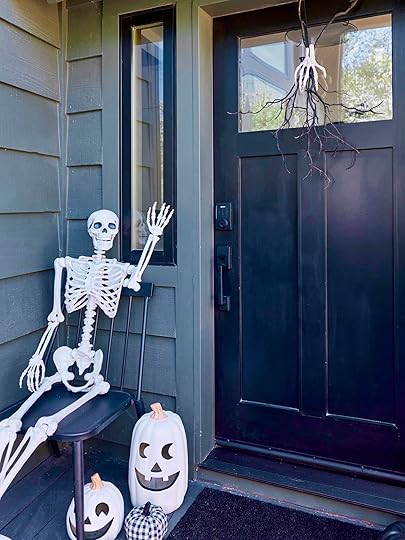
It’s only almost poked out Brian’s eyes like 4 times now, but he’s just got to learn to open the door wider
October 6, 2020
Sara’s Haunted (But Happy) Halloween House with Affordable New and Vintage Finds

Today, we have a VERY EXCITING special guest…that’s right folks,
SARA
IS BACK. AGAIN. She’s a die-hard Halloween lover, so we
partnered with eBay
and challenged her to deck her halls (too soon?) using a mix of vintage and affordable items. It’s been hard to get into the spooky spirit now that a lot of our traditional favorite fall activities are off-limits – so this year, consider skipping the scary, public, crowded haunted house and cozying up in your very own happy haunted house instead
October 5, 2020
The DIY Headboard You All Wanted To Know About
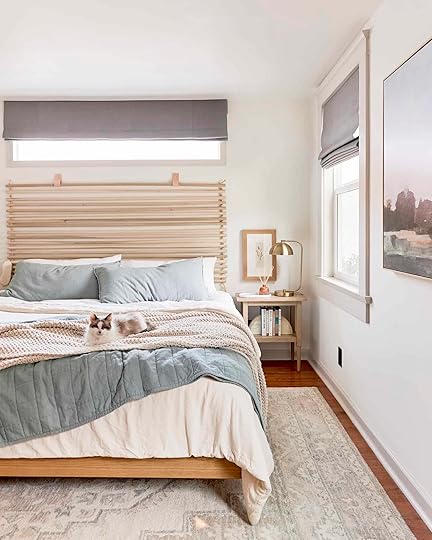
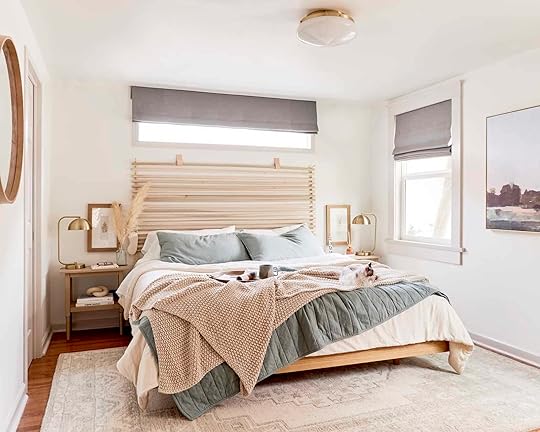
Y’all saw this bedroom story up on the blog a few days ago, and some of you were keen enough to notice that YES, that is my bedroom. A secret mini reveal if you will. In order to keep sets safe, we’ve really scaled back on crew and locations. So when it came time to shoot Target’s new Casaluna bedding we decided a safe option would be using my practically empty bedroom as the location, and we kept the crew down to just Emily Bowser and myself (with Em checking in virtually and then popping by on the day of the actual shoot for a bit).
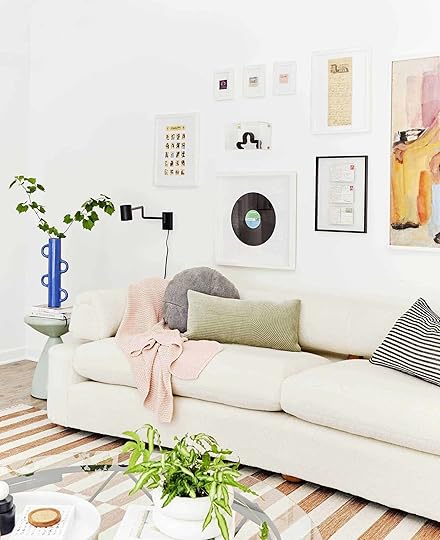
When it comes to building room sets that no one will actually live in, this wasn’t our first rodeo. One thing that we’ve found that makes these sets feel more unique, when there’s a lack of personal propping, is a good DIY. Take the DIY canopy idea from this bedroom story, or the ultra-cool gallery wall from this staged living room as examples (both of which were concepted and executed by Bowser and Julie).
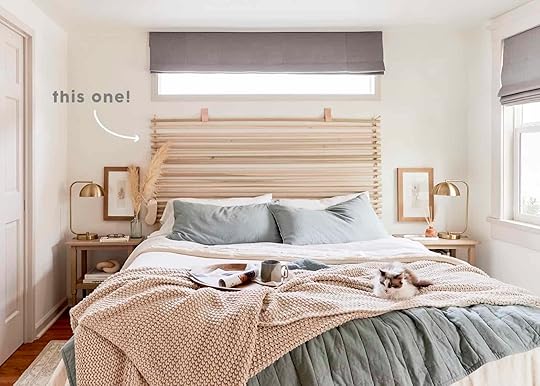
When we started brainstorming how to bring in some character to my blank slate of a bedroom, while keeping the styling minimal and bedding focused, we decided a simple DIY headboard would be the best option.
The room was already painted Sherwin William’s Greek Villa with Sherwin William’s Heron Plume as the trim, and already had these amazing stone-colored, blackout roman shades from Decorview installed (which look so pretty as a tone on tone with the painted window trim). Otherwise, we had very little going on in terms of design.
Hemp Sheet Set | Linen Shams | Comforter | Quilt | Throw | Side Table | Table Lamp | Tray | Reed Diffuser | Botanical Art | Bookends | Rug | Bed Frame
To start, in order to keep the story bedding focused, we decided that we need to opt for a bed frame that didn’t come with a built-in headboard. That way we could easily take headboard-less photos to pass along to our client, Target, for their use.
Our existing bed had a huge, solid wood headboard, so for the shoot we were going to have to swap it out. I saw this as an opportunity to accomplish a dream I’d had ever since upgrading to a queen bed . . . upgrading to a KING BED. My parents always had a California King bed, and we’d all pile in there to read, cuddle, and sleep when we were little. I have such good memories of growing up like that and knew that eventually, we’d want a king bed for our family too.
Mirror | Vase | Knot Object | Flushmount | Roman Shades | Wall Paint | Trim Paint
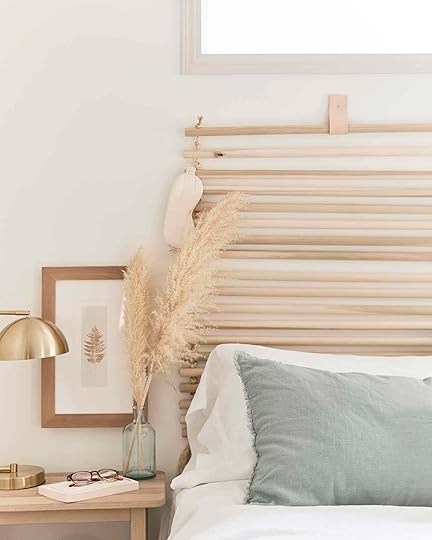
Enter Article’s Basi bed frame in Oak – a super clean, minimal, and headboard-less bed frame. I had actually originally ordered the bed frame in the darker Walnut color, but had to pivot due to shipping lead times. The lighter Oak color ended up working even better and turned out to be the perfect match for the pine headboard we made. Article actually has separate headboards your can order to go along with this bed frame, but buying a headboard-less frame allows you more creativity and customization with the headboard.
A bigger bed frame meant we needed a bigger mattress. After laying on both Julie and Bowser’s Tuft & Needle mattresses while shooting their bedrooms, I knew that when Mac and I DID eventually upgrade from a queen bed to a king bed, we wanted one of those mattresses to sleep on. Months ago Mac and I had gone to the Tuft & Needle store at the Americana in Glendale and tried out all the different kinds, settling on their Hybrid mattress. It’s both supportive, and soft, and absorbs my constant moving so much better than our old Ikea mattress.

AND NOW WE FINALLY HAVE A KING BED. It’s a luxury for sure, but one that 6’1″ Mac, our two cats who sleep with us every night but refuse to touch each other, and myself who likes to move A LOT in order to get comfortable each night, all really appreciate. And we were able to pass along our queen bed frame and mattress to my brother, Shade, who had just recently moved into his own apartment and, at 26, was ready for something bigger than a twin.
That was a really long tangent, but one that I was passionate about, haha. BACK TO THE HEADBOARD.
I originally sent Bowser a few different DIY ideas for cane headboards (like this one). But she did me one better and modified a concept for a DIY dowel headboard. Her inspiration came from a DIY wood dowel floor mat for a mudroom. We figured out all the measurements on the first day of install, had Shade do all the dowel prep, and then we put the rest of it together in an hour on the second day of install.
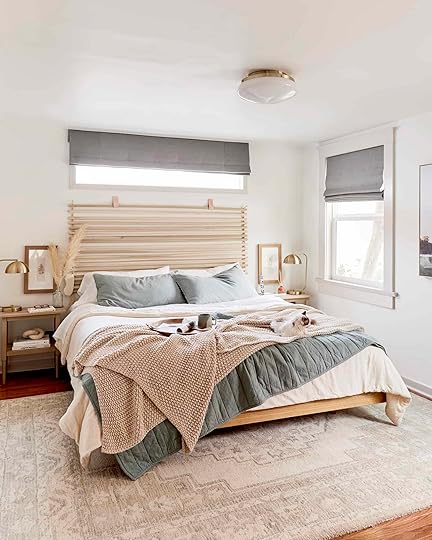
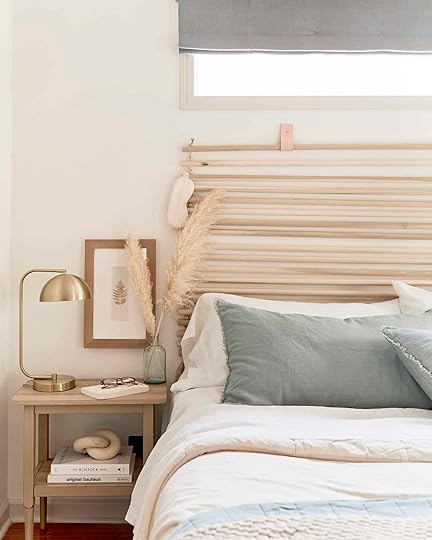
The end result? A super unique, beautiful, and customizable headboard that we still have up in our bedroom right now.
WHAT YOU’LL NEED:
15-20, 1″ diameter Wood Dowels A saw of some sort to cut your dowels to sizeAccess to a press drillRope or leather to hang the dowels fromLeather strapsLeather punchNails (preferably gold or brass)
DIY WOOD DOWEL HEADBOARD
Ok, now for the part you really came for, the step-by-step how-to for this DIY wood dowel headboard.
STEP ONE: MEASURE FOR YOUR DOWELS
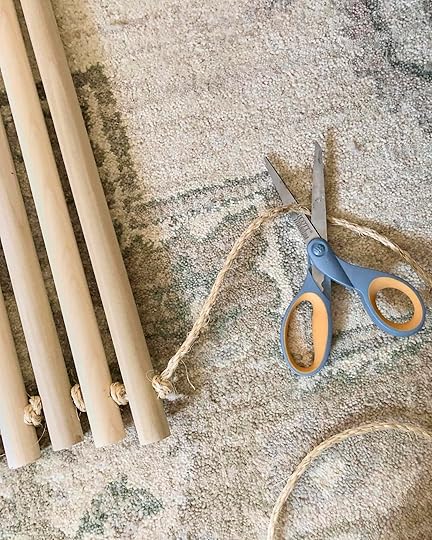
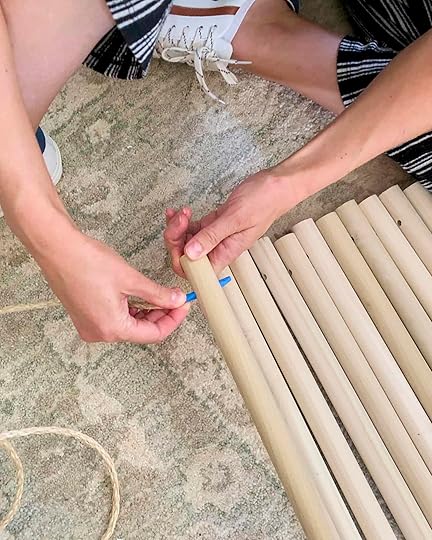
For our headboard, we used 1″ diameter round dowels. At the Home Depot., where Shade shopped for dowels the longest size they came in was 10ft. We wanted the headboard to be just a little bigger than the bed frame (which is 79 inches wide), so we bought nineteen 10ft (120 inches) dowels and cut them down to 81 inches. You can use a hand saw, a table saw, or like Shade, improvise and use a tile saw, because he didn’t have anything else on hand. They may even cut the dowels for you at Home Depot.
STEP TWO: DRILL HOLES IN YOUR DOWELS
Shade then used a press drill to drill holes in either end of the dowels, 1.5″ in from the ends. Make sure that your holes face the same direction since you’ll be stringing them from ropes on either end. It would be a bummer to have one hole on the dowel drilled vertically, while the hole on the other end was drilled horizontally. This was something Bowser and I didn’t consider, but luckily Shade did.
STEP THREE: SAND YOUR DOWELS

Cutting them and drilling into them will create little splinters all along your dowels. Smooth these out by quickly running a piece of fine grit sandpaper over them.
STEP FOUR (OPTIONAL): STAIN, OIL, OR PAINT YOUR DOWELS
We choose to keep our dowels as-is, in the natural pine color and finish that they came in. But staining them a darker walnut color, oiling them, or painting them is definitely an easy way to customize the headboard to whatever style you want for your bedroom.
STEP FIVE: STRING TOGETHER YOUR DOWELS

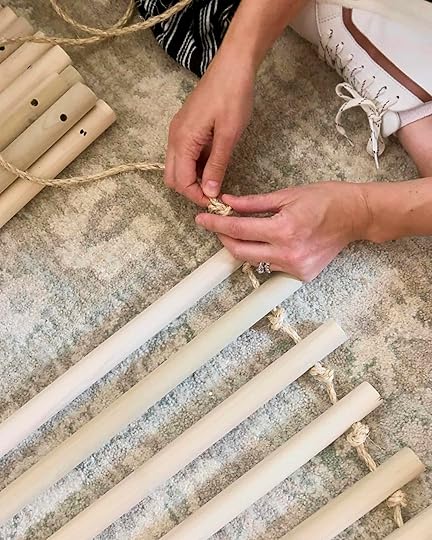
This is another step where you can customize your headboard. We choose to use a rough sisal rope to tie together all our dowels. But you could go with a smoother hemp rope, a white cotton cord, or even a leather rope.

Bowser strung together the dowels one side at a time, using a little piece of cut rope to measure how far between each dowel she tied a new knot, so that it was roughly the same each time. She left a long tail at the end of the bottom dowel that we frayed, aesthetically of course.
Hot Tip
If your rope is unruly, you can tape the end of it to make it easier to get through the holes of your dowels.
STEP SIX: MAKE YOUR LEATHER STRAPS
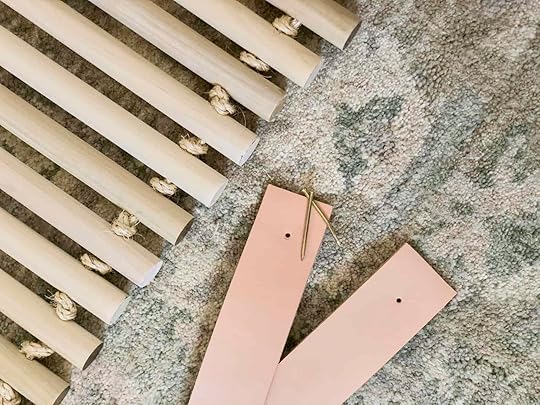
First I’ll say that this headboard did get HEAVY. You don’t think wood dowels are gonna add up, but they do. So we used a stud finder to figure out where the studs were in the wall behind the bed, so we wouldn’t have to use drywall anchors. Once we figure out there were just two, we decided on having two leather straps to hold up the headboard, which we’d nail directly into the studs.
Bowser cut two pieces of leather strap she had from a leftover project, folded them over to create a loop, and using a leather hole punch she pierced holes into both of them for the nail to pass through.
STEP SEVEN: HANG YOUR HEADBOARD
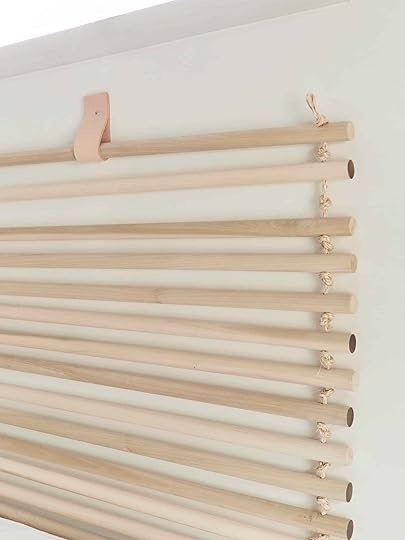
This part is a two-person job. Measure where you want your straps nailed in and put those penciled dots up on the wall. Then, have one person hold up the headboard, while the other person loops the leather straps around the top dowel, passes the nail through the holes, and hammers the strap into the wall.
Then gently let your headboard hang to see where it needs to be adjusted or supported. You should be able to slide your headboard around on the leather straps, once they’re nailed in, to get it perfectly centered.
We also found that the headboard was putting a lot of strain on the top dowel, so we hammered in a small gold nail behind a rope knot on either side of the headboard a few dowels down and let a lower dowel rest on the nails to help take some of the strain off the top dowel.

AND THAT’S IT! All in all the headboard cost us about $120, most of that being the wood dowels, and took about 3 hours start to finish. Bowser is super tempted to start taking orders for these, because it turned out so well, and if I didn’t already have an original Bowser headboard I would be her first customer. Also, do you remember the one she made for her primary bedroom????
If anyone makes a dowel headboard of their own don’t forget to tag us (my Instagram, Bowser’s Instagram) so we can see!
**Photos by Sara Ligorria-Tramp (ME!) | Styled by Emily Bowser
The post The DIY Headboard You All Wanted To Know About appeared first on Emily Henderson.
October 4, 2020
The Link Up: Emily’s Recent Art Find, Mallory’s $18 Shorts, & Vintage Floor Lamp Dupes We’re Obsessing Over
Somehow, someway it’s officially spooky season, which sort of makes sense considering this year is getting spookier by the second. Needless to say, we could all use some fun shopping links, house tours, and life hacks. So let’s get right into it…
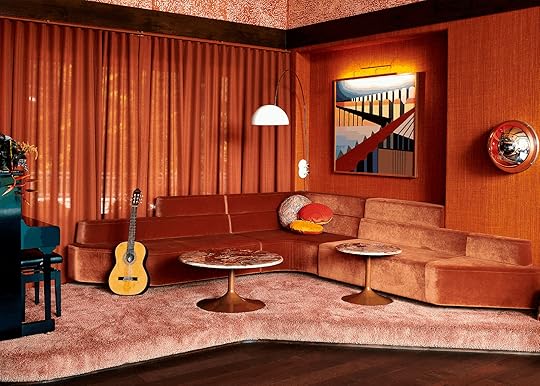
This week’s house tour come is the home of Jaime Schmidt and comes to us from Lonny Mag. It’s the sassiest, moodiest dream house ever. We think we could all use more rust orange on rust orange in our lives. Prepare to be swept off your feet by clicking here.
From Emily: While I typically don’t go for big box store art (some are good, don’t get me wrong, I just love supporting artists directly). If I had seen this painting at a vintage store or boutique I would have bought it. I also think its a pretty great one to DIY (not to rip off CB2, but your own spin on it could create something more unique)
From Jess: I NEED YOUR HELP! This past weekend I went into my dad’s storage unit and grabbed most of our family photos (we have sooooooo many). I really want to digitize them because first, I want to be able to actually share them with my family instead of them sitting boxed up (maybe even create some beautiful books) and secondly, I want to have an extra copy in case of a disaster or accident which seem more likely by each passing day. So my question to all of you is if you have used a service like Legacy Box? My fear is to send them away because no amount of insurance will cover the loss of those irreplaceable items. Or have any of you done this a different way that you really loved?? I would really appreciate any and all advice!
Also From Jess: One of our favorite textile designers, Rebecca Atwood, just came out with some beautiful new fabrics! The Briar collection is even a performance fabric. I know! However, I think my favorite new design is the Blocks pattern… but can’t decide on my favorite color. What’s yours??
From Caitlin: A couple of years ago, my godmother showed me how she reheats leftover pizza in a pan (instead of a microwave) and WOW, it’s been a game-changer. If you’re also at the “my meal prep plan has shifted to me ordering a pizza that will last 3-4 days” stage of desperation and ennui brought on by the state of the world, here are some explicit instructions from a real chef so that you, too, can have delightful leftovers.
Also From Caitlin: IT’S BOOT SZN. (At least, that’s what I’ve heard? What is it like to live somewhere that’s not 90 degrees in October?) Last year, I grabbed these black heeled boots and wore them non-stop. They are so comfortable and warm and flattering! I actually even wore them while trekking around Quebec for a few days last winter during an actual snowstorm (and they cleaned up like a dream after being exposed to all that salt and slush). ANYWAY, they just released the same boot in brown and I’m very excited about it!!! (For what it’s worth, I do already own these Chelsea boots in brown and love them, but I do just prefer the shape of the aforementioned boots with my calves and ankles.)
From Mallory: I’ve only half moved on to the “wearing normal clothes thing” meaning that 50% of the time I’m wearing dresses, jean shorts, or skirts and the other 50% is workout comfies. With this crazy October heatwave here in LA (cough*global warming*cough), I’ve needed less leggings and more workout shorts. I stumbled upon these $18 beauties at Target and threw them in my cart (a ballsy choice since dressing rooms are still closed and I didn’t try them on). I’m happy to confirm that they fit VERY WELL and are mega comfy. I got them in this cute lil dusty purple color, but may go back for the red, black, and or grey. 10/10
From Ryann: After seeing this home tour on IG, and spotting this perfect Caprani floor lamp that I am convinced would be perfect in my home, I’ve been chaotically searching for a cheaper dupe. I like this one from Anthro, and the shape of this one from Urban is really good and could be improved with a simple switch of the lampshade. I am close to just flipping a coin at this point so does anyone want to weigh in??? Your considerations would be much appreciated to this indecisive Gemini.
That’s all we have for you for this week. Enjoy the rest of your weekend & we’ll see you in the comments xx
Opening Image Credits: Home of Jaime Schmidt | Design by Osmose Design | Photography by Dina Avila | via Lonny Mag
The post The Link Up: Emily’s Recent Art Find, Mallory’s $18 Shorts, & Vintage Floor Lamp Dupes We’re Obsessing Over appeared first on Emily Henderson.
The Link Up 10/2/20: Emily’s Favorite CB2 Art, Mallory’s $18 Shorts, & Vintage Floor Lamp Dupes We’re Obsessing Over
Somehow someway it’s officially spooky season, which sort of makes sense considering this year is getting spookier by the second. Needless to say, we could all use some fun shopping links, house tours, and life hacks. So let’s get right into it…
This week’s house tour come is the home of Jaime Schmidt and comes to us from Lonny Mag. It’s the sassiest, moodiest dream house ever. We think we could all use more rust orange on rust orange in our lives. Prepare to be swept off your feet by clicking here.
From Emily: While I typically don’t go for big box store art (some are good, don’t get me wrong, I just love supporting artists directly). If I had seen this painting at a vintage store or boutique I would have bought it. I also think its a pretty great one to DIY (not to rip off CB2, but your own spin on it could create something more unique)
From Jess: I NEED YOUR HELP! This past weekend I went into my dad’s storage unit and grabbed most of our family photos (we have sooooooo many). I really want to digitize them because first, I want to be able to actually share them with my family instead of them sitting boxed up (maybe even create some beautiful books) and secondly, I want to have an extra copy in case of a disaster or accident which seem more likely by each passing day. So my question to all of you is if you have used a service like Legacy Box? My fear is to send them away because no amount of insurance will cover the loss of those irreplaceable items. Or have any of you done this a different way that you really loved?? I would really appreciate any and all advice!
Also From Jess: One of our favorite textile designers, Rebecca Atwood, just came out with some beautiful new fabrics! The Briar collection is even a performance fabric. I know! However, I think my favorite new design is the Blocks pattern… but can’t decide on my favorite color. What’s yours??
From Caitlin: A couple of years ago, my godmother showed me how she reheats leftover pizza in a pan (instead of a microwave) and WOW, it’s been a game-changer. If you’re also at the “my meal prep plan has shifted to me ordering a pizza that will last 3-4 days” stage of desperation and ennui brought on by the state of the world, here are some explicit instructions from a real chef so that you, too, can have delightful leftovers.
Also From Caitlin: IT’S BOOT SZN. (At least, that’s what I’ve heard? What is it like to live somewhere that’s not 90 degrees in October?) Last year, I grabbed these black heeled boots and wore them non-stop. They are so comfortable and warm and flattering! I actually even wore them while trekking around Quebec for a few days last winter during an actual snowstorm (and they cleaned up like a dream after being exposed to all that salt and slush). ANYWAY, they just released the same boot in brown and I’m very excited about it!!! (For what it’s worth, I do already own these Chelsea boots in brown and love them, but I do just prefer the shape of the aforementioned boots with my calves and ankles.)
From Mallory: I’ve only half moved on to the “wearing normal clothes thing” meaning that 50% of the time I’m wearing dresses, jean shorts, or skirts and the other 50% is workout comfies. With this crazy October heatwave here in LA (cough*global warming*cough), I’ve needed less leggings and more workout shorts. I stumbled upon these $18 beauties at Target and threw them in my cart (a ballsy choice since dressing rooms are still closed and I didn’t try them on). I’m happy to confirm that they fit VERY WELL and are mega comfy. I got them in this cute lil dusty purple color, but may go back for the red, black, and or grey. 10/10
From Ryann: After seeing this home tour on IG, and spotting this perfect Caprani floor lamp that I am convinced would be perfect in my home, I’ve been chaotically searching for a cheaper dupe. I like this one from Anthro, and the shape of this one from Urban is really good and could be improved with a simple switch of the lampshade. I am close to just flipping a coin at this point so does anyone want to weigh in??? Your considerations would be much appreciated to this indecisive Gemini.
That’s all we have for you for this week. Enjoy the rest of your weekend & we’ll see you in the comments xx
Opening Image Credits: Home of Jaime Schmidt | Design by Osmose Design | Photography by Dina Avila | via Lonny Mag
The post The Link Up 10/2/20: Emily’s Favorite CB2 Art, Mallory’s $18 Shorts, & Vintage Floor Lamp Dupes We’re Obsessing Over appeared first on Emily Henderson.
Emily Henderson's Blog

- Emily Henderson's profile
- 10 followers

