
Emily Henderson's Blog, page 175
March 31, 2021
HAVE YOU SEEN THIS?? The New Products Jess Can’t Keep To Herself Any Longer
Ok here’s the deal. I spend likely too much time “fantasy shopping”. I can’t help myself. I see a new line drop or a beautiful new item on Instagram and my adrenaline goes through the roof. It’s involuntary but also a deep passion. So since you all probably have better things to do with your time or you know, have self-control and not scour online shops daily, you might have missed some of the new things to hit the market recently. Fear not because I have no life and want to talk about beautiful new products ALL. DAY. LONG.
Originally this was supposed to be a small but fun post. Maybe 20 or so items that I was really lusting after. Well, my friends, let’s just say self-control isn’t my thing and there are more than 20 items I’ll be showing you today (and that’s not even including the new outdoor goods that popped up after Ryann did this post). I mean when it comes to decor I have a very hard time not wanting to celebrate all of the things I love. The libra in me simply can’t make a decision when needing to cull back products that deserve their time in the sun. I think ultimately you all benefit.
Now, this post isn’t meant to be a “BUY THIS! AND THIS! O AND DON’T FORGET THIS BEAUTY!” But if you are in need of a little decor shake-up or have searching high and low for the perfect “fill in the blank,” I want to show you how even swapping out (or adding) something to your home can really make everything feel brand spanking new.
Let’s start with the Portland Project Living Room by switching out the pedestal side table for fun.
Example One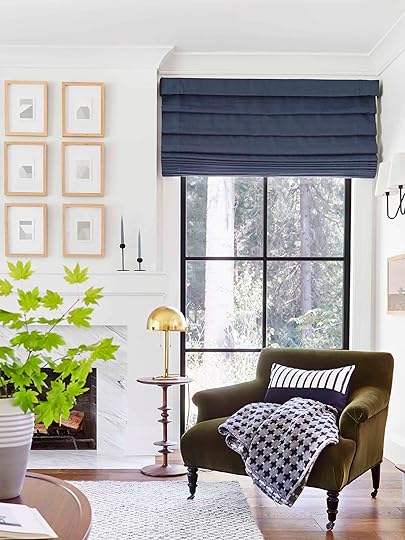
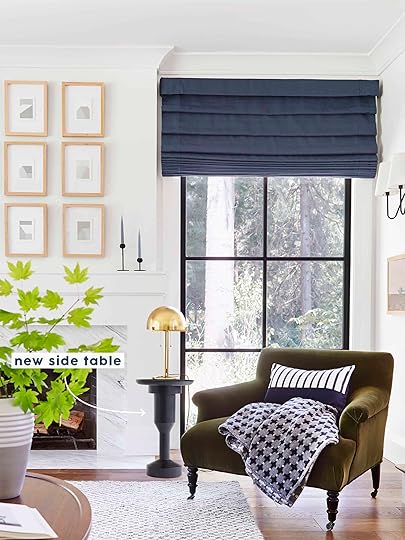 photo by sara ligorria-tramp | from: portland project living room reveal
First off the original side table on the left is still perfection. But let’s say we really wanted to “modern the joint up”. This graphic and bold table still has the same silhouette and natural wood material but gives off a much bigger edge and contrast to that beautiful vintage chair.
Example Two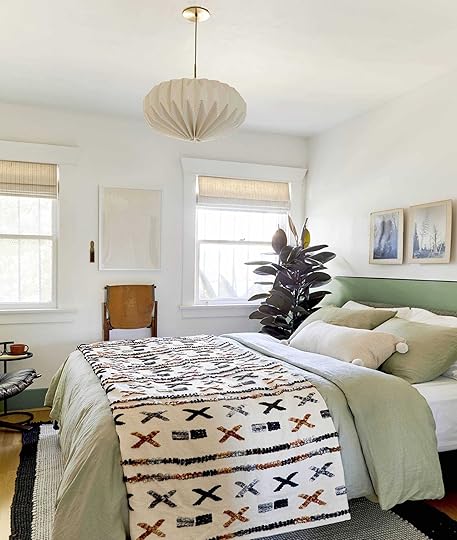
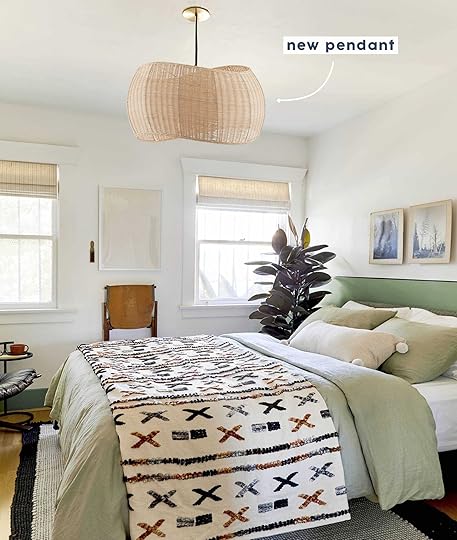 photo by sara ligorria-tramp | from: julie’s huge (and diy packed) bedroom upgrade
Again, Julie’s current pendant is perfect but trying out something new is fun! Both pendants are made with organic materials but the softness of the wicker one gives a totally different feel from the geometric one. (P.S. The scale of the mocked up example is likely off so make sure to measure for your own space:))
Example Three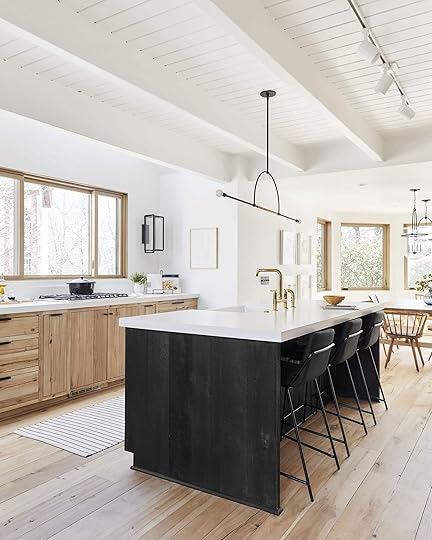
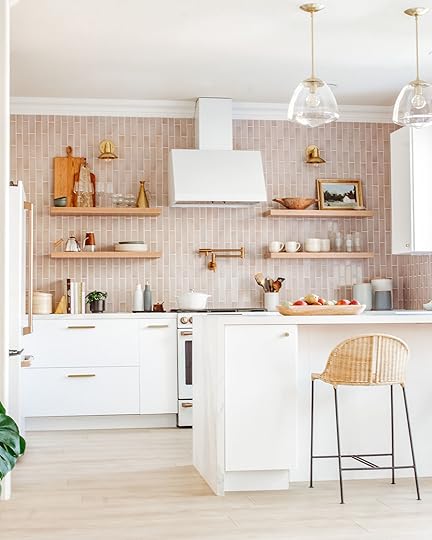
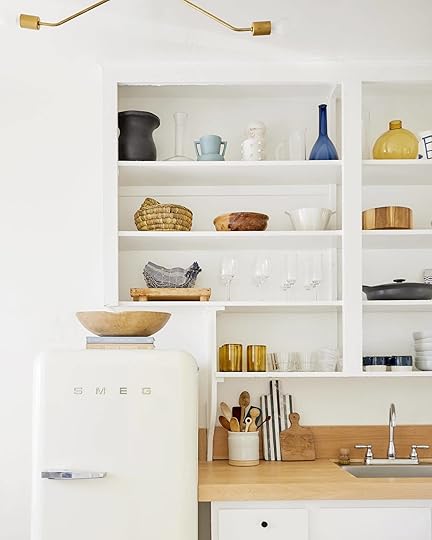
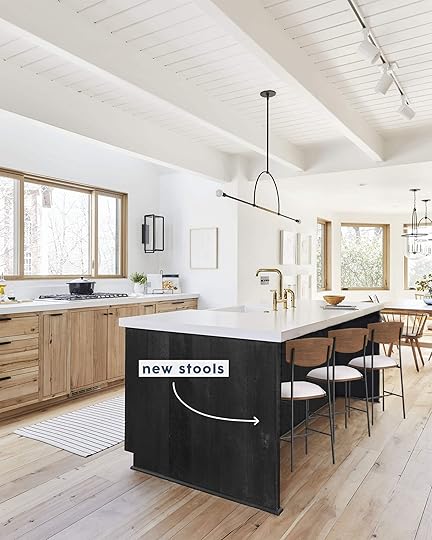 photo by sara ligorria-tramp | from: mountain house kitchen reveal
Ok, the photoshopped stools are NOT the right scale either but I do think it’s fun to see a totally different look (except for having backs… Emily Henderson is VERY pro backed stools for the comfort they provide). Also, these are from Target!
Example Four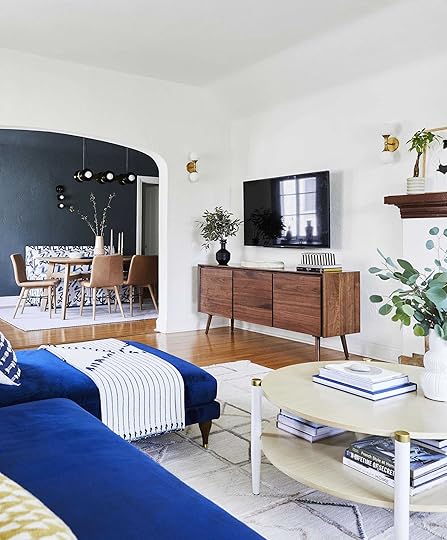
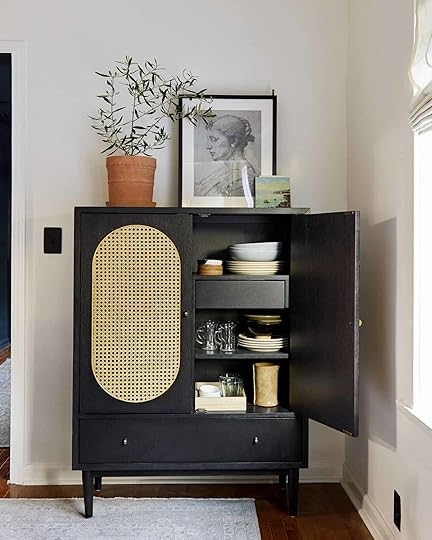
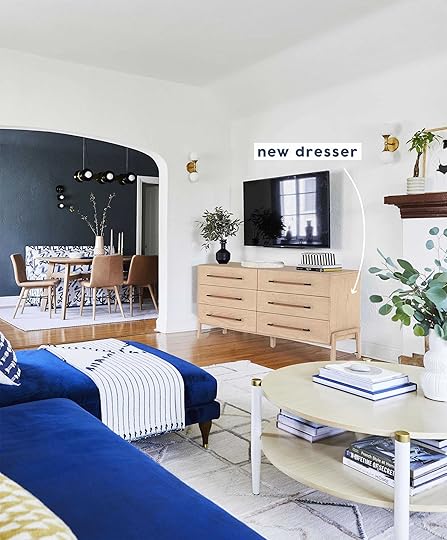 photo by sara ligorria-tramp | from: arlyn’s moody dining room reveal
Let’s mix up some wood tones! That Article sideboard is an EHD favorite but look at how different the room looks with a new and lighter wood tone in town. Both are so pretty (though a dresser as a media console would be tricky… but THOSE HANDLES!)
Example Five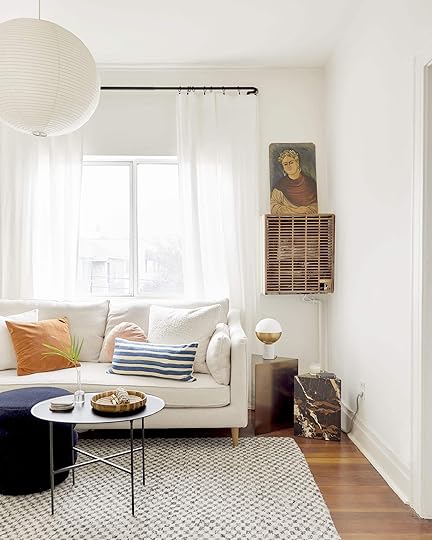
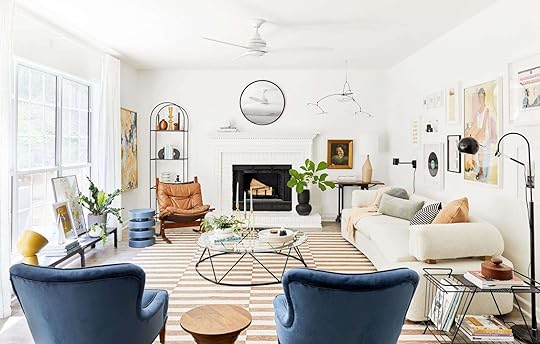
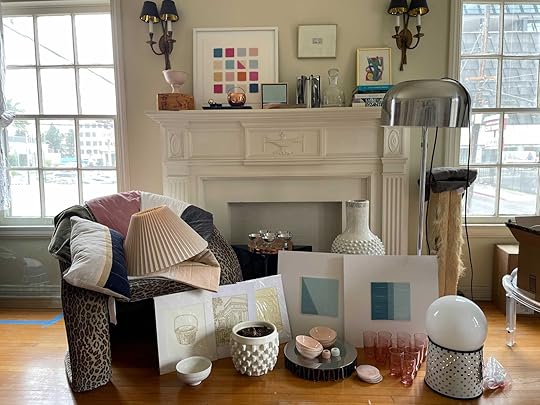
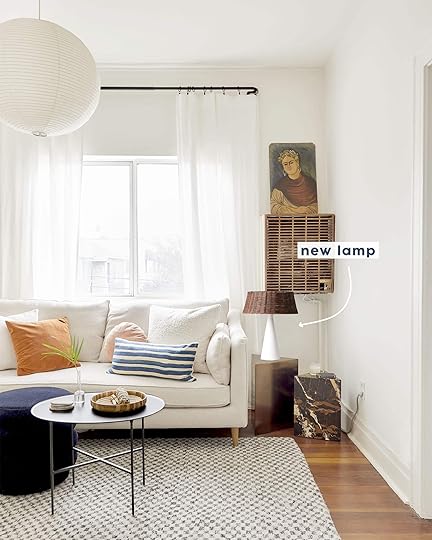 photo by sara ligorria-tramp | from: jess’ living room reveal
Last but not least we have my old living room. I love that little Target table lamp (no longer available) but throwing in that wicker shade BEAUTY gives a ton of texture to space that it didn’t have before. Both are great but I really like how the new one makes my eyes feel!
Hopefully, with these examples, you can see the value of switching out something (or moving it to another room) and how it can really inject new energy into your space if you want it. So I’ll stop gabbing and get to the real reason you all clicked in…THE PRETTY STUFF.
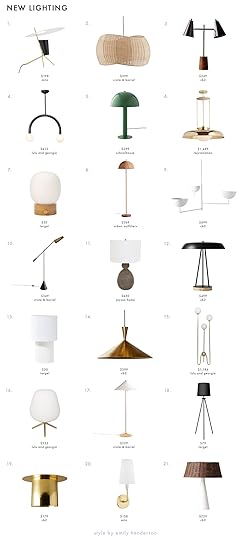
1. Kenly Table Lamp | 2. Althea Wicker Pendant | 3. Paul McCobb Table Lamp | 4. Happy Pendant Light | 5. Sidnie Lamp – Juniper | 6. 24″ Ormandy Rod Pendant | 7. Desk Lamp with USB Ports | 8. Willow Rattan Floor Lamp | 9. Verner 3-Tiered Pendant | 10. Rik Adjustable Floor Lamp | 11. Vita Lamp | 12. Paul McCobb Table Lamp | 13. Modern Metal Table Lamp | 14. Paul McCobb Pendant | 15. Illona Floor Lamp | 16. Ina Table Lamp | 17. Floor Lamp With Fluted Shade | 18. Tripod Floor Lamp | 19. Frasco Brass Flush Mount | 20. Janice Wall Sconce | 21. Palomino White Table Lamp
Lighting, lighting, lighting you are my favorite (as also proven in this post). I feel like there is something for everyone in this roundup! For the more natural lovers #2, #7, #8, #9, #11, and #21 are right up your alley. Actually, #7 is a pretty great affordable dupe for Em’s favorite table lamp. For the ultra-modern you have #4, #5, #13, and #19. And of course the vintage-inspired lovers (shout out to the CB2 and Paul McCobb collab!) there’s #1, #3, #12, #14, #15, and #17. Clearly, I love ALL of these lights and hope if you are looking there’s one that’s perfect for you:)
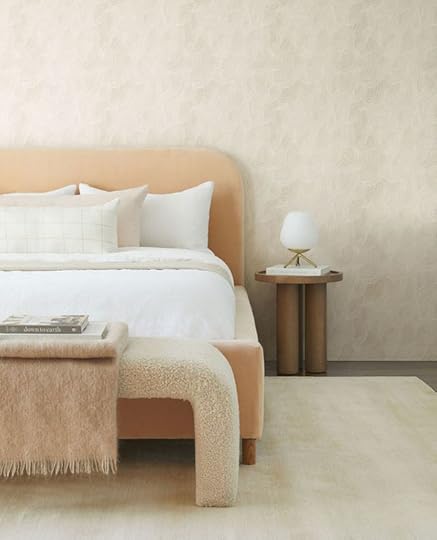
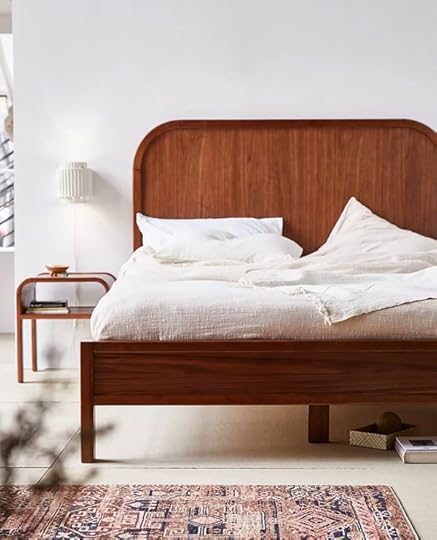 left: via lulu & georgia | right: via urban outfitters
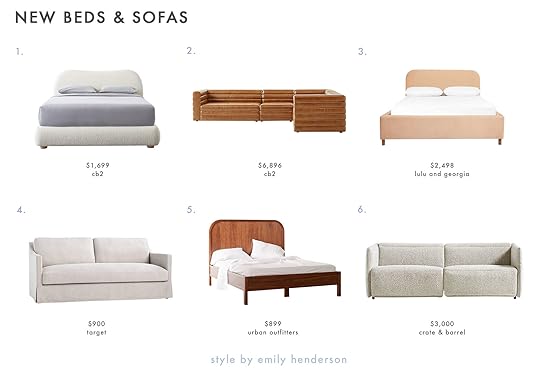
1. Diana White Queen Bed | 2. 4-Piece Leather Sectional | 3. Solene Platform Bed | 4. Studio McGee Upholstered Sofa | 5. Marienne Bed | 6. Leisure Power Recliner Sofa
I love all of these pieces (duh) but can we just take a moment to admire the beauty of that Target sofa. So chic! Also, #6 is a DOUBLE reclining sofa so yes, dreams do come true and that leather sofa is so freaking cool without being too loud. Then for the beds, they are all so special and so different. Which is your favorite??
 via crate and barrel
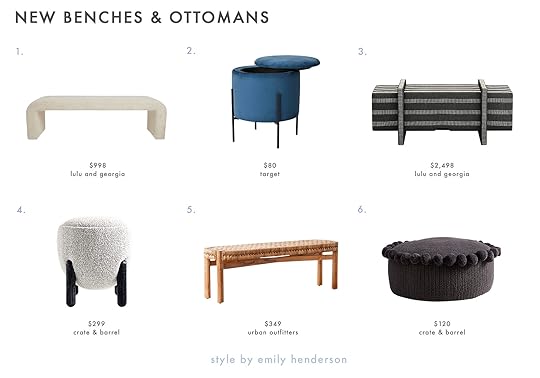
1. Tate Bench | 2. Stilted Storage Ottoman | 3. Escalante Storage Bench | 4. Borrego Small Round Ottoman | 5. Clara Entryway Bench | 6. Round Pom Pom Pouf
My top pick is #4 because while not inexpensive, it looks like it costs triple that. Everything from the fabric choice to the thickness of the legs is SO GOOD. But if storage is what you need, both #2 and #3 are awesome options. Then #1, #5, and #6 are all testaments to the fact that texture is chic in any style (plus that pom pouf is so fun and great for that price:))
 via lulu & georgia
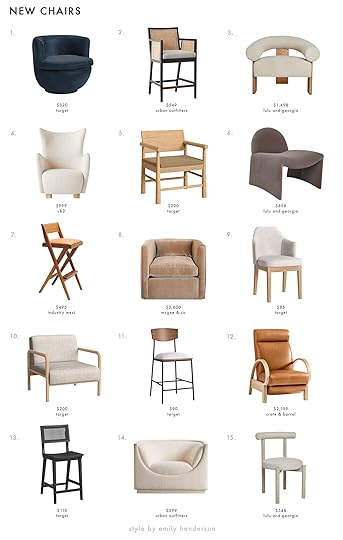
1. Round Swivel Barrel Chair | 2. Cane Counter Height Stool | 3. Celeste Accent Chair | 4. Bozzi Chair | 5. Wood Chair with Woven Seat | 6. Weiss Accent Chair | 7. Compass Bar Stool | 8. Reese Curved Chair | 9. Curved Back Dining Chair | 10. Low and Wide Accent Chair | 11. Mixed Material Counter Height Stool | 12. Rivera Leather Recliner | 13. Cane Counter Height Stool | 14. Aria Chair | 15. Dame Dining Chair
Wow can a special chair make/change a room. While all of these are pretty neutral in color, the shapes are incredibly special. Take #12. Those arms are so freaking cool and really elevate what could have easily been a perfectly nice (but not that interesting) recliner. However, comfort doesn’t have to always be sacrificed for shape. All I want to do is curl up in #4, #8, and #14.
 via cb2
1. Ralston 6-Drawer Dresser | 2. Statuer Black End Table | 3. Oval Wood Console Table | 4. White Oak Accent Table | 5. Nadia Low Credenza | 6. Darma Stool | 7. Grayson Kitchen Island | 8. Fayette Nightstand | 9. Studio McGee Round Coffee Table | 10. Kono Dresser | 11. Rosswood Counter Stool | 12. Noralee Coffee Table | 13. Shadow Blackened Wood Dining Table | 14. Rattan & Wood Bedside Cabinet | 15. Linnea 5-Drawer Dresser | 16. Palms Desk | 17. Delta Side Table | 18. Port Blackened Wood Nightstand
You already know the handles on #1 are very dear to my heart to but #15 has a similar vibe at almost half of the price. Also, can you believe that #9 is from Target?! There’s a matching side table too juuuust in case you were wondering:) The last thing I’ll say is that #7 is a freaking kitchen island and would make any kitchen so pretty (and done right could give off some serious deVOL energy).
 via sarah ellison
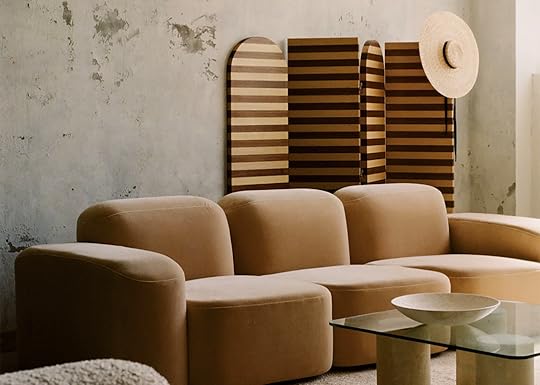
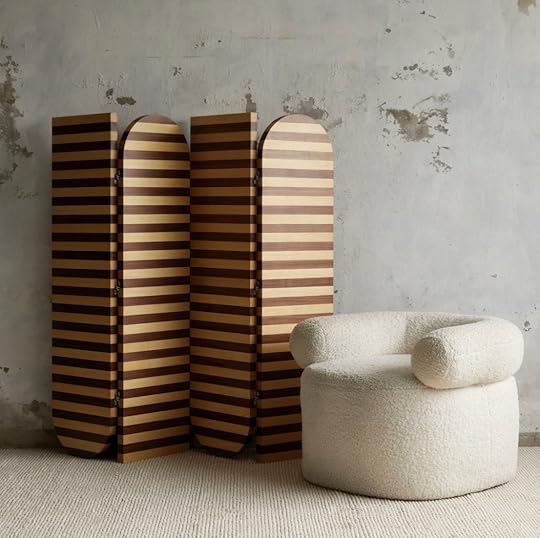
1. Anaise Cane Room Divider | 2. Rolf Floor Mirror | 3. Valentina Screen | 4. Elise Floor Mirror | 5. Aria Room Divider Screen | 6. Floor Mirror with Ladder and Hooks
Room dividers have been coming back into style for a little while. But now there are some INCREDIBLY cool ones that will kick up your room’s style into the highest of gears. #5 is definitely more decorative than function but is insanely cool. Then while the striped Sarah Ellison one is a pretty penny, it’s also so clear that’s it’s a forever, pass down to the kids/grandkids kinda piece.
 design by sarah sherman samuel for etsy
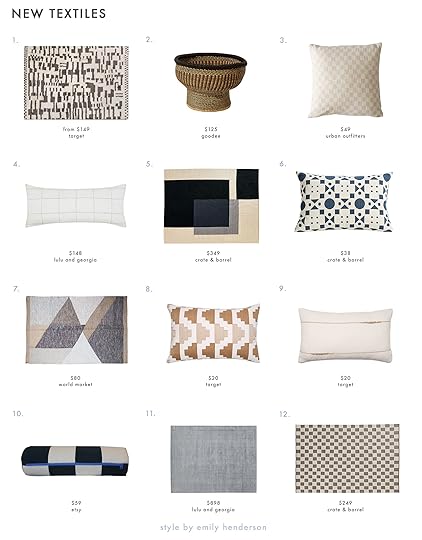
1. Geo Moroccan Hand Tufted Shag Area Rug | 2. Drum Basket | 3. Checkerboard Throw Pillow | 4. Lucian Long Lumbar Pillow | 5. Indoor/Outdoor Geo Rug | 6. Araati Blue Floral Pillow Cover | 7. Modern Geometric Rug | 8. Embroidered Modern Lumbar Pillow | 9. Embroidered Thin Line Lumbar Pillow | 10. Bigoulin Mini Duffchon | 11. Dylan Rug | 12. Indoor/Outdoor Checkered Rug
I promise that I didn’t pick out all of these checkered patterns on purpose. I don’t know if I have a problem (likely) or they are just everywhere (another BIG possibility) but I’m not tired of them yet. Actually, #10 was a last-minute add-on from the new Sarah Sherman Samuel Etsy Edit. It took every inch of willpower I had in me to not hit add to cart (to be fair I was meeting with a financial planner and buying a pillow that I don’t have a definite plan for seemed counterproductive…also growing up is SCARY). But there’s a high chance of it sneaking into my MOTO once I get to the finishing touches so keep an eye out.
 via cb2
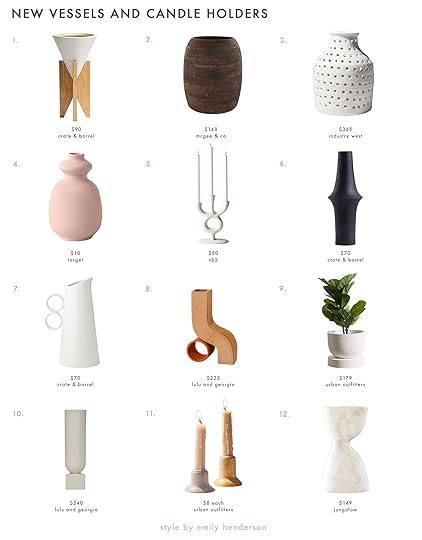
1. Large White Planter with Wood Stand | 2. Barred Wood Vase | 3. Helsop Vase | 4. Ceramic Stoneware Vase | 5. Vinia Multitaper Holder | 6. Narrow Black Wood Vase | 7. Ramona Mint Pitcher | 8. Sin Doline Vase | 9. Archer Planter | 10. Light + Ladder Tava Vase | 11. Blossom Taper Candle Holder | 12. Tall White Bust Vase
Oh man, I love getting into the little pretty things and if my last kitchen was any indication, I love candlestick holders. I also have a vessel obsession as proven by my EHD prop garage loot. I love “the age” of that dark wood vase (#2) so much. A definite “instant soul” piece. I also think that the mix of the modern clean shape and black wood of #6 is so stunning. #7 is kind of an EHD no-brainer piece because it can be used as a vase or pitcher! Those circle handles are so awesome. Lastly, if you don’t know Virginia Sin of Sin Ceramics go now. Her vessel (#8) is such a statement and will bring in a true piece of art into your room.

 via urban outfitters
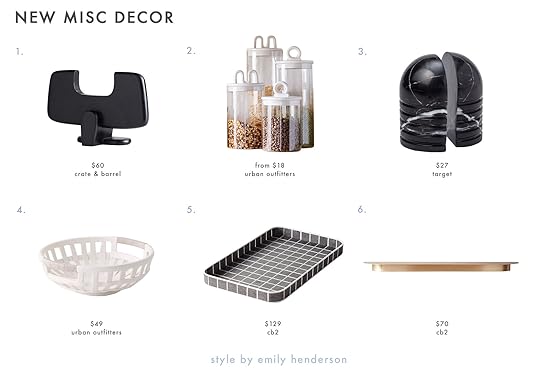
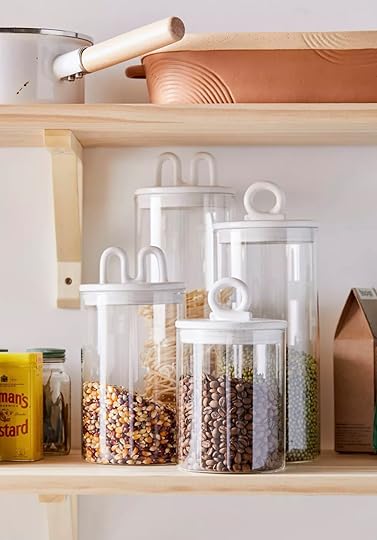
1. Abstract Wood Bull | 2. Andrea Glass Storage Containers | 3. Marble Bookends | 4. Robin Fruit Basket | 5. Hilo Lava Stone and Resin Tray | 6. Brass Wall Ledge
Did you think I could end this post without grouping of beautiful stragglers?? No way. So here they are. #1 is an AWESOME object that will surely make your space both cool and will be a conversation starter when people can come to your house again. Those food containers (#2) are incredible and affordable! I can’t tell you how hard it was for me to find food containers that were stylish and not a million dollars. I did find some that are fine so I won’t be switching them out for these. But if you are still on the hunt CONGRATS because you can be the owners of these cuties! Now I could talk about each piece but I will spare as you can clearly see how great they are. BUT that grid tray is incredible and such a freaking great styling piece. DON’T MISS OUT. I know it’s not cheap but if you need a tray and can swing the $129, DO IT.
See? Wasn’t that a blast??? I hope that either your fantasy shopping itch was scratched or you found a great new piece to make your home feel even better. As design lovers, I think it’s kinda our duty to appreciate design whether it’s just looking or buying. So let me know what you think? How do you feel about these cool shapes? Has there been anything you’ve seen recently you need to show us? Let’s talk shop in the comments:)
Love you, mean it.
Opening Image Credit: via Sarah Ellision
The post HAVE YOU SEEN THIS?? The New Products Jess Can’t Keep To Herself Any Longer appeared first on Emily Henderson.


March 30, 2021
Why Aren’t There More Women Contractors?? Jean Brownhill Is Changing This ASAP – Here’s How
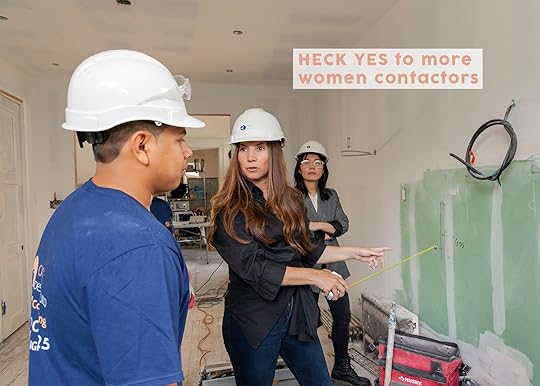
Jean Brownhill (you might remember her from this post and the incredible company she started) reached out about promoting her new program SAW which is all about uplifting women contractors. We were super inspired by this and of course wanted to support because we also want to see waaaay more women contractors!
I have personally seen a lot of women go into interior design or architecture and work in these industries for many years. What I saw was that oftentimes we were doing the job of the general contractor: managing subcontractors, choosing materials, or coming up with construction details. It’s so obvious to me that women are already doing that work and just not being compensated for it. I think that is the reason why I started SAW (Sweeten Accelerator for Women), and why I started Sweeten in general, because I believe that with internet technology and the web, it allows for new access points. It allows for new opportunities. In the past, a woman would have had an incredibly hard time becoming a general contractor, to be able to get clients, or to get the subcontractor networks that they needed.
Now there’s so much transparency and opportunity. Sweeten can provide that job deal flow to help a woman-led general contracting firm not only in its first few years of business but as the company continues to grow. We are so excited to support that.
 via saw
The general contractor and the industry of construction in general has long been dictated by nepotism and through union participation. Union participation is related to commercial work and we don’t typically do that type of project. In residential, however, it’s mostly through nepotism. Fathers would hand down their construction businesses to their son—an intergenerational transfer. In some ways, Sweeten’s platform can help with the mentorship and tutelage to help women grow their business.
We’ve had conversations with our male general contractors and have said, “Hey, you should think about giving this business to your daughter.” In fact, we have one in our network right now whose daughter went to architecture school. And I said, “Your daughter should take over your business.” He said, “That’s so funny you’re saying that. I just was having that conversation. I didn’t even think that she would want it.” And she does.
Through the power of storytelling and our blog, we’re highlighting the incredible projects that our women general contractors have completed and are really changing the narrative around what the job is.
 via sweeten
The job of a general contractor—it is logistics, it is communication, it is delegation. You have to marshal labor and materials to a job site, and orchestrate the labor and the materials to come together to finish a project. You do not need to swing a hammer. You do not need to be a burly guy. Whenever the image of a general contractor is, it is a false one. Those executive functioning skills, women are great at that.
For all those reasons, it was clear to me that a program like SAW needed to exist. We’re so excited to be able to support these women general contractors. Hopefully, it will encourage more women to join the industry, because they have the skillset for it. It’s a great profession and offers a path to small business ownership. The hours can be very flexible if you have children at home.
 via sweeten
In some of the challenges that our woman general contractors face, getting hired by a homeowner is not one of them. The challenge is when women need to secure additional subcontractor labor and get them to work on their projects. Subcontractors still have a very outdated idea about who a general contractor is. The good news is that if there is a steady deal flow and steady work, money does talk. They can break that up really quick.
In general, when it comes to renovating homeowners—women or men—they’re at a disadvantage. There’s such a high information asymmetry, because as a homeowner, you don’t renovate that often. And this is a general contractor’s full time job. That’s why resources like our blog and Emily’s blog are so important, because the information imbalance is just huge.
The post Why Aren’t There More Women Contractors?? Jean Brownhill Is Changing This ASAP – Here’s How appeared first on Emily Henderson.
You Guys Hated 5 Things About The Farmhouse First Floor Floor Plan – We Changed Some Of Them

No one likes being told they’re wrong. Especially in a public forum.
I was in a creative writing class at U of O when I really learned that lesson. It was a small group, maybe twelve of us, all of us trying to prove how well-read and literary we were while critiquing each other’s work around a large wooden table. The first couple of weeks had gone better than expected. I had made some well-received comments, and my pages were getting good marks, so I was really feeling myself during that third week.
It was during a discussion on another student’s story when I confidently chimed in about the main character. I used a certain word in my overly-verbose dissection that would ultimately cause me to never raise my hand again.
I was mid-sentence into my second important point when a dude (who I think was trying to show off for the cute girl in class) interrupted me,
“Sorry, did you say ‘volumptuous’?”
“…yeah. Anyway I thought that–“
“Ummmm. It’s voluptuous.” He looked around the table, like can you believe this idiot? Then hammered it home,
“Volumptuous isn’t a word.”
The air went out of the room and my lungs. All the faces swung back to me like spectators watching a tennis match, but like, if one of the players was a baboon. My cheeks flushed. My tongue clinched. I couldn’t believe what an idiot I was. I had always thought the word was volumptuous. I mean, just like in an onomonpea way it makes way more sense. It sounds more rotund and sexy. I think. But I could tell by the faces staring at me, I was wrong. I went white-hot. This guy had just called me out in the worst possible way, basically pointing out that there was toddler at the table.
Now. I could have graciously accepted the correction, admitted my mistake, and continued like a big boy. But that’s not how a stubborn guy rolls. I really don’t like being wrong. Especially when people are watching. So naturally, I doubled down.
“No. It’s volumptuous.” I snipped.
The little titters around the table broiled my cheeks even more. I was ready to triple down, louder and more emphatic. There was no way I was going to lose ump-gate, dammit. But thankfully, right before I gave a version of “Yeah-huh“, the professor stepped in and moved the discussion along. I think he saw how embarrassed I was and graciously forced the room to ignore the exchange without taking a side on the issue. I learned a lot about myself that day.
I haven’t seen that hot-faced indignant kid for a while, I’ve developed a more grown-up set of responses and recognitions. But I have to tell you, he was back in full-force when I read all your comments about the farm floor plans. I was pissed! I was indignant! I couldn’t believe how wrong you all were! We had worked for like two months straight trying to figure out the best possible floor plan for the new house, and even though there were little things that we were still kind of bumping on, it at least felt done, like we’d done the best we could have.
I think Emily has learned from getting negative comments about her work before. She is very good at letting things roll off her back, or just ignoring them. Living your life somewhat in public teaches you to accept that haters are gonna hate. It’s been a hard-won victory for her, and took many years of crying before she learned to not let the comments get under her skin which I’m super happy about. Sometimes I’d rather she didn’t read them, because all it takes is one Mean Jean or Asshole Casserole to ruin all the positive comments (and now the comment policy is so much more strict towards cruel or inflammatory comments). It’s all you focus on. But she’s become very zen about it. In fact, she hadn’t even gotten around to read the comments that day, despite it being such a popular post. I think she knew what she was in for. Let me say right here, it’s a very vulnerable thing to share your work with the world, I don’t think I could do it. At least not in a place where I’m allowing immediate feedback. So my hat’s off to her for even doing it. I’m a little different. Because this was the first design plan where I had skin in the game, I definitely felt personally attacked and angry. Like, how could you not like this thing? We worked so hard on it! We really love it and so should you! But then I started noticing a pattern form in the comments.
First off, they all ended with “but I’m sure it’s going to be beautiful” or “can’t wait to see how it turns out”. Even the negative ones ended with a nice note of care and investment, which settled my hot cheeks down. I started to read them with more of a willingness to listen, not just through defensiveness. And the more I read, the more I started to see that there were consistent areas of concern. A few of them really hit home, because I had felt some of those concerns myself, but not like in a major way. Just like little naggings of, “I kinda wish this wasn’t like this, but I don’t know how to make it better.” So when those areas were highlighted it made me reluctantly admit that they might be bigger than I thought. And there were a few that I didn’t agree with or I think can be eased by some explanations. So here we go. I’ll start with the ones that aren’t getting changed.
1. Y’all Really Like To Pee But The Bathroom Isn’t Moving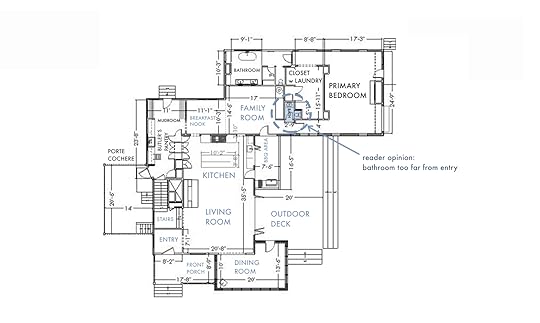
Yes, the powder room on the lower floor is tucked into the family room, which means that if you’re hanging out inside and have to go, you have to walk past a sofa. But this one isn’t a concern for us for two reasons – first, if you could see the whole layout of the property, you’d find that the majority of the time is going to be spent directly out the west side. It’s where the kids will play, it’s where the stables are, it’s where the deck is. So anytime someone needs to go, they just come in the door at the family room and it’s right there. Second, there’s no other place to put it without disrupting the entire layout. So you’re just gonna have to do a pee-pee dance twenty steps further than you’d like. Sorry.
2. Stackable Laundry In Our Closet Is Staying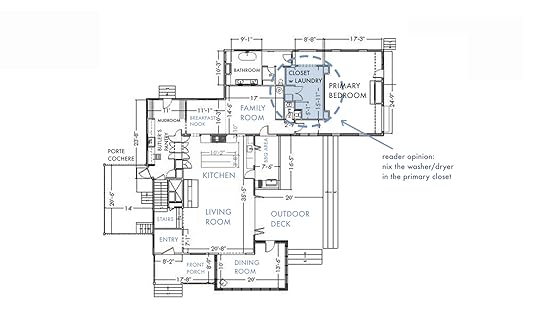
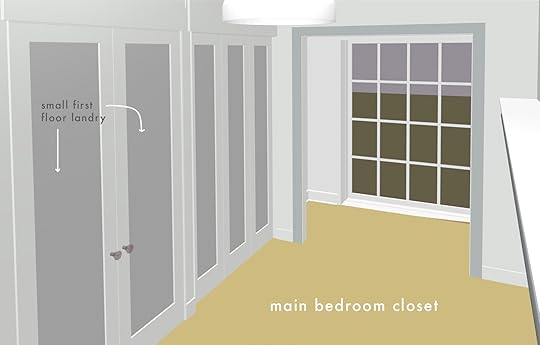
Yes, if this was meant to be the primary washing station it would be insane. But it’s not. This is a small unit that is just for our bedding, towels, and clothes from the main bedroom. We are installing a proper laundry room up on the second floor (well, it’s shrinking by the second because we are trying to add another WC up there). We’re doing this because we’re teaching our kids to wash and fold their own clothes and we want that mess out of sight down on the first floor. Oh, and for the commenters who see this as wasteful, I hear you, it seems like a lot, but it’s not like we’re going to be using twice the electricity or water, we’d still be doing the same amount of laundry, it will just be split between two units rather than an all-day marathon of one. I promise, we’re very conscious of wastefulness and will not be running these things day and night (and we make ourselves and our kids wear things until they are filthy, never washing after one wear). And for those concerned about not having it in the mudroom, well, now we barely have a mudroom so there’s no space. Also, is the concern that muddy pants will drip all over the house? I’m a little confused. It would be nice, but then that means you’re literally washing clothes every time you come in the house? I don’t mean for that to be condescending so don’t get your cheeks flushed but I’m genuinely confused as to why having your laundry in the mudroom is a “must-have”. But like I said, it’s not even an option anymore.
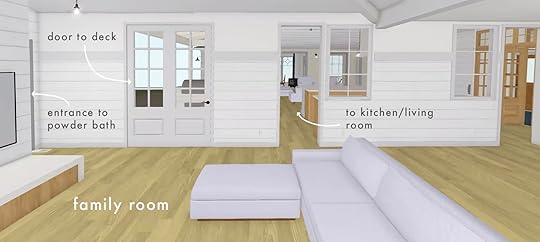
3. Family Room “Too Close” To Main Bedroom But We Have A Plan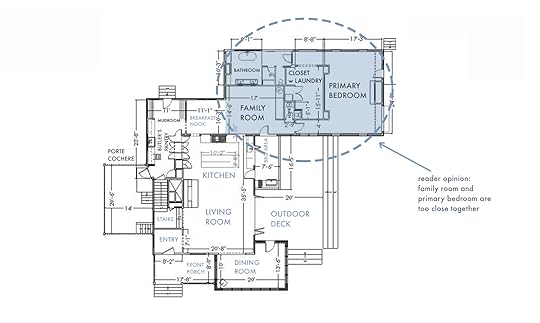

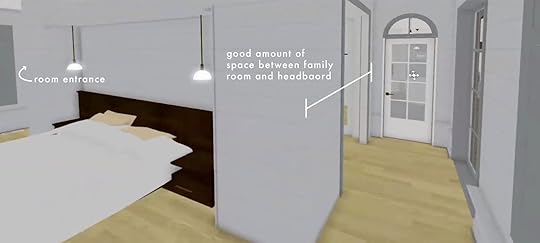
I actually voiced this when we were designing. It does seem like it will be annoying to have the TV going when we’re sleeping but there are a few things that keep it from being a big enough concern to re-work the space. First, there’s a large walk-in closet between the wall that the TV is on and our bed. So noise won’t be an issue. Yes, I don’t love the idea of a bunch of smelly teens hanging out by my sanctuary of a bedroom. But here’s the thing you didn’t know – we’re planning a whole teen enclosure, like a zoo, out in the 1850s original house. If you look at the original post about the property, you’ll see that there’s an adorable little one-bedroom structure that Arciform labeled “The Victorian House” because of its style. Well, it needs a LOT of love but we’ve got some years to do it, and it is scheduled to become the teen-zoo. We’re gonna put a TV and sofas and maybe some games out there. I’m lobbying hard for a shuffleboard table and a pinball machine, so maybe it’s a Brian-zoo too. All that to say, hopefully by the time the kids are teenagers, all their friends will be out there so the adults can be in the main house talking about adult things like broccoli and economics.
4. The Sunroom/Dining Room (I Call It The Office) Distance Drama
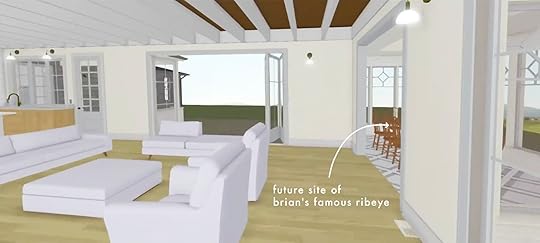
Many people thought that it was a waste to have a breakfast nook and a dining room, and you’d be right if that dining room was meant to be our nightly eating area. I wanted to rename this just “Sunroom” because I didn’t see us using it for eating very often. Only when we had guests. Most days it would be used for Emily’s writing space (until the Victorian is done). We’re a casual eating family and we were planning on using the cozy breakfast nook for our day-to-day dining (which seats 4-6). What we have here at the Mountain House is kind of a nook, and we use it all the time. So that wasn’t a big deal to me. I really don’t mind walking a few more steps than normal to bring a steaming dish of Brian’s Famous Ribeye to a table of happy guests. The distance really wasn’t a concern. What WAS a concern was the fact that we’re adding an expensive (albeit beautiful) addition to the structure. We needed to make sure it was going to be used. Well, when you get to number 5, you’ll see that it may or may not have become obsolete. Saving us money, but leaving us a bit sad. What do we do?
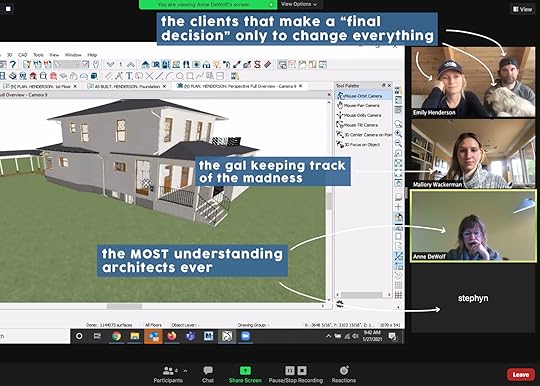
5. The Kitchen/Living Room Situation (You Had Some Good Points)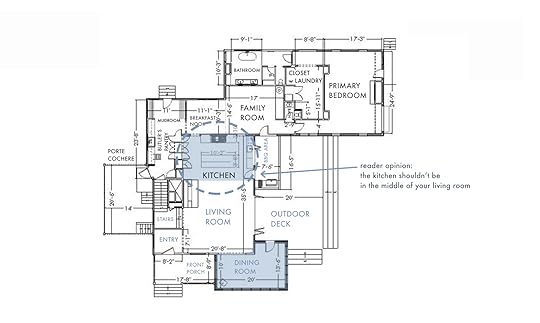
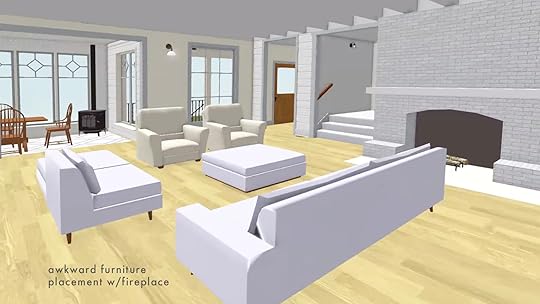
This was by far the most commented upon aspect of the floor plan. Many of you thought it was too modern to have a great room and many thought it encroached on the living room too much. Both of which I had felt for a while but didn’t really know how to express. It’s also hard because the Chief Architect program makes everything look like a video game, and therefore more modern and sleek than it would be in real life. It can feel a little lifeless in the program. In reality, Emily had found an amazing ten-foot apothecary table with ornate drawers and labels that looked aged and had so much character. It would have made the space really unique and cool. But it was in the middle of the room, and it made the living room kind of hunch over to the wall away from the fireplace. Also, the fridge so close to the living room always seemed a bit odd, but there was no real other place for it that made sense for the flow of the kitchen.
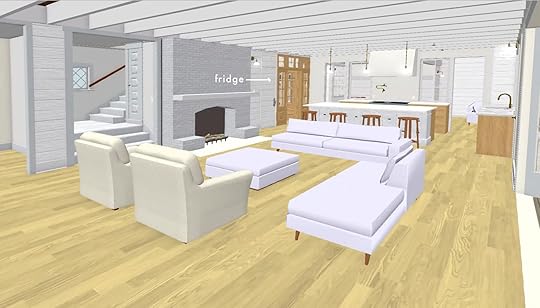
Also, by pulling the kitchen into the living room, it would allow us to have that big beautiful mudroom, which was one of our favorite moments. AND it meant we could keep the cabinets that the previous owner had built and use them as like a pantry. Which I know would have made a lot of the “preservationists” happy.
But all the comments started scratching at an itch that we realized needed to be addressed. For some reason, we had just kind of thought, we either keep the small kitchen that’s there or we move it to the center and make it the hub of the house. The way it’s set up now is just not functional, it’s on the Eastern wall, with no real access to the rest of the house, even if you open up that eastern wall, the kitchen is like an afterthought. But you guys had a great idea – what if we put it up where the breakfast nook was?
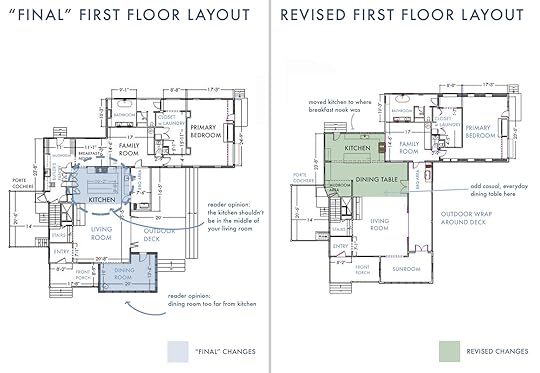
Well, I had to fight my urge to double down and say that IT IS PRONOUNCED VOLUMPTUOUS! YOU’RE WRONG! but then we tried it out. And after the initial wave of nausea, we think we came to a new design that makes much more sense. We even wrote out a pros and cons list for each floor plan and we think the new one wins. We’re going to lose three major elements that everyone involved had come to adore -the mudroom, the breakfast nook, and the sunroom (potentially). They were all stand out, like, magazine pieces. But were they totally necessary? A reluctant no. Would removing them save us a lot of money that could be used on the Victorian, or even landscaping? A resounding yes. Does this new design keep things beautiful while making everything a little more functional? We hope so. It definitely moved the adjectives from luxurious to sweet. Is that a good thing? We think so. Especially when you’re trying to raise two level-headed children.
The reason we didn’t originally do this is also because there will be 3 different ceilings in the kitchen/living room – which is odd. We also thought that you’d have to have a load bearing post to hold up the second floor in the middle of this new kitchen. We’ve since talked to our engineer and Arciform helped come up with a solution. It of course will cost, but it will be a much better room. Moving the kitchen had a domino effect on everything else. It took away the mudroom, which is now like a six-foot area off the side of the house, and it took away the breakfast nook. But now we’ve got a small dining area right off the kitchen that flows into the living room or around into the family room. We have opened a ton of new light into the cavernous living room and put the kitchen in the best light. And instead of a separate sunroom we’re thinking about a wrap around deck. And we’re really digging all of it…… or we WERE.
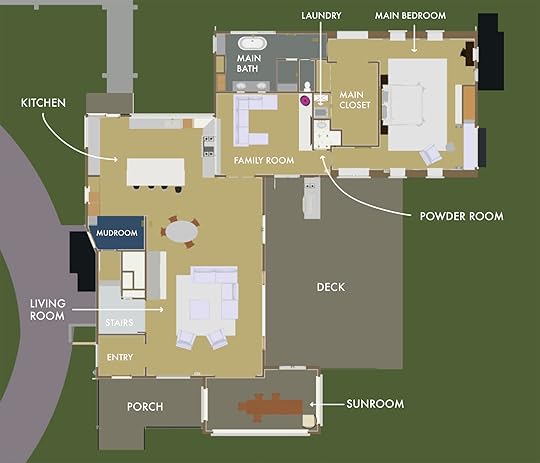
After days of being sad about the sunroom we realized that we missed it too much. Anne showed us that if we made it a few feet narrower (so we don’t have to redo all the rooflines) it won’t be as expensive. So now we have a smaller little dining area near the kitchen, we have a ton of flexibility with how we lay out the living area AND Emily gets her sunroom/writing room back.
So I want to thank you guys for being so generous in your comments. It’s a strange thing, designing by committee, we probably would have just pushed forward with the great room design if I hadn’t spent the morning pouring over everything you wrote. And as much as it was painful, it was also very helpful. So bravo you designers. You all should have your own blogs. And when they get up and running I’ll come over and comment about how I would do things differently. And maybe I’ll be right!
The post You Guys Hated 5 Things About The Farmhouse First Floor Floor Plan – We Changed Some Of Them appeared first on Emily Henderson.
March 29, 2021
How Ajai Added A Lot Of Character To Her (*Cough* Her Husband’s) Builder Grade Bathroom
Hi there, Ajai here, and I’m back with an apartment bathroom refresh. As you may already know, I’ve been making it my goal to characterize our apartment to represent the things we love, but this time around, I’ll be designing for my husband. I typically make a lot of decisions regarding the design of our home, and always try to keep in mind how we as a family function in it. That said, a lot of you may already know that we tend to enjoy a neutral color palette in our home. I recently shared the reason for this via my social media. I know that “colors evoke feelings, and neutrals are grounding. I’m in an industry where I’m constantly entering other people’s worlds and am always thinking along the lines of what other people need and how I can help them to function better in their space. So I like to have a place where I can come home to reset and feel grounded.”
Before the pandemic, I would go out and work in someone else’s home, and then spend hours on a computer sourcing for that home and designing its floor plan, and after spending all day in someone else’s space, I’d want to go home and not feel overwhelmed. I needed to give my mind a chance to relax, and take a break from such specific, and sometimes, complex designs. I also mentioned how my husband used to travel 75% of the month to different states for work. Now that we are working from home, my husband deals with a new group of customers each week. Our work worlds consist a lot of assessing and aiding the needs of others. All that to say, this is why we enjoy neutral color palettes. To quote myself exactly, “they are simple and minimalistic – tones that give a feeling of being calm and provide stability – feelings that are a necessity for me and my family in our living space.”
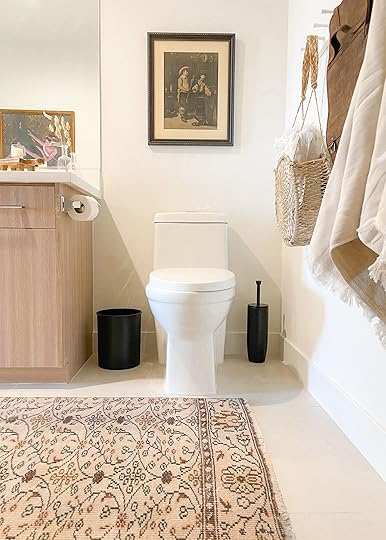
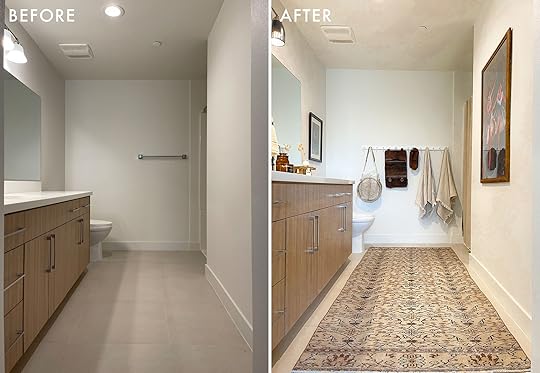
Since my husband (Jonathan) is the client this time around, I took into account his personality and interests, but I didn’t want to stray too far away from the concept of the other bathroom in our home. What I found myself with was an artisanal and minimal oasis fit for my husband. Beginning with a neutral palette was a no-brainer for me, yet I wanted to pick Jonathan’s brain about what his needs would be for his space. This was quite fun, and I must say, he ended up being one of my favorite clients (this is more than likely because we are generally on the same page with a lot of things and enjoy many of the same hobbies… we even have the same quirky ways about us… we have an obsession with peg racks – they’re all over our home). When I asked Jonathan what he enjoyed most about our home, he responded “I enjoy how there’s not a lot going on everywhere.” I should mention that Jonathan and I both grew up in homes where there was always a lot going on…everywhere. You could say our mothers were a bit of what we like to joke about and call “collectors.” When we were growing up, they both had a bit of a hard time parting with things. In turn, I believe this has made Jon and I minimalists. So most of the time, we are thinking about how an item not only can look nice, but how it can also function in our home. So let’s get to this bathroom of ours… I mean, his. Here is the bathroom before:
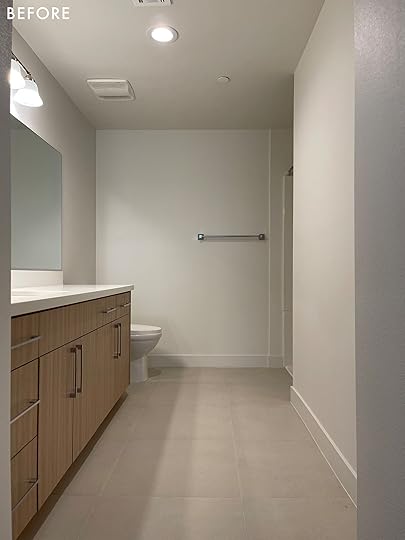
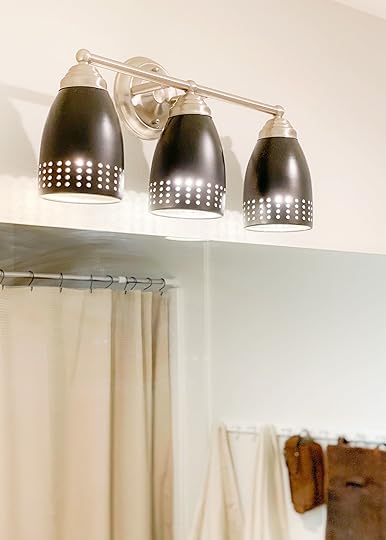
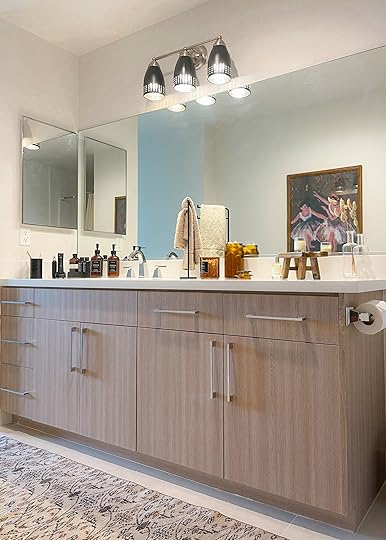
I mentioned in an earlier blog post, that we moved into a new build. So like many new builds, we’ve got the same generic glass lamp shades over the vanity in our bathroom – these had to go first. We replaced them with a new metal shade I found and spray painted. Jonathan wanted more black accents in his bathroom, so I wanted to make sure I incorporated it as much as I could for us… I mean, him. Along with the newly painted lamp shades, I sourced a black set of towels to go along with a flat weaved sand set. This way he could switch out the palette from time to time. He also mentioned how he enjoyed the antique and artisanal elements from the barbershop he used to frequent in Atlanta. It had considerably aged photographs with antiqued frames hung throughout the shop, this is what inspired the art I chose for his bathroom. I thrifted the piece that displays the two gentlemen with swords, and the print with the two ballerinas came from Juniper Print Shop (Jon and I love this print because it looks like two ladies are dabbing – you’ll have to google this if you don’t already know what dabbing is… lol). The frame I chose for the dab print was custom, and I chose it because it too had an aged/antiqued feel about it.
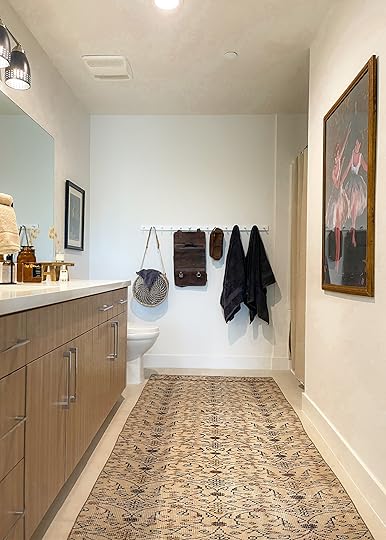

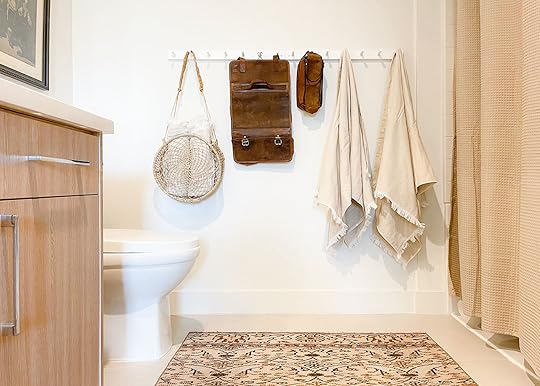
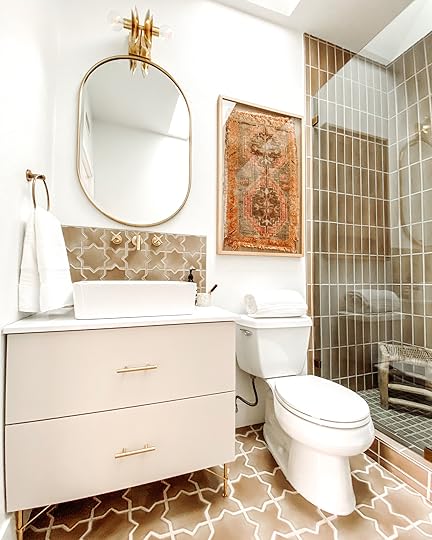
Peg Rail | Woven Hanging Basket | Black Towels | Sand Towels | Shower Curtain | Rug

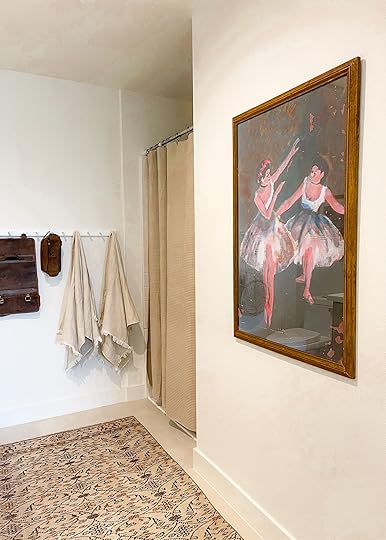
Sword Art (vintage) | Ballerina Art
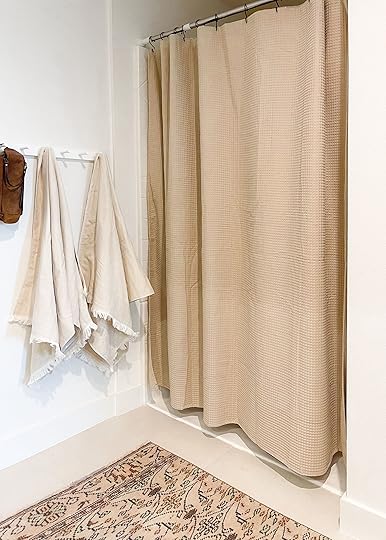
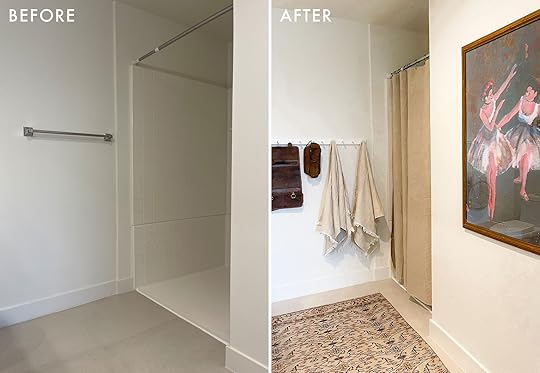
Peg Rail | Sand Towels | Shower Curtain | Rug (vintage)
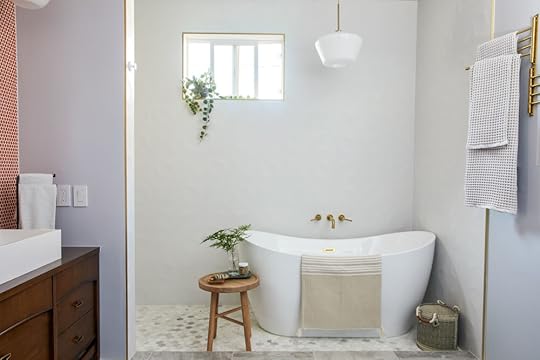
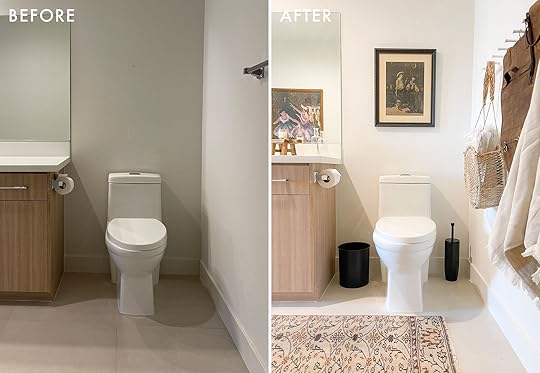
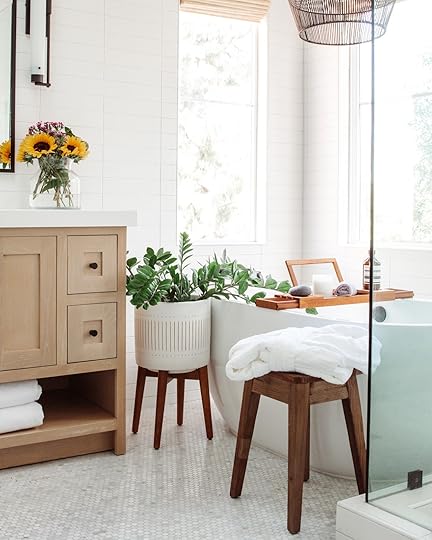
I wanted to add more texture to the bathroom, so I chose a waffle shower curtain that is tan, to keep with the oasis feel. My husband kept saying “I want my bathroom to feel like I’m in a hotel, a relaxing hotel.” This encouraged me to play on the white aspects of the bathroom, because a white hue is airy and clean – like relaxing hotel rooms. This led me to get rid of the boring towel bar and incorporate a white peg rack. The white peg rack allows for all of the items we hang on it to look as if they are floating – a pretty cool design aspect, along with them being very functional and creating much storage. I love hanging towels and woven baskets from our peg racks to create even more storage. To keep with the black accents, I added a black wastebasket, toilet brush, and vanity organizer. Also, I want to reiterate that my husband used to travel 75% of each month for work, so I’d consider him a professional hotel-stayer lol. He would always facetime me as he walked into each hotel room to show me what the room and bathroom looked like. Then he’d come back home with a synopsis on how the space felt and functioned (I have taken so many mental notes and stashed them away for future projects).
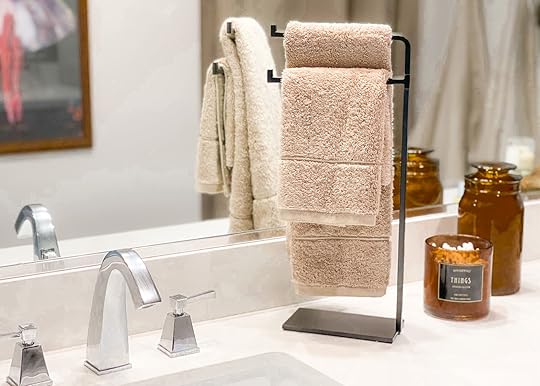

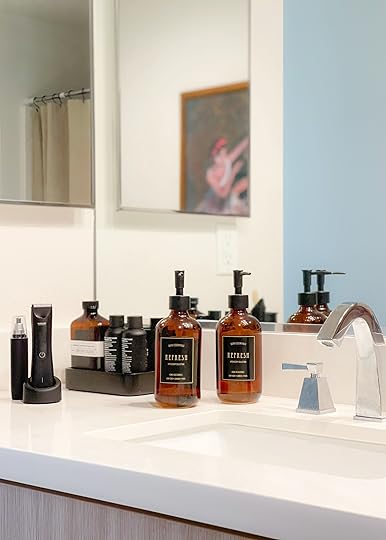
Candle | Scent | Vanity Organizer
During these summaries, I noticed how he’d always mention how easily accessible hand towels were or weren’t. I wanted to make sure I met his hand towel expectations by having them easily accessible via the towel stand, and right next to the sink. He’d also mention how hard it was to squeeze soap from the little bottles left on the bathroom countertops in hotels, and how sometimes there would be no lotion. So I sourced the cutest little artisanal soap, lotion, and q-tip cotton swab jar set from HomeGoods, along with a jar I found to host cotton balls. To finish the look I searched high and low for the perfect runner. I was able to procure a one-of-a-kind Turkish rug from Etsy (I have so many rugs and consider myself a “collector” haha… I guess the apple doesn’t fall far from the tree on this one… in fact, I have a blog that shares where my love for rugs began and highlights a few etsy sellers I love to shop with), and with the perfect dimensions. I also left out his favorite Vetiver (Jon’s favorite Scent) along with a Petit Grain 21 candle (another one of his favorites), because smells are everything when it comes to a bathroom. Jonathan is loving his bathroom refresh, and I’m so happy he is.
Before and Afters, anyone??
It was important for me to give him a space of his own that he could enjoy. Because we live in an apartment now, he doesn’t have a “man-cave,” so having a space to retreat to groom himself was so fun to create. I hear him in there during the mornings shaving and singing, and I love how happy he is after a shower and a couple sprays of his favorite scent. He came to me just yesterday and told me how much he loves the sand towel set. He said he likes that it doesn’t get extremely damp like other towels after he dries off. He thanked me for making his bathroom special then kissed me on my head, and I melted. This is what I love about design, the psychology of a space and the effect it has on us, but I guess that’s a blog post for another time.
**Design and Photos by Ajai Guyot
The post How Ajai Added A Lot Of Character To Her (*Cough* Her Husband’s) Builder Grade Bathroom appeared first on Emily Henderson.
March 28, 2021
The Link Up: The First New Shirt Emily Bought In 4 Months, Jess’s PERFECT Denim Jacket, and The Best At-Home Matcha Latte
HI and WELCOME! Sorry to yell at your first thing in the morning (or whenever you’re reading this) but we just wanted to greet you with a big, warm, internet hug. We’re happy you’re here. Now let’s talk links this week:
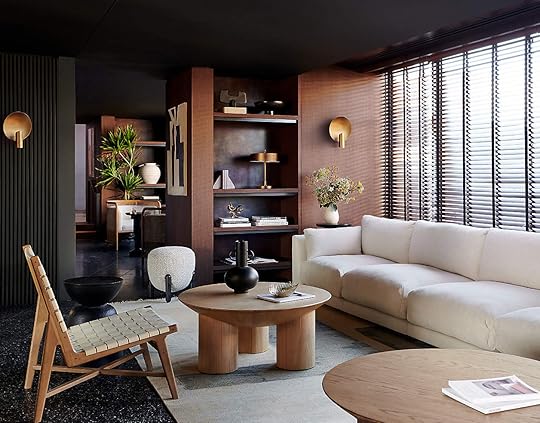
This week’s home tour was found via Sight Unseen (one of our favorites) and is a feature on Parisian designers, Hauvette & Madani. They go through 6 of their projects and each one is better than the next. Scroll through and enjoy their 1970s Parisian style (it’s SO good).
From Emily: Introducing my first new shirt in 4 months and it’s only $30 (on sale for $24 until Monday). Being up in the mountains, quarantined, means that A. I don’t go anywhere fancy and B. shipping up here is VERY difficult (no USPS and since we never know how companies ship we’ve learned the hard way that so often things never arrive so we’ve stopped ordering a lot online and just using what we have). It’s been SUCH a blessing, actually. All the kid’s clothes have holes. We wash our aluminum foil and I use every beauty product til it’s GONE. I wear the same sweatshirt every day and besides that, I mostly wear past seasons of The Great (it’s expensive but some of it is truly timeless – I have many pieces from 6 years ago when I first fell in love with the brand that I still wear frequently). But this week Emily Bowser brought me a Target wardrobe for our shoot and I loved SO much of what she bought. I’m going to do a whole post about which pieces I love before she donates what I don’t need (Pen and Napkin is doing a rummage sale with the EHD prop/wardrobe leftovers – stay tuned for that) but I wanted to call out this shirt as it’s SO CUTE. I’ve always been a proponent of ruffled and puffy sleeves as you know, and this one has great structure (it’s thick, not like a thin poplin that loses shape) and the stonewash is so fun and 90s. Again, more to come from what she brought me (she knows me VERY well) but it’s exciting to put on something new, even if it’s just around the house.
From Mallory: I was shopping at CVS for a long random list of stuff we needed and on that list was Olly Sleep Gummies for my boyfriend who sleeps horribly. Backstory: he started taking these natural melatonin gummies at night and they’ve significantly helped him I’ve tried them too and they WORK). So when I was grabbing some more at CVS I realized they had these stress gummies sitting right next to them (and no they’re not CBD gummies). I HAD to try it out because, like any normal person, I get stressed on occasion so I thought maybe this would help. I don’t take them every day but when I feel overwhelmed I take two and they taste VERY good IMHO. I’d probably equate it to the feeling of having a single glass of wine while you’re finishing up your workday (I definitely haven’t done that), but if you’re looking to cure anxiety or have a serious condition, see a medical professional!! Honestly, these stress gummies might be a placebo effect but either way, I really really like them 
From Ryann: One of the many positives of working from home is how much I save by not buying 5 dollar iced coffees and lattes. It’s ridiculous I know, but I used to savor going to a coffee shop and getting any sort of iced caffeinated drink no matter the cost. It’s the little things. But now that I work from home, I discovered I can make delicious iced drinks at home. WHO KNEW? One of my favorite things to make is iced matcha lattes using this pure matcha powder from Golde. It’s the best matcha I’ve had and mixed with plain Chobani oat milk, it’s actual heaven.
From Jess: I found MY PERFECT JEAN JACKET! I’ve always labeled my body type as “can’t do boyfriend fit”. This gal has hips and boobs and clothes that aren’t made for the curvy female shape usually look comically bad on me. BUT this jean jacket, that I was for some reason inspired to buy, IS a boyfriend (well ex-boyfriend) cut and is the perfect amount of roomy yet still flattering. I got a medium so if need be I could button it up if I want to (even though I probably won’t). It’s my new go-to jacket and I am pumped.
Also From Jess: You’ve heard me sing the praises of Material Kitchen before with my incredible pan, knives, and cutting board. For their next venture, they just came out with a truly beautiful everyday tabletop collection in collaboration with Soil Baker, a Korean handmade tableware company. The owner of Material kitchen is Korean American so not only is this collaboration extremely meaningful to both of companies but until March 31, 50% of profits from the ceramics collection will be donated to #HateIsAVirus Community Action Fund. So if you are in need of some stunning and soulful tableware this would be a great time to grab some. Or you could simply donate to this fund. We need to keep the gas on the pedal if we have any chance of ever seeing a different and hate-free world.
Also Also From Jess: In my pursing of the internet (a daily habit of mine) I noticed that Bloomist is killing it with a bunch of organic yet high-end pieces. My favorites are probably the paper mache bowls, these ceramic vases, and these stools. And since it’s spring (finally but also WILD), I want flowers that aren’t affected by my black thumb, this branch and this branch are calling my name. Do yourself a favor and go check out all their pretty things.
From Caitlin: This Planet Money episode, about a guy who invents a new shape of pasta and then spends 3 years and a ton of money to bring it to market, is SO FUN and fascinating. (You can pre-order it here and yes, it IS probably the best pasta shape I’ve ever seen).
Also From Caitlin: Mallory and I actually both got this wall hook this week!!! It has a unique shape, six hooks, and luxe finish (it’s resin, but looks ceramic) which makes it look pretty expensive, despite being super affordable. Would be a great entryway piece (it says it holds up to 11 lbs, which is a lot of coats!) but I’m using it in my bathroom to hold all my big terrycloth headbands and my necklaces when I’m showering. 10/10, love a look for less!!
Lastly, if you didn’t get a chance yesterday to read our newest contributor, Anita Yokota’s post about her experience as an Asian American and her extremely helpful resources to help fight against racism towards the AAPI community please do. With that said have a great rest of your day xx
Opening Image Credit: Designs by Hauvette & Madani | Photo by Cerruti Draime | via Sight Unseen
The post The Link Up: The First New Shirt Emily Bought In 4 Months, Jess’s PERFECT Denim Jacket, and The Best At-Home Matcha Latte appeared first on Emily Henderson.
March 27, 2021
My Asian American Experience – Designer/Therapist, Anita Yokota, Talks About Her Life And Resources To Start Creating Change

“Where are you really from?“
“Wow! You speak such fluent English.“
“So, what’s your real name?“
I’ve been asked these questions all my life.
Last week’s news about the murder of six Asian women by a mass shooter in Atlanta has really shaken me to the core. The gunman had targeted Asian spas, killing eight innocent people. When I first heard, I immediately called my partner Travis, then my mom. It’s the first thing we do in moments of crisis: you go to your loved ones and make sure they’re okay. None of us were okay.
I was really struck by the thought that we were better than this. A naive part of me thought we had made more progress. I was shocked and scared. I thought of my elderly parents and my uncles and aunties. The first instinct is to protect the ones you love… then you get angry. How can we stop this? I can’t help but think: what’s my part in this?
To be transparent, it’s taken me a week to really process everything. And of course, no one is ever “done” processing racism. I’m reeled back into the plethora of emotions each time the aggression of hate is made against my AAPI community.
As an interior designer with a background as a therapist, I have always wanted to inspire people to feel safe in their spaces. But getting to a place of safety means speaking up, setting boundaries, and seeking change. This is an emotional and isolating time not only for me but the entire AAPI community, and we need all the support we can get.
Growing Up As An Asian-AmericanMy parents came to the U.S. as exchange students in the 1960’s from Taiwan straight to Arkansas. In recounting her time in Arkansas, my mom very matter of factly told us that her host family asked her to do their laundry by hand and it was without pay.
It wasn’t always easy for my sister and me growing up in our neighborhood in the 80s and 90s, either. Even a simple thing like a school lunch could be a source of stress. Because our parents were first-generation, we often did not have the same lunches as our peers. Our friends may have had peanut butter and jelly while we had char sui in a bun. One time my sweet grandma attempted to make a sandwich with peanut butter and lettuce. We wanted the traditional American lunch so badly, mostly to stop the daily questions and teasing from everyone around us. The need to belong was so intense, especially at such an early age.
My mother and grandmother were wonderful in empowering us as females and they were strong role models for us. But it was harder for them to relate to our identity crisis of being American-born living a very different culture at home than at school or the homes of our friends. Learning to embrace both cultures took time and many ups and downs for us to land in an emotionally balanced place.
 design and photo by meDismantling The “Model Minority” Myth
Most older Asian Americans feel pressure to be the “model minority.” As a result, they raised their children like me to uphold that value. There’s an unspoken pressure to be perfect: to try to fit in.
We’re often taught that if we keep our heads down and work hard, it’ll pass. Society isn’t used to Asian Americans speaking up. But now is the time to amplify the AAPI community. We need to be heard, seen, and respected.
I am committed to unlearning the harmful myth that I need to be silent and obedient. In my own way, I’ve stopped being a “model minority.” I don’t think I would have gotten this far in my career if I hadn’t overcome the perfectionism that keeps you playing small.
As I began to pursue my passion for interior design, I quickly realized I was once again needing to find my voice. It was starkly clear that my physical appearance was very different from the majority of designers in the interior design world. And that I would have to work a lot harder to prove myself in the industry.
In the beginning as a newbie design influencer, I was surprised to find that I was the only Asian American or Person of Color present at many design events. It takes a lot of emotional strength to constantly break through barriers, speak up for yourself daily and not give into your own fears and judgment of others.
I remind myself that my feelings of anger are valid. I give myself permission to stand up and speak about my experience. We need to stop this violence against Asian Americans. Now.
How To Be An Asian-American AllyLet a friend know you’re here for them, without expecting a responseI’ve had some friends ask me how to approach their Asian American friends from a communication perspective. Honestly, questions like “How are you doing?” may not receive a reply.
Remember that it really depends on the person, but a lot of times we are so overwhelmed, we don’t even know what we are feeling, let alone what to say. It can be a hard question to answer. But that shouldn’t be the end of a very important connection and dialogue. Whatever relationships you have with them, continue it, and let the dialogue flow naturally.
As a therapist, my emphasis in my practice is on connection and empathy. If you want to be a true advocate, it’s simple. Just reach out. Don’t hesitate. Culturally, it’s not always easy to be vulnerable and open. We may not overtly say or show our pain but believe me, it exists every day of our lives. So knowing that we have someone in our corner can make all the difference.
And the first step towards empathizing is acknowledgment.
If you think about it, it is truly a human need that we all desire. We just want to be seen, heard, and acknowledged.
The feeling of being invisible and the lack of recognition over a long period of time can be psychologically very damaging.
The most lovely message I received was: “Anita. I’ve been thinking of you. Sending lots of love and strength to you and your family.” And that was it. It made me feel so good, like I was going to make it through all of this because my friend acknowledged what was happening. But I wasn’t required to make a big response back. She acknowledged me but also gave me space to process and not necessarily respond right away.
 design and photo by meLearn the Asian American impact on American history and culture
I encourage you to educate and learn the multitude of ways we’ve contributed to the success of our country—and continue to. Learn to pronounce Asian names correctly, and acknowledge the talents of Asian Americans around you. We work really hard, and it helps to know our efforts are seen and valued!
A few of my favorite books written by Asian American authors are
Minor Feelings by Cathy Park Hong Dumpling Galaxy by Helen YouEx Libris by Michiko KakutaniFor a more complete list of Asian American Authors check out this link.
And here are three truly talented Asian American artists that truly are inspiring:
Windy ChienCindy Hsu Zell Dana TanamachiPlease check out their beautiful work and join me in supporting their creativity.
Don’t Be SilentOur boundaries don’t have to be abrasive or abrupt, but they need to be clear and firm. (I’m still learning to do this every step of the way!) This happens in practical, everyday situations.
Whether they are microaggressions that frankly are sometimes harder to confront or heinous violent acts like in Atlanta, we need your support to amplify our voices and stand beside us against hatred.
We all have ways that we can share our thoughts and show support. Find your avenue of support. It doesn’t have to be through social media. It can be through volunteering at a non-profit organization that supports the AAPI community like Asian Americans Advancing Justice or reaching out to your Asian American friends and offering any support that will help them consistently. Don’t give up.
 design and photo by meFor my AAPI friends, Here Is How We Cope:
As a designer who marries interior design and therapy, I find it healing to set my home up so that it can help me process my emotions. Here are some design strategies from my Home Therapy method to help you feel grounded:
Create a spot or corner just for yourself and dedicate time every day to meditate and write out your thoughts. A cozy invitation calls for a comfy seat, a relaxing scented candle, and a journal to invite you to open up and reflect. Remember, flushing out raw emotions and thoughts is essential to your mental health.Organize your home to give you a sense of positive control. When the environment outside of our home is chaotic, it can leave us feeling hopeless and helpless. But if we keep our pantries, closets, and entryways tidy, we automatically feel more safe and secure. And that increases our self-esteem in a significant way.Learn to express your anger appropriately, which is not always easy. Paint your living room or dining room in calming colors: whites, blues, and greens. This visually cues you to de-stress. Designate these rooms to be a neutral place where you can express and communicate in a relaxing environment. Prepare your home with self-care zones in your bedroom and bathroom. Dealing with fears and judgment from others is emotionally taxing and you need space to focus on yourself. Aromatherapy diffusers, mood lights to balance your circadian rhythm, and weighted blankets are key items for restorative sleep. For your bathroom, having a fully stocked bath caddy of skincare and bath salts for your next spa bath experience relaxes your body, brings down the stress hormone cortisol and increases your adrenalin to up your mood.Home Therapy isn’t just about pretty aesthetics. Case in point: I have three girls and Travis and I spend lots of time with them in our family room. It used to not be the case. But once I intentionally and thoughtfully arranged furniture to encourage communication and family interaction, I got a golden opportunity to really get to know my girls. We talk about everything and that includes what happened last week. This is proof that being intentional with your home design is truly therapeutic.
It’s been enlightening to see my commitment to raising my girls to be fearless really shining through. They won’t stand for any kind of racism and they do NOT subscribe to the “Model Minority” myth. This gives me so much hope in a very unsettling time. I see them fighting the fight and communicating honestly about their experiences.
I strongly believe that every small or large act is movement and progress. And if we all act together, there is hope no matter what. I liken it to styling or renovating our home–the emphasis isn’t about perfection. Things may take time and there may be delays, but we must keep going forward. Join me to stop this horrific violence against the AAPI community now.

Opening Image Credit: Photo by Ari Michelson
The post My Asian American Experience – Designer/Therapist, Anita Yokota, Talks About Her Life And Resources To Start Creating Change appeared first on Emily Henderson.
March 26, 2021
The EHD Prop Closet Isn’t Going To Portland…So Here Are The Art & Decor The Team Scored For MOTOs
When we packed up to move to Portland (in August) I did likely the most EPIC purge of my life – keeping only what was 2 of the following 3 things – functional, sentimental, or beautiful. I had a lot of hard conversations with myself, holding each vase or book far longer than what felt normal to surmise whether it would make the cross-state cut. I pictured where it would go, how often I would use it, and wondered if there was something else so similar that I also was moving with me. Once I let go of something I let GO of it, and then it’s a “who wants this awesome stuff” party. We are likely not going to even be able to unpack or style with these things for another year, plus there’s intentionally not a lot of open storage or shelving that needs “stuff” at the farm, and it felt increasingly greedy to hoard anything that I wasn’t SURE was going to get used (clothes and accessories). So while most things that we staged within the house were shipped up (barring a few things that the new owners bought) most everything else needed a new good home – and it was REALLY good stuff. So since most of my team are in mid-makeover of their own spaces I invited them over (first time in a year for some of us seeing each other!!) to shop the storage unit for their spaces (with masks of course). It helps offset their budget and gets in a lot of awesome pieces that people have sent to us over the years or that I’ve collected. It was stupidly fun to see them go on a spree – the mom in me loves to spoil them and it’s just a general win-win. So today we thought it would be fun to show you what they snagged and why (and no, there weren’t any real fights over things but it was so cute how they all supported each other and said “this will look so good in your house” even when I could tell that the speaker also wanted it). Oh and stay tuned till the end when you find out what will happen to everything else (they barely made a dent in it) as you might have a chance to shop it all for a good cause.
RYANN’S PICKSFull disclosure: I had trouble fitting my entire loot into one photo. Being pretty far along into my MOTO, I was looking for art and decor to accent my design and color scheme. I shamelessly scored a ton of insane pieces that I’ve secretly been loving for a while from afar…
These pictures bring me so much joy. Looking at all the special pieces I was able to snag makes me feel infinitely grateful for Emily and my job, plus I am so excited to play around with these gems in my home. A lot of them already have a permanent home and you’ll see them in my MOTO coming soon:). It’s hard to even pick out my favorites, but there are a few that I fell HARD for, especially after seeing them in my space. (P.S. A couple of those art pieces are from artists who sent in work to be featured in the book. Don’t worry we are going to do a big post with all of them coming soon:))
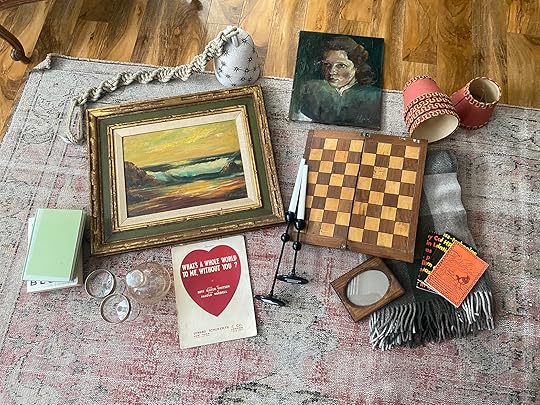
 vintage
When Em held this checkerboard up and said “Who wants it??” I immediately screamed “ME!” and then followed up sheepishly with… “unless someone else wants it hahah…” But I felt like I needed it even though I wasn’t exactly sure where it would live in my MOTO. Right now, it’s styled on my coffee table, as a sort of makeshift tray and it looks very cool and brings in much-needed pattern (which y’all know I can’t get enough of). I can also see it leaned against a wall as art or even hung up in a gallery wall.
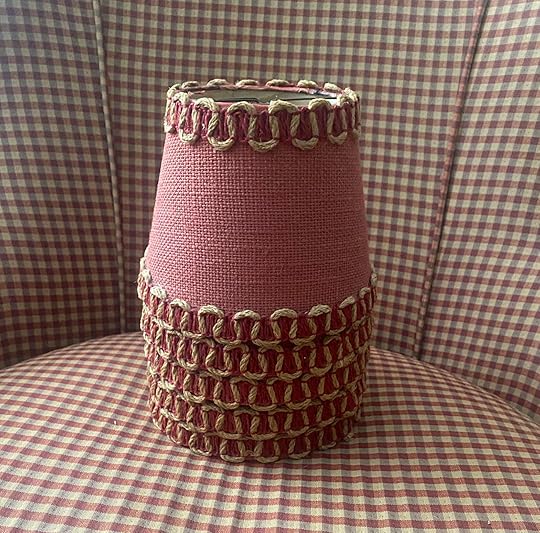 vintage (?)
Next, these miniature lampshades are probably the coolest things that I now own. I am not sure where they will go yet, but I am playing with the idea of installing a double bulb sconce somewhere in my living room (maybe in my gallery wall). That said, I think they look kinda cool just stacked up like so, and could be styled on a shelf or bookcase. What do you think?
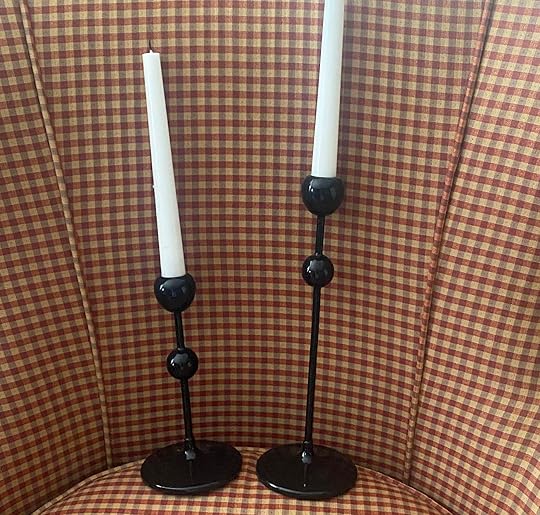 h&m – no longer available
I love the way these candlesticks look on my dining table because of the bulb shape and how they pull together all the black accents in my dining nook. I also think the modern shape juxtaposes quite nicely with the Eclectic granny-style I have going on.
You might think you’ve seen them before and you’re right! Here’s one way EHD has styled them in past projects:
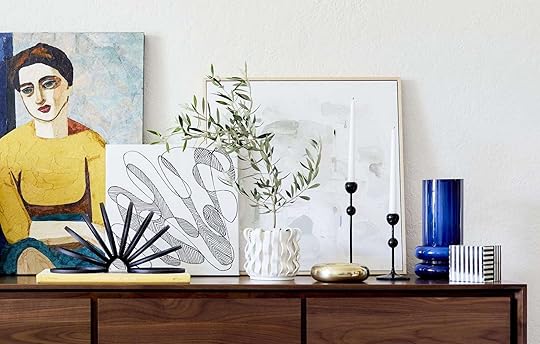 Styling by jess bunge with assistance from velinda hellen | photo by sara ligorria-tramp | from: 4 ways to style that credenza for “real life”
 You see, one of the greatest things about styling is how you can take the same piece and make it appear differently in different spaces Above, the candlesticks feel super modern amongst the abstract art and art deco pieces, but in my home they appear more dialed back and classic.
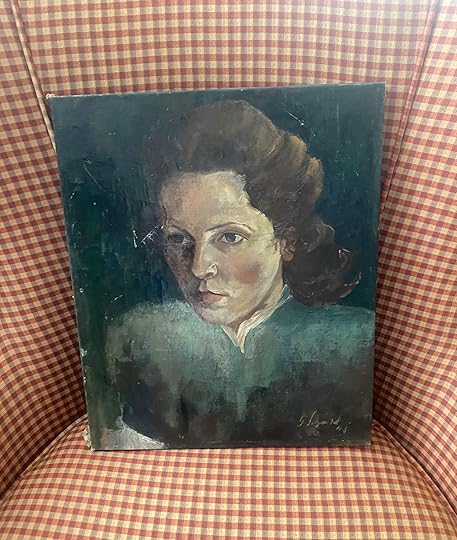
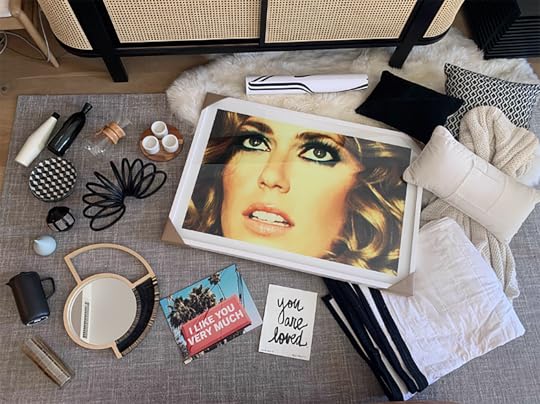
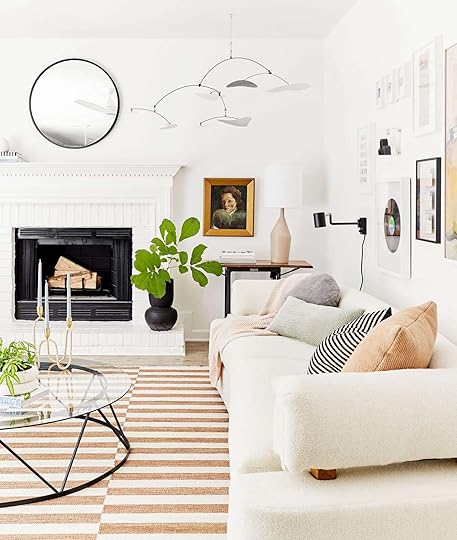 design and styling by emily bowser & julie rose for ehd | photo by sara ligorria-tramp| from: reveal: a budget and rental-friendly living and dining room (with 80% thrifted finds)
When I saw this portrait in the garage I almost couldn’t believe Em was giving it up. It’s a little beat up, sure, but the colors are gorgeous and it has a lot of soul. She is officially one of my favorite pieces on my gallery wall and I can’t wait to show you how she shines in my living room reveal, just as she does in the Atlanta project pictured above.
MALLORY’S PICKSGuys. Okay. First off, this was the coolest opportunity at the most perfect time and I cannot believe the stars have aligned like this!! I know we’ve all already told you about how Emily is the most generous person ever, but I have to say it again because look! Look at all the amazing things she gave me (and there’s even more than this, this was just all I could drag into one photo). As you may know, I’m working on my studio apartment MOTO, and when I moved in a year ago, we had nothing but a mattress on the floor and zero furniture. Emily even let me borrow two lamps because there’s almost no recessed lighting in the place and we didn’t have any light fixtures yet. We’ve come a long way since then as we’re getting closer and closer to finishing this thing, but no way in hell would I be here without Emily’s generosity. So let me show you some things I snagged!!
GAH I’m FREAKING OUT THIS STUFF IS SO GOOD. Now let’s get into some details:
 photos by tessa neustadt | from: 1 credenza 4 ways: bold mid-century contemporary
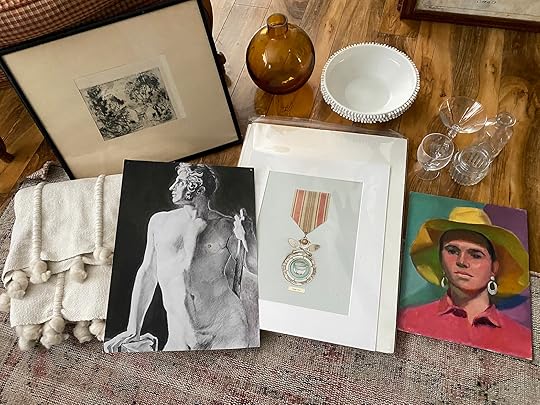
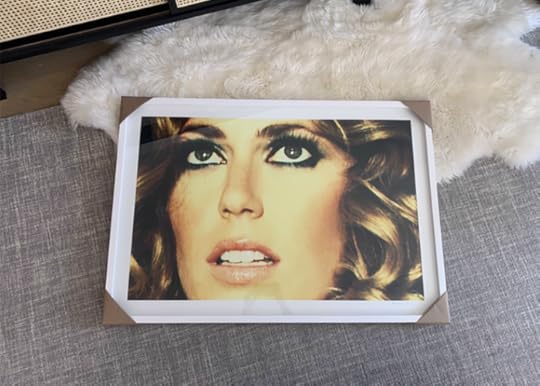
 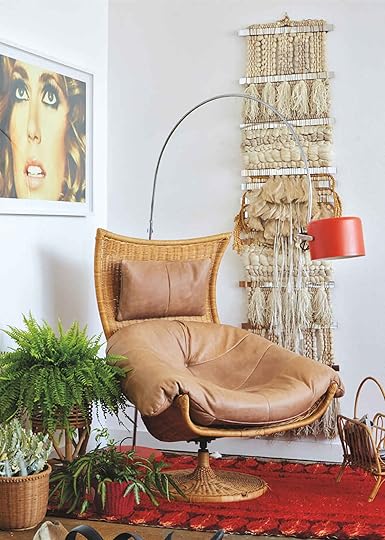 photo by david tsay for styled: secrets for arranging rooms, from tabletops to bookshelves
THIS LADY ART. I had seen this art in Em’s first book and I couldn’t stop looking at it. It’s SUCH a cool piece that demands your full attention, so it’s a great focal point in a room. The frame was not in awesome condition when I picked it up, so I took it to get reframed & VOILA! Good as new

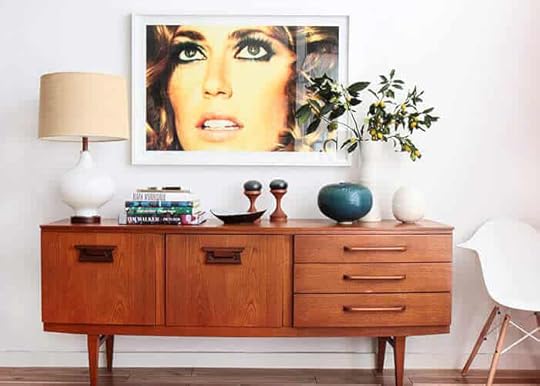
 design by julie rose for ehd | photo by sara ligorria-tramp | from: a mid-century eclectic living room with kilz primer and paint
This mirror from 54kibo has caught my eye for almost a year now. When Emily said, “HEY ANYONE WANT TO PUT THIS IN THEIR HOUSE AND SHOOT IT?” I screamed ME! But also Jess, Caitlin, & Ryann if you wanna borrow it for your shoots too lmk because this bad boy deserves to be photographed. Just look at her curves!!
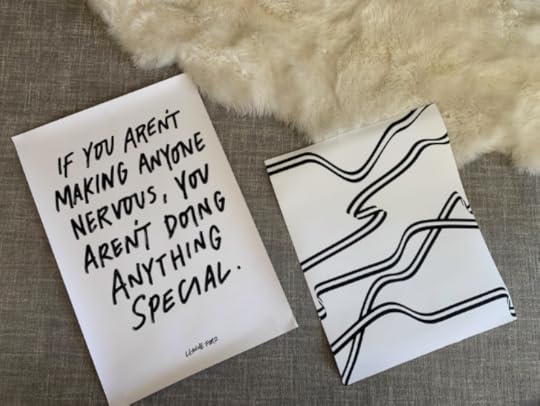

Lastly, these guys I wanted to call out because they’re so special. I loved this quote (which is blown up HUGE) that’s by Leanne Ford. It feels so cool to have this piece of a quote from a designer I love that was given to me by another designer I love. THAT’S special. Then also this piece next to it is also amazing (there are two of them!!) and it totally reminded me of Angela Chrusciaki Blehm’s ribbon art (is it by her?? I don’t know but Angela, if you’re reading this lmk so I can give you proper credit!)
Also this little black slinky thing on the right has a hilarious story that I must share. When I first started working at EHD we went shopping at the antique mall and Emily picked up this cool “vintage” slinky thing. She styled it out on a credenza and talked about how special it was and everyone commented that they had the same one from HOME GOODS. HAHA. I still love it so much and love the story behind it.
So what do you think? Do ya like my pile? I just have one more thing to say: THANK YOU EMILY!
JESS’S PICKSClearly, this was a dream come true (duh) but also oddly emotional (but that’s not surprising with me… I’m hereditarily very sappy so it’s par for the course). To be clear there were zero tears, just the knowledge that this was yet another closing of another awesome EHD chapter – Emily’s official LA departure. It’s getting real people! But there’s SO MUCH to look forward to so I happily took as many pretty pieces as possible (that made sense for me) because being surrounded by things that evoke happy memories is truly all that I want. Wanna see???
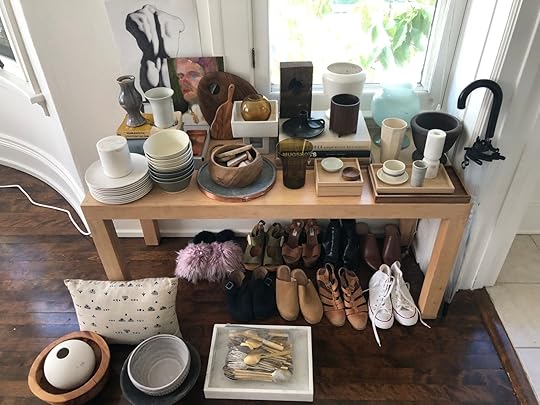
My heart rate skyrockets every time I look at this photo (and now when I see them spread throughout my home…so 24/7). So not only did I acquire an insane amount of styling gems that mean a ton to me but I am the only current member on the team who shares Em shoe size. WHAT??!!! I scored 9 pairs of extremely cute shoes that are about to hit these streets hard when it’s fully safe to do so. Watch out fellas! Anyway back to Sappy Jess, here are a few stand-out pieces I got and why they are special to me.
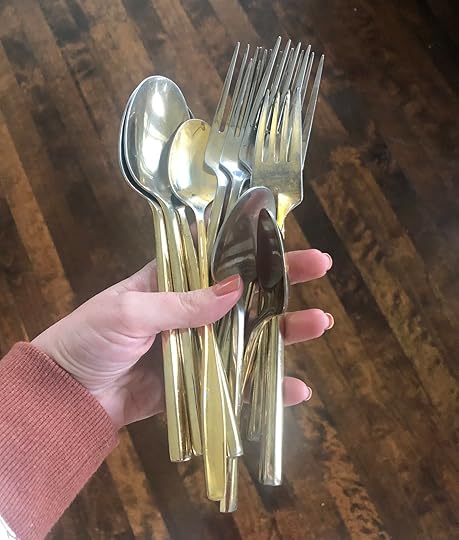
 photo by sara ligorria-tramp | from: #janstewary: how soup changed my life (& body)…really…and continues in 2021
First up is the giant bag of brass flatware. I know this may seem like a strange one but I remember going to for the first time and needing to get a fork or something from her kitchen. Now, prior to this, I was like all of you, a HUGE fan that had seen this home hundreds of times online. So to physically be in Emily Freaking Henderson’s home was beyond surreal. Then to top it off, she had the most beautiful brass flatware I had ever seen. To me, it was the peak of design to have every detail down to your spoon look chic AF. So while these pieces have been very well-loved, I jumped at the chance to get them into my kitchen. (Also they are very famous as they have been in countless EHD photoshoots. NBD)
 design by jess bunge for ehd | photo by sara ligorria-tramp | from: jess’ moto: you have to see how she hacked her rental kitchen with diys
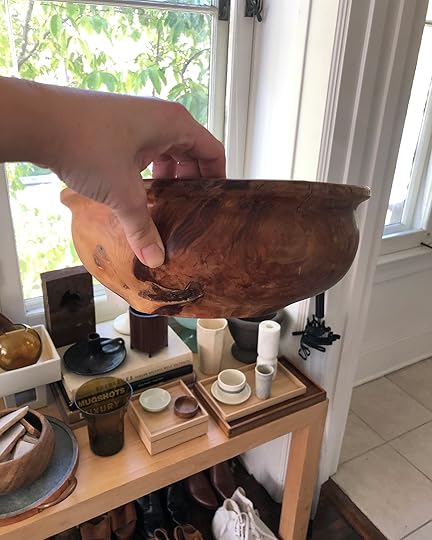
I think it was in stars for this bowl and I to be in each other’s lives. Why? Well for our MOTO shoots we get to pull from the props to fill out our spaces. You might remember my old kitchen had A LOT of shelving space to fill. So per Emily Bowser’s suggestion, I did a self of neutral bowls but needed one more, one with some real soul. Enter this beauty! I was VERY sad to give it back after my shoot but them’s the breaks. So when I saw that Boss Emily as I call her to friends and family (as I am blessed with many amazing Emilys in my life) didn’t grab it for herself, I quickly snagged it and asked if she was sure she didn’t want it. It was a true happily ever after for Bowl and Bunge.
 art by stephanie kurth | design by velinda hellen for ehd | photo by sara ligorria-tramp | from: sara’s living and dining room reveal
My oh my, am I a HUGE fan of this artist. Stephanie Kurth, sent in a ton of her beautiful art to potentially be used in the book (you’ll have to buy the book to see:)). Since I wasn’t on the team organizing the book shoots, I wasn’t made aware of her work until recently. Well actually, Sara used one of her pieces that she put on top of her dining room bar cabinet which I loved but thought it was vintage. That’s how much soul is in her work! They almost look vintage!! I knew that I wanted to use this piece in my home but thought it would be another borrowing situation like the bowl. But now it’s not, it’s going to stay with me forever. I can’t get over how much I love it and all of you need to go check out her site now and get something for yourself. You will be as happy as I am, guaranteed.
Now, I have something to say about literally every piece but you have lives and your time is precious so until my MOTO reveal I’ll stop here. Also THANK YOU, Em!
CAITLIN’S PICKSSo, uh, SURPRISE – I’m doing a MOTO!! After two years of sitting in my apartment and treating it as a holding cell, everyone on the team was basically like, “hey dummy, you have a great space and a ton of pieces already, just finish it; you deserve to enjoy living somewhere instead of just waiting for the next place,” and BY GOLLY, THEY’RE RIGHT. Em had opened up the garage a few times for picking over the past year but I had never gone, so I went HARD (and Em graciously let me go twice, on Monday and Tuesday, to make sure I could find everything!) and I’m so excited by all the finds. Here goes:
Basically, since our styles are so different, it was already pretty arbitrarily decided that I’d get anything pink, blue, copper, brass, OR anything with a super fun shape. I am still in disbelief that I got to bring home some Jane Denton pieces, because she’s an absolute favorite of mine. I also grabbed SO MANY more coffee table books than are pictured here – THANK YOU BOSS – in addition to some cups, which I’m ashamed to say that I literally did not own any until now. (I only have mugs, guys! WHY HAVE I WAITED TO BUY CUPS???) In any case, stay tuned because after two years of dragging my feet and some helpful encouragement from my stylish coworkers, my hereby-named ~disco deco~ apartment is coming to the blog this year (You see that 70s lucite coffee table pushed outta the way to the right? There’s more where that came from!!).
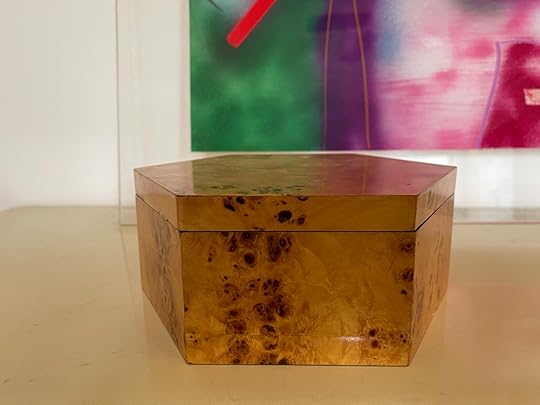 cb2 – no longer available
This hexagonal burl box is SO COOL and I wish it could say it was a super rare vintage piece, but it’s actually CB2! I love it a lot, though, because Jess was digging around when she found it and was like, “I loooove this,” before being like, “actually, I think you would love this, too, so you should have it” and then SHE GAVE IT TO ME. I know we all write a lot about how much we really love each other, but WOW, I really do love everyone at EHD (and not just because they bribe me with burl boxes).
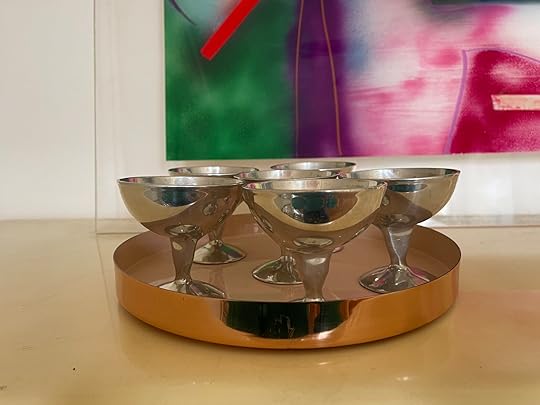 vintage coups | tray (similar)
I don’t know what these vintage aluminum cups are for (champagne? Dessert? Sticking your fingers in? Goblets for a Jetson? WHO KNOWS? Please advise!) but I love how special their shape is – the stems, in particular, are so beautiful to me because they almost look thumb-molded. I love, love, LOVE them – they were the first thing I grabbed for myself. (Actually, the first was that Schoolhouse lamp, but I knew I wanted that – these were my first dig find!)
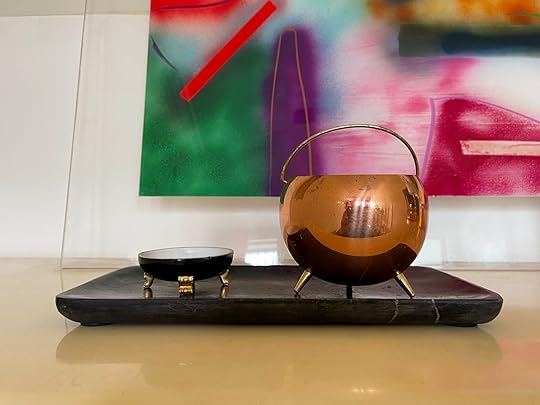 vintage
This is technically two pieces but it was a total kinder-egg style surprise! I saw a flash of copper through a ton of paper in a big box (I’m like a crow when it comes to shiny things) so I dove in, unwrapped, and FELL IN LOVE with this sweet shape and brass accents. But then, as if my newfound magical styling cauldron wasn’t enough, this tiny black dish with sweet pedestal feet was wrapped inside!!! I’ve missed the flea market SO MUCH and this find ignited all of those long-dormant dopamine receptors. I LOVE THEM.
So hopefully this post got you even more excited for the team’s MOTOs because I know I am! Now as I said at the beginning of the post they hardly made a dent… I know that seems impossible but it’s true. So after they were done I arranged for Pen & Napkin (remember the amazing folks from the charity rummage sale??) to come and get whatever they wanted which was basically everything else. The great news is they are planning on having another sale which means you can potentially get in on the prop garage goods too. We will for sure let you know more info when we have it.
Hope you all enjoyed this post and we are so curious to know what pieces you love most? Would you have fought for anything in particular??
Opener Image Credit: Design and Styling by Emily Bowser & Julie Rose for EHD | Photo by Sara Ligorria-Tramp| From: Reveal: A Budget and Rental-Friendly Living and Dining Room (With 80% Thrifted Finds)
The post The EHD Prop Closet Isn’t Going To Portland…So Here Are The Art & Decor The Team Scored For MOTOs appeared first on Emily Henderson.
March 25, 2021
The Farmhouse Second Floor Plan (It’s So Much Easier Than The 1st…Hopefully).

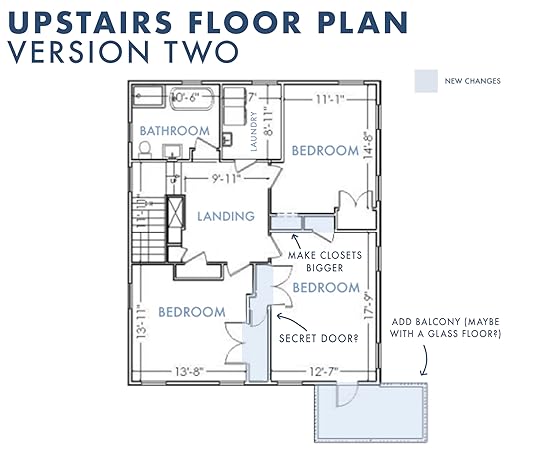
The first floor floorplan was a DOOZY, for us and for you. Thanks to a lot of your input Arciform, Brian and I have actually done some pretty substantial changes that Brian will be writing about (we agreed with many but not all of the ideas). But for now, the much easier floor is todays subject – the original bedroom floor and where we are hoping to just work with the original layout, while making a few substantial lifestyle improvements in the storage and laundry departments.

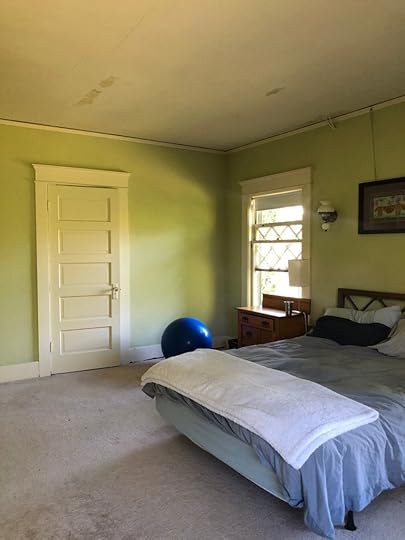


The layout was pretty great upstairs. We love the spacious landing and how all of the bedrooms and bath open into that landing. All three bedrooms are corner rooms giving them all great light with original windows and enough space. Our only issues with the layout of it was needing bigger closets and we fantasized about having a stacking washer and dryer for the kids to do their own laundry and bedding.
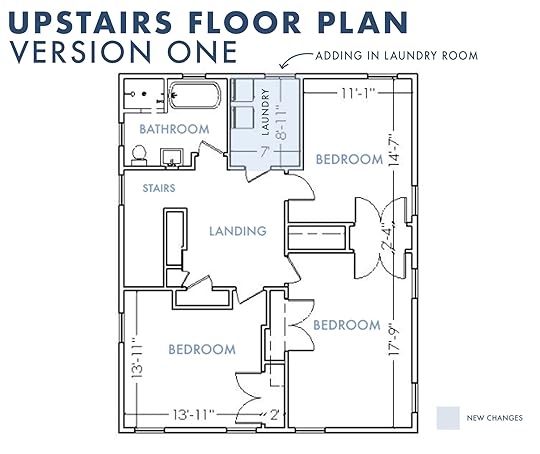
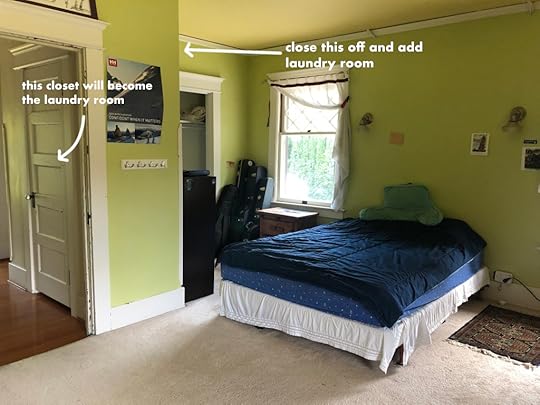
In the first version that Anne sent to us we were ecstatic to see that there wasn’t just a stacking washer/dryer in the landing but a whole (if not tight) laundry room. She stole from the biggest of the bedrooms (that will be our guest room) to make it AND it even has a pretty original window!! We’ve chosen to have this (plus a stacking version in our primary closet) instead of a full fledge laundry room somewhere on the first floor or basement (with is only 6′ tall and like a dungeon so its likely not going to be a space anybody wants to hang out in). Again, this is a pure lifestyle choice as we know that the kids will be more likely to be more responsible for their own laundry if its near them (and same with us).
If you want to see me lay this whole thing out in video form…the check this out (wait for the ad to play then enjoy me pretending to do laundry in our “new” laundry room)
Next the closets…
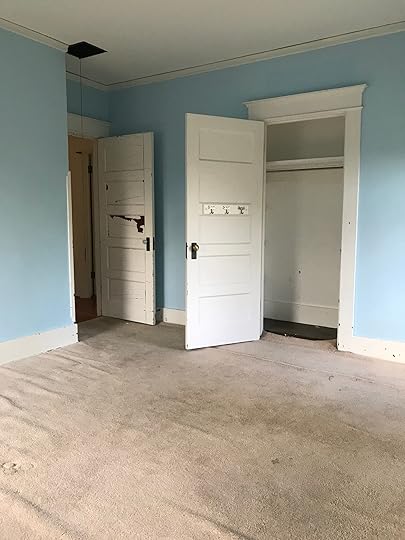
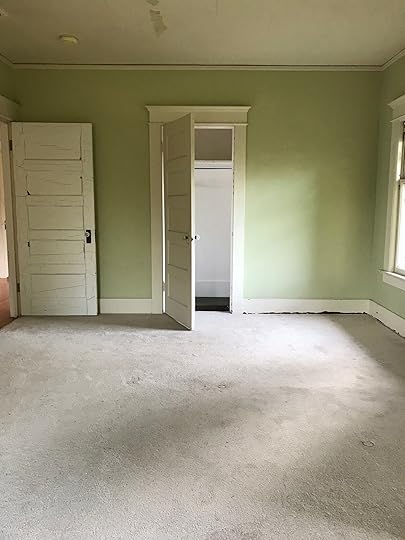 small, sad closets
The closets were all pretty small reach-ins and while these kids don’t need walk-in closets we knew there was space to make them wider and more functional. So we recongifured the space to give them each larger closets + to add a secret passageway between their two rooms (which they won’t stop talking about).
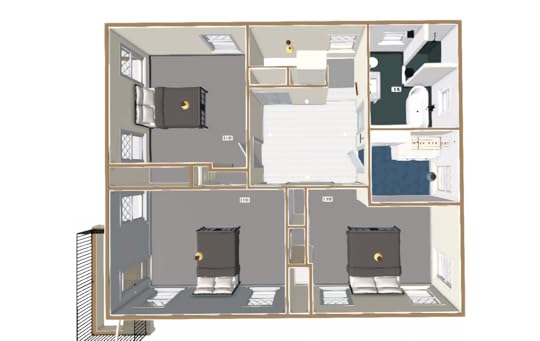
We don’t know whose room is whose yet TBH. Right now they share a room and love it so they say they want to share a room up there, and then have the second bedroom as a playroom and the third our guest room. But by the time we actually move in they might want their own space (Charlie will be 8 hopefully). I’d prefer them to share until they don’t want to anymore (we hear around 10/11 is when the older one wants some more privacy as they near puberty – dear god we can’t be so close to that!!!). Either way we are ok with letting them decide, I just might not be able to totally design the rooms for a while as where they land might be in limbo so all three rooms will be designed initially with a lot of flexbility.
Now, whats up with the balcony?

Well, until last week we had a sunroom with a balcony on top of it. Brian had this awesome idea of a glass ceiling which admittedly I thought was both cool and unnecessarily expensive (and maybe weird), but he was SO excited about it that we kept it in the plans. But since we have shifted the first floor and now there might be a sunroom but it’s going to be smaller, and then to save money we’ll eliminate the balcony and just have a normal non-walkable glass ceiling. I actually wasn’t psyched about the kids having a balcony off their room anyway. So we are back to just having a window there instead of a door.
Lastly the bathroom will have the same footprint that it had before as we are hoping to barely change the plumbing and save on that. We MIGHT even be adding in a double sided, shaker style cabinet that connects from the bathroom to the laundry room. The thought of putting your dirty clothes straight into the hamper in the laundry room is very exciting to us and our kids don’t even realize how good they’ll have it.
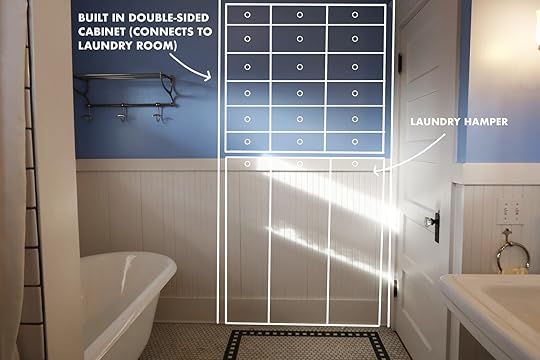
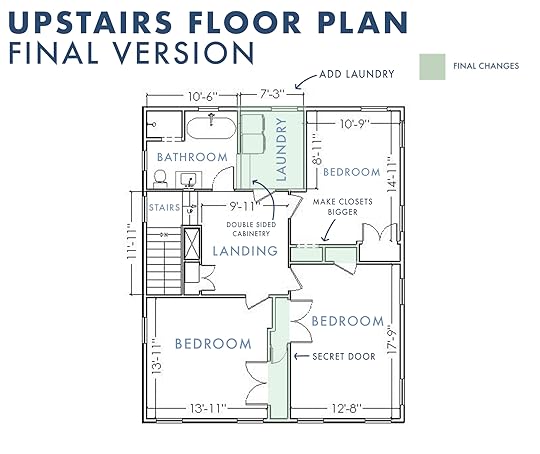
I feel like there is NO way that this could change much based on your comments, but then I honestly thought the same with the first floor post and look what has happened. After I posted it i thought ‘this is it, we aren’t changing our minds as this is the best floorplan possible’ then lo and behold enough of you had the same ideas so we had to try them and then once we saw the drawings we realized that some of you are absolutely right. We are still working on it, but we feel that this floor is pretty darn SOLID. Eh?
The post The Farmhouse Second Floor Plan (It’s So Much Easier Than The 1st…Hopefully). appeared first on Emily Henderson.
March 24, 2021
How It Feels To Watch Design Star 10 Years After Winning (And Why I Said No To Being A Judge)

My kids (and Brian and I) are obsessed with watching talent competition shows, so Brian thought it would be “fun” to rewatch my season of Design Star with them, shot 10 years ago. And y’all, the kids did think it was fun, but it was VERY HARD for me to watch. Let me be clear – winning Design Star changed my life. It blew up my career. I’m ENDLESSLY grateful for HGTV and they have always been so good for me. But I realized why it was hard…
Reality shows have changed sooooo much for the better – and this season, in 2021, of Design Star Next Gen is pretty darn GOOD and so different than my year. You can see real talent and while they are still designing under such wild constraints, they for the most part have enough time to make the rooms look really GOOD. The producers this time around (partly due to Covid) basically do the in/famous “white box challenge” for each contestant every episode, calling them their design “labs” that they redo every week and I think totally works. Kudos to HGTV for figuring this out during Covid. They have a huge inventory to pull from and it seems like they are able to send people out shopping for specialty items like wallpaper. I LOVE this season and it seems like HGTV and the producers want to showcase great designers and their work, not internal drama.
My season of Design Star was very very different than this season. And while I lived it, watching it back was pretty shocking. It was produced by Mark Burnett – yes, the creator/producer of The Apprentice and Survivor and a huge name at the time. Now while I came to care about a lot of the producers (Stockholm syndrome is real) the reality show culture back then was focused far more on creating drama, drumming up fights, and putting people in really uncomfortable positions to create problems. It was way more about personality than talent (which is fine, but maybe not on a talent competition show). In fact, only the first 30 on-air minutes were dedicated to design, the last 30 minutes were us up on stage defending it to the judges and answering really uncomfortable questions about our competitors/friends. It’s just how it was. We recently tried watching Work of Art from 2010 and it was the same thing – people clearly being pinned against each other, not set up to really show off talents, and judges being strangely mean. When we were being interviewed most of the questions were about the other contestants and their design, and I was smart enough to not say anything that I would regret. I was extremely diplomatic, which is why I wasn’t quoted on camera very often and seemed barely on the show some episodes. I was just kinda “boring”. Watching it back I can see on my face and my body language how I wanted to go home almost immediately. I’m not competitive with other people, at all. Plus as a stylist, I wasn’t a big picture designer that could design on paper, I needed vintage and thrift to create a room. That was the hardest part about watching it back – I was pretty unimpressed with myself (and after watching Blown Away I could tell my kids kinda were, too).
When the challenge was to “make a room look like how the sound of a tuba makes you feel”, and you are given $500 gift card to shop at Macy’s, you can imagine how good/bad the room will look. We were all so embarrassed at the time. I actually think Nina, who as you might remember wasn’t exactly my friend, stood out – she at least did something intentional. Rewatching myself during that feud even I thought, “I see why she called me so weak”. Not that she should have, but when she yelled at me aggressively I would just walk away. I’ve since learned that I have zero tools to know how to respond to someone else’s angry, aggressive temper when it’s pointed at me and just generally defend myself a bit. But as it persists I start crying and just remove myself from the situation. This is recent news to me as it has happened in two separate instances last year. However, it tracks and seeing it on camera made me feel bad for my 29-year-old self and so grateful that I married someone who also is not a yeller and doesn’t have a temper. But it was hard to watch. I remember the producers BEGGED me off-camera to stay that week because I asked to go home. Based on how it was going (badly) I was sure I wasn’t going to win, and my personality wasn’t good at the feuding. I was NOT having fun, at first. I felt bullied and my first few designs were so bad. I just wanted to call it.
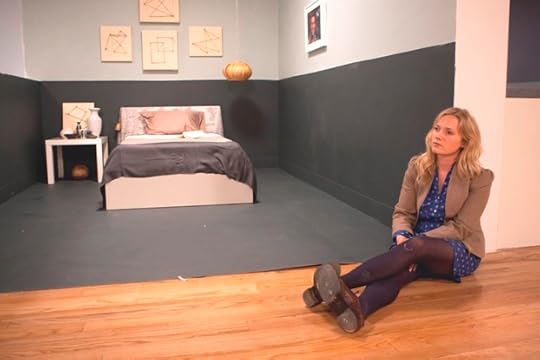 i mean, i was NOT proud of this…does my face give it away??
On our season we had 5 hours to do the white box challenge. FIVE. We arrived that morning, were given the challenge, went shopping at one store with $500, and had to reveal that night. Every room was so bad!!! And it continued – watching it back, none of the rooms were impressive (some had cool things, but I think every contestant of 2010 would agree it wasn’t our best work). I remember around episode 8 The Apprentice producers were pushing us to make the rooms just look better. I told them the truth – We can’t make beautiful rooms with limited furniture, no money and no time. I remember specifically saying, “you’ll continue to get mediocre results until you give us more time and better places to shop”. Having never done a design show before this was news to them. They knew how to produce The Apprentice, but not a design show and their tool bag (drama, unrealistic challenges, mean judges) didn’t work at HGTV. By the way, I really cared about some of them and I’m still facebook friends with many. They started to understand and asked me where should we shop. Since I was a stylist in New York I gave them a list of cool stores that they contacted and the next episode those of us who were left got to shop there (and that’s how I won the glasshouse challenge – because I was able to go thrift store shopping).
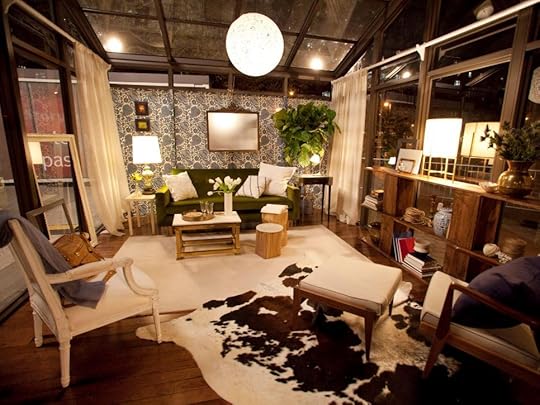 the glasshouse challenge
It was a 6-week adrenaline rush, living in the house together, on camera every second of the day unless you were in the bathroom. After Nina left I had so much fun and started to maybe want to win. However, I lost 15 lbs and by the end, Casey and I both couldn’t talk due to laryngitis. I became super close to Casey, Dan, Court, and Stacey. I think Dan should have won the whole thing personally, he got sent home way too early and I’m happy to have seen him on HGTV a lot over the years. We all talked daily afterward and got together frequently because we needed each other. It’s like no one else could understand what we went through. I remember after I won the producers told me to get a couples therapist because competing and winning a reality show and the fame that would ensue would be very hard on my marriage (they were right…at first). Oh and here’s my last juicy secret – we weren’t allowed to talk on the phone to any loved ones but we were allowed to email once a week and Brian and I had set up a code early on – that the “weather” would be the indicator of how I was doing. So even if the weather was great, if I was doing badly in the competition I would say “it’s a lot colder than I thought it would be this week”. I didn’t win one challenge until near the end, so the weather was normally bad to ok
Reliving it was fun, weird, and far more embarrassing than I thought it would be. It was a different era in reality shows – which is one of the million reasons that this year’s Bachelor was almost unwatchable – the producers should be fired for drumming up so much unnecessary and gross drama in the house. Shame on them. Ahem.
Anyway, thank goodness that our culture has changed and there is such a better focus on creativity in these talent shows.
Proof – you can see it in the new Design Star – it feels positive and friendly, and they are given at least “3 days” to produce good results (I wish there were 4 days – I personally want to see the best result possible without them running out of time). Our kids LOVE watching it and we have our favorites, but honestly now that we are down to the final four and they are all good. And the judges are pretty nice – it now feels so dated to encourage judges to be mean to these people who are putting themselves out there to the world, trying to be EXTREMELY creative with no resources or time. Ten years ago they would ask us in front of our fellow contestants, on the dark foreboding stage, who (of our friends!) we think should go home. My kids were horrified and kept saying “this show is really mean, mama”. Seeing the difference actually gave me hope that we are moving in the right direction on some things. Great job, HGTV.
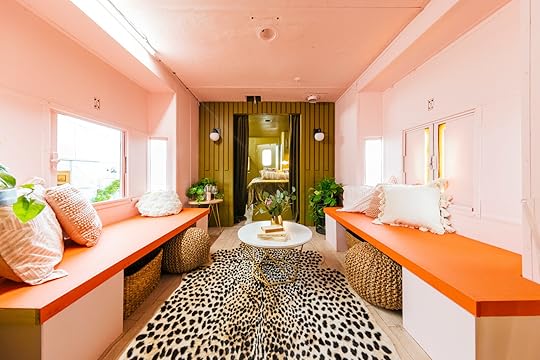 look at carmeon hamilton and eli hariton’s amazing transformed train car
 and this bar!
So that’s why I didn’t judge it. In early fall they reached out, asking if I’d be one of the main judges and I was very, very flattered – OF COURSE. While I haven’t been on HGTV in 7 years I’m a Design Star alum who can solidly say my career was launched by this show and this network. I owe them A LOT. I was SO excited about the show, but I had too much happening at the time that I couldn’t cancel. Plus I wasn’t comfortable being gone for over a month. I just didn’t want to leave Brian and the kids for that long during such a weird time in the world. But I think the truth is that I think I’d be a terrible judge. Having been in the contestant’s position, trying to be creative under pressure with such limited resources and time constraints, and doing it so publicly – putting themselves out there to the world, being so vulnerable for so many people to watch – I can’t do it. I knew that my empathy towards them would trump my ability to be a great judge, I would only say positive things, and I certainly would not be able to be snarky or harsh. I’m not saying I’m the nicest person, I can be snarky FOR SURE, but I refuse to do that to another fellow contestant, so publicly, having been in that extremely vulnerable position myself – even if it was 10 years ago. I’m bad at giving negative feedback in every way. I know that writing this will take me out of the judging game altogether for any future seasons, but that’s ok. I talked to Brian about it before I posted this and he agreed that being a judge is not right for me, and watching this season confirmed it. I wouldn’t be able to say enough critical feedback (on the spot) to do a proper job. I want them all to win.
Now, I would LOVE to be a Tim Gunn character – a mentor to give advice and help the designers throughout the process. I would love to be on their side and give tips, maybe push them a bit, coach them on the content creation side. Uplift them, encourage them when they are feeling defeated, and just root for them. Now THAT sounds fun.
Also, I would want to give all of the designers a heads up on what the themes of the challenges are before they come on the show so they can get the creative juices flowing in order to execute something extra incredible. And maybe they did. This last week I was super impressed with all of them. OR maybe that’s cheating and I just personally need more prep time to be super creative. In the past, I know that I relied too much on curating awesome materials together within an architectural framework rather than being able to concept designs quickly from scratch. I think my white box challenge was the best example of that – I didn’t find much at the store that I loved for the room, so I literally just didn’t buy anything. I know that I have obviously grown since then, but I think that a white box and warehouse full of Wayfair furniture would be extremely hard for me even now. I don’t think I’d win this year (so maybe it’s good that I was the Mark Burnett year after all. Ha)
Anyway, I just want to say congrats to all the designers who started the season and those who are remaining. I feel you. I know what you are going through both during filming and after and I want to say that you are ALL doing an incredible job for something SO very difficult. It looks easy on TV but I’m here to make sure the world knows that it’s NOT easy, it’s VERY difficult to do what you are doing and you are killing it. And again, thanks to the producers for creating a positive competitive environment with a focus on design, not feuds and drama that I can watch with my kids.
Are you guys watching it? How are you feeling about it? Oh and it’s only on Discovery + which at first I was bummed about but the app is FULL of great shows in all the categories, including Magnolia which I’m very excited about. And no, this isn’t sponsored by them in any way
 from left to right: chris goddard | marisa molinaro | tony allgeier | carmeon hamilton | allison holker (host) | peti lau | arianna danielson | eli hariton | justin williams
If you all want to go follow all of the contestants and give them some love and support – above are their Instagrams. I knew Carmeon, Justin, and Arianna before and am so glad they are on the show. It’s been so fun to watch, but I’m sure glad it not me
The post How It Feels To Watch Design Star 10 Years After Winning (And Why I Said No To Being A Judge) appeared first on Emily Henderson.
March 23, 2021
Caitlin’s Joint Nursery/Office Update – Figuring Out A Multifunctional Layout

OH BOY, I have a design update, and it’s a big and juicy one! Here’s the deal: two people I love very much are having a baby! The catch: they live in an apartment and needed their nursery space to do double-duty as a WFH office. I wrote about the initial plan back in January, and, well, the parents of the EHD world really did NOT love this joint-space idea. The comments all read, “Caitlin, no!!!” so naturally, I said “Caitlin, yes!!!”
Look, I read all your feedback and took it to heart – you influenced everything from the color palette to the layout to the furniture pieces – but after a lot of back and forth between my friends and I, we did go full steam ahead with the multifunctional space plan (with a little twist!). And y’all, all the major pieces have been ordered, shipped, and installed – my friends are living with this space RIGHT NOW.
The room still needs a little styling and sprucing – we’re waiting to get to know both the baby and the parents’ care-taking preferences a little more before we grab the finishing touches like organizational tools, blankets, or custom signs – but today, I wanted to walk you through the whole layout and furniture selection process from start to finish.
Sometimes I read reveal posts and I’m like “YEAH, but HOW did you figure out how to do that?” so the over-thinker in me wanted to pop in this morning with a real look into a regular person’s process. Maybe you’ll read and be like, “Hey, that’s exactly how I, another regular person, also design my rooms,” and we can just gab about our processes in the comments. Or maybe you’ll be like, “You fool!!! Why did you put the office in there after 100 people told you not to,” and I’ll say, “but did you see how I prepared for a scenario where it doesn’t work out?” and we’ll gab about that. In any case, let’s get to reading so we can get to gabbing!!!
A Quick Catch UpIt’s been two months, so let me refresh your memory (unless you have an elephant memory, in which case you can skip down to the “tips” section): 10 years ago, I tweeted at two of my college roommates and told them that they should date. Instead of being weird or off-putting or presumptuous or awkward, it was very effective: they did, in fact, start dating. And then they fell in love, got married, and now they’re expecting their first child. The moral of the story here is that you should always play matchmaker in a very public (and potentially embarrassing) way, because (a.) the matchmake-ees (not a word, but should be) will end up super happy together and (b.) you’ll have a good story to tell at dinner parties. (Or, like, a good story to write about on a blog for millions of people to read. Either way – a win!!!)
 marissa and jess – the parents to be!
But more than that, these are just really great, kind, salt of the earth people who deserve a room makeover. Marissa is an awesome, super-smart librarian (she even worked in our college library, so she’s serious business!) and Jess is finishing up his Ph.D. in saving the world. They are both warm and hilarious and SUCH bright lights in my life, and since I have a very vested interest in this baby, I wanted to gift them a special nursery (for baby) and functional office (for Jess).
 the view from the entry & closet area
So this is what we started with: their original primary bedroom. It was pretty much a blank canvas with neutral walls, carpeting, and classic apartment vertical blinds. Jess and Marissa chose to relocate into the smaller, draftier guest bedroom so that this room would have space for the baby to crawl, learn, and play while Jess would have room to, like, teach the next generation of climate leaders while working on his own research and projects. NBD.
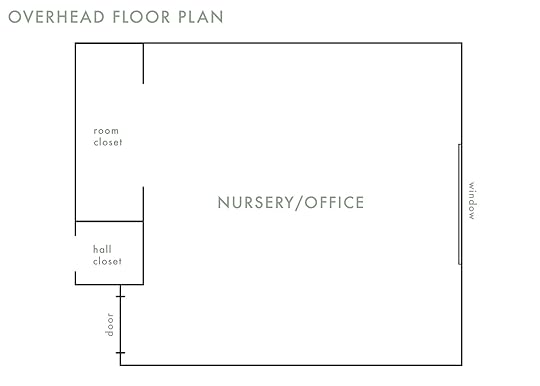 a nice blank canvas!
The room is pretty cozy – only 11′ wide by 12′ long – but it is blessed with an awesome layout already. Multifunctional spaces can be tricky when you’re working around a ton of doors or windows (where do things go??? How can you make zones out of such fragmented areas???), so having two straight, blank walls paired with a one-windowed wall and a wall with all of the doors made this a real treat and allowed for a ton of layout possibilities.
What They Wanted“We were hoping for a nature/plants/forest animals?/cats theme… mostly nature-ish with cats and other animals sprinkled in. Idk it all works together in our heads.”
That was the initial design direction given to me by Jess, which I loved. But when I prodded further, asking how they wanted the room to feel, Marissa responded, “green.” That may have been the funniest answer I’ve ever heard to that question, and I do love a gal who knows what she wants, so we rolled onwards. They also had received a few pieces from their baby shower that they wanted to be incorporated into the room…
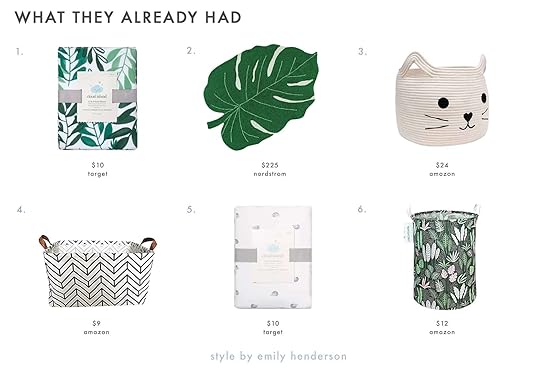
1. Leaves Fitted Sheet | 2. Monstera Leaf Rug | 3. Cat Woven Bin | 4. Rectangular Storage Bin | 5. Hedgehog Fitted Sheet | 6. Collapsible Laundry Basket
These were helpful to see as they really dictated the exact shade of green we’d be shooting to encapsulate – it’s a really bright, saturated, happy tone (no olives or sages here! These two were ALL in). But beyond the color scheme and nature direction, these were the other primary requests:
Walnut or gray wood, with chrome accents (this was a fun challenge for me, as my instincts always go straight towards whites, oak, and brass – this project did turn me into a chrome believer, though!) A crib that is safe A rocker that is not an “ugly granny chair” A desk with storage options that makes Jess look like “a semi-professional podcaster when he’s running his classes and meetings on Zoom University”Whimsy, bright, fun artSo with all these things in mind, I started to source furniture, sent a ton of temporary wallpaper options to Marissa and Jess to make sure I was jumping off in the right direction, and started to pull together an initial design plan and layout.
The Tips from You, My HeroesThat’s around where we were when I posted the original intro post, and you all provided some INVALUABLE feedback. I know that Em can testify to this, too (she’s changing her home layout in response to your comments!), but y’all are a smart and thoughtful bunch. I’m really lucky to have you as a sounding board! Here are the big 3 that really stuck with me that I hadn’t really considered:
From Virginia: “There is SO MUCH PATTERN all the time. So it can be really nice to have some neutral pieces in the mix.” This one definitely informed the furniture decisions – I wanted neutral, clean backdrops for the baby paraphernalia, but it was especially valuable when I picked out the wallpaper.From Rachael: “Some advice from someone who did a PhD while having babies—you cannot use the same room for an office as you can for a nursery.” Boy, this one weighed heavily on me…and I thiiink I figured out a great little solution in case things go south with a shared space. Read on From Erica: “I agree with the others who are confused about an office/nursery combo. Even if the baby is sleeping elsewhere, wouldn’t the background on said Zoom calls be a crib?” And yes, this was the comment that influenced my final, official layout. Without further ado…Where We Ended Up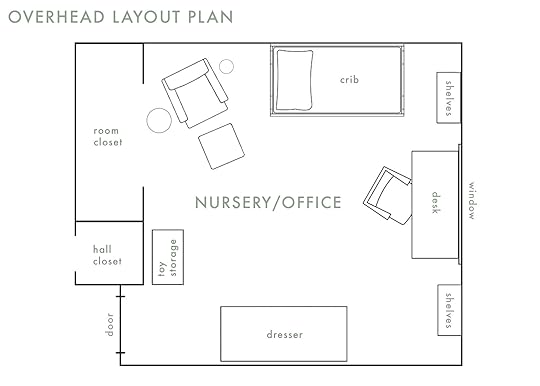
OH BOY. Let’s break this down a little bit and show how we got here. (It’s like showing your work in math class, except this is actually fun and I’m not crying.)
Starting counter-clockwise, from the top: I got Marissa an awesome, not-fugly glider (hooray!) with a matching storage ottoman and a great little end table, so she could be comfy while hanging out with the baby. I also decided to put the crib right next to it for easy lines of sight from the hall door. On the next wall, I diiiid install a desk (just wait, it’s flexible!) flanked by two wall-mounted shelves, which will be awesome for joint toy/diaper/other things babies need AND Ph.D. storage (the anchoring also makes them great for not falling on baby, which I was VERY concerned about at every stage of this process).
On the other long wall, I grabbed them a stunning long and tall dresser to do double-duty as a changing table (it’s gorgeous, you guys – just wait!!!) and finished the room off with two kid-sized storage bins in the tiny area between the entry door and the closet doors. It’s a really practical and fair layout for a room that’ll be working overtime.
OKAY, ENOUGH TALK. NOW THAT YOU KNOW WHERE IT’S GOING, LET’S LOOK AT THE ACTUAL STUFF I BOUGHT!!! You know, the things that are actually living in Marissa and Jess’ apartment RIGHT NOW!
The Crib Wall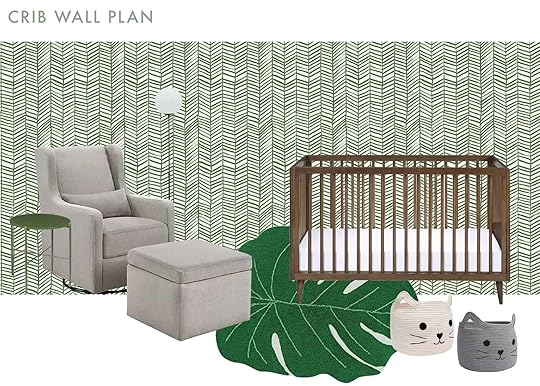
Wallpaper | Side Table | Glider & Ottoman| Floor Lamp | Monstera Leaf Rug | Crib | Cat Woven Bins
First off: I cannot tell y’all HOW MANY WALLPAPERS I looked at. I must have sent Marissa and Jess at least 30 options – there were a few that they loved (and even more that they did not love, if I’m being honest), but once I found this one, I was done. It echoed a pattern I knew they liked (they had herringbone bins from their registry!), and it felt like a nice mix between “green” (see, I can take direction!) while still being “youthful for baby,” and “not embarrassing if your coworkers catch glimpses in the background of a Zoom.”
I really liked that it was a simple, saturated pattern, so Marissa and Jess can shift decor as baby grows – it looks like leaves but it’s not super literal, so while it works for this “nature/plant/animal” theme, it can complement any other style they lean into down the road. Color-wise, it also worked with the tone of their rug, which was ::chef’s kiss::. 10/10 BIG FAN OF THE WALLPAPER.
Next up: that crib! The other bonus of picking such a light yet saturated, bold wallpaper was that it made an awesome backdrop for a sturdy, timeless walnut crib. This one was from Target and it’s a 3-in-1, so it’ll last a few years as the baby grows! Plus, it looks like a million bucks (despite being under $300 – what?!) and it’s SO SWEET when flanked by their really cute, textured happy cat bins.
Jumping over to the left, you’ll find the beautiful, comfortable glider! She’s sleek, modern, definitively NOT granny, and she came with a great matching storage ottoman, which is obviously key in a multipurpose space. Most importantly, though, this glider was very highly rated by actual parents, which was why I wanted to grab it for my pals. (Bonus: Marissa and Jess’ cats LOVE taking naps on it, which feels like the ultimate comfort endorsement.)
And you know I’d be remiss if I didn’t include some Article in an EHD room – I love this sturdy, four-legged green table for an extra pop against the glider – it brings the green a little further into the room – and this simple, graphic globe lamp for a little hit of black some contrast against all of the straight angles in the space.
The Office Wall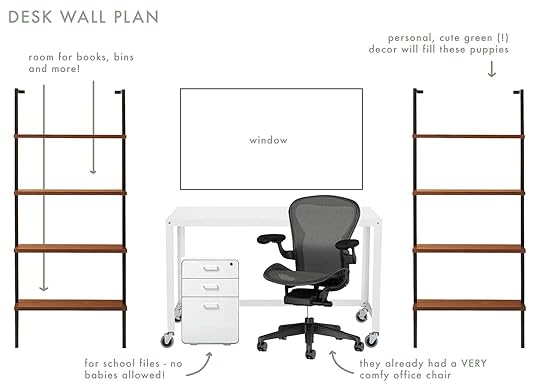
Shelving Units | Desk | Filing Cabinet | Office Chair
THE CONTROVERSIAL OFFICE. Here’s the deal: I decided to flank the windows with 2 wall-mounted bookshelves from CB2, because (a). I thought it would look nice and bring some symmetry to the space, (b.) I wanted shelves that were anchored to the wall, and (c.) Marissa and Jess have floor heating, so I wanted to make access to that hot vent a little more difficult for curious babies. I went with the awesome walnut and black finish, which speak to the crib and the Article lamp from the other wall. These units are a blank slate with a TON of storage (I have 4 in my own home and they hold SO much!) – I can’t wait to see them all styled out with bright toys, textured bins with daily baby essentials like wipes or diapers, and sweet books (and also some serious books, for adult Ph.D. learning).
Conversely, I decided to go with a white desk – overruling the couple’s preferences!!! – to make sure the room didn’t feel too heavy. Plus, the white will reflect the light from the window and Jess will look like a VERY professional podcast host, instead of his earlier goal of just looking like a semi-professional podcast host.
But beyond that, I decided to put the office area on this wall (instead of on the wall across the crib) because it will provide a cleaner background for Zooms – you were right, we don’t need a crib in every shot! Jess will be able to angle his computer towards the dresser and entry and totally mask the fact that he’s, you know, working from a nursery. In the daytime, he’ll also be able to work on his angled computer without having any computer light shining straight into the crib, which is a nice win.
But let’s talk about the real coup here: I heeded your warnings!!! I ended up going for a rolling desk and a locked rolling filing cabinet in case the combined spaces do get a little bit untenable. Jess will be able to unlock the casters and move everything quickly, without hassle, and by himself (I mean, Marissa will have given birth – she’s done enough without having to rearrange furniture). This desk is about 48″ wide, so if the office doesn’t work out, they’ll be able to pull in a tiny loveseat and make a sweet reading nook surrounded by the shelves. Plus, Jess found and fixed a classic Herman Miller chair for like, 20 bucks, so…that’s awesome, and I wasn’t going to fix what ain’t broken, you know?
The Dresser Wall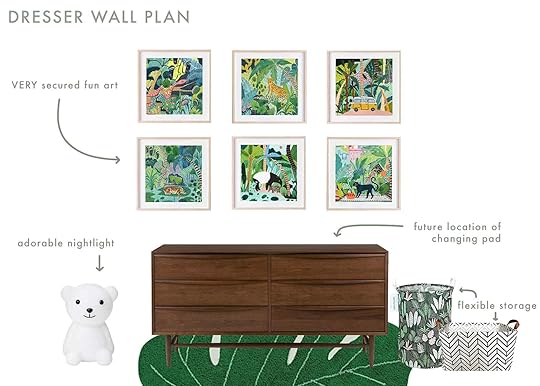
Bear Nightlight | Dresser | Monstera Leaf Rug | Collapsible Laundry Basket | Rectangular Storage Bin | Art (clockwise from top left) 1 | 2 | 3 | 4 | 5| 6
Fun fact: so many of you had said that the Ikea Hemnes was the perfect height for those looking for a double-duty dresser/changing table, so I went on the prowl for something with the same height…and BOY, DID MY JAW DROP when I found this walnut one from Article. Nothing else could compete!! It’s gorgeous and mid-century inspired with tons of storage AND it’s a great height for easy diaper changes. Plus, it’s a keep-forever piece that Marissa or Jess will be able to work into a ton of different rooms in the future – is there a room where this classic shape WOULDN’T look good? (Answer: no! It would be stunning in any space.)
I flanked it with their existing storage bins to bring in some of the pattern from the opposite wall, but I also had to grab this adorable bear nightlight. HE’S SO CUTE AND HAPPY and he looks like a nice gentleman who would be friends with the cat bins. He was also surprisingly affordable, so uh….add to cart. I love a smiling animal and I’m not afraid to say it.
And last but not least, that art!!! This was actually straight from the requests of Marissa and Jess – they had found the artist on Etsy and said they loved her work. Her name is Amber Davenport and has SO many amazing pieces, but I ended up choosing these six (you can actually get the cats in a set of three; I bought the other three a la carte) to hang in a grid pattern above the dresser. I wanted to bring some more color and life to this side of the room (so the crib wall wouldn’t feel too overpowering), and these pieces were the perfect balance of vibrant and cheerful without being too busy – if Marissa and Jess bring in print through changing table pad covers, toys, onesies, etc., the art will still have enough “oomph” and color variety to stand on its own without clashing. Per your feedback, these will be VERY anchored to the wall. (Thank you, wise parents!)
The Storage Wall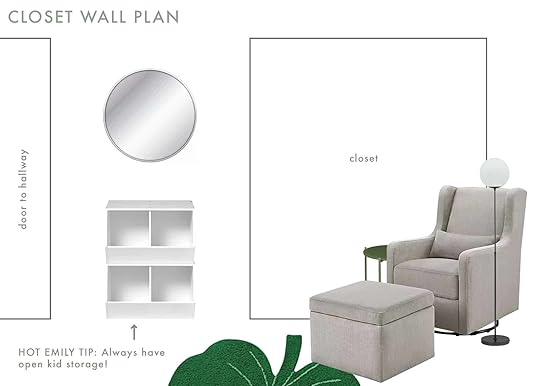
Round Mirror | Stacking Bins | Monstera Leaf Rug | Side Table | Glider & Ottoman| Floor Lamp
And last but not least, the entry and storage wall! For this one, I only had about 3′ of wall space to work with, so I kept it really simple with 2 stacking storage bins – also in white, to balance out the white desk across the room – with a classic Target chrome mirror (to speak to their love of chrome), which will bounce light from the window around the room.
At the end of the day, my thought process for the room was to install two bold, colorful (albeit mostly-green!), pretty-finished wall areas while leaving two totally blank-slate storage walls for Marissa, Jess, and baby to fill with bins, baskets, toys, books, or whatever they need. More than anything, though, I wanted to give them long-lasting pieces that could work beyond the nursery phase – they’ll be able to re-use their new desk, bookshelves, dresser, storage bins, and lamps in a bunch of places moving forward.
Once the baby is born and the two have a better idea of what final accessories or organizational materials will suit them and their day-to-day life the best, we’ll go on a little bit of a shopping spree to grab all of their final touches…but for now, the wallpaper’s up, the furniture’s in, and we’re expecting a new human any day now. But now that you’ve seen the final design plan, is anything missing? Do you have any favorite blankets or pillows that made your early baby days a little more comfortable? How’d I, a not-designer, do on her first e-design from 2,250 miles away? (I can take it, I swear!!!) Let’s chat all things multifunctional spaces and also leave some love for the almost-parents below, yeah? Xx
Opening Image Credits: Design by Brady Tolbert for EHD | Photo by Tessa Neustadt | From: A Girl’s Bedroom Makeover With Stokke
The post Caitlin’s Joint Nursery/Office Update – Figuring Out A Multifunctional Layout appeared first on Emily Henderson.
Emily Henderson's Blog

- Emily Henderson's profile
- 10 followers

